

Page 1

Compressor 3
User Manual
Page 2

Copyright © 2009 Apple Inc. All rights reserved.
Your rights to the software are governed by the
accompanying software license agreement. The owner or
authorized user of a valid copy of Final Cut Studio or
Logic Studio software may reproduce this publication for
the purpose of learning to use such software. No part of
this publication may be reproduced or transmitted for
commercial purposes, such as selling copies of this
publication or for providing paid for support services.
The Apple logo is a trademark of Apple Inc., registered in
the U.S. and other countries. Use of the “keyboard” Apple
logo (Shift-Option-K) for commercial purposes without
the prior written consent of Apple may constitute
trademark infringement and unfair competition in violation
of federal and state laws.
Every effort hasbeen made to ensure thatthe information
in this manual is accurate. Apple is not responsible for
printing or clerical errors.
Note: Because Apple frequently releases new versions
and updates to its system software, applications, and
Internet sites,images shownin this manualmay beslightly
different from what you see on your screen.
Apple
1 Infinite Loop
Cupertino, CA 95014
408-996-1010
www.apple.com
Apple, the Apple logo, AppleScript, Apple TV,
DVD Studio Pro, Final Cut, Final Cut Pro, Final Cut Studio,
FireWire, iPod, iTunes, Logic, Logic Studio, Mac, Mac OS,
QuickTime, Soundtrack, and Xsan are trademarks of
Apple Inc., registered in the U.S. and other countries.
Finder, iPhone, and NetInfo are trademarks of Apple Inc.
AppleCare is a service mark of Apple Inc., registered in the
U.S. and other countries.
MobileMe is a service mark of Apple Inc.
“Dolby,” “Pro Logic,” and the double-D symbol are
trademarks of Dolby Laboratories. Confidential
Unpublished Works,© 1992–1997 Dolby Laboratories, Inc.
All rights reserved.
UNIX is a registered trademark of The Open Group.
The YouTube logo is a trademark of Google Inc.
Other company and product names mentioned herein
are trademarks of their respective companies. Mention of
third-party products is for informational purposes only
and constitutes neither an endorsement nor a
recommendation. Apple assumes no responsibility with
regard to the performance or use of these products.
Production stills from the film “Koffee House Mayhem”
provided courtesy of Jean-Paul Bonjour. “Koffee House
Mayhem” © 2004 Jean-Paul Bonjour. All rights reserved.
http://www.jeanpaulbonjour.com
Production stills from the film “A Sus Ordenes” provided
courtesy of Eric Escobar. “A Sus Ordenes” © 2004 Eric
Escobar. All rights reserved.http://www.kontentfilms.com
Page 3

Contents
Welcome to Compressor9Preface
About Compressor9
About the Compressor Documentation9
Additional Resources10
Getting Started Quickly11Chapter 1
Terms Used by Compressor11
Quick and Easy Compressor Workflow: Batch Template Method12
Quick and Easy Compressor Workflow: Manual Method16
Optional Tasks You Can Perform Before Submitting a Batch23
Ways to Use Compressor25Chapter 2
Typical Compressor Scenarios26
Compressor Features27
The Basic Transcoding Workflow29Chapter 3
Compressor Concepts and Terms29
Preparing Compressor for Transcoding with Custom Settings32
Choosing an Output Format34
Creating a Compressor Batch35
Viewing Transcoding Status37
Optional Compressor Shortcuts37
The Compressor Interface39Chapter 4
Compressor Windows and the Transcoding Workflow40
Creating and Managing Compressor Layouts41
Working with the Compressor Windows44
Batch Window47
Settings Tab50
Destinations Tab51
Inspector Window51
History Window61
Preview Window61
Batch Monitor63
3
Page 4

Droplet Windows64
About Changing Values and Timecode Entries64
Keyboard Shortcuts66
Setting Compressor Preferences67Chapter 5
About Compressor Preferences67
Using Compressor Preferences70
Importing Source Media Files75Chapter 6
About the Batch Window75
Adding Source Media Files to a Batch to Create Jobs77
Using the Inspector with Source Media Files86
Tips on Importing Source Media Files89
Creating, Previewing, and Modifying Settings93Chapter 7
About the Settings Tab93
Using the Inspector with Settings97
Duplicating Settings98
Creating a Setting from Scratch100
Previewing a Setting101
Deleting Settings103
Creating Groups of Settings104
Distributing and Sharing Settings105
Example: Creating Custom Groups and Settings for DVD106
Finalizing Jobs and Submitting Batches109Chapter 8
Assigning Settings109
Assigning Destinations114
General Job and Target Information116
General Batch Information119
Using Final Cut Pro with Compressor126
Using Distributed Processing with Compressor131
Creating AIFF Files133Chapter 9
Creating AIFF Output Files133
About the AIFF Encoder Pane134
About the Sound Settings Dialog134
QuickTime Audio Sample Sizes and Rates135
Choosing an Audio Codec for Distribution136
Configuring AIFF Settings136
Creating Dolby Digital Professional Output Files137Chapter 10
About the Dolby Digital Professional Encoder Pane138
General Information About Creating Dolby Digital Professional Files144
4 Contents
Page 5

Converting Stereo Audio Files to Dolby Digital Professional Format145
Assigning Files to Surround Sound Channels (Manual Method)146
Assigning Files to Surround Sound Channels (Automatic Methods)149
Assigning Files to Surround Sound Channels with Droplets151
Options for Spatial Mixing151
Creating DV Stream Output Files153Chapter 11
About the DV Stream Encoder Pane153
DV Transcoding Workflow154
Creating H.264 for Apple Devices Output Files155Chapter 12
About the H.264 for Apple Devices Encoder Pane156
Chapter and Podcast Markers for Apple Devices160
Aspect Ratios for Apple Devices160
H.264 Workflows for Apple Devices161
Configuring Settings for H.264 for Apple Devices Output Files161
Creating H.264 for DVD Studio Pro Output Files163Chapter 13
About the H.264 for DVD Studio Pro Encoder Pane163
About the Frame Sync Setting167
Using Multi-Pass for DVD Authoring167
About the Bit-Rate Settings167
H.264 Workflows for DVD168
Creating H.264 for Blu-ray Disc169Chapter 14
About the H.264 for Blu-ray Disc Encoder Pane170
H.264 Workflows for Optical Disc172
Creating Image Sequence Files173Chapter 15
Creating Image Sequence Output Files173
About the Image Sequence Encoder Pane174
Configuring Image Sequence Settings175
Creating MP3 Output Files177Chapter 16
Common Uses for MP3177
About the MP3 Encoder Pane178
MP3 Transcoding Workflow179
Creating MPEG-1 Output Files181Chapter 17
Common Uses for MPEG-1181
MPEG-1 Specifications182
About the MPEG-1 Encoder Pane183
About the MPEG-1 Video Tab184
About the MPEG-1 Audio Tab185
5Contents
Page 6

About System and Elementary Streams186
MPEG-1 Transcoding Workflow186
Configuring the MPEG-1 File Format for Web Use188
Configuring the MPEG-1 File Format for DVD Use189
Creating the MPEG-1 Video for DVD Setting190
Creating the MPEG-1 Audio for DVD Setting191
Optional—Creating an MPEG-1 for DVD Group and Destination193
Creating MPEG-2 Output Files195Chapter 18
About Standard Definition MPEG-2195
About High Definition Sources and MPEG-2196
About Elementary, Transport, and Program Streams196
About the MPEG-2 Encoder Pane197
MPEG-2 Reference Information208
MPEG-2 Transcoding Workflow213
Example MPEG-2 Settings219
Creating MPEG-4 Output Files221Chapter 19
About MPEG-4 Part 2221
About the MPEG-4 Part 2 Encoder Pane222
Using Default MPEG-4 Part 2 Settings226
Customizing MPEG-4 Part 2 Settings227
Audio Podcasting Workflow230
Adding Additional Settings and Presets233
Creating QuickTime Movie Output Files235Chapter 20
Creating QuickTime Output Files235
About the QuickTime Movie Encoder Pane236
QuickTime Transcoding Workflow242
Understanding Codecs246
QuickTime Video Codecs246
QuickTime Audio Codecs247
Creating QuickTime Export Component Files249Chapter 21
Creating QuickTime Export Component Output Files249
Installing QuickTime Export Component Plug-ins250
About the iPod Plug-in250
About the QuickTime Export Components Encoder Pane251
Configuring Export Components Settings251
Adding Filters to a Setting253Chapter 22
Working with Filters253
About the Filters Pane255
Video Filters Tab256
6 Contents
Page 7

Audio Filters Tab263
Color Tab265
Adding Filters to a Setting266
Working with Frame Controls269Chapter 23
About the Frame Controls Pane269
Adding Frame Controls to a Setting274
About Deinterlacing275
About Reverse Telecine276
Using the Retiming Controls279
Adding Geometry Settings283Chapter 24
Working with Cropping, Scaling, and Padding283
About the Geometry Pane285
Making Geometry Adjustments to a Setting290
Adding Actions293Chapter 25
Working with Post-Transcoding Actions293
Adding Setting Actions293
Adding Job Actions297
Using the Preview Window309Chapter 26
About the Preview Window309
Previewing a Clip315
Transcoding a Portion of the Clip with the Preview Window320
Adding Markers to a Clip321
About the Preview Window Keyboard Shortcuts327
Creating and Changing Destinations329Chapter 27
About the Destinations Tab330
Using the Inspector with Destinations332
Creating a Destination333
Warning Triangles335
Deleting and Duplicating a Destination336
Creating Destinations for Use with DVD Studio Pro337
Using Droplets339Chapter 28
Creating Droplets340
About the Droplet Window342
Checking Droplet Settings344
Using a Droplet to Transcode Source Media Files346
Using Droplets to Create Jobs and Settings in Compressor348
Droplet Tips349
7Contents
Page 8

Keyboard Shortcuts351Appendix A
General Compressor Keyboard Shortcuts351
Preview Window Keyboard Shortcuts352
Solving Problems353Appendix B
Resources for Solving Problems353
Solutions to Common Problems353
Contacting AppleCare Support358
Using the Command Line359Appendix C
Installing Apple Qmaster from the Command Line359
Using the Command Line for Distributed Processing360
Using Scripts to Run Apple Qmaster, Compressor, and Batch Monitor367
8 Contents
Page 9

Welcome to Compressor
Compressor is an essential part of the video compression process. It makes compression
fast, efficient, and convenient, giving you more options in your choices of compression
settings and output formats.
This preface covers the following:
• About Compressor (p. 9)
• About the Compressor Documentation (p. 9)
• Additional Resources (p. 10)
About Compressor
Compressor is targeted at video postproduction professionals and compressionists who
require high performance and maximum control over the final digital content for DVD
authoring, streaming media servers, and wireless devices.
Preface
Compressor gives you resizing, cropping, image processing, encoding, and delivery
options, and offers batch processing, VBR options, and H.264 encoding. You can also use
Droplets and AppleScript, specify and save transcode settings, use filters, specify
destinations, and more. Compressor also provides a variety of output formats for Apple
Devices, DVD, web, CD, and kiosk.
About the Compressor Documentation
Compressor comes with various documents that will help you get started as well as
provide detailed information about the application. (To access onscreen help for
Compressor, open Compressor and choose Help > Compressor Help.)
• Compressor User Manual: This is a comprehensive document that describes the
Compressor interface, commands, and menus and gives step-by-step instructions for
using Compressor and accomplishing specific tasks. It is written for users of all levels
of experience.
9
Page 10

• Distributed Processing Setup Guide: This guide explains how to set up and maintain a
distributed processingnetwork for use with Compressor or digital visual effects software
packages.
• Batch Monitor User Manual: This brief document describes how to use the Batch Monitor
to monitor the transcoding progress of batches and jobs.
Additional Resources
Along with the documentation that comes with Compressor, there are a variety of other
resources you can use to find out more about Compressor.
Compressor Website
For general information and updates, as well as the latest news on Compressor, go to:
• http://www.apple.com/finalcutstudio/compressor
Apple Service and Support Websites
For software updates and answers to the most frequently asked questions for all Apple
products, go to the general Apple Support web page. You’ll also have access to product
specifications, reference documentation, and Apple and third-party product technical
articles.
• http://www.apple.com/support
For software updates, documentation, discussion forums, and answers to the most
frequently asked questions for Compressor, go to:
• http://www.apple.com/support/compressor
For discussion forums for all Apple products from around the world, where you can search
for an answer, post your question, or answer other users’ questions, go to:
• http://discussions.apple.com
10 Preface Welcome to Compressor
Page 11

Getting Started Quickly
1
Compressor contains a number of preexisting settings that allow you tostart transcoding
immediately. You can begin transcoding media files as soon as you install Compressor,
if you have one or more source media files and the preexisting Compressor batch
templates or settings and destinations suit your transcoding needs.
This chapter covers the following:
• Terms Used by Compressor (p. 11)
• Quick and Easy Compressor Workflow: Batch Template Method (p. 12)
• Quick and Easy Compressor Workflow: Manual Method (p. 16)
• Optional Tasks You Can Perform Before Submitting a Batch (p. 23)
Terms Used by Compressor
There are a few terms used by Compressor that you should feel comfortable with before
you begin using it.
A batch is the heart of the transcode process. It contains one or more source media files,
which are the files you want to convert, or transcode, to another format. Each source
media file creates its own job. This means that a batch can contain multiple jobs, with
each job based on its own source media file.
Each job also has at least one target. The targets define what sort of output file should
be created by the transcoding process and where it should be placed. You can have
multiple targets assigned to a job, which means thatyou can easilycreate multiple output
files, each with a different format.
Each target has three parts.
• The setting: The setting part of a target defines the transcoding process, including the
encoder format that is used as well as a variety of filters and geometry attributes.
• The destination: The destination part of a target defines where the output file is saved.
It also defines the rules that are used to create theoutput filename. Compressor includes
a preference setting that allows you to specify a default destination.
11
Page 12
• The output filename: You can edit the output filename part of the target if for some
reason you do not want to use the name generated based on the destination.
Note: You can transcode a job only after it has at least one setting assigned to it.
If you need to create your own settings, or modify those that come with Compressor, see
The Basic Transcoding Workflow and Creating, Previewing, and Modifying Settings.
Quick and Easy Compressor Workflow: Batch Template Method
Batch templates simplifyand accelerate your transcoding workflow. The following workflow
shows you a quick and easy way to use Compressor with batch templates.
• Stage 1: Choosing a Batch Template
• Stage 2: Adding a Source Media File
• Stage 3: Submitting the Batch
• Stage 4: Using Post-Transcoding Actions
• Stage 5: Saving Custom Batch Templates—Optional
Stage 1: Choosing a Batch Template
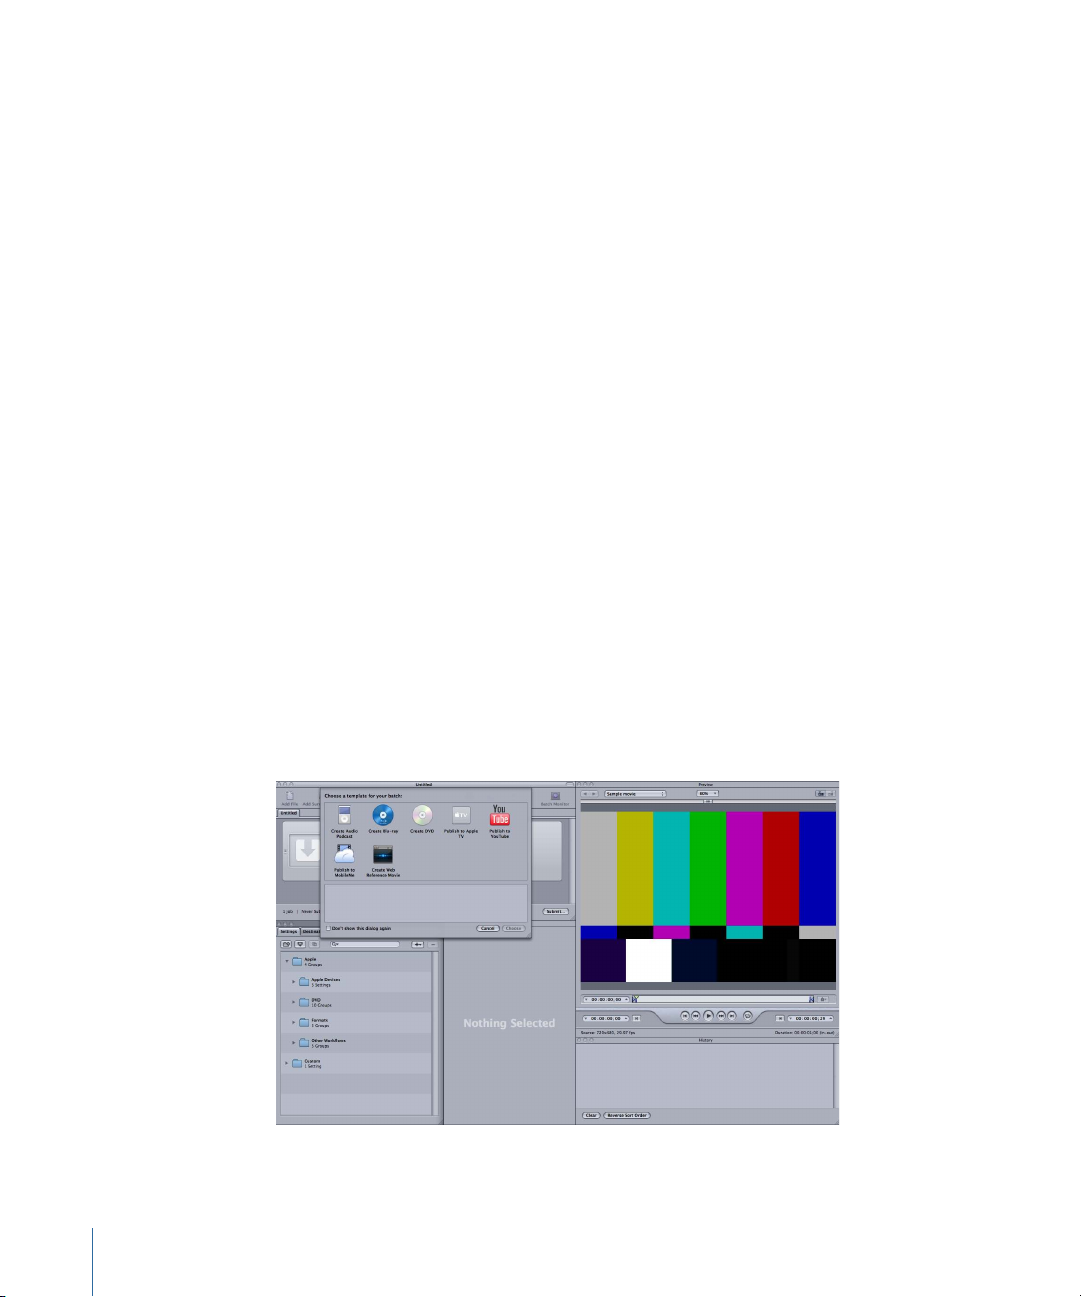
To use Compressor with this workflow, you must choose a batch template.
To open Compressor and choose a batch template
1 Double-click the Compressor icon in the Applications folder.
Compressor opens with the Batch Template Chooser and an empty untitled batch with
a placeholder job.
12 Chapter 1 Getting Started Quickly
Page 13

The Batch Template Chooser contains options for the standard Apple batch templates
(described in step 2).
You can also add custom batch templates. For more information, see Creating a Custom
Batch Template.
Note: To see the Compressor interface configured similarly to what is shown above,
choose a Standard layout from the Layouts submenu of the Window menu. To prevent
the Batch Template Chooser from opening when you open Compressor, click the “Don’t
show this dialog again” checkbox, or, in Compressor Preferences, choose Show Blank
Template.
2 Click one of the options in the Batch Template Chooser to select it.
The standard Apple batch templates are listed below.
• Create Audio Podcast: Use this template to create an AAC audio file suitable for
podcasting and add it to the iTunes library.
• Create Blu-ray: Use this template to create BDH.264 video and Dolby DigitalProfessional
(.ac3) audio files and automatically burn them to a Blu-ray disc or an AVCHD disc (AVCHD
discs can be played in Blu-ray Disc players that are compatible with theAVCHD format).
Note: Blu-ray output options are available only on computers that have Final Cut Studio
installed.
13Chapter 1 Getting Started Quickly
Page 14
• Create DVD: Use this template to create a standarddefinition DVD using MPEG-2(.m2v)
video and Dolby Digital Professional (.ac3) audio and automatically burn it to a disc.
• Publish to Apple TV: Use this template to create a video file suitable for viewing on
Apple TV and add it to the iTunes library.
• Publish to YouTube: Use this template to create a video file suitable for viewing on
YouTube and upload it to a YouTube account.
• Publish to MobileMe: Use this template to create video files suitable for viewing on
MobileMe and upload them to a MobileMe account.
• Create Web Reference Movie: Use this template to create a reference movie that enables
a web browser and a server to automatically select the right movie for any device or
connection speed, without requiring the viewer to make a choice.
Note: Your choice of a template should be based on the intended use of the output
media file you are creating. If there is no obvious template for your intended workflow,
you may want to try the manual method. For more information, see Quick and Easy
Compressor Workflow: Manual Method. For information about creating custom templates,
see Creating a Custom Batch Template.
3 Click Choose.
Compressor applies a target to the placeholder job. The target contains the appropriate
transcoding setting (based on the template you chose), the default destination (Source),
and a suggested output filename, based on the source filename and the name of the
applied setting.
In the spirit of this simplified batch template workflow, it is recommended that you accept
the default destination Source (the same folder as the source media files originated from)
specified in the Destination column. For more advanced information about destinations,
see Creating and Changing Destinations.
Stage 2: Adding a Source Media File
Drag a source file from the Finder or the desktop to the placeholder job in the Batch
window.
14 Chapter 1 Getting Started Quickly
Page 15
Note: You can drag in only one source file because batch templates contain only one
job. If you drag multiple files to the job, only the last file is added to this job and all other
files are ignored.
Stage 3: Submitting the Batch
Once the job includes a source media file, a setting, a destination, and an output filename,
it is ready for processing.
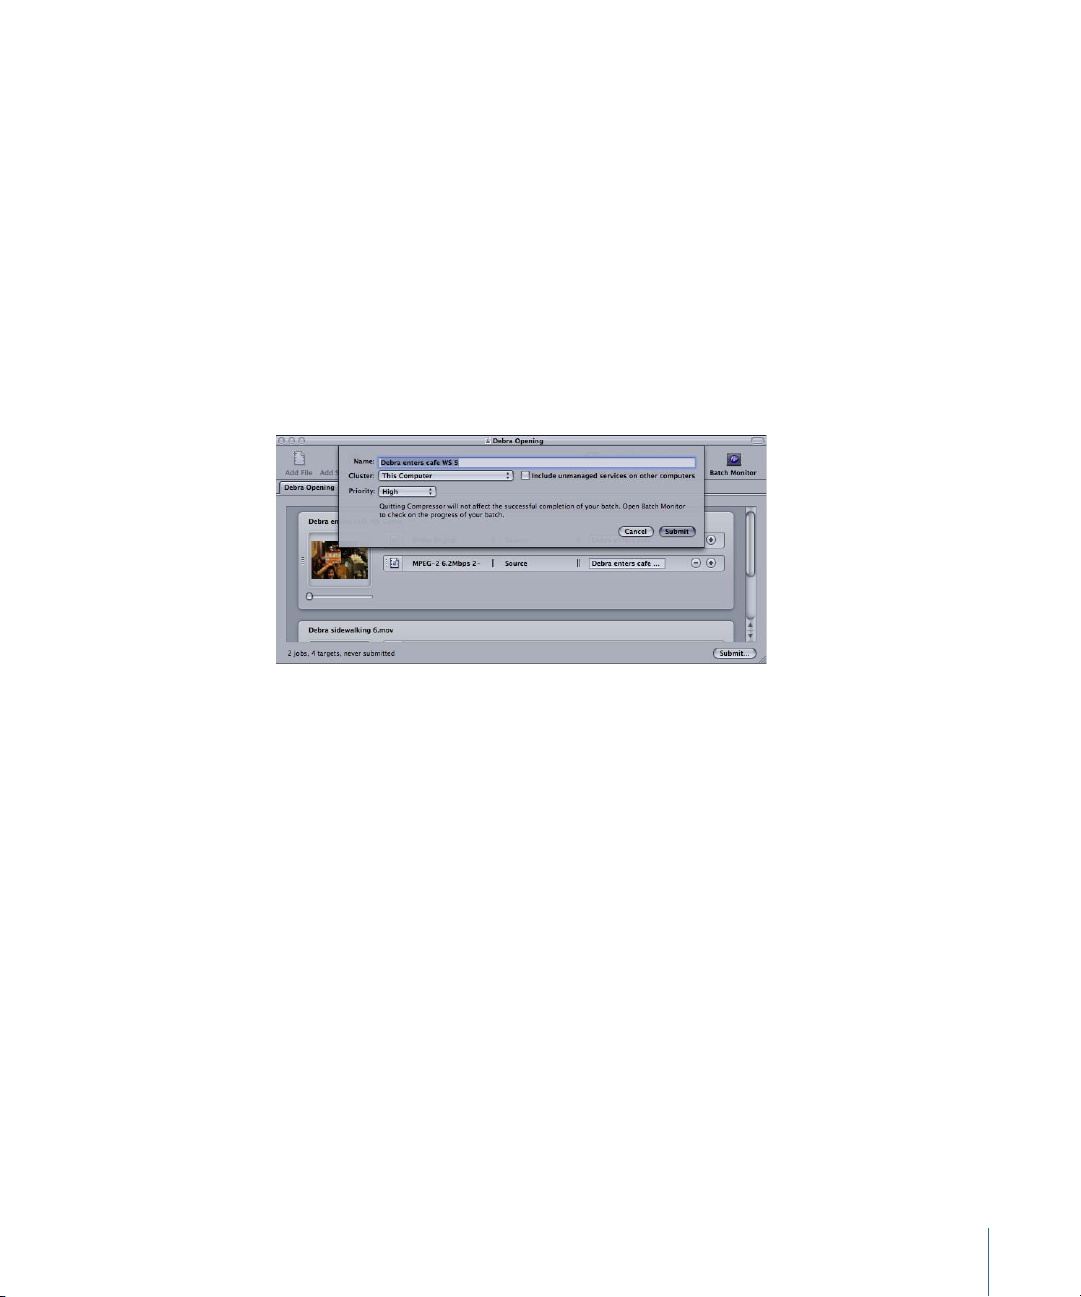
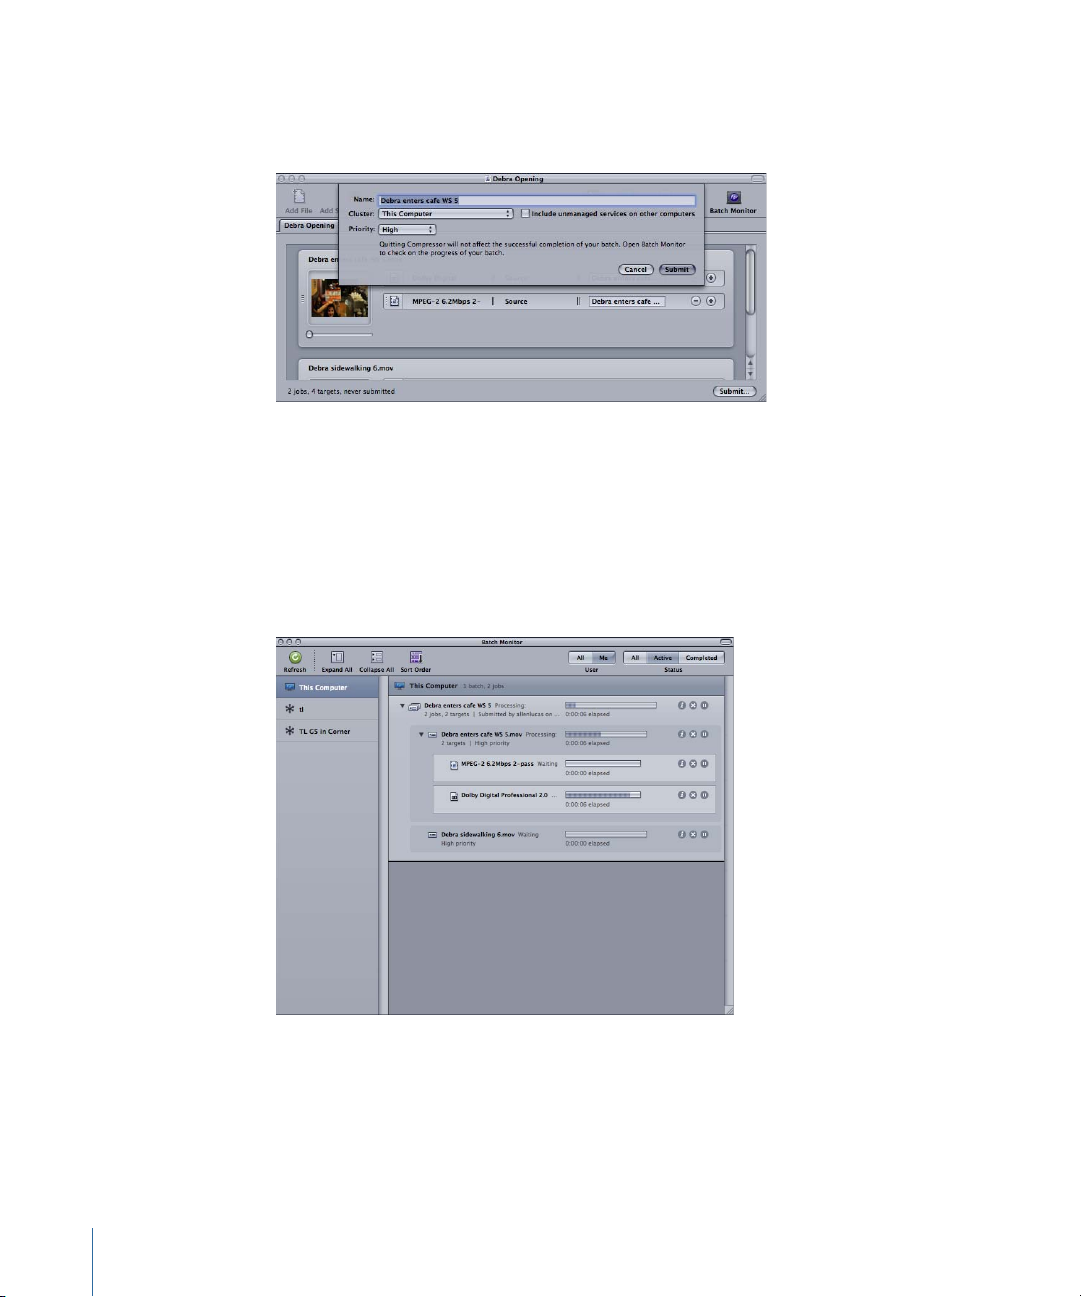
To submit the batch for processing
Click the Submit button to submit the batch containing your job.
µ
A dialog appears where youcan name thissubmission, choose whether to use distributed
processing, and set the priority of this submission. In most cases you can leave the settings
as they are and just click Submit.
For more details about this Submit dialog, see Submitting a Batch.
After you submit a batch, you can open the Compressor History window or the
Batch Monitor application so you can monitor the transcoding progress of your batch.
You can also set Compressor Preferences to open Batch Monitor automatically.
Stage 4: Using Post-Transcoding Actions
Almost every batch template includes an automatic post-transcoding action. When
Compressor has completed transcoding one of these batch template jobs to an output
media file, it will execute a corresponding automatic action, such as uploading the file
to a YouTube account, running an Automator workflow, or burning a DVD.
For more information about job actions such as these, see Job Action Tab and Adding
Actions.
The following list indicates the default post-transcoding job action for each Compressor
batch template.
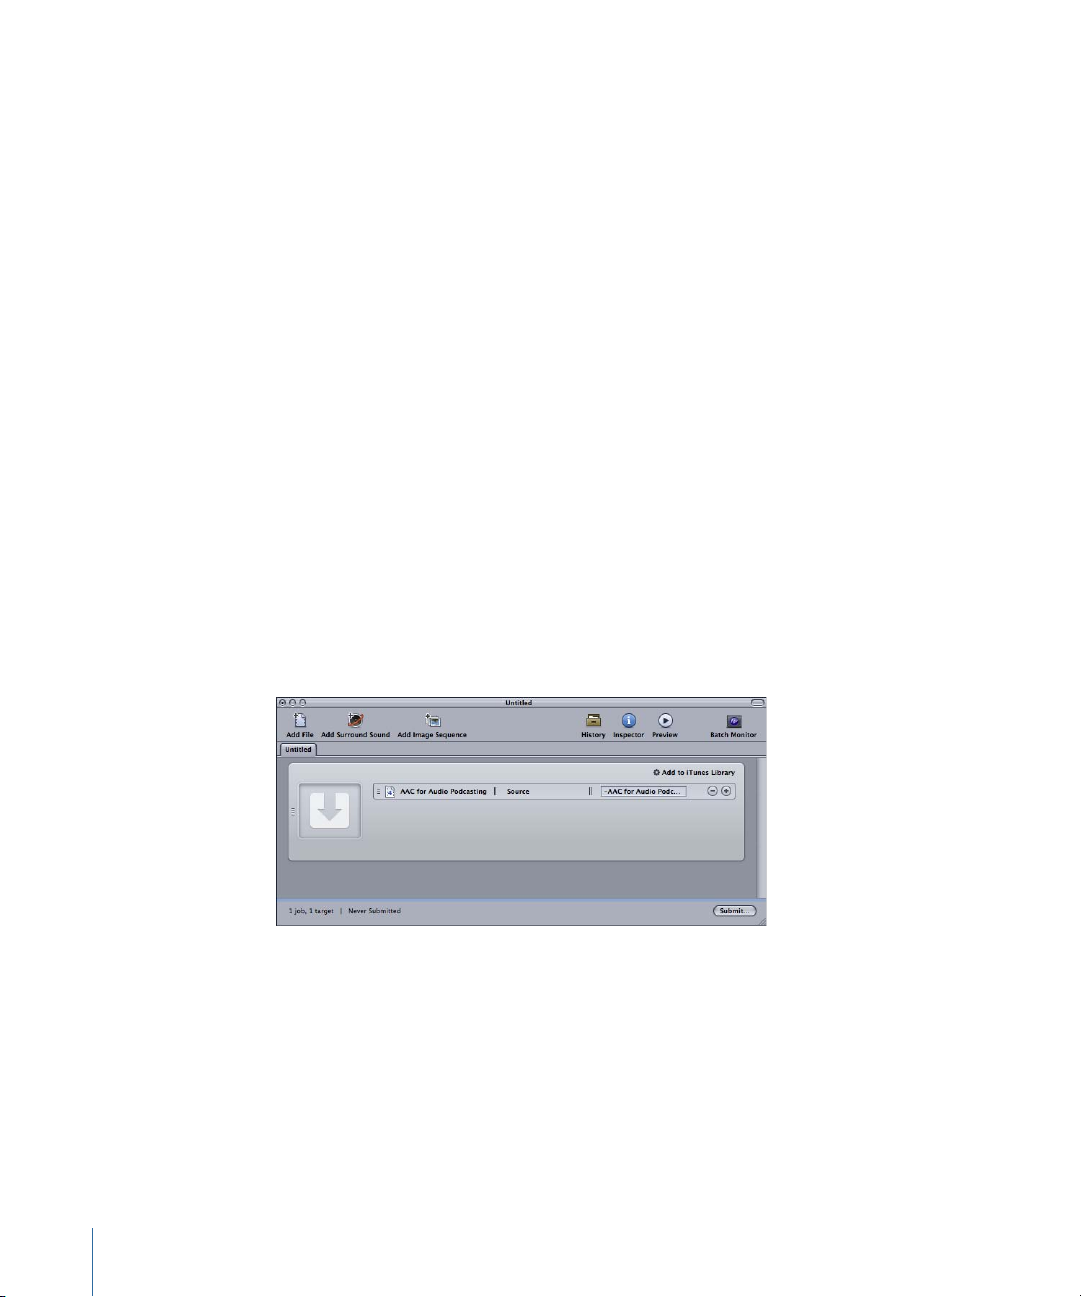
• Create Audio Podcast: Add to iTunes Library.
• Create Blu-ray: Create Blu-ray Disc.
15Chapter 1 Getting Started Quickly
Page 16

Note: Blu-ray output options are available only on computers that have Final Cut Studio
installed.
• Create DVD: Create DVD.
• Publish to Apple TV: Add to iTunes Library.
• Publish to YouTube: Publish to YouTube.
• Publish to MobileMe: Publish to MobileMe.
• Create Web Reference Movie: Create Web Reference Movie.
Stage 5: Saving Custom Batch Templates—Optional
For information about the optional step of creating custom templates, see Creating a
Custom Batch Template.
Quick and Easy Compressor Workflow: Manual Method
The following workflow shows you an easy way to manually build and process a batch
in Compressor.
• Stage 1: Adding Source Media Files
• Stage 2: Assigning Settings and Destinations
• Stage 3: Submitting the Batch
Stage 1: Adding Source Media Files
To use Compressor, you must first add source media files to the Batch window.
To open Compressor and add source media files to the Batch window
1 Double-click the Compressor icon in the Applications folder.
16 Chapter 1 Getting Started Quickly
Page 17
Compressor opens with the batch template chooser and an empty untitled batch with
a placeholder job.
2 Since this workflow is focused on the manual method rather than the batch template
method, click Cancel in the Batch Template Chooser to close it.
To prevent the Batch Template Chooser from opening in the future, select “Don’t show
this dialog again,” or, in Compressor Preferences, choose Show Blank Template.
For information about the batch template method, see Quick and Easy Compressor
Workflow: Batch Template Method.
The figure below shows the remaining windows in the Compressor interface.
Note: To see the Compressor interface configured similarly to what is shown above,
choose a Standard layout from the Layouts submenu of the Window menu.
17Chapter 1 Getting Started Quickly
Page 18
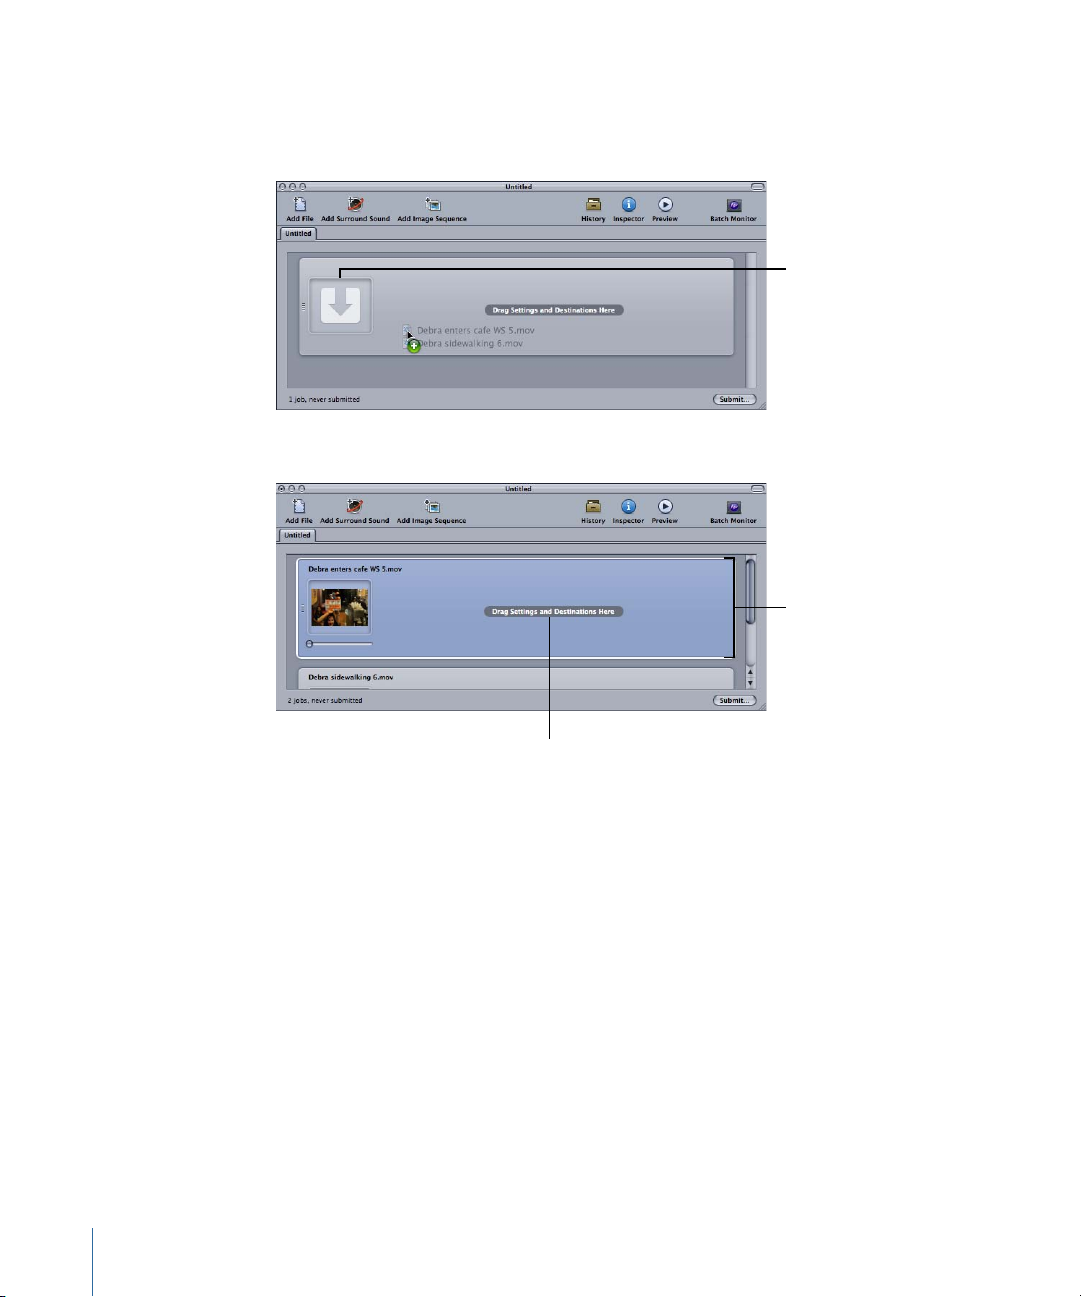
3 Drag source files from the Finder or the desktop to the Batch window.
The thumbnail area
of the job
Each source file creates
a job in the batch.
Target area (empty in
this case) of a job
Note: If you drag multiple files to the thumbnail area (with the arrow in this example),
only the last file is added to this job and all other files are ignored.
New jobs are created for each source file you dragged to the batch.
See About the Batch Window for more information about the controls in the Batch
window.
Stage 2: Assigning Settings and Destinations
You need to assign at least one setting to each source media file job before you can
submit the batch for processing, but you can also add multiple settings to the same job
to transcode multiple versions of the media file. Each setting-destination pair is known
in Compressor as a target.
18 Chapter 1 Getting Started Quickly
Page 19
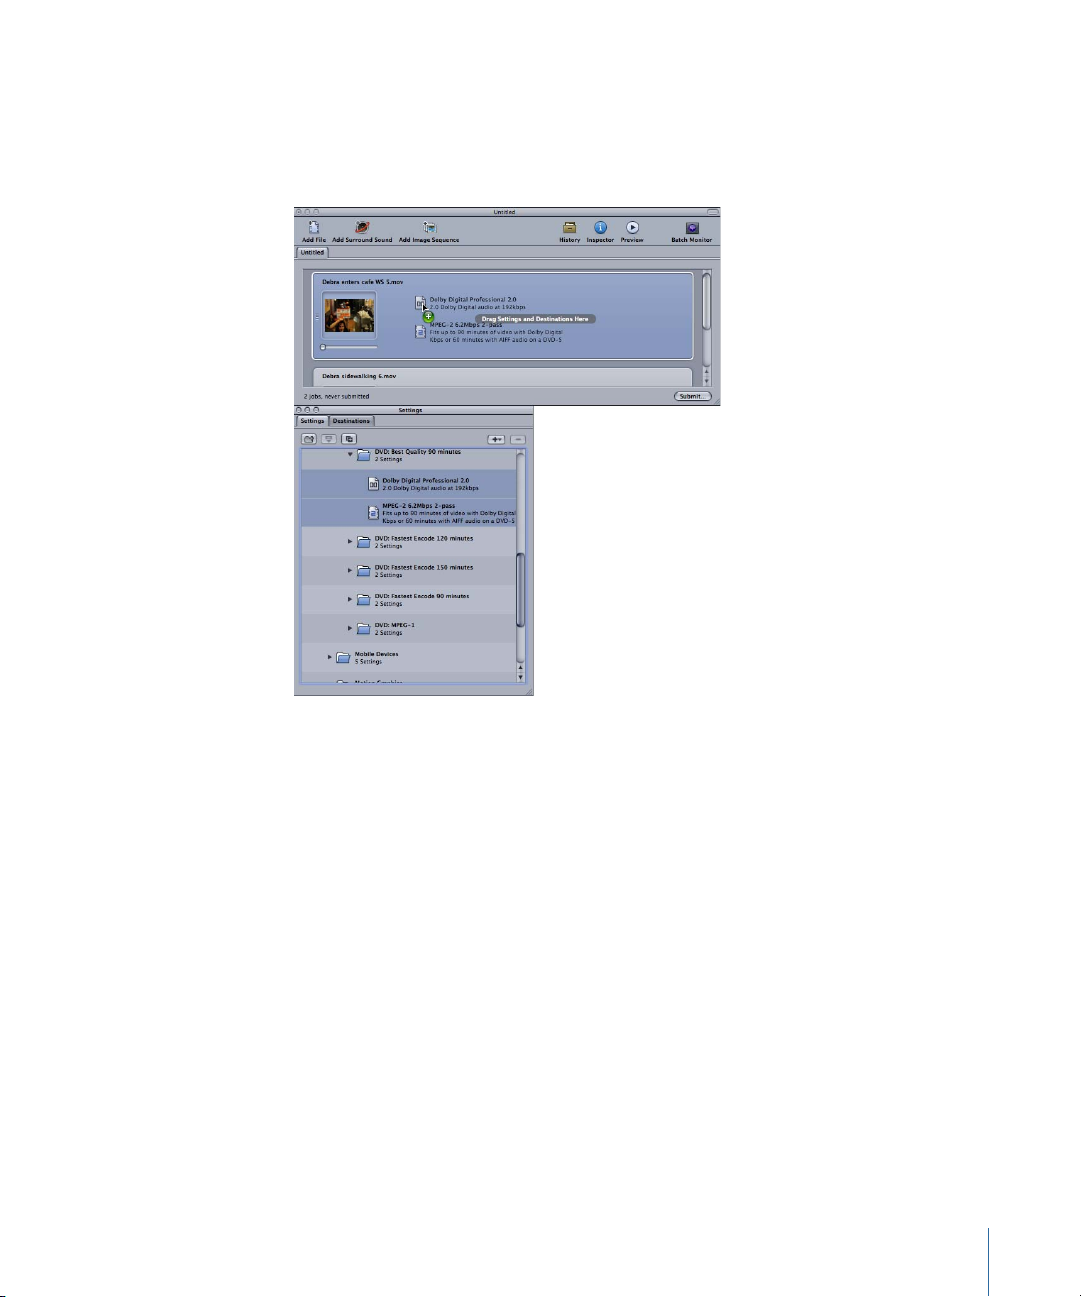
To assign a setting and a destination to a job
1 Choose a setting for your source media file jobs in any of the following ways.
• To assign different settings to different jobs: Drag settings from the Settings tab to
individual jobs in the Batch window.
• To assign a single setting to multiple selected jobs: Select the jobs (source media files) in
the Batch window and choose Target > New Target With Setting. This opens a settings
selection dialog over the Batch window.
19Chapter 1 Getting Started Quickly
Page 20
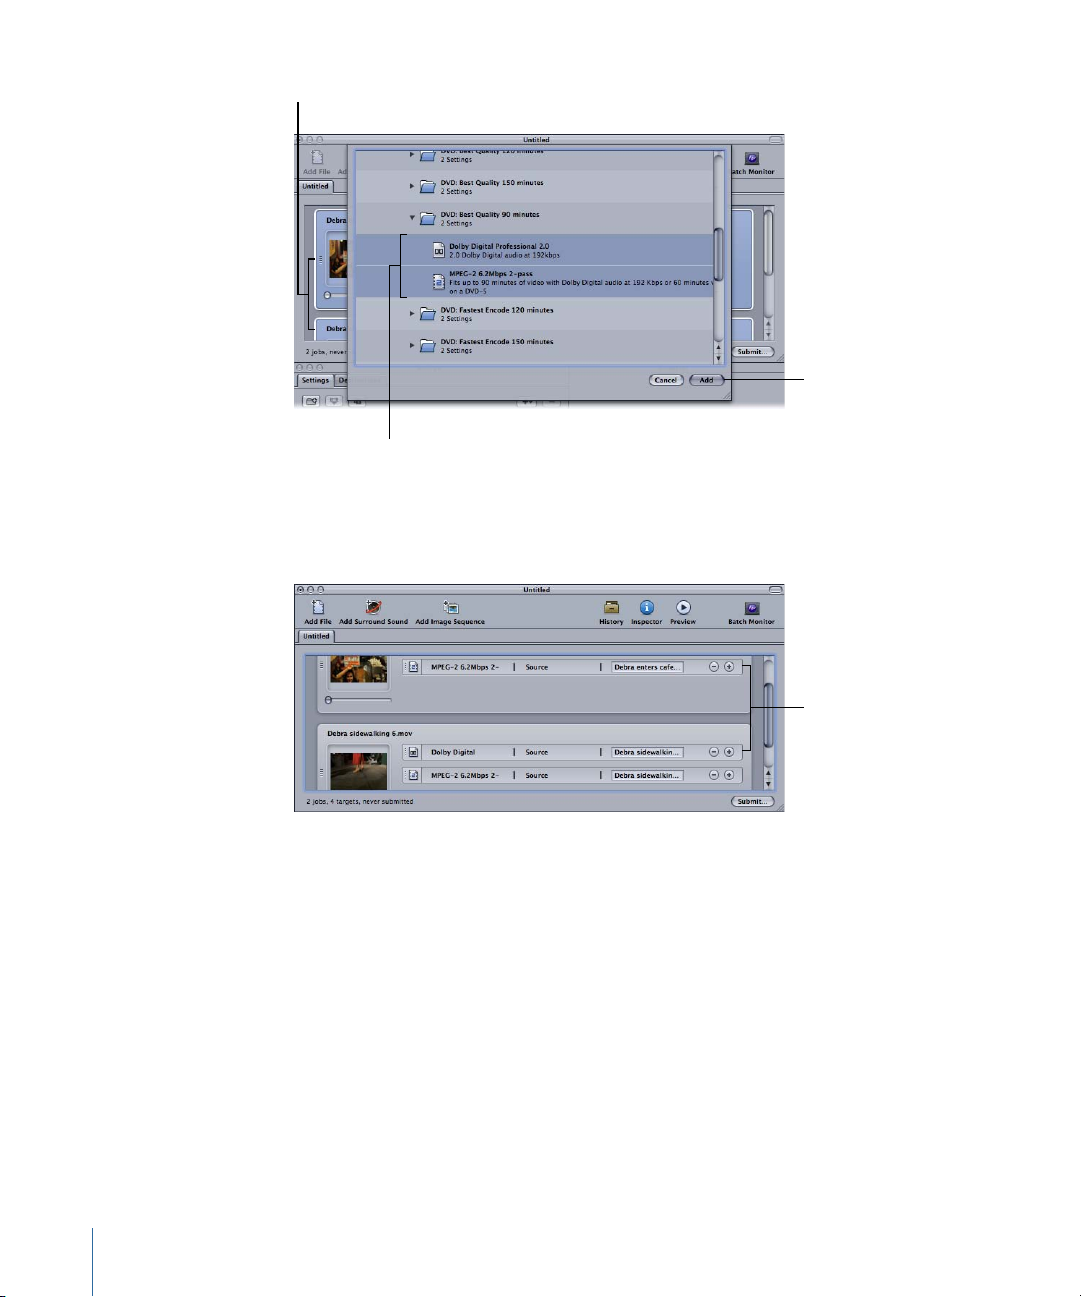
Click Add to assign
the settings to the
selected jobs.
Select the jobs in
the Batch window.
Select the settings
to apply to the
selected jobs.
Choose one or more settings, using the disclosure triangles to revealindividual settings,
The chosen settings
are assigned as targets
to the selected jobs.
and click Add. The chosen settings are assigned to all the selected jobs.
You can also choose Edit > Select All to select all the jobs before applying the settings.
See Creating, Previewing, and Modifying Settings for more information on settings,
and Finalizing Jobs and Submitting Batches for more information about working with
jobs and targets.
The next step is to set the destination. By default, the destinationis set to Source, which
writes the output files to the same folder as the source files originated from. You can
change the destination for organization purposes or to take advantage of larger and
faster hard disks.
Note: You can choose a default destination from the Compressor Preferences window.
See Setting Compressor Preferences for more information.
You can set the destination for each individual target or for a selected group of targets.
20 Chapter 1 Getting Started Quickly
Page 21
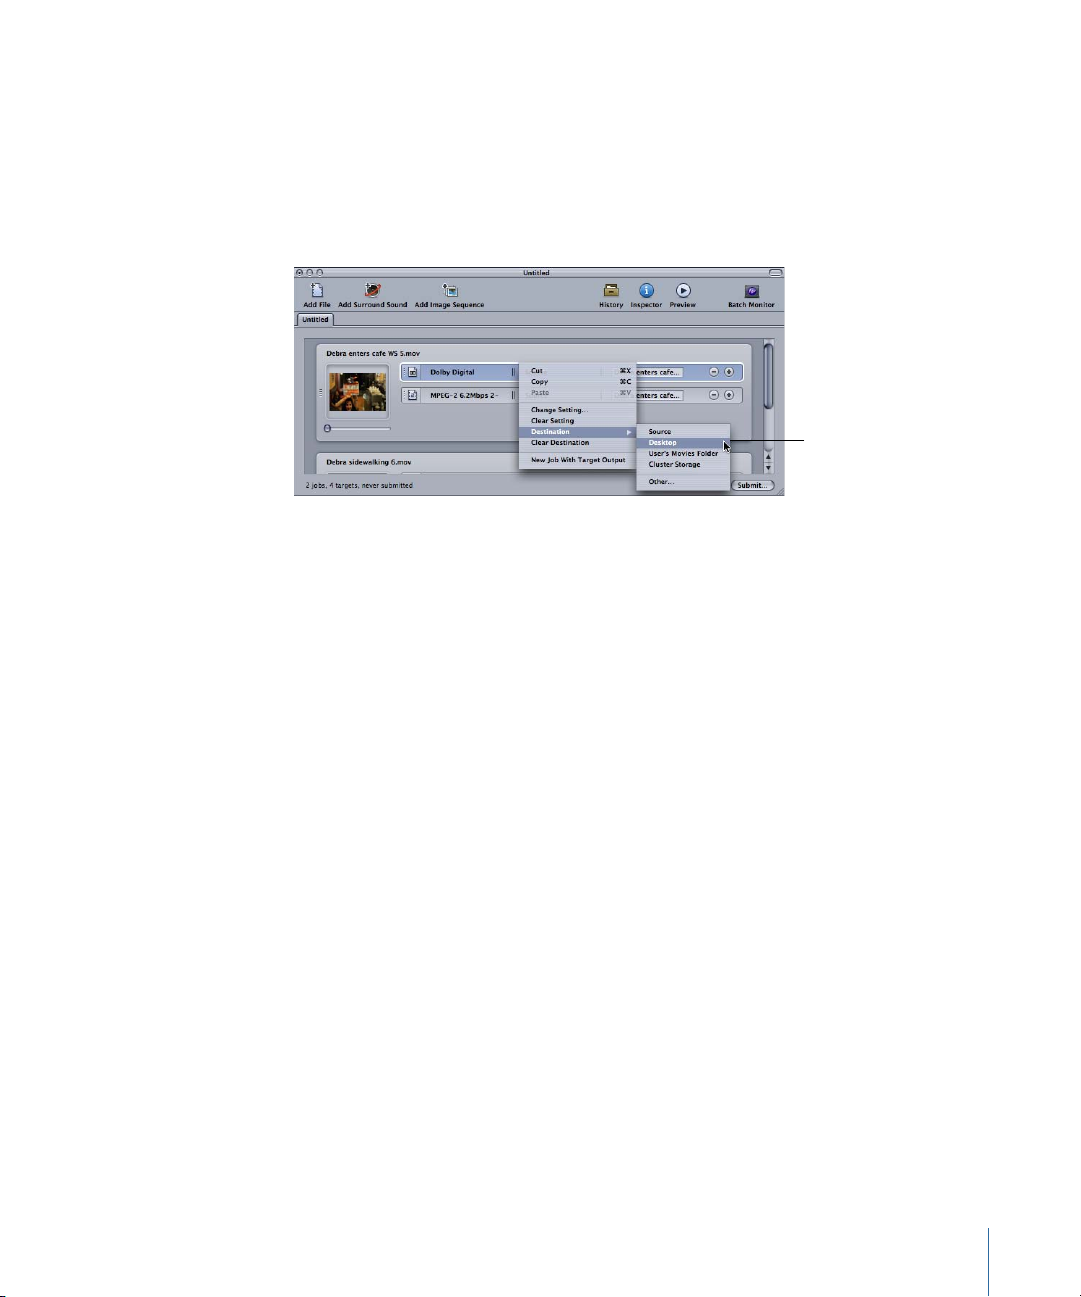
2 Choose a destination for your job’s targets in one of the following ways.
Use the target’s shortcut
menu to change the
destination for the
selected targets.
• Do nothing: Accept the default destination Source(the same folder as the source media
files originated from) specified in the Destination column.
• Use the target’s shortcut menu to change one setting at a time: Control-click the target
you want to change and then choose any of the preexisting destinations available to
you from the Destination submenu.
You can also choose Other from the shortcut menu to open a dialog to choose any
location available to your computer as the destination.
Note: Choosing Other allows you to choose any location currently accessible from your
desktop, including a mounted open volume. However, this volume must remain open
until the batch has been transcoded.
You can select multiple targets and change all their destinations at once using the same
method. You can also use the Destination submenu of the Target menu to choose a
destination, or drag a destination from the Destinations tab to the target.
See Creating and Changing Destinations for more information on destinations.
3 You can name the batch, and save it, by choosing File > Save.
Stage 3: Submitting the Batch
Once each media file has at least one setting anddestination associated with it, it becomes
a job, and your batch is ready to be submitted. Click the Submit button to submit your
batch.
To submit a batch for processing
Click Submit.
µ
21Chapter 1 Getting Started Quickly
Page 22
A dialog appears where youcan name thissubmission, choose whether to use distributed
processing, and set the priority of this submission. In most cases you can leave the settings
as they are and just click Submit.
For more details about this Submit dialog, see Submitting a Batch.
After you submit a batch, you can open Batch Monitor so you can monitor the transcoding
progress of your batch. You can also set Batch Monitor to automatically open in the
Compressor Preferences window.
Note: You can always open Batch Monitor by double-clicking the Batch Monitor icon in
the Utilities folder inside the Applications folder or by clicking its icon in the Batch window.
22 Chapter 1 Getting Started Quickly
Page 23
You can also monitor the encoding progress in the History window.
See Finalizing Jobs and Submitting Batches for more information on jobs and batches.
Optional Tasks You Can Perform Before Submitting a Batch
The three stages described in the previous section show you the fastest way to transcode
media files. Although you can modify your preexisting settings using this method, you
can’t preview your files or fine-tune any settings.
The following chapters describe additional steps that can be performed on the setting
of any job before it is submitted:
• Creating, Previewing, and Modifying Settings
• Finalizing Jobs and Submitting Batches
• Adding Filters to a Setting
• Working with Frame Controls
• Adding Geometry Settings
• Adding Actions
• Using the Preview Window
• Creating and Changing Destinations
The following chapters give a more detailed look at output format settings and various
transcoding options:
• Creating AIFF Files
• Creating Dolby Digital Professional Output Files
• Creating DV Stream Output Files
• Creating H.264 for DVD Studio Pro Output Files
• Creating H.264 for Apple Devices Output Files
• Creating Image Sequence Files
• Creating MP3 Output Files
• Creating MPEG-1 Output Files
• Creating MPEG-2 Output Files
23Chapter 1 Getting Started Quickly
Page 24

• Creating MPEG-4 Output Files
• Creating QuickTime Movie Output Files
• Creating QuickTime Export Component Files
24 Chapter 1 Getting Started Quickly
Page 25

Ways to Use Compressor
2
Compressor is a powerful and flexible tool that can be used in many different ways to
achieve the results you want.
This chapter covers the following:
• Typical Compressor Scenarios (p. 26)
• Compressor Features (p. 27)
25
Page 26
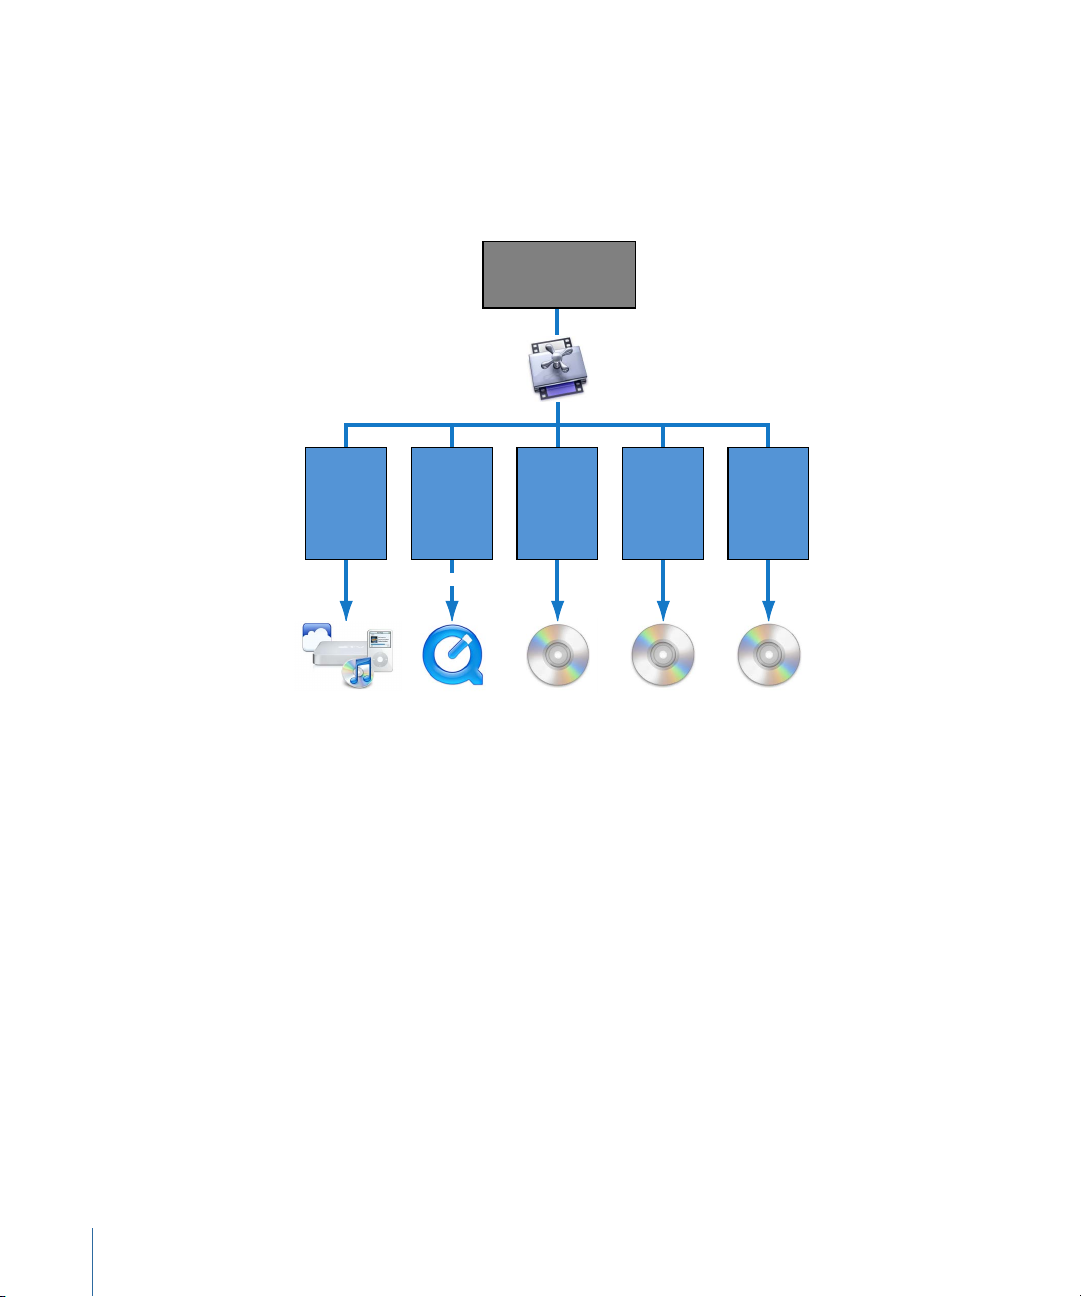
Typical Compressor Scenarios
CD-ROM
DVD video
Apple devices
Apple TV
iPod
iTunes
MobileMe
H.264
MP3
AC-3
MP3
MPEG-1
MPEG-4
QuickTime
AC-3
AIFF
H.264
MPEG-1
MPEG-2
AIFF
MP3
QuickTime
Blu-ray Disc
H.264
AC-3
Source media or
Final Cut Pro project
To web
QuickTime
movie
(for broadband
and lowband)
The following are typical Compressor scenarios.
• Converting source mediato oneor more different output formats: You canuse Compressor
to convert one or more media files to one or more different media file output formats.
See Quick and Easy Compressor Workflow: Manual Method for more information.
• Exporting sequences or clips to one or more formats directly from other applications: You
can use Compressor to convert sequences or clips to one or more file formats from
within other applications, such as Final Cut Pro. This workflow is the same as described
in detail in Submitting a Final Cut Pro Project for Transcoding.
This integration with Final Cut Pro and other applications makes transcoding (the
process of converting files from their original format into output files ready for
distribution in another format) faster and more convenient. Integration also saves hard
disk space by eliminating the need to export intermediate media files before processing
them. It also leverages the video processing technology of the other applications to
do much of the work (therefore maximizing the quality of images that are encoded),
and avoids degradation that can occur from multiple compression and decompression
steps.
26 Chapter 2 Ways to Use Compressor
Page 27

• Creating DVD compliant files for use with DVD Studio Pro: Before you can convert your
existing media files into DVD Studio Pro projects, you must convert the video into
MPEG-1 (SD projects only), MPEG-2 (SD and HD projects), or H.264 (HD projects only)
files. Before importing one or more media files into DVD Studio Pro, Compressor
transcodes the files into the correct format. Compressor can encode audio in the Dolby
Digital Professional format (also known as AC-3). Dolby Digital Professional is a very
common compressed audio format for DVD-Video discs.Compressor alsosupports two
specialized situations:
• For those situations in which you are editing high definition (HD) sources in
Final Cut Pro and want to create a standard definition (SD) DVD from them,
Compressor includes a high-quality down conversion capability. HD sources using
1080i or 720p resolutions use a high-quality transcoding process to create SD MPEG-2
video output files.
• For those situations in which you must fit the maximum video onto a DVD and do
not require broadcast quality, Compressor includes the ability to export
DVD-Video-compatible MPEG-1 format files.
Compressor Features
Compressor can work as a standalone application or be integrated into the workflow of
other applications, such as Final Cut Pro. To this end, Compressor accepts the same full
range of source media file types that Final Cut Pro accepts. Compressor offers the following
features.
• Batch processing: This streamlined process allows you to create multiple output files
from single source media files.
• VBR options: Using the MPEG-2 encoder, you can set either a single- or dual-pass variable
bit rate (VBR) for your output files, a setting that affects the video file image quality.
• H.264 encoding: H.264 produces higher quality video at lower data rates for everything
from mobile phones to High Definition (HD). H.264 works especially well with the Apple
QuickTime 7 media player. Compressor includes H.264 formats that specifically target
HD DVDs, iTunes, the iPod, and Apple TV.
• Droplets: These standalone applications can be used for drag-and-drop transcoding
operations straight from your desktop. Once created, Droplets simplify and automate
the transcoding process and can be used even without opening Compressor.
• Settings: Settings contain all necessary file format, filter, and geometry settings needed
for transcoding. You can customize and modify the Apple-supplied settings or create
new ones, making it possible to create a library of specialized settings that can be
reused.
27Chapter 2 Ways to Use Compressor
Page 28

• Filters: The selection of available Compressor filters gives you dynamic artistic control
while you convert your source media to other formats and allows you to create a final
product to your precise specifications. A selection of the available filters includes fade
in/fade out, timecode overlays, gamma correction, noise removal, letterbox, watermark,
color adjustment, and others. Additionally,there are audio filters for controlling dynamic
range, peak levels, equalization, and fade in/fade out.
• Previewing: You can preview your filter settings in real time using the Preview window
as you adjust them in the Inspector window. This lets you tweak the settings to your
satisfaction, before transcoding the source media file.
• Destinations: Youcan create and save destinations for your outputfiles, which can then
be assigned to each output file’s target. You can even include FTP and iDisk locations.
A destination can also specify the filenaming convention to use.
• Geometry: You can adjustyour frame size usingthe geometry Inspector window controls
and graphical controls in the Preview window. These features allow you to crop
unwanted image areas of your source media file and reduce file size. Compressor also
allows you to resize your image to other aspect ratios such as 4:3, 16:9, and 2.35:1 for
delivery onto other platforms, such as DVD or iPod.
• Publishing: You can use Compressor to upload output files to a QuickTime Streaming
Server or other locations for DVD authoring.
• AppleScript usage: You can add specialized AppleScript information to any output file,
which givesyou the flexibility to automate and customize any post-encodingoperations.
• Interoperability: Compressor is an integral component of other Apple professional video
applications such as Final Cut Pro and DVD Studio Pro. You can export sequences directly
from Final Cut Pro into Compressor for transcoding and drag MPEG-2 files transcoded
from Compressor into DVD Studio Pro to simplify the DVD authoring process.
• Transcoding activity in the background: Compressor lets you begin transcoding a batch
and then continues processing in the background, allowing you to perform other tasks
at the same time.
• Email notification: You can set up Compressor to send an email notification to any
location to notify you when the batch transcode is complete.
• Distributed processing: Compressor offers distributed processing, distributing the work
to multiple computers that have been chosen to provide more processing power. The
distributed processing feature is limited to computers that have either Final Cut Studio
or DVD Studio Pro installed. For more details, see the Distributed Processing Setup Guide,
available in Compressor Help.
• Command-Line Features: Compressor has a number of command-line options for
submitting jobs, enabling and disabling service node and cluster-controlling services,
and monitoring batches.
28 Chapter 2 Ways to Use Compressor
Page 29

The Basic Transcoding Workflow
3
Compressor makes it easy to transcode media into multiple formats. In addition,
Compressor is integrated into other applications, such as Final Cut Pro, Motion, and
Soundtrack Pro. And Compressor generates high-quality assets for use in DVD Studio Pro,
providing seamless transcoding between media formats directly within one application.
For simple or repetitive workflows, you can also use the Share feature in Final Cut Pro
and Motion. The Share feature is an easy “one-click” way to send your work to clients,
friends, and other audiences without any advanced knowledge of transcoding, delivery
file formats, or FTP protocols. From the Share window in Final Cut Pro and Motion, you
can quickly create and deliver output media files in iPod, iPhone, Apple TV, MobileMe,
DVD, Blu-ray Disc, and YouTube formats without having to open any additional
applications. For more information about the Share feature, see the Final Cut Pro
User Manual and the Motion User Manual.
This chapter covers the following:
• Compressor Concepts and Terms (p. 29)
• Preparing Compressor for Transcoding with Custom Settings (p. 32)
• Choosing an Output Format (p. 34)
• Creating a Compressor Batch (p. 35)
• Viewing Transcoding Status (p. 37)
• Optional Compressor Shortcuts (p. 37)
Compressor Concepts and Terms
This section covers some common terms that you may encounter as you use Compressor.
29
Page 30
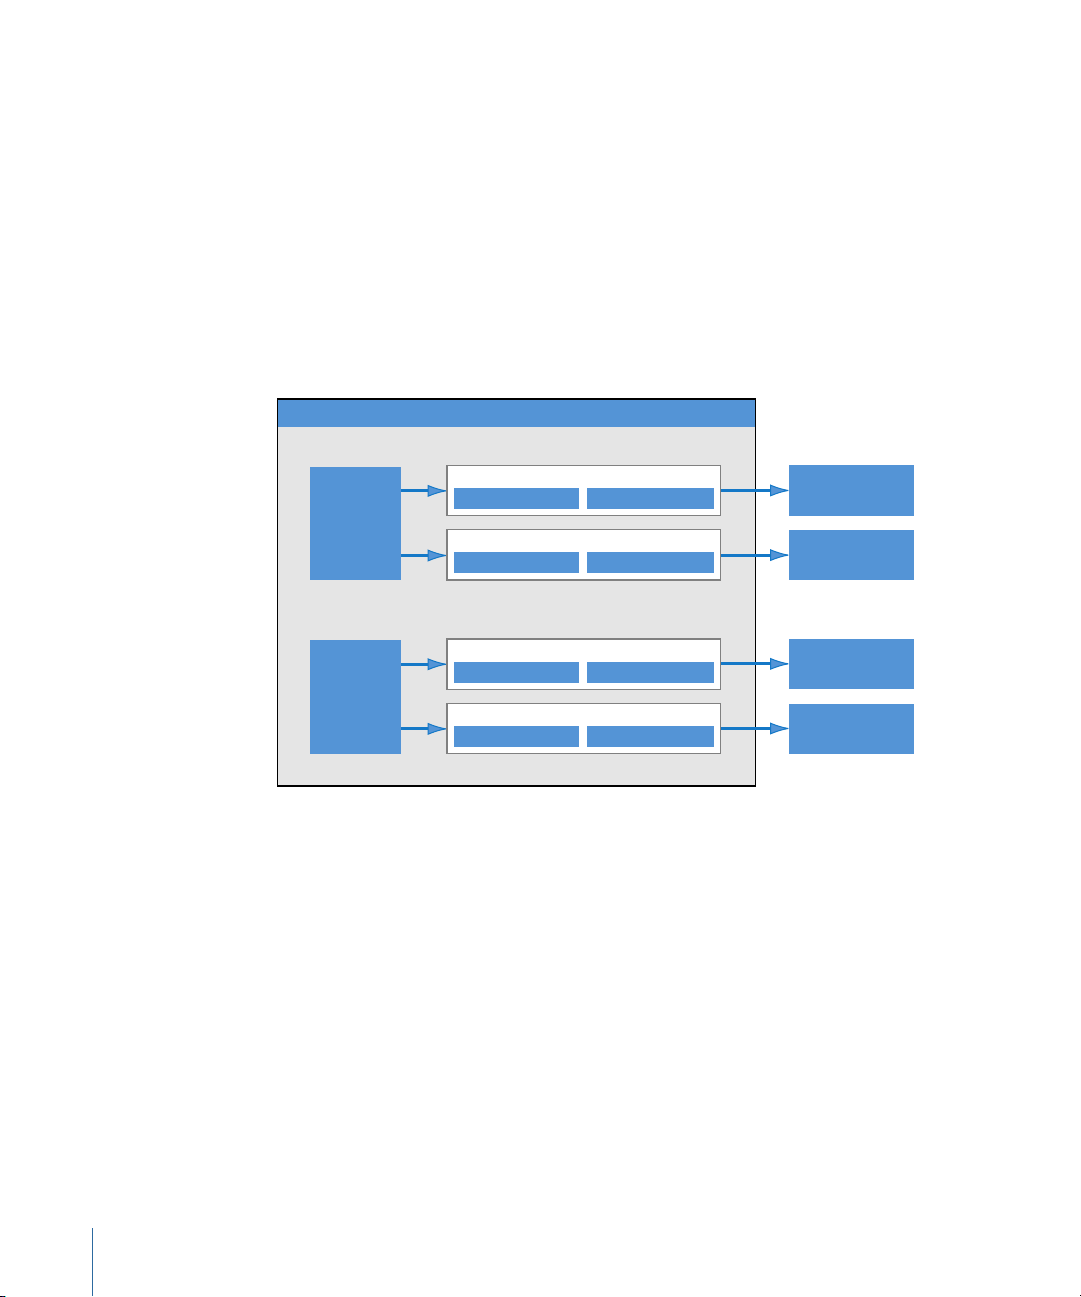
The following diagram illustrates how the standard Compressor transcoding process
Job 2
Job1
Output media file
(Job 1, Target 1)
Output media file
(Job 1, Target 2)
Output media file
(Job 2, Target 1)
Output media file
(Job 2, Target 2)
Source
media file
1
Source
media file
2
Target 1
Setting Destination
Target 2
Setting Destination
Target 1
Setting Destination
Target 2
Setting Destination
Batch
works. The largest transcoding component is a batch. The batch represents all the
components needed to transcode your current media. It must contain one or more jobs.
A job consists of at least one source media file with one or more targets, each with a
setting and a destination associated with it. After the transcoding process, the resulting
file is known as the output media file. One output media file is created for each setting
assigned to a source media file.
In the illustration below, the batch contains two source media files, each of which is a
job containing two targets (sets of a setting and destination). The total number of output
files created by transcoding this batch will be four: Job 1 will create two output media
files, as will Job 2.
• Codec: Short for COmpression/DECompression. A mathematical model for reducing the
data of a source media file.
• File Format: The output format you use to transcode your source media file.
• Group: Contains designated settings placed into a folder in the Settings tab. Groups
help you organize your settings and can simplify the job creation process.
• Transcoding: The process of converting files from their original format into output files
ready for distribution in another format. Closely related terms include compression,
which specifically refers to data reduction, and encoding, a term that is essentially
synonymous with transcoding, but does not emphasize the conversion aspect.
• Source mediafile: The transcoding process always starts with a source media file, which
is the file intended for transcoding in its original form. Source media files are always
30 Chapter 3 The Basic Transcoding Workflow
one of the following.
• Movies: Containing video, audio, and other data (such as markers)
Page 31

• Stills: Used as part of a sequence of still images for certain video productions
• QuickTime: QuickTime is cross-platform multimedia technology which allows Mac OS
and Windows applications to capture and play back video, audio, and still-image files.
QuickTime files can contain many different kinds of media and codecs. Codecs give
instructions to QuickTime on how to play back the media.
A typical Compressor transcoding process consists of the following components.
• Setting: Once you have imported your source media file, you must assign one or more
settings to it. A setting is a combination of transcode attributes, such as output format,
filter, and geometry settings, that are applied to the source media file during the
transcoding process.
• Output (file) format: The encoder you choose to convert your source media file.
Choose one of the following output formats based on the intended playback method
and environment of your transcoded media files: AIFF, Dolby Digital Professional, DV
Stream, H.264 for DVD Studio Pro, H.264 for Apple Devices (which contains settings
for use with an iPod or Apple TV), Image Sequence (which supports TIFF and TARGA
images), MPEG-1, MPEG-2, MPEG-4, QuickTime Movie, or QuickTime Export
Components.
• Filters: Allow you to adjust different characteristics of your video such as color,
brightness, and sharpness, to maximize your video quality as the file is compressed.
• Geometry settings: Allow you to crop the image and adjust its frame size.
• Actions settings: Allow you to create automatic post-transcoding actions and apply
them to jobs and settings. Easily create and deliver output media files, send email
notifications and execute post-transcoding tasks using Automator.
31Chapter 3 The Basic Transcoding Workflow
Page 32

• Destination: A destination also needs to be assigned to the source media file. This is
the location where your transcoded media file is stored. You can either use the default
destination called Source (the same folder the source media file is in), or you can
designate any location to which you have full access. You can also change the default
destination inCompressor preferences. Thedestination also controls how thetranscoded
media file is named.
• Target: A blueprint for creating an output media file containing a setting, a destination,
and an output filename.
• Job: Once you assign one or more targets to the source media file, it becomes a job,
and is ready to be transcoded.
• Batch: A batch consists of one or more jobs that are processed at one time. All jobs
contained withinthe batch are submitted collectively when youclick the Submit button.
• Output media file: The transcoded media files created after the batch is submitted and
processed are called output media files. An output media file is the result of a
successfully transcoded source mediafile (containing one setting anddestination). You
can create as many output media files as there are different settings applied to the
various source media files in the batch.
Preparing Compressor for Transcoding with Custom Settings
Compressor contains a number of preconfigured settings that allow you to start
transcoding immediately. If you want to transcode your source media files immediately
and don’t need to create your own settings, you can follow the steps described in Quick
and Easy Compressor Workflow: Batch Template Method instead. Or if your workflow is
not covered by anyof the batch templates and you want to start transcoding immediately,
you can also try the steps in Quick and Easy Compressor Workflow: Manual Method.
However, if you want to create your own settings and destinations, and customize other
attributes such as filters, cropping, frame resizing, and actions settings, you need to follow
the steps outlined below. If the custom settings you create here can be used for all your
transcoding needs, you won’t need to go through these steps again. However, if you
need to create new settings and destinations for each transcoding project, you’ll need
to repeat these steps each time.
Stage 1: Creating a Setting
Unless you are using a preexisting setting or a batch template supplied with Compressor,
you will need to create your own settings. This is done using the Settings tab and begins
with choosing an output format from the File Format menu that opens when you click
the Add (+) button. See Choosing an Output Format for more information. In addition,
you also have the option of adding filters, geometry settings, and posttranscoding actions
and then previewing your setting to ensure satisfaction. See Creating a Setting from
Scratch for more information.
32 Chapter 3 The Basic Transcoding Workflow
Page 33

You can also streamline your workflow by putting your settings into groups. See Creating
Groups of Settings for more information.
After you have created a setting, you can further customize it with additionaladjustments
such as filters (to adjust image quality or add effects such as letterboxing), pixel size
(geometry values), and post-transcoding actions. These additional adjustments are all
managed in the Inspector window. See Adding Filters to a Setting, Working with Frame
Controls, Adding Geometry Settings, and Adding Actions for more information.
Stage 2: Previewing the Setting
It’s a good time-saving measure to preview your setting before submitting the batch.
This can be done using the Preview window and ensures that the quality of the output
media file is acceptable. The Preview window consists of a split screen displaying the
content of your source media file in its original form in one half, and the content of your
output media file in the other half.
From the Preview window, you can do any of the following:
• Play the media file.
• Dynamically preview effects (in real time).
• Modify the effects of the filters and geometry settings of your setting.
• Compare source or output versions.
• Crop the output file frame size.
• Change the aspect ratio.
• Add various markers (compression, chapter, or podcast).
Note: Frame Controls settings cannot be previewed in the Preview window. To preview
Frame Controls settings, do a test transcode of a small section of your source media file.
(See Transcoding a Portion of the Clip with the Preview Window for more information.)
See Previewing a Setting or Using the Preview Window for more information.
Stage 3: Creating a Destination
By default, your transcoded file is saved in the same folder as your source media file
(Source). However, if you want to store your transcoded files in a different location, you
can create a new destination in the Destinations tab. Using this tab, you can choose any
folder, volume, or remote server for which you have permissions and access to be a
destination, and add useful file identifiers for your transcoded output file. Once you have
created sufficient destinations, you won’t need to open the Destinations tab again.
See Creating and Changing Destinations for more information.
33Chapter 3 The Basic Transcoding Workflow
Page 34

Choosing an Output Format
Selecting the relevant playback platform (Apple Devices, DVD, web, CD, and kiosk) is the
first choice you need to make before you compress a source media file into a different
output format. Once you have decided on the platform, you can choose the appropriate
output format for that platform.
Choosing an output format is the first decision you need to make once you’ve decided
to transcode a source media file. You choose an output format based on the intended
playback method for the audience. Whatever the digital video format of your source
media file, youcan transcode itusing one ofthe many encoders supplied with Compressor.
Compressor gives you access to the following industry-standard formats, all of which
have their own particular attributes. (They are presented here in alphabetical order.)
• AIFF: Intended for audio use (including DVD or CD authoring). For more details on the
AIFF format, see Creating AIFF Files.
• Dolby Digital Professional: Also known as AC-3. Usually intended for DVD authoring.
For more details on the AC-3 format, see Creating Dolby Digital Professional Output
Files.
• DV Stream: Common format used for SD projects. See Creating DV Stream Output Files
for more information.
• H.264 for Apple Devices: Intended for creating video files suitable for playback using
iTunes, an iPod, and Apple TV. For more details on the H.264 for Apple Devices format,
see Creating H.264 for Apple Devices Output Files.
• H.264 for Blu-ray: Intended for creating H.264 settings specifically configured for Blu-ray
Disc. For more details on the H.264 for Blu-ray Disc format, see Creating H.264 for Blu-ray
Disc
Note: Blu-ray output options are available only on computers that have Final Cut Studio
installed.
• H.264 for DVD Studio Pro: Intended for a variety of uses including HD-DVD. For more
details on the H.264 format, particularly for authoring HD-based DVDs, see Creating
H.264 for DVD Studio Pro Output Files.
• Image Sequence: Compatible with a wide range of compositing and image processing
applications. For more details see Creating Image Sequence Files.
• MP3: Intended for audio compression. The MP3 format creates audio files that are
compatible with a wide variety of playback devices. For more details on the MP3 format,
see Creating MP3 Output Files.
• MPEG-1: Intended for Internet, CD-ROM, and specialized DVD use. For more details on
the MPEG-1 format, see Creating MPEG-1 Output Files.
• MPEG-2: Intended for standard and high definition DVD use. For more details on the
MPEG-2 format, see Creating MPEG-2 Output Files.
34 Chapter 3 The Basic Transcoding Workflow
Page 35

• MPEG-4, Part-2: Intended for a variety of uses including the web or wireless devices.
For more details on the MPEG-4 format, see Creating MPEG-4 Output Files.
• QuickTime Export Components: Leveraging the component plug-in architecture of
QuickTime, Compressor can output a variety ofadditional codec optionsand third-party
formats such as Windows Media, RealPlayer, 3G, and AVI. The QuickTime Export
Components feature allows you to control the third-party encoding engine without
having to open another application. For more details on QuickTime Export Components,
see Creating QuickTime Export Component Output Files.
• QuickTimeMovie: Intended for use with QuickTime in a variety of playback environments.
Because QuickTime is cross-platform multimedia technology, it allows Mac OS and
Windows applications to capture and play back video, audio, and still-image files. For
more details on the QuickTime format, see Creating QuickTime Movie Output Files.
Creating a Compressor Batch
This section describes the completesteps in manuallycreating and submitting a complete
Compressor batch. For a quicker and easier but more limited method, see Quick and Easy
Compressor Workflow: Batch Template Method.
Once you have the necessary settings and destinations available, you can begin to create
your batch for transcoding. A batch contains one or more jobs. A job consists of one
source media file with one or more targets, which contain the settings and destinations.
You can submit a batch for transcoding only after you have assigned at least one target
(setting and destination) to each job (source media file) in the batch. All jobs in the batch
are submitted together. Think of batches as documents that can be saved, closed, and
opened again. And much like a Final Cut Pro project, a separate tab (that can be torn off)
contains each Compressor batch.
Stage 1: Importing Source Media Files into Compressor
You import source media files into a batch either by using the File Selection dialog or by
dragging the files from the Finder to the Compressor Batch window. You can import
source media files from any folder that you have access to.
See Importing Source Media Files for more information.
Stage 2: Assigning a Setting
Once you have imported your source media file into the Batch window, you need to
assign one or more settings to it. This makes ita job. A sourcemedia file can be transcoded
only after it has at least one setting assigned to it, and you can add a setting to a source
media file only after you have either selected a preexisting setting or created one. Your
setting must have an output file format associated with it.
• If you choose a preexisting setting: The output file format has already been assigned.
35Chapter 3 The Basic Transcoding Workflow
Page 36

• If youcreate yourown setting: You must choose an output file format from the file format
menu that opens when you click the “Create a New Setting” button (+) in the Settings
tab.
You can add one setting to multiple jobs in one step by selecting the jobs in the Batch
window and choosing a setting from the dialog that appears when you choose Target >
New Target With Setting, or by Control-clicking one of the selected jobs and choosing a
setting from the New Target With Setting submenu of the shortcut menu that appears.
If you have a favorite setting (preexisting or customized), you can streamline your workflow
by creating a standalone application called a Droplet containing multiple settings, and
use the Droplet to submit batches without opening Compressor. See Creating a Droplet
from the Settings Tab for more information.
Note: You can also create groups of settings, which is a quick and convenient way to
assign multiple settings to a source media file. See Creating Groups of Settings for more
information.
Stage 3: Previewing the Setting Using the Preview Window
You can either preview a source media file or the source media file with its assigned
setting. From the Preview window, you can dynamically preview (in real time) and modify
the effects of the filters and geometry adjustments of your setting, play back the media
file, view source or output views, crop the output file frame size, change the aspect ratio,
and add various markers relevant to the MPEG-1, MPEG-2, H.264 for DVD Studio Pro, and
H.264 for Apple Devices formats.
See Previewing a Setting or Previewing a Clip for more information.
Stage 4: Assigning a Destination
You can choose the location to place your output media files by assigning a destination
to each target. The destination also defines various aspects of how the output media file
is named. There are several supplied destinations in the Destinations tab you can choose
from, or you can create your own custom destinations. In addition to assigning a
destination by dragging one from the Destinations tab to a job’s target, you can also use
the Target > Destination menuor the shortcut menu that appears whenyou Control-click
a target to assign an existing destination to a job. You also have the option of choosing
a location that has not been defined as a destination by choosing Other in the above two
menus.
See Assigning Destinations to Source Media Files for more information.
Stage 5: Submitting the Batch for Transcoding
Once you have created all the jobs you want in the batch and are satisfied with the
settings and quality of your output files (having previewed them), you are ready to submit
the batch. You do this by clicking the Submit button in the Batch window.
36 Chapter 3 The Basic Transcoding Workflow
Page 37

Note: If you are transcoding a large batch, you should turn off the screen saver application
on your computer. This will improve the speed of your transcode because resources are
not being diverted to the screen saver.
See Submitting a Batch for more information.
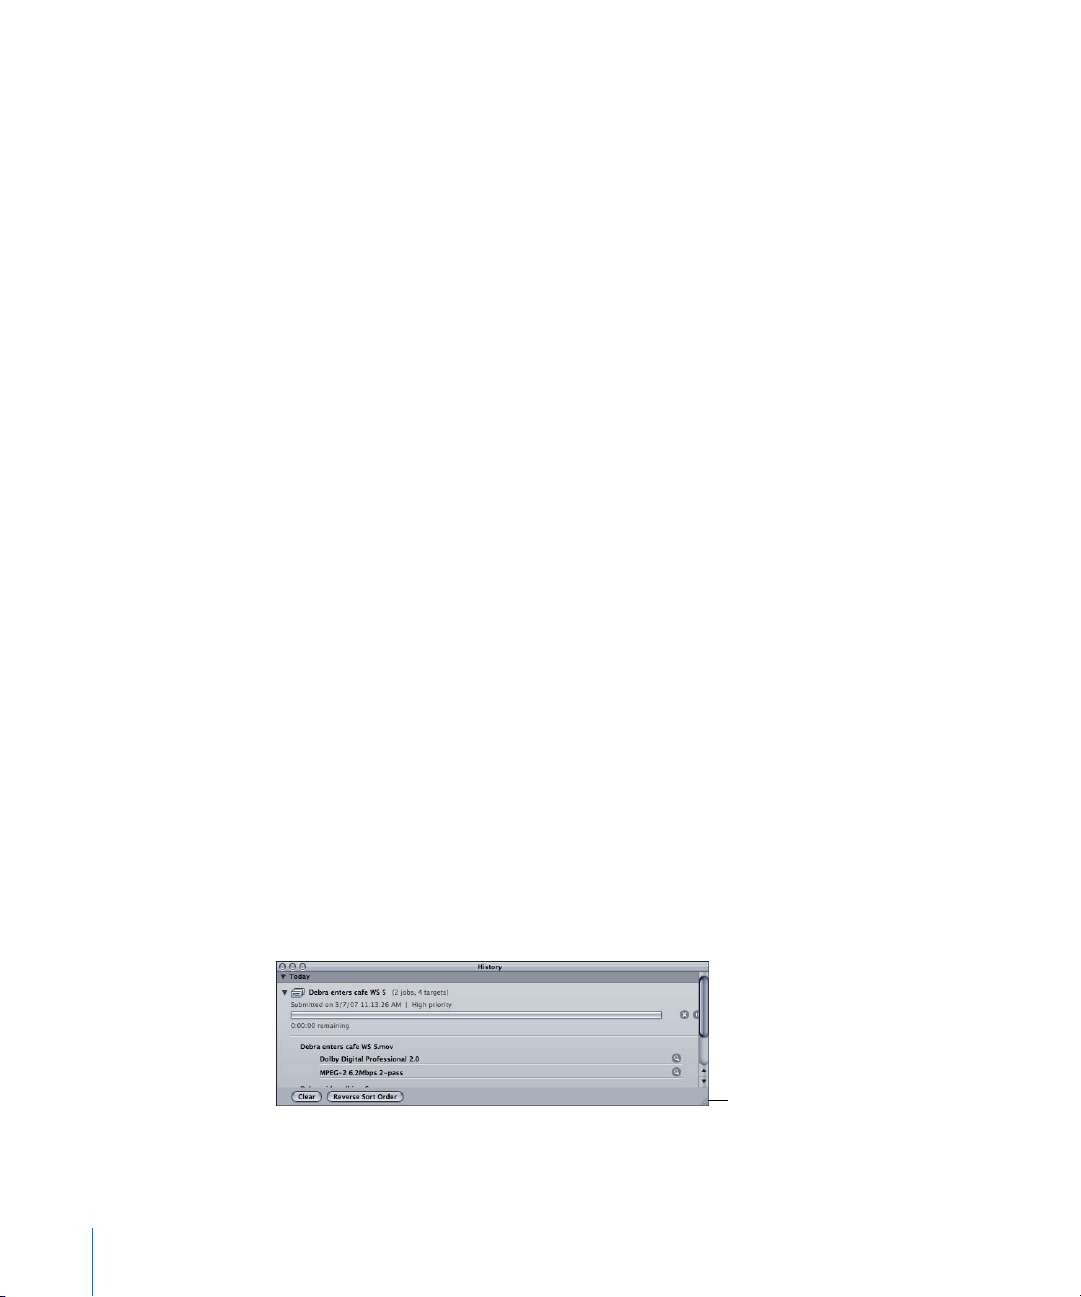
Viewing Transcoding Status
You use Batch Monitor and the History window to see the current status of a submitted
batch and all the jobs contained within it. Batch Monitor is a standalone application, so
that it can work with both Compressor and Droplets, whether or not Compressor is open,
and regardless of whether you have submitted anything. See Creating a Droplet from
the Settings Tab for more information about Droplets.
Stage 1: Viewing the Batch Transcoding Status
After you submit a batch, then you can open Batch Monitor so you can view the
transcoding status of your batch. This is a good way to monitor when your batch has
finished transcoding and if any problems occurred during the transcode process. You
can set Compressor Preferences to open Batch Monitor automatically.
See Setting Compressor Preferences and the Batch Monitor User Manual for more details.
Alternatively, you can look at the History window in Compressor. It contains a progress
bar and, like Batch Monitor, it can tell you if a submission was successfully transcoded.
Stage 2: Confirming Transcode Completion
It’s a good idea to open the transcoded media file’s destination folder to ensure that the
media file was transcoded successfully and saved to that location.
Optional Compressor Shortcuts
Compressor was designed with workflow in mind. Depending on your needs, there are
a number of ways to speed up the Compressor transcoding workflow.
Using Preexisting Settings
Compressor contains a number of preexisting settings that allow you tostart transcoding
immediately. If these preexisting settings suit your needs, you can transcode your source
media files immediately.
See Quick and Easy Compressor Workflow: Manual Method for more information.
Even if you need to create customsettings, you can group them so that they can be easily
applied to targets. See Creating, Previewing, and Modifying Settings for moreinformation.
37Chapter 3 The Basic Transcoding Workflow
Page 38

Using Default Settings and Destinations
If you find that you are applying the same settings and destinations to each source media
file, you can configure Compressor preferences to automatically apply those settings and
destinations. See Setting Compressor Preferences for more information.
Working with Droplets
Droplets provide a fast and convenient way to transcode material without even opening
Compressor. You create a Droplet by saving a setting or a group of settings and
destinations as an active icon. When you drag one or more source media files to it, the
Droplet begins the transcoding process automatically.
See Creating a Droplet from the Settings Tab for more information.
38 Chapter 3 The Basic Transcoding Workflow
Page 39

The Compressor Interface
4
The Compressor interface consists of a number of core windows in which you do most
of your transcoding preparation work.
This chapter covers the following:
• Compressor Windows and the Transcoding Workflow (p. 40)
• Creating and Managing Compressor Layouts (p. 41)
• Working with the Compressor Windows (p. 44)
• Batch Window (p. 47)
• Settings Tab (p. 50)
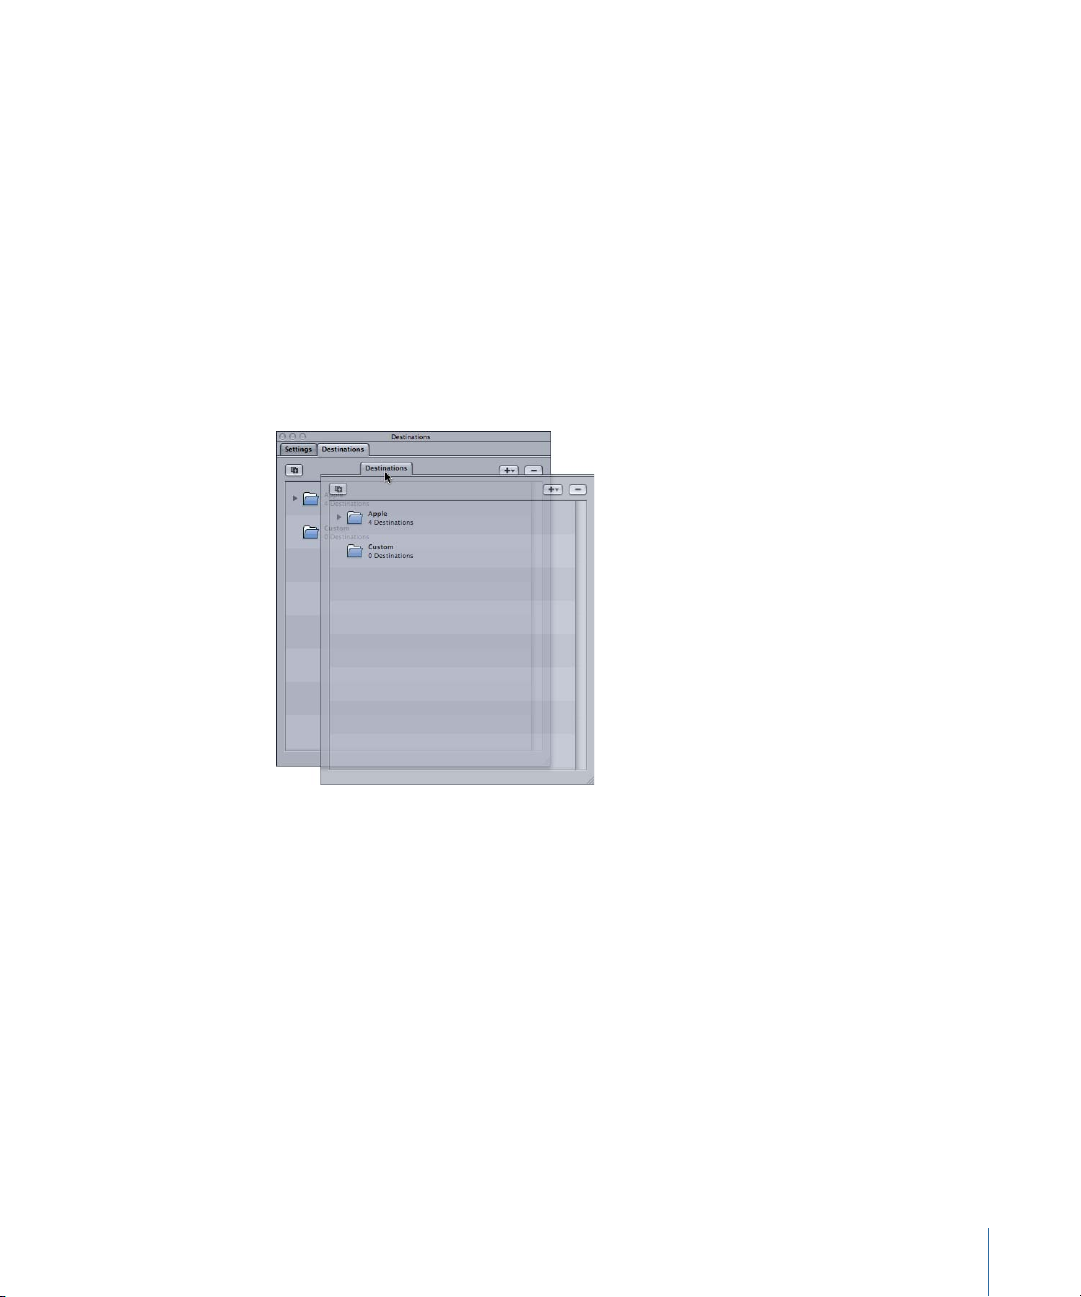
• Destinations Tab (p. 51)
• Inspector Window (p. 51)
• History Window (p. 61)
• Preview Window (p. 61)
• Batch Monitor (p. 63)
• Droplet Windows (p. 64)
• About Changing Values and Timecode Entries (p. 64)
• Keyboard Shortcuts (p. 66)
39
Page 40

Settings and
Destinations tabs
Batch window
Preview window
History window
Inspector window
Compressor Windows and the Transcoding Workflow
Each Compressor window represents a part of the transcoding workflow.
• Batch window: Allows you to import source media files, add settings and destinations,
and name the batch.
• Settings and Destinations tabs: The Settings tab allows you to centrally manage Apple
and custom settings. The Destinations tab allows you to create, modify, or remove
destination settings, set a default destination, and add file identifiers to your output
media filename.
• Inspector window: Allows you easy access to common transcoding controls, and a full
summary table containing all the details of each setting. You can also use the Inspector
window to gather information on source clips, and to make dynamic changes
interactively with the Preview window.
• Preview window: Allows you to play your source media file in its original format, or
preview your source media file with settings that have been assigned to it. You can
see the effects of settings—such as filters and frame resizing—and make adjustments
to these attributes while previewing the media file in real time. You can also use the
Preview window to add and view various kinds of markers.
• History window: The History window allows you to view a full log of all batchessubmitted
from your computer, including progress bars of those still being transcoded, and pause
or resubmit any batches listed in the log.
• Droplet window (not pictured): Allows you to save one or more settings or groups of
settings into a Droplet, a standalone preset, packaged into a drag-and-drop application
and saved as an icon.
40 Chapter 4 The Compressor Interface
Page 41

• Batch Monitor (not pictured): Allows you toview the status of all batchesbeing processed.
(See the Batch Monitor User Manual for more information.)
Creating and Managing Compressor Layouts
As you use Compressor you will find that, depending on the particular encoding task you
are configuring, how the various Compressor windows are laid out can affect how easy
Compressor is to use. To help with this, Compressor includes the ability to configure and
save layouts. Layouts define which windows are visible, their size, their position, and
which icons are in the Batch window’s toolbar.
Compressor includes two layouts that you can use to get a starting point for creating
your own custom layouts.
Note: Each layout is available in several sizes, allowing you to choose the size that best
fits yourmonitor. You can modify any ofthese layouts and save themas your own custom
layouts.
Standard Layout
The standardlayout shows all the Compressorwindows, with the Settings and Destinations
tabs sharing a window. This layout is optimized for those times when you are transcoding
a single source media file.
41Chapter 4 The Compressor Interface
Page 42

Batch Layout
The batch layout places the emphasis on the Batch window. This layout is optimized for
those times when you are transcoding a number of similar source media files.
Choosing, Saving, and Managing Layouts
Compressor makes it easy to choose a layout.
To choose a layout
Choose Window > Layouts, and choose a layout from the list that appears.
µ
Once you choose a layout, the Compressor interface changes to match it.
You can also create and save your own custom layouts.
To save a layout
1 Configure the Compressor interface the way you want it to be saved.
See Working with the Compressor Windows for information on the ways you can work
with the various windows.
2 Choose Window > Save Layout.
3 In the dialog that appears, enter a name for the layout and click Save.
The layout is saved and appears in the Windows > Layouts list.
You can manage the layouts list by removing or renaming existing layouts.
To manage your layouts
1 Choose Window > Manage Layouts.
42 Chapter 4 The Compressor Interface
Page 43

The layout manager dialog appears.
2 Do any of the following.
• To rename a layout: Double-click it and type the new name.
• To remove a layout: Select it and click the Delete (–) button.
• To save the current interface configuration as a new layout: Click the Add (+) button and
enter a name for the layout.
• To choose a layout and apply it to the current Compressor interface: Choose the layout
and click the Apply button.
3 Click Done when you have finished managing your layouts.
The layout manager closes and the Compressor interface changes to match the chosen
layout setting.
Note: The layouts list is actually divided into two sections—the ones supplied by Apple
and the ones that you create. The ones that you create are listed in alphabetical order.
Use care when naming your layouts to ensure you can easily locate them in the list.
About the Layout Files
If you have several workstations using Compressor, you might find that you want to be
able to have the same layouts available on all of them.
You can accomplish this by copying the layout files from one system to another, ensuring
you put them in the correct location. The layouts are stored in the following path:
Users/username/Library/Application Support/Compressor/Layouts. The layouts all have
a .moduleLayout extension.
Important: Do not manually add or remove the layout files while Compressor is open.
Compressor checks this location for available layouts as part of its startup process. You
must restart Compressor to have it recognize any changes you have made to these files.
43Chapter 4 The Compressor Interface
Page 44
Working with the Compressor Windows
Drag this corner to resize
the window.
While the standard and batch workflow layouts present the Compressor interface as a
single large element, it is actually composed of a number of individual windows that can
be positioned and sized to best suit your needs.
Why Are Some Windows Covered Up?
Because the Compressor interface is made up of individual windows, you may find that
when you switch from Compressor to another application and then switch back to
Compressor by clicking one of its windows, only that window appears, with the others
remaining covered by other windows you might have open.
To bring all Compressor windows to the front
Do one of the following:
When switching between applications, take advantage of the built-in application switching
µ
feature of Mac OS X. Press Command-Tab to have an application selection dialog appear.
As you hold down the Command key, you can press the Tab key to cycle through the
currently running applications, releasing the Command key once the Compressor icon is
selected. This ensures that all the Compressor windows are visible.
Choose Window > Bring All to Front.
µ
Click the Compressor application icon in the Dock.
µ
Note: The Compressor toolbar, located along the top of the Batch window, makes it easy
to navigate to the main Compressor windows and to Batch Monitor.
Resizing the Compressor Windows
All the Compressor windows can be resized with the exception of the Inspector window,
which has a fixed size.
Each window has a minimum size limit, both horizontally and vertically, that affects how
small you can make the window.
To resize a window
Drag the window’s lower-right corner to stretch or compress the window horizontally or
µ
vertically.
Note: As you reposition or resize a window, it will snap to a nearby window once you
get close to it. This makes it easy to create a neat layout without gaps or overlaps.
44 Chapter 4 The Compressor Interface
Page 45
About the Tabs
The Batch windowand the Settings and Destinations tabwindow can have multiple tabs.
• The Batchwindow: When youare working with a large monitor and have several batches
open, you might want to be able to see each of them in its own window.
• The Settingsand Destinations tabs: By default, the Settings tab and the Destinations tab
are located in the same window. You can choose to have each in its own window or
to close one of the tabs. You can even choose to add any of the other windows (except
the Batch window) as an additional tab to the window.
In both cases, you can also control the order of the tabs.
To move a tab to its own window by dragging
1 Drag the tab out of its current location.
45Chapter 4 The Compressor Interface
Page 46

2 Release the tab to have it appear in its own window.
To move a tab to its own window using a shortcut menu
Control-click the tab and choose Tear Off Tab from the shortcut menu.
µ
The tab opens in its own window.
To add a tab from one window to another window by dragging
1 Drag the tab to the tab area of the window you want to add it to.
A highlight appears around the tab area.
2 Release the tab.
46 Chapter 4 The Compressor Interface
Page 47

It snaps to the tab area and its original window closes.
Job area
Toolbar
Batch tabs
Batch status
Batch submission button
Show/hide
toolbar button
To add a tab from one window to another window by using a shortcut menu
Control-click the tab area where you want the window to appear, and choose the tab
µ
from the list that appears in the shortcut menu.
Note: This is the only method that allows you to add the History, Preview, or Inspector
tabs to the window.
To change the order of the tabs in their current window
Drag the tab left or right to its new position.
µ
The other tabs move to make room for it.
Once you have the Compressor interface configured as you like it, you can save it as a
layout. That makes it easy to restore the layout or to switch between it and other layouts.
See Creating and Managing Compressor Layouts for more information.
Batch Window
When you first open Compressor, the Batch window appears. The Batch window allows
you to import source media files for compressing, add settings and destinations, name
the batch, and choose where you want to save it. The Batch window is where you place
all source media files in preparation for transcoding.
Note: Generally the Batch window is always showing. If you close it, it will reopen when
you create a new batch (File > New Batch) or open an existing batch (File > Open).
You can use the Compressor menu bar or the toolbar at the top of the Batch window to
open all other windows. (If the toolbar isn’t visible when you open Compressor, click the
button in the upper-right corner of the Batch window to open it.)
47Chapter 4 The Compressor Interface
Page 48

In additionto the Compressor toolbar and the Submit button, theBatch window contains
the tabs for the open batches and an area for showing and configuring a batch’s jobs.
For information about adding source media files to a batch, see Adding Source Media
Files to a Batch to Create Jobs. For information on working with jobs and targets, see
Finalizing Jobs and Submitting Batches.
Customizing the Toolbar
The Batch window contains a toolbar that you can customize to better fit your needs.
Note: If the toolbar isn’t visible when you open Compressor, click the button in the
upper-right corner of the Batch window to open it.
To customize the Batch window toolbar
1 Do one of the following to open the toolbar customization palette:
• Choose View > Customize Toolbar.
• Control-click in the toolbar and choose Customize Toolbar from the shortcut menu.
• Click the Customize icon in the toolbar (if present).
The toolbar palette opens.
2 To customize the toolbar, do any of the following.
• To remove items currently in the toolbar: Drag them off.
• To add items to the toolbar: Drag them from the toolbar palette to the toolbar, placing
them where you want them to appear.
• Torearrange itemsin thetoolbar: Drag them from their current location toa new location.
• To restore the toolbar to its default configuration: Drag the default set (located on the
bottom of the palette) to the toolbar.
48 Chapter 4 The Compressor Interface
Page 49

• To configure how items show in the toolbar: Choose a setting from the Show pop-up
Click these arrows
to see items that did
not fit in the toolbar.
menu.
You can choose to show the icon and text, the icon only, or the text only.
3 Click Done when you have finished.
Note: The toolbar configuration is saved as part of a layout. See Creating and Managing
Compressor Layouts for more information about layouts.
It is possible to add more items to the toolbar than there is room for. When that happens,
the right edge of the toolbar shows a double arrow that you can click to get access to
the icons that do not fit.
About the Toolbar Items
Most of the items you can add to the toolbar can be added only once. There are a few
that can be added multiple times, such as the separator, the space, and the flexible space.
• New Batch: Creates a new untitled batch.
• Open Batch: Opens a dialog for you to locate and select a saved batch to open.
• Close: Closes the currently selected batch.
Note: You cannot close a batch if it is the only one open.
• Add File: Opens a dialog for you to locate and select one or more source media files to
import into the current batch.
• Add Surround Sound: Opens the audio file assignment dialog that you can use to
manually assign files to each audio channel in a surround sound configuration.
• Submit withPrevious Settings: Submits the batch by usingthe settings used by previous
batch submissions, bypassing the submission dialog.
• History: Opens the History window.
• Inspector: Opens the Inspector window.
• Settings: Opens the Settings tab.
• Destinations: Opens the Destinations tab.
49Chapter 4 The Compressor Interface
Page 50

• Preview: Opens the Preview window.
• Batch Monitor: Opens the Batch Monitor application.
• Separator: Adds a vertical line to the toolbar, allowing you to group items together.
• Space: Adds a fixed-width space to the toolbar.
• Flexible Space: Adds a flexible-width space to the toolbar. The space makes it possible
to force items to the left and right edges of the toolbar, with it expanding to fill any
unused area.
• Customize: Opens the toolbar customization palette.
Settings Tab
The Settings tab allows you to centrally manage Apple and custom settings. You use the
Settings tab together with the Inspector window to create and modify settings, decide
exactly which settings you want to use to transcode your source media file, and choose
which output format you want the transcoded file converted to.
To open the Settings tab
Do one of the following:
Choose Window > Settings (or press Command-3).
µ
Click the Settings icon in the Batch window toolbar (if present).
µ
Click the Settings tab (if present).
µ
The Settings tab contains a list of the existing settings and the necessary buttons to add,
remove, or duplicate a setting and to create groups and Droplets.
See Creating, Previewing, and Modifying Settings for details on using the Settings tab to
create, manage, and choose settings.
50 Chapter 4 The Compressor Interface
Page 51

Destinations Tab
The Destinations tab allows you to create, modify, or remove destination settings, set a
default destination, and add file identifiers to your output media filename.
To open the Destinations tab
Do one of the following:
Choose Window > Destinations (or press Command-4).
µ
Click the Destinations icon in the Batch window toolbar (if present).
µ
Click the Destinations tab (if present).
µ
See Creating and Changing Destinations for details on how to configure destinations to
simplify your Compressor workflow.
Inspector Window
The Inspector window has easy access to common transcoding controls (for creating and
modifying settings and destinations); a full summary table containing all the details of
each setting; and information about source media files, including A/V attributes, closed
caption data, annotations, and job actions.
To open the Inspector window
Do one of the following:
Choose Window > Show Inspector (or press Command-Option-I).
µ
Click the Inspector icon in the Batch window toolbar.
µ
Note: Unlike the other Compressor windows, the Inspector window cannot be resized.
51Chapter 4 The Compressor Interface
Page 52
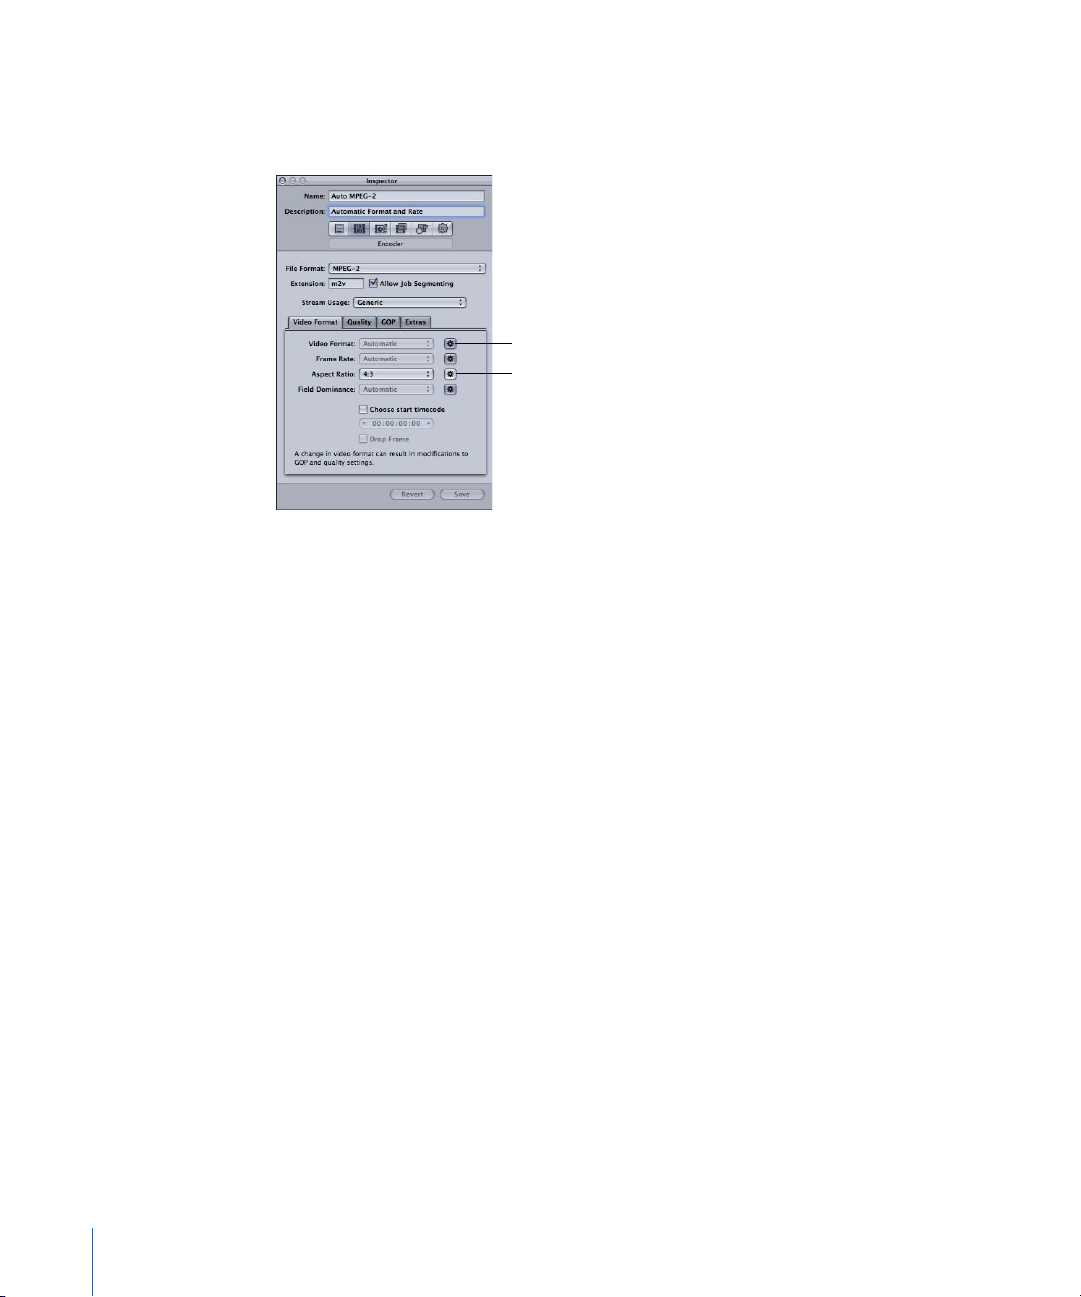
About the Automatic Settings
The Automatic button is
dark when active, and its
item is dimmed.
The Automatic button is
dimmed when inactive,
and its item is selectable.
Several itemsin the settingspanes have an optionalautomatic mode. When the automatic
mode is enabled, Compressor determines the optimal value for the setting.
In general, when the automatic mode is active, its item is dimmed and cannot be changed.
• If the setting has not been assigned to a source media file: The item says “Automatic.” An
exception is in the Frame Controls pane of the Inspector window, whose state is
undetermined until you have applied the setting to a source media file.
• If the setting has been assigned to a source media file: The item remains dimmed but
shows the value that will be used.
When the automatic mode is inactive, its button is dimmed and you can choose values
for an item as usual.
You can turn the Automatic button on or off to change from on (the button darkens) to
off (the button lightens).
Tip: It is a good idea to verify the values in the Inspectors for those settings that are set
to automatic. Compressor can usually correctly determine the appropriate values; however,
there may be instances where there is not enough information in the source media file
to determine the correct value. For example, some QuickTime clips might not have proper
metadata or the metadata might be incorrect. Additionally, if the source media file uses
nonstandard settings (such as the video frame size or frame rate), Compressor chooses
the nearest standard value to use.
52 Chapter 4 The Compressor Interface
Page 53
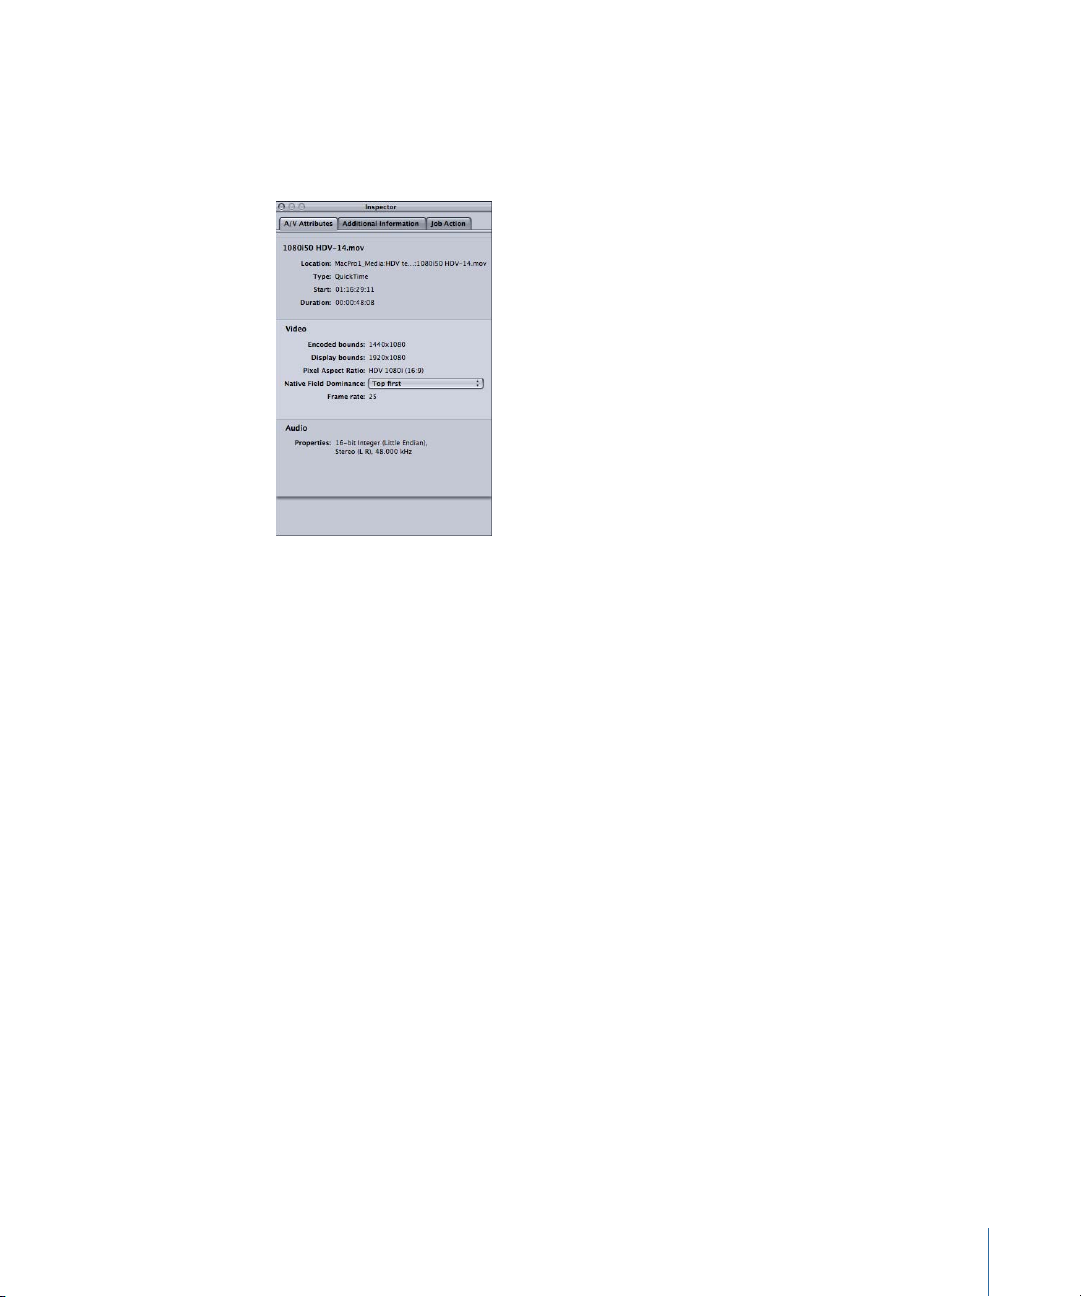
Media Source Files and the Inspector Window
When you select a job in theBatch window, the Inspector window shows you information
about the job’s source media file and allows you to add annotations, closed caption files,
and job actions.
The Inspector window contains three tabs: A/V Attributes, Additional Information, and
Job Action.
A/V Attributes Tab
The A/V Attributes tab contains general information about the source media file and is
divided into three sections.
• File information: This section shows the filename, location, and type of file.
• Video information: This section, when applicable, shows all video-related information
about the file. This includes its frame size, frame rate, and timecode information.
• Audio information: This section, when applicable, shows all audio-related information
about the file. This includes its sample size and sample rate.
Additional Information Tab
The Additional Information tab allows you to see and modify a variety of metadata items
that might have been added in other applications such as Final Cut Pro, Soundtrack Pro,
or QuickTime. You can also add metadata items to the output media file. It also includes
the ability to associate a closed caption file with the file.
53Chapter 4 The Compressor Interface
Page 54

See Using the Inspector with Source Media Files for more information on managing the
closed caption files and annotations.
• “Closed Captionfile” field: Displays the name of the closed caption file currently associated
with the source media file.
• Choose (closed caption) button: Use this button to open a dialog and navigate to the
the closed caption file you want to associate with the source media file.
• Add Annotation pop-up menu: Use this menu to choose the type of annotation you
want to add to the source media file.
• Remove (annotation) button: Use this button to remove the selected annotation.
• Annotation table: Displays the current annotation types and the corresponding
annotation text.
• Revert button: Use this button to revert to the last saved state of the Annotation table.
54 Chapter 4 The Compressor Interface
Page 55

Job Action Tab
The Job Action tab allows you to apply and/or adjust post-transcoding actions to entire
jobs. See Adding Actions for more information.
• “When job completes” pop-up menu: Use this pop-up menu to select and apply a
post-transcoding action for a job selected in the Batch window. For more information,
see Adding Actions.
Note: Blu-ray output options are available only on computers that have Final Cut Studio
installed.
• Do nothing: Choose this option to disable the Job Action tab.
• Add toiTunes Library: Compressor will add the output media file to an iTunes playlist.
• Create DVD: Compressor will burn a standard-definition DVD using MPEG-2 (.m2v)
video and Dolby Digital Professional (.ac3) audio.
• Create Blu-ray Disc: Compressor will burn a Blu-ray disc or an AVCHD disc using video
and audio that is compatible with Blu-ray.
• Create Web Reference Movie: Compressor will create a reference movie that enables
a web browser and a server to automatically select the right movie for any device or
connection speed, without requiring the viewer to make a choice.
55Chapter 4 The Compressor Interface
Page 56

• Open with Application: Compressor will open the output media file with a specific
application.
• Publish to MobileMe: Compressor will create video files suitable for viewing on
MobileMe and upload them to a MobileMe account.
• Run Automator Workflow: This option opens a dialog for you to locate and select an
Automator script which Compressor will execute automatically on completion of the
transcoding job.
• Upload toYouTube: Compressor will create a video file suitable for viewing on YouTube
and upload it to a YouTube account.
About the Settings Panes
When you select a setting in the Settings tab or a target in a batch’s job, the Inspector
shows one of six panes.
Summary Pane
The Summary pane contains the Summary table, which describes all the settings (video
and audio settings, geometry, and filter settings) associated with the setting selected in
the Settings tab. Information in the Summary table is updated automatically whenever
any setting is modified.
The Summary table includes the following details.
• Name: The name of the setting selected in the Settings tab.
• Description: A description of the setting selected in the Settings tab.
• File Extension: The extension assigned to the transcoded media file. This identifies which
format your source media file is being converted to.
56 Chapter 4 The Compressor Interface
Page 57

• Estimated filesize: When assigned to a source media file, this shows the estimated total
file size. When not assigned to a source media file, this shows an estimated size per
hour of source media.
Note: The estimated total file size is not available for all output formats.
• Audio Encoder: Details of the audio output file format and other transcoding settings,
such as sample rate, channels, bits per sample, and codec type.
• Video Encoder: Details of the video output file format and other transcoding settings
such as frame width and height, crop amount (in pixels), frame rate, aspect ratio, codec
type, pixel depth, spatial quality, minimum spatial quality, key frame interval, temporal
quality, minimum temporal quality, and data rate (in bits per second).
• Filter: Details of all, some, or none (depending on how many filters you selected in the
Filters pane) of the available Compressor filters.
Encoder Pane
You use the Encoder pane to select and configure the output file format and other settings.
The file format options and attributes are different for each format.
• File Format: Use this pop-up menu to choose an output file format. See Choosing an
Output Format for more information on the available output formats.
• File Extension field: The following file extensions automatically appear in this field based
on the format you choose from the File Format pop-up menu, and if video and audio
tracks are enabled. Don’t alter this field without good reason, because your file may
not be recognized if you do.
• aiff: Represents AIFF.
• ac3: Represents Dolby Digital Professional.
• dv: Represents Digital Video (DV) format video.
57Chapter 4 The Compressor Interface
Page 58

• mpg: Represents MPEG-1 multiplexed (video and audio) stream.
• m1v: Represents MPEG-1 video elementary stream.
• m1a: Represents MPEG-1 audio elementary stream.
• m2v: Represents MPEG-2 video elementary stream.
• m2t: Represents MPEG-2 transport stream.
• mpeg: Represents MPEG-2 program stream.
• m4v: Represents H.264 for Apple Devices.
• mp4: Represents MPEG-4.
• mov: Represents QuickTime and H.264 for DVD Studio Pro.
• tga: Represents TARGA.
• tiff: Represents TIFF.
• Allow JobSegmenting: This checkbox allows you to turn off job segmenting. It is relevant
only if you are using Compressor with distributed processing and with two–pass or
multi-pass encoding. (The Compressor distributed processing feature is limited to
computers that have either Final Cut Studio or DVD Studio Pro installed.) For more
information, see Job Segmenting and Two-Pass or Multi-Pass Encoding.
Frame Controls Pane
This pane of the Inspector offers automatic and customized settings for advanced image
analysis in frame resizing and frame retiming.
Frame resizing would be necessary when transcoding between a high definition format
such as 1080i and a standard definition format such as DV-NTSC. An example of frame
retiming would be when transcoding between video formats with different frame rates
such as NTSC (29.97 frames per second) and PAL (25 frames per second). For more
information about the Frame Controls pane, see About the Frame Controls Pane.
58 Chapter 4 The Compressor Interface
Page 59

Filters Pane
You use the Filters pane to add filters to your setting. You can perform tasks such as
gamma correction and noise removal from here.
Select the checkbox next to any of the filters you want to include in a particular setting.
Use each filter’s sliders or arrow controls to adjust your filter settings as necessary.
Filters are applied to the source media file in the order you organize them in the Filters
list. You can reorder filters by dragging them up or down in this list.
For more information about the Filters pane, see About the Filters Pane.
Geometry Pane
You use the options in the Geometry pane to crop and size the media file being
compressed and set its aspect ratio.
59Chapter 4 The Compressor Interface
Page 60

The Geometry pane has three sections:
• Source inset(Cropping): Use any of the four fields to enter the number of pixels by which
you want to reduce the source media file size, or click the “Automatically detect crop
settings for letter-box” checkbox to have Compressor enter crop values based on the
source media file video content.
• Dimensions (encoded pixels): Use the Frame Size pop-up menu or these fields to create
an appropriate output frame size and aspect ratio for your output media file. Use the
Pixel Aspect pop-up menu to set width and height values to conform to a designated
pixel aspect ratio.
• Output image inset (Padding): Use the Padding pop-up menu to calculate the output
height or width values. With Custom selected, you can enter values in the fields.
For more information about the Geometry pane, see Adding Geometry Settings.
Actions Pane
You use the Actions pane to activate transcode-completion notificationemails and execute
post-transcoding AppleScript actions.
• “Email Notification to” checkbox and field: Use to enter the address to which you want
an email notification sent after the media file has been transcoded, or in the event of
an error.
• “Execute AppleScript on output”checkbox: Select this checkbox to activate any AppleScript
you have assigned to the setting after the media file has been transcoded.
• Choose button: Click to select the AppleScript you want to assign to the setting.
• Default Destination: Choose a destination from the pop-up menu that you want this
setting to use as its default.
For more information about the Actions pane, see Adding Actions.
60 Chapter 4 The Compressor Interface
Page 61

History Window
The History window gives you quick access to and some information about previously
submitted batches. You can use this window to pause a transcoding operation, resubmit
batches by dragging them to the Batch window, or view submission details about
particular batches. You can also use it to locate the output media files from previously
submitted batches.
The History window also contains a progress bar that you can use to monitor the status
of previously submitted batches.
To open and close the History window
Do one of the following:
Choose Window > History (or press Command-1).
µ
Click the History button in the Batch window toolbar.
µ
Note: The History window automatically opens if it is closed when you submit a batch
for transcoding.
The History window contains entries that display information about the batch name and
the date and time it was originally transcoded. The entries are ordered by date, with the
oldest first. When you drag a batch into the Batch window for resubmission, anew untitled
batch is created for it (any existing batches are unaffected).
For more information about the controls and settings in the History window, see About
the History Window.
Preview Window
The Preview window consists of a split screen that displays your selected source media
file in its original form on the left side, and what your output media file will look like on
the right side. This allows youto make a comparison between the original and transcoded
versions and adjust your settings as necessary. Using the options in this window, you can
crop the frame, add key frames, and change the aspect ratio.
To open the Preview window
Do one of the following:
Choose Window > Preview (or press Command-2).
µ
61Chapter 4 The Compressor Interface
Page 62

Click the Preview button in the Batch window toolbar.
Marker pop-up menu
button
µ
The Preview window has additional features, including a marker management pop-up
menu. The marker management pop-up menu allows you to import chapter lists or
manually add chapter (and podcast) markers and compression markers (to improve the
compression quality of your media file). You can also view Edit/Cut compression markers
that were generated in other applications such as Final Cut Pro. If you are sending a
Final Cut Pro project to Compressor, these settings or markers are transferred with your
project. These markers are also exported to DVD Studio Pro. See Working with MPEG-2
I-Frames and More About GOPs and Markers for more information.
For more information about the controls and settings in the Preview window, see About
the Preview Window.
62 Chapter 4 The Compressor Interface
Page 63

Batch Monitor
You use Batch Monitor to monitor the progress of all transcoding batch activity, including
estimates for the transcoding time remaining for all jobs. Batch Monitor is a separate
application that can be opened without opening Compressor. For more details on
Batch Monitor, see the Batch Monitor User Manual.
To open Batch Monitor
Do one of the following:
Click the Batch Monitor button in the Batch window toolbar.
µ
Double-click the Batch Monitor icon in the Utilities folder.
µ
You can also set Compressor preferences so that Batch Monitor opens automatically when
you submit a batch. See Setting Compressor Preferences for more information.
Batch Monitor displays the status of all your submitted batches, including each batch’s
name and other details. You can view reports for both successful and failed jobs in
Batch Monitor as well as the History window.
For more information about the controls and settings in Batch Monitor, see the
Batch Monitor User Manual.
63Chapter 4 The Compressor Interface
Page 64

Droplet Windows
Drag selected source
media files to a Droplet
to transcode them.
You can save one or more settings or groups of settings into a Droplet, a standalone
preset, packaged into a drag-and-drop application and saved as an icon. Then you can
transcode source media files (without even opening Compressor) by simply dragging
them to a Droplet icon. See Using Droplets for information on creating and using Droplets.
You can open any Droplet and view its window for full details about the Droplet.
To open a Droplet window
Double-click a Droplet icon.
µ
For more information about the controls and settings in the Droplet window, see About
the Droplet Window.
About Changing Values and Timecode Entries
Compressor includes several types of value entry methods. Most of them have features
that can make changing the values or timecode fields much easier.
64 Chapter 4 The Compressor Interface
Page 65

Using Value Sliders
Value slider with
combined slider and
numeric entry field
Separate slider and
numeric entry field
There are two methods used to enter general numeric values: traditional sliders with
separate numeric entry fields and value sliders that combine the slider with the numeric
entry field.
Value sliders allow you to enter a specific number in the value field or to drag in the value
field to set a value. When using the value sliders, you can use a modifier key to make
normal, small, or large valueadjustments. Dragging in the middle area (where the number
is) works the same as an ordinary slider; dragging to the right increases the value and
dragging to the left decreases the value. Additionally, you can click the right or left arrow
to change the value one step at a time. You can also double-click the number itself and
type a new number to enter a specific number in the value field.
To change values in normal increments
Do one of the following:
Drag left or right in the value field.
µ
Click the left arrow to decrease a value, or click the right arrow to increase a value.
µ
If you have a three-button mouse with a scroll wheel, click in the value field and use the
µ
scroll wheel on the mouse.
To change values in fine increments
Do one of the following:
Option-drag in the value field.
µ
Option-click the left arrow to decrease a value, or Option-click the right arrow to increase
µ
a value.
If you have a mouse with a scroll wheel, Option-scroll in the value field.
µ
To change values in coarse increments
Do one of the following:
Shift-drag in the value field.
µ
Shift-click the left arrow to decrease a value, or Shift-click the right arrow to increase a
µ
value.
If you have a mouse with a scroll wheel, Shift-scroll in the value field.
µ
When a value slider or value field is active (highlighted), press Tab to move to the next
field.
65Chapter 4 The Compressor Interface
Page 66

Using Timecode Value Sliders
Compressor uses timecode value sliders for all timecode entry fields. In addition to being
able to enter timecode values directly, you can “scrub” the timecode value by dragging.
If you place the pointer over a segment of the timecode, small arrows appear above and
below that segment.
You can drag up or to the right to increase the value in that segment (values in segments
to the left will also increment if your dragging causes the selected segment to roll over).
Dragging to the left or down decreases the value. You can hold down the Option key to
make the value changes slower, or the Shift key to make them faster.
Alternatively, you can click the up and down arrows on each side of the timecode value
or press the keyboard’s Up Arrow and Down Arrow keys to increase or decrease the
timecode value.
You can control which segment is affected by the up and down arrows by selecting a
segment so that a caret appears below the segment. You can also use the keyboard’s
Left Arrow and Right Arrow keys to select other segments.
Keyboard Shortcuts
For complete lists of Compressor keyboard shortcuts, see General Compressor
Keyboard Shortcuts and Preview Window Keyboard Shortcuts.
66 Chapter 4 The Compressor Interface
Page 67

Setting Compressor Preferences
5
You can use Compressor preferences to configure many aspects of Compressor.
This chapter covers the following:
• About Compressor Preferences (p. 67)
• Using Compressor Preferences (p. 70)
About Compressor Preferences
Use the Compressor Preferences window to configure a variety of Compressor controls.
The Compressor Preferences window contains the following controls.
Compressor Preferences Details
• Email Address field: Use this field to enter the default email address for email notification.
67
Page 68

• Outgoing Mail Server field: For more information about email notification, see Working
with Post-Transcoding Actions.
• “Auto launch Batch Monitor” checkbox: Use this checkbox to control whether
Batch Monitor automatically opens when you submit a batch.
• “Autolaunch Content Agent” checkbox: Use this checkbox to control whether theContent
Agent opens automatically when the computer is started.
Content Agent is a background process that Compressor uses to transfer source files
to other nodes in an Apple Qmaster cluster and to receive the transcoded files back
from those nodes. Generally, Content Agent is not needed until you are ready to submit
a batch using distributed processing. There may be times, however, when having the
Content Agent open automatically when the computer starts can help a transcode
process.
For example, if a computer loses power and automatically restarts while a large batch
is being processed, having Content Agent restart can automatically get the transcode
process to resume running.
• “Quit after submitting batches from other applications” checkbox: Use this checkbox to
control whether Compressor quits once a batch has been submitted.
• “Display job thumbnails” checkbox: Use this checkbox to control whether thumbnail
images are displayed for jobs in a batch.
• Cluster Options pop-up menu: Choose one of the following to control cluster options
(for distributed processing scratch storage settings).
• Copy Source to Cluster as Needed: Instructs Compressor to copy source files to a
cluster’s scratch storage location as needed.
• Always Copy Source to Cluster: Requires Compressor to always copy source files to a
cluster’s scratch storage location.
• Never Copy Source to Cluster: Prevents Compressor from copying source files.
• Never copy files to/from server: Prevents Compressor from copying any files. Either all
the files are in the correct locations, or the batch fails.
• “Copy at submission (high priority)” checkbox: Use this checkbox to control whether
Compressor transfers Source files to the processing cluster immediately.
• Default Settingpop-up menu: Use the Default Setting pop-up menu to choose from the
list of existing settings.
• Default Destination pop-up menu: Use the Default Destination pop-up menu to choose
from the list of existing destinations.
• ForNew Batches buttons: Choose one of the following options forsetting the Compressor
startup screen.
• Show Template Chooser: Compressor opens with the Batch Template Chooser on
startup.
68 Chapter 5 Setting Compressor Preferences
Page 69

• Show Blank Template: Compressor opens with an empty untitled batch with a
placeholder job.
• “Enter IP addresses or ranges for manually selected computers” table: This table displays
information about remote host computers.
• Add/Remove button: Use this button to add or remove information about remote host
computers.
Remote Computer Address Dialog
The remote computer address dialog is displayed when youclick the Add/Remove button
in the main Compressor Preferences dialog. Use thisdialog to enter IP addresses or ranges
for manually selected computers.
This dialog contains the following controls:
• Host/Host IP Address Range buttons: These buttons control whether this dialog is in IP
Address mode (in which you enter a specific address) or IP Address Range mode (in
which you enter a range of addresses).
• Host: Use this mode to enter a host name and IP address for a specific remote
computer.
• Host IP Address Range: Use this mode to enter a name and set of range numbers
(Range From, Range To) for a range of remote IP addresses.
69Chapter 5 Setting Compressor Preferences
Page 70

Using Compressor Preferences
Follow the instructions below to set Compressor preferences.
To open Compressor preferences
Choose Compressor > Preferences, or press Command-Comma (,).
µ
The Preferences window appears.
To configure the email notification preference
1 Enter the default email address to use when email notification is activated.
You can change this address in the Actions pane of the Inspector window.
2 Enter the mail server used by this computer for outgoing email.
For more information about email notification, seeWorking with Post-Transcoding Actions.
To set whether or not Batch Monitor automatically opens
Do one of the following:
Select the “Auto launch Batch Monitor” checkbox to have Batch Monitor automatically
µ
open when you submit a batch.
Deselect the “Auto launch Batch Monitor” checkbox to prevent Batch Monitor from
µ
automatically opening. You can still manually open Batch Monitor from the Batch window.
70 Chapter 5 Setting Compressor Preferences
Page 71

To control whether Content Agent automatically opens
Do one of the following:
Select the “Auto launch Content Agent” checkbox to have Content Agent open
µ
automatically when the computer is started.
Deselect the “Auto launch Content Agent” checkbox to have Content Agent not open
µ
until Compressor is opened.
Content Agent is a background process that Compressor uses to transfer source files to
other nodes in an Apple Qmaster cluster and to receive the transcoded files back from
those nodes. Generally, Content Agent is not needed until you are ready to submit a
batch using distributed processing. There may be times, however, when having the
Content Agent open automatically when the computer starts can help a transcode process.
For example, if a computer loses power and automatically restarts while a large batch is
being processed, having Content Agent restart can automatically get the transcode
process to resume running.
To control whether Compressor remains running after a batch has been submitted
through it by another application (such as Final Cut Pro)
Do one of the following:
Select “Quit upon submitting batches from other applications” to have Compressor quit
µ
once the batch has been submitted.
Deselect “Quit upon submitting batches from other applications” to have Compressor
µ
continue running once the batch has been submitted.
To control whether thumbnail images are displayed for each job in a batch
Select “Display job thumbnails” to have Compressor display the images.
µ
Deselect “Display job thumbnails” to have Compressor not display the images.
µ
To control cluster options (for distributed processing scratch storage settings)
1 Click the Cluster Options pop-up menu.
2 Choose one of the following.
• Copy Source toCluster asNeeded: Instructs Compressor to copy source files to a cluster’s
scratch storage location as needed.
• Always Copy Source to Cluster: Requires Compressor to always copy source files to a
cluster’s scratch storage location.
• Never Copy Source to Cluster: Prevents Compressor from copying source files.
• Never copy files to/from server: Prevents Compressor from copying any files. Either all
the files are in the correct locations, or the batch fails.
71Chapter 5 Setting Compressor Preferences
Page 72

To control whether Compressor transfers Source files to the processing cluster
immediately
Do one of the following:
Select “Copy at submission (high priority)” to have Compressor transfer source files
µ
immediately.
Deselect “Copy at submission (high priority)” to prevent Compressor from transferring
µ
source files immediately.
To control the default setting
Use the Default Setting pop-up menu to choose from the list of existing settings.
µ
The setting you choose appears as the default setting when you import a new source file
in the Batch window.
To change the default destination
Use theDefault Destination pop-up menu to choose from the list of existing destinations.
µ
The destination you choose appears as the default destination when you import a new
source file in the Batch window.
To control whether Compressor displays the Batch Template Chooser on startup
Select Show Template Chooser to display the Batch Template Chooser on startup.
µ
Select Use Blank Template to not display the Batch Template Chooser on startup.
µ
To enter IP addresses or ranges for remote host computers
1 Click Add (+) at the bottom of the Compressor Preferences dialog.
The host address dialog appears.
2 In the host address dialog, do one of the following:
• Select Host, complete the Host Name and IP Address fields, and click Add Host.
• Select “Host IP address range,” complete the Range fields, and click Add Range.
The hosts or host ranges appear in the Host table in the main Preferences dialog.
72 Chapter 5 Setting Compressor Preferences
Page 73

Important: Any changes you make to the Compressor preference settings take effect
only when you click OK. If you make changes but decide not to use them, click Cancel.
73Chapter 5 Setting Compressor Preferences
Page 74

Page 75

Jobs area
Toolbar
Batch tabs
Batch status
Batch submission button
Show/hide
toolbar button
Currently selected
batch name
Importing Source Media Files
6
The first step in the traditional Compressor transcoding process is to import at least one
source media file into the Batch window.
Note: If you are using the batch template workflow, the first step would be to choose a
batch template. For more information about the simple batch template workflow, see
Quick and Easy Compressor Workflow: Batch Template Method.
This chapter covers the following:
• About the Batch Window (p. 75)
• Adding Source Media Files to a Batch to Create Jobs (p. 77)
• Using the Inspector with Source Media Files (p. 86)
• Tips on Importing Source Media Files (p. 89)
About the Batch Window
The Batch window provides a central location for organizing your transcoding tasks and
quickly assigning settings. When you first open Compressor, an untitled Batch window
appears. Think of batches as documents that can be saved, closed, and opened again.
You use the toolbar at the top of the Batch window to open all other task windows.
75
Page 76
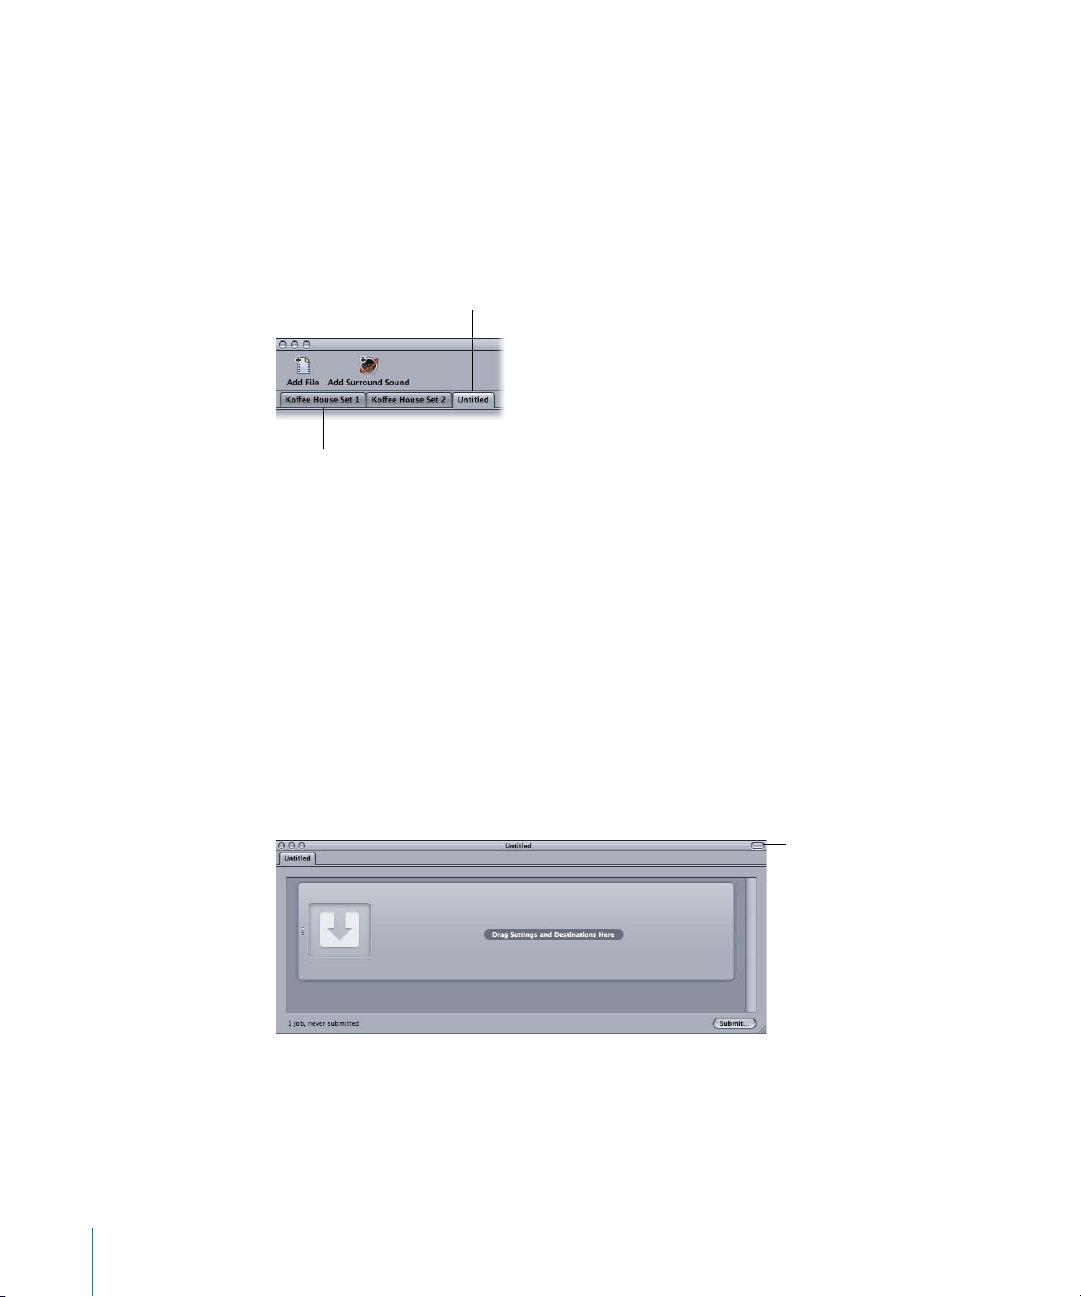
General Batch Window Information
Each tab is for
a different batch.
The new batch’s tab
Show/hide toolbar
button (with the toolbar
hidden in this example)
Batches are the heart of your Compressor workflow, and the Batch window is where you
work with the batches. The Batch window supports having multiple batches open at
once, showing them as separate tabs.
To create a new batch
Choose File > New Batch (or press Command-N).
µ
A new untitled batch is added to the Batch window.
See Saving and Opening a Batch File for more information about batch files.
You can even have multiple Batch windows open, with each containing a different batch,
by dragging a batch’s tab to a new location. See About the Tabs for information on
dragging tabs to open or close additional Batch windows.
The Batch window has a Submit button, located in the lower-right corner, that you can
use to begin transcoding the currently selected batch. The lower-left corner shows the
status of the current batch (how many jobs itcontains and whether it has been submitted).
About the Batch Window Toolbar
The Batch window has a customizable toolbar along its top. You can choose whether to
show or hide the toolbar by clicking the button in the window’s upper-right corner.
You can choose to have a variety of items in the toolbar, such as items to open, save, or
close a batch. See Customizing the Toolbar for details on the items you can add and how
76 Chapter 6 Importing Source Media Files
to add them.
Page 77

Adding Source Media Files to a Batch to Create Jobs
Untitled batch tab
Empty batch area with
a placeholder job
You need to import the source media files into the batch in the Batch window before
you can add any transcoding settings to them. Once they are imported into the batch,
the source media files create a job, which is the first step to getting the files transcoded.
There are special methods to use when importing surround sound source media files.
Adding Standard Source Media Files to Batches
Following are the details for adding standard (non–surround sound) source media files
to a batch.
To add source media files to a batch
1 Open Compressor.
The Batch window opens with an empty batch tab named Untitled.
2 Do one of the following:
• Choose Job > New Job With File (or press Command-I), navigate to the relevant media
file folder, select one or more source media files, and then click Open.
Note: Choose Job > New Job With Surround Sound Files (or press Command-Control-I)
to create a new job using a set of audio files for surround sound output. See Adding
Image Sequences to Batches for more information.
• Click the Add File button (in the Batch window toolbar, if visible), navigate to the
relevant media file folder, select one or more source media files, and then click Open.
• Control-click an empty area of the batch and choose New Job With File from the shortcut
menu. You can then navigate to the relevant media file folder, select one or more
source media files, and then click Open.
77Chapter 6 Importing Source Media Files
Page 78

• Open your source media file folder and drag one or more source media files into the
batch.
Note: You can combine the above steps by selecting all the source media files you want
to transcode before opening Compressor and then dragging them to the Compressor
application icon. This opens Compressor and adds the media files to the default untitled
batch at the same time.
3 Save the batch by choosing File > Save As (or pressing Command-Shift-S).
4 Enter a name for the batch and choose the location where you want to save it in the
dialog that appears.
5 Click Save when done.
The tab in the Batch window changes to match the name of the file.
Note: If your Finder preferences are set to show the extensions,the extension .compressor
appears in the tab along with the name.
You are not actually required to name and save your batches, and for quick jobs you
might decide not to. However, naming and saving a batch makes it easy to go back and
resubmit it later if you find that the output files were not as expected or if your needs
change. It also makes it easier to figure out what is in the History window and in
Batch Monitor if you submit multiple batches in a short period of time.
78 Chapter 6 Importing Source Media Files
Page 79

The batch now contains your selected media files, each in its own job. Source media files
Drag the slider to scroll
through video files.
Click anywhere in the job
to see this file’s attributes
in the Inspector window.
Each source media
file creates a job.
The targets for this job
will appear in this area.
with video content also include a thumbnail image and a scroller that you can use to
scroll through the video.
You can change the source media file assigned to a job.
To change the source media file assigned to a job
1 Select the job for which you want to change the source media file.
2 Do one of the following:
• Choose Job > Source > File, navigate to the relevant media file folder, select one or
more source media files, and then click Open.
• Control-click the job and choose Source from the shortcut menu. Youcan then navigate
to the relevant media file folder, select one or more source media files, and then click
Open.
• Drag a new source media file to the job.
Any targets you had already configured remain and are now applied to the new source
media file. You can also remove a source media file from a job if needed.
To remove a source media file from a job
Control-click the job and choose Clear Source from the shortcut menu.
µ
To remove a job from a batch
Do one of the following:
Select the job and press Delete.
µ
Control-click in an empty part ofthe batch and choose Remove All Jobsfrom the shortcut
µ
menu.
79Chapter 6 Importing Source Media Files
Page 80

These jobs are now ready to have a target added to them. Targets include the settings
and destinations required to make this a job that you can submit for transcoding. See
Finalizing Jobs and Submitting Batches for information on adding targets to jobs. Also
see Creating, Previewing, and Modifying Settings for information on how to create your
own settings.
Adding Surround Sound Source Media Files to Batches
There are two methods you can use to add audio files to a batch to create a surround
sound job: an automatic method that relies on file naming to map the audio files to the
proper channels and a manual method that allows you to manually assign the audio files
to the channels.
Each method results in ajob to whichyou can add a setting that supports surround sound
audio outputs, such as Dolby Digital Professional, AIFF, and several audio codecs in the
QuickTime Movie output format.
Important: Some of the output formats have multiple configurations for the surround
sound audio channels. Be sure you know which configuration your intended playback
device requires. For example, the AIFF output format provides fourdifferent configurations
for 5.1 (six-channel) audio outputs, with the difference being the order of the channels.
Assigning Files to Surround Sound Channels (Automatic Method)
Compressor offers some streamlined channel assignment techniques that can save you
time.
To assign files to surround channels with channel identifier codes
1 Append the channel identifier code of the target surround channel to the filename of
each source audio file. (See the list below for the appropriate channel identifier codes.)
• -L: Left front channel
• -R: Right front channel
• -C: Center front channel
• -Ls: Left surround channel
• -Rs: Right surround channel
• -S: Center surround channel
• -LFE: Low frequency channel (Subwoofer, LFE)
For example, to assign an AIFF file to the left surround channel, rename the file as
filename-Ls.aiff (where filename is the name of your file). (The channel identifier codes
must include the hyphen, as shown.)
Note: Mac OS X may add a file extension like .aiff. This will not interfere with this channel
assignment method.
80 Chapter 6 Importing Source Media Files
Page 81

This procedure works only when you drag and drop files into the Batch window. If you
drag the files onto the Compressor application icon, they will appear as separate source
files, each in its own job.
Note: If you are creating Dolby Digital Professional (AC-3) surround sound streams, you
will not use all the channels listed in the table at once. See Audio Tab Settings for a
diagram of the Dolby audio coding modes.
2 Drag the renamed source audio files to the Batch window.
If the following conditions are met, Compressor automatically collapses the entire group
of files into what appears as a single surround source media file in the Batch window:
• The files in the group must be named correctly. (See the list in the previous step.)
• The total number of files in the group must be fewer than seven.
Assigning Files to Surround Sound Channels (Manual Method)
Follow these steps to use the manual method for assigning individual audio files to
surround sound channels.
To manually assign source audio files to channels of a surround sound stream
1 Do one of the following to import the source audio files:
• Choose Job > New Job With Surround Group (or press Command-Control-I).
• Click the Add Surround Sound button in the Batch window.
• Control-click in the batch and choose New Job With Surround Group from the shortcut
menu.
The channel assignment interface opens.
2 Do one of the following to assign a source audio file to a particular channel:
• Drag the source audio file from the Finder to the icon fora specific channel (for example,
“L”).
• Click the icon for a specific channel (for example, “L”) and use the Open dialog to locate
the source audio file intended for that channel.
81Chapter 6 Importing Source Media Files
Page 82

The file is now assigned to the “L” (Left Front) Channel.
3 Repeat step 2 for each of the source audio files that you intend to include in the surround
stream.
Note: If you are creating Dolby Digital Professional (AC-3) surround sound streams, you
will not use all the channels listed in the table at once. See Audio Tab Settings for a
diagram of the Dolby audio coding modes.
4 When you have finished adding source audio files to the channel assignment interface,
click OK.
The group of surround files appears as a single surround source media file job in the
Batch window.
82 Chapter 6 Importing Source Media Files
Page 83

About Surround Sound Jobs
Click a channel’s icon to
change the file assigned
to that channel.
Once you have created a surround sound job, the batch window shows the surround
sound icon in the source media file thumbnail and the Inspector window shows the
channels and their assigned files.
You can change any of the file assignments in the Inspector window.
To change a surround sound file assignment
1 Click the speaker icon of the channel you want to change.
A file selection dialog opens.
2 Locate the file to assign to that channel and click Open.
See Creating Dolby Digital Professional Output Files for information on creating Dolby
Digital Professional output files. See the Soundtrack Pro User Manual for comprehensive
information about creating surround sound audio files. If you are planning to make DVDs
using DVD Studio Pro, see the DVD Studio Pro User Manual for more information about
the DVD authoring workflow.
83Chapter 6 Importing Source Media Files
Page 84

Adding Image Sequences to Batches
Untitled batch tab
Empty batch area with
a placeholder job
You can import a sequence of still images into Compressor as a single image sequence
job and then apply an output frame rate and an audio file to the job. From that point,
you treat the job as you do any other Compressor source media file, adding settings,
destinations, filters, and post-transcoding actions to create an output media file with the
desired video and audio formats and characteristics.
To add a still image sequence job to a batch
1 Open Compressor.
The Batch window opens with an empty batch tab named Untitled.
Note: If the Batch Template Chooser opens automatically, click Cancel to close the Batch
Template Chooser. To prevent the Batch Template Chooser from opening when you open
Compressor, click the “Don’t show this dialog again” checkbox, or, in Compressor
Preferences, choose For New Batches: Show Blank Template.
2 Do one the following:
• Click the Add Image Sequence button and navigate to the folder containing the image
sequence files you want to import.
• Choose Job> New JobWith Image Sequence (orpress Command-Option-I) and navigate
to the folder containing the image sequence files you want to import.
3 Select the folder containing the image sequence files you want to import.
4 Click Open.
84 Chapter 6 Importing Source Media Files
Page 85

The new job appears in the Batch window.
5 Select the job in the Batch window.
The Inspector window displays the A/V Attributestab containing information and controls
for the new image sequence job.
6 Do any of the following:
• Confirm the selected image sequence files. (Click the Info (i) button for the complete
list of files.)
• Confirm the video format information in the Video section.
• Use the Native Field Dominance pop-up menu to adjust the field dominance for the
source files. (The choices are Progressive, Top First, and Bottom First.)
• Use the Frame Rate pop-up menu to adjust the frame rate for the source files by
choosing from a list of standard frame rates.
• Click Choose Audio to locate, select, and add an audio file to the image sequence job.
Note: Compressor supports the following audio file types for image sequences: AIFF,
MP3, MPEG-4 audio-only (.m4a), and QuickTime movie (.mov).
85Chapter 6 Importing Source Media Files
Page 86

Note: You can also use Compressor to output an image sequence. For more information,
see Creating Image Sequence Output Files.
Using the Inspector with Source Media Files
When you select a batch’s job, the Inspector window shows you information about the
job’s source media file.
The Inspector window contains three tabs: A/V Attributes, Additional Information, and
Job Action.
A/V Attributes Tab
The A/V Attributes tab contains general information about the source media file and is
divided into three sections.
• File information: This section shows the filename, location, and type of file.
• Video information: This section, when applicable, shows all video-related information
about the file. This includes its frame size, frame rate, and timecode information.
• Audio information: This section, when applicable, shows all audio-related information
about the file. This includes its sample size and sample rate.
86 Chapter 6 Importing Source Media Files
Page 87

Additional Information Tab
The Additional Information tab allows you to see and modify a variety of metadata items
that might have been added in other applications such as Final Cut Pro or QuickTime. It
also includes the ability to associate a closed caption file with the file.
To associate a closed caption file with a job’s source media file
1 Click the job to show the source media file’s attributes in the Inspector window.
2 Click the Additional Information tab.
3 Click Choose, locate the closed caption file (must be a Scenarist closed caption format
file, usually with an .scc file extension), and click Open.
Note: Closed caption data is supported by the H.264 for Apple Devices, MPEG-2, and
QuickTime Movie output formats.
Depending on the output format of the job’s target, Compressor applies the closed
caption file to the output media files.
• For QuickTime outputs: Compressor adds the closed caption file as a closed caption
track to the QuickTime output file. You can view the closed captions using
QuickTime Player (version 7.2 or later).
• For MPEG-2elementary stream outputs: Compressor embeds the closed caption data in
an elementary MPEG-2 video stream so that it can be used for DVD authoring.
DVD Studio Pro will retain this closed caption data when the video stream is used in a
track in a standard definition NTSC DVD project. You can use Apple DVD Player to play
the DVD Studio Pro build files and verify that the closed caption data is present.
• For MPEG-2 program and transport stream outputs: Compressor embeds the closed
caption data in program andtransport MPEG-2 streamsusing the EIA-708ATSC protocol.
87Chapter 6 Importing Source Media Files
Page 88

Important: The timecode values in the closed caption file must directly relate to the
timecode of the source media file. You can open a closed caption file in TextEdit to see
the timecode values it contains (the actual text is encoded and cannot be read this way).
To add an annotation
1 Click the job to show the source media file’s attributes in the Inspector window.
2 Click the Additional Information tab.
3 Use the Add Annotation pop-up menu to choose the type of annotation.
4 Double-click the corresponding Value field and enter the annotation text.
5 Click Save.
Note: This Add Annotation feature is supported by the H.264 for DVD Studio Pro, H.264
for Apple Devices, MP3, and QuickTime Movie output formats.
88 Chapter 6 Importing Source Media Files
Page 89

Job Action Tab
The Job Action tab allows you to apply and/or adjust post-transcoding actions to entire
jobs.
For complete details on using the Job Action tab, see Adding Job Actions and Job Action
Tab.
Tips on Importing Source Media Files
Here are some additional tips on importing source media files.
Highly Compressed Source Files
It is strongly recommended that you do not use highly compressed source files, such as
MPEG files, as your source files, because they can cause undesirable artifacts inthe encoded
video.
QuickTime Reference Movies
If you submit a reference movie for distributed processing, the Apple Qmaster distributed
processing system will automatically copy the appropriate media files to the processing
cluster. For the best performance, you can avoid this file transfer step by making sure
that the media files specified in the reference movie are available to each node of the
Apple Qmaster cluster. For more information, see the Distributed Processing Setup Guide,
available in Compressor Help, and Exporting from Final Cut Pro and Distributed Processing.
89Chapter 6 Importing Source Media Files
Page 90

Importing MPEG-2 Files
When you import an MPEG-2 file, Compressor must parse the file before you can play it
in thePreview window. Parsing the file involves determining its framestructure and other
necessary information about the file. Since the frame structure can change throughout
the file, Compressor must scan through the entire file, which can take several minutes
for longer files.
This does not happen with MPEG-2 elementary files encoded using Compressor that had
the “Add DVD Studio Pro metadata” checkbox selected. See Extras Tab for more
information.
About Dolby Digital Professional Source Media Files
You can use Dolby Digital Professional AC-3 audio files as source media files for your jobs.
There are two common reasons to want to do this.
• To test a file you just encoded: Since you cannot preview the Dolby Digital Professional
output settings, importing an encoded file into a job allows you to play it and verify
the settings.
• Toconvert aDolby Digital audiofile toanother format: Since not all media players include
Dolby Digital decoders, you may find that you need to transcode the file into another
format.
Compressor includes a Dolby Digital decoder that it uses wheneveryou play or transcode
Dolby Digital audio files. This makes it possible to verify the Dolby Digital Professional
output settings of a previously encoded file on your system without requiring you to
have an external Dolby Digital decoder. To hear surround sound youmust have an external
surround sound device connected to your computer’s USB or FireWire output. The audio
is mixed down to two channels if you play the audio using your system’s stereo speakers.
Important: Since the audio output is already decoded and not in the Dolby Digitalformat,
the optical output cannot be used when playing Dolby Digital files from Compressor.
Tip: Add an .ac3 extension to the filename if Compressor does not allow you to add it to
a job.
Automatic Values and Nonstandard QuickTime Files
Compressor uses a variety of tactics to determine the proper values for any settings that
are set to Automatic. In most cases, QuickTime files contain metadata that specify the
various attributes of the file, such as frame rate and frame size. In some cases, this metadata
is not present, forcing Compressor to try to determine this information, or it is incorrect,
causing Compressor to generate incorrect values for the Automatic settings.
Additionally, some QuickTime files use nonstandard settings that require Compressor to
choose an automatic value that may not be suitable.
90 Chapter 6 Importing Source Media Files
Page 91

For these reasons, it is a good idea to verify the values in the Inspectors for those settings
that are set to automatic. See About the Automatic Settings for more information.
91Chapter 6 Importing Source Media Files
Page 92

Page 93

Creating, Previewing, and Modifying Settings
A setting is a combination of transcode attributes, such as output format, filter, and
geometry settings, that you apply to the source media file as a part of the transcoding
process.
You need to assign at least one setting to a source media file before you can transcode
it. Once you have a source media file in the current batch in the Batch window, you can
either select a preexisting setting or create a customized one using the Settings tab.
Once you have all the settings that you think you need, you won’t have to open the
Settings tab again because you can select the settings directly from the Batch window.
Note: A setting is just one kind of Compressor preset. You can also create, modify, save,
or remove Destination presets. For more information on destinations, see Creating and
Changing Destinations.
This chapter covers the following:
• About the Settings Tab (p. 93)
• Using the Inspector with Settings (p. 97)
• Duplicating Settings (p. 98)
• Creating a Setting from Scratch (p. 100)
• Previewing a Setting (p. 101)
• Deleting Settings (p. 103)
• Creating Groups of Settings (p. 104)
7
• Distributing and Sharing Settings (p. 105)
• Example: Creating Custom Groups and Settings for DVD (p. 106)
About the Settings Tab
The Settings tab allows you to manage your settings. In conjunction with the Inspector
window, the Settings tab also provides details of all the settings and provides easy access
to common transcoding controls.
93
Page 94
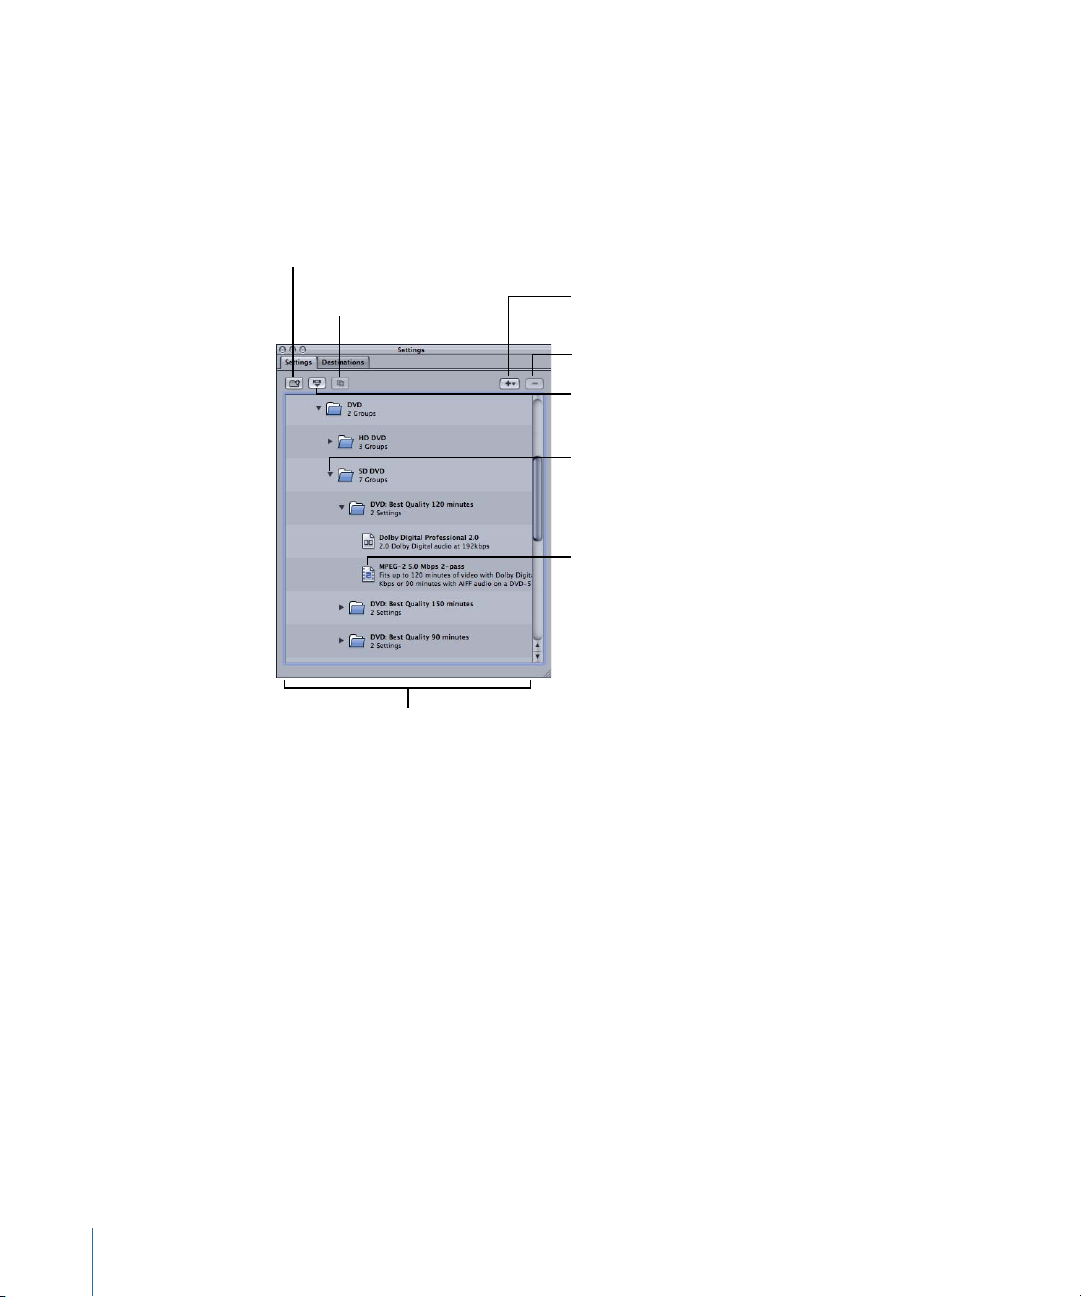
You usethe Settings tab (together with theInspector window) to create, modify, or delete
Duplicate Selected
Setting button
Settings list
“Create a New
Setting Group” button
An example setting
Click the disclosure
triangles to show
or hide a setting
group’s contents.
“Save Selection
as Droplet” button
Delete Selected
Settings button
“Create a New
Setting” button
settings, as well as create group folders for multiple settings. You can also create Droplets
from the Settings tab.
The Settings tab contains a list of the existing settings and the necessary buttons to add,
remove, or duplicate a setting and create groups and Droplets.
Settings Tab Buttons
The following buttons are located along the top of the Settings tab.
94 Chapter 7 Creating, Previewing, and Modifying Settings
• Create a New Setting Group: Click to create a folder where you can group existing
settings. Use this button as a way to organize your settings into some sort of logical
order, keeping the Settings tab easy to navigate. Once settings have been created, you
can assign a whole group of settings to a source media file (by dragging it onto the
source file in the Batch window) or youcan create a Droplet containing multiple settings.
See Creating Groups of Settings for more information.
• Save Selection as Droplet: Click to create a Droplet from an existing setting or group of
settings. Droplets allow you to transcode a media file by simply dragging one or more
source media files over the Droplet icon. Once you have selected your setting or group
and clicked the “Save Selection as Droplet” button, the Save dialog asks you to name
your Droplet, choose a location for it, and choose a destination folder for the relevant
output media files. Once you complete this dialog, your Droplet is ready and you can
drag as many files as you want to its icon. See Using Droplets for more information
about Droplets.
Page 95

• Duplicate Selected Setting: Click to duplicate a selected setting in the Settings tab. The
The Apple setting group
with subgroups
New “Untitled” setting
Duplicate button copies the exact settings of the setting currently selected in the
Settings tab. Using the Duplicate button allows you to create a new setting from a
preexisting one; you can then adjust that setting according to your needs, rather than
creating a new setting from scratch.
• Create a New Setting (+): Click to add anew setting to theSettings tab. A dialog appears
for you to choose an output file format (H.264 for Apple Devices, MPEG-2, MPEG-4, and
so on) when you click this button.
• Delete Selected Settings (-): Click to remove a setting from the Settings tab. You are not
asked for a confirmation, so be sure you want to remove the setting before clicking
this button.
Note: You cannot delete the Apple settings.
Settings List
When you first open the Settings tab it contains a set of preexisting (Apple) settings
supplied with Compressor. The Settings tab displays name and description details of all
existing settings and groups stored on your computer.
95Chapter 7 Creating, Previewing, and Modifying Settings
Page 96

New settings appear in the Custom group folder with the default name “Untitled [File
Click a setting to see it in
the Inspector window.
Enter the selected
setting’s name and
description in the
Inspector window.
Format]” with “[File Format]” being the file format you chose from the (+) pop-up menu.
It’s a good idea to change the setting name to something meaningful, such as details of
the settings or distribution method associated with the setting. Click the setting in the
Settings tab to open it in the Inspector window.
Use the Name field in the Inspector window to enter a name. Use the Description field
to enter more information about each setting. This information only appears within the
Settings tab and can help you keep track of your files when you have many settings.
You can also organize your settings by putting them in group folders. Once you have
created and nameda group folder, you can dragany existing custom setting into it. When
you drag a setting to a group, you remove it from its current location. You can also drag
individual settings from a group to a source media file. See Creating Groups of Settings
for more information.
96 Chapter 7 Creating, Previewing, and Modifying Settings
Page 97

Selecting a Target
Select a target in the
Batch window to see
its settings in the
Inspector window.
The setting’s name shows
as “Selected Target”.
Click the Save As button
to save this as a new
setting with any
changes you make.
Whenever you select a batch’s target, its setting immediately appears in the Inspector
window with Selected Target in the Name field. This is a temporary copy of the setting
and not the setting itself, so you can make temporary modifications to the setting for
just that one batch submission.
When you modify the target’s setting, the Save As button at the bottom of the Inspector
window becomes active. Click Save As to save the modified setting with a new name.
The saved copy appears in the Settings tab as Setting Name-Copy, and immediately
becomes the selected setting in the Settings tab.
Using the Inspector with Settings
The Inspector window contains the panes that let you create and modify all the settings
related to your output media file, such as filters, geometry, and output format. The
Inspector window is also where you name your settings, as well as add descriptions to
make it easier to remember later what you customized.
• Summary pane: Provides a detailed summary of a selected setting. See Summary Pane
for more information about this pane.
97Chapter 7 Creating, Previewing, and Modifying Settings
Page 98

• Encoder pane: Allows you to select an output file format and other related video and
audio settings. See the following specific sections for more information about the
different encoder panes.
• About the AIFF Encoder Pane
• About the Dolby Digital Professional Encoder Pane
• About the DV Stream Encoder Pane
• About the H.264 for Apple Devices Encoder Pane
• About the H.264 for DVD Studio Pro Encoder Pane
• About the Image Sequence Encoder Pane
• About the MPEG-1 Encoder Pane
• About the MPEG-2 Encoder Pane
• About the MPEG-4 Part 2 Encoder Pane
• About the QuickTime Movie Encoder Pane
• About the QuickTime Export Components Encoder Pane
• Frame Controls pane: Allows you to customize changes to the frame size, frame rate,
or field dominance. (See Working with Frame Controls for more information.)
• Filters pane: Allows you to add filters to your setting to enhance the quality of the
output files. (See About the Filters Pane for more information.)
• Geometry pane: Allows you to crop and set the frame size for your output media file.
(See Adding Geometry Settings for more information.)
• Actions pane: Allows you to execute AppleScripts and send email notifications. (See
Adding Actions for more information.)
Duplicating Settings
If there is a setting that contains some attributes that you want to use in another setting,
you can duplicate the existing setting and make the necessary modifications to the
duplicated one, rather than creating a new setting from scratch.Duplicating a stockApple
setting and then adjusting the duplicate to suit your needs is the most convenient way
to create custom settings.
To duplicate a setting
1 Select the setting that you want to duplicate in the Settings tab.
98 Chapter 7 Creating, Previewing, and Modifying Settings
Page 99

Select the setting
to be duplicated.
Click the Duplicate
Selected Setting
button to duplicate
the selected setting.
2 Click the Duplicate Selected Setting button.
A new setting appears in the Custom folder with the word Untitled appended before the
original name.
3 Select the new setting in the Custom folder.
4 Open the following Inspector panes to modify the following items:
• The setting name and description: Change the name and description to make it easy to
remember why you created this custom setting.
• Encoder pane: Change the output format and video and audio codecs and their
associated attributes here.
• Frame Controls pane: Change any attribute in the Frame Controls pane.
• Filters pane: Change any filter attributes here. Click the checkbox next to a filter to add
it to the setting, or deselect it to remove it from the setting.
• Geometry pane: Change any attribute in the Geometry pane.
• Actions pane: Change any attribute in the Actions pane.
5 If you have modified the setting in any way, you can do either of the following to save
the changes:
• Click the Save button at the bottom of the Inspector window to save the changes.
• Attempt to select any other setting.
A dialog asks if you want to save the changed attributes.
99Chapter 7 Creating, Previewing, and Modifying Settings
Page 100

6 Click OK to save the changes, or click Revert to cancel the changes and return to the
Inspector.
See Assigning Settings to Source Media Files for information about assigning settings.
Creating a Setting from Scratch
If the preexisting settings are not sufficient for your transcoding needs or if you simply
want additional settings, you can create your own.
Note: The recommended procedure for creating custom settings is to duplicate a stock
Apple settingand then adjustthe copy to suit your needs. For information onduplicating
settings, see Duplicating Settings.
To create a setting
1 Click the Add (+) buttonin the Settings tab and choose an output format from the pop-up
menu.
100 Chapter 7 Creating, Previewing, and Modifying Settings
 Loading...