

Page 1

3445#+67+89#$
Apple Confidential
:-(.#
!"#$%&'()*+%,-+)##.+&,+/),0
12,-&+3445#+67
!"#$%#&$&'($)*$&')+"$)#,#-./.*%
!"#$%%#&'#()*#%+$,*#-./#*0*/1()&23#1.4#5$2(#(.#5$(,)
6.4#7.28(#2**7#(.#2$0&3$(*#94+(&%+*#$%%'#5)*2#1.4#:4'(#5$2(#(.#5$(,)#!";
!)*#!"#$%%#&'#()*#-&/'(#%+$,*#(.#3.#(.#,.2(&24*#5$(,)&23#./#-&27
'.9*()&23#2*5;
!"#$%&'()'*+,$
Page 2

<(#()*#(.%#.-#()*#=$(,)#>.5#',/**2#&'#()*#?%#>*@(#/.5A#5)*/*#1.4#,$2
%&,B#4%#/&3)(#5)*/*#1.4#+*-(#.--#5$(,)&23#').5'#./#9.0&*'A#$27
Apple Confidential
$4(.9$(&,$++1#'**#2*5#*%&'.7*'#.-#1.4/#').5'#$'#()*1#C*,.9*#$0$&+$C+*;
6.4#7.28(#)$0*#(.#/*9*9C*/#5)&,)#*%&'.7*#1.48/*#.2#./#5)&,)#$%%#(.#4'*
D<%%+*#!"#B**%'#(/$,B#.-#$++#()$(#-./#1.4E#F&9%+1#'*+*,(#$#').5#&2#?%
>*@(A#./#%/*''#()*#F&/&#C4((.2#$27#'$1#GH+$1#I$9*#.-#!)/.2*';J#<%%+*#!"
$4(.9$(&,$++1#'($/('#()*#2*@(#425$(,)*7#*%&'.7*;
-$#.$'/#$0"1*2'/1$"'#'&1*23+'03104
!)*#!"#$27#9.0&*#/*,.99*27$(&.2'#&2#=$(,)#>.5#$/*#C$'*7#.2#5)$(
1.4#$+/*$71#.52#./#'4C',/&C*#(.;
=$(,)#>.5#&'#()*#%+$,*#(.#'**#5)$(8'#2*5#$27#%.%4+$/A#$27#*@%+./*#3/*$(
,.++*,(&.2'#)$27%&,B*7#C1#.4/#*@%*/('#$,/.''#()*#$%%'#1.4#4'*E
!.#+*$/2#9./*A#'**# ;
=$(,)#>.5
Page 3

5,)36.+'$"+'-$6.+
Apple Confidential
!)*#F(./*#').5,$'*'#$%%'#$27#'*/0&,*'#$0$&+$C+*#.2#<%%+*#!"#()$(#1.4
7.28(#)$0*#1*(#./#)$0*28(#1*(#'4C',/&C*7#(.#./#'&32*7#&2#(.;
!.#+*$/2#9./*A#'**# ;
>.(#$++#-*$(4/*'#$27#,.2(*2(#$/*#$0$&+$C+*#&2#$++#$/*$';# #&'#$0$&+$C+*#.2#&!42*';
L+$,B\&') H.5*/
H.5*/ I$9*#.-#!)/.2*'
.2#&!42*';# #K#QRST#X.9*#L.@#Y--&,*A#Z2,;#<++#/&3)('#/*'*/0*7;#XLY[#$27
/*+$(*7#'*/0&,*#9$/B'#$/*#()*#%/.%*/(1#.-#X.9*#L.@#Y--&,*A#Z2,;#=$(,)#!"#$%&'()#.2
XLY#>Y=#5&()#'4C',/&%(&.2;#XLY#>Y=[#&'#$,,*''&C+*#.2+1#()/.43)#%$/(&,&%$(&23
%$/(2*/'#&2#()*#?;F;#$27#,*/($&2#?;F;#(*//&(./&*';#M*/($&2#/*'(/&,(&.2'#$%%+1;#[#$27#K#QRST
X.9*#L.@#Y--&,*A#Z2,;#<++#/&3)('#/*'*/0*7;#XLY[A#XLY#>Y=[A#$27#/*+$(*7#,)$22*+'#$27
'*/0&,*#9$/B'#$/*#()*#%/.%*/(1#.-#X.9*#L.@#Y--&,*A#Z2,;
#K#<LM#N&'2*1;#=$(,)# #.2#F!<OP#5&()#'4C',/&%(&.2#./#$4()*2(&,$(&.2;
#K#QRST#F($/U#V2(*/($&29*2(A#WWM;#<++#/&3)('#/*'*/0*7;# #&'#$0$&+$C+*
I$9*#.-#!)/.2*'
F(./*
L+$,B\&')
!"#0#1/$'%$'22$3*0$)"')
?'*#1.4/#!"#-./#9./*#()$2#:4'(#!"
6.4#,$2#%+$1#3$9*'A#+*$/2#'.9*()&23#2*5A#3*(#-&(A#').%A#$27#9./*D
5&().4(#+*$0&23#1.4/#!"A#./#1.4/#F&/&#O*9.(*;
Page 4

761*'$"+'2#8+
Apple Confidential
]&27#()*#%*/-*,(#3$9*#.2#()*#<%%#F(./*A#$27#4'*#()*#F&/&#O*9.(*#
3$9*#,.2(/.++*/
A#./#,.22*,(#$2#^]*0&,*;
$'#$
9+$'86.+':6*+
W$42,)#P&++.5#(.#7.#'.9*#).4'*#)42(&23;#Y/#.%*2#()*#I&+(#$%%#(.#7.
'.9*#').%%&23D$++#/&3)(#.2#1.4/#!";
Page 5
;#4+'1$':6/*'#'*6$0"
<6$'#33'=+#$(.+&'#*:'06*$+*$'#.+'#>#13#?3+'1*'#33'#.+#&@
Apple Confidential
N.52+.$7#.2*#.-#9$21#1.3$#./#9*7&($(&.2#$%%'#(.#(4/2#1.4/#!"#/..9#&2(.
$2#.$'&'#.-#(/$2_4&+&(1;
!.#+*$/2#9./*A#'**# ;
]&27#$%%'
4,,$.%$)"#$3'5.,(
M4'(.9&U*#<%%+*#!"#-./#7&--*/*2(#($'(*'
>.(#*0*/1.2*#)$'#()*#'$9*#-$0./&(*#$%%'#./#($'(*'#&2#94'&,;#6.4#,$2#'*(
4%#<%%+*#!"#(.#7&'%+$1#()*#/&3)(#.%(&.2'#-./#*$,)#-$9&+1#9*9C*/;
5>+.A'#))'1*'1$&')3#0+
O*$//$23*#$%%'#C$'*7#.2#-$9&+1#9*9C*/'8#4'$3*#$27#%/*-*/*2,*';#`**%
()*#X.9*#',/**2#./3$2&U*7#C1# #-./#()*#3$9*/'A
./#$#').%%&23#-.+7*/#-./#1.4/'*+-;
,/*$(&23#$#'*%$/$(*#-.+7*/
Page 6
-"#.+'+#0"'6$"+.%&'06*$+*$
Apple Confidential
=&()#]$9&+1#F)$/&23A#*$,)#-$9&+1#9*9C*/#,$2#%4/,)$'*#()*&/#.52#9.0&*'A
!"#').5'A#94'&,A#$27#$%%';#<27#*0*/1.2*#&2#()*#-$9&+1#,$2#')$/*#*$,)
.()*/8'#%4/,)$'*';#V0*/1()&23#&'#%$&7#-./#$27#9$2$3*7#C1#()*#)*$7#.).4'*).+7;
B++)'1$'&#=+'#*:'&+0(.+'=6.'#33'#2+&
!.#9$B*#'4/*#.2+1#$4()./&U*7#4'*/'#,$2#5$(,)#,*/($&2#,.2(*2(A#%+$1
3$9*'A#./#9$B*#%4/,)$'*'A#3.#(.#F*((&23'#a#I*2*/$+#a#O*'(/&,(&.2';
M)..'*#5)&,)#.%(&.2'#(.#/*'(/&,(
,).&,*'#'*,4/*;
A#()*2#'*(#$#%$'',.7*#(.#B**%#1.4/
Page 7

Not all features and content are available in all areas.
Welcome
Set up and get started
Whatʼs new in tvOS 11
Basics
Siri and dictation
TV
App Store
iTunes movies and TV shows
Music
Photos
Podcasts
Search
Home Sharing
Beyond basics
Restart, reset, update
Accessibility
Safety, handling, and support
Apple Confidential
Page 8
Overview
This guide describes tvOS 10.3 for Apple TV 4K and Apple TV (4th generation). Not all
features and content are available in all areas.
For information about earlier Apple TV models, go to the website.
For information about setting up Apple TV, see .
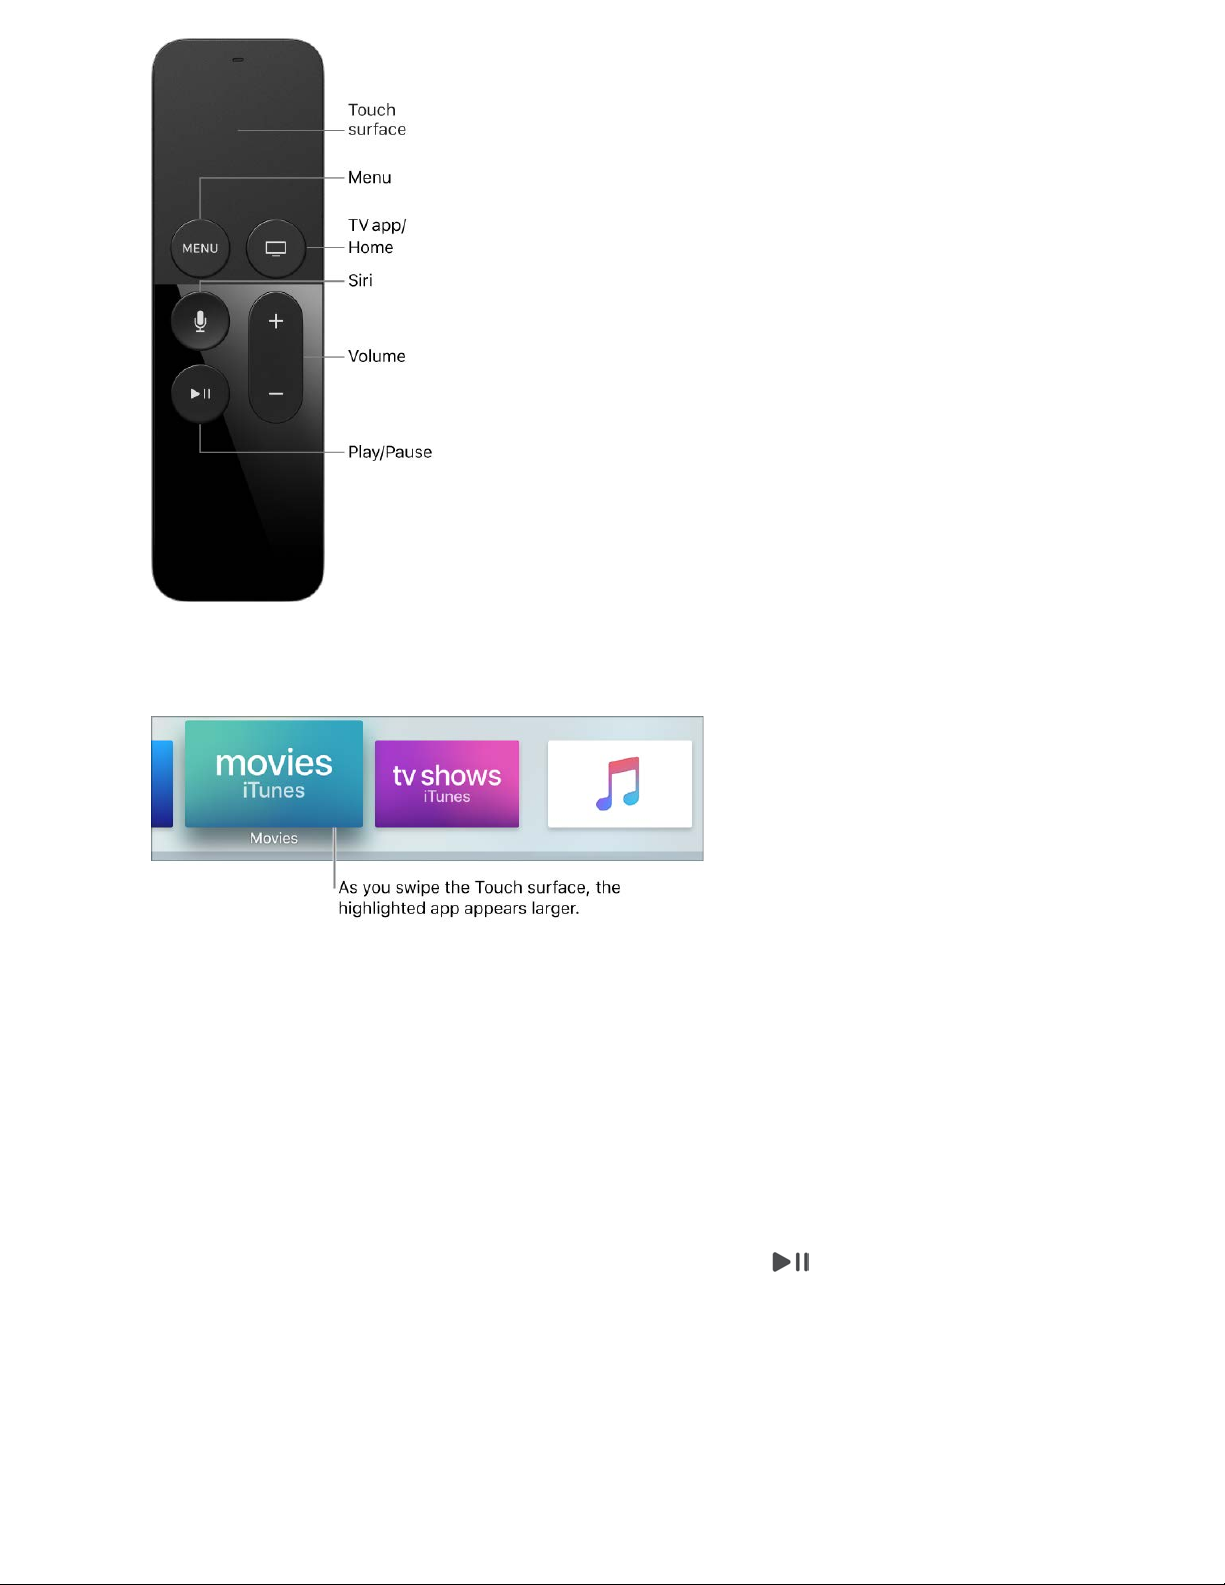
Siri Remote
Use the Touch surface on the Siri Remote to set up your Apple TV.
Set up and get started
Apple TV support
Set up Apple TV
Apple Confidential
Page 9

Swipe left, right, up, or down to highlight items during setup. When you press the Touch
surface, it makes a clicking sound as you select the highlighted item.
For more information about Siri Remote functions and buttons, see .
Set up Apple TV
To use Apple TV, you need :
A 4K or high-definition TV with HDMI capable of displaying 720p or 1080p video for
Apple TV 4K
A high-definition TV with HDMI capable of displaying 720p or 1080p video for Apple
TV (4th generation)
An HDMI cable to connect Apple TV to your TV. For best results, Apple TV 4K may
require an HDMI cable made for 4K televisions, sold separately.
Access to an 802.11 wireless network (wireless streaming requires 802.11a, g, n, or
ac), Ethernet network, or broadband Internet
An iTunes Store account for iTunes purchasing, renting, and using Home Sharing
Navigate Apple TV
Apple Confidential
Page 10

Set up Apple TV. Before you start, make sure you know your wireless network name (and
password if the network is password-protected). If youʼre using a wired network, use an
Ethernet cable to connect your Apple TV.
Connect Apple TV: Connect one end of an HDMI cable to the HDMI port on your
Apple TV, then connect the other end to the HDMI port on your TV.
Plug in Apple TV: Connect one end of the power cord to the power port on your Apple
TV and the other end to a power outlet.
Select the HDMI input on your TV: Turn on your TV, then select the HDMI input thatʼs
connected to your Apple TV. On some televisions, this may occur automatically.
Follow the onscreen instructions: A series of setup screens assists you with your
Internet connection and other setup items. To use VoiceOver during setup, press the
button on the Siri Remote three times. For more information, see .
Alternatively, you can transfer your Wi-Fi network and password and Apple ID account
information automatically to Apple TV from an iOS device with iOS 9.1 or later.
Set up Apple TV automatically with an iOS device. When the Apple TV setup screen
appears, unlock your iOS device and make sure Bluetooth® and Wi-Fi are turned on.
Touch your iOS device to App le TV and follow th e onscree n instructions on you r iOS
device and Apple TV.
Note: Automatic setup doesnʼt transfer account information for third-party apps such as
Netflix or Hulu, and doesnʼt turn on iTunes Match or Home Sharing.
For more information and recommendations for Apple TV 4K setup with a 4K TV, go to
.
VoiceOver
Apple Support
Apple Confidential
Page 11

'#,(-.(/88+-0,3
'6.'1;(*+&';F'-"6/&'
Apple Confidential
9+-$(4..5#(:;
_6(.'G))3+'WV'1&'$"+'#006(*$'A6('(&+'=6.'`(&$'#?6($'+>+.A$"1*2'A6(':6'6*'G))3+';FL
1*03(:1*2'?(A1*2'06*$+*$'6*'1;(*+&'H6>1+&' '6.'1;(*+&';F'-"6/&' L'#*:
:6/*36#:1*2'#))&'=.68'$"+'G))'-$6.+' @'_6('0#*'#3&6'(&+'1\36(:L'/"10"'06**+0$&'A6(
#*:'#33'6='A6(.'G))3+':+>10+&'$6'&"#.+')"6$6&'#*:'86.+@
W='A6('#3.+#:A'"#>+'#*'G))3+'WVL'+*$+.'1$'/"+*'A6('=1.&$'&+$'()'G))3+';F@'W='A6(':6*%$
#3.+#:A'"#>+'#*'G))3+'WVL'A6('0#*'0.+#$+'6*+'6*'$"+' @'_6('*++:'6*3A
6*+'G))3+'WV'$6'(&+'1;(*+&L'1\36(:L'#*:'9#8+'\+*$+.'&+.>10+&@
G))3+'WV'/+?)#2+
R6.'86.+'1*=6.8#$16*L'&++'$"+' @
J+.+'#.+'#'=+/'6='$"+'$"1*2&'A6('0#*':6'/1$"'A6(.'G))3+'WV'6*'G))3+';FT
1+/#$<'6"=1$<'>#?'+,'23";<-'I(.0"#&+'6.'.+*$'86>1+&'#*:'?(A';F'+)1&6:+&'#*:
&+#&6*&@'_6('0#*'#3&6'#00+&&'A6(.'1;(*+&')(.0"#&+&'8#:+'6*'6$"+.':+>10+&@
6/<1%-'W='A6(%.+'#*'G))3+'H(&10'8+8?+.L'A6('0#*'#00+&&'813316*&'6='&6*2&'6*'G))3+
;F@'!1$"'#*'1;(*+&'H#$0"'&(?&0.1)$16*L'#33'A6(.'8(&10a1*03(:1*2'8(&10'A6(%>+
18)6.$+:'=.68'\V&'6.')(.0"#&+:'&68+/"+.+'6$"+.'$"#*'$"+'1;(*+&'-$6.+a0#*'#3&6
?+'&$6.+:'1*'1\36(:'#*:')3#A+:'6*':+8#*:@'-++' @
())<-'I(.0"#&+'#))&':1.+0$3A'6*'G))3+';F'#*:':6/*36#:').+>16(&'G))'-$6.+
)(.0"#&+&'$6'G))3+';F'=6.'=.++L'#*A$18+@'B++)'A6(.'#))&'J68+'&0.++*&'()'$6':#$+
#0.6&&'+>+.A'G))3+';F'A6('6/*@'-++'@
@>A$'!$#&$9-'I3#A'A6(.'=#>6.1$+'2#8+&'/1$"'=.1+*:&'/"6'"#>+'#*'G))3+';FL'#*'1C:+>10+L'6.'#'H#0'PC-'b'DM@Z'6.'3#$+.L'6.'8#0C-Q@
.3"&"<-'F1+/'A6(.')"6$6&'#*:'>1:+6&'=.68'1\36(:'I"6$6'c1?.#.AL'HA'I"6$6'-$.+#8L
#*:'1\36(:'I"6$6'-"#.1*2@'-++' @
G))3+'WV'RGd'/+?)#2+
H(&10'#$'#'23#*0+
I"6$6&'#$'#'23#*0+
:>A1*8'23>91#0-'-"#.+'$"+')(.0"#&+&'=.68'$"+'1;(*+&'-$6.+'#*:'$"+'G))'-$6.+'6='()
$6'&1,'=#813A'8+8?+.&'6*'A6(.'G))3+';F@'-++' @
4"A$'<%9$$#'>))$>9>#%$-'B++)'A6(.'#))&'#*:'J68+'&0.++*&'()'$6':#$+'#0.6&&
+>+.A'G))3+';F'A6('6/*@'-++' @
(19."?'</))"9&-'<6'&+$()'.+[(1.+:aG))3+'G1.I6:&'06**+0$'#($68#$10#33A'$6'A6(.
G))3+';F'#*:'A6('0#*'+#&13A'&/1$0"'&6(*:'?+$/++*':+>10+&'$"#$'(&+'$"+'+'G))3+
WV@
8-#"9$G33'=+#$(.+&'8#A'*6$'?+'#>#13#?3+'1*'#33'#.+#&@
R#813A'-"#.1*2
\(&$681e+'$"+'J68+'&0.++*
Page 12

Speak user names and passwords. With the text entry field highlighted, press and hold
the Siri button , then speak letters, numbers, and symbols instead of using the onscreen
keyboard. Say “uppercase” to indicate an uppercase letter. For more, see .
Tip: You can use th e key boa rd o n a ne arby iP hon e o r iPad to e nter tex t d irec tl y on
Apple TV, instead of using the Siri Remote. For more, see
.
Set password requirements for purchases. You can se t whether App le TV requ ires
your Apple ID password to complete an iTunes or App Store purchase. In Settings ,
go to Accounts > “iTunes and App Store” > Password Settings > Require Password, then
select Always, After 15 Minutes, or Never.
Accounts for other content providers
Some apps and content providers, such as Netflix, HBO NOW, and Showtime, require
that you sign in before using them. When you open the app to sign in or set up an
account, follow the onscreen instructions.
Speak user names and passwords. With the text entry field highlighted, press and hold
the Siri button , then speak letters, numbers, and symbols instead of using the onscreen
keyboard. Say “uppercase” to indicate an uppercase letter. For more, see .
Change app settings. Some apps may provide settings you can modify within the app.
To see what other options may be avai lable, g o to Sett ings > Apps and select the app.
Single sign-on
Single sign-on simplifies access to entertainment apps, like HBO GO and FXNOW. With it,
you only have to sign in once on your Apple TV to get immediate access to all the
supported apps that require your cable or satellite pay TV credentials.
You can activate s ing le sig n-on in Setti ngs or wh en you firs t u se a suppor ted app . Once
signed in, any other supported app you have access to will automatically authenticate
you, eliminating the need to sign in again.
Activate single sign-on. In Settings , go to Accounts > TV Provider and select your
TV provider. Sign in with your user name and password for that provider.
Deactivate single sign-on. In Settings , go to Accounts > TV Provider and select
your TV provider. Click Sign Out.
Note: You h ave t o s ign in once fo r e ach Ap ple TV to use th is feature. Single sign- on is
also available on iOS.
Dictation
Use the iOS keyboard to enter
text on Apple TV
Dictation
Apple Confidential
Page 13

Manage subscriptions
You can mod ify or ca ncel subscri ptions availabl e o n A ppl e T V, inclu din g A ppl e M usi c or
apps such as STARZ and HBO NOW.
Manage your subscriptions. In Settings , go to Accounts > Manage Subscriptions
and select a subscription. Follow the onscreen instructions to change or cancel your
subscription.
Here are some of the new features and enhancements in the latest version of tvOS. Not
all features and content are available in all areas.
Support for Apple TV 4K
Apple TV 4K is built to take full advantage of 4K and HDR to deliver an amazing
experience that makes it incredibly easy to enjoy TV in the highest quality ever. During
setup, an onscreen display assistant will automatically detect and help you calibrate your
HDTV or 4K TV to get the best picture experience. For basic setup instructions, see
.
Other tvOS 11 features
Accessibility enhancements include VoiceOver support for connected braille displays
and Bluetooth-connected keyboards, brailled captions and subtitles, and a playback
control for for Switch Control. See .
Using the same iCloud account, you can keep apps and Home screens up to date
across multiple Apple TVs. You can also set Apple TV to automatically switch
between Light and Dark mode according to the time of day. See
.
You can now sub scr ibe to Ap ple Music direct ly from Ap ple TV. See .
Control Center enhancements in iOS 11 make it easier to control your Apple TV from
an iOS device. See .
Whatʼs new in tvOS 11
Set
up Apple TV
Accessibility features
Customize the Home
screen
Music at a glance
Use Control Center with the Apple TV Remote app
Apple Confidential
Page 14
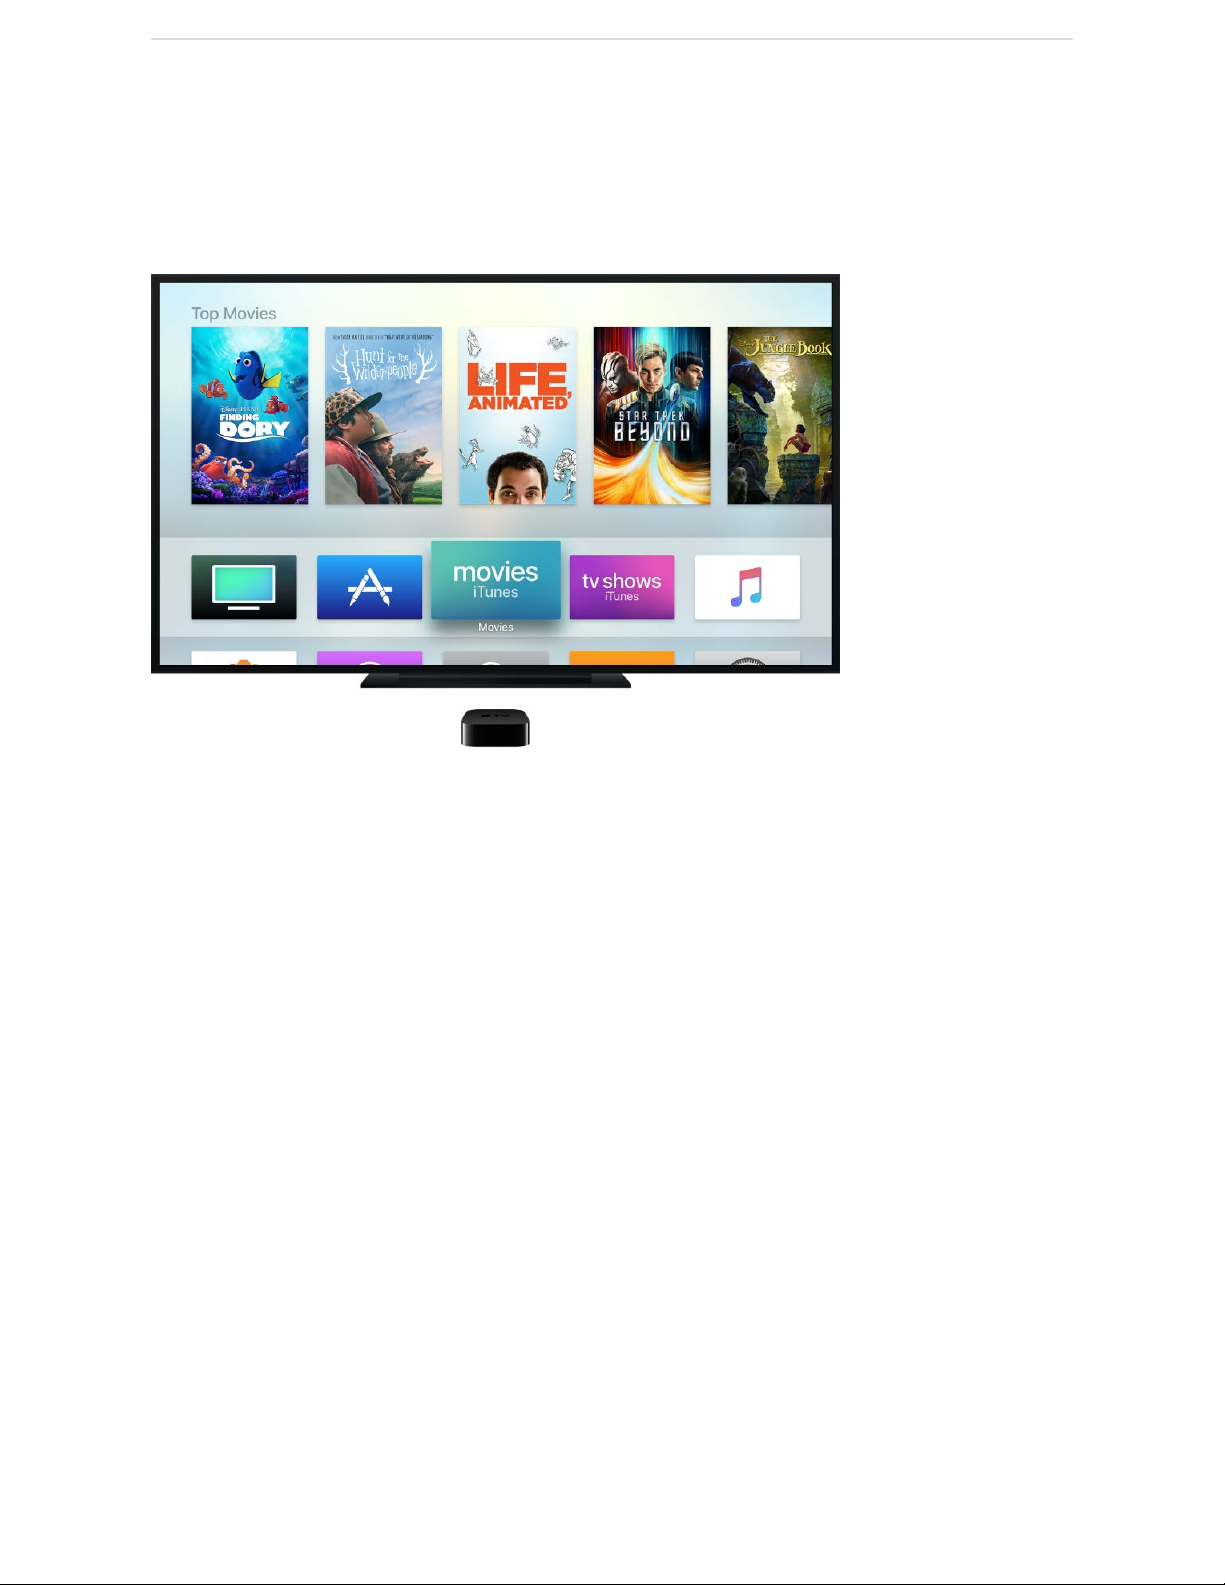
Navigate Apple TV
The Home screen on Apple TV provides easy access to apps and settings. And, when
you highlight an app thatʼs on the top row, you may see app shortcuts at the very top of
the Home screen. To change the look of your Home screen, see
.
Not all features and content are available in all areas.
Use the Touch surface and buttons on the Siri Remote to navigate Apple TV.
Basics
Customize the Home
screen
Apple Confidential
Page 15
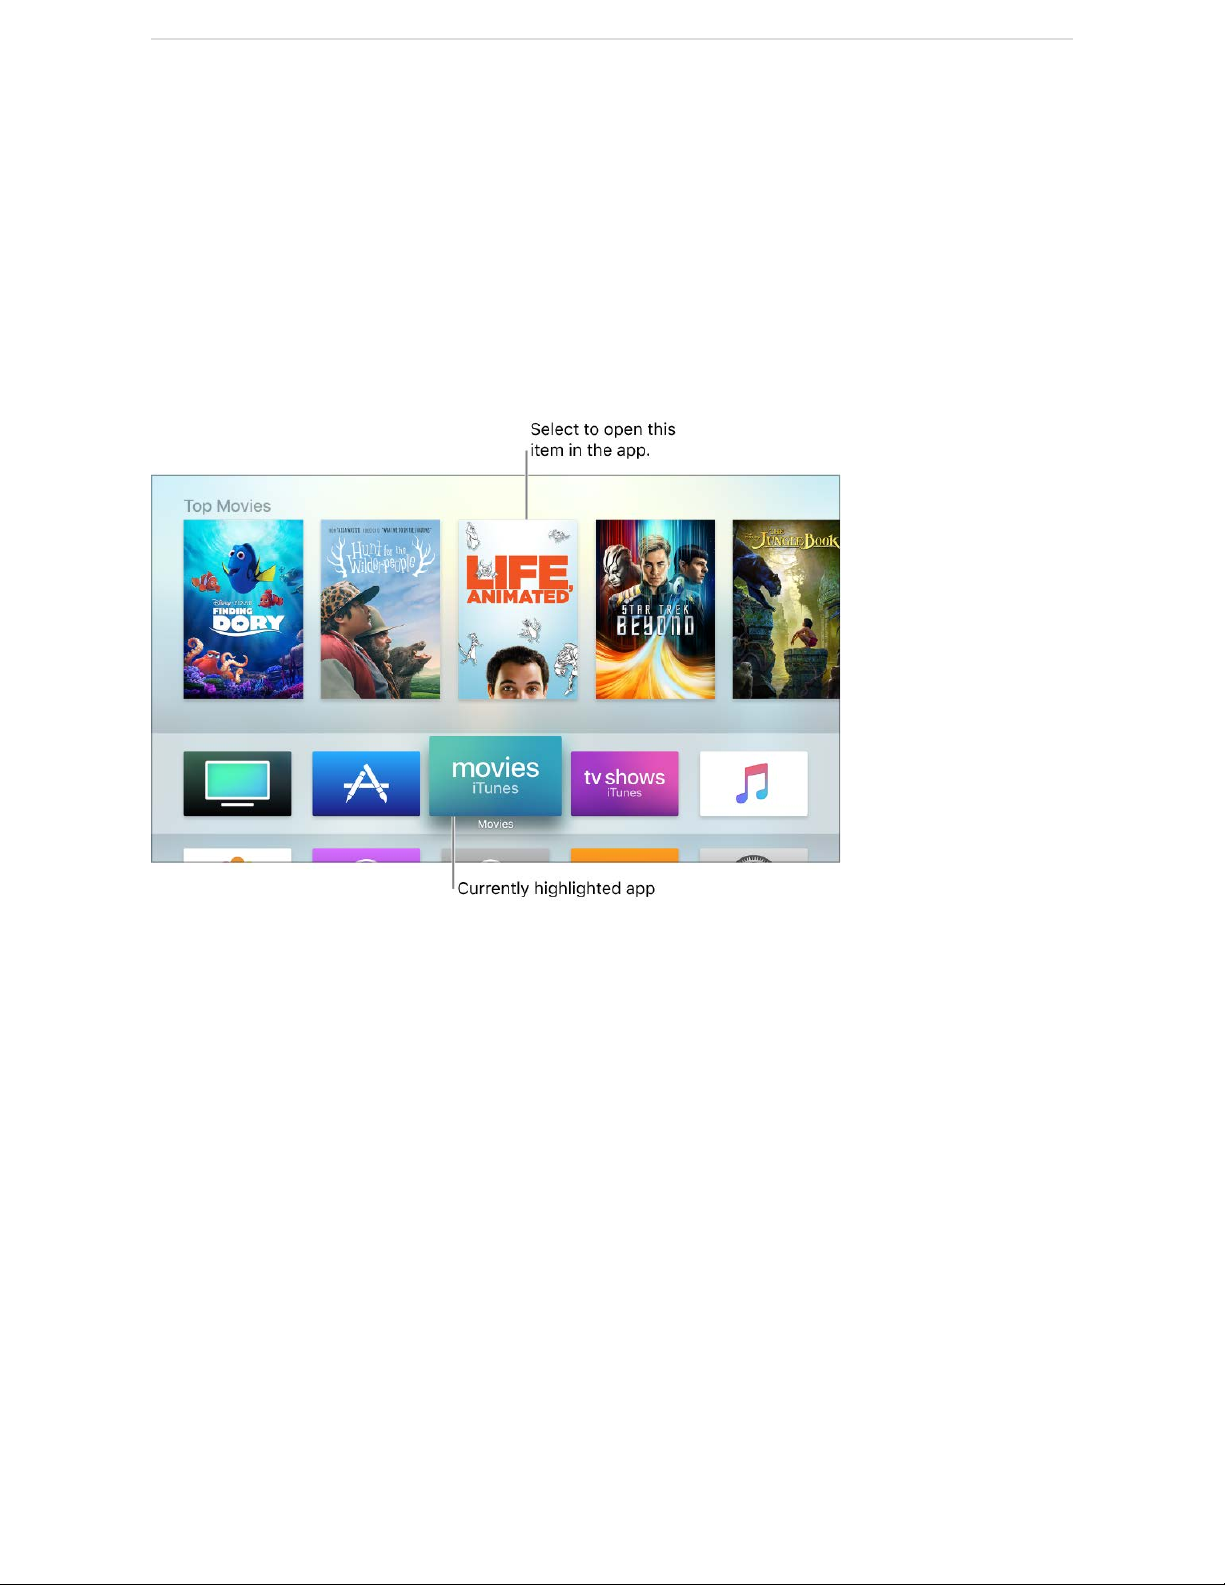
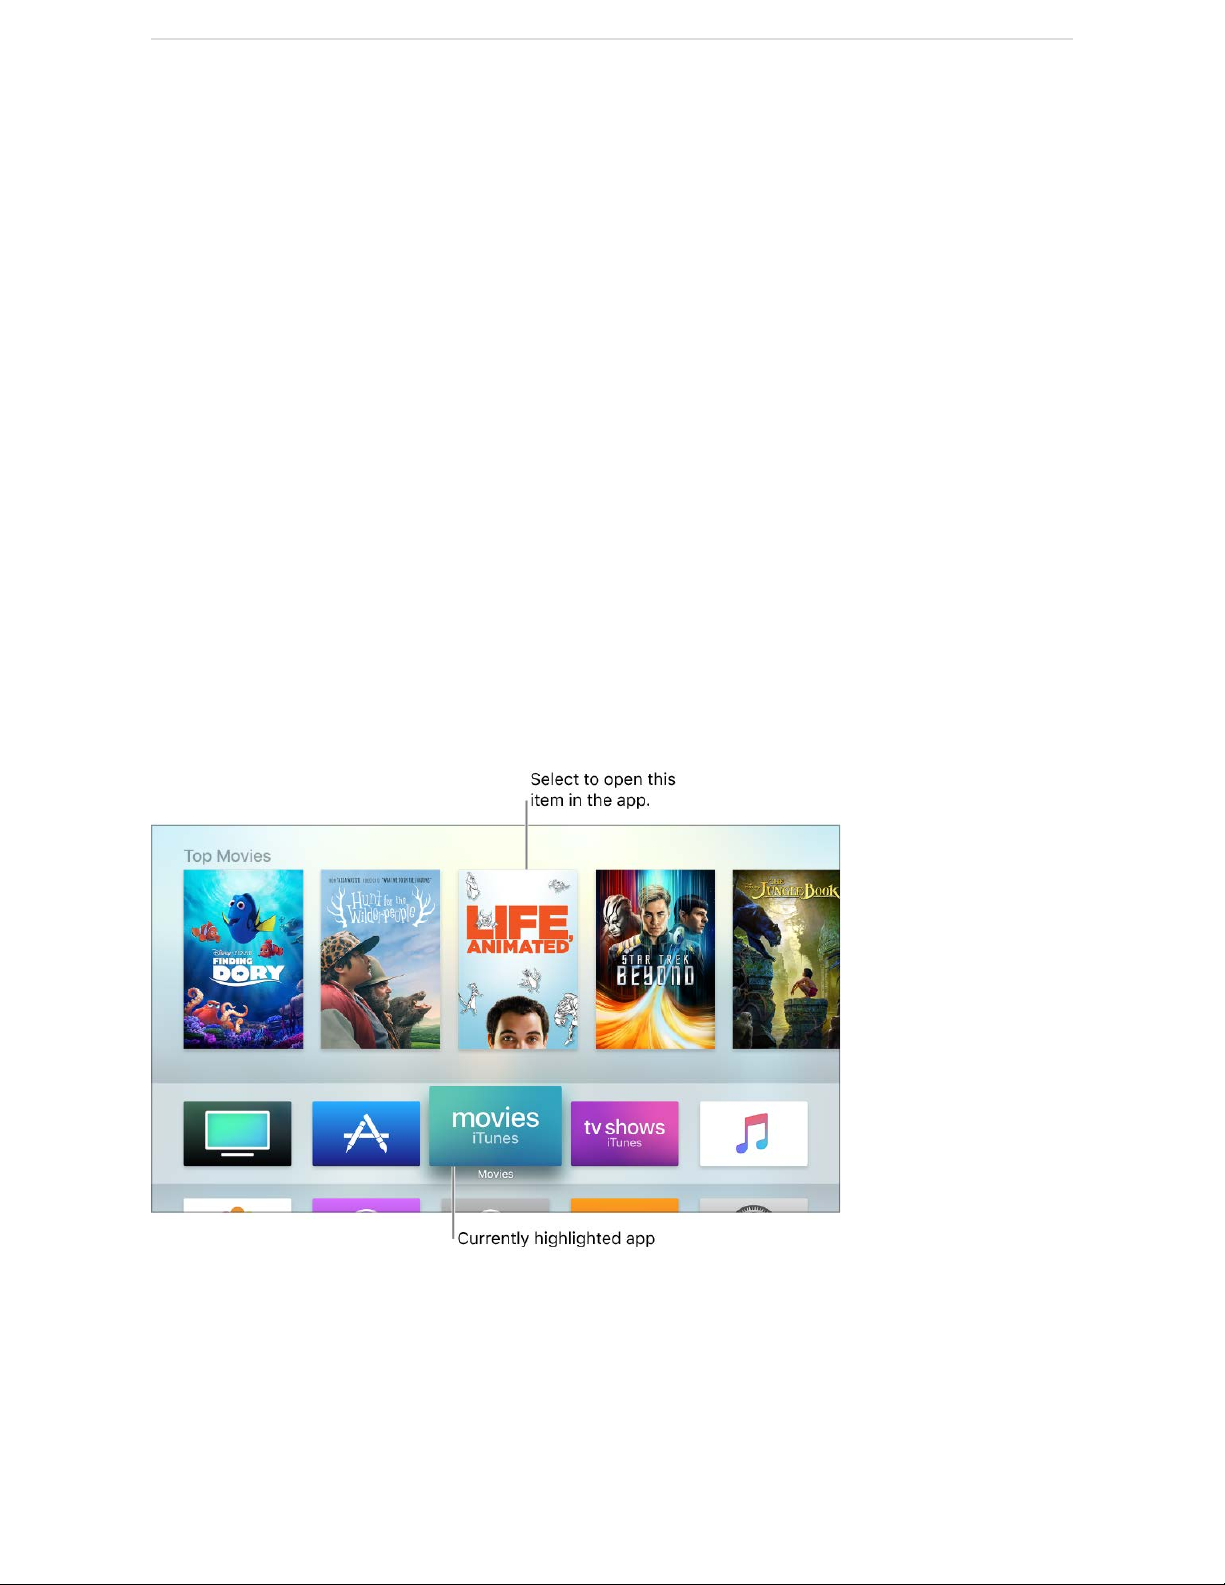
Navigate Apple TV. Swipe left, right, up, or down on the Touch surface. The app thatʼs
highlighted expands slightly.
Navigate lists. Swipe up or down a few times on the Touch surface to scroll quickly. If
thereʼs an index next to the list, swipe right, then highlight a letter to jump ahead.
Select an item. Swipe to highlight the item, then press the Touch surface.
Access contextual menus. Press and hold the Touch surface. If youʼve highlighted an
item that has additional options, they appear in a pop-up menu.
Use the onscreen keyboard. If a keyboard appears for entering text, swipe across the
characters—or tap left or right—to highlight a character, then press the Touch surface to
select it. To change keyboards, press the Play/Pause button , or swipe down and
select uppercase, lowercase, numbers, or special symbols. To enter an alternate
character (such as a letter with an accent mark), highlight the character, then press and
hold the Touch surface to select an option.
Optionally, you can use your iOS deviceʼs keyboard to enter text on Apple TV. See
.
Use
the iOS keyboard to enter text on Apple TV
Apple Confidential
Page 16

Dictate instead of type. Whenever you see a text entry field, you can use your voice
instead of using the onscreen keyboard. Press and hold the Siri button and say the text
you want to enter. You can even speak individual characters—for example when entering
user names and passwords. For more, see .
Return to the previous screen. Press the button.
Return to Up Next or the Home screen. Press the Home button once to go to Up
Next in the TV app. Press again to go to the Home screen. To change this behavior, see
.
View open apps. Press the Home button twice quickly. See
.
Put Apple TV to sleep. Press and hold the Home button , then select Sleep. See
.
Activate Siri. Press and hold the Siri button . See .
Control Apple TV from an iOS device. You can us e t he Apple TV Remote a pp (avai lab le
from the App Store on your iOS device) to navigate, enter text, and control playback on
Apple TV. For more information, see the Apple Support article
.
Use a wireless keyboard. You can use a wire less key board to en ter text. See
.
Manage your apps
Apple TV comes preloaded with a collection of apps on the Home screen. You can add
other apps using the App Store . To learn more, see .
Open an app. Navigate to an app on the Home Screen, then press the Touch surface to
open it. Press the Home button to return to the Home Screen.
Ask Siri. “Open <app name>” or “Play <app name>”
You can qui ckl y sw itc h between apps you ʼve p reviously open ed. Se e
.
Change an appʼs settings. Some apps have a Settings menu within the app. For other
apps, you can go to Settings , select Apps, then select the app you want.
Dictation
Set the destination for the Home button
Switch quickly between
apps
Sleep or wake Apple TV
Talk to your Apple TV
Set up Remote for your
iPhone, iPad, or iPod touch
Connect
Bluetooth devices to Apple TV
Find apps
Switch quickly
between apps
Apple Confidential
Page 17

G+0,$+5(&=/,B3(.5/F%02
!"+$"+.'A6(%.+'/#$0"1*2'#';F'&"6/'6.'#'86>1+L'A6(%.+'1*'06*$.63@
Apple Confidential
L(,1$-<$&,%;"+$I.+&&'$"+';6(0"'&(.=#0+'6.').+&&'$"+'I3#AkI#(&+'?($$6*' @
!3-2$0-4#<-(;$-4$#3"$;0<""4$6%</4@$&(,1D,0:+$I.+&&'$"+'I3#AkI#(&+'?($$6*' '6.'.+&$
A6(.'=1*2+.'6*'$"+';6(0"'&(.=#0+@'G'&$#$(&'1*:10#$6.'#))+#.&'&"6/1*2'+3#)&+:'#*:
.+8#1*1*2'$18+@';"+'&631:'?#.'1*:10#$+&'"6/'8(0"'6='$"+'1$+8'1&'0#0"+:'P$+8)6.#.13A
:6/*36#:+:'6*'G))3+';FQ@'_6('0#*'&$133'`(8)'#"+#:'6='$"+'0#0"+:'#.+#'#*:'?+21*
)3#A?#04'=.68'$"+.+@
L<"7/"2$7/6"-$-4$#3"$&(,1D,0:$#/."(/4"+$V(.1*2')3#A?#04L').+&&'$"+';6(0"'&(.=#0+'$6
)#(&+')3#A?#04'#*:'&"6/'$"+').+>1+/'/1*:6/L'$"+*'&/1)+'3+=$'6.'.12"$'$6'86>+'?#04'6.
=6./#.:'1*'$18+@'I.+&&'$"+';6(0"'&(.=#0+'#2#1*'$6'&$#.$')3#A?#04'#$'$"+'*+/')6&1$16*L'6.
).+&&'$"+' '?($$6*'$6'0#*0+3'#*:'.+&(8+')3#A?#04'#$'$"+'6.121*#3')6&1$16*@
2&>9'+9$B'C$8"#?'
!:/&$D,0:2,<6$-<$>-<2,<6$GN$;"0-46;+$C*'$"+';6(0"'&(.=#0+L').+&&'3+=$'6.'.12"$'$6'&41)
?#04/#.:'6.'=6./#.:@'I.+&&'#2#1*'$6'&41)'#*6$"+.'DM'&+06*:&@
W='A6(%.+'(&1*2'$"+'G))3+';F'K+86$+'#))L'$#)'$"+'E#04'DM'?($$6*' '$6'&41)'?#04/#.:'DM
&+06*:&L'6.'$#)'$"+'-41)'DM'?($$6*' '$6'&41)'=6./#.:'DM'&+06*:&@
J"2/46$-<$>,;#$>-<2,<6+$!"13+')3#A1*2L'6*'$"+';6(0"'&(.=#0+L').+&&'3+=$'6.'.12"$'#*:'"63:
$6'.+/1*:'6.'=#&$'=6./#.:@'K+3+#&+'$6'.+&(8+')3#A?#04@
O"#$.-<"$/4>-+$-/1)+':6/*'$6'&"6/'$"+'W*=6')#*+3@'-/1)+'3+=$'6.'.12"$'$6'&/1$0"'?+$/++*
)#*+3&@
1&'#>#13#?3+'6*'1;(*+&@
Page 18

Star Trek Beyond
Turn on subtitles and closed captioning (if available). Swipe down to show the Info
panel, then swipe right to show the Subtitles panel. Then swipe down and select the
option you prefer.
© 2017 Paramount Pictures. STAR TREK and related marks are trademarks of CBS Studios,
Inc. All rights reserved.
Adjust audio
You can con trol you r T V o r A /V rece iver vol ume with the Sir i Remote. Additional aud io
controls let you change AirPlay speakers, choose a Bluetooth headphone, change the
language audio track on a TV show or movie, or reduce loud sounds.
Adjust the volume. Press the or button on the Siri Remote. For more information
about setting up the remote to control your TV or receiver, see
.
Access audio controls. During playback, swipe down to show the Info panel, then swipe
to the Audio panel.
is available on iTunes.
Star Trek Beyond
Control your home
entertainment system with the Siri Remote
Apple Confidential
Page 19

Change the language. Select a different audio language.
Reduce loud sounds. Select Reduce Loud Sounds to enhance dialogue and reduce loud
sounds so as not to disturb others.
Change speakers. Select another AirPlay speaker on your network, or select paired
AirPods, Bluetooth speakers, or Bluetooth headphones. See
.
Customize the Home screen
The top row of the Home screen is a great place for your favorite apps. When you
highlight an app in the top row, you get shortcuts that can take you to content without
opening the app first.
You can dec ide wh ich apps appear in the top row, ar range the m i n t he orde r yo u p refer,
and delete apps from the App Store that appear on the Home screen.
You can als o c han ge the appearance o f b ackg roun ds and menus between li ght an d d ark .
Rearrange apps. Using the Touch surface on the Siri Remote, highlight an app, then
press and hold until the app starts to jiggle. Swipe to move the app to a new location,
then press the Touch surface again to save the new arrangement.
Pick your top-row apps. Move your favorite apps to the top row of the Home screen.
You may g et add iti ona l o pti ons and shor tcu ts when you hi ghl igh t t hem .
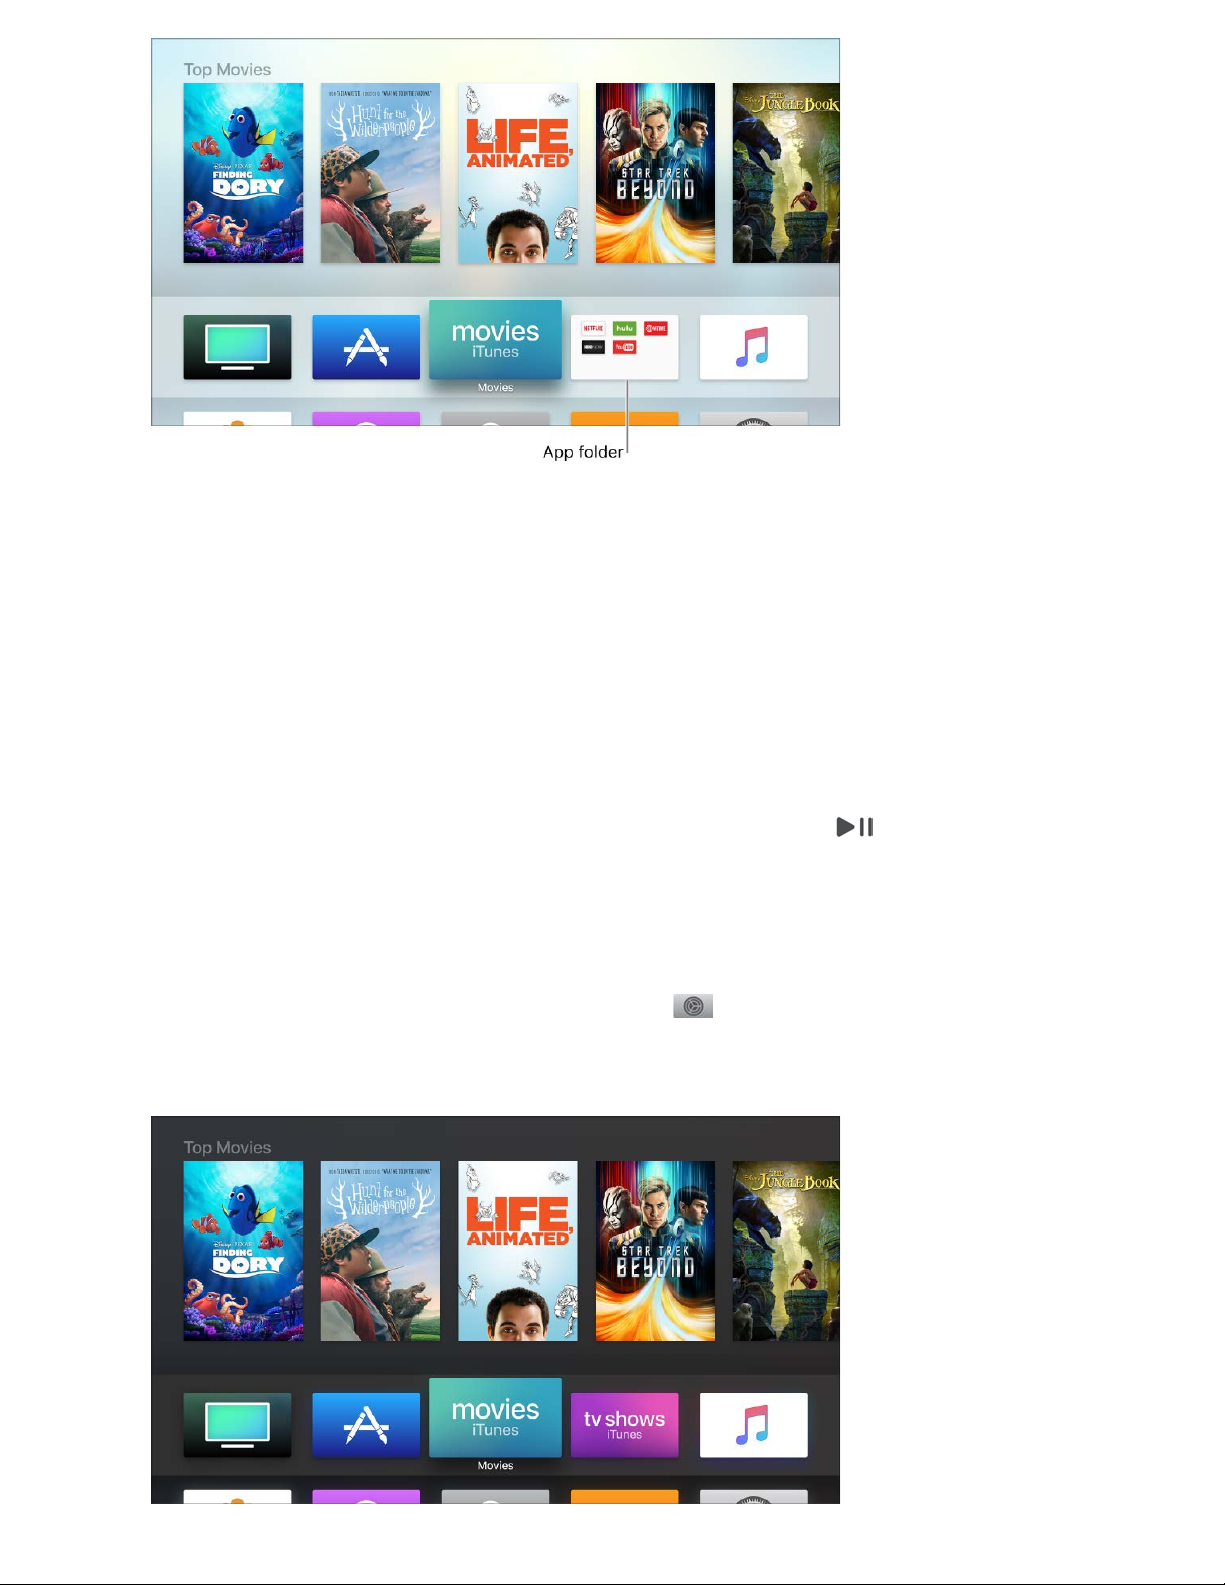
Create a folder for apps. Using the Touch surface on the Siri Remote, highlight an app,
then press and hold until the app starts to jiggle. Drag the app over another app until a
folder appears, then release. Press the Touch surface again to save the new
arrangement.
Adjust video and audio
settings
Apple Confidential
Page 20
Not all features and content are available in all areas.
Note: When you first create a folder, Apple TV chooses a name for the folder based on
its contents. To customize the folder name, open the folder, swipe up to the name, and
use the onscreen keyboard or dictation to rename the folder.
Move an app into a folder. Using the Touch surface on the Siri Remote, highlight an app,
then press and hold until the app starts to jiggle. Drag the app over a folder, then release.
Press the Touch surface again to save the new arrangement.
Delete an app. Use the Touch surface to select the app you want to delete, then press
and hold until the app starts to jiggle. Press the Play/Pause button for more options,
then select Delete.
Deleting an app also deletes its data. You can download any app again that youʼve
purchased on the App Store, free of charge, but the data may not be restored.
Change the appearance of Apple TV. In Settings , go to General > Appearance,
then select Light, Dark, or Automatic. When set to Automatic, the appearance shifts from
Light during daytime hours to Dark during nighttime hours.
Apple Confidential
Page 21

Keep apps and Home screens up to date across multiple Apple TVs: If you have more
than one Apple TV associated with the same iCloud account, you can keep the same
appearance and apps for each device. This makes it seamless to switch between an
Apple TV in the bedroom to one in the living room, for example. In Settings , go to
Accounts > iCloud and turn Home Screen on.
Switch quickly between apps
You can qui ckl y sw itc h between diffe rent ap ps on App le TV without having to fi rst retu rn
to the Home screen. It works very much like the multitasking feature on iPhone or iPad.
See recent apps. Press the Home button twice quickly. Small windows representing
each of the open apps appear in a row on the screen.
Select a different app. Swipe left or right to navigate to a different app. Press the Touch
surface to open the app thatʼs in the center of the screen.
Force the highlighted app to quit. Swipe up to force the highlighted app to quit.
To leave the app switcher without changing apps, press the button.
Apple Confidential
Page 22

Use the Siri Remote
Connect the Siri Remote to Apple TV
The Siri Remote comes automatically paired with your Apple TV. If it disconnects or you
get a replacement remote, youʼll need to manually pair it to Apple TV.
You can pai r t he Sir i Remote w ith on ly one App le TV at a t ime . W hen you pair a remote ,
any other paired remote is automatically unpaired.
Pair the Siri Remote with Apple TV. Turn on Apple TV and position the Siri Remote so
itʼs within 3 to 4 inches (8 to 10 cm) and pointing at the front of Apple TV. Then press
and hold the button and the Up button for 2 seconds. When the Siri Remote is
successfully paired, an onscreen message appears.
Charge the Siri Remote
The Siri Remote has a rechargeable battery inside. With typical usage, youʼll need to
charge it a few times a year. An alert appears on the TV screen when the remote battery
is running low; in Settings , you can go to > Remotes and Devices > Bluetooth to
check the battery level. You can continue to use the Siri Remote while itʼs charging.
Apple Confidential
Page 23

Charge the Siri Remote. Connect one end of a Lightning cable to the Lightning port on
the bottom of the Siri Remote. Connect the other end to a computer USB port or to an
Apple USB power adapter (sold separately).
The Siri Remote takes about three hours to fully charge.
Use the Siri Remote for game play
The Siri Remote includes an accelerometer and gyroscope that make it fun for playing a
variety of games. Depending on the game, you can hold it either vertically or horizontally.
Some games respond to movements you make in the air with the remote.
Use the Remote Loop. Attach the Remote Loop (sold separately) and maintain a secure
grip on the Siri Remote to prevent injury or accidental damage to the Siri Remote or other
property.
To enhance game play, some apps may also work with a third-par ty Bluetooth game
controller or other accessory, or may require the use of a third-party Bluetooth game
controller. Game controller requirements are provided in the appʼs product page on the
App Store. See .
Control the Touch surface sensitivity
You can cus tomize the Touch sur fac e on the Sir i Re mote to ma tch your pa rticular co ntro l
style.
Change Touch surface tracking. In Settings , go to “Remotes and Devices” > Touch
Surface Tracking.
Set Tracking to Fast in order to make smaller thumb movements move farther on the
Apple TV screen. Set Tracking to Slow in order to require larger movements to move a
smaller distance.
Connect Bluetooth devices to Apple TV
Apple Confidential
Page 24
Use the Apple TV Remote app
Connect the Apple TV Remote app to Apple TV
To use a compatible iOS device to control your Ap ple TV, you have to connect the Apple
TV Remote app and your Apple TV.
Before you begin, download the Apple TV Remote app from the App Store on your
compatible iOS device, and make sure your Apple TV, iOS device, and the Apple TV
Remote app are updated to the latest software version and connected to the same Wi-Fi
network. For more information, see the Apple Support article
.
Set up the Apple TV Remote app. Open the Apple TV Remote app on your iOS device,
then select your Apple TV when it appears on the screen. When a four-digit code
appears on the display connected to your Apple TV, enter the code on your iOS device.
Navigate with the Apple TV Remote app
You can use th e A ppl e T V Re mote app o n a co mpa tib le iOS dev ice to con trol Ap ple TV.
Not all features and content are available in all areas.
Use the Touch surface area and buttons in the Apple TV Remote app to navigate Apple
TV.
Navigate Apple TV. Swipe left, right, up, or down on the Touch surface area. The app
thatʼs highlighted expands slightly.
Set up the Apple TV
Remote app
Apple Confidential
Page 25

Select an item. Swipe to highlight the item, then tap the Touch surface area.
Navigate lists. Swipe up or down a few times on the Touch surface area to scroll quickly.
If thereʼs an index next to the list, swipe right, then highlight a letter to jump ahead.
Access contextual menus. Touch and hold the Touch sur face area. If youʼve highlighted
an item that has additional options, they appear in a pop-up menu.
Use the app keyboard. When entering text, use the onscreen keyboard to tap the
characters you want to enter. If the keyboard doesnʼt appear, tap the keyboard button
to show the keyboard.
Dictate instead of type. Whenever you see a text field, you can use your voice instead
of the onscreen keyboard. Tap Done to dismiss the keyboard, then touch and hold the
Siri button and speak the text you want to enter. You can even speak individual
characters—for example when entering user names and passwords. For more, see
.
Show the Now Playing screen. Tap Details, then use the built-in controls in the Apple
TV Remote app to control playback. If you dismiss the Now Playing screen, you can use
the Touch surface area to control playback. See .
Adjust the volume. Press the volume buttons on your iOS device. This only works with
supported AV receivers. For information about setting up Apple TV to control your TV or
receiver, see .
Switch to game mode. While playing a game, press the Game button to switch the
Apple TV Remote app to game mode. Hold your iOS device in landscape orientation and
use the Touch surface area and buttons to play the game.
Return to Up Next or the Home screen. Tap the Home button once to go to Up Next
in the TV app. Tap again to go to the Home screen. To change this behavior, see
.
View open apps. Tap the Home button twice. See .
Put Apple TV to sleep. Touch and hold the Home button , then select Sleep. See
.
Activate Siri. Touch and hold the Siri button . See .
Dictation
Control whatʼs playing
Control your home entertainment system with the Siri Remote
Set the
destination for the Home button
Switch quickly between apps
Sleep or wake Apple TV
Talk to your Apple TV
Apple Confidential
Page 26

Return to the previous screen. Tap the button.
Use Control Center with the Apple TV Remote app
You can activate a nd use Ap ple TV Remote app co ntro ls in Con trol Ce nter on a
compatible iOS device with iOS 11 or later.
Before you begin, download the Apple TV Remote app from the App Store on your
compatible iOS device, and make sure your Apple TV, iOS device, and the Apple TV
Remote app are updated to the latest software version and connected to the same Wi-Fi
network. For more information, see the Apple Support article
.
Turn on Apple TV Remote app controls in Control Center. On the iOS device, go to
Settings > Control Center, then tap Customize Controls. Tap the Add button next to
Apple TV Remote in the More Controls list to add it to controls that appear in Control
Center.
Open Apple TV Remote app controls in Control Center. On your iOS device, swipe up
from the bottom edge of any screen (even the Lock screen), then tap the Apple TV icon
.
The controls in Control Center function the same as in the app. For more information, see
.
Stream content using AirPlay
Use AirPlay to view the screen of your Mac or iOS device directly on Apple TV and share
it with other people in the room.
In order to share the screen in this way, both Apple TV and the shared device may need
to be connected to the same network. For more about peer-to-peer sharing, see the
Apple Support article .
To display AirPlay c onnection instructi ons on Apple TV, see
.
View an iOS device on Apple TV. On the iOS device, swipe up from the bottom of the
screen to open Control Center. Tap , then select Apple TV in the list of AirPlay devices.
Listen to audio from an iOS device on Apple TV. On the iOS device, do either of the
following:
From Control Center: Tap and hold the area above the Music playback controls, then
tap and select Apple TV in the list of devices.
Set up the Apple TV
Remote app
Navigate with the Apple TV Remote app
How to AirPlay content from your iPhone, iPad, or iPod touch
Use Apple TV as a
conference room display
Apple Confidential
Page 27

From the Music app: In Now Playing, tap , then select Apple TV in the list of
devices.
View a Mac on Apple TV. On the Mac, click in the Mac menu bar. Choose the name
of the Apple TV you want to use.
Instead of viewing your Macʼs screen you can send just the audio from the Mac to Apple
TV and use the speakers attached to your AV receiver.
Listen to audio from a Mac on Apple TV. Option-click the Sound icon in the Mac menu
bar. Select Apple TV in the Output Device list.
Rename Apple TV. You ca n c han ge the name of yo ur App le TV so you can easily id ent ify
it in a list of AirPlay devices. In Settings on Apple TV, go to AirPlay > Apple TV Name.
Restrict access to Apple TV. When you use Apple TV as an AirPlay device, you can
require users to enter a passcode or password when they try to connect. In Settings ,
go to AirPlay and turn on Require Device Verification. Then, go to AirPlay > Security and
select “Passcode” or “Password.” Selecting Passcode requires AirPlay users to enter a
code when a device attempts to connect; selecting Password prompts you to create a
password.
Fix a cropped AirPlay display. If your AirPlay display appears cropped on Apple TV, you
can apply underscan to show the entire image. In Settings , go to AirPlay > AirPlay
Display Underscan. If you see black bars around the image, turn this setting off.
Use iTunes in the Cloud. When playing content from an AirPlay device, you can tell
Apple TV to stream the content from an iTunes server rather than over the local network
from the AirPlay-connected device. In Settings , go to AirPlay > Play Purchases from
iCloud.
Screensavers
Apple TV displays a screensaver after itʼs idle for a preset number of minutes.
The Aerial screensaver shows beautiful slow-motion videos of places around the world,
download from an online server, making the screensaver more engaging and dynamic.
For Aerial, you can control how often Apple TV checks for and downloads new videos.
Change the Aerial screensaver download frequency. In Settings , go to General >
Screensaver and select Download New Videos, then select an option.
Return to using Apple TV. When the screensaver is active, press the Touch surface to
return to whatever app you were previously using.
Apple Confidential
Page 28

Choose a different screensaver. In Settings , go to General > Screensaver and
select Type. Then select the screensaver you want to use.
Select which photos to display. Many of the screensaver options display a slideshow of
photos—these can be photos provided by Apple, or a collection of your own stored in
iCloud. To choose which photos are used, in Settings , go to General > Screensaver
and select Type. Then choose one of the photo-based screensaver types.
If you choose My Photos, the Photos app opens. Follow the instructions in
.
Set the screensaver delay time. In Settings , go to General > Screensaver and
select the Start After setting, then specify a number of minutes. This instructs Apple TV
to automatically start the screensaver if the device has been idle for the specified
duration.
Activate the screensaver immediately. Press the Home button to go to the Home
screen (if youʼre not already there), then press the button twice.
Sleep or wake Apple TV
Apple TV is ready for you to watch at any time, and automatically goes to sleep after a
preset period of inactivity.
Wake Apple TV from sleep. Press the , Home , Siri , or Play/Pause button
on the Siri Remote. A small light glows on the front of Apple TV. Apple TV wakes and
displays whatever was last visible.
Put Apple TV to sleep. When youʼre done, you can just shut off your television or
receiver. Apple TV falls asleep after a period of inactivity.
Set the delay before sleep starts. To set h ow long Apple TV waits before going to
sleep, in Settings , go to General > Sleep After.
Force Apple TV to sleep now. Press and hold the Home button , then select Sleep.
Or in Settings , go to General, and select Sleep Now.
Status light
The status light on the front of Apple TV indicates the following:
Set photos as
a screensaver
Apple Confidential
Page 29

If Apple TV is The status light
On Glows
Off or in standby Is off
Starting up Flashes slowly
Accepting a command from the remote Flashes once
Updating software Flashes quickly
Apple Confidential
Page 30

Talk to your Apple TV
Siri makes interacting with Apple TV easy, fun, and informative. You can search for
movies, TV shows, music, or apps; find actors or directors you like; control playback;
open your apps; even ask about sports, weather, and stocks—no matter whatʼs
happening onscreen.
Siri doesnʼt talk back to you on Apple TV like it does on iPhone and other devices, but itʼll
carry out your request and display the results onscreen.
See a list of things you can ask Siri. Press the Siri button .
Search and control Apple TV with your voice. Press and hold the Siri button and
start talking.
Siri understands a wide range of commands, and intuitively applies them to the current
context whenever possible. To see some commands and queries that show what Siri can
do, see and .
Dictate instead of type. Whenever you see a text entry field, you can use your voice
instead of using the onscreen keyboard. Press and hold the Siri button and say the text
you want to enter. You can even speak individual characters—for example, when entering
user names and passwords. For more, see .
Search movies, TV shows, and apps
Siri on Apple TV helps you quickly find movies and TV shows to watch, and apps in the
App Store to download. Siri can find movies and TV shows based on a wide range of
criteria—including title, topic, genre, actors, director, rating, age appropriateness, and
more. You can even ask to find “good” or “popular” results. For apps, you can search by
app name, developer, or category.
Ask Siri. Say something like:
“What should I watch?”
Siri and dictation
Search movies, TV shows, and apps Other things you can ask Siri
Dictation
Apple Confidential
Page 31

“Find The Boxtrolls”
“Play Episode 3 of Season 1 of Homeland”
“Show me popular comedies”
“What are the best baseball movies?”
“Find Benedict Cumberbatch movies”
“Find documentaries about cars”
“Watch great dramas”
“Find me some TV Shows that are good for kids”
“Show PG-13 movies”
“Find Crossy Road”
“Find weather apps”
“What are some new sports apps?”
“Find apps by Activision”
Combine search terms
You can als o c omb ine ge nres for movies and TV sh ows.
Ask Siri. Say something like:
“Find me some funny horror movies”
“Show me independent foreign films”
“Search for crime documentaries”
Once you make an initial search, you can ask additional questions to zero in on exactly
what you want to watch. See .
Search for free content
You can ask Si ri to lim it the search res ults to conten t t hat is im mediate ly playa ble ba sed
on what you own and the services you already subscribe to.
Refine movie and TV show search results
Apple Confidential
Page 32

Ask Siri. Say something like:
“Find free kidsʼ movies”
“I want to watch Homeland for free”
“What are some free movies?”
When you search for a movie or TV show, Siri searches a wide range of apps to find
exactly what youʼre looking for. If you request a specific title, Siri takes you directly to the
detail page for that video. If thereʼs more than one result, Siri displays search results for
you to choose from or further refine your search.
Search within a specific app
You can sea rch for items on YouTub e by in clu ding “YouTub e” in your Siri requ est
(requires the YouTube app, available on the App Store for Apple TV). Siri automatically
opens the YouTube app and adds your request to its search screen.
Ask Siri. Say something like:
“Search for Coldplay on YouTube”
“Show me crafts for kids on YouTube”
“Search YouTube for Minecraft”
You can sea rch spe cif ica lly for podcas ts by inclu din g “podcast ” i n yo ur query.
Ask Siri. Say something like:
“Get some funny podcasts”
“Find podcasts about surfing”
“Play ‘Radiolabʼ podcast”
If youʼve subscribed to the selected podcast, Apple TV begins playing the current
episode right away.
You can als o s earc h d irec tly withi n m any app s. See .
For a list of Siri-compatible apps, see the Apple Support article
.
To learn more about working with search results, see and
.
Search in a specific app
About Search on your
Apple TV (4th generation)
View search results Select a
search result
Apple Confidential
Page 33

7%#&(3#/$8=($#3-5,3
!"+*'A6('#&4'-1.1'$6'=1*:'86>1+&L';F'&"6/&L'#0$6.&'6.'6$"+.'&(?`+0$&L'$"+'&+#.0"'.+&(3$&
Apple Confidential
#))+#.&'#$'$"+'?6$$68'6='$"+'&0.++*@
!>)&>1#'(A$91%>-'!1=1*'D>9'
<#>12#$+'$6'$"+'.+&(3$'A6('/#*$'$6'6)+*L'$"+*').+&&'$"+';6(0"'&(.=#0+'$6'&"6/':+$#13&'=6.
$"#$'>1:+6@'R.68'"+.+'A6('0#*'/#$0"'#'$.#13+.L'&++'$"+'>1:+6%&':+&0.1)$16*L'.#$1*2L'0#&$L
#*:'/"10"'#))&'$"+'>1:+6'1&'#>#13#?3+'6*@
W='A6(.'[(+.A'A1+3:&'6*3A'6*+'&+#.0"'.+&(3$L'-1.1'&"6/&'$"+':+$#13&'=6.'$"#$'>1:+6@
1&'#>#13#?3+'6*'1;(*+&@
*/"2$.-<"$/4>-<.,#/-4$,D-%#$,$7/6"-+$-/1)+':6/*'$6'>1+/'86.+':+$#13&'#?6($'$"+
>1:+6L'1*03(:1*2'.#$1*2&'#*:'.+>1+/&@
\#)$#1*'G8+.10#T'\1>13'!#.
'm'YMDq'HGKF5c@'G33'.12"$&'.+&+.>+:@
Page 34

Refine movie and TV show search results
You can refine a s earch fo r m ovie s o r T V shows by a ski ng Sir i fo r a subset of you r i nit ial
search results. For example, if you ask Siri to show you Jason Bateman movies, you can
then ask for a subset of them, such as:
Ask Siri. Say something like:
Just show me the ones from this year”
“Only the dramas”
“Ju st t he be st o ne s”
Tune directly in to live content
Some apps on Apple TV include live video streams featuring content like news or sports.
You can use Si ri to jum p r igh t i nto these live fee ds.
Not all features and content are available in all areas.
Live channels
Speak the name of the channel you want to watch and the live video stream immediately
begins to play.
Ask Siri. Say something like:
“Watch ESPN2”
“Turn on CBS News.”
For a list of supported apps and countries, see the Apple Support article
.
Live sports
Ask Siri about a sports team, score, or schedule. If the game is available on a supported
app, Siri takes you straight to the action.
Ask Siri. Say something like:
“I want to watch the Warriors game.”
“What hockey games are on?”
Ask Siri to
watch live channels on your Apple TV
Apple Confidential
Page 35

-+3+0$'$"+'!#$0"'c1>+'?($$6*'$6'6)+*'$"+'#))'#*:'/#$0"'$"+'2#8+@
Apple Confidential
_6('0#*'#3&6'#&4'#?6($'&)6.$&'&0"+:(3+&'1*'2+*+.#3@
';:$!/</+$-#A'&68+$"1*2'314+T'f!"6%&')3#A1*2'?#&+?#33'$6*12"$og
-1.1'&"6/&'A6('#'31&$'6='#33'$"+'.+3+>#*$'2#8+&L'$"+1.'&$#.$'$18+&'#*:'&06.+&'P1='2#8+'"#&
#3.+#:A'&$#.$+:QL'#*:'#'!#$0"'<6/'?($$6*'1='#'&())6.$+:'#))'1&'0(..+*$3A'#1.1*2'$"+'2#8+@
E3#046($'#*:'6$"+.'.+&$.10$16*&'#))3A@'9#8+'>1:+6'1&'1*'JV'[(#31$A'/"+*'#>#13#?3+@'<Jc'#*:'$"+'<Jc'&"1+3:'#.+
.+21&$+.+:'$.#:+8#.4&'6='$"+'<#$16*#3'J604+A'c+#2(+@'<Jc'#*:'<Jc'$+#8'8#.4&'#.+'$"+').6)+.$A'6='$"+'<Jc
#*:'1$&'$+#8&@'m'<Jc'YMDq@'G33'.12"$&'.+&+.>+:@
!,=#$(,=%023(F+-(8/0(/3L('%$%
-1.1'0#*':6'8(0"'86.+'$"#*'=1*:'#'2.+#$'&"6/'$6'/#$0"'6.'#'2.+#$'#))'$6':6/*36#:@'_6(
0#*'#3&6'(&+'-1.1'$6'6)+*'#))&'6*'A6(.'G))3+';FL'06*$.63'$"+')3#A?#04'6='#'>1:+6'A6(%.+
/#$0"1*2L'3+#.*'86.+'#?6($'$"+'#0$6.&'6.':1.+0$6.'6='#'&"6/L'#*:'8(0"'86.+@
8,7/@,#"$'&&("$)*
_6('0#*'(&+'-1.1'$6'6)+*'#*'#))'6.'&/1$0"'$6'#*6$"+.'#))@
';:$!/</+$-#A'&68+$"1*2'314+T
fC)+*'G))'-$6.+g
fc#(*0"'<+$=31,g
fI3#A'IE-'BWV-'F1:+6g
f96'$6'I"6$6&g
Page 36

While playing video
When youʼre playing video content there are a number of commands you can use to
control playback.
Ask Siri. Say something like:
“Pause this”
“Play from the beginning”
“Skip forward 90 seconds”
“Ju mp b ac k 1 0 mi nu tes ”
“Turn on closed captioning”
“Turn on French subtitles”
“What did she just say?”
In this case, Apple TV skips back 15 seconds and temporarily turns on subtitles.
Get more information about a show
You can ask qu est ions to ge t m ore info rma tio n a bou t a pro gra m yo uʼre wat chi ng.
Ask Siri. Say something like:
“Who stars in this?”
“Who directed this?”
“Whatʼs this rated?”
“When was this released?”
Play music
If youʼre an Apple Music subscriber, you can use Siri to play songs from Music.
Ask Siri. Say something like:
“Play ‘Sleek White Babyʼ by Punch Brothers”
“Play the top ten hip-hop tracks”
“Play the first Alabama Shakes album”
“Add ‘U ptow n F unk ʼ by Br uno Ma rs to my c oll ec ti on ”
“Play the live version of this song”
Apple Confidential
Page 37

“Play more like this”
To learn more about using Siri for musi c playback, see .
Control HomeKit products
If youʼre signed in on Apple TV with an authorized iCloud account, you can ask Siri to
control many HomeKit products from Apple TV, including lights, thermostats, shades,
and more. You can change a setting, set a scene, get the status of a device, or get a list
of devices.
Ask Siri. Say something like:
“Dim the dining room lights to 50%”
“Turn on the coffee maker”
“How many outlets are in my apartment?”
“Set the temperature to 72 degrees”
“Ar e the up st air s l ig hts on ?”
“Party”
“Goodnight”
“Iʼm heading out”
Note: You c ann ot con trol se cure Ho meK it-compatible produc ts s uch as do or locks,
motorized doors or windows, security systems, and garage doors from Apple TV. You
must use an iOS device to control to those devices.
To learn more about HomeKit, see t he .
Get information
You can ask Si ri abo ut oth er topics, li ke s por ts, weather, and stocks.
Ask Siri. Say something like:
“Who won the NBA Finals?”
“Who are the Mavericks playing tomorrow?”
“Howʼs the weather?”
“Whatʼs the weather in Vancouver?”
“When is sunset in Paris?”
Use Siri with Music
iPhone User Guide
Apple Confidential
Page 38

f!"+.+%&'$"+'<G-VGd'$6:#Aog
fJ6/%&'G))3+%&'&$604og
Apple Confidential
;"+'.+&(3$&'#))+#.'#$'$"+'?6$$68'6='$"+'&0.++*@
W*'&68+'0#&+&L'A6('0#*'&/1)+'()'6*'$"+';6(0"'&(.=#0+'$6'.+>+#3'86.+'1*=6.8#$16*@
8-#"9$<6$'#33'-1.1'0688#*:&'#.+'#>#13#?3+'1*'#33'#))&'6.'1*'#33'06(*$.1+&@
'.#/L(+038$##0(5/@#53(/01(8=/02#(3#,,%023
_6('0#*'(&+'A6(.'>610+'$6'*#>12#$+'#*A'#))'6*'G))3+';F@'-1.1'0#*'.+062*1e+'$"+'*#8+'6=
6*&0.++*'3#?+3&@
I;"$!/</$#-$4,7/@,#"$#3"$/4#"<>,0"$->$,4$,&&+$!"+*'A6(').+&&'#*:'"63:'$"+'-1.1'?($$6*'
#*:'&#A'$"+'*#8+'6='#*'6*&0.++*'06*$.63a&(0"'#&'#*'1$+8'1*'$"+'8+*('?#.'#$'$"+'$6)'6=
$"+'1;(*+&'H6>1+&'&$6.+aG))3+';F'&+3+0$&'$"#$'06*$.63@
Page 39

Use Siri to change settings. In Settings , press and hold the Siri button and speak
a command you see onscreen to open or activate that setting.
Dictation
Whenever you see an onscreen keyboard—such as when searching in a third party app
or when entering a user name or password—you can speak the text instead of using the
onscreen keyboard.
Note: Dictation may not be available in all areas.
Speak instead of typing. With a text entry field highlighted onscreen, press and hold
the Siri button and speak whatever you want to enter in the text field.
Speak user names and passwords. If a text field tells you to spell out characters
instead of speaking words, press and hold the Siri button , then speak the letters,
numbers, and symbols you want to enter.
Say “uppercase” to enter an uppercase letter.
Siri recognizes many domain names such as icloud.com, so they donʼt need to be
spelled out.
You can use ph one tic or military alp hab et pron unc iat ion s, such as alpha, bravo,
charlie, delta for A, B, C, D, and so on.
You can use th e s pec ial command “Clear” to delete the characters you just entered.
Clear applies only to characters spoken during the current Siri entry. For example, if
you say “A, B, C,” then release the Siri button, then press it again and say “1, 2, 3,
clear,” the numbers will be deleted but the letters will remain.
Note: Dictation sends information, such as voice input and location, to Apple to process
requests. Voice input from spelling dictation of user names and passwords isnʼt sent.
Turn dictation on or off. In Settings , go to General > Dictation.
Turn Siri on or off
When you first set up Apple TV, you may be asked if you want to use Siri (depending on
your country and language). You can change your mind at any time and turn Siri on or off.
Turn Siri on or off. In Settings , go to General > Siri.
Apple Confidential
Page 40

TV at a glance
Black-ish
Game of Thrones
The TV app is the first place you go to start watching on your TV.
Continue playing your TV shows and movies, from across your apps, as well as
browse great new content and collections from the apps you have access to. See
.
Access your entire iTunes movie and TV show collection. See .
Explore great new content across channels and services youʼve not yet subscribed
to, along with the latest iTunes releases. See .
The TV app is available on Apple TV, iPad, and iPhone.
For a list of video apps compatible with the TV app, see the Apple Support article
.
Not all features and content are available in all areas.
© ABC Disney. Watch Power on STARZ with subscription or authentication. Power © 2017 Starz
Entertainment, LLC. All rights reserved. © 2017 Home Box Office, Inc. All rights reserved.
HBO® and related service marks are the property of Home Box Office, Inc.
TV
is available on iTunes.
is available on iTunes.
Watch Now
Library
Store
https://support.apple.com/HT207254
Black-ish
Game of Thrones
Apple Confidential
Page 41

Watch Now
Watch Now includes TV shows and movies you have access to from free services,
services youʼve subscribed to, and your iTunes purchases and rentals.
See whatʼs up next. Navigate to Up Next to quickly access the TV shows and movies
youʼre currently watching, including new rentals and purchases from iTunes. Shows and
movies appear in the order youʼre most likely to want to watch them in. For example,
when a showʼs episode is finished, the next one automatically appears in Up Next. And if
youʼve already caught up on a show, whenever a new episode becomes available, it
immediately shows up in the beginning of Up Next.
If you have an iPad or iPhone and are signed in with the same iTunes account, your
viewing progress and episode selection are also kept in sync in the TV app on those
devices. You can start watching a show on your Apple TV and then finish watching it on
iPad, or vice-versa.
Remove an item from Up Next. Highlight an item, then press and hold the Touch
surface and select “Remove from Up Next.”
Browse content. Explore a great selection of curated TV shows and movies–including
collections hand-picked by experts as well as dedicated categories such as kids. To see
more options, select a category or genre.
Start watching a show or movie. Highlight a movie or TV show, then press the Touch
surface to start playing it.
When you ask Siri to play a TV show, Apple TV automatically starts the next episode you
havenʼt seen, whether itʼs the middle of season 1, or last nightʼs episode.
Ask Siri. “Play Game of Thrones”
Return to the app that hosts the content youʼre watching. Press the button.
Apple Confidential
Page 42

J"#%<4$#-$#3"$)*$,&&$-4$#3"$K-."$;0<""4+$!"+*')3#A1*2'#*'1$+8L').+&&'$"+'J68+
?($$6*' @
Apple Confidential
O"#$.-<"$/4>-<.,#/-4+$-+3+0$'#*'1$+8'$6'&++'1$&'.#$1*2L':+&0.1)$16*L'#>#13#?3+'&+.>10+&L
#*:')(.0"#&+'6.'.+*$#3'1*=6.8#$16*@
!#$0"'D$<&;"9*?'6*'JEC'<C!'/1$"'&(?&0.1)$16*@'JEC'<C!^'1&'#00+&&1?3+'6*3A'$".6(2"')#.$101)#$1*2
)#.$*+.&'1*'$"+'S@-@'#*:'0+.$#1*'S@-@'$+..1$6.1+&@'\+.$#1*'.+&$.10$16*&'#))3A@'^'#*:'m'YMDq'J68+'E6,'C==10+L
W*0@'G33'.12"$&'.+&+.>+:@'JEC^L'JEC'<C!^L'#*:'.+3#$+:'0"#**+3&'#*:'&+.>10+'8#.4&'#.+'$"+').6)+.$A'6='J68+
E6,'C==10+L'W*0@
P%@$/$F
c1?.#.A'1*03(:+&'A6(.'1;(*+&')(.0"#&+&'#*:'.+*$#3&L'6.2#*1e+:'?A'0#$+26.A@
O"#$.-<"$/4>-<.,#/-4+$-+3+0$'#*'1$+8'$6'&++'.#$1*2&L':+&0.1)$16*&L'#*:')(.0"#&+'6.
.+*$#3'1*=6.8#$16*@
?5CCX8)9$LT'?XK5TBXJ$58TY$S5J$SI)IJX$I!X$5S$V8TV8X$V?58!$A$S'*5JV)X!
SX')IJX$)WB+$C*'#*'1$+8%&'V+$#13&')#2+L'&+3+0$'$"+'fG::'$6'R#>6.1$+&g'?($$6*' @'W=
A6(%>+'#3.+#:A'#::+:'#*'1$+8'$6'A6(.'=#>6.1$+&L'$"+'?($$6*'0"#*2+&'$6'fK+86>+'=.68
R#>6.1$+&g' @
Page 43

',+$#
Apple Confidential
5,)36.+'2.+#$'*+/'06*$+*$'#0.6&&'0"#**+3&'#*:'&+.>10+&'A6('"#>+*%$'A+$'&(?&0.1?+:'$6L
#&'/+33'#&'$"+'3#$+&$'.+3+#&+&'6*'1;(*+&@
XH&(-<"$#3"$!#-<"+$E.6/&+'=+#$(.+:'86>1+&L';F'&"6/&L'6.'06*$+*$'#))&@
W%1$-<$<"4#$-4$/)%4";+$G=$+.'&+3+0$1*2'#*'1$+8L'&+3+0$'1$&').10+L'$"+*'06*=1.8'$"#$'A6(
/#*$'$6'?(A'1$@'R6.';F'&"6/&L'A6('0#*'?(A'#*'+*$1.+'&+#&6*'6.'1*:1>1:(#3'+)1&6:+&@
W*'&68+'#.+#&L'A6('0#*'.+*$'86>1+&@'-+3+0$'$"+'1$+8%&').10+L'$"+*'06*=1.8'$"#$'A6('/#*$
$6'.+*$'1$@'_6('"#>+'NM':#A&'$6'?+21*'/#$0"1*2'#'.+*$+:'86>1+@'G=$+.'A6('&$#.$'/#$0"1*2'1$L
A6('0#*')3#A'1$'#&'8#*A'$18+&'#&'A6('/#*$'1*'$"+'#336$$+:'$18+'&"6/*'6*&0.++*@'C*0+
A6(.'$18+'1&'()L'$"+'86>1+'1&'*6'36*2+.'#>#13#?3+@'K+*$#3&'0#*%$'?+'$.#*&=+..+:'$6'#*6$"+.
:+>10+@
!%D;0</D"$#-$,$;"<7/0"+$-$6.+'=+#$(.+&'06*$+*$'#*:'#))&'$"#$'#.+'#>#13#?3+'/1$"'#
&(?&0.1)$16*@';6'&12*'()L'&+3+0$'$"+'1$+8'#*:'=6336/'$"+'&12*U()').60+&&'(&1*2'A6(.'G))3+
WV@'W='A6('"#>+*%$'1*&$#33+:'$"+'#))'A+$L'A6(%33'?+').68)$+:'=1.&$'$6':6/*36#:'1$'=.68'$"+
G))'-$6.+@
O"#$,&&;$#3,#$,<"$&,<#$->$1-%<$&,1$)*$;%D;0</&#/-4+$-$6.+'=+#$(.+&'#))&'$"#$'8#A'?+
#>#13#?3+'$6'A6('/1$"'A6(.'0#?3+'6.'&#$+331$+'&(?&0.1)$16*@'-+3+0$'#*'#))'$6'+1$"+.'6)+*'1$'6.
:6/*36#:'1$'=.68'$"+'G))'-$6.+@'W='$"1&'1&'A6(.'=1.&$'$18+'(&1*2'6*+'6='$"+&+'#))&L'A6('8#A
*++:'$6'+*$+.'A6(.';F').6>1:+.'0.+:+*$1#3&'P&++' Q@
-1*23+'&12*U6*
'#/$8=
S&+'-+#.0"'$6'=1*:';F'&"6/&'#*:'86>1+&'?A'$1$3+L'0#&$L'6.'0.+/@
!",<03+$-/1)+'$6'26'$6'-+#.0"L'$"+*'+*$+.'#'&+#.0"'$+.8@
Page 44

You can als o b rowse ite ms tha t a ppe ar in trending searches.
Dictate instead of type. In Search, highlight the text entry field. Press and hold the Siri
button and speak. For more information, see .
Use Siri to search at any time. See .
Get more information. Select an item to see ratings, descriptions, and purchase or
rental information.
Settings
To change these and other settings, i n Settin gs , go to Apps > TV.
Turn Up Next on or off. Select Up Next, which shows your viewing history and updates
with the next episode for you to play.
Determine which apps share content with TV app. Select an app, then turn it on or off.
Clear your Play History. To re move TV shows and movies from Up Next, selec t Cl ear
Play History. This also removes information about what youʼve watched, which is synced
with your other devices.
Dictation
Search movies, TV shows, and apps
Apple Confidential
Page 45

Q%01(/..3
4..(',+$#
Apple Confidential
S&+'$"+'G))'-$6.+' '$6'?.6/&+L')(.0"#&+L'#*:':6/*36#:'#))&'$6'G))3+';F@
<6$'#33'=+#$(.+&'#*:'06*$+*$'#.+'#>#13#?3+'1*'#33'#.+#&@
W<-2;"$D1$0,#"@-<1$-<$@"4<"+$W*'$"+'8+*('?#.L'&/1)+'$6'#*A'6='$"+'=6336/1*2'0#$+26.1+&T
:$>&/9$?-'E.6/&+'#'2.+#$'&+3+0$16*'6='#))&'0"6&+*'?A'$"+'G))'-$6.+@
+")'!3>9&<-'E.6/&+'$"+'$6)'1$+8&'1*'$"+'G))'-$6.+@
!>&$0"91$<-'E.6/&+'#))&'?A'0#$+26.A@
./9%3><$?-'-++'$"+'#))&'A6(%>+')(.0"#&+:'6*'$"+'G))'-$6.+a1*03(:1*2')(.0"#&+&
8#:+'6*'6$"+.'1C-':+>10+&'$"#$'"#>+'#'&"#.+:'G))3+';F'>+.&16*'6='$"+'#))L'#&'/+33'#&
)(.0"#&+&'?A'R#813A'-"#.1*2'8+8?+.&@
!",<03$#3"$'&&$!#-<"+$-/1)+'$6'26'$6'-+#.0"L'$"+*'+*$+.'#'&+#.0"'$+.8@
B/0#,#"$/4;#",6$->$#1&"+$W*'-+#.0"L'"12"312"$'$"+'$+,$'+*$.A'=1+3:@'I.+&&'#*:'"63:'$"+'-1.1
?($$6*' '#*:'&)+#4@'R6.'86.+'1*=6.8#$16*L'&++' @
I;"$!/</$#-$;",<03$,#$,41$#/."+$<6'8#$$+.'/"#$'#))'1&'6)+*L'6.'/"+$"+.'$"+'J68+
&0.++*'1&'>1&1?3+L'A6('0#*'#3/#A&').+&&'#*:'"63:'$"+'-1.1'?($$6*' '#*:'&+#.0"'=6.'#))&'?A
*#8+L':+>+36)+.L'6.'0#$+26.A@
';:$!/</+$-#A'&68+$"1*2'314+T
V10$#$16*
fR1*:'\.6&&A'K6#:g
Page 46

fR1*:'/+#$"+.'#))&g
f!"#$'#.+'&68+'*+/'&)6.$&'#))&og
Apple Confidential
fR1*:'#))&'?A'G))3+g
8-#"9$W='A6('2+$'86>1+'#*:';F'.+&(3$&'1*&$+#:'6='#))&L'$.A'1*03(:1*2'f#))g'#$'$"+'+*:'6=
A6(.'-1.1'.+[(+&$T'fR1*:'\.6&&A'K6#:'#))@g
'00";;$>,./(1$.".D"<;M$,&&;+$!1$"'R#813A'-"#.1*2'+*#?3+:L'A6('0#*'>1+/'#*:
:6/*36#:'#))&')(.0"#&+:'?A'6$"+.'=#813A'8+8?+.&@'-+3+0$'I(.0"#&+:L'&+3+0$'R#813A
-"#.1*2L'$"+*'&+3+0$'$"+'*#8+'6='#'=#813A'8+8?+.@'R6.'86.+L'&++' @
R#813A'-"#.1*2
N-$8=/3#(/01(1+&05+/1(/..3
-+3+0$'$"+'#))%&').10+'P6.'=6.'#'=.++'#))L'&+3+0$'f9+$gQL'$"+*').+&&'$"+';6(0"'&(.=#0+'$6
)(.0"#&+'$"+'#))@
7F'8"/'<$$'&3$'1!*"/?'1%"#'1#<&$>?'"F'>')91%$L'A6(%>+'#3.+#:A')(.0"#&+:'$"+'#))'#*:
A6('0#*':6/*36#:'1$'#2#1*'=6.'=.++@
7F'8"/'<$$'G)$#'1#<&$>?'"F'>')91%$L'$"+'#))'1&'#3.+#:A'1*&$#33+:@'-+3+0$'C)+*'$6'3#(*0"
$"+'#))@
!"13+'#*'#))'1&':6/*36#:1*2'6.'():#$1*2L'1$&'106*'#))+#.&'6*'$"+'J68+'&0.++*'/1$"'#
).62.+&&'1*:10#$6.@
J"7/"2$S,./(1$!3,</4@$&%<03,;";+$W='A6('&+$'()'R#813A'-"#.1*2L'$"+'=#813A'6.2#*1e+.
0#*'.+>1+/')(.0"#&+&'8#:+'?A'6$"+.'=#813A'8+8?+.&'(*:+.'$"+'#2+'6='DZ@'R6.'+,#8)3+L'1=
G&4'$6'E(A'1&'&+$'=6.'A6(*2+.'=#813A'8+8?+.&'P06*=12(.+:'1*'1;(*+&'6*'#'H#0'6.'1C-
Page 47

device), then when those members try to make a purchase, a message is sent to the
family organizer asking for approval. For more about setting up Family Sharing, see
.
Note: Age restrictions for Ask to Buy vary by area.
Restrict in-app purchases. Many apps provide extra content or enhancements for a fee.
To limit purchases that can be made wi thin an app, in Settings , go to General >
Restrictions (make sure Restrictions is turned on) and turn off In-App Purchases. For
more about Restrictions, see .
Turn off automatic updates. By default, apps are automatically updated when new
versions are released. To turn off this feature, in Settings , go to Apps > Automatically
Update Apps.
If Automatically Update Apps is turned off, you can select any app in the App Store to
check if an update is available and manually update there.
Turn on automatic app installation. If you download an app on an iPhone or iPad that
also has an Apple TV version (known as a universal purchase app), the app can be
automatically added to the Home screen of any Apple TV signed in to the same iTunes
account. To turn on this feature, in Settings , go to Apps > Automatically Install Apps.
Note: Family membersʼ universal apps are not automatically added to the Home screen.
For information about deleting apps, see .
Family Sharing
Restrict access to content
Customize the Home screen
Apple Confidential
Page 48

Q%01(/01(&/,8=(%6-0#3(*+"%#3(+$(67(3=+&3
%6-0#3(*+"%#3(/01(67(3=+&3
'#*:';F'&"6/&'
Apple Confidential
!1$"'1;(*+&'86>1+&' '#*:';F'&"6/&' L'A6(%.+'6*3A'#'=+/'03104&'#/#A'=.68'$"+'3#$+&$
86>1+&'#*:'"1$';F'&"6/&@
W<-2;"$D1$0,#"@-<1$-<$@"4<"+$W*'$"+'8+*('?#.L'&/1)+'$6'#*A'6='$"+'=6336/1*2'0#$+26.1+&T
./9%3><$?-'-++'$"+'86>1+&'A6(%>+')(.0"#&+:'6*'$"+'1;(*+&'-$6.+L'1*03(:1*2
)(.0"#&+&'8#:+'6*'6$"+.'1C-':+>10+&'#*:')(.0"#&+&'?A'R#813A'-"#.1*2'8+8?+.&@
+")'6"=1$<'6.'+")'+,'23";<-'E.6/&+'$"+'$6)'1$+8&'1*'$"+'1;(*+&'-$6.+@
D1<3'H1<&I:>="91&$<-'R1*:'1$+8&'A6(%>+'#::+:'$6'A6(.'!1&"'c1&$'PH6>1+&Q'6.'R#>6.1$+&
P;F'&"6/&Q'?($'"#>+*%$'A+$')(.0"#&+:'6.'.+*$+:@
@$#9$<-'E.6/&+'?A'2+*.+@
J$%"AA$#?$?-'R1*:'.+0688+*:#$16*&'?#&+:'6*'A6(.').+>16(&')(.0"#&+&@
!",<03$#3"$/)%4";$!#-<"+$-/1)+'$6'26'$6'-+#.0"L'$"+*'+*$+.'#'&+#.0"'$+.8@
B/0#,#"$/4;#",6$->$#1&"+$W*'-+#.0"L'"12"312"$'$"+'$+,$'+*$.A'=1+3:@'I.+&&'#*:'"63:'$"+'-1.1
?($$6*' '#*:'&)+#4@'R6.'86.+'1*=6.8#$16*L'&++' @
I;"$!/</$#-$;",<03$,#$,41$#/."+$-++' @
-+#.0"'86>1+&L';F'&"6/&L'#*:'#))&
V10$#$16*
O"#$.-<"$/4>-<.,#/-4+$-+3+0$'#*'1$+8'$6'&++'.#$1*2&L':+&0.1)$16*&L'#*:')(.0"#&+'6.
.+*$#3'1*=6.8#$16*@
Page 49

Watch a free preview. Select Preview.
Add an item to your Wish List. When you find something you might want to buy or rent
later, select Wish List. To view your Wish List, swipe to Wish List in the menu bar.
Buy an item. Select the itemʼs price, then confirm that you want to buy it. For TV shows,
you can buy an entire season or individual episodes.
Rent a movie. In some areas, you can rent movies. Select the itemʼs price, then confirm
that you want to rent it. You have 30 days to begin watching a rented movie. After you
start watching it, you can play it as many times as you want in the allotted time shown
onscreen. During the rental period, you can download the rented movie on one device at
any given time and also stream it on another. For example, you can start watching a
movie downloaded on your iPhone, then finish watching it later on your Apple TV. Once
your time is up, the movie is no longer available.
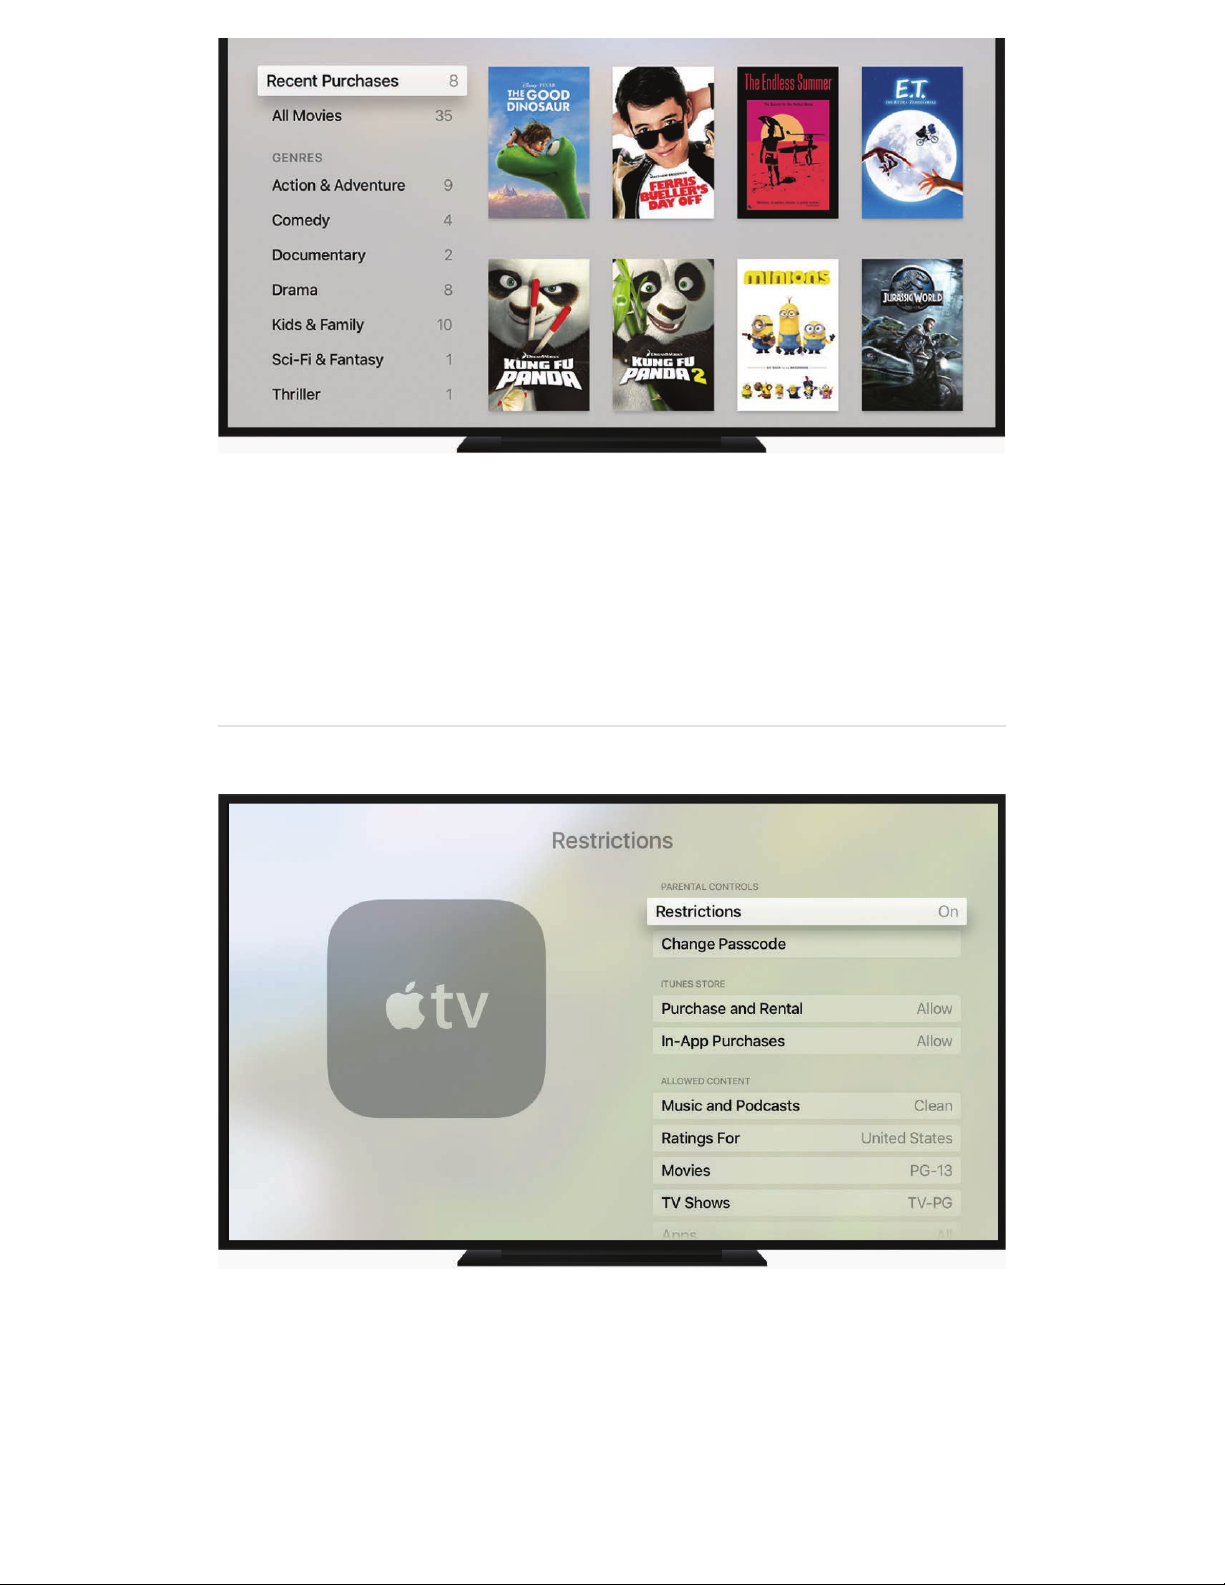
Access family membersʼ purchases. With Family Sharing turned on, you can view
movies and TV shows purchased by other family members. From the menu bar, swipe to
Purchased, choose Family Sharing, then select the name of a family member in the list.
Note: To set up Fa mily Sharing or change settings, you need to use a Mac or an iOS
device such as iPhone or iPad.
If Apple TV is using the iTunes account of an “Ask to Buy” user, the family organizer is
sent a message asking for approval before the purchase is completed. Age restrictions
for “Ask to Buy” vary by area. Using iTunes on a computer, family members can hide any
of their purchases so other family members canʼt view them. For more information, see
.Family Sharing
Apple Confidential
Page 50

iTunes Movies and TV Shows settings
In Settings , go to Apps > iTunes Movies and TV Shows to change these and other
settings.
Change the video resolution for purchases and rentals. By default, you rent,
purchase, and play back iTunes videos in 1080p, which requires a fast Internet
connection. If you have a slower connection, select Video Resolution and choose a lower
resolution.
Change the video resolution for previews. By default, iTunes previews are high
definition (HD). To view standard definition (SD) previews, choose Standard Definition.
Apple Confidential
Page 51

Music at a glance
Use Music to enjoy music in the following ways:
Access millions of songs on Apple Music (requires a subscription). Discover
recommendations based on your tastes (see ), or browse the hottest new
music and recommendations from music experts (see ).
Listen to dozens of hand-curated ad-free radio stations and Beats 1 radio brought to
you by Apple Music. See .
Listen to music from your iCloud Music Library, including music you add from Apple
Music, your iTunes purchases, songs uploaded from your computer, and your iTunes
Match library. Find all of these in Library. See .
To join Apple Music, fo llow the onscreen instructions in Music , or go to the Music
app on an iOS device or in iTunes on your computer.
Note: In some cases an Apple ID is required. Services and features are not available in all
areas, and features may vary by area. You can play Apple Music and Radio tracks on only
one device at a time unless you have an Apple Music Family Membership, which lets you
play music on multiple devices. If you end your Apple Music membership, you can no
longer stream Apple Music tracks or play Apple Music tracks saved for offline play.
You can als o u se App le TV to s trea m m usi c t hat ʼs in the iTunes library on your co mpu ter.
See .
Music
For You
Browse
Radio
Library
Stream content using Home Sharing
Apple Confidential
Page 52

Now Playing
No matter where you are in Music , you can select a song, then press the Touch
surface to start playing it.
Once a song starts playing, it appears in Now Playing. Press the Play/Pause button to
control playback. The song continues to play even if you leave Music, but it stops if you
begin playing video or audio in another app.
On the Now Playing screen, you can quickly navigate to other songs in an album or
playlist, or select more options.
Show controls on the screen during playback. Rest your finger on the Touch surface.
A status indicator appears showing elapsed and remaining time.
Go back to the beginning or skip to the next song. On the Touch surface, press left or
right to restart the current song or skip to the start of the next song.
Rewind or fast forward. On the Touch surface, press left or right and hold to rewind or
fast forward. Release to resume playback.
Show what songs are next. On the Now Playing screen, press the Touch surface to
show songs adjacent to the current song in the Now Playing queue. To play a different
song, swipe left or right to highlight the song you want to play, then press the Touch
surface.
Move to a specific point in the song. On the Now Playing screen, press the Touch
surface, then swipe down to show the elapsed and remaining time. Swipe left or right to
move backward or forward on the timeline.
Quickly add a song to your library. On the Now Playing screen, press the Touch
surface, then select the Add button at the top of the screen.
View a songʼs lyrics. On the Now Playing screen, press the Touch surface, then select
the Lyrics button at the top of the screen.
Note: Lyrics are available only if youʼre a member of Apple Music. The Lyrics button
wonʼt appear if lyrics arenʼt available for the currently playing song.
Get more options. On the Now Playing screen, press the Touch surface, then select the
More button at the top of the screen. Depending on the song, you may be able to:
Go to the album
Go to the artist
Add the song to or delete the song from your library
Apple Confidential
Page 53

Add the song to a playlist
Play the song next
Start a custom radio station from the song
Flag the song as one you love or dislike
Change your speaker settings
Ask Siri. Say something like:
“Play,” “Pause,” “Next song,” or “Previous song”
“Create a radio station based on this song”
“Add th is to my c oll ect ion ”
Repeat. In Settings , go to Apps > Music, then turn on Repeat Music.
Library
Library includes any Apple Music content and playlists you added, iTunes purchases and
playlists you created, and music you make available through iTunes Match.
Note: You c an sub scr ibe to iTu nes Ma tch onl y i n M usi c o n a n iOS devi ce or in iTun es on
your computer.
Browse and play your music. Select an option in the list to display your music by
Recently Added, Playlists, Artists, Albums, Songs, and more. Select a song to play it.
Browse playlists. Highlight a playlist, then press the Touch surface to view it. Select a
song to play it. In addition to playlists you create on the Now Playing screen, Playlists
includes playlists you added from Apple Music, as well as those shared with you.
Shuffle. To play al l of your library in random order, select Shu ffle All at the top of the list.
To play an album in random order, se lect the album, then select the Shuffl e bu tton .
Ask Siri. Say something like:
“Play Bastille shuffled”
“Play ‘More Rainʼ shuffled”
Get more options. On the Now Playing screen, press the Touch surface, then select the
More button at the top of the screen to see more options.
Playlists you create on Apple TV are added to your iCloud Music Library and appear on all
your devices.
Apple Confidential
Page 54

For You
For You appears in the Music menu bar if youʼre a member of Apple Music. Apple
Music suggests curated playlists and albums, based on your specific tastes.
Browse music custom-picked for you. Highlight an album or playlist, then press the
Touch sur face to view it. Select a song to play it. If you f ind a recommendation you donʼt
care for, press and hold the Touch surface, then select Dislike.
Add a song or album to your library. Do any of the following:
Press and hold the Touch surface and select “Add to Library.”
Select the Add button .
Select “Add to Library” in the list of More button options in Now Playing.
Add a playlist to your library. Select the Add button , or select “Add to Library” in the
list of More button options in Now Playing.
The playlist remains in your library, and updates automatically if the playlist changes.
Remove a song, album, or playlist from your library. Do one of the following:
Press and hold the Touch surface and select “Delete from Library.”
Select the In Library button , then select “Delete from Library.”
Select “Delete from Library” in the list of More button options in Now Playing.
Tell Musi c w hat you l ove . To help imp rove future recommendations, do one of the
following:
Press and hold the Touch surface and select Love.
Select the Love button while viewing an albumʼs contents, a playlist, or an artistʼs
screen.
Select Love in the list of More button options in Now Playing.
Get more songs by this artist. Do one of the following:
Press and hold the Touch surface and select “Go to Artist.”
Select the Go to Artist button while viewing an albumʼs contents.
Select “Go to Artist” in the list of More button options in Now Playing.
Ask Siri. “Add th is to my c ol le cti on”
Apple Confidential
Page 55

Get more playlist or album options. While viewing an itemʼs contents, select the More
button to add music to the Up Next queue, create a station based on the currently
selected music, add the playlistʼs songs to your own playlist, or rate whether you love or
dislike the item.
Get more song options. Highlight a song in a playlist, then press and hold the Touch
surface to see more options. Depending on the song, you can choose shuffle, view the
album or artist, add it to your library, add it to a playlist, play it next, create a station, view
lyrics, flag it as a song you love or dislike, or change your speakers.
Browse
Browse appears in the Music menu bar if youʼre a member of Apple Music. Browse
showcases the best recommendations from music experts.
Browse expert recommendations. Highlight a featured album, artist, music video, or
playlist, then press the Touch surface to view it. Select a song to play it. Press and hold
the Touch surface to show a menu with more options. Depending on the song, you can
create a station, add it to a playlist or your library, or remove it from your library.
Ask Siri. Say something like:
“Add th is to my c oll ect ion ”
“Create a radio station based on this song”
Browse new music. Select New Music, then select a featured album, song, artist, or
playlist to hear music handpicked by music experts.
Fit the music to the mood. Select Curated Playlists, then browse Activities and Moods
to play music that fits with what youʼre doing or how youʼre feeling.
Get expert advice. To discover music rec ommended by music experts, select Curated
Playlists, then browse a wide variety of playlists organized by curator, genre, and more.
See whatʼs hot. Select Top Charts, where you can view top songs, top albums, and
other popular content.
Hear music handpicked by music experts. Select Genres, choose a genre, then select
a featured album, song, artist, or playlist.
Apple Confidential
Page 56

Radio
Radio offers the always-on Beats 1, featuring top DJs playing todayʼs best music, as well
as a collection of stations based on different genres. Stations created by experts provide
a great way to explore and enjoy new music. You can also create your own custom
stations, based on your pick of artist, song, or genre.
Listen to Beats 1 radio. Swipe to Beats 1, then select Listen Now to listen to live radio, or
browse and select to play previously recorded shows.
Listen to stations. Swipe to Featured or Stations. Select a station to start listening.
Start a station. On the Now Playing screen, do either of the following:
Press and hold the Touch surface and select Create Station.
Press the Touch surface to show additional controls. Select the More button , then
select Create Station.
Newly created stations appear in Featured.
Ask Siri. Say something like:
“Play the radio station ‘Pure Popʼ”
“Create a radio station based on this song”
Search for music
Find music in your library. Select Search in the Music menu bar, then enter a song,
album, playlist, artist, compilation, or genre and select Library.
Search Apple Music. Select Search in the Music menu bar, then select a trending
search—or enter a song, album, playlist, artist, curator, music video, activity, radio
station, or genre and select All Apple Music.
Dictate instead of type. In Search, highlight the text entry field. Press and hold the Siri
button and speak. For example, say the name of the artist, album, or song youʼre
looking for. For more, see .
Use Siri to search at any time. Whether youʼre in an app or on the Home screen, you
can always press and hold the Siri button and say the name of an artist, album, or song
youʼre looking for.
Dictation
Apple Confidential
Page 57

M3#('%$%(&%,=(?-3%8
_6('0#*'(&+'-1.1'$6'06*$.63'8(&10')3#A?#04'6*'G))3+';F@
Apple Confidential
I;"$!/</+$I.+&&'#*:'"63:'$"+'-1.1'?($$6*' @'-1.1'&())6.$&'$"+'=6336/1*2T
2$>9%3'F"9'A/<1%-'-#A'$"+'*#8+'6='$"+'#.$1&$L'#3?(8L'6.'&6*2'A6(%.+'36641*2'=6.@
.*>8'"9')>/<$'A/<1%-'-#A'f)3#A'8(&10@g';6')#(&+L'&#A'f)#(&+Lg'f)#(&+'8(&10Lg'6.
f& $ 6 ) @g '_6('0#*'#3&6'&#A'f*+,$'&6*2g'6.'f).+>16(&'&6*2@g
.*>8'>#'>*K/AL'>9&1<&L'<"#0L')*>8*1<&L'"9'9>?1"'<&>&1"#-'-#A'f)3#Ag'=6336/+:'?A'$"+'*#8+
6='$"+'#.$1&$L'#3?(8L'&6*2L')3#A31&$L'6.'&$#$16*'$"#$'A6('/#*$'$6')3#A@'W='-1.1':6+&*%$'=1*:
/"#$'A6('#&4+:'=6.L'?+'86.+'&)+01=10@'R6.'+,#8)3+L'&#A'f)3#A'$"+'.#:16'&$#$16*'pI(.+
I6)%g'.#$"+.'$"#*'&#A1*2'f)3#A'pI(.+'I6)@%g
.*>8'A/<1%'1#'9>#?"A'"9?$9-'-#A'$"+'*#8+'6='$"+'#.$1&$'Pf)3#A'E#&$133+'&"(==3+:gQ'6.
#3?(8'Pf)3#A'pH6.+'K#1*%'&"(==3+:gQ'$"#$'A6(%:'314+'$6'"+#.'1*'.#*:68'6.:+.@
.*>8'<1A1*>9'A/<1%-'!"13+'8(&10'1&')3#A1*2L'&#A'f)3#A'86.+'&6*2&'314+'$"1&'6*+g'6.
f0.+#$+'#'.#:16'&$#$16*'?#&+:'6*'$"1&'&6*2@g
C9";<$'())*$'6/<1%'M())*$'6/<1%'A$AK$9<31)'9$N/19$?O-'_6('0#*')3#A'#*A'G))3+
H(&10'$.#04'?A'$1$3+'Pf)3#A'pS)$6/*'R(*4%'?A'E.(*6'H#.&gQL'?A'#.$1&$'Pf)3#A'G3#?#8#
-"#4+&gQL'?A'0"#.$'Pf)3#A'$"+'$6)'&6*2'=.68'H#.0"'D]Z]gQL'6.'?A'>+.&16*'Pf)3#A'$"+
31>+'>+.&16*'6='1$gQ@
(??'A/<1%'F9"A'())*$'6/<1%'&"'8"/9'%"**$%&1"#'M())*$'6/<1%'A$AK$9<31)'9$N/19$?O-
-#AL'=6.'+,#8)3+L'f#::'p-3++4'!"1$+'E#?A%'?A'I(*0"'E.6$"+.&'$6'c1?.#.Ag'6.L'/"13+
)3#A1*2'&68+$"1*2L'&#A'f#::'$"1&'$6'8A'0633+0$16*@g
Page 58

Music settings
In Settings , go to Apps > Music.
Sort songs. Sort songs in your library by artist or title.
Sort albums. Sort albums in your library by artist or title.
Automatically add to your library any Apple Music songs you add to playlists. Turn
on Add Playlist Songs to Library.
Repeat songs. Turn on Repeat Music.
Normalize the sound level of your music. Turn on Sound Check.
Show the screensaver while listening to music. In Settings , go to General >
Screensaver and turn on “Show during music and podcasts.” For more, see
.Screensavers
Apple Confidential
Page 59

N=+,+3(/,(/(25/08#
N=+,+3
Apple Confidential
;"+'I"6$6&'#))' '3+$&'A6('+*`6A'A6(.')10$(.+&'#*:'>1:+6&'6*'$"+'?12'&0.++*@'_6('0#*
(&+'$"+'=6336/1*2'&+.>10+&'$6'>1+/'$"+')"6$6&'#*:'>1:+6&'=.68'A6(.'1\36(:'#006(*$T
1!*"/?'.3"&"'H1K9>98-'1\36(:'I"6$6'c1?.#.A'#($68#$10#33A'&$6.+&'A6(.'=(33U.+&63($16*
)"6$6&'#*:'>1:+6&'1*'1\36(:@'_6('0#*'#00+&&'1\36(:'I"6$6'c1?.#.A'=.68'#*A':+>10+
(&1*2'$"+'+'G))3+'WV@'_6('0#*%$'+:1$')"6$6&'#*:'>1:+6&'6*'G))3+';FL'?($'A6('0#*
(&+'$"+'I"6$6&'#))'6*'6$"+.'1C-':+>10+&'#*:'H#0'068)($+.&'$6'+:1$'$"+8'#*:'"#>+
$"6&+'0"#*2+&'#($68#$10#33A'():#$+'6*'G))3+';F'#*:'#33'6='A6(.'6$"+.':+>10+&@
6$A"91$<-'F1+/'#33'$"+'8+86.1+&'#>#13#?3+'$6'/#$0"'6*'A6(.'G))3+';F'$"#$'/+.+
0.+#$+:'6*'#*6$"+.'1C-':+>10+'6.'H#0'#*:'#.+'&$6.+:'1*'1\36(:'I"6$6'c1?.#.A@'_6('0#*
#3&6'#:`(&$')3#A?#04'&+$$1*2&L'#&'/+33'#&'&++'#33'$"+')"6$6&'#*:'>1:+6&'$"#$'8#4+'()
+#0"'0633+0$16*@'-++' @
68'.3"&"'2&9$>A-'HA'I"6$6'-$.+#8'#($68#$10#33A'()36#:&'*+/')"6$6&'$#4+*'6*'#*
1C-':+>10+'$6'A6(.'6$"+.':+>10+&'$"#$'(&+'HA'I"6$6'-$.+#8L'1*03(:1*2'G))3+';F@
1!*"/?'.3"&"'23>91#0-'_6('0#*'>1+/'#3?(8&'6=')"6$6&'#*:'>1:+6&'&"#.+:'=.68
#*6$"+.'1C-':+>10+'6.'H#0'(&1*2'1\36(:'I"6$6'-"#.1*2L'6.'>1+/'6$"+.')+6)3+%&'&"#.+:
#3?(8&'1='A6(%.+'&(?&0.1?+:@
8-#"9$I"6$6&'&"#.+:'(&1*2'J68+'-"#.1*2'=.68'1;(*+&'6*'A6(.'068)($+.'#))+#.'6*3A'1*
$"+'\68)($+.&'#))' L'*6$'1*'$"+'I"6$6&'#))' @'-++'
6*'G))3+';F
@
H+86.1+&
F1+/')"6$6&'=.68'A6(.'068)($+.
Page 60

Turn on access to photos from iCloud. In Settings , go to Accounts > iCloud, then
turn on iCloud Photo Library, My Photo Stream, or iCloud Photo Sharing.
View iCloud Photo Library photos and albums
To see all your sti ll photos, Live Ph otos, and videos from your iCloud Photo Library, swip e
to the Photos category in the menu bar. Your iCloud Photo Library albums appear in the
Albums category in the menu bar.
View your iCloud Photo Library items. In Photos, swipe up or down on the Touch
surface to scroll through the items, which are organized by date and location. To view
and scroll through full-screen photos, select a photo, then swipe left or right.
View your iCloud Photo Library albums. In Albums, you can see all of the albums
created on your iOS devices, such as Favorites or Selfies. Select an album, then swipe
left or right on the Touch surface to scroll through the photos. To view and scroll through
full-screen photos, select a photo, then swipe left or right.
Memories
Memories works with your iCloud Photo Library to automatically find photos and videos
you havenʼt seen or thought about in a while. Then it displays them in a beautiful
collection and turns them into a short movie you can watch on the big screen.
To get memories on you r Apple TV, you need to have photos and videos on another iOS
device or Mac linked to the same iCloud Photo Library. The best memories created on
those devices will automatically become available on your Apple TV.
You canʼ t c reat e, edi t, or delete mem ori es on App le TV, b ut you can adjust pl ayba ck
settings such as mood and duration.
Browse your memories. Swipe to the Memories category in the menu bar, then swipe
left or right to scroll through the memories. Select a memory to watch the movie and
view related photos and videos.
Play a memory. Select a movie to play it.
Change the mood. During playback, swipe down to show the Info panel, then swipe to
Mood. Swipe down and select the mood you prefer.
Change the duration. During playback, swipe down to show the Info panel, then swipe
to Duration. Swipe down and select the duration you prefer.
Access audio controls. During playback, swipe down to show the Info panel, then swipe
to Audio. Swipe down and select the option you prefer.
Apple Confidential
Page 61

View shared photos and albums
To see photos and videos you shared with others or that others shared with you, swipe to
the Shared category in the menu bar.
Browse your most recent shared photos. In Shared, select Activity, then swipe left or
right on the Touch surface to scroll through the photos, or select a photo to view it full
screen.
View your My Photo Stream album. In Shared, select Photo Stream in My Albums, then
swipe left or right on the Touch surface to scroll through the photos. To view and scroll
through full-screen photos, select a photo, then swipe left or right.
View a shared album. In Shared, select an album in My Albums, then swipe left or right
on the Touch surface to scroll through the photos. To view and scroll through photos full
screen, select a photo, then swipe left or right. To view a list of people who are
subscribed to this shared album, select People.
View comments and like photos in a shared album. In Shared, select a photo in a
shared album so that itʼs displayed full screen, then press the Touch surface to view
when the photo was posted, along with comments from others. To mark a photo as one
you like, press the Touch surface again.
Delete a shared album. In Shared, select an album from My Albums, select People, then
select Delete Shared Stream. The album is removed from Apple TV, but not from iCloud.
Create a slideshow
You can vie w yo ur sha red pho tos and al bum s a s a sl ide show on Apple TV.
Create a slideshow. In Shared, select an album or Photo Stream in My Albums, then
select Play Slideshow. Select the slideshow settings you want, then select Start
Slideshow.
Set slideshow settings. Before you start the slideshow, you can adjust the following
settings:
Shuffle Photos: Turn on to show your photos in random order.
Repeat Photos: Turn on to play the slideshow continuously.
Theme: Select a slideshow theme to apply a different style to your slideshow.
Time Per Slide: Select how long to display each photo on the screen.
Transition: Select the transition effect used between photos.
Apple Confidential
Page 62

Set photos as a screensaver
You can use sh ared ph oto s or album s i n P hot os as your App le TV scre ens aver.
Set a screensaver. In Shared, select an album, then select Set as Screensaver and
confirm.
Adjust screensaver settings. In Settings , go to General > Screensaver. See
.Screensavers
Apple Confidential
Page 63

R#,(.+18/3,3(/01(#.%3+1#3
N+18/3,3
Apple Confidential
C)+*'$"+'I6:0#&$&'#))' '$6'#00+&&'A6(.'=#>6.1$+')6:0#&$&'6*'G))3+';F@
W<-2;"$&-60,;#;+$W*'$"+'8+*('?#.L'&/1)+'$6'#*A'6='$"+'=6336/1*2'0#$+26.1+&T
P#)*>8$?-'-++'#'31&$'6='#33'(*)3#A+:')6:0#&$&@
68'."?%><&<-'-++'A6(.'&(?&0.1)$16*&'#*:'$"+'&$#$16*&'A6(%>+'0.+#$+:@
:$>&/9$?-'E.6/&+'=+#$(.+:')6:0#&$&@
+")'!3>9&<-'E.6/&+'$"+'86&$')6)(3#.')6:0#&$&'?A'2+*.+@
I;"$!/</$#-$>/46$,$&-60,;#+$I.+&&'#*:'"63:'$"+'-1.1'?($$6*' '#*:'#&4'=6.'#')6:0#&$'?A
*#8+L'=6336/+:'?A'$"+'/6.:'f)6:0#&$@g'G))3+';F'6)+*&'$"+'I6:0#&$&'#))'#*:'#::&'A6(.
.+[(+&$'$6'1$&'&+#.0"'&0.++*@'W='A6(%>+'#3.+#:A'&(?&0.1?+:'$6'$"+')6:0#&$L'1$'?+21*&
)3#A1*2'$"+'0(..+*$'+)1&6:+@
!",<03$>-<$4"2$&-60,;#;+$-/1)+'$6'26'$6'-+#.0"L'$"+*'+*$+.'#'&+#.0"'$+.8@
B/0#,#"$/4;#",6$->$#1&"+$W*'-+#.0"L'"12"312"$'$"+'$+,$'+*$.A'=1+3:@'I.+&&'#*:'"63:'$"+'-1.1
?($$6*' '#*:'&)+#4@'R6.'+,#8)3+L'&#A'$"+'*#8+'6='$"+')6:0#&$'A6(%.+'36641*2'=6.@'R6.
86.+L'&++' @
S/46$4"2$"&/;-6";+$-/1)+'$6'26'$6'S*)3#A+:'$6'=1*:'+)1&6:+&'A6('"#>+*%$'"+#.:'6.
/#$0"+:@
V10$#$16*
L<"7/"2$-<$;#<",.$,4$"&/;-6"+$-+3+0$'$"+')6:0#&$L'$"+*'&+3+0$'#*'+)1&6:+@
Page 64

Get new episodes as theyʼre released. Subscribe to the podcast. If youʼre browsing in
Featured or Top Charts, select the podcast, then select Subscribe.
Delete unplayed episodes. Swipe to go to Unplayed and highlight an individual episode.
Press and hold the Touch surface, then select Delete.
Control playback
Once a podcast starts playing, it appears in Now Playing. At any time, you can press the
Play/Pause button to control playback. The podcast continues to play even if you
leave Podcasts, but it stops if you begin playing video or audio in another app.
On the Now Playing screen, you can quickly navigate to other podcasts, or select more
options.
Ask Siri. Say: “Play” or “Pause”
Show a timeline on the screen during playback. Rest your finger on the Touch surface.
A status indicator appears showing elapsed and remaining time. When the timeline is
active, you can also press the Touch surface to play or pause the podcast.
Go back to the beginning or skip to the next podcast or episode. Press left or right to
restart the current podcast or episode or skip to the start of the next podcast or episode.
Rewind or fast forward. Rest your finger on the Touch surface, then press left or right
and hold to rewind or fast forward during playback. Release to resume playback.
Skip backward or forward 10 seconds. Rest your finger on the Touch surface, then
swipe down to highlight the playhead. Press left or right to skip backward or forward.
Press again to skip another 10 seconds.
Show what podcasts or episodes are up next. On the Now Playing screen, rest your
finger on the Touch surface to show podcasts or episodes adjacent to the current
podcast in the Now Playing queue. To play a different podcast, swipe left or right to
highlight the podcast you want to play, then press the Touch surface.
Move to a specific point in the podcast or episode. On the Now Playing screen, rest
your finger on the Touch surface to show elapsed and remaining time, then swipe down
to highlight the playhead. Swipe left or right to move backward or forward on the
timeline.
Get more options. On the Now Playing screen, rest your finger on the Touch surface,
then swipe up and select the More button at the top of the screen to see more
options:
Mark the podcast as played or unplayed
Apple Confidential
Page 65

View a full description of the podcast
Subscribe to the podcast
Change your speaker settings
Organize your favorites into stations
You can organize your favori te podcasts to wh ich you ʼve subscribed into s tations that
update automatically across all of your devices.
Create a station. Swipe to go to My Podcasts, then select Create a Station. Enter a
name for your station, select Done, then add podcasts. To create additional stations,
select the Add button in My Podcasts.
Browse station episodes. Swipe to go to My Podcasts, then select a station to see a list
of episodes. To play an episode, highlight it, then press the Touch surface or the
Play/Pause button .
Get more options from the episode list. To s ee a list of episodes, sw ipe to go to My
Podcasts, then select a station. Highlight a podcast, then press and hold the Touch
surface to see more options:
Play the next episode
Add the current episode to Up Next
Mark the episode as played
View a full description of the episode
Delete the episode
Get more options for a station. Swipe to go to My Podcasts, then highlight a station.
Press and hold the Touch surface to see more options:
Play the station
Refresh the station to see the newest episodes
Go to that stationʼs settings
Delete the station
Change a stationʼs settings. Swipe to go to My Podcasts, select a station, then select
Station Settings. Select menu items to:
Rename the station
Apple Confidential
Page 66

Change the playback order of episodes
Change which episodes, type of media, and playback status to include
Add or choose different subscribed podcasts for the station
Delete the station
Podcasts settings
In Settings , go to Apps > Podcasts.
Sync podcasts. Turn on to sync podcasts with your other iOS devices.
Set podcast defaults. Select menu items to:
Choose how frequently Podcasts checks your subscriptions for new episodes
Limit the number of episodes that appear in the episode list
Choose whether to keep episodes after you finish them
Set custom colors for accessibility. Turn on Custom Colors to change the artwork for
each podcast.
Show the screensaver while listening to podcasts. In Settings , go to General >
Screensaver and turn on “Show during music and podcasts.” For more, see
.Screensavers
Apple Confidential
Page 67

Search by text
Apple TV includes a Search app that can help you locate movies, TV shows, cast and
crew, apps in the App Store , and even Music if youʼre an Apple Music subscriber.
Search using the keyboard. Highlight the Search app on the Home screen, then
press the Touch surface. Type your query using the onscreen keyboard.
The Search app returns content associated with your search terms.
Tip: You can use th e key boa rd o n a ne arby iP hon e o r iPad to e nter tex t d irec tl y on
Apple TV instead of using the Siri Remote. For more, see
.
For a list of apps included in searches, see the Apple Support article
.
Note: Apps included in search results may vary based on region.
Dictate instead of type. Whenever you see a text entry field, you can use your voice
instead of using the onscreen keyboard. Press and hold the Siri button and speak the
text you want to enter. For more, see .
Use Siri to search at any time. Press and hold the Siri button to search for content
using Siri. See .
Select a search result
When you select a video in the search results, you see details for the video.
Search
Use the iOS keyboard to enter
text on Apple TV
About Search on
your Apple TV (4th generation)
Dictation
Talk to your Apple TV
Apple Confidential
Page 68

Youʼll f ind ext ens ive informa tio n about th e s ele cte d i tem, inclu din g a ll the ap ps where t he
content is available.
Search in a specific app
By default, the Search app finds results across all searchable apps. However, you can
also search for a video in a specific app. Most apps provide a search option, usually in
the upper right.
Apple Confidential
Page 69

',$#/*(8+0,#0,(-3%02(J+*#('=/$%02
J+*#('=/$%02
'6*'$"+'G))3+';F'J68+'&0.++*'#*:').+&&'$"+';6(0"
Apple Confidential
_6('0#*'&$.+#8'8(&10L'86>1+&L';F'&"6/&L')"6$6&L'#*:'6$"+.'1;(*+&'06*$+*$'=.68'#
068)($+.'6.'1C-':+>10+'$6'A6(.'G))3+';F@'E6$"'$"+':+>10+'#*:'G))3+';F'8(&$'?+
06*=12(.+:'$6'(&+'$"+'+'1;(*+&'#006(*$@
?-4>/@%<"$,$0-.&%#"<+$W*'1;(*+&L'26'$6'R13+'h'J68+'-"#.1*2'#*:'0"66&+';(.*'6*'J68+
-"#.1*2@'5*$+.'A6(.'G))3+'WV'#*:')#&&/6.:L'$"+*'03104';(.*'6*'J68+'-"#.1*2@
8-#"9$W*'!1*:6/&'X'#*:'!1*:6/&'ZL'1;(*+&'8+*(&'#.+'"1::+*'?A':+=#(3$@';6'&"6/'$"+8
$+8)6.#.13AL').+&&'$"+'G3$'4+A@
?-4>/@%<"$,4$/5!$6"7/0"+$W*'-+$$1*2&'6*'$"+':+>10+L'26'$6'F1:+6&'6.'H(&10@';(.*'6*
J68+'-"#.1*2L'$"+*'+*$+.'A6(.'G))3+'WV'#*:')#&&/6.:@
?-4>/@%<"$'&&("$)*+$W*'-+$$1*2&' L'26'$6'G006(*$&'h'J68+'-"#.1*2@';(.*'6*'J68+
-"#.1*2L'$"+*'+*$+.'A6(.'G))3+'WV'#*:')#&&/6.:@
!#<",.$0-4#"4#$-4$'&&("$)*+$C*0+'A6(%>+'06*=12(.+:'#33'A6(.':+>10+&'(&1*2'$"+'+
G))3+'WVL'"12"312"$'\68)($+.&' '6*'$"+'G))3+';F'J68+'&0.++*'#*:').+&&'$"+';6(0"
&(.=#0+@'c1?.#.1+&'=.68'A6(.'&"#.+:':+>10+&'#))+#.L'#*:'A6('0#*'>1+/'6.')3#A'06*$+*$
=.68'#*A'31?.#.A@
7%#&(.=+,+3(<$+*(F+-$(8+*.-,#$(+0(4..5#(67
_6('0#*'&"#.+')"6$6&'=.68'A6(.'068)($+.'6*'G))3+';F@'-+3+0$'/"10"')"6$6&'A6('/#*$'$6
&"#.+'?#&+:'6*'#3?(8&'1*'I"6$6&'6*'#'H#0L'6.'`(&$'0"66&+'#'=63:+.'6*'A6(.'H#0@
!3,<"$&3-#-;$#-$'&&("$)*+$W*'1;(*+&'6*'A6(.'H#0L'26'$6'R13+'h'J68+'-"#.1*2'h'f\"66&+
I"6$6&'$6'-"#.+'/1$"'G))3+';F@g
;"+'I"6$6'-"#.1*2'I.+=+.+*0+&'/1*:6/'6)+*&@'-+3+0$'f-"#.+'I"6$6&'=.68Lg'$"+*'&+3+0$
I"6$6&'6.'1I"6$6L'6.'0"66&+'#'=63:+.'$6'&"#.+@'\"66&+'/"+$"+.'A6('/#*$'$6'&"#.+')"6$6&
#*:'#3?(8&'6.'`(&$'&+3+0$+:'#3?(8&L'$"+*'03104'G))3A@
;"+')"6$6'#3?(8&'6.'=63:+.&'A6('&"#.+'#))+#.'1*'$"+'\68)($+.&'#))' @
Page 70

Restrict access to content
You can con fig ure App le TV to restr ic t c er tai n c ontent so onl y a uth orized users can
watch, play, or make purchases. This is often also referred to as parental controls. You
can restrict a variety of content and activities, such as:
Purchasing movies, TV shows, and apps
Making in-app purchases
Playing iTunes movies or TV shows based on content ratings
Opening apps based on age ratings
Playing content identified as explicit
Playing multiplayer games in Game Center
Adding friends in Game Center
Changing AirPlay or Location settings
Note: Restrictions may not apply to 3rd-party apps. To restrict 3rd-party content, adjust
the settings for the individual apps either inside the apps, or in Settings , go to Apps.
To set or overr ide restr ictions, you must enter t he passcode.
Turn on restrictions. In Settings , go to General > Restrictions and turn on
Restrictions. Youʼll be asked to enter a 4-digit passcode.
Once you enter and verify the passcode, restrictions and other options in the
Restrictions menu are enabled.
Change the passcode. In Settings , go to General > Restrictions. Select Change
Passcode, enter the current passcode, then enter the new passcode.
Configure what types of content are restricted. In Settings , go to General >
Restrictions, and enter the passcode if required. You can restrict iTunes Store purchases
and rentals, allowed content types, Game Center settings, and other settings.
You must fi rst tur n on restr ic tio ns in orde r to co nfi gure th e Re str ic tions setting s. To
access restricted content, you must enter the passcode each time.
Beyond basics
Apple Confidential
Page 71

Remove all restrictions. You ca n t emp oraril y re move all res tri ctions an d t hen ad d t hem
back again later. In Settings , go to General > Restrictions, select Restrictions, enter
the passcode, then set Restrictions to Off.
If you use Family Sharing, you can also use your iOS device to limit the content your
family members can buy—including enabling Ask to Buy, which lets your kids purchase
items only with parental approval. For more, see .
Manage storage
Your App le TV streams video and music, but it stores apps locally. The more apps you
download to Apple TV, the more storage is used up. At some point you may get a warning
that youʼre running out of disk space. If so, you can remove apps to free up space.
Check the Apple TV storage levels. In Settings , go to General > Manage Storage.
A list of the apps on your Apple TV shows how much space each item is using.
Delete apps to recover space. Highlight the trash icon for any item in the list and press
the Touch surface. The app and all of its data are removed from the device.
You can als o d ele te apps di rec tly on the Home screen. Se e .
If you delete an app, you can download it again from the App Store without repurchasing
it. For more about the App Store, see .
Share Apple TV with multiple users
You can use se par ate Apple ID acc oun ts fo r t he foll owin g services on Ap ple TV:
iCloud: Photos
iTunes Store and App Store: iTunes movies and TV shows, Apple Music, and the App
Store
Game Center: Game play with friends
You can use di ffere nt App le IDs and passwords fo r i Clo ud, iTu nes (a nd App Store) and
Game Center. Only one Apple ID at a time can be active for each service.
Switch the account used to purchase movies, TV shows, and apps. In Settings ,
go to Accounts > iTunes and App Store, then enter a new Apple ID.
If you set up Family Sharing, you can see movies, TV shows, and apps purchased by
other family members without switching accounts. See .
Family Sharing
Customize the Home screen
Find apps
Family Sharing
Apple Confidential
Page 72

See another userʼs purchased music. In Settings , go to Accounts > iTunes and
App Store and enter the other userʼs Apple ID.
Change iCloud account. In Settings , go to Accounts > iCloud and enter a new Apple
ID.
Change Game Center account. In Settings , go to Accounts > Game Center and
enter a new Apple ID.
Switch between family member accounts. You can swi tch direct ly bet ween fam ily
member iTunes accounts without reentering your Apple ID. In Settings , go to
Accounts > iTunes and App Store, then select the name of a family member in the list.
You may n eed to en ter the pa ssword for th at fami ly mem ber ʼs acco unt .
Family Sharing
Family Sharing lets you share apps and viewing privileges with up to six family members.
One adult in your household—the family organizer—invites family members to join the
family group and agrees to pay for any iTunes Store or App Store purchases made by
family members.
Important: You can ʼt ini tia te or c onf igu re Family Sh aring direct ly on App le TV. I t must be
done on a Mac or iOS device. To learn more about setting up Family Sharing, see
.
Adjust video and audio settings
There are controls and settings you can use to customize your viewing and listening. For
example, you can:
Make sure the Apple TV output resolution matches your televisionʼs native resolution
Control whether Apple TV outputs Dolby Digital encoded audio
Send audio output to Bluetooth headphones or alternative speakers
Decide what language to use for subtitles and audio tracks in foreign language
content
Set the language of audio and subtitles. In Settings , go to “Audio and Video” and
select the language you want under Audio Language or Subtitle Language.
Note: If the language you select isnʼt available, the default language is used—itʼs the one
associated with your region, or the one thatʼs selected in General Settings.
Set up
Family Sharing
Apple Confidential
Page 73

Send audio to AirPods, Bluetooth headphones, or another AirPlay speaker. In
Settings , go to “Audio and Video” > Audio Output.
For more information, see .
Watch Apple TV without disturbing others. Apple TV can lower the overall sound level
by reducing the loudness of music and sound effects. To turn on this feature while
playing a video, swipe down to show the Info panel, select Audio, then select Reduce
Loud Sounds.
To change this setting for all videos, in Settings , go to “Audio and Video” > Reduce
Loud Sounds.
Adjust other audio and video settings. You ca n a dju st o the r a udi o o r v ide o re lated
settings, such as Sound Effects and Music, Navigation Clicks, Surround Sound mode,
HDMI Output settings, and Resolution. In Settings , go to “Audio and Video.”
Set the destination for the Home button
By default, pressing the Home button once on your Siri Remote takes you to Up Next in
the TV app, and pressing the Home button again takes you to the Home screen.
You can cha nge th is set ting so that pressin g t he Home butto n o nce take s yo u d irec tly to
the Home screen.
Change the Home button setting. In Settings , go to “Remotes and Devices” >
Home button, then select either Home Screen or TV App.
Connect Bluetooth devices to Apple TV
You may want to con nec t a Bl uetooth devic e to you r A ppl e T V—s uch as an MFi -ce rtifi ed
(made for iPhone, iPod touch, and iPad) game controller, Bluetooth headphones, wireless
keyboard, or other accessory.
Apple AirPods connect automatically to Apple TV if associated with the same iCloud
account. See .
Connect Bluetooth devices to Apple TV
Your App le ID
Apple Confidential
Page 74

Find a nearby Bluetooth device. Refer to the deviceʼs instructions to set the device to
“Discoverable.” Then in Settings , go to “Remotes and Devices” > Bluetooth and
select the device in the list.
For more information, see the Apple Support article
.
Use the iOS keyboard to enter text on Apple TV
If you prefer not to enter text using Siri Remote, you can configure a nearby iOS device to
share its keyboard whenever a text field appears on Apple TV.
The iOS device must meet certain minimum requirements. See the Apple Support article
.
Configure an iPhone or iPad to enter text on Apple TV. Make sure the iOS device and
Apple TV are both signed in to iCloud using the same account. Also, you must turn on
Bluetooth and Wi-Fi on the iOS device.
Use an iOS keyboard to type on Apple TV. Whenever a text field appears on Apple TV,
a notification appears on your iPhone or iPad. Tap the notification and the iOS keyboard
appears. Text you enter on the iOS device automatically appears in the text field on Apple
TV.
Turn off the Apple TV keyboard on iOS. If you donʼt want your iOS device to be used as
a keyboard for Apple TV, on your iOS device go to Settings > Notifications > Apple TV
Keyboard and turn off Allow Notifications.
Control your home entertainment system with the Siri
Remote
You can con fig ure the Si ri Remote to tur n yo ur TV on or off, change t he inp ut to your
Apple TV, and even control the volume.
Use the Siri Remote to turn your TV on or off. In Settings , go to “Remotes and
Devices” > “Turn On Your TV with Your Remote.”
Use the Siri Remote to control the volume of your TV or receiver. In Settings , go
to “Remotes and Devices” > Volume Control.
Note: These settings may not work with all devices. For more information, see the Apple
Support article .
Use Bluetooth accessories with your
Apple TV (4th generation)
Continuity system requirements
Control your TV or receiver with your Siri Remote or Apple TV Remote
Apple Confidential
Page 75

Use a universal remote to control Apple TV
You can use any in fra red remo te to cont rol App le TV. Yo u j ust ne ed to l et the ot her
remote learn the signals that the Siri Remote generates.
Teach an inf rared remo te t o co ntrol Ap ple TV. In Settings , go to “Remotes and
Devices” > Learn Remote, then follow the onscreen instructions.
You can als o u se the Si ri Remo te to cont rol the powe r a nd volu me of your TV or receiver.
See .
Use Apple TV as a conference room display
You can use Ap ple TV as a conference room display so th at anyon e c an easily share their
screen from a Mac or iOS device using AirPlay. When Conference Room Display is turned
on, a message appears on the display with AirPlay connection instructions and wireless
network details.
Turn on Conference Room Display. On Apple TV, in Settings , go to AirPlay >
Conference Room Display.
Create a custom message. In Settings , go to AirPlay > Conference Room Display >
Custom Message, then enter your message. Your message appears only when Apple TV
is in Conference Room Display mode.
Choose a background. In Settings , go to AirPlay > Conference Room Display >
Choose Photo, then choose one of the photo-based background types. If you choose My
Photos, the Photos app opens.
Preview Conference Room Display mode. In Settings , go to AirPlay > Conference
Room Display, go to Conference Room Display > Preview.
Lock Conference Room Display mode. You can set A ppl e T V s o t hat it ʼs locked in
Conference Room Display mode until a 4-digit passcode is entered. In Settings , go
to General > Restrictions, and enter the passcode if required. Then make sure
Conference Room Display is set to Restrict in the list of restricted items. For more
information, see .
Note: You u se the sa me 4-digit passc ode you set in Restrict ion s to un loc k C onfe renc e
Room Display mode. If you forget the passcode, disconnect Apple TV from the power
outlet, reconnect it, then press and hold the button as it restarts. This temporarily
unlocks Conference Room Display mode. For more information, see the Apple Support
article .
Control your home entertainment system with the Siri Remote
Restrict access to content
Use Conference Room Display mode and related settings on your Apple TV
Apple Confidential
Page 76

Change network settings
If you initially set up Apple TV using a wired network, you can change to a wireless
network without having to set up Apple TV again.
Change from a wired to a wireless network. Disconnect the Ethernet cable from Apple
TV. Then in Settings , select Network and join a Wi-Fi network.
Change the language or region format
The first time you set up Apple TV, you choose which display language and region format
to use. You can change this later in Settings.
Change the language. In Settings , go to General > Language and select a language.
Note: Siri and Dictation may or may not be available, depending on the language you
select. For more information, see the Apple Support article
.
Change the region format. In Settings , go to General > Region Format and select a
region.
Use Siri on your Apple TV
(4th generation)
Apple Confidential
Page 77

Restart Apple TV
If Apple TV isnʼt responding, try restarting it.
Restart Apple TV. Do any of the following:
Press and hold the and Home buttons until the Apple TV status light blinks
rapidly.
Disconnect Apple TV from the power outlet, wait five seconds, then reconnect it.
In Settings , go to System and select Restart.
Reset Apple TV
If youʼre having problems and Apple TV still doesnʼt respond after restarting, try resetting
Apple TV to its factory settings. When you reset Apple TV, all data is erased, including
your accounts and configuration.
You can als o re set you r A ppl e T V a nd update its software a t the same ti me.
Reset Apple TV. In Settings , go to System > Reset, then select Reset. Resetting
Apple TV and restoring it to factory settings can take some time, so be patient.
If Apple TV still doesnʼt respond, do one of the following:
If you have an Apple TV 4K: Contact .
If you have an Apple TV (4th generation): Disconnect the power and HDMI cables
from Apple TV. Connect one end of a USB-C cable (sold separately) to Apple TV and
the other end to your computer. Open iTunes on your computer, select Apple TV in
the Source list, then select Restore. If that doesnʼt work, contact .
Reset Apple TV and update software. In Settings , go to System > Reset, then
select Reset and Update.
Selecting this option restores your Apple TV to factory settings, erases all settings and
information, and updates to the latest tvOS version.
Restart, reset, update
Apple TV Support
Apple TV Support
Apple Confidential
Page 78

Update Apple TV software
Youʼll s ee a m essage on App le TV whe n a softwa re u pda te is availa ble . Yo u c an als o
check for updates, or set Apple TV to update automatically.
Check for updates. In Settings , go to System > Software Updates and select Check
for Update. If an update is available, a message appears. Select “Download and Install”
to start downloading. During the update process, donʼt disconnect your Apple TV. The
status light may flash slowly during the update process.
Set automatic updates. In Settings , go to System > Software Updates and select
Update Automatically.
Apple Confidential
Page 79

Accessibility features
Apple TV includes built-in accessibility features:
Siri: The Siri Remote lets you use your voice to bypass onscreen navigation. Ask Siri
to perform a wide range of tasks, such as “Find kid movies,” “Rewind five minutes,”
“Open Music,” and more. See .
When the onscreen keyboard appears, highlight the text entry field and press and
hold the Siri button . Dictate text or spell out user names and passwords instead of
typing. See .
Closed Caption and SDH support: Apple TV supports closed captioning, so those
who are deaf or hard of hearing can fully enjoy new TV episodes and thousands of
movies. Just look for the CC or SDH icon when youʼre browsing movies or TV shows
on the iTunes Store. You can even customize captions with special styles and fonts.
See .
Audio Descriptions: Audio descriptions provide an explanation of important onscreen
action and content in movies and TV shows. See .
VoiceOver: Apple TV supports VoiceOver, Appleʼs screen reader. Available in all the
languages supported by Apple TV, and with support for Braille displays, VoiceOver
tells you exactly whatʼs on your TV screen and helps you choose commands. See
.
Zoom: Zoom is a built-in magnifier that works anywhere on the new Apple TV screen.
With magnification adjustable up to 15 times the normal size, Zoom can help with a
range of vision challenges. See .
Display Accommodations: Change parameters on Apple TV for color differentiation,
light sensitivity, and brightness. See .
Bold Text: Choose Bold Text to make the text easier to read throughout the Apple TV
interface. See .
Increase Contrast: Increase contrast on the screen by reducing the transparency of
background elements on Movie and TV Show pages, menu tabs, and more. You can
also use a high-contrast cursor to better delineate the focused content. See
.
Accessibility
Talk to your Apple TV
Dictation
Subtitles and captioning
Audio descriptions
VoiceOver
Zoom
Display Accommodations
Bold text
Increase
the screen contrast
Apple Confidential
Page 80

Reduce Motion: With Reduce Motion, some screen actions—such as moving between
app icons on the Home screen and launching apps—are visually simpler. See
.
Switch Control: Control Apple TV using an attached Bluetooth device or other
platform as a switch. See .
Subtitles and captioning
If you prefer special accessible captions, such as subtitles for the deaf and hard of
hearing (SDH), you can set Apple TV to show them instead of standard subtitles and
captions. You can also customize the look of subtitles and captions.
Note: Not all videos include closed captions.
Turn on Closed Captions and SDH. In Settings , go to General > Accessibility, then
turn on “Closed Captions and SDH.” Or, use the Accessibility Shortcut. See
.
Turn closed captions on or off during video playback. Press the Touch surface three
times. When VoiceOver is turned on, this action instead turns audio descriptions on or
off. See .
Customize your subtitles and captions. In Settings , go to General > Accessibility >
Style, where you can choose an existing caption style or create a new style based on
your choice of:
Font, size, and color
Background color and opacity
Tex t op acity, ed ge style, and highlight
Note: If you connect a Braille display to Apple TV, it will continuously print captions and
subtitles of a TV show or movie when captions or subtitles are turned on.
Audio descriptions
Audio descriptions provide an audible narration of important onscreen action and
content in movies and TV shows. If you have a video that includes audio descriptions,
Apple TV can play them for you.
Turn on audio descriptions. In Settings , go to General > Accessibility > Audio
Descriptions. Or, use the Accessibility Shortcut. See .
Reduce
screen motion
Switch Control
Accessibility
Shortcut
VoiceOver
Accessibility Shortcut
Apple Confidential
Page 81

Turn audio descriptions on or off during video playback. When VoiceOver is turned
on, press the Touch surface three times. When VoiceOver is turned off, this action
instead turns closed captions on or off. See .
VoiceOver
VoiceOver lets you control Apple TV without seeing the screen. You use simple gestures
on the Touch surface of the Siri Remote to move around the screen, and listen as
VoiceOver speaks each item you highlight.
When you highlight an item, VoiceOver first speaks the item and any associated text.
After a short delay, VoiceOver speaks any remaining text items on the screen, such as
movie descriptions or actor listings.
Turn on VoiceOver. In Settings , go to General > Accessibility > VoiceOver. Or, use
the Accessibility Shortcut. See .
Ask Siri. “Turn VoiceOver on.”
Operate the VoiceOver rotor. Rotate two fingers around a point on the Touch surface to
open the VoiceOver rotor, which contains additional controls. The available rotor controls
vary, depending on what youʼre doing.
Explore. Drag your finger over the Touch surface. VoiceOver speaks each menu or text
item you select.
Move your selection: Swipe up, down, left, or right.
Select the previous or next rotor control: Rotate two fingers left or right.
Adjust a rotor control: Swipe up or down. For example, to adjust speech rate, rotate
two fingers until the VoiceOver speech rate rotor control is selected. Then swipe up
or down to increase or decrease the speech rate.
Speak from the current text item to the bottom of the screen: Swipe down with two
fingers.
Speak the items on screen, starting at the top: Swipe up with two fingers, or press
and hold the Play button.
Pause speaking: Tap once with two fingers. Tap again with two fingers to resume, or
select another item.
Perform a custom rotor action. Rotate two fingers until Custom Actions is selected in
the rotor. Swipe up or down to hear each custom action, then press the Touch surface to
perform an action.
VoiceOver
Accessibility Shortcut
Apple Confidential
Page 82

Connect a braille display. In Settings , go to General > Accessibility > VoiceOver >
Braille, then select Braille Display to pair the display with Apple TV.
When VoiceOver is used with a connected braille display, the display prints out onscreen
text for the item you are hovering over. As you move focus, VoiceOver speaks and braille
displays print the text. The braille display may include additional buttons that support
basic Apple TV navigation.
Use a connected Bluetooth keyboard. VoiceOver can be controlled when using a
paired Bluetooth keyboard. See the list below for commands.
VoiceOver keyboard commands
VO = Control-Option
Turn on VoiceOver Help: VO–K
Turn off VoiceOver Help: Escape
Select the next or previous item: VO–Right Arrow or VO–Left Arrow
Double-tap to activate the selected item: VO–Space bar
Press the Home button: VO–H
Touch and hold the selected ite m: VO–Shift–M
Move to the status bar: VO–M
Read from the current position: VO–A
Read from the top: VO–B
Pause or resume reading: Control
Copy the last spoken text to the clipboard: VO–Shift–C
Search for text: VO–F
Mute or unmute VoiceOver: VO–S
Open the notifications screen: Fn–VO–Up Arrow
Open Control Center: Fn–VO–Down Arrow
Open the Item Chooser: VO–I
Change the label of the selected item: VO–/
Double-tap with two fingers: VO–”-”
Apple Confidential
Page 83

Swipe up or down: VO–Up Arrow or VO–Down Arrow
Adjust the rotor: VO–Command–Left Arrow or VO–Command–Right Arrow
Adjust the setting specified by the rotor: VO–Command–Up Arrow or VO–Command–
Down Arrow
Turn the screen curtain on or off: VO–Shift–S
Return to the previous screen: Escape
Switch apps: Command–Tab or Command–Shift–Tab
Quick Nav
Turn on Quick Nav to control VoiceOver using the ar row keys.
Turn Quick Nav on or off: Left Arrow–Right Arrow
Select the next or previous item: Right Arrow or Left Arrow
Select the next or previous item specified by the rotor: Up Arrow or Down Arrow
Select the first or last item: Control–Up Arrow or Control–Down Arrow
Tap an i tem : Up Arrow–Down Arrow
Scroll up, down, left, or right: Option–Up Arrow, Option–Down Arrow, Option–Left
Arrow, or Option–Right Arrow
Adjust the rotor: Up Arrow–Left Arrow or Up Arrow–Right Arrow
Single-key Quick Nav for web browsing
When you view a webpage with Quick Nav on, you can use the following keys on the
keyboard to navigate the page quickly. Typing the key moves to the next item of the
indicated type. To move to the previous item, hold the Shift key as you type the letter.
Turn on Single-key Quick Nav: VO-Q
Heading: H
Link: L
Tex t field: R
Button: B
Form control: C
Image: I
Apple Confidential
Page 84

Table: T
Static text: S
ARIA landmark: W
List: X
Item of the same type: M
Level 1 heading: 1
Level 2 heading: 2
Level 3 heading: 3
Level 4 heading: 4
Level 5 heading: 5
Level 6 heading: 6
Tex t e dit ing
Use these commands (with Quick Nav turned off) to work with text. VoiceOver reads the
text as you move the insertion point.
Go forward or back one character: Right Arrow or Left Arrow
Go forward or back one word: Option–Right Arrow or Option–Left Arrow
Go up or down one line: Up Arrow or Down Arrow
Go to the beginning or end of the line: Command–Left Arrow or Command–Down
Arrow
Go to the beginning or end of the paragraph: Option–Up Arrow or Option–Down
Arrow
Go to the previous or next paragraph: Option–Up Arrow or Option–Down Arrow
Go to the top or bottom of the text field: Command–Up Arrow or Command–Down
Arrow
Select text as you move: Shift + any of the insertion point movement commands
above
Select all text: Command–A
Copy, cut, or paste the selected text: Command–C, Command–X, or Command–V
Apple Confidential
Page 85

Undo or redo last change: Command–Z or Shift–Command–Z
Turn off VoiceOver. In Settings , go to General > Accessibility > VoiceOver. Or, use
the Accessibility Shortcut.
Ask Siri. “Turn VoiceOver off.”
Zoom
Use Zoom to magnify the image on Apple TV. You use the Touch surface on the remote
to control Zoom and to pan around the zoomed image.
Turn Zoom on or off. In Settings , go to General > Accessibility > Zoom. Or, use the
Accessibility Shortcut. See .
Zoom in or out. With Zoom turned on, press the Touch surface three times. Any item
you highlight is automatically magnified.
Move the zoom focus. Tap the top, bottom, left, or right edge of the Touch surface to
move in that direction by one screen item.
Adjust the magnification. Tap the Touch sur face and drag up or down with two fingers.
To limit the maximum magnification, in Se ttings go to General > Accessibility > Zoom
> Maximum Zoom Level.
Turn panning on or off. Tap the Touch surface with two fingers.
Pan to see more. While panning, drag your finger on the Touch surface.
Speak the currently selected screen item. Press the Siri button twice.
Display Accommodations
You chan ge oth er par ame ters on Apple TV for col or dif feren tia tio n, light sens iti vit y, and
brightness.
Tip: To inver t light and dark colors on Apple TV, change it to dark mode. See
.
Turn on Color Filters. In Settings , go to General > Accessibility > Display
Accommodations, then turn on Color Filters.
You can sel ect from a varie ty of filters use d t o d ifferent iate co lors. This se tti ng is for
users who are color blind or have difficulty reading text on the display.
Accessibility Shortcut
Customize the Home screen
Apple Confidential
Page 86

Turn on Light Sensitivity. In Settings , go to General > Accessibility > Display
Accommodations, then turn on Light Sensitivity. Select Intensity, then swipe to adjust the
percentage of display intensity. This adjusts the level of dimness or brightness on your
display.
Turn on Reduce White Point. In Settings , go to General > Accessibility > Display
Accommodations, then turn on Reduce White Point. Select Intensity, then swipe to adjust
the percentage of white point intensity. This adjusts the brightness level of colors on
your display.
Bold text
You can make text on Ap ple TV ea sie r to read by displ ayin g o nsc reen tex t w ith boldface
type.
Turn on bold text. In Settings , go to General > Accessibility, then turn on Bold Text.
Increase the screen contrast
There are two ways you can increase the screen contrast to make items easier to see on
Apple TV.
Remove blurred image backgrounds. In Settings , go to General > Accessibility >
Increase Contrast, then turn on Reduce Transparency.
Highlight selected items further. In Settings , go to General > Accessibility >
Increase Contrast, then turn on Focus Style.
Reduce screen motion
You can stop the m oveme nt of app ic ons , movie posters , a nd som e o the r scree n
elements on Apple TV.
Reduce motion. In Settings , go to General > Accessibility, then turn on Reduce
Motion.
Apple Confidential
Page 87

Switch Control
Switch Control
Switch Control lets you control Apple TV using an attached Bluetooth device as a switch.
Use any of several methods to perform actions such as selecting, dragging, and typing.
You use a switc h to selec t an item on th e s cree n, and then use the sa me (or different)
switch to choose an action to perform on that item or location. The basic methods are:
Item scanning (default), which highlights different items on the screen until you
select one.
Manual selection, which lets you move from item to item on demand (requires
multiple switches).
Whichever method you use, when you select an individual item (rather than a group), a
menu appears so you can choose how to act on the selected item (press or drag).
If you use multiple switches, you can set up each switch to perform a specific action and
customize your item selection method. For example, instead of automatically scanning
screen items, you can set up switches to move to the next or previous item on demand.
You can adj ust th e behavior of Swi tch Contro l in a var iet y of ways , t o suit your sp eci fic
needs and style.
Add a switch and turn on Switch Control
To connec t a switch to Apple TV, you can connect a n exte rnal Bluetoo th device suc h as a
keyboard, or you can use the platform switching feature that forwards switch actions
from another device such as an iPhone or a Mac. On an iOS device, tap the screen to
trigger the switch. (On iPhone 6s and iPhone 6s Plus or later, press the screen.)
Add a switch and choose its action. In Settings , go to General > Accessibility >
Switch Control > Switches. If you use only one switch, itʼs your Select Item switch by
default.
If youʼre adding an external switch, you need to connect it to Apple TV before it will
appear in the list of available switches. Follow the instructions that came with the switch.
If it connects using Bluetooth, you need to pair it with Apple TV. For more information,
see .
Turn on Switch Control. In Settings , go to General > Accessibility, then turn on
Switch Control.
Connect Bluetooth devices to Apple TV
Apple Confidential
Page 88

Turn off Switch Control. In Settings , go to General > Accessibility, then turn off
Switch Control.
Basic techniques
Here are some basic techniques for Switch Control.
Select an item. While the item is highlighted, trigger the switch youʼve set up as your
Select Item switch. If youʼre using a single switch, itʼs your Select Item switch by default.
Perform an action on the selected item. Choose a command from the control menu
that appears when you select the item. The layout of the menu depends on how you
configure press behavior. In Settings , go to General > Accessibility > Switch Control
> Press Behavior and choose an option.
With Default on: The control menu usually includes only the Press button and the
More button (two dots at the bottom). If youʼre in a scrollable area of the screen, a
Scroll bar also appears. To press the highlighted item, trigger your Select Item button
when Press is highlighted. To see additional action buttons, choose More at the
bottom of the menu. If you have multiple switches, you can set one up specifically for
pressing.
With Auto Press on: To press the item, do nothing—t he item is automatically tapped
when the Auto Press interval expires (0.75 seconds if you havenʼt changed it). To see
the control menu, trigger your Select Item button before the Auto Press interval
expires. The control menu skips the Press button and goes right to the full set of
action buttons.
With Always Press on: Press to select the highlighted item rather than display the
control menu. Wait until the end of the scan cycle, then press a button to display the
control menu.
Scroll the screen. Select an item in a scrollable part of the screen, then:
With Auto Press off: Choose the Scroll Down button (next to the Press button) in the
control menu. Or, for more scrolling options, choose More, then choose Scroll.
With Auto Press on: Choose Scroll from the control menu. If many actions are
available, you might have to choose More first.
Press the Home button. Choose Home from the control menu.
Control media playback. When media is playing on Apple TV, a control menu
automatically appears with playback controls.
Apple Confidential
Page 89

Dismiss the control menu without choosing an action. Press while the original item is
highlighted and all the icons in the control menu are dimmed. Or choose Escape from the
control menu. The menu goes away after cycling the number of times you specify in
Settings , at General > Accessibility > Switch Control > Loops.
Perform other hardware actions. Select any item, then choose Device from the menu
that appears. Use the menu to mimic these actions:
Click the multitasking menu button for multitasking
Press the volume buttons
Triple-click the Menu button
Item scanning
Item scanning alternately highlights each item or group of items on the entire screen until
you trigger your Select Item switch. If there are many items, Switch Control highlights
them in groups. When you select a group, highlighting continues with the items in the
group. When you select a unique item, scanning stops and the control menu appears.
Item scanning is the default when you first turn on Switch Control.
You can cho ose fro m t hree sc ann ing styles—au to sca nning, manual sc ann ing , a nd
single-switch step scanning.
Auto scanning automatically highlights items, one after the other.
Manual scanning uses one switch to highlight an item and another to activate it.
Single-switch step scanning uses a switch to move the highlight from item to item. If
you take no action after a period of time, the highlighted item activates.
Select an item or enter a group. Watch (or listen) as items are highlighted. When the
item you want to control (or the group containing the item) is highlighted, trigger your
Select Item switch. Work your way down the hierarchy of items until you select the
individual item you want to control.
Back out of a group. Trigger your Select Item switch when the dashed highlight around
the group or item appears.
Dismiss the control menu without performing an action. Trigger your Select Item
switch when the item itself is highlighted. Or choose Escape from the control menu.
Hear the names of items as they are highlighted. In Settings , go to General >
Accessibility > Switch Control, then turn on Speech. Or choose Settings from the control
menu, then choose Speech On.
Apple Confidential
Page 90

Slow down or speed up the scanning. In Settings , go to General > Accessibility >
Switch Control > Auto Scanning Time.
Settings and adjustments
Adjust basic settings. In Settings , go to General > Accessibility > Switch Control,
where you can:
Add switches and specify their function
Adjust how rapidly items are scanned
Turn off auto scanning (only if youʼve added a Move to Next Item switch)
Set scanning to pause on the first item in a group
Choose how many times to cycle through the screen before hiding Switch Control
Set whether a movement action is repeated when you hold down a switch, and how
long to wait before repeating
Add another action to a switch by holding down the switch for a long duration
Choose a Press behavior and set the interval for performing a second switch action
to show the control menu
Set whether and how long you need to hold a switch down before itʼs accepted as a
switch action
Have Switch Control ignore accidental repeated switch triggers
Turn on sound effects or have items read aloud as theyʼre scanned
Choose which items appear in menus and the order in which they appear
Choose what to include in the Switch Control menu
Set whether items should be grouped while item scanning
Make the selection cursor larger or a different color
Fine-tune Switch Control. Choose Settings from the control menu to:
Adjust scanning speed
Change the location of the control menu
Turn sound or speech accompaniment on or off
Turn off groups to scan items one at a time
Apple Confidential
Page 91

Change the cursor color
Set hearing controls
You can set he aring con trol s s o t hat Ap ple TV outputs o nly mono audio o r a dju st the
balance of audio between left and right speakers.
Turn on mono audio. In Settings , go to General > Accessibility, then turn on Mono
Audio.
Adjust balance. In Settings , go to General > Accessibility, then select Balance and
adjust the slide control left or right from the center position.
Accessibility Shortcut
You can set Ap ple TV to tur n one part icular acc essibility se tti ng on or off by pressing th e
button three times.
Set the Accessibility Shortcut. In Settings , go to General > Accessibility >
Accessibility Shortcut and select an option.
Apple Confidential
Page 92

Important safety and handling information
WARNING: Read all safety information below and operating instructions before using
Apple TV to avoid injury. Failure to follow these safety instructions could result in fire,
electric shock, or other injury or damage to Apple TV or other property.
Important Safety Instructions Read and follow these instructions to use Apple TV
safely.
Read these instructions.
Keep these instructions.
Heed all warnings.
Follow all instructions.
Do not use Apple TV near water.
Clean only with a dry cloth.
Do not block any ventilation openings. Install in accordance with manufacturerʼs
instructions.
Do not install near any heat sources such as radiators, heat registers, stoves, or other
devices (including amplifiers) that produce heat.
Protect the power cord from being walked on or pinched, particularly at the plugs and
at the point where it exits from Apple TV.
Only use attachments/accessories specified by the manufacturer.
Unplug Apple TV during lightning storms or when unused for long periods of time.
Refer all servicing to qualified service personnel. Servicing is required when Apple TV
has been damaged in any way, such as when the power cord or plug is damaged,
liquid has been spilled or objects have fallen into Apple TV, or Apple TV has been
exposed to rain or moisture, does not operate normally, or has been dropped.
Power Apple TV has no on/off switch. To disconnect Apple TV from power, unplug the
power cord. Make sure the power cord is always easily accessible. When connecting or
disconnecting Apple TV, always hold the plug by its sides. Keep fingers away from the
metal part of the plug.
Safety, handling, and support
Apple Confidential
Page 93

Location Do not use Apple TV outdoors. Apple TV is an indoor product. Do not place
naked flame sources, such as lighted candles, on or near Apple TV. Do not use Apple TV
near water. Do not expose Apple TV to dripping or splashing, and do not place any object
filled with liquid, such as a vase, on Apple TV. Do not move Apple TV if another device
such as a TV, computer, or other electronic device is connected to it.
WARNING: To reduce the ri sk o f fire or electr ic shock, do not expose Apple TV to rain,
liquid, moisture, excessive heat, or naked flame.
WARNING: The Siri Remote contains batteries. Do not expose the Siri Remote to
excessive heat such as sunshine, fire, or the equivalent.
Cleaning and care To clean Apple TV, unplug the power cord and all cables. Then use a
soft, dry, lint-free cloth. Avoid getting moisture in openings. Donʼt use window cleaners,
household cleaners, aerosol sprays, solvents, alcohol, ammonia, or abrasives to clean
Apple TV.
Repairing Do not make repairs yourself. You can find more information about getting
service at the .
WARNING: Do not attempt to open Apple TV or disassemble it. You run the risk of
electric shock, and damage caused by disassembly is not covered by the limited
warranty. No user-serviceable parts are inside.
Handling Your App le TV may be dam aged by improper stor age or handling. Be ca refu l
not to drop Apple TV when transporting it.
Operating environment Apple TV works best in ambient temperatures between 32° and
95° F (0° and 35° C) and can be stored at temperatures between -4° and 113° F (-20°
and 45° C). While youʼre using Apple TV, itʼs normal for the case to get warm. The Apple
TV case is designed to transfer heat from inside the unit to the cooler air outside.
Do not operate Apple TV in areas with significant amounts of airborne dust or particulate
matter that might clog the ventilation openings.
Explosive atmospheres Using Apple TV in any area with a potentially explosive
atmosphere, such as areas where the air contains high levels of flammable chemicals,
vapors, or particles (such as grain, dust, or metal powders), may be hazardous. Obey all
signs and instructions.
Medical conditions If you have a medical condition that you believe could be affected by
using Apple TV (for example, seizures, blackouts, eyestrain, or headaches), consult with
your physician prior to using Apple TV.
Medical devices The Siri Remote contains radios that emit electromagnetic fields. These
electromagnetic fields may interfere with pacemakers, defibrillators, and other medical
devices. Keep at least 6 inches (approximately 15 cm) of separation between your
Apple TV Service Answer Center
Apple Confidential
Page 94

pacemaker or defibrillator and the Siri Remote. If you suspect the Siri Remote is
interfering with your pacemaker or any other medical device, stop using it and consult
your physician for information specific to your medical device.
Repetitive motion When you perform repetitive activities such as playing games on
Apple TV, you may experience occasional discomfort in your hands, arms, wrists,
shoulders, neck, or other parts of your body. If you experience discomfort, stop those
activities and consult a physician.
Charging the Siri Remote Charge the Siri Remote with the included Lightning cable, or
with other third-party “Made for iPhone” Lightning cables. Using counterfeit or damaged
cables or chargers, or charging when moisture is present, can cause fire, electric shock,
injury, or damage to the Siri Remote or other property. When you use a power adapter to
charge the Siri Remote, make sure the Lightning cable is fully inserted into the power
adapter before you plug the adapter into a power outlet.
Lightning cable and connector Avoid prolonged skin contact with the connector when
the Lightning cable is plugged into a power source, because it may cause discomfort or
injury. Avoid situations where your skin is in contact with the Lightning connector for a
long period of time when itʼs plugged in. For example, while the Siri Remote is charging
or while the Lightning cable is plugged into a power source, donʼt sit or sleep on it or
place it under a blanket, pillow, or your body. Take special care if you have a physical
condition that affects your ability to detect heat against the body.
Discoloration of the Lightning connector after regular use is normal. Dirt, debris, and
exposure to liquids may cause discoloration. To remove the discoloration or if the cable
becomes warm during use or wonʼt charge the Siri Remote, disconnect the Lightning
cable from your computer or power adapter and clean it with a soft, dry, lint-free cloth.
Do not use liquids or cleaning products when cleaning the Lightning connector.
Gaming Hold the Siri Remote securely and avoid excessive motion when playing games
on Apple TV. Use the Remote Loop (sold separately) and maintain a secure grip on the
Siri Remote to prevent injury, or accidental damage to the Siri Remote or other property.
Device information Information such as the model number, serial number, and electrical
rating is located on the bottom of Apple TV. To find the serial number onscreen, in
Settings , go to General > About.
Apple TV Support site
Comprehensive support information is available online at . To contact
Apple for personalized support (not available in all areas), go to .
Apple TV Support
Contact Support
Apple Confidential
Page 95

FCC compliance statement
This device complies with part 15 of the FCC rules. Operation is subject to the following
two conditions: (1) This device may not cause harmful interference, and (2) this device
must accept any interference received, including interference that may cause undesired
operation.
Note: This equipment has been tested and found to comply with the limits for a Class B
digital device, pursuant to part 15 of the FCC Rules. These limits are designed to provide
reasonable protection against harmful interference in a residential installation.
This equipment generates, uses, and can radiate radio frequency energy and, if not
installed and used in accordance with the instructions, may cause harmful interference to
radio communications. However, there is no guarantee that interference will not occur in
a particular installation.
If this equipment does cause harmful interference to radio or television reception, which
can be determined by turning the equipment off and on, the user is encouraged to try to
correct the interference by one or more of the following measures:
Reorient or relocate the receiving antenna.
Increase the separation between the equipment and receiver.
Connect the equipment to an outlet on a circuit different from that to which the
receiver is connected.
Consult the dealer or an experienced radio/TV technician for help.
Important: Changes or modifications to this product not authorized by Apple could void
the electromagnetic compatibility (EMC) and wireless compliance and negate your
authority to operate the product.
This product has demonstrated EMC compliance under conditions that included the use
of compliant peripheral devices and shielded cables between system components. It is
important that you use compliant peripheral devices and shielded cables between
system components to reduce the possibility of causing interference to radios, television
sets, and other electronic devices.
Exposure to radio frequency energy The radiated output power of this device meets
the limits of FCC/IC radio frequency exposure limits. This device should be operated with
a minimum separation distance of 20 cm (8 inches) between the equipment and a
personʼs body.
Responsible party (contact for FCC matters only):
Apple Inc. Corporate Compliance
Apple Confidential
Page 96

1 Infinite Loop, MS 91-1EMC
Cupertino, CA 95014
Canadian compliance statement
This device complies with Innovation, Science and Economic Development Canada
licence-exempt RSS standard(s). Operation is subject to the following two conditions: (1)
this device may not cause interference, and (2) this device must accept any interference,
including interference that may cause undesired operation of the device.
Operation in the band 5150–5250 MHz is only for indoor use to reduce the potential for
harmful interference to co-channel mobile satellite systems.
Exposure to radio frequency energy The radiated output power of this device meets
the limits of FCC/IC radio frequency exposure limits. This device should be operated with
a minimum separation distance of 20 cm (8 inches) between the equipment and a
personʼs body.
Le présent appareil est conforme aux CNR dʼInnovation, Sciences et Développement
économique Canada applicables aux appareils radio exempts de licence. Lʼexploitation
est autorisée aux deux conditions suivantes : (1) lʼappareil ne doit pas produire de
brouillage, et (2) lʼutilisateur de lʼappareil doit accepter tout brouillage radioélectrique
subi, même si le brouillage est susceptible dʼen compromettre le fonctionnement.
La bande 5150–5250 MHz est réservée uniquement pour une utilisation à lʼintérieur afin
de réduire les risques de brouillage préjudiciable aux systèmes de satellites mobiles
utilisant les mêmes canaux.
Lʼexp os it io n à l ʼénerg ie ra di of réq ue nce La puissance de sortie rayonné de cet appareil
est conforme aux limites de la FCC/IC limites d'exposition aux fréquences radio. Cet
appareil doit être utilisé avec une distance minimale de séparation de 20 cm entre
lʼappareil et le corps dʼune personne.
CAN ICES-3 (B)/NMB-3(B)
Apple Confidential
Page 97

Disposal and recycling information
Disposal and recycling The lithium-ion battery in the Siri Remote should be removed by
Apple or an authorized service provider. Dispose of this product and/or its battery
separately from household waste, and in accordance with local environmental laws and
guidelines. For information about battery service and recycling, go to
. For information about Appleʼs recycling program, recycling collection points,
restricted substances, and other environmental initiatives, go to
.
European Union—Disposal Information
The symbol above means that according to local laws and regulations your product
and/or its battery shall be disposed of separately from household waste. When this
product reaches its end of life, take it to a collection point designated by local
authorities. The separate collection and recycling of your product and/or its battery at
the time of disposal will help conserve natural resources and ensure that it is recycled in
a manner that protects human health and the environment.
Brasil—Informações sobre descarte e reciclagem
O símbolo acima indica que este produto e/ou sua bateria não devem ser descartados no
lixo doméstico. Quando decidir descartar este produto e/ou sua bateria, faça-o de
acordo com as leis e diretrizes ambientais locais. Para informações sobre substâncias de
uso restrito, o programa de reciclagem da Apple, pontos de coleta e telefone de
informações, visite .
Información sobre eliminación de residuos y reciclaje
El símbolo de arriba indica que este producto y/o su batería no debe desecharse con los
residuos domésticos. Cuando decida desechar este producto y/o su batería, hágalo de
conformidad con las leyes y directrices ambientales locales. Para obtener información
sobre el programa de reciclaje de Apple, puntos de recolección para reciclaje, sustancias
restringidas y otras iniciativas ambientales, visite o
.
Battery service
The lithium-ion battery in the Siri Remote should be serviced by Apple or an authorized
service provider, and must be recycled or disposed of separately from household waste.
For more information about battery service and recycling, go to the
.
Dispose of batteries according to your local environmental laws and guidelines.
Apple Lithium-ion
Batteries
www.apple.com/environment
www.apple.com/br/environment
www.apple.com/la/environment
www.apple.com/mx/environment
Battery Service and
Recycling website
Apple Confidential
Page 98

Battery charger system efficiency
Turkey environmental information
Türkiye Cumhuriyeti: AEEE Yönetmeliğine Uygundur.
Taiwan bat tery stateme nt
ENERGY STAR® compliance statement
As an ENERGY STAR® partner, Apple has determined that this product meets the
ENERGY STAR® guidelines for energy efficiency. The ENERGY STAR® program is a
partnership with electronic equipment manufacturers to promote energy-efficient
products. Reducing energy consumption of products saves money and helps conserve
valuable resources.
By default, power management is enabled and puts Apple TV to sleep after 1 hour of user
inactivity. To put Apple TV to sleep immediately, press and hold the Home button on
the remote. To wake Apple TV, press the Home button on the remote. To change
sleep settings in Settings , go to General > Sleep After.
For more information about ENERGY STAR®, go to .
Apple and the environment
At Apple, we recognize our responsibility to minimize the environmental impacts of our
operations and products. For more information, go to .
Apple Inc.
© 2017 Apple Inc. All rights reserved.
Under the copyright laws, this manual may not be copied, in whole or in part, without the written consent of
Apple.
www.energystar.gov
www.apple.com/environment
Apple Confidential
Page 99

Apple, the Apple logo, AirPlay, Apple Music, Apple TV, iPad, iPhone, iPhoto, iPod touch, iTunes, Lightning,
Mac, OS X, Siri, and Siri Remote are trademarks of Apple Inc., registered in the U.S. and other countries.
HomeKit and macOS are trademarks of Apple Inc.
App Store, iCloud, iTunes Match, and iTunes Store are service marks of Apple Inc., registered in the U.S. and
other countries.
IOS is a trademark or registered trademark of Cisco in the U.S. and other countries and is used under license.
The Bluetooth® word mark and logos are registered trademarks owned by Bluetooth SIG, Inc. and any use of
such marks by Apple Inc. is under license.
ENERGY STAR® is a U.S. registered trademark.
Other company and product names mentioned herein may be trademarks of their respective companies.
Every effort has been made to ensure that the information in this manual is accurate. Apple is not responsible
for printing or clerical errors.
Some apps are not available in all areas. App availability is subject to change.
Because Apple periodically releases new versions and updates to its software, images shown in this book
may be different from what you see on your screen.
Apple
1 Infinite Loop
Cupertino, CA 95014-2084
408-996-1010
www.apple.com
Apple Confidential
 Loading...