

Page 1
iPad User Guide
Page 1 of 292
Everything you need to
know about iPad
iPad
User Guide
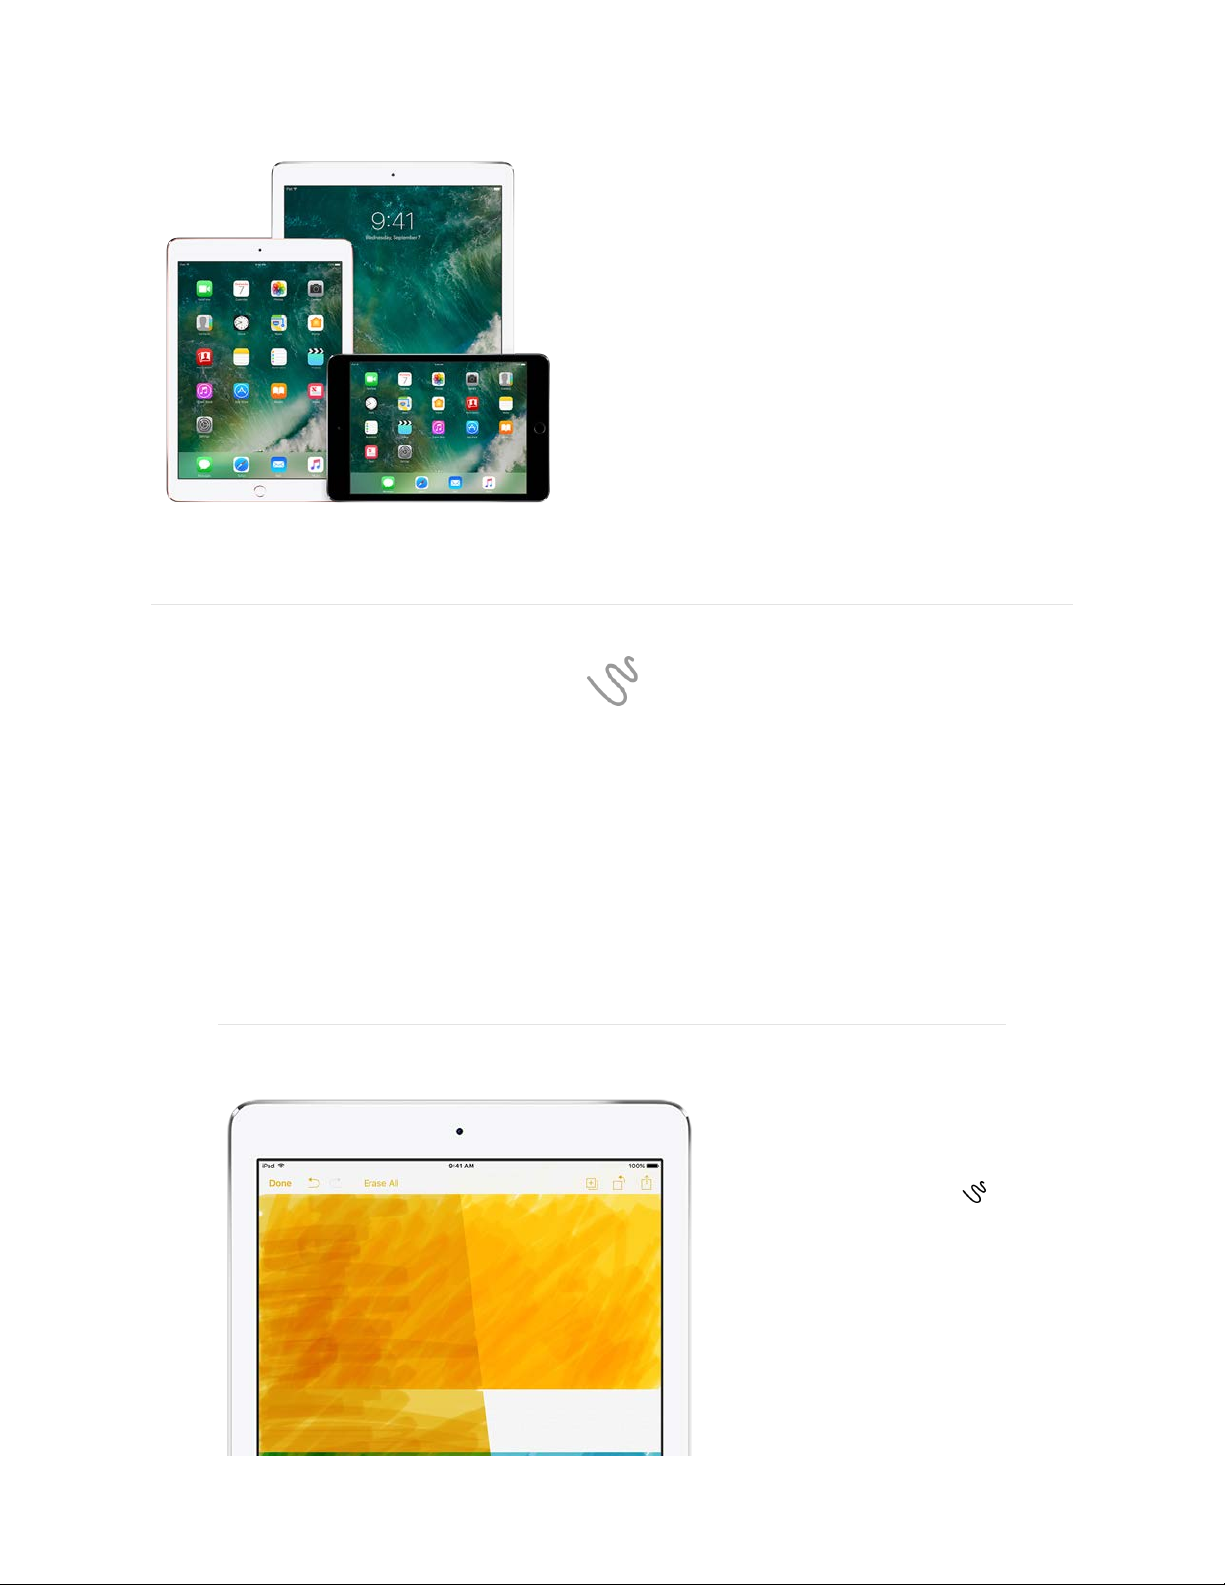
The cocktail napkin has met its match
With Notes, your sketchbook is always at your fingertips
In the Notes app you can use different tools—like colored pencils,
markers, and felt tip pens—to doodle to your heartʼs content. Whether
sketching helps you focus, come up with ideas, or just relax and have
fun, you never run out of pages with iPad.
Start a sketch
Open a note in the
Notes app, then tap .
To see more color
choices, swipe the
palette left or right.
Zoom in on your work to
sketch the details. Pinch
open to get up close,
Page 2
iPad User Guide
Page 2 of 292
then pinch closed when
youʼre done to zoom
back out.
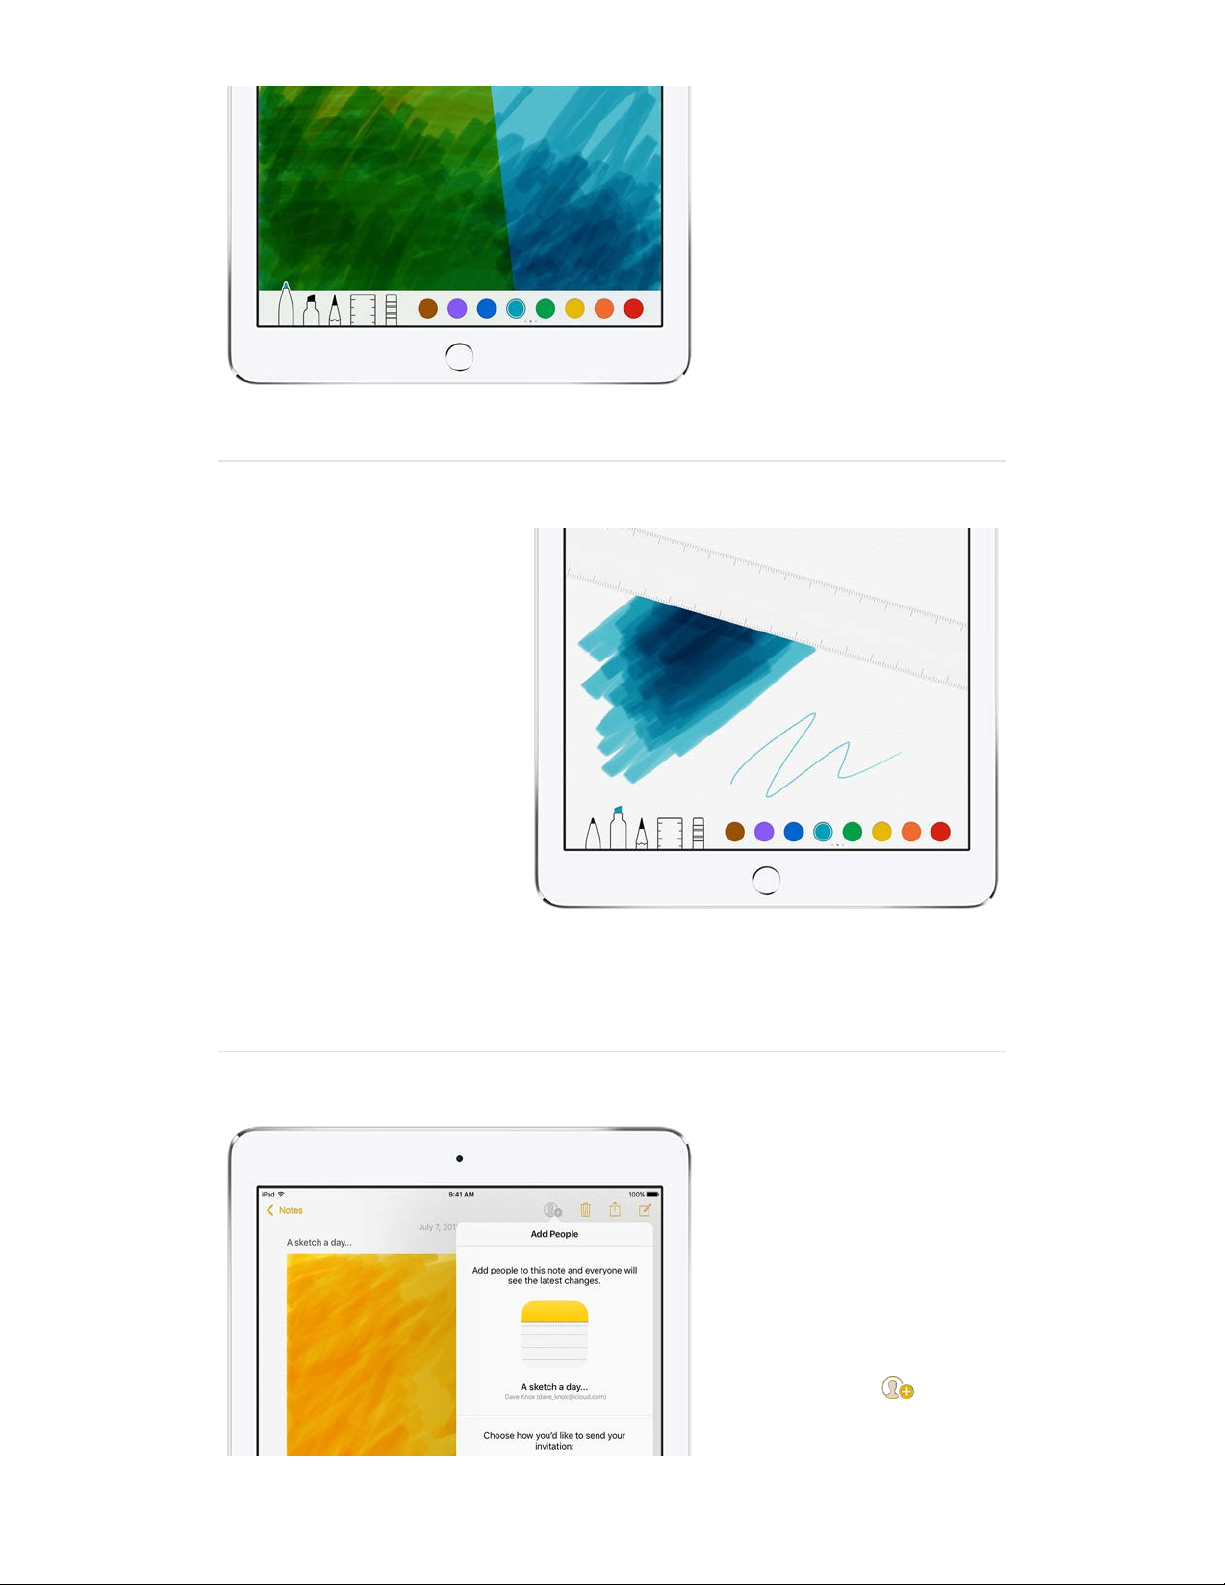
Experiment with
the tools
Just like real drawing
tools, the marker is
translucent so you can
layer your strokes to
vary the tone, and the
pencil is great for subtle
shading. To adjust the
angle of the ruler, touch
and hold it with two
fingers, then rotate your
fingers.
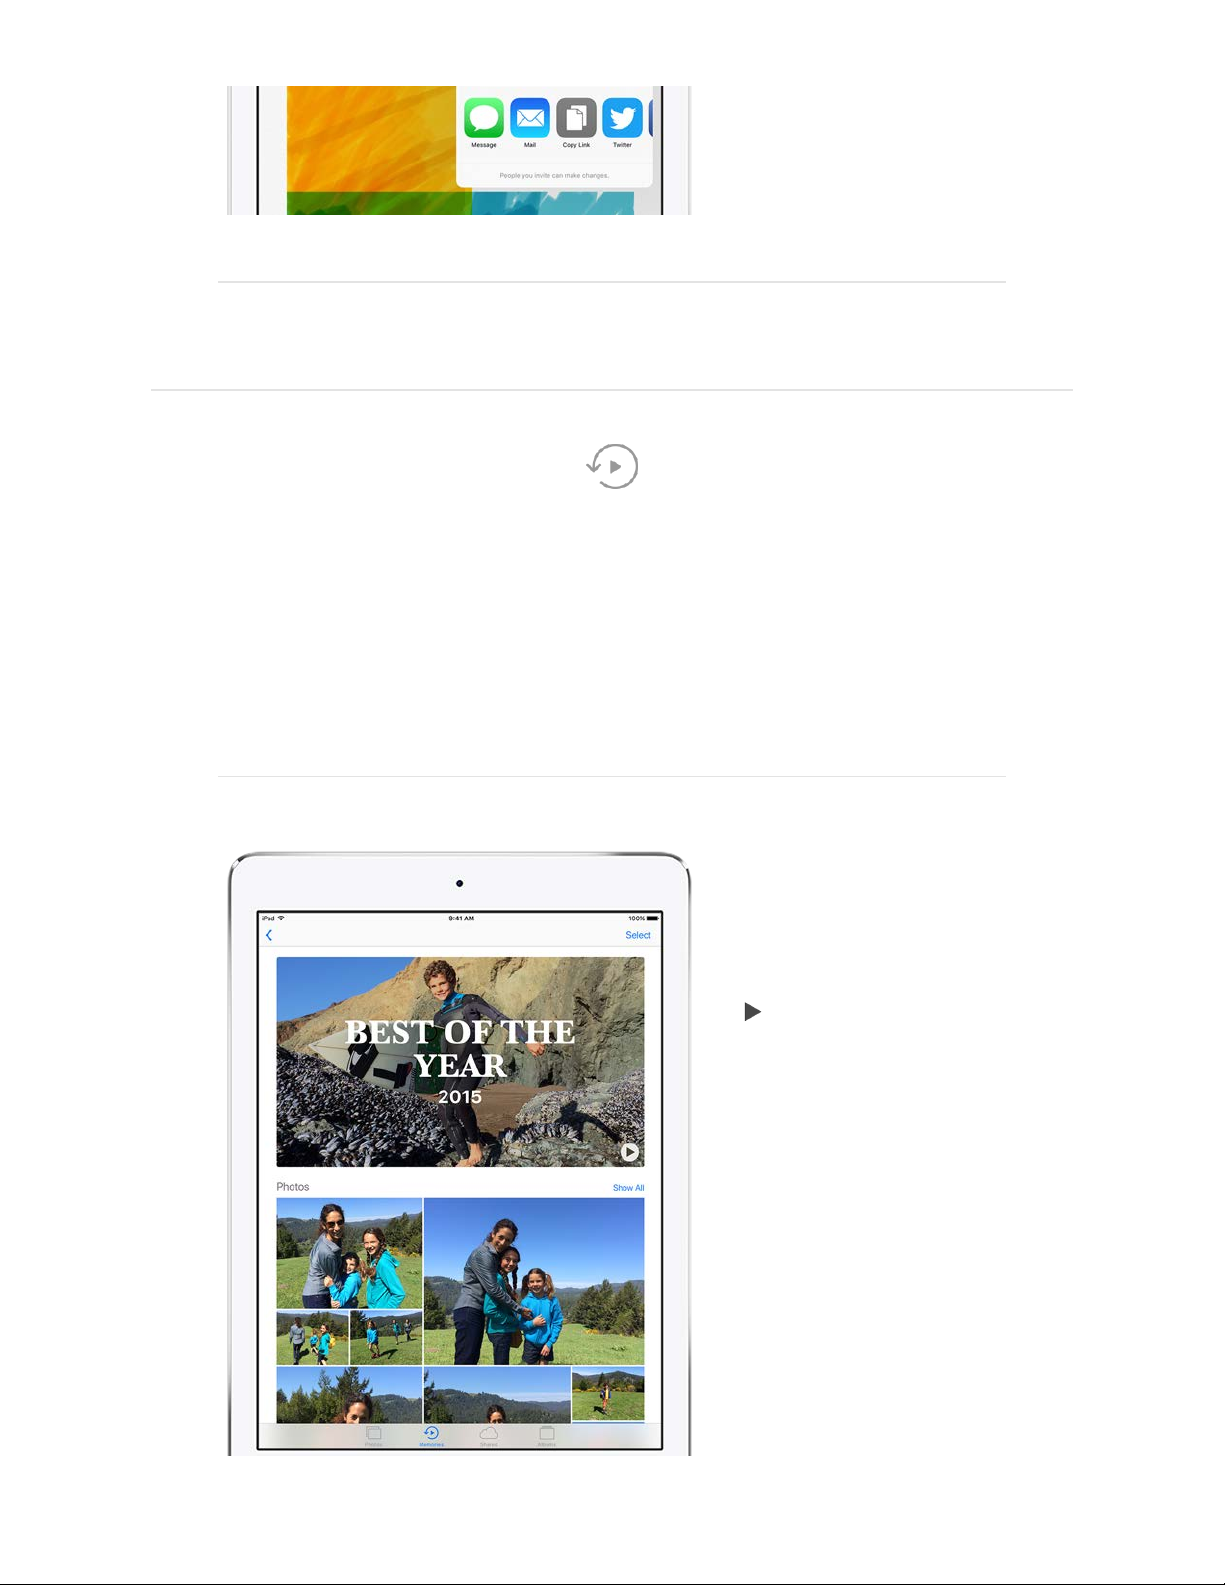
Collaborate
Whether itʼs a doodlefilled brainstorm page, a
work of art, or
something in between,
invite a friend to
contribute and see what
unfolds. Tap to
share your note.
Page 3
iPad User Guide
Page 3 of 292
Want to learn more? Check out .Create a sketch
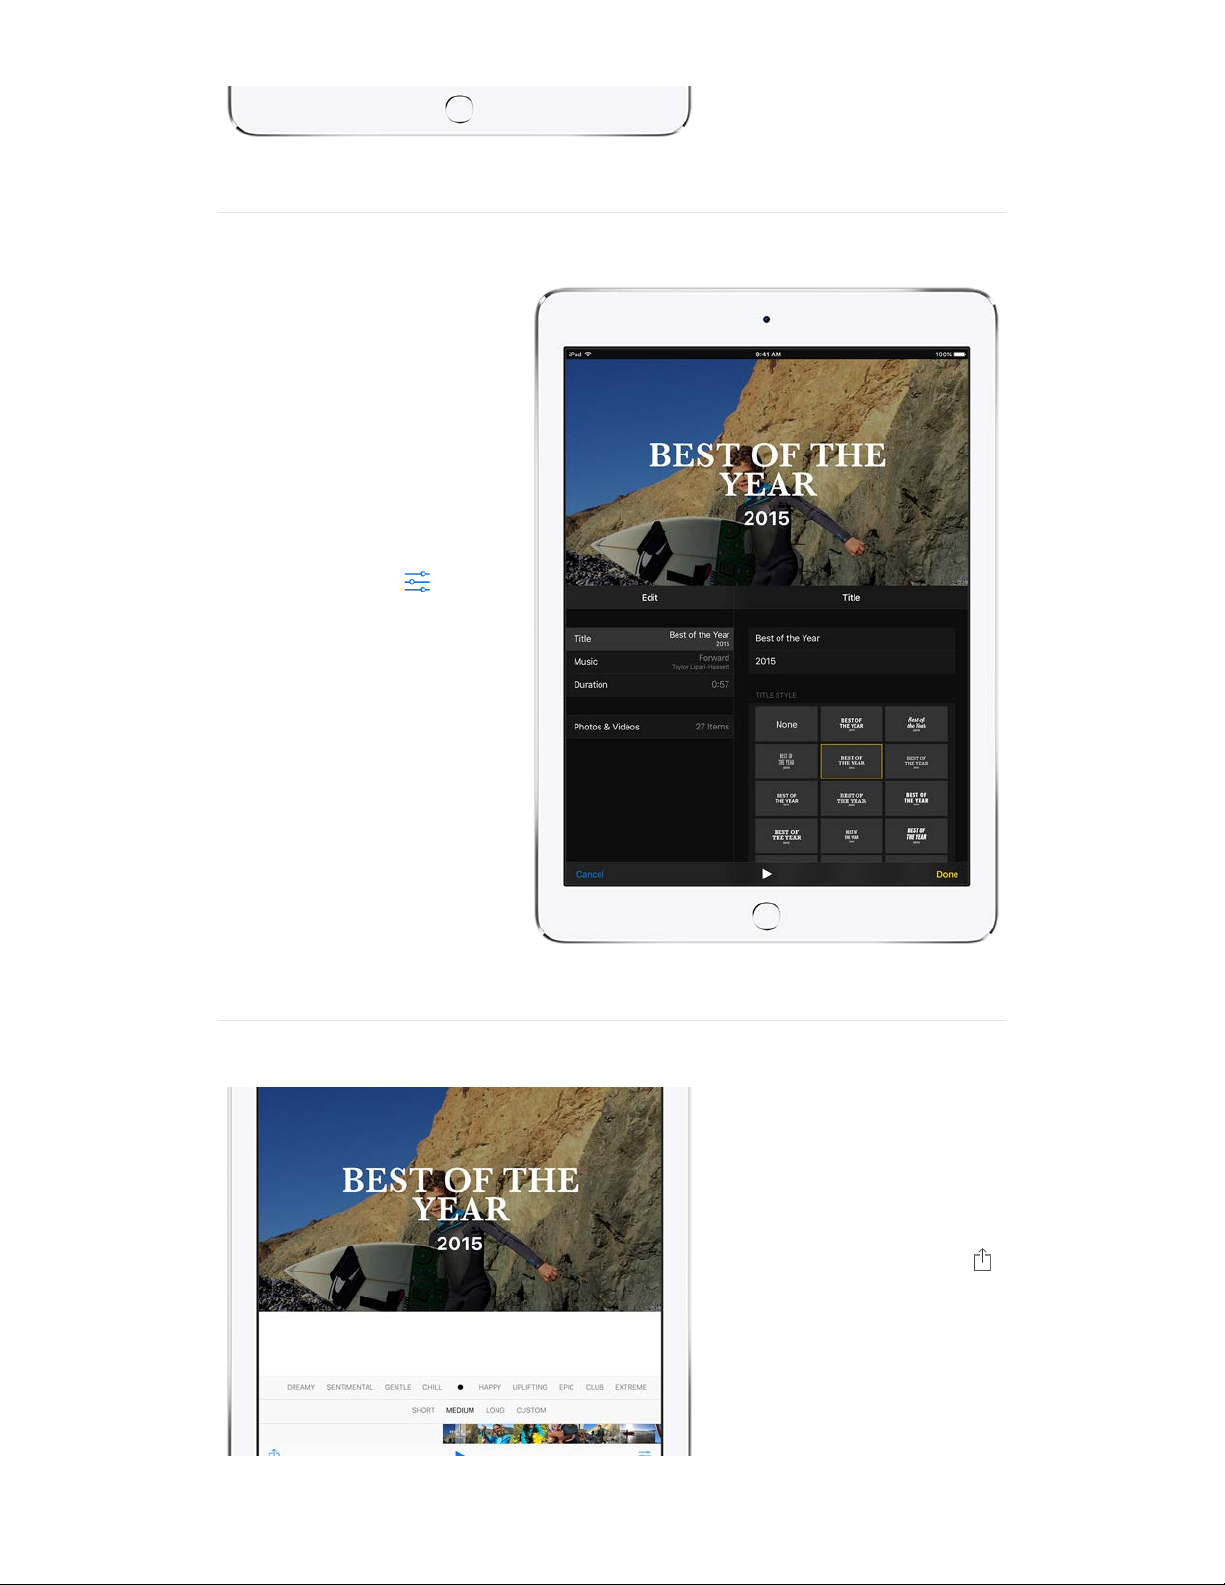
Remember when?
Rediscover special moments with Memories
Memories takes photos and videos from special times in your life—that
crazy race with your best friend, the backpacking trip in Colorado, that
blurry first year of your sonʼs life—and turns them into short movies.
Get started
Tap the Memories tab in
the Photos app and
choose a memory. Tap
to play the Memory
movie, or scroll down
below the movie to see
people, places, and
other related memories.
Page 4
iPad User Guide
Page 4 of 292
Make it perfect
You can add or remove
specific photos and
videos, change the
music or title, even
adjust the length of the
Memory movie. Just tap
a movie while itʼs
playing, then tap .
Remember
together
To share your Memory
movie, tap the movie
while itʼs playing, tap ,
then email it to a friend
or send it with
Messages. Or, if you
have Apple TV, get
everyone together and
Page 5
iPad User Guide
Page 5 of 292
watch on a big screen.
All your memories are
available in the Photos
app on Apple TV when
you
.
Want to learn more? Check out in the Photos chapter.
use iCloud Photo
Library
Memories
A quiet Sunday
Take a break with iPad
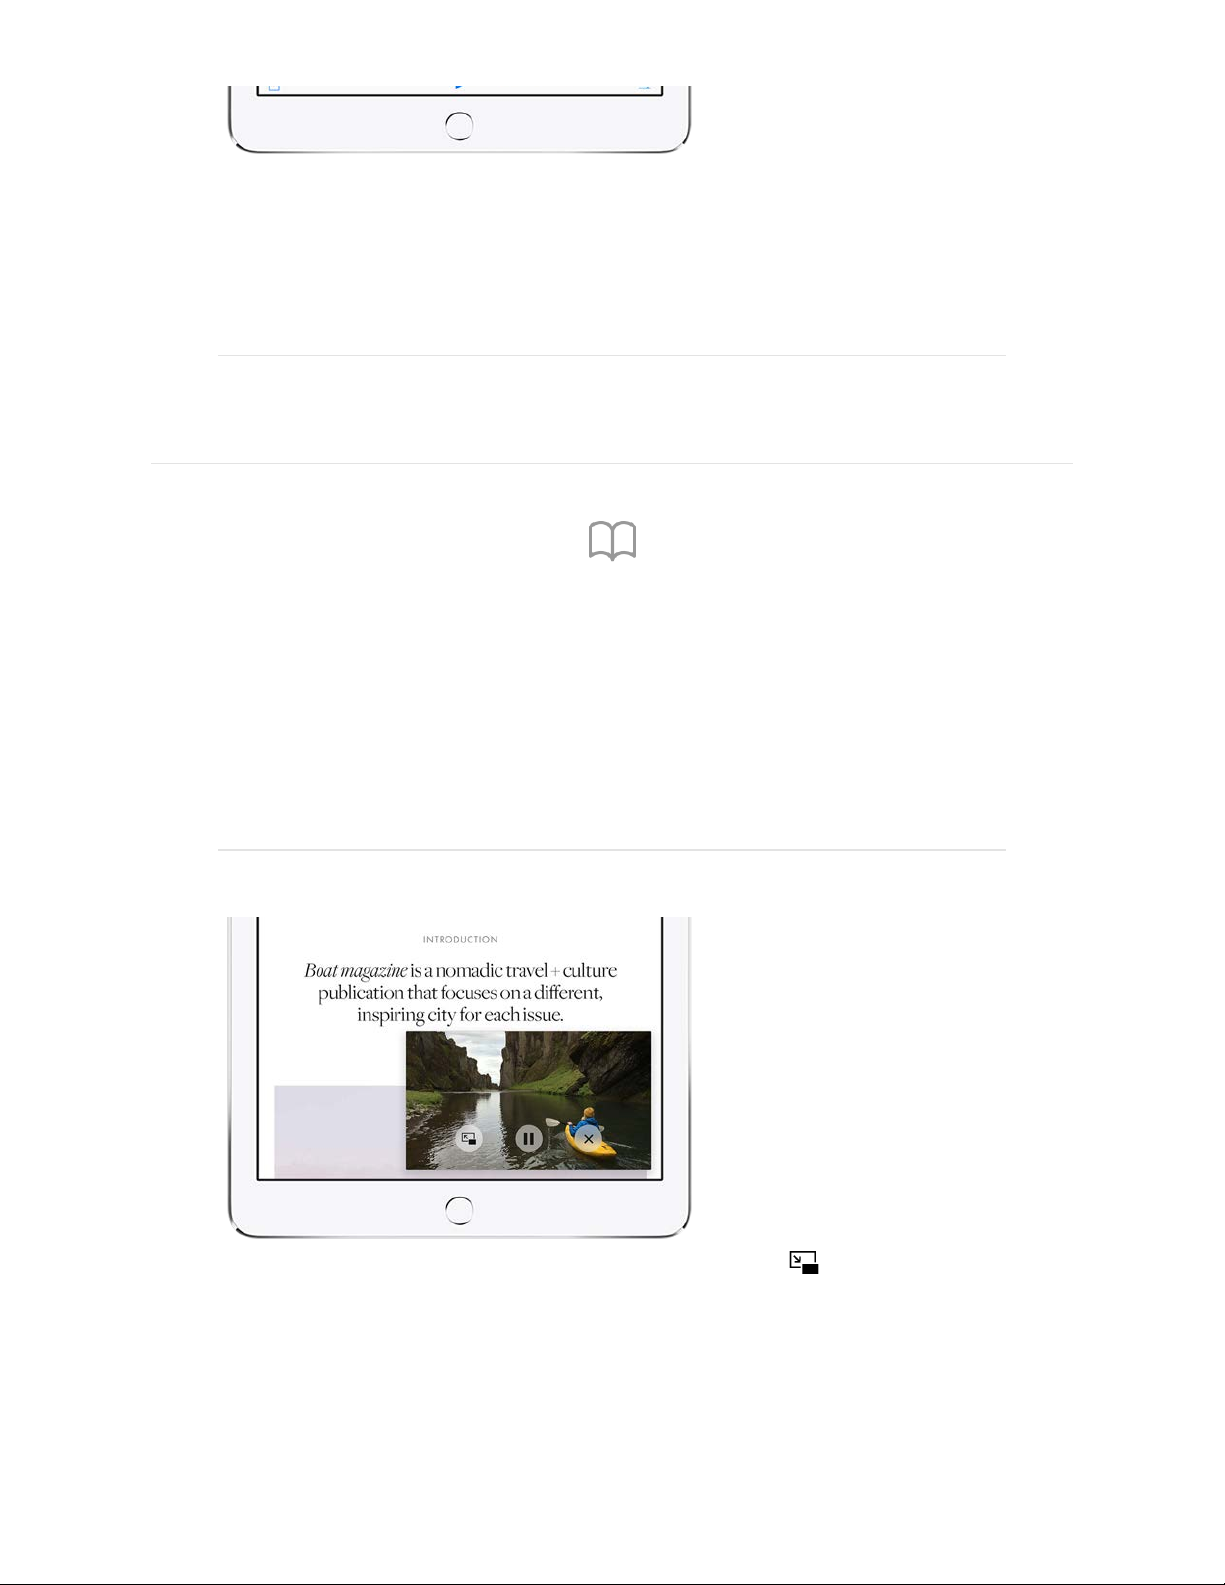
Sometimes after a busy week, you just need some down time. Curl up
with iPad to enjoy a good book, watch a TV show, do some shopping, and
catch up with friends.
Watch a show
while you surf the
web
Multitask with Picture in
Picture while you watch
your favorite show—so
you can check your
mail, look at something
on the web, and more.
Tap at the bottom of
your video screen. To
make the small video
screen larger, pinch it
open. Pinch closed to
shrink it again.
Page 6
iPad User Guide
Page 6 of 292
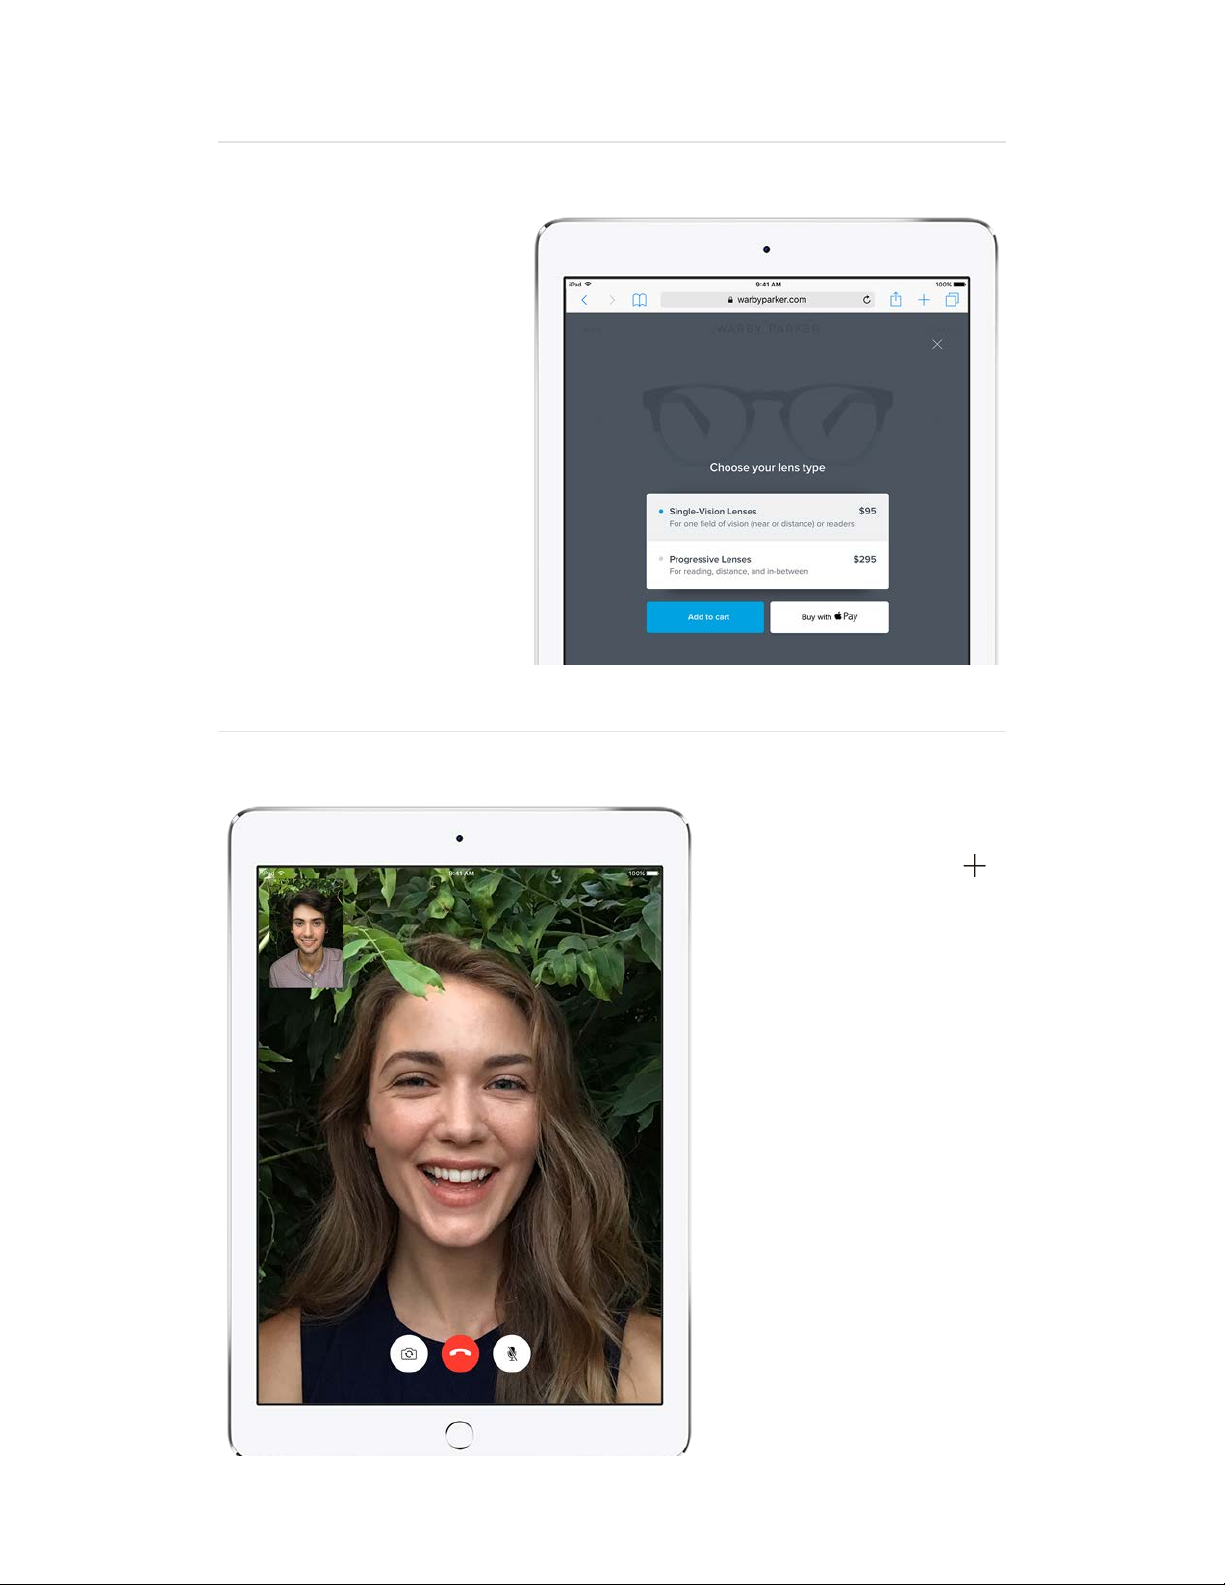
Shop with
Apple Pay
Use Safari to visit your
favorite store online.
When you find that
perfect shirt, tap
Apple Pay, then follow
the instructions to
check out with a touch
of your finger—no need
to hunt for your credit
card.
Hang out
Open FaceTime, tap ,
then call your friend for
a visit. As you chat, you
can take a screenshot
to capture a photo of
the conversation. Press
and hold the
Sleep/Wake button on
the top of your iPad
while you press the
Home button.
Page 7
iPad User Guide
Page 7 of 292
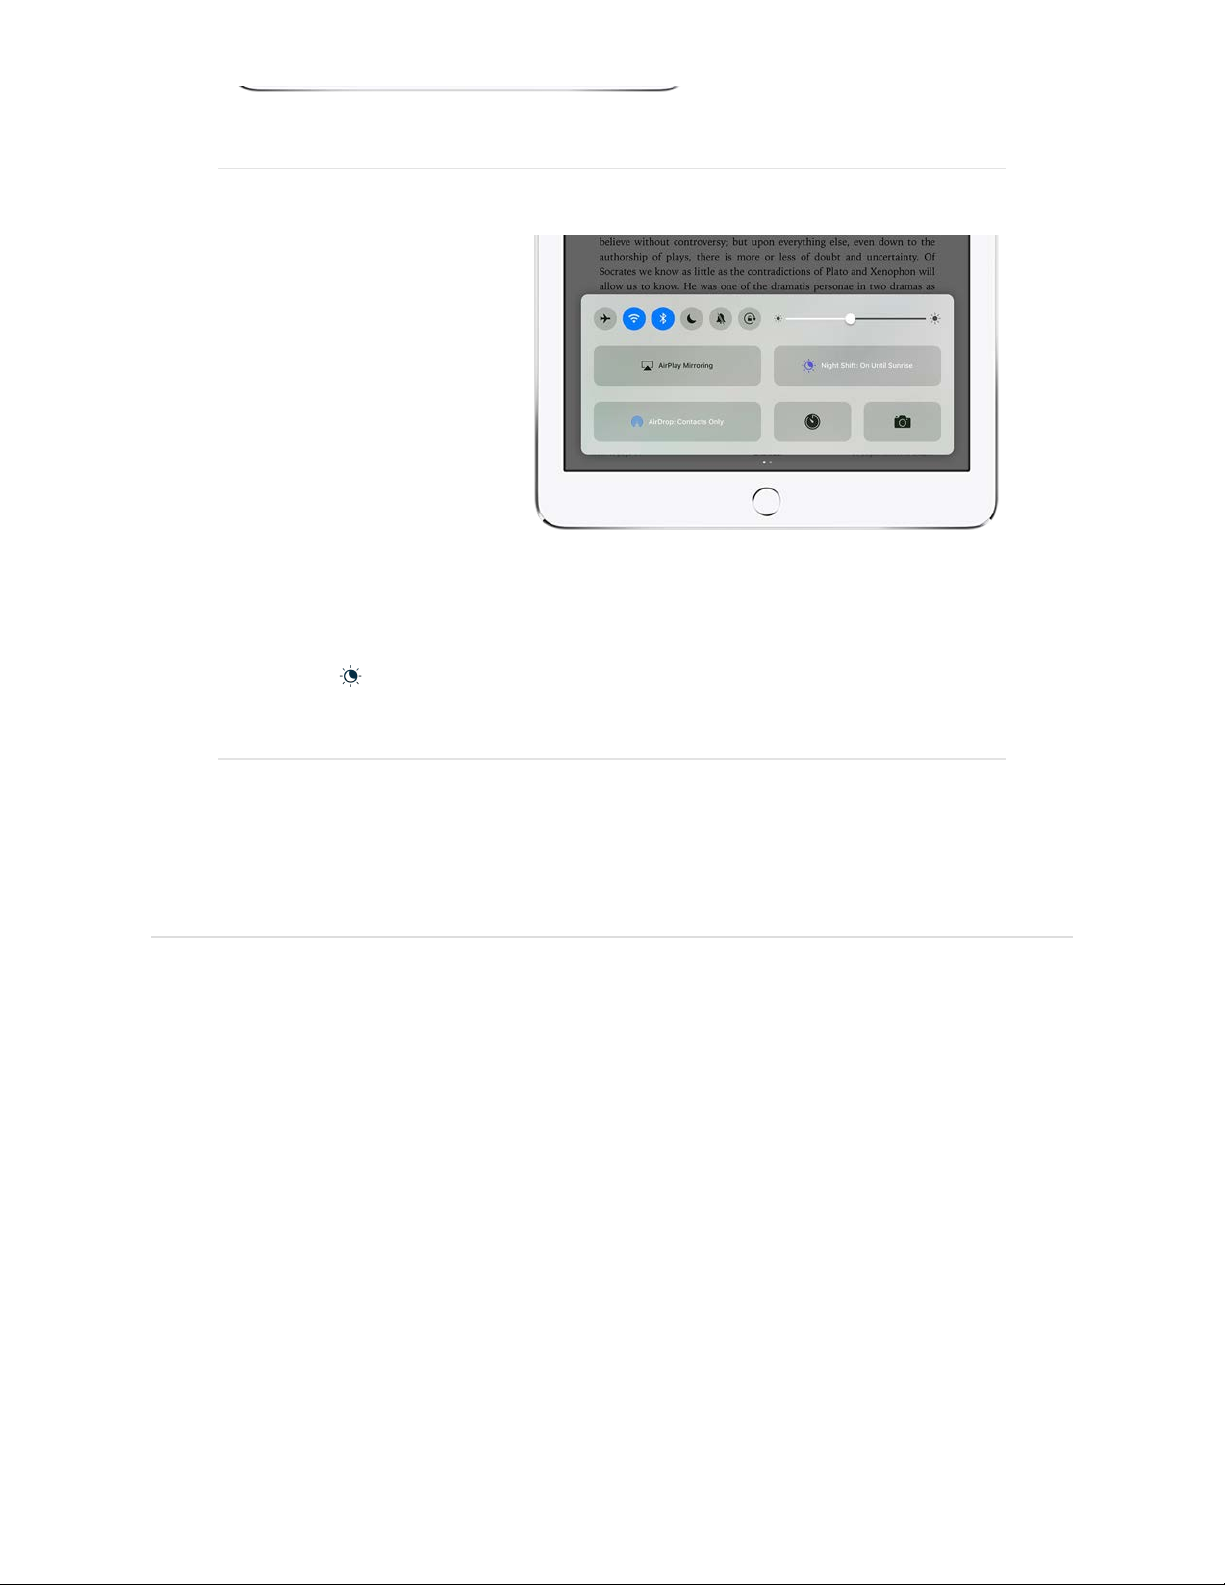
Fall asleep with a
book
Reading a book is a
great way to wind down
as bedtime draws near.
Choose a good read in
iBooks, then tone down
the blue light that may
make it harder for you
sleep. Swipe up from
the bottom of the
screen and turn on
Night Shift .
To learn more, check out , , and .
Not all features are available in all areas.
Apple Pay FaceTime Multitasking
Welcome
Set up and get started
Whatʼs new in iOS 10
Basics
Personalize your iPad
Apps
Sharing
iPad and other devices
Privacy and security
Restart, update, reset, and restore
Accessibility
Safety, handling, and support
Page 8
iPad User Guide
Page 8 of 292
A quick look at iPad
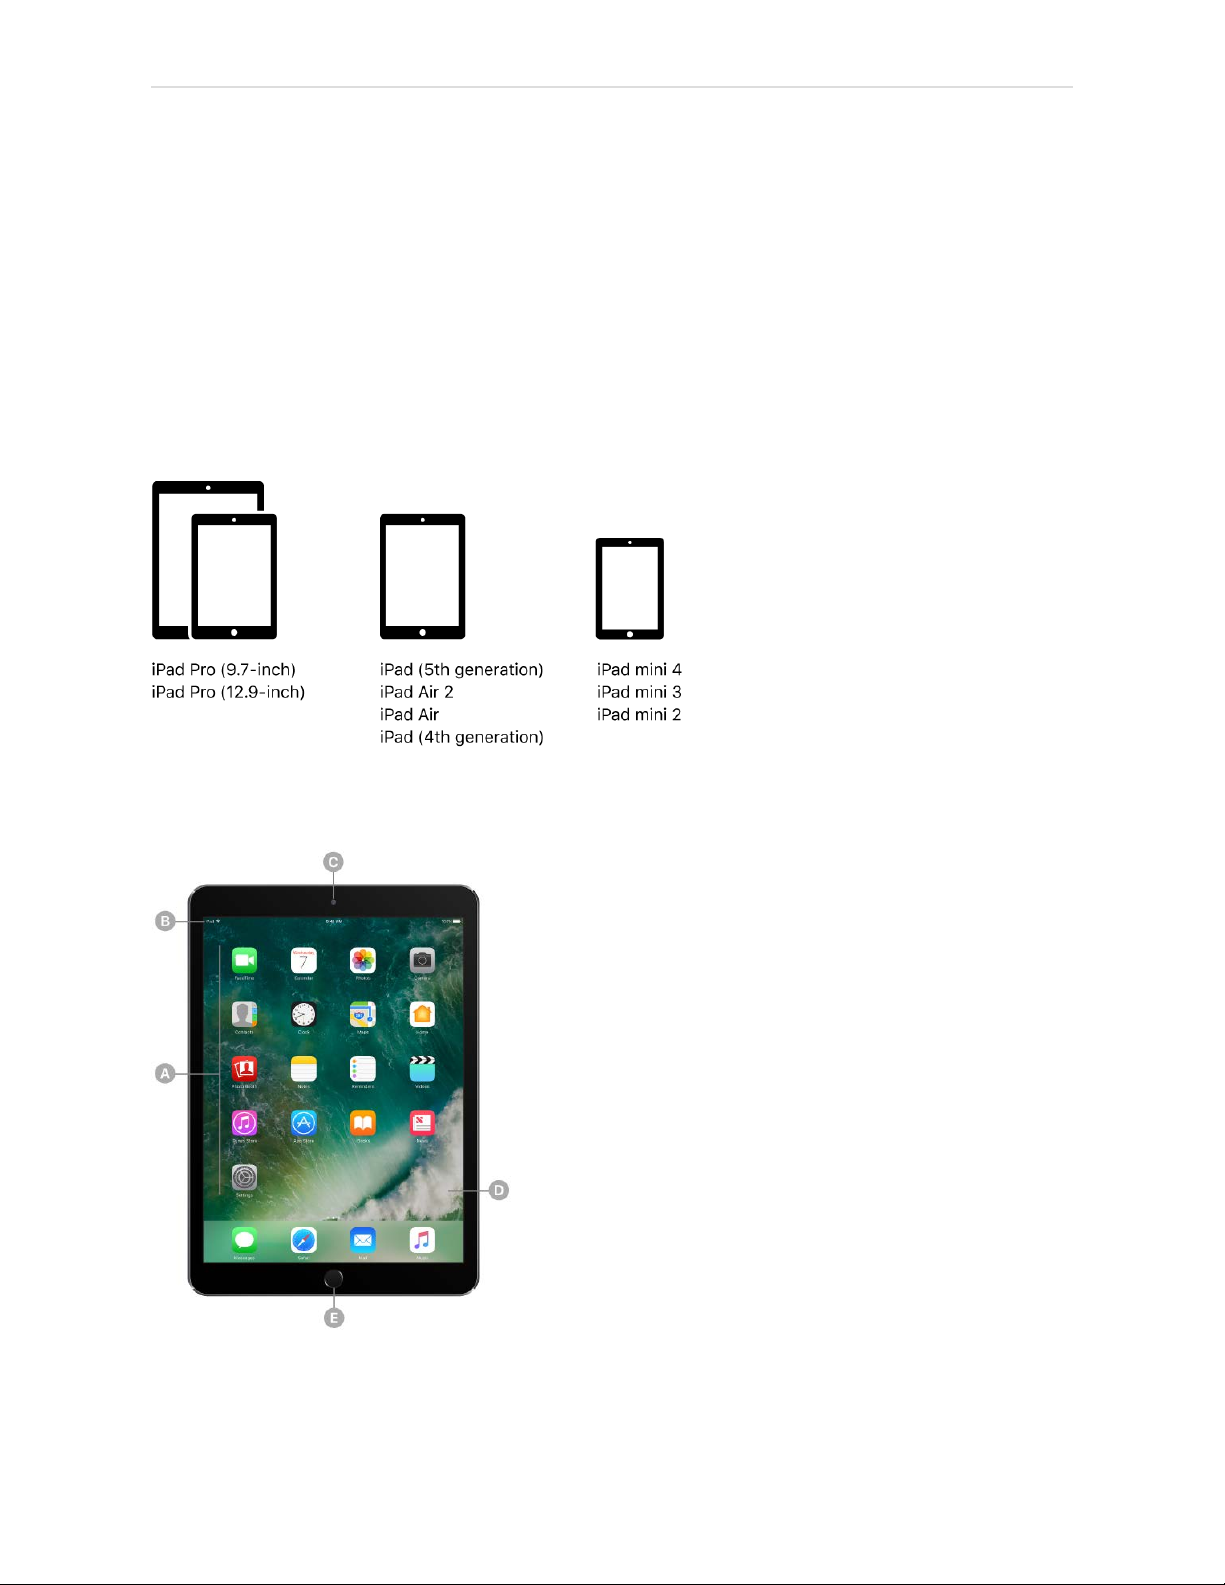
iPad overview
This guide describes iOS 10.3 for:
iPad Pro (9.7-inch)
Set up and get started
Page 9
iPad User Guide
Page 9 of 292
Page 10

iPad User Guide
Page 10 of 292
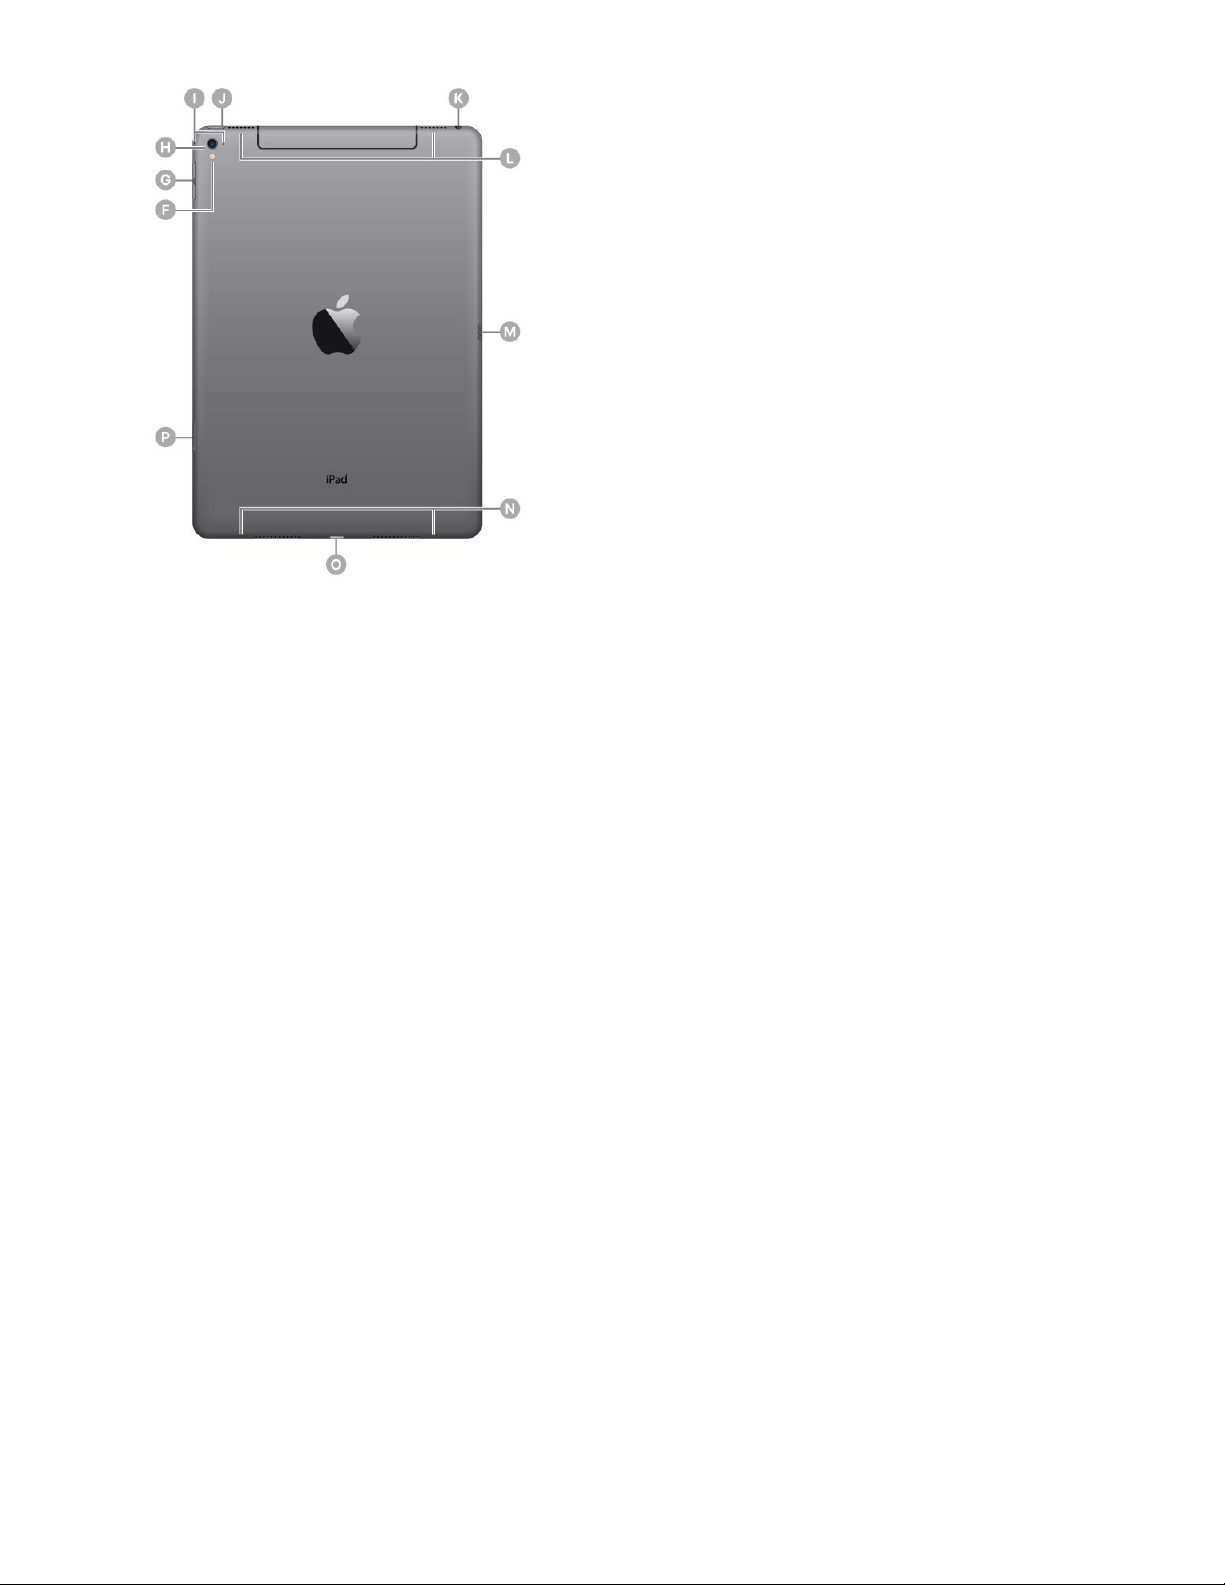
iPad Pro (9.7-inch) features
App icons
Status bar
FaceTime HD camera
Multi-Touch display
Home button/Touch ID sensor
True Tone Flash
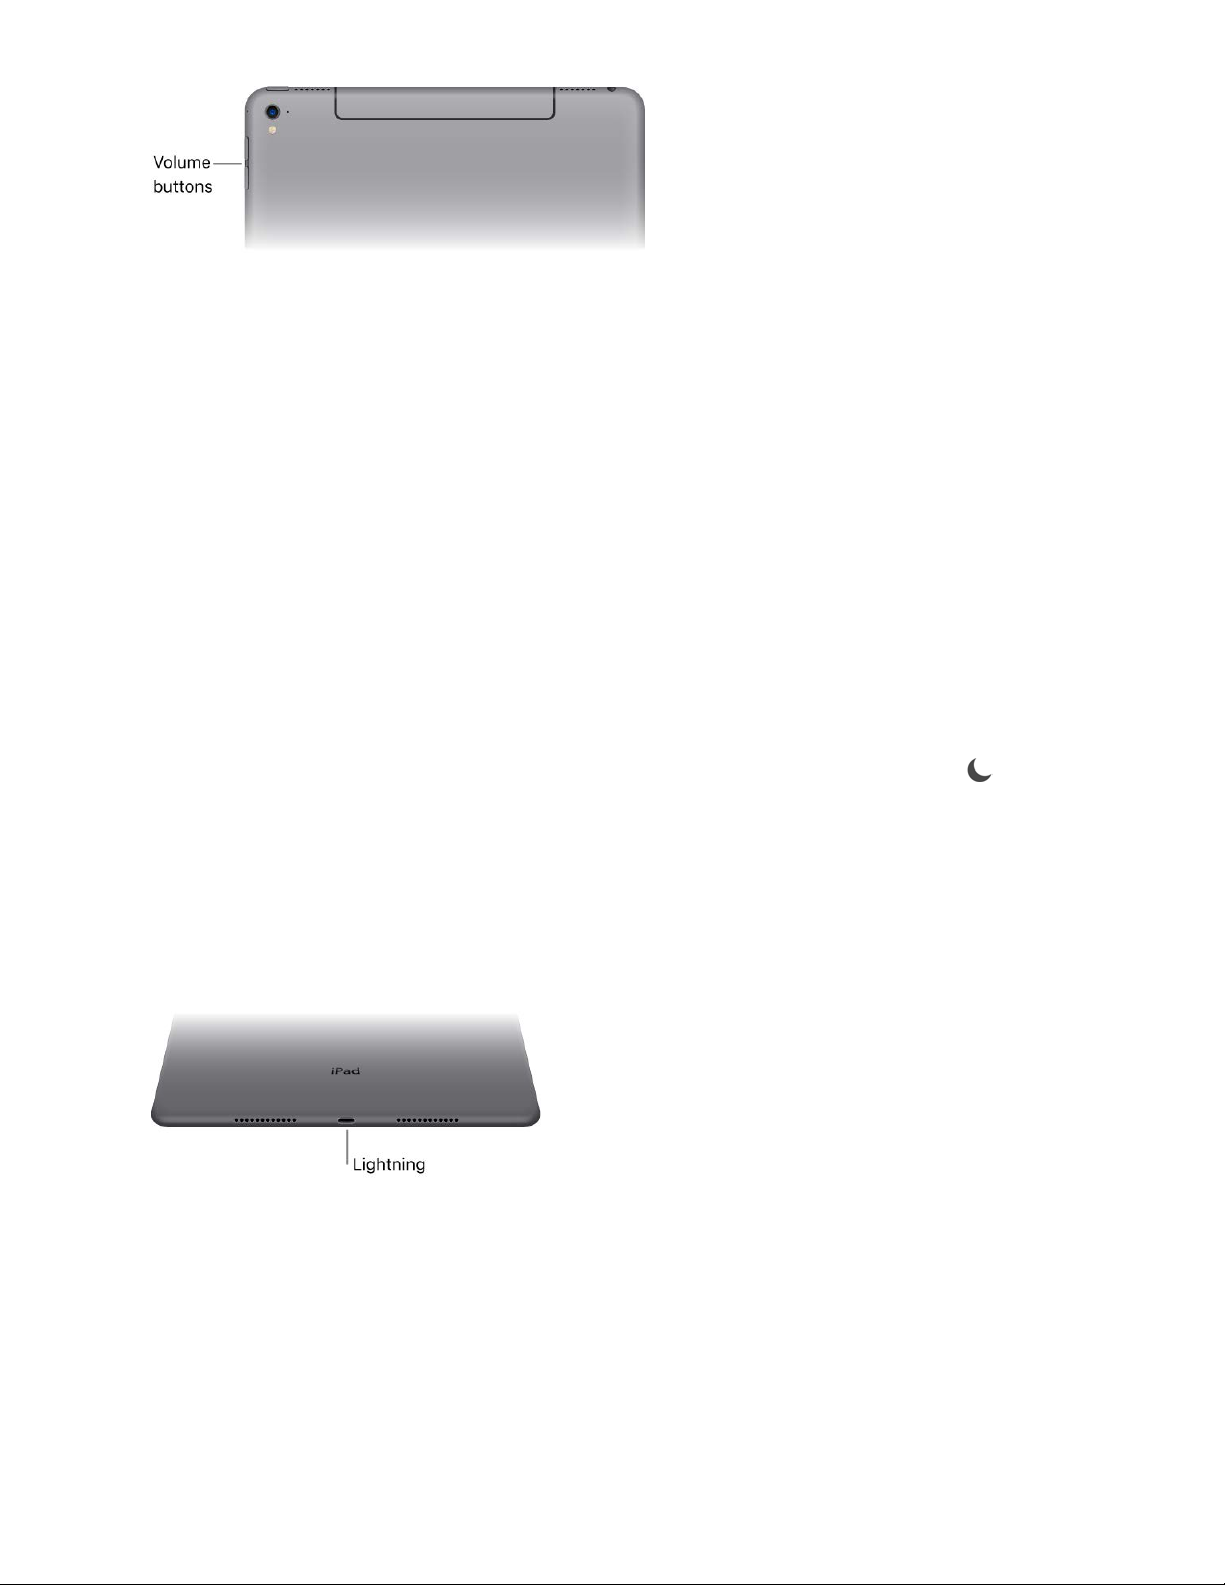
Volume buttons
iSight camera
Microphones
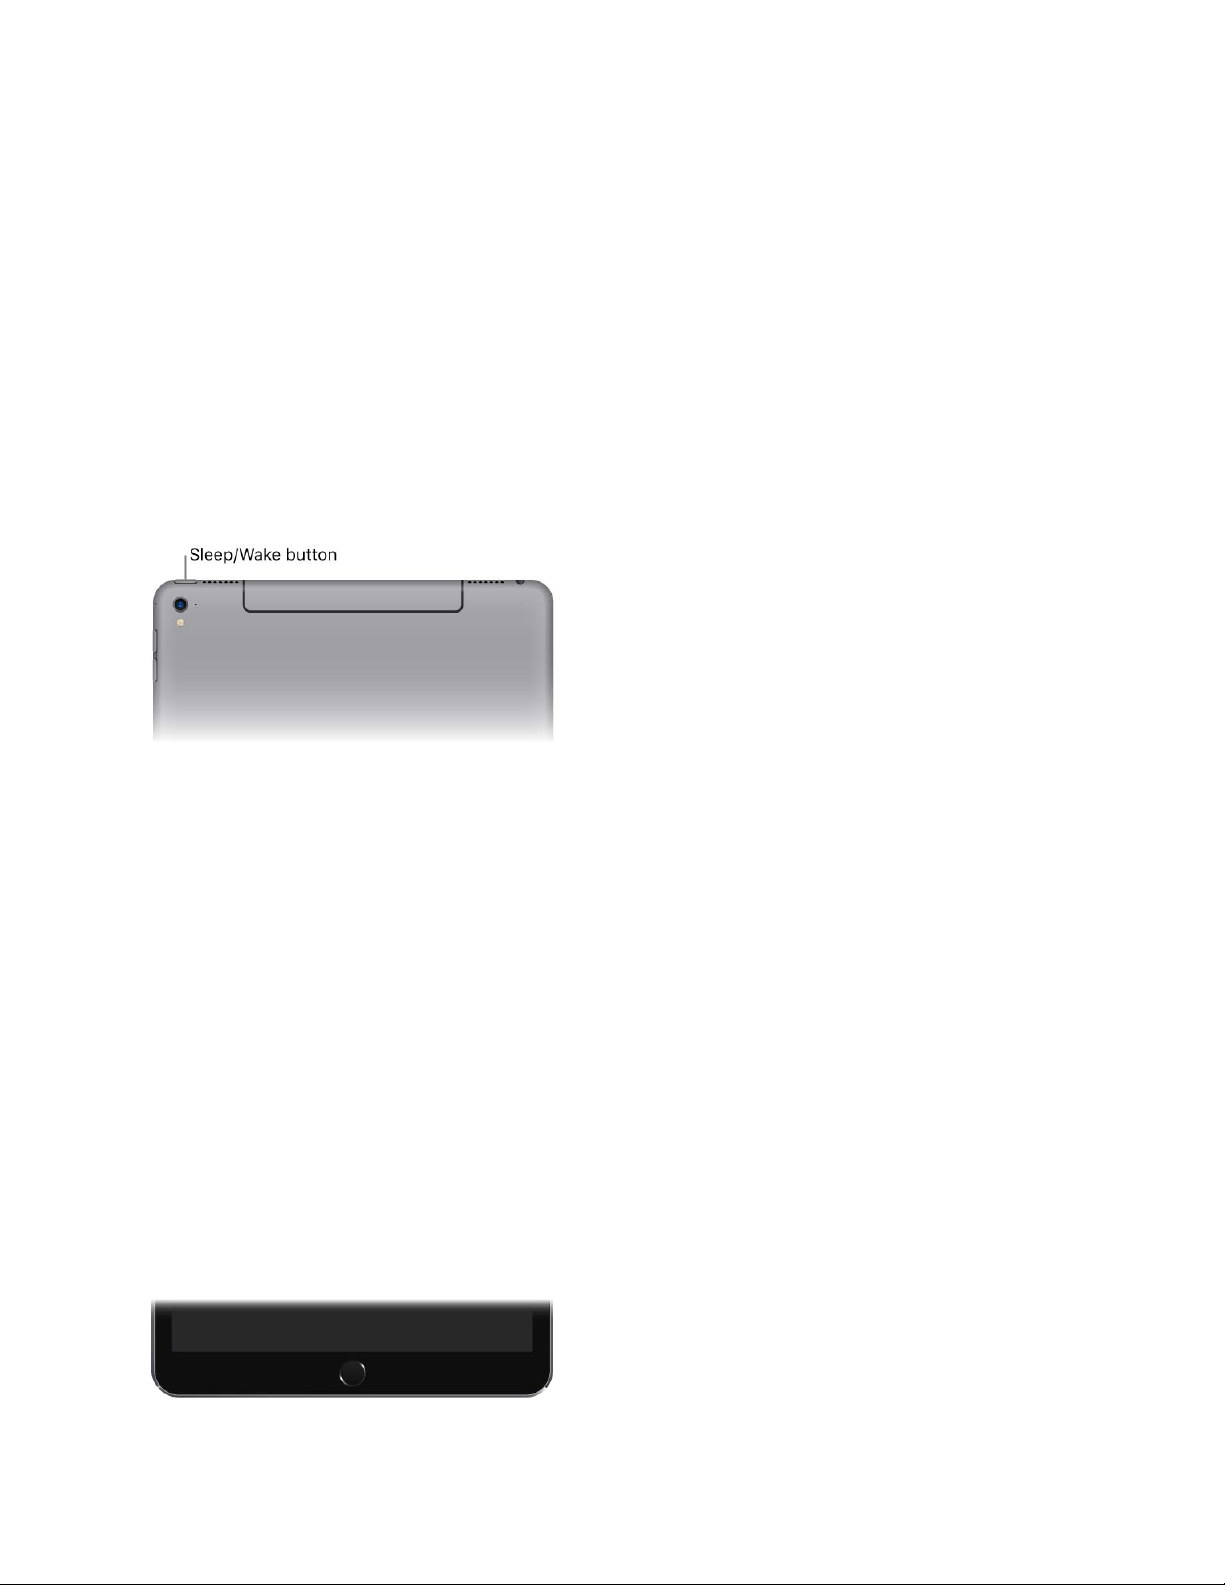
Sleep/Wake button
Headset jack
Speakers
Smart Connector
Speakers
Lightning connector
Nano-SIM tray (cellular models)
Page 11

iPad User Guide
Page 11 of 292
iPad Pro (12.9-inch)
Page 12

iPad User Guide
Page 12 of 292
iPad Pro (12.9-inch) features
App icons
Status bar
FaceTime HD camera
Multi-Touch display
Home button/Touch ID sensor
Volume buttons
iSight camera
Microphones
Sleep/Wake button
Headset jack
Speakers
Smart Connector
Speakers
Lightning connector
Nano-SIM tray (cellular models)
Page 13
iPad User Guide
Page 13 of 292
iPad (5th generation)
Page 14
iPad User Guide
Page 14 of 292
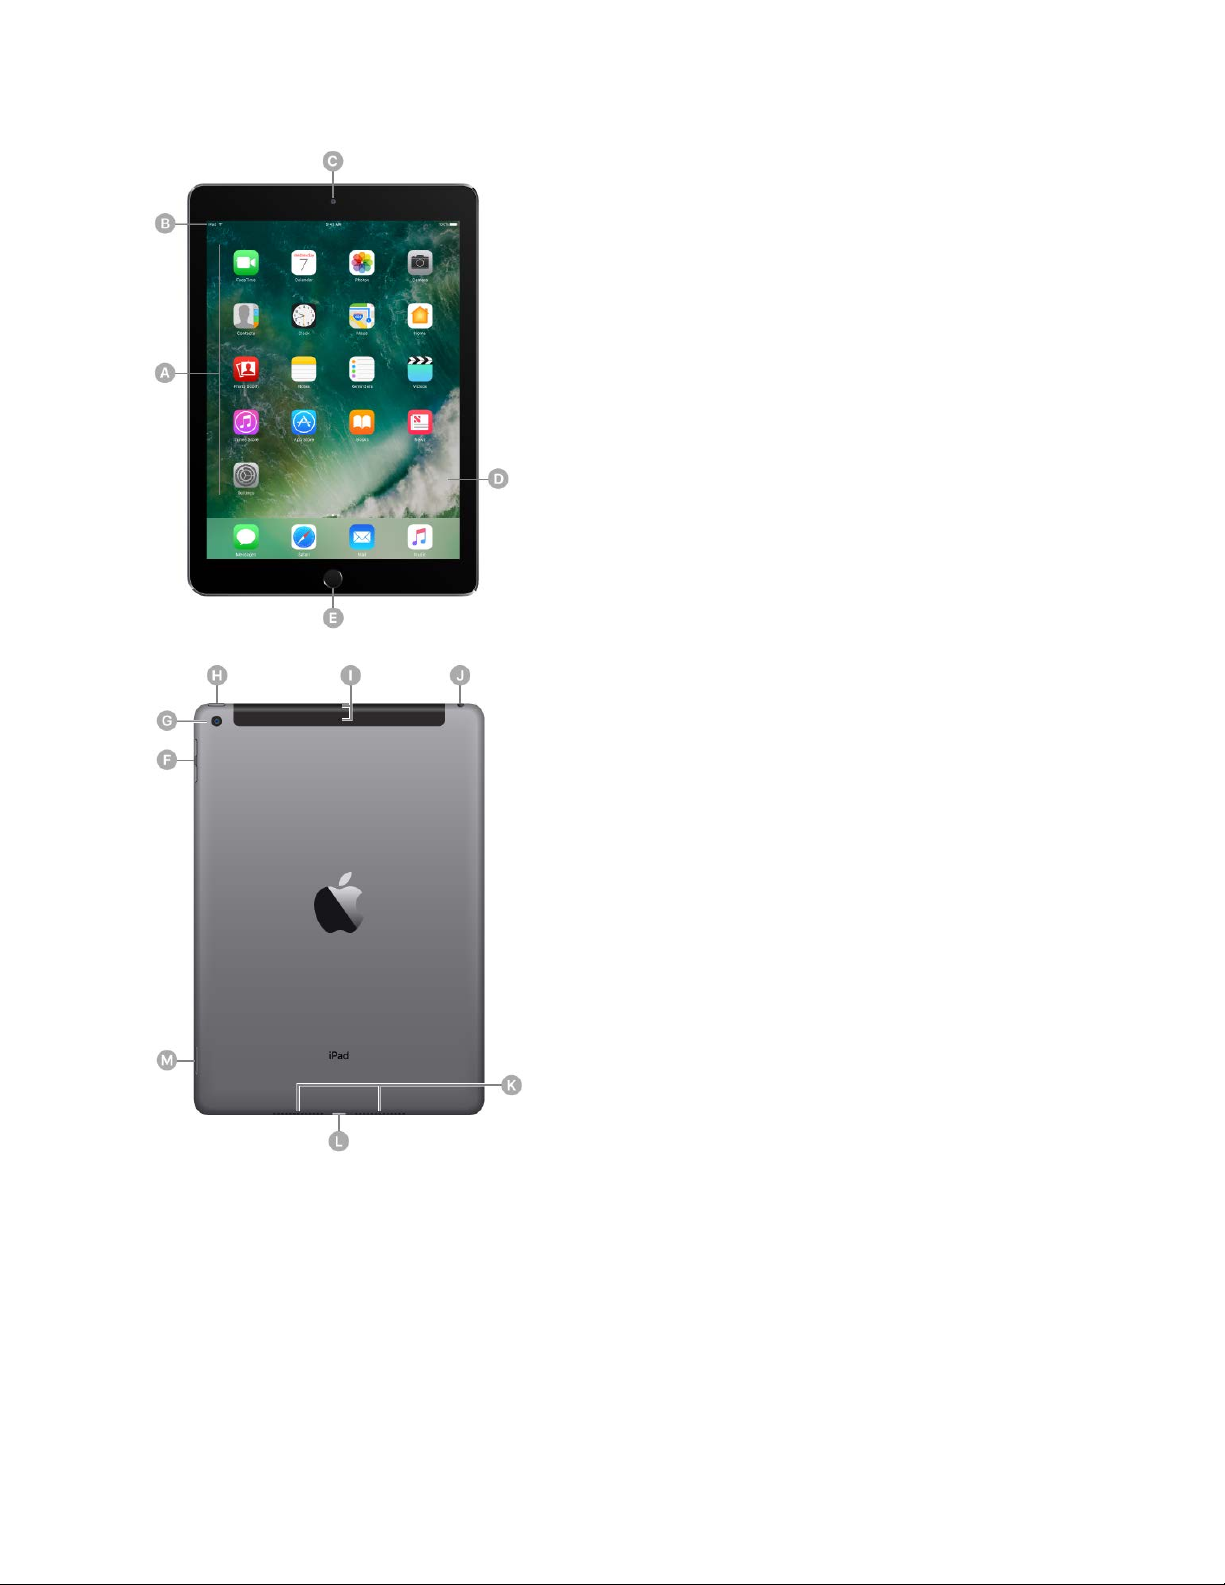
iPad (5th generation) features
App icons
Status bar
FaceTime HD camera
Multi-Touch display
Home button/Touch ID sensor
Volume buttons
iSight camera
Sleep/Wake button
Microphones
Headset jack
Speakers
Lightning connector
Nano-SIM tray (cellular models)
iPad mini 4
Page 15
iPad User Guide
Page 15 of 292
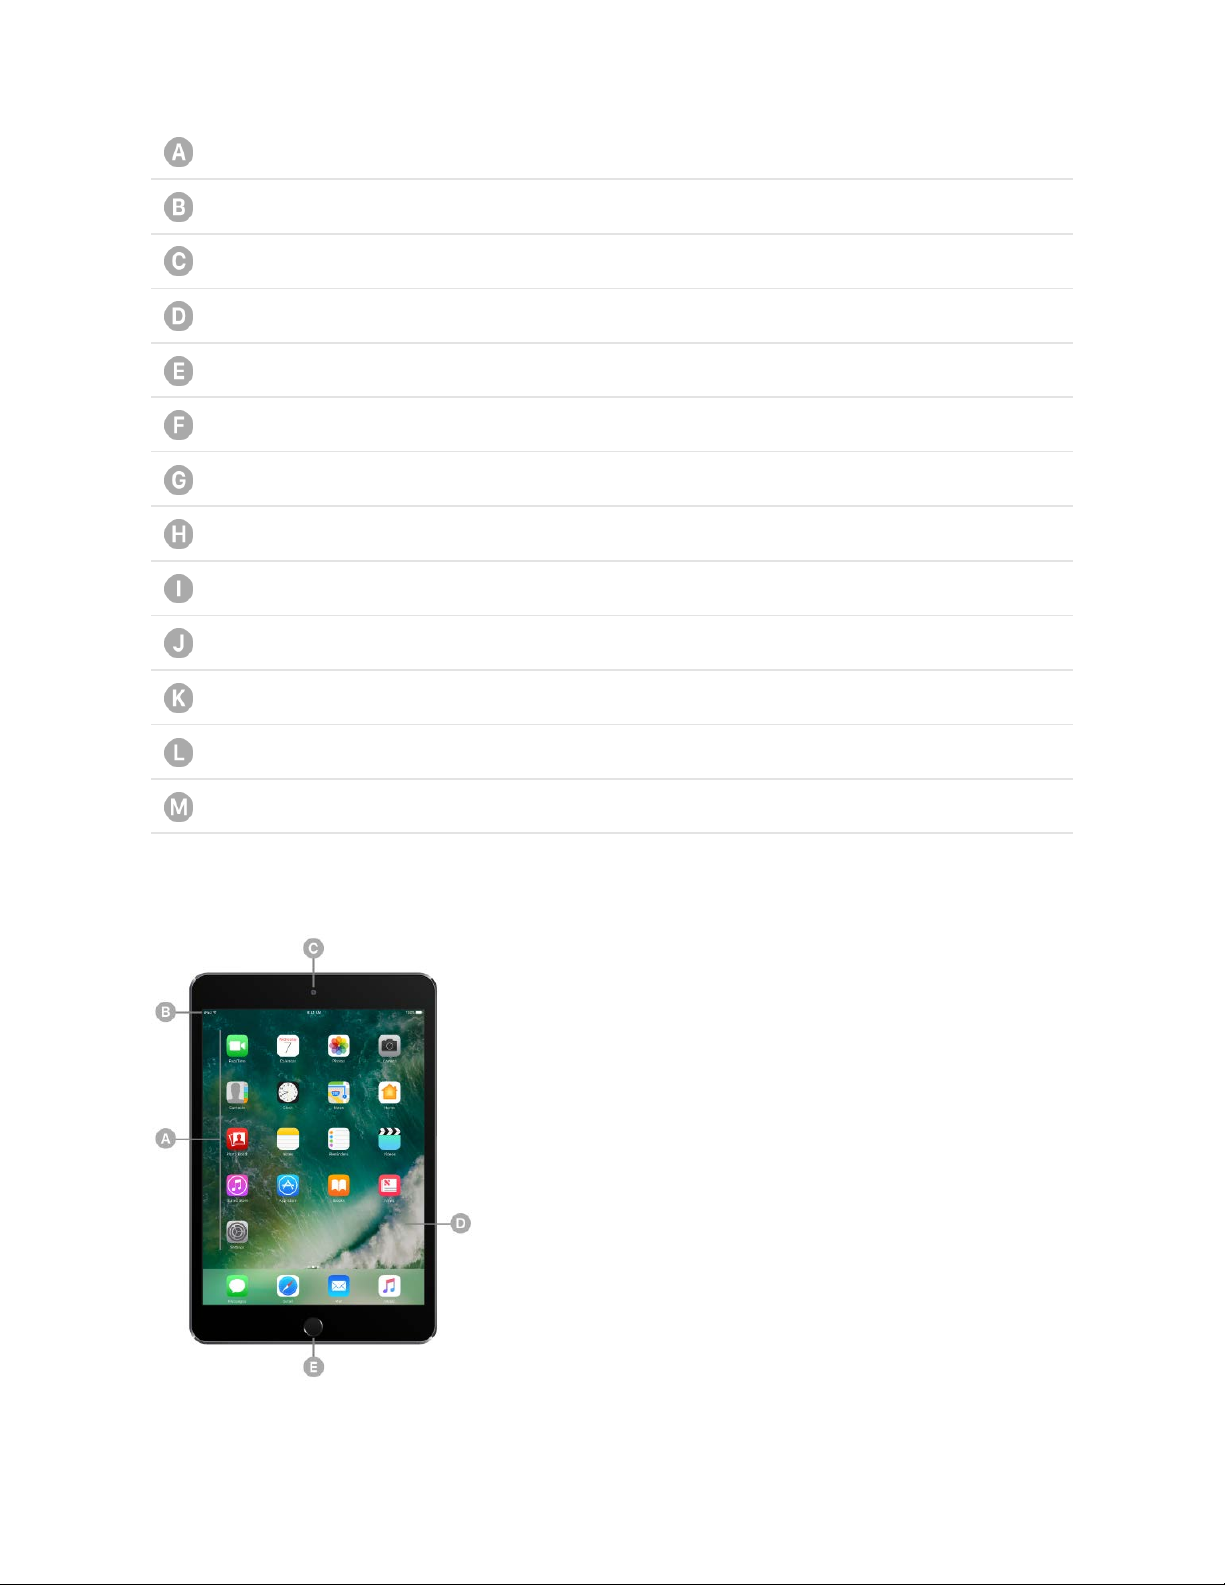
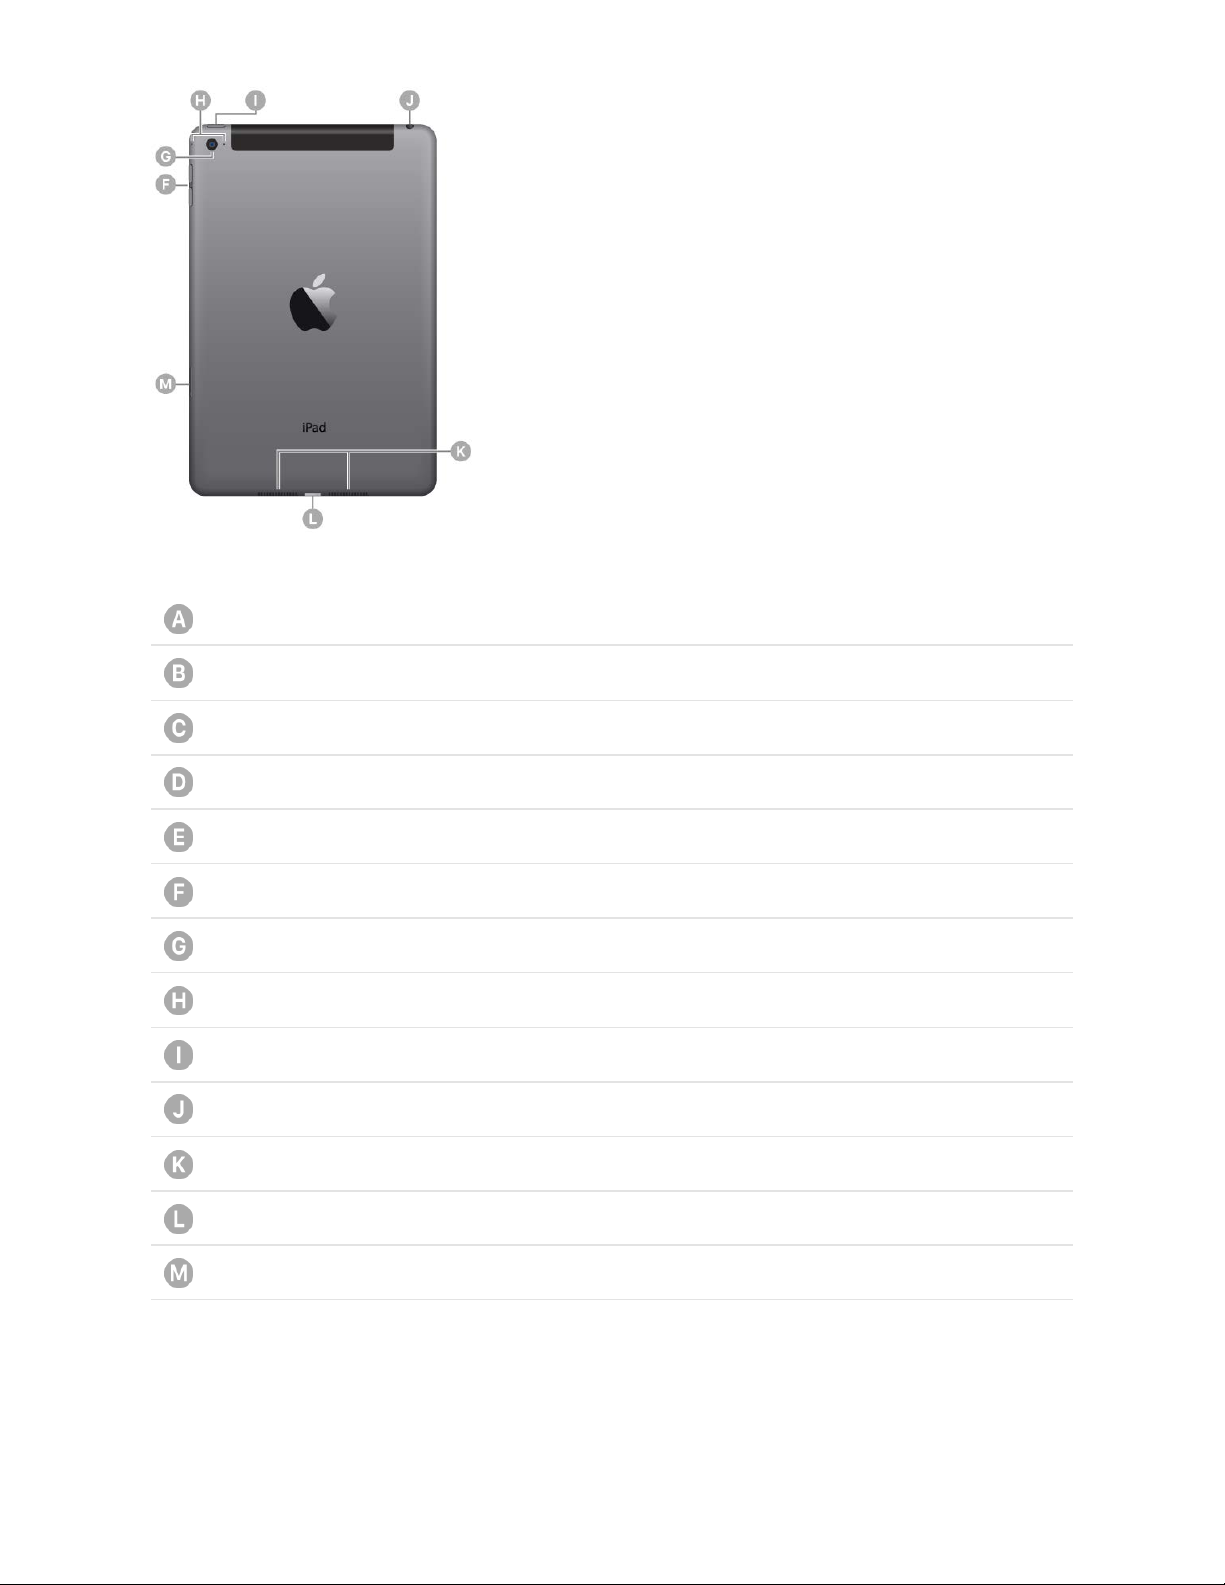
iPad mini 4 features
App icons
Status bar
FaceTime HD camera
Multi-Touch display
Home button/Touch ID sensor
Volume buttons
iSight camera
Microphones
Sleep/Wake button
Headset jack
Speakers
Lightning connector
Nano-SIM tray (cellular models)
Your feat ures and a pps may var y d epe ndi ng on the mo del of iPad you have, a nd on your
location, language, and carrier. To learn which features are available on your iPad, go to
the . To find out which features are supported in your area,Compare iPad models website
Page 16
iPad User Guide
Page 16 of 292
go to the .
Note: Apps and services that send or receive data over a cellular network may incur
additional fees. Contact your carrier for information about your iPad service plan and
fees.
Sleep/Wake button
Use the Sleep/Wake button to turn on or wake iPad, lock it, or turn it off. Locking iPad
puts the display to sleep, saves the battery, and prevents anything from happening if you
touch the screen. You can still listen to music and adjust the volume using the buttons on
the side of iPad, and you can receive FaceTime calls, text messages, alarms,
notifications, and other updates.
iPad locks itself automatically if you donʼt touch the screen for a minute or so. To adjust
the timing, go to Settings > Display & Brightness > Auto-Lock.
Turn on iPad. Press and hold the Sleep/Wake button until the Apple logo appears.
Turn off iPad. Press and hold the Sleep/Wake button until the slider appears onscreen,
then drag the slider.
Wake iPad. Press the Sleep/Wake button. From the wake screen you can check
notifications and recent app activity, take photos, and more. For more information, see
.
Home button
The Home button takes you to the Home screen, where you can tap an app to open it.
The Home button also provides other convenient shortcuts.
Unlock iPad. Press the Home button, then enter the passcode if required.
iOS Feature Availability website
Lock screen
Page 17

iPad User Guide
Page 17 of 292
Tip: To unlock iPad by touching instea d of pressing the Home button, go to
Settings > General > Accessibility > Home Button, then turn on Rest Finger to Open
(iPad Pro, iPad 5th generation, iPad Air 2, iPad mini 3 and later).
You can use iPa d S mar t Cover, sold se par ate ly, to lock or unloc k i Pad (iPa d 2 an d l ater,
iPad mini and later). You can use iPad Smart Case, sold separately, to lock or unlock iPad
(iPad 2 and later, iPad mini 3, iPad mini 2, iPad mini). You can use iPad Pro Smart
Keyboard or iPad Pro Smart Cover, sold separately, to lock or unlock iPad Pro.
Set a passcode. For additional security you can require a passcode to unlock iPad. If you
didnʼt create a passcode during setup, go to Settings > Touch ID & Passcode (iPad Pro,
iPad 5th generation, iPad Air 2, iPad mini 3 and later) or Settings > Passcode (other
models). See .
Go to the Home screen. Press the Home button.
See apps youʼve opened. Double-click the Home button when iPad is unlocked to see
the app switcher, then swipe left or right. See .
Use Siri. Press and hold the Home button. See .
On iPad Pro, iPad (5th generation), iPad Air 2, and iPad mini 3 and later, you can use the
sensor in the Home button to unlock iPad or make purchases in the iTunes Store,
App Store, and iBooks Store (instead of using your passcode or Apple ID password). See
. You can also use the Touch ID sensor when using Apple Pay (in countries
where Apple Pay is supported) to make a purchase. See .
You can als o u se the Ho me but ton to tur n a cce ssibility feat ures on or of f. See
.
Volume controls
Use the Volume buttons on the side of iPad to adjust the volume of songs and other
media, alerts, and sound effects. You can also use Siri to turn the volume up or down.
Just say “Turn up the volume” or “Turn down the volume.” Use Control Center (or on
some iPad models, the Side Switch) to silence audio alerts and notifications.
WARNING: For important information about avoiding hearing loss, see
.
Use a passcode with data protection
Switch between apps
Make requests
Touch ID
Apple Pay
Accessibility Shortcut
Important safety
information
Page 18
iPad User Guide
Page 18 of 292
Lock the ringer and alert volumes. Go to Settings > Sounds, then turn off Change with
Buttons.
Note: To limit the maximum headset volume, go to Sett ings > M usic > Volume L imit. To
prevent changes to the volume limit, go to Settings > General > Restrictions > Volume
Limit.
Use Control Center to adjust the volume. When iPad is locked or when youʼre using
another app, swipe up from the bottom edge of the screen to open Control Center, swipe
left, then adjust the volume.
Mute the sound. Press and hold the Volume Down button.
You can als o u se eit her vol ume bu tton to .
Use Do Not Disturb. You c an sil ence aler ts and no tif ica tio ns usi ng .
Swipe up from the bottom edge of the screen to open Control Center, then tap .
Do Not Disturb and the Side Switch donʼt mute the audio from music, podcasts, movies,
and TV shows.
Lightning connector
Connect your Lightning to USB Cable to the Lightning connector to charge or sync your
iPad. For more information about charging, see . For more
information about syncing, see .
If you have Apple Pencil, plug it into the Lightning connector to pair or charge it with
iPad Pro. For more information about Apple Pencil, see the Apple Support article
.
take a photo or record a video
Do Not Disturb
Charge and monitor the battery
Sync with iTunes
Use
Apple Pencil with iPad Pro
Page 19

iPad User Guide
Page 19 of 292
Smart Connector for iPad Pro
Using the Smart Connector, you magnetically attach an accessory, such as iPad Pro
Smart Keyboard, to iPad Pro. For more information about iPad Pro Smart Keyboard, see
the Apple Support article .
SIM card
An Apple SIM card or an embedded Apple SIM is used for your cellular data connection.
All iPad Wi-Fi + Cellular models include a SIM card tray. iPad Pro (9.7-inch) WiFi + Cellular also includes an embedded Apple SIM (except in China). In some regions,
other iPad Wi-Fi + Cellular models may include a preinstalled Apple SIM card.
If you change carriers or if no SIM card is installed, you may need to install or replace the
SIM card. (Apple SIM card kits are available for purchase at Apple Retail locations in
countries with participating carriers. Except in China, iPad Pro (9.7-inch) Wi-Fi + Cellular
has an embedded SIM, so thereʼs no need to purchase a SIM card.)
Eject the SIM card tray. Insert a paper clip or the SIM eject tool (sold separately) into
the small hole of the SIM card tray on the right side of iPad, then press firmly to eject and
remove the tray. Place the SIM card in the tray—the angled corner determines the
correct orientation—then insert the SIM card tray back into iPad.
Use your Smart Keyboard with iPad Pro
Page 20
iPad User Guide
Page 20 of 292
Cellular data also requires a wireless data plan. See .
Important: A SIM card or an Apple SIM is required to use cellular services when
connecting to GSM networks and some CDMA networks. Your iPad is subject to your
wireless service providerʼs policies, which may include restrictions on switching service
providers and roaming, even after conclusion of any required minimum service contract.
Contact your wireless service provider for more details. Availability of cellular capabilities
depends on the wireless network.
For more information, see the Apple Support article
.
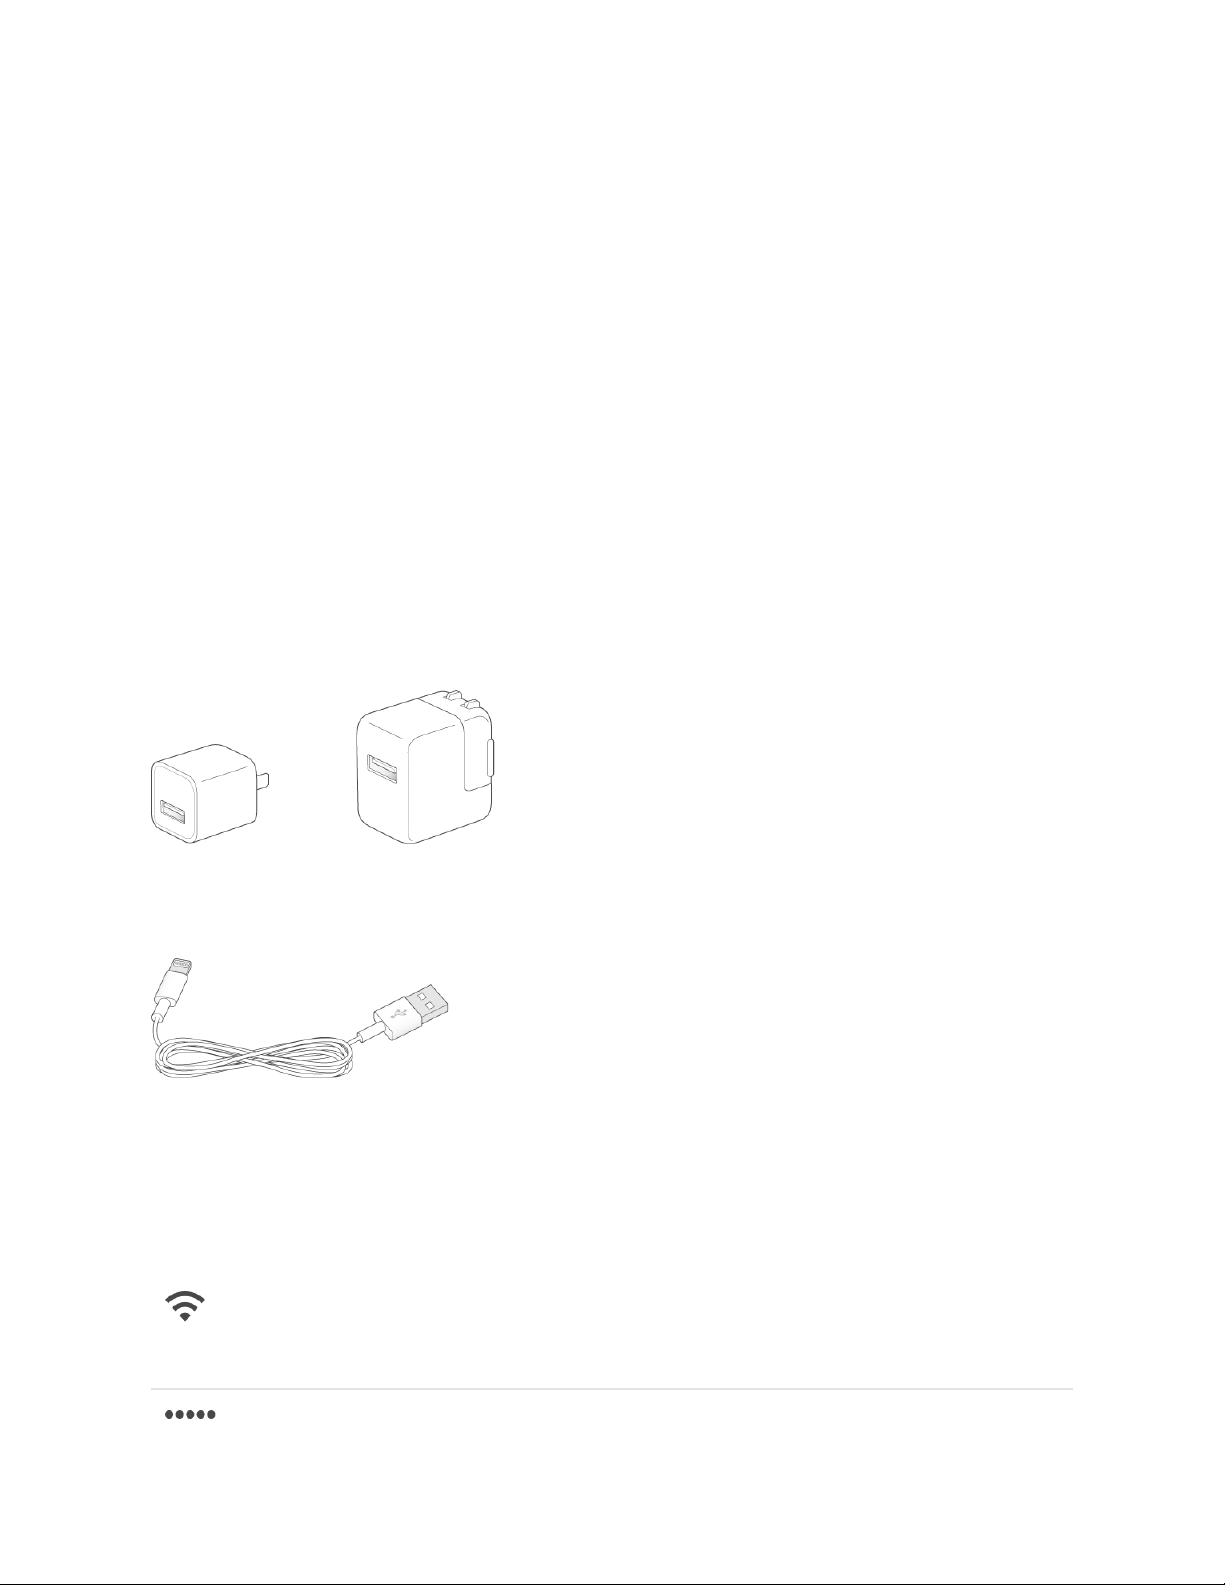
Accessories included with iPad
The following accessories are included with iPad:
USB power adapter. Use with the Lightning to USB Cable to charge the iPad battery.
The size of your adapter depends on the iPad model and your region.
Lightning to USB Cable. Use this to connect iPad to the USB power adapter or to your
computer.
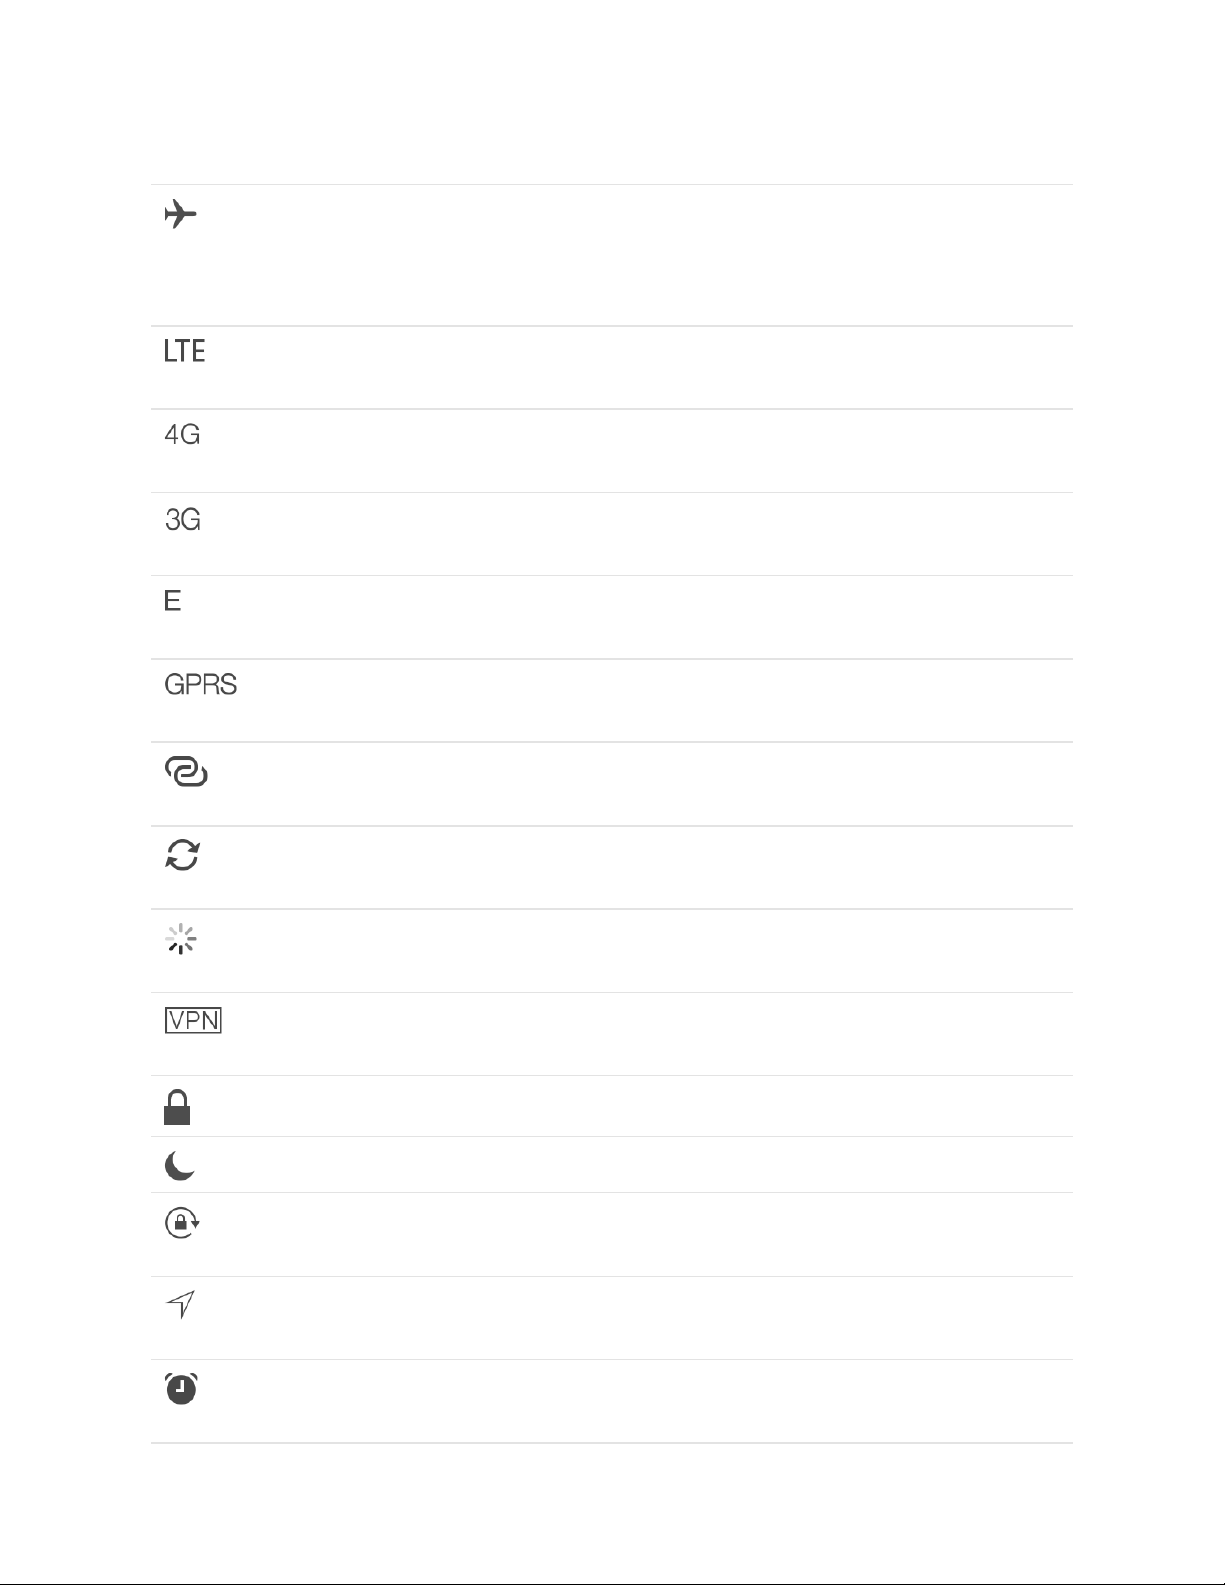
Status icons
The icons in the status bar at the top of the screen give information about iPad:
Status icon What it means
Wi-Fi iPad has a Wi-Fi Internet connection. The more
bars, the stronger the connection. See
.
Cell signal
Sign up for cellular service
Learn which SIM card your iPad
uses
Connect
to Wi-Fi
Page 21
iPad User Guide
Page 21 of 292
iPad (Wi-Fi + Cellular models) is in range of the
cellular network. If thereʼs no signal, “No
service” appears.
Airplane Mode Airplane Mode is on—you canʼt access the
Internet, or use Bluetooth® devices. Nonwireless features are available. See
.
LTE iPad (Wi-Fi + Cellular model) is connected to the
Internet over a 4G LTE network.
4G iPad (Wi-Fi + Cellular model) is connected to the
Internet over a 4G network.
3G iPad (Wi-Fi + Cellular model) is connected to the
Internet over a 3G network.
EDGE iPad (Wi-Fi + Cellular model) is connected to the
Internet over an EDGE network.
GPRS iPad (Wi-Fi + Cellular model) is connected to the
Internet over a GPRS network.
Personal Hotspot iPad is providing a Personal Hotspot for other
iOS devices. See .
Syncing iPad is syncing with iTunes. See
.
Activity There is network or other activity. Some third-
party apps use this icon to show app activity.
VPN iPad is connected to a network using VPN. See
.
Lock iPad is locked. See .
Do Not Disturb Do Not Disturb is turned on. See .
Orientation lock Screen orientation is locked. See
.
Location Services An app is using Location Services. See
.
Alarm An alarm is set. See
.
Travel with
iPad
Personal Hotspot
Sync with
iTunes
VPN settings
Lock screen
Do Not Disturb
Change the
screen orientation
Location
Services
Set an alarm or bedtime
schedule
Page 22
iPad User Guide
Page 22 of 292
Bluetooth Blue or White icon: Bluetooth is on and paired
with a device, such as a headset or keyboard.
Gray icon: Bluetooth is on and paired with a
device, but the device is out of range or turned
off.
See .
Headphones connected iPad is paired with Bluetooth headphones that
are turned on and within Bluetooth range. See
.
Bluetooth battery Shows the battery level of a supported paired
Bluetooth device.
Battery Shows the battery level or charging status. See
.
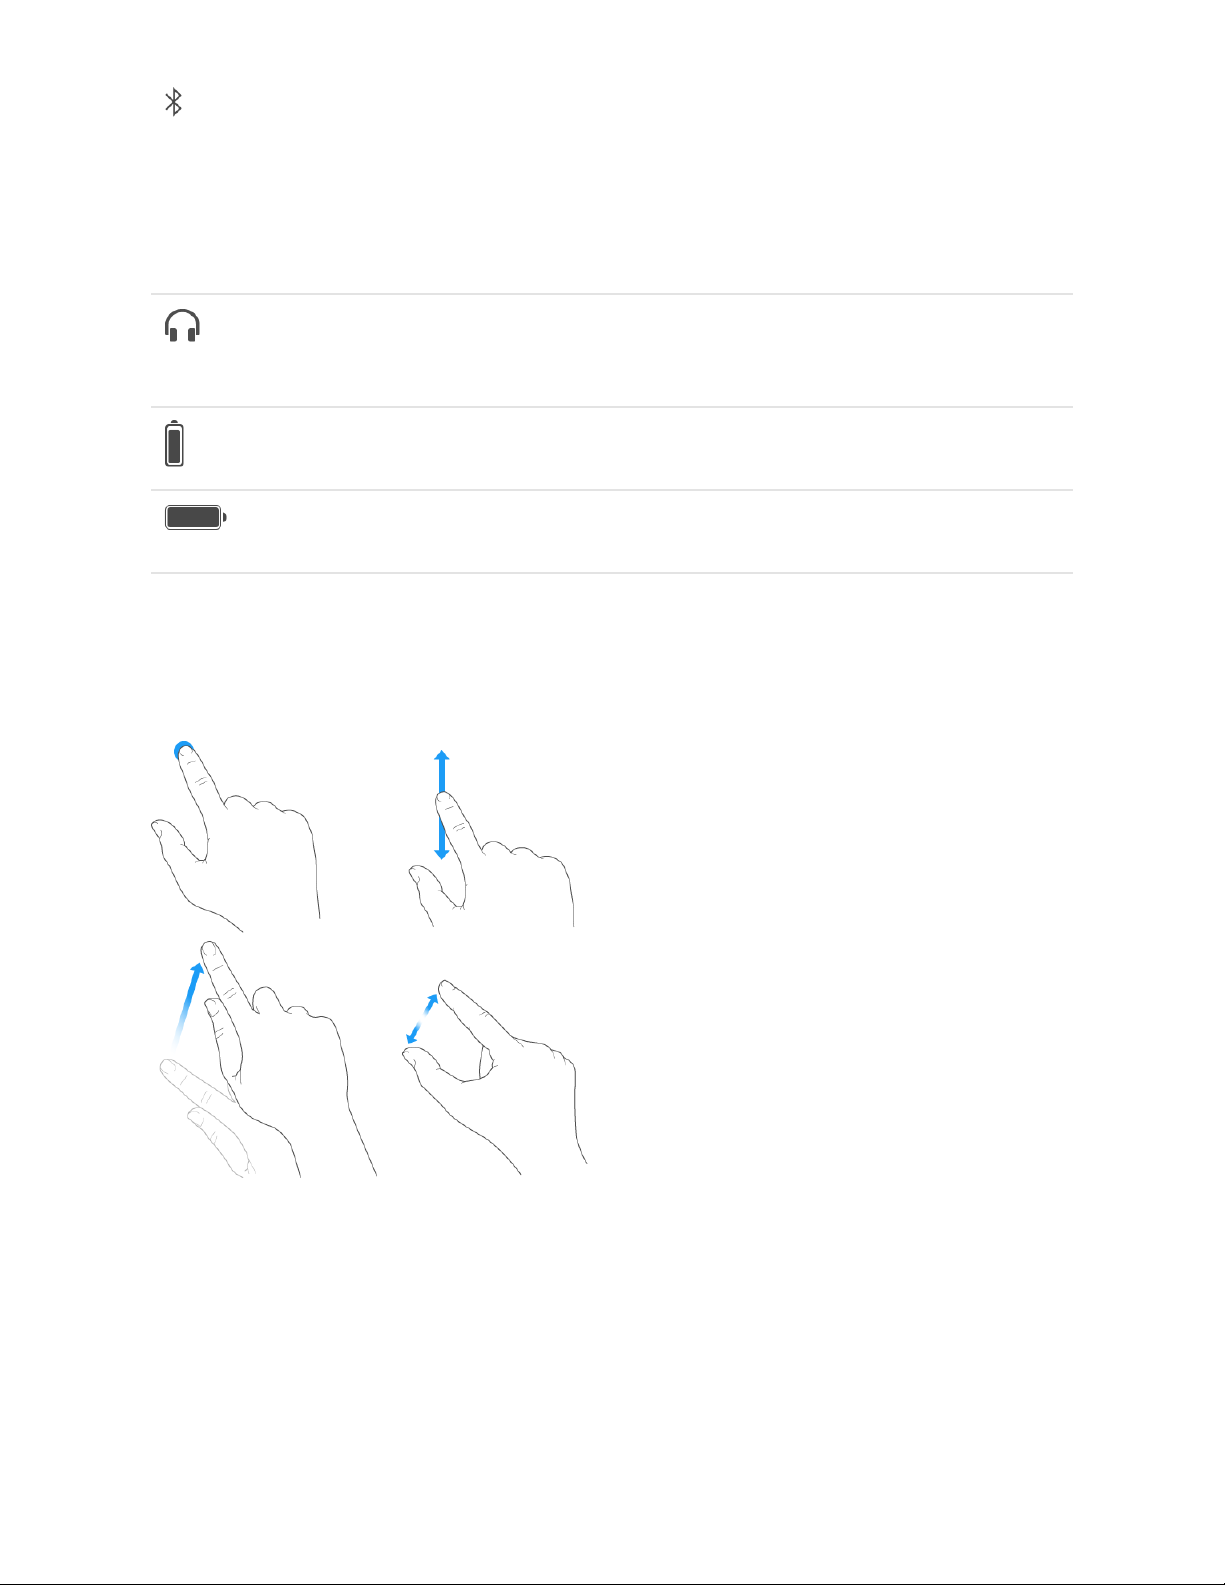
Gestures
Use a few simple gestures—tap, drag, swipe, and pinch—to control iPad and its apps.
You can als o u se add iti ona l g estures when editing tex t o r n avig ati ng between app s a nd
the Home screen. See and .
Bluetooth devices
Bluetooth devices
Charge and monitor the battery
Type and edit text Gestures
Page 23

iPad User Guide
Page 23 of 292
Set up
Apple ID
Your Apple ID is the ac cou nt you use for jus t a bou t everyt hin g yo u d o w ith Ap ple —
including storing your content in iCloud; downloading apps from the App Store;
streaming Apple Music content; buying music, movies, and TV shows from the
iTunes Store; and purchasing books from the iBooks Store.
If you already have an Apple ID, use it to sign in when you first set up iPad, and whenever
you need to sign in to use an Apple service. If you didnʼt sign in during setup, go to
Settings > Sign in to your iPad.
If you donʼt have an Apple ID, you can create one anyplace youʼre asked to sign in—for
example, the iTunes Store, the App Store, and the iBooks Store. Itʼs best to have only one
Apple ID.
For more information, go to the .
iCloud
Safely store your photos and videos, documents, music, calendars, contacts, News
favorites and saved stories, and more in iCloud so theyʼre available even if you lose your
iPad.
Apple ID account website
Page 24
iPad User Guide
Page 24 of 292
Set up iCloud. Go to Settings > Sign in to your iPhone. Create an if you donʼt
have one, or use your existing one.
Content stored in iCloud is pushed wirelessly to your other devices where youʼre signed
in to iCloud with the same Apple ID.
iCloud is available on devices with iOS 5 or later, on Mac computers with Mac OS X 10.7.5
or later, and on PCs with iCloud for Windows 5 or later (Windows 7 or later is required).
You can als o s ign in to from any Mac or PC to access your iCloud information
and features like Photos, Find My iPhone, Mail, Calendar, Contacts, iWork for iCloud, and
more.
Note: iCloud may not be available in all areas, and iCloud features may vary by area. For
more information, go to the (apple.com/icloud).
With iCloud you can:
Access your purchases: Automatically get iTunes purchases on all your devices set
up with iCloud, or download previous purchases from the iTunes Store, App Store,
and iBooks Store for free, anytime.
Access your music: With an membership, any music you added from
Apple Music is accessible from iPad. With an iTunes Match subscription, music from
your library, including music you imported from CDs or purchased somewhere other
than the iTunes Store, can also be stored in iCloud and played on demand.
Apple ID
iCloud.com
iCloud website
Apple Music
Page 25

iPad User Guide
Page 25 of 292
Store your photos and videos: Use to store all your photos and
videos in iCloud. You can access them from any device with iOS 8.1 or later, a Mac
with OS X 10.10.3 or later, a PC with iCloud for Windows 5 or later, and on
when you sign in with the same Apple ID. Use to share photos
and videos with only the people you choose, and let them add photos, videos, and
comments.
Note: If you use iCloud Photo Library to store your photos and videos, you canʼt use
iTunes to sync them with your computer.
Share with your family: With , up to six family members can share their
purchases from the iTunes Store, App Store, and iBooks Store. With an optional
Apple Music family membership, all family members can use Apple Music. Pay for
family purchases with the same credit card and approve kidsʼ spending right from a
parentʼs device. Plus, share photos, a family calendar, and more.
Store and retrieve your documents: Store PDFs in iCloud and access them in iBooks
from your iPhone, iPad, iPod touch, Mac, or PC. With you can safely
store your presentations, spreadsheets, images, and other documents in iCloud, and
access them from your iPhone, iPad, iPod touch, Mac, or PC. iCloud Drive is available
on any device with iOS 8 or later and on any Mac with OS X 10.10 or later. If youʼre
using an earlier version of iOS, see .
Synchronize mail, contacts, calendars, and more: Keep your mail, contacts,
calendars, notes, and reminders up to date across all your devices.
Note: If you use iCloud to store your contacts and calendars, you canʼt use iTunes to
sync them with your computer.
Keep tabs on your browsing: With Safari tabs you can see the tabs you have open on
your other iOS devices and Mac computers. See .
Keep News up to date across all your devices: Access your favorite News sources
and topics as well as the saved stories on all your devices with iOS 9 or later that are
set up with iCloud. (News isnʼt available in all areas). See .
Back up your data: Back up iPad to iCloud automatically when iPad is connected to
power and Wi-Fi. iCloud data and backups sent over the Internet are encrypted. See
.
Find your iPad: Use the Find My iPhone app on another iOS device—or use the
on any Mac or PC—to locate your missing iPad on a map, lock it
remotely, suspend or remove the ability to pay using Apple Pay, play a sound, display
iCloud Photo Library
iCloud.com
iCloud Photo Sharing
Family Sharing
iCloud Drive
Set up iCloud Drive
Browse the web
Get started with News
Back up iPad with iCloud Backup
Find
My iPhone web app
Page 26

iPad User Guide
Page 26 of 292
a message, or erase all the data on it. Find My iPhone also includes Activation Lock,
which requires your Apple ID and password to disable Find My iPhone, erase iPad, or
reactivate your device. See .
Find your friends: Use to share your location with friends and family.
Store and access your passwords and credit card information: keeps
passwords and credit card information up to date across all your designated devices.
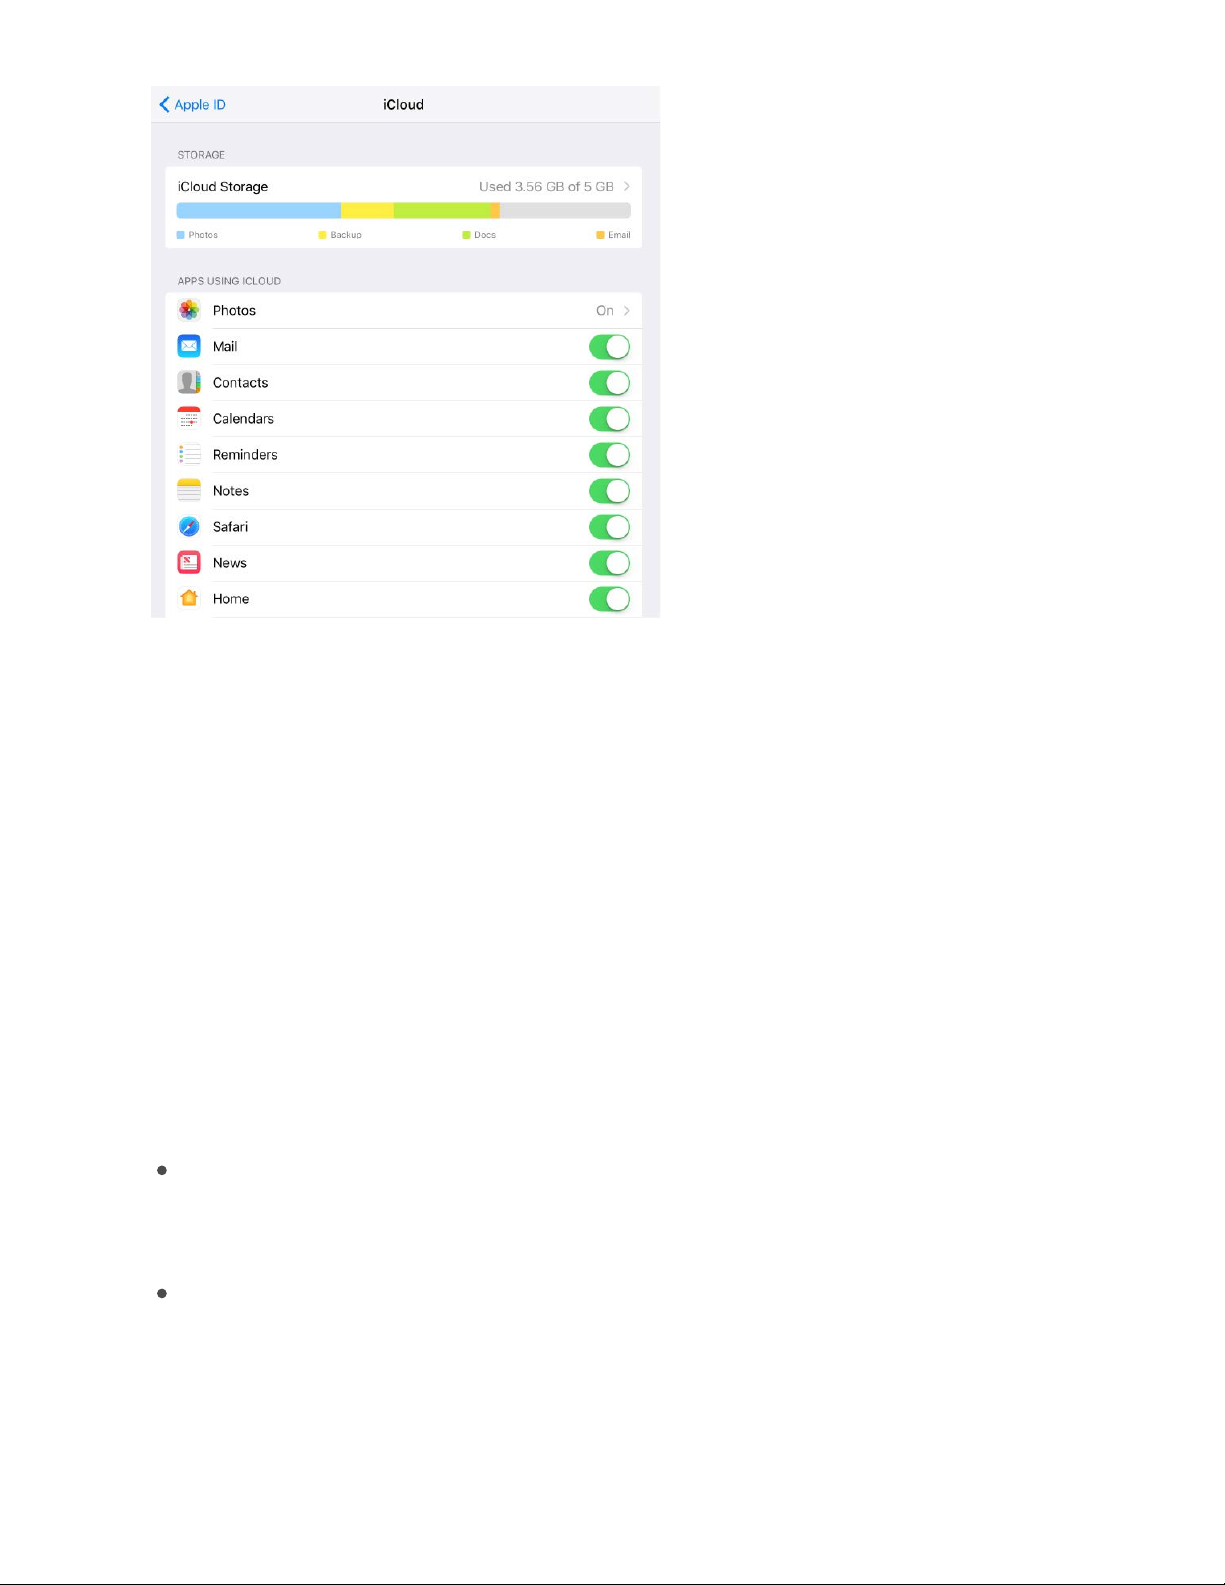
With iCloud, you get a free email account and 5 GB of storage for your mail, documents,
photos and videos, and backups. Your purchased music, apps, TV shows, and books
donʼt count against your available storage space. You can purchase additional storage
right from your device.
Upgrade your iCloud storage. Go to Settings > [your name] > iCloud > iCloud Storage,
then tap Change Storage Plan. For information about upgrading your iCloud storage, see
.
View and download previous or shared purchases. You c an down load purchases from
the iTunes Store, App Store, and iBooks Store.
iTunes Store purchases: Go to the iTunes Store, then tap Purchased. You can also
access your purchased songs and videos in the Music app (see ), the TV app
(see ), and the Videos app (see ).
App Store: Go to the App Store, then tap Purchased.
iBooks Store: Go to iBooks, then tap Purchased.
If you donʼt see your previous or shared purchases, make sure youʼre signed in with your
Apple ID in Settings > iTunes & App Store.
Turn on Automatic Downloads for music, apps, or books. Go to Settings > iTunes &
App Store.
For more information about iCloud, go to the . For support information, go
to the .
Set up iPad
WARNING: To avo id i njury, read before using iPad.
With only a Wi-Fi connection, you can easily set up iPad. You can also set up iPad by
and using iTunes.
Find your iPad
Find My Friends
iCloud Keychain
iCloud Help
Library
Library Add videos to your library
iCloud website
iCloud Support website
Important safety information
connecting it to your computer
Page 27

iPad User Guide
Page 27 of 292
Note: If youʼre using iPad with a company or other organization, see
. If the iPad youʼre using is administered by your school, see your teacher or
administrator for setup instructions. Your school may give you a passcode (to turn on or
wake up iPad) and a Managed Apple ID (to access features like iCloud Drive). Some
standard iPad apps and features arenʼt available to accounts with Managed Apple IDs.
For more information, see the Apple Support article
Set up iPad. Turn on iPad, then follow the setup assistant.
To make set up as sm ooth as possible, have this informat ion at hand:
The name and password (if applicable) of your
The email address and password for your , to set up iCloud, iTunes, the
App Store, and more
Create an Apple ID if you donʼt have one, or use your existing one.
Your credit or deb it card ac cou nt info rma tio n, if you want to ad d a ca rd to Apple Pay
during setup
Apple Pay is compatible with iPad Pro, iPad (5th generation), iPad Air 2, iPad mini 3,
and later.
A backup of your data if youʼre upgrading from another device (see
and )
You can als o resto re i Pad from an iC lou d o r i Tune s b ack up or
during setup.
Note: Find My iPhone—a feature you use to locate your iPad, as well as AirPods,
Apple Watch, and other iOS devices—is turned on automatically when you sign in with
your Apple ID during iPad setup. See . Find My iPhone includes a feature
called Activation Lock that prevents anyone else from activating and using your iPad,
even if itʼs completely erased. Before you , you should erase and
unlock iPad so that the next owner can activate it.
Move to iOS from Android
During setup you can migrate your content automatically and securely from your Android
device.
Download the Move to iOS app. On your device running Android version 4.0 or later, see
the Apple Support article and download the Move to iOS app.
iPad in the
enterprise
What are Managed Apple IDs?
Wi-Fi network
Apple ID
Back up iPad with
iCloud Backup Back up iPad with iTunes
migrate from an
Android device
Find your iPad
sell or give away iPad
Move from Android to iOS
Page 28

iPad User Guide
Page 28 of 292
Move your data from Android during setup. When setting up iPad, on the Apps & Data
screen, select Move Data from Android, turn on Wi-Fi on the Android device, open the
Move to iOS app on the Android device, then follow the steps.
Note: You c an use th e M ove to iOS app onl y w hen you fi rst set up iPa d. If youʼve al read y
finished setup and want to use Move to iOS, you must erase your iOS device and start
over or move your data manually. See the Apple Support article
.
The Settings app
The Settings app is on the Home screen. You use it to configure many of the settings on
iPad. For example, tap Settings, then tap Sounds (Settings > Sounds) to choose the
sound that plays when you receive an email message. Among other things, you can also
use Settings to:
Change your device passcode
Choose a different wallpaper
Configure privacy controls
Find out how much free storage remains on iPad
Enable restrictions
Search for a setting. Open Settings, swipe down to reveal the search field, then enter a
term—alert or password, for example.
Set up other mail, contacts, and calendar accounts
In addition to the apps that come with iPad and that you use with , iPad works with
Microsoft Exchange and many of the most popular Internet-based mail, contacts, and
calendar services.
For information about setting up a Microsoft Exchange account in a corporate
environment, see the Apple Support article
.
Set up an account. Go to Settings, choose a setting to configure (Mail, Contacts, or
Calendar), tap Accounts, then tap Add Account.
Move content manually
from your Android device to your iOS device
iCloud
Set up Exchange ActiveSync on your iPhone,
iPad, or iPod touch
Page 29

iPad User Guide
Page 29 of 292
You can add co nta cts us ing an LDAP or Ca rdDAV acc oun t, if your co mpa ny o r
organization supports it. See .
You can add ca len dars using a Cal DAV cale nda r a cco unt , a nd you can sub scr ibe to
iCalendar (.ics) calendars or import them from Mail. See .
Date and time
The date and time are usually set for you based on your location—take a look at the Lock
screen to see if theyʼre correct.
Set whether iPad updates the date and time automatically. Go to Settings >
General > Date & Time, then turn Set Automatically on or off. If you set iPad to update
the time automatically, it gets the correct time over the network and updates it for the
time zone youʼre in. Some networks donʼt support network time, so in some areas iPad
may not be able to automatically determine the local time.
Set the date and time manually. Go to Settings > General > Date & Time, then turn off
Set Automatically.
Set whether iPad shows 24-hour time or 12-hour time. Go to Settings > General >
Date & Time, then turn 24-Hour Time on or off (it may not be available in all areas).
Language and region
Go to Settings > General > Language & Region to set:
The language for iPad
The preferred language order for apps and websites
The region format
The calendar format
The temperature unit (Celsius or Fahrenheit)
To add a keyboard for another language, go to Settings > General > Keyboard >
Keyboards. For more information, see .
Add contact accounts
Use multiple calendars
Use international keyboards
Page 30

iPad User Guide
Page 30 of 292
Sign up for cellular service
If your iPad has an embedded Apple SIM (available on 9.7-inch iPad Pro Wi-Fi + Cellular)
or an Apple SIM card (available for other iPad Wi-Fi + Cellular models with Touch ID), you
can choose a carrier and sign up for cellular service right on iPad. Depending on your
home carrier and your destination, you may also be able to travel abroad with iPad and
sign up for cellular service with a carrier in the country youʼre visiting. This isnʼt available
in all areas and not all carriers are supported; contact your carrier for more information.
Sign up for cellular service. Go to Settings > Cellular Data, then tap Set Up Cellular
Data and follow the onscreen instructions.
Set up cellular service in another country. When traveling to another country, you can
choose a local carrier rather than roaming. Go to Settings > Cellular Data, tap Choose a
Data Plan, then select the plan you want to use.
For more information, see , , and the Apple Support article
.
Connect to the Internet
iPad connects to the Internet whenever necessary, (if available)
or your carrierʼs cellular network.
When an app needs to use the Internet, iPad does the following, in order:
Connects over the most recently used available Wi-Fi network
Shows a list of Wi-Fi networks in range and connects using the one you choose
Connects over the cellular data network, if available
Note: If a Wi-Fi connection to the Internet isnʼt available, apps and services may transfer
data over your carrierʼs cellular network, which may result in additional fees. Contact
your carrier for information about your cellular data plan rates. To manage cellular data
usage, see .
Connect to Wi-Fi
If appears at the top of the screen, youʼre connected to a Wi-Fi network. iPad
reconnects when you return to the same location.
SIM card Cellular data settings
Set up cellular data service on your Wi-Fi + Cellular model iPad
using a Wi-Fi connection
Cellular data settings
Page 31

iPad User Guide
Page 31 of 292
Configure Wi-Fi. Go to Settings > Wi-Fi, then turn Wi-Fi on or off. (You can also turn WiFi on or off in Control Center.)
Choose a network: Tap one of the listed networks, then enter the password, if
required.
Ask to join networks: Turn on Ask to Join Networks to be notified when a Wi-Fi
network is available. Otherwise, you must manually join a network when a previously
used network isnʼt available.
Join a closed network: Tap Other, then enter the name of the network. You need to
know the network name, security type, and password.
Adjust the settings for a Wi-Fi network: Tap next to a network. You can set an
HTTP proxy, define static network settings, turn on BootP, or renew the settings
provided by a DHCP server.
Note: Some networks may offer different information.
Forget a network: Tap next to a network youʼve joined before, then tap Forget This
Network.
Set up your own Wi-Fi network. If you have an unconfigured AirPort base station turned
on and within range, you can use iPad to set it up. Go to Settings > Wi-Fi, then look for
Set up an AirPort base station. Tap your base station, and Setup Assistant does the rest.
Manage your AirPort network. If iPad is connected to an AirPort base station, go to
Settings > Wi-Fi, tap next to the network name, then tap Manage This Network. If you
havenʼt yet downloaded AirPort Utility, tap OK to open the App Store, then download it
(this requires an Internet connection).
Connect iPad to your computer
By connecting iPad to your computer you can
and . You can also sync with iTunes wirelessly.
To use iPad with your computer, you need:
A Mac with a USB 2.0 or 3.0 port, or a PC with a USB 2.0 port, and one of the
following operating systems:
OS X 10.9 or later with iTunes 12.5 or later
Windows 7 or later with iTunes 12.5 or later
sync content from your computer using
iTunes back up iPad with iTunes
Page 32

iPad User Guide
Page 32 of 292
iTunes, available from the
Connect iPad to your computer. Use the included Lightning to USB Cable.
Unless iPad is actively syncing with your computer, you can disconnect it at any time.
Look at the top of the iTunes screen on your computer or on iPad to see if syncing is in
progress. If you disconnect iPad while itʼs syncing, some data may not get synced until
the next time you connect iPad to your computer.
Manage content on your iOS devices
You can tra nsfe r i nfor mation an d f ile s b etwe en iPad an d yo ur oth er iOS dev ice s a nd
computers, using either iCloud or iTunes.
iCloud stores your photos and videos, documents, music, calendars, contacts, and
more. It all gets pushed wirelessly to your other iOS devices and computers, keeping
everything up to date. See .
iTunes syncs music, videos, photos, and more between your computer and iPad.
Changes you make on one device are copied to the other when you sync. You can
also use iTunes to copy a file to iPad for use with an app, or to copy a document
youʼve created on iPad to your computer. See .
You can use iC lou d o r i Tunes, or bot h, dep end ing on you r needs. For exam ple , yo u c an
use iCloud to automatically keep your contacts and calendars up to date on all your
devices, and use iTunes to sync music from your computer to iPad.
You can als o m anu all y m ana ge con tent from iTunes in the iPad Su mma ry pan e. To a dd
songs and videos, choose a song, video, or playlist from your iTunes library then drag it
to iPad in the iTunes sidebar. This is useful if your iTunes library contains more items than
can fit on iPad. See the Apple Support article
.
iTunes download website
iCloud
Sync with iTunes
Sync your iPhone, iPad, or iPod touch with
iTunes using USB
Page 33

iPad User Guide
Page 33 of 292
Note: If you have iCloud Music Library turned on, you can manually manage only video.
Sync with iTunes
Syncing with iTunes copies information from your computer to iPad, and vice versa. You
can sync by connecting iPad to your computer, or you can set up iTunes to wirelessly
sync music, videos, photos, and more with Wi-Fi. For help syncing iPad, open iTunes on
your computer, choose Help > iTunes Help, then select “Add items to iPod, iPhone, or
iPad.” iTunes is available from the .
Note: If features such as iCloud Music Library, iCloud Photo Library, and iCloud calendar
and contacts syncing are turned on, you canʼt use iTunes to sync their associated media
and data.
Sync using a USB cable. using the included cable, open
iTunes on your computer, then click the iPad button in the top-left of the iTunes window.
Select a setting (Summary, Apps, or Music, for example) to configure it.
Note: If iPad doesnʼt appear in iTunes, make sure youʼre using the latest version of
iTunes, check that the cable is correctly connected, then try restarting your computer.
To learn more, see the Apple Support ar tic le
.
Set up wireless syncing. Connect iPad to your computer using the included cable, open
iTunes, click the iPad button in the top-left of the iTunes window, click Summary, then
select Sync with this iPad over Wi-Fi.
If Wi-Fi syncing is turned on, both iPad and your computer are on and connected to the
same wireless network, and iTunes is open on your computer, iPad syncs when itʼs
connected to a power source.
To learn more, see the Apple Support ar tic le
.
iTunes provides these syncing options:
In the Music pane, you can sync your entire music library or just selected playlists,
artists, albums, and genres.
In the Movies, TV Shows, Podcasts, and Books panes, you can choose to sync all the
media they contain, or just the media you choose.
iTunes website
Connect iPad to your computer
Sync your iPhone, iPad, or iPod touch with
iTunes using USB
Sync your iPhone, iPad, or iPod touch with
iTunes using Wi-Fi
Page 34

iPad User Guide
Page 34 of 292
In the Photos pane, you can sync photos and videos from a supported app or a folder
on your computer.
In the Summary pane, you can set iTunes to automatically sync iPad when itʼs
attached to your computer. To temporarily prevent syncing after you attach the
device, press and hold Command and Option (Mac) or Shift and Control (PC) until you
see iPad appear in the iTunes window.
Back up iPad with iCloud Backup
When you first sign in with your Apple ID, iCloud Backup turns on automatically. iCloud
backs up iPad daily over Wi-Fi, when itʼs connected to a power source and is locked. (To
lock iPad, press the . iPad also locks automatically if you donʼt touch
the screen for a minute or so.)
iCloud backups are encrypted automatically so that your data is protected from
unauthorized access both while itʼs transmitted to your devices and when itʼs stored in
iCloud. Purchased content, iCloud Photo Sharing, and My Photo Stream content donʼt
count against your 5 GB of free iCloud storage.
Music that wasnʼt purchased in iTunes isnʼt backed up in iCloud, but it can be restored by
syncing with iTunes on your computer. See .
When you back up iPad using iCloud, you canʼt simultaneously use iTunes to
automatically back up iPad to your computer. However, you can use iTunes to manually
back up iPad to your computer. See .
iCloud backups donʼt include:
Data thatʼs already stored in iCloud, such as contacts, calendars, notes, iCloud
Shared Streams, My Photo Stream, iCloud Photo Library, and the contents of
iCloud Drive
Data stored in other cloud services, such as Gmail and Exchange mail
Apple Pay information and settings
Touch ID settings
Content you didnʼt get directly from the iTunes Store, App Store, or iBooks Stores,
such as imported MP3s, videos, or CDs
Content from the iTunes Store, App Store, or iBooks Store (if itʼs still available, you
can tap to redownload content you purchased)
Sleep/Wake button
Sync with iTunes
Back up iPad with iTunes
Page 35

iPad User Guide
Page 35 of 292
Stop or resume iCloud backups. Go to Settings > [your name] > iCloud, then turn
iCloud Backup off or on.
Back up immediately on iCloud. Go to Settings > [your name] > iCloud >
iCloud Backup, then tap Back Up Now.
View or remove iCloud backups. Go to Settings > [your name] > iCloud > iCloud
Storage > Manage Storage.
Important: Backups for music, movies, or TV show purchases arenʼt available in all
countries. Previous purchases may not be restored from iCloud Backup if they're no
longer in the iTunes Store, App Store, or iBooks Store.
If you replace your iPad, you can use its backup to transfer your information to a new
device. See .
For more information, see the Apple Support article .
Back up iPad with iTunes
Connect to iTunes and back up. Open iTunes on your computer, then connect iPad.
(See .) Click the iPad button, then click Summary in the
sidebar. To create a manual backup, click Back Up Now (below Backups). To turn on
automatic iTunes backups, click “This computer” (below Backups). iTunes automatically
backs up iPad when you connect it to your computer.
iTunes backups donʼt include:
Content from the iTunes and App Stores, or PDFs downloaded directly to iBooks
Content synced from iTunes, such as imported MP3s or CDs, videos, books, and
photos (see )
Photos already stored in the cloud, such as in iCloud Shared Streams, My Photo
Stream, and iCloud Photo Library
Touch ID settings
Apple Pay information and settings
Keychain data
To back up this content, select “ Encrypt local backup” (below Backups) in iTune s.
Back up iPad with iCloud Drive
About backups for iOS devices
Connect iPad to your computer
Sync with iTunes
Page 36

iPad User Guide
Page 36 of 292
View or remove iTunes backups. Open iTunes on your computer, choose iTunes >
Preferences, then click Devices. Encrypted backups have a lock icon in the list of
backups.
Encrypt iPad backup. In the Summary pane, select “Encrypt iPad backup” if you want to
encrypt the information stored on your computer when iTunes makes a backup.
Encrypted backups are indicated by a lock icon , and a password is required to restore
the backup. If you donʼt select this option, other passwords (such as those for mail
accounts) arenʼt included in the backup, and you have to reenter them if you use the
backup to restore iPad.
If you replace your iPad, you can use its backup to transfer your information to a new
device. See .
For more information, see the Apple Support article .
iPad in the enterprise
To use iPad with your work ac coun ts, you need to know the set tings your organization
requires. If you received your iPad from your organization, the settings and apps you
need might already be installed. If youʼre using your own iPad, your system administrator
may provide you with settings to enter, or have you connect to a mobile device
management server that installs the required settings and apps for you.
You may be a sked to instal l a co nfi gur ati on prof ile , w hich confi gures iPad for you, an d
may define some settings that you canʼt change. For example, your organization might
turn on Auto-Lock and require you to set a passcode to protect the information in the
accounts you access. You can see your profiles in Settings > General > Profiles & Device
Management. When you delete a profile, the settings and accounts, and everything else
associated with the profile, are also removed.
If your organization wants you to have certain apps, it might provide you with redemption
codes to use in the App Store. When you download an app using a redemption code, you
own the app, even though your organization purchased it for you. Your organization can
also purchase App Store app licenses that the organization retains but assigns to you for
a period of time. An app you receive this way is removed if the organization assigns it to
someone else.
Your organization mig ht als o d evelop custom apps th at arenʼt in the Ap p S tore . Yo u
install them from a webpage, or you may receive a notification from your organization
asking you to install them wirelessly. These apps belong to your organization, and they
may be removed or stop working if you delete a configuration profile.
Restore iPad
About backups for iOS devices
Page 37

iPad User Guide
Page 37 of 292
If you have questions about the settings, apps, or other requirements for using iPad in
your enterprise environment, contact the system administrator at your organization. For
general information about using iPad in business, go to the .
View this user guide on iPad
You can vie w t he iPad User Guide on iPad in Safari, and in the iBooks app.
View the user guide in Safari. Tap , then tap the iPad User Guide bookmark. (If you
donʼt see a bookmark, go to .)
Add an icon for the user guide to the Home screen: Tap , then tap Add to Home
Screen.
View the user guide in a different language: Tap the language link (English, for
example) at the bottom of the first page, then choose a language.
View the user guide in iBooks. Open iBooks, then search for “iPad user” in the
iBooks Store.
For more information about iBooks, see .
Tips for using iOS 10
The Tips app helps you get the most from iPad.
Get Tips. Open the Tips app. New tips are added frequently.
Get notified when new tips arrive. Go to Settings > Notifications > Tips.
iPad in Business website
iPad help
Get books
Page 38
iPad User Guide
Page 38 of 292
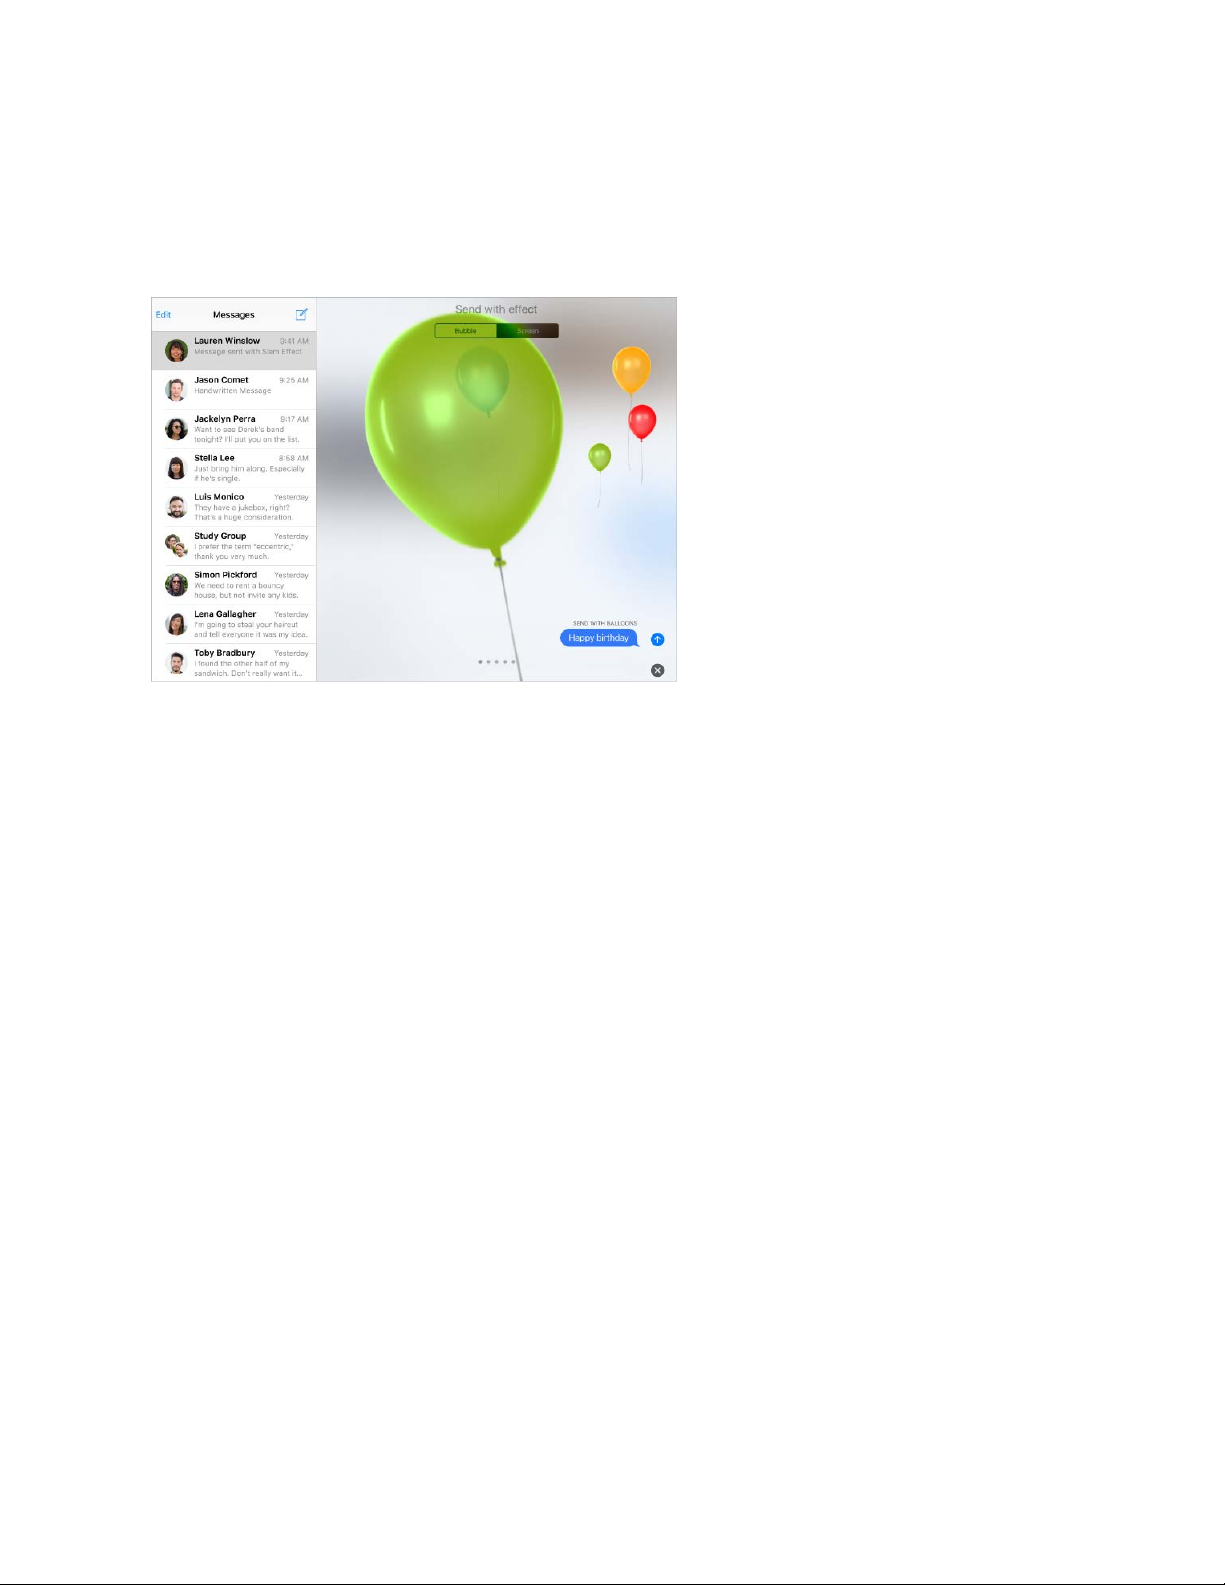
Expressive messages. Enhance your messages with bubble effects, invisible ink, fullscreen effects, handwritten messages, Digital Touch, larger emoji, iMessage apps
(including stickers), and more. See .
Broader Siri capabilities. Siri works with many of your favorite apps from the App Store.
For example, you can use Siri with an app to book a ride or send money to a friend in
need. See .
Discover TV. (iOS 10.2) The new TV app is where you can discover and watch movies
and TV episodes from your favorite apps in one place. It works with your participating
apps to bring together a list of what youʼve been watching so you can continue viewing a
movie or TV show, or go to the next episode in a TV series, even when you started
watching on another device. Available in the U.S. See .
More from Maps. Reserve a table at your favorite restaurant, order a ridesharing vehicle
for a cross-town trip, search for places along your route, and more. See .
Remember meaningful moments. Memories, a new feature of Photos, takes the photos
and videos of special moments, people, and places, and turns them into shareable
Memory movies. See .
Whatʼs new in iOS 10
Send and receive messages
Siri and apps
TV overview
Find places
Memories
Page 39

iPad User Guide
Page 39 of 292
Control your home. The Home app lets you securely control Works with Apple HomeKit
accessories, such as lights, locks, thermostats, smart plugs, and more, even when youʼre
away from home. You can create automations that, for example, turn on the lights at
sunset or unlock your door and dial up the heat when you return home. See
.
Quickly find music. Music is now simpler. Enjoy the fresh design that provides greater
clarity and simplicity to every aspect of Apple Music. Plus, sing along with your favorite
songs with the new lyrics feature. See .
Home
overview
Apple Music
Page 40

iPad User Guide
Page 40 of 292
More ways to read News. Easily find interesting stories with the all-new For You design,
subscribe to your favorite publications, and get notifications about the dayʼs most
important stories, right on your Lock screen. See .
A more powerful Lock screen. Interact with notifications and, with an Internet
connection, catch up on news, check your reminders, and check your mail—all without
unlocking iPad. See and .
Two tabs are better than one. In Safari, view and interact with two tabs, side-by-side.
See .
Apple Pay on the web. Shopping online is now faster, safer, and more private than ever.
Just pick out the things you want, then pay in your browser. See .
Noteworthy collaboration. Invite people to view and make edits to notes in your iCloud
account and everyone will see the latest changes. See .
Get started with News
Today View Notifications
Browse the web
Apple Pay
Collaborate in Notes
Page 41

iPad User Guide
Page 41 of 292
Apple ID information in Settings. (iOS 10.3) See all your Apple ID information in one
location. This includes your contact information, the iCloud services and features youʼre
using, a list of your Apple devices, and more. See .
Type in two languages. Add a keyboard in another language, and you can type in two
languages at the same time without having to switch between keyboards. See
.
Apple ID
Add or
change keyboards
Page 42

iPad User Guide
Page 42 of 292
Use apps
Switch between apps
You can eas ily switch be twee n t he app s yo uʼre us ing .
View open apps. Double-click the Home button to reveal your open apps in the app
switcher. Swipe sideways to see more. To switch to another app, tap it.
Close an app. If an app isnʼt working properly, you can force it to quit. Swipe the app up
from the app switcher display, then try opening the app again.
Search for apps. If you have lots of apps, you can use Search to find and open them.
Swipe the center of the Home screen down to see the search field. See .
Look around
Drag a list up or down to see more. Swipe to scroll quickly; touch the screen to stop
scrolling. Some lists have an index—tap a letter to jump ahead.
Basics
Search
Page 43

iPad User Guide
Page 43 of 292
Drag a photo, map, or webpage in any direction to see more.
To quickly jump to the top of a page, tap the status bar at the top of the screen.
Zoom in or out
Pinch open on a photo, webpage, or map for a close-up—then pinch closed to zoom
back out. In Photos, keep pinching to see the collection or album the photoʼs in.
Page 44

iPad User Guide
Page 44 of 292
Or double-tap a photo or webpage to zoom in, then double-tap again to zoom out. In
Maps, double-tap to zoom in, then tap once with two fingers to zoom out.
Gestures
Use multitasking gestures on iPad to return to the Home screen, reveal the app switcher
display, or switch to another app.
Return to the Home screen. Pinch four or five fingers together.
Reveal the app switcher. Swipe up with four or five fingers.
Switch apps. Swipe left or right with four or five fingers.
Turn multitasking gestures on or off. Go to Settings > General > Multitasking.
Change the screen orientation
Many apps give you a different view when you rotate iPad.
Page 45

iPad User Guide
Page 45 of 292
Lock the screen orientation. Swipe up from the bottom edge of the screen to open
Control Center, then tap .
The Lock Orientation icon appears in the status bar when the screen orientation is
locked.
On iPad models with a side switch, you can also set the Side Switch to lock the screen
orientation instead of silencing sound effects and notifications. Go to Settings > General
then, under “Use Side Switch to,” tap Lock Rotation.
Home screen
Tap an app to open it.
Press anytime to return to the Home screen. Swipe left or right to see
additional Home screens.
Some apps may include a badge on their Home screen icon, to let you know how many
new items await—for example, the number of new email messages. If thereʼs a problem—
such as a message that couldnʼt be sent—an exclamation mark appears on the badge.
On a folder, a numbered badge indicates the total number of notifications for all the apps
inside.
the Home button
Page 46

iPad User Guide
Page 46 of 292
Lock screen
Press the Sleep/Wake button to see the Lock screen and quickly access the features and
information you need most. You can see your most recent notifications without unlocking
iPad. You can also:
Swipe down from the top of the screen to
.
Swipe up from the bottom of the screen to .
Swipe right to .
Swipe left to open Camera.
Unlock iPad. Press the , then enter the passcode (if required).
see all your recent notifications at once in
Notification Center
open Control Center
see Today View and get information from your favorite apps
Home button
Page 47

iPad User Guide
Page 47 of 292
Notifications
Notifications help you keep track of whatʼs new. They let you know if you missed a call, if
the date of an event moved, and more. You can customize your notifications so you just
see whatʼs important to you.
Respond when iPad is locked. Swipe the notification left.
Open the app to respond. Swipe the notification right.
Respond without leaving the current app. Pull the notification down when it appears at
the top of your screen.
Note: This feature works with text and email messages, calendar invitations, and more.
Open Notification Center to view all your notifications at once. Swipe down from the
top edge of any screen.
Clear a notification. Swipe the notification left. To clear a group of notifications, tap .
Set notification preferences. Go to Settings > Notifications. Tap an app to set its
notification options. For example, choose whether to allow notifications from a specific
app or turn the sound on a notification on or off.
Choose whether to show notifications on the Lock screen. Go to Settings > Touch ID
& Passcode (iPad Pro, iPad 5th generation, iPad Air 2, iPad mini 3 and later) or Settings >
Passcode (other models), then choose whether to allow access when locked.
Page 48

iPad User Guide
Page 48 of 292
Silence all your notifications. Go to Settings > Do Not Disturb. You can also use Siri to
turn Do Not Disturb on or off. Say “Turn on Do Not Disturb” or “Turn off Do Not Disturb.”
Close Notification Center. Swipe up, or press the Home button.
Tod ay V iew
Get information from your favorite apps, at a glance. Choose from Maps Nearby,
Calendar, Notes, News, Reminders, and more.
Open Today View. Swipe right from the left edge of the Home screen or Lock screen.
Add and organize Today View widgets. To choo se which wid gets appear, tap Edit at
the bottom of the screen. Tap or to add or remove widgets. To arrange the order of
your widgets, touch , then drag to a new position.
Choose whether to allow access to Today View when iPad is locked. Go to Settings >
Touch ID & Passcode (iPad Pro, iPad 5th gen eration, iPad Air 2, i Pad mini 3 and later) or
Settings > Passcode (other models).
Page 49

iPad User Guide
Page 49 of 292
Control Center
Control Center gives you instant access to the camera, AirPlay Mirroring, control and
playback of currently playing audio and video, and other handy features. You can also
adjust the brightness, lock the screen in portrait orientation, turn wireless services on or
off, and turn on AirDrop.
Open Control Center. Swipe up from the bottom edge of any screen (even the Lock
screen).
Control audio. Swipe Control Center left to quickly reach audio controls.
If you set up your iPad with speakers, headphones, or another device, tap the device to
switch the output. For information about setting up iPad with devices using Bluetooth,
see .
Open the currently playing audio app. Tap the song title.
Control home accessories. Swipe Control Center left to reach accessory controls (if
youʼve ).
Close Control Center. Swipe down, tap the top of the screen, or press the Home button.
Turn off access to Control Center in apps or on the Lock screen. Go to Settings >
Control Center.
Search
You can sea rch iPad, t he Int ern et, an d a pps for useful information, in clu din g:
Bluetooth devices
set up accessories in the Home app
Page 50

iPad User Guide
Page 50 of 292
Sports scores and schedules
Weather forecasts
Stock prices
Quick conversions
Calculations
Places nearby
Media, including music, TV shows, movies, and web videos
Websites
Content in apps (for supporting apps)
Siri provides even more information before you start to type.
Relevant people
Suggested apps
Places nearby
Items in the news
Search with iPad. Swipe down from the middle of the Home screen to show Search. Tap
an item to get more information, or tap the search field. Results occur as you type; to
hide the keyboard and see more results on the screen, tap Search. Tap an item in the list
to open it.
Page 51

iPad User Guide
Page 51 of 292
Choose what to search. Go to Settings > General > Spotlight Search, then tap to
deselect apps or content.
Turn off Siri Suggestions and Suggestions in Search. Go to Settings > General >
Spotlight Search.
Turn off Location Services for Spotlight Suggestions. Go to Settings > Privacy >
Location Services. Tap System Services, then turn off Location-Based Suggestions.
Search in apps. Many apps include a search field where you can type to find something
within the app. For example, in the Maps app, you can search for a specific location.
Page 52

iPad User Guide
Page 52 of 292
Siri
Make requests
Siri (on iPad Pro, iPad 3rd generation and later, iPad mini and later) lets you speak to your
iPad to send messages, schedule meetings, make FaceTime calls, and much more. Siri
understands natural speech, so you donʼt have to learn special commands or keywords.
Ask Siri anything, from “set the timer for 3 minutes” to “what movies are showing
tonight?” Open apps, and turn features like Airplane Mode, Bluetooth, Do Not Disturb,
and VoiceOver on or off. Siri is great for keeping you updated with the latest sports info,
helping you decide on a restaurant, and searching the iTunes Store or App Store.
Note: To use Siri, iPad must be connected to the Inte rnet. See .
Cellular charges may apply.
Summon Siri. Press and hold the Home button, release the button, then make your
request. Or, instead of waiting for Siri to notice that youʼve stopped talking, you can
continue to hold down the Home button while you speak, then release it when you finish.
If youʼre using a headset, you can use the center or call button in place of the Home
button.
Hey Siri. You c an use Siri wit hou t p ressing the Ho me but ton. Just say “Hey Siri,” t hen
make your request. With iPad Pro, Siri is always listening, even when iPad isnʼt connected
to a power source. Other models require iPad to be plugged in.
To turn Hey Siri on or off, go to Settings > Sir i > Allow “Hey Siri.”
Connect to the Internet
Page 53
iPad User Guide
Page 53 of 292
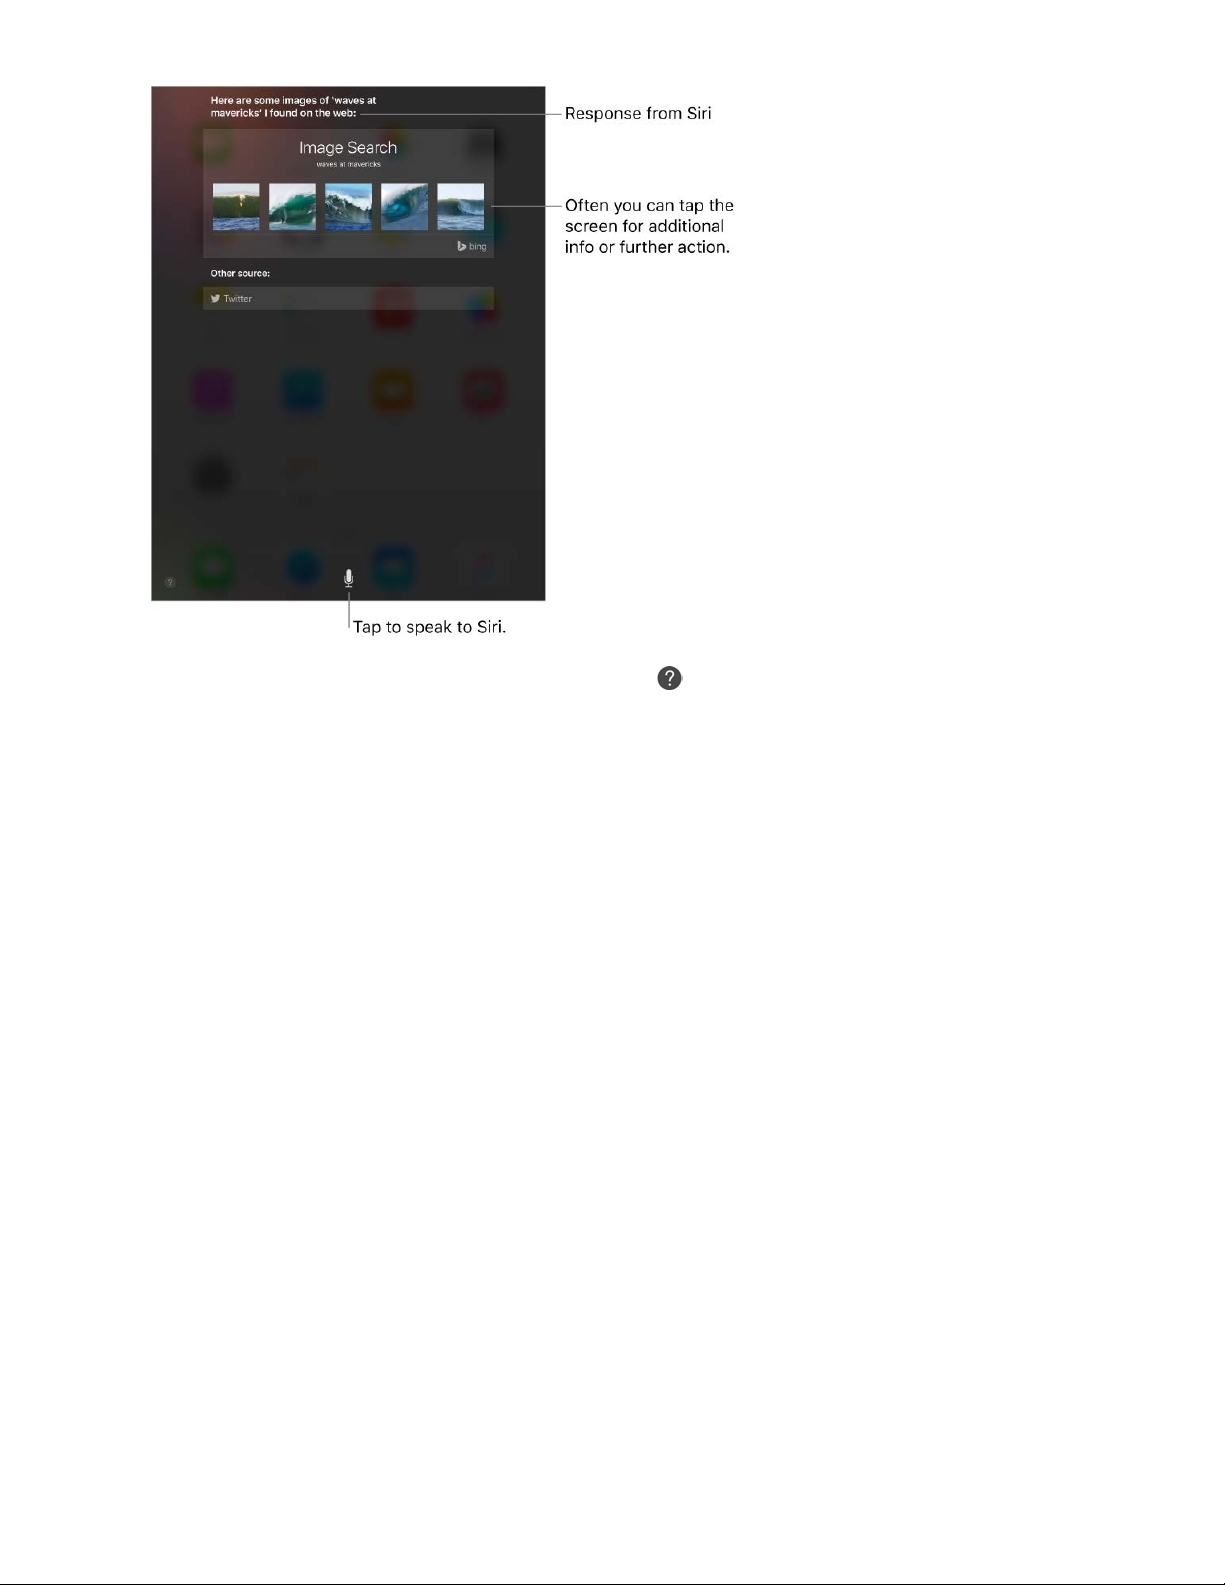
Get Siri hints. Ask Siri “what can you do,” or tap .
The onscreen response from Siri often includes information or images that you can tap
for additional detail, or to perform some other action.
Change the voice gender for Siri. Go to Settings > Siri > Siri Voice (may not be available
in all areas).
Adjust the volume for Siri. Use the volume buttons while youʼre interacting with Siri. For
voice feedback options, go to Settings > Siri > Voice Feedback.
Prevent access to Siri when iPad is locked. Go to Settings > Touch ID & Passcode
(iPad models with Touch ID) or Settings > Passcode (other models). You can also disable
Siri by turning on restrictions. See .
Tel l Si ri ab ou t yo ur se lf
If you tell Siri about yourself—including things like your home and work addresses, and
your relationships—you can get personalized service like, “remind me to call my husband
when I get home.”
Tell Sir i wh o you are . Fill out your contact card in Contacts, go to Settings > Siri > My
Info, then tap your contact card.
Set restrictions
Page 54

iPad User Guide
Page 54 of 292
To let Siri know about a re lati onship, say something like “Emily Parker is my wife” or
“Ai li sh K imb er is my mo m.”
Note: Siri uses Location Services when your requests require knowing your location. See
.
Siri and apps
Siri works with many of the apps on iPad, including FaceTime, Messages, Maps, Clock,
Calendar, and more. For example, you can say things like:
“FaceTime Mom”
“Do I have any new texts from Rick?”
“Set an alarm for 8 a.m.”
To get personalized service for reque sts like “FaceTime Mom,” tell Siri about yourself and
your relationships. See .
More examples of how you can use Siri with apps appear throughout this guide.
Using Siri with third-party apps. Some apps from the App Store also support Siri.
These include apps that let you book a ride, send a message, search photos, send
payments, place calls, and track your workouts. Look for apps that work with Siri in the
App Store.
Make corrections
If Siri doesnʼt get something right, you can tap to edit your request.
Or tap again, then clarify your request verbally.
Want to change a message before sending it? Say “Change it.”
Location Services
Siri and apps
Page 55

iPad User Guide
Page 55 of 292
Enter text
Type and edit text
Tap a text field to see the onscreen keyboard, then tap letters to type.
You can als o rest your fi nge rs on t he ons cree n keyboard, then s tar t typing no rmally. T he
placement of the keys invisibly adjusts based on where youʼve rested your fingers. If you
stop typing, the placement of the keys resets after two seconds (iPad Pro, iPad 5th
generation, iPad Air and later).
Type uppercase letters. Tap Shift or touch the Shift key and slide to a letter.
Turn on Caps Lock. Double-tap Shift.
Enter numbers, punctuation, or symbols. Tap the Number key or the Symbol key
.
Enter accented letters or other alternate characters. Touch and hold a key, t hen slide
to choose one of the options.
Page 56

iPad User Guide
Page 56 of 292
Quickly end a sentence with a period and a space. Double-tap the space bar.
Correct spelling. If you see a word underlined in red, tap it to see suggested
corrections. If the word you want doesnʼt appear, type the correction.
Hide the onscreen keyboard. Tap the Keyboard key .
Set options for typing or add keyboards. Go to Settings > General > Keyboard.
You can als o u se an App le Wire less Keyb oard to en ter text . S ee
. To dictate instead of typing, see .
Select text. Tap the inser tion point to display the selection options. Or double-tap a
word to select it. Drag the grab points to select more or less text. In read-only
documents, such as webpages, touch and hold to select a word.
You can cut , c opy, or pas te over selected text. Wi th Uni versal C lip boa rd, you can al so
.
With some apps, you can also get bold, italic, or underlined text (tap B/I/U); see
suggestions in Look Up; or have iPad suggest an alternative. You may need to tap to
see all the options. If you choose Look Up, you see suggested information from the web
and different apps. To turn off Suggestions in Look Up, go to Settings > General >
Spotlight Search.
Revise text. Touch and hold the text to show the magnifying glass, then drag to position
the insertion point.
Use an Apple Wireless
Keyboard Dictate
cut
or copy something on one Apple device, and paste it on another
Page 57

iPad User Guide
Page 57 of 292
Turn your keyboard into a trackpad. Touch and hold the key board wit h two fingers until
it turns light gray. Drag around the keyboard to position the insertion point. Lift, then
touch and hold with two fingers to reveal the drag points. Move your fingers to select
text. Tap with two fingers to select a word. Double-tap with two fingers to select a
sentence. Tap three times with two fingers to select a paragraph.
Use the Shortcut Bar. Copy and paste selected text, or style your text to be bold, italic,
or underline—right from the Shortcut Bar at the top of your keyboard.
Note: The Shortcut Bar differs from app to app. The features described here may not be
available with all apps.
Page 58

iPad User Guide
Page 58 of 292
Undo the last edit. Use the Shortcut Bar, or shake iPad, then tap Undo.
Justify text. Select the text, then tap the left or right arrow (not always available).
Predictive text
As you write, the keyboard predicts your next word, suggests emoji that could take the
place of your word, and makes suggestions based on your recent activity and information
from your apps (not available in all languages). For example, when you type something
like:
“My number is,” your phone number appears as an option.
“Iʼm available at,” the free time in your calendar pops up as an option.
“Iʼm at,” your current location appears as an option when youʼre typing in Messages.
Tap a word to choose it, or accept a highlighted prediction by entering a space or
punctuation. When you tap a suggested word, a space appears after the word. If you
enter a comma, period, or other punctuation, the space is deleted. Reject a suggestion
by tapping your original word (shown as the predictive text option with quotation marks).
Turn off predictive text. To uch and hold or , then slide to Predictive.
Dictate
If you like, you can dictate text instead of typing it. Make sure Enable Dictation is turned
on (go to Settings > General > Keyboard). On iPad Pro models, you can use dictation
when youʼre not connected to the Internet.
Page 59

iPad User Guide
Page 59 of 292
Note: Dictation may not be available in all languages or in all areas, and features may
vary. Cellular data charges may apply. See .
Dictate text. Tap on the iPad keyboard, then speak. When you finish, tap Done.
Add text. Tap again and continue dictating. To insert text, tap to place the insertion
point first. You can also replace selected text by dictating.
Add punctuation or format text. Say the punctuation or format. For example, “Dear
Mary comma the check is in the mail exclamation mark” becomes “Dear Mary, the check
is in the mail!” Punctuation and formatting commands include:
quote … end quote
new paragraph
new line
cap—to capitalize the next word
caps on … caps off—to capitalize the first character of each word
all caps—to make the next word all uppercase
all caps on … all caps off—to make the enclosed words all uppercase
no space—to eliminate the space between two words
no caps on … no caps off—to make the enclosed words all lowercase
no space on … no space off—to run a series of words together
smiley—to insert :-)
frowny—to insert :-(
winky—to insert ;-)
Cellular data settings
Page 60

iPad User Guide
Page 60 of 292
Save keystrokes
A shortcut lets you enter a word or phrase by typing just a few characters. For example,
type “omw” to enter “On my way!” That oneʼs already set up for you, but you can also
add your own.
Create a shortcut. Go to Settings > General > Keyboard, then tap Text Replacement.
Have a word or phrase you use and donʼt want it corrected? Create a shortcut, but
leave the Shortcut field blank.
Use iCloud to keep your personal dictionary up to date on your other devices. Go to
Settings > [your name] > iCloud, then turn on iCloud Drive.
Add or change keyboards
You can tur n typing feat ures, s uch as sp ell ch eck ing, on or of f; add keyboards fo r w riting
in different languages; and change the layout of your onscreen keyboard or Apple
Wireless Keyboard.
If youʼve added keyboards in other languages, you can type in two languages without
having to switch between keyboards. Your keyboard automatically switches between the
two languages you type in most often. (Not available for all languages.)
Tip: On iPad Pro (12.9 inch), if youʼve added a Chinese, Korean, Japanese, or Hebrew
keyboard, you can use the Caps Lock key to quickly switch back and forth between Latin
script and the other keyboard youʼre using.
Set typing features. Go to Settings > General > Keyboard.
Add a keyboard for another language. Go to Settings > General > Keyboard >
Keyboards > Add New Keyboard.
Switch keyboards. Touch and hold , then slide your finger to the name of the
keyboard.
You can als o t ap to switch from one keyboard to the other. Continue tapping to
access other enabled keyboards.
For information about international keyboards, see .
Use international keyboards
Page 61

iPad User Guide
Page 61 of 292
Change the keyboard layout. Go to Settings > General > Keyboard > Keyboards, select
a keyboard, then choose a layout.
For more information about your keyboard, see the Apple Support article
.
Keyboard layouts
You can typ e w ith a spl it keybo ard tha tʼs a t t he bot tom of the sc reen, o r u ndo cked an d i n
the middle of the screen.
Adjust the keyboard. Touch and hold , then:
Use a split keyboard: Slide your finger to Split, then release. Or spread the keyboard
apart from the middle using two fingers.
Move the keyboard to the middle of the screen: Slide your finger to Undock, then
release.
Return to a full keyboard: Slide your finger to Dock and Merge, then release.
Return a full keyboard to the bottom of the screen: Slide your finger to Dock, then
release.
Turn Split Keyboard on or off. Go to Settings > General > Keyboard > Split Keyboard.
Note: The split keyboard option is not available on iPad Pro (12.9-inch).
iPad Pro Smart Keyboard
Use iPad Pro Smart Keyboard to hold your iPad Pro in just the right position—for typing,
watching movies, drawing, and more. Attach the keyboard to the Smart Connector on the
side.
Get help with
the keyboard on your iPhone, iPad, or iPod touch
Page 62

iPad User Guide
Page 62 of 292
Quickly switch between apps. Press and hold the Command key, then press Tab until
you reach the app you want to open.
View keyboard shortcuts. Press and hold the Command key to see shortcuts for an
app.
Open Search. Press Command-Space.
Tip: If youʼve added a Chinese, Korean, Japanese, or Hebrew keyboard, you can use
the Caps Lock key to quickly switch back and forth between Latin script and the other
keyboard youʼre using.
For more information about iPad Pro Smart Keyboard, see the Apple Support article
.
Use an Apple Wireless Keyboard
You can use an Ap ple Wi rele ss Key boa rd ( avail abl e s epa rat ely) to en ter text on you r i Pad.
The keyboard connects via Bluetooth, so you must first pair it with iPad.
Note: The Apple Wireless Keyboard may not support keyboard features that are on your
device. For example, you canʼt enable dictation with Apple Wireless Keyboard.
Pair an Apple Wireless Keyboard with iPad. Turn the keyboard on. On iPad, go to
Settings > Bluetooth and turn on Bluetooth, then tap the keyboard when it appears in the
Devices list.
Once itʼs paired, the keyboard reconnects to iPad whenever itʼs in range—up to about 33
feet (10 meters). When itʼs connected, the onscreen keyboard doesnʼt appear.
Use
your Smart Keyboard with iPad Pro
Page 63

iPad User Guide
Page 63 of 292
View keyboard shortcuts. Press and hold the Command key to see shortcuts for an
app.
Quickly switch between apps. Press and hold the Command key, then press Tab until
you reach the app you want to open.
Open Search. Press Command-Space.
Tip: If youʼve added a Chinese, Korean, Japanese, or Hebrew keyboard, you can use
the Caps Lock key to quickly switch back and forth between latin script and the other
keyboard youʼre using.
Save your batteries. Turn off the wireless keyboard when not in use. To turn off the
keyboard, press and hold the On/Off switch until the green light goes off.
Page 64

iPad User Guide
Page 64 of 292
Multitasking
Multitasking with iPad
Work with more than one app at the same time with Slide Over, Split View, and Picture in
Picture.
You can and with many apps including Safari, Notes, Photos,
Calendar, and more. You can with FaceTime, Videos, and more.
Slide Over
With Slide Over, you can open a second app without closing the one youʼre in. The
second app (side app) slides in from the right (iPad Pro, iPad 5th generation, iPad Air and
later, iPad mini 2 and later).
Open a side app. When using an app, swipe left from the right edge of the screen.
Switch to a different side app. Swipe down from the top edge of the screen.
Close the side app. Tap the app on the left, or swipe right from the app divider.
Turn Slide Over off. Go to Settings > General > Multitasking, then turn off Allow Multiple
Apps.
use Slide Over Split View
use Picture in Picture
Page 65
iPad User Guide
Page 65 of 292
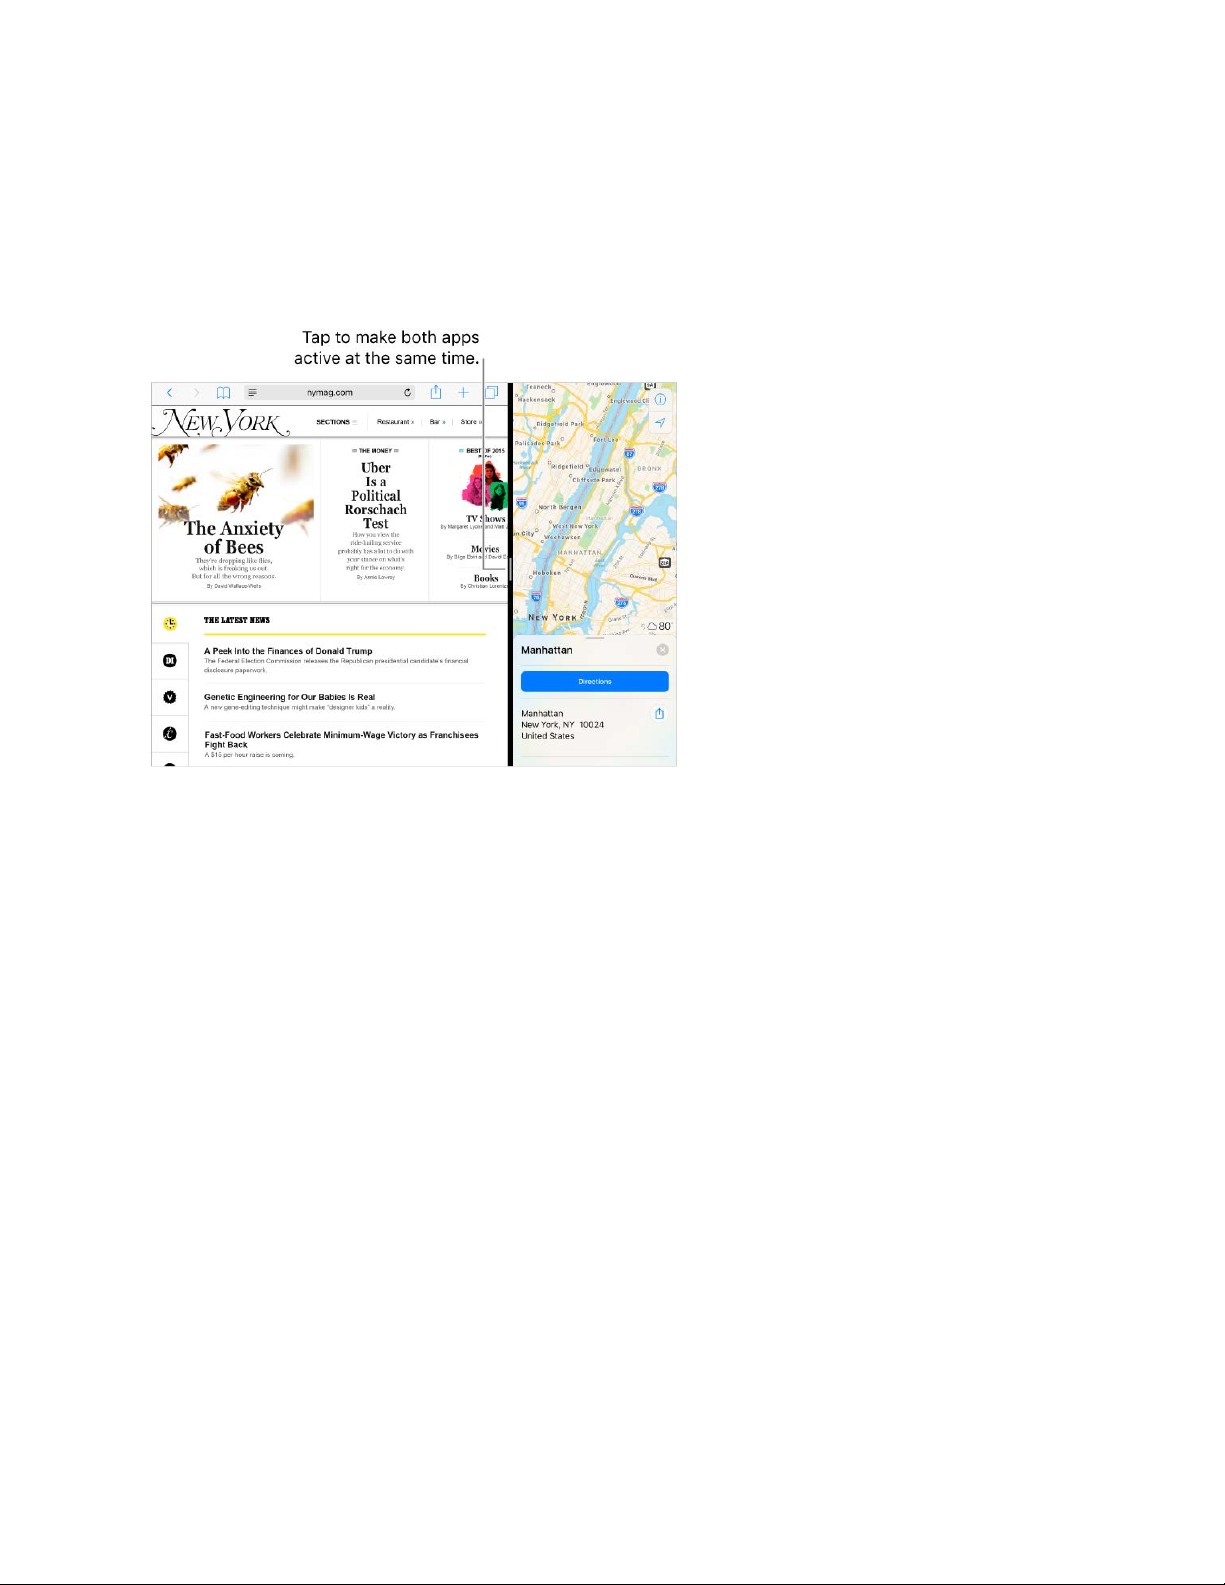
Split View
Keep two apps open and active at the same time (iPad Pro, iPad 5th generation,
iPad Air 2, iPad mini 4).
Make both apps active. When using an app, swipe left from the right edge of the
screen, then tap the middle of the app divider.
Give both apps equal space. Drag the app divider to the center of the screen.
Close Split View. Drag the app divider to the left or right, depending on which app you
want to close.
Turn Split View off. Go to Settings > General > Multitasking, then turn off Allow Multiple
Apps.
Picture in Picture
Open and use other apps as you watch a movie or use FaceTime (iPad Pro, iPad 5th
generation, iPad Air and later, iPad mini 2 and later).
Page 66

iPad User Guide
Page 66 of 292
Use Picture in Picture. When watching a video or using FaceTime, press the Home
button or tap . Your video screen scales down to a corner of your display so you can
see the Home screen and open other apps.
Resize the video window. Pinch open the small video window to make it larger. Then
pinch closed to shrink it again.
Move the video window. Drag the small video window to a different corner of the
screen. Drag it off the left or right edge of the screen if you need it out of the way for a
bit.
Return FaceTime or video to full screen. Tap in the small video window.
Turn Picture in Picture off. Go to Settings > General > Multitasking, then turn off
Persistent Video Overlay.
Sounds and silence
You can cha nge or tu rn off th e s oun ds iPad pl ays w hen you ge t a FaceTime call, tex t
message, email, tweet, Facebook post, reminder, or other event.
Tip: If youʼre not hearing or seeing incoming calls and alerts when you expect, swipe
up from the bottom edge of the screen to open Control Center, then check to see if Do
Not Disturb is on.
Set sound options. Go to Settings > Sounds for options such as alert tones and
ringtones, and ringer and alert volumes.
If you want to temporarily silence incoming FaceTime calls, alerts, and sound effects, see
.
Do Not Disturb
Page 67

iPad User Guide
Page 67 of 292
Do Not Disturb
Do Not Disturb is an easy way to silence iPad, whether youʼre going to dinner or to sleep.
It keeps FaceTime calls and alerts from making any sounds or lighting up the screen.
Turn on Do Not Disturb. Swipe up from the bottom edge of the screen to open Control
Center, then tap . When Do Not Disturb is on, appears in the status bar.
Even if Do Not Disturb is on, calls and messages from your emergency contacts in
Medical ID still come through as usual, and Alarms still sound. If you turned on
Emergency Bypass for texts or calls from a contact, those sounds come through, too.
Schedule Do Not Disturb. Go to Settings > Do Not Disturb.
You can sch edu le qui et hou rs, all ow FaceTime call s f rom your Favor ite s, and allow
repeated FaceTime calls to ring through for those emergency situations. You can also set
whether Do Not Disturb silences iPad only when itʼs locked, or even when itʼs unlocked.
Charge and monitor the battery
iPad has an internal, lithium-ion rechargeable battery. For more information about the
battery—including tips for maximizing battery life—go to the
.
WARNING: For important safety information about the battery and charging iPad, see
.
Charge the battery. The best way to charge the iPad battery is to connect iPad to a
power outlet using the included cable and USB power adapter.
Note: Connecting iPad to a power outlet can start an iCloud backup or wireless iTunes
syncing. See and .
Apple Lithium-ion Batteries
website
Important safety information
Back up iPad with iCloud Backup Sync with iTunes
Page 68

iPad User Guide
Page 68 of 292
iPad may also charge slowly when you connect it to a USB 2.0 port on your computer. If
your Mac or PC doesnʼt provide enough power to charge iPad, a “Not Charging”
message appears in the status bar.
Important: The iPad battery may drain instead of charge if iPad is connected to a
computer thatʼs turned off or is in sleep or standby mode, to a USB hub, or to the USB
port on a keyboard.
Show percentage of battery remaining in the status bar. Go to Settings > Battery,
then turn on Battery Percentage.
See proportion of battery used by each app. Go to Settings > Battery.
The battery icon in the upper-right corner of the status bar shows the battery level or
charging status.
Important: If iPad is very low on power, it may display an image of a nearly depleted
battery, indicating that iPad needs to charge for up to twenty minutes before you can use
it. If iPad is extremely low on power, the display may be blank for up to two minutes
before the low-battery image appears.
Rechargeable batteries have a limited number of charge cycles and may eventually need
to be replaced. The iPad battery should be replaced by Apple or an authorized service
provider. For more information, go to the .
Apple Pay
On devices that support Apple Pay, you can use Apple Pay to buy goods and services
within supporting apps and on supporting websites (not available in all areas). Look for
the Apple Pay payment option.
Battery service and recycling website
Page 69

iPad User Guide
Page 69 of 292
Set up Apple Pay. Go to Settings > Wallet & Apple Pay, then tap Add Credit or Debit
Card. The first time you add a card to Apple Pay, you may be prompted to use the card
you use with iTunes. Then tap Next on the following screen, and position iPad so that
your card appears in the frame.
The card issuer determines if your card is eligible for Apple Pay, and may ask you for
additional information to complete the verification process. See the Apple Support article
.
You can add up to ei ght cre dit and debit ca rds, in clu din g s tore cards.
Note: If you sign out of iCloud (in Settings > [your name]), all the credit and debit cards
you added to Apple Pay on iPad are removed. You can add the cards again the next time
you sign in to iCloud.
Manage Apple Pay settings. Go to Settings > Wallet & Apple Pay. You can:
Set your default card.
Specify the shipping address and contact information for purchases.
Pay within an app or on a website. During checkout, tap the Apple Pay or Buy with
Apple Pay button, then review the payment information. Make any changes to the
shipping and billing information, or choose a different card. Then, use Touch ID or your
passcode to complete the payment.
Apple Pay participating banks
Page 70

iPad User Guide
Page 70 of 292
You may receive a no tif ica tio n w ith th e m erch ant na me, an d the amount aut hor ize d for
the purchase. Your zip or postal code may be provided to the merchant to calculate tax
and shipping costs. Payment information—such as billing and shipping addresses, email
address, and phone number—may also be provided to the merchant once you authorize
the payment with Touch ID or a passcode.
View and manage the card information. Go to Settings > Wallet & Apple Pay, then tap a
card. You can:
Tap Transactions to view transactions made on this iPad. To hide this information,
turn off Transaction History. To view all your Apple Pay activity, see the statement
from your card issuer.
View the last four digits of the card number and Device Account Number—the
number transmitted to the merchant.
Change the billing address.
Remove the card from Apple Pay.
If your iPad is lost or stolen. If you enabled , you can use it to help locate
and secure your iPad—including suspending or removing the ability to make purchases
using your cards in Apple Pay. To do this, sign in to using your Apple ID on a
Mac or PC, click Settings, then select a device with Apple Pay in the My Devices section.
You can als o c all th e i ssuers of your cards.
Proactive assistant
Based on how you use your iPad, proactive assistant gives you suggestions for what you
might want to do next. Proactive assistant might help when you:
Listen to music: Plug in your headphones, and proactive assistant recognizes that
you might want to play an album you started earlier. Your music is ready to play from
the Lock screen—or swipe the Music icon up from the lower left and it opens the
Music app after you unlock iPad.
Find your iPad
iCloud.com
Page 71

iPad User Guide
Page 71 of 292
Create email and events: When you start adding people to an email or calendar event,
proactive assistant suggests the people you included in previous emails or events.
Leave for an event: If your calendar event includes a location, proactive assistant
assesses traffic conditions and notifies you when to leave.
Turn off contact suggestions. Go to Settings > Contacts, then turn off Contacts Found
in Apps.
Turn off event suggestions. Go to Settings > Calendars, then turn off Events Found in
Apps.
Find My Friends
Find My Friends is a great way to share your location with people who are important to
you. Friends and family members who share their locations with you appear on a map, so
you can quickly see where they are. You can set notifications for friends and family
members to alert you when they leave from or arrive at various locations.
Note: For more information about Find My Friends, refer to the Help in the app.
Page 72

iPad User Guide
Page 72 of 292
Turn on Share My Location. Go to Settings > [your name] > iCloud > Share My
Location.
Share your location with a friend. Open Find Friends, then tap Add. Select a contactʼs
name, or type a name in the To field. Choose how long you want to share your location.
Share your location using AirDrop. Tap Add, then select a friend who appears in
AirDrop. Choose how long you want to share your location.
Set a notification. Select a friend, then tap Notify Me. Choose whether you want to be
notified when a friend leaves from or arrives at a location. Choose the friendʼs current
location, or tap Other to create a new location for the notification.
Travel with iPad
Some airlines let you keep your iPad turned on if you switch to Airplane Mode. Wi-Fi and
Bluetooth are disabled so you canʼt make or receive FaceTime calls or use features that
require wireless communication, but you can listen to music, play games, watch videos,
or use other apps that donʼt require Internet access. If your airline allows it, you can turn
Wi-Fi or Bluetooth back on to enable those services, even while in Airplane Mode.
Turn on Airplane Mode. Swipe up from the bottom edge of the screen to open Control
Center, then tap . You can also turn Airplane Mode on or off in Settings. When Airplane
Mode is on, appears in the status bar at the top of the screen.
You can als o t urn Wi-Fi an d B lue tooth on or o ff in Con trol Ce nte r. See .
When you travel abroad, you may be able to sign up for cellular service with a carrier in
the country youʼre visiting, right from your iPad (available on iPad models with cellular
and Touch ID). For more information see .
Control Center
Sign up for cellular service
Page 73

iPad User Guide
Page 73 of 292
Arrange your apps
Arrange apps. Touch and hold any app on the Home scree n un til you see the app i cons
jiggle, then drag apps around. Drag an app to the edge of the screen to move it to a
different Home screen, or drag it to the Dock at the bottom of the screen (you may need
to remove another app first). Press the Home button to save your arrangement.
Create a new Home screen. While arranging apps, drag an app to the right edge of the
last Home screen. The dots above the Dock show which of your Home screens youʼre
viewing.
Start over. Go to Settings > General > Reset, then tap Reset Home Screen Layout to
return the Home screen and apps to their original layout. Any folders youʼve created are
removed, the original wallpaper is restored, and apps youʼve downloaded are placed after
apps that came with your iPad.
Personalize your iPad
Page 74

iPad User Guide
Page 74 of 292
Remove apps
Remove apps from the Home screen. Touch and hold an app on t he Home scree n un til
you see the app icons jiggle, then tap in the upper-left corner. When you finish, press
the Home button.
In addition to removing third-party apps, you can remove some built-in Apple apps that
come with your iPad:
(also removes the Music app from CarPlay)
Note: When you remove a built-in app from your Home screen, you also remove any
related user data and configuration files. Removing built-in apps from your Home screen
can affect other system functionality. For more information, see the Apple Support article
.
Calendar
FaceTime
Find My Friends
Home
iBooks
iCloud Drive
iTunes Store
Mail
Maps
Music
News
Notes
Podcasts
Reminders
Tips
TV
Videos
Remove built-in apps from the Home screen on your iOS device with iOS 10
Page 75

iPad User Guide
Page 75 of 292
Restore an app you removed. Go to the App Store, search for the app, then tap .
Organize with folders
Create a folder. While arranging apps, drag one app onto another. Tap the name of the
folder to rename it. Drag apps into or out of the folder. Press the Home button when you
finish.
You can have mul tip le pag es of app s i n a folder.
Delete a folder. Drag out all the apps—the folder is deleted automatically.
Change the wallpaper
Wallpaper settings let you set an image or photo as wallpaper for the Lock screen or
Home screen. You can choose from dynamic and still images.
Change the wallpaper. Go to Settings > Wallpaper > Choose a New Wallpaper.
Tip: If you choose your own image as wallpaper, you can pinch open to zoom in on
your selected image, then drag your finger to move the image. Pinch closed to zoom
back out.
Page 76

iPad User Guide
Page 76 of 292
When choosing an image for new wallpaper, you may be able to tap Perspective Zoom to
make your wallpaper move when you change the angle you view the screen. To turn on
the Perspective Zoom option for wallpaper youʼve already set, go to Settings >
Wallpaper, then tap the image of the Lock screen or Home screen.
Note: Perspective Zoom doesnʼt work if Reduce Motion (in Accessibility settings) is
turned on. See .
Adjust the screen brightness and color balance
Dim the screen or use Auto-Brightness to extend battery life. Use Night Shift to shift the
colors in your display to the warmer end of the spectrum at night and make viewing the
screen easier on your eyes. Turn on True Tone, and iPad automatically adapts the color
and intensity of the display to match the light in your environment.
Adjust the screen brightness. Go to Settings > Display & Brightness, then drag the
slider. If Auto-Brightness is on, iPad adjusts the screen brightness for current light
conditions using the built-in ambient light sensor. You can also adjust the brightness in
Control Center.
Reduce motion
Page 77

iPad User Guide
Page 77 of 292
Use Night Shift. Go to Settings > Display & Brightness > Night Shift.
Turn on Night Shift manually—helpful when youʼre in a darkened room during the day, for
example—or schedule it to turn on automatically. If you schedule Night Shift to turn on
from sunset to sunrise, iPad uses the data from your clock and your geolocation to
determine when itʼs nighttime for you.
Note: You wonʼt se e t he opt ion to turn on Night S hif t f rom sun set to sunri se if youʼve
turned off Location Services in Settings > Privacy, or if youʼve turned off Setting Time
Zone in Settings > Privacy > Location Services > System Services.
To adjust the color balance for Nig ht Shift, go to Settings > Display & Brightness > Nig ht
Shift, then drag the slider toward the warmer or cooler end of the spectrum.
You can als o t urn on Ni ght Sh ift in Co ntro l C ent er. Tap .
Use True Tone. (9.7-inch iPad Pro) Go to Settings > Display & Brightness, then turn on
True Tone.
Display Zoom
With iPad Pro (12.9-inch), you can magnify the screen display. Go to Settings > Display &
Brightness. Tap View (below Display Zoom), choose Zoomed, then tap Set. For additional
zoom features, see .
App extensions
Some apps let you extend the functionality of your apps on iPad. An app extension may
appear as a sharing option, an action option, a widget in Today View, a file provider, or a
custom keyboard. For example, if you download Pinterest to iPad, Pinterest becomes
another option for sharing when you click .
Zoom
Page 78

iPad User Guide
Page 78 of 292
App extensions can also help you edit a photo or video in your Photos app. For example,
you can download a photo-related app that lets you apply filters to photos.
Install app extensions. Download the app from the App Store, open the app, then follow
the onscreen instructions.
Turn sharing or action options on or off. Tap , then tap More (drag options to the left
if necessary). Turn off third-party sharing or action options (they're on by default).
Organize sharing and action options. Tap , then tap More (drag options to the left if
necessary). Touch and drag to rearrange your options.
For more information about Today widgets, see . For more information about
Sharing options, see .
Your iPad name
The name of your iPad is used by iTunes and iCloud.
Change the name of your iPad. Go to Settings > General > About > Name.
Set restrictions
You can set restrict ion s for some app s, and for pu rcha sed co ntent. For exa mpl e, parents
can restrict explicit music from appearing in playlists, or disallow changes to certain
settings. Use restrictions to prevent the use of certain apps, the installation of new apps,
or changes to accounts or the volume limit.
Today View
Share from apps
Page 79

iPad User Guide
Page 79 of 292
Turn on restrictions. Go to Settings > General > Restrictions, then tap Enable
Restrictions. Youʼll be asked to define a restrictions passcode thatʼs necessary to change
the settings you make. This can be different from the passcode for unlocking iPad.
Important: If you forget your restrictions passcode, you must restore the iPad software.
See .Restore iPad
Page 80

iPad User Guide
Page 80 of 292
International keyboards
Use international keyboards
With international keyboards you can type text in many different languages, including
Asian languages and languages written from right to left. For a list of supported
keyboards, go to Appleʼs , choose your iPad, click Tech Specs, then scroll to
Languages.
Manage keyboards. Go to Settings > General > Keyboard > Keyboards.
Add a keyboard: Tap Add New Keyboard, then choose a keyboard from the list.
Repeat to add more keyboards.
Remove a keyboard: Tap Edit, tap next to the keyboard you want to remove, tap
Delete, then tap Done.
Edit your keyboard list: Tap Edit, drag next to a keyboard to a new place in the list,
then tap Done.
If youʼve added keyboards in other languages, you can type in two languages without
having to switch between keyboards. Your keyboard automatically switches between the
two languages you type in most often. (Not available for all languages).
Switch keyboards. Touch and hold , then slide your finger to the name of the
keyboard.
You can als o t ap to switch from one keyboard to the other. Continue tapping to
access other enabled keyboards.
Enter accented letters or other characters. Touch and hold t he re lated letter, num ber,
or symbol, then slide to choose a variant. For example:
On a Thai keyboard: Choose native numbers by touching and holding the related
Arabic number.
On a Chinese, Japanese, or Arabic keyboard: Suggested characters or candidates
appear at the top of the keyboard. Tap a candidate to enter it, or swipe left to see
more candidates.
Use the extended suggested candidate list. Tap the up arrow on the right to view the
full candidate list. To return to the short list, tap the down arrow.
iPad website
Page 81

iPad User Guide
Page 81 of 292
When using certain Chinese or Japanese keyboards, you can create a shortcut for word
and input pairs. The shortcut is added to your personal dictionary. When you type a
shortcut while using a supported keyboard, the paired word or input is substituted for
the shortcut.
Create shortcuts. Go to Settings > General > Keyboard > Text Replacement. Shortcuts
are available for:
Simplified Chinese: Pinyin
Traditional Chinese: Pinyin and Zhuyin
Japanese: Romaji and Kana
Reset your personal dictionary. Go to Settings > General > Reset > Reset Keyboard
Dictionary. All custom words and shortcuts are deleted, and the keyboard dictionary
returns to its default state.
Special input methods
You can use keyboards to e nter some lan gua ges in di ffere nt ways. A few examples are
Chinese Cangjie and Wubihua, Japanese Kana, and Facemarks. You can also use your
finger or a stylus to write Chinese characters on the screen.
Build Chinese characters from the component Cangjie keys. As you type, suggested
characters appear. Tap a character to choose it, or continue typing up to five
components to see more options.
Build Chinese Wubihua (stroke) characters. Use the keypad to build Chinese
characters using up to five strokes, in the correct writing sequence: horizontal, vertical,
left falling, right falling, and hook. For example, the Chinese character ࢻ (circle) should
begin with the vertical stroke Ӻ.
As you type, suggested Chinese characters appear (the most commonly used
characters appear first). Tap a character to choose it.
If youʼre not sure of the correct stroke, enter an asterisk (*). To see more character
options, type another stroke, or scroll through the character list.
Tap the match key (܃ᯈ) to show only characters that match exactly what you typed.
Write Chinese characters. Write Chinese characters directly on the screen with your
finger when Simplified or Traditional Chinese handwriting input is turned on. As you write
character strokes, iPad recognizes them and shows matching characters in a list, with
Page 82
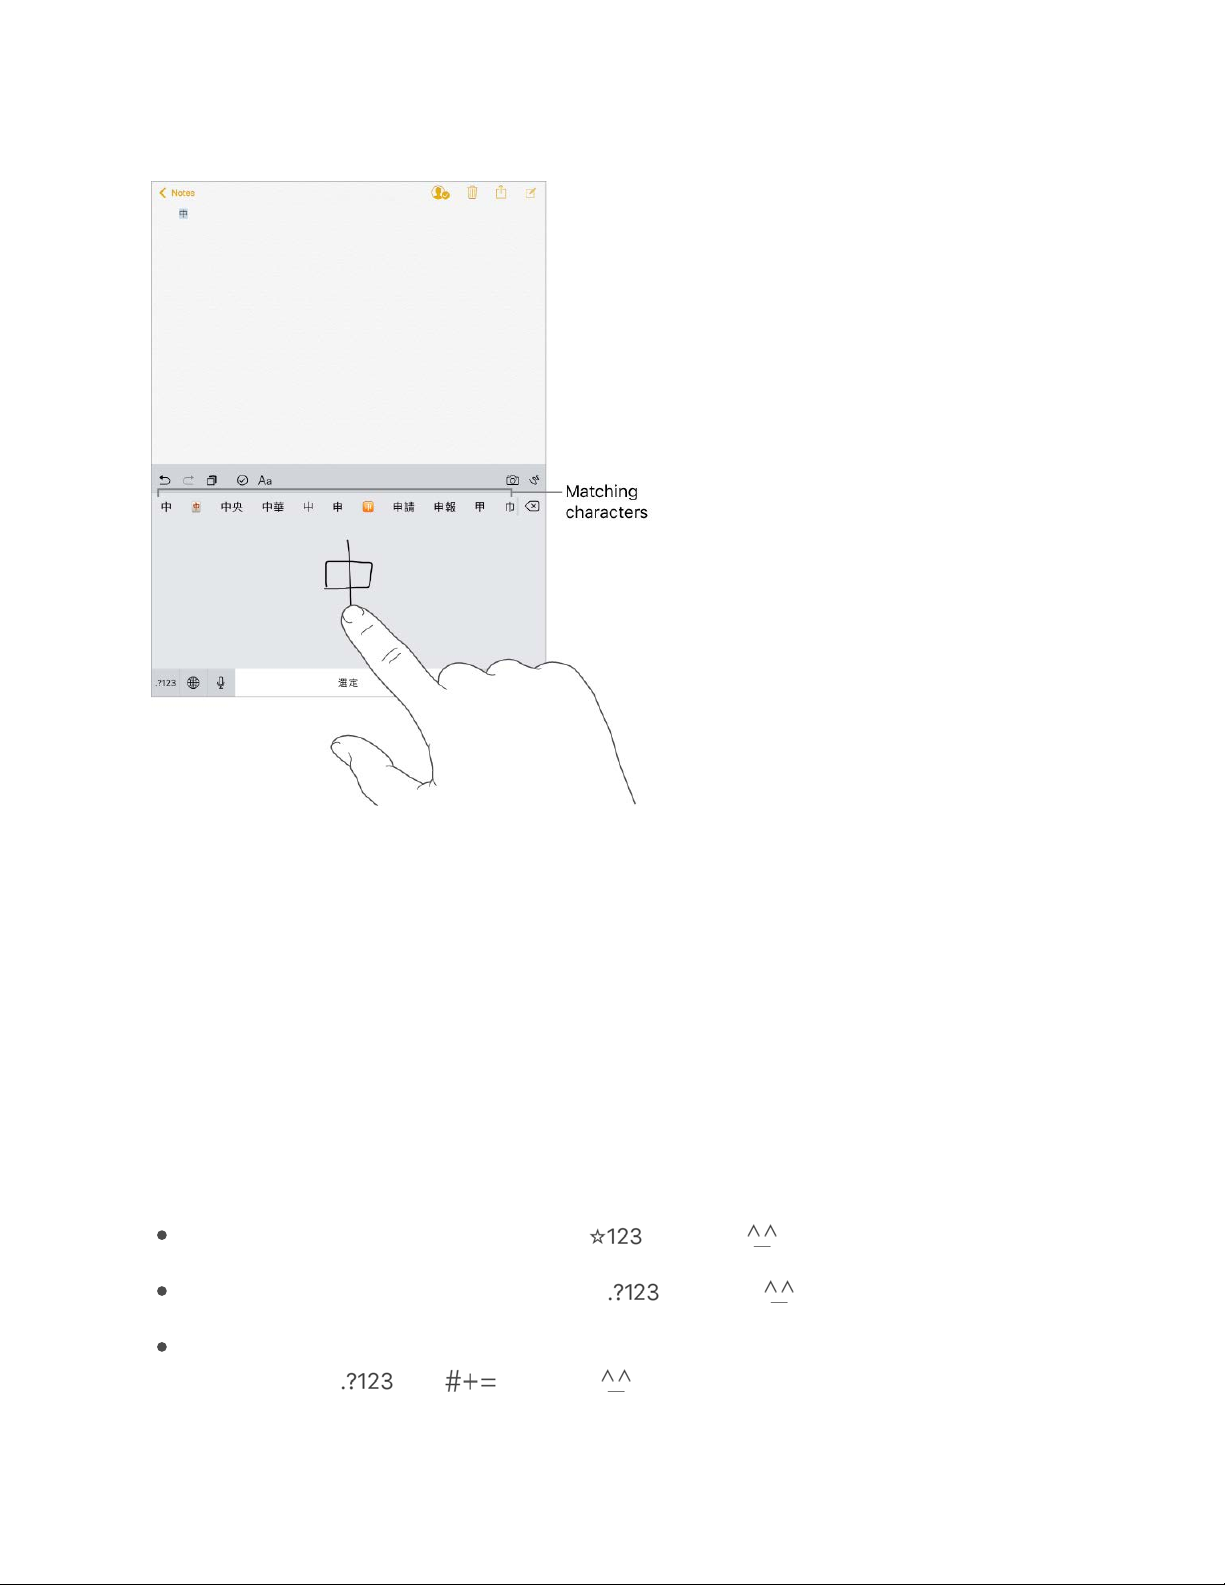
iPad User Guide
Page 82 of 292
the closest match at the top. When you choose a character, its likely follow-on
characters appear in the list as additional choices.
You can typ e s ome co mpl ex c har act ers, su ch as 潚 (part of the name for the Hong Kong
International Airport), by writing two or more component characters in sequence. Tap the
character to replace the characters you typed. Roman characters are also recognized.
Type Japanese kana. Use the Kana keypad to select syllables. For more syllable
options, tap the arrow key and select another syllable or word from the window.
Type Japanese romaji. Use the Romaji keyboard to type syllables. Alternative choices
appear along the top of the keyboard; tap one to type it. For more syllable options, drag
the list to the left or tap the arrow key.
Type facemarks or emoticons. Do one of the following:
Use the Japanese Kana keyboard: Tap , then tap .
Use the Japanese Romaji keyboard: Tap , then tap .
Use the Chinese (Simplified) Pinyin or Chinese (Traditional) Zhuyin or Pinyin
keyboard: Tap , tap , then tap .
Page 83

iPad User Guide
Page 83 of 292
Messages
Send and receive messages
Use Messages to send and receive texts, photos, videos, and more through iMessage or
SMS/MMS services. With the iMessage service, you can enhance your messages with
bubble effects, invisible ink, full-screen effects, your own handwriting, Digital Touch,
iMessage apps, stickers, and more.
Start a conversation. Tap . Enter the recipientʼs phone number or email address, or
tap and choose a contact. Tap the text field, then enter your message. Tap to send.
Alternatively, to start a conversation from Mail, Calendar, or Safari, touch and hold a
phone number, then tap Send Message.
Tip: To see what time a me ssage was sent or received, drag a bubble to the left.
Note: An alert appears if a message canʼt be sent. Tap the alert to try sending the
message again.
Send a message to a group. Tap , then enter multiple recipients.
Apps
Page 84

iPad User Guide
Page 84 of 292
To manage a group convers ation, tap . You can name the conversation, add someone
to the conversation, or leave the conversation.
Use emoji. When typing a message, tap or to switch to the Emoji keyboard. To
automatically replace text with emoji, tap the highlighted words.
Hide the keyboard. Tap in the lower-right corner.
Resume a conversation. Tap the conversation in the Messages list.
Ask Siri. Say something like:
“Send a message to Emily saying how about tomorrow”
“Reply thatʼs great news”
“Read my messages”
“Read my last message from Bob”
Respond with a Tapback. To se nd a qui ck re sponse t hat lets people know what youʼre
thinking, double-tap a message, then choose your response.
View and manage conversation details. Tap . You can:
Tap a contact to view the contact card.
Perform quick actions such as making a FaceTime call.
Send your current location or share your location for a specified length of time.
Send read receipts.
View images and attachments.
Search conversations. In the Messages list, swipe down to reveal the search field, then
enter the text youʼre looking for. You can also search conversations from the Home
screen. See .
Delete a conversation. In the Messages list, swipe left on the conversation, then tap
Delete.
Search
Page 85

iPad User Guide
Page 85 of 292
Note: You c anʼ t recover a del ete d convers ati on.
Set up iMessage and SMS/MMS
With the Messages app, you can exchange messages with other SMS and MMS devices
using your cellular connection, and with other iOS devices and Mac computers using
iMessage.
iMessage is an Apple service that sends messages over Wi-Fi or cellular connections to
other iOS devices (with iOS 5 or later) and Mac computers (with OS X 10.8 or later).
These messages donʼt count against your messaging plan. Messages sent via iMessage
can include photos, videos, and other info. You can see when other people are typing,
and send read receipts to let them know when youʼve read their messages. For security,
messages sent via iMessage are encrypted before theyʼre sent.
iMessage texts appear in blue bubbles, and SMS/MMS texts appear in green bubbles. For
more information about SMS/MMS and iMessage, see the Apple Support article
.
Sign in to iMessage. Go to Settings > Messages, then turn on iMessage.
If youʼre signed in to iMessage with the same Apple ID on all your devices, all the
messages that you send and receive on iPad can also appear on your other Apple
devices. You can send a message from whichever device is closest to you. You can even
start a conversation on one device and continue it on another with .
Sign in to iMessage with the same Apple ID on your other Apple devices.
iOS devices: Go to Settings > Messages, then turn on iMessage.
Mac: Open Messages. If youʼre signing in for the first time, enter your Apple ID and
password, then click Sign In. If you signed in before and want to use a different
Apple ID, choose Messages > Preferences, click Accounts, then select iMessage in
the Accounts list.
With Continuity, all the SMS/MMS messages that you send and receive on your iPhone
can also appear on iPad. For more information, see the Apple Support article
.
Use
Messages with your iPhone, iPad, or iPod touch
Handoff
Use
Continuity to connect your iPhone, iPad, iPod touch, and Mac
Page 86

iPad User Guide
Page 86 of 292
Share photos, videos, and audio
With iMessage or MMS, you can send messages with photos, videos, and audio. Your
carrier determines the size limit of attachments; iPad may compress photo and video
attachments when necessary.
Send a photo or video. Tap . You can:
Quickly take a photo from within Messages: Frame the shot in the viewfinder, then
tap .
Choose a recent photo or video: Swipe left to browse through recent shots.
Take a ph oto or vi deo using Cam era: Tap Camera.
Choose a photo or video from your Photo Library: Tap Photo Library.
Then, tap to send or to cancel.
Mark up a photo. Tap the photo in the message bubble, then tap Markup. Annotate the
photo with the Markup tools.
Find and share trending photos and videos from the web. See .
Send an audio message. Touch and hold to record an audio message, then lift your
finger to stop recording. Tap to listen to your message before you send it. Tap to
send or to cancel.
iMessage apps
Page 87

iPad User Guide
Page 87 of 292
Note: To save space, i Pad automa tica lly deletes audio message s two minutes afte r you
listen to them, unless you tap Keep. To always keep them, go to Settings > Messages >
Expire (below Audio Messages), then tap Never.
Forward a message or attachment. Touch and hold a message or attachment, tap
More, select additional items if desired, then tap .
Share, save, or print an attachment. Tap the attachment, then tap .
Copy an attachment. Tou ch and hold the attachment, then tap Copy.
Share items from another app. In the other app, tap Share or , then tap Message.
Delete a message or attachment. Touch and hold a message or attachment, tap More,
select additional items if desired, then tap .
Digital Touch
With iMessage, you can use Digital Touch to send sketches, taps, kisses, heartbeats, and
more. You can even add a Digital Touch effect to a photo or video.
Sketch. Tap , then draw with one finger. You can change the color, then start drawing
again. Tap to send.
Express your feelings. Tap , then use gestures on the canvas to send a Digital Touch
effect. Your feelings are sent automatically when you finish the gesture:
Tap: Tap with one finger to create a burst of color. You can change the color, then tap
again.
Page 88

iPad User Guide
Page 88 of 292
Fireball: Touch and hold with one finger.
Kiss: Tap with two fingers.
Heartbeat: Touch and hold with two fingers.
Heartbreak: Touch and hold with two fingers until you see a heartbeat, then drag
down to break the heart.
Add a Digital Touch effect to a photo or video. Tap , then tap . Tap to take a
photo or to record a video. Add a Digital Touch effect, such as a sketch or kiss, to the
photo or video, then tap to send.
Handwritten messages
With iMessage, you can send a handwritten message. The recipient sees the message
animate, just as ink flows on paper.
Create and send a handwritten message. Tap the text field to see the onscreen
keyboard, then tap . Write a message with your finger. Tap Done, then tap to send
or to cancel.
Page 89

iPad User Guide
Page 89 of 292
Send a saved message. After you create and send a handwritten message, the message
is saved so you can use it again. Tap , then choose a saved message.
Remove a saved message. Touch and hold a handwritten message until the mess ages
jiggle, then tap in the top-left corner. When you finish, press the Home button.
iMessage apps
With iMessage apps, you can decorate a conversation with stickers, schedule dinner and
a movie, send payments, share a song, and more—all without leaving Messages. Expand
your options by downloading more iMessage apps from the App Store.
Download iMessage apps. Tap , tap , then tap Store.
Use an iMessage app. Tap , then swipe left or right to browse. Tap an app to add it to
the conversation. Add a comment if you want, then tap to send or to cancel.
Decorate with stickers. Tap to open the app drawer, then swipe left or right to
navigate to a stickers app. Touch and hold a sticker, then drag it anywhere in the
conversation. Before you release, you can:
Page 90

iPad User Guide
Page 90 of 292
Adjust the angle: Rotate a second finger around the finger dragging the sticker.
Adjust the size: Move a second finger closer to or away from the finger dragging the
sticker.
You can pla ce the st icker on to p o f a messag e b ubb le, pu t i t on another sti cker, or eve n
dress up a photo.
See text covered by a sticker. Double tap the sticker.
See sticker details. Touch and hold a sticker, then tap Sti cker Details. You c an:
See who sent the sticker.
View which iMessage app was used to send the sticker.
Delete the sticker—swipe left, then tap Delete.
Manage iMessage apps. Tap , tap , tap Store, then tap Manage. You can:
Automatically add iMessage apps to the app drawer.
Turn iMessage apps on or off.
Remove an iMessage app. Tap , tap , touch and hold an app until you see the app
icons jiggle, then tap in the top-right corner. When you finish, press the Home button.
Animate messages
With iMessage, you can animate a single message with a bubble effect or fill the entire
message screen with a full-screen effect. You can even send a personal message with
invisible ink.
Use a bubble effect. After you type a message, touch and hold . Tap the choices to
preview different bubble effects. Tap to send.
Page 91

iPad User Guide
Page 91 of 292
Tip: Want to send a personal message? When you use invisible ink, the message
remains blurred until the recipient swipes to reveal it.
Use a full-screen effect. After you type a message, touch and hold , then tap Screen.
Swipe left or right to preview different screen effects. Tap to send.
iMessage automatically uses the following screen effects for specific text strings:
Balloons for “Happy birthday”
Confetti for “Congratulations”
Fireworks for “Happy New Year”
Page 92

iPad User Guide
Page 92 of 292
Manage message notifications and privacy
Manage notifications for messages. Go to Settings > Notifications > Messages. See
.
Set the alert sound for messages. Go to Settings > Sounds > Text Tone. See
.
Assign different text tones for the special people in your life. Go to Contacts, select a
contact, tap Edit, then tap Text Tone. To allow alerts for messages sent by this contact
even when Do Not Disturb is on, turn on Emergency Bypass.
Mute notifications for a conversation. View the conversation, tap , then turn on Do
Not Disturb.
Block unwanted messages and FaceTime calls. View the conversation, tap , tap the
phone number or name to view the contact card, then scroll down and tap Block this
Caller. To view and manage your list of blocked phone numbers and contacts, go to
Settings > Messages > Blocked. For more information, see the Apple Support article
.
Filter iMessage messages from unknown senders. Go to Settings > Messages, then
turn on Filter Unknown Senders. This turns off iMessage notifications from senders who
aren't in your contacts and moves the messages to the Unknown Senders tab in the
Messages list.
You canʼ t o pen any li nks in a m essage from an un know n s end er unt il you add th e sender
to your contacts or reply to the message. If the message is spam, tap Report Junk (below
the message) to delete and send the message to Apple.
Notifications
Sounds
and silence
Block phone numbers and contacts or filter messages on your iPhone, iPad or
iPod touch
Page 93

iPad User Guide
Page 93 of 292
Safari
Browse the web
With Safari on iPad, you can browse the web, add webpages to your reading list to read
later, and add page icons to the Home screen for quick access. If you sign in to iCloud
with the same Apple ID on all your devices, you can see pages you have open on other
devices, and keep your bookmarks, history, and reading list up to date on your other
devices.
Look before you leap. To see the URL of a link before you go there, touch and hold the
link.
Page 94

iPad User Guide
Page 94 of 292
Open a link in a new tab. Touch and hold the link, then tap Open in New Tab. To
automatically switch to the new tab whenever you open a link in a new tab, go to
Settings > Safari, then turn off Open New Tabs In Background.
View two pages side-by-side. Turn iPad to landscape orientation, then do one of the
following:
Open a link in Split View: Touch and hold the link, then tap Open in Split View.
Open a blank page in Split View: Touch and hold , then tap Open Split View.
Open a link on the other side of Split View: Tap with two fingers on the link.
Move a tab to the other side of Split View: Drag the tab left or right from the tab bar.
Merge or close all tabs: Touch and hold again.
Browse open tabs. Tap , or pinch closed with three fingers to view all your open tabs.
If you have several open tabs, tabs for the same site are stacked.
Close a tab: Tap in the upper-left corner, or swipe the tab to the left.
Return to viewing a single tab: Tap a tab, tap Done, or pinch open with three fingers.
View tabs that are open on your other devices. If you sign in to iCloud with the same
Apple ID on all your devices, and you turn on Safari in Settings > [your name] > iCloud on
iPad, you can view tabs that are open on your other devices. Tap , then scroll to the list
at the bottom. To close a tab, swipe left, then tap Close.
View recently closed tabs. Touch and hold .
Get back to the top. Tap the top edge of the screen to quickly return to the top of a long
page.
See more of the page. Turn iPad to landscape orientation.
Refresh the page. Tap next to the address in the search field.
See a tabʼs history. Touch and hold or .
View the desktop version of a site. To se e the full desktop version of a si te instead of
the mobile version, tap , then tap Request Desktop Site.
Show or hide the tab bar. Go to Settings > Safari, then turn Show Tab Bar on or off.
Block pop-ups. Go to Settings > Safari, then turn Block Pop-ups on or off.
Page 95

iPad User Guide
Page 95 of 292
Search the web
Search the web. Enter a URL or search term in the search field at the top of the page,
then tap a search suggestion, or tap Go on the keyboard to search for exactly what you
typed. If you donʼt want to see suggested search terms, go to Settings > Safari, then turn
off Search Engine Suggestions (below Search).
Quickly search a site youʼve visited before. Enter the name of the site, followed by
your search term. For example, enter “wiki einstein” to search Wikipedia for “einstein.”
Go to Settings > Safari > Quick Website Search to turn this feature on or off.
See your favorites when you enter an address, search, or create a new tab. Go to
Settings > Safari > Favorites, then select the folder containing your favorites.
Search the page. To find a specific word or phrase on the cur rent page, tap , then tap
Find on Page. Enter the word or phrase in the search field to search. Tap to find other
instances.
Choose your search engine. Go to Settings > Safari > Search Engine.
Add bookmarks and favorites
Bookmark the current page. Tap (or touch and hold ), then tap Add Bookmark.
View and organize your bookmarks. Tap , then tap the Bookmarks tab. To create a
folder for bookmarks, tap Edit.
Add a webpage to your favorites. Open the page, tap , then tap Add to Favorites.
Quickly see your favorite and frequently visited sites. Tap the search field to see your
favorites. Scroll down to see frequently visited sites. (To avoid seeing a list of these sites,
go to Settings > Safari, then turn off Frequently Visited Sites.)
Edit your favorites. Tap , tap the Bookmarks tab, tap Favorites, then tap Edit to
delete, rename, or change the order of favorites.
Page 96

iPad User Guide
Page 96 of 292
Choose which favorites appear when you tap the search field. Go to Settings >
Safari > Favorites.
See your Mac bookmarks on iPad. Go to Settings > [your name] > iCloud, then turn on
Safari. Bookmarks on your Mac appear in Favorites on iPad.
Add an icon for the current page to your Home screen. To quic kly access the page
from your Home screen, tap , then tap Add to Home Screen. The icon appears only on
the device where you add it.
Save a reading list for later
Save interesting items in your reading list so you can revisit them later. You can read
pages in your reading list even when youʼre not connected to the Internet.
Add the current page to your reading list. Tap , then tap Add to Reading List.
Add a linked page without opening it. Touch a nd h old the link, then t ap Add to Reading
List.
View your reading list. Tap , then tap .
Delete an item from your reading list. In your reading list, swipe the item to the left.
Limit downloads to Wi-Fi connections (Wi-Fi + Cellular models). To prevent re adin g
list downloads from using cellular data, go to Settings > Safari, then turn off Use Cellular
Data (below Reading List).
Page 97

iPad User Guide
Page 97 of 292
Shared links and subscriptions
You can vie w l inks sh ared from soci al med ia, su ch as Twitter, a nd feed s yo uʼve
subscribed to.
View shared links and subscriptions. Tap , then tap .
Subscribe to a feed. On a site that provides a subscription feed, tap , then tap Add to
Shared Links.
Delete a subscription. Tap , tap , tap Subscriptions below the list of your shared
links, then tap next to the subscription you want to delete.
Share links. Tap .
Fill in forms
When you sign in to a website, sign up for a service, or make a purchase, you can fill in a
web form using the onscreen keyboard, or have Safari fill it in for you using AutoFill.
Page 98

iPad User Guide
Page 98 of 292
Turn on AutoFill. Go to Settings > Safari > AutoFill.
Tired of always having to sign in? When youʼre asked if you want to save the password
for the site, tap Yes. The next time you visit, your user name and password are filled in for
you.
Choose a different identity. If you use multiple identities with a site and an incorrect
identity is filled in, tap Passwords above the keyboard, then select the identity you prefer.
Fill in a form. Tap a field to bring up the keyboard. Tap or above the keyboard to
move from field to field.
Fill it in automatically. When you fill in contact information on a website that supports
AutoFill, tap AutoFill Contact above the keyboard. Tap Customize to edit and store your
information for next time. Or, tap Other Contact to fill in someone elseʼs information.
Add a credit card for purchases. Go to Settings > Safari > AutoFill > Saved Credit
Cards > Add Credit Card. To enter the information without typing, tap Use Camera, then
position iPad so that your card appears in the frame. Also, when you make an online
purchase, you can allow Safari to save the credit card information. See .
Use your credit card information. When you fill in credit card information, tap AutoFill
Credit Card above the keyboard. Enter your cardʼs security code, which isnʼt stored. For
greater security of your credit card information, for iPad.
Submit a form. Tap Go, Search, or the link on the webpage.
Use Reader for distraction-free reading
Use Safari Reader to view a page without ads, navigation, or other distracting items.
iCloud Keychain
use a passcode
Page 99

iPad User Guide
Page 99 of 292
Focus on content. Tap at the left end of the address field. If you donʼt see the icon,
Reader isnʼt available for the page youʼre looking at.
Share just the good stuff. To sh are j ust the article text and a l ink to it, tap while
viewing the page in Reader.
Return to the full page. Tap in the address field again.
Privacy and security
Adjust Safari settings to keep your browsing activities to yourself and protect yourself
from malicious websites.
Keep a low profile. Go to Settings > Safari, then turn on Do Not Track. Safari asks
websites you visit not to track your browsing, but beware—a website can choose not to
honor the request.
Control cookies. Go to Settings > Safari > Block Cookies. To remove cookies already on
iPad, go to Settings > Safari > Clear History and Website Data.
Let Safari create and store secure passwords for you. When creating a new account,
tap the password field, tap Suggest Password, then tap Use Suggested Password.
View your saved passwords. Go to Settings > Safari > Passwords, then enter your iPad
passcode or use Touch ID.
Erase your browsing history and data from iPad. Go to Settings > Safari > Clear
History and Website Data.
Visit sites without making history. Tap , then tap Private. Sites you visit arenʼt added
to History on iPad and donʼt appear in the list of tabs on your other devices. To hide the
sites and exit Private Browsing Mode, tap , then tap Private again. The sites reappear
the next time you use Private Browsing Mode.
Watch for suspicious websites. Go to Settings > Safari, then turn on Fraudulent
Website Warning.
Page 100

iPad User Guide
Page 100 of 292
Mail
Write messages
WARNING: For important information about avoiding distractions that could lead to
dangerous situations, see .
Create a message. Tap . Touch and hold to view draft messages youʼve saved.
Ask Siri. Say something like:
“New email to Jonah Schmidt”
“Email Simon and say I got the forms, thanks”
Add attachments. Double-tap in the message body, tap Add Attachment, then select
files from iCloud Drive.
Insert a photo or video. Double-tap in the message body, then tap Insert Photo or
Video. Also see .
Quote some text when you reply. Touch and hold in the message body, then s elec t the
text you want to include. Tap , then tap Reply. To turn off the indentation of the
quoted text, go to Settings > Mail > Increase Quote Level.
Send a message from a different account. Tap the From field to choose an account.
Important safety information
Type and edit text
 Loading...