


Nike + iPod
Sensor
KKApple Inc.
© 2009 Apple Inc. All rights reserved.
Apple, the Apple logo, iPod, iPod nano, iPod touch, and iTunes are trademarks of Apple Inc., registered in the U.S. and other countries. iPhone is a trademark of Apple Inc. iTunes Store is a service mark of Apple Inc., registered in the U.S. and other countries. NIKE and the
Swoosh Design are trademarks of NIKE, Inc. and its affiliates, and are used under license. The Nike + iPod Sport Kit is covered by one or more of U.S. patent numbers 6,018,705, 6,052,654, 6,493,652, 6,298,314, 6,611,789, 6,876,947, and 6,882,955, either alone or when used in combination with a Nike + iPod enabled iPod media player or iPhone.
Mention of third-party products is for informational purposes
only and constitutes neither an endorsement nor a recommendation. Apple assumes no responsibility with regard to the performance or use of these products. All understandings, agreements, or warranties, if any, take place directly between the vendors and the prospective users. Every effort has been made to ensure that the information in this manual is accurate. Apple is not responsible for printing or clerical errors.

Contents
4 Welcome to Nike + iPod
4Your Personal Workout Assistant
5Quick Start
11 Using Nike + iPod
11 Calibrating Nike + iPod
14Setting the Units of Distance
14Entering Your Weight
14Locking Your Device During a Workout
15Getting Spoken Feedback
16Using a PowerSong
16Pausing a Workout
17Receiving Calls During a Workout
18Changing Music During a Workout
18Sending Workouts to Nikeplus.com
19Reviewing Workouts on Your Device
20Creating Custom Workout Shortcuts
22Purchasing Nike+ Workouts
23Using a Nike+ Compatible Remote
24Linking to Another Sensor
25Putting the Nike + iPod Sensor to Sleep
26Important Safety Information
28Learning More, Service, and Support
3
Welcome to
Nike + iPod
Your Personal Workout Assistant
Nike + iPod is a workout partner and coach all in one. Select the type of workout you want— open-ended, distance, time, or calorie-burning— choose music to keep you motivated, and then keep track of your progress every step of the way with spoken and onscreen feedback. Upload your workout data to nikeplus.com, where you can set goals and monitor your improvement from
workout to workout. Join the world’s largest online running community, participating in challenges with runners from across the globe.
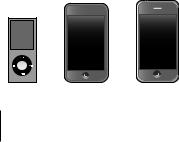
Nike + iPod is supported by iPhone 3G S, all iPod nano models, and iPod touch (2nd generation).
iPod nano |
iPod touch |
iPhone 3G S |
(all models) |
(second generation) |
|
4

Quick Start
Follow these instructions to get started using Nike + iPod right away.
Step 1: Enable Nike + iPod on your device. mm iPod nano: Attach the Nike + iPod receiver to
iPod nano. Nike + iPod appears in the main menu.
mm iPhone 3G S and iPod touch: Choose Settings > Nike + iPod and set it to On. A Nike + iPod icon appears on the Home screen.
Note: iPhone 3G S and iPod touch have an internal receiver; no externally attached receiver is required.
Step 2: Make sure you have the latest iPod and iTunes software.
1Download and install the latest iTunes software to your computer from www.apple.com/itunes. You need iTunes 7.0 or later.
2Connect the device to your computer, then select it in the iTunes sidebar and click Summary.
5

3If iTunes indicates your iPod needs an update, click Update and follow the onscreen instructions.
Step 3: Insert the Nike + iPod Sensor in your Nike+ ready shoe.
mm Lift the insole of the left shoe, remove the foam insert from the pocket underneath, and replace it with the sensor.
Lift the insole and place the sensor in the pocket, flat side up.
You can leave the sensor in your shoe when you aren’t working out, but if you plan to wear your shoes for a long time without working out, replace the sensor with the foam insert to save battery life. The battery in the sensor is not user-replaceable.
6

Step 4: Choose a type of workout.
An open-ended workout
ÂÂiPod nano: Choose Nike + iPod > New Workout > Basic.
ÂÂiPhone 3G S and iPod touch: Choose Nike + iPod > Basic.
A workout with a time goal
ÂÂiPod nano: Choose Nike + iPod > New Workout > Time.
ÂÂiPhone 3G S and iPod touch: Choose Nike + iPod > Time.
A workout with a distance goal
ÂÂiPod nano: Choose Nike + iPod > New Workout > Distance.
ÂÂiPhone 3G S and iPod touch: Choose Nike + iPod > Distance.
A workout with a calorie burning goal
ÂÂiPod nano: Choose Nike + iPod > Settings > Weight and enter your weight. Then click the Menu button and choose Nike + iPod > New Workout > Calorie.
ÂÂiPhone 3G S and iPod touch: Choose Settings >
Nike + iPod > Weight and enter your weight. Then press the Home button and choose Nike + iPod > Calorie.
Note: You need to enter your weight only the first time you start a calorie burning workout.
7

Step 5: Choose music to accompany your workout.
To play |
Do this |
A Nike+ Workout mix |
Choose the mix |
|
(see page 22). |
|
|
The currently playing song |
Choose Now Playing. |
|
|
Songs from a playlist |
Choose Playlists and then |
|
choose a playlist. |
|
|
Songs in random order |
Choose Shuffle Songs. |
|
|
No music |
Choose None. |
|
|
Step 6: Start your workout.
mm iPod nano: Press the Center button and begin walking or running.
mm iPhone 3G S and iPod touch: Tap Play and begin walking or running.
Step 7: Monitor your progress.
Nike + iPod automatically displays your workout status on the iPhone 3G S or iPod screen.
8
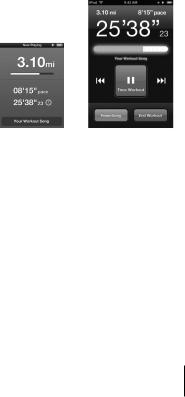
iPod nano |
iPhone 3G S |
|
and iPod touch |
Nike + iPod automatically gives you spoken feedback on your progress during your workout (see “Getting Spoken Feedback” on page 15). You can also get feedback whenever you want it.
To get spoken feedback manually:
mm iPod nano: Press the Center button at any time during your workout.
mm iPhone 3G S and iPod touch: Press the Home button at any time during your workout.
Note: iPhone 3G S and iPod touch must be locked to get spoken feedback manually (see “Getting Spoken Feedback” on page 15).
9

Step 8: End your workout.
You can end your workout at any time. If you continue working out after you reach your time, distance, or calorie goal, your progress continues to be monitored.
To end your workout:
mm iPod nano: Press the Play/Pause (’) button to pause your workout. Then press the Menu button and choose End Workout.
mm iPhone 3G S and iPod touch: Tap End Workout. If the device is locked, press the Home button and tap Pause. Then drag the slider and tap End Workout.
Your most recent workout data is stored for future reference.
Step 9: Track your progress at nikeplus.com.
At nikeplus.com you can track your progress over time, view a record of all of your past workouts, set and monitor goals, and compare your results with others. You can even compete with other online Nike + iPod users in workout challenges.
To send your workout data to nikeplus.com:
1Make sure your computer is connected to the Internet, and then connect iPhone 3G S or iPod to your computer.
10
2Click Send in the dialog that asks if you want to send your workout data to nikeplus.com. You can do it later if you don’t want to do it now.
3Click Visit in the dialog that asks if you want to go to nikeplus.com. The nikeplus.com website opens with your most recent workout graphed on the homepage.
4Click Save Your Runs, then click Sign Me Up and follow the onscreen instructions.
See “Sending Workouts to Nikeplus.com” on page 18 for more information.
Using Nike + iPod
Follow these instructions to get the most out of Nike + iPod.
Note: Some features are new with iPod nano (4th generation) and iPhone 3G S.
Calibrating Nike + iPod
The default calibration for Nike + iPod is accurate for many users. You can improve the accuracy by calibrating Nike + iPod to your natural running and walking style.
11
 Loading...