


Apple LED
Cinema Display

Apple Inc.
© 2008 Apple Inc. All rights reserved.
Under the copyright laws, this manual may not be
copied, in whole or in part, without the written consent
of Apple.
The Apple logo is a trademark of Apple Inc., registered
in the U.S. and other countries. Use of the “keyboard”
Apple logo (Option-Shift-K) for commercial purposes
without the prior written consent of Apple may
constitute trademark infringement and unfair
competition in violation of federal and state laws.
Every effort has been made to ensure that the
information in this manual is accurate. Apple is not
responsible for printing or clerical errors.
Apple
1 Infinite Loop
Cupertino, CA 95014-2084
408-996-1010
www.apple.com
Apple, the Apple logo, Apple Cinema Display, iChat,
iMovie, iPod, iSight, Mac, MacBook, MagSafe, and Photo
Booth are trademarks of Apple Inc., registered in the U.S.
and other countries.
iPhone is a trademark of Apple Inc.
Apple Store is a service mark of Apple Inc., registered in
the U.S. and other countries.
The Bluetooth
trademarks owned by Bluetooth SIG, Inc. and any use of
such marks by Apple is under license.
®
word mark and logos are registered
ENERGY STAR is a U.S. registered trademark.
Other company and product names mentioned herein
may be trademarks of their respective companies.
Mention of third-party products is for informational
purposes only and constitutes neither an endorsement
nor a recommendation. Apple assumes no responsibility
with regard to the performance or use of these
products.

Contents
7 Getting Started
8
Setting Up Your Display
10
Using Your Display
14
Care and Safety
15
Ergonomics
17
Troubleshooting Your Display
18
Learning More, Service, and Support
19
Specifications
21 Premiers contacts
22
Installation du moniteur
24
Utilisation du moniteur
28
Entretien et sécurité
29
Ergonomie
31
Dépannage du moniteur
32
Informations, services et assistance
33
Spécifications
3

35 Einführung
36
Einrichten Ihres Bildschirms
38
Verwenden des Bildschirms
42
Sicherheit und Pflege
44
Ergonomie
46
Fehlerbeseitigung
47
Weitere Informationen, Service und Support
48
Technische Daten
49 Introduzione
50
Installare il monitor
52
Utilizzare il monitor
56
Sicurezza e manutenzione
57
Disposizione dell’ambiente di lavoro
59
Risoluzione dei problemi del monitor
60
Ulteriori informazioni, servizio e supporto
61
Specifiche tecniche
63 Aan de slag
64
Het beeldscherm installeren
66
Het beeldscherm gebruiken
70
Voorzorgsmaatregelen en veiligheid
71
Ergonomie
73
Problemen met het beeldscherm oplossen
4
Contents

74
Meer informatie over service en ondersteuning
75
Specificaties
77 Primeros pasos
78
Instalación de la pantalla
80
Utilización de la pantalla
84
Mantenimiento y seguridad
85
Ergonomía
87
Solución de problemas con la pantalla
88
Más información, servicio y soporte
89
Especificaciones
91 Introduktion
92
Opstille skærmen
94
Bruge skærmen
98
Vedligeholdelse og sikkerhed
99
Ergonomi
101
Fejlfinding til skærmen
10 2
Flere oplysninger samt service og support
10 3
Specifikationer
10 5 Introdução
10 6
Instalação do monitor
10 8
Utilização do monitor
112
Cuidado e segurança
Contents
5

113
Ergonomia
115
Resolução de problemas do monitor
11 6
Mais informações, assistência e suporte
117
Especificações
119 Regulatory Compliance Information
12 0
Apple and the Environment
6
Contents

Getting Started
Your Apple LED Cinema Display is designed to work seamlessly
with the MacBook family of computers that have a Mini
DisplayPort connector. It features a 24-inch LED-backlit
widescreen display, a MagSafe connector to charge your
MacBook computer, a built-in iSight camera, a speaker system,
and a microphone.
The instructions on the following pages help you set up and use your new display,
including:
Â
Connecting the display to your computer
Â
Using the camera, microphone, speakers, and USB ports
Â
Adjusting your display’s settings
Important:
page 14) carefully before you first use your display.
For information about the specific computers and graphics cards that are compatible
with your display, go to www.apple.com/displays.
Read all the installation instructions (and the safety information starting on
English
7
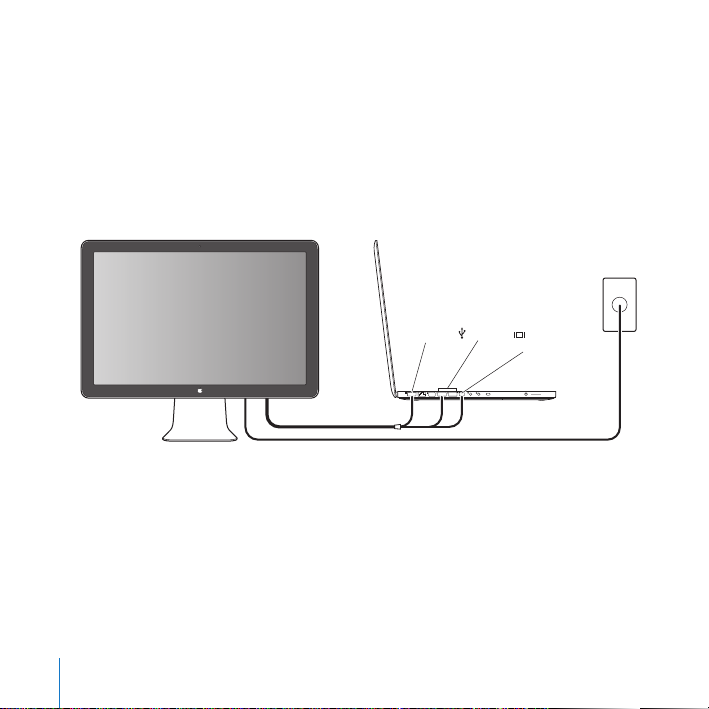
Setting Up Your Display
Follow these steps to set up your Apple LED Cinema Display:
1
Remove the protective film from the display and cables.
2
Insert the power cord into the display, and then insert the AC plug into a grounded
power outlet.
3
Connect the Mini DisplayPort cable to your computer, as shown below.
Apple LED Cinema Display
Mac portable
Power
outlet
MagSafe USB
4
Connect the USB cable to your computer to use the display’s built-in iSight camera,
Mini
DisplayPort
speakers, microphone, and USB ports.
5
Plug the MagSafe connector into the MagSafe power port on your computer to charge
the battery and provide power to your computer.
6
Press the power button on your computer to start it up. The display turns on
automatically when you start up your computer.
8
English

Setting Up Your Computer with the Lid Closed
You can close the lid of your computer and use just your Apple LED Cinema Display.
Follow the setup instructions on the previous page and make sure the MagSafe
connector from the display is plugged into the MagSafe power port on your computer.
To use your Apple LED Cinema Display with your computer’s display closed:
1
Connect an external USB keyboard and mouse to the USB port on your display or use
the Bluetooth® Setup Assistant to set up a wireless keyboard and mouse.
2
Make sure your computer is turned on.
3
Close the display on your computer to put it to sleep.
4
Wait a few seconds, and then press any key on the external keyboard or move the
mouse to wake your computer.
English
9
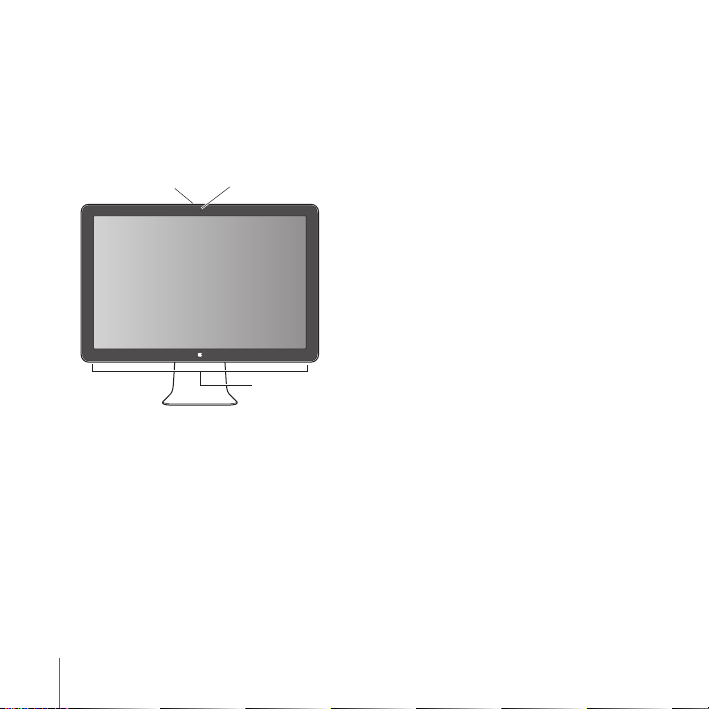
Using Your Display
Your Apple LED Cinema Display has a built-in iSight camera, microphone, and display
speaker system. The USB connection between the display and your computer enables
these features.
Built-in
Microphone
Setting Up Sound Input and Output
You can listen to music, movies, games, and multimedia files through the speaker
system on your display. You can use the microphone to record sounds, or talk with
friends using iChat. Use Sound preferences to manage sound input and output.
To set up sound input:
1
Choose Apple (
2
Click the Input tab in Sound preferences.
3
Choose Display Audio to input sound through your display’s microphone.
10
English
iSight camera
Display speaker system
) > System Preferences, and then click Sound.

To set up sound output:
1
Click the Output tab.
2
Choose Display Audio to hear sound through your display’s speaker system.
These sound settings are used whenever your computer is connected to your display.
They remain in effect until you change them.
Using the Built-in iSight
You can use the built-in iSight camera and microphone to capture still images, video,
and audio with applications such as iChat, iMovie, and Photo Booth.
To set up the camera and microphone with iChat:
1
Click the iChat icon in the Dock to open the iChat application.
2
Choose iChat > Preferences, and then click Audio/Video.
3
Choose Display iSight from the Camera pop-up menu.
4
Choose Display Audio from the Microphone pop-up menu.
Setting Up Your Apple LED Cinema Display as an Additional Display
When you leave your computer’s display open, you can mirror the same image on both
displays or use the displays as an extension of your desktop. Use Displays preferences
to set up video mirroring or extended desktop.
To set video mirroring or extended desktop:
1
Choose Apple (
2
Click Arrangement and follow the onscreen instructions.
) > System Preferences, and then click Displays.
English
11

Adjusting the Color and Brightness
You can use your Apple Keyboard to increase
your display. You can also use System Preferences to adjust the resolution, brightness,
and color settings.
To adjust the resolution, the number of colors, or the brightness of your display:
1
Choose Apple (
2
Click the Display tab.
3
Choose a resolution or color setting, or drag the Brightness slider to adjust the
) > System Preferences, and then click Displays.
brightness.
To change the display profile or calibrate your display:
1
Click the Color tab in Displays preferences.
2
Choose a display profile, or click Calibrate to open the Display Calibrator Assistant.
For more information about calibrating your display, choose Help > Mac Help in the
menu bar, and search for “calibrate.”
12
English
()
or decrease
()
the brightness of

Using the USB Ports and Security Slot
Your display has three powered USB ports on the back. Use these ports to connect a
mouse, keyboard, iPhone, iPod, or other USB peripheral. Make sure the display’s USB
cable is connected to your computer.
USB ports
Security slot
To secure your display, use the security slot to attach a locking cable.
Using a VESA Mounting Solution with Your Display
You can attach your display to an alternative mounting solution, using the VESA Mount
Adapter kit available from the Apple Online Store at www.apple.com/store. Use the kit
to attach your display to any available VESA-compatible mounting solution. Simply
follow the instructions included with the kit.
English
13
Care and Safety
Before you lift or reposition your display, you may need to disconnect the cables and
power cord. Use correct lifting techniques when positioning the display. When lifting or
carrying the display, hold it by the edges. Don’t lift the display by the stand or the cord.
To clean the screen on your display:
1
Disconnect the power cord.
2
Use the cloth that came with your display or another soft, dry cloth to wipe
dust from the screen.
WARNING:
Don’t clean the screen with a cleaner containing alcohol or acetone. Use a
cleaner intended for use with a screen or display. Never spray cleaner directly on the
screen. It may drip inside the display and cause damage.
Follow these safety guidelines for using your display:
Â
The only way to completely disconnect power is to unplug the power cord. Be sure
to pull the plug, not the cord.
Â
Disconnect power immediately if the power cord is frayed or damaged, if you spill
something on the display, or if the display falls or is damaged in some other way.
WARNING:
Use only the power cord that came with your display. The power cord has
a three-wire grounding plug (a plug that has a third grounding pin) that fits only a
grounded AC outlet. If you are unable to insert the plug into an outlet because the
outlet is not grounded, contact a licensed electrician to replace the outlet with a
properly grounded outlet.
14
English

WARNING:
Your display is a high-voltage component and should not be opened for
any reason, even when it’s unplugged. If your display needs service, see “Learning
More, Service, and Support” on page 18.
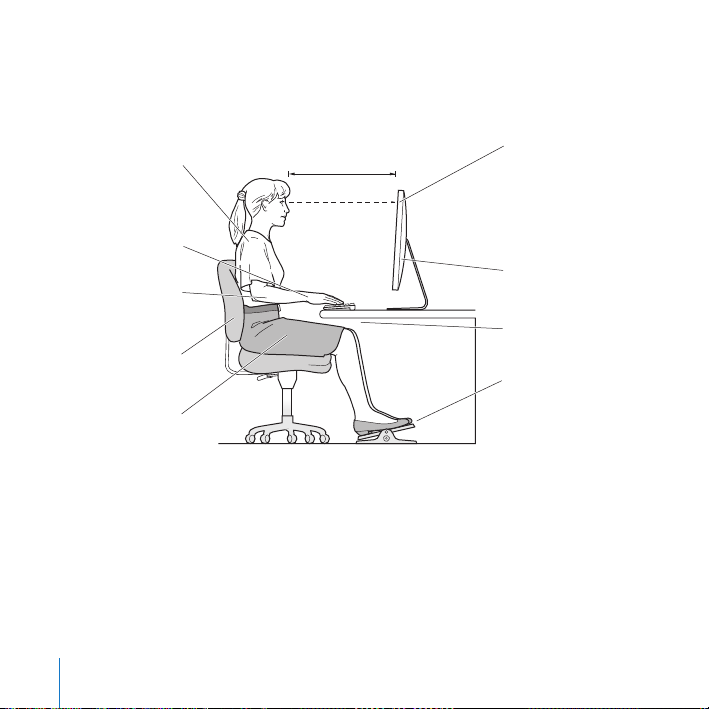
Ergonomics
Here are some guidelines for adjusting your display to reduce glare and to
accommodate your physical size and shape.
Â
Arrange the display so that the top of the screen is slightly below your eye level
when you’re sitting at the keyboard. The best distance from your eyes to the screen is
up to you, although most people tend to prefer 18 to 28 inches (45 to 70 cm).
English
15

Â
Position the display by tilting it up or down to minimize glare and reflections from
overhead lights and nearby windows.
Shoulders
relaxed
Forearms and
hands in a
straight line
Forearms level
or tilted slightly
Lower back
supported
Thighs tilted
slightly
18–28 in. (45–70 cm)
Top of the screen at or
slightly below eye level
(You may need to adjust
the height of your display
by raising or lowering
your work surface)
Screen positioned to
avoid reflected glare
Clearance under
work surface
Feet flat on the floor
or on a footrest
For more information about health, safety, and maintenance, go to the Apple
ergonomic website at www.apple.com/about/ergonomics.
16
English

Troubleshooting Your Display
Before performing any of these steps, make sure your computer is turned on, the
display is plugged into an outlet, all the cables are connected properly to your
computer and display, and your computer is not in sleep mode.
If the screen doesn’t have an image:
 Check the cables and connectors again to make sure they are connected properly to
your computer and the display.
 Make sure your computer is turned on and is not in sleep mode. If your computer’s
display is closed, use the external keyboard or mouse to wake the computer from
sleep.
 Reset the PRAM by restarting your computer while holding down the Command (x),
Option, P, and R keys until you hear the startup sound a second time.
If the screen is dim:
 Make sure the display brightness controls are set properly. Choose Apple () >
System Preferences and click Displays. Drag the Brightness slider to adjust the
brightness.
 If the colors on the display are too saturated or not correct, you may need to calibrate
your display. Open Displays preferences, click Color, click Calibrate, and follow the
instructions.
If your portable computer isn’t charging:
Make sure the MagSafe connector from your display is seated properly in the MagSafe
power port on your computer.
English
17
If the built-in iSight camera, microphone, speakers, or USB ports on the display
aren’t working:
Make sure the USB cable from the display is firmly plugged into the USB port on your
computer. The display’s camera, microphone, speakers, and USB ports work only when
this cable is attached to your computer.
More Troubleshooting Information
You can find more troubleshooting information on the Displays support website at:
www.apple.com/support/displays
Learning More, Service, and Support
You can find more information about your display on the Apple website and in
Mac Help.
To learn about Do this
Using your display Choose Help > Mac Help in the menu bar, and search for
Displays service, support,
discussions, troubleshooting,
and software downloads
The latest information about
displays
Registering your display Go to: www.apple.com/register
18 English
“displays.”
Go to: www.apple.com/support/displays
Go to: www.apple.com/displays

Specifications
 Model number: A1267
 Resolution: 1920 x 1200 @ 60 Hz
 Ports: Three USB 2.0 ports on the back
 Camera and microphone: Built-in iSight camera with microphone
 Speakers: Built-in 2.1 speakers with 12 W output
Dimensions:
 Weight: 20.92 lb. (9.49 kg)
 Height: 18.84 inches (478.38 mm)
 Width: 22.57 inches (573.22 mm)
 Depth (with stand): 7.76 inches (197.10 mm)
 Viewable: 24 inches (609.60 mm) diagonal
Operating environment:
 Operating temperature: 50° to 95° F (10° to 35° C)
 Relative humidity: 20% to 80% (noncondensing)
 Altitude: 0 to 10,000 feet (0 to 3048 meters)
English 19


Premiers contacts
Votre moniteur Apple LED Cinema Display est conçu pour fonctionner parfaitement avec la famille d’ordinateurs MacBook
possédant un connecteur Mini DisplayPort. Il comprend un moniteur à écran large à rétro-éclairage par diode électroluminescente
de 24 pouces, un connecteur MagSafe pour recharger votre ordinateur MacBook, une caméra iSight intégrée, un système de hautparleurs et un micro.
Les instructions des pages suivantes vous permettent de configurer et d’utiliser votre
nouveau moniteur et de :
 brancher le moniteur sur votre ordinateur ;
 utiliser la caméra, le micro, les haut-parleurs et les ports USB ;
 régler votre moniteur.
Important : lisez soigneusement toutes les instructions d’installation (et les consignes
de sécurité à partir de la page 28) avant d’utiliser votre moniteur pour la première fois.
Pour en savoir plus sur les ordinateurs et les cartes graphiques compatibles avec votre
moniteur, rendez-vous sur www.apple.com/fr/displays.
Français 21

Installation du moniteur
Suivez ces étapes afin de configurer votre moniteur Apple LED Cinema Display:
1 Retirez le film protecteur du moniteur et des câbles.
2 Branchez le câble d’alimentation sur le moniteur, puis la fiche CA dans une prise
de courant avec mise à la terre.
3 Branchez le câble Mini DisplayPort sur votre ordinateur, comme illustré ci-dessous.
Moniteur Apple LED Cinema Display
Portable Mac
Prise
d’alimentation
MagSafe USB
Mini
DisplayPort
4 Branchez le câble USB sur votre ordinateur pour utiliser la caméra iSight, les haut-parleurs,
le micro et les ports USB intégrés du moniteur.
5 Branchez le connecteur MagSafe sur le port secteur MagSafe de votre ordinateur
pour recharger la batterie et alimenter votre ordinateur.
6 Appuyez sur le bouton d’alimentation de l’ordinateur pour l’allumer. Le moniteur
s’allume automatiquement lorsque vous mettez l’ordinateur sous tension.
22 Français

Installation de votre ordinateur avec le couvercle fermé
Vous pouvez fermer le couvercle de votre ordinateur et utiliser votre moniteur Apple LED
Cinema Display. Suivez les instructions d’installation à la page précédente et assurez-vous
que le connecteur MagSafe du moniteur est branché sur le port secteur MagSafe de votre
ordinateur.
Pour utiliser votre moniteur Apple LED Cinema Display avec le moniteur de votre
ordinateur fermé :
1 Branchez un clavier et une souris USB externes sur le port USB de votre moniteur ou
utilisez l’Assistant réglages Bluetooth® pour installer un clavier et une souris sans fil.
2 Assurez-vous que votre ordinateur est activé.
3 Fermez le moniteur de votre ordinateur pour le mettre en mode veille.
4 Attendez quelques secondes, puis appuyez sur n’importe quelle touche du clavier
externe ou déplacez la souris pour réactiver votre ordinateur.
Français 23

Utilisation du moniteur
Votre moniteur Apple LED Cinema Display possède une caméra iSight, un micro et un
système de haut-parleurs intégrés. La connexion USB entre le moniteur et votre ordinateur active ces fonctionnalités.
Caméra iSight
Microphone
Configuration de l’entrée et de la sortie audio
Vous pouvez écouter de la musique, des films, des jeux et des fichiers multimédia grâce
au système de haut-parleurs de votre moniteur. Le micro vous permet d’enregistrer des
sons ou de parler avec des amis à l’aide d’iChat. Utilisez les Préférences audio pour gérer
l’entrée et la sortie audio.
Pour configurer l’entrée audio :
1 Sélectionnez le menu Pomme () > Préférences Système puis cliquez sur Son.
2 Cliquez sur l’onglet Entrée dans Préférences audio.
24 Français
intégrée
Système de haut-parleurs de l’écran

3 Sélectionnez Audio du moniteur pour utiliser le micro de votre moniteur comme
entrée audio.
Pour configurer la sortie audio :
1 Cliquez sur l’onglet Sortie.
2 Sélectionnez Audio du moniteur pour utiliser le système de haut-parleurs de votre
moniteur comme sortie audio.
Ces réglages sonores sont utilisés chaque fois que votre ordinateur est connecté
à votre moniteur. Ils restent actifs jusqu’à ce que vous les modifiiez.
Utilisation de la caméra iSight intégrée
La caméra iSight et le microphone intégrés vous permettent de capturer des images,
de la vidéo et de l’audio avec des applications comme iChat, iMovie et Photo Booth.
Pour configurer la caméra et le micro avec iChat :
1 Cliquez sur l’icône iChat dans le Dock pour ouvrir l’application iChat.
2 Choisissez iChat > Préférences, puis cliquez sur Audio/Vidéo.
3 Choisissez iSight du moniteur dans le menu local Caméra.
4 Choisissez Audio du moniteur dans le menu local Micro.
Configuration de votre Apple LED Cinema Display comme moniteur supplémentaire
Lorsque vous gardez le moniteur de votre ordinateur ouvert, vous pouvez afficher la même
image sur les deux moniteurs ou bien les utiliser comme extension de votre bureau.
Utilisez Préférences Moniteurs pour configurer la recopie vidéo ou le bureau étendu.
Français 25

Pour configurer la recopie vidéo ou le bureau étendu :
1 Sélectionnez le menu Pomme () > Préférences Système puis cliquez sur Moniteurs.
2 Cliquez sur Disposition et suivez les instructions à l’écran.
Réglage de la couleur et de la luminosité
Vous pouvez utiliser votre clavier Apple Keyboard pour augmenter () ou réduire ()
la luminosité de votre moniteur. Les Préférences Système vous permettent également
de régler la résolution, la luminosité et la balance des couleurs.
Pour régler la résolution, le nombre de couleurs ou la luminosité de votre écran :
1 Sélectionnez le menu Pomme () > Préférences Système puis cliquez sur Moniteurs.
2 Cliquez sur l’onglet Moniteur.
3 Choisissez un réglage de résolution ou de couleur ou faites glisser le curseur pour régler
la luminosité.
Pour changer le profil de moniteur ou étalonner votre moniteur :
1 Cliquez sur l’onglet Couleur dans Préférences Moniteurs.
2 Choisissez un profil de moniteur ou cliquez sur Étalonner pour ouvrir l’assistant de l’outil
d’étalonnage du moniteur.
Pour en savoir plus sur l’étalonnage de votre moniteur, sélectionnez Aide > Aide Mac
dans la barre des menus et effectuez une recherche sur « étalonner ».
26 Français

Utilisation des ports USB et du logement de sécurité
Votre moniteur présente trois ports USB à l’arrière. Utilisez-les pour brancher une souris,
un clavier, un iPhone, un iPod ou d’autres périphériques USB. Assurez-vous que le câble
USB du moniteur est branché sur votre ordinateur.
Ports USB
Logement de sécurité
Pour protéger votre moniteur, utilisez le logement de sécurité pour attacher un câble
de sécurité.
Utilisation d’une solution de montage VESA avec votre moniteur
Il est possible d’utiliser d’autres configurations de montage à l’aide du kit VESA Mount
Adapter en vente sur l’Apple Store en ligne à l’adresse www.apple.com/fr/store. Utilisez
ce kit pour connecter votre moniteur à n’importe quelle configuration de montage compatible avec la norme VESA. Suivez les instructions qui accompagnent le kit de montage.
Français 27

Entretien et sécurité
Avant de soulever ou déplacer votre moniteur, il peut s’avérer nécessaire de débrancher
les différents câbles, dont le câble d’alimentation. Lorsque vous soulevez ou déplacez le
moniteur, utilisez la méthode la plus adéquate. Tenez-le toujours par les côtés, jamais par
le support ou le câble d’alimentation.
Pour nettoyer votre écran, procédez comme suit :
1 Débranchez le câble d’alimentation.
2 Utilisez le tissu fourni avec le moniteur ou tout autre tissu doux et sec pour dépoussiérer
l’écran.
AVERTISSEMENT : ne nettoyez pas l’écran à l’aide d’un produit nettoyant contenant
de l’alcool ou de l’acétone. Utilisez un produit destiné à nettoyer les écrans. Ne projetez
jamais directement le produit nettoyant directement sur l’écran. Le produit risque de
s’infiltrer à l’intérieur du moniteur et d’entraîner des dégâts.
Suivez ces consignes de sécurité lors de l’utilisation de votre moniteur :
 Le seul moyen de couper entièrement l’alimentation est de débrancher le câble
d’alimentation. Ce faisant, veillez à tirer sur la prise et non sur le câble.
28 Français
 Coupez immédiatement l’alimentation si le câble d’alimentation est détérioré, si vous avez
renversé un liquide sur le moniteur, ou si ce dernier est tombé ou a subi une détérioration.
AVERTISSEMENT : utilisez uniquement le câble d’alimentation fourni avec votre moni-
teur. Le câble d’alimentation est constitué d’une prise de terre à trois fils (une prise
équipée d’une troisième broche reliée à la masse) que vous ne pouvez brancher qu’à
une prise de courant alternatif. Si vous ne parvenez pas à insérer la fiche dans une prise
parce que celle-ci n’est pas mise à la terre, contactez un électricien agréé qui se chargera de remplacer la prise par une prise mise à la terre adéquate.
AVERTISSEMENT : votre moniteur est un composant haute tension et ne doit être
ouvert ou démonté sous aucun prétexte, même s’il est débranché. Si votre moniteur
doit être révisé ou réparé, voir « Informations, services et assistance » à la page 32.
Ergonomie
Veuillez trouver ci-après quelques recommandations pour régler votre moniteur pour
réduire la luminosité et pour placer le moniteur de façon à respecter votre morphologie.
 Disposez le moniteur de façon à ce que la partie supérieure soit située légèrement en
dessous de vos yeux lorsque vous êtes assis(e) devant le clavier de l’ordinateur. Il vous
appartient de juger de la meilleure distance entre vos yeux et l’écran. Elle se situe en
général entre 45 et 70 cm.
Français 29
 Positionnez le moniteur en le faisant pivoter vers le haut ou le bas pour limiter
tout éblouissement ou reflet sur l’écran, notamment lorsque l’écran est placé
sous un éclairage ou près d’une fenêtre.
Épaules
détendues
Mains dans le
prolongement
des avant-bras
Avant-bras à
l’horizontale ou
légèrement relevés
Dossier soutenant
la région lombaire
Cuisses
légèrement
inclinées
45–70 cm
Haut de l’écran au niveau
des yeux ou légèrement
en dessous. (Vous devrez
peut-être ajuster la hauteur
du moniteur en surélevant
votre plan de travail ou
le moniteur lui-même.)
Écran orienté de manière
à réduire les reflets
Espace dégagé sous
le plan de travail
Pieds à plat sur le sol
ou sur un repose-pied
Pour en savoir plus sur la santé, la sécurité et l’entretien du moniteur, rendez-vous sur le
site web d’Apple consacré à l’ergonomie à l’adresse www.apple.com/fr/about/ergonomics.
30 Français

Dépannage du moniteur
Avant d’effectuer les étapes ci-dessous, vérifiez que votre ordinateur est allumé, que
le moniteur est branché sur une prise, que tous les câbles sont correctement branchés
entre votre ordinateur et le moniteur et que l’ordinateur n’est pas en mode veille.
Si aucune image n’apparaît à l’écran :
 Vérifiez à nouveau que les câbles et les connecteurs sont correctement branchés
sur l’ordinateur et le moniteur.
 Assurez-vous que votre ordinateur est allumé et non en mode veille. Si le moniteur de
votre ordinateur est fermé, utilisez le clavier ou la souris externe pour réactiver l’ordinateur.
 Réinitialisez la PRAM en redémarrant votre ordinateur tout en maintenant les touches
Commande (x), Option, P, et R enfoncées jusqu’à ce que vous entendiez le signal de
démarrage une seconde fois.
Si l’écran n’est pas suffisamment éclairé :
 Vérifiez que les commandes de luminosité du moniteur sont correctement réglées.
Sélectionnez le menu Pomme () > Préférences Système, puis cliquez sur Moniteurs.
Faites glisser le curseur pour régler la luminosité.
 Si les couleurs s’affichant sur le moniteur sont trop saturées ou sont incorrectes,
il peut s’avérer judicieux de l’étalonner . Ouvrez les préférences Moniteurs, cliquez
sur Couleur, puis sur Étalonner et suivez les instructions.
Si votre ordinateur portable ne se recharge pas :
Assurez-vous que le connecteur MagSafe de votre moniteur est correctement branché
sur le port secteur MagSafe de votre ordinateur.
Français 31

Si la caméra iSight, le micro, les haut-parleurs et les ports USB intégrés au moniteur
ne fonctionnent pas :
Assurez-vous que le câble USB du moniteur est correctement branché sur le port USB
de votre ordinateur. La caméra, le micro, les haut-parleurs et les ports USB du moniteur
ne fonctionnent que lorsque ce câble est branché sur votre ordinateur.
Autres informations de dépannage
D’autres renseignements concernant le dépannage sont disponibles sur le site web
d’assistance des moniteurs à l’adresse suivante : www.apple.com/fr/support/displays.
Informations, services et assistance
Vous trouverez des renseignements complémentaires à propos de votre moniteur
sur le site web d’Apple et dans l’Aide Mac.
Pour Procédez comme suit
Utilisation du moniteur Sélectionnez Aide > Aide Mac dans la barre des menus,
Service, assistance, forums
de discussion, dépannage et
téléchargements de logiciels
pour les moniteurs
Les toutes dernières informations sur les moniteurs
Enregistrement du moniteur Rendez-vous à l’adresse : www.apple.com/fr/register.
32 Français
puis recherchez « moniteur ».
Rendez-vous à l’adresse :
www.apple.com/fr/support/displays.
Rendez-vous à l’adresse : www.apple.com/fr/displays.

Spécifications
 Numéro de modèle : A1267
 Résolution : 1920 x 1200 à 60 Hz
 Ports : trois ports USB 2.0 à l’arrière
 Caméra et micro : caméra iSight intégrée avec micro
 Haut-parleurs : haut-parleurs 2.1 intégrés avec sortie de 12 W
Dimensions :
 Poids : 9,49 kg (20,92 livres)
 Hauteur : 478,38 mm (18,84 pouces)
 Largeur : 573,22 mm (22,57 pouces)
 Profondeur (support compris): 197,10 mm (7,76 pouces)
 Diagonale visible : 609,60 mm (24 pouces)
Environnement de fonctionnement :
 Température de fonctionnement : 10 °C à 35 °C
 Humidité relative : 20 % à 80 % (sans condensation)
 Altitude : 0 à 3 048 mètres (0 à 10 000 pieds)
Français 33


Einführung
Ihr Apple LED Cinema Display ist speziell für die Verwendung mit MacBook-Computern konzipiert, die einen Mini
DisplayPort-Anschluss besitzen. Bei diesem Gerät handelt
sich um ein 24"-LED-Display mit Hintergrundbeleuchtung,
das einen MagSafe-Anschluss zum Aufladen Ihres MacBookComputers, eine integrierte iSight-Kamera, ein Lautsprechersystem und ein Mikrofon besitzt.
Die Anleitungen auf den folgenden Seiten helfen Ihnen bei der Einrichtung und
Verwendung Ihres neuen Displays. Sie finden Informationen zum
 Anschließen des Bildschirms an Ihren Computer
 Verwenden der Kamera, des Mikrofons, der Lautsprecher und der USB-Anschlüsse
 Anpassen der Einstellungen Ihres Bildschirms
Wichtig: Lesen Sie alle Installationsanleitungen (und die Informationen zur Sicherheit
ab Seite 42) sorgfältig durch, bevor Sie Ihr Display zum ersten Mal verwenden.
Weitere Informationen zu bestimmten Computern und Grafikkarten, die mit Ihrem
Display kompatibel sind, finden Sie unter: www.apple.com/de/displays.
Deutsch 35

Einrichten Ihres Bildschirms
Gehen Sie wie im Folgenden beschrieben vor, um Ihr Apple LED Cinema Display
einzurichten:
1 Entfernen Sie die Schutzfolie von Bildschirm und Kabeln.
2 Schließen Sie das Netzkabel an den Bildschirm und dann den Netzstecker an eine
geerdete Steckdose an.
3 Verbinden Sie das Mini DisplayPort-Kabel wie unten gezeigt mit Ihrem Computer.
Apple LED Cinema Display
Mac-Mobilcomputer
Steck-
dose
MagSafe USB
Mini
DisplayPort
4 Schließen Sie das USB-Kabel an Ihren Computer an, um die integrierte iSight-Kamera,
die Lautsprecher, das Mikrofon und die USB-Anschlüsse des Bildschirms verwenden
zu können.
5 Schließen Sie den MagSafe-Stecker an den MagSafe-Netzanschluss Ihres Computers an,
um die Batterie aufzuladen und den Computer mit Strom zu versorgen.
36 Deutsch

6 Drücken Sie den Ein-/Ausschalter am Computer, um ihn zu starten. Der Bildschirm wird
automatisch eingeschaltet, wenn Sie Ihren Computer einschalten.
Konfigurieren des Computers mit geschlossenem Bildschirm
Sie können den Bildschirm Ihres Computers schließen und nur Ihr Apple LED Cinema
Display verwenden. Befolgen Sie die Anleitungen auf der vorherigen Seite und vergewissern Sie sich, dass der MagSafe-Stecker des Bildschirms am MagSafe-Netzanschluss
des Computers angeschlossen ist.
Gehen Sie wie folgt vor, um Ihr Apple LED Cinema Display mit Ihrem Computer zu
verwenden, wenn dessen Bildschirm geschlossen ist:
1 Schließen Sie eine externe USB-Tastatur und -Maus an den USB-Anschluss Ihres Bild-
schirms an oder verwenden Sie den Bluetooth®-Assistenten, um eine drahtlose Tastatur oder Maus zu konfigurieren.
2 Stellen Sie sicher, dass Ihr Computer eingeschaltet ist.
3 Schließen Sie den Bildschirm Ihres Computers, um den Ruhezustand zu aktivieren.
4 Warten Sie einige Sekunden und drücken Sie dann eine beliebige Taste auf der
externen Tastatur oder bewegen Sie die Maus, um den Ruhezustand des Computers
zu beenden.
Deutsch 37

Verwenden des Bildschirms
Ihr Apple LED Cinema Display besitzt eine integrierte iSight-Kamera, ein Mikrofon
und ein Lautsprechersystem. Diese Funktionen werden durch die USB-Verbindung
zwischen Display und Computer aktiviert.
Integrierte
Mikrofon
Konfigurieren der Toneingabe und -ausgabe
Über das Lautsprechersystem Ihres Displays können Sie Musik oder den Ton von
Filmen, Spielen und Multimedia-Dateien hören. Mithilfe des Mikrofons können Sie
Töne aufzeichnen oder sich via iChat mit Freunden unterhalten. Verwenden Sie die
Systemeinstellung „Ton“, um die Toneingabe und -ausgabe zu steuern.
38 Deutsch
iSight-Kamera
Display-Lautsprechersystem

Gehen Sie wie folgt vor, um die Toneingabe zu konfigurieren:
1 Wählen Sie „Apple“ () > „Systemeinstellungen“ und klicken Sie auf „Ton“.
2 Klicken Sie in der Systemeinstellung „Ton“ auf „Eingabe“.
3 Wählen Sie „Display-Audio“, um die Toneingabe über das Mikrofon des Bildschirms
zu aktivieren.
Gehen Sie wie folgt vor, um die Tonausgabe zu konfigurieren:
1 Klicken Sie auf „Ausgabe“.
2 Wählen Sie „Display-Audio“, um die Tonwiedergabe über das Lautsprechersystem
des Bildschirms zu aktivieren.
Diese Toneinstellungen werden nun immer dann verwendet, wenn Sie Ihren Computer
an Ihr Display anschließen. Sie bleiben solange gültig, bis Sie sie ändern.
Verwenden der integrierten iSight-Kamera
Sie können die integrierte iSight-Kamera und das eingebaute Mikrofon verwenden, um
Standbilder, Videos und Audioelemente mithilfe von Programmen wie iChat, iMovie
und Photo Booth aufzunehmen.
Gehen Sie wie folgt vor, um die Kamera und das Mikrofon mit iChat zu konfigurieren:
1 Klicken Sie auf das iChat-Symbol im Dock, um das Programm „iChat“ zu öffnen.
2 Wählen Sie „iChat“ > „Einstellungen“ und klicken Sie auf „Audio/Video“.
3 Wählen Sie „Display-iSight“ aus dem Einblendmenü „Kamera“.
4 Wählen Sie „Display-Audio“ aus dem Einblendmenü „Mikrofon“.
Deutsch 39

Einrichten des Apple LED Cinema Display als zweiten Bildschirm
Wenn Sie den Bildschirm Ihren Computers geöffnet lassen, können Sie auf beiden Bildschirmen dasselbe Bild anzeigen oder Ihren Schreibtisch so erweitern, dass er auf beiden Bildschirmen zu sehen ist. Verwenden Sie die Systemeinstellung „Monitore“, um die
Funktion „Bildschirme synchronisieren“ oder „Erweiterter Schreibtisch“ einzurichten.
Gehen Sie wie folgt vor, um die Funktion zum Synchronisieren der Bildschirme oder
für den erweiterten Schreibtisch einzurichten:
1 Wählen Sie „Apple“ () > „Systemeinstellungen“ und klicken Sie auf „Monitore“.
2 Klicken Sie auf „Anordnen“ und befolgen Sie die Anleitungen auf dem Bildschirm.
Anpassen von Farbe und Helligkeit
Mit Ihrem Apple Keyboard können Sie die Helligkeit Ihres Displays erhöhen () oder
verringern (). Verwenden Sie die Systemeinstellungen, um die Einstellungen für Auf-
lösung, Helligkeit und Farbe anzupassen.
Gehen Sie wie folgt vor, um die Auflösung, die Anzahl der Farben oder die Helligkeit
Ihres Bildschirms einzustellen:
1 Wählen Sie „Apple“ () > „Systemeinstellungen“ und klicken Sie auf „Monitore“.
2 Klicken Sie auf „Monitor“.
3 Wählen Sie eine Auflösung oder eine Farbeinstellung aus oder bewegen Sie die Hellig-
keitsregler, um die Helligkeit einzustellen.
40 Deutsch

Gehen Sie wie folgt vor, um das Profil für den Bildschirm zu ändern oder den Bildschirm zu kalibrieren:
1 Klicken Sie in der Systemeinstellung „Monitore“ auf „Farbe“.
2 Wählen Sie ein Monitorprofil aus oder klicken Sie auf „Kalibrieren“, um den Kalibrie-
rungsassistenten zu öffnen.
Weitere Informationen zum Kalibrieren Ihres Bildschirms können Sie anzeigen, indem
Sie in der Menüleiste „Hilfe “> „Mac-Hilfe“ wählen und nach „Kalibrieren“ suchen.
Verwenden der USB-Anschlüsse und der Diebstahlsicherung
Ihr Display besitzt an der Rückseite drei USB-Anschlüsse mit integrierter Stromversorgung. An diesen Anschlüssen können Sie eine Maus, eine Tastatur, ein iPhone, einen
iPod oder andere USB-Geräte anschließen. Stellen Sie sicher, dass das USB-Kabel des
Bildschirms an Ihrem Computer angeschlossen ist.
USB-Anschlüsse
Anschluss für die
Diebstahlsicherung
Schließen Sie ein Sicherungskabel an der Diebstahlsicherung an, um Ihr Display vor
Diebstahl zu schützen.
Deutsch 41

Verwenden einer VESA-Befestigungslösung für Ihr Display
Mithilfe des VESA Mount Adapter-Kit steht Ihnen auch eine alternative Möglichkeit zum
Aufstellen bzw. Anbringen Ihres Bildschirms zur Verfügung. Das VESA Mount AdapterKit erhalten Sie online im Apple Store unter: www.apple.com/de/store. Mit diesem Kit
können Sie Ihren Bildschirm an jede beliebige VESA-kompatible Befestigungslösung
anbringen. Befolgen Sie dazu einfach die dem VESA Mount Adapter-Kit beiliegenden
Anleitungen.
Sicherheit und Pflege
Vor dem Anheben oder Neupositionieren Ihres Bildschirms müssen Sie möglicherweise die Verbindungskabel und das Netzkabel vom Bildschirm abziehen. Beachten Sie
beim Aufstellen des Bildschirms die empfohlenen Techniken zum Anheben des Geräts.
Fassen Sie den Bildschirm beim Anheben oder Transportieren an den Kanten. Heben
Sie den Bildschirm nicht am Aufstellfuß oder Kabel an.
Gehen Sie wie folgt vor, um die Bildschirmoberfläche zu reinigen:
1 Ziehen Sie das Netzkabel heraus.
2 Entfernen Sie mit dem beiliegenden Tuch oder einem anderen weichen, trockenen
Tuch den Staub von der Bildschirmoberfläche.
ACHTUNG: Reinigen Sie den Bildschirm nicht mit einem alkohol- oder azetonhaltigen
Reinigungsmittel. Verwenden Sie nur Reiniger, die speziell für Bildschirme vorgesehen sind. Sprühen Sie den Reiniger niemals direkt auf die Bildschirmoberfläche. Die
Flüssigkeit könnte in das Bildschirmgehäuse gelangen und das Gerät beschädigen.
42 Deutsch

Beachten Sie die folgenden Sicherheitsrichtlinien für die Verwendung Ihres
Bildschirms:
 Die einzige Möglichkeit, die Stromzufuhr vollständig zu unterbrechen, besteht darin,
den Netzstecker zu ziehen. Achten Sie darauf, das Kabel am Stecker, nicht am Kabel,
aus dem Anschluss herauszuziehen.
 Trennen Sie das Netzkabel sofort vom Stromnetz, falls es beschädigt oder abgenutzt
sein sollte, falls Flüssigkeit in den Bildschirm gelangt ist oder der Bildschirm heruntergefallen oder anderweitig beschädigt sein sollte.
ACHTUNG: Verwenden Sie ausschließlich das mit Ihrem Display gelieferte Netzkabel.
Dieses Gerät muss elektrisch geerdet sein. Schließen Sie das Gerät nur an eine fachgerecht verlegte, geerdete Schuko-Steckdose an. Dies ist eine wichtige Sicherheitsmaßnahme. Entspricht die Steckdose nicht den Vorschriften, muss sie von einem Fachmann neu verlegt werden. Gehen Sie beim Anschließen von Geräten an das
Stromnetz stets vorsichtig vor.
ACHTUNG: Bei Ihrem Bildschirm handelt es sich um ein Hochspannungsgerät, das auf
keinen Fall geöffnet werden darf, auch dann nicht, wenn es nicht am Stromnetz angeschlossen ist. Wenn Ihr Display gewartet oder repariert werden muss, lesen Sie den
Abschnitt „Weitere Informationen, Service und Support“ auf Seite 47.
Deutsch 43

Ergonomie
Im Folgenden finden Sie einige Richtlinien, die Sie beim Einstellen Ihres Bildschirms
beachten sollten, um ein störungsfreies, bequemes Arbeiten zu ermöglichen.
 Stellen Sie den Bildschirm so auf, dass sich die Oberkante des Bildschirms beim
Arbeiten etwa in Augenhöhe oder knapp darunter befindet. Wie groß der Abstand
zwischen Bildschirm und Betrachter sein soll, hängt von den jeweiligen Anforderungen ab. Häufig werden Abstände zwischen 45 und 70 cm verwendet.
44 Deutsch

 Stellen Sie die Neigung des Bildschirms so ein, dass auf der Bildschirmanzeige keine
störenden Lichtreflexe von Lampen oder Fenstern zu sehen sind.
Die Oberkante des Bildschirms sollte sich etwa
Die Schultern
sind locker und
entspannt.
Die Unterarme und
Hände befinden sich
auf einer Höhe.
Die Unterarme
sind horizontal
oder leicht
geneigt.
Die Rückenlehne
unterstützt den
Lendenwirbelbereich.
Die Oberschenkel
ruhen horizontal
auf dem Sitz.
45–70 cm
in Augenhöhe oder
knapp darunter befinden.
(Möglicherweise müssen
Sie dazu die Höhe des
Arbeitstischs verändern.)
Der Bildschirm sollte so
aufgestellt werden, dass
Spiegelungen auf dem
Bildschirm vermieden
werden.
Unter der Arbeitsplatte
sollte ein Freiraum sein.
Die Füße stehen flach
auf dem Boden oder
auf einer Fußstütze.
Weitere Informationen zur Ergonomie, Sicherheit und Wartung finden Sie auf der
Apple Website: www.apple.com/about/ergonomics.
Deutsch 45

Fehlerbeseitigung
Bevor Sie eine der im Folgenden beschriebenen Maßnahmen ergreifen, stellen Sie
sicher, dass Ihr Computer eingeschaltet ist, der Bildschirm mit dem Stromnetz verbunden ist, alle Kabel korrekt am Computer und am Bildschirm angeschlossen sind und der
Ruhezustand Ihres Computers nicht aktiviert ist.
Wenn auf dem Bildschirm keine Anzeige sichtbar ist:
 Prüfen Sie die Kabel und Stecker erneut, um sicherzustellen, dass sie korrekt mit
Computer und Bildschirm verbunden sind.
 Stellen Sie sicher, dass Ihr Computer eingeschaltet ist und sich nicht im Ruhezustand
befindet. Wenn der Bildschirm Ihres Computers geschlossen ist, verwenden Sie eine
externe Tastatur oder Maus, um den Ruhezustand des Computers zu beenden.
 Setzen Sie das Parameter-RAM zurück, indem Sie den Computer neu starten,
während Sie die Befehlstaste (x), die Wahltaste (z) und die Tasten „P“ und „R“
gleichzeitig drücken und gedrückt halten, bis der Startton ein zweites Mal ertönt.
Wenn der Bildschirm dunkel ist:
 Stellen Sie sicher, dass die Helligkeit für den Bildschirm korrekt eingestellt ist. Wählen
Sie „Apple“ () > „Systemeinstellungen“ und klicken Sie auf „Monitore“. Bewegen Sie
den Helligkeitsregler, um die Helligkeit einzustellen.
 Wenn die Farben zu stark oder nicht korrekt wiedergegeben werden, müssen Sie Ihren
Bildschirm möglicherweise kalibrieren. Öffnen Sie die Systemeinstellung „Monitore“,
klicken Sie auf „Farbe“ und auf „Kalibrieren. Befolgen Sie die anzeigten Anleitungen.
Wenn Ihr Mobilcomputer nicht aufgeladen wird:
Vergewissern Sie sich, dass der MagSafe-Stecker Ihres Displays fest mit dem MagSafeNetzanschluss Ihres Computers verbunden ist.
46 Deutsch

Wenn die integrierte iSight-Kamera, das Mikrofon, die Lautsprecher oder die USBAnschlüsse am Display nicht funktionieren:
Stellen Sie sicher, dass das USB-Kabel vom Display fest mit dem USB-Anschluss
des Computers verbunden ist. Die Kamera, das Mikrofon, die Lautsprecher und
die USB-Anschlüsse des Displays funktionieren nur, wenn das Kabel am Computer
angeschlossen ist.
Weitere Informationen zur Fehlerbeseitigung
Mehr Informationen und Tipps zur Fehlerbeseitigung finden Sie auf der SupportWebsite für Ihr Display unter: www.apple.com/de/support/displays
Weitere Informationen, Service und Support
Weitere Informationen zu Ihrem Bildschirm finden Sie auf der Apple-Website und
in der Mac-Hilfe.
Näheres zum Thema finden Sie wie folgt
Verwenden des Bildschirms Wählen Sie in der Menüleiste „Hilfe“ > „Mac-Hilfe“ und suchen
Service und Support,
Diskussionsforen,
Einführungen und AppleSoftware zum Laden
Aktuelle Informationen
zu Bildschirmen
Registrieren des Bildschirms Besuchen Sie folgende Website: www.apple.com/de/register
Sie nach „Bildschirme“.
Besuchen Sie folgende Website:
www.apple.com/de/support/displays
Besuchen Sie folgende Website: www.apple.com/de/displays
Deutsch 47

Technische Daten
 Modellnummer: A1267
 Auflösung: 1920 x 1200 bei 60 Hz
 Anschlüsse: Drei USB 2.0-Anschlüsse an der Rückseite
 Kamera und Mikrofon: Integrierte iSight-Kamera mit Mikrofon
 Lautsprecher: Eingebaute 2.1-Lautsprecher mit 12 W-Ausgabe
Abmessungen und Gewicht:
 Gewicht: 9,49 kg
 Höhe: 478,38 mm
 Breite: 573,22 mm
 Tiefe (mit Standfuß): 197,10 mm
 Sichtbare Bildschirmdiagonale: 24" (609,60 mm) diagonal
Umgebungsbedingungen
 Betriebstemperatur: 10 °C bis 35 °C
 Relative Luftfeuchtigkeit: 20 % bis 80 % (nicht kondensierend)
 Höhe über NN: unterhalb ca. 3000 m, ohne Druckausgleich
48 Deutsch

Introduzione
Il monitor Apple LED Cinema Display è progettato per funzionare
con la famiglia di computer MacBook dotati di connettore Mini
DisplayPort. Dispone di un monitor retroilluminato da 24 pollici,
un connettore MagSafe per caricare il tuo computer MacBook,
una videocamera iSight, un sistema di altoparlanti e un microfono integrati.
Le istruzioni contenute nelle pagine seguenti ti aiutano a configurare e utilizzare il nuovo
monitor e ti spiegano come:
 Collegare il monitor al computer
 Utilizzare la videocamera, il microfono, gli altoparlanti e le porte USB
 Regolare le impostazioni del monitor
Importante: prima di utilizzare il monitor per la prima volta, leggi attentamente
le istruzioni sull'installazione (e le informazioni di sicurezza a pagina 56).
Per informazioni su computer e schede grafiche specifici compatibili con il monitor,
vai all'indirizzo www.apple.com/it/displays.
Italiano 49

Installare il monitor
Segui questi passi per configurare il monitor Apple LED Cinema Display:
1 Rimuovi la pellicola protettiva dal monitor e dai cavi.
2 Inserisci il cavo di alimentazione nell'alimentatore di corrente, quindi inserisci la spina CA
in una presa dotata di messa a terra.
3 Collega il cavo Mini DisplayPort al computer, come mostrato a continuazione.
Monitor Apple LED Cinema Display
Portatile Mac
Presa di
corrente
MagSafe USB
Mini
DisplayPort
4 Collega il cavo USB al computer per utilizzare la videocamerra iSight, le porte USB,
gli altoparlanti e il microfono integrati del computer.
5 Inserisci il connettore MagSafe nella porta di alimentazione MagSafe del computer
per caricare la batteria e fornire alimentazione al computer.
6 Premi il pulsante di alimentazione sul computer per avviarlo. Il monitor si accende
automaticamente quando avvii il computer.
50 Italiano

Configurare il computer con il coperchio chiuso
Puoi chiudere il coperchio del computer e utilizzare solamente il monitor Apple LED
Cinema Display. Segui le istruzioni di configurazione illustrate nella pagina precedente e
assicurati che il connettore MagSafe del monitor sia inserito nella porta di alimentazione
di MagSafe del computer.
Per utilizzare il monitor Apple LED Cinema Display con il monitor del tuo computer
chiuso:
1 Collega una tastiera USB esterna ed un mouse alla porta USB del monitor oppure utilizza
Impostazione Assistita Bluetooth® per configurare una tastiera e un mouse wireless.
2 Assicurati che il computer sia acceso.
3 Per metterlo in stop, chiudi il display del computer.
4 Attendi alcuni secondi, quindi premi un tasto della tastiera esterna oppure muovi il mouse
per riattivare il computer.
Italiano 51

Utilizzare il monitor
Il monitor Apple LED Cinema Display dispone di videocamera iSight, microfono e di un
sistema di altoparlanti integrati. Il collegamento USB tra il monitor e il computer abilita
tali elementi.
Videocamera
Microfono
Configurare l'ingresso e l'uscita di audio
Puoi ascoltare musica, filmati, giochi e documenti multimediali attraverso il sistema di altoparlanti del monitor. Puoi utilizzare il microfono per registrare dei suoni o per parlare con
i tuoi amici via iChat. Utilizza le preferenze Audio per gestire l'ingresso e l'uscita di audio.
Per configurare l'ingresso audio:
1 Scegli Apple () > Preferenze di Sistema, quindi fai clic su Suono.
2 Fai clic sul pannello Ingresso, nelle preferenze Audio.
52 Italiano
iSight integrata
Sistema di altoparlanti del monitor

3 Scegli “Audio monitor” perché l'ingressso dell'audio avvenga attraverso il microfono
del monitor.
Per configurare l'uscita audio:
1 Fai clic sul pannello Uscita.
2 Scegli “Audio monitor” per sentire l'audio attraverso il sistema di altoparlanti del monitor.
Queste impostazioni vengono utilizzate ogni volta che il computer è collegato al monitor.
Rimarranno in vigore finché non le modificherai.
Utilizzare la videocamera iSight integrata
Puoi utilizzare la videocamera iSight e il microfono integrati per acquisire immagini
statiche, video e audio con applicazioni come iChat, iMovie e Photo Booth.
Per configurare la videocamera e il microfono con iChat:
1 Fai clic sull'icona di iChat nel Dock per aprire l'applicazione.
2 Scegli iChat > Preferenze, quindi fai clic su Audio/Video.
3 Dal menu a comparsa Videocamera, scegli “iSight monitor”.
4 Dal menu a comparsa Microfono, scegli “Audio monitor”.
Configurare il monitor Apple LED Cinema Display come monitor aggiuntivo
Quando lasci aperto il monitor del computer, puoi visualizzare la stessa immagine
su entrambi i monitor oppure puoi utilizzarne uno come estensione della tua
scrivania. Utilizza le preferenze Monitor per configurare la duplicazione dello
schermo o la scrivania estesa.
Italiano 53

Per impostare la duplicazione dello schermo o la scrivania estesa:
1 Scegli Apple () > Preferenze di Sistema, quindi fai clic su Monitor.
2 Fai clic su Disposizione e segui le istruzioni su schermo.
Regolare il colore e la luminosità
Puoi utilizzare la tastiera Apple Keyboard per aumentare () o diminuire () la luminosità
del monitor. Inoltre, puoi utilizzare Preferenze di Sistema per regolare le impostazioni di
risoluzione, luminosità e colore.
Per regolare la risoluzione, il numero di colori o la luminosità del monitor:
1 Scegli Apple () > Preferenze di Sistema, quindi fai clic su Monitor.
2 Fai clic sul pannello Monitor.
3 Scegli un'impostazione di risoluzione o di colore, oppure, per regolare la luminosità,
trascina il cursore.
Per calibrare il monitor o per modificarne il profilo:
1 Fai clic sul pannello Colore, nelle preferenze Monitor.
2 Scegli un profilo per il monitor o fai clic su Calibra per aprire Calibrazione Monitor assistita.
Per ulteriori informazioni sulla calibrazione del monitor, dalla barra dei menu scegli
Aiuto > Aiuto Mac, quindi cerca “calibra”.
54 Italiano

Utilizzare le porte USB e lo slot di sicurezza
Sul retro, il monitor è dotato di tre porte USB ad alta velocità. Utilizza tali porte per connettere un mouse, una tastiera, iPhone, iPod o altre periferiche USB. Assicurati che il cavo USB
del monitor sia collegato al computer.
Porte USB
Slot di sicurezza
Per proteggere il monitor, utilizza lo slot di sicurezza per collegarvi il cavo di sicurezza.
Utilizzare una soluzione di montaggio VESA con il monitor
Puoi installare il monitor sfruttando una soluzione di montaggio alternativa grazie al kit
adattatore di montaggio VESA Mount Adapter disponibile su Apple Store in linea all'indirizzo www.apple.com/it/store. Il kit ti consente di installare il monitor utilizzando qualsiasi
soluzione di montaggio compatibile con lo standard VESA. Attieniti alle istruzioni incluse
nel kit.
Italiano 55

Sicurezza e manutenzione
Prima di sollevare o riposizionare il monitor, scollega i cavi e l'alimentazione. Per effettuare
qualsiasi spostamento attieniti alla procedura più adeguata. Solleva e trasporta il monitor
reggendolo per i bordi e mai tenendolo per la base o per i cavi.
Per pulire lo schermo del monitor:
1 Scollega il cavo di alimentazione.
2 Rimuovi la polvere dallo schermo utilizzando il panno fornito in dotazione o un altro
panno morbido e asciutto.
ATTENZIONE: non pulire lo schermo con detergenti contenenti alcol o acetone. Utilizza
un prodotto adatto alla pulizia dello schermo o del monitor. Non utilizzare mai prodotti
spray direttamente sullo schermo per evitare che il liquido possa penetrare al suo interno
provocando danni.
Per utilizzare l'alimentatore di corrente attieniti a queste linee guida di sicurezza:
 L'unico modo per interrompere completamente l'alimentazione consiste nello scolle-
gare il cavo di alimentazione afferrandolo per la spina e non direttamente per il cavo.
56 Italiano

 Interrompi immediatamente l'alimentazione nel caso in cui il cavo di alimentazione sia in
qualche modo danneggiato, qualora abbia versato del liquido sul monitor, o se il monitor
dovesse cadere o subire altri tipi di danni.
ATTENZIONE: utilizza solamente il cavo di alimentazione in dotazione con il monitor.
Il cavo di alimentazione dispone di una spina tripolare con messa a terra (una spina
con un terzo pin per la messa a terra) adatta solo a una presa AC con messa a terra.
Se non riesci a inserire la spina nella presa perché quest'ultima non è dotata di messa
a terra, contatta un elettricista per richiedere l'installazione di una presa appropriata
dotata di messa a terra.
ATTENZIONE: il monitor è un componente ad alto voltaggio e non deve mai essere
aperto per nessun motivo, neppure quando non è collegato. Se il monitor richiede
manutenzione, consulta “Ulteriori informazioni, servizio e supporto” a pagina 60.
Disposizione dell’ambiente di lavoro
Di seguito sono riportate alcune indicazioni per regolare il monitor in modo da ridurre
i riflessi della luce e lavorare in una posizione adatta al proprio corpo.
 Colloca il monitor in modo che la parte superiore dello schermo risulti leggermente al
di sotto dell’altezza degli occhi quando si è seduti. La distanza tra gli occhi e il monitor
è soggettiva, tuttavia la distanza più diffusa è fra 45 e 70 cm.
Italiano 57

 Posiziona il monitor inclinandolo verso l'alto o verso il basso in modo da ridurre
al massimo la presenza di riflessi causati da fonti di luce artificiale o naturale.
Parte superiore dello
Spalle rilassate
Avambracci e
mani devono
essere in
linea retta
Il braccio e
l'avambraccio
devono formare
un angolo retto
Inclinare lo
schienale
Cosce in
posizione
orizzontale
45–70 cm
schermo leggermente
al di sotto dell'altezza
degli occhi (se necessario,
posizionare oggetti sotto
lo schermo o sollevare il
piano della scrivania)
Schermo posizionato in modo
da eliminare i riflessi di luce
Mantenere libero lo spazio
sottostante la scrivania
Appoggiare i piedi a terra
o su un poggiapiedi
Per maggiori informazioni sulla salute, la sicurezza e la manutenzione, consulta il sito
web di Apple dedicato all'ergonomia all'indirizzo www.apple.com/it/about/ergonomics.
58 Italiano

Risoluzione dei problemi del monitor
Prima di eseguire la seguente procedura, assicurati che il computer sia acceso, che il monitor sia collegato ad una fonte di alimentazione, che tutti i cavi siano collegati correttamente
al computer e al monitor e che il computer non sia in stop.
Se non compare nessuna immagine:
 Verifica nuovamente che i cavi e i connettori siano collegati correttamente al computer
e al monitor.
 Assicurati che il computer sia acceso e che non sia in stop. Se il monitor del computer
è chiuso, utilizza la tastiera esterna oppure muovi il mouse per riattivare il computer.
 Reimposta i parametri PRAM riavviando il computer tenendo premuti i tasti
Comando (x), Opzione, P e R finché non avverti una seconda volta il suono di avvio.
Se lo schermo è scuro:
 Assicurati che i controlli di luminosità del monitor siano impostati in modo corretto.
Scegli Apple () > Preferenze di Sistema, quindi fai clic su Monitor. Trascina il cursore
della luminosità per regolarla.
 Se i colori del monitor sono troppo saturati o non sono corretti, potresti dovere calibrare il
monitor. Apri le preferenze Monitor, fai clic su Colore, fai clic su Calibra e segui le istruzioni.
Se il computer portatile non si ricarica:
Assicurati che il connettore MagSafe del monitor sia inserito correttamente nella porta
di alimentazione di MagSafe del computer.
Italiano 59

Se la videocamera iSight, il microfono, gli altoparlanti e le porte USB integrati
nel monitor non funzionano:
Assicurati che il cavo USB del monitor sia inserito saldamente nella porta USB del computer.
La videocamera, le porte USB, gli altoparlanti e il microfono del monitor funzionano solo
quando il cavo è collegato al computer.
Ulteriori informazioni sulla risoluzione dei problemi
Puoi trovare ulteriori informazioni sulla risoluzione dei problemi tecnici sul sito web
di supporto per i monitor all'indirizzo: www.apple.com/it/support/displays.
Ulteriori informazioni, servizio e supporto
Puoi reperire maggiori informazioni riguardo al monitor sul sito web di Apple e in Aiuto Mac.
Per informazioni su Esegui questa operazione
Utilizzare il monitor Scegli Aiuto > Aiuto Mac nella barra dei menu e cerca “monitor”.
Servizio e assistenza per il
monitor, discussioni, risoluzione dei problemi tecnici e
download di software Apple
Le informazioni più recenti
sui monitor
Registrare il monitor Vai a: www.apple.com/it/register.
60 Italiano
Vai a: www.apple.com/it/support/displays.
Vai a: www.apple.com/it/displays.

Specifiche tecniche
 Numero modello: A1267
 Risoluzione: 1920 x 1200 a 60 Hz
 Porte: tre porte USB 2.0 sul retro
 Videocamera e microfono: videocamera iSight integrata con microfono
 Altoparlanti: altoparlanti 2.1 integrati con uscita a 12 W
Dimensioni:
 Peso: 9,49 Kg (20,92 lb)
 Altezza: 478,38 mm
 Larghezza: 573,22 mm
 Profondità (con base): 197,10 mm
 Area visibile: 24 pollici (609,60 mm)
Ambiente operativo:
 Temperatura operativa: tra 10° e 35° C
 Umidità relativa: da 20% a 80% (in assenza di condensa)
 Altitudine: da 0 a 3048 metri
Italiano 61


Aan de slag
De Apple LED Cinema Display is ontworpen voor gebruik met
computers uit de MacBook-serie die voorzien zijn van een Mini
DisplayPort-connector. Dit beeldscherm heeft een 24-inch
LED-backlit-breedbeeldscherm, een MagSafe-connector voor
het opladen van uw MacBook, een ingebouwde iSight-camera,
een luidsprekersysteem en een microfoon.
Aan de hand van de instructies op de volgende pagina's leert u hoe u het nieuwe
beeldscherm installeert en gebruikt. De volgende onderwerpen komen aan bod:
 Het beeldscherm op uw computer aansluiten
 De camera, microfoon, luidsprekers en USB-poorten gebruiken
 De beeldscherminstellingen aanpassen
Belangrijk: lees alle installatie-instructies (en de veiligheidsinstructies vanaf pagina 70)
zorgvuldig door voordat u het scherm voor de eerste keer in gebruik neemt.
Meer informatie over de specifieke computers en videokaarten die compatibel zijn met
uw beeldscherm vindt u op www.apple.com/nl/displays.
Nederlands 63

Het beeldscherm installeren
Voer de onderstaande stappen uit om de Apple LED Cinema Display te installeren.
1 Verwijder het plastic beschermmateriaal van het beeldscherm en de kabels.
2 Sluit het netsnoer aan op het beeldscherm en sluit vervolgens de stekker van het
netsnoer aan op een geaard stopcontact.
3 Sluit de Mini DisplayPort-kabel op de computer aan (zie onderstaande afbeelding).
Apple LED Cinema Display
Mac-notebook
contact
Stop-
MagSafe USB
Mini
DisplayPort
4 Sluit de USB-kabel op uw computer aan zodat u de ingebouwde iSight-camera, de
luidsprekers, de microfoon en de USB-poorten van het beeldscherm kunt gebruiken.
5 Sluit de MagSafe-connector aan op de poort voor de MagSafe-lichtnetadapter van uw
computer om de batterij op te laden en de computer van stroom te voorzien.
6 Zet de computer aan door op de aan/uit-knop te drukken. Het beeldscherm wordt
ingeschakeld zodra u de computer aanzet.
64 Nederlands

De computer met dichtgeklapt beeldscherm gebruiken
U kunt het beeldscherm van de computer dichtklappen en alleen de Apple LED
Cinema Display gebruiken. Volg de installatie-instructies op de vorige pagina en
controleer of de MagSafe-connector van het beeldscherm is aangesloten op de poort
voor de MagSafe-lichtnetadapter van de computer.
De Apple LED Cinema Display gebruiken terwijl het beeldscherm van de computer is
dichtgeklapt
1 Sluit een extern USB-toetsenbord en een USB-muis aan op het beeldscherm of gebruik
de Bluetooth®-configuratie-assistent om een draadloos toetsenbord en een draadloze
muis te configureren.
2 Zorg ervoor dat de computer is ingeschakeld.
3 Klap het beeldscherm van de computer dicht om de sluimerstand in te schakelen.
4 Wacht een paar seconden en druk vervolgens op een willekeurige toets op het externe
toetsenbord of beweeg de muis om de computer uit de sluimerstand te halen.
Nederlands 65

Het beeldscherm gebruiken
De Apple LED Cinema Display heeft een ingebouwde iSight-camera, een microfoon en
een beeldschermluidsprekersysteem. De USB-verbinding tussen het beeldscherm en
uw computer zorgt ervoor dat deze voorzieningen kunnen worden gebruikt.
Ingebouwde
Microfoon
Geluidsinvoer en -uitvoer instellen
U kunt via het luidsprekersysteem van het beeldscherm naar muziek luisteren en het
geluid van films, games en ander multimediamateriaal weergeven. Met de microfoon
kunt u geluid opnemen of via iChat met vrienden en bekenden praten. In het paneel
'Geluid' in Systeemvoorkeuren kunt u de instellingen voor de geluidsinvoer en -uitvoer
opgeven.
66 Nederlands
iSight-camera
Beeldschermluidsprekersysteem

De geluidsinvoer instellen
1 Kies 'Apple' () > 'Systeemvoorkeuren' en klik op 'Geluid'.
2 Klik op de tab 'Invoer'.
3 Kies 'Beeldschermaudio' om geluid in te voeren via de microfoon van het beeldscherm.
De geluidsuitvoer instellen
1 Klik op de tab 'Uitvoer'.
2 Kies 'Beeldschermaudio' om geluid te horen via het luidsprekersysteem van uw
beeldscherm.
Deze geluidsinstellingen worden steeds gebruikt wanneer de computer op het
beeldscherm is aangesloten. Ze blijven van kracht totdat u ze wijzigt.
De ingebouwde iSight-camera gebruiken
Met de ingebouwde iSight-camera en de microfoon kunt u stilstaande beelden, video
en geluid vastleggen in programma's als iChat, iMovie en Photo Booth.
De camera en microfoon instellen in iChat
1 Klik op het iChat-symbool in het Dock om het programma iChat te openen.
2 Kies 'iChat' > 'Voorkeuren' en klik vervolgens op 'Audio/Video'.
3 Kies 'Beeldscherm-iSight' uit het venstermenu 'Camera'.
4 Kies 'Beeldschermaudio' uit het venstermenu 'Microfoon'.
De Apple LED Cinema Display instellen als extra beeldscherm
Wanneer u het beeldscherm van de computer niet dichtklapt, kunt u hetzelfde beeld
op beide beeldschermen weergeven of het bureaublad uitbreiden. U kunt deze
voorzieningen in het paneel 'Beeldschermen' in Systeemvoorkeuren instellen.
Nederlands 67

Synchrone weergave of een uitgebreid bureaublad instellen
1 Kies 'Apple' () > 'Systeemvoorkeuren' en klik op 'Beeldschermen'.
2 Klik op 'Rangschikking' en volg de instructies op het scherm.
De kleur en helderheid aanpassen
U kunt uw Apple Keyboard gebruiken om de helderheid van het beeldscherm te
verhogen () of te verlagen (). U kunt de resolutie, helderheid en kleurinstellingen
ook aanpassen via Systeemvoorkeuren.
De resolutie, het aantal kleuren of de helderheid van het beeldscherm aanpassen
1 Kies 'Apple' () > 'Systeemvoorkeuren' en klik op 'Beeldschermen'.
2 Klik op de tab 'Beeldscherm'.
3 Kies een resolutie of kleurinstelling of sleep de schuifknop 'Helderheid' om de
helderheid aan te passen.
Het beeldschermprofiel wijzigen of het beeldscherm kalibreren
1 Klik op de tab 'Kleur' in het paneel 'Beeldschermen' in Systeemvoorkeuren.
2 Kies een beeldschermprofiel of klik op 'Kalibreer' om de Beeldschermkalibratie-
assistent te openen.
Voor meer informatie over het kalibreren van uw beeldscherm kiest u 'Help' >
'Mac Help' in de menubalk en zoekt u op “kalibreren”.
68 Nederlands

De USB-poorten en de opening voor een antidiefstalkabel gebruiken
Aan de achterzijde van het beeldscherm bevinden zich drie USB-poorten met eigen
voeding. Op deze poorten kunt u een muis, toetsenbord, iPhone, iPod of een ander
USB-randapparaat aansluiten. Zorg ervoor dat de USB-kabel van het beeldscherm op
de computer is aangesloten.
USB-poorten
Opening voor
antidiefstalkabel
Om het beeldscherm tegen diefstal te beschermen, kunt u een antidiefstalkabel
gebruiken en deze door de opening aan de achterzijde voeren.
Een VESA-montageoplossing voor het beeldscherm gebruiken
U kunt het beeldscherm op een andere montageoplossing aansluiten met behulp van
de VESA-montageadapterkit. Deze is verkrijgbaar via de online Apple Store op
www.apple.com/nl/store. Met deze kit kunt u het beeldscherm bevestigen aan elke
VESA-compatibele montageoplossing. Volg de instructies die bij de kit worden
meegeleverd.
Nederlands 69

Voorzorgsmaatregelen en veiligheid
Voordat u het beeldscherm optilt of op een andere positie plaatst, moet u wellicht de
kabels en het netsnoer loskoppelen. Let bij het verplaatsen van het beeldscherm op
uw houding. Houd het beeldscherm bij de randen vast wanneer u het beeldscherm
optilt of vervoert. Til het beeldscherm niet op aan de standaard of aan het snoer.
Het beeldscherm schoonmaken
1 Koppel het netsnoer los.
2 Gebruik de doek die bij het beeldscherm is meegeleverd, of een andere zachte, droge
doek om stof van het scherm te vegen.
WAARSCHUWING: Reinig het scherm niet met een schoonmaakmiddel dat alcohol of
aceton bevat. Gebruik een schoonmaakmiddel dat geschikt is voor beeldschermen.
Spuit schoonmaakmiddelen nooit rechtstreeks op het scherm. Het schoonmaakmiddel zou in het beeldscherm terecht kunnen komen en zo schade kunnen
veroorzaken.
Volg deze veiligheidsrichtlijnen voor het gebruik van het beeldscherm:
 U kunt de stroom alleen volledig uitschakelen door de stekker uit het stopcontact te
trekken. Trek aan de stekker en niet aan het snoer.
70 Nederlands

 Schakel de stroom onmiddellijk uit als het netsnoer gerafeld of beschadigd is, als u
iets morst op het beeldscherm of als het beeldscherm valt of op een andere manier
beschadigd raakt.
WAARSCHUWING: Gebruik alleen het netsnoer dat bij het beeldscherm is geleverd.
Het netsnoer heeft een stekker die alleen mag worden gebruikt met een geaard
stopcontact. Laat, indien nodig, een geaard stopcontact aanleggen door een erkend
elektrotechnisch installatiebureau.
WAARSCHUWING: Het beeldscherm heeft een hoog voltage en mag om geen enkele
reden worden geopend, zelfs niet wanneer de adapter is losgekoppeld. Zie “Meer
informatie over service en ondersteuning” op pagina 74 als het beeldscherm
onderhoud nodig heeft.
Ergonomie
Volg de onderstaande richtlijnen om spiegeling in het beeldscherm te voorkomen en
zo comfortabel mogelijk te kunnen werken.
 Zet het beeldscherm zo neer dat de bovenkant van het scherm zich iets onder uw
oogniveau bevindt wanneer u achter het toetsenbord zit. De ideale afstand tussen
het beeldscherm en uw ogen kunt u zelf bepalen. Gebruikelijk is een afstand tussen
45 en 70 centimeter.
Nederlands 71

 Plaats het beeldscherm zo dat verlichting en ramen er zo min mogelijk in worden
weerspiegeld. U kunt het hiervoor omhoog of omlaag kantelen.
Schouders
ontspannen
Onderarmen
en handen in
een rechte lijn
Onderarmen
horizontaal of
iets omhoog
gericht
Onderrug
ondersteund
Bovenbenen iets
omlaag gericht
45–70 cm
Bovenzijde beeldscherm
iets onder ooghoogte
(leg eventueel iets onder
het scherm of verstel het
werkblad om ervoor te
zorgen dat het scherm
op de juiste hoogte staat)
Scherm zo geplaatst dat
er geen weerspiegelingen
optreden
Geen obstakels
onder het werkblad
Voeten plat op de vloer
of op een voetsteun
Raadpleeg de website www.apple.com/nl/about/ergonomics voor meer informatie
over veiligheid, onderhoud en ergonomie.
72 Nederlands

Problemen met het beeldscherm oplossen
Voordat u een van de onderstaande stappen uitvoert, controleert u of de computer is
ingeschakeld, of het beeldscherm op een stopcontact is aangesloten, of alle kabels op
de juiste wijze op de computer en het beeldscherm zijn aangesloten en of de
computer zich niet in de sluimerstand bevindt.
Er verschijnt niets op het beeldscherm
 Controleer of de kabels en connectors op de juiste manier zijn aangesloten op de
computer en het beeldscherm.
 Controleer of de computer is ingeschakeld en zich niet in de sluimerstand bevindt.
Als het beeldscherm van de computer is dichtgeklapt, gebruikt u het externe
toetsenbord of de muis om de computer uit de sluimerstand te halen.
 Stel het PRAM opnieuw in door de computer opnieuw op te starten terwijl u de
Command-toets (x), Option-toets (z) en de P- en R-toets ingedrukt houdt totdat u
het opstartgeluid voor de tweede keer hoort.
Het scherm blijft donker
 Controleer of de helderheidsregelaars juist zijn ingesteld. Kies 'Apple' () >
'Systeemvoorkeuren' en klik op 'Beeldschermen'. Sleep de schuifknop 'Helderheid'
om de helderheid aan te passen.
 Als de kleuren op het beeldscherm te verzadigd zijn of niet juist worden
weergegeven, moet u het beeldscherm mogelijk kalibreren. Open het paneel
'Beeldschermen' in Systeemvoorkeuren, klik op 'Kleur', klik op de knop 'Kalibreer' en
volg de instructies.
Nederlands 73

De notebook wordt niet opgeladen
Controleer of de MagSafe-connector van het beeldscherm goed is aangesloten op de
poort voor de MagSafe-lichtnetadapter van uw computer.
De ingebouwde iSight-camera, microfoon, luidsprekers of USB-poorten van het
beeldscherm werken niet
Controleer of de USB-kabel van het beeldscherm goed is aangesloten op de USB-poort
van de computer. De camera, de microfoon, de luidsprekers en de USB-poorten van het
beeldscherm werken alleen als deze kabel op uw computer is aangesloten.
Meer informatie over het oplossen van problemen
Ga voor meer informatie over het oplossen van problemen naar de ondersteuningswebsite voor beeldschermen op www.apple.com/nl/support/displays.
Meer informatie over service en ondersteuning
Meer informatie over het beeldscherm kunt u vinden op de website van Apple en in
Mac Help.
Meer informatie over Stappen
Het beeldscherm gebruiken Kies in de menubalk 'Help' > 'Mac Help' en zoek op
Service voor uw beeldscherm,
ondersteuning, discussies,
oplossingen voor problemen
en softwaredownloads
Beeldschermen Ga naar www.apple.com/nl/displays.
Het beeldscherm registreren Ga naar www.apple.com/nl/register.
74 Nederlands
“beeldschermen”.
Ga naar www.apple.com/nl/support/displays.

Specificaties
 Modelnummer: A1267
 Resolutie: 1920 x 1200, 60 Hz
 Poorten: drie USB 2.0-poorten aan de achterzijde
 Camera en microfoon: ingebouwde iSight-camera met microfoon
 Luidsprekers: ingebouwde 2.1-luidsprekers met 12 W uitvoer
Afmetingen:
 Gewicht: 9,49 kg
 Hoogte: 478,38 mm
 Breedte: 573,22 mm
 Diepte (inclusief standaard): 197,10 mm
 Weergavegebied: 609,60 mm diagonaal
Omgeving:
 Temperatuur bij gebruik: 10 tot 35 °C
 Relatieve vochtigheid: 20% tot 80%, niet-condenserend
 Hoogte: 0 tot 3048 meter
Nederlands 75


Primeros pasos
La pantalla Apple LED Cinema Display ha sido diseñada para
utilizarse con la familia de ordenadores MacBook equipados
con un conector Mini DisplayPort. Incorpora una pantalla LED
panorámica de 24 pulgadas, un conector MagSafe para recargar el MacBook, una cámara iSight integrada, un sistema de
altavoces y un micrófono.
Las instrucciones que figuran en las próximas páginas le ayudarán a instalar y usar
su nueva pantalla, y en concreto a:
 conectar la pantalla al ordenador;
 usar la cámara, el micrófono, los altavoces y los puertos USB;
 configurar los ajustes de la pantalla.
Importante: Lea detenidamente todas las instrucciones de instalación (así como la
información sobre seguridad de la página 84) antes de usar la pantalla por primera vez.
Para obtener más información acerca de determinados modelos de ordenadores y
de tarjetas gráficas compatibles con su pantalla, visite www.apple.com/es/displays.
Español 77

Instalación de la pantalla
Siga los pasos que se detallan a continuación para instalar su pantalla Apple LED
Cinema Display:
1 Retire el plástico protector de la pantalla y de los cables.
2 Conecte el cable de alimentación a la pantalla y enchúfelo en una toma de corriente
con toma de tierra.
3 Conecte el cable Mini DisplayPort al ordenador, tal como se muestra en la imagen.
Pantalla Apple LED Cinema Display
Ordenador Mac portátil
Toma de
corriente
MagSafe USB
Mini
DisplayPort
4 Conecte el cable USB al ordenador para usar la cámara iSight integrada, los altavoces,
el micrófono y los puertos USB de la pantalla.
5 Inserte el conector MagSafe en el puerto de alimentación MagSafe del ordenador
para cargar la batería y proporcionar alimentación al ordenador.
6 Pulse el botón de arranque del ordenador para encenderlo. La pantalla se encenderá
automáticamente cuando se encienda el ordenador.
78 Español

Configuración del ordenador con la pantalla integrada cerrada
Si lo desea, puede cerrar la pantalla integrada del ordenador y usar únicamente la pantalla
Apple LED Cinema Display. Siga las instrucciones de instalación de la página anterior y asegúrese de que el conector MagSafe de la pantalla está conectado al puerto de alimentación
MagSafe del ordenador.
Para usar la pantalla Apple LED Cinema Display con la pantalla integrada del ordenador
cerrada:
1 Conecte un teclado USB externo y un ratón al puerto USB de la pantalla o utilice el
Asistente Configuración Bluetooth® para configurar un teclado y un ratón inalámbricos.
2 Asegúrese de que el ordenador está encendido.
3 Cierre la pantalla del ordenador para ponerlo en reposo.
4 Espere unos segundos y, a continuación, pulse cualquier tecla del teclado externo o mueva
el ratón para activar el ordenador.
Español 79

Utilización de la pantalla
La pantalla Apple LED Cinema Display incorpora una cámara iSight integrada, un micrófono y un sistema de altavoces. La conexión USB entre la pantalla y el ordenador permite
el funcionamiento de estas funciones.
Cámara iSight
Micrófono
Configuración de la entrada y la salida de sonido
Puede escuchar música, películas, juegos y archivos multimedia a través del sistema de
altavoces de la pantalla. Puede usar el micrófono para grabar sonidos o hablar con sus
amigos mediante iChat. Utilice el panel de preferencias Sonido para configurar la entrada
y la salida de sonido.
Para configurar la entrada de sonido:
1 Seleccione Apple () > Preferencias del Sistema y haga clic en Sonido.
2 Haga clic en la pestaña Entrada del panel de preferencias Sonido.
80 Español
integrada
Sistema de altavoces de la pantalla

3 Seleccione la opción “Audio de la pantalla” para utilizar el micrófono de la pantalla
como entrada de audio.
Para configurar la salida de sonido:
1 Haga clic en la pestaña Salida.
2 Seleccione “Audio de la pantalla” para escuchar el sonido a través del sistema de altavoces
de la pantalla.
Estos ajustes de sonido se usarán siempre que la pantalla esté conectada al ordenador.
Si no los cambia, se mantendrán de forma permanente.
Uso de la cámara iSight integrada
Puede usar la cámara iSight integrada y el micrófono para capturar imágenes estáticas,
vídeo y audio con diversas aplicaciones, como iChat, iMovie y Photo Booth.
Para configurar la cámara y el micrófono con iChat:
1 Haga clic en el icono de iChat situado en el Dock para abrir la aplicación iChat.
2 Seleccione iChat > Preferencias y, a continuación, haga clic en Audio/Vídeo.
3 Seleccione “iSight de la pantalla” en el menú local Cámara.
4 Seleccione “Audio de la pantalla” en el menú local Micrófono.
Configuración de la pantalla Apple LED Cinema Display como pantalla adicional
Si deja la pantalla integrada del ordenador abierta, podrá ver la misma imagen en ambas
pantallas o bien usarlas para ampliar el escritorio. Para configurar estas dos modalidades
(duplicado de vídeo o escritorio ampliado), utilice el panel de preferencias Pantallas.
Español 81

Para configurar la modalidad de duplicado de vídeo o la de escritorio ampliado:
1 Seleccione Apple () > Preferencias del Sistema y haga clic en Pantallas.
2 Haga clic en Alineación y siga las instrucciones que aparecen en pantalla.
Ajuste del color y del brillo
Puede usar el teclado Apple Keyboard para aumentar () o reducir () el brillo de
la pantalla. También pueden ajustarse los ajustes de resolución, brillo y colores desde
Preferencias del Sistema.
Para ajustar la resolución, el número de colores y el brillo de la pantalla:
1 Seleccione Apple () > Preferencias del Sistema y haga clic en Pantallas.
2 Haga clic en la pestaña Pantalla.
3 Seleccione una resolución o un ajuste de color, o bien arrastre el regulador de brillo
para ajustar el brillo de la pantalla.
Para cambiar el perfil de la pantalla o para calibrarla:
1 Haga clic en la pestaña Color del panel de preferencias Pantallas.
2 Seleccione un perfil o haga clic en Calibrar para abrir el Asistente del Calibrador de Pantalla.
Para obtener más información acerca de cómo calibrar su pantalla, seleccione
Ayuda > “Ayuda Mac” en la barra de menús y, a continuación, busque “calibrar”.
82 Español

Uso de los puertos USB y de la ranura de seguridad
La pantalla tiene tres puertos USB en la parte posterior. Úselos para conectar un ratón,
un teclado, un iPhone, un iPod u otro dispositivo periférico USB. Asegúrese de que el
cable USB de la pantalla está conectado al ordenador.
Puertos USB
Ranura de seguridad
Para proteger la pantalla, use la ranura de seguridad con un cable de seguridad.
Utilización de una solución de montaje VESA con la pantalla
Puede colocar su pantalla en otros soportes alternativos mediante el kit de adaptadores
de montaje VESA, que puede adquirirse a través de la tienda Apple Store en Internet
(www.apple.com/es/store). Con este kit podrá usar diversos soportes compatibles
con el estándar VESA con su pantalla. Sólo tiene que seguir las instrucciones del kit.
Español 83
Mantenimiento y seguridad
Antes de levantar la pantalla o cambiarla de lugar, debe desconectar los cables y el cable
de alimentación. Cuando levante la pantalla, hágalo de la forma adecuada. Sosténgala
siempre por los bordes para levantarla o trasladarla. No la levante por el pie o el cable.
Para limpiar la pantalla:
1 Desconecte el cable de alimentación.
2 Use el paño que venía incluido con la pantalla u otro paño suave y seco para quitarle
el polvo.
ADVERTENCIA: No utilice ningún producto que contenga alcohol o acetona. Use un
limpiador específico para pantallas y no lo aplique directamente sobre ella, pues podría
filtrarse hacia el interior de la pantalla y provocar daños.
Siga estas instrucciones de seguridad para usar la pantalla:
 La única manera de desconectar completamente la pantalla de la corriente es desen-
chufar el cable de alimentación. Recuerde tirar del enchufe, no del cable.
 Desconecte el ordenador de la corriente inmediatamente si el cable de alimentación
está roto o dañado, si se derrama líquido sobre la pantalla o si ésta sufre una caída
o está dañada.
ADVERTENCIA: Utilice únicamente el cable de alimentación que venía con la pantalla.
El cable de alimentación tiene un enchufe con toma de tierra y sólo puede acoplarse
a una toma de CA del mismo tipo. Si no puede introducir el enchufe en la toma de
corriente porque ésta no posee toma de tierra, póngase en contacto con un electricista para sustituir la toma de corriente por una adecuada.
84 Español

ADVERTENCIA: La pantalla es un componente de alto voltaje y por ello no debe abrirse
bajo ninguna circunstancia, incluso aunque esté desenchufada. Si es necesario reparar
la pantalla, consulte el apartado “Más información, servicio y soporte” en la página 88.
Ergonomía
Siga estos consejos para eliminar los reflejos de la pantalla y colocarla de la manera
que le resulte más cómoda y adecuada.
 Coloque la pantalla de forma que la parte superior quede ligeramente por debajo
de la altura de sus ojos cuando esté sentado ante el teclado. La distancia desde sus
ojos a la pantalla depende de sus preferencias, aunque la mayoría de los usuarios se
sitúan a una distancia de entre 45 y 70 cm.
Español 85

 Ajuste la posición de la pantalla inclinándola hacia arriba o hacia abajo para minimizar
los reflejos causados por la luz procedente de lámparas de techo y ventanas cercanas.
Nivel superior de la pantalla
Hombros relajados
Antebrazos y
manos formando
una línea recta
Nivel de los antebrazos
recto y ligeramente
inclinado hacia arriba
Zona lumbar
perfectamente
apoyada
Muslos en
posición horizontal
De 45 a 70 cm
ligeramente inferior al de los
ojos (es posible que deba
ajustar la altura del monitor
colocando una base o
elevando la superficie
de trabajo)
Pantalla colocada para
evitar los efectos del
deslumbramiento
Espacio debajo de la
superficie de trabajo
Pies apoyados totalmente
en el suelo
Si desea más información sobre salud, seguridad y mantenimiento, visite el sitio web
de Apple sobre ergonomía (www.apple.com/es/about/ergonomics).
86 Español

Solución de problemas con la pantalla
Antes de realizar alguna de las acciones que indicamos en este apartado, compruebe
que el ordenador esté encendido, que la pantalla esté enchufada a una toma de corriente,
que todos los cables estén conectados adecuadamente al ordenador y a la pantalla, y que
el ordenador no esté en modo de reposo.
Si no se ve nada en la pantalla:
 Vuelva a comprobar los cables y los conectores para asegurarse de que estén bien
conectados al ordenador y a la pantalla.
 Asegúrese de que el ordenador esté encendido y no se encuentre en modo reposo.
Si la pantalla integrada de su ordenador está cerrada, use el teclado externo o el ratón
para activar el ordenador si estaba en reposo.
 Reinicie la PRAM reiniciando el ordenador mientras pulsa las teclas Comando (x), Opción,
P y R simultáneamente hasta que oiga el sonido de arranque por segunda vez.
Si la pantalla se ve oscura:
 Compruebe también que los controles de brillo de la pantalla estén ajustados correc-
tamente. Seleccione Apple () > Preferencias del Sistema y haga clic en Pantallas.
Arrastre el regulador de brillo para ajustar el brillo de la pantalla.
 Si los colores de la pantalla están demasiado saturados o no se visualizan correctamente,
puede que sea necesario calibrar la pantalla. Abra el panel de preferencias Pantallas, haga
clic en Color, haga clic en Calibrar y siga las instrucciones.
Si su ordenador portátil no se está cargando:
Asegúrese de que el conector MagSafe de la pantalla esté conectado correctamente
al puerto de alimentación MagSafe del ordenador.
Español 87

Si la cámara iSight integrada, el micrófono, los altavoces o los puertos USB de la pantalla
no funcionan:
Asegúrese de que el cable USB de la pantalla esté conectado firmemente al puerto USB
del ordenador. La cámara, el micrófono, los altavoces y los puertos USB de la pantalla
solo funcionan si este cable está conectado al ordenador.
Información adicional sobre solución de problemas
Puede encontrar más información sobre la solución de problemas en la página web
de soporte para pantallas: www.apple.com/es/support/displays.
Más información, servicio y soporte
Puede encontrar más información sobre su pantalla en la página web de Apple
y en la Ayuda Mac.
Para obtener
información sobre...
Utilización de la pantalla Seleccione Ayuda > “Ayuda Mac” en la barra de menús
Servicio, soporte, foros de
debate, solución de problemas
y descargas de software relacionadas con las pantallas
La información más reciente
sobre pantallas
Registro de la pantalla Vaya a: www.apple.com/es/register.
88 Español
Haga lo siguiente
y busque “pantallas”.
Vaya a: www.apple.com/es/support/displays.
Vaya a: www.apple.com/es/displays.

Especificaciones
 Número de modelo: A1267
 Resolución: 1920 x 1200 a 60 Hz
 Puertos: tres puertos USB 2.0 en la parte posterior
 Cámara y micrófono: cámara iSight integrada con micrófono
 Altavoces: altavoces 2.1 integrados con una salida de 12 W
Dimensiones:
 Peso: 9,49 kg
 Altura: 478,38 mm
 Anchura: 573,22 mm
 Profundidad (con soporte): 197,10 mm
 Tamaño de la pantalla: 24 pulgadas (609,60 mm) en diagonal
Entorno operativo
 Temperatura operativa: de 10 a 35 °C
 Humedad relativa: 20–80% (sin condensación)
 Altitud: de 0 a 3.048 metros
Español 89


Introduktion
Din Apple LED Cinema Display er designet til at arbejde
problemløst med MacBook-computere, som har et Mini
DisplayPort-stik. Den har en bred 24" skærm med LEDbaggrundsbelysning, et MagSafe-stik til opladning af
MacBook-computeren, et indbygget iSight-kamera,
højttalere og en mikrofon.
Instruktionerne på de følgende sider hjælper dig med at indstille og bruge den nye
skærm, inklusive:
 Slutte skærmen til computeren
 Bruge kamera, mikrofon, højttalere og USB-porte
 Justere skærmindstillinger
Vigtigt: Læs hele installeringsvejledningen (og alle sikkerhedsoplysningerne på
side 98) grundigt, før du begynder at bruge skærmen.
Gå ind på www.apple.com/dk/displays, hvis du vil vide, hvilke computere og skærmkort
der er kompatible med skærmen.
Dansk 91

Opstille skærmen
Følg disse trin ved opstilling af Apple LED Cinema Display:
1 Fjern beskyttelsesfilmen fra skærmen og kablerne.
2 Sæt netstikket i skærmen, og sæt derefter den anden ende af netledningen i en jordet
stikkontakt.
3 Slut Mini DisplayPort-kablet til computeren som vist nedenfor.
Apple LED Cinema Display
Bærbar Mac
Stikkontakt
MagSafe USB
Mini
DisplayPort
4 Slut USB-kablet til computeren, så du kan bruge skærmens indbyggede iSight-kamera,
højttalere, mikrofon og USB-porte.
5 Sæt MagSafe-stikket i MagSafe-strømforsyningsporten på computeren for at oplade
batteriet og levere strøm til computeren.
6 Tryk på afbryderknappen på computeren for at starte den. Skærmen tænder
automatisk, når du starter computeren.
92 Dansk

Indstille computeren, når den indbyggede skærm er slået ned
Du kan slå skærmen på computeren ned og kun bruge din Apple LED Cinema Display.
Følg instruktionerne på den foregående side, og sørg for, at MagSafe-stikket fra
skærmen sidder i MagSafe-strømforsyningsporten på computeren.
Du bruger din Apple LED Cinema Display, når skærmen på computeren er slået ned,
på følgende måde:
1 Slut et eksternt USB-tastatur og en mus til USB-porten på bagsiden af skærmen, eller
brug Bluetooth-indstillingsassistent til at indstille et trådløst tastatur og en trådløs mus.
2 Sørg for, at computeren er tændt.
3 Slå skærmen på computeren ned for at sætte computeren på vågeblus.
4 Vent nogle sekunder, og tryk derefter på en vilkårlig tast på det eksterne tastatur, eller
flyt musen for at afbryde vågeblus.
Dansk 93

Bruge skærmen
Din Apple LED Cinema Display har et indbygget iSight-kamera, en indbygget mikrofon
og indbyggede højttalere. USB-forbindelsen mellem skærmen og computeren gør det
muligt at benytte disse funktioner.
Indbygget
Mikrofon
Indstille lyd ind og lyd ud
Du kan lytte til musik, film, spil og multimediearkiver via skærmens højttalere. Du kan
bruge mikrofonen til at optage lyd eller tale med dine venner vha. iChat. Brug vinduet
Lyd i Systemindstillinger til at administrere lyd ind og lyd ud.
Du indstiller lyd ind på følgende måde:
1 Vælg Apple () > Systemindstillinger, og klik på Lyd.
2 Klik på fanen Lyd ind i vinduet Lyd.
3 Vælg Skærmlyd for at bruge skærmens mikrofon til lyd ind.
94 Dansk
iSight-kamera
Skærmens højttalersystem

Du indstiller lyd ud på følgende måde:
1 Klik på fanen Lyd ud.
2 Vælg Skærmlyd for at høre lyd via skærmens højttalere.
Disse lydindstillinger bliver brugt, når computeren er sluttet til skærmen. De bliver
brugt, indtil du ændrer dem.
Bruge det indbyggede iSight-kamera
Du kan bruge det indbyggede iSight-kamera og mikrofonen til at optage stillbilleder,
video og lyd med programmer som iChat, iMovie og Photo Booth.
Du indstiller kamera og mikrofon med iChat på følgende måde:
1 Klik på symbolet for iChat i Dock for at åbne programmet iChat.
2 I iChat skal du vælge iChat > Indstillinger og derefter klikke på Lyd/video.
3 Vælg Skærmens iSight på lokalmenuen Kamera.
4 Vælg Skærmlyd på lokalmenuen Mikrofon.
Indstille Apple LED Cinema Display som en ekstra skærm
Når skærmen på computeren er slået op, kan du vise det samme skærmbillede
på begge skærme eller bruge den ekstra skærm som en udvidelse af skrivebordet.
Brug vinduet Skærm til at indstille skærmdublering eller udvidet skrivebord.
Du indstiller skærmdublering eller udvidet skrivebord på følgende måde:
1 Vælg Apple () > Systemindstillinger, og klik på Skærm.
2 Klik på Opstilling, og følg vejledningen på skærmen.
Dansk 95

Justere farve og lysstyrke
Du kan bruge dit Apple Keyboard til at øge () eller mindske () lysstyrken på
skærmen. Du kan også bruge Systemindstillinger til at justere indstillinger til skærmens
opløsning, lysstyrke og farver.
Du justerer opløsningen, antallet af farver eller lysstyrken på skærmen på følgende
måde:
1 Vælg Apple () > Systemindstillinger, og klik på Skærm.
2 Klik på fanen Skærm.
3 Vælg en opløsning eller farveindstilling, eller træk mærket Lysstyrke for at justere
lysstyrken.
Du ændrer skærmbeskrivelsen eller kalibrerer skærmen på følgende måde:
1 Klik på fanen Farve ind i vinduet Skærm.
2 Vælg en skærmbeskrivelse, eller klik på Kalibrer for at åbne Kalibreringsassistent.
Hvis du vil have flere oplysninger om kalibrering af skærmen, skal du vælge Hjælp >
Mac-hjælp på menulinjen og søge efter “kalibrere”.
96 Dansk

Bruge USB-portene og pladsen til sikkerhedslåsen
Skærmen har tre aktive USB-porte på bagsiden. Brug disse porte til at tilslutte en mus,
et tastatur, iPhone, iPod eller en anden USB-enhed. Sørg for, at skærmens USB-kabel er
sluttet til computeren.
USB-porte
Plads til sikkerhedslås
Du sikrer skærmen ved at bruge pladsen til sikkerhedslåsen til et sikkerhedskabel.
Bruge en VESA Mounting Solution med skærmen
Du kan montere skærmen på en alternativ fod vha. et VESA Mount Adapter Kit, som
kan købes fra Apple Online Store på www.apple.com/dk/store. Brug sættet til at
montere skærmen på en af de tilgængelige VESA-kompatible fødder. Følg blot de
instruktioner, der følger med udstyret.
Dansk 97

Vedligeholdelse og sikkerhed
Før du løfter eller flytter skærmen, skal du evt. afmontere kabler og strømforsyning.
Brug korrekt løfteteknik, når du flytter skærmen. Tag fat i skærmens sider, når du løfter
eller bærer skærmen. Løft ikke skærmen i foden eller ledningerne.
Du rengør skærmen på følgende måde:
1 Tag netledningen ud.
2 Brug den klud, der fulgte med skærmen, eller en anden blød og tør klud til at tørre
støvet af skærmen.
ADVARSEL: Brug ikke rengøringsmidler, der indeholder sprit eller acetone. Brug et
rengøringsmiddel, der er beregnet til skærme. Sprøjt aldrig rensemiddel direkte på
skærmen. Hvis du gør det, drypper det måske ind i skærmen, hvor det kan forårsage
skader.
Følg disse sikkerhedsretningslinjer ved brug af skærmen:
 Du kan kun afbryde strømmen helt ved at trække netledningen ud. Sørg for, at du
trækker i stikket, ikke i ledningen.
 Tag netledningen ud med det samme, hvis stikket er beskadiget, eller ledningerne er
flossede, hvis du spilder noget på skærmen, eller hvis skærmen vælter eller bliver
beskadiget på anden vis.
ADVARSEL: Brug kun den netledning, der fulgte med skærmen. Netledningen er udstyret
med et jordet stik med tre ben, der kun passer til en stikkontakt med jordforbindelse.
Hvis du ikke kan sætte stikket i en stikkontakt, fordi den ikke har jordforbindelse, skal du
kontakte en elektriker for at få installeret en stikkontakt med jordforbindelse.
98 Dansk

ADVARSEL: Skærmen er en stærkstrømskomponent, og du bør under ingen
omstændigheder åbne den, heller ikke når strømmen til er afbrudt. Hvis skærmen har
brug for service, skal du læse “Flere oplysninger samt service og support” på side 102.
Ergonomi
Dette afsnit indeholder nogle gode råd om, hvordan du justerer skærmen, så du
undgår lysreflekser og får den bedste arbejdsstilling.
 Anbring skærmen, så dens overkant er lige i eller en anelse under øjenhøjde, når du
sidder ved tastaturet. Du bestemmer selv, hvor langt fra skærmen du vil sidde, men
45 til 70 cm er normalt.
Dansk 99
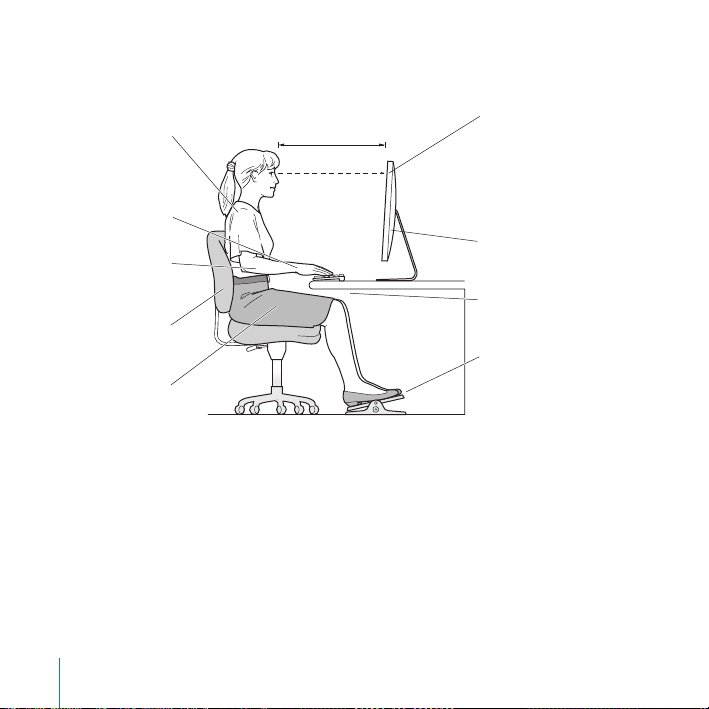
 Vip skærmen op eller ned for at undgå lysreflekser fra loftsbelysning og vinduer.
Afslappede
skuldre
Underarme og
hænder i en
ret linje
Underarme lige
eller en
anelse bøjet
Støtte i
lænden
Lårene en
anelse skråt
45 - 70 cm
Toppen af skærmen i eller
lige under øjenhøjde.
(Det kan være nødvendigt
at justere skærmens højde
ved at hæve eller sænke
arbejdsbordet.)
Skærmen anbringes,
så den ikke reflekterer lys
Plads under arbejdsbordet
Fødderne fladt mod gulvet
eller en fodskammel
Du kan få flere oplysninger om ergonomi, sikkerhed og vedligeholdelse på adressen
www.apple.com/about/ergonomics.
100 Dansk
 Loading...