


 Loading...
Operating Instructions
Hardware Guide
1Guide to the Printer
2Installing Options
3Connecting the Printer
4Configuration
5Paper and Other Media
6Replacing Consumables and Maintenance Kit
7Cleaning the Printer
8Adjusting the Printer
9Troubleshooting
10Removing Misfed Paper
11Appendix
Read this manual carefully before you use this machine and keep it handy for future reference. For safe and correct use, be sure to read the Safety Information before using the machine.
Introduction
This manual contains detailed instructions and notes on the operation and use of this machine. For your safety and benefit, read this manual carefully before using the machine. Keep this manual in a handy place for quick reference.
Do not copy or print any item for which reproduction is prohibited by law. Copying or printing the following items is generally prohibited by local law:
bank notes, revenue stamps, bonds, stock certificates, bank drafts, checks, passports, driver's licenses.
The preceding list is meant as a guide only and is not inclusive. We assume no responsibility for its completeness or accuracy. If you have any questions concerning the legality of copying or printing certain items, consult with your legal advisor.
Important
Contents of this manual are subject to change without prior notice. In no event will the company be liable for direct, indirect, special, incidental, or consequential damages as a result of handling or operating the machine.
Two kinds of size notation are employed in this manual. With this machine refer to the inch version.
For good print quality, the supplier recommends that you use genuine print cartridges from the supplier.
The supplier shall not be responsible for any damage or expense that might result from the use of parts other than genuine parts from the supplier with your office products.
Trademarks
Microsoft, Windows and Windows NT are registered trademarks of Microsoft Corporation in the United States and/or other countries.
Adobe®, PostScript®, Acrobat®, PageMaker® and Adobe Type Manager are registered trademarks of Adobe Systems Incorporated.
PCL® is a registered trademark of Hewlett-Packard Company.
Apple, AppleTalk, EtherTalk, Macintosh, Mac OS, and True Type are trademarks of Apple Computer, Inc., registered in the U.S. and other countries.
IPS-PRINT Printer Language Emulation Copyright© 1999-2000 Oak Technology, Inc., All rights reserved. NetWare is a registered trademark of Novell, Inc.
Other product names used herein are for identification purposes only and might be trademarks of their respective companies. We disclaim any and all rights to those marks.
*The product name of Windows® 95 is MicrosoftR Windows® 95.
*The product name of Windows® 98 is MicrosoftR Windows® 98.
*The product name of Windows® Me is MicrosoftR Windows® Millennium Edition (Windows Me).
*The product names of Windows® 2000 are as follows: Microsoft® Windows® 2000 Professional
Microsoft® Windows® 2000 Server Microsoft® Windows® 2000 Advanced Server
*The product names of Windows® XP are as follows: Microsoft® Windows® XP Home Edition Microsoft® Windows® XP Professional
*The product names of Windows Server® 2003 are as follows: Microsoft® Windows Server® 2003 Standard Edition Microsoft® Windows Server® 2003 Enterprise Edition Microsoft® Windows Server® 2003 Web Edition
*The product names of Windows Server® 2003 R2 are as follows: Microsoft® Windows Server® 2003 R2 Standard Edition Microsoft® Windows Server® 2003 R2 Enterprise Edition Microsoft® Windows Server® 2003 R2 Web Edition
*The product names of Windows NT® 4.0 are as follows: Microsoft® Windows NT® Workstation 4.0
Microsoft® Windows NT® Server 4.0
Some illustrations in this manual might be slightly different from the machine.
Certain options might not be available in some countries. For details, please contact your local dealer.

TABLE OF CONTENTS |
|
Positions of WARNING and CAUTION labels....................................................................................... |
5 |
Manuals for This Printer...................................................................................................................................... |
7 |
How to Read This Manual................................................................................................................................. |
8 |
Symbols........................................................................................................................................................... |
8 |
Description for the Specified Model................................................................................................................. |
9 |
Installing the Operating Instructions............................................................................................................... |
10 |
1. Guide to the Printer |
|
Exterior.............................................................................................................................................................. |
11 |
Inside................................................................................................................................................................. |
13 |
Control Panel.................................................................................................................................................... |
14 |
2. Installing Options |
|
Available Options............................................................................................................................................ |
17 |
Option List..................................................................................................................................................... |
17 |
Option Installation Flow Chart.................................................................................................................... |
17 |
Installing Options......................................................................................................................................... |
18 |
Caution when re-installing the controller board........................................................................................ |
20 |
Attaching Paper Feed Unit TK1030............................................................................................................... |
22 |
Attaching Envelope Feeder Type 400........................................................................................................... |
25 |
Attaching Hard Disk Drive Type 2650........................................................................................................... |
27 |
Attaching Memory Unit Type C 128MB/256MB (SDRAM Module)........................................................ |
29 |
Attaching IEEE 802.11b Interface Unit.......................................................................................................... |
33 |
Attaching Gigabit Ethernet Board Type A...................................................................................................... |
37 |
Attaching Optional Cards............................................................................................................................... |
40 |
Attaching AD1000 (Duplex Unit)................................................................................................................... |
42 |
3. Connecting the Printer |
|
Network Connection........................................................................................................................................ |
47 |
Reading the LED Lamps............................................................................................................................... |
49 |
USB Connection............................................................................................................................................... |
50 |
Parallel Connection.......................................................................................................................................... |
52 |
4. Configuration |
|
Ethernet Configuration..................................................................................................................................... |
53 |
Using DHCP - Detecting the Network Address Automatically................................................................. |
56 |
Making Network Settings for Using NetWare.......................................................................................... |
57 |
1

Setting the Ethernet Speed.......................................................................................................................... |
59 |
IEEE 802.11b (Wireless LAN) Configuration................................................................................................ |
61 |
Setting SSID.................................................................................................................................................. |
63 |
Setting Security Method of Wireless LAN...................................................................................................... |
65 |
Setting a WEP key....................................................................................................................................... |
65 |
Setting WPA................................................................................................................................................. |
66 |
Configuring WPA (802.1X)............................................................................................................................ |
70 |
Installing a Site Certificate........................................................................................................................... |
70 |
Installing Device Certificate......................................................................................................................... |
71 |
Setting Items of WPA................................................................................................................................... |
72 |
5. Paper and Other Media |
|
Paper and Other Media Supported by This Printer....................................................................................... |
75 |
Paper Recommendations................................................................................................................................. |
78 |
Loading Paper.............................................................................................................................................. |
78 |
Storing Paper................................................................................................................................................ |
78 |
Types of Paper and Other Media.............................................................................................................. |
78 |
Paper Not Supported by this Printer........................................................................................................... |
82 |
Print Area...................................................................................................................................................... |
83 |
Loading Paper.................................................................................................................................................. |
85 |
Loading Paper in Tray 1 and the Optional Paper Feed Unit.................................................................... |
85 |
Loading Paper in the Bypass Tray.............................................................................................................. |
94 |
Loading Envelopes.................................................................................................................................... |
100 |
Switching Between Paper Trays............................................................................................................... |
105 |
6. Replacing Consumables and Maintenance Kit |
|
Replacing the Toner Cartridge (Print Cartridge)......................................................................................... |
107 |
Replacing the Maintenance Kit.................................................................................................................... |
112 |
Before Replacing....................................................................................................................................... |
112 |
Replacing the Friction Pad........................................................................................................................ |
113 |
Replacing the Transfer Roller.................................................................................................................... |
115 |
Replacing the Paper Feed Roller.............................................................................................................. |
118 |
Replacing the Fusing Unit......................................................................................................................... |
122 |
7. Cleaning the Printer |
|
Cautions to Take When Cleaning................................................................................................................ |
129 |
2

Cleaning the Friction Pad.............................................................................................................................. |
130 |
Cleaning the Paper Feed Roller.................................................................................................................... |
132 |
Cleaning the Registration Roller................................................................................................................... |
135 |
8. Adjusting the Printer |
|
Adjusting the Image Density......................................................................................................................... |
139 |
Adjusting Tray Registration........................................................................................................................... |
141 |
Reducing Paper Curl...................................................................................................................................... |
144 |
9. Troubleshooting |
|
Error & Status Messages on the Control Panel............................................................................................ |
145 |
Panel Tone...................................................................................................................................................... |
152 |
Printer Does Not Print.................................................................................................................................... |
153 |
Checking the Port Connection.................................................................................................................. |
154 |
Other Printing Problems................................................................................................................................. |
156 |
When You Cannot Print Properly............................................................................................................. |
156 |
Paper Misfeeds Occur Frequently........................................................................................................... |
158 |
The printed image is different from the image on the computer............................................................ |
159 |
When Printer is Not Functioning Properly............................................................................................... |
161 |
Additional Troubleshooting........................................................................................................................... |
162 |
Using the Envelope Lever.............................................................................................................................. |
164 |
10. Removing Misfed Paper |
|
Removing Misfed Paper................................................................................................................................ |
167 |
When "Remove Misfeed Paper Tray" Appears...................................................................................... |
167 |
When "Remove Misfeed Internal Path" Appears.................................................................................... |
169 |
When "Remove Misfeed Paper Exit Cover" Appears............................................................................ |
171 |
When "Remove Misfeed Duplex Unit" Appears..................................................................................... |
181 |
11. Appendix |
|
Moving and Transporting the Printer............................................................................................................ |
185 |
Moving the Printer..................................................................................................................................... |
185 |
Consumables.................................................................................................................................................. |
187 |
Toner Cartridge (Print Cartridge)............................................................................................................. |
187 |
Maintenance Kit........................................................................................................................................ |
188 |
Specifications................................................................................................................................................. |
189 |
Mainframe................................................................................................................................................. |
189 |
3

Options....................................................................................................................................................... |
192 |
INDEX........................................................................................................................................................... |
197 |
4

Positions of  WARNING and
  CAUTION labels
This machine has labels for  WARNING and
  CAUTION at the positions shown below. For safety, please follow the instructions and handle the machine as indicated.
AUB050S
Do not incinerate toner or toner containers. Toner dust may cause flashback when exposed to open flames.
The inside of this printer becomes very hot. Do not touch parts with this label (indicating a hot surface). Touching these parts will result in burns.
The inside of this printer becomes very hot. Do not touch parts with this label (indicating a hot surface). Touching these parts will result in burns.
5
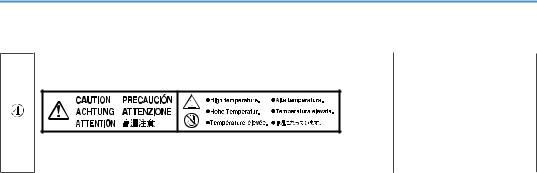
The inside of this printer becomes very hot. Do not touch parts with this label (indicating a hot surface). Touching these parts will result in burns.
6

Manuals for This Printer
For particular functions, see the relevant parts of the manual.
Safety Information
Provides information on safe usage of this machine.
To avoid injury and prevent damage to the machine, be sure to read this.
Quick Installation Guide
Contains procedures for removing the printer from its box, connecting it to a computer, and installing its driver.
Hardware Guide (This manual)
Contains information about paper and procedures such as installing options, replacing consumables, responding to error messages, and resolving jams.
Software Guide
Contain procedures for using this machine in a network environment, utilizing the software, and using security functions.
7
How to Read This Manual
Symbols
This manual uses the following symbols:
Indicates important safety notes.
Ignoring these notes could result in serious injury or death. Be sure to read these notes. They can be found in the "Safety Information".
Indicates important safety notes.
Ignoring these notes could result in moderate or minor injury, or damage to the machine or to property. Be sure to read these notes. They can be found in the "Safety Information".
Indicates points to pay attention to when using the machine, and explanations of likely causes of paper misfeeds, damage to originals, or loss of data. Be sure to read these explanations.
Indicates supplementary explanations of the machine's functions, and instructions on resolving user errors.
This symbol is located at the end of sections. It indicates where you can find further relevant information. [ ]
Indicates the names of keys that appear on the machine's display. [ ]
Indicates the names of keys on the machine's control panel.
8
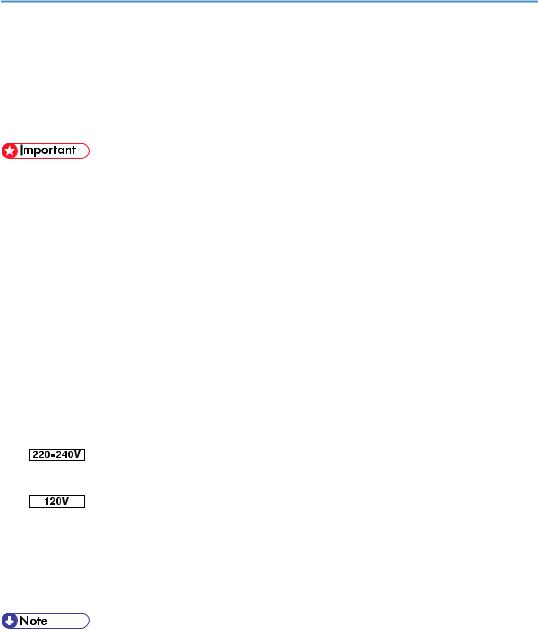
Description for the Specified Model
In this manual, the following items explain about the printer for the specified models:
This explains about the 220-240 V model printer.
Read if you purchase this model.
This explains about the 120 V model printer.
Read if you purchase this model.
• You can identify the printer's model by checking the label on its inside as shown.
AUB067S |
9
Installing the Operating Instructions
Follow the instructions in the HTML Operating Instructions Manuals that are provided on the "Manuals" CR-ROM.
•System Requirements :
•Windows 95/98/Me, Windows 2000/XP, Windows Server 2003/2003 R2 or Windows NT4.0.
•800 × 600 or higher monitor resolution.
•Web Browser Requirements :
•Microsoft Internet Explorer 5.5 SP2 or higher
•Firefox 1.0 or higher
1.Quit all applications currently running.
2.Insert the CD-ROM "Manuals" into the CD-ROM drive.
The installer starts.
3.Select an interface language and the model type you want to use, and then click [OK].
4.Click [Install manuals] or [Install HTML Manuals].
If you want to read manuals from CD-ROM, click [Read manuals].
If you want to read manuals from CD-ROM, click [Read HTML Manuals] or [Read PDF Manuals].
5.Follow the instructions on the screen to complete the installation.
6.Click [Finish] when the installation is completed.
7.Click [Exit].
•Auto Run may not work under certain operating system setting. If this is the case, copy all data on the CD-ROM root directory to your hard disk drive, and then launch "Setup.exe" to start the installation.
•To uninstall the Operating Instructions Manual, select [Programs] in the [Start] menu, select your printer driver, and then click [uninstall]. You can uninstall each Operating Instructions separately.
•If you are using an unsupported Web browser and the simpler version of the Operating Instructions Manual does not display correctly, open the folder "MANUAL_HTML\LANG\ (language)\(manual name) \unv\" on the "Manuals" CD-ROM, and then double-click on "index.htm".
10
1. Guide to the Printer
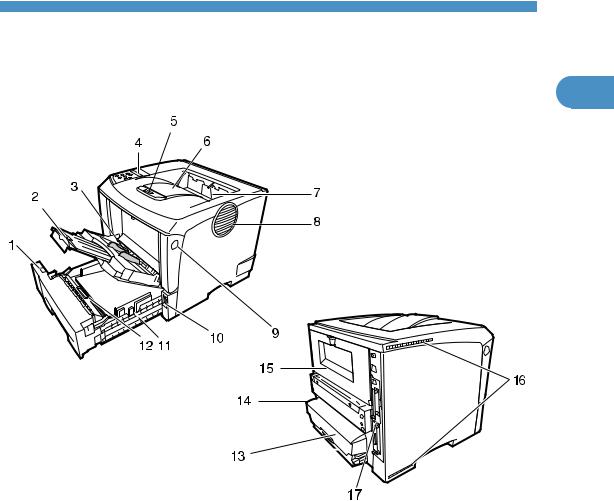
Exterior |
1 |
AUB034S
1.Paper Size Dial
Adjust this dial to match the size and feed direction of the paper loaded in the paper tray.
2.Bypass Tray Extension
Pull out this extension to load paper into the Bypass Tray when its length is longer than B5 .
.
3.Bypass Tray
Use this tray to print onto thick paper, OHP transparencies, adhesive labels, envelopes as well as plain paper. When printing on custom paper size, printer driver settings are required.
Up to 100 sheets of plain paper (80 g/m2, 20 lb.) can be loaded.
See p.75 "Paper and Other Media Supported by This Printer" and p.85 "Loading Paper".
4.Control Panel
Contains keys for the printer operation and display that shows the printer status.
5.Tray Extension
Pull out this extension when paper's length is longer than B5.
11

1.Guide to the Printer
6.Output Tray (Standard Tray)
Stacks printed output with the print side facing down.
7.Paper Exit Cover
1Open this cover to remove misfed paper.
8.Ventilator
Helps to keep components inside the printer from overheating.
Do not block or obstruct this hole. A malfunction may occur due to overheating.
9.Front Cover Release Button
Use this button to open the front cover.
10.Power Switch
Use this switch to turn the printer power on and off.
11.Paper Tray (Tray 1)
Loads up to 500 sheets of plain paper (80 g/m2, 20 lb.) into this tray for printing. The paper tray is displayed with "Tray 1" on the display.
12.Friction pad
This is provided to feed one sheet of paper at a time. Clean the friction pad when more than one sheet of paper is fed into the printer. Also, replace the friction pad when the message "Replace Maintenance Kit", appears.
13.Paper Tray Cover
Prevents paper inside the tray from getting dirty.
14.Power Port
Connect the power cable to this port and the other end of the cable to the outlet.
15.Rear Cover
Remove this cover to install the optional duplex unit or to replace the fusing unit.
16.Ventilators
Help to keep components inside the printer from overheating.
Do not block or obstruct these holes. A malfunction may occur due to overheating.
17.Controller Board
Slide it out to install the optional memory unit.
Plug cables such as the ethernet cable, USB cable and parallel interface cable and into their connectors.
12
Inside
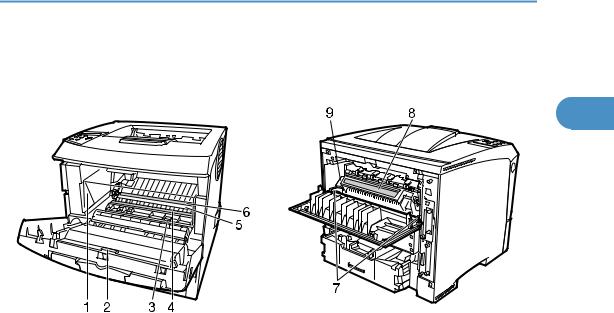
Inside
[Front view] |
[Back view] |
1
AUB031S
1.Toner Cartridge (Print Cartridge)
Includes toner and a photo conductor unit.
When "Replace Print Cartridge" appears on the display, replace this unit.
2.Front Cover
Open this cover when accessing the inside of the printer.
3.Guide Board
Open this board to remove misfed paper.
4.Registration Roller
Feeds the paper. If it becomes dirty, clean it. See p.129 "Cleaning the Printer".
5.Transfer Roller Cover
Open this cover when replacing a transfer roller.
6.Transfer Roller
When "Replace Maintenance Kit" appears on the display, replace this roller.
7.Fusing Unit Lock Levers
Lift these levers when replacing the fusing unit.
8.Fusing Unit
Fuses the image onto paper.
When "Replace Maintenance Kit" appears on the display, replace this unit.
9.Envelope lever
Use this lever if envelopes become wrinkled during printing. Using the envelope lever can improve print quality.
13
1. Guide to the Printer
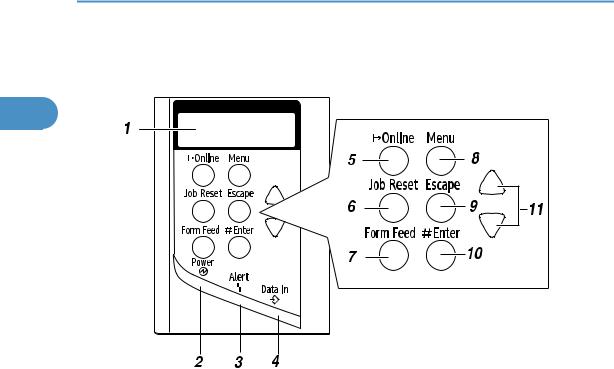
Control Panel
1
AUB035S
1.Display
Shows the current status of the printer and error messages.
2.Power indicator
Is on while the printer power is on.
Is off when the power is turned off or while the printer is in Energy Saver mode.
3.Alert indicator
Blinks or lights up whenever any printer error occur. A message describing the cause of the error also appears on the display.
4.Data In indicator
Blinks while the printer is receiving data from a computer. Is on if there is data to be printed.
5.[Online] key
Press this key to switch the printer between online and offline.
6.[Job Reset] key
When the printer is online, press this key to cancel any ongoing print jobs. See "Canceling a Print job", Software Guide.
7.[Form Feed] key
If the printer is offline, press this key to print all the data left in the printer's input buffer. This does not work if the printer is online.
14

|
|
Control Panel |
|
|
|
|
|
8. |
[Menu] key |
|
|
|
Press this key to make and check the current printer settings. |
|
|
9. |
[Escape] key |
|
|
|
Press this key to return to the previous condition on the display. |
1 |
|
10.[ Enter] key
Press this key to execute menu items selected on the display. Press this key to clear some errors.
11.[ ] [
] [ ] keys
Press keys to increase or decrease values on the display when making settings.
Keep the key pressed to quicken scrolling, and increase or decrease values on the display in units of 10.
15

1. Guide to the Printer
1
16

2. Installing Options
Available Options
This section describes how to install options.
By installing options, you can improve the printer performance and have an expanded variety of features 2 to use.
•Before installing options, the machine should be turned off and unplugged for at least an hour. Components inside the machine become very hot, and can cause a burn if touched.
•Before moving the machine, unplug the power cable from the outlet. If the cable is unplugged abruptly, it could become damaged. Damaged plugs or cables can cause an electrical or fire hazard.
•When lifting the machine, use the grips on both sides. The machine could break or cause an injury if dropped.
•The voltage rating of the connector for options is 24 V DC or less.
Option List
The following is a list of options for this printer.
•Paper Feed Unit TK1030
•Envelope Feeder Type 400
•AD1000 (Duplex Unit)
•Memory Unit Type C 128MB/ 256MB
•IEEE 802.11b Interface Unit
•Gigabit Ethernet Board Type A
•Hard Disk Drive Type 2650
•VM Card Type D
•Data Storage Card Type A
Option Installation Flow Chart
Installing multiple options in the following order is recommended:
17

2.Installing Options
1.Attach the paper feed unit (Paper Feed Unit TK1030).
Attach the paper feed unit to the bottom of the printer.
You can attach up to two paper feed units. Up to 1600 sheets of paper can be loaded.
2.Attach the envelope feeder (Envelope Feeder Type 400).
Replace the paper tray of the optional feeder with the envelope feeder.
2 |
3. |
Take out the controller board from the printer. |
|
|
4. |
Remove all the SDRAM module before installing the hard disk drive. |
|
|
5. |
Install the hard disk drive (Hard Disk Drive Type 2650). |
|
|
|
Install the hard disk drive to the controller board. |
|
|
6. |
Install the SDRAM module (Memory Unit Type C 128MB/ 256MB). |
|
|
|
Install the module to the SDRAM module slot on the controller board. |
|
|
|
There are three types of memory unit: 128 MB and 256 MB. |
|
|
7. |
Install the IEEE 802.11b interface unit, or the Gigabit Ethernet board. |
|
|
|
Install one of these options into the vacant expansion slot (on the left) of the controller board. |
|
|
|
The followings can be installed: |
|
|
|
• |
IEEE 802.11b Interface Unit |
|
|
• |
Gigabit Ethernet Board Type A |
Do not install more than one option. These options do not function simultaneously.
8.Install the VM card (VM Card Type D) or the data storage card (Data Storage Card Type A).
Insert these units into the SD card slot on the controller board.
9.Attach the AD1000 (duplex unit).
Attach the duplex unit to the rear of the printer.
Installing Options
Install options in the positions shown in the illustration.
18
Available Options
Exterior
2
AUB053S
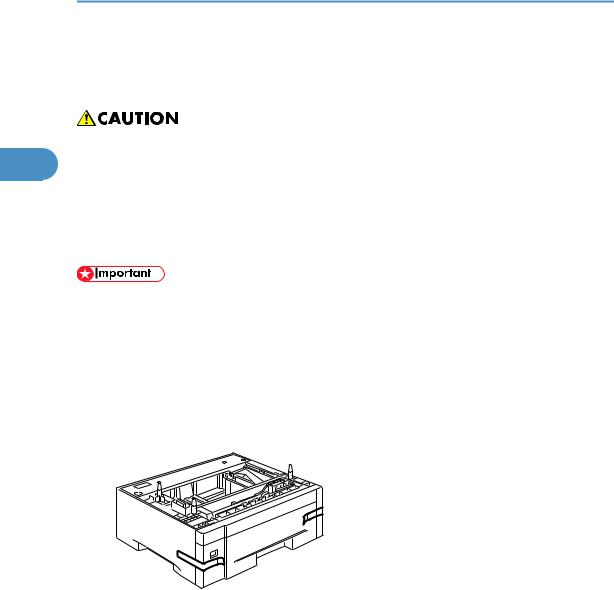
1.Paper Feed Unit TK1030 (Tray 2 or Tray 3)
You can load up to 500 sheets (60-130 g/m2, 16-34 lb.) of plain paper into the tray. See p.22 "Attaching Paper Feed Unit TK1030".
2.Envelope Feeder Type 400
You can load up to 60 envelopes (72-90 g/m2, 19-24 lb.) into the tray. See p.25 "Attaching Envelope Feeder Type 400".
3.AD1000 (duplex unit)
You can print on both sides of paper.
Install the duplex unit by removing the rear cover of the printer. See p.42 "Attaching AD1000 (Duplex Unit)".
•Up to two Paper Feed Units TK1030 can be attached.
•The upper optional paper feed unit is displayed with "Tray 2", and the lower unit is displayed with "Tray 3" on the display.
•The Envelope Feeder is a tray that slides into the optional paper feed unit. Without the optional paper feed unit, the Envelope Feeder cannot be used.
•Your printer can accommodate two optional paper feed units. The envelope feeder unit can be used in "Tray 2" and "Tray 3". The main unit's feed tray (Tray 1) cannot be used for this purpose.
19
2. Installing Options
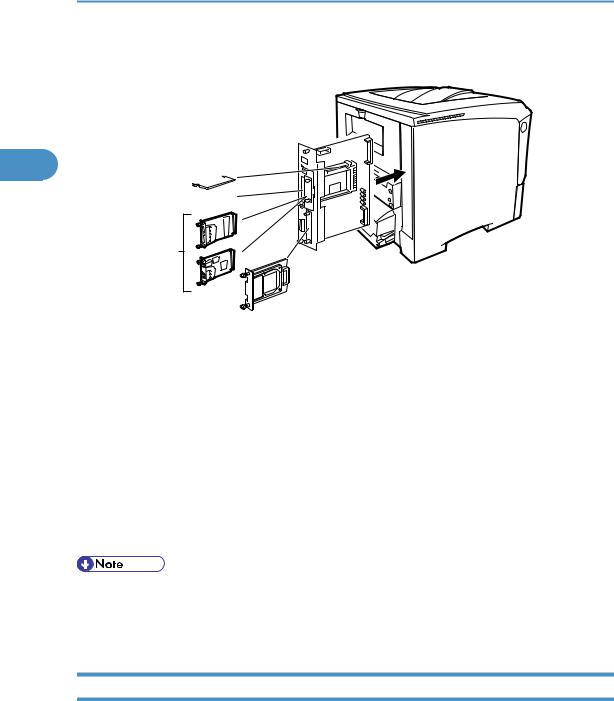
Interior
2
1 
2 
3
4
AUB055S
1.Memory Unit Type C 128MB/ 256MB (SDRAM module)
Install 128 MB or 256 MB SDRAM module into the controller board slot.
See p.29 "Attaching Memory Unit Type C 128MB/256MB (SDRAM Module)"
2.Optional cards
See p.40 "Attaching Optional Cards".
3.Optional boards
See p.33 "Attaching IEEE 802.11b Interface Unit". See p.37 "Attaching Gigabit Ethernet Board Type A".
4.Hard Disk Drive Type 2650
See p.27 "Attaching Hard Disk Drive Type 2650".
•You cannot install following options at the same time:
•IEEE 802.11b Interface Unit
•Gigabit Ethernet Board Type A
Caution when re-installing the controller board
This section describes handling the controller board when installing options.
If you slide out the controller board to install units, carefully read the instruction to re-install the controller board.
20

Available Options
•The following may occur if the controller board is not properly installed:
•all control panel indicators are lit.
•no control panel indicators is lit.
•the error message appears on the display.
2
21
2. Installing Options
Attaching Paper Feed Unit TK1030
When installing multiple options, install the paper feed unit first.
|
• Before moving the machine, unplug the power cord from the outlet. If the cord is unplugged abruptly, |
2 |
it could become damaged. Damaged plugs or cords can cause an electrical or fire hazard. |
• When lifting the paper feed unit, hold the bottom of it, and then lift it slowly. Lifting it carelessly or dropping it may cause an injury.
• The printer weighs about 17 kg (37.5 lb.). When lifting the machine, use the inset grips on both sides. Otherwise the printer could break or cause injury if dropped.
• Do not slide out more than one paper tray at a time. Fully extending more than one full tray at a time can cause the machine to topple over.
• Check the printer nameplate to confirm the model code.
• Before using the new paper feed unit, you must make settings in the printer driver.
1.Check the package contains the following: Paper Feed Unit (including a paper tray)
ZKDX210J
2.Turn off the power of the printer, and then unplug the printer's power cable and the interface cable.
22

Attaching Paper Feed Unit TK1030
3. Remove the adhesive tape from the paper feed unit.
2
ZKDX390J
4.Align the holes over the pins, and then lower the printer gently onto the paper feed unit.
There are three pins on the top of the paper feed unit that point straight up. On the bottom of the printer, there are three holes.
AUB100S
AUB200S
5.Attach the interface cable to the printer.
6.Plug the printer's power cord back into the wall outlet, and then turn on the power.
•After finishing installation, you can check whether the paper feed unit is properly installed: Print the configuration page from the [List/Test Print] menu. If it is installed properly, you will see "Paper Feed
23

2. Installing Options
Unit (Tray 2)" or "Paper Feed Unit (Tray 2)", "Paper Feed Unit (Tray 3)" for "Connection Equipment" on the configuration page.
•If the paper feed unit is not installed properly, reinstall it from the start. If you cannot install it properly even after attempting reinstallation, contact your sales or service representative.
•To attach two paper feed units at the same time, first stack them one upon the other, and then attach them as a single unit.
2

•"Printing the Test Page", Quick Installation Guide.
•p.85 "Loading Paper"
•p.141 "Adjusting Tray Registration"
24
Attaching Envelope Feeder Type 400
Attaching Envelope Feeder Type 400
•Do not slide more than plural paper tray out at once. Having plural full paper trays fully extended could cause the machine to topple.
• The tray of the upper optional paper feed unit (Tray 2) is beneath the standard paper tray (Tray 1). |
2 |
•Your printer can accommodate two optional paper feed units. The envelope feeder unit can be used in "Tray 2" and "Tray 3". The main unit's feed tray (Tray 1) cannot be used for this purpose.
The following explanation uses the example of installing the envelope feeder unit in "Tray 2".
1.Check the package contains the following: Envelope Feeder
AUB019S
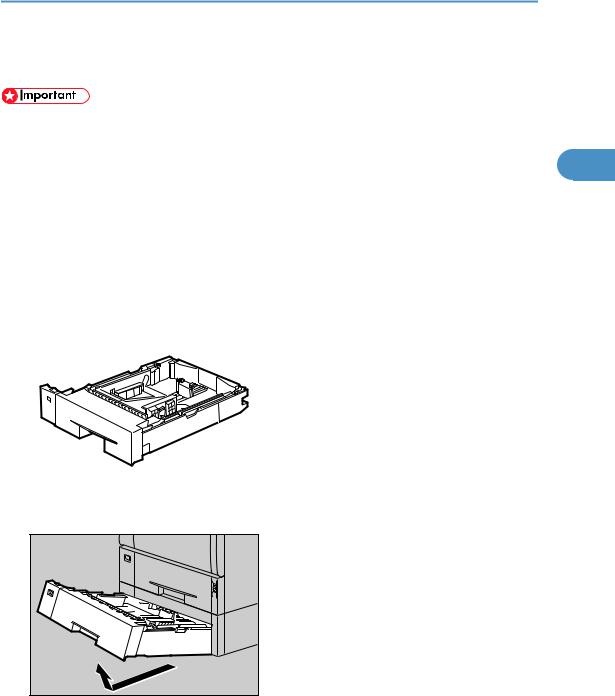
2.Pull out the optional paper tray (Tray 2) of the optional paper feed unit until it stops. After that, lift it slightly, and then pull it out.
ZKEP330E |
25
2.Installing Options
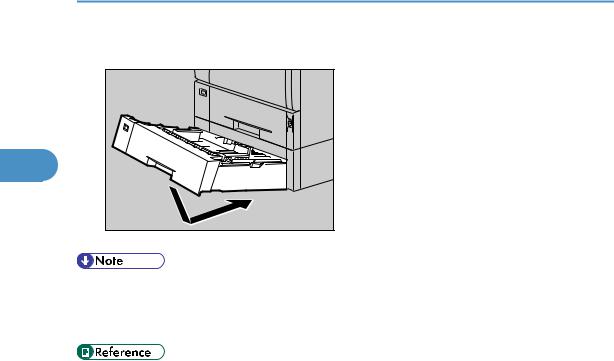
3.Lift the front of the envelope feeder, and slide it carefully into the paper feed until it stops.
2 |
ZKEP340E |
•This unit is a tray that slides into the optional paper feed unit. Without the optional paper feed unit, this Envelope Feeder cannot be used.
•Keep the removed paper tray with paper in a cool dark place.
•p.85 "Loading Paper"
26
Attaching Hard Disk Drive Type 2650
Attaching Hard Disk Drive Type 2650
•Do not touch the inside of the controller board compartment. Doing so may cause a machine malfunction or a burn.
2
•Before touching the hard disk drive, touch something metal to discharge any static electricity. Static electricity can damage the hard disk drive.
•Do not subject the hard disk drive to physical shocks.
•Before using the new hard disk drive, be sure to make the settings in the printer driver.
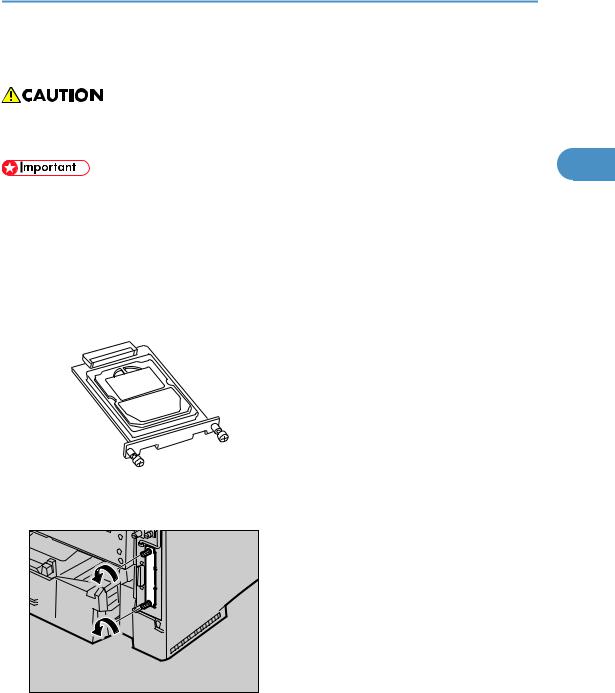
1.Check the package contains the following: Hard Disk Drive
ZKDX220J
2.Turn off the power of the printer, and then unplug the power cable.
3.Remove the two screws and the cover of the hard disk drive mounting bracket.
AUB215S |
The removed screws and cover are not used when installing the hard disk drive.
27
2.Installing Options
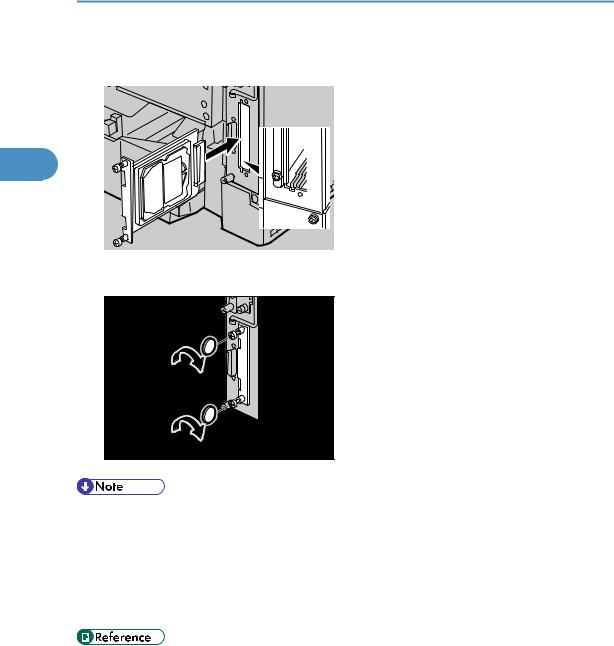
4.Slowly insert the hard disk drive while aligning it with the top and bottom rails in the printer until it stops.
2
AUB216S
5. Fasten the two screws to fix the hard disk drive.
AUB217S |
•Use a coin or similar object if the screws do not turn easily.
•After finishing installation, you can check whether the hard disk drive is properly installed: Print the configuration page from the [List/Test Print] menu. If it is installed properly, you will see "Hard Disk
Drive" for "Device Connection" on the configuration page.
•If the Hard disk drive is not installed properly, repeat the procedure from the start. If you cannot install it properly even after reinstallation, contact your sales or service representative.
•"Printing the Test Page", Quick Installation Guide.
28
Loading...