


6016X
Quick Start Guide
Thank you for buying ALCATEL ONETOUCH 6016X. We hope you will enjoy your high-quality mobile communication experience.
Important:
Your phone is a unibody device, so the back cover and battery are not removable.
If your phone meets any unexpected system crash, try to power off it by pressing and holding the Power key and Volume up key at the same time for a while until power-on animation appears.
For more information about how to use the cellphone, please go to www.alcatelonetouch.com to download the complete user manual. From the website you can also consult the FAQ, upgrade software, etc.
English-CJB18N0ALAAB
1

Table of contents |
|
||
1 |
Your mobile |
|
3 |
2 |
Text input |
|
14 |
3 |
Phone call |
|
15 |
4 |
People |
|
17 |
5 |
Messaging |
|
18 |
6 |
|
19 |
|
7 |
Getting connected |
|
20 |
8 |
Find my location using GPS satellites |
22 |
|
9 |
Data backup |
|
23 |
10 |
Factory data reset |
|
23 |
11 Applications & Internal storage |
24 |
||
12 Making the most of your phone |
25 |
||
Safety and use |
|
27 |
|
General information |
|
34 |
|
Warranty |
|
35 |
|
Troubleshooting |
|
36 |
|
|
|
This product meets |
applicable |
|
|
national SAR limits of 2.0 W/kg. The |
|
|
|
specific maximum SAR values can be |
|
|
|
found on page 30 of this user guide. |
|
|
|
When carrying the product or using |
|
|
|
it while worn on your body, either |
|
|
|
use an approved accessory such as |
|
www.sar-tick.com |
|
|
|
|
|
a holster or otherwise maintain a |
|
|
|
distance of 10 mm from the body to |
|
|
|
ensure compliance with RF exposure |
|
|
|
requirements. Note that the product |
|
|
|
may be transmitting even if you are |
|
|
|
not making a phone call. |
|
PROTECT YOUR HEARING
To prevent possible hearing damage, do not listen at high volume levels for long periods. Exercise caution when holding your device near your ear while the loudspeaker is in use.
2
1 Your mobile
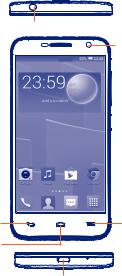
1.1Keys and connectors
Headset connector
Front camera
 Touch screen
Back key |
Menu key |
Home key
Micro-USB connector
3
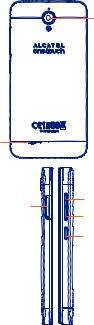
Camera
Speaker
Micro-SIM |
Volume up |
& Micro SD |
Volume down |
card slot |
|
|
Power key |
4

Menu key
•Touch to access Wallpaper, Manage applications or Settings.
•Touch and hold: Touch and hold to open a list of thumbnail images of applications you've worked with recently.
Home key
•While on any application or screen, touch to return to the Home screen.
Back key
• Touch to go back to the previous screen, or to close a dialog box, options menu, the notification panel, etc.
Power key
•Press: Lock the screen/Light up the screen
•Press and hold: Power on or generate a pop up menu providing more options, such as Power off, Restart, Airplane mode, etc.
•Press and hold Power key and Volume down key to capture a screenshot.
•Press to light up the screen when it dims during a call.
•Mute the ringtone of an incoming call.
Volume keys
•Under call mode, adjust the earpiece or headset volume.
•In Music/Video/Streaming mode, adjust the media volume.
•Press to mute the ringtone when there’s an incoming call.
5

1.2Getting started
1.2.1Set-up
Inserting or removing the Micro-SIM & Micro SD card
You must insert your Micro-SIM or MicroSD card to make phone calls. Before inserting/removing the Micro-SIM or MicroSD card, you should ensure the phone is off, to protect it from corruption or damage.
To install, press the small hole on Micro-SIM & MicroSD card protector by SIM card tool, and then pull out the Micro-SIM & MicroSD card slot. Put the Micro-SIM card or MicroSD card into the slot with chip facing downward, and then pull in the slot.
To remove the card, open card protector by using SIM card tool, fetch out Micro-SIM card or MicroSD card, and then pull in the slot.
Your phone only supports Micro-SIM card. Do not attempt
to insert other SIM types like mini and nano cards,
otherwise you may damage your phone.
Before inserting/removing the MicroSD card, you should ensure the phone is off, to protect it from corruption or damage. In addition, regularly removing or inserting the
MicroSD card may cause the phone to restart.
6

Charging the battery
Connect the battery charger to your phone and mains socket respectively.
If the battery is very low, there will be no indication that power is being received until the charge is sufficient to show the charging status bar. To reduce power consumption and energy waste, once the battery is fully charged, disconnect your charger from the plug; switch off Wi-Fi, GPS, Bluetooth or background-running applications when not in use; reduce the backlight time, etc.
1.2.2Power on your phone
Hold down the Power key until the phone powers on. It will take a few seconds before the screen lights up.
Set up your phone for the first time
The first time you power on the phone, you should set the following options: language, date & time, Google account, etc.
1.2.3Power off your phone
Hold down the Power key from the Home screen until the Phone options appear, select Power off.
7
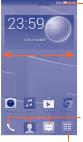
1.3Home screen
You can bring all the items (applications, shortcuts, folders and widgets) you love or use most frequently to your Home screen for quick access. Slide the Home screen horizontally left and right to get a complete view of the home screen. Touch the Home key to switch to Home screen.
Status bar
• Status/Notification indicators
Favorite application tray
•Touch to enter the application.
•Touch and hold to move or change applications.
Application tab
• Touch to open main menu.
8

1.3.1Using the touchscreen
Touch 
To access an application, touch it with your finger.
Touch and Hold
Touch and hold the home screen to access Select wallpaper from.
Drag 
Place your finger on any item to drag it to another location.
Slide/Swipe 
Slide the screen to scroll up and down the web pages; slide left and right to view applications, images… at your convenience.
Flick
Similar to swiping, but flicking makes it moves quicker.
Pinch/Spread 

Place your fingers of one hand on the screen surface and draw them apart or together to scale an element on the screen.
Rotate
Automatically change the screen orientation from portrait to landscape by turning the phone sideways to have a better view.
9
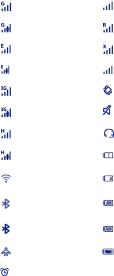
1.3.2Status bar
From status bar, you can view both phone status (to the right side) and notification information (to the left side).
Status icons
|
GPRS connected |
|
No signal (gray) |
|
|
|
|
|
GPRS in use |
|
Roaming |
|
|
|
|
|
EDGE connected |
|
No SIM card inserted |
|
|
|
|
|
EDGE in use |
|
Signal strength (blue) |
|
|
|
|
|
3G connected |
|
Vibrate mode |
|
|
|
|
|
3G in use |
|
Ringer is silenced |
|
|
|
|
|
HSPA (3G+) connected |
|
Headset connected |
|
|
|
|
|
HSPA (3G+) in use |
|
Battery is very low |
|
|
|
|
|
Connected to a Wi-Fi |
|
Battery is low |
|
network |
|
|
|
|
|
|
|
|
|
|
|
Bluetooth is on |
|
Battery is partially |
|
|
drained |
|
|
|
|
|
|
|
|
|
|
Connected to a |
|
Battery is full |
|
Bluetooth device |
|
|
|
|
|
|
|
|
|
|
|
Airplane mode |
|
Battery is charging |
|
|
|
|
|
Alarm is set |
|
|
|
|
|
|
10
Notification icons
|
New text or |
|
Missed call |
|
multimedia message |
|
|
|
|
|
|
|
|
|
|
|
Problem with SMS or |
|
Call in progress |
|
MMS delivery |
|
|
|
|
|
|
|
|
|
|
|
New Hangouts message |
|
Call forwarding is on |
|
|
|
|
|
New voicemail |
|
Radio is on |
|
|
|
|
|
Upcoming event |
|
Uploading data |
|
|
|
|
|
Portable Wi-Fi hotspot |
|
Downloading data |
|
is on |
|
|
|
|
|
|
|
|
|
|
|
Song is playing |
|
Select input method |
|
|
|
|
|
Screenshot captured |
|
An open Wi-Fi network |
|
|
is available |
|
|
|
|
|
|
|
|
|
|
USB tethering is on |
|
Phone is connected via |
|
|
USB cable |
|
|
|
|
|
|
|
|
|
11
Touch and drag down the Status bar to open the Quick setting panel or Notification panel.Touch and drag up to close it.
When there are notifications, you may touch and drag the Status bar with two fingers to access Quick setting panel directly.
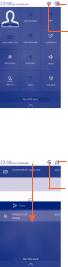
Quick setting panel
You can enable or disable functions or change modes by touching the icons on Quick setting panel.
Touch to switch to the notification panel
Touch to access Settings, where you can set more items
Notification panel
When there are notifications, touch and drag down the Status bar to open the Notification panel and read the detailed information.
Touch to switch to the
Quick setting panel
Touch to clear all event–based notifications (other ongoing notifications will remain)
12
 Loading...