


 Loading...
SnapScan™ e42/e52
Owner’s Guide
!Preface
This chapter gives you information about SnapScan and about How to Use this Online Guide.
!Chapter 1: Preparing the Scanner
“Preparing the Scanner” explains how to prepare your SnapScan for installation.
!Chapter 2: Installing the Scanner for PC
This chapter shows you how to set up your SnapScan for your PC.
!Chapter 3: Configuring Buttons on Your PC
This chapter shows you how to configure your SnapScan Buttons on your PC.
!Chapter 4: Installing the Scanner for Macintosh
This chapter shows you how to set up your SnapScan for your Macintosh computer.
!Chapter 5: Configuring Buttons on Your Macintosh Computer
This chapter shows you how to configure your SnapScan Buttons on your Macintosh computer.
!Chapter 6: Making Your First Scan
Here you find instructions on how to place reflective originals on the glass plate of your scanner.
!Chapter 7: Using the Transparency Module (SnapScan e52)
Here you find instructions on how to use the transparency module to scan negatives, transparencies or slides.
!Appendix A: Troubleshooting
“Troubleshooting” can be helpful when you come across problems.
!Appendix B: Technical Information
This appendix provides specifications for your SnapScan.
!Appendix C: Regulation Compliance
This appendix gives you information about safety regulations and electromagnetic compatibility.
ab

Trademarks
Agfa and the Agfa rhombus are trademarks of Agfa-Gevaert A.G.
ScanWise and SnapScan are trademarks of Agfa-Gevaert N.V.
Acrobat and Photoshop LE are trademarks of Adobe Systems Incorporated which may be registered in certain jurisdictions.
Apple, Macintosh, PowerPC and Mac OS are trademarks of Apple Computer Inc., registered in the U.S. and other countries.
email VoiceLink Basic is a trademark of inChorus.com.
IBM PC is a trademark of the International Business Machines Corporation.
Microsoft, Windows and Windows NT are registered trademarks of the Microsoft Corporation in the U.S. and other countries.
Pentium is a registered trademark of the Intel Corporation.
Photo Explorer and PhotoImpact are trademarks of Ulead Systems which may be registered in certain jurisdictions.
Readiris is a registered trademark of I.R.I.S.
Web!Personal is a registered trademark of Noble Twin Mountain B.V.
Other product or company names are trademarks or registered trademarks of their respective holders.
Copyright© February 2001 Agfa-Gevaert N.V.
All rights reserved.
All software and hardware described in this document are subject to change without any notice.
Trademarks 2

Contents |
|
Preface ............................................................................................................................................... |
5 |
About SnapScan ......................................................................................................................... |
6 |
Environmental Requirements...................................................................................................... |
6 |
Precautions ................................................................................................................................. |
7 |
Cleaning your Scanner................................................................................................................ |
7 |
How to Use this Online Guide ......................................................................................................... |
8 |
How to Print this Guide .................................................................................................................... |
8 |
Chapter 1: Preparing the Scanner................................................................................................... |
9 |
Unpacking the Scanner............................................................................................................. |
10 |
Taking a Closer Look ................................................................................................................ |
10 |
Changing the Handle................................................................................................................. |
12 |
Changing the Button Cap.......................................................................................................... |
14 |
Unlocking the Scanner .............................................................................................................. |
15 |
Chapter 2: Installing the Scanner for PC...................................................................................... |
16 |
Minimum System Requirements ............................................................................................... |
17 |
Installing the Scanner Software................................................................................................. |
18 |
Connecting the Scanner to Your PC ......................................................................................... |
21 |
Installing Additional Software .................................................................................................... |
22 |
Chapter 3: Configuring Buttons on Your PC ............................................................................... |
23 |
Selecting a Different ScanWise Configuration .......................................................................... |
24 |
Modifying an Existing Configuration .......................................................................................... |
25 |
Creating a New Configuration ................................................................................................... |
28 |
Modifying the ScanWise Settings.............................................................................................. |
31 |
Chapter 4: Installing the Scanner for Macintosh......................................................................... |
33 |
Minimum System Requirements ............................................................................................... |
34 |
Installing the Image Editing Software........................................................................................ |
34 |
Installing the Scanner Software................................................................................................. |
35 |
Connecting the Scanner to the Macintosh Computer ............................................................... |
38 |
Installing Additional Software .................................................................................................... |
39 |
Chapter 5: Configuring Buttons on Your Macintosh Computer ................................................ |
40 |
Contents 3

Selecting a Different ScanWise Configuration .......................................................................... |
41 |
Modifying an Existing Configuration .......................................................................................... |
42 |
Creating a New Configuration ................................................................................................... |
45 |
Modifying the ScanWise Settings.............................................................................................. |
47 |
Chapter 6: Making Your First Scan............................................................................................... |
49 |
Chapter 7: Using the Transparency Module (SnapScan e52 only) ............................................ |
51 |
Appendix A: Troubleshooting ....................................................................................................... |
55 |
Appendix B: Technical Information .............................................................................................. |
58 |
Appendix C: Regulation Compliance............................................................................................ |
60 |
Safety Regulations .................................................................................................................... |
61 |
UL Safety Statement ......................................................................................................... |
61 |
TÜV: Wichtige Sicherheitshinweise................................................................................... |
61 |
Electromagnetic Compatibility................................................................................................... |
62 |
Federal Communications Commission Radio Frequency Interference Statement ........... |
62 |
Industry Canada Class A and B Label Requirements ....................................................... |
62 |
Declaration of Conformity: SnapScan e42/e52 ......................................................................... |
63 |
Contents 4

Preface
!About SnapScan
!Environmental Requirements
!Precautions
!Cleaning your Scanner
!How to Use this Online Guide
!How to Print this Guide
Preface 5

About SnapScan
In this Owner’s Guide, the name SnapScan is used for both the SnapScan e42 and e52.
The SnapScan is a one pass flatbed color scanner with a resolution of
1200 x 2400 ppi equipped with a cold cathode lamp. It is based on CCD (Charge-Coupled Device) scanning technology. With the SnapScan, you can scan line-art, gray-scale and color reflective originals up to A4 format. With the SnapScan e52 you can also scan negatives, transparencies or slides.
The scanned data is transferred through the computer’s USB (Universal Serial Bus) port. The USB technology makes it easy to install multiple peripherals to your computer. USB eliminates any need to turn off or restart the computer when attaching a new peripheral.
SnapScan is a scanner that captures and converts reflective originals (for example pictures, text) into electronic data that can be used in computer applications. With the SnapScan e52 you can also scan negatives, transparencies or slides. It offers high-resolution image capturing and is an ideal tool in making presentations come to life.
SnapScan supports multiple scanning modes and includes scanner software to get you started right away. With its powerful and easy-to-use scanner driver software, SnapScan gives you easy access to high-quality color scans. The scanner driver software gives you a number of additional features to create special effects or to reproduce even the most difficult originals.
The document cover is adjustable: when you put a thick original (like a book or a magazine) on the reflective glass plate, the document cover adapts to the thickness of the original.
Environmental Requirements
"Place the scanner on a horizontal, flat surface.
"To ensure proper ventilation, allow a minimum of 10 cm (4 inches) free space around each side of the scanner.
"Make sure that no vibrations or shocks occur.
"Make sure that the area is free of dust.
"Avoid any contact with water. Do not use your scanner near water or in a damp environment.
"Your SnapScan is designed to perform at best when the environmental humidity is between 20% and 85%. Avoid environments where humidity fluctuations might occur.
"Your SnapScan is designed to perform at best when the environmental temperature is between 10 °C (+ 50 degrees Fahrenheit) and 40 °C (+104 degrees Fahrenheit). Avoid exposure to direct sunlight and heating devices.
Preface 6

Precautions
For your own safety and that of your equipment, respect conscientiously the Environmental Requirements and always take the following precautions:
"Check frequently whether there is no overheating of the AC adapter.
"If you do not use your scanner for some time, pull the AC adapter cable out of the power supply socket.
"Handle your SnapScan with care: the glass plate is fragile. There is no warranty on breaking the glass plate and your dealer is not liable for consequential damages.
"Disconnect the AC adapter when you want to clean the scanner housing or the glass plate and when the scanner needs servicing or repairing.
"Do not open the scanner housing as it contains high-voltage areas and sensitive components. Every repair should be carried out by your dealer.
"Do not leave originals on the reflective glass plate for excessive periods of time. The warmth of the scanner may cause them to deteriorate.
"For safety reasons, never use extension cables for the AC adapter.
Caution: For safety reasons, besides the personal maintenance mentioned in this Owner's Guide, do not try to remove any mechanical parts or any electronic components from your scanner. If your scanner needs service, our dealer and service offices are available to help you.
Cleaning your Scanner
"Cleaning the glass plate regularly, ensures that dirt or smudges do not reduce the quality of your scanned images.
"Before cleaning, disconnect the AC adapter from your scanner.
"Use a soft damp cloth and a mild detergent to clean the surface of the glass plate. If you use alcohol to clean the glass plate, make sure that you do not touch the plastic elements of the scanner.
"Avoid using sprays directly onto the glass plate as this may cause the liquid to penetrate the seams around the glass and contaminate the mirrors and lenses inside the scanner.
"Do not use liquid cleaners or aerosol cleaners.
Preface 7

How to Use this Online Guide
To … |
Click … |
jump to another location within or outside the |
blue text |
document |
|
|
|
jump to a topic in the document |
click the corresponding bookmark |
|
|
jump to the first or the last page |
|
retrace your steps in the document |
|
jump to the previous or to the next page |
|
zoom in and zoom out (control-click) on the |
|
page |
|
search for a part of a word, a complete word |
|
or multiple words |
|
|
|
print the document |
|
|
|
#Note: Due to rescaling, some of the screenshots included in this document may appear unclear when displayed at 100% magnification. You can view these screenshots more clearly by using the Zoom tool to increase the default magnification.
How to Print this Guide
1Choose Page Setup from the File menu.
2Choose your paper format from the Paper popup menu.
3Select Orientation: Portrait.
4Click OK.
5Choose Print from the File menu.
Preface 8

Chapter 1: Preparing the Scanner
This chapter helps you to prepare your SnapScan for installation.
!Unpacking the Scanner
!Taking a Closer Look
!Changing the Handle
!Changing the Button Cap
!Unlocking the Scanner
Chapter 1: Preparing the Scanner |
9 |
Unpacking the Scanner
1Open the packing box and carefully unpack all the items.
2Check each item to make sure that everything listed on the Packing List (printed on the box) is present. Check if there is no visible defect.
If something is missing, contact your dealer.
3Remove the plastic wrapping and the packing materials from the scanner.
#Note: Do not throw away the packing materials. They can be useful to protect the scanner during later transport.
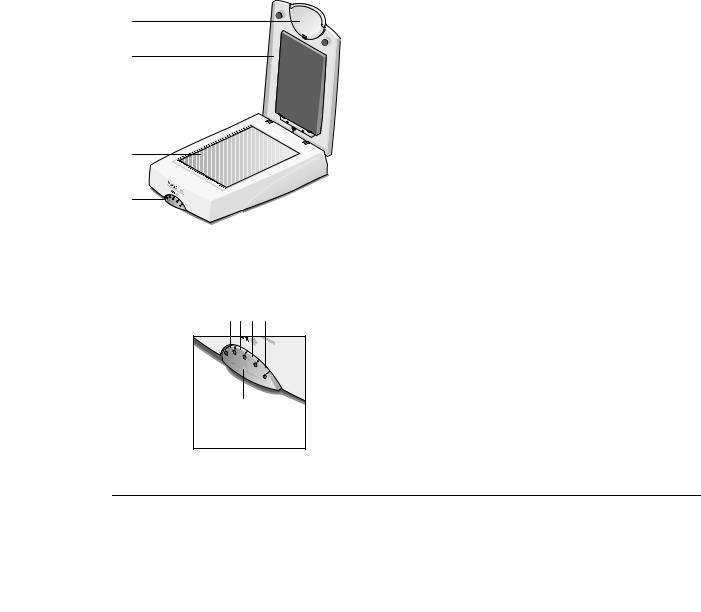
Taking a Closer Look
When you have taken the scanner out of the box, take a closer look at its parts. The following figures illustrate the different parts of your SnapScan.
SnapScan e42:
1 |
|
|
2 |
1. |
replaceable handle |
|
||
|
2. |
adjustable document cover |
|
3. |
glass plate |
|
4. |
replaceable button cap |
3 |
|
|
4 |
|
|
5 6 7 8 |
5. |
e-mail button |
|
6. |
print button |
|
7. |
ScanWise button |
|
8. |
OCR button |
9 |
9. |
status indicator |
|
Chapter 1: Preparing the Scanner |
10 |

SnapScan e52:
|
|
1. |
replaceable handle |
|
1 |
2. |
adjustable document cover |
3 |
2 |
3. |
transparency lamp cover (for |
|
reflective scanning) |
||
|
|
|
|
|
|
4. |
transparency module |
4 |
|
5. |
glass plate |
|
|
6. |
replaceable button cap |
5 |
|
|
|
6 |
|
|
|
7 8 9 10
|
7. |
e-mail button |
|
|
8. |
print button |
|
|
9. |
ScanWise button |
|
11 |
10. |
OCR button |
|
11. |
status indicator |
||
|
12 |
12. holder for scanning slides |
13 |
13. holder for scanning |
|
|
|
negatives/transparencies |
Chapter 1: Preparing the Scanner |
11 |
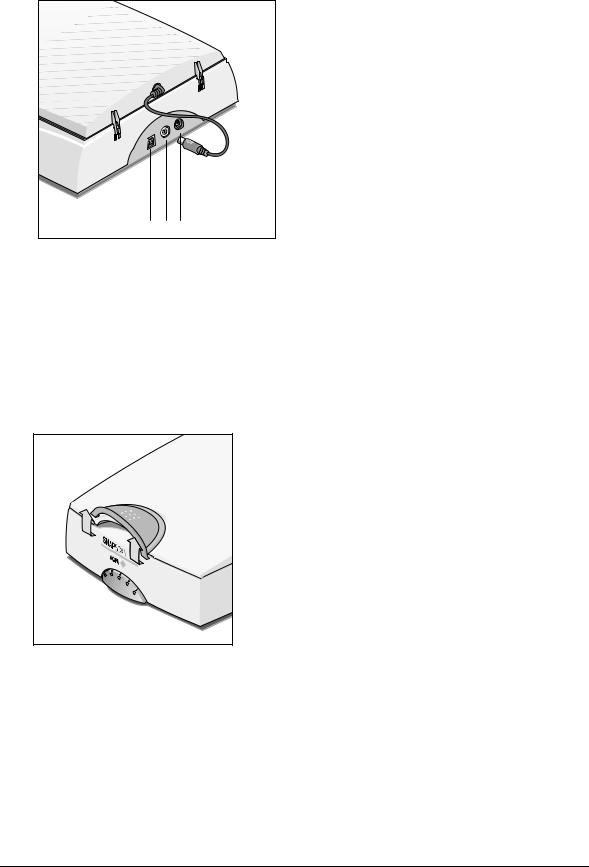
The following figure illustrates the location of the different ports at the rear of your scanner (SnapScan e42/e52).
1. USB Port (labeled with the USB icon  ) to make a connection to your computer
2. Transparency Module Port (SnapScan e52
only)
3. Power connector
1 2 3
Changing the Handle
It is possible to customize your SnapScan by changing its handle.
1 Press the two clips at the inside of the cover upwards and lift the handle.
Chapter 1: Preparing the Scanner |
12 |

2 Remove the handle by sliding it out of its lip.
3Choose a new handle.
4Slide the handle in the lip.
5 Press the front of the handle down until you hear a click.
Chapter 1: Preparing the Scanner |
13 |
Changing the Button Cap
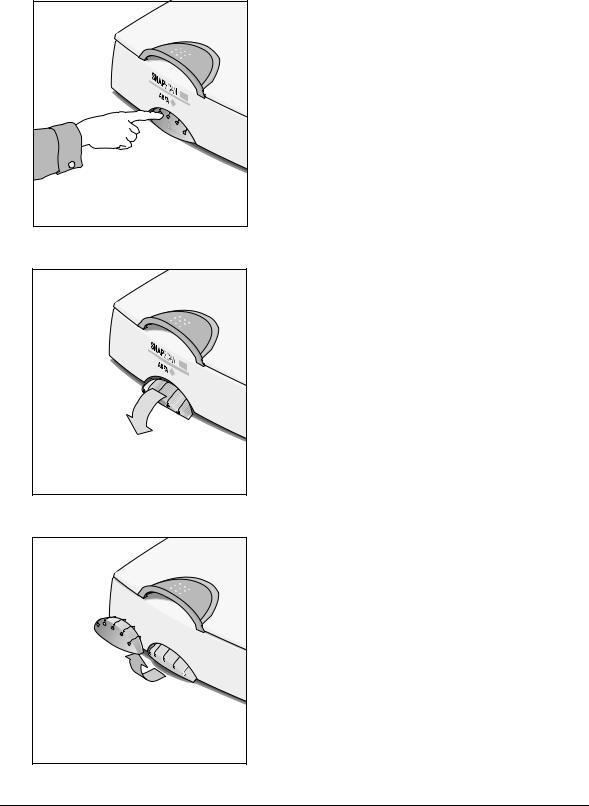
It is possible to customize your SnapScan by changing the button cap.
1 Open the button panel by pushing the button cap.
2 Pull out the upper part of the button cap.
3 Remove the button cap by lifting it at the underside and sliding it out of its lip.
Chapter 1: Preparing the Scanner |
14 |
#Note: Do not remove the button cap while the button panel is still closed.
4Choose a new button cap.
5Press the upper part of the button cap over the button panel into the scanner.
6Press the underside of the button cap in the right position.
Unlocking the Scanner
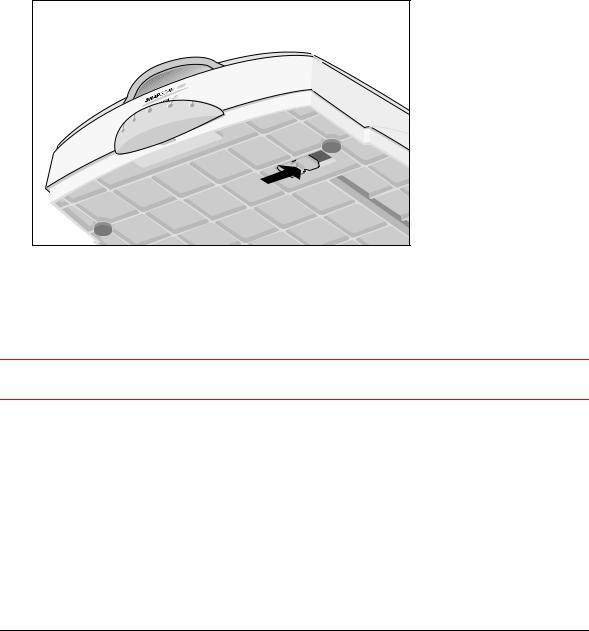
Before you start using the scanner, you first have to unlock it.
1Place the scanner on a horizontal, flat surface and pull it carefully towards you until you can see the locking slider at the bottom.
2Slide the locking slider to the right.
Your scanner is unlocked.
#Note: If you want to transport your scanner, you have to lock it. To do this, first connect the AC adapter to the scanner so that its optical assembly moves to its home position. Then, slide the locking slider to the left and disconnect the scanner. Your scanner is now locked and ready for transportation.
Caution: Make sure to install the ScanWise software before connecting the scanner to your PC or Macintosh computer.
Chapter 1: Preparing the Scanner |
15 |

Chapter 2: Installing the Scanner for PC
This chapter shows you how to set up your SnapScan for your PC.
!Minimum System Requirements
!Installing the Scanner Software
!Connecting the Scanner to Your PC
!Installing Additional Software
Chapter 2: Installing the Scanner for PC |
16 |

Minimum System Requirements
"A USB port
"A Pentium® processor
"A 14 inch color monitor
"A video card that can display a minimum of 16 bit high color
"64 MB of RAM
"A CD-ROM drive
"Windows® 98
"ScanWise is compatible with all IBM™ PCs and compatibles running Windows 98/Me/2000
"The amount of disk space available on your PC determines the number and the size of the images that you can scan. Make sure that you have enough free storage space on your hard disk. You need about two times the size of the image to scan, edit and save it.
Chapter 2: Installing the Scanner for PC |
17 |
Installing the Scanner Software
1 Insert the Agfa ScanWise CD-ROM in your CD-ROM drive.
# Note: If the ScanWise Installer program does not appear automatically, carry out the following instructions:
1 Double-click My computer.
2 Double-click the CD-ROM drive.
3 Double-click Setup.exe.
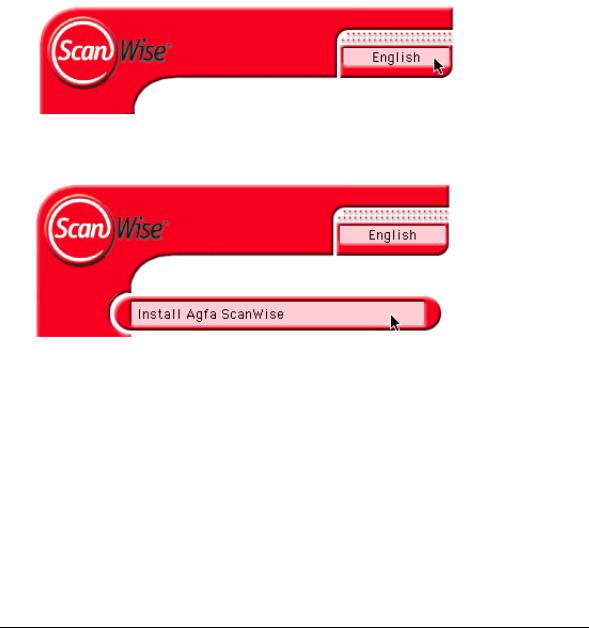
2If you want to use ScanWise in another language, click the language button to select a language.
#Note: If you choose another language, that language will be used for all the documentation.
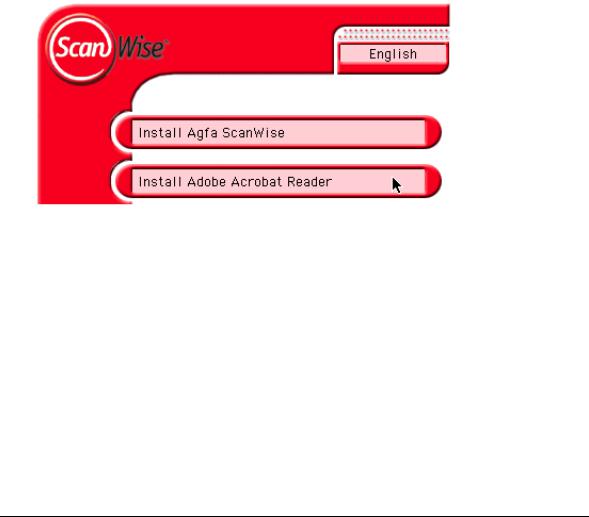
3Click Install Agfa ScanWise.
Follow the instructions on your screen.
#Note: After installation the Register ScanWise window appears. You can choose to register now or later.
$Register now: If you choose to register now, the Agfa webpage opens. Here you can register on line.
$Register later: If you choose to register later, you can register afterwards via Start/Programs/Agfa ScanWise/Register ScanWise.
Chapter 2: Installing the Scanner for PC |
18 |
By registering on line, you will create your personal e-Service account and you will enjoy the following benefits:
1.Customized self-help tools:
You have access to the following self-help tools which are customized according to your e-service account profile:
$Software downloads
$Technical knowledge database (FAQ)
$On line manuals and documentation
$Access to third-party software support sites
2.Personalized one-to-one technical support:
Agfa assists you on line if you have additional questions about technical issues.
3.Automatic e-mail notification:
Agfa notifies you immediately when new software and upgrades are available for downloading.
#Note: For support issues, go to http://support.agfa.com.
#Note: For the latest information consult the ScanWise Read Me File.
4 Click Install Adobe Acrobat Reader to install this program, if needed.
You need Adobe Acrobat Reader to read the SnapScan documentation.
Chapter 2: Installing the Scanner for PC |
19 |
Loading...