


TM
Click anywhere to begin.
User’s Guide
FCC INFORMATION
FCC WARNING: This equipment meets the limits for a Class B digital device, pursuant to Part 15 of FCC Rules. Only the power pack and cable supplied with the camera should be used. Operation with other power packs and cables is likely to result in interference to radio and TV reception and could void the user’s authorization to operate this equipment.
This device complies with Part 15 of the FCC Rules. Operation is subject to the following two conditions:
1)This device may not cause harmful interference.
2)This device must accept any interference received, including interference that may cause undesired operation.
Changes or modifications not expressly approved by the manufacturer may void the user’s authority to operate this equipment.
USER INFORMATION
NOTE: This equipment has been tested and found to comply with the limits for a Class B digital device, pursuant to Part 15 of the FCC Rules. These limits are designed to provide reasonable protection against harmful interference in a residential installation. This equipment generates, uses and can radiate radio frequency energy and, if not installed and used in accordance with the instructions, may cause harmful interference to radio communications. However, there is no guarantee that interference will not occur in a particular installation. If this equipment does cause harmful interference to radio or television reception, which can be determined by turning the equipment off and on, the user is encouraged to try to correct the interference by one or more of the following measures:
–Reorient or relocate the receiving antenna.
–Increase the separation between the equipment and receiver.
–Connect the equipment into an outlet on a circuit different from that to which the receiver is connected.
CANADIAN RADIO INTERFERENCE REGULATIONS STATEMENT
This Class B digital device meets all the requirements of the Canadian Interference-Causing Equipment Regulations.
Cet appareil numérique de la Classe B respecte toutes les exigences du Réglement sur le matériel brouilleur du Canada.
1-YEAR LIMITED HARDWARE WARRANTY
Agfa warrants this product to be free from defects of material and workmanship for one (1) year from the date of purchase. During the warranty period, Agfa will repair or replace, at its option, the product at no charge to the customer. The replacement unit may be a remanufactured unit or a unit of equal or greater functionality. After one (1) year, Customer shall pay for all parts, labor and service.
Agfa warrants that software products will conform to published specifications in effect at the time of delivery for 90 days after purchase. Customer acknowledges that the Software may have inherent defects because of its complexity. The warranty applies only to the media on which the software is recorded.
If a unit is replaced during the warranty period, the original warranty shall remain in effect until the end of the one (1) year period or shall be 30 days, whichever is longer.
This warranty is transferable with new owner notification to Agfa.
This warranty shall not apply if Customer: (1) abuses or modifies Product or Software; (2) operates the system in an environment with excessive dirt, moisture, chemical fumes, extremes of temperature or other improper conditions. The camera is not impermeable to water, dust or sand, or (3) supplies other Software or Interfacing. Warranty service is excluded if the serial number of the product has been tampered with or removed.
THE PARTIES AGREE THAT ALL OTHER WARRANTIES, EXPRESS OR IMPLIED, INCLUDING WARRANTIES OF FITNESS FOR A PARTICULAR PURPOSE, MERCHANTABILITY AND NON-INFRINGEMENT, ARE EXCLUDED.
Copyright © 1997 Bayer Corporation. All rights reserved.

Agfa ePhoto Digital Camera
REGISTER NOW!
Register your product right away to take advantage of on-line product information and technical support from Agfa. To register, visit our Web site at:


 http://www.agfahome.com


By registering, you will get:
µWorldwide multilingual technical support
µValuable updates about your camera and related products
µInformation about optional accessories
µAnnouncements of the latest products from Agfa
Click anywhere to continue.

|
|
|
|
Contents of This Guide |
|
|
||||||||||||||||||
|
|
|
|
FCC Information |
|
|
||||||||||||||||||
|
|
|
|
1-Year Limited Warranty |
|
|
||||||||||||||||||
|
|
|
|
Welcome! |
|
8 |
|
|||||||||||||||||
|
|
|
|
|
Using This Document |
|
8 |
|
||||||||||||||||
|
|
|
|
|
Other Documents |
|
8 |
|
||||||||||||||||
|
|
|
|
Parts of Your Camera |
|
9 |
|
|||||||||||||||||
|
|
|
|
|
||||||||||||||||||||
|
|
|
|
|
||||||||||||||||||||
|
|
|
|
Safety Information |
|
10 |
|
|||||||||||||||||
|
|
|
|
|
||||||||||||||||||||
|
|
|
|
|
||||||||||||||||||||
|
|
|
|
|
Batteries |
|
10 |
|
||||||||||||||||
|
|
|
|
|
Battery Charger |
|
11 |
|
||||||||||||||||
|
|
|
|
|
Camera |
|
11 |
|
||||||||||||||||
|
|
|
|
Turning the Camera On and Off |
|
12 |
|
|||||||||||||||||
|
|
|
|
|
Automatic Power Down Feature |
13 |
|
|||||||||||||||||
|
|
|
|
Taking Pictures |
|
13 |
|
|||||||||||||||||
|
|
|
|
Memory Cards |
|
15 |
|
|||||||||||||||||
|
|
|
|
|
Inserting Memory Cards |
|
16 |
|
||||||||||||||||
|
|
|
|
|
Memory Card Conditions |
|
16 |
|
||||||||||||||||
|
|
|
|
Status Information |
|
18 |
|
|||||||||||||||||
|
|
|
|
|
Battery Indicator / Image Counters |
|
18 |
|
||||||||||||||||
|
|
|
|
|
BATTERY INDICATOR |
|
18 |
|
||||||||||||||||
|
|
|
|
|
IMAGE COUNTERS |
|
19 |
|
||||||||||||||||
|
|
|
|
|
Date and Time |
|
20 |
|
||||||||||||||||
|
|
|
|
|
Resolution / Flash / Preview |
|
20 |
|
||||||||||||||||
|
|
|
|
Changing Basic Settings |
|
21 |
|
|||||||||||||||||
|
|
|
|
|
Changing the Resolution |
|
22 |
|
||||||||||||||||
|
|
|
|
|
Changing the Flash Setting |
|
23 |
|
||||||||||||||||
|
|
|
|
|
Changing the Preview Setting |
|
24 |
|
||||||||||||||||
|
|
|
|
Changing Advanced Settings |
|
25 |
|
|||||||||||||||||
5 |
|
|
Using the ADVANCED MODE Menu |
|
26 |
|
||||||||||||||||||
|
|
Self Timer |
28 |
|
||||||||||||||||||||
|
|
|
|
|
|
|||||||||||||||||||
|
|
|
|
|
|
|
|
|
|
|
|
|
|
|
|
|
|
|
|
|
|
|
|
|
|
|
|
|
|
|
|
|
|
|
|
|
|
|
|
|
|
|
|
|
|
|
|
|
|
|
|
|
|
Contents of This Guide (cont.) |
|
|
|||||||||||||||||
|
|
|
|
Focus |
|
28 |
|
||||||||||||||||
|
|
|
|
Exposure |
|
29 |
|
||||||||||||||||
|
|
|
|
MANUAL |
|
30 |
|
||||||||||||||||
|
|
|
|
APERTURE VALUE |
|
30 |
|
||||||||||||||||
|
|
|
|
TIME VALUE |
|
31 |
|
||||||||||||||||
|
|
|
|
White Point |
|
31 |
|
||||||||||||||||
|
|
|
|
|
|||||||||||||||||||
|
|
|
|
|
|||||||||||||||||||
|
|
|
|
External Flash |
|
32 |
|
||||||||||||||||
|
|
|
|
|
|||||||||||||||||||
|
|
|
|
|
|||||||||||||||||||
|
|
|
|
Date & Time |
|
34 |
|
||||||||||||||||
|
|
|
|
AUTOMATIC |
|
35 |
|
||||||||||||||||
|
|
|
|
Viewing Images in Your Camera |
|
35 |
|
||||||||||||||||
|
|
|
|
Viewing Single Images |
|
36 |
|
||||||||||||||||
|
|
|
|
Viewing Multiple Images |
|
36 |
|
||||||||||||||||
|
|
|
|
Viewing Camera Images on a TV |
|
37 |
|
||||||||||||||||
|
|
|
|
Deleting Images in Memory |
|
38 |
|
||||||||||||||||
|
|
|
|
Locking and Unlocking Images |
|
40 |
|
||||||||||||||||
|
|
|
|
Connecting the Camera to Your Computer |
|
41 |
|
||||||||||||||||
|
|
|
|
Downloading Images into Your Computer |
|
42 |
|
||||||||||||||||
|
|
|
|
Downloading Images with a 1280 Resolution |
|
44 |
|
||||||||||||||||
|
|
|
|
Downloading Images with Other Resolutions |
|
44 |
|
||||||||||||||||
|
|
|
|
Using PhotoWise |
|
45 |
|
||||||||||||||||
|
|
|
|
Working with Images |
|
45 |
|
||||||||||||||||
|
|
|
|
Naming Images |
|
46 |
|
||||||||||||||||
|
|
|
|
QuickLink |
|
47 |
|
||||||||||||||||
|
|
|
|
Launching QuickLink |
|
47 |
|
||||||||||||||||
|
|
|
|
Using QuickLink |
|
48 |
|
||||||||||||||||
|
|
|
|
Installation Floppy Disks for PhotoWise |
|
49 |
|
||||||||||||||||
|
|
|
|
WINDOWS |
|
49 |
|
||||||||||||||||
6 |
|
MACINTOSH |
|
50 |
|
||||||||||||||||||
|
Recharging the Batteries |
50 |
|
||||||||||||||||||||
|
|
|
|
|
|||||||||||||||||||
|
|
|
|
|
|
|
|
|
|
|
|
|
|
|
|
|
|
|
|
|
|
|
|
|
|
|
|
|
|
|
|
|
|
|
|
|
|
|
|
|
|
|
|
|
|
|
|

|
|
|
|
Contents of This Guide (cont.) |
|
|
|||||||||||||||
|
|
|
|
Troubleshooting |
|
51 |
|
||||||||||||||
|
|
|
|
The camera has no power. |
|
51 |
|
||||||||||||||
|
|
|
|
The shutter button doesn’t work. |
|
52 |
|
||||||||||||||
|
|
|
|
The LCD screen doesn’t light up. |
|
53 |
|
||||||||||||||
|
|
|
|
The live image on the LCD screen is jerky. |
|
53 |
|
||||||||||||||
|
|
|
|
The live image on the LCD screen appears brighter |
|
|
|||||||||||||||
|
|
|
|
|
|
||||||||||||||||
|
|
|
|
|
|
||||||||||||||||
|
|
|
|
than it should be. |
|
53 |
|
||||||||||||||
|
|
|
|
|
|||||||||||||||||
|
|
|
|
The built-in flash doesn’t work. |
|
54 |
|
||||||||||||||
|
|
|
|
The recorded image is blurry. |
|
54 |
|
||||||||||||||
|
|
|
|
The recorded image is too dark. |
|
54 |
|
||||||||||||||
|
|
|
|
The recorded image is too bright. |
|
55 |
|
||||||||||||||
|
|
|
|
Part of the recorded image is missing. |
|
56 |
|
||||||||||||||
|
|
|
|
The wrong date and/or time are displayed. |
|
56 |
|
||||||||||||||
|
|
|
|
PhotoWise can’t find the camera. |
|
56 |
|
||||||||||||||
|
|
|
|
An image can’t be deleted. |
|
57 |
|
||||||||||||||
|
|
|
|
Camera Care and Maintenance |
|
57 |
|
||||||||||||||
|
|
|
|
System Requirements |
|
58 |
|
||||||||||||||
|
|
|
|
IBM PCs and Compatibles |
|
58 |
|
||||||||||||||
|
|
|
|
Macintosh |
|
59 |
|
||||||||||||||
|
|
|
|
Camera Specifications |
|
60 |
|
||||||||||||||
|
|
|
|
Physical |
|
60 |
|
||||||||||||||
|
|
|
|
Optics |
|
60 |
|
||||||||||||||
|
|
|
|
Images |
|
61 |
|
||||||||||||||
|
|
|
|
Power |
|
61 |
|
||||||||||||||
|
|
|
|
Operation |
|
61 |
|
||||||||||||||
|
|
|
|
Environment |
|
62 |
|
||||||||||||||
|
|
|
|
Approvals |
|
62 |
|
||||||||||||||
7 |
|
Local Agfa Dealers |
63 |
|
|||||||||||||||||
|
|
|
|
|
|
|
|
|
|
|
|
|
|
|
|
|
|
|
|||
|
|
|
|
|
|
|
|
|
|
|
|
|
|
|
|
|
|
|
|
|
|
|
|
|
|
|
|
|
|
|
|
|
|
|
|
|
|
|
|
|
|
|
|

Welcome!
Now that you have set up your new Agfa ePhoto™ 1280 digital camera and software, we are sure you are eager to begin taking and viewing pictures. This on-line guide is designed to show you how to use your camera properly to get the best results.
Using This Document
To move around in this document, you can:
Go to the previous page
Return to the Contents page
Go to the next page
Use the standard Acrobat buttons at the top of your screen.
Click on any underlined text in red to go to the page that describes that topic (e.g. Parts of Your Camera).
Print some or all of this guide by selecting Print from the File menu.
Other Documents
This User’s Guide also describes the basic functions of PhotoWise™, the image editing software included with your camera. For more detailed information on PhotoWise, read the .pdf file called PhotoWise Tips in the PhotoWise folder on your hard disk, or consult the on-line help in the software itself.
8
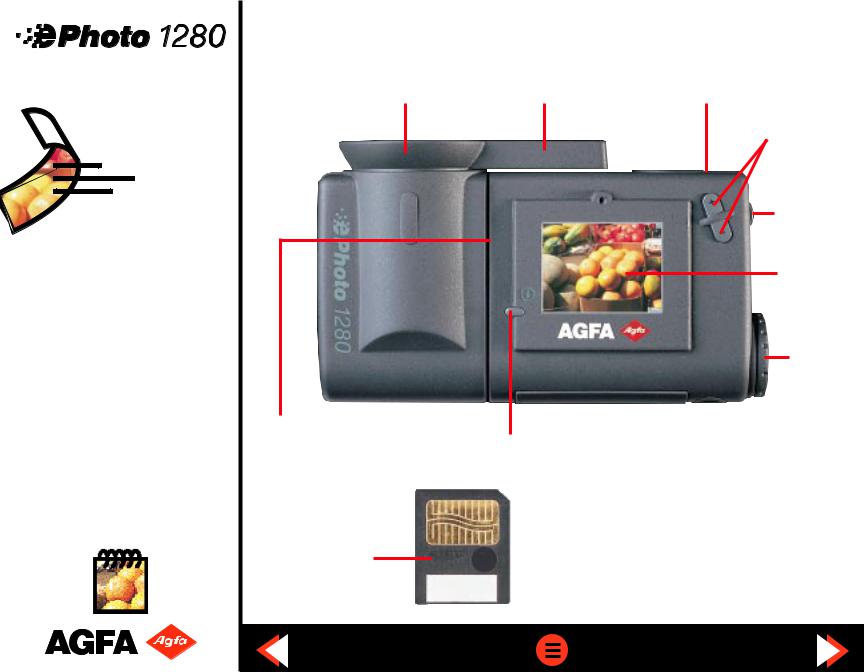
Parts of Your Camera
FlashTrack™ swivel |
|
|
zoom lens |
Built-in flash |
Shutter button |
Zoom buttons
EasyPilot™ button
LCD panel
Mode switch
Memory card slot |
|
|
|
|
|
(on side of main |
Info button |
|
|
Wrist strap |
|
camera body) |
|
|
|
hook |
|
|
Port cover |
||||
|
|
|
|
||
3.3 V Memory card
9

Safety Information
!!!WARNING! To avoid the risk of electric shock, do not disassemble the camera. Refer all servicing to qualified service personnel.
!!!WARNING! To avoid the risk of fire or electric shock, do not expose the camera to rain or moisture.
Batteries
Before installing the batteries, make sure the camera is off by turning the Mode switch to OFF.
Use only size AA alkaline, lithium or NiMH rechargeable batteries.
!Note: Because of their short life, alkaline batteries are not recommended for the ePhoto 1280.
Do not use batteries that show signs of leakage, corrosion or swelling, or batteries that are excessively warm to the touch.
Always replace all four batteries with four identical, new (or fully charged) ones.
Dispose of used batteries promptly in a manner that complies with applicable laws.
Keep all batteries away from children.
10
Safety Information (cont.)
Battery Charger
Place only rechargeable NiMH batteries in the battery charger.
Never charge different types or sizes of batteries at the same time.
Keep the battery charger away from moisture at all times.
Do not use the battery charger as a power source.
Camera
Do not force the zoom lens to swivel beyond its range (280°).
Be careful not to pinch your fingers or clothing between the swivel lens and the main camera body.
Do not touch or press on the LCD screen.
When installing the removable memory card, make sure the door of the memory card slot is fully closed before swiveling the lens over it.
Keep memory cards away from sources of heat, moisture and static electricity, as well as magnetic fields generated by electrical appliances such as TVs, loudspeakers, VCRs, microwave ovens.
11

Safety Information (cont.)
Avoid leaving the camera in the sun or in a very warm location (on the beach, in a car, etc.) for prolonged periods of time.
Do not wrap the camera in cloth or plastic while it is turned on (this may trap heat and moisture and damage the camera).
Avoid using the camera in excessively cold (below 32°F/0°C) or excessively warm (above
104°F/40°C) conditions.
When you bring the ePhoto 1280 from a cold to a warm location, allow the camera to reach room temperature before you use it.
Do not drop or bump the camera.
!!CAUTION: Use only the optional Agfa ePhoto AC adapter with your camera. The use of any other adapter will void your warranty and may damage the camera.
Turning the Camera On and Off
The ePhoto 1280 can be turned on in two ways:
To take pictures — Turn the Mode switch to REC.
To view stored images — Turn the Mode switch to PLAY. To turn the camera off, turn the Mode switch to OFF.
12

!
13
Turning the Camera On and Off (cont.)
Automatic Power Down Feature
Whenever the ePhoto 1280 is not connected to a computer, the camera powers down automatically after 60 seconds of inactivity. To turn the camera back on in REC mode, press the shutter button (this does not take a picture); in PLAY, turn the Mode switch to OFF and back to PLAY.
Note: The automatic power down time can be changed in PhotoWise (see the .pdf file PhotoWise Tips or on-line help in PhotoWise for details).
Taking Pictures
Unlike conventional cameras, the ePhoto 1280 has no viewfinder. The image seen through the lens is shown on the color LCD screen. For best results, hold the camera as follows to frame and take pictures:
Hold the main body of the camera with your right hand. Place your palm over the Mode switch and your thumb to the left of the zoom buttons. Use your index finger to press the shutter button on the front of the camera.
Hold and adjust the swivel lens with your left hand.

!
!
!
14
Taking Pictures (cont.)
Note: To take pictures with the ePhoto 1280 you must have batteries installed and a removable memory card inserted. (If you have not already done so, see the Getting Started sheet in your package for instructions.)
To take pictures:
Turn the Mode switch to REC. The LCD screen briefly shows the Agfa logo and then the “live” image seen through the lens.
Swivel the lens and use the zoom buttons (+ to zoom in, – to zoom out) while framing your picture on the LCD screen.
Note: If the lens swivels more than 45° toward the viewer, the image on the LCD screen is flipped upside down so it will appear rightside up.
Hold the camera still and fully press the shutter button. The camera beeps and the LCD screen display freezes for a few seconds while the image is processed and stored.
Note: Pressing the shutter button down halfway activates the camera’s automatic focus and light meter.
The higher the resolution of the image is, or the more data there is to capture in the scene, the longer the image takes to process. When the LCD screen again shows the live image, the camera is ready for the next shot.
!
15
Memory Cards
The ePhoto 1280 has no internal memory. All images are stored on removable memory cards. These cards are available in the following sizes: 2 MB, 4 MB and 8 MB.
Note: The ePhoto 1280 accepts only 3.3 volt SSFDC or SmartMedia™ removable memory cards.
Your camera comes with one 4 MB card, whose storage capacity depends on the resolution of the images:
Resolution |
Minimum Card Capacity* |
1280 |
6 images |
780 HI |
12 images |
780 S |
24 images |
307 HI |
30 images |
307 S |
60 images |
*Depending on the complexity of the images stored, the memory card capacity may be up to 20% higher.
Memory cards can store images in any combination of resolutions.
Memory Cards (cont.)
Inserting Memory Cards
To insert a memory card:
Swivel the lens up to expose the memory card slot on the side of the camera’s main body.
Open the door covering the memory slot and hold it down.
! Note: The door is equipped with an interlock mechanism which automatically turns off the camera whenever the door is opened.
Hold the memory card with the notch toward the hinge of the lens (gold side facing up) and insert it into the slot until it stops. The memory card can only be inserted this way.
Release the door. Make sure it closes completely and does not interfere with the swivel action of the lens.
Memory Card Conditions
Certain memory card conditions may be indicated on the camera’s LCD screen from time to time. These are described below.
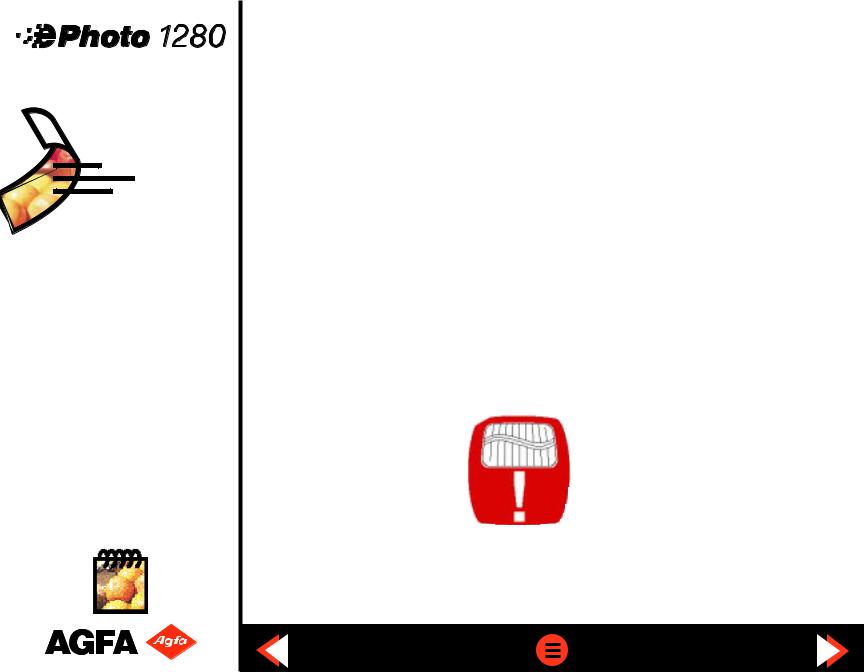
This flashing icon indicates that no memory card has been inserted. As soon as you insert a
card, the icon disappears.
16
Memory Cards (cont.)
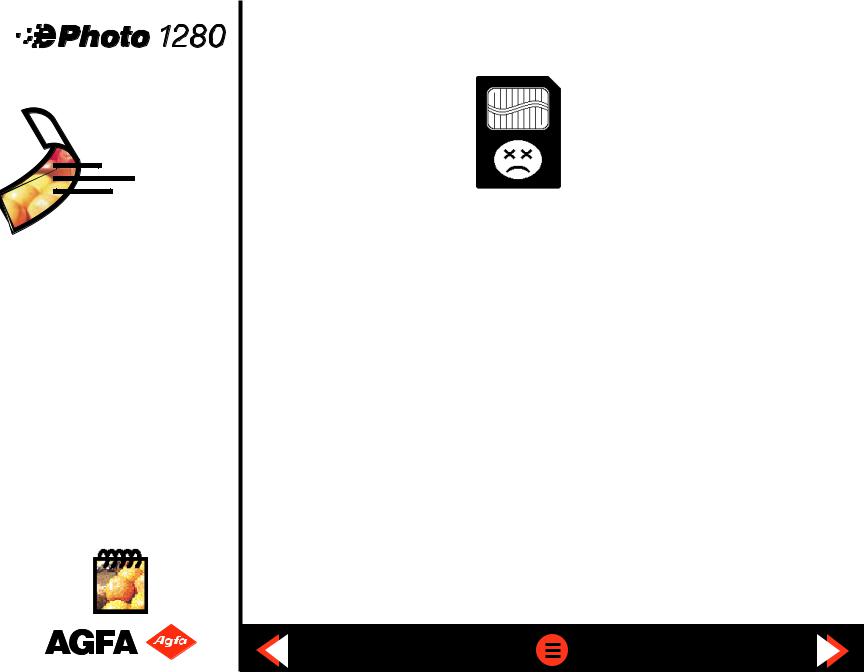
This icon flashes to indicate that an installed memory card is the wrong type or is unreadable. Proceed in one of two ways:
To reformat the card, turn the EasyPilot™ button to move the selection triangle to the YES option, then press in the EasyPilot button to select the option. A message confirms the reformatting process.
! Note: Selecting YES erases all data that may be stored on the memory card.
To remove the card without reformatting, select NO using the EasyPilot button. Remove the card and insert a different one.
[no live image]
No more pictures can be taken until you insert a new card, download the pictures to your computer or delete some or all of the pictures on the card.
17
!
18
Status Information
The ePhoto 1280 keeps track of certain information automatically. This information can be displayed on the LCD screen at any time using the Info button.
Battery Indicator / Image Counters
BATTERY INDICATOR
Press the Info button once in REC or PLAY mode to display the following information on the LCD screen:
The Battery icon (top) consists of segments which disappear as power is used. When only the battery outline remains, there is very little power left and the batteries should be replaced.
Note: When the batteries have run out completely, a flashing battery icon appears across the entire LCD screen. If this occurs, the camera cannot be used until the batteries are replaced. For optimal use, always empty rechargeable NiMH batteries completely.

!
19
Status Information (cont.)
IMAGE COUNTERS
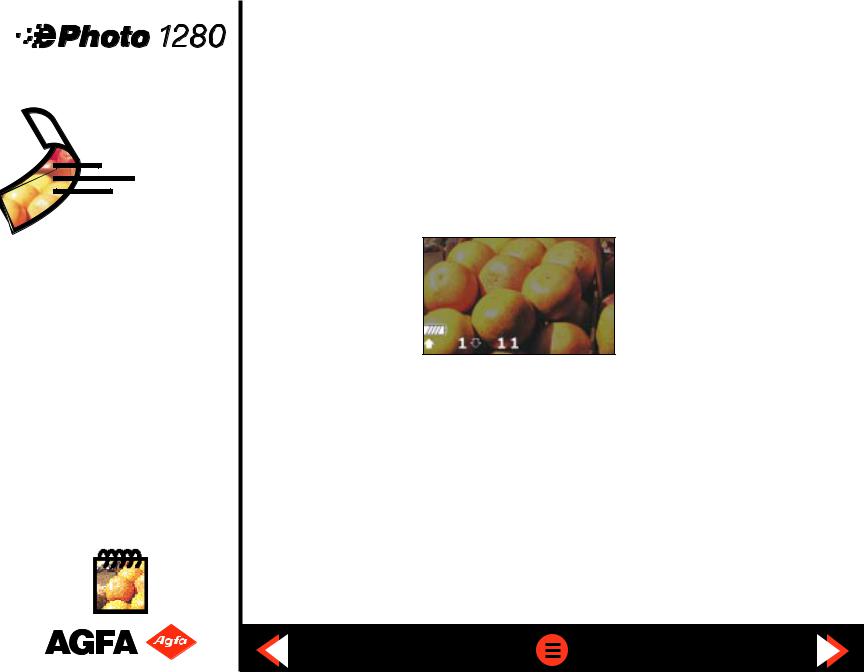
REC mode — The image counters (bottom of the screen) indicate the following:
The number after the d symbol shows the number of images stored on the memory card.
The number after the F symbol indicates the number of pictures that can still be taken at the current resolution setting.
Note: If the camera is in REC mode and is not processing an image, but is unable to take another picture, the memory card may be full. If the card is full, the number after the F symbol is 0. No more pictures can be taken until you insert a new card, download the pictures to your computer or delete some or all of the pictures on the card.
PLAY mode — The image counter shows the number of the image and the total number of images stored separated by a slash. For example, 1/20 indicates that the image displayed on the LCD screen is the first out of 20 stored on the memory card. If the image shown has been locked to avoid accidental deletion, a lock icon (  ) is also displayed in the upper right-hand corner.

Status Information (cont.)
Date and Time
When you press the Info button twice, the date and time are displayed at the bottom of the screen in addition to the battery indicator and image counters:
REC mode — The current date and time are shown (using a 24-hour clock). Whether or not this information is displayed when you take a picture, the date and time of each shot are stored with the image.
PLAY mode — The date (month/day/year) and time shown indicate when the current image was taken. Pressing the Info button twice also displays the resolution at which the photo was taken in the upper left-hand corner.
Resolution / Flash / Preview
When the Info button is pressed twice in REC mode, the LCD screen also shows the current resolution, flash and preview settings in the upper left-hand corner:
20
 Loading...