


ENGLISH
Welcome
Thank you for purchasing our photo frame.Get ready to experience photography like never before!
The photo frame allows you to view photos.
Safety instructions and recommendations
In order to prevent damage to the card or the unit,please turn off the power before removing or inserting the card.
Use enclosed DC 9V/1.8A power adapter,the unit is for indoor use only.
Always handle the unit with care.Avoid touching the LCD screen.
Never place heavy or sharp objects on the LCD panel,frame,or power cord.
Keep the screen clean(please use a dry soft cloth for cleaning).Make sure the power is off before cleaning the unit. Then gently wipe with a dry soft cloth. Do not place the unit near any other heat sources.
Do not splash or fill the unit with liquids.
Do not place the unit to rain,water,moisture or high humidity.
Temperature and humidity: Operating temperature:0 C- + 45 C, Humidity:20%-80%
This equipment complies with the voltage type specified on the unit.
The CE marking certifies that the product meets the main requirements of the European Parliament and Council directive 1999/5/CE on telecommunications terminal equipment, regarding safety and health of users, and regarding electromagnetic interference.
The declaration of compliance can be consulted on the site www.agfaphoto.com or can be requested at the following address:
AgfaPhoto Holding Gmbh:AGFAPHOTO is used under license of Agfa-Gevaert NV & Co.KG.Agfa-Gevaert NV & Co.KG does not manufacture these products or provide any product warranty or support.Contact:www.agfaphoto.com-For service,support and warranty information,contact the distributor or manufacturer: sold and distributed by Sagem Communication-www.sagem.com
Environment
Preservation of the evironment as part of a sustainable development logic is an essential concern of AgfaPhoto.The desire of AgfaPhoto is to operate systems observing the environment and consequently it has decided to integrate environmental performances in the life cycle of this products,from manufacturing to commissioning use and elimination.
PACKAGING
The presence of the logo(green dot) means that a contribution is paid to an approved national organisation to improve package recovery and recycling infrastructures to facilitate.please respect the sorting rules set up locally for this kind of waste.
BATTERIES
If your product contains batteries,they must be disposed of at appropriate collection point.
THE PRODUCT
The crossed-out waste bin stuck on the product means that the product belongs to the family of electrical and electronic equipment.
In this respect,the European regulations ask you to dispose of it selectively;
-At sales points in the event of the purchase of similar equipment.
-At the collection points made available to you locally( dropoff centre,
selective collection,etc.).
In this way you can participate in the reuse and upgrading of Electrical and Electronic Equipment Waste,which can have an effect on the environment and human health.
1 |
2 |
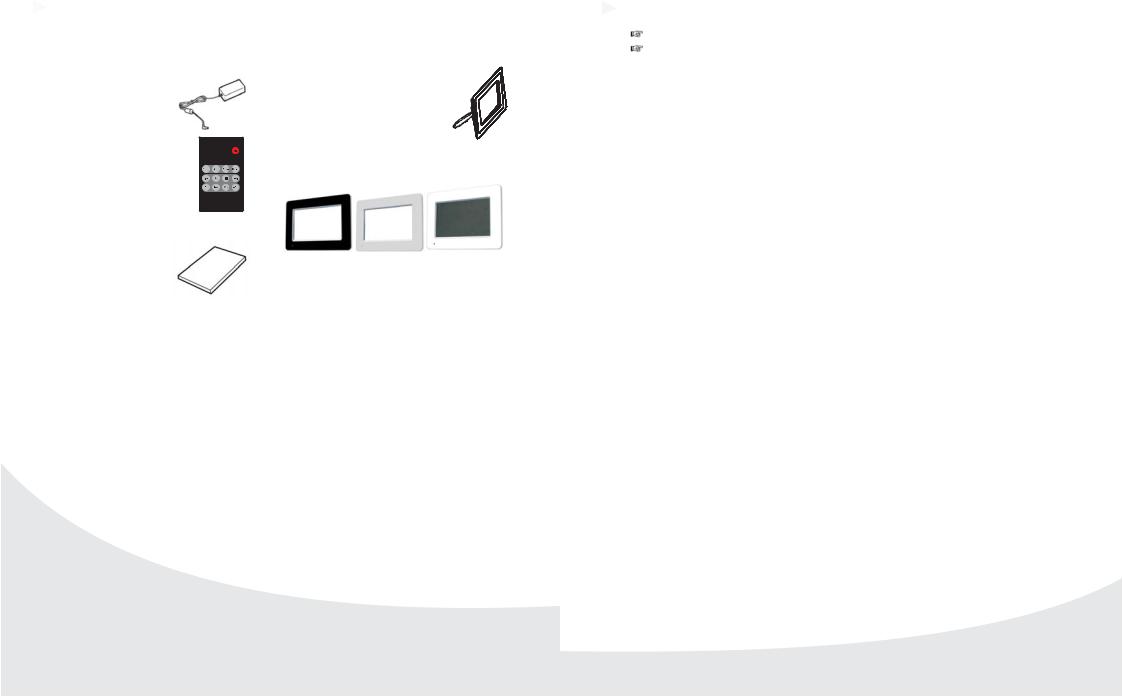
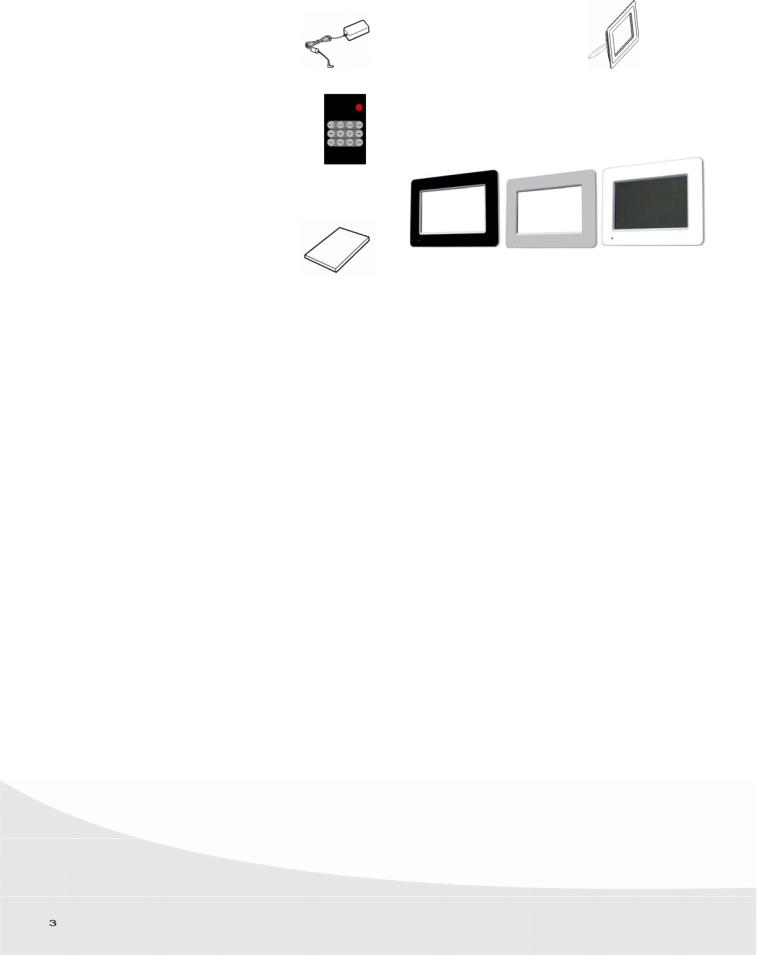
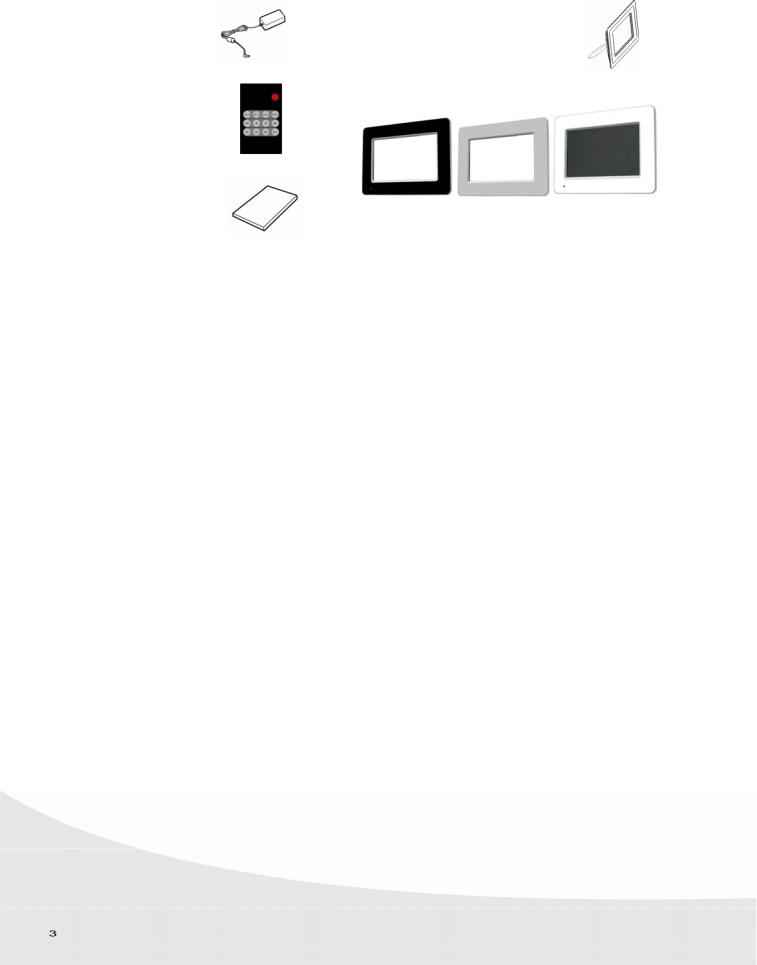
Your photo frame and its accessories
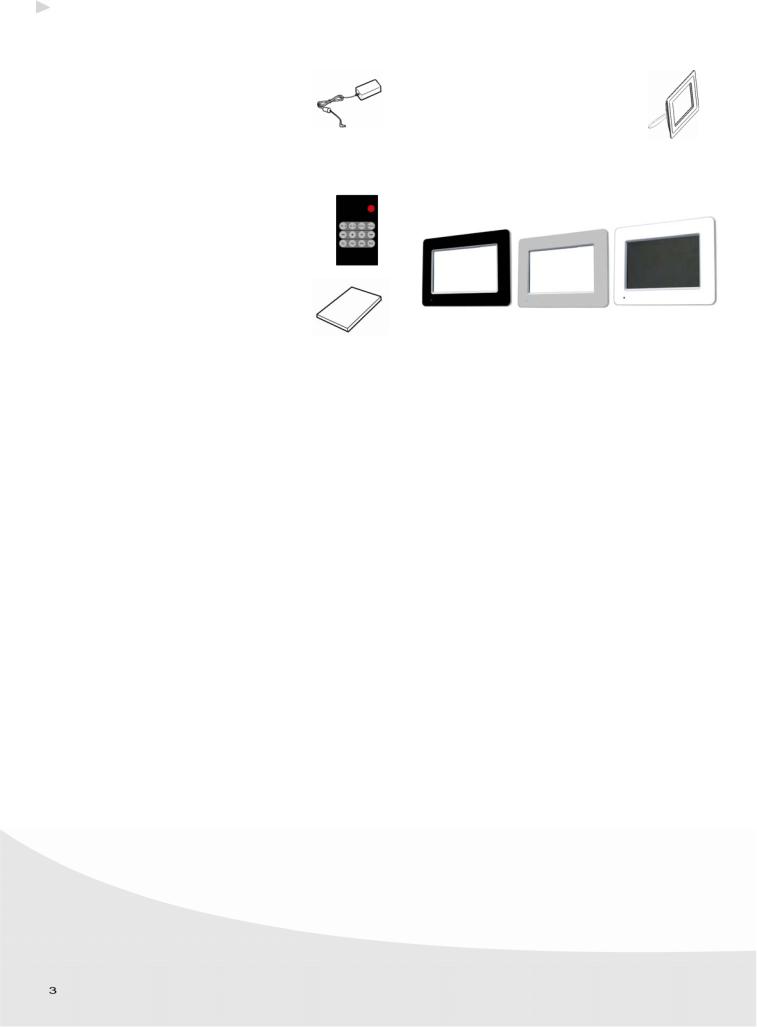
Place your set in front of you.Take out the various components for your photo frame and check that the components shown below are present:
A power supply |
A photo frame and bracket |
A remote control |
Intechangeable frames |
(With battery) |
|
A user guide
Features
7″high definition TFT LCD screen
Compatible with most digital cameras stored JPEG images
 Automatic slideshow with adjustable display time.
 Supports SD/MMC/MS/XD memory cards and USB Memory.
 Supports photo rotate and strech function.
 Includes infrared remote control
3 |
4 |
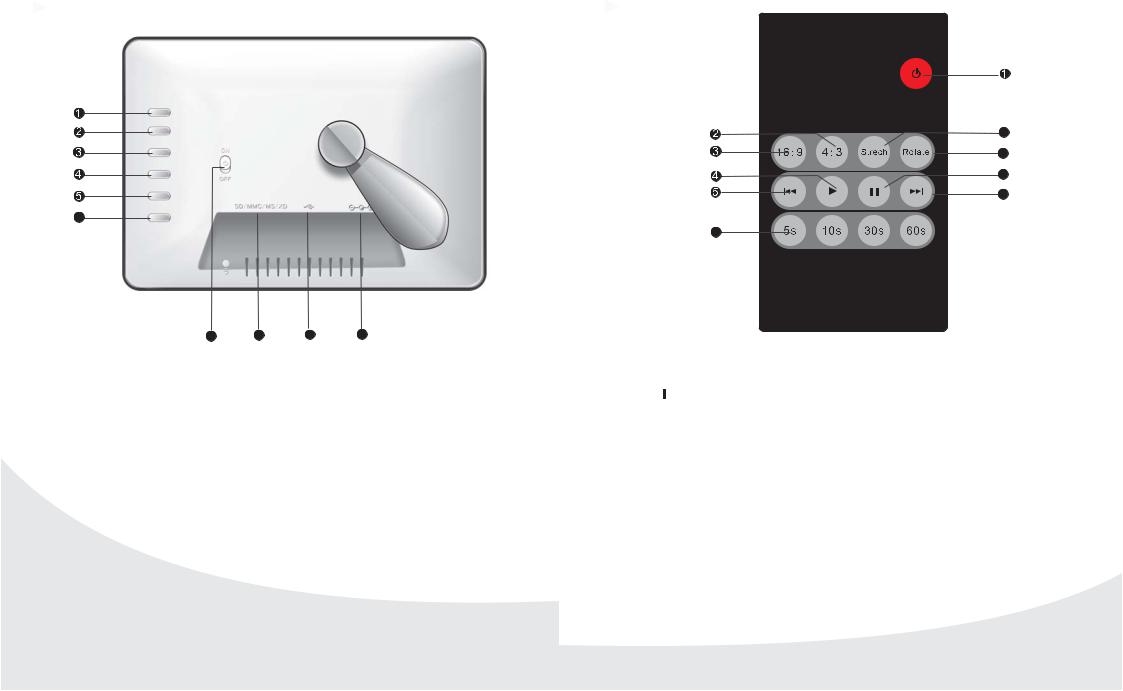
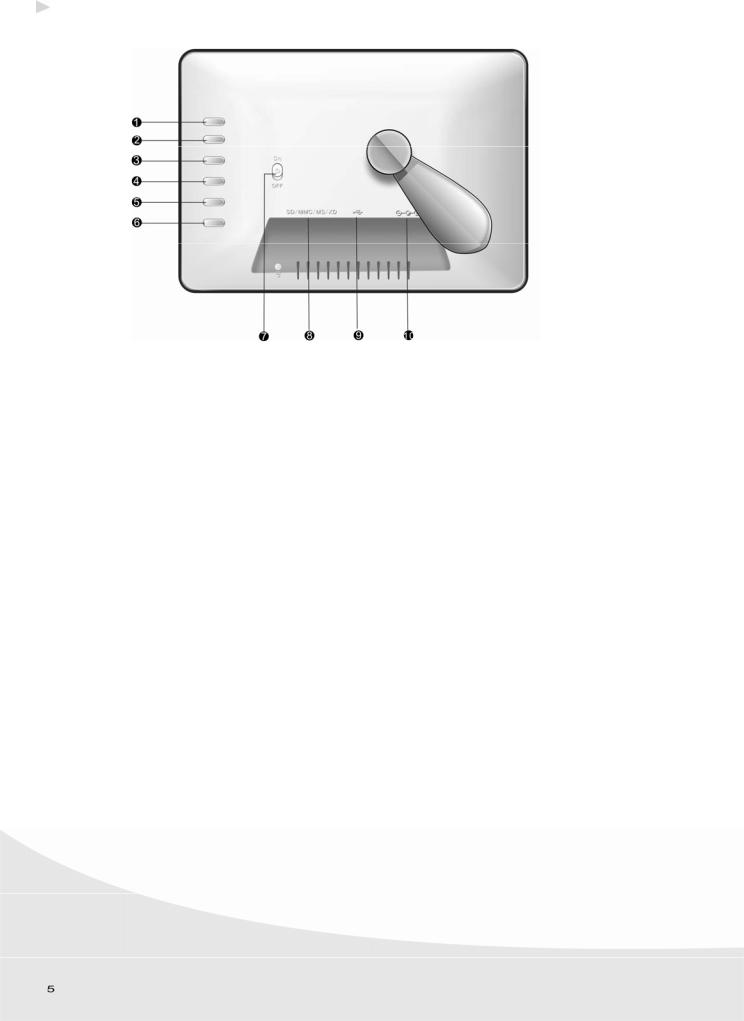
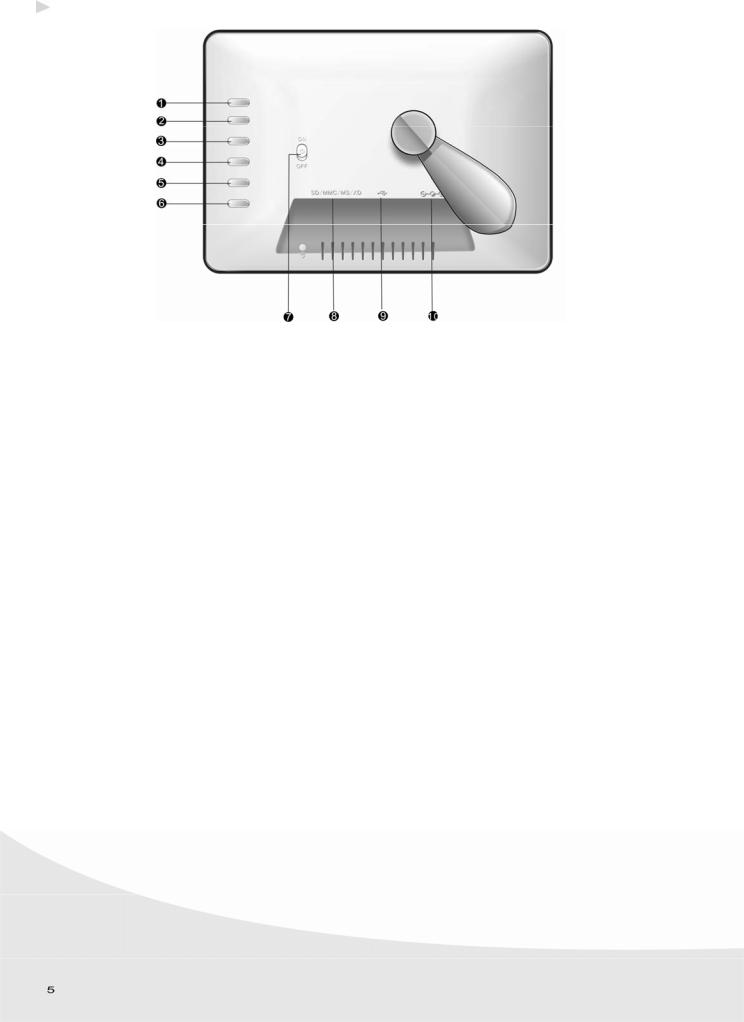
Schematic Diagram
6
7 |
8 |
9 |
10 |
1.  : To rotate the photo.
2.  : Skips to the previous photo.
3.  /
/
 :To start or to pause the playback. 4.
 : Skips to the next photo.
5. : To change the photo display size. 6.To change the photo show delay time. 7. Power Button
8.SD/MMC/MS/XD slot 9.USB Port
10.DC 9V Jack
Remote Control
7
8
9
10
6
1.  : Standby button,to turn on/off backlight. 2. 4:3: To switch to 4:3 LCD screen display.
3. 16:9: To switch to 16:9 LCD screen display. 4.  : To start the playback.
5. 
 : Skips to the previous photo.
6. 5s/10s/30s/60s:To change photo show delay time.Four items are available:
5,10,30,60 seconds.
7. Strech:Switch to stretch LCD screen display.
8. Rotate:To rotate the photo for different angle viewing.
9. 
 :To pause the playback.
10. 
 :Skips to the next photo.
5 |
6 |
How to use the Remote Control
Installing the Battery in the Remote Control
Remove the battery cover on the rear of the remote control and insert the battery.Make sure the polarities (+ and -) are aligned correctly.
Note !
Normally the batteries can last for around one year,if remote control does not work,please replace the batteries.
 If the player is not used for a long time,take out the batteries to prevent leakage and possible damage to the remote control.
 Do not mix new and old batteries.Nerer mix different types of batteries.
 CAUTION RISK OF EXPLOSION IF BATTERY IS REPLACED BY AN INCORRECT TYPE.DISPOSE OF USED BATTERIES ACCORDING TO THE INSTRUCTIONS.
How to use the remote control
Point the remote control to the remote sensor on the player front panel. Its working limits is within an angle of 3 0 and a distance of 2m. When using the remote control,no obstacle is to be set between the remote control and remote sensor.
Basic Operation
Getting Started
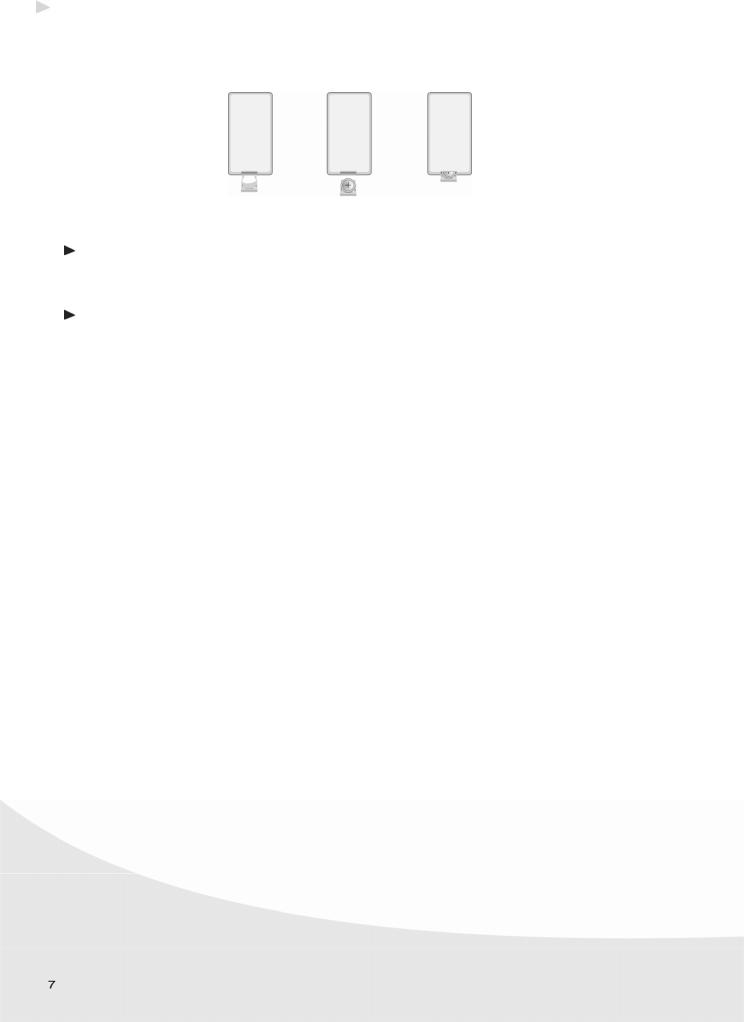
 Assemble the Photo Frame bracket on the back to prop the player up, insert adapter
DC plug into the unit first, then plug adapter into a standard outlet.
 Once you have photos on the memory card or USB device, insert the card or USB device into the proper slot. Do not force the card into the slot.
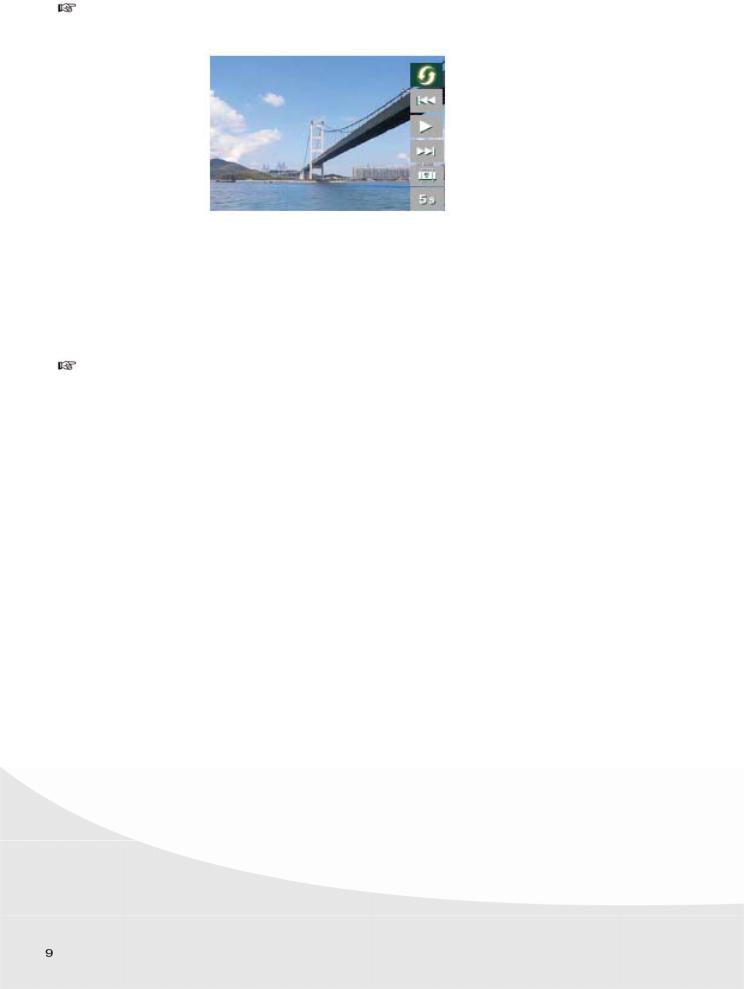
 Switch the Power switch on the rear panel of the player to be ON, the screen will display as below:
Note: !
The player will select one memory card to play at a time even though more might be installed.If you insert a memory card and USB device at the same time,the player will play the file on the memory card firstly.
 And then the player will start photo slideshow .
7 |
8 |
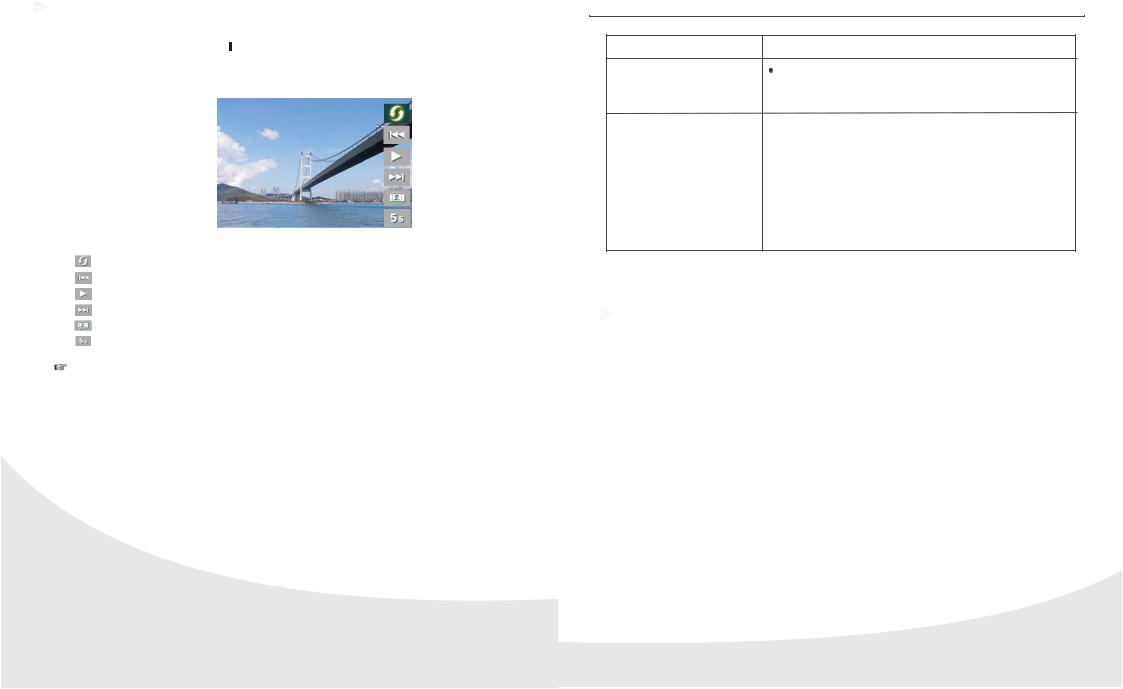
Basic Operation
 During slideshow process,Press any key on the rear panel of the playe or on the remote control (exclude the
  key),the player will display as below:
:To rotate the photo in different angles for viewing. :To skip to the previous photo.
:To start or pause the playback. :To skip to the next photo.
:To change the photo display size.
:To change the photo show delay time.
Six items are available.You can set the photo slideshow effect according to your preference.Press the button on the remote control or on the rear panel of the player,the corresponding icon on the menu will be highlighted.Press the button repeatly,you can enjoy different slideshow .
Indicates
PROBLEMS
Photo Frame does not power on.
After Power on,the photo slideshow does not start.
SOLUTIONS
Check that you connect the AC adapter to the frame properly.
 Check that you have inserted memory card or USB device.
 Check that the memory card or USB device is inserted correctly.
 Check that the memory card or USB device is supported by the player.
 Check that the photo format is supported by the player.
Specifications
Model No. |
: |
AF5075 |
Product |
: |
7" TFT LCD screen |
Input formats |
: SD/MMC/MS/XD |
|
File format |
: |
JPEG |
USB Port |
: |
2.0 |
Power |
: |
DC 9V/1.8A |
Dimension |
: |
216.5 X 149.5 X 26.5 mm. |
Weight |
: |
0.439kg |
Approval |
: |
CE & ROHS |
All data are provided for reference purposes only.AgfaPhoto reserves the right to make any changes without prior notice.
9 |
10 |
Bienvenue
Merci d'acheter notre nouveau cadre photo numérique. Avec ce produit de qualité vous pourrez profiter au mieux de vos photos numériques.
Vous trouverez plus d'information sur le site Web : www.agfaphoto.com.
Instructions et recommandations de sécurité
Afin d'empêcher des dommages de la carte ou de le cadre photo, couper svp le courant avant d'enlever ou d’insérer une carte mémoire.
Utiliser l'adapteur dc 9 V/1.8A livré avec votre produit. le cadre photo est pour un usage intérieur uniquement.
Manipuler le cadre photo avec attention. Éviter de toucher l'écran d'affichage LCD.
Ne jamais placer d’objets lourds ou pointus sur le panneau d'affichage, le cadre photo ou le câble de puissance.
Garder l'écran propre (employer svp un tissu mou sec pour le nettoyage). S'assurer que l’alimentation est éteinte avant de nettoyer le cadre photo, puis doucement nettoyer avec un tissu mou sec.
Ne pas placer le cadre photo près d'une source de chaleur.
Ne pas éclabousser ou remplir le cadre photo avec des liquides.
Ne pas placer le cadre photo sous la pluie, l’arroser, ou le placer dans un lieu à humidité élevée.
Température et l’humidité:
Température de fonctionnement : 0 °C- + 45°C, Humidité : 20%-80%
Cet équipement est conforme au type de tension indiqué sur le cadre photo.
L'inscription de la CE certifie que le produit correspond aux exigences principales de la directive du Conseil 1999/5/CE du Parlement européen sur l'équipement terminal de télécommunications, concernant la sûreté et la santé des utilisateurs, et considérant l'interférence électromagnétique. La déclaration de la conformité peut être consultée sur le site www.agfaphoto.com ou peut être demandée à l'adresse suivante :
AgfaPhoto Holding Gmbh: AGFAPHOTO is used under license of Agfa-Gevaert NV & Co. KG. Agfa-Gevaert NV & Co. KG does not manufacture these products or provide any product warranty or support. Contact : www.agfaphoto.com - For service, support and warranty information, contact the distributor or manufacturer: sold and distributed by Sagem Communication - www.sagem.com

ENVIRONEMENT
La préservation de l'environnement est une préoccupation essentielle de AgfaPhoto. AgfaPhoto a la volonté d'exploiter des installations respectueuses de l'environnement et a choisi d'intégrer la performance environnementale dans l'ensemble du cycle de vie de ses produits, de la phase de fabrication à la mise en service, l'utilisation et l'élimination.
L'EMBALLAGE
La présence du logo (point vert) signifie qu'une contribution est versée à un organisme national agréé, pour améliorer les infrastructures de récupération et de recyclage des emballages.
Pour faciliter ce recyclage, veuillez respecter les règles de tri mises en place localement pour ce type de déchets.
LES PILES ET BATTERIES
Si votre produit contient des piles ou des batteries, ces dernières doivent être déposées dans les points de collecte désignés.
LE PRODUIT
La poubelle barrée apposée sur le produit ou ses accessoires signifie qu'ils appartiennent à la famille des équipements électriques et électroniques.
A ce titre, la réglementation européenne vous demande de procéder à sa collecte sélective : - dans les points de distribution en cas d'achat d'un équipement équivalent,
- dans les points de collecte mis à votre disposition localement (déchetterie, collecte sélective, etc.). Ainsi, vous participez à la réutilisation et à la valorisation des Déchets d'Equipement Electriques et Electroniques qui peuvent avoir des effets potentiels sur l'environnement et la santé humaine.
 Votre cadre photo et ses accessoires
Placez votre équipement devant vous. Sortez les divers composants de votre cadre photo et vérifiez que les composants montrés ci-dessous sont présents :
Une alimentation de puissance |
Un cadre photo numérique |
Une télécommande (Avec la batterie) |
cadres interchangeable |
Une notice d’utilisation

 Caractéristiques :
Ecran 7’ haute définition
Compatible avec la plupart des images JPEG des appareils-photo numériques Présentation automatique avec temps d'affichage réglable
Supporte les cartes mémoire de type MMC /MS/ XD et les clés mémoire USB Permet plusieurs formats d’affichage (rotations, 16/9, 4/3, étiré)
Inclut une télécommande infrarouge
Schéma
1. : Pour tourner la photo
2. : revenir à la photo précédente
3. : mettre le diaporama en marche ou pause
4. : Avancer à la prochaine photo
5. : Pour changer le type d’affichage de la photo
6.changer la durée de temps entre chaque photo
7.ON/OFF
8.ports SD /MMC/ MS/XD
9.Port USB
10.Connecteur DC 9V
Télécommande
1. : Bouton "Marche/Arrêt".
2.4: 3 : affichage des photos en mode 4 3.
3.16: 9 : affichage des photos en mode 16 9
4. :Lancer la lecture du diaporama.
5. :retourner à la photo précédente.
6.5s/10s/30s/60s: Pour changer le temps de pause entre chaque photo. Quatre durées sont disponibles :
5.10.30.60secondes
7.Strech : affichage des photos en mode étiré.
8.Rotate Faire tourner la photo.
9. : mettre en pause la lecture du diaporama.
10. : avancer à la prochaine photo

Comment utiliser le télécommande
Installation de la batterie dans la télécommande
Enlever la couverture de batterie sur l'arrière de la télécommande et insérer la batterie. S'assurer que les polarités (+ et -) sont alignées correctement.
Note !
Normalement les batteries peuvent durer pendant environ une année, si la télécommande ne fonctionne pas, remplacez les batteries SVP.
Si la télécommande n'est pas employée pendant longtemps, sortir les batteries pour empêcher la fuite et les dommages possibles à la télécommande.
Ne pas mélanger de nouvelles et vieilles batteries. Ne jamais mélanger les différents types de batteries.
 ATTENTION AU RISQUE D'EXPLOSION SI LA BATTERIE EST REMPLACÉE PAR UN TYPE INCORRECT. DISPOSER DES BATTERIES UTILISÉES SELON LES INSTRUCTIONS.
Comment utiliser la télécommande
Diriger la télécommande vers le récepteur IR situé sur le panneau avant du cadre photo. Ses limites de fonctionnement sont sur un angle de 30 et une distance de 2m. Lors de l’utilisation de la télécommande, aucun obstacle ne doit être placé entre la télécommande et le récepteur IR situé sur le panneau avant du cadre photo.
Opérations de base Démarrer le cadre photo
 Assembler le cadre photo avec l'appui vertical et insérer la prise de l'adapteur dans le cadre photo en premier, puis brancher l'adapteur à une prise de courant.
Insérer votre carte mémoire ou clé mémoire USB dans la fente appropriée. Ne pas forcer l’insertion dans la fente.
 Allumer le cadre photo en appuyant sur le bouton
  ou l’interrupteur à l’arrière du cadre photo. L'écran affichera les images ci-dessous :
Note: !
En cas de double insertion d’une carte mémoire et d’une clé mémoire USB, le cadre photo ne fonctionnera que pour un seul dispositif. Si vous insérez une carte mémoire et une clé mémoire USB en même temps le cadre photo jouera le dossier sur la carte de mémoire en priorité.
 Le cadre photo commencera la présentation de photo

 Opérations de base
 Pendant la présentation, presser n’importe quel bouton sur le panne à l’arrière du cadre photo ou sur la télécommande (exclure le bouton
 ), le menu ci-dessous sera affiché :
 : Pour faire tourner la photo.
 : Pour revenir à la photo précédente.
 : Pour mettre en marche ou pause le défilement.
 : Pour avancer à la prochaine photo.
 : Pour changer la taille d’affichage de la photo
 :Pour changer le temps de temps de pause entre chaque photo
Avec ces six options disponibles, vous pouvez modifier les paramètres de la présentation à votre convenance en pressant le bouton approprié de la télécommande ou du panneau arrière du cadre photo. L'icône correspondante sur le menu sera alors accentuée.

Remarques
PROBLEMES |
SOLUTIONS |
Votre Cadre photo n’est pas allumée. |
Vérifier que vous connectez le AC adapteur au cadre photo |
|
correctement. |
|
|
|
Vérifier que vous avez inséré la carte mémoire ou la clé |
|
mémoire USB. |
Après allumage du carde photo, la |
Vérifier que la carte mémoire ou la clé mémoire USB est |
présentation ne démarre pas. |
insérée correctement. |
|
Vérifier que la carte mémoire ou la clé mémoire USB est |
|
supportée par le cadre photo. |
|
Vérifier que le format de photo est supporté par le cadre |
|
photo. |
Specifications |
|
No de modèle. |
: AF5075 |
Produit |
: 7" TFT LCD écran |
Formats d’entrée |
: SD/MMC/MS/XD |
Format de dossier : JPEG |
|
USB Port |
: 2 0 . |
Puissance |
: DC 9V/1.8A |
Dimension |
: 216.5 X 149.5 X 26.5 mm. |
Poid |
: 0 439kg |
Conforme |
: CE & ROHS |
Toutes ces informations sont données pour référence seulement. AgfaPhoto se réserve le droit de faire des changements sans préavis.
NEDERLANDS
 Welkom
Dank u wel voor de aanschaf van deze nieuwe fotolijst. Geniet van uw foto’s als nooit tevoren. Met deze fotolijst kunt u uw foto’s bekijken.
Veiligheidsinstructies en aanbevelingen
Om schade te voorkomen aan de kaart of het apparaat, dient u de stroom uit te schalelen voordat u de kaart verwijdert of aanbrengt.
Gebruik de bijgesloten DC 9V/1.8 A stroomadapter, het apparaat is alleen bedoeld voor gebruik binnenshuis.
Behandel het apparaat altijd met zorg. Raak het LCD scherm niet aan.
Zet nooit zware of scherpe voorwerpen op het LCD scherm, de lijst of de stroomdraad.
Houd het scherm schoon (gebruik een droge, zachte doek voor het schoonmaken). Verzeker u ervan dat de stroom uitgeschakeld is, voordat u het apparaat schoonmaakt. Veeg dan lichtjes met een droge, zachte doek.
Zet het apparaat niet dichtbij andere warmtebronnen.
 Zorg dat er geen spatten op het apparaat komen of vul deze niet met vloeistoffen.
Stel het apparaat niet bloot aan regen, water, vocht of een hoge vochtigheidsgraad.
Temperatuur en vochtigheid: Bedieningstemperatuur: 0°C- + 45°C, Vochtigheidsgraad: 20%-80%
Dit apparaat stemt overeen met het voltagetype, gespecificeerd op de unit.
Het CE merk bevestigt dat het product overeenstemt met de voornaamste eisen van
het Europese Parlement en de richtlijn van de Raad 1999/5/CE aangaande eindapparatuur voor telecommunicatie, betreffende de veiligheid en gezondheid van gebruikers, en betreffende elektromagnetische interferentie.
De verklaring van overeenstemming kan geraadpleegd worden op www.agfaphoto.con of kan opgevraagd worden op het volgende adres:
AgfaPhoto Holding Gmbh: AGFAPHOTO is used under license of Agfa-Gevaert NV & Co. KG. Agfa-Gevaert NV & Co. KG does not manufacture these products or provide any product warranty or support. Contact : www.agfaphoto.com - For service, support and warranty information, contact the distributor or manufacturer: sold and distributed by Sagem Communication - www.sagem.com

Milieu
Milieubehoud als onderdeel van een duurzame ontwikkelingslogica is een wezenlijke zorg van AgfaPhoto. De wens van AgfaPhoto is om systemen te beheren rekening houdend met het milieu en ze heeft besloten consequent milieumaatregelen te integreren in de levensduur van deze producten, vanaf fabricage tot gebruik en verwijdering.
VERPAKKING
De aanwezigheid van het logo (groene punt) betekent dat een bijdrage geleverd is aan een goedgekeurde nationale organisatie om het terugwinnen en het recycleren van verpakkingsmateriaal te verbeteren om infrastructuren te bevorderen. Respecteer de scheidingsregels die lokaal opgesteld zijn voor dit soort afval.
BATTERIJEN
Als u product batterijen bevat, moeten die verwijderd worden op een daarvoor geschikt inzamelpunt.
HET PRODUCT
Het logo van de doorgehaalde afvalcontainer betekent dat het product tot de serie van elektrische of elektronische apparaten behoort.
De Europese regelingen vereisen dat u het product na gebruik bij de volgende plekken kunt afgeven:
-Bij verkoopplaats van het product
-Bij uw lokale collectieplaats (afvalverwerkingcentrum, selectieve inzameling, enz.)
Op deze manier kunt u aan het hergebruik en verbeteren van elektrisch en elektronisch apparatenafval deelnemen, hetgeen een positief effect op het milieu en de volksgezondheid heeft.
 Uw fotolijst en de accessoires
Plaats de set voor u. Neem de verschillende componenten van uw fotolijst eruit en controleer of de componenten die hier beneden getoond worden, aanwezig zijn.
Een voeding |
Een fotolijst en steun |
Een afstandsbediening |
Verwisselbare lijsten |
(Met batterij) |
|
Een handleiding |
|

 Kenmerken
 7” high definition TFT LCD scherm
 Compatibel met de meeste digitale camera’s met JPEG beelden
 Automatische diashow met instelbare displaytijd
 Ondersteunt SD MMC MS XD geheugenkaarten en USB apparatuur
 Ondersteunt het roteren van foto’s en stretchfunctie
  Inclusief infrarood afstandsbediening
Schematische weergave
1. : Foto roteren.
2. : Springt naar de vorige foto.
3. : Start of pauzeren afspelen.
4. : Springt naar de volgende foto.
5. : Verander afmeting van het fotodisplay te veranderen.
6.Verander de tijdsinterval tussen het tonen van de foto’s tijdens de diashow.
7.Aan/uit knop
8.SD/MMC/MS/XD kaartgleuf
9.USB poort
10.DC 9V plug
 Afstandsbediening
1. : Stand-by knop. om achtergrondverlichting aan/uit te zetten.
2.4:3: Om te schakelen naar 4 :3 verhouding van het display.
3.16:9: Om te schakelen naar 16: 9 verhouding van het display.
4. : Start afspelen.
5. :Springt naar de vorige foto.
6.5s/10s/30s/60s: Verander de tijdsinterval tussen het tonen van de foto’s. Er zijn vier mogelijkheden:
5,10,30,60 seconden.
7.Stretch: Om de afmeting van het fotobeeld te veranderen.
8.Rotate: Om de foto te roteren om deze uit verschillende hoeken te bekijken.
9. : Pauzeren van afspelen.
10. : Springt naar de volgende foto.
Gebruik van de afstandsbediening
De batterij in de afstandsbediening doen.
Verwijder het batterijdeksel op de achterzijde van de afstandsbediening en doe de batterij erin. Verzeker u ervan dat de polariteiten (+ en -) correct geplaatst zijn.
Opmerking!
Normaal gesproken houden de batterijen het ca. een jaar uit. Als de afstandsbediening niet werkt, vervang dan de batterijen.
 Haal de batterijen eruit om lekken en mogelijke schade aan de afstandsbediening te voorkomen, als de speler lange tijd niet gebruikt wordt.
Meng nieuwe en oude batterijen niet. Meng nooit verschillende typen batterijen.
 LET OP. ONTPLOFFINGSGEVAAR ALS DE BATTERIJ VERVANGEN IS DOOR EEN ONJUIST TYPE. VERWIJDER GEBRUIKTE BATTERIJEN CONFORM DE INSTRUCTIES.
Gebruik van de afstandsbediening.
Richt de afstandsbediening op de afstandssensor op de voorzijde van de speler. De werking ervan is begrensd tot een hoek van 30o en een afstand van 2m. Wanneer u de afstandsbediening gebruikt, mag er geen obstakel zijn tussen de afstandsbediening en de afstandssensor.
Basisbediening
Beginnen
 Monteer de steun van de fotolijst op de achterzijde om de speler overeind te houden, doe dan eerst de gelijkstroomplug van de adapter in het apparaat, en steek dan de adapter in een gewoon stopcontact.
 Steek, wanneer u foto’s op de geheugenkaart of USB apparaat hebt, de kaart of het USB apparaat in de juiste sleuf. Forceer de kaart niet bij het insteken.
 Zet de voedingsschakelaar op de achterzijde van de speler op ON, het beeld ziet er als volgt uit:
Opmerking: !
De speler selecteert één geheugenkaart om af te spelen, zelfs als er meer zijn geïnstalleerd. Als u een geheugenkaart en een USB-apparaat tegelijkertijd erin steekt zal de speler eerst het bestand op de geheugenkaart afspelen.
 En dan start de speler de diashow.
 Basisbediening
Druk gedurende het diashowproces op een knop op de achterzijde van de speler of op de afstandsbediening (uitgezonderd de  knop), het beeld ziet er als volgt uit:
 : Om de foto te roteren om deze uit verschillende hoeken te bekijken.
 : Om naar de vorige foto te springen.
 : Start of pauzeren van het afspelen.
 : Om naar de volgende foto te springen.
 : Verander de afmeting van het beeld.
 : Verander de tijdsinterval tussen het tonen van de foto’s.
Er zijn zes mogelijkheden. U kunt het effect van de diashow instellen volgens uw voorkeur. Druk op de knop op de afstandsbediening of op de achterzijde van de speler, het corresponderende pictogram op het menu licht op. Druk herhaaldelijk op de knop, u kunt genieten van een andersoortige diashow.

Toont
PROBLEMEN |
|
OPLOSSINGEN |
|
|
|
De fotolijst gaat niet aan. |
Controleer of u de wisselstroomadapter |
|
|
|
juist met het apparaat hebt verbonden. |
|
|
|
Na inschakelen start de diashow niet. |
Controleer, of u de geheugenkaart of het USB-apparaat |
|
|
|
erin hebt gestoken. |
|
|
Controleer, of de geheugenkaart of het USB-apparaat |
|
|
er correct in zit. |
|
|
Controleer, of de geheugenkaart of het USB-apparaat |
|
|
door de speler ondersteund wordt. |
|
|
Controleer, of het fotoformaat door de speler |
|
|
ondersteund wordt. |
|
|
|
Specificaties |
|
|
Model no. |
: AF5075 |
|
Product |
: 7" TFT LCD scherm |
|
Inputformaten |
: SD/MMC/MS/XD |
|
Bestandsformaat |
: JPEG |
|
USB poort |
: 2 0 . |
|
Stroom |
: Gelijkstroom 9V/1.8A |
|
Afmeting |
: 216.5 X 149.5 X 26.5 mm. |
|
Gewicht |
: 0. 439kg |
|
Goedkeuring |
: CE& ROHS |
|
Alle gegevens worden verschaft alleen voor referentiedoeleinden. AgfaPhoto behoudt het recht veranderingen aan te brengen zonder voorafgaand bericht.

Ambiente
La preservación del medio ambiente como parte des desarrollo sostenible es una preocupación esencial para AgfaPhoto. El deseo de AgfaPhoto es hacer funcionar sistemas observando el medioambiente y por lo tanto se ha decidido integrar diseños ambientales en el ciclo de vida de estos productos, de la fabricación hasta el uso y por último la eliminación.
EMPAQUETADO
La pre sencia del logo significa que una contribución es donada a una organización nacional aprobada para mejorar la recuperación del paquete y reciclando las infraestructuras para facilitar. Por favor respete las reglas establecidas localmente para esta clase de desperdicios.
BATERÍAS
Si su producto contiene baterías, deben ser dispuestas en el punto apropiado para su recogida.
EL PRODUCTO
El cubo de la basura tachado pegado en el producto significa que este pertenece a la familia de equipamiento eléctrico y electrónico. Respecto a ello, las regulaciones europeas piden que usted disponga de él selectivamente:
-En los puntos de ventas en el momento de la compra de equipamiento similar.
-En los puntos de la recogida disponibles para usted en su localidad (centros de entrega, de colección selectiva, etc.).
De esta manera usted puede participar en la reutilización y aumento de basura de equipamiento eléctrico y electrónico, que puede tener efectos en el ambiente y la salud humana.
Su marco de fotos y sus accesorios
Ponga su sistema delante de usted. Saque los diferentes componentes para su marco fotos y compruebe que los componentes mostrados abajo están presentes:
Una fuente de alimentación |
Un marco y un soporte |
Un mando a distancia (con la batería) |
Marcos Intercambiables |
Una guía del usuario

Características
Pantalla de 7” de alta definición TFT LCD
Compatible con la mayoría de las cámaras fotográficas digitales que almacenan imágenes JPEG Slideshow automático con tiempo ajustable de exhibición
Soporta tarjetas de memoria de MS ,XD , SD ,MMC y dispositivo del USB. Soporta fotos rotativas y funciones strech
Incluye mando a distancia infrarrojo
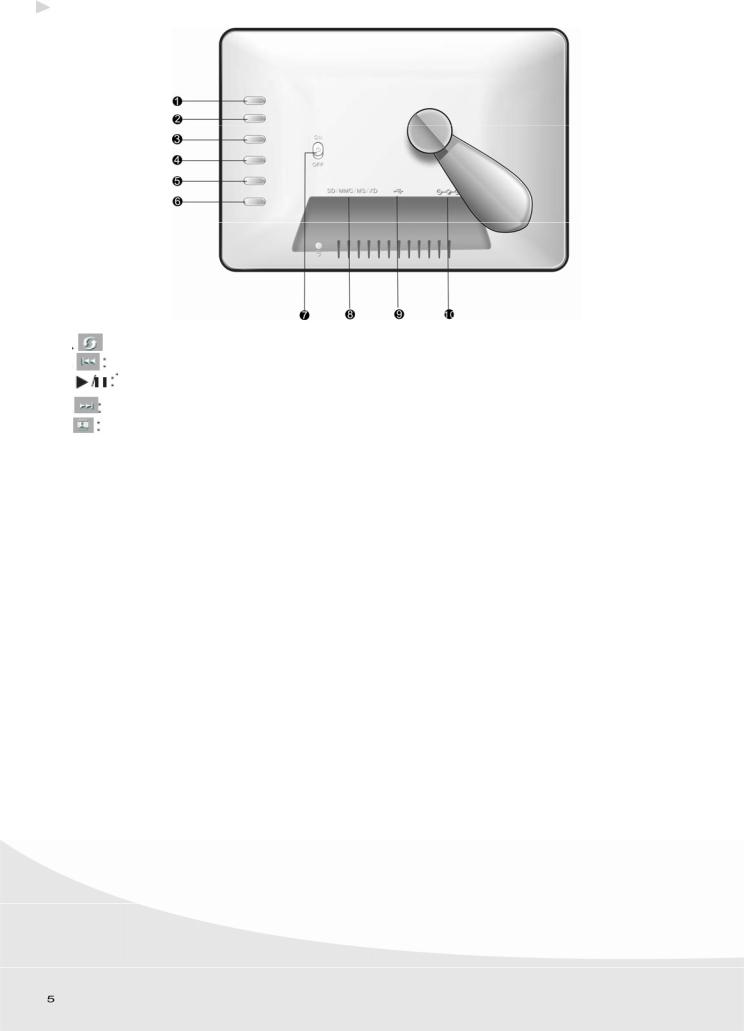
Diagrama Esquemático
1.Para rotar la foto.
2.Salta a la foto anterior
3.Para comenzar o detener brevemente la reproducción
4.Salta a la foto siguiente
5.Para cambiar el tamaño de la exhibición de la foto
6.Para cambiar el tiempo de exposición de cada foto
7.Botón de encendido
8.Ranura de MS, XD, SD y MMC
9.Puerto Usb
10.Adaptador D.C. 9V
 Loading...