


CL30
ePhoto CL30
User’s Guide

2
ePhoto CL30 User’s Guide
FCC Information Test
FCC WARNING:
This equipment meets the limits for a Class B digital device, pursuant
to Part 15 of FCC Rules. Only the power pack and cable supplied with the camera
should be used. Operation with other power packs and cables is likely to result in inter-
ference to radio and TV reception and could void the user’s authorization to operate this
equipment.
This device complies with Part 15 of the FCC Rules. Operation is subject to the follow-
ing two conditions:
1. This device may not cause harmful interference.
2. This device must accept any interference received, including interference that may
cause undesired operation.
Changes or modifications not expressly approved by the manufacturer may void the
user’s authority to operate this equipment.
User Information
NOTE:
This equipment has been tested and found to comply with the limits for a Class
B digital device, pursuant to Part 15 of the FCC Rules. These limits are designed to pro-
vide reasonable protection against harmful interference in a residential installation. This
equipment generates, uses and can radiate radio frequency energy and, if not installed
and used in accordance with the instructions, may cause harmful interference to radio
communications. However, there is no guarantee that interference will not occur in a
particular installation. If this equipment does cause harmful interference to radio or
television reception, which can be determined by turning the equipment off and on, the
user is encouraged to try to correct the interference by one or more of the following
measures:
◗
Reorient or relocate the receiving antenna.
◗
Increase the separation between the equipment and receiver.
◗
Connect the equipment into an outlet on a circuit different from that to which the
receiver is connected.
Canadian Radio Interference Regulations
Statement
This Class B digital device meets all the requirements of the Canadian Interference-
Causing Equipment Regulations.
Cet appareil numérique de la Classe B respecte toutes les exigences du Réglement sur
le matériel brouilleur du Canada.

ePhoto CL30 User’s Guide
3
1-Year Limited Hardware Warranty
Agfa warrants this product to be free from defects of material and workmanship for one
(1) year from the date of purchase. During the warranty period, Agfa will repair or
replace, at its option, the product at no charge to the customer. The replacement unit
may be a remanufactured unit or a unit of equal or greater functionality. After one (1)
year, Customer shall pay for all parts, labor and service.
Agfa warrants that software products will conform to published specifications in effect
at the time of delivery for 90 days after purchase. Customer acknowledges that the
Software may have inherent defects because of its complexity. The warranty applies
only to the media on which the software is recorded.
If a unit is replaced during the warranty period, the original warranty shall remain in
effect until the end of the one (1) year period or shall be 30 days, whichever is longer.
This warranty is transferable with new owner notification to Agfa.
This warranty shall not apply if Customer:
1. abuses or modifies Product or Software;
2. operates the system in an environment with excessive dirt, moisture, chemical
fumes, extremes of temperature or other improper conditions. The camera is not
impermeable to water, dust or sand.
3. supplies other Software or Interfacing.
4. Uses any adapter other than the Agfa ePhoto AC adapter.
Warranty service is excluded if the serial number of the product has been tampered
with or removed.
THE PARTIES AGREE THAT ALL OTHER WARRANTIES, EXPRESS OR IMPLIED,
INCLUDING WARRANTIES OF FITNESS FOR A PARTICULAR PURPOSE, MERCHANT-
ABILITY AND NON-INFRINGEMENT, ARE EXCLUDED.

4
ePhoto CL30 User’s Guide

ePhoto CL30 User’s Guide
5
Contents
C
ONTENTS
FCC Information Test
. . . . . . . . . . . . . . . . . . . . . . . . . . . . . . . . . 2
User Information
. . . . . . . . . . . . . . . . . . . . . . . . . . . . . . . . . . . . . . . . . 2
Canadian Radio Interference Regulations Statement
. . . . . . . . 2
1-Year Limited Hardware Warranty
. . . . . . . . . . . . . . . . . . . . . . . . 3
Contents
. . . . . . . . . . . . . . . . . . . . . . . . . . . . . . . . . . . . . . . . . . . . . . . . 5
Introduction
. . . . . . . . . . . . . . . . . . . . . . . . . . . . . . . . . . . . . . . . . . . . . 7
Camera Parts
. . . . . . . . . . . . . . . . . . . . . . . . . . . . . . . . . . . . . . . . . . . . 8
Memory Cards
. . . . . . . . . . . . . . . . . . . . . . . . . . . . . . . . . . . . . . . . . . 10
Inserting a Memory Card . . . . . . . . . . . . . . . . . . . . . . . . . 10
Memory Card Capacity . . . . . . . . . . . . . . . . . . . . . . . . . . . 10
Batteries
. . . . . . . . . . . . . . . . . . . . . . . . . . . . . . . . . . . . . . . . . . . . . . . 12
Battery Conditions . . . . . . . . . . . . . . . . . . . . . . . . . . . . . . . 12
Controlling the Camera
. . . . . . . . . . . . . . . . . . . . . . . . . . . . . . . . . 13
Mode Switch . . . . . . . . . . . . . . . . . . . . . . . . . . . . . . . . . . . 13
EasyPilot Button . . . . . . . . . . . . . . . . . . . . . . . . . . . . . . . . 13
LCD Switch . . . . . . . . . . . . . . . . . . . . . . . . . . . . . . . . . . . . 13
Shutter Button . . . . . . . . . . . . . . . . . . . . . . . . . . . . . . . . . . 14
Status Display
. . . . . . . . . . . . . . . . . . . . . . . . . . . . . . . . . . . . . . . . . . 15
Taking Pictures
. . . . . . . . . . . . . . . . . . . . . . . . . . . . . . . . . . . . . . . . . 16
Changing Basic Settings
. . . . . . . . . . . . . . . . . . . . . . . . . . . . . . . . . 17
Resolution . . . . . . . . . . . . . . . . . . . . . . . . . . . . . . . . . . . . . 18
Flash . . . . . . . . . . . . . . . . . . . . . . . . . . . . . . . . . . . . . . . . . 18
Digital Zoom . . . . . . . . . . . . . . . . . . . . . . . . . . . . . . . . . . . 19
Focus . . . . . . . . . . . . . . . . . . . . . . . . . . . . . . . . . . . . . . . . 19
Preview . . . . . . . . . . . . . . . . . . . . . . . . . . . . . . . . . . . . . . . 20
Changing Advanced Settings
. . . . . . . . . . . . . . . . . . . . . . . . . . . . . 21
Tips on Using the Advanced Menu . . . . . . . . . . . . . . . . . . 21
Advanced Settings Icons . . . . . . . . . . . . . . . . . . . . . . . . . 22
QuickReview . . . . . . . . . . . . . . . . . . . . . . . . . . . . . . . . . . . 22
Self Timer . . . . . . . . . . . . . . . . . . . . . . . . . . . . . . . . . . . . . 23
Exposure . . . . . . . . . . . . . . . . . . . . . . . . . . . . . . . . . . . . . . 23
White Point . . . . . . . . . . . . . . . . . . . . . . . . . . . . . . . . . . . . 24
External Flash . . . . . . . . . . . . . . . . . . . . . . . . . . . . . . . . . . 25
Automatic . . . . . . . . . . . . . . . . . . . . . . . . . . . . . . . . . . . . . 26
Video Out . . . . . . . . . . . . . . . . . . . . . . . . . . . . . . . . . . . . . 26
Preferences . . . . . . . . . . . . . . . . . . . . . . . . . . . . . . . . . . . . 26

6
ePhoto CL30 User’s Guide
Contents
Date & Time . . . . . . . . . . . . . . . . . . . . . . . . . . . . . . . . . . .27
RS232 Speed . . . . . . . . . . . . . . . . . . . . . . . . . . . . . . . . . .27
Working with Captured Images
. . . . . . . . . . . . . . . . . . . . . . . . . . . 28
Using Single-Image View . . . . . . . . . . . . . . . . . . . . . . . . .28
Using Multi-Image View . . . . . . . . . . . . . . . . . . . . . . . . . . 31
Using the Camera with a TV
. . . . . . . . . . . . . . . . . . . . . . . . . . . . . . 34
Changing the Type of Video Connection . . . . . . . . . . . . . .34
Using the Camera with a Computer
. . . . . . . . . . . . . . . . . . . . . . . . 35
System Requirements . . . . . . . . . . . . . . . . . . . . . . . . . . . . 35
IBM PCs and Compatibles . . . . . . . . . . . . . . . . . . . . . . . .35
Installing PhotoWise Software . . . . . . . . . . . . . . . . . . . . .35
Connecting to Your Computer . . . . . . . . . . . . . . . . . . . . . .36
Transferring Images into Your Computer . . . . . . . . . . . . .36
Creating Installation Diskettes for PhotoWise . . . . . . . . . .37
Care and Maintenance
. . . . . . . . . . . . . . . . . . . . . . . . . . . . . . . . . . . 38
Camera . . . . . . . . . . . . . . . . . . . . . . . . . . . . . . . . . . . . . . .38
AC Adapter . . . . . . . . . . . . . . . . . . . . . . . . . . . . . . . . . . . .38
Batteries . . . . . . . . . . . . . . . . . . . . . . . . . . . . . . . . . . . . . . 38
Memory Cards . . . . . . . . . . . . . . . . . . . . . . . . . . . . . . . . . . 39
Cleaning the Camera . . . . . . . . . . . . . . . . . . . . . . . . . . . . .39
Troubleshooting
. . . . . . . . . . . . . . . . . . . . . . . . . . . . . . . . . . . . . . . . 40
Camera Specifications
. . . . . . . . . . . . . . . . . . . . . . . . . . . . . . . . . . . 45

ePhoto CL30 User’s Guide
7
Introduction
I
NTRODUCTION
Your ePhoto CL30 takes high quality digital pictures— and it’s easy
to use. Just point and click, like a conventional camera. You can
quickly change the camera settings, too, with the EasyPilot button.
But the CL30 is more than a conventional camera. You can:
◗
Check the camera settings on the status display
◗
Frame pictures with the optical viewfinder or color LCD screen
◗
Take pictures and immediately review them on the color LCD
screen or a TV
◗
Store images on a removable, reusable CompactFlash™ mem-
ory card—up to 36 images, depending on the resolution.
◗
Keep only your best shots and delete the rest immediately.
◗
Quickly load pictures into a computer and print them, or use
them on the Web, in email or multimedia. No need to scan pic-
tures.
◗
Transfer your pictures to a computer with a serial connection or
with the newer, faster USB connection (requires Windows 98
and a computer with a USB connection)
◗
Take pictures in black and white text mode and use the docu-
ments in an electronic database and with OCR software
8
ePhoto CL30 User’s Guide
Camera Parts
C
AMERA
P
ARTS
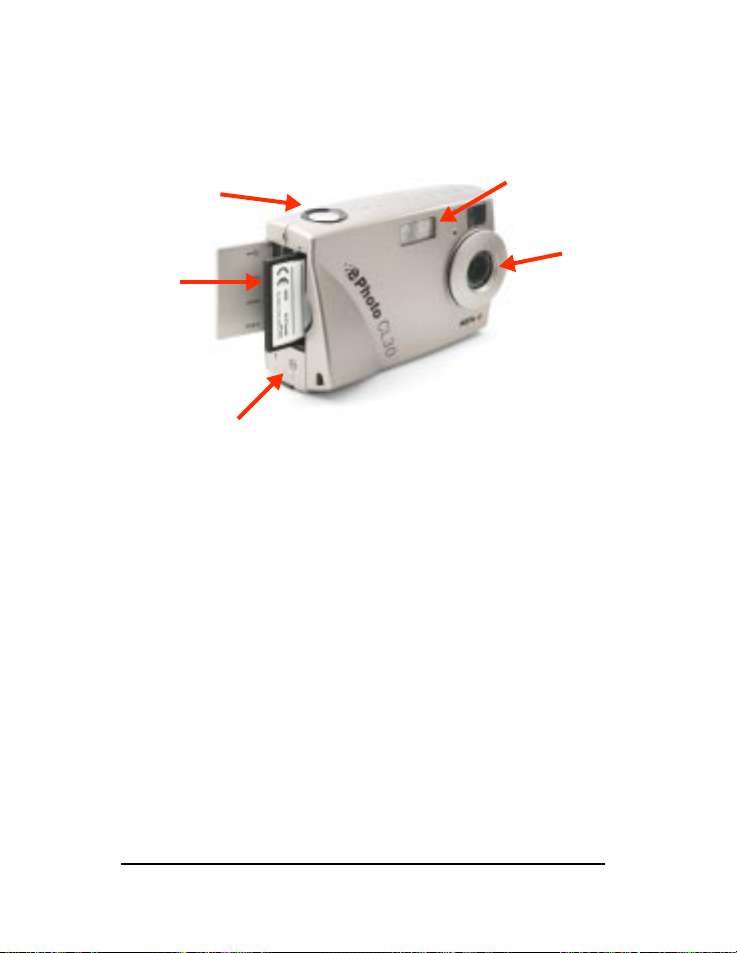
1.
Shutter Button:
takes pictures.
2.
Built-in Flash:
with 4 settings (automatic, fill-in, “red-eye” and
off).
3.
Auto-focus Lens:
glass, 43mm
4.
Battery Compartment:
holds 4 size AA alkaline (included), lith-
ium or rechargeable NiMH batteries.
5.
Memory Card/Port Compartment:
holds a removable Compact-
Flash memory card and the USB, SERIAL, POWER (AC adapter)
and VIDEO OUT ports.
1
2
3
4
5
ePhoto CL30 User’s Guide
9
Camera Parts
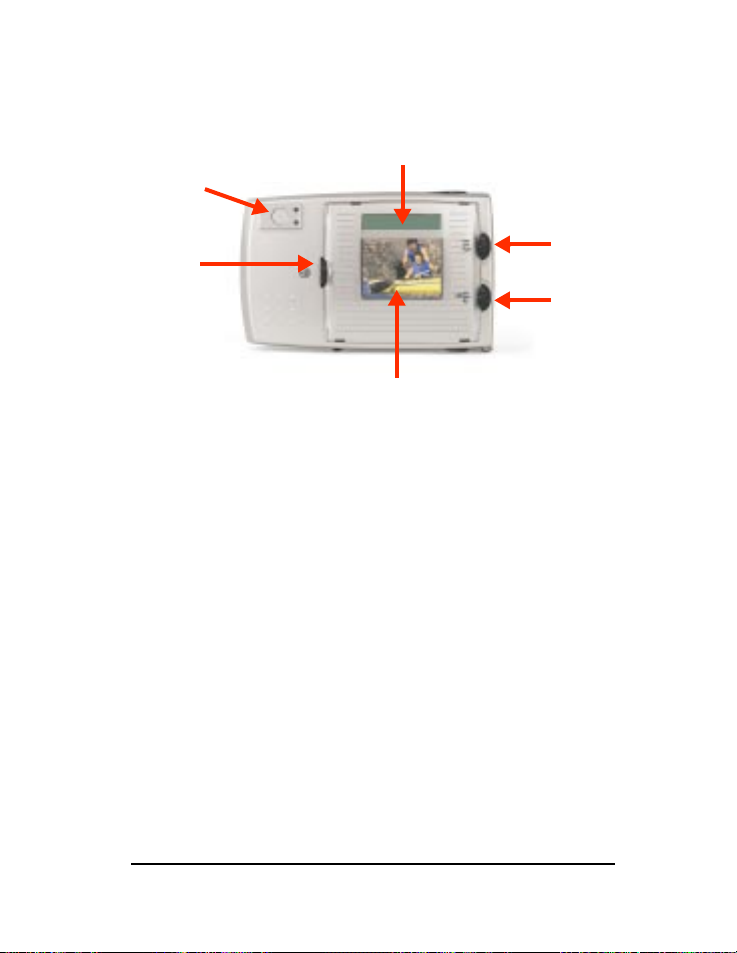
6.
EasyPilot™ Button:
scrolls through menu options (when
turned) and makes a selection (when pressed).
7.
Optical Viewfinder:
frames pictures. Use instead of the color
LCD to conserve battery power.
8.
Status Display:
displays information about the memory card,
batteries, the number of pictures remaining, and the camera
settings.
9.
Mode Switch:
turns the camera on (REC to take pictures or
PLAY to view stored images) and OFF.
10.
LCD Switch
:
turns the color LCD screen ON and OFF, or selects
the PC mode, which you use when you connect your camera to
a computer.
11.
Color LCD:
displays the live image (like the viewfinder), cap-
tured images, and the camera’s built-in menu system.
7
8
9
11
10
6

10
ePhoto CL30 User’s Guide
Memory Cards
M
EMORY
C
ARDS
The ePhoto CL30 has no internal memory. All pictures are stored on
removable CompactFlash™ memory cards. These cards are avail-
able in 2 - 96 MB sizes.
You can only use
o
nly CompactFlash memory cards.
Inserting a Memory Card
To insert a memory card:
1. Open the door of the memory card/port compartment.
2. Insert the memory card (included) and push it all the way into
the slot. The card can only be inserted one way.
3. Close the door.
Memory Card Capacity
Your camera comes with one 4 MB CompactFlash card, whose stor-
age capacity depends on the resolution of the images. For more
information, see
Resolution
on page 18.
Memory cards can store images in any combination of
resolutions.
Memory Card Conditions
Certain memory card conditions are indicated on the color LCD and
on the Status Display from time to time. On the color LCD, you may
see a message such as
No
card!
On the Status Display, you’ll see a memory card icon. When the icon
is flashing, it indicates that:
◗
The memory card is full. To take more pictures, do one of the
following:
◗
Insert a new memory card.

ePhoto CL30 User’s Guide
11
Memory Cards
◗
Lower the resolution. See
Resolution
on page 18.
◗
Transfer the pictures to your computer. See
Connecting to
Your Computer
on page 36.
◗
Delete some or all of the images. See
Deleting Images
on
page 29.
◗
No memory card has been inserted.
◗
The memory card is the wrong type or is unreadable. To refor-
mat the card, press the EasyPilot button, turn it to select YES
and then press it in to begin the reformatting process.
Selecting YES erases all data stored on the memory card.
12
ePhoto CL30 User’s Guide
Batteries
B
ATTERIES
For best results, use batteries of the following types:
Battery life can be greatly extended by using the optional
Agfa AC adapter to power the camera indoors.
To install the batteries:
◗
Slide the Mode switch to OFF.
◗
Unlock the door of the battery compartment.
◗
Press down on the door and slide it, in the direction of the
arrow, until it releases.
◗
Lift up the door and insert the four batteries as shown in the
battery compartment and on the compartment door.
◗
Press down on the door, slide it into place and lock it.
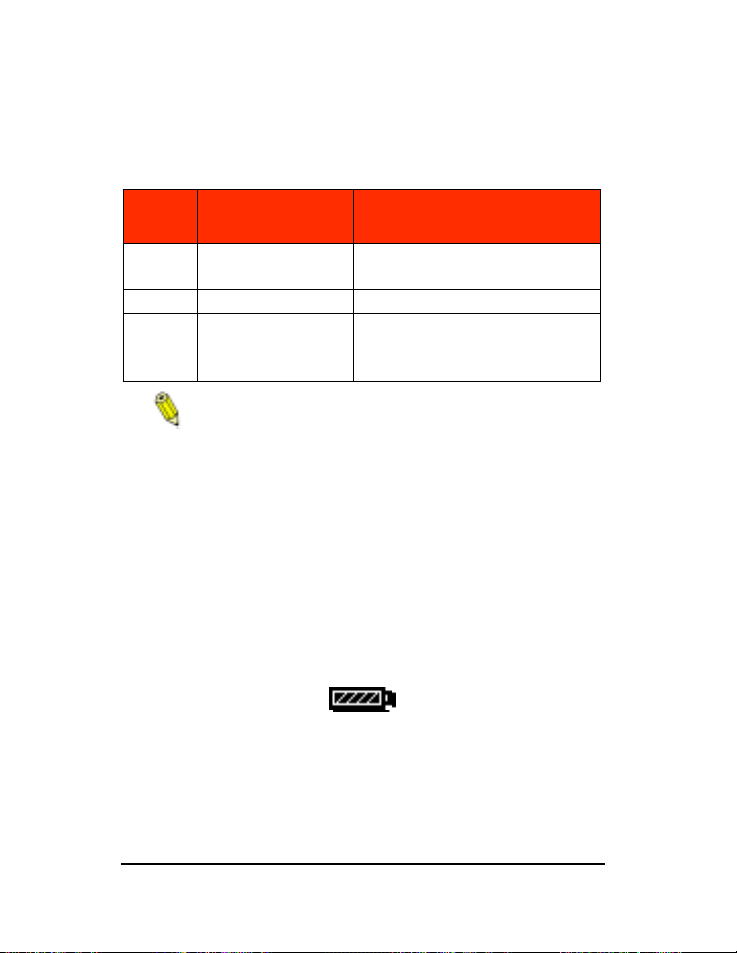
Battery Conditions
A battery icon is displayed on the Status Display. Segments disap-
pear as power is used. When only an outline displays, replace the
batteries. A flashing icon indicates that the batteries are empty. You
cannot use the camera until you replace the batteries.
Battery
Type
Average Pictures
Per Charge
Notes
Lithium 300 Recommended: Energizer® Hi
Energy Lithium.
NiMH 600 Rechargeable.
Alkaline 200 Use only brands specifically
made for “high-drain” devices
(such as Duracell ULTRA®).

ePhoto CL30 User’s Guide
13
Controlling the Camera
C
ONTROLLING
THE
C
AMERA
Mode Switch
Slide the Mode switch to select:
◗
REC
— to turn on the camera and take pictures.
◗
PLAY
— to turn on the camera and view or delete stored
images.
◗
OFF
— to turn off the camera.
When the ePhoto CL30 is not connected to a computer, the camera
powers down automatically after 60 seconds (REC or PLAY) of inac-
tivity. To turn the camera back on, press the EasyPilot button.
When the camera is using batteries, turn off the camera when
it is idle to conserve the life of the batteries.
EasyPilot Button
Use the EasyPilot button to navigate the menus. To:
◗
Display
— Press the button to display a menu.
◗
Select
— Press the button to select the highlighted icon or the
setting indicated by the arrow.
◗ Scroll — Turn the button in either direction to move from one
menu option or icon to another.
LCD Switch
When you want to use the color LCD as a viewfinder in REC mode,
slide the LCD switch to ON. When you connect the camera to a
computer, slide the switch to PC.

14 ePhoto CL30 User’s Guide
Controlling the Camera
Shutter Button
The shutter button has two positions. Press the shutter button:
◗ Halfway — to lock the camera’s focus and calculate the
exposure.
◗ All the way — to take a picture.
The camera sets the autofocus and calculates exposure,
so there may be a slight delay before the picture is taken.

ePhoto CL30 User’s Guide 15
Status Display
STATUS DISPLAY
The Status Display is the black and white LCD on top of the camera.
Using icons, it displays information about your camera and some of
the settings that you selected, including the following:
◗ Status of the batteries. See Batteries on page 12.
◗ Status of the CompactFlash memory card. See Memory Card
Conditions on page 10.
◗ Number of pictures that can still be taken at the current resolu-
tion setting. (3 ▼)
◗ Resolution setting. See Resolution on page 18.
◗ Flash setting. See Flash on page 18.
◗ Focus setting. See Focus on page 19.
◗ Exposure setting. See Exposure on page 23.
◗ Self-timer setting. See Self Timer on page 23.
◗ External flash setting. See External Flash on page 25.
 Loading...