


 Loading...
Classic E.O.S.
Reference manual

© Agfa-Gevaert N.V. 2000.
No parts of this document may be reproduced, copied, adapted or transmitted in any form or by any means without the written permission of Agfa-Gevaert N.V.
Agfa-Gevaert N.V. makes no warranties or representation, expressed or implied, with respect to the accuracy, completeness or usefulness of the information contained in this document and specifically disclaims warranties of suitability for any particular purpose. Agfa-Gevaert N.V. shall under no circumstances be liable for any damage arising from the use or inability to use any information, apparatus, method or process disclosed in this document.
Agfa-Gevaert N.V. reserves the right to make changes to this document without prior notice.
Agfa-Gevaert N.V., Septestraat 27, B-2640 Mortsel, Belgium.
Classic E.O.S. is a trademark of Agfa-Gevaert N.V., Belgium
Agfa and the Agfa-Rhombus are trademarks of Agfa-Gevaert AG, Germany
2
1280C GB 20001204

Table of contents |
|
Chapter 1: Introducing the Classic E.O.S............................................................... |
5 |
Welcome to the Classic E.O.S................................................................................. |
6 |
Safety precautions................................................................................................... |
7 |
Safety compliance ................................................................................................... |
9 |
Chapter 2: Getting started with the Classic E.O.S............................................... |
11 |
Main components .................................................................................................. |
12 |
The control panel................................................................................................... |
15 |
Switching the Classic E.O.S. on ............................................................................ |
17 |
Switching the Classic E.O.S. off ............................................................................ |
20 |
Chapter 3: Processing films................................................................................... |
21 |
Processing films .................................................................................................... |
22 |
Processing an emergency film............................................................................... |
25 |
Recommended chemicals ..................................................................................... |
27 |
Chapter 4: Customization....................................................................................... |
29 |
Customizing the processing parameters................................................................ |
30 |
Processing cycle ................................................................................................... |
34 |
Developer temperature .......................................................................................... |
36 |
Dryer setting .......................................................................................................... |
38 |
Developer replenishment rate................................................................................ |
40 |
Fixer replenishment rate........................................................................................ |
43 |
Standby developer and fixer replenishment (jog cycle) ......................................... |
45 |
Setting the start-up replenishment function ........................................................... |
47 |
Language .............................................................................................................. |
49 |
Autofill ................................................................................................................... |
50 |
Chapter 5: Preventive maintenance ...................................................................... |
51 |
Survey of the preventive maintenance work .......................................................... |
52 |
General cleaning directions ................................................................................... |
53 |
Clean the feed table and film scanner ................................................................... |
54 |
Clean the tank covers and film guide elements ..................................................... |
56 |
Clean the tanks and roller sets .............................................................................. |
59 |
Clean the squeegee roller set................................................................................ |
66 |
Clean the pumps ................................................................................................... |
68 |
3
1280C GB 20001204

Chapter 6: Troubleshooting ................................................................................... |
73 |
Troubleshooting checklist ...................................................................................... |
74 |
The processor is out of operation .......................................................................... |
77 |
The developer or fixer level is too low ................................................................... |
79 |
The water level is too low ...................................................................................... |
84 |
Jammed film .......................................................................................................... |
85 |
Film quality problems ............................................................................................ |
87 |
The developer temperature is too low ................................................................... |
88 |
The fixer temperature is too low ............................................................................ |
90 |
Messages when accessories are connected ......................................................... |
92 |
Chapter 7: Instructions for skilled service personnel......................................... |
95 |
Important safety notice .......................................................................................... |
96 |
Clean the dryer roller sets ..................................................................................... |
97 |
Check for jams in the dryer section ..................................................................... |
100 |
Failure of the dryer heaters ................................................................................. |
101 |
Cleaning the water filter....................................................................................... |
104 |
Appendix A: Equipment information sheet ........................................................ |
107 |
Specifications ...................................................................................................... |
108 |
Accessories ......................................................................................................... |
112 |
Appendix B: Index................................................................................................. |
113 |
4
1280C GB 20001204

Chapter 1
Introducing the Classic E.O.S.
This chapter introduces the Classic E.O.S. to the user and draws the attention to some important safety precautions.
Welcome to the Classic E.O.S.
Safety precautions
Safety compliance

Welcome to the Classic E.O.S.
The Classic E.O.S. is a processor for medical X-ray films developed by Agfa. The Classic E.O.S. cannot process rollfilms.
The Classic E.O.S. offers the following features:
■Three fast processing cycles for optimal processing quality in accordance with the film type that is used: High Throughput (HT), Intermediate Processing (IP) and Rapid Processing (RP).
■Operation of the processor can be completely customized by means of the following processing parameters:
•developer temperature,
•dryer stage,
•developer replenishment rate,
•fixer replenishment rate,
•jog-cycle function (standby developer and fixer replenishment),
•initial developer and fixer replenishment function.
■The Classic E.O.S. (‘Ecological Optimized System’) features a twin fixer tank system which reduces substantially the silver carry-over to the rinse water tank.
•After development, the exposed film enters the first fixer tank, where most of the silver is removed from the film.
•The film then is transported through the second fixer tank, to be treated again with fresh fixer.
•As a consequence, when the film is passed to the rinse water tank, silver freight carry-over will be very low.
Agfa can guarantee optimal film quality and compliance with statutory regulations only if Agfa materials are used.
6
1280C GB 20001204

Safety precautions
General safety instructions
■The Classic E.O.S. was designed for processing medical X-ray films, and should only be used for this purpose.
■The processor may only be operated by qualified staff, skilled on the machine.
■Make sure that only by Agfa authorized personnel has access to the processor.
■Only trained and authorized service personnel can make repairs or changes to the processor.
■If there is visible damage to the machine casing, the processor should not be started or used.
■Do not override or disconnect the integrated safety features.
■Disconnect the processor from the mains before performing any maintenance activities.
■Like all technical devices, the processor must be operated, cared for and serviced correctly, as described in the documentation provided with the machine.
■If the processor is not operated correctly or if you do not have it serviced correctly, Agfa is not liable for resulting disturbances, damages or injuries.
■When installing the processor, care must be taken to ensure that there is either a mains plug or an all-cable disconnecting device in the internal installation fitted near the processor and that it is easily accessible.
■If connections with other components or assemblies are made, Agfa can guarantee safety only for combinations which are approved by Agfa.
■If you notice conspicuous smoke or noise, disconnect the processor immediately.
7
1280C GB 20001204

Special instructions for the handling of chemicals
■When handling chemicals, you must observe safety and environmental regulations as well as the operating and warning instructions accompanying the chemicals.
■Wear stipulated protective clothing and safety goggles.
■When disposing of chemicals and waste water, you must comply with the local regulations concerning waste water and environmental protection.
■If chemicals get into your eyes, immediately rinse your eyes with cold water and consult a physician.
■Do not inhale vapor from chemicals. Make sure that there is sufficient ventilation where the processor is installed, i.e. air exchange that is at least ten times the space volume per hour.
■Always comply with the installation instructions.
■Regularly check all connections to the processor for tightness.
■If liquid gets into the inside of the processor (due to spills), disconnect the processor from the mains immediately and have the device cleaned thoroughly by service personnel.
8
1280C GB 20001204

Safety compliance
■This processor complies with the safety regulations EN 60950: 1997 (IEC 950)
and EN 60601-1-2: 1993, UL 1950 and CSA C22.2 No. 950 and with the regulations on radio interference suppression EN 50081-1, EN 55011 and FCC 47 Part 15, Subchapter B, Class A.
■The non-return water connection system complies with DIN 1988.
9
1280C GB 20001204

10
1280C GB 20001204
Chapter 2
Getting started with the Classic E.O.S.
This chapter introduces the Classic E.O.S. to the user and explains some key concepts.
Main components
The control panel
Switching the Classic E.O.S. on
Switching the Classic E.O.S. off
Main components
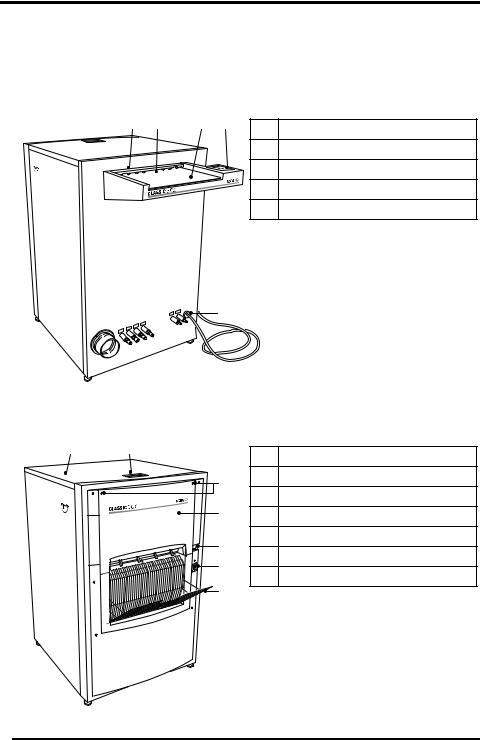
View from film entry side
1 |
2 |
3 |
4 |
5
1Film scanner
2Feed slot
3Feed table
4Control panel
5Power supply
As an option, the Classic E.O.S. can be installed with all drain and replenishment tubes at the bottom of the processor.
View from film return side
1 |
2 |
6 |
Top cover |
|
|
||
|
3 |
7 |
Top cover lift-up handle |
|
8 |
Cover quarter turn fasteners (2) |
|
|
|
||
|
4 |
9 |
Cover |
|
5 |
10 |
On/Off switch |
|
11 |
Ground fault switch |
|
|
6 |
||
|
12 |
Exit tray |
|
|
|
||
|
7 |
|
|
12
1280C GB 20001204

View from above (upper cover removed)
5 |
4 |
3 |
2 |
1 |
6 |
7 |
8 |
9 |
10 |
|
DEV |
|
|
|
|
|
|
|
|
PROTECTION |
|
|
|
|
|
|
|
|
|
|
FIX |
|
|
|
|
|
|
|
|
|
OVERHEAT |
|
|
|
|
|
|
|
|
15 |
14 |
13 |
|
|
12 |
|
|
|
11 |
1 |
Developer section |
2 |
Fixer section #1 |
3 |
Fixer section #2 |
4 |
Rinsing water section |
5 |
Dryer section |
6 |
Tank cover release clips (8) |
|
|
7 |
Tank transport roller set (4) |
|
|
8 |
Tank cover with film guide elements (4) |
|
|
9 |
Control panel |
|
|
10 |
Feed table |
|
|
11 |
Drain valve (4) |
|
|
12 |
Pump housing (4) |
|
|
13 |
Squeegee roller set |
|
|
14 |
Fixer and developer overheat protection button (2) |
|
|
15 |
Interlock switch (2) |
|
|
13
1280C GB 20001204
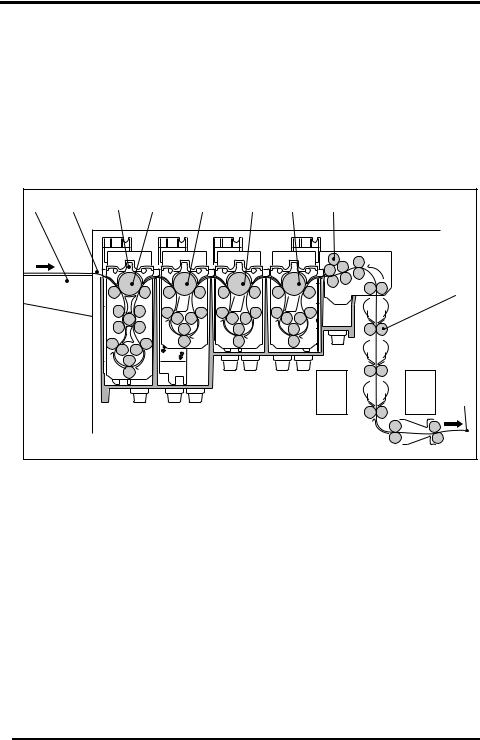
Functional diagram (cross section)
The Classic E.O.S. automatically accepts the film as you introduce it in the feed slot on the feed table.
A built-in film scanner measures the surface of the entered film, which enables the processor to provide the appropriate amount of replenishment.
The Classic E.O.S. then develops, fixes, rinses and dries the film.
Finally, it deposits the processed film in the exit tray.
1 |
2 |
3 |
4 |
5 |
6 |
7 |
8 |
|
|
|
|
|
|
|
9 |
|
|
|
|
|
|
|
10 |
1 |
Feed table |
|
|
2 |
Film scanner |
|
|
3 |
Tank cover with film guide elements (4) |
|
|
4 |
Developer transport roller set |
|
|
5 |
Fixer transport roller set #1 |
|
|
6 |
Fixer transport roller set #2 |
|
|
7 |
Rinsing water transport roller set |
|
|
8 |
Squeegee roller set |
|
|
9 |
Dryer transport roller set (7) |
|
|
10 |
Exit tray |
|
|
14
1280C GB 20001204
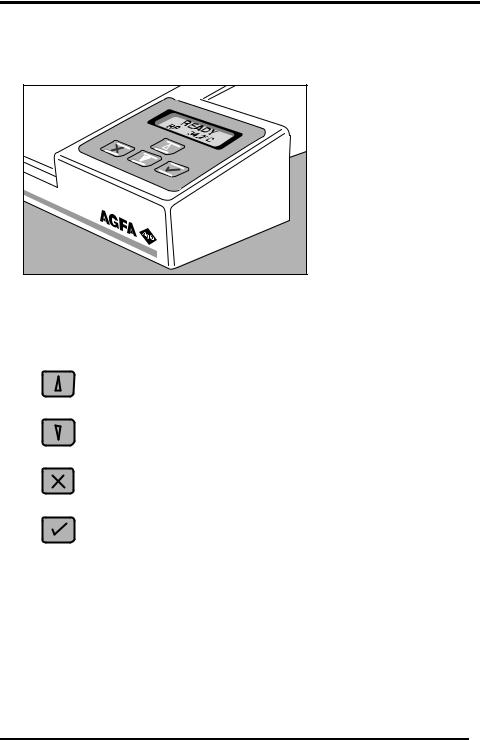
The control panel
Control panel keys
Key |
Key description |
|
Action |
|
|
|
|
|
Up key. |
• |
To scroll upward through multiple choices in a |
|
|
field. |
|
|
|
|
|
|
|
|
|
|
Down key. |
• |
To scroll downward through multiple choices in |
|
|
a field. |
|
|
|
|
|
|
|
|
|
|
Escape key. |
• |
To quit a submenu without saving any |
|
|
changes. |
|
|
|
|
|
|
|
|
|
|
Confirm key. |
• |
To select a menu item. |
|
|
|
|
15
1280C GB 20001204

Control panel display
The LCD display of the control panel consists of two lines of 16 digits, located above the keys on the control panel.
|
5($'< |
or, e.g.: |
cHDWLQJ |
|
53 |
|
d& |
GHYHORSHU |
|
|
|
|||
|
|
|
||
|
|
|
|
|
The display keeps the user informed on the status of the processor, e.g. when failures occur by showing an appropriate message.
Refer to chapter 6, ‘Troubleshooting’.
User language
The language in which the messages on the display appear can be selected in accordance with your personal choice. The following are available:
|
Language |
|
Language |
||
|
|
|
|
|
|
Danish |
|
Dansk |
|
Greek |
)ППЛСМО£ |
|
|
|
|
|
|
Dutch |
|
Nederlands |
|
Italian |
Italiano |
|
|
|
|
|
|
English |
|
English |
|
Norwegian |
Norsk |
|
|
|
|
|
|
Finnish |
|
Suomi |
|
Portuguese |
Português |
|
|
|
|
|
|
French |
|
Français |
|
Spanish |
Español |
|
|
|
|
|
|
German |
|
Deutsch |
|
Swedish |
Svenska |
|
|
|
|
|
|
Refer to your local service organization.
Audio signals
The Classic E.O.S. also informs you about its status by means of beeps. The length of the beep indicates the system’s response to a key command.
A short beep means that Classic E.O.S. accepts the command and begins the operation.
A long beep signifies that the Classic E.O.S. rejected the command or the action or process failed.
An interval beep accompanies an error status message. Refer to ‘Troubleshoot- ing checklist’ on page 74.
16
1280C GB 20001204
Switching the Classic E.O.S. on
Before switching on
When operating the processor for the first time, make sure that the processor has been installed in accordance with the Agfa installation instructions.
1Make sure the machine is connected to the power supply.
2Make sure all drain valves are closed by turning clockwise.
3Make sure the water tap is opened.
4Make sure the chemical tanks are filled.
5Make sure all covers are properly installed and that the interlock switches are engaged.
6Make sure the feed table and exit tray are clean.
7Make sure the ground fault switch is not switched off.
17
1280C GB 20001204
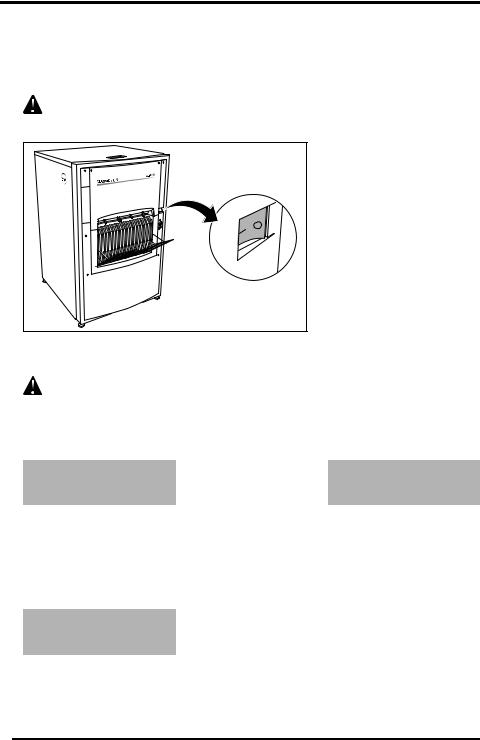
Switching the Classic E.O.S. on
1 Locate the main switch and place it in position ‘I’.
Do not touch the switches with wet fingers!
The processor starts an initialization procedure that may take 15 to 20 minutes.
During the initialization phase an emergency film can be processed if a film is introduced on the feed table. Refer to ‘Processing an emergency film’ on page 25.
2 The developer and fixer are heated or cooled.
cHDWLQJ |
or, e.g.: |
|
|
GHYHORSHU |
d& |
||
53 |
You can watch the progress of heating or cooling as the temperature indication changes accordingly.
3After a while, the following message indicates that the processor is ready for operation:
5($'<
53d&
The actual temperature to be reached depends upon the setting for the actual processing cycle. Refer to ‘Developer temperature’ on page 36.
18
1280C GB 20001204

After switching on
1Introduce large sheets of blank films (cleaning films), e.g. film size 35x43 cm/ 14x17 inch, when the processor has been on standby for an extended period of time, e.g. overnight, to remove any deposits or residue from the transport path of the film.
2It might be necessary to initiate an additional developer replenishment, depending on the start-up developer replenishment setting, which can be set ON or OFF.
If set ON, an automatic replenishment is initiated automatically when switching the processor on. Refer to ‘Setting the start-up replenishment function’ on page 47.
19
1280C GB 20001204
Switching the Classic E.O.S. off
Before switching off
Verify that no film is being processed before switching off the processor.
Switching off
It is recommended to switch the processor off:
when you do not intend to process films for the next couple of hours,
at the end of the day.
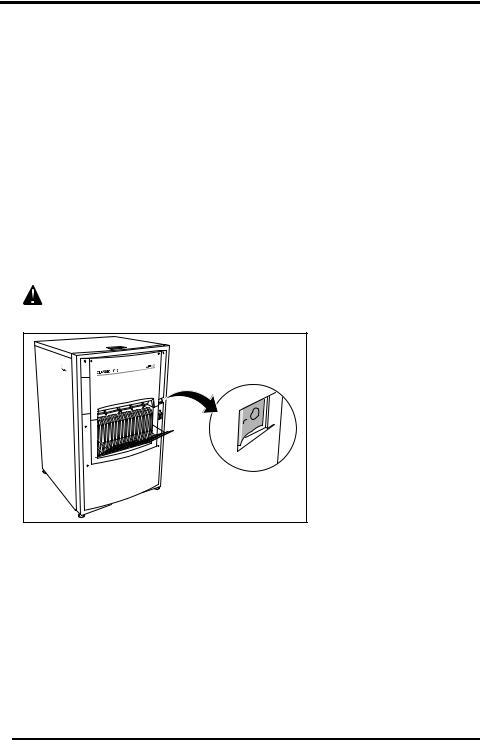
1 Place the main switch in position ‘0’.
Do not touch the switch with wet fingers!
2The water tank is drained automatically.
If the processor is used continually, the water tank will be drained automatically once per period of twenty-four hours. The default time setting is 02:00 h; the time can be changed by your local service organization. This draining operation takes approx. 8 minutes.
20
1280C GB 20001204
Chapter 3
Processing films
This chapter holds basic information on how to process films both under normal conditions and in emergency situations.
Processing films
Processing an emergency film
Recommended chemicals

Processing films
Processing a film is very easy and straightforward: you just have to place the exposed film on the feed table and feed it into the feed slot of the Classic E.O.S. The Classic E.O.S. will then process the film and deposit it in the exit tray.
The Classic E.O.S. can process all common brands of medical X-ray film suitable for machine processing. You can apply sheet films of the following sizes:
maximum width: 43,2 cm (17 inch),
smallest size: 10 x 10 cm.
DO NOT process rollfilm on the Classic E.O.S.
Processing under normal conditions
Proceed as follows:
1Check whether the processor is switched on and ready for operation.
The display should show, for example, the READY message:
5($'<
53 |
d& |
|
Introduce |
large sheets of blank films (cleaning films), e.g. film size |
|
35 x 43 cm, when the processor has been on standby for an extended period of time, e.g. overnight, to remove any deposits or residue from the transport path of the film.
22
1280C GB 20001204
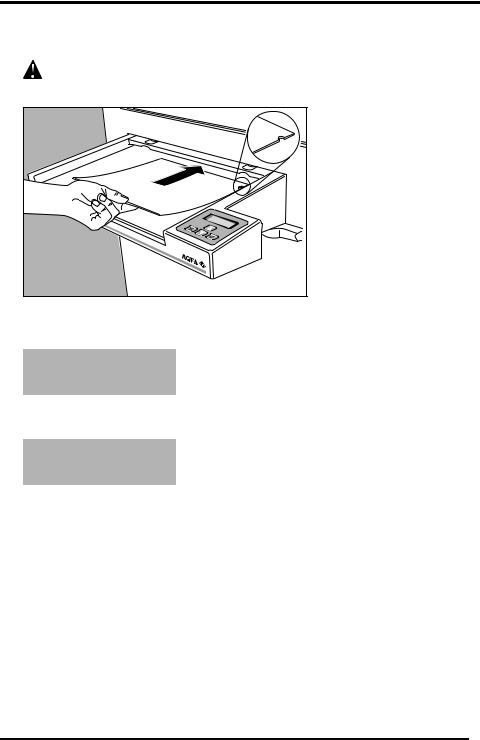
2 Place the sheet of film to be processed on the feed table.
Make sure that the film edge is aligned with the feed slot.
The processor accepts the film and starts processing it.
The following message is shown:
3OHDVH ZDLW
3 Wait until you hear a short beep, and the READY status message reappears.
5($'<
53 d&
You can now introduce the next film to be processed.
23
1280C GB 20001204
Processing narrow films
You can place narrow films side by side on the feed table to have them processed simultaneously.
However, make sure these films do not overlap.
You can introduce 2 sheets of 10 x 10 cm film simultaneously as shown below.
DO NOT process roll film on the Classic E.O.S.
24
1280C GB 20001204

Processing an emergency film
It may happen that you have one or more films to process at a time when the Classic E.O.S. is not completely ready for operation. This can be e.g.:
when the Classic E.O.S. is initializing and the developer has not yet reached the set temperature,
when an error status message is displayed.
Still, the Classic E.O.S. enables you to process films in these conditions. Films thus processed are referred to as ’emergency films’.
Emergency films do not always meet the quality standards of development, rinsing or fixing. In addition, the archivibility of films thus processed is not always guaranteed. Under particular circumstances, the film might be useless to make a proper diagnosis!
Proceed as follows to process emergency films:
1Check the display.
Caution: Emergency film processing is not possible if, e.g., the following message appears:
(UURU
6HH PDQXDO √
Refer to ‘Emergency film processing’ on page 75.
25
1280C GB 20001204
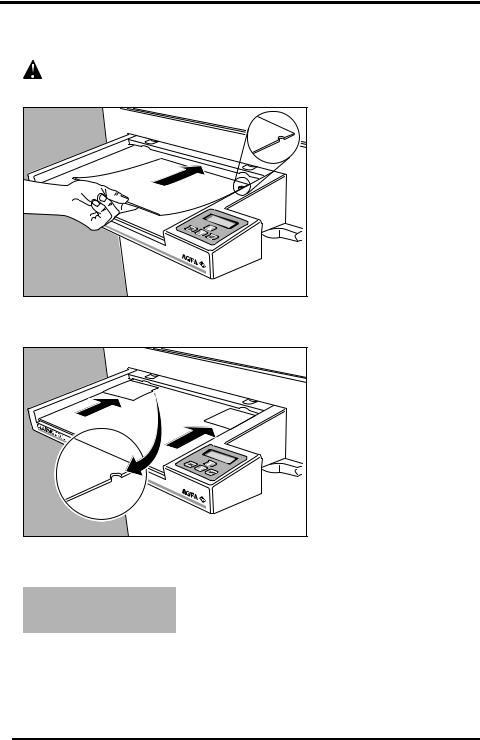
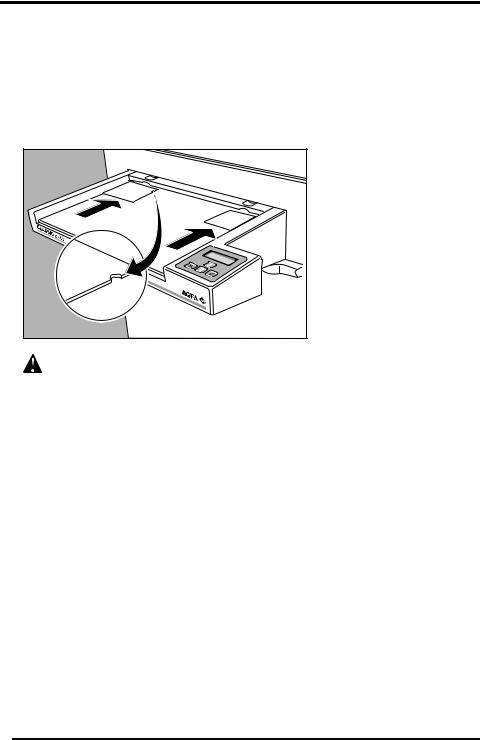
2 Place the emergency film to be processed on the feed table.
Make sure that the film edge is aligned with the feed slot.
You can place narrow films side by side on the feed table to have them processed simultaneously. However, make sure these films do not overlap.
The processor accepts the film automatically and displays the following message on the control panel:
(PHUJHQF\ ILOP 3OHDVH ZDLW
3Wait until you hear a short beep.
You can now introduce the next emergency film to be processed.
26
1280C GB 20001204

Recommended chemicals
The tables below list the recommended chemicals, as a function of the processing cycle, temperature level and the replenishment quantity.
Chemicals |
|
Developer and fixer temperature |
|
||
|
|
|
|
|
|
|
HT |
|
IP |
|
RP |
|
|
|
|
|
|
Developer G 138 i |
38 ° C |
|
37 ° C |
|
34 ° C |
|
|
|
|
|
|
Fixer G 334 i/ |
34 ° C |
|
34 ° C |
|
34 ° C |
G 338 |
|
|
|||
|
|
|
|
|
|
|
|
|
|
|
|
|
|
|
|
||
Chemicals |
|
Replenishment quantity |
|
||
|
|
|
|
|
|
|
|
|
HT / IP / RP |
|
|
|
|
|
|
|
|
Developer G 138 i |
|
|
400 ml/m2 |
|
|
Fixer G 334 i/ |
|
|
400 ml/m2 |
|
|
G 338 |
|
|
|
||
|
|
|
|
|
|
|
|
|
|
|
|
The replenishment quantities as listed in the above table are valid only if your film consumption exceeds 5 m2 film/day and is based on a regular daily use. If your daily film consumption is lower, you can initiate a chemical jog cycle, which provides additional replenishment rates that compensate for low film usage.
When handling chemicals, make sure to take notice of the warning instructions on the packing material. Refer to ‘Special instructions for the handling of chemicals’ on page 8.
Refer to chapter 4, ‘Customization’.
27
1280C GB 20001204

28
1280C GB 20001204

Chapter 4
Customization
This chapter holds the step-by-step procedures which explain how to set the processing parameters to customize the Classic E.O.S.
Customizing the processing parameters
Processing cycle
Developer temperature
Dryer setting
Developer replenishment rate
Fixer replenishment rate
Standby developer and fixer replenishment (jog cycle)
Setting the start-up replenishment function
Language
Autofill

Customizing the processing parameters
Overview
The following processing parameters can be set to optimize the sensitometric stability of the system.
It may be possible that all parameters settings are password protected, except for the dryer setting. Refer to qualified service personnel if settings need to be changed and a password must be entered.
Processing parameter |
Default setting |
Refer to |
|
|
|
|
|
Processing cycle. |
RP |
34 |
|
|
|
|
|
Developer temperature. |
34 °C |
36 |
|
|
|
|
|
Dryer setting. |
Stage 05 |
38 |
|
(Default stage 05 for RP and IP; 07 for HT) |
|||
|
|
||
|
|
|
|
Developer replenishment rate. |
400 ml/m2 |
40 |
|
Fixer replenishment rate. |
400 ml/m2 |
43 |
|
Standby developer and fixer replenishment |
AUTO |
45 |
|
(jog cycle). |
|||
|
|
||
|
|
|
|
Setting the start-up replenishment function. |
Deactivated |
47 |
|
|
|
|
|
Language. |
Country |
49 |
|
specific |
|||
|
|
||
|
|
|
|
Autofill. |
OFF |
50 |
|
|
|
|
30
1280C GB 20001204
Loading...