


User Manual
SELECTA 16

WARNING
Do not expose the camera battery pack or other accessories to rain or humidity to prevent fire hazard or electric shock.
For customers in the U.S.A.
Tested To Comply With FCC Standards
FOR HOME OR OFFICE USE
FCC Statement
This device complies with part 15 of the FCC Rules. Operation is subject to the following two conditions:
(1) This device may not cause harmful interference, and (2) this device must accept any interference received, including interference that may cause undesired operation.
For customers in Europe
"CE" mark indicates that this product complies with the European requirements for safety,
health, environment and customer protection. "CE" marked cameras are intended for sales in Europe.
This symbol [crossed-out wheeled bin WEEE Annex IV] indicates separate collection of waste electrical and electronic equipment in the European countries. Please do not throw the equipment into the domestic
refuse. Please use the return and collection systems available in your country for the disposal of this product.
Declaration of Conformity
Model Name: |
SELECTA 16 |
Trade Name: |
AgfaPhoto |
Responsible Party: RedDot Imaging
Address: RedDot Imaging, 2275 NW 84thAve, Doral, FL 33122.
Customer Care Hotline:
Service & Repair Hotline (USA): 1-855-243-2937 (from a landline only)
Service & Repair (UK): +44 1908 488676
Online Service / International contact: customersupport@reddotimaging.com
For repair and service in all other countries, please refer to the warranty pamphlet for additional information.

SAFETY PRECAUTIONS
Camera notes:
 Do not store or use the camera in the following types of locations:
•In the rain, very humid and dusty places.
•In a place where the camera can be exposed directly to the sunlight or subject to high temperature, e.g. Inside a closed car in summer.
•In a place where the camera is subject to a high magnetic field, e.g. near motors, transformers or magnets.
Do not place the camera on a wet surface or places where dripping water or sand may come in contact with the camera, which may cause irrepairable faults.
If the camera will not be used for a long period of time, we suggest you remove the battery and the memory card from the camera and keep them in dry environment.
 If you carry the camera suddenly from a cold location to a warm place, moisture may condense inside the camera. We suggest you wait for a while before turing on the camera.
 If water has gotten inside the camera, turn off the camera and remove the battery and memory card. Allow to air-dry for at least 24 hours before using the camera again.
 If camera overheats, while in use or charging, disconnect charger and carefully remove batteries
Battery notes:
Incorrect use of the batteries may cause them to leak, become hot, ignite or burst. Always observe the precautions given below.
•Do not expose the batteries to water, and take particular care to keep the terminals dry.
ii• Do not heat the batteries or throw them into a fire.
•Do not attempt to deform, disassemble or modify the batteries.
 Keep the batteries out of reach of babies and small children.
In cold locations, battery performance deteriorates and the time for which they can be used shortens markedly.
Memory card notes:
When using a new memory card, or a memory card that has been used or initialized by a P.C. or a different model camera, be sure to format the card with your digital camera before using it. To edit image data, copy the image data to the PC’s hard disk first.
 Do not change or delete the folder names or file names in the memory card from your PC, as this may cause a memory card read error to occur when viewing photos on the memory card from the playback mode in your camera.
The photos taken by this camera are stored in the autogenerated folder in the SD card. Please do not store photos that are not taken by this model of camera, as this may cause a read error to occur when the camera is in playback mode.
 Please do not expose the camera to harsh environments such as moisture or extreme temperatures, which may shorten the life of your camera or damage the batteries.
Do not remove memory card without turning the digital camera off to avoid possible damage of your memory card.
 Do not switch off the digital camera when a writing process is occurring to avoid incomplete data writing and damaged pictures.
 Align the memory card correctly before inserting it into the camera's SD card slot. Do not force the memory card into the cameras' SD card slot.

BEFORE YOU START
Preface
Thank you for purchasing this AgfaPhoto digital camera. Please read this manual carefully and keep it in a safe place for future reference.
Copyright
© Copyright 2011 RedDot Imaging All rights reserved.
No part of this publication may be reproduced, transmitted, transcribed, stored in a retrieval system, or translated into any language or computer language, in any form, by any means, without the prior written permission of RedDot Imaging
Trademarks
All trademarks mentioned in this manual are used for identification purposes only and are properties of their respective owners.
Safety information
Please read the following important information carefully before using the product.
•Do not take apart or attempt to service the camera yourself.
•Do not drop or knock the camera. Improper handling may damage the product.
•Turn off the camera before inserting or removing the battery and memory card.
•Do not touch the camera lens.
•Please do not expose the camera to harsh environments such as moisture, chemicals or extreme temperatures, which may shorten the life of your camera or damage the batteries.
•Do not use or store the camera in dusty, dirty, or sandy areas, as its components may be damaged.
•Do not expose the lens to direct sunlight for extended periods.
•Download all pictures and remove the batteries from the camera if you are going to store the camera for long periods of time.
•Do not use abrasive cleansers, alcohol-based, or solvent-based cleaners to clean the camera. To clean, wipe the camera with a slightly damp soft cloth.

AgfaPhoto SELECTA 16
•If water has gotten inside the camera, turn off the camera and remove the battery and memory card. Allow to air-dry for at least 24 hours before using the camera again.
•Do not touch lens.
•Do not place camera strap around a child's neck
•Always carry camera in a padded camera bag.
•When coming in from a cold to a warm environment, avoid condensation by placing camera in a cooler area and then let it warm up slowly to room temperature.
•Always place the camera on a vibration-free surface.
About this manual
This manual provides you with instructions on how to use your AgfaPhoto digital camera. Every effort has been made to ensure that the contents of this manual are accurate, however RedDot Imaging reserves the right to make changes without notice.
Symbols used in this manual
Throughout this manual, the following symbols are used to help you locate information quickly and easily:
 Indicates the useful information to know.
Indicates precautions to be taken while operating the camera.

CONTENTS
AgfaPhoto SELECTA 16
WARNING ................................................................... |
i |
SAFETY PRECAUTIONS .................................... |
ii |
BEFORE YOU START ......................................... |
1 |
Preface ................................................................................................... |
1 |
Copyright ..................................................................................... |
1 |
Trademarks ................................................................................ |
1 |
Safety information ........................................................................... |
1 |
About this manual ............................................................................ |
2 |
Symbols used in this manual ........................................... |
2 |
CONTENTS .............................................................. |
3 |
GETTING READY.................................................... |
7 |
Unpacking.............................................................................................. |
7 |
Install Shoulder Strap and Lens Cap...................................... |
8 |
Camera Views ..................................................................................... |
9 |
Inserting the Battery and |
|
SD/SDHC Card (Not included) ................................................. |
12 |
Turning On and Off ....................................................................... |
14 |
Setting Language and Date/Time......................................... |
14 |
Set Display Language......................................................... |
14 |
Set Date/Time......................................................................... |
15 |
Using the Mode Dial...................................................................... |
16 |
About the LCD Screen................................................................. |
17 |
Electronic Viewfinder.................................................................... |
18 |
BASIC OPERATION............................................ |
19 |
Shooting in Auto Mode................................................................ |
19 |
Using the Zoom Function........................................................... |
19 |
Open Flash......................................................................................... |
20 |
Self-timer............................................................................................. |
21 |
Macro Mode........................................................................................ |
22 |
EV (Exposure Value)...................................................................... |
22 |
Face Detection ................................................................................ |
23 |
Smile Detection .............................................................................. |
24 |
Blink Detection................................................................................. |
24 |
Stabilization....................................................................................... |
25 |
Advanced Functions Menu........................................................ |
26 |
WB (White Balance) ............................................................ |
27 |
ISO ................................................................................................ |
27 |
Quality ........................................................................................ |
28 |
Size .............................................................................................. |
28 |

AgfaPhoto SELECTA 16
Color ............................................................................................ |
29 |
USING THE MODES ......................................... |
30 |
LCD Screen Display ...................................................................... |
30 |
Still Picture Mode Display ................................................ |
30 |
Video Shooting Mode Display ....................................... |
32 |
Playback Mode Display ..................................................... |
33 |
Auto Scene Mode (ASCN) ......................................................... |
34 |
Landscape ............................................................................... |
34 |
Portrait ....................................................................................... |
34 |
Night Portrait .......................................................................... |
35 |
Backlit Portrait ...................................................................... |
35 |
Night Landscape .................................................................. |
35 |
Macro .......................................................................................... |
35 |
Auto ............................................................................................ |
35 |
Panorama ........................................................................................... |
35 |
Scene Mode (SCN) ......................................................................... |
36 |
Sport ........................................................................................... |
37 |
Indoor ......................................................................................... |
37 |
Snow ........................................................................................... |
37 |
Fireworks .................................................................................. |
37 |
Museum ..................................................................................... |
37 |
Night Landscape .................................................................. |
37 |
Children ..................................................................................... |
37 |
Leaf............................................................................................... |
38 |
Sunset ........................................................................................ |
38 |
Glass ........................................................................................... |
38 |
Landscape ............................................................................... |
38 |
Night Portrait........................................................................... |
38 |
Beach........................................................................................... |
38 |
Text............................................................................................... |
38 |
Gathering................................................................................... |
38 |
ID.................................................................................................... |
38 |
Fish eye...................................................................................... |
38 |
Travel shooting...................................................................... |
38 |
Photo frame............................................................................. |
38 |
Sketch......................................................................................... |
38 |
Portrait Mode ................................................................................... |
39 |
Auto Program Exposure.............................................................. |
39 |
Shutter Priority ............................................................................... |
40 |
Aperture Priority ............................................................................ |
41 |
Manual Mode..................................................................................... |
41 |

AgfaPhoto SELECTA 16
PLAYBACK ........................................................... |
42 |
Viewing Photos and Videos ..................................................... |
42 |
Thumbnail View .............................................................................. |
43 |
Using Zoom on Playback (for still pictures only) .......... |
44 |
Using the Delete Button ............................................................ |
45 |
USING THE MENUS ......................................... |
46 |
Still Picture Menu ........................................................................... |
46 |
AF Mode (Auto-Focus mode) ........................................ |
47 |
AF-assist Beam .................................................................... |
47 |
Continuous AF ....................................................................... |
48 |
Expo Metering (Exposure Metering) .......................... |
48 |
Continuous Shot .................................................................. |
49 |
Date Imprint ............................................................................ |
50 |
Quick Review .......................................................................... |
50 |
Digital Zoom ........................................................................... |
51 |
Movie Menu ....................................................................................... |
52 |
Continuous AF ....................................................................... |
53 |
Expo Metering (Exposure Metering) .......................... |
53 |
Playback Menu ................................................................................ |
54 |
Protect ....................................................................................... |
54 |
Delete ......................................................................................... |
55 |
DPOF (Digital Print Order Format) .............................. |
56 |
Trim .............................................................................................. |
57 |
HDR-High Dynamic Range................................................ |
57 |
Resize ........................................................................................ |
58 |
Rotate ........................................................................................ |
58 |
Red-eye Reduction............................................................... |
59 |
Display Setup.................................................................................... |
59 |
Slideshow ................................................................................. |
60 |
Wallpaper Settings ............................................................. |
60 |
Setup Menu ...................................................................................... |
63 |
Beep ............................................................................................ |
64 |
LCD Brightness ..................................................................... |
64 |
Power Saver ........................................................................... |
65 |
Zone ............................................................................................ |
65 |
Date/Time ................................................................................ |
66 |
Language ................................................................................. |
66 |
File and Software .......................................................................... |
66 |
File Numbering ...................................................................... |
67 |
Copy to Card (Copy internal memory to |
|
memory card) ......................................................................... |
67 |
Reset Settings ...................................................................... |
68 |

AgfaPhoto SELECTA 16
FW Version (Firmware version) .................................... |
68 |
CONNECTIONS ................................................... |
69 |
Video System ................................................................................... |
69 |
Connecting to a PC ....................................................................... |
70 |
Setting the USB Mode ...................................................... |
70 |
Transferring Files to your PC ........................................ |
70 |
Connecting to a PictBridge Compatible Printer ............ |
72 |
Setting the USB Mode ...................................................... |
72 |
Connecting the Camera and Printer .......................... |
73 |
Using the PictBridge Menu ...................................................... |
74 |
Print with Date ...................................................................... |
74 |
Print without Date ............................................................... |
75 |
Print Index ................................................................................ |
76 |
Print DPOF ............................................................................... |
77 |
Exit ............................................................................................... |
77 |
APPENDICES ....................................................... |
78 |
Specifications................................................................................... |
78 |
Error Messages ............................................................................... |
82 |
Troubleshooting ............................................................................. |
84 |
Customer Care.................................................................................. |
86 |
GETTING READY
AgfaPhoto SELECTA 16
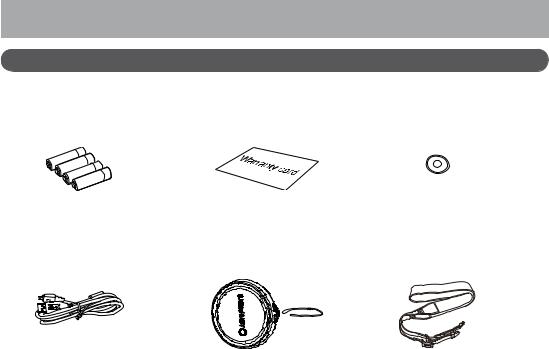
Unpacking
Your package should contain the camera model you purchased along with the following items. If anything is missing or appears to be damaged, please contact your vendor.
AA-size Alkaline Batteries |
|
|
Warranty Card |
CD-ROM |
USB Cable |
Lens Cap |
Shoulder Strap |
|
|
|
|
|
|
|
|
|
|
|
|
|
AgfaPhoto SELECTA 16
Install Shoulder Strap and Lens Cap
Install Shoulder Strap |
Install Lens Cap |
1
LMEGAPIXE0.16 16 SELECTA
1
2 
 3
3
LMEGAPIXE0.16 16 SELECTA
2
3
4
AgfaPhoto SELECTA 16
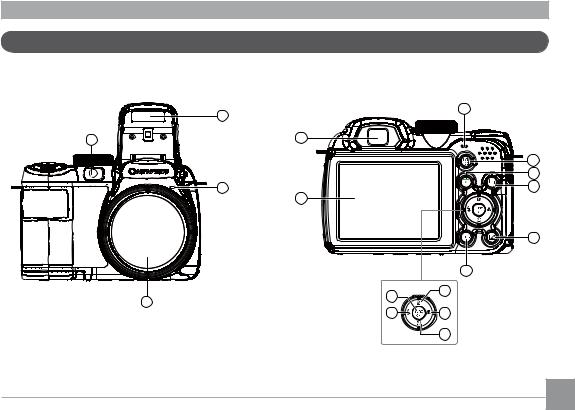
Camera Views
Front View |
|
|
Back View |
|
|
|
|
2 |
7 |
|
|
|
|
|
|
1 |
|
6 |
|
|
|
|
|
|
|
|
|
|
8 |
|
|
|
|
9 |
|
|
|
3 |
10 |
|
|
|
5 |
|
|
|
|
|
11 |
|
|
|
|
12 |
|
|
|
17 |
13 |
|
|
4 |
|
|
|
|
|
|
|
|
|
|
16 |
14 |
|
|
|
|
15 |
AgfaPhoto SELECTA 16
Left View |
Right View |
18
19
Top View
27 28
26
25
24
23
22
20
21
Bottom View
29
30
31
10

|
|
|
|
|
|
AgfaPhoto SELECTA 16 |
|
|
|
|
|
|
|
|
|
|
1 |
AF Assist/Timer Indicator |
11 |
Exposure Compensation Button |
21 |
Speaker |
|
|
2 |
Flash Lamp |
12 |
Menu Button |
22 |
Zoom Wheel |
|
|
3 |
Microphone |
13 |
Delete Button/Up Button |
23 |
Shutter Button |
|
|
4 |
Lens |
14 |
Macro Button/Right Button |
24 |
Face Identification Button |
|
|
5 |
LCD Screen |
15 |
Self-timer Button/Down Button |
25 |
Stabilization Button |
|
|
6 |
Electronic Viewfinder |
16 |
Flash Button/Left Button |
26 |
Shoulder Strap Mount |
|
|
7 |
Status Indicator |
17 |
OK Button |
27 |
ON / OFF |
|
|
8 |
Electronic Viewfinding Window/ |
18 |
USB/AV Port |
28 |
Mode Dial |
|
|
|
LCD Screen Button |
|
|
|
|
|
|
9 |
Playback Button |
19 |
Handle |
29 |
Card Slot/Battery Compartment |
|
|
10 |
DISP |
20 |
Flash On Button |
30 |
Tripod Socket |
|
|
|
|
|
|
|
|
|
11

AgfaPhoto SELECTA 16
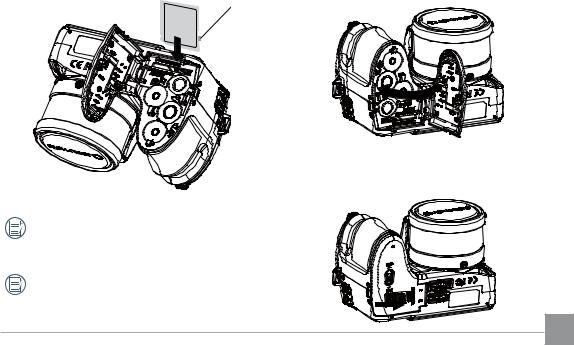
Insert the Battery and SD/SDHC Card (Not included)
1. Open the battery compartment.
2.Insert the enclosed batteries into the battery slot according to the correct polarity as shown below.
12
|
AgfaPhoto SELECTA 16 |
3. Insert an SD/SDHC card (not included) into the memory |
4. Close the battery compartment. |
card slot as shown. |
|
Write protection buckle
Optional SD/SDHC cards are not included. The use of 64MB to16 GB memory cards from recognized manufacturers such as SanDisk, Panasonic and Toshiba is recommended for reliable data storage.
To remove the SD/SDHC card, open the battery compartment and gently push the card to release it. Pull the card out carefully.
13
AgfaPhoto SELECTA 16
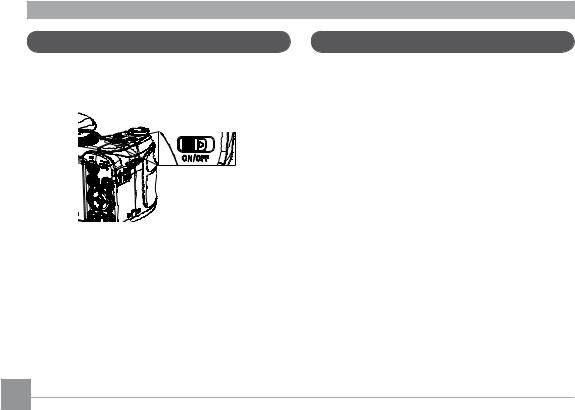
Turning On and Off
Push ON/OFF to turn on/off camera.
After the camera is powered on, set the camera to Auto mode by turning the Mode dial at the top of the top of the camera (see page 16). When using the camera for the firsttime, the language setting page will appear.
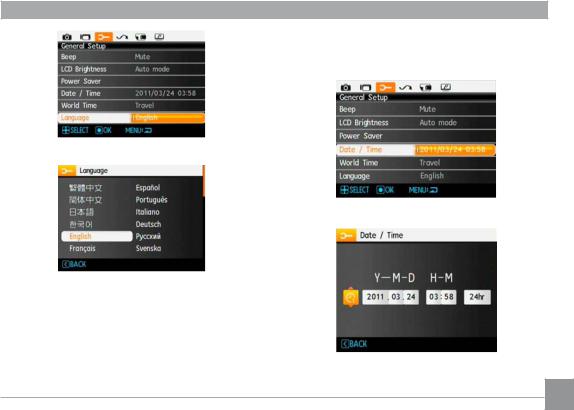
Setting Language and Date/Time
When turning on the camera for the first time, the Display Language and Date/Time Setup menu will appear. Use the following procedures to set the camera to your preferences:
1.Push ON/OFF to turn on the camera.
2.Press Up/Down/Left/Right button to select the settings.
3.Press the  button to confirm the settings.
Set Display Language
1.Press the  button and the Left/Right button and select the General Setup menu tab.
2.Use the Up/Down button and scroll down to Language. Then press the Right button to access the language options.
3.Use the Up/Down/Left/Right buttons to select the desired language.
4.Press the  button to confirm the setting.
14
AgfaPhoto SELECTA 16
2. Use the Left/Right button to select date or time field, then press Up/Down buttons to adjust values.
3. Press the  button to confirm the settings.
Set Date/Time
1.Press the  button and use the Up/Down button to select the the General Setup menu tab. Press the
  button to enter the Date/Time menu.
15
AgfaPhoto SELECTA 16
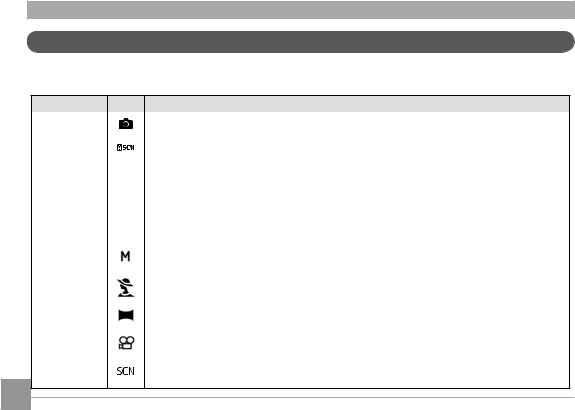
Using the Mode Dial
The AgfaPhoto camera provides a convenient mode dial that allows you to switch between different modes with ease. All the available modes are listed as follows:
Mode Name |
Icon Description |
||
|
|
|
|
Auto mode |
|
Take still pictures in automatic mode. |
|
|
|
|
|
ASCN mode |
|
Have the camera automatically select the best scene type for still pictures. |
|
|
|
|
|
Program AE |
P |
This setting allows you to choose the EV value and the camera will select both the shutter speed |
|
and aperture automatically. |
|||
|
|
||
|
|
|
|
Shutter priority |
S |
This setting allows you to choose a specific shutter speed while the camera will adjust the |
|
aperture automatically to ensure correct exposure. |
|||
|
|
||
|
|
|
|
Aperture |
A |
This allows you to choose a specific aperture and the camera will automatically the adjust the |
|
priority |
shutter speed to match it. |
||
|
|||
|
|
|
|
Manual mode |
|
Many of the camera settings can be configured manually in this mode. |
|
|
|
|
|
Portrait |
|
Take portrait pictures under normal conditions. |
|
|
|
|
|
Panorama mode |
|
Capture a sequence of shots and stitch them together into a panoramic photo. |
|
|
|
|
|
Movie mode |
|
Record videos. |
|
|
|
|
|
Scene mode |
|
Choose from 20 different scene types and effects for your photos. |
|
16

AgfaPhoto SELECTA 16
About the LCD Screen
When you turn the camera on, various icons are shown on the LCD screen to indicate the current camera settings and status. To learn more about the displayed icons, see “LCD Screen display” on page 30.
LCD Screen notes:
Extremely high-precision technology has been used to manufacture the LCD screen so that most of the pixels are operational for use. However, there may be some minute points (black, white, red, blue or green) that constantly appear on the LCD screen. These points are normal in the manufacturing process and the recording is not affected in any way.
Avoid exposing the LCD screen to water; please remove any moisture on the LCD screen with a soft, dry cleaning cloth.
If the LCD monitor is damaged, take particular care with the liquid crystal in the monitor. If any of the following situations arise, take the recommended immediate action indicated below:
•If liquid crystal comes in contact with your skin, wipe the area with a cloth and then wash thoroughly with soap and running water.
•If liquid crystal gets into your eye, flush the affected eye with clean water for at least 15 minutes and then seek medical assistance.
•If the liquid crystal display or the liquid inside it are swallowed, flush your mouth thoroughly with water. Drink large quantities of water and induce vomiting. Then seek medical assistance immediately.
17
AgfaPhoto SELECTA 16
Electronic Viewfinder
The Electronic Viewfinder displays the same information as the LCD screen. To switch between the LCD screen and the
Electronic Viewfinder, press the  button. When selecting the EVF indicator, the LCD screen will automatically shut off.
evf/lcd switch button
LCD
18
BASIC OPERATION
AgfaPhoto SELECTA 16
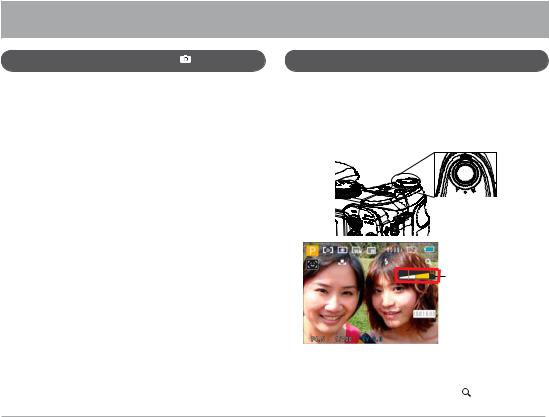
Shooting in Auto Mode AUTO
Auto mode is the easiest mode to take photos. While operating in this mode, the camera automatically optimizes your photos for best results.
To start shooting, do the following:
1.Push ON/OFF to turn on the camera.
2.Switch the Mode dial to Auto mode (  ).
).
3.Compose your picture on the LCD screen and press the Shutter button halfway to focus on the subject.
4.The LCD screen will show a green focus frame after the subject is in focus.
5.Press the Shutter button fully to capture the image.
Using the Zoom Function
Your camera is equipped with two types of zoom functions: optical zoom and digital zoom. Press the Zoom button of the camera to zoom in or out of the subject while taking pictures.
Zoom Wheel
Zoom indicator (See “Digital Zoom“ on page 51)
When the optical zoom reaches its maximum value, release the Zoom button and then press it again for the digital zoom to begin. The zoom indicator is hidden after the Zoom
button is released. The screen shows ( |
) for the current |
|
zoom status. |
|
19 |
|
|
|
|
|
|
AgfaPhoto SELECTA 16
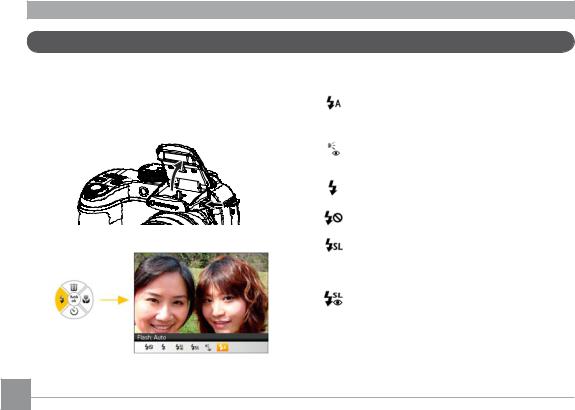
Open Flash
The flash is used to illuminate a subject in low light or for fill-in lighting to achieve better illumination of a subject with pronounced shadows.
1. To turn on the flash, press the flash  button.
2. Press the left button to enter the flash Functions menu.
3.Press the Left/Right button to select from the following 6 modes:
•Flash: Auto
Camera flash goes off automatically based on existing light conditions.
•Flash: Red-eye reduction
The camera emits a brief flash before the picture is taken to reduce red-eye effects.
•Flash: Forced flash
Make forced flash at the moment of shooting.
•Flash: Forced off Flash is turned off.
•Flash: Slow Synchro
This allows for night scenery photos that include people in the foreground. The use of a tripod is recommended when shooting with this setting.
•Flash:Red-Eye+Slow Synchro
Using this mode for slow synchro shots with redeye reduction.
4.Press the  button to confirm the settings and exit the option.
20
AgfaPhoto SELECTA 16
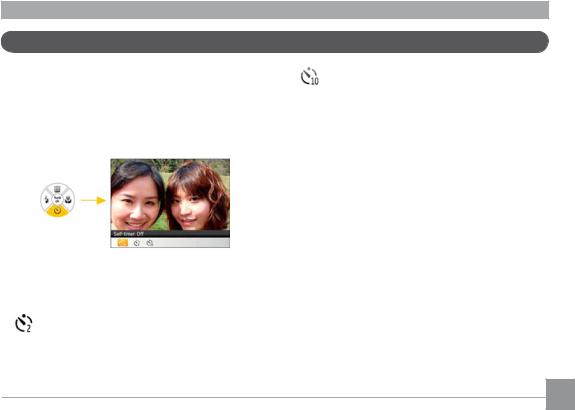
Self-timer
This setting allows the photographer to set the camera for self portraits or group shots. The timer can be set to fire the shutter 2 seconds, or 10 seconds after the shutter button is pressed.
1. Press the Down button to enter the Self-timer menu.
2.Press the Left/Right button to select the following three modes:
•Self-timer: 2 sec
A single picture is shot 2 seconds after the Shutter button is pressed.
•Self-timer: 10 sec
A single picture is shot 10 seconds after the Shutter button is pressed.
• Self-timer: Off
Disables the self-timer.
3.Press the  button to confirm the settings and exit the menu.
21
AgfaPhoto SELECTA 16
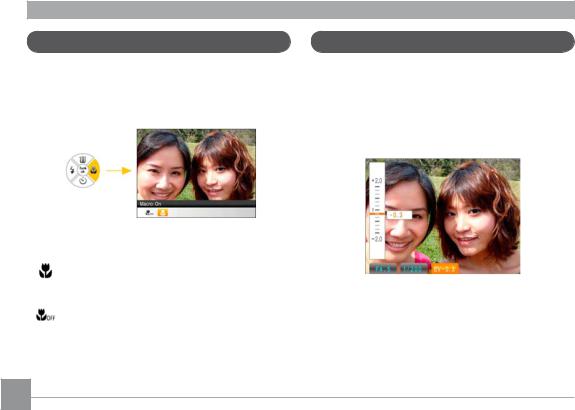
Macro Mode
The Macro setting is ideal for shooting small objects or close-up photos. This mode allows you to focus on subjects very close to the camera.
1. Press Right button to enter the Macro menu.
2.Press the Left/Right button to select the following two modes:
•Macro: On
Select this to focus on subjects 5cm from the lens.
• |
Macro: Off |
Select this option to disable Macro.
3.Press the  button to confirm the settings and exit the menu.
EV (Exposure Value)
The EV control allows for an override of the camera's auto exposure settings in order to provide more control in tricky lighting conditions. This will allow you to lighten or darken the exposure to your preference.
1.Press the  button to enter the exposure settings screen.
2.Press the Up/Down button to adjust the exposure value of the image, from the range between EV -2.0 to EV+2.0.
22
AgfaPhoto SELECTA 16
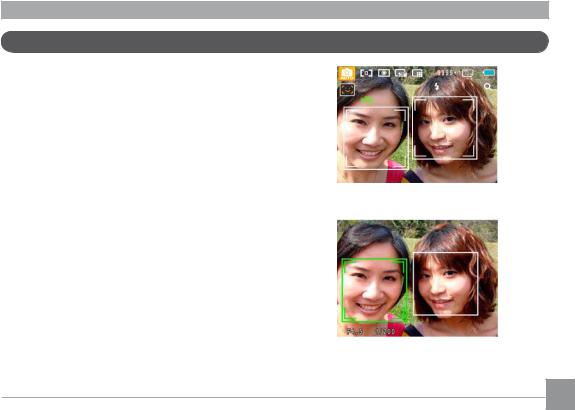
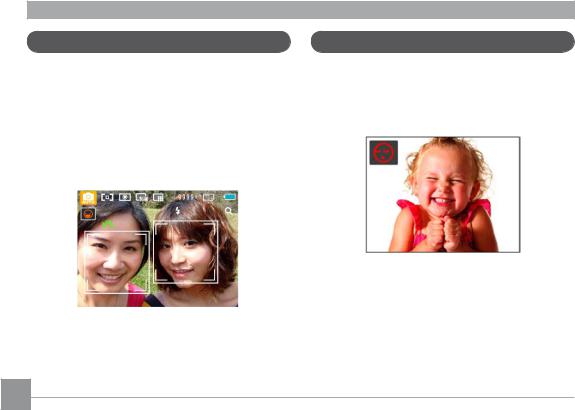
Face Detection
The face detection mode detects people's faces and focuses on them resulting in clearer images. Face detection is engaged by default in most modes unless it is disabled by the user. Face detection is disabled in Panorama Mode.
1.When the face detection feature is enabled it will display a frame around detected faces in the camera's field of view.
2.Press the Shutter halfway to focus on the subject.
3.Press the Shutter fully to capture the image.
4.Press the Face Detection button to close this function.
23
AgfaPhoto SELECTA 16
Smile Detection
The Smile Detection feature automatically detects and captures a person's smile.
1.In shooting mode, Press the Face Detection button until the Icon  appears on the LCD screen
2.Point the camera at the subject, and press the Shutter button half way to focus.
3.Press the Shutter button all the way to capture the image, the camera will automatically release the shutter when it detects a smile.
4. Press the Face Detection button to close this function.
Blink Detection
Blink Detection is enabled by default unless disabled by the user. When shooting, if a face is detected with its eyes
closed, the Blink Detection  will appear on the screen to show that a blink was detected.
24
 Loading...