


HBS 100
HBSE 100
GB |
Instructions for use |
|
Please read and save these |
|
instructions. |
D |
Gebrauchsanleitung |
|
Bitte lesen und aufbewahren. |
F |
Instruction d'utilisation |
|
Prière de lire et de conserver. |
I |
Istruzioni d'uso |
|
Si prega di leggere le istruzioni e |
|
di conservarle. |
E |
Instrucciones de uso |
|
Lea y conserve estas |
|
instrucciones por favor. |
P |
Instruções de serviço |
|
Por favor leia e conserve em seu |
|
poder. |
NL |
Gebruiksaanwijzing |
DK Brugsanvisning
Vñr venlight at lñse og opbevare.
S Bruksanvisning
Var god läs och tag tillvara dessa instruktioner.
FIN Käyttöohje
Lue ja säilytö
Lees en let goed op deze adviezen.

Introduction |
|
You have high standards and expect to purchase quality goods ± quality offered by |
|
||||
|
|
Atlas Copco. |
|
|
|
|
|
|
|
We have built a durable and reliable electric power tool for you. |
|
|
|||
|
|
Please read the instructions for use before first operation so you can handle your |
|
||||
|
|
power tool effectively and safely. |
|
|
|
|
|
|
|
We are sure that buying an AEG Electric Power Tool from Atlas Copco was the |
|
||||
|
|
right choice! |
|
|
|
|
|
|
|
|
|
|
|
||
|
|
|
HBS 100 |
HBSE 100 |
|
||
Technical Data |
|
Nominal power . . . . . . . . . . . . |
. . . . 1010 |
W . . . . . . . . |
. . . 1010 |
W |
|
|
|
Belt speed no load . . . . . . . . . . |
. . . . 350 |
m/min . . . . . |
230±350 |
m/min |
|
|
|
Sanding width . . . . . . . . . . . . . . |
. . . . 100 |
mm . . . . . . . |
. . . . . 100 |
mm |
|
|
|
Belt length . . . . . . . . . . . . . . . . . |
. . . . 560 |
mm . . . . . . . |
. . . . . 560 |
mm |
|
|
|
Sanding surface . . . . . . . . . . . |
100 x 140 |
mm . . . . . . |
100 x 140 |
mm |
|
|
|
Weight . . . . . . . . . . . . . . . . . . . . |
. . . . . 4,2 |
kg . . . . . . . . |
. . . . . 4,2 |
kg |
|
|
|
|
|
||||
Advice for your |
Please pay attention to the safety instructions in the attached leaflet! |
|
|||||
safety |
Dust that arises when working in wood or using the tool on industrial material can be |
|
|||||
|
|
||||||
|
|
dangerous to health. In this case connect the tool to a suction device (e.g. Atlas |
|
||||
|
|
Copco absorbtion system AS 3 W). |
|
|
|
|
|
|
Appliances used at many different locations including open air must be connected |
|
|||||
|
|
via a current surge preventing switch. |
|
|
|
|
|
|
Always wear goggles when using the machine. It is recommended to wear gloves, |
|
|||||
|
|
sturdy non slipping shoes and apron. |
|
|
|
|
|
|
Sawdust and splinters must not be removed while the machine is running. |
|
|||||
|
Do not pierce the motor housing as this could damage the double insulation (use |
|
|||||
|
|
adhesives). |
|
|
|
|
|
|
Always disconnect the plug from the socket before carrying out any work on the |
|
|||||
|
|
machine. |
|
|
|
|
|
|
|
Only plug-in when machine is switched off. |
|
|
|
|
|
|
Keep mains lead clear from working range of the machine. Always lead the cable |
|
|||||
|
|
away behind you. |
|
|
|
|
|
|
When sanding metal the dust suction facility should not be used, because of the risk |
|
|||||
|
|
of fire from flying sparks. |
|
|
|
|
|
|
|
|
|
|
|
||
Measured sound |
|
Typically the A-weighted noise levels of the tool are: |
|
|
|
||
value |
|
Sound pressure level = 91 dB (A). |
|
|
|
|
|
|
|
Sound power level = 104 dB (A). |
|
|
|
|
|
|
|
Wear ear protectors! |
|
|
|
|
|
|
|
|
|
|
|
||
Measured |
|
Typically the hand-arm vibration is below 2.5 m/s2. |
|
|
|
||
vibration value |
|
|
|
|
|
|
|
Mains |
|
|
|
||||
|
Connect only to a single-phase AC current supply and only to the mains voltage |
|
|||||
connection |
|
specified on the rating plate. Connection to sockets without earth protection is |
|
||||
|
|
possible as the appliance features protective insulation to DIN 57 740/ VDE 0740 |
|
||||
|
|
and CEE 20. Radio suppression complies with the European standard EN 55014. |
|
||||
|
|
When fitting the plug, make sure that the brown (live) wire of this appliance is |
|
||||
|
|
connected to the plug terminal marked L or coloured red, and the blue (neutral) wire |
|
||||
|
|
of this appliance is connected to the plug terminal marked N or coloured black. |
|
||||
|
|
Under no circumstances must the wires of this appliance be connected to the earth |
|
||||
|
|
terminal of the plug marked either E, with the earth symbol or coloured green or |
|
||||
|
|
green/yellow. |
|
|
|
|
|
|
|
|
|
|
|||
Use |
|
The belt sander can be used for sanding wood, plastics and metal. |
|
|
|||
Do not use this product in another way as stated for normal use.
ENGLISH |
2 |
HBS 100, HBSE 100 |

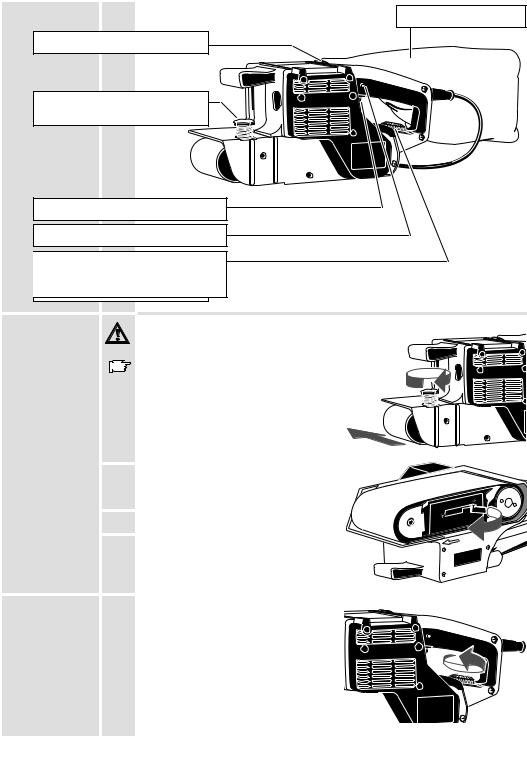
Brief description
Suction connector
Adjusting screw for belt
On-/off switch
Locking button
Electronic thumb wheel (only applicable for HBSE 100)
Integrated dust removal
Dust bag
Modifications: Text, diagrams and data are correct at the time of printing. In the interest of continuous improvement of our products, technical specifications are subject to alteration without prior notice.
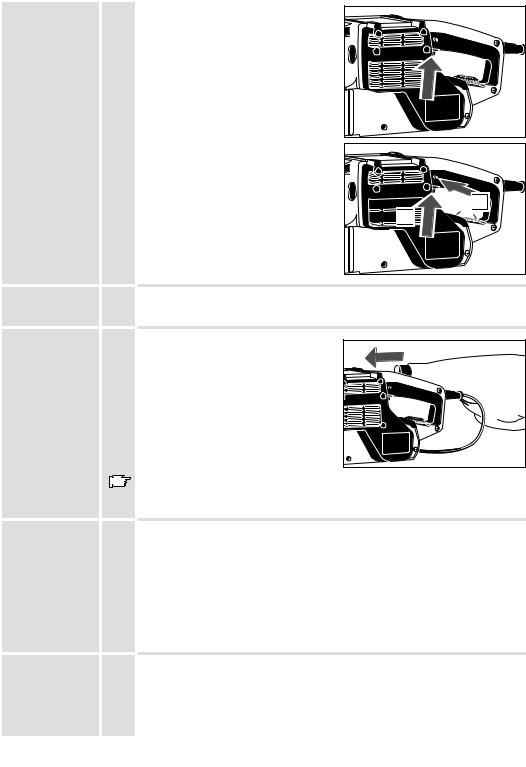
Changing the |
|
Always disconnect the plug from the |
|
|
|
belt |
|
socket before carrying out any work on the |
|
|
|
|
|
machine. |
|
|
|
|
|
Prior the changing belt, adjust sanding belt |
|
|
|
|
|
by turning the belt adjusting screw approx. |
|
|
|
|
|
2±3 cm in the direction of the open side of |
|
|
|
|
|
the machine beyond the rollers, whilst the |
|
|
|
|
|
machine is running, as the new sanding |
|
|
|
|
|
belt can sometimes brush against the |
|
|
|
|
|
machine housing. |
|
|
|
|
1. Pull the clamping lever forwards |
|
|
||
|
|
|
|||
|
|
|
|
||
|
2. Remove the worn belt and fit the inside of |
|
|||
|
|
the belt is pointing in the same direction as |
|
||
|
|
the arrow on the machine. |
|
||
|
3. Push the clamping lever back again |
|
|||
|
4. Taking a test run, position the sanding belt |
|
|||
|
|
with the aid of the belt adjusting screw so |
|
||
|
|
that it is flush with the outer edge of the |
|
||
|
|
sanding belt support. |
|
||
Setting speed of |
|
|
|
|
|
|
|
|
|
|
|
|
The speed is adjusted by means of the |
|
|
||
|
|
|
|
||
rotation |
|
electronic thumb wheel. |
|
|
|
(only applicable |
|
A = lowest speed |
|
|
|
for HBSE 100) |
|
F = highest speed |
|
|
|
|
|
|
|
|
|
ENGLISH |
3 |
HBS 100, HBSE 100 |
Switching the |
Intermittent use |
machine on and |
Switching on: Press On-/off switch |
off |
Switching off: Release On-/off switch |
|
Continuous use |
|
Switching on: Press the On-/off switch and |
|
then the locking button, after that release |
|
on-off switch. |
|
Switching off: Press the On-/off switch and |
|
then release. |
|
Always hold machine firmly with both hand |
|
prior to switching on. Only switch on in |
|
raised position. |


 2
2 
 1
1 

Advice for |
When sanding, guide the machine without applying special pressure. The weight of |
operation |
the machine itself is quite sufficent for good sanding results. |
Dust extraction |
When sanding wood, the dust bag should |
|
be used. |
|
When suction performance becomes less |
|
effective empty dust bag. |
|
For suction greater quantities of dust, an |
|
adaptor can be fitted which enables a |
|
suction hose to be used (available as |
|
accessory). This can be connected to an |
|
industrial vacuum cleaner. |
|
When sanding metal the dust suction |
|
facility should not be used, because of the |
|
risk of fire from flying sparks. |
Maintenance |
The ventilation slots of the machine must be kept clear at all times. |
|
Use only AEG accessories and spare parts. Should components need to be |
|
replaced which have not been described, please contact one of our AEG service |
|
agents (see our list of guarantee/service addresses). |
|
If needed, an exploded view of the tool can be ordered. Please state the ten±digit |
|
No. as well as the machine type printed on the label and order the drawing at your |
|
local service agents or directly at: Atlas Copco Electric Tools GmbH, Postfach 320, |
|
D±71361 Winnenden. |
Accessories |
The range of accessories with part numbers is shown in our catalogue. |
ENGLISH |
4 |
HBS 100, HBSE 100 |

Vorwort |
|
Sie sind anspruchsvoll und erwarten Qualität, die Ihnen Atlas Copco bietet. |
||||
|
|
Für Sie haben wir ein haltbares und möglichst sicheres Elektrowerkzeug gebaut. |
||||
|
|
Bitte lesen Sie vor Inbetriebnahme Ihres Gerätes die Gebrauchsanleitung, um Ihr |
||||
|
|
Elektrowerkzeug effektiv und gefahrlos nutzen zu können. |
|
|||
|
|
Wir sind sicher, daû Sie mit AEG-Elektrowerkzeugen von Atlas Copco Ihre richtige |
||||
|
|
Wahl getroffen haben. |
|
|
|
|
|
|
|
|
|
||
|
|
|
HBS 100 |
HBSE 100 |
||
Technische |
|
Nennaufnahme . . . . . . . . . . . . |
. . . 1010 |
W . . . . . . . . |
. . . 1010 |
W |
Daten |
|
Bandgeschwindigkeit Leerlauf |
. . . . 350 |
m/min . . . . . |
230±350 |
m/min |
|
|
Schleifbreite . . . . . . . . . . . . . . . |
. . . . 100 |
mm . . . . . . . |
. . . . . 100 |
mm |
|
|
Bandlänge. . . . . . . . . . . . . . . . . |
. . . . 560 |
mm . . . . . . . |
. . . . . 560 |
mm |
|
|
Schleiffläche . . . . . . . . . . . . . . |
100 x 140 |
mm . . . . . . |
100 x 140 |
mm |
|
|
Gewicht . . . . . . . . . . . . . . . . . . . |
. . . . . 4,2 |
kg . . . . . . . . |
. . . . . 4,2 |
kg |
|
|
|
|
|||
Hinweise für |
Sicherheitshinweise der beiliegenden Broschüre beachten! |
|
||||
Ihre Sicherheit |
|
|
|
|
|
|
Bei längerem Bearbeiten von Holz oder bei gewerblichem Einsatz für Materialien, bei denen gesundheitsgefährdende Stäube entstehen, ist das Elektrowerkzeug an eine geeignete Absaugvorrichtung anzuschlieûen (z.B. Atlas Copco Absaugsystem
AS 3 W). (In Deutschland werden für Holzstäube aufgrund TRGS 553 geprüfte Absaugeinrichtungen gefordert).
Für andere Materialien muû der gewerbliche Betreiber die speziellen Anforderungen mit der zuständigen Berufsgenossenschaft klären.
Steckdosen in Auûenbereichen müssen mit Fehlerstrom-Schutzschaltern ausgerüstet sein. Das verlangt die Installationsvorschrift für Ihre Elektroanlage. Bitte beachten Sie das bei der Verwendung unseres Gerätes ± sprechen Sie mit Ihrem Elektroinstallateur.
Beim Arbeiten mit der Maschine stets Schutzbrille tragen. Schutzhandschuhe, festes und rutschsicheres Schuhwerk und Schürze werden empfohlen.
Späne oder Splitter dürfen bei laufender Maschine nicht entfernt werden.
Gehäuse der Maschine nicht anbohren, da sonst die Schutzisolierung unterbrochen wird (Klebeschilder verwenden).
Vor allen Arbeiten an der Maschine Stecker aus der Steckdose ziehen. Maschine nur ausgeschaltet an die Steckdose anschlieûen.
Anschluûkabel stets vom Wirkungsbereich der Maschine fernhalten. Kabel immer nach hinten von der Maschine wegführen.
Beim Schleifen von Metall wegen Brandgefahr durch Funkenflug keine Staubabsaugung verwenden.
Geräusch- |
|
Der A-bewertete Geräuschpegel des Gerätes beträgt typischerweise: |
|
|
meûwerte |
|
Schalldruckpegel = 91 dB (A). |
|
|
|
|
Schalleistungspegel = 104 dB (A). |
|
|
|
|
Gehörschutz tragen! |
|
|
|
|
|
|
|
Vibrations- |
|
Die Hand-Arm Vibration ist typischerweise niedriger als 2,5 m/s2. |
|
|
meûwerte |
|
|
|
|
Netzanschluû |
|
|
|
|
|
Nur an Einphasen-Wechselstrom und nur an die auf dem Leistungsschild |
|
||
|
|
angegebene Netzspannung anschlieûen. Anschluû ist auch an Steckdosen ohne |
|
|
|
|
Schutzkontakt möglich, da eine Schutzisolierung nach DIN 57 740/ VDE 0740 bzw. |
|
|
|
|
CEE 20 vorliegt. Die Funkentstörung entspricht der Europanorm EN 55014. |
|
|
|
|
|
|
|
Verwendung |
|
Der Bandschleifer ist geeignet zum Flächenschleifen von Holz, Kunststoff und Metall. |
|
|
|
|
Dieses Gerät darf nur wie angegeben bestimmungsgemäû verwendet werden. |
|
|
|
|
|
|
|
DEUTSCH |
5 |
HBS 100, HBSE 100 |
|
|

Kurzbeschreibung
Absaugstutzen
Justierschraube für Bandlauf
Schalterdrücker
Arretierknopf für Schalterdrücker
Stellrad Drehzahl (nur bei HBSE 100)
Integrierte Staubabsaugung
Staubsack
Änderungen: Text, Bild und Daten entsprechen dem technischen Stand zur Zeit des Drucktermins. Änderungen im Sinne der Weiterentwicklung unserer Produkte sind vorbehalten.
Schleifband |
Vor allen Arbeiten an der Maschine |
|
|
|
|
wechseln |
Stecker aus der Steckdose ziehen. |
|
|
|
|
|
Vor dem Schleifbandwechsel das |
|
|
|
|
|
Schleifband etwas zur offenen |
|
|
|
|
|
Maschinenseite hin verstellen, da das |
|
|
|
|
|
neue Schleifband unter Umständen am |
|
|
|
|
|
Maschinengehäuse streifen kann; hierzu |
|
|
|
|
|
Bandjustierschraube bei laufender |
|
|
|
|
|
Maschine nach rechts drehen. |
|
|
|
|
1. Entspannhebel nach vorn ziehen. |
|
|
|
||
|
|
|
|||
|
|
|
|
||
2. Verbrauchtes Band entnehmen und neues |
|
|
|||
|
Band aufziehen. Darauf achten, daû die |
|
|
||
|
Pfeilrichtung auf der Inneseite des Bandes |
|
|
||
|
mit dem Pfeil auf der Maschine |
|
|
||
|
übereinstimmt. |
|
|
||
3. |
Entspannhebel wieder einklappen. |
|
|
||
4. Maschine einschalten und das Schleifband |
|
|
|||
|
mit der Bandjustierschraube so ausrichten, |
|
|
||
|
das es mit der äuûeren Kante der |
|
|
||
Drehzahl |
Schleifbandauflage abschlieût. |
|
|
||
|
|
||||
|
|
|
|
|
|
Die Drehzahl mit dem Elektronik-Stellrad |
|
|
|
||
|
|
|
|
||
einstellen |
einstellen. |
|
|
|
|
(nur bei |
A = kleinste Drehzahl |
|
|
|
|
HBSE 100) |
F = gröûte Drehzahl |
|
|
|
|
|
|
|
|
|
|
DEUTSCH |
6 |
HBS 100, HBSE 100 |

Ein-/Ausschalten |
Momentschaltung |
|
Einschalten: Ein-/Ausschalter drücken. |
|
Ausschalten: Ein-/Ausschalter loslassen. |
|
Dauerschaltung |
|
Einschalten: Ein-/Ausschalter drücken und |
|
dann Arretierknopf drücken, |
|
Ein-/Ausschalter loslassen. |
|
Ausschalten: Ein-/Ausschalter drücken |
|
und loslassen. |
|
Maschine schon vor dem Einschalten fest |
|
mit beiden Händen festhalten. |
|
Einschalten nur in abgehobener Position. |


 2
2 
 1
1 

Arbeitshinweise |
Maschine beim Schleifen ohne Druck führen. Das Eigengewicht der Maschine |
|
genügt für gute Schleifergebnisse. |
Staubabsaugung |
Zum Schleifen von Holz den Staubsack |
|
verwenden. |
|
Bei nachlassender Saugleistung den |
|
Staubsack entleeren. |
|
Bei groûen Staubmengen kann auch über |
|
einen Adapter ein Saugschlauch |
|
angeschlossen werden. Der Saugschlauch |
|
kann an einen Atlas Copco Naûund |
|
Trockensauger oder Rüttelsauger |
|
angeschlossen werden. |
|
Beim Schleifen von Metall wegen |
|
Brandgefahr durch Funkenflug keine |
|
Staubabsaugung verwenden. |
Wartung |
Stets die Lüftungsschlitze der Maschine sauber halten. |
|
Nur AEG Zubehör und Ersatzteile verwenden. Bauteile, deren Austausch nicht |
|
beschrieben wurde, bei einer AEG Kundendienststelle auswechseln lassen |
|
(Broschüre Garantie/Kundendienstadressen beachten). |
|
Bei Bedarf kann eine Explosionszeichnung des Gerätes unter Angabe der |
|
Maschinen Type und der zehnstelligen Nummer auf dem Leistungsschild bei Ihrer |
|
Kundendienststelle oder direkt bei Atlas Copco Electric Tools GmbH, Postfach 320, |
|
D±71361 Winnenden angefordert werden. |
Zubehör |
Das Zubehör mit Bestellnummern ersehen Sie bitte aus unseren Katalogen. |
DEUTSCH |
7 |
HBS 100, HBSE 100 |

Introduction |
|
|
Vous avez des exigences et vous voulez de la qualité ± une qualité que vous offre |
|
|||||
|
|
|
Atlas Copco. |
|
|
|
|
|
|
|
|
|
Nous avons mis au point pour vous un outil électrique de longue durée vous offrant |
|
|||||
|
|
|
un maximum de sécurité. Avant la mise en service de votre appareil, veuillez lire |
|
|||||
|
|
|
attentivement le mode d'emploi afin d'en tirer le plus d'efficacité et d'éviter tout risque |
|
|||||
|
|
|
de danger. |
|
|
|
|
|
|
|
|
|
Nous sommes convaincus qu'avec les outils électriques Atlas Copco vous avec fait |
|
|||||
|
|
|
le choix qu'il fallait. |
|
|
|
|
|
|
|
|
|
|
|
|
|
|
||
|
|
|
|
HBS 100 |
HBSE 100 |
|
|||
Caractéristiques |
|
|
Puissance absorbée . . . . . . . . . . . |
1010 |
W . . . . . . . . . . . 1010 |
W |
|
||
techniques |
|
|
Vitesse de bande à vide . . . . . . . . . |
350 |
m/min . . . . . 230±350 |
m/min |
|
||
|
|
|
Largeur de la bande . . . . . . . . . . . . |
100 |
mm . . . . . . . . . . . . 100 |
mm |
|
||
|
|
|
Longueur de la bande . . . . . . . . . . . |
560 |
mm . . . . . . . . . . . . 560 |
mm |
|
||
|
|
|
Surface de ponçage . . . . . . . 100 x 140 |
mm . . . . . . |
100 x 140 |
mm |
|
||
|
|
|
Poids . . . . . . . . . . . . . . . . . . . . . . . . . . 4,2 |
kg . . . . . . . . . . . . . 4,2 |
kg |
|
|||
|
|
|
|
|
|
||||
Conseils de |
|
Respecter les instructions de sécurité se trouvant dans le prospectus ci-joint. |
|
||||||
sécurité |
|
Lors de travaux de ponçage de longue durée, bois ou autres matériaux dégageant |
|
||||||
|
|
|
|||||||
|
|
|
des poussières nocives pour la santé, la machine est à raccorder à un appareil |
|
|||||
|
|
|
d'aspiration (Atlas Copco AS 3 W). |
|
|
|
|
|
|
|
|
Les prises de courant se trouvant à l'extérieur doivent être équipées de disjoncteurs |
|
||||||
|
|
|
de protection, répondant ainsi à la prescription de mise en place de votre installation |
|
|||||
|
|
|
électrique. Veuillez, d'une part, en tenir compte lors de l'utilisation de notre appareil |
|
|||||
|
|
|
et d'autre part, en parler à votre électricien. |
|
|
|
|
||
|
|
Toujours porter des lunettes protectrices lorsqu'on travaille avec la machine. Des |
|
||||||
|
|
|
gants de sécurité et un masque de protection sont recommandés. |
|
|
|
|||
|
|
Ne jamais enlever les copeaux ni les éclats lorsque la machine est en marche. |
|
||||||
|
|
Ne pas percer le carter de la machine; ceci pourrait entraîner une détérioration de |
|
||||||
|
|
|
l'isolation de protection (utiliser des autocollants). |
|
|
|
|
||
|
|
Avant tous travaux sur la machine extraire la fiche de la prise de courant. |
|
||||||
|
|
|
Ne raccorder la machine au réseau que si l'interrupteur est en position arrêt. |
|
|||||
|
|
Le câble d'alimentation doit toujours se trouver en dehors du champ d'action de la |
|
||||||
|
|
|
machine. Toujours maintenir le câble d'alimentation à l'arrière de la machine. |
|
|||||
|
|
En raison des risques d'incendie, il est déconseilléd'avoir recours au sysréme |
|
||||||
|
|
|
d'aspiration pour le ponçage des métaux. |
|
|
|
|
|
|
|
|
|
|
|
|
|
|||
Mesure de bruit |
|
|
Les mesures réelles (A) des niveaux de bruit de la machine sont: |
|
|
|
|||
|
|
|
Intensité de bruit = 91 dB (A). |
|
|
|
|
|
|
|
|
|
Niveau de bruit = 104 dB (A). |
|
|
|
|
|
|
|
|
|
Toujours porter des casques protecteurs! |
|
|
|
|
|
|
|
|
|
|
|
|
|
|||
Valeur de |
|
|
La vibration de l'avant±bras est en±dessous de 2,5 m/s2. |
|
|
|
|||
vibration |
|
|
|
|
|
|
|
|
|
mesurée |
|
|
|
|
|
|
|
|
|
Branchement |
|
|
|
|
|
||||
|
|
Nos machines fonctionnent uniquement sur courant alternatif monophasé. S'assurer |
|
||||||
secteur |
|
|
que la tension du réseau correspond effectivement à celle indiquée sur la plaque |
|
|||||
|
|
|
signalétique de la machine. Le branchement sur une prise de courant sans mise à |
|
|||||
|
|
|
terre est possible du fait de la double isolation selon normes DIN 57 740/VDE 0740 |
|
|||||
|
|
|
et CEE 20. Antiparasitage selon normes européennes EN 55014. |
|
|
|
|||
|
|
|
|
|
|
||||
Utilisation |
|
|
La ponceuse a bande peut-être utilisée pour poncer le bois, les plastiques et le |
|
|||||
|
|
|
métal. |
|
|
|
|
|
|
|
|
|
Comme déjà indiqué, cette machine n'est conçue que pour une utilisation normale. |
|
|||||
|
|
|
|
|
|
|
|
|
|
FRANÇAIS |
8 |
|
|
|
|
HBS 100, HBSE 100 |
|
||
Description
Sac à poussières
Manchon d'aspiration
Vis de réglage de la bande (centrage)
Interrupteur
Bouton de blocage
Molette de réglage de la vitesse
électronique (potentiomètre)
Modifications: Les textes, les illustrations et les données (uniquement sur HBSE 100) techniques correspondent à la situation au moment de l'impression.
Aspiration intégrée de la poussière
Toutes modifications techniques sont réservées dans le cadre du développement technique permanent.
Remplacement |
Avant tous travaux sur la machine extraire |
|
|
|
de la bande |
la fiche de la prise de courant. |
|
|
|
|
Mettre la machine en route. Tourner la vis |
|
|
|
|
d'ajustage vers la droite et faire glisser la |
|
|
|
|
bande vers l'extérieur d'environ 2à 3cm. |
|
|
|
|
Arrêter la machine. |
|
|
|
1. Tirer le lever vers l'avant. |
|
|
||
|
|
|||
|
|
|
||
2. Enlever la bande et la remplacer. Veiller à |
|
|||
|
faire corresspondre le sens des flèches qui |
|
||
|
se trouvent sur la bande et sur la machine. |
|
||
3. |
Repousser le lever. |
|
||
4. Mettre en route et positionner la bande au |
|
|||
|
moyen de la vis. |
|
||
Reglage de la |
|
|
|
|
|
|
|
|
|
La vitesse se règle au moyen de la |
|
|
||
|
|
|
||
vitesse |
molette. |
|
|
|
(uniquement sur |
A = Vitesse réduite |
|
|
|
HBSE 100) |
F = Vitesse élevée |
|
|
|
|
|
|
|
|
FRANÇAIS |
9 |
HBS 100, HBSE 100 |

Mise en |
Marche momentanée |
marche/arrêt |
Mise en marche: appuyer sur l'interrupteur |
|
Marche/Arrêt |
|
Arrêt: lâcher l'interrupteur Marche/Arrêt |
Marche continue
Mise en marche: appuyer d'abord sur l'interrupteur marche/arrêt puis sur le bouton de blocage, lâcher l'interrupteur marche/arrêt.
Arrêt: appuyer sur l'interrupteur marche/arrêt et lâcher.
Avant la mise en route, maintenir la machine en l'air avec les deux mains.


 2
2 
 1
1 

Conseils |
Il n'est pas nécessaire, lors du ponçage, d'exercer une pression particulière sur la |
pratiques |
machine, son propre poids suffit. |
Aspiration de la |
Pour le poncage du bois, utiliser le sac à |
poussière |
poussières. |
|
Si le rendement de l'aspiration baisse, |
|
vider le sac. |
|
Pour les travaux dégageant beaucoup de |
|
poussière, il est possible, tant en utilisation |
|
portative que stationnaire, de raccorderla |
|
ponceuse à l'aspirateur NTE 1100, RSE |
|
ou tout aspirateur industriel. Pour se faire, |
|
utiliser un adaptateur et un tuyau (en |
|
option). |
|
En raison des risques d'incendie, il est |
|
déconseilléd'avoir recours au sysréme |
|
d'aspiration pour le ponçage des métaux. |
Entretien |
Tenir toujours propre les orifices de ventilation de la partie moteur. |
|
N'utiliser que des pièces et accessoires AEG. Pour des pièces dont l'échange n'est |
|
pas décrit, s'adresser de préférence aux stations de service après-vente AEG (voir |
|
brochure Garantie/Adresses des stations de service après-vente). |
|
Si besoin est, une vue éclatée de l'appareil peut être fournie. S'adresser, en |
|
indiquant bien le numéro à dix chiffres porté sur la plaque signalétique, à votre |
|
station de service après±vente (voir liste jointe) ou directement à Atlas Copco |
|
Electric Tools GmbH, B.P. 320, D±71361 Winnenden. |
Accessoires |
Consulter nos catalogues qui vous renseignent sur notre programme d'accessoires |
|
avec leur référence. |
FRANÇAIS |
10 |
HBS 100, HBSE 100 |
 Loading...