


HG60FX |
USER MANUAL |
GAS COOKTOPS |
HG75FX |
|
|
HG90FX |
|
|

GENERAL NOTICE
We invite you to read this instruction booklet carefully, before installing and using the equipment. It is very important that you keep this booklet together with the equipment for any future consultation.
If this equipment should be sold or transferred to another person, make sure that the new user receives the booklet, so that they can learn how to operate the appliance and read the corresponding notice.
This is a Class 3 appliance.
This appliance complies with the following Directives:
EEC 2009/142/CE (Gas) |
EEC 2004/108/CE (Electromagnetic Compatibility) |
EEC 2006/95/CE (Low Voltage) |
EEC 89/109 (Contact with foods) |
WARNING
––The installation must be carried out by authorised personnel, in conformity with the regulations in force.
––CAUTION: The surface temperature of underbench components exceeds 95°C. To avoid a hazard, underbench access must be restricted. Refer to the installation instructions.
––This appliance is not intended for use by persons (including children) with reduced physical, sensory or mental capabilities, or lack of experience and knowledge, unless they have been given supervision or instruction concerning use of the appliance by a person responsible for their safety.
––Children should be supervised to ensure that they do not play with the appliance.
––Before powering the equipment, check that it is properly adjusted for the type of gas at disposal (see the “installation” paragraph).
––If the supply cord is damaged it must be replaced by a special cord or assembly available from the manufacturer or its service agent.
––Before carrying out the maintenance or cleaning the equipment, cut off power supply and allow it cool down.
––Make sure that air circulates around the gas equipment. Insufficient ventilation produces a lack of oxygen.
––In case of an intense or prolonged use of the equipment, it may be necessary to improve aeration, for example by opening a window or increasing rangehood venting power, if it exists.
––The products of combustion must be discharged outside through a suction hood or an electric fan (see the “installation” paragraph).
––For any possible operation or modification, apply to an authorized Technical Assistance Centre and demand original spare parts.
––Where this appliance is installed in marine craft or in caravans, it shall not be used as a space heater.
––Not for use in marine craft, caravans or mobile homes unless each burner is fitted with a flame safeguard.
––Do not spray aerosols in the vicinity of the appliance while it is in operation. ––Do not store or use flammable materials or items in the vicinity of this appliance.
DO NOT MODIFY THIS APPLIANCE.
Servicing shall be carried out only by authorised personnel.
The product label, with the serial number, is fixed to the underside of hob.
An additional label should be adhered to adjacent cabinetry for easy accessrefer installation instructions.
The manufacturer refuses all responsibility for possible damages to things or people, resulting from incorrect installation or from an improper, incorrect or unreasonable use of this equipment.
3

INSTRUCTIONS FOR THE USER
It is necessary that all the operations regarding the installation, adjustment and adaptation to the type of gas available are carried out by authorised personnel, in conformity with the regulations in force. The specific instructions are described in the booklet section intended for the installer.
Conditions of Use.
This appliance is intended to be used in household and similar applications such as:
-Staff kitchen areas in shops, offices and other working environments
-Farm Houses
-By clients in hotels, motels and other residential type environments
-Bed and breakfast type environment
USING THE BURNERS
The symbols silk-screen printed on the side of the knob indicate the correspondence between the knob and the burner.
Automatic start-up with valves
Turn the corresponding knob anticlockwise up to the maximum position (large flame, fig. 1) and press the knob. Once the burner has been started up, keep the knob pressed for about 6 seconds.
ATTENTION: the triple ring burner switches on only in the maximum flame position
Using the burners
In order to obtain the maximum yield without waste of gas, it is important that the diameter of the pot is suitable for the burner potential (see the following table), so as to avoid that the flame going out (fig. 2).
Use the maximum capacity to quickly make liquids reach boiling temperature, and the reduced capacity to heat food or maintain boiling. All of the operating positions must be chosen between the maximum and the minimum ones, never between the minimum position and the closing point.
The gas supply can be interrupted by turning the knob clockwise up to the closing position. If there is no power supply, it is possible to light the burners with matches, setting the knob to the start-up point (large flame, fig. 1).
BURNERS |
Power (MJ/h) |
Ø of pots |
||
NG |
LPG |
(*) |
||
|
||||
|
|
|
|
|
Auxiliary |
3,4 |
3,4 |
10 - 14 cm |
|
|
|
|
|
|
Semi-rapid |
6,3 |
5,6 |
16 - 18 cm |
|
|
|
|
|
|
Rapid |
11,5 |
9,6 |
20 - 22 cm |
|
|
|
|
|
|
Triple crown |
13,0 |
12,0 |
24 - 26 cm |
|
|
|
|
|
|
Double crown |
10,3 |
9,6 |
24 - 26 cm |
|
|
|
|
|
|
(*) For pots with diameter 120mm or below use mini-trivet supplied, refer fitment instructions on page 13.
Notice
––When the equipment is not working, always check that the knobs are in the closing position (see fig.1).
––If the flame should blow out accidentally, the safety valve will automatically stop the gas supply, after a few seconds. To restore operation, set the knob to the lighting point (large flame, fig. 1) and press.
––While cooking with fat or oil, pay the utmost attention as these substances can catch fire when overheated.
––Do not place unstable or deformed pots on the burner, so as to prevent them from overturning or overflowing.
––Handles should be turned away from the front of the bench to avoid accidents.
––When the burner is started up, check that the flame is regular and, before taking pots away, always lower the flame or put it out.
4
INSTRUCTIONS FOR THE USER
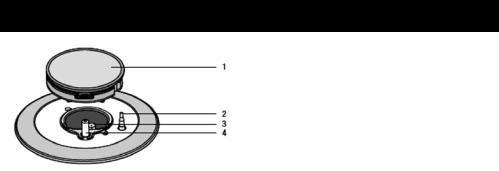
1 |
Burner |
2 |
Flame safeguard sensor (where fitted) |
3 |
Injector |
4 |
Ignition spark plug |
If you have a problem with the cooktop, check the table below. You may be able to solve the problem and this will save you from paying for a service call. You will have to pay for a service call even in the warranty period if the problem is one listed below
FAULT |
POSSIBLE CAUSES |
REMEDY |
|
Burner will not light |
Knob not held down long enough in |
Repeat lighting procedure and hold knob |
|
even though the |
‘High’ position for flame safeguard |
down for 6 seconds in ‘High’ position (refer |
|
sparker is working. |
(where fitted) to engage |
page 3) |
|
|
Gas supply valve turned off |
Turn on gas supply to appliance |
|
|
Wrong knob turned |
Ensure the knob you are turning |
|
|
|
corresponds to the burner you want to light |
|
|
Port blockage in ignition area |
Ensure that ports in ignition area are clean |
|
|
|
and dry |
|
|
Ignition spark plugs wet or dirty |
Dry or clean ignition spark plugs |
|
No spark is obtained |
Electricity supply is disconnected or |
Switch on electricity or check fuses |
|
when control knob is |
switched off" |
|
|
activated |
|
|
|
Ignition spark plugs wet or dirty |
Dry or clean ignition spark plugs |
||
|
|||
Flames uneven or |
Flame ports blocked or wet |
Clean or dry flame ports |
|
tending to lift |
|
|
|
Burner incorrectly fitted |
Ensure this component is fitted correctly |
||
|
|||
Flames not staying on |
Knob not held down long enough |
Repeat lighting procedure and hold knob |
|
when knob released |
in ‘High’ position for flame safeguard |
down for 6 seconds in ‘High’ position |
|
|
(where fitted) to engage |
(refer page 3) |
|
|
Knob not set between ‘High’ and |
Knob MUST be set between these |
|
|
‘Low’ |
positions |
|
|
Dirt or spillage on flame safeguard |
Clean flame safe guard sensor tip |
|
|
sensor (where fitted) |
|
|
Low heat, slow |
Incorrect cooking pot or pan being |
Refer to table page 3 |
|
cooking |
used |
|
|
Benchtop or knobs |
Incorrect cooking pot or pan used |
Check table on page 3 for correct pot or |
|
overheating |
|
pan to be used |
|
|
Pot or pan not located on burner |
Ensure pot or pan is centrally located |
|
|
properly |
on burner |
If the above points have been checked and there is still a problem with the cooktop, please call the Service
Centre.
5
 Loading...