

Page 1
What's New in Flash 8
October 16, 2005
Josh Cavalier
Lodestone Digital, LLC
www.lodestone.com
josh@lodestone.com
Page 2

Macromedia MAX 2005 - Anaheim, CA What’s New In Flash 8
Unit 1:
Overview of the Session
Unit Objectives:
After this unit, you will:
y Describe the course objectives
y Know what the prerequisites of the class are
y Know the content of each unit for the course
y Understand the course materials
Unit Topics:
y About the Course
y Course Format
y Course Objectives
y Course Prerequisites
y Course Outline
2
Page 3

Macromedia MAX 2005 - Anaheim, CA What’s New In Flash 8
About the Course
What’s New in Flash 8 provides Macromedia Flash 8 users with the hands-on instruction that will
help them become competent with all the new expressiveness features in Flash 8.
By the end of the course, students should be able to use what they learned here to build rich user
experiences that include new features like complex gradients, blends, filters, Flash Video, and
mobile device emulation.
The methodology for the course includes the following:
y Clearly stated learning objectives
Each unit in this course starts with the objectives for that unit.
y Presentation of material to support the learning objectives
y The instructor uses slides and other media to get across
concepts.
y Model uses of new material
The instructors for this course demonstrate the use of the
product.
y Feedback from students
The instructors for this course test for understanding during
and after each unit.
y Guided practice
Each unit in this course has a series of walkthroughs that you
perform along with your instructor so that you get familiar with
new skills.
y Independent practice
Each unit in this course concludes with a hands-on lab that
lets you practice a set of new skills, on your own, in context.
3
Page 4

Macromedia MAX 2005 - Anaheim, CA What’s New In Flash 8
Course Format
This course is divided into 8 units, most of which present new information and contain
demonstrations, walkthroughs and a lab where you can practice you new skills.
You will experience the following learning techniques to better understand the course:
y Concepts introduce new information.
y Demonstrations illustrate new concepts.
y Walkthroughs guide you, with the instructor’s assistance, through procedures.
y Labs let you practice new skills on your own.
y Summaries provide a brief synopsis of the unit’s content.
4
Page 5

Macromedia MAX 2005 - Anaheim, CA What’s New In Flash 8
Course Objectives
After completing the course, you will be able to use the following new features in Flash 8:
y Toolbar Settings
y The Object Drawing Model
y Text and Graphic Rendering Options
y Ease In/Ease Out Animation Options
y Flash Video Components for Flash 8
y Blends and Filters
y Mobile Device Settings
Course Prerequisites
To get the most from this class, you should already be familiar with:
y The Windows XP operating system
y Basic Flash functionality including the interface, animation and ActionScript
Course Outline
This one day class contains the following 8 Units:
y Unit 1: Overview of the Session.
y Unit 2: Setting up your Flash 8 Document
y Unit 3: Interface Improvements
y Unit 4: Drawing Improvements
y Unit 5: Expressiveness Features and Animation
y Unit 6: Text and Graphics Rendering
y Unit 7: Using Video in Flash 8
y Unit 8: Mobile Phone Workflow
5
Page 6

Macromedia MAX 2005 - Anaheim, CA What’s New In Flash 8
Unit 2:
Setting Up the Flash 8
Document
Unit Objectives:
After this unit, you will be able to:
y Set up your document for web and mobile output
y Modify your document properties
y Define a Site in Flash 8
y Upload a Site via Flash 8
y Save versions of your FLA file
Unit Topics:
y Document Setup
y Document Setup for Flash Lite / Mobile Devices
y Defining a Site
y Uploading a Site
y Version Control
6
Page 7
Macromedia MAX 2005 - Anaheim, CA What’s New In Flash 8
Setting Up Your Flash Document
In this unit, you will set up a simple Flash document, and examine some of the new features of
setting up a FLA file.
Creating a Simple Flash Document
To illustrate the basic steps of creating any Flash document, this section guides you through the
process in a simple tutorial.
The first step is to create a new document in Flash and explore on of the new features – SWF
MetaData.
Setting Up a Document with SWF MetaData
You can now add metadata to Flash files so that you can search more effectively for these files
using Internet search engines, such as Google.com.
You can give your Flash content a search-engine friendly description and title. Search engines that
look inside a SWK file can then better rank your Flash content.
To embed metadata within your SWF files, improving the ability of web-based search engines to
return meaningful search results for Flash content, do the following:
• Enter a descriptive title in the Title text box. (Modify > Document…)
• Enter a description in the Description text box.
Descriptions can contain searchable keywords, author and copyright information, and
short descriptions about the content and its purpose.
7
Page 8

Macromedia MAX 2005 - Anaheim, CA What’s New In Flash 8
The search metadata is based on the RDF (Resource Description Framework) and XMP (Extensible
Metadata Platform) specifications and is stored in Flash in a W3C-compliant format.
NOTE:
Flash lets you make the settings you specify in the Document Properties dialog box the
default settings for any Flash document that you create. The exception to this is the Title and
Description, which you need to specify for each Flash document that you create.
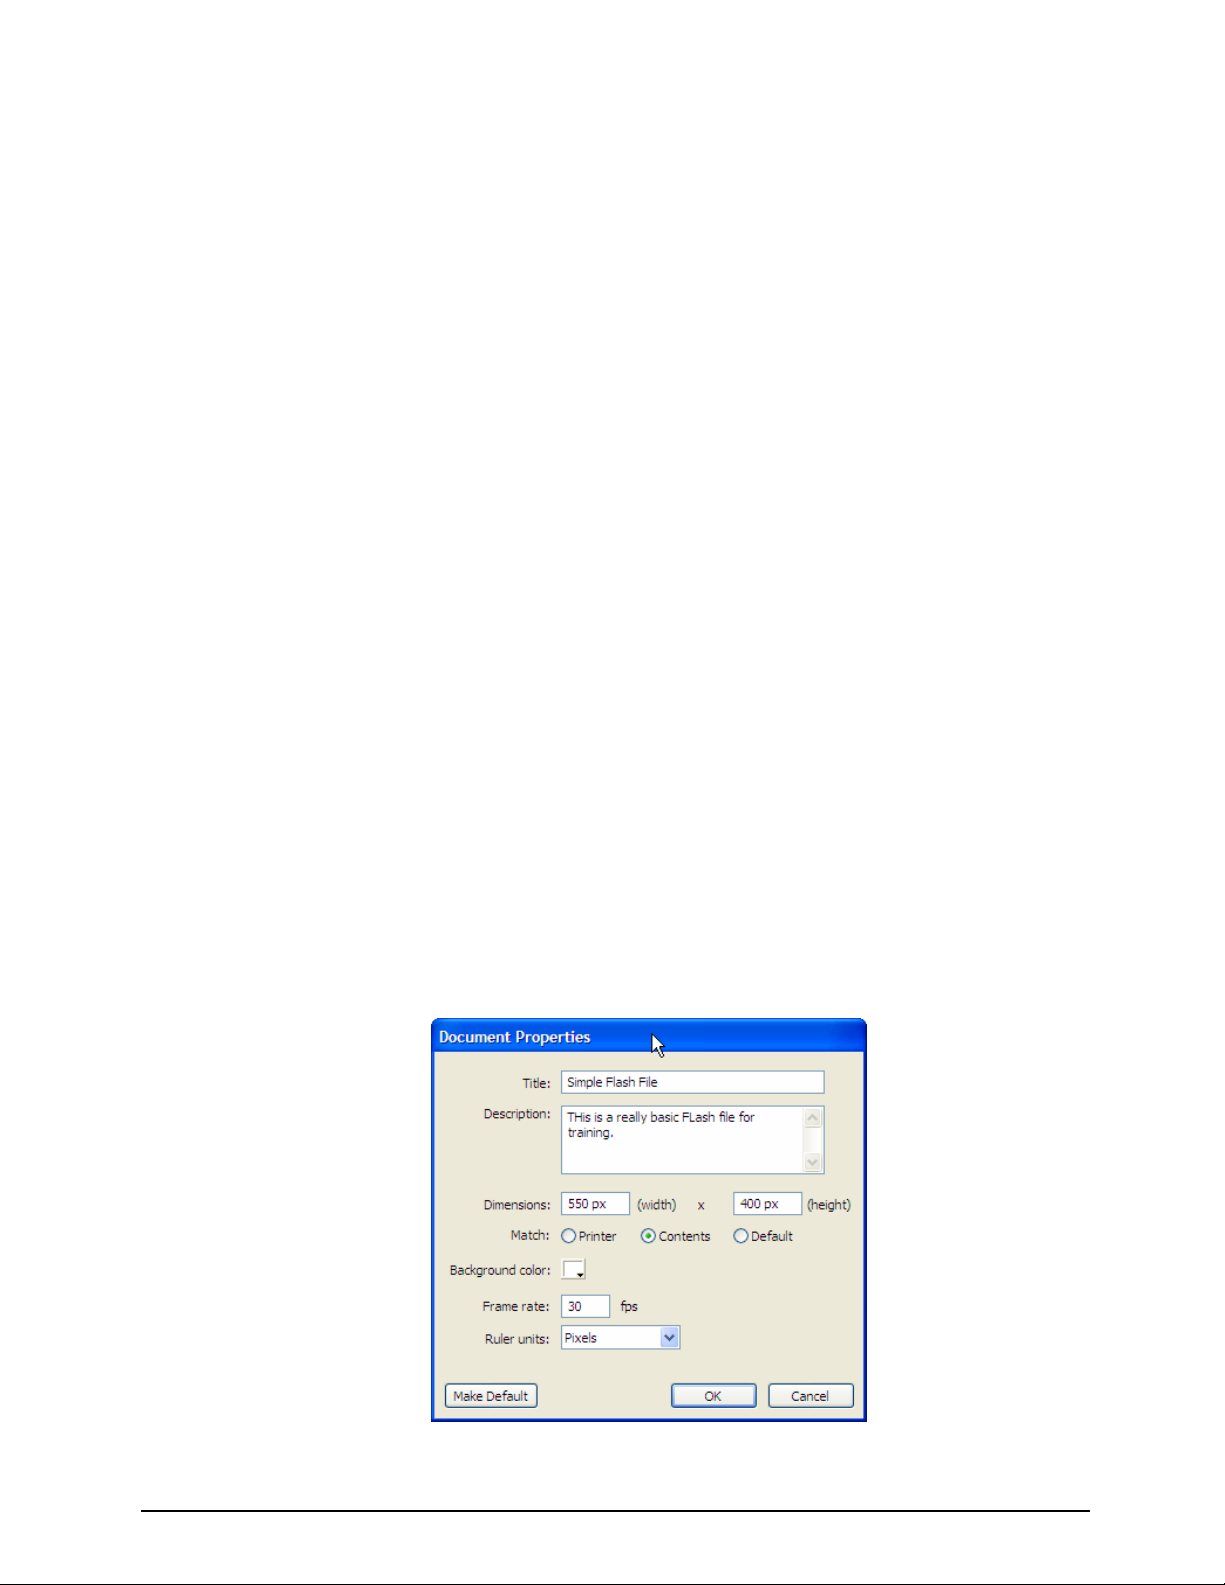
To set properties for a new or existing document in the Document Properties dialog
box:
1. Select File > New.
2. With the document open, select Modify > Document.
The Document Properties dialog box appears.
3. To embed metadata within your SWF files, improving the ability of web-based search
engines to return meaningful search results for Flash content, do the following:
o Enter a descriptive title in the Title text box.
o Enter a description in the Description text box.
Descriptions can contain searchable keywords, author and copyright information, and
short descriptions about the content and its purpose.
4. The search metadata is based on the RDF (Resource Description Framework) and XMP
(Extensible Metadata Platform) specifications and is stored in Flash in a W3C-compliant
format.
5. For Frame Rate, enter 30 frames per second.
6. For Dimensions, specify the Stage size in pixels - enter values of 240 width and 270 height.
7. To set the background color of your document, click the triangle in the Background Color box
and select a color from the palette. Pick any color you like!
8. To specify the unit of measure for rulers that you can display along the top and side of the
application window, select an option from the pop-up menu in the upper right. We’ll leave it
pixels for this and future files.
9. To make the new settings the default properties for your new document only, click OK.
10. Save the file as SimpleFlash.fla in the Unit 2 folder.
8
Page 9
Macromedia MAX 2005 - Anaheim, CA What’s New In Flash 8
Drawing a circle
After you've created your document, you are ready to add some artwork for the document.
To draw a circle on the stage:
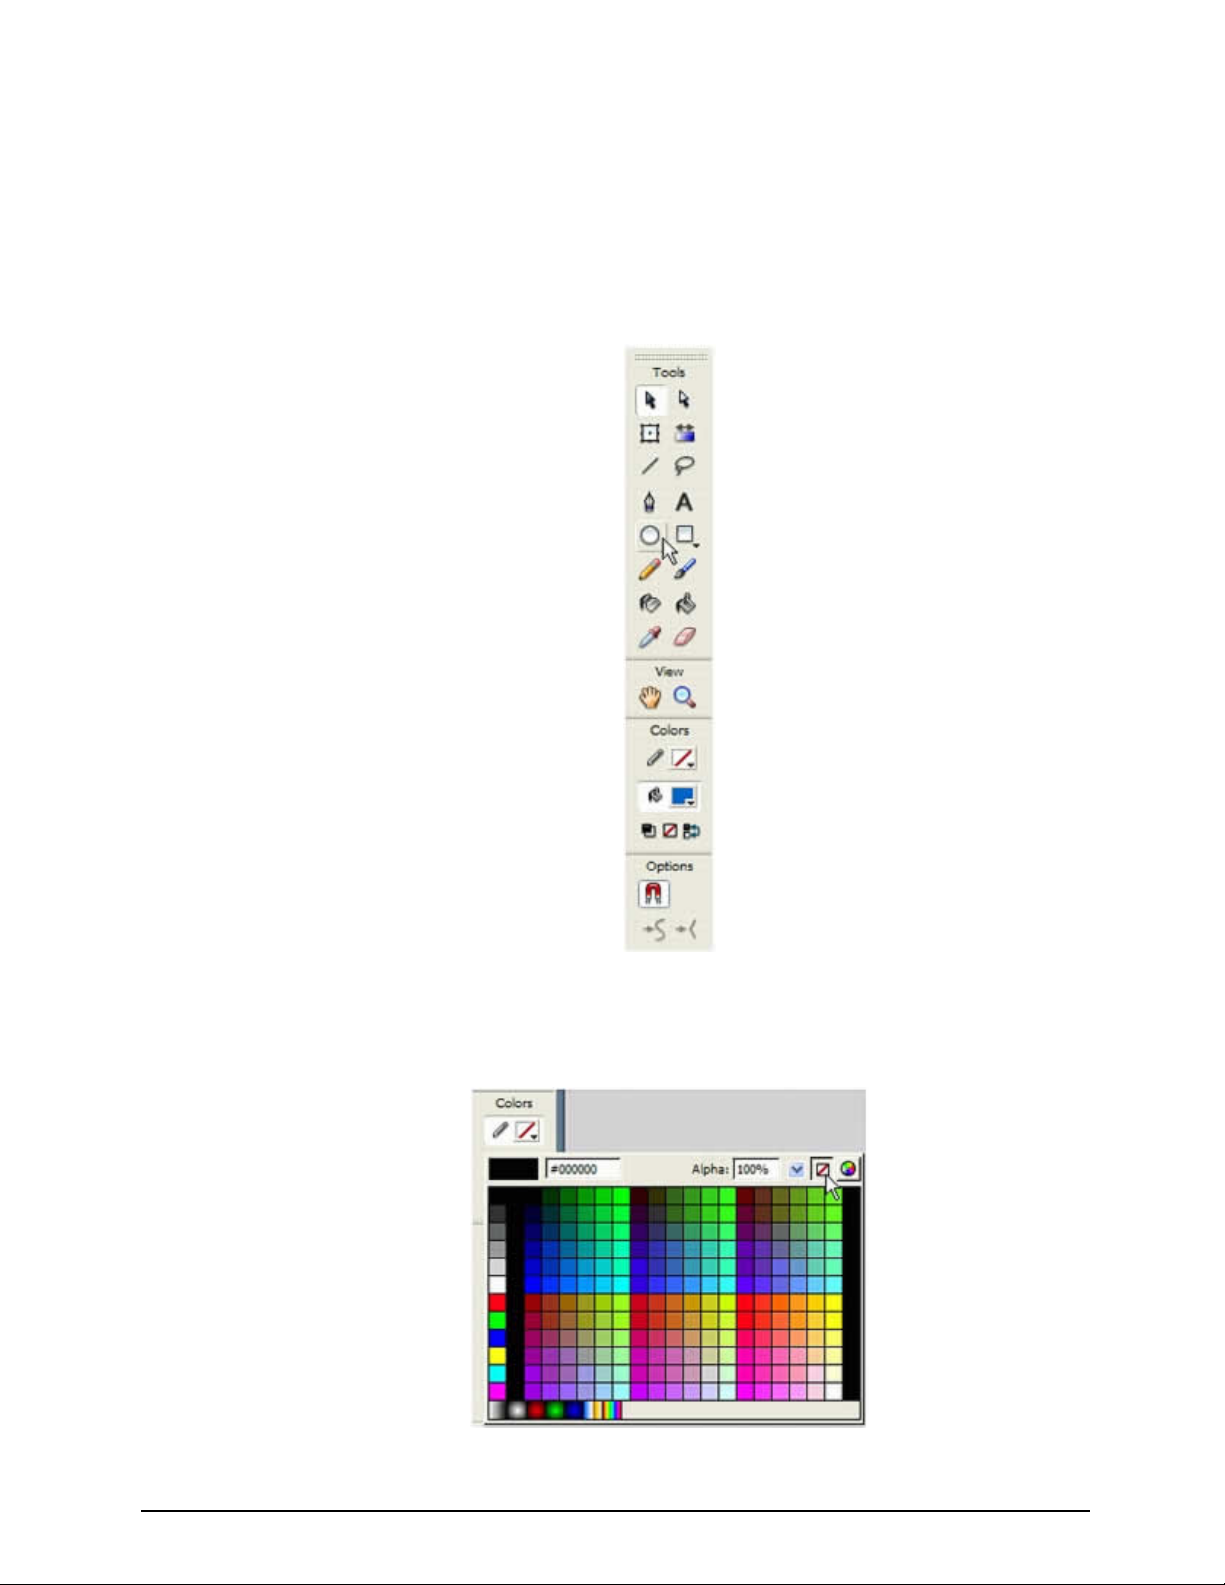
1. Select the Oval tool from the Tools panel.
The Oval tool in the Tools panel
2. Select the No Color option from the Stroke Color Picker.
Selecting the No Color option in the Stroke Color Picker
9
Page 10
Macromedia MAX 2005 - Anaheim, CA What’s New In Flash 8
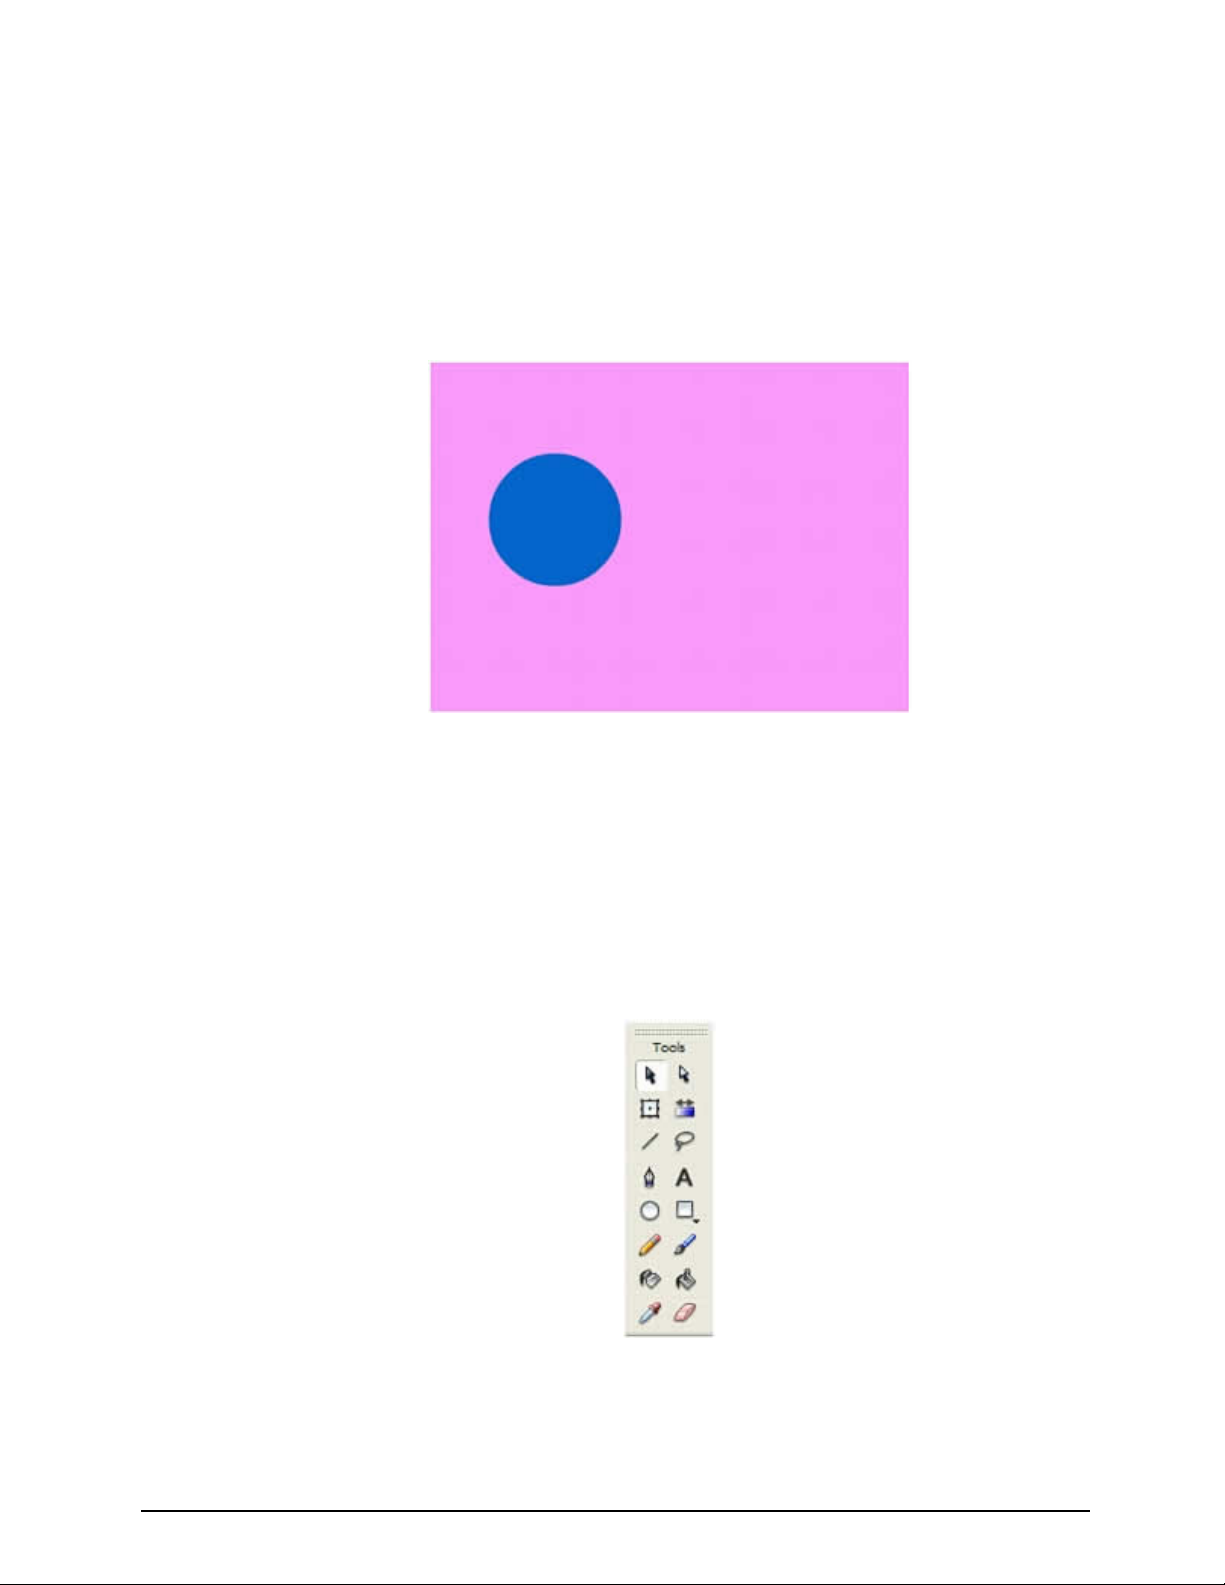
3. Select a color of your choice from the Fill Color Picker.
Make sure the fill color contrasts well with the Stage color.
4. Draw a circle on the Stage by selecting the Oval tool and Shift-dragging on the Stage.
Holding the Shift key constrains the Oval tool to a circle.
The circle shape drawn on the Stage
Creating a symbol
You can turn your new artwork into a reusable asset by converting it to a Flash symbol. A symbol is
a media asset that can be reused anywhere in your Flash document without the need to re-create it.
To create a symbol:
1. Click the Selection tool in the Tools panel.
The Tools panel with the Selection tool selected
2. Click the circle on the Stage to select it.
10
Page 11

Macromedia MAX 2005 - Anaheim, CA What’s New In Flash 8
3. With the circle still selected, select Modify > Convert to Symbol.
4. In the Convert to Symbol dialog box, type my_circle into the Name text box.
The default behavior is now Movie Clip.
5. Click OK.
A square bounding box appears around the circle. You have now created a reusable asset,
called a symbol, in your document.
6. The new symbol appears in the Library panel.
If the Library panel is not open, select Window > Library.
Animating the Circle
Now that you have some artwork in your document, you can make it more interesting by animating it
to move across the Stage.
To create an animation with the circle:
1. Drag the circle to just left of the Stage area.
The circle shape moved to the left of the Stage area
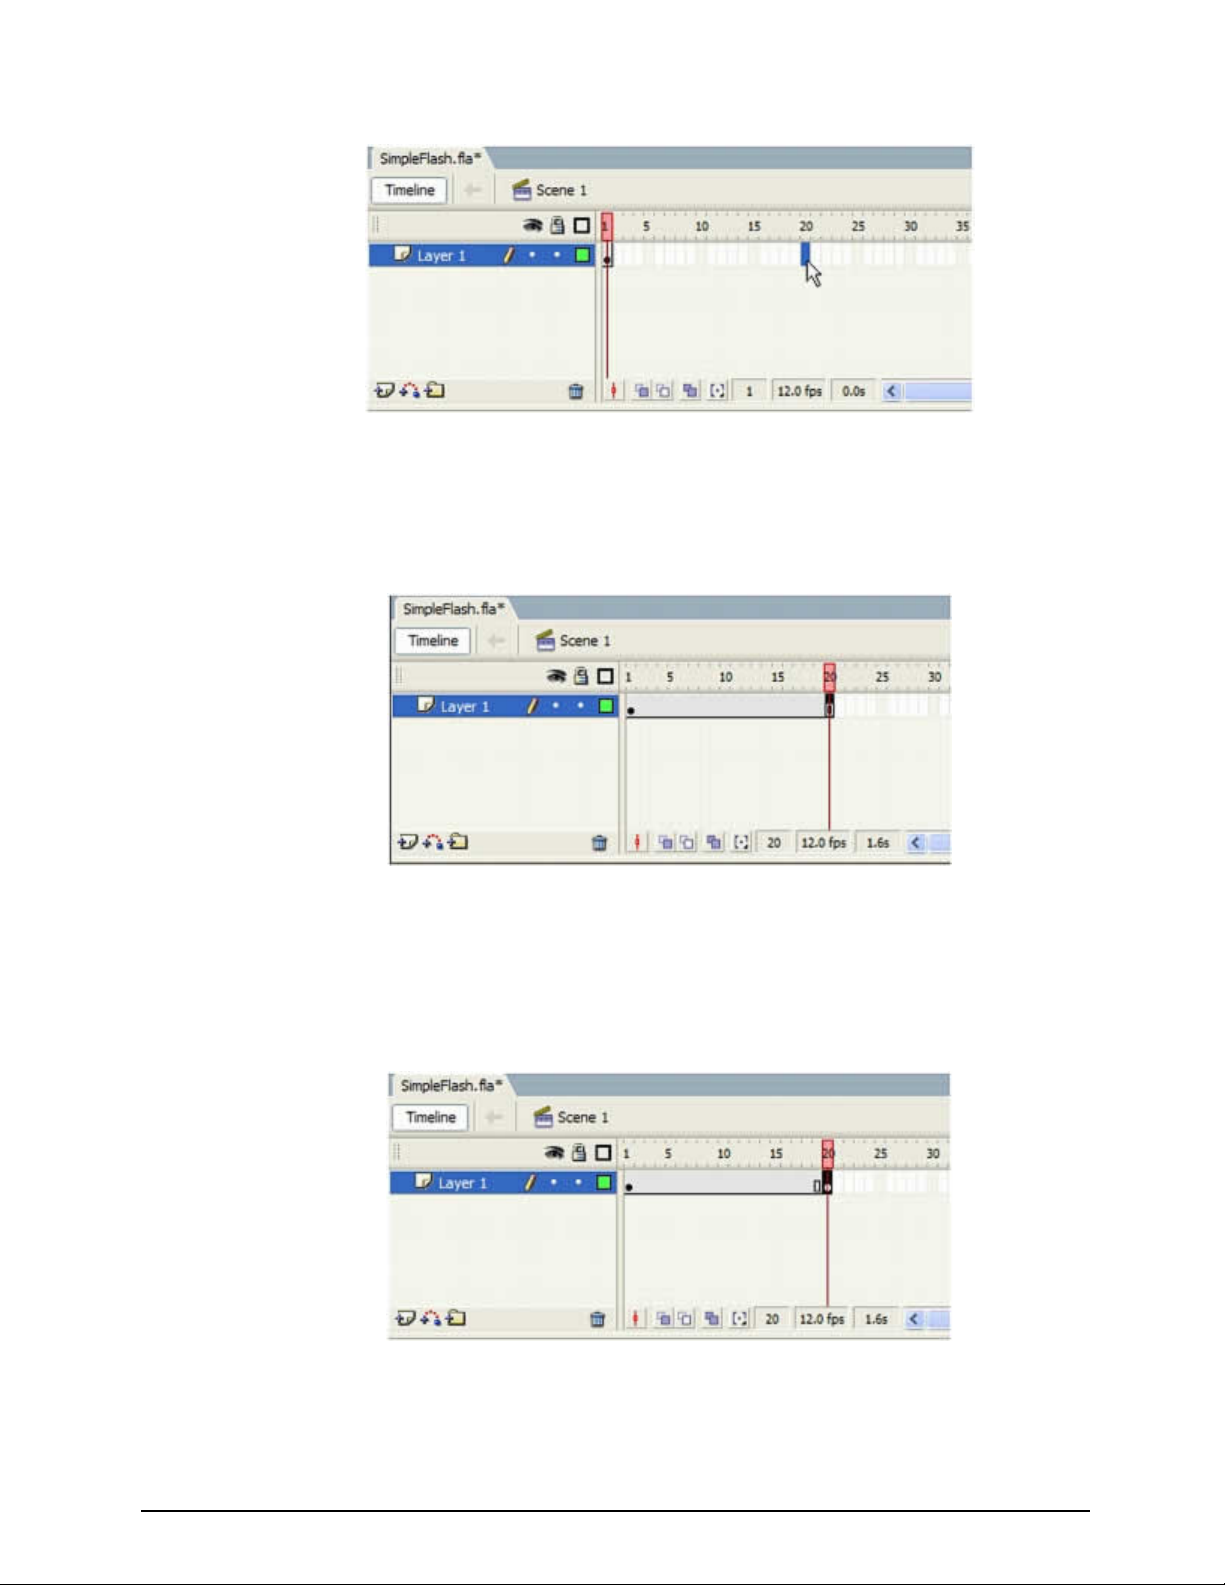
2. Click Frame 20 of Layer 1 in the Timeline.
11
Page 12
Macromedia MAX 2005 - Anaheim, CA What’s New In Flash 8
Selecting Frame 20 of Layer 1 in the Timeline
3. Select Insert > Timeline > Frame.
Flash adds frames to Frame 20, which remains selected.
Frames inserted in the Timeline
4. With Frame 20 still selected, select Insert > Timeline > Keyframe.
A keyframe is added in Frame 20. A keyframe is a frame where some property of an object is
explicitly changed. In this new keyframe, you will change the circle's location.
Inserting a keyframe in Frame 20
5. With Frame 20 still selected in the Timeline, drag the circle to just right of the Stage area.
12
Page 13
Macromedia MAX 2005 - Anaheim, CA What’s New In Flash 8
6. Select Frame 1 of Layer 1 in the Timeline.
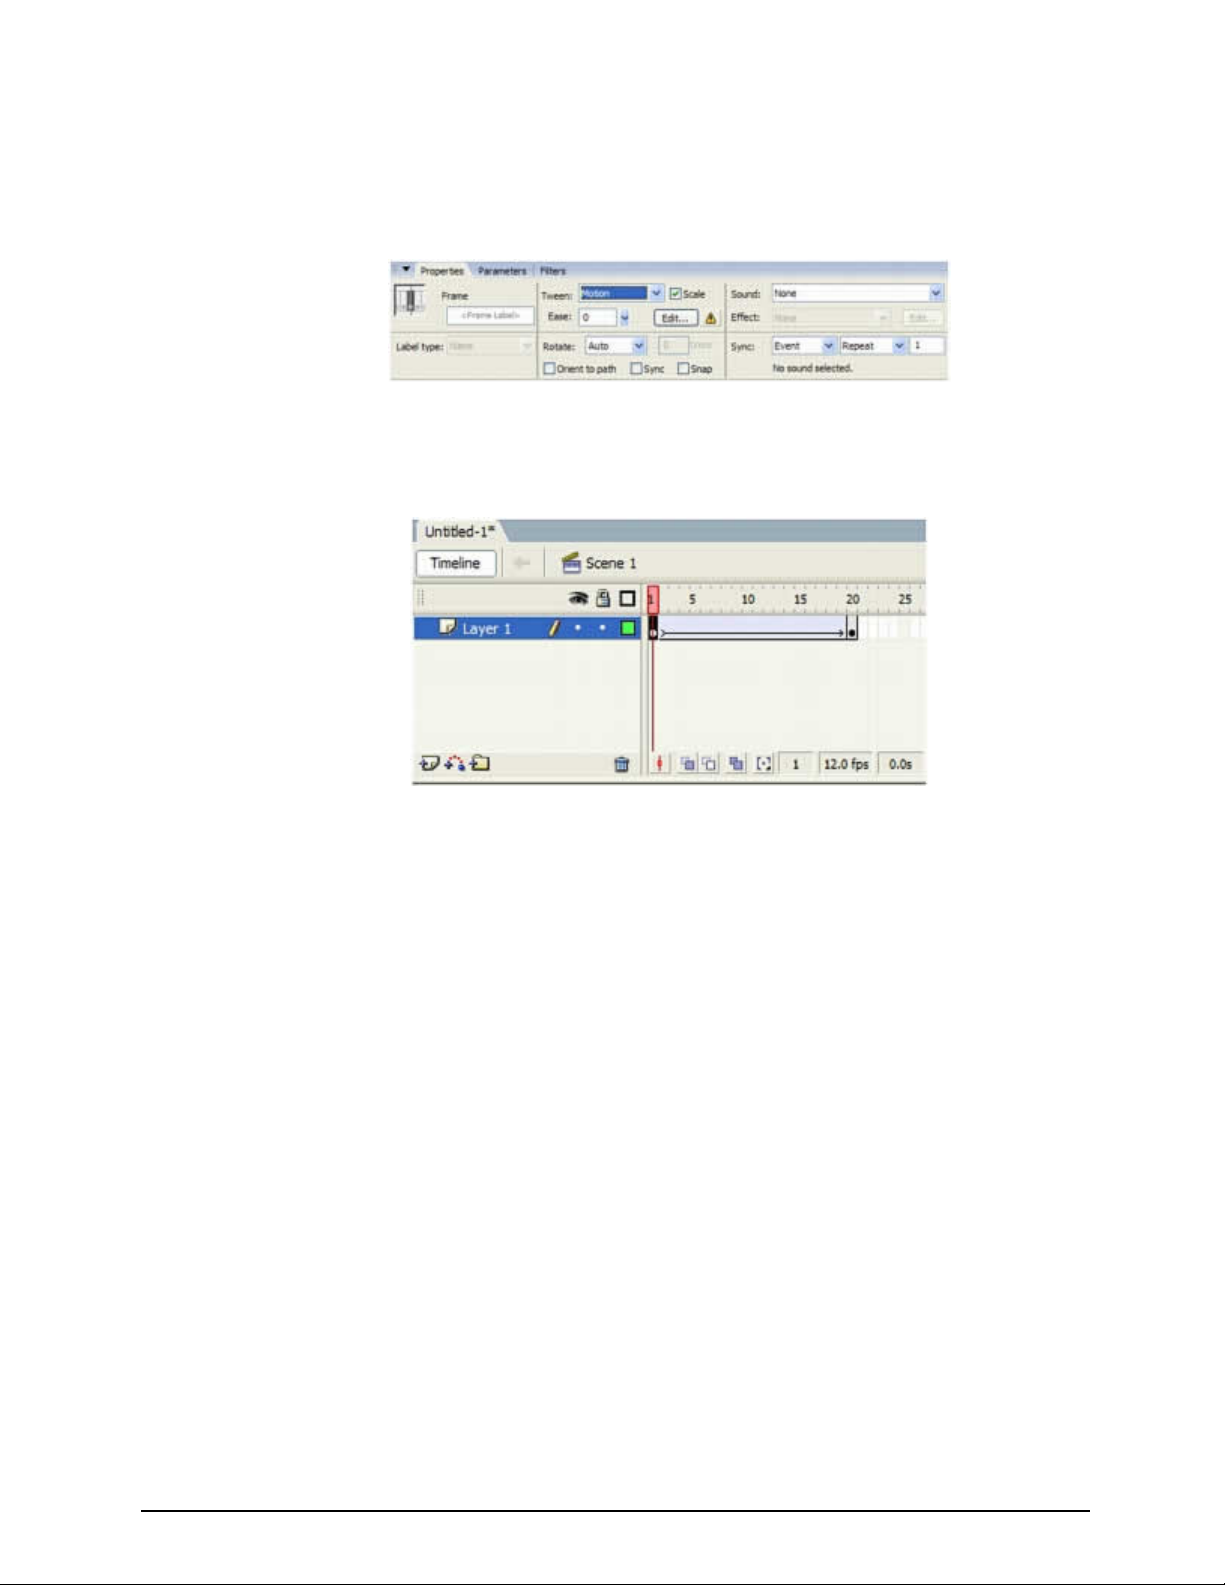
7. In the Property inspector (its default location is at the bottom of the Flash application
window), select Motion from the Tween pop-up menu.
Selecting a motion tween in the Property inspector
An arrow appears in the Timeline in Layer 1 between Frame 1 and Frame 20.
The Timeline with an arrow indicating a motion tween
This step creates a tweened animation of the circle moving from its position in the first
keyframe in Frame 1 to its new position in the second keyframe in Frame 20.
8. In the Timeline, drag the red playhead back and forth from frame 1 to frame 20 to preview
the animation.
9. Select File > Save.
10. Select Control > Test Movie to test the FLA file.
11. Close the Test Movie window.
13
Page 14
Macromedia MAX 2005 - Anaheim, CA What’s New In Flash 8
Publishing the File with HTML and Version Detection
When you finish your Flash document, you are ready to publish it so it can be viewed in a browser.
When you publish a FLA file, Flash compresses it into the SWF file format. This is the format that
you place in a web page. The Publish command can automatically generate an HTML file with the
correct tags in it for you.
To publish the Flash file and view it in a browser:
1. Select File > Publish Settings.
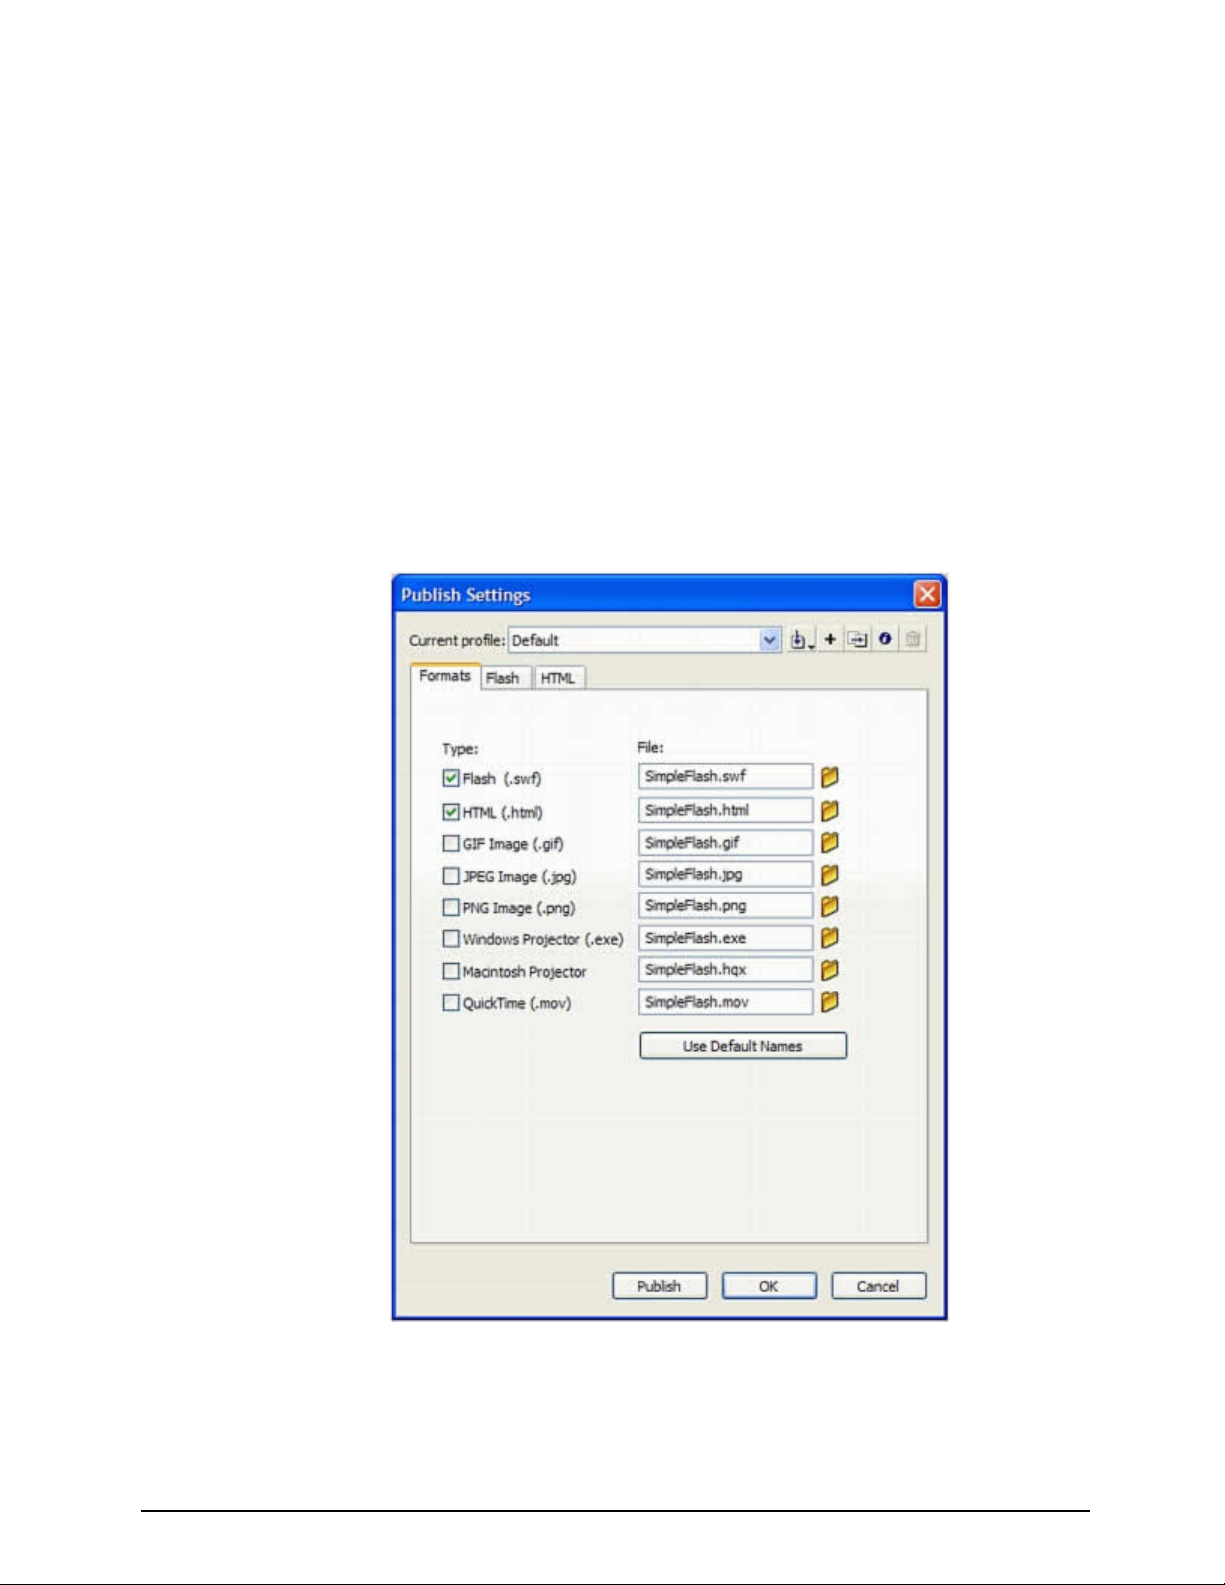
2. In the Publish Settings dialog box, select the Formats tab and verify that only the Flash and
HTML options are selected.
This action causes Flash to publish only the Flash SWF file and an HTML file. The HTML file
is used to display the SWF file in a web browser.
The Flash and HTML options on the Formats tab
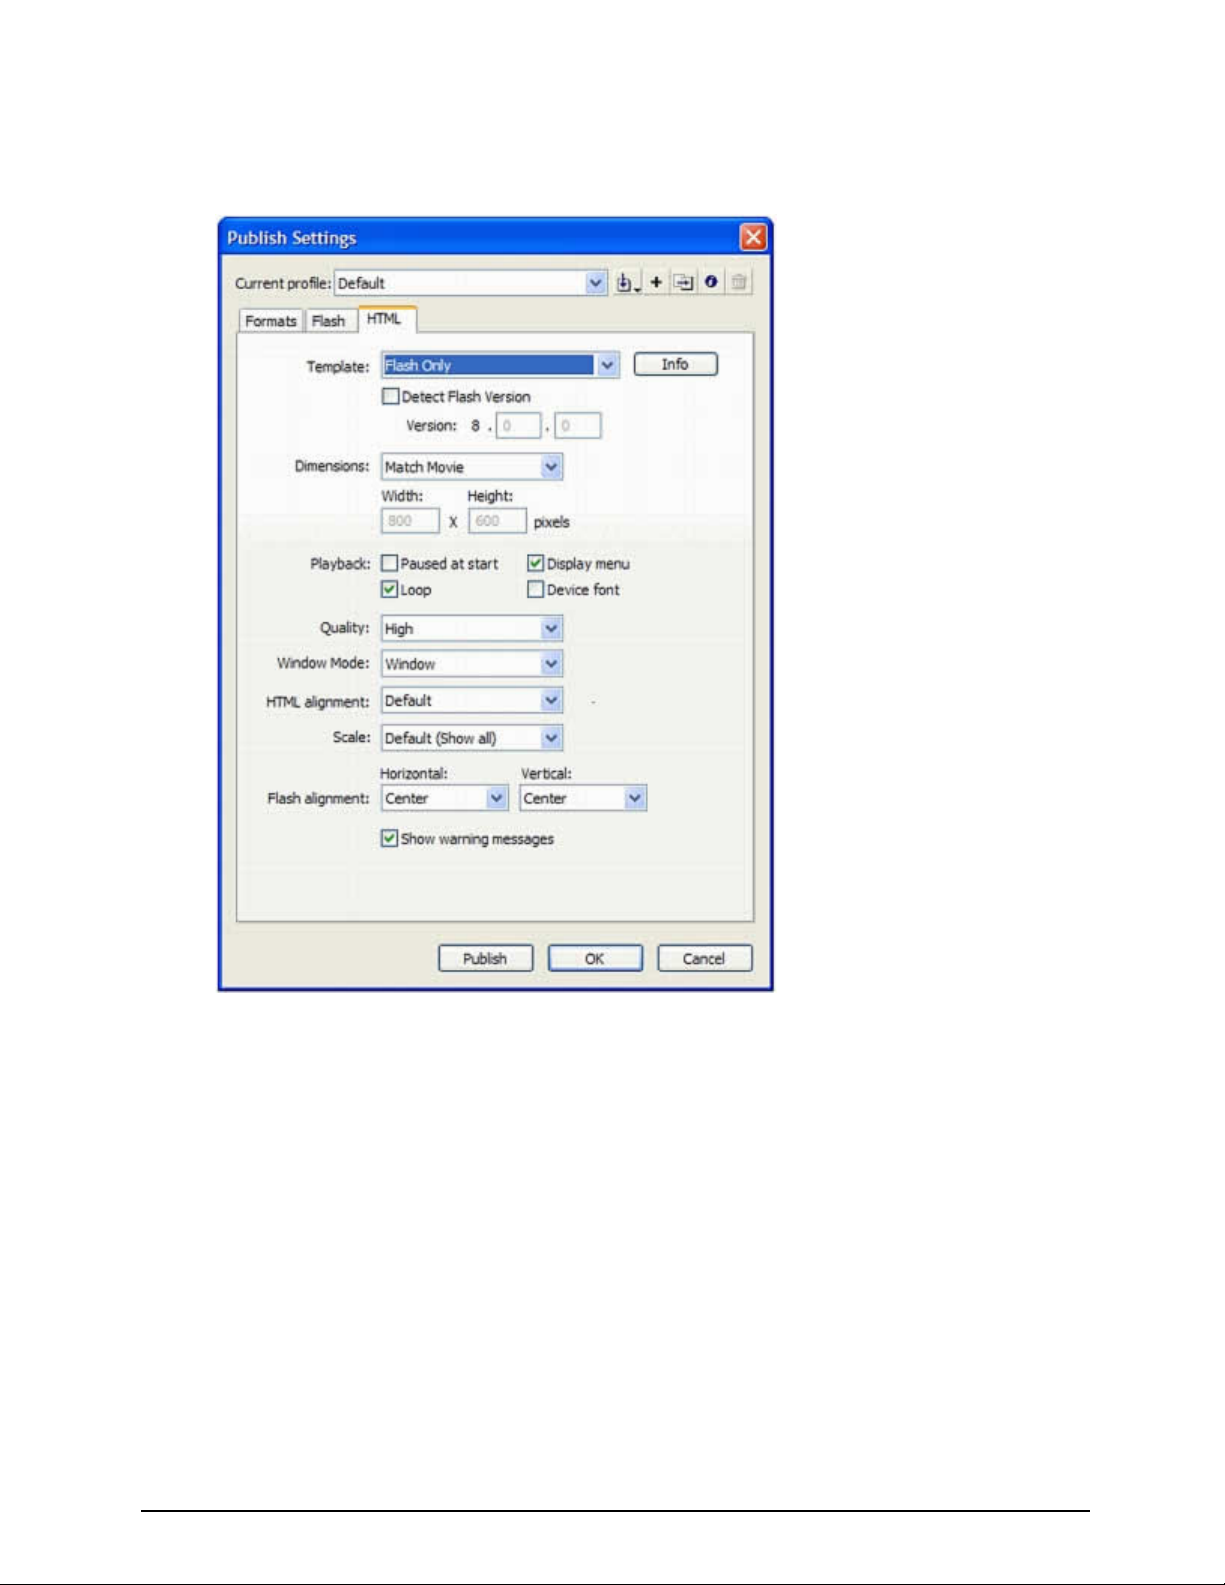
3. In the Publish Settings dialog box, select the HTML tab and verify that Flash Only is selected
in the Template pop-up menu.
14
Page 15
Macromedia MAX 2005 - Anaheim, CA What’s New In Flash 8
This template creates a simple HTML file that contains only your SWF file when displayed in
a browser window.
Choosing Flash Only from the Template menu
4. Click Detect Flash Version – Keep the value at 8.0.0.
5. Click OK.
6. Select File > Publish and open your web browser.
7. Select File > Open in the web browser.
8. Navigate to the folder where you saved your FLA file in the Unit 2 folder.
The SimpleFlash.swf and SimpleFlash.html files are there. Flash creates these files when
you click Publish.
9. Select the file named SimpleFlash.html.
10. Click Open. Your Flash document is displayed in the browser window. Congratulations! You
have now completed your first Flash document.
15
Page 16

Macromedia MAX 2005 - Anaheim, CA What’s New In Flash 8
Specifying Publish Settings with HTML and Version Detection
Let’s go back and revisit our Detect Flash Version settings, and how Flash will publish your HTML
template.
Playing Flash content in a web browser requires an HTML document that activates the SWF file and
specifies browser settings. This document is generated automatically by the Publish command, from
HTML parameters in a template document.
The template document can be any text file that contains the appropriate template variables-including a plain HTML file, one that includes code for special interpreters such as ColdFusion or a
template included with Flash.
You can customize a built-in template or manually enter HTML parameters for Flash using any
HTML editor.
HTML parameters determine where the Flash content appears in the window, the background color,
the size of the SWF file, and so on, and set attributes for the object and embed tags. You can
change these and other settings in the HTML panel of the Publish Settings dialog box. Changing
these settings overrides options you've set in the SWF file.
NOTE:
Flash Version Detection configures your document to detect the version of Flash Player that
the user has and shows the user to alternate HTML code if the user does not have the
targeted player.
Currently, Flash uses JavaScript to detect the Flash player, and to display some simple HTML
content. You will notice that the Content and Alternate file options have been eliminated from Flash
8.
For a more sophisticated experience you can download the Flash Detection Kit. This contains three
ways of detecting the Flash player:
• ActionScript Detection – ActionScript solution
• Client-Side Detection – JavaScript/VB Script solution that comes with Flash 8
• Express Detection – Installs the player directly from the Macromedia website
You can find the kit at:
http://www.macromedia.com/software/flashplayer/download/detection_kit/
16
Page 17
Macromedia MAX 2005 - Anaheim, CA What’s New In Flash 8
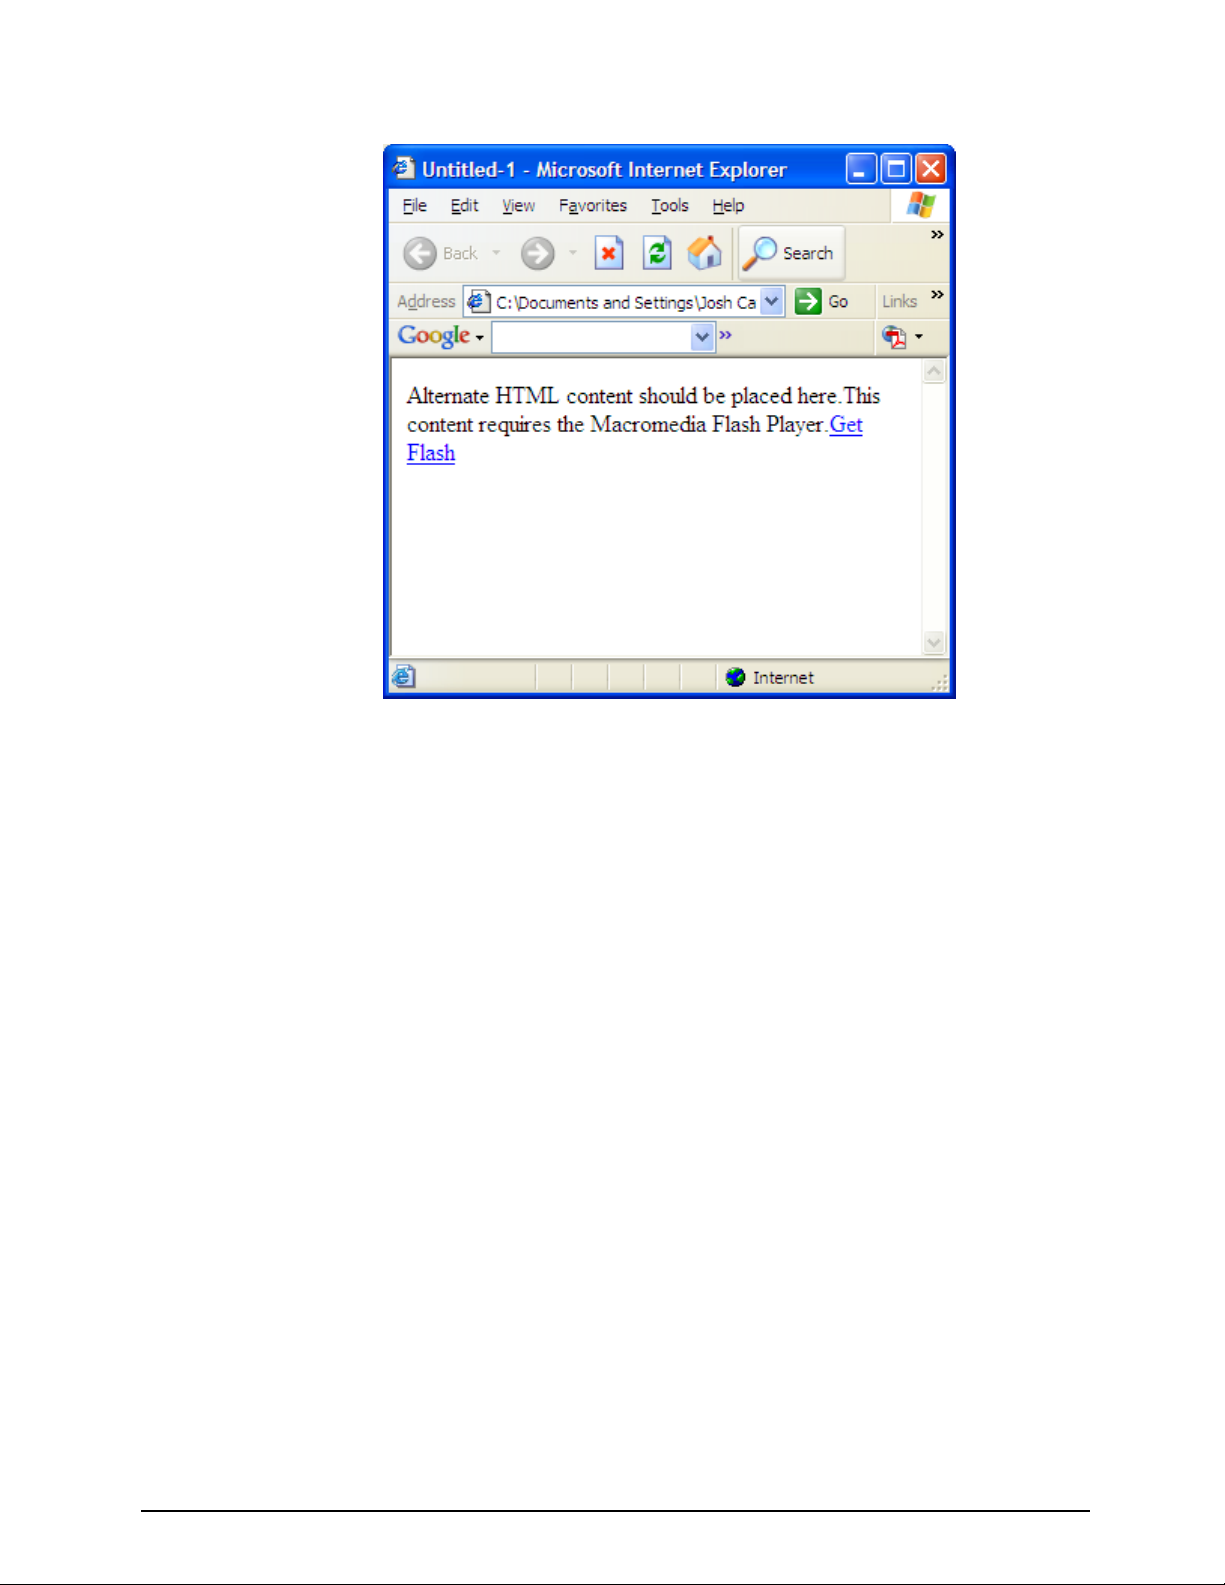
This is the window that appears if you use the JavaScript detection, and the user needs the
Flash Player.
Detection Code
Let’s take a close look at the source code that’s used in our current document.
1. In the Browser select View > Source (IE) or View > Page Source (FireFox).
2. The alternate content that will be displayed is highlighted in the source code below. You can
change this code to customize the user’s experience.
<body bgcolor="#ffffff">
<!--url's used in the movie-->
<!--text used in the movie-->
<script language="JavaScript" type="text/javascript">
<!--
var hasRightVersion = DetectFlashVer(requiredMajorVersion,
requiredMinorVersion, requiredRevision);
if(hasRightVersion) { // if we've detected an acceptable version
var oeTags = '<object classid="clsid:D27CDB6E-AE6D-11cf-96B8444553540000"'
+ 'width="550" height="400"'
+
'codebase="http://download.macromedia.com/pub/shockwave/cabs/flash/swflash.
cab">'
+ '<param name="movie" value="Untitled-2.swf" /><param name="quality"
value="high" /><param name="bgcolor" value="#ffffff" />'
+ '<embed src="Untitled-2.swf" quality="high" bgcolor="#ffffff" '
17
Page 18

Macromedia MAX 2005 - Anaheim, CA What’s New In Flash 8
+ 'width="550" height="400" name="Untitled-2" align="middle"'
+ 'play="true"'
+ 'loop="false"'
+ 'quality="high"'
+ 'allowScriptAccess="sameDomain"'
+ 'type="application/x-shockwave-flash"'
+ 'pluginspage="http://www.macromedia.com/go/getflashplayer">'
+ '<\/embed>'
+ '<\/object>';
document.write(oeTags); // embed the flash movie
} else { // flash is too old or we can't detect the plugin
var alternateContent = 'Alternate HTML content should be placed here.'
+ 'This content requires the Macromedia Flash Player.'
+ '<a href=http://www.macromedia.com/go/getflash/>Get Flash</a>';
document.write(alternateContent); // insert non-flash content
}
// -->
</script>
<noscript>
// Provide alternate content for browsers that do not support
scripting
// or for those that have scripting disabled.
Alternate HTML content should be placed here. This content requires
the Macromedia Flash Player.
<a href="http://www.macromedia.com/go/getflash/">Get Flash</a>
</noscript>
</body>
3. Since the Flash 8 player has already been installed on your machine – you will not see the
alternate content.
4. Close out of the browser and go back into Flash 8.
Document Setup for Mobile Devices
Flash Lite 1.0 and Flash Lite 1.1 are supported on a variety of mobile devices that are available in a
number of different geographic regions and markets. Some of these devices are available globally,
while others are available only in specific geographic regions or from specific mobile operators.
Some devices come with Flash Lite pre-installed from the device manufacturer or mobile operator,
while on others it can be installed after purchase.
NOTE:
For the most current list of devices that support Flash Lite, see the Supported Devices page
located at www.macromedia.com/mobile/supported_devices/.
Globally available devices that support Flash Lite include the Symbian Series 60-based devices
from Nokia, Sendo, and Seimens, and the Symbian UIQ-based devices from Sony-Ericcson. The
stand-alone player installs as a "top-level" application that a user can start from the device's
application menu (just like a text messaging application or a mobile web browser, for example).
18
Page 19

Macromedia MAX 2005 - Anaheim, CA What’s New In Flash 8
Regionally available devices that support Flash Lite comprise a larger group of devices than are
available globally. As of this writing, these devices are available primarily in Japan and come with
Flash Lite pre-installed. On these devices, Flash Lite enables several different types of content, such
as Flash screen savers or animated ring tones.
About Flash Lite Content Types
Before you start developing a Flash Lite application, you need to know the following:
• The device or devices on which the content will be running, or target devices. The Flash Lite
player is installed on a variety of devices. For a full list of devices with Flash Lite installed,
see the Supported Devices page on the Macromedia website at
www.macromedia.com/mobile/supported_devices/.
• The Flash Lite content types supported by the target devices. Each Flash Lite installation
supports one or more application modes, or content types. For example, some devices use
Flash Lite to enable Flash-based screen savers or animated ring tones. Others use Flash
Lite to render Flash content that is embedded in mobile web pages. Not all content types
support all Flash Lite features.
Each Flash Lite content type, paired with a specific device, defines a specific set of Flash Lite
features that are available to your application. For example, a Flash application that's running as a
screen saver is not typically allowed to make network connections or download data.
The Flash Lite testing features in Macromedia Flash Professional 8 let you test against multiple
devices and different Flash Lite content types. This lets you determine if your application uses
features that aren't available for the type of content that you are developing.
Flash Lite authoring features in Flash Professional 8
This section discusses the features in Flash Professional 8 designed specifically for Flash Lite
developers. With the exception of the device templates feature, the following features are only
available when your document's Version setting on the Flash tab of the Publish Setting dialog box is
set to either Flash Lite 1.0 or Flash Lite 1.1.
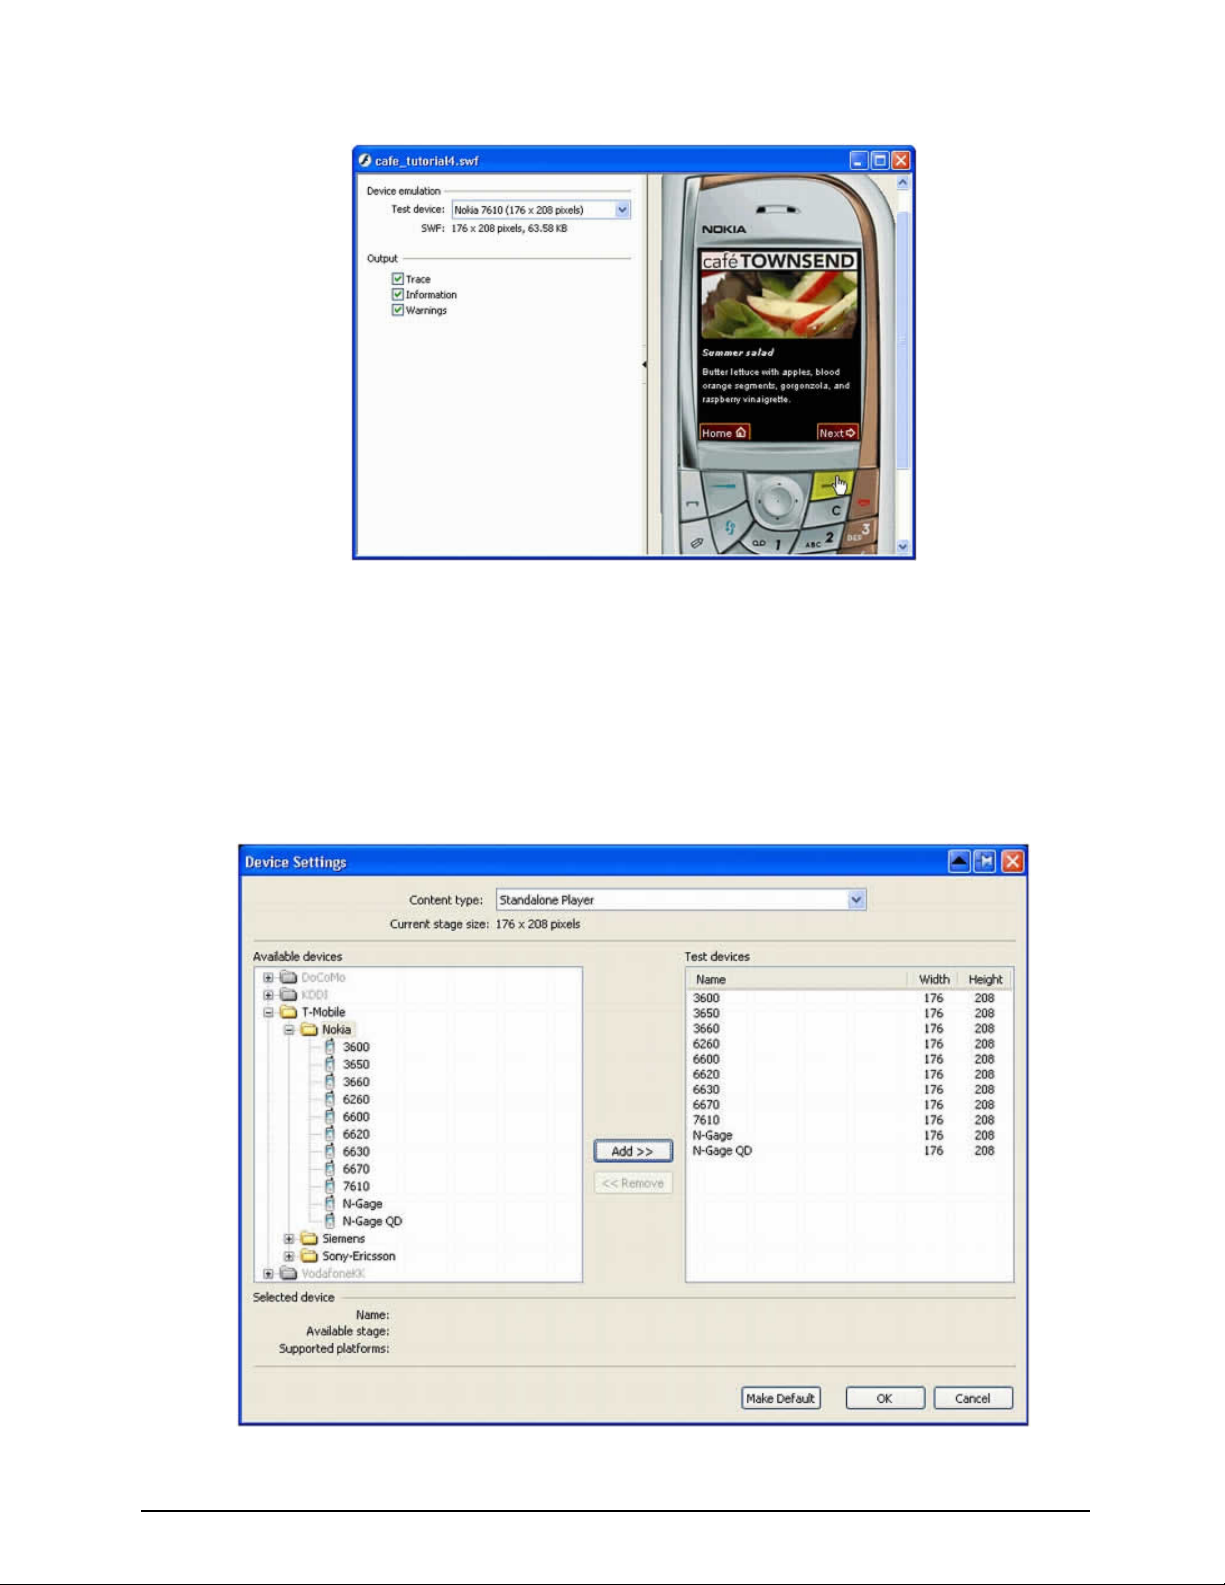
The Flash Lite emulator and test window let you test your content as it will run and appear on an
actual device. A settings pane in the Flash Lite test window lets you select a different test device,
view information about your application, and set emulator debug output options.
19
Page 20
Macromedia MAX 2005 - Anaheim, CA What’s New In Flash 8
The Flash Lite emulator and test window.
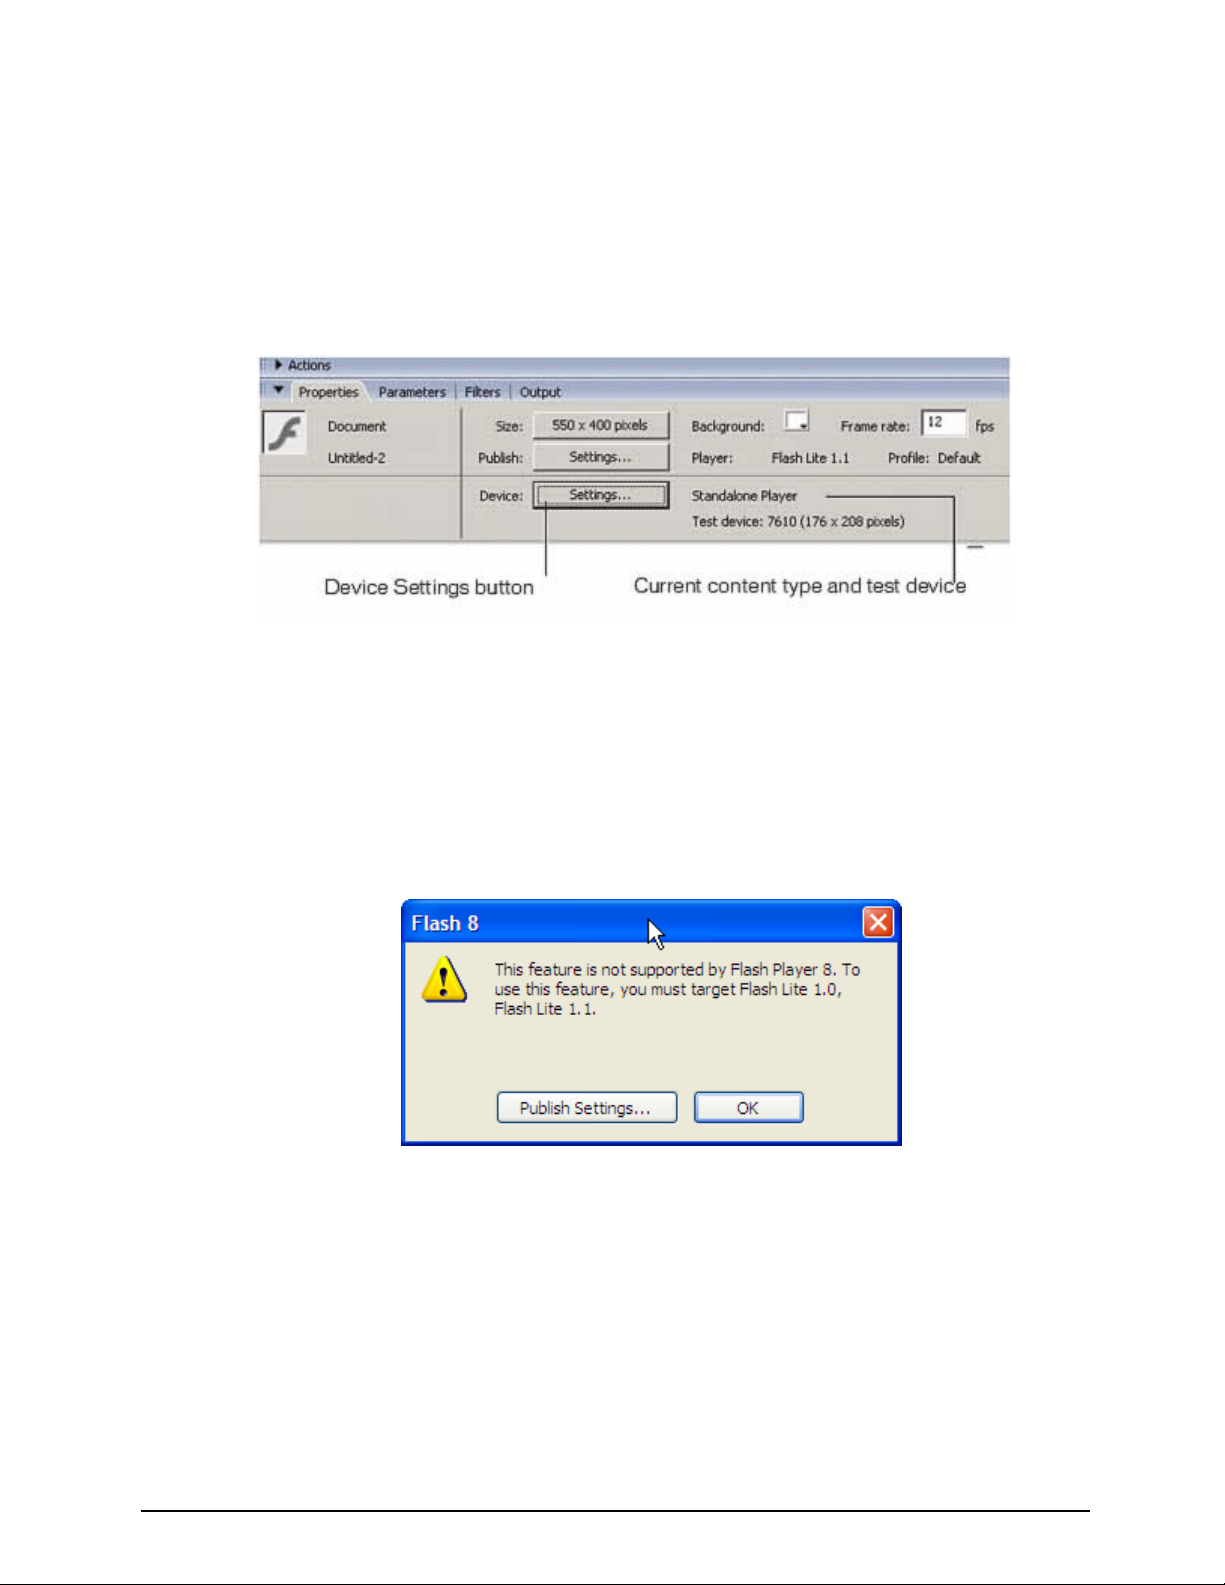
The Device Settings dialog box lets you select the test devices and Flash Lite content type that
you want to test against in the Flash Lite emulator. Different devices support different media types
(for example, different types of device sound formats) as well as different Flash Lite content types,
such as stand-alone player, screensaver, or browser. When you preview your application in the
Flash Lite test window, the emulator mimics the features available to the selected test device
running as the selected content type.
The Device Settings dialog box.
20
Page 21
Macromedia MAX 2005 - Anaheim, CA What’s New In Flash 8
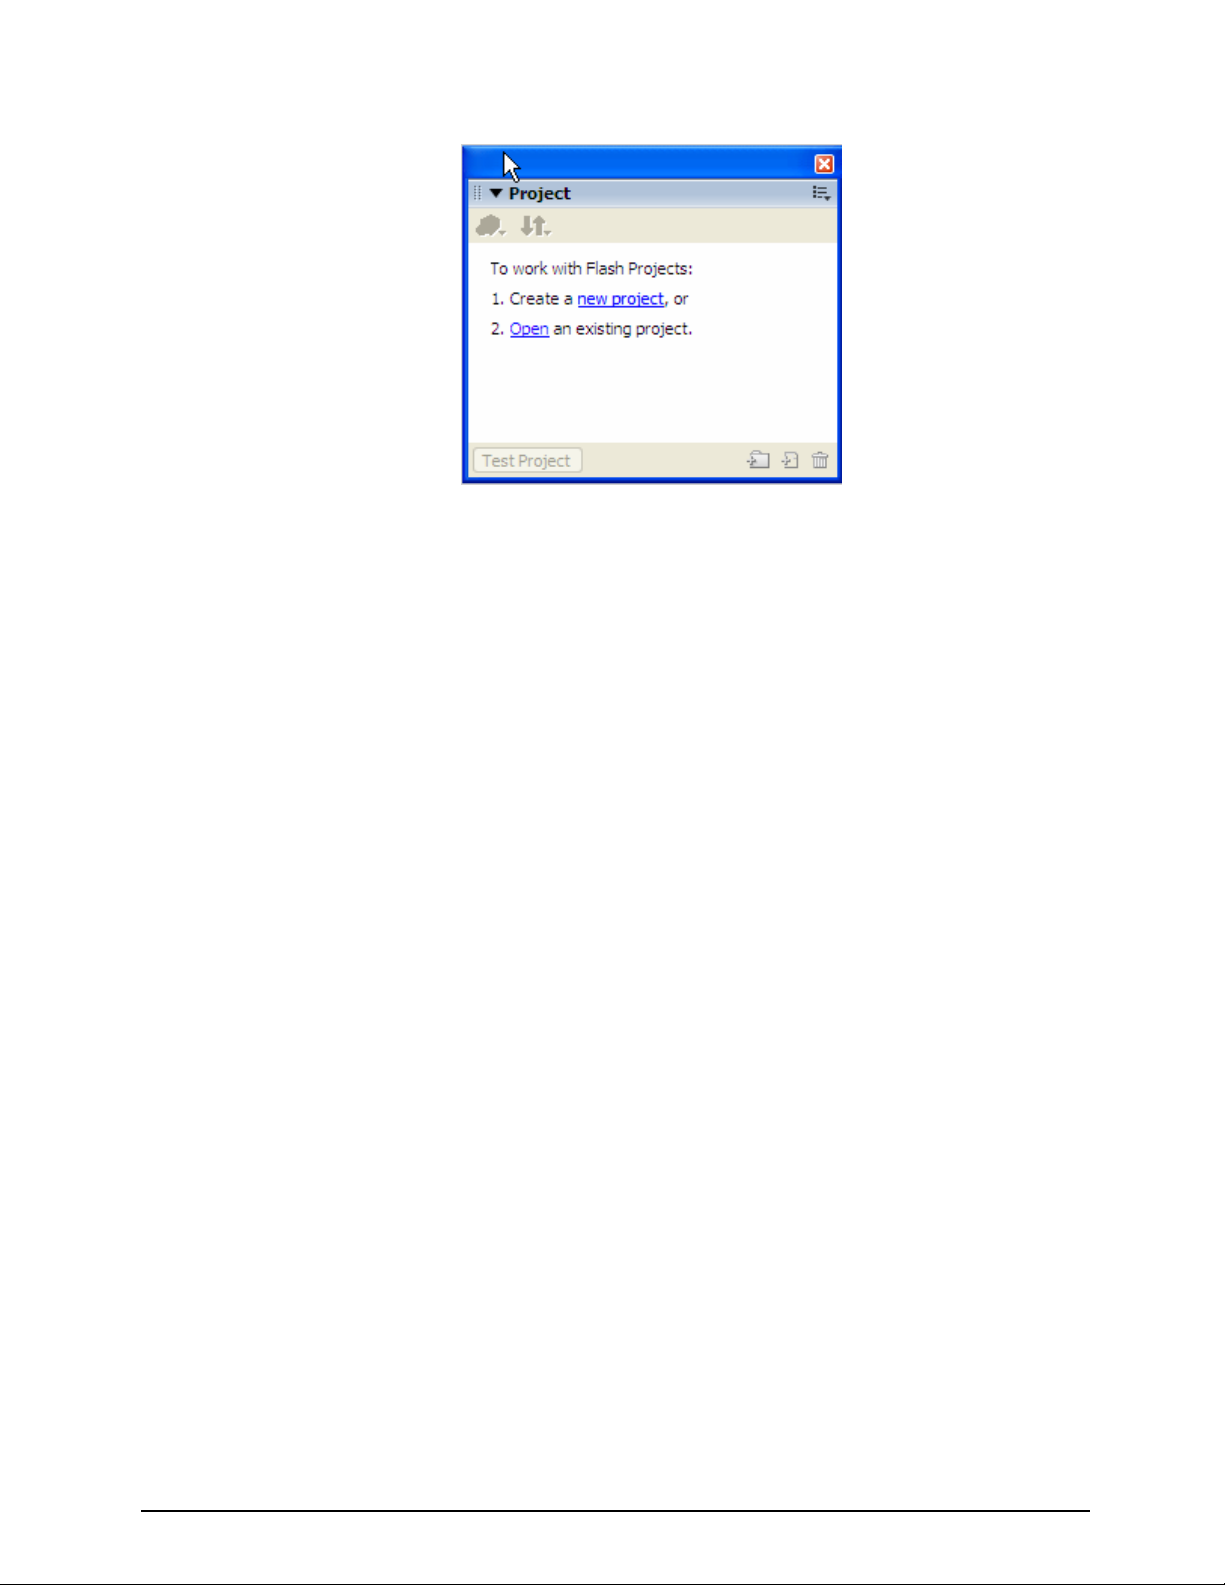
The Property inspector contains a section that provides information about your current device
settings, as well as a button that lets you open the Device Settings dialog box. This button is active
only when your document's Version setting on the Flash tab of the Publish Setting dialog box is set
to Flash Lite 1.0 or Flash Lite 1.1.
Setting the Publishing Settings for Mobile Devices
1. Make sure you have the SimpleFlash.fla file still open.
2. In the Property inspector, click the Device Settings button. Because our current Publishing
settings are set to Flash Player 8 you will see the following message:
3. Click the Publishing Settings button.
4. Select the Flash Tab.
5. Change your Flash player version to Flash Lite 1.1. Click OK. The Device setting dialog box
appears.
6. Select Browser from the Content Type pop-up menu.
7. In the list of available devices, double-click the NTT DoCoMo folder to expand it, double-click
the Panasonic folder.
21
Page 22

Macromedia MAX 2005 - Anaheim, CA What’s New In Flash 8
8. With the Panasonic folder selected, click Add to add all the Panasonic devices to your list of
test devices.
9. Test your application. Control > Test Movie. When you test your application in the emulator,
you'll be able to test your application against any of your test devices for the selected content
type.
10. Close the emulator window.
Saving and Version Control
When you save your FLA files, it is important to consider using a consistent naming scheme for your
documents. This is particularly important if you save multiple versions of a single project.
Use intuitive, easy-to-read names for your files. Do not use spaces, capitalization, or special
characters. Only use letters, numbers, dashes, and underscores. If you save multiple versions of the
same file, devise a consistent numbering system such as site_menu01.swf, site_menu02.swf, and
so on. Many designers and developers choose to use all lowercase characters in their naming
schemes. Many Flash designers and developers adopt a naming system that uses a noun-verb or
adjective-noun combination for naming files. Two examples of naming schemes are as follows:
class_planning.swf and my_project.swf. Avoid cryptic file names.
It is good practice to save new versions of a FLA file when you build an extensive project. The
following are different ways that you can save new versions of files:
Select File > Save As, and save a new version of your document.
Use version control software (such as SourceSafe, CVS, or Subversion) to control your Flash
documents.
NOTE:
SourceSafe on Windows is the only supported version control software that integrates with
the Project panel. You can use other version control software packages with FLA documents,
but not necessarily in the Project panel.
Some problems might occur if you work with only one FLA file and do not save versions during the
process of creating the file. It is possible that files might bloat in size because of the history that's
saved in the FLA file or that a file might become corrupt (as with any software you use) while you are
working on it. If any of these unfortunate events occur, you have other versions of your file to use if
you save multiple versions throughout your development.
You might also encounter problems when you create an application. Perhaps you made a series of
changes to the file and you do not want to use these changes. Or you might delete parts of the file
that you want to use later in your development. If you save multiple versions while developing, you
have an earlier version available if you need to revert.
There are several options that you can use to save a file: Save, Save As, and Save and Compact.
When you save a file, Flash does not analyze all the data before creating an optimized version of the
document. Instead, the changes you make to the document are appended to the end of the FLA
file's data, which shortens the time it takes to save the document. When you select Save As and
22
Page 23

Macromedia MAX 2005 - Anaheim, CA What’s New In Flash 8
type a new name for the file, Flash writes a new and optimized version of the file, which results in a
smaller file size. When you select Save and Compact, Flash creates a new optimized file and
deletes the original file.
Caution When Saving
When you select Save and Compact, you cannot undo any changes you made before you saved the
file. If you select Save when working with a document, you can undo changes made prior to that
save point. Because Save and Compact deletes the earlier version of the file and replaces it with the
optimized version, you cannot undo earlier changes.
Remember to use Save As frequently and to type a new file name for your document after every
milestone in your project if you are not using version control software to create backups of your FLA
file. If you encounter major problems while working on the document, you have an earlier version to
use instead of losing everything.
There are many software packages that let users use version control with their files, which enables
teams to work efficiently and reduce errors (such as overwriting files or working on old versions of a
document). Popular version control software programs include CVS, Subversion, and SourceSafe.
As with other documents, you can use these programs to organize the Flash documents outside
Flash.
Using Version Control with Projects
Version control in Flash Professional 8 lets you ensure that each author working in a project file is
always using the latest version of a file, and that multiple authors do not overwrite each other's work.
To use version-control features, you must define a site for the project. You can specify a local,
network, or FTP connection, or you can specify custom plug-ins for version control systems.
On Windows, you can use Flash projects with SourceSafe. You must have Microsoft Visual
SourceSafe Client version 6 installed.
To define a site for version control:
1. Create a new project (Window > Project) and save it as SimpleFlash.flp in the Unit 2 folder.
2. Add the SimpleFlash.fla, SimpleFlsh.swf, and SimpleFlash.html files from the Unit 2 folder.
23
Page 24
Macromedia MAX 2005 - Anaheim, CA What’s New In Flash 8
3. Select File > Edit Sites.
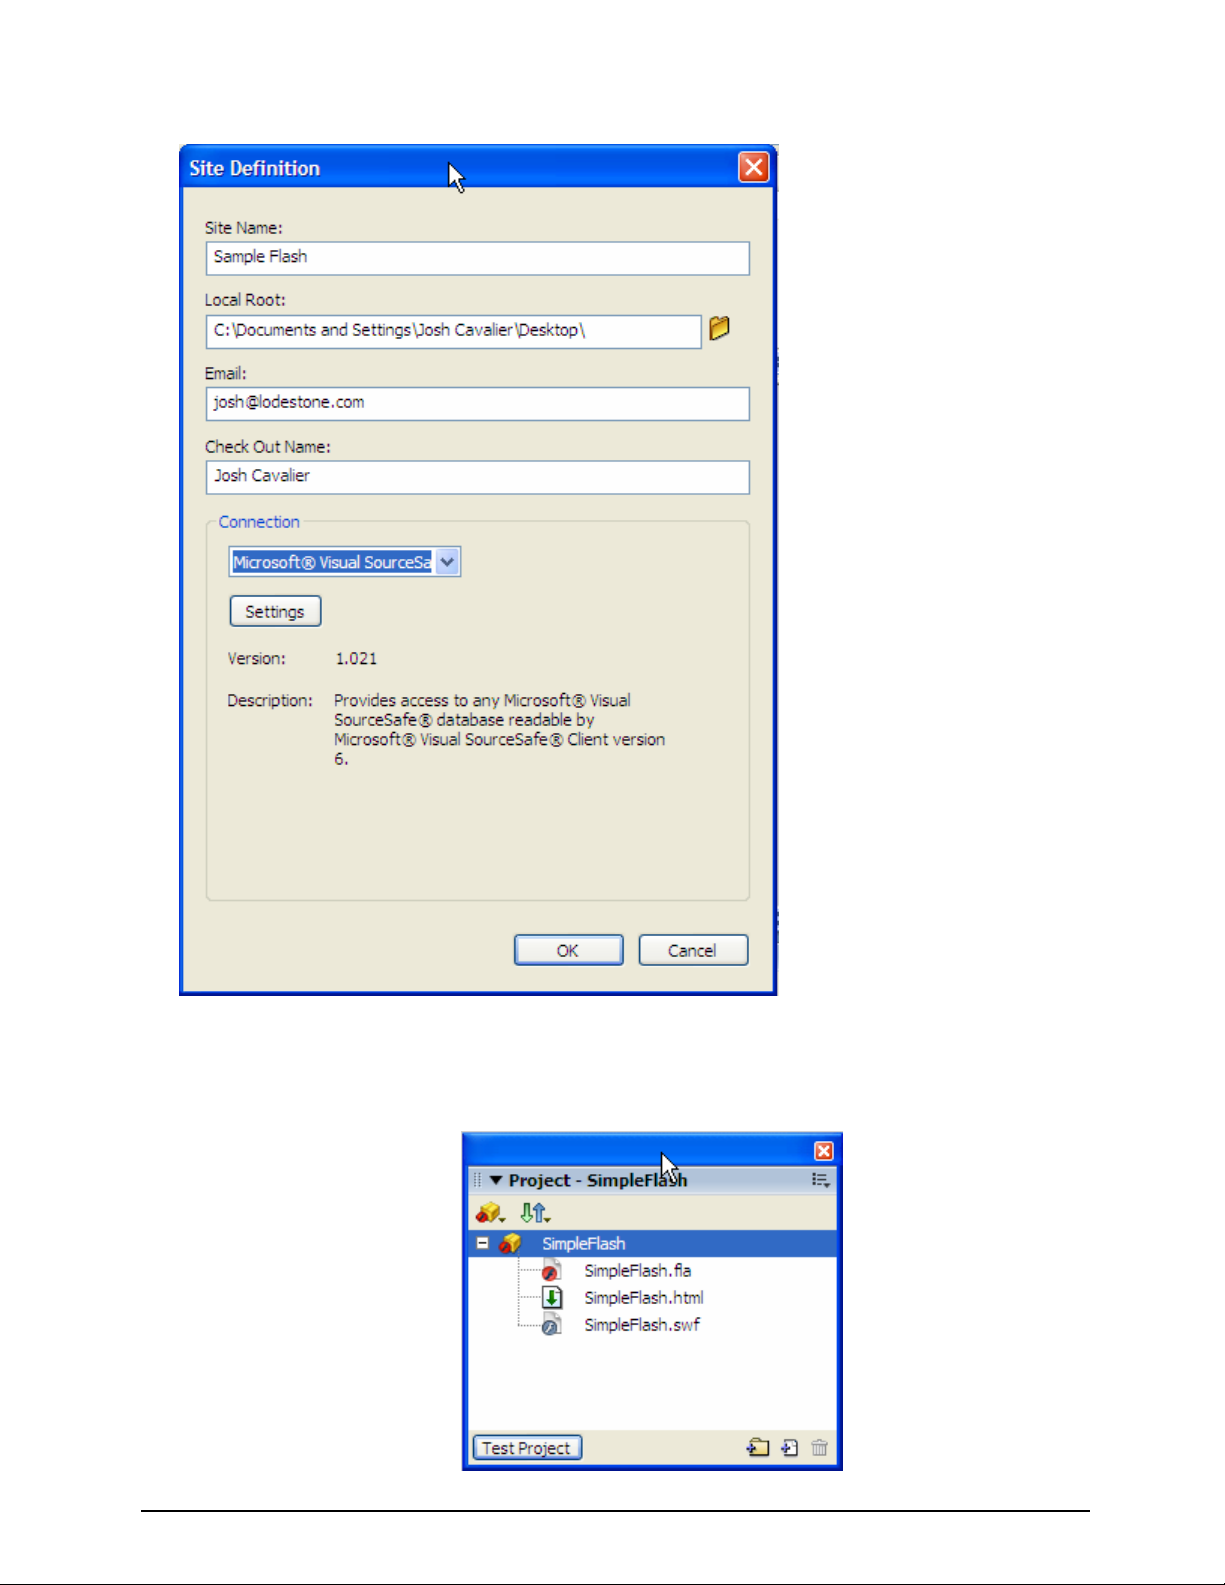
4. In the Edit Sites dialog box, click New.
5. In the Site Definition dialog box, enter the site name, the local root path, and the e-mail
address and name of the user.
6. To specify a local, network, or FTP connection, select Local/Network or FTP from the
Connection menu. Enter the location information for the Local/Network path or for the
FTP connection and skip the next step.
7. To specify a Visual SourceSafe database, select SourceSafe Database from the Connection
menu. Because we do not have VSS installed – just click OK.
NOTE:
SourceSafe database support is available for Windows only. You must have Microsoft Visual
SourceSafe Client version 6 installed.
24
Page 25
Macromedia MAX 2005 - Anaheim, CA What’s New In Flash 8
8. In the Flash Project panel (Window > Project), select Settings from the Project pop-up menu
or context menu.
25
Page 26

Macromedia MAX 2005 - Anaheim, CA What’s New In Flash 8
9. In the Project Settings dialog box, select the site definition from the Site menu in the Version
Control section. Click OK.
10. In the Project pop-up menu, select Check In. Flash checks all files in the current project
into the site.
LAB
• Create a new Flash movie
• Add a motion tween
• Set up the Publishing Setting for any Sony cell phone.
New Features Summary
• SWF file metadata You can now add metadata to Flash files so that you can search more
effectively for these files using Internet search engines, such as Google.com.
• Flash Player Detection. Currently, Flash 8 uses JavaScript to detect the Flash player, and
to display some simple HTML content. You will notice that the Content and Alternate file
options have been eliminated from Flash 8.
For a more sophisticated experience you can download the Flash Detection Kit. This
contains three ways of detecting the Flash player:
• ActionScript Detection – ActionScript solution
• Client-Side Detection – JavaScript/VB Script solution that comes with Flash 8
• Express Detection – Installs the player directly from the Macromedia website
You can find the kit at:
http://www.macromedia.com/software/flashplayer/download/detection_kit/
• The Flash Lite emulator and test window let you test your content as it will run and appear
on an actual device. A settings pane in the Flash Lite test window lets you select a different
test device, view information about your application, and set emulator debug output options.
• The Property inspector contains a section that provides information about your current
device settings, as well as a button that lets you open the Device Settings dialog box. This
button is active only when your document's Version setting on the Flash tab of the Publish
Setting dialog box is set to Flash Lite 1.0 or Flash Lite 1.1.
26
Page 27

Macromedia MAX 2005 - Anaheim, CA What’s New In Flash 8
Unit 3:
Interface Improvements
Unit Objectives:
After this unit, you will be able to:
y Describe the new interface features in Flash 8
y Use the new Property Inspector
y Work with the Expanded Stage Area
y Customize the Flash Toolbar
y Use the new Preferences panel
y Use the new Library Panel and Tabbed Panels
Unit Topics:
y Working with the Property Inspector
y Viewing the Expanded Stage Area
y Customizing the Flash Toolbar
y Modifying the Property Inspector
y Changing Preferences
y Using the Flash 8 Library Panel
y Using Tabbed Panels
27
Page 28
Macromedia MAX 2005 - Anaheim, CA What’s New In Flash 8
Working with the Property Inspector
The Property inspector simplifies document creation by making it easy to access the most commonly
used attributes of the current selection, either on the Stage or in the Timeline. You can make
changes to the object or document attributes in the Property inspector without accessing the menus
or panels that also control these attributes.
Depending on what is currently selected, the Property inspector displays information and settings for
the current document, text, symbol, shape, bitmap, video, group, frame, or tool. When two or more
different types of objects are selected, the Property inspector displays the total number of objects
selected.
Open a Sample File and View the Property Inspector:
1. In Flash, select File > Open.
2. Use one of the following paths to browse to the completed file:
o In Windows, browse to Unit_3\ AnimationandGradients\ double-click
animation_and_gradients.fla.
Test the movie. Control > Test Movie. You can see some of the blends and easing
animation techniques that we will learn later.
3. After viewing the application, close the Flash Player window.
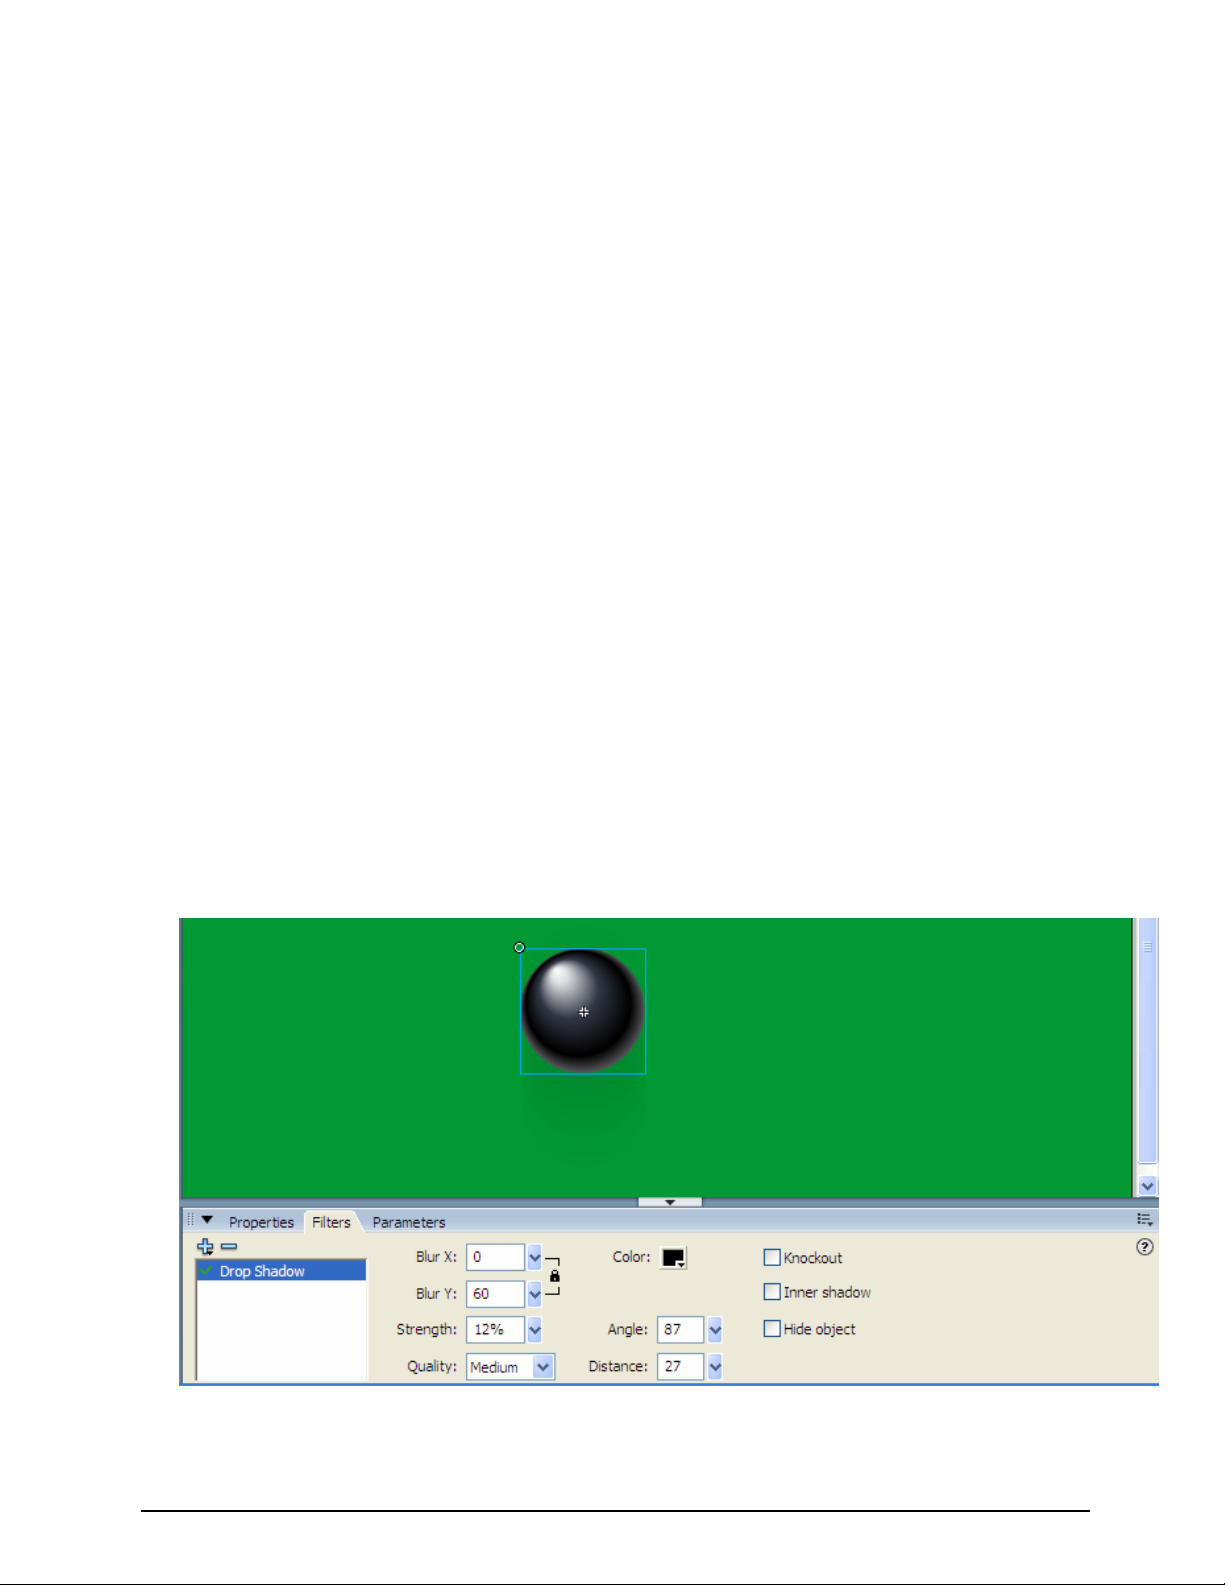
4. Click on the black ball on the Stage area. This is the 8ball movie clip
5. At the bottom of the Flash 8 interface locate the Property Inspector:
The Property inspector showing the properties for the MovieClip – 8ball.
28
Page 29

Macromedia MAX 2005 - Anaheim, CA What’s New In Flash 8
6. Notice the new Filter Tab in the Property Inspector.
7. Have some fun, and modify the drop shadow settings.
We will learn more about Filter settings later on. Let’s take a look at another new feature.
Viewing the Expanded Stage Area
Expanded Stage Work Area
You can use the area around the Stage to store graphics and other objects without having them
appear on the Stage when you play the SWF file. Macromedia expanded this area, called the work
area, to allow you to store more items there. Flash users often use the work area to store graphics
they plan to animate on the Stage later, or to store objects that do not have a graphical
representation during playback, such as data components.
Animating item of the stage is easier than ever.
NOTE:
The only time the Stage will expand is when an object goes beyond the 2880 pixel limitation.
Viewing the Expanded Stage Area:
1. In Flash, select View > Work Area.
2. Using the Zoom Out tool
area.
3. With the Selection tool
grey workspace limit area.
4. Notice how the workspace now expands!
, Zoom out al the way so you can see the entire grey work
, click on the 8ball movie clip and drag it outside of the current
Move the 8ball movie clip outside of the current limit area.
29
Page 30
Macromedia MAX 2005 - Anaheim, CA What’s New In Flash 8
Customizing the Flash Tools Panel
You can customize the Tools panel to specify which tools appear in the authoring environment. You
use the Customize Tools panel dialog box to add or remove tools from the Tools panel.
You can display more than one tool in one location. When more than one tool is displayed in a
location, the top tool in the group (the most recently used) is displayed with an arrow in the lowerright corner of its icon. When you press and hold the mouse button on the icon, the other tools in the
group appear in a pop-up menu. You can then select a tool from the menu.
To customize the Tools panel:
1. To display the Customize Tools panel dialog box, do one of the following:
o (Windows) Select Edit > Customize Tools panel.
o (Macintosh) Select Flash > Customize Tools panel.
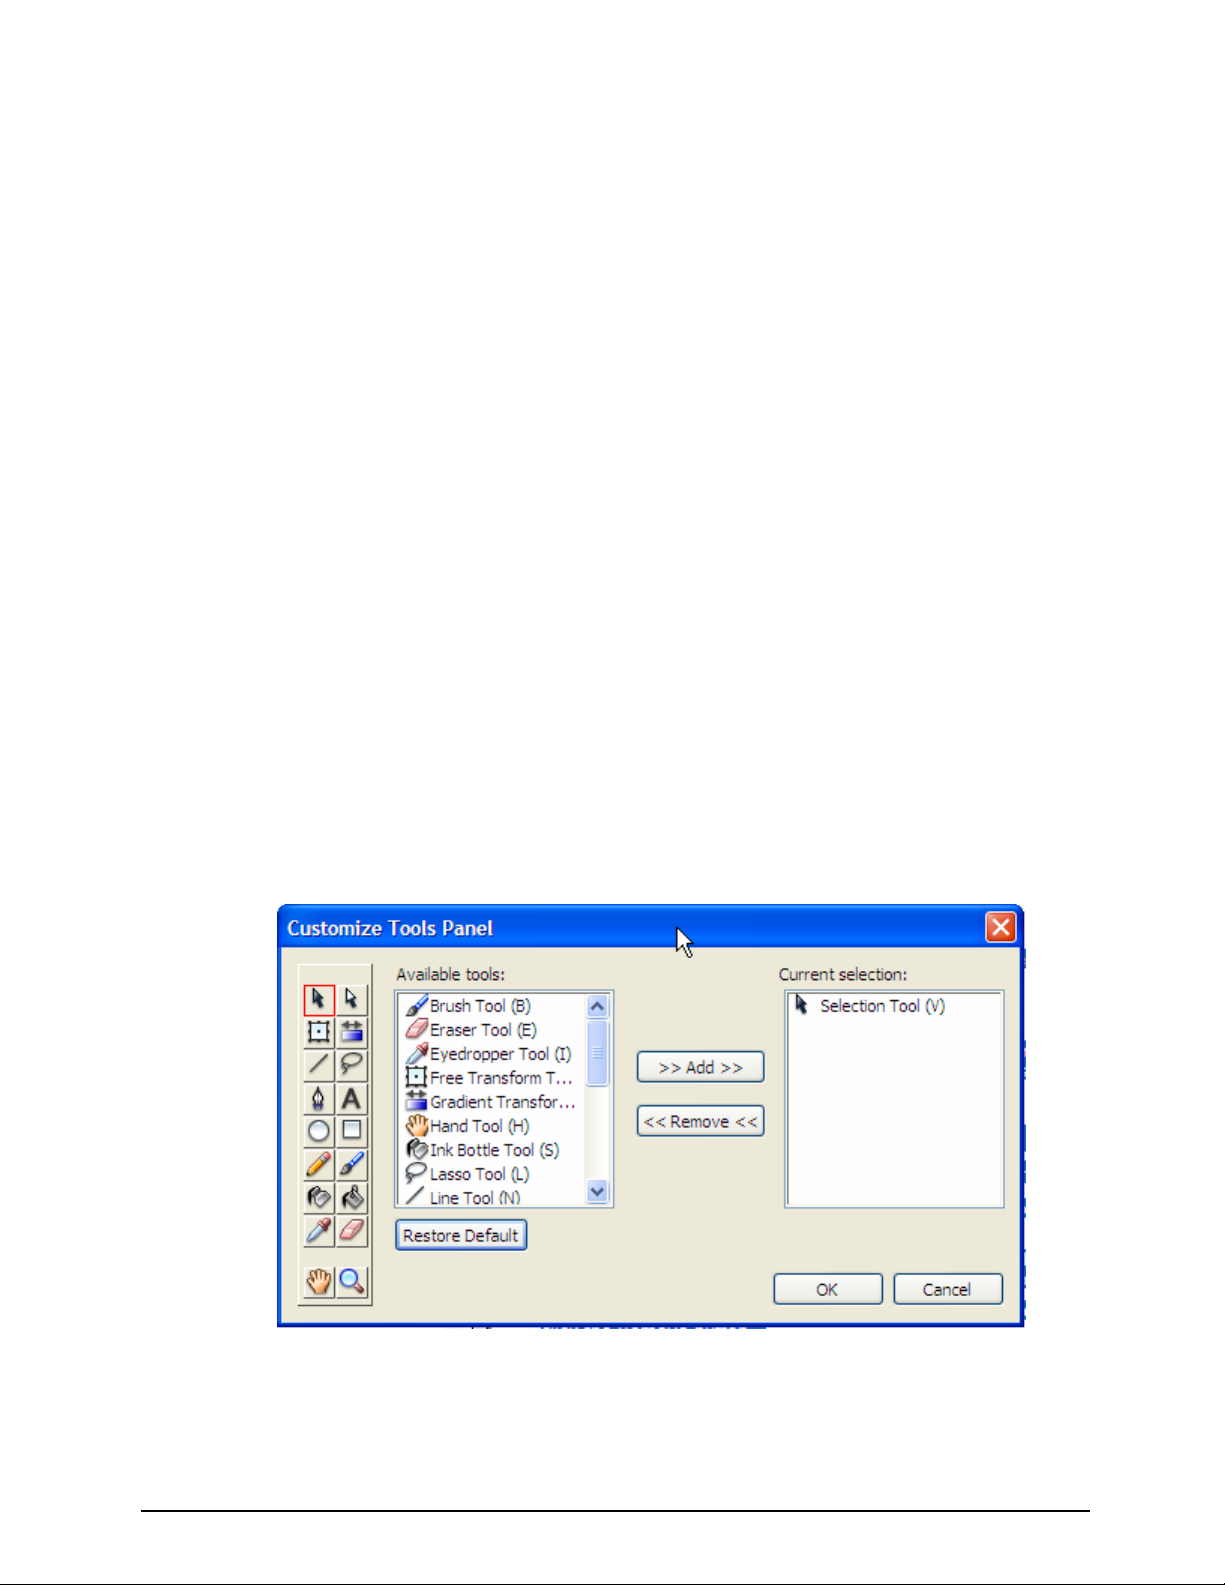
The Available Tools menu indicates the tools that are currently available in the Flash. The
Current Selection menu indicates the tool (or tools) currently assigned to the selected
location in the Tools panel.
NOTE:
If more than one tool is assigned to one location in the Tools panel, a small arrow
appears in the lower-right corner of the tool. This arrow indicates that additional tools
are present in a pop-up menu. The same keyboard shortcut functions for all tools in
the pop-up menu.
2. Click a tool in the Tools panel image or use the arrows to cycle through the tools to specify
the location to which you want to assign another tool.
3. To add a tool to the selected location, select the tool in the Available Tools list and click the
Add button. It is possible to assign a tool to more than one location.
4. To remove a tool from the selected location, select the tool in the Current Selection scroll list
and click the Remove button.
30
Page 31

Macromedia MAX 2005 - Anaheim, CA What’s New In Flash 8
5. Click OK to apply your changes and close the Customize Tools panel dialog box.
6. Notice now that when you have added tools, they appear as a drop down menu selection.
Here the Rectangle and PolyStar tool were added to the Oval Tool.
• Try to make a few more changes to the toolbar. You can even try the example above.
To restore the default Tools panel layout:
• Click Restore Default in the Customize Tools panel dialog box.
31
Page 32

Macromedia MAX 2005 - Anaheim, CA What’s New In Flash 8
Changing Preferences
Improved Preferences dialog box
Macromedia streamlined the design of the Preferences dialog box and reorganized it for improved
clarity and ease of use.
Flash lets you set preferences for general application operations, editing operations, and Clipboard
operations.
The General category in the Preferences dialog box
To set preferences:
1. Select Edit > Preferences (Windows) or Flash > Preferences (Macintosh).
2. In the Category list, select the one of the following:
o General
o ActionScript
o Auto Format
o Clipboard
o Drawing
o Text
o Warning
32
Page 33

Macromedia MAX 2005 - Anaheim, CA What’s New In Flash 8
3. Select from the respective options to view the new way the panel is set up.
4. In the General section, under Project: choose the Save files on test or publish project
checkbox.
Using the Flash 8 Library Panel
The Library panel is where you store and organize symbols created in Flash, as well as imported
files, including bitmap graphics, sound files, and video clips. The Library panel lets you organize
library items in folders, see how often an item is used in a document, and sort items by type.
The Library panel showing a movie clip symbol
To display the Library panel, do one of the following:
Select Window > Library.
Press Control+L (Windows) or Command+L (Macintosh).
Managing media assets with the library
The library in a Flash document stores media assets that you create or import for use in a Flash
document. The library stores imported files such as video clips, sound clips, bitmaps, and imported
vector artwork as well as symbols. A symbol is a graphic, button, or movie clip that you create once
and can reuse multiple times. You can also create a font symbol. For information on symbols, see
Using Symbols, Instances, and Library Assets and Creating font symbols.
The library also contains components that you have added to your document. Components appear
in the library as compiled clips. For more information, see Components in the Library panel in Using
Components.
33
Page 34

Macromedia MAX 2005 - Anaheim, CA What’s New In Flash 8
The Library panel displays a scroll list with the names of all items in the library, which lets you view
and organize these elements as you work. An icon next to an item's name in the Library panel
indicates the item's file type. The Library panel has an options menu with commands for managing
library items.
You can open the library of any Flash document while you are working in Flash, to make the library
items from that file available for the current document.
You can create permanent libraries in your Flash application that is available whenever you start
Flash. Flash also includes several sample libraries containing buttons, graphics, movie clips, and
sounds that you can add to your Flash documents. The sample Flash libraries and permanent
libraries that you create are listed in the Window > Common Libraries submenu. For more
information, see Working with common libraries.
You can export library assets as a SWF file to a URL to create a runtime-shared library. This lets
you link to the library assets from Flash documents that import symbols using runtime sharing. For
more information, see Using shared library assets.
Single Library panel
You can now use a single Library panel to view the library items of multiple Flash files
simultaneously. You can switch back and forth as you edit multiple files.
View the Single Library Function:
1. Select File > New, and make a blank Flash Docment.
2. Save the file as Test.fla in the Unit 3 folder.
34
Page 35

Macromedia MAX 2005 - Anaheim, CA What’s New In Flash 8
The new Library Panel in Flash 8.
3. Click the drop down menu in the Library panel to toggle between the Libraries.
4. Copy and Paste a symbol into the Test.fla Library. In the animation_and_gradients.fla
Library select the 8ball movie clip.
5. In Windows, Right click and select Copy.
6. Switch to the Test.fla Library and Right click again to Paste the symbol.
35
Page 36

Macromedia MAX 2005 - Anaheim, CA What’s New In Flash 8
The 8ball movie clip has been copied to Test.fla. Notice it’s associated Graphic symbols came
along for the ride!
To Pin the Library Panel:
1. Switch back to the animation_and_gradients.fla Library using the drop down menu.
2. Click the Pin button
on the Library Panel.
3. Switch between your files by clicking on the file name tab.
36
Page 37

Macromedia MAX 2005 - Anaheim, CA What’s New In Flash 8
Switch between files to see how the Library stays pinned
4. Notice how the same Library stays open.
5. Deselect the Pin, and switch between files. Notice how the Library Panel changes.
To resize the Library panel, do any of the following:
1. Drag the lower right corner of the panel.
2. Click the Wide State
3. Click the Narrow State
4. To change the width of columns:
5. Position the pointer between column headers and drag to resize.
NOTE: You cannot change the order of columns.
button to enlarge the Library panel so it shows all the columns.
button to reduce the width of the Library panel.
Using Tabbed Panels
Improved Panel Management
Group panels together and navigate between panels with tabs, like other graphic applications. This
is a old throwback that is a worthwhile addition to the Flash 8 environment.
To display multiple panels in a single panel window:
1. Click a panel's pop-up menu.
2. Select the Group Panel Name With option.
3. Select another panel to add the current panel to from the submenu.
The first panel is added as a tab to the second panel.
37
Page 38

Macromedia MAX 2005 - Anaheim, CA What’s New In Flash 8
A tabbed panel showing the Library and Movie Explorer panels
Additional Interface Items
Drag and Drop Components to Library Panel
If you want to add a component to your Library, you can just drag it in the Library. There’s no need
to place one on the stage until you need it.
Macintosh document tabs
You can now open multiple Flash files in the same Flash application window and choose among
them by using the document tabs at the top of the window.
Export Keyboard Shortcuts as HTML
You can select keyboard shortcuts in Flash to match the shortcuts you use in other
applications, or to streamline your Flash workflow. By default, Flash uses built-in keyboard
shortcuts designed for the Flash application. You can also select a built-in keyboard
shortcut set from one of several popular graphics applications, including Macromedia
Fireworks, Adobe Illustrator, and Adobe Photoshop.
To create a custom keyboard shortcut set, you duplicate an existing set, and then add or
remove shortcuts from the new set. You can also delete custom shortcut sets.
To view or print the current set of keyboard shortcuts:
1. Select Edit > Keyboard Shortcuts.
2. In the Keyboard Shortcuts dialog box, select the shortcut set you wish to view from
the Current pop-up menu.
3. Click the Export Set as HTML button.
38
Page 39

Macromedia MAX 2005 - Anaheim, CA What’s New In Flash 8
The Export Set as HTML button
4. In the Save As dialog box that appears, select a name and location for the exported
HTML file. The default file name is the name of the selected shortcut set.
5. Click Save.
6. Find the exported file in the folder you selected and open the file in a web browser.
7. To print the file, use the browser's Print command.
Lab
No lab for this unit. Let’s move on to Drawing!
New Features Summary
• Working with the Property Inspector – There is a new Filter Tab and other goodies.
• Viewing the Expanded Stage Area – Place objects as far out as you want!
• Customizing the Flash Toolbar – Modify your tools.
• Changing Preferences – New format, easier to read.
• Using the Flash 8 Library Panel – One Panel for all your files!
• Using Tabbed Panels – Organize for easier panel access.
39
Page 40

Macromedia MAX 2005 - Anaheim, CA What’s New In Flash 8
40
Page 41

Macromedia MAX 2005 - Anaheim, CA What’s New In Flash 8
Unit 4:
Drawing Improvements
Unit Objectives:
After this unit, you will be able to:
y Understand and use the new Object drawing model
y Use the Gradient Tool
y Create new Gradients with ActionScript
y Use the new Shape tool Features
y Use the Free-Transform Tool
y Use Enhance Strokes
Unit Topics:
y The Object Drawing Model
y Using Gradients in Flash 8
y Building an 8-Ball with Gradients
y New Drawing Features in Flash 8
41
Page 42

Macromedia MAX 2005 - Anaheim, CA What’s New In Flash 8
Object Drawing Model
Previously in Flash, all shapes in the same layer on the Stage could affect the outlines of other
overlapping shapes. You can now create shapes directly on the Stage that do not interfere with
other shapes on the Stage. When you create a shape with the new Object Drawing model, the
shape does not cause changes to other shapes that exist underneath the new shape.
Flash provides two drawing models that give you a great deal of flexibility when drawing shapes:
Merge Drawing model automatically merges shapes that you draw when you overlap them.
If you select a shape that has been merged with another, and move it, the shape below it is
permanently altered. For example, if you draw a square and overlay a circle on top of it, and
then select the circle and move it, the portion of the square that overlaid the circle is
removed.
Object Drawing model lets you draw shapes as separate objects that do not automatically
merge together when overlaid. This lets you overlap shapes without altering their
appearance should you choose to move them apart, or rearrange their appearance. Flash
creates each shape as a separate object that you can individually manipulate. In previous
versions of Flash, to overlap shapes without having their appearance altered, you had to
draw each shape on its own layer.
When you select a shape created using the Object Drawing model, Flash surrounds the shape with
a rectangular bounding box. You can use the Pointer tool to move the object by clicking the
bounding box and dragging the shape anywhere you'd like to position it on the Stage.
42
Page 43

Macromedia MAX 2005 - Anaheim, CA What’s New In Flash 8
NOTE:
You can set preferences for contact sensitivity when selecting shapes created using the
Object Drawing model.
The new object drawing mode has to be enabled when using a drawing tool by pressing the "J" key
or by pressing the "Object Drawing button" next to the magnet in the Tools panel.
Use the Object Drawing Model
1. Create a new Flash Document. File > New. Choose Flash Document.
2. Save the file as Objects.fla in the Unit 4 folder.
3. Draw any shapes that you want on top of each other.
4. Pull the shapes apart by using the Selection tool. Notice how the artwork is still destructive
5. Click on the Object Drawing button.
6. Draw a few more shapes on top of each other.
7. Try pulling them apart. They are now all seen as grouped objects!
43
Page 44

Macromedia MAX 2005 - Anaheim, CA What’s New In Flash 8
Object-Level Undo Mode
You can now choose to keep track of the changes you make in Flash on a per-object basis. When
you use this mode, each object on the Stage and in the library has its own undo list. This allows you
to undo the changes you make to an object without having to undo changes to any other object.
Using the Undo, Redo, and Repeat menu commands
The Edit > Undo and Edit > Redo commands let you undo and redo steps as you work on Flash
documents. The name of the command switches between Undo and Redo, depending on the action
that was last performed.
Flash lets you specify either object-level or document-level Undo and Redo commands. This lets
you undo or redo actions on individual objects, or all objects within the current document. The
default behavior is document-level Undo and Redo.
You cannot undo the following actions when using object-level Undo:
• Enter Edit mode
• Exit edit mode
• Select unused library items
• Select library items
• Add library items
• Delete library items
• Duplicate library item
• Modify library item
• Modify library symbol behavior
• Rename library items
• Move library items
• Edit library items
• Import to library
• Create font symbols
• Create library folders
• Expand all library folders
• Create video stream symbols
• Convert to compiled clip
• JSFL library edits
• Modify bitmap symbol properties
• Modify sound symbol properties
• Modify library item linkage
• Convert to symbol
• Create new symbol
• Run JSFL command
• Run JSFL file
• Modify movie properties
• Import
• Create scene
44
Page 45

Macromedia MAX 2005 - Anaheim, CA What’s New In Flash 8
• Delete scene
• Duplicate scene
• Rename scene
• Move scene
To remove deleted items from a document after using the Undo command, you use the Save and
Compact command. See Saving documents when you undo steps.
You can use the Repeat command to reapply a step to the same object or to a different object. For
example, if you move a shape named shape_A, you can select Edit > Repeat to move the shape
again, or you can select another shape, shape_B, and select Edit > Repeat to move the second
shape by the same amount.
By default, Flash supports 100 levels of undo for the Undo menu command. You can select the
number of undo and redo levels, from 2 to 9999, in Flash Preferences.
Set Up Your Undo Editing Preference
1. Select Edit > Preferences. General Category.
2. Click the Undo Dropdown and change it to Object Level Undo.
3. You will see the following dialog box:
45
Page 46

Macromedia MAX 2005 - Anaheim, CA What’s New In Flash 8
4. Click OK.
Transforming gradient and bitmap fills
You can transform a gradient or bitmap fill by adjusting the size, direction, or center of the fill. To
transform a gradient or bitmap fill, you use the Gradient Transform tool. One of the new features of
Flash 8 is adjusting the Focal Point of a gradient.
To adjust a gradient or bitmap fill with the Gradient Transform tool:
1. Create a new Flash Document (File > New), and draw a shape with a radial gradient fill.
Select the Gradient Transform tool.
2. Click an area filled with a gradient or bitmap fill. A bounding box with editing handles is
displayed. When the pointer is over any one of these handles, it changes to indicate the
function of the handle.
Center point Select and move the center point handle to change the center point of the
gradient. The rollover icon for the center point handle is a four-way arrow.
Focal point Select the focal point handle to change the focal point of a radial gradient. The
focal point handle is displayed only when you select a radial gradient; the rollover icon for the
focal point handle is an inverted triangle.
Size Click and move the middle handle icon on the edge of the bounding box to adjust the
size of the gradient. The rollover icon for the size handle is a circle with an arrow inside of it.
Rotation Click and move the bottom handle on the edge of the bounding box to adjust the
rotation of the gradient. The rollover icon for the rotation handle is four arrows in the shape of
a circle.
Width Click and move the square handle to adjust the width of the gradient. The rollover icon
for the width handle is a double-ended arrow.
46
Page 47

Macromedia MAX 2005 - Anaheim, CA What’s New In Flash 8
Press Shift to constrain the direction of a linear gradient fill to multiples of 45°.
Reshape the gradient or fill in any of the following ways:
To reposition the center point of the gradient or bitmap fill, drag the center point.
To change the width of the gradient or bitmap fill, drag the square handle on the side of
the bounding box. (This option resizes only the fill, not the object containing the fill.)
To change the height of the gradient or bitmap fill, drag the square handle at the bottom
of the bounding box.
47
Page 48

Macromedia MAX 2005 - Anaheim, CA What’s New In Flash 8
To rotate the gradient or bitmap fill, drag the circular rotation handle at the corner. You
can also drag the lowest handle on the bounding circle of a circular gradient or fill.
To scale a linear gradient or a fill, drag the square handle at the center of the bounding
box.
To change the focal point of a circular gradient, drag the middle circular handle on the
bounding circle.
To skew or slant a fill within a shape, drag one of the circular handles on the top or right
side of the bounding box.
To tile a bitmap inside a shape, scale the fill
.
48
Page 49

Macromedia MAX 2005 - Anaheim, CA What’s New In Flash 8
New Gradient Color Options
The Color Mixer provides options for changing the color of strokes and fills, as well as creating
multicolor gradients. You can use gradients to produce a wide range of effects, such as giving an
illusion of depth to a two-dimensional object. For example, you can use a gradient to transform a
simple, two-dimensional circle into a sphere, with the illusion of light illuminating the surface at one
angle and casting a shadow to the opposite side of the sphere.
The Color Mixer with the gradient controls displayed.
The Color Mixer has the following options:
Stroke color changes the color of the stroke, or the border, of a graphic object.
Fill Color changes the color of the fill. The fill is the area of color that fills up the shape.
Type pop-up menu changes the fill style:
• None removes the fill.
• Solid provides a solid, single fill color.
• Linear produces a gradient that blends on a linear path.
• Radial produces a gradient that blends outward in a circular path from a central focal point.
• Bitmap lets you tile the selected fill area with a bitmap image that you can select. When you
choose Bitmap, a dialog box lets you select a bitmap image on your local computer, and add
it to the library. You can apply this bitmap as a fill; the appearance is something similar to a
mosaic tile pattern with the image repeated within the shape.
RGB let you change the density of the red, blue, and green (RGB) colors in a fill.
Alpha sets the opacity for a solid fill, or the currently selected slider for a gradient fill. An alpha value
of 0% creates an invisible (or transparent) fill; an alpha value of 100% creates an opaque fill.
49
Page 50

Macromedia MAX 2005 - Anaheim, CA What’s New In Flash 8
Current Color Swatch displays the currently selected color. If you select a gradient fill type (Linear
or Radial) from the fill Type pop-up menu, the Current Color Swatch displays the color transitions
within the gradient you create.
Color Picker lets you select a color visually. Click the Color Picker and drag the cross-hair pointer
around until you find the color you want.
Hexadecimal value displays the current color's hexadecimal value. To change the color using the
hexadecimal value, type in a new value. Hexadecimal color values (also called hex values) are 6digit alphanumeric combinations that represent a color.
Brand New in Flash 8
Now you can apply up to 16 colors!
Overflow lets you control colors applied past the limits of a linear or radial gradient. The overflow
modes are extend (the default mode), reflect, and repeat.
• Extend applies the colors you specify past the end of the gradient.
• Reflect causes the gradient colors to fill the shape using a reflective mirroring effect. The
gradients you specify are repeated in a pattern of from the beginning of the gradient to the
end, and then repeated in the opposite sequence from the end of the gradient to the
beginning, and then back to the beginning of the gradient to the end until the selected shape
is filled.
• Repeat repeats the gradient from the beginning of the gradient to the end until the selected
shape is filled.
Linear RGB creates an SVG-compliant (Scalable Vector Graphics) linear or radial gradient.
50
Page 51

Macromedia MAX 2005 - Anaheim, CA What’s New In Flash 8
Building the 8-Ball with Gradients
As you examine the finished version of an application you'll create, you will also look at the Flash
workspace.
In this section, you will complete the following tasks:
• Open the authoring document
• Review the completed FLA file
• Close the completed FLA file
Open the authoring document
It's helpful to analyze the completed authoring document, which is a FLA file, to see how the author
designed the illustration and understand what you are going to create.
On most computers, you will find the Gradients tutorial folder in the following locations:
• In Windows: Unit_4 folder/Gradients/gradients_finish.fla
Double-click the file to open it in Flash. You now see the completed tutorial file in the Flash authoring
environment.
Review the completed FLA file
In the completed FLA file, you will see the combined effects of several gradients. The illustration
looks like this:
51
Page 52

Macromedia MAX 2005 - Anaheim, CA What’s New In Flash 8
There are five gradients in the illustration:
• A gradient from black to green on the background.
• A gradient from black to green to black on the bottom of the eight ball.
• Another from white to black in the highlight on the top of the eight ball.
• A subtle gradient on the white circle surrounding the number "8."
• A radial gradient in the shadow beneath the eight ball.
Close the completed FLA file
Open the starter document
Now that you have seen the completed file, it is time to create your own Flash document. To get
started, you'll open a starter file that contains a few graphics to which you will apply gradients.
1. In Flash, select File > Open.
2. Navigate to the following directory:
o In Windows: Unit_4 folder/Gradients/gradients_start.fla
3. Open the gradients_start.fla file.
Apply a linear gradient
In this section you will add a linear gradient to the background.
1. Click the Selection tool in the Tools panel.
2. Select the gray box in the layer named Background.
3. Select Window > Color Mixer to display the Color Mixer panel.
4. In the Color Mixer's Type pop-up menu, select Linear.
5. Double-click the right gradient color swatch and select the color green (#006600).
52
Page 53

Macromedia MAX 2005 - Anaheim, CA What’s New In Flash 8
Selecting the right gradient color swatch in the Color Mixer
Selecting the color green #006600 in the Color Picker
6. Double-click the left gradient color swatch and select the color black (#000000).
7. Select the Gradient Transform tool from the Tools panel. The Gradient Transform controls
appear on the Stage around the gradient.
The Gradient Transform tool
8. Drag the Gradient Rotate handle to rotate the linear gradient clockwise as shown.
The Gradient Rotate handle
53
Page 54

Macromedia MAX 2005 - Anaheim, CA What’s New In Flash 8
Rotating the gradient clockwise
9. Lock the Background layer in the Timeline to prevent further changes to this layer.
10. Select File > Save to save your FLA file.
Create a Radial Gradient
Next, you will add a radial gradient to the black eight ball.
1. Double-click the black circle in the layer called Ball. This opens the group containing the
eight-ball shape.
2. Select the black circle shape. You will apply a gradient to this shape. Do not select the
number "8" on the eight ball.
3. In the Color Mixer panel select Radial from the Type pop-up menu. Select Mirror Overflow
mode from the Overflow pop-up menu.
The correct Radial Type and Mirror Overflow settings
4. Double-click the left gradient color swatch and select the color black (#000000).
5. Double-click the right gradient color swatch and type 002200 into the color text box. Press
Enter.
54
Page 55

Macromedia MAX 2005 - Anaheim, CA What’s New In Flash 8
6. Drag the left gradient color swatch to the right about three-fourths of the way as shown in the
following illustration. This makes the green part of the gradient appear only in the outer 25%
of the ball shape.
Dragging a gradient color swatch
7. Select the Zoom tool from the Tools panel and click the circle shape to magnify it.
8. Select the Gradient Transform tool in the Tools panel.
9. Rotate the radial gradient 90º clockwise by dragging the Gradient Rotate handle.
Dragging to rotate the gradient 90º clockwise.
10. Select the Focal Point control and drag it near the top of the circle.
Dragging the Focal Point control toward the top of the circle shape
55
Page 56

Macromedia MAX 2005 - Anaheim, CA What’s New In Flash 8
11. Select the center control point and drag the entire gradient upward a short distance as shown
in the following illustration. The mirrored overflow gradient is at the bottom of the circle.
Dragging the center control point upwards
12. Select the Selection tool in the Tools panel.
13. Double-click the Zoom tool to return the Stage area to a view of 100%.
14. Double-click the Stage area to deselect the eight-ball group.
15. Select File > Save to save your FLA file.
Create a Transform Gradient with a Shape
In this section, you will create a gradient and then use the Free Transform tool to change its shape.
1. Select the Shadow layer in the Timeline.
2. Select the Oval tool in the Tools panel.
3. Hold down Shift and then drag on the Stage with the Oval tool to draw a circle approximately
150 pixels square. This should be about the same diameter as the eight ball.
4. In the Color Mixer's Type menu, select Radial.
5. Move the left gradient color swatch all the way to the left. You should have one swatch all the
way to the left and one all the way to the right.
6. Double-click the left swatch and select the color black (#000000) in the Color Picker.
7. Double-click the right swatch to display the Color Picker.
8. Select the color black (#000000).
9. In the Color Picker, drag the Alpha slider down to zero. This creates a gradient from black to
transparent, allowing the green background to show through the edge of the circle you just
drew.
10. Select the Gradient Transform tool from the Tools panel and drag the Focal Point control of
the gradient back to the center of the circle.
56
Page 57

Macromedia MAX 2005 - Anaheim, CA What’s New In Flash 8
11. Select the Free Transform tool and scale the circle along the y (vertical) axis by dragging
the top-center handle downward as shown in the following illustration.
The gradient is transformed along with the shape transformation.
12. Select the Selection tool from the Tools panel.
13. Drag the shadow shape under the eight ball with the Selection tool.
14. Click outside the Stage to deselect the shadow.
15. Select File > Save to save your FLA file.
Apply the Finishing Touches
To complete the illustration, you will apply two more linear gradients: one to the white circle on the
eight ball and one to make a highlight on the top of the eight ball.
Apply a gradient to the white circle on the eight ball
Next you will add a gradient to the white circle on the eight ball graphic.
1. Select the Selection tool from the Tools panel.
2. Double-click the eight ball group to edit the group.
3. Double-click the white circle group.
4. Select the white circle shape.
5. In the Color Mixer panel, assign the white circle shape a linear gradient by selecting Linear
from the Type menu.
6. Select Nonrepeating from the Overflow menu.
7. Drag the left gradient color swatch all the way to the left and double-click it.
8. Select the color white (#FFFFFF) from the Color Picker.
9. Set the Alpha value for the white color swatch to 100%.
10. Drag the right color swatch all the way to the right and double-click it.
57
Page 58

Macromedia MAX 2005 - Anaheim, CA What’s New In Flash 8
11. Select the color black (#000000) from the Color Picker.
12. Set the Alpha value for the black color swatch to 100%.
Your gradient settings should match those in the following illustration:
The Color Mixer with the correct settings for the gradient on the white circle
13. Select the Gradient Transform tool from the Tools panel.
14. Drag the Gradient Rotate handle approximately 120º clockwise.
The gradient rotated 120º
15. Select the Selection tool in the Tools panel.
16. Double-click the Stage twice to exit the white circle group and the eight-ball group.
17. Select File > Save to save your FLA file.
Apply a linear gradient to the highlight
In this section you will apply a linear gradient.
1. Click the red X icon in the layer named Highlight to reveal the shape in that layer. The shape
appears at the top of the eight ball.
2. With the Selection tool, double-click the highlight shape to edit its group.
3. Select the highlight shape.
4. In the Color Mixer, select Linear from the Type menu.
58
Page 59

Macromedia MAX 2005 - Anaheim, CA What’s New In Flash 8
5. Select Non-repeating from the Overflow menu.
6. Drag the left gradient color swatch all the way to the left and double-click it.
7. Select the color white (#FFFFFF) from the Color Picker.
8. Set the Alpha value for the left swatch to 0%.
9. Drag the right gradient color swatch all the way to the right and double-click it.
10. Select the color white from the Color Picker.
11. Set the Alpha value for the right swatch to 75%.
Your gradient settings should match those in the following illustration:
The Color Mixer with the correct settings for the gradient on the highlight shape
12. With the highlight shape still selected, select the Gradient Transform tool from the Tools
panel.
13. Drag the Gradient Rotate control 90º counterclockwise.
14. Drag the Gradient Scale control downward until it touches the top of the highlight shape.
The Gradient Scale control
Dragging the Gradient Scale control downward to touch the highlight shape
15. Select the Selection tool from the Tools panel.
59
Page 60

Macromedia MAX 2005 - Anaheim, CA What’s New In Flash 8
16. Double-click outside the Stage twice to deselect the highlight group.
The finished Flash illustration looks like this:
17. Select File > Save to save your FLA file.
To close the document, select File > Close.
60
Page 61

Macromedia MAX 2005 - Anaheim, CA What’s New In Flash 8
Using Complex Gradient Fills with ActionScript
The Flash Drawing API supports gradient fills as well as solid fills. The following procedure creates a
new movie clip on the Stage, use the Drawing API to create a square, and then fills the square with
a radial red and blue gradient.
To create a complex gradient:
1. Create a new Flash document and save it as radialgradient.fla in the Unit 4 folder.
2. Add the following ActionScript to Frame 1 of the Timeline:
this.createEmptyMovieClip("gradient_mc", 10);
var fillType:String = "radial";
var colors:Array = [0xFF0000, 0x0000FF];
var alphas:Array = [100, 100];
var ratios:Array = [0, 0xFF];
var matrix:Object = {a:200, b:0, c:0, d:0, e:200, f:0, g:200,
h:200, i:1};
var spreadMethod:String = "reflect";
var interpolationMethod:String = "linearRGB";
var focalPointRatio:Number = 0.9;
with (gradient_mc) {
beginGradientFill(fillType, colors, alphas, ratios, matrix,
spreadMethod, interpolationMethod, focalPointRatio);
moveTo(100, 100);
lineTo(100, 300);
lineTo(300, 300);
lineTo(300, 100);
lineTo(100, 100);
endFill();
}
The preceding ActionScript code uses the Drawing API to create a square on the Stage and
calls the beginGradientFill() method to fill the square with a red and blue circular gradient.
3. Save the Flash document and select Control > Test Movie to view the Flash file.
61
Page 62

Macromedia MAX 2005 - Anaheim, CA What’s New In Flash 8
Using Script Assist with Gradients
Script Assist mode
A new assisted mode in the Actions panel allows you to create scripts without detailed knowledge of
ActionScript.
For users who are new to ActionScript, or for those who want to add simple interactivity without
having to learn the ActionScript language and its syntax, you can opt to use Script Assist to help you
more easily add ActionScript to your Flash documents.
NOTE:
Script Assist is intended to help you format your scripts in such a way as to avoid the syntax
and logic errors a novice user might encounter when writing ActionScript. However, to use
Script Assist you must become familiar with ActionScript, and know what methods, functions,
and variables to use when creating your scripts.
62
Page 63

Macromedia MAX 2005 - Anaheim, CA What’s New In Flash 8
Using Script Assist to view ActionScript
To add an action to a Flash document, you must attach it to a button or movie clip, or to a frame in
the Timeline. The Actions panel lets you select, drag and drop, rearrange, and delete actions.
1. To write ActionScript using Script Assist:
1. Select Window > Actions.
2. The Actions panel appears.
3. Click the Script Assist button.
4. The Actions panel enters Script Assist mode.
NOTE:
If the Actions panel contains ActionScript code when you click the Script Assist button, Flash
compiles the existing code. If there are errors in the code, you will not be able to use Script
Assist until you fix the current code selection.
5. Click on each line of code. Notice how Script Assist gives you the details.
Script Assist giving specific information on each line of code.
When Script Assist in enabled, the Actions panel user interface and behaviors change in the
following ways:
• The Add (+) button functions differently in Script Assist mode. When the focus is on the
ActionScript window, it adds the selection after the currently selected text block. If the focus
is in the edit pane, the selection is added to that text block.
63
Page 64

Macromedia MAX 2005 - Anaheim, CA What’s New In Flash 8
• The Remove (-) button lets you remove the current selection in the scrolling text area.
• The Up and Down Arrow buttons let you move the current selection in the scrolling text
area forward or backward within the code.
• The Check Syntax, Auto Format, Show Code Hint, and Debug Options buttons and
menu items normally visible in the Actions panel are disabled, as they do not apply to Script
Assist mode.
• The Insert Target button is disabled unless you are editing a field. Clicking Insert Target
places the resulting code in the current edit field.
• To view a description of an action, do one of the following:
• Click a category in the Actions toolbox to display the actions in that category, and click an
action.
• Select a line of code in the Script pane.
• The description appears at the upper left of the Actions panel, beginning with the Property or
Event name.
Change the Values of the Gradient using Script Assist
1. Click on the following line of code:
var colors:Array = [0xFF0000, 0x0000FF];
1. Change the first color value to 0xFFCC66. Don’t delete the brackets!
2. Test your movie. Control > Test Movie.
64
Page 65

Macromedia MAX 2005 - Anaheim, CA What’s New In Flash 8
You gradient color changes.
65
Page 66

Macromedia MAX 2005 - Anaheim, CA What’s New In Flash 8
New Drawing Items In Flash 8
Transforming objects freely
You can use the Free Transform tool to freely transform objects, groups, instances, or text blocks.
You can perform individual transformations or combine several transformations, such as moving,
rotating, scaling, skewing, and distortion.
To transform freely:
1. Select a graphic object, group, instance, or text block on the Stage. No Movie clips!
2.
Click the Free Transform tool.
Moving the pointer over and around the selection changes the pointer to indicate which
transformation function is available.
3. Drag the handles to transform the selection, as follows:
o To move the selection, position the pointer over the object within the bounding box,
and drag the object to a new position. Do not drag the transformation point.
o To set the center of rotation or scaling, drag the transformation point to a new
location.
o To rotate the selection, position the pointer just outside a corner handle and drag.
The selection rotates around the transformation point.
Shift-drag to rotate in 45˚ increments.
Alt-drag (Windows) or Option-drag (Macintosh) to rotate around the opposite corner.
o To scale the selection, drag a corner handle diagonally to scale in two dimensions.
To scale in the respective direction only, drag a corner handle or a side handle
horizontally or vertically.
Shift-drag to resize proportionally.
o To skew the selection, position the pointer on the outline between the
transformation handles and drag.
o To distort shapes, press Control (Windows) or Command (Macintosh) and drag a
corner handle or a side handle.
o Shift-Control-click to drag (Windows) or Shift-Command-click to drag (Macintosh) a
corner handle to taper the object--to move the selected corner and the adjoining
corner equal distances from their origins.
NOTE:
The Free Transform tool cannot transform symbols, bitmaps, video objects, sounds,
gradients, or text. If a multiple selection contains any of these, only the shape objects
are distorted. To transform a text block, first convert the characters to shape objects.
66
Page 67
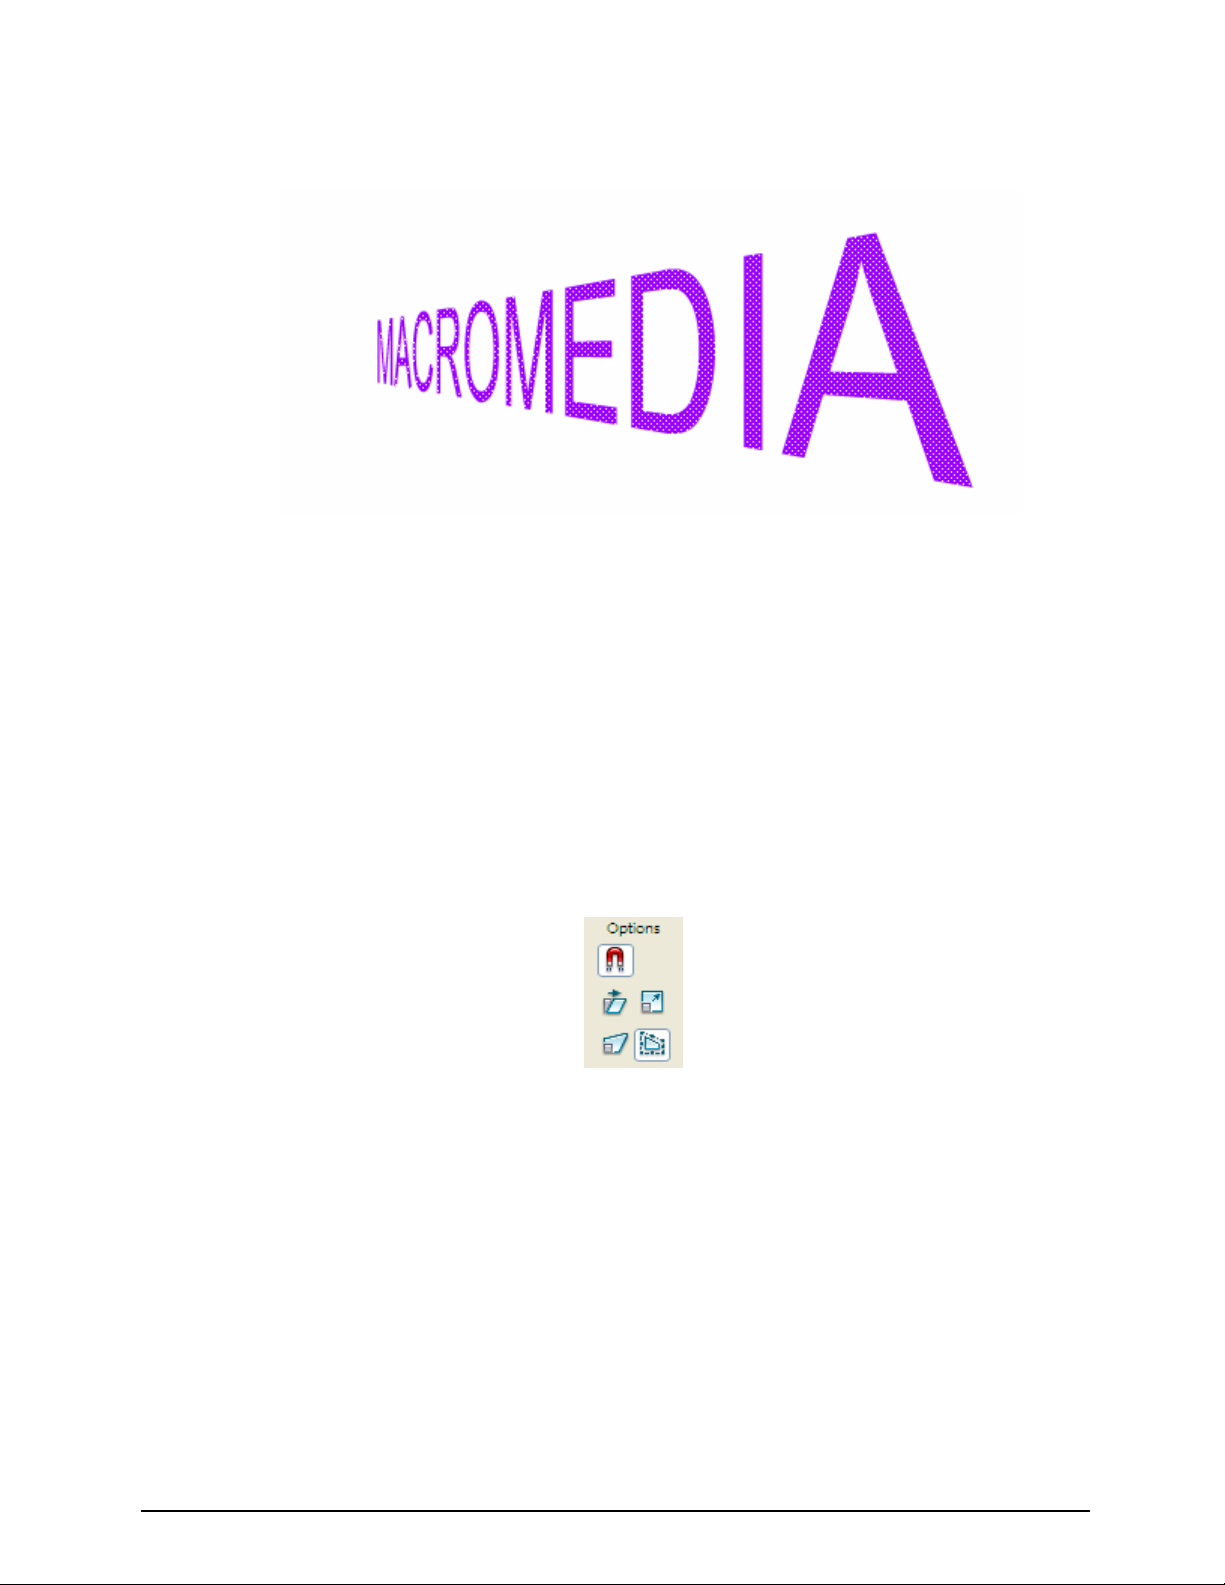
Macromedia MAX 2005 - Anaheim, CA What’s New In Flash 8
4. To end the transformation, click outside the selected object, group, instance, or text block.
Now you can taper shapes. This text was broken apart before transforming.
Distorting Objects
When you apply a Distort transformation to a selected object, dragging a corner handle or an edge
handle on the bounding box moves the corner or edge and realigns the adjoining edges. Shift-drag a
corner point to taper the object--that is, move that corner and the adjoining corner an equal distance
and in the opposite direction from each other. The adjoining corner is the corner on the same axis as
the direction you drag. Control-click to drag (Windows) or Command-click to drag a middle point on
an edge to move the entire edge freely.
You can distort graphic objects by using the Distort command. You can also use the tool options on
the tool panel:
To distort graphic objects:
1. Select a graphic object or objects on the Stage.
2. Select Modify > Transform > Distort.
3. Place the pointer on one of the transformation handles and drag.
4. To end the transformation, click outside the selected object or objects.
67
Page 68

Macromedia MAX 2005 - Anaheim, CA What’s New In Flash 8
Modifying Shapes with the Envelope Modifier
The Envelope modifier lets you warp and distort objects. An envelope is a bounding box that
contains one or more objects. Changes made to an envelope's shape affect the shape of the objects
contained within the envelope. You edit the shape of an envelope by adjusting its points and tangent
handles.
To modify a shape with the Envelope modifier:
1. Select a shape on the Stage.
NOTE:
The Envelope modifier cannot modify symbols, bitmaps, video objects, sounds, gradients, object
groups, or text. If a multiple selection contains any of these, only the shape objects are distorted.
To modify text, first convert the characters to shape objects.
2. Select Modify > Transform > Envelope.
3. Drag the points and tangent handles to modify the envelope.
The Envelope in action!
68
Page 69

Macromedia MAX 2005 - Anaheim, CA What’s New In Flash 8
Drawing straight lines, ovals, and rectangles
You can use the Line, Oval, and Rectangle tools to easily create these basic geometric shapes. The
Oval and Rectangle tools create stroked and filled shapes. The Rectangle tool lets you create
rectangles with square or rounded corners.
To draw a straight line, oval, or rectangle:
1. Select the Line, Oval, or Rectangle tool.
2. Select Window > Properties and select stroke and fill attributes in the Property inspector.
3. For the Rectangle tool, specify rounded corners by clicking the Round Rectangle modifier
and entering a corner radius value. A value of zero creates square corners.
4. Drag on the Stage. If you are using the Rectangle tool, press the Up Arrow and Down Arrow
keys while dragging to adjust the radius of rounded corners.
For the Oval and Rectangle tools, Shift-drag to constrain the shapes to circles and squares.
New in Flash 8
To specify a specific size of Oval or Rectangle in pixels, press the Alt key (Windows) or
Option key (Macintosh) with the Oval or Rectangle tool selected, and click the Stage to
display the Oval and Rectangle Settings dialog box.
o For ovals, you can specify the width and height in pixels, and whether to draw the
oval from the center.
o For rectangles, you can specify the width and height in pixels, the radius of the
rectangle corners for rounded corners, and whether to draw the rectangle from the
center.
For the Line tool, Shift-drag to constrain the angle of lines to multiples of 45°.
69
Page 70

Macromedia MAX 2005 - Anaheim, CA What’s New In Flash 8
Using the Stroke Color and Fill Color controls in the
Property inspector
To change the stroke color, style, and weight for a selected object, you can use the Stroke Color
controls in the Property inspector. For stroke style, you can choose from styles that are preloaded
with Flash, or you can create a custom style.
To select a solid color fill, you can use the Fill Color control in the Property inspector.
To select a stroke color, style, and weight using the Property inspector:
1. Select an object or objects on the Stage or draw a new shape.
2. To select a stroke style, click the triangle next to the Style pop-up menu and select an option
from the menu. To create a custom style, select Custom from the Property inspector, and
then select options in the Stroke Style dialog box and click OK. Also, try to give the stroke a
gradient fill.
3. To select a stroke weight, click the triangle next to the Weight pop-up menu and set the slider
at the weight you want.
4. Specify a stroke height by doing one of the following:
• Select one of the preset values from the height pop-up menu. Preset values appear in
points.
• New Flash 8 Feature: Type a value from 0 to 200 in the height text box, and press
Enter.
5. New Flash 8 Feature:Select the Stroke Hinting check box to enable stroke hinting. Stroke
hinting adjusts line and curve anchors on full pixels, preventing blurry vertical or horizontal
lines.
6. New Flash 8 Feature :Select a Cap option to set the style for a path end:
• None is flush with the path's end
• Round
• Square extends beyond the path by half the stroke width
7. Select a Join option to define how two path segments meet: Miter, Round, or Bevel. To
change the corners in an open or closed path, select a path and select another join option.
8. To avoid beveling a Miter join, enter a Miter limit.
70
Page 71

Macromedia MAX 2005 - Anaheim, CA What’s New In Flash 8
Line lengths exceeding this value are squared off instead of pointed. For example, a Miter
limit of 2 for a 3-point stroke means that when the length of the point is twice the stroke
weight, Flash removes the limit point.
Lab
• Draw some text and distort it using the Envelope tool. You will need to Break the text
apart. Remember – no objects when distorting!
New Features Summary
• Object Drawing Mode
• Object Level Undo
• 16 Colors in Gradients
• Modify Gradients
• Program Gradients with ActionScript
• New Script Assist Tool
• Free Distort and Envelope
• Caps,Joins and Miter on Strokes
71
Page 72

Macromedia MAX 2005 - Anaheim, CA What’s New In Flash 8
72
Page 73

Macromedia MAX 2005 - Anaheim, CA What’s New In Flash 8
Unit 5:
Expressiveness Features
and Animation
Unit Objectives:
After this unit, you will be able to:
y Use Blend Modes and Filters
y Use ActionScript to Control Expressiveness Features
y Import Blends and Filters from Fireworks
y Work with the new Easing In/Easing Out Controls
Unit Topics:
y Working with Blends
y Programming Blends
y Working with Filters
y Programming Filters
y Importing From Fireworks
y Using the New Easing In/Easing Out Controls
73
Page 74

Macromedia MAX 2005 - Anaheim, CA What’s New In Flash 8
Working with Blends
Blend Modes
Blend two movie clips (or buttons) together using the following modes: layer, darken, multiply,
lighten, screen, overlay, hardlight, add, subtract, difference, invert, alpha, and erase. Again, straight
out of Photoshop. Graphic designers will love this feature, but not as much as filters :).
In Flash, blend modes let you create composite images. Compositing is the process of varying the
transparency or color interaction of two or more overlapping objects. Blending modes also add a
dimension of control to the opacity of objects and images. You can use Flash blending modes to
create highlights or shadows that let details from an underlying image show through, or to colorize a
desaturated image.
About blend modes
Blend modes let you create composite images. Compositing is the process of varying the
transparency or color interaction of two or more overlapping objects. Blending lets you create unique
effects by blending the colors in overlapping movie clips.
A blending mode contains these elements:
• Blend color is the color applied to the blend mode.
• Opacity is the degree of transparency applied to the blend mode.
• Base color is the color of pixels underneath the blend color.
• Result color is the result of the blend's effect on the base color.
Blend modes in Flash
Since blend modes depend on both the color of the object you're applying the blend to and the
underlying color, you must experiment with different colors to see what the result will be.
Macromedia recommends that you experiment with the different blend modes to achieve the effect
you want.
Flash provides the following blend modes:
Normal applies color normally, with no interaction with the base colors.
Layer lets you stack movie clips on top of each other without affecting their color.
Darken replaces only the areas that are lighter than the blend color. Areas darker than the blend
color don't change.
Multiply multiplies the base color by the blend color, resulting in darker colors.
Lighten replaces only pixels that are darker than the blend color. Areas lighter than the blend color
don't change.
Screen multiplies the inverse of the blend color by the base color, resulting in a bleaching effect.
74
Page 75

Macromedia MAX 2005 - Anaheim, CA What’s New In Flash 8
Overlay multiplies or screens the colors, depending on the base colors.
Hard light multiplies or screens the colors, depending on the blend mode color. The effect is similar
to shining a spot light on the object.
Difference subtracts either the blend color from the base color or the base color from the blend
color, depending on which has the greater brightness value. The effect is similar to a color negative.
Invert inverts the base color.
Alpha applies an alpha mask.
NOTE:
Alpha blend mode requires that a Layer blend mode be applied to the parent movie clip. You
cannot change the background clip to Alpha and apply it because the object would appear
invisible.
Erase removes all base color pixels, including those in the background image.
NOTE:
Erase blend mode requires that a Layer blend mode be applied to the parent movie clip. You
cannot change the background clip to Erase and apply it because the object would appear
invisible.
75
Page 76

Macromedia MAX 2005 - Anaheim, CA What’s New In Flash 8
Blend mode examples
The following examples illustrate how different blend modes affect the appearance of an image. Be
aware that the resulting effect of a blend mode may be considerably different, depending on the
color of the underlying image and the type of blend mode you apply.
Original image
Multiply
Overlay
Layer Darken
Lighten
Hard Light
Screen
Add
Subtract
Difference
Invert
76
Page 77

Macromedia MAX 2005 - Anaheim, CA What’s New In Flash 8
Applying a Blend Mode
You use the Property inspector for movie clips to apply blends to selected movie clips.
NOTE:
Multiple graphic symbols are merged as a single shape when you publish the SWF. For this reason,
you cannot apply different blend modes to different graphic symbols.
To apply a blend mode to a movie clip:
1. Create a new Document and save it as blend_test.fla. Draw a red square and convert it to a
movie clip. Draw a blue circle beside the red square and convert it to a movie clip.
2. Select the blue circle movie clip instance.
3. Adjust the color and transparency of the movie clip instance using the Color pop-up menu in
the Property inspector.
4. Select a blend mode from the Blend pop-up menu in the Property inspector for movie clips.
The blend mode is applied to the selected movie clip instance.
5. Position the movie clip with the blend mode over the graphic symbol whose appearance you
want to modify.
6. Verify that the blend mode you selected is appropriate to the effect you're trying to achieve.
You might need to experiment with both the color and transparency settings of the movie clip
and the different blend modes to achieve the effect you want.
77
Page 78

Macromedia MAX 2005 - Anaheim, CA What’s New In Flash 8
Programming Blends
About blending modes
You can apply blend modes to movie clip objects by using the Flash workspace (Flash Professional
8) or ActionScript (Flash Basic 8 and Flash Professional 8). At runtime, multiple graphics are merged
as one shape. For this reason, you cannot apply different blend modes to different graphic symbols.
Blend modes involve combining the colors of one image (the base image) with the colors of another
image (the blend image) to produce a third image. Each pixel value in an image is processed with
the corresponding pixel value of the other image to produce a pixel value for that same position in
the result.
The MovieClip.blendMode property supports the following blend modes:
• add Commonly used to create an animated lightening dissolve effect between two images.
• alpha Commonly used to apply the transparency of the foreground on the background.
• darken Commonly used to superimpose type.
• difference Commonly used to create more vibrant colors.
• erase Commonly used to cut out (erase) part of the background using the foreground alpha.
• hardlight Commonly used to create shading effects.
• invert Used to invert the background.
• layer Used to force the creation of a temporary buffer for pre-composition for a particular
movie clip.
• lighten Commonly used to superimpose type.
• multiply Commonly used to create shadows and depth effects.
• normal Used to specify that the pixel values of the blend image override those of the base
image.
• overlay Commonly used to create shading effects.
• screen Commonly used to create highlights and lens flares.
• subtract Commonly used to create an animated darkening dissolve effect between two
images.
78
Page 79

Macromedia MAX 2005 - Anaheim, CA What’s New In Flash 8
Applying Blending Modes with ActionScript
The following procedure loads a dynamic image and lets you apply different blend modes to the
image by selecting a blending mode from a combo box on the Stage.
To apply different blending modes to an image:
1. Create a new Flash document and save it as blendmodes.fla.
2. Drag a ComboBox component instance onto the Stage and give it an instance name of
blendMode_cb.
3. Add the following ActionScript to Frame 1 of the Timeline:
var blendMode_dp:Array = new Array();
blendMode_dp.push({data:"add", label:"add"});
blendMode_dp.push({data:"alpha", label:"alpha"});
blendMode_dp.push({data:"darken", label:"darken"});
blendMode_dp.push({data:"difference", label:"difference"});
blendMode_dp.push({data:"erase", label:"erase"});
blendMode_dp.push({data:"hardlight", label:"hardlight"});
blendMode_dp.push({data:"invert", label:"invert"});
blendMode_dp.push({data:"layer", label:"layer"});
blendMode_dp.push({data:"lighten", label:"lighten"});
blendMode_dp.push({data:"multiply", label:"multiply"});
blendMode_dp.push({data:"normal", label:"normal"});
blendMode_dp.push({data:"overlay", label:"overlay"});
blendMode_dp.push({data:"screen", label:"screen"});
blendMode_dp.push({data:"subtract", label:"subtract"});
blendMode_cb.dataProvider = blendMode_dp;
var mclListener:Object = new Object();
mclListener.onLoadInit = function(target_mc:MovieClip) {
var blendModeClip:MovieClip =
target_mc.createEmptyMovieClip("blendModeType_mc", 20);
with (blendModeClip) {
beginFill(0x999999);
moveTo(0, 0);
lineTo(target_mc._width / 2, 0);
lineTo(target_mc._width / 2, target_mc._height);
lineTo(0, target_mc._height);
lineTo(0, 0);
endFill();
}
target_mc._x = (Stage.width - target_mc._width) / 2;
target_mc._y = (Stage.height - target_mc._height) / 2;
blendModeClip.blendMode = blendMode_cb.value;
};
this.createEmptyMovieClip("img_mc", 10);
var img_mcl:MovieClipLoader = new MovieClipLoader();
img_mcl.addListener(mclListener);
img_mcl.loadClip("http://www.helpexamples.com/flash/images/image1.jpg",
img_mc);
function cbListener(eventObj:Object):Void {
img_mc.blendModeType_mc.blendMode = eventObj.target.value;
}
blendMode_cb.addEventListener("change", cbListener);
79
Page 80

Macromedia MAX 2005 - Anaheim, CA What’s New In Flash 8
This ActionScript code populates the combo box with each type of blending mode, so the
user can view each effect on the dynamically loaded image. A listener object is created,
which is used with a MovieClipLoader instance. The listener object defines a single event
listener, onLoadInit, which is invoked when the image is completely downloaded and is
initialized by Flash.
The event listener creates a new movie clip named blendModeType_mc, and uses the
Drawing API to draw a rectangular shape over the left half of the image. The currently
selected blending mode for the ComboBox instance is then applied to the
blendModeType_mc movie clip.
The rest of the code sets up the MovieClipLoader instance, which is responsible for loading
the specified image into a movie clip on the Stage. Finally, a listener is defined for the
blendMode_cb ComboBox instance, which applies the selected blending mode whenever a
new item is selected from the ComboBox instance.
4. Select Control > Test Movie to test the document.
Working with Filters
About Filters
Filters let you add interesting visual effects to text, buttons, and movie clips and are most often
associated with applying drop shadows, blurs, glows, and bevels to graphic elements. A feature
unique to Flash is that you can animate the filters you apply using motion tweens. For example, if
you create a ball (or sphere) with a drop shadow, you can simulate the look of the light source
moving from one side of the object to another by changing the position of the drop shadow from its
beginning and ending frames in the Timeline.
After you apply a filter, you can change its options any time, or rearrange the order of filters to
experiment with a combined effect. You can enable or disable filters or delete them in the Property
inspector. When you remove a filter, the object returns to its previous appearance. You can view the
filters applied to an object by selecting it; doing so automatically updates the filters list in the
Property inspector for the selected object.
About importing filters and blends from Fireworks PNG files (Flash Professional only)
Flash Professional 8 provides support for Fireworks filters and blending modes. When you import
Fireworks PNG files, you can retain many of the filters and blending modes applied to objects within
Fireworks, and continue to modify those filters and blends using Flash Professional 8.
Flash only supports modifiable filters and blends for objects imported as text and movie clips. If an
effect or blend mode is not supported, Flash will rasterize or ignore it when it is imported. If you want
to import a Fireworks PNG file that contains filters or blends that Flash does not support, you must
rasterize the file during the import process. After this operation, you will not be able to edit the file.
80
Page 81

Macromedia MAX 2005 - Anaheim, CA What’s New In Flash 8
Animating Filters
You can animate filters in the Timeline. Objects on separate keyframes joined by a tween have
the parameters for corresponding filters tweened on intermediate frames. If a filter does not have a
matching filter (a filter of the same type) at the opposite end of the tween, a matching filter is added
automatically to ensure that the effect is at the end of the animation sequence.
Flash does the following to prevent motion tweens from functioning incorrectly in the event of a
missing filter at one end of the tween, or filters applied in a different order at each end:
• If you apply a motion tween to a movie clip that has filters applied to it, when you insert a
keyframe at the opposite end of the tween, the movie clip automatically has the same filters,
with the same stacking order, on the last frame of the tween as it did at the beginning of the
tween.
• If you place movie clips on two different frames with different filters applied to each, and you
apply a motion tween between the frames, Flash first processes the movie clip with the most
filters. Flash then compares the filters applied to the first movie clip against those used by the
second movie clip.
If no matching filters are found in the second movie clip, Flash generates a "dummy" filter
with no parameters and the color of the existing filters.
• If a motion tween exists between two keyframes:
o If you add a filter to the object in one keyframe, Flash automatically adds a dummy
filter to the movie clip when it reaches the keyframe at the other end of the tween.
o If you remove a filter from an object in one keyframe, Flash automatically removes the
matching filter from the movie clip when it reaches the keyframe at the other end of
the tween.
• If you set filter parameters inconsistently between the beginning and end of a motion tween,
Flash applies the filter settings of the starting frame to the interpolated frames. Inconsistent
settings occur when the following parameters are set differently between the beginning and
end of the tween: knockout, inner shadow, inner glow, and type of gradient glow and gradient
bevel.
For example, if you create a motion tween using the drop shadow filter, and apply a drop
shadow with a knockout on the first frame of the tween, and an inner shadow on the last
frame of the tween, Flash corrects the inconsistent use of the filter in the motion tween. In
this case, Flash applies the filter settings used on the first frame of the tween--a drop shadow
with a knockout.
Filters and Flash Player performance
The type, number, and quality of filters you apply to objects can affect the performance of SWF files
as you play them. The more filters you apply to an object, the greater the number of calculations
Macromedia Flash Player must process to correctly display the visual effects you've created. For this
reason, Macromedia recommends that you apply only a limited number of filters to a given object.
81
Page 82

Macromedia MAX 2005 - Anaheim, CA What’s New In Flash 8
Each filter includes controls that let you adjust the strength and quality of the applied filter. Using
lower settings improves performance on slower computers. If you are creating content for playback
on a wide range on computers, or are unsure of the computing power available to your audience, set
the quality level to low to maximize playback performance.
Applying Filters
You can apply one or more filters to selected objects using the Property inspector. Each time you
add a new filter to an object, it is added to the list of applied filters for that object in the Property
inspector. You can apply multiple filters to an object, as well as remove filters that have been
previously applied.
The Add Filter menu in the Property inspector.
To apply a filter:
1. Select a movie clip, button, or text object on the Stage that you want to apply a filter to.
You can apply filters only to text, button, and movie clip objects.
2. Select the Filter tab in the Property inspector.
3. Click the Add Filter (+) button and select a filter from the Filters pop-up menu.
The filter you select is applied to the object, and the controls for the filter settings appear in
the Property inspector. Experiment with the settings until you get the look you want. The
different types of Filters include the following:
o Drop shadow
o Blur
o Glow
o Bevel
o Gradient Glow
82
Page 83

Macromedia MAX 2005 - Anaheim, CA What’s New In Flash 8
o Gradient Bevel
o Adjust Color
To remove a filter:
1. Select the movie clip, button, or text object that you want to remove a filter from.
2. Select the Filter tab in the Property inspector.
3. Select the filter you want to remove in the list of applied filters.
4. Click the Remove Filter (-) button to remove the filter.
You can create a filter settings library that lets you easily apply the same filter or sets of filters to an
object. Flash stores the filter presets you create in the Property inspector on the Filters tab in the
Filters > Presets menu.
You can delete or rename any presets.
To apply a preset filter to an object:
1. Select the movie clip, button, or text object that you want to apply a filter preset to.
2. Select the Filter tab in the Property inspector.
3. Click the Add Filter (+) button, and select Presets from the Filters pop-up menu.
4. Select the filter preset you want to apply from the list of available presets at the bottom of the
preset menu.
NOTE:
When you apply a filter preset to an object, Flash replaces any filters currently applied to the
selected object(s) with the filter(s) used in the preset.
To enable or disable a filter applied to an object:
• Click the enable or disable icon next to the filter name in the Filter list in the Property
inspector.
NOTE:
Alt-click (Windows) or Option-click (Macintosh) the enable icon in the Filter list to toggle the
enable state of the other filters in the list. If you Alt-click the disable icon, the selected filter is
enabled, and all others filters in the list are disabled.
To enable or disable all filters applied to an object:
• Click the Add Filter (+) button in the Property inspector, and then select Enable All or Disable
All from the pop-up menu.
83
Page 84

Macromedia MAX 2005 - Anaheim, CA What’s New In Flash 8
Apply Graphic Filters and Blends
This tutorial guides you through the process of creating eye-catching graphic effects using some of
the authoring features in Macromedia Flash Professional 8 (Filters are not available in Flash Basic).
By using the graphic filters and blend modes available in Flash, you can transform ordinary graphic
objects into much more visually compelling content.
Review your task
In this tutorial, you will add some graphics to the Stage and apply filters to them to create a realisticlooking image of a pool table with a narrow depth of field. The balls in the foreground and
background will appear out of focus, as if seen through a camera.
The completed FLA file
To see the completed FLA file (Filters&Blends_finished.fla), browse to one of the following
locations:
• In Windows: Unit_5/Filters and Blends
• On the Macintosh: Unit_5/Filters and Blends
84
Page 85

Macromedia MAX 2005 - Anaheim, CA What’s New In Flash 8
Open the starter document
Now that you have seen the document you will create, it is time to create your own version of the
document. The first thing to do is open the starter document, which contains the graphic objects you
will use with the filter and blend features of Flash.
1. In Flash, select File > Open.
2. Browse to one of the following locations:
o In Windows: Unit_5\Filters and Blends
o On the Macintosh: Unit_5/Filters and Blends
3. Select the file named Filters&Blends_start.fla and click Open.
Apply filters and blends
In the following sections, you will apply blends and filters to the 9ball and CueBall movie clips found
in the Library panel.
Apply a blend to the 9ball movie clip
The first task you must perform in the starter file is to apply a blend effect to an instance of the 9ball
outlines movie clip to make its colors combine with the colors of the 9ball movie clip. This achieves a
realistic shiny pool ball look.
1. Open the Library panel (Window > Library).
2. Drag the 9ball movie clip from the Library panel to the lower-right corner of the Stage.
This creates an new instance of the 9ball movie clip on the Stage.
3. Double-click the new 9ball instance to enter symbol-editing mode.
4. Drag the 9ball outlines movie clip from the Library panel onto the Stage so that it perfectly
covers the 9ball instance.
You can use the Arrow keys to make fine adjustments to the placement of the 9ball outlines
instance.
5. With the 9ball outlines instance still selected, go to the Property inspector and select
Multiply from the Blend menu.
6. Double-click outside the Stage to exit symbol-editing mode.
The 9ball instance should still be selected on the Stage.
7. Open the Transform panel (Windows > Transform).
8. In the Transform panel, click the Constrain check box.
9. Double-click the Width text box and enter 140.
85
Page 86

Macromedia MAX 2005 - Anaheim, CA What’s New In Flash 8
10. This makes the 9ball instance appear larger than the 8ball instance on the Stage.
11. Reposition the 9ball instance so it slightly overlaps the right edge of the 8ball instance on the
Stage.
Apply a filter
The next step is to apply a blur filter to the 9ball movie clip to make it appear out of focus, as if it is in
the foreground of the Stage.
1. With the 9ball instance still selected, click the Filters tab in the Property inspector.
2. In the Filters tab, click Add Filter and select Blur from the pop-up menu.
3. Drag the BlurX slider until the BlurX and BlurY value is 19.
The BlurX and BlurY values are constrained to each other by default. Click the lock icon if
they are not.
4. Click the Properties tab of the Property inspector.
5. In the Property inspector, enter the following values in the W, H, X, and Y text boxes:
W: 210
H: 235
X: 315
Y: 155
6. Click outside the Stage to deselect the 9ball instance.
Apply filters and blends to the cue ball
The last step is to use a color effect and a filter to make the cue ball appear to be in the background
of the Stage.
1. Drag the CueBall movie clip from the Library panel to the upper-left corner of the Stage.
2. With the new CueBall instance still selected on the Stage, go to the Transform panel and
enter 70 in the W (Width) and H (Height) text boxes.
This makes the CueBall instance appear smaller than the 8ball instance.
3. With the CueBall instance still selected on the Stage, go to the Property inspector and select
Brightness from the Color menu.
A Brightness Amount slider appears to the right of the Color menu.
4. Drag the Brightness Amount slider until the value is -48%.
86
Page 87

Macromedia MAX 2005 - Anaheim, CA What’s New In Flash 8
5. Enter the following values in the W, H, X, and Y text boxes:
W: 105
H: 115
X: 95
Y: 105
6. With the CueBall instance still selected on the Stage, click the Filters tab in the Property
inspector.
7. Click Add Filter and select Blur from the Filter pop-up menu.
8. Drag the BlurX slider until the BlurX and BlurY values are each 13.
These text boxes are constrained to match each other by default. Click the lock icon if they
are not.
9. Click outside the Stage to deselect the CueBall instance.
You have now applied the graphic effects to create a realistic look of depth.
87
Page 88

Macromedia MAX 2005 - Anaheim, CA What’s New In Flash 8
Programming Filters
Working with filters using ActionScript
The flash.filters package contains classes for the bitmap filter effects that are new in Flash Player 8.
Filters let you use ActionScript to apply rich visual effects, such as blur, bevel, glow, and drop
shadow, to text, movie clip, and button instances. You can also use the Flash authoring tool to apply
filter effects to objects such as text, images, and video. Flash has nine filter effects, although only
seven are accessible by using the user interface in Flash Professional 8. The ConvolutionFilter and
DisplacementMapFilter filters are only available by using ActionScript code.
NOTE:
All filters are availabe by using ActionScript in both Flash Basic 8 and Flash Professional 8
The following procedure loads a semitransparent PNG image, and applies a GlowFilter effect to the
nontransparent portion of the image.
To apply filters to semitransparent images:
1. Create a new Flash document and save it as transparentImg.fla.
2. Add the following ActionScript to Frame 1 of the Timeline:
import flash.filters.GlowFilter;
System.security.allowDomain("http://www.helpexamples.com");
var mclListener:Object = new Object();
mclListener.onLoadInit = function(target_mc:MovieClip) {
target_mc._x = (Stage.width - target_mc._width) / 2;
target_mc._y = (Stage.height - target_mc._height) / 2;
var glow:GlowFilter = new GlowFilter();
target_mc.filters = [glow];
};
this.createEmptyMovieClip("img_mc", 10);
var img_mcl:MovieClipLoader = new MovieClipLoader();
img_mcl.addListener(mclListener);
img_mcl.loadClip("http://www.helpexamples.com/flash/images/logo.p
ng", img_mc);
This code uses a movie clip loader instance to load a semi-transparent PNG image. After the
image finishes loading, the image moves to the center of the Stage and a glow filter is
applied.
3. Select Control > Test Movie to test the document.
The glow filter effect is only applied to the opaque (nontransparent) area of the PNG image.
88
Page 89

Macromedia MAX 2005 - Anaheim, CA What’s New In Flash 8
Importing From Fireworks
Fireworks effects supported in Flash
The following Fireworks effects are imported as modifiable filters by Flash:
Fireworks Effect Flash Filter
Drop shadow Drop shadow
Solid shadow Drop shadow
Inner shadow Drop shadow (with Inner shadow
automatically selected)
Blur Blur (where blurX = blurY=1)
Blur more Blur (where blurX = blurY=1)
Gaussian blur Blur
Adjust color brightness Adjust color
Adjust color contrast Adjust color
Blend modes
You can achieve a variety of compositing effects by using blend modes to change the way the image
of one object on the Stage is combined with the images of any objects beneath it.
Fireworks blend modes supported in Flash
Flash imports the following Fireworks blend modes as modifiable blends:
Fireworks Blending Mode Flash Blending Mode
Normal Normal
Darken Darken
Multiply Multiply
Lighten Lighten
Screen Screen
Overlay Overlay
Hard light Hard light
Additive Add
Difference Difference
Invert Invert
Alpha Alpha
Erase Erase
89
Page 90

Macromedia MAX 2005 - Anaheim, CA What’s New In Flash 8
Flash ignores all other blending modes imported from Fireworks. The blending modes that are not
supported in Flash are Average, Negation, Exclusion, Soft Light, Subtractive, Fuzzy Light, Color
Dodge, and Color Burn.
Using the New Easing In/Easing Out Controls
A tween is the application of a change to a graphic object over a period of time. For example, you
could tween the location of a picture of a car from one side of the Stage to the other to make the car
move from side to side. To ease a tween is to control the rate at which the change is applied to the
object. New easing controls in Flash allow you to precisely control how tweens that you apply in the
timeline affect the appearance of tweened objects on the Stage. With the new controls, you can
make an object move back and forth on the Stage within a single tween or create other complex
tween effects.
Custom Easing Controls with Various Properties
You have complete control over acceleration and deceleration for motion tweens. You can also set
easing for position, rotation, scale, color, and even filters separately. This is really an amazing
feature, and it will speed along animation development.
Applying custom ease in/ease out to motion tweens
The Custom Ease In/Ease Out dialog box displays a graph representing the degree of motion over
time. Frames are represented by the horizontal axis, and the percentage of change is represented
by the vertical axis. The first keyframe is represented as 0%, and the last keyframe is represented
as 100%.
The rate of change of the object is represented by the slope of the graph's curve. When the curve is
horizontal (no slope), the velocity is zero; when the curve is vertical, there is an instantaneous rate of
change.
The dialog box provides the following additional controls:
90
Page 91

Macromedia MAX 2005 - Anaheim, CA What’s New In Flash 8
Use One Setting for All Properties check box
The default value for this is selected, which means that the displayed curve is used for all properties,
and the Properties pop-up menu is disabled. When the check box is not selected, the Properties
pop-up menu is enabled, and each property has a separate curve defining the velocity of that
property.
Property pop-up menu
This menu is enabled only when the Use One Setting for All Properties check box is not selected.
When enabled, a separate curve is maintained for each of the five properties appearing in the menu.
Selecting a property in the menu displays the curve for that property. The properties are:
Position
Specifies custom ease settings for the position of an animated object on the Stage.
Rotation
Specifies custom ease settings for the rotation of an animated object. For example, you can finetune how quickly or slowly an animated character turns around to face the user on the Stage.
Scale
Specifies custom ease settings for the scale of an animated object. For example, you can more
easily customize the scale of an object so it appears to be moving away from the viewer, then
coming closer, and then moving away again.
Color
Specifies custom ease settings for color transitions applied to an animated object.
Filters
Specifies custom ease settings for filters applied to an animated object. For example, you can
control the ease setting of a drop shadow that simulates a change in the direction of a light source.
Play and Stop buttons These buttons let you preview an animation on the Stage using all the
current velocity curves defined in the Custom Ease In/Ease Out dialog box.
Reset button
This button lets you reset the velocity curve to the default, linear state.
Position of the selected control point In the lower-right corner of the dialog box, a numeric value
displays the keyframe and position of the selected control point. If no control point is selected, no
value appears.
To add a control point to the line, click the diagonal line once. This adds a new control point to the
line. By dragging the positions of the control points, you can achieve a precise degree of control over
the motion of an object.
Using frame indicators (represented by square handles), you click where you want an object to slow
down or speed up. Clicking the handle of a control point (the square handles) selects that control
point, and displays the tangent points on either side of it. Tangent points are represented by hollow
circles. You can drag the control point or its tangent points with the mouse or you can position them
using the keyboard's arrow keys.
91
Page 92

Macromedia MAX 2005 - Anaheim, CA What’s New In Flash 8
TIP:
By default, the control points snap to a grid. You can turn off snapping by pressing the X key
while dragging the control point.
Clicking an area of the curve away from any control points adds a new control point to the
curve at that point, without changing the shape of the curve. Clicking away from the curve
and control points deselects the control point that is currently selected.
Compatibility with current ease in/ease out settings
If you apply a custom ease to a frame using the Custom Ease In/Ease Out dialog box, the edit text
box that displays the ease value displays '--'. If you apply an ease value to a frame with the Edit text
box or the pop-up slider, the Custom Ease graph is set to the equivalent curve, and the Use One
Setting for All Properties check box is selected.
Unsupported easing curves
Certain types of easing curves are not supported:
y No part of the graph can represent a nonlinear curve (such as a circle)
y The Custom Ease dialog box automatically prevents moving a control point or a tangent handle
to a position that would render an invalid curve.
y All points must exist on the graph. Control points cannot be moved beyond the bounds of the
graph.
y All segments of the curve must exist within the graph. The shape of the curve will be flattened to
prevent it from extending beyond the bounds of the graph.
To use the Custom Ease In/Ease Out dialog box:
1. Select a layer in the Timeline that has a motion tween applied to it.
2. Click the Edit button next to the Ease slider in the frame Property inspector. The Custom
Ease In/Ease Out dialog box appears.
3. (Optional) Deselect the Use One Setting for All Properties check box, and select a property
in the menu to display the curve for that property. For more information about the properties
you can specify, see Applying custom ease in/ease out to motion tweens (Flash Professional
only).
4. In the Custom Ease In/Ease Out dialog box, Control-click (Windows) or Command-click
(Macintosh) on the diagonal line to add a control point.
5. Drag the control point up to increase the speed of the object, or drag it downwards to slow
down the speed of the object.
6. Drag the vertex handles to further adjust the ease curve, and fine tune the ease value of the
tween.
7. View the animation on the Stage by clicking the play button in the lower left corner of the
Custom Ease In/Ease Out dialog box.
8. Adjust the controls until you achieve the effect you want.
92
Page 93

Macromedia MAX 2005 - Anaheim, CA What’s New In Flash 8
To copy and paste an ease curve:
y Copy the current ease curve by pressing Control+C (Windows) or Command+C
(Macintosh)
y Paste the copied curve into another ease curve by pressing Control+V (Windows) or
Command+V (Macintosh)
You can copy and paste the ease curve. The copied curve remains available until you exit the Flash
application.
Follow the Bouncing Text
Well, let’s get rolling on our animated bouncing text effect. To get started, just open Flash 8 and
create a new document. I've also provided the finished FLA file for your reference; you can
download it from the sample files download link at the beginning of this article.
Creating the Text
Launch Flash 8 and create a new Flash document from the start screen. I named my file
bouncing_text.fla, but you can name your file whatever you like.
• Create a new Symbol in Flash. (Select Insert > New Symbol.) Name the symbol gr_text
and select Graphic as the behavior type in the Create New Symbol dialog box. Click the
OK button.
Figure 1. Creating the new text symbol
93
Page 94

Macromedia MAX 2005 - Anaheim, CA What’s New In Flash 8
Now you'll create the text for the animation. In the Tools panel, select the Text tool (T).
1. In the Properties panel, make sure that Static Text is selected. Select a bold font like Arial
Black, but you can pick any font you like. Next, set the font size to 80 and set the text fill
color to #FF0000 (Red).
2. Still in the Properties panel, change the Anti-alias option to Anti-Alias for animation. This
setting improves the overall motion quality of animated text, and its visibility.
3. Draw a text area in the middle of the Stage by clicking and dragging with the Text tool (T).
4. Type in the text Flash 8. (See Figure 2.) Notice that in Flash 8 the text area now has control
points on all four corners. You can adjust the width of your text box by selecting any one of
the edit nodes and dragging it to the left or right.
Figure 2. The new Static Text area with the Anti-alias for animation setting
Adding the Bevel Filter
In these next steps we will be adding a Bevel Filter and modifying the Filter’s attributes.
Select the Filters tab in the Property Inspector. Filters are another great new feature in Flash 8
that will allow you to add shadows, glows, and other visual effects to your objects. For our text,
we’re going to use a bevel filter.
94
Page 95

Macromedia MAX 2005 - Anaheim, CA What’s New In Flash 8
Figure 3. Setting the Bevel Filter attributes in the Property inspector
1. Click the Add icon to expose the filter menu. Select the Bevel option. You can add additional
effects to your objects. For this project, we’ll stick with just one.
2. Change the following Bevel attributes (See Figure 3.):
• Blur X: 3
• Blur Y: 3
• Quality: High
• Distance: 2
y Keep the other settings to their default values.
2. Notice that the text now takes on a 3-D effect - that was too easy. Having the ability to add
these Filters in Flash 8 will save you plenty of time. (See Figure 4.)
3. Finally, select Scene 1 in Timeline panel to jump out of the gr_text symbol. Now we are
ready to animate our text with a motion tween.
Figure 4. The text now has a Bevel Filter applied to it
95
Page 96

Macromedia MAX 2005 - Anaheim, CA What’s New In Flash 8
Create the Motion Tween
1. In the tools panel, choose the Selection tool (V). In the Timeline double click the name
“Layer 1” to rename it to Flash Text.
2. From the Library Panel, drag and instance of the gr_text symbol to the stage. At this point
we have our symbol on frame 1.
3. Next let’s add a keyframe to frame 30. Select frame 30 on the Flash Text layer. From the
Insert menu select (Insert > Timeline > Keyframe).
Figure 5. Place the symbol on the stage and add a keyframe
4. Select Frame 1 in the Flash Text layer.
5. In the Property Inspector, choose the Motion option from the Tween drop down menu. We
don’t have an animation just yet. We need to make another adjustment to Frame 1.
6. While still in Frame 1 take your Selection tool (V) and click on the graphic symbol to select
it.
7. We are going to scale the text down by selecting (Modify > Transform > Scale and
Rotate…)
8. In the Scale and Rotate dialog box, set the scale value to 10% and click the OK button. At
this point you can now click on the playback head in the timeline and scrub back and forth to
see the animation effect.
96
Page 97

Macromedia MAX 2005 - Anaheim, CA What’s New In Flash 8
Figure 6. Modify the scale of the symbol in frame one
9. Test you movie by selecting the Control menu (Control > Test Movie). You will notice that in
Flash 8 that now when you test your .swf file – a Flash Player window will appear. This will
give you a better representation of your final output.
10. Close the test movie by clicking the close window button. Well, I have to admit that this
animation is really nothing to write home about. That is all going to change when we add a
“bounce” effect to our animation.
Using Custom Ease In / Ease Out
Finally, we are going to modify our existing animation by giving it a “bounce” effect with the new
Ease In / Ease Out controls. This is another great new feature in Flash 8 that will add sophistication
to your animation without the use of additional keyframes.
11. With your Selection tool (V) choose Frame 1 from the Flash Text layer.
12. In the Property Inspector click on the Edit button next to the Ease drop down menu.
13. The Custom Ease In / Ease Out dialog box appears. (See Figure 7.)
97
Page 98
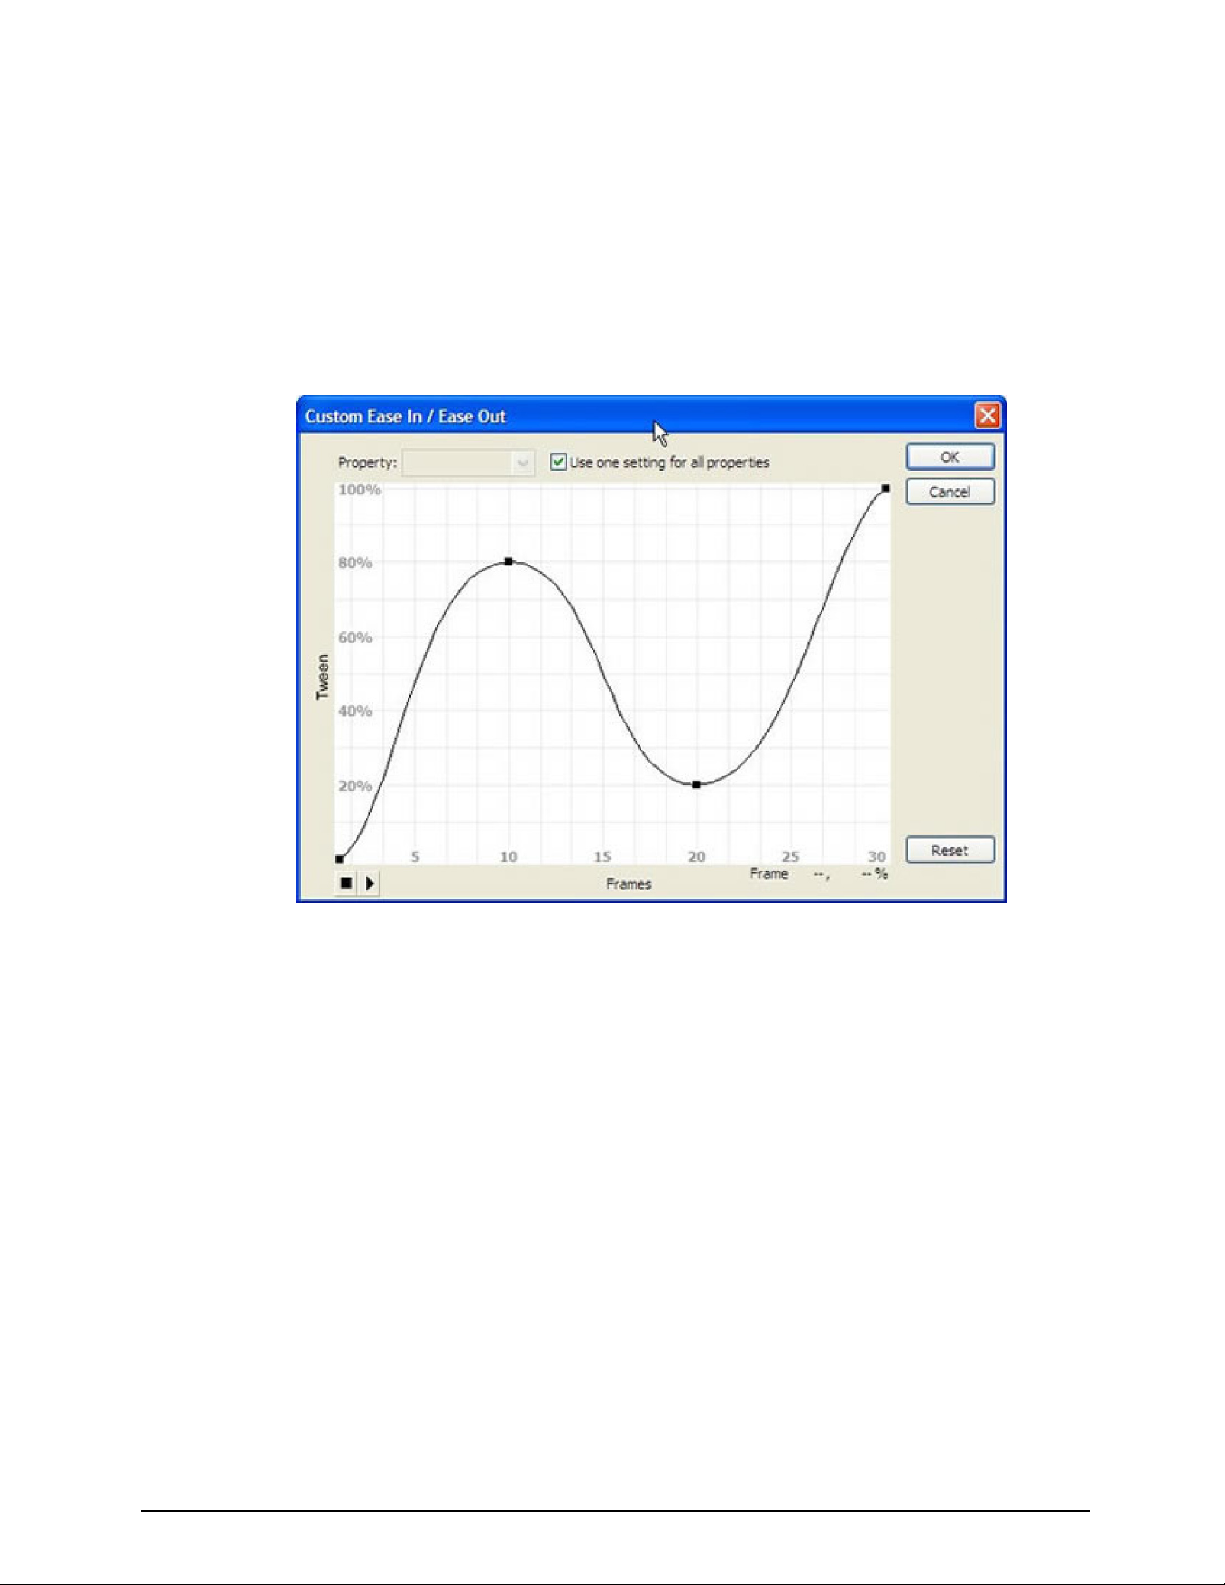
Macromedia MAX 2005 - Anaheim, CA What’s New In Flash 8
14. Figure 7. The Custom Ease In / Ease Out dialog box
15. Click the Ease In/Ease Out line to add and edit node at Frame 10.
16. Take the new node and drag it up to a Teen value of 80%. This represents the completion
value of the entire motion tween from frame 1 to frame 30.
17. Click the Ease In/Ease Out line to add a second edit node at Frame 20.
18. Take the new node and drag it down to a Teen value of 20%. (See Figure 8.)
Figure 8. Modify the motion tween by adding edit nodes
19. Click the Play button in the bottom left corner of the dialog box to view your animation. Now
you can see the “bounce” effect on your motion tween with no additional reframes added.
That’s really cool.
20. Close the Ease In/Ease out dialog box and test your movie. You have now finished your
bouncing text!
98
Page 99

Macromedia MAX 2005 - Anaheim, CA What’s New In Flash 8
Lab
• Create your own Motion Tween and try the custom Easing In and Out features.
Summary of New Features
y New Blends modes
y You can program blends
y New Graphic Filters
y You can program Filters
y Importing From Fireworks retains Filter and Blend attributes
y New Easing In/Easing Out Controls
99
Page 100

Macromedia MAX 2005 - Anaheim, CA What’s New In Flash 8
Unit 6:
Text and Graphics
Rendering
Unit Objectives:
After this unit, you will be able to:
y Use the New Text Handles
y Use the Various Text Anti-Alias Settings
y Use Bitmap Smoothing
y Understand How Bitmap Caching Works
y Load new Graphic Formats Dynamically
y Create a MovieClip with 9-Slice Scaling
y Understand the ConvolutionFilter
y Use Programmatic Bitmap Creation with ActionScript
Unit Topics:
y FlashType Overview
y FlashType Anti-Alias Settings
y Using Bitmaps in Flash 8
y Loading Graphics Dynamically
y Using the New 9-Slice Scaling Feature
y Using ActionScript to Modify Bitmaps
100
 Loading...