

Page 1

Aastra Model 6739i IP Phone
User Guide
Release 3.2.2
Service Pack 3 Hot Fix 1
41-001317-05 REV01 – 06.2013
Page 2

Software License Agreement
Aastra Telecom Inc., hereinafter known as "Seller", grants to Customer a personal, worldwide, non-transferable, non-sublicenseable and non-exclusive, restricted use license to use Software in object form solely with the Equipment for which
the Software was intended. This Product may integrate programs, licensed to Aastra by third party Suppliers, for distribution under the terms of this agreement. These programs are confidential and proprietary, and are protected as such
by copyright law as unpublished works and by international treaties to the fullest extent under the applicable law of the
jurisdiction of the Customer. In addition, these confidential and proprietary programs are works conforming to the
requirements of Section 401 of title 17 of the United States Code. Customer shall not disclose to any third party such
confidential and proprietary programs and information and shall not export licensed Software to any country except in
accordance with United States Export laws and restrictions.
Customer agrees to not reverse engineer, decompile, disassemble or display Software furnished in object code form.
Customer shall not modify, copy, reproduce, distribute, transcribe, translate or reduce to electronic medium or machine
readable form or language, derive source code without the express written consent of the Seller and its Suppliers, or disseminate or otherwise disclose the Software to third parties. All Software furnished hereunder (whether or not part of
firmware), including all copies thereof, are and shall remain the property of Seller and its Suppliers and are subject to the
terms and conditions of this agreement. All rights reserved.
Customer's use of this software shall be deemed to reflect Customer's agreement to abide by the terms and conditions
contained herein. Removal or modification of trademarks, copyright notices, logos, etc., or the use of Software on any
Equipment other than that for which it is intended, or any other material breach of this Agreement, shall automatically
terminate this license. If this Agreement is terminated for breach, Customer shall immediately discontinue use and
destroy or return to Seller all licensed software and other confidential or proprietary information of Seller. In no event
shall Seller or its suppliers or licensors be liable for any damages whatsoever (including without limitation, damages for
loss of business profits, business interruption, loss of business information, other pecuniary loss, or consequential damages) arising out of the use of or inability to use the software, even if Seller has been advised of the possibility of such
damages.
ii 41-001317-05 REV01 – 06.2013
Page 3

Content
Software License Agreement . . . . . . . . . . . . . . . . . . . . . . . . . . . . . . . . . . . . . . . . . . . . . . . . . . . . . . . . . . . . . . . . . . . . . . . . . . . . . . . .ii
Welcome. . . . . . . . . . . . . . . . . . . . . . . . . . . . . . . . . . . . . . . . . . . . . . . . . . . . . . . . . . . . . . . . . . . . . . . . . . . . . . . . . . . . . . . . . . . . . . . . . . . . . . . . .1
About this guide. . . . . . . . . . . . . . . . . . . . . . . . . . . . . . . . . . . . . . . . . . . . . . . . . . . . . . . . . . . . . . . . . . . . . . . . . . . . . . . . . . . . . . . . . . . . .1
Phone Features. . . . . . . . . . . . . . . . . . . . . . . . . . . . . . . . . . . . . . . . . . . . . . . . . . . . . . . . . . . . . . . . . . . . . . . . . . . . . . . . . . . . . . . . . . . . . . 1
Requirements . . . . . . . . . . . . . . . . . . . . . . . . . . . . . . . . . . . . . . . . . . . . . . . . . . . . . . . . . . . . . . . . . . . . . . . . . . . . . . . . . . . . . . . . . . . . . . . 2
Installation and Setup . . . . . . . . . . . . . . . . . . . . . . . . . . . . . . . . . . . . . . . . . . . . . . . . . . . . . . . . . . . . . . . . . . . . . . . . . . . . . . . . . . . . . . . 2
Cleaning the 6739i Touchscreen . . . . . . . . . . . . . . . . . . . . . . . . . . . . . . . . . . . . . . . . . . . . . . . . . . . . . . . . . . . . . . . . . . . . . . . . . . . . . 3
Getting Started. . . . . . . . . . . . . . . . . . . . . . . . . . . . . . . . . . . . . . . . . . . . . . . . . . . . . . . . . . . . . . . . . . . . . . . . . . . . . . . . . . . . . . . . . . . . . . . . .4
Plugging in and Starting the Phone. . . . . . . . . . . . . . . . . . . . . . . . . . . . . . . . . . . . . . . . . . . . . . . . . . . . . . . . . . . . . . . . . . . . . . . . . . 4
Network Connected/Network Disconnected . . . . . . . . . . . . . . . . . . . . . . . . . . . . . . . . . . . . . . . . . . . . . . . . . . . . . . . . . . . . . . . . . 7
Idle Screen . . . . . . . . . . . . . . . . . . . . . . . . . . . . . . . . . . . . . . . . . . . . . . . . . . . . . . . . . . . . . . . . . . . . . . . . . . . . . . . . . . . . . . . . . . . . . . . . . . 8
Off-Hook and Dialing Screen . . . . . . . . . . . . . . . . . . . . . . . . . . . . . . . . . . . . . . . . . . . . . . . . . . . . . . . . . . . . . . . . . . . . . . . . . . . . . . .11
Connected Call Screen. . . . . . . . . . . . . . . . . . . . . . . . . . . . . . . . . . . . . . . . . . . . . . . . . . . . . . . . . . . . . . . . . . . . . . . . . . . . . . . . . . . . . .12
Incoming Call Screen . . . . . . . . . . . . . . . . . . . . . . . . . . . . . . . . . . . . . . . . . . . . . . . . . . . . . . . . . . . . . . . . . . . . . . . . . . . . . . . . . . . . . . .13
Terminating Calls . . . . . . . . . . . . . . . . . . . . . . . . . . . . . . . . . . . . . . . . . . . . . . . . . . . . . . . . . . . . . . . . . . . . . . . . . . . . . . . . . . . . . . . . . .15
Methods for Setting/Using Features on the Phone. . . . . . . . . . . . . . . . . . . . . . . . . . . . . . . . . . . . . . . . . . . . . . . . . . . . 16
Using the IP Phone UI. . . . . . . . . . . . . . . . . . . . . . . . . . . . . . . . . . . . . . . . . . . . . . . . . . . . . . . . . . . . . . . . . . . . . . . . . . . . . . . . . . . . . . .17
Navigation Keys. . . . . . . . . . . . . . . . . . . . . . . . . . . . . . . . . . . . . . . . . . . . . . . . . . . . . . . . . . . . . . . . . . . . . . . . . . . . . . . . . . . . . . . . . . . .18
Using the Aastra Web UI . . . . . . . . . . . . . . . . . . . . . . . . . . . . . . . . . . . . . . . . . . . . . . . . . . . . . . . . . . . . . . . . . . . . . . . . . . . . . . . . . . . .19
IP Phone Keys and Key Descriptions . . . . . . . . . . . . . . . . . . . . . . . . . . . . . . . . . . . . . . . . . . . . . . . . . . . . . . . . . . . . . . . . . . . . . 23
IP Phone Keys . . . . . . . . . . . . . . . . . . . . . . . . . . . . . . . . . . . . . . . . . . . . . . . . . . . . . . . . . . . . . . . . . . . . . . . . . . . . . . . . . . . . . . . . . . . . . .23
Key Descriptions . . . . . . . . . . . . . . . . . . . . . . . . . . . . . . . . . . . . . . . . . . . . . . . . . . . . . . . . . . . . . . . . . . . . . . . . . . . . . . . . . . . . . . . . . . .24
Hard Keys. . . . . . . . . . . . . . . . . . . . . . . . . . . . . . . . . . . . . . . . . . . . . . . . . . . . . . . . . . . . . . . . . . . . . . . . . . . . . . . . . . . . . . . . . . . . . . . . . . . . . . 26
Line Keys . . . . . . . . . . . . . . . . . . . . . . . . . . . . . . . . . . . . . . . . . . . . . . . . . . . . . . . . . . . . . . . . . . . . . . . . . . . . . . . . . . . . . . . . . . . . . . . . . . .27
Callers List Key . . . . . . . . . . . . . . . . . . . . . . . . . . . . . . . . . . . . . . . . . . . . . . . . . . . . . . . . . . . . . . . . . . . . . . . . . . . . . . . . . . . . . . . . . . . . .29
Directory Key. . . . . . . . . . . . . . . . . . . . . . . . . . . . . . . . . . . . . . . . . . . . . . . . . . . . . . . . . . . . . . . . . . . . . . . . . . . . . . . . . . . . . . . . . . . . . . .33
Redial Key. . . . . . . . . . . . . . . . . . . . . . . . . . . . . . . . . . . . . . . . . . . . . . . . . . . . . . . . . . . . . . . . . . . . . . . . . . . . . . . . . . . . . . . . . . . . . . . . . .42
Services Key . . . . . . . . . . . . . . . . . . . . . . . . . . . . . . . . . . . . . . . . . . . . . . . . . . . . . . . . . . . . . . . . . . . . . . . . . . . . . . . . . . . . . . . . . . . . . . . .45
Conference Key. . . . . . . . . . . . . . . . . . . . . . . . . . . . . . . . . . . . . . . . . . . . . . . . . . . . . . . . . . . . . . . . . . . . . . . . . . . . . . . . . . . . . . . . . . . . .46
Transfer Key. . . . . . . . . . . . . . . . . . . . . . . . . . . . . . . . . . . . . . . . . . . . . . . . . . . . . . . . . . . . . . . . . . . . . . . . . . . . . . . . . . . . . . . . . . . . . . . .46
41-001317-05 REV01 – 06.2013 iii
Page 4

Content
Messages Key . . . . . . . . . . . . . . . . . . . . . . . . . . . . . . . . . . . . . . . . . . . . . . . . . . . . . . . . . . . . . . . . . . . . . . . . . . . . . . . . . . . . . . . . . . . . . .47
Keypad Keys. . . . . . . . . . . . . . . . . . . . . . . . . . . . . . . . . . . . . . . . . . . . . . . . . . . . . . . . . . . . . . . . . . . . . . . . . . . . . . . . . . . . . . . . . . . . . . . .48
Options Key . . . . . . . . . . . . . . . . . . . . . . . . . . . . . . . . . . . . . . . . . . . . . . . . . . . . . . . . . . . . . . . . . . . . . . . . . . . . . . . . . . . . . . . . . . . . . . . . . . . 52
Options List . . . . . . . . . . . . . . . . . . . . . . . . . . . . . . . . . . . . . . . . . . . . . . . . . . . . . . . . . . . . . . . . . . . . . . . . . . . . . . . . . . . . . . . . . . . . . . . .52
Simplified Options List . . . . . . . . . . . . . . . . . . . . . . . . . . . . . . . . . . . . . . . . . . . . . . . . . . . . . . . . . . . . . . . . . . . . . . . . . . . . . . . . . . . . .54
Audio . . . . . . . . . . . . . . . . . . . . . . . . . . . . . . . . . . . . . . . . . . . . . . . . . . . . . . . . . . . . . . . . . . . . . . . . . . . . . . . . . . . . . . . . . . . . . . . . . . . . . .55
Display. . . . . . . . . . . . . . . . . . . . . . . . . . . . . . . . . . . . . . . . . . . . . . . . . . . . . . . . . . . . . . . . . . . . . . . . . . . . . . . . . . . . . . . . . . . . . . . . . . . . .62
Set Time . . . . . . . . . . . . . . . . . . . . . . . . . . . . . . . . . . . . . . . . . . . . . . . . . . . . . . . . . . . . . . . . . . . . . . . . . . . . . . . . . . . . . . . . . . . . . . . . . . . .64
Language . . . . . . . . . . . . . . . . . . . . . . . . . . . . . . . . . . . . . . . . . . . . . . . . . . . . . . . . . . . . . . . . . . . . . . . . . . . . . . . . . . . . . . . . . . . . . . . . . .70
Bluetooth . . . . . . . . . . . . . . . . . . . . . . . . . . . . . . . . . . . . . . . . . . . . . . . . . . . . . . . . . . . . . . . . . . . . . . . . . . . . . . . . . . . . . . . . . . . . . . . . . .75
Softkeys. . . . . . . . . . . . . . . . . . . . . . . . . . . . . . . . . . . . . . . . . . . . . . . . . . . . . . . . . . . . . . . . . . . . . . . . . . . . . . . . . . . . . . . . . . . . . . . . . . . .81
Status . . . . . . . . . . . . . . . . . . . . . . . . . . . . . . . . . . . . . . . . . . . . . . . . . . . . . . . . . . . . . . . . . . . . . . . . . . . . . . . . . . . . . . . . . . . . . . . . . . . . 124
Advanced . . . . . . . . . . . . . . . . . . . . . . . . . . . . . . . . . . . . . . . . . . . . . . . . . . . . . . . . . . . . . . . . . . . . . . . . . . . . . . . . . . . . . . . . . . . . . . . . 127
Password. . . . . . . . . . . . . . . . . . . . . . . . . . . . . . . . . . . . . . . . . . . . . . . . . . . . . . . . . . . . . . . . . . . . . . . . . . . . . . . . . . . . . . . . . . . . . . . . . 128
Restart . . . . . . . . . . . . . . . . . . . . . . . . . . . . . . . . . . . . . . . . . . . . . . . . . . . . . . . . . . . . . . . . . . . . . . . . . . . . . . . . . . . . . . . . . . . . . . . . . . . 130
Lock. . . . . . . . . . . . . . . . . . . . . . . . . . . . . . . . . . . . . . . . . . . . . . . . . . . . . . . . . . . . . . . . . . . . . . . . . . . . . . . . . . . . . . . . . . . . . . . . . . . . . . 131
Making Calls . . . . . . . . . . . . . . . . . . . . . . . . . . . . . . . . . . . . . . . . . . . . . . . . . . . . . . . . . . . . . . . . . . . . . . . . . . . . . . . . . . . . . . . . . . . . . . . . . 133
Dialing a Number . . . . . . . . . . . . . . . . . . . . . . . . . . . . . . . . . . . . . . . . . . . . . . . . . . . . . . . . . . . . . . . . . . . . . . . . . . . . . . . . . . . . . . . . 133
Using Handsfree Speakerphone . . . . . . . . . . . . . . . . . . . . . . . . . . . . . . . . . . . . . . . . . . . . . . . . . . . . . . . . . . . . . . . . . . . . . . . . . . 134
Using a Headset . . . . . . . . . . . . . . . . . . . . . . . . . . . . . . . . . . . . . . . . . . . . . . . . . . . . . . . . . . . . . . . . . . . . . . . . . . . . . . . . . . . . . . . . . . 134
Using Intercom . . . . . . . . . . . . . . . . . . . . . . . . . . . . . . . . . . . . . . . . . . . . . . . . . . . . . . . . . . . . . . . . . . . . . . . . . . . . . . . . . . . . . . . . . . . 135
Muting a Call . . . . . . . . . . . . . . . . . . . . . . . . . . . . . . . . . . . . . . . . . . . . . . . . . . . . . . . . . . . . . . . . . . . . . . . . . . . . . . . . . . . . . . . . . . . . . 136
Receiving Calls. . . . . . . . . . . . . . . . . . . . . . . . . . . . . . . . . . . . . . . . . . . . . . . . . . . . . . . . . . . . . . . . . . . . . . . . . . . . . . . . . . . . . . . . . . . . . . . 137
Answering an Incoming Call . . . . . . . . . . . . . . . . . . . . . . . . . . . . . . . . . . . . . . . . . . . . . . . . . . . . . . . . . . . . . . . . . . . . . . . . . . . . . . 137
Sending an Incoming Call to Voicemail . . . . . . . . . . . . . . . . . . . . . . . . . . . . . . . . . . . . . . . . . . . . . . . . . . . . . . . . . . . . . . . . . . . 138
Handling Calls . . . . . . . . . . . . . . . . . . . . . . . . . . . . . . . . . . . . . . . . . . . . . . . . . . . . . . . . . . . . . . . . . . . . . . . . . . . . . . . . . . . . . . . . . . . . . . . 139
Placing a Call on Hold . . . . . . . . . . . . . . . . . . . . . . . . . . . . . . . . . . . . . . . . . . . . . . . . . . . . . . . . . . . . . . . . . . . . . . . . . . . . . . . . . . . . 139
Transferring Calls . . . . . . . . . . . . . . . . . . . . . . . . . . . . . . . . . . . . . . . . . . . . . . . . . . . . . . . . . . . . . . . . . . . . . . . . . . . . . . . . . . . . . . . . 140
Conferencing Calls . . . . . . . . . . . . . . . . . . . . . . . . . . . . . . . . . . . . . . . . . . . . . . . . . . . . . . . . . . . . . . . . . . . . . . . . . . . . . . . . . . . . . . . 144
Ending Calls . . . . . . . . . . . . . . . . . . . . . . . . . . . . . . . . . . . . . . . . . . . . . . . . . . . . . . . . . . . . . . . . . . . . . . . . . . . . . . . . . . . . . . . . . . . . . . 149
Managing Calls . . . . . . . . . . . . . . . . . . . . . . . . . . . . . . . . . . . . . . . . . . . . . . . . . . . . . . . . . . . . . . . . . . . . . . . . . . . . . . . . . . . . . . . . . . . . . . 150
Account Configuration (DND and Call Forwarding) . . . . . . . . . . . . . . . . . . . . . . . . . . . . . . . . . . . . . . . . . . . . . . . . . . . . . . . 150
Missed Calls Indicator . . . . . . . . . . . . . . . . . . . . . . . . . . . . . . . . . . . . . . . . . . . . . . . . . . . . . . . . . . . . . . . . . . . . . . . . . . . . . . . . . . . . 164
iv 41-001317-05 REV01 – 06.2013
Page 5

Content
Voicemail . . . . . . . . . . . . . . . . . . . . . . . . . . . . . . . . . . . . . . . . . . . . . . . . . . . . . . . . . . . . . . . . . . . . . . . . . . . . . . . . . . . . . . . . . . . . . . . . 165
Additional Features . . . . . . . . . . . . . . . . . . . . . . . . . . . . . . . . . . . . . . . . . . . . . . . . . . . . . . . . . . . . . . . . . . . . . . . . . . . . . . . . . . . . . . . . 166
Star Codes. . . . . . . . . . . . . . . . . . . . . . . . . . . . . . . . . . . . . . . . . . . . . . . . . . . . . . . . . . . . . . . . . . . . . . . . . . . . . . . . . . . . . . . . . . . . . . . . 166
Call Waiting . . . . . . . . . . . . . . . . . . . . . . . . . . . . . . . . . . . . . . . . . . . . . . . . . . . . . . . . . . . . . . . . . . . . . . . . . . . . . . . . . . . . . . . . . . . . . . 166
Display DTMF Digits. . . . . . . . . . . . . . . . . . . . . . . . . . . . . . . . . . . . . . . . . . . . . . . . . . . . . . . . . . . . . . . . . . . . . . . . . . . . . . . . . . . . . . 167
Play Call Waiting Tone . . . . . . . . . . . . . . . . . . . . . . . . . . . . . . . . . . . . . . . . . . . . . . . . . . . . . . . . . . . . . . . . . . . . . . . . . . . . . . . . . . . 168
Stuttered Dial Tone. . . . . . . . . . . . . . . . . . . . . . . . . . . . . . . . . . . . . . . . . . . . . . . . . . . . . . . . . . . . . . . . . . . . . . . . . . . . . . . . . . . . . . . 169
XML Beep Support. . . . . . . . . . . . . . . . . . . . . . . . . . . . . . . . . . . . . . . . . . . . . . . . . . . . . . . . . . . . . . . . . . . . . . . . . . . . . . . . . . . . . . . . 170
Status Scroll Delay . . . . . . . . . . . . . . . . . . . . . . . . . . . . . . . . . . . . . . . . . . . . . . . . . . . . . . . . . . . . . . . . . . . . . . . . . . . . . . . . . . . . . . . 171
Call Hold Reminder During Active Calls . . . . . . . . . . . . . . . . . . . . . . . . . . . . . . . . . . . . . . . . . . . . . . . . . . . . . . . . . . . . . . . . . . . 172
Call Hold Reminder (on single hold) . . . . . . . . . . . . . . . . . . . . . . . . . . . . . . . . . . . . . . . . . . . . . . . . . . . . . . . . . . . . . . . . . . . . . . 173
Call Waiting Tone Period . . . . . . . . . . . . . . . . . . . . . . . . . . . . . . . . . . . . . . . . . . . . . . . . . . . . . . . . . . . . . . . . . . . . . . . . . . . . . . . . . 174
Preferred Line and Preferred Line Timeout. . . . . . . . . . . . . . . . . . . . . . . . . . . . . . . . . . . . . . . . . . . . . . . . . . . . . . . . . . . . . . . . 175
Message Waiting Indicator . . . . . . . . . . . . . . . . . . . . . . . . . . . . . . . . . . . . . . . . . . . . . . . . . . . . . . . . . . . . . . . . . . . . . . . . . . . . . . . 177
Incoming Intercom Call Features . . . . . . . . . . . . . . . . . . . . . . . . . . . . . . . . . . . . . . . . . . . . . . . . . . . . . . . . . . . . . . . . . . . . . . . . . 178
Using Redial Key for “Last Number Redial” . . . . . . . . . . . . . . . . . . . . . . . . . . . . . . . . . . . . . . . . . . . . . . . . . . . . . . . . . . . . . . . 179
Group RTP Paging (receives RTP streams) . . . . . . . . . . . . . . . . . . . . . . . . . . . . . . . . . . . . . . . . . . . . . . . . . . . . . . . . . . . . . . . . 180
Shared Call Appearance (SCA) Call Bridging . . . . . . . . . . . . . . . . . . . . . . . . . . . . . . . . . . . . . . . . . . . . . . . . . . . . . . . . . . . . . . 181
Available Features Enabled by Administrators . . . . . . . . . . . . . . . . . . . . . . . . . . . . . . . . . . . . . . . . . . . . . . . . . . . . . . . 183
Outgoing Intercom Calls. . . . . . . . . . . . . . . . . . . . . . . . . . . . . . . . . . . . . . . . . . . . . . . . . . . . . . . . . . . . . . . . . . . . . . . . . . . . . . . . . . 183
Missed Call Summary Subscription . . . . . . . . . . . . . . . . . . . . . . . . . . . . . . . . . . . . . . . . . . . . . . . . . . . . . . . . . . . . . . . . . . . . . . . 183
Customizable Callers List Key and Services Key . . . . . . . . . . . . . . . . . . . . . . . . . . . . . . . . . . . . . . . . . . . . . . . . . . . . . . . . . . . 184
Autodial (Hotline and Warmline) . . . . . . . . . . . . . . . . . . . . . . . . . . . . . . . . . . . . . . . . . . . . . . . . . . . . . . . . . . . . . . . . . . . . . . . . . 184
Centralized Conferencing . . . . . . . . . . . . . . . . . . . . . . . . . . . . . . . . . . . . . . . . . . . . . . . . . . . . . . . . . . . . . . . . . . . . . . . . . . . . . . . . 184
Answer and Ignore Softkeys for XML Applications . . . . . . . . . . . . . . . . . . . . . . . . . . . . . . . . . . . . . . . . . . . . . . . . . . . . . . . . 185
XML Softkey for Special Characters in XML Applications . . . . . . . . . . . . . . . . . . . . . . . . . . . . . . . . . . . . . . . . . . . . . . . . . . 185
Playing a WAV File On Your Phone. . . . . . . . . . . . . . . . . . . . . . . . . . . . . . . . . . . . . . . . . . . . . . . . . . . . . . . . . . . . . . . . . . . . . . . . 186
Using the Keypad During Active XML Applications . . . . . . . . . . . . . . . . . . . . . . . . . . . . . . . . . . . . . . . . . . . . . . . . . . . . . . . . 186
Key Redirection . . . . . . . . . . . . . . . . . . . . . . . . . . . . . . . . . . . . . . . . . . . . . . . . . . . . . . . . . . . . . . . . . . . . . . . . . . . . . . . . . . . . . . . . . . 187
XML Applications and Off-Hook Interaction . . . . . . . . . . . . . . . . . . . . . . . . . . . . . . . . . . . . . . . . . . . . . . . . . . . . . . . . . . . . . . 187
XML Override for a Locked Phone. . . . . . . . . . . . . . . . . . . . . . . . . . . . . . . . . . . . . . . . . . . . . . . . . . . . . . . . . . . . . . . . . . . . . . . . . 188
“Hold” Feature Enhancement (for Broadsoft Servers) . . . . . . . . . . . . . . . . . . . . . . . . . . . . . . . . . . . . . . . . . . . . . . . . . . . . . 188
Authentication Support for HTTP/HTTPS Download Methods Used
with Broadsoft Client Management System (CMS) . . . . . . . . . . . . . . . . . . . . . . . . . . . . . . . . . . . . . . . . . . . . . . . . . . . . . . . . 188
41-001317-05 REV01 – 06.2013 v
Page 6

Content
Diverting Calls from Your Phone. . . . . . . . . . . . . . . . . . . . . . . . . . . . . . . . . . . . . . . . . . . . . . . . . . . . . . . . . . . . . . . . . . . . . . . . . . 189
Display of Call Destination Information . . . . . . . . . . . . . . . . . . . . . . . . . . . . . . . . . . . . . . . . . . . . . . . . . . . . . . . . . . . . . . . . . . 190
Indication of Terminated Calls. . . . . . . . . . . . . . . . . . . . . . . . . . . . . . . . . . . . . . . . . . . . . . . . . . . . . . . . . . . . . . . . . . . . . . . . . . . . 191
Model M670i and M675i Expansion Modules. . . . . . . . . . . . . . . . . . . . . . . . . . . . . . . . . . . . . . . . . . . . . . . . . . . . . . . . . . 193
Using the Expansion Modules . . . . . . . . . . . . . . . . . . . . . . . . . . . . . . . . . . . . . . . . . . . . . . . . . . . . . . . . . . . . . . . . . . . . . . . . . . . . 194
Troubleshooting Solutions. . . . . . . . . . . . . . . . . . . . . . . . . . . . . . . . . . . . . . . . . . . . . . . . . . . . . . . . . . . . . . . . . . . . . . . . . . . . . . . . 196
Limited Warranty . . . . . . . . . . . . . . . . . . . . . . . . . . . . . . . . . . . . . . . . . . . . . . . . . . . . . . . . . . . . . . . . . . . . . . . . . . . . . . . . . . . .Warranty-1
Exclusions . . . . . . . . . . . . . . . . . . . . . . . . . . . . . . . . . . . . . . . . . . . . . . . . . . . . . . . . . . . . . . . . . . . . . . . . . . . . . . . . . . . . . . . . . Warranty-1
Warranty Repair Services . . . . . . . . . . . . . . . . . . . . . . . . . . . . . . . . . . . . . . . . . . . . . . . . . . . . . . . . . . . . . . . . . . . . . . . . . . Warranty-1
After Warranty Service . . . . . . . . . . . . . . . . . . . . . . . . . . . . . . . . . . . . . . . . . . . . . . . . . . . . . . . . . . . . . . . . . . . . . . . . . . . . Warranty-1
Limited Warranty (Australia Only). . . . . . . . . . . . . . . . . . . . . . . . . . . . . . . . . . . . . . . . . . . . . . . . . . . . . . . . . . . . . . . .Warranty-2
Repair Notice. . . . . . . . . . . . . . . . . . . . . . . . . . . . . . . . . . . . . . . . . . . . . . . . . . . . . . . . . . . . . . . . . . . . . . . . . . . . . . . . . . . . . . Warranty-2
Exclusions . . . . . . . . . . . . . . . . . . . . . . . . . . . . . . . . . . . . . . . . . . . . . . . . . . . . . . . . . . . . . . . . . . . . . . . . . . . . . . . . . . . . . . . . . Warranty-2
Warranty Repair Services . . . . . . . . . . . . . . . . . . . . . . . . . . . . . . . . . . . . . . . . . . . . . . . . . . . . . . . . . . . . . . . . . . . . . . . . . . Warranty-3
After Warranty Service . . . . . . . . . . . . . . . . . . . . . . . . . . . . . . . . . . . . . . . . . . . . . . . . . . . . . . . . . . . . . . . . . . . . . . . . . . . . Warranty-3
Appendix A - Time Zone Codes. . . . . . . . . . . . . . . . . . . . . . . . . . . . . . . . . . . . . . . . . . . . . . . . . . . . . . . . . . . . . . . . . . . . . . . . . . . A-1
Index . . . . . . . . . . . . . . . . . . . . . . . . . . . . . . . . . . . . . . . . . . . . . . . . . . . . . . . . . . . . . . . . . . . . . . . . . . . . . . . . . . . . . . . . . . . . . . . . . . . . . . Index-1
vi 41-001317-05 REV01 – 06.2013
Page 7

Welcome
The Aastra 6739i, a new member of the carrier-grade, open-standards based 67xi SIP portfolio, brings leading
edge communications technology to the desktop in a stylish global design. Featuring a 5.7” full color high
resolution VGA touch screen display, the 6739i offers an intuitive graphical user interface, touch screen softkeys,
full duplex wideband audio speaker and handset, dual Gigabit Ethernet ports, built-in bluetooth interface
technology, and a USB port. The 6739i also is equipped with multiple headset connection options and extensive
call management capabilities.
This 6739i IP telephone has all the features of a regular business phone, allowing you to make and receive calls,
transfer, conference and more. The 6739i IP telephone provides communications over an IP Network using the SIP
IP telephony protocol. The easy-to-use touch-screen technology allows you to interact with features and functions
on the phone faster and more conveniently.
About this guide
This guide explains how to use the basic features of your new 6739i phone. Not all features listed are available by default.
Contact your system or network administrator to find out which features and services are available to you on your system.
Your System Administrator has the ability to customize some features on this phone.
Reference
For information on more advanced settings and configurations, administrators should refer to the Aastra Models 9000i
and 6700i Series SIP IP Phones Administrator Guide.
Documentation
• Aastra 6739i SIP IP Phone Installation Guide – Installation and set-up instructions, general features and functions, and
basic options to customize your phone. This Installation Guide is included with the telephone.
• Aastra 6739i SIP IP Phone User Guide – Describes the most commonly used features and functions for an end user. This
User Guide can be downloaded from http://www.aastra.com.
• Aastra Models 9000i and 6700i Series SIP IP Phones Administrator Guide – Describes how to set the 6739i phone up
on the network and contains advanced configuration instructions for the 6739i. This guide has instructions that are at
an administrator level. This Administrator Guide is intended for the System Administrator and can be downloaded from
http://www.aastra.com.
Phone Features
• Large 5.7” full VGA (640x480) color touch screen display and backlight
• Advanced and expandable Executive Level SIP Phone
• Intuitive graphical user interface and navigation menus
• Two built-in 10/100/1000 Gigabit Ethernet switch ports - lets you share a connection with your computer.
• Inline power support (based on 802.3af Power-over-Ethernet (PoE) standard) which eliminates power adapters
• Built-in Bluetooth technology for headset support
• Existing 675xi Expansion Module support
• USB port support (for future use)
• Aastra Hi-Q Audio™ Technology
• Full-duplex speakerphone for handsfree calls
41-001317-05 REV01 – 06.2013 1
Page 8

Welcome
• Additional headset connection options: modular RJ jack, built-in EHS/DHSG port
(refer to the IP Phone 6739i Installation Guide for information on installing a DHSG headset on your phone.)
• Up to 9 lines with 3 call appearance lines with multi-proxy support
• Up to 55 programmable softkeys
• Picture ID feature (during calls and in the Directory, Callers List, and Redial List)
• XML support for productivity-enhancing applications
• AC power adapter (sold separately)
• Set paging*
* Availability of feature dependant on your phone system or service provider.
Requirements
The 6739i IP Phone requires the following environment:
• SIP-based IP PBX system or network installed and running with a SIP account created for the 6753i phone.
• Access to a Trivial File Transfer Protocol (TFTP), File Transfer Protocol (FTP), Hypertext Transfer Protocol (HTTP) server,
or Hyper Text Transfer Protocol over Secure Sockets Layer (SSL) (HTTPS).
• Ethernet/Fast Ethernet LAN (10/100 BaseT) or Gigabit Ethernet LAN (1000 BaseT) (Gigabit Ethernet LAN (1000 Mbps)
recommended)
• Category 5/5e straight through cabling (category 6 straight through cabling required for optimum Gigabit Ethernet
performance)
• Power source
– For Ethernet networks that supply in-line power to the phone (IEEE 802.3af):
– For power, use the Ethernet cable (supplied) to connect from the phone directly to the network for power. (No AC
power adapter required.)
– For Ethernet networks that DO NOT supply power to the phone:
– (optional) For power, use the AC Power Adapter (optional accessory) to connect from the DC power port on the
phone to a power source. Contact Aastra Telecom for more information.
or
– (optional) For power, use a Power over Ethernet (PoE) power injector or a PoE switch. A PoE power injector is avail-
able as an optional accessory from Aastra Telecom. Contact your Administrator for more information.
Installation and Setup
If your System Administrator has not already setup your 6739i phone, please refer to the Aastra 6739i Installation Guide
for basic installation and physical setup information. For more advanced administration and configuration information,
System Administrators should refer to the Aastra Models 9000i and 6700i Series SIP IP Phones Administrator Guide.
2 41-001317-05 REV01 – 06.2013
Page 9

Welcome
Cleaning the 6739i Touchscreen
Repeated use of the 6739i touchscreen may lead to a dirty screen. To clean the phone’s screen, Aastra recommends the
use of a super fine cotton cloth, cotton swab, or microfiber lens cloth made of microfiber suede (preferably one without
sewn hems or similar characteristics that would scratch the surface of the screen). You can use the cloth dry for dusting,
polishing and light cleaning, or dampen it (with water only) to deep clean the surface. If using a damp cloth, make sure to
use just a little water on the cloth. Too much moisture can cause damage to your phone that could be permanent. If the
cloth is dripping or the surface shows water spots after wiping, then you are using too much water on the cloth.
Some rules to follow when cleaning your screen are:
• DO NOT use any sharp objects including your fingernail.
• DO NOT rub, touch or tap the surface of the screen with sharp or abrasive items such as a ball-point pen or a screw
driver.
• DO NOT use any type of cleansers including abrasive cleansers.
• DO NOT use any type of glass cleaner or any cleaner that contains alcohol or ammonia.
• DO NOT spray any type of cleaner directly on the phone’s screen.
• DO NOT allow any liquid to run down the surface of the touchscreen and under the bezel.
• If using a damp cloth, DISCONNECT power to the phone before wiping the screen.
Caution:
DO NOT use chemicals or sharp objects to clean your phone. Use of any type of cleaners, alcohol, ammonia, etc., and/or
hard or sharp objects can harm the touchscreen surface and potentially cause transparent conductive film cracks in the
screen.
To clean your 6739i touchscreen:
1. Disconnect power to your phone.
2. Get a soft cloth, such as a microfiber cloth.
3. If necessary, dampen the cloth. (For regular cleanings, a dry cloth is usually sufficient. For stubborn build-up
or for periodic deep cleanings, get the cloth wet under the faucet and then wring out until it is just damp.)
4. Wipe the screen gently with the cloth making sure to not get any moisture in the sides of the screen. You
can also wipe down the entire phone to remove dirt and grime.
5. Allow your phone to completely dry after you are done cleaning. This should only take a few minutes
6. Reconnect power to your phone.
Note:
Keeping your touchscreen clean and free of dirt and fingerprints on a regular basis extends the life of your phone’s
touchscreen.
41-001317-05 REV01 – 06.2013 3
Page 10

Getting Started
The 6739i must be set up and be configured prior to its first use. This section describes phone behaviour and start up
screens you may see when the phone is first plugged in, or when it is restarted.
Plugging in and Starting the Phone
The 6739i automatically begins the start up sequence as soon as it is connected. The phone goes through the following
startup process the first time you plug in your phone and any time you restart your phone.
0%
15%
LLDP
20%
DHCP: Waiting for IP
4 41-001317-05 REV01 – 06.2013
Page 11
Getting Started
50%
Checking for Firmware. Do Not Unplug Phone
50%
Updating configuration.......
The 6739i phone checks for a changed configuration and new firmware updates if available, whenever you unplug or
restart your phone. If either of these events occur (you unplugged or restarted the phone), the following screens display.
This may take a few moments while the phone downloads the latest updates.
Note:
New updates to your phone can be automatically scheduled from the server. This is set up on the phone system by your
System Administrator and should be scheduled during non-business hours or slow call periods.
Important!
Do not unplug or remove power to the phone while it is checking or installing firmware and configuration information.
If language packs were loaded to your phone by your System Administrator, the following screen displays.
80%
Downloading language packs......
41-001317-05 REV01 – 06.2013 5
Page 12

Getting Started
92%
SIP
99%
Bluetooth Upgrade... Please Wait
100%
Done
Idle Screen
L1 John Smith 401
12 : 45pm
Mon Jan 1
John Smith
401
The phone then displays the following screens followed by the Idle screen.
80%
Network
85%
DSP
6 41-001317-05 REV01 – 06.2013
Page 13
Getting Started
L1 John Smith 401
12 : 45pm
Mon Jan 1
Network
Disconnected
Network Connected/Network Disconnected
If your phone is successful when connecting to the network the following screen displays before changing to the Idle
screen.
L1 John Smith 401
Network
Connected
Mon Jan 1
12 : 45pm
If your phone did not successfully connect to the network, the "Network Disconnected" prompt appears on the display
and the telephone status light turns on.
Check that the cables are tightly connected to the phone and to the wall jack. The phone should automatically detect
when it is reconnected and displays the "Network Connected" prompt for a few seconds. However, if changes have been
made to your phone’s network settings, you may need to restart your phone.
For more information about connecting your phone, see the Aastra 6739i IP Phone Installation Guide. Check with your
system or network administrator for assistance.
Note:
If the phone displays "No Service" you can still use the phone but it is not registered with the Registrar. For more information about registering your phone, see your System Administrator.
41-001317-05 REV01 – 06.2013 7
Page 14

Getting Started
L1 John Smith 401
12 : 45pm
Mon Jan 1
John Smith
401
Status Icon
Day, Date, Time
User Name and
Phone Number/
Extension
phone onhook
(shows here as
and idle)
Softkeys
Idle Screen
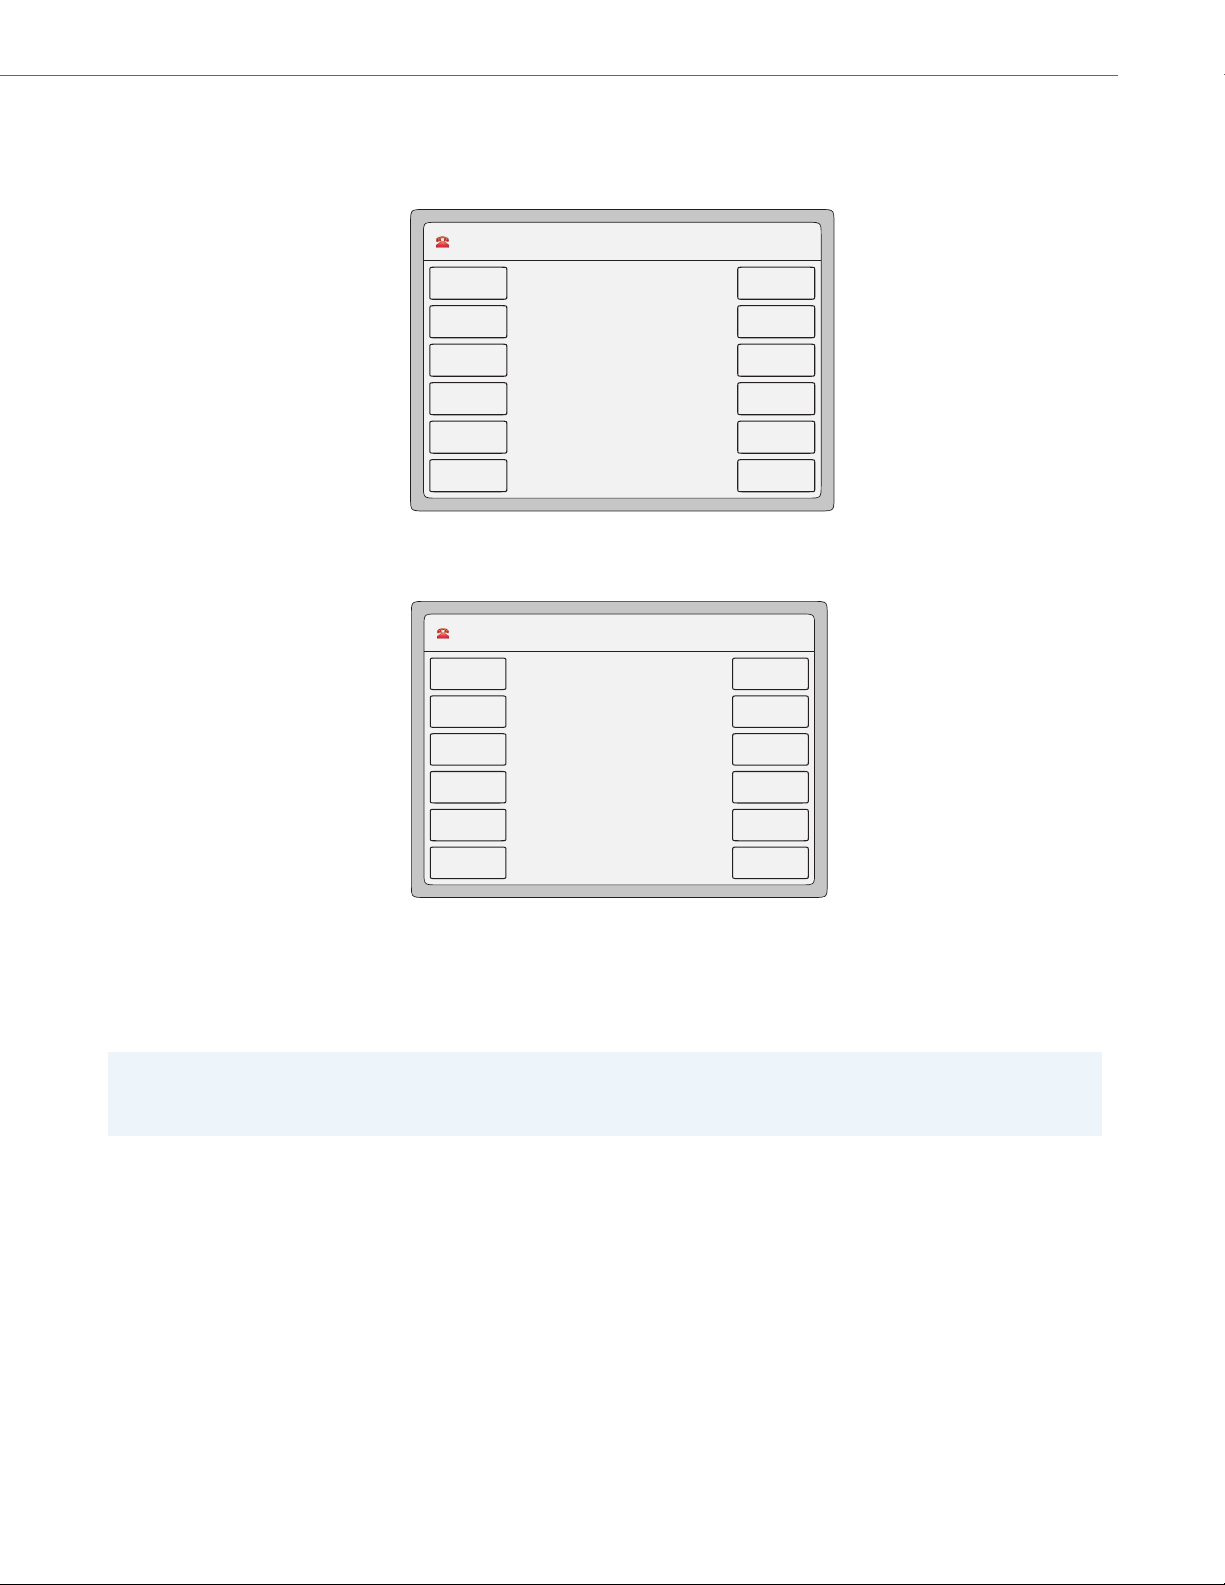
When the phone is successfully connected to the network, the phone displays the Idle screen. The idle screen is shown
whenever your phone is not in use.
Note:
Your System Administrator sets up your SIP screen name, line number, and any other administrative features required.
If your name does not display on the screen, contact your System Administrator.
The Idle screen lists your name and/or extension (SIP screen name) and day, date, and time. In the above screen, the "L1"
indicates John Smith with extension 401 is configured on Line 1. The icon indicates the phone is idle and the handset is on-hook.
By default, the softkeys display as empty. You can configure these softkeys with specific functions using the Aastra Web
User Interface (UI), or your System Administrator may have configured some of these softkeys for you.
Reference
For more information about the Status Icons on the phone, see “Phone Status Icons” on page 9.
For more information about configuring the softkeys, see “Softkeys” on page 81.
8 41-001317-05 REV01 – 06.2013
Page 15

Getting Started
Phone Status Icons
There are icons that display on the phone to graphically indicate the status of the phone and/or the status of calls. These
icons display on the upper left corner of the screen. The following table identifies the status icons that may display.
Status Icon Description
Idle - Phone is on-hook and in the idle state.
Handset or Speakerphone/Headset Off-Hook - Handset or the speakerphone/headset is off-hook and the caller is dialing.
Call Connected and in Progress - There is an active call connected and in progress.
Incoming Call - The phone is ringing due to an incoming call.
Drop Conference Call - To drop a party from the conference.
Conference Call - The current line on the phone has multiple callers connected via a Conference.
Busy - An outgoing call is being made to a far-end destination, and the far-end line is busy.
Call Park - The current line on the phone has a call parked.
Call Pickup - The line that has a call parked on it was pressed to pick up the parked call.
DND - The current line on the phone has “Do Not Disturb” (DND) enabled.
Call Failed - The outgoing call to a far-end destination has failed.
Forward/Transfer - The call on the line has been forwarded/transferred to another destination.
Hang Up - The User has placed the handset in its cradle (on-hook) or pressed the Speakerphone/Headset key to hang up the
phone.
Intercom - The User has pressed the Intercom Key.
Handset Volume - The User is adjusting the volume for the Handset.
Headset Volume - The User is adjusting the volume for the Headset.
Ringer Volume - The User is adjusting the volume for the Ringer.
Speakerphone Volume - The User is adjusting the volume for the Speakerphone.
41-001317-05 REV01 – 06.2013 9
Page 16

Getting Started
Idle Screen with Softkeys
Configured
softkeys
Indicates more
pages
L1 John Smith 401
12 : 45pm
Mon Jan 1
John Smith
401
Home
DND
404
Call Forward
406
Flash
Intercom
Paging
Park
Pickup
402
Idle Screen with Feature Icons
Call Forward
Icon
DND
Icon
Messages
Icon
Bluetooth
Icon
Idle Screen With Softkeys Configured
If you or your Administrator have configured softkey functions on your phone, the keys for those functions display on
the screen. The 6739i displays up to 12 softkeys per page. If you configure more than 12 softkeys, the last softkey displays
with leaders ( ) indicating there are more softkeys on additional pages that follow. Pressing this key toggles
between pages of configured softkeys. You can configure up to 55 softkeys on the 6739i. For example, the following illustration, shows 11 softkeys and a key on the phone.
L1 John Smith 401
Home
402
John Smith
Mon Jan 1
12 : 45pm
503
Office
401
403
404
405
406
BLF
Park
Pickup
Idle Screen with Feature Icons
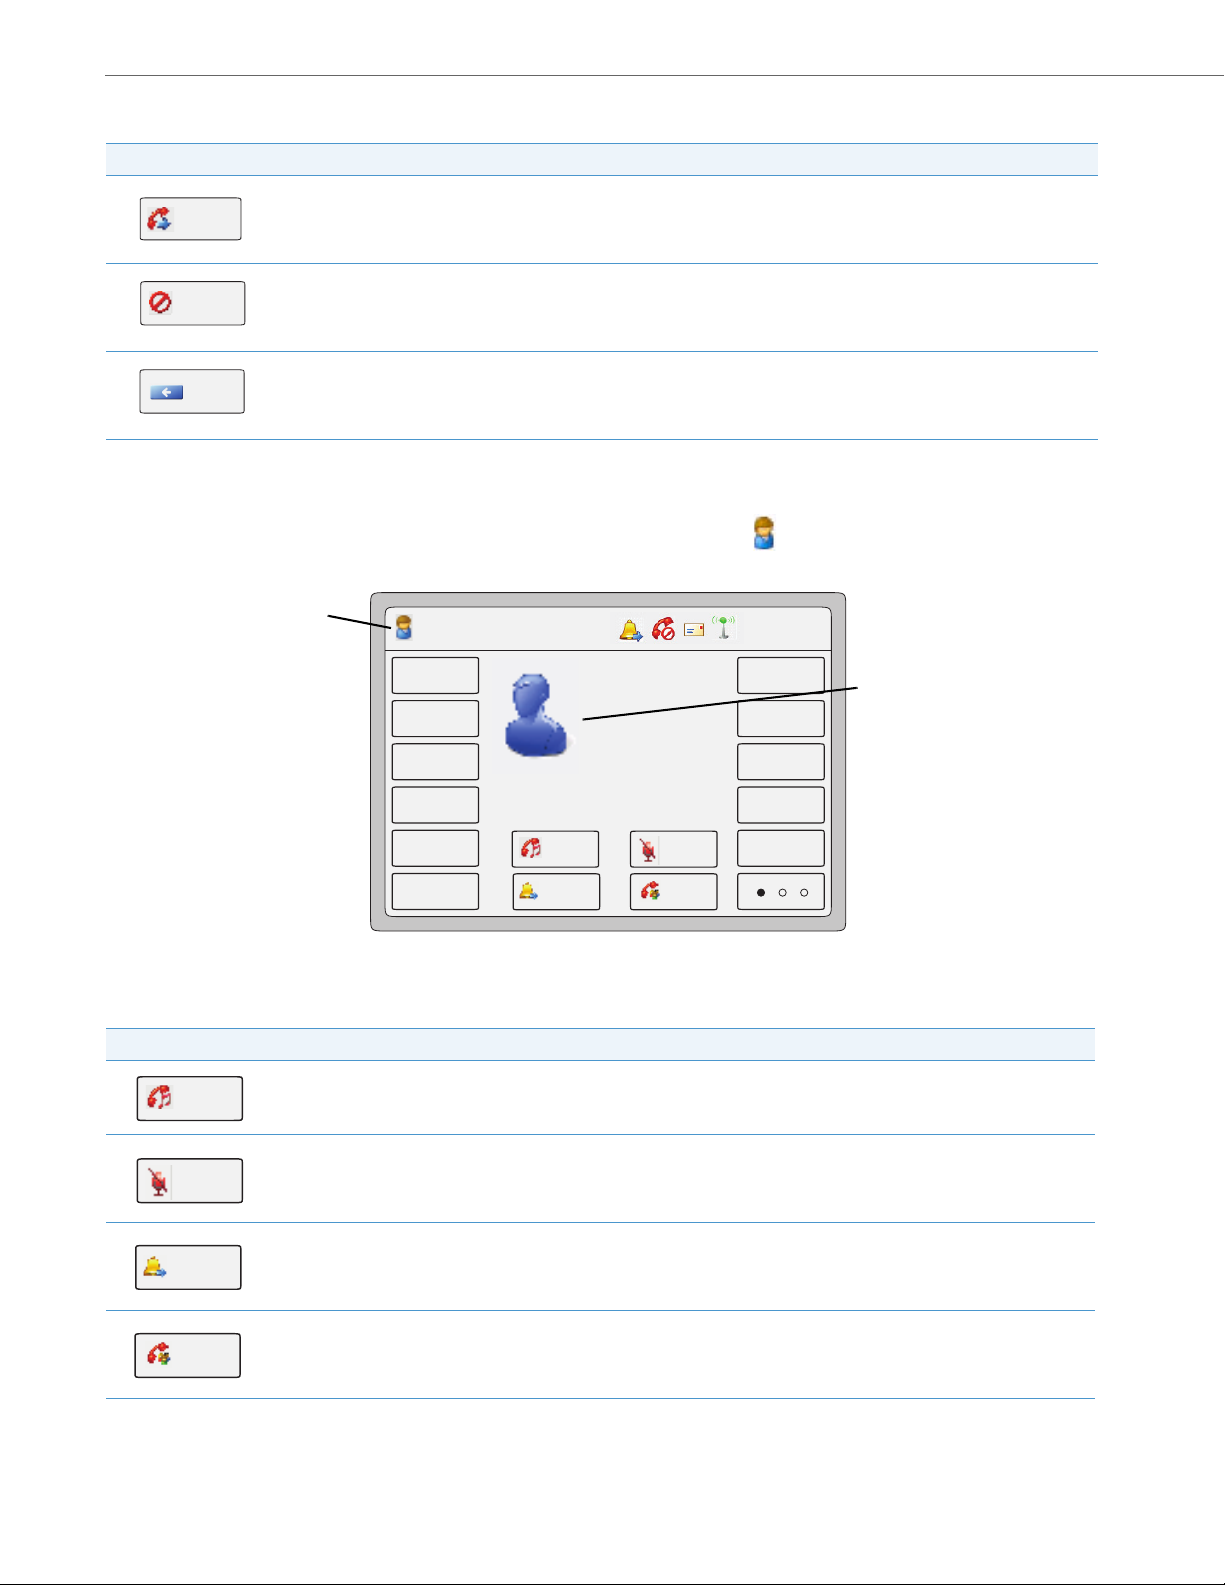
You can configure specific features on your phone such as, Call Forward and Do Not Disturb (DND). When you use these
features on your phone, each feature icon displays at the top of the Idle screen indicating the feature is enabled. When
you receive messages in your mailbox, a “Messages” icon also displays.
10 41-001317-05 REV01 – 06.2013
Page 17

Getting Started
Dial
Off-Hook and Dialing Screen
L1 John Smith 401
12 : 45pm
Mon Jan 1
>601
Home
DND
404
Call Forward
406
Flash
Intercom
Paging
Park
Pickup
402
Dial
Bksp
Cancel
Phone Off-hook
Status Icon
Number Dialed
Off-Hook and Dialing Screen
When you lift the handset or press the Speakerphone/Headset key on the phone, the screen displays a “Dial” key and a
“Cancel” key you can use for dialing or cancelling a call. The off-hook status icon displays in the upper left corner of
the screen.
Icon Description
Dial Button - Press this button after entering a phone number or extension from the phone’s keypad. The phone dials the
number you entered.
Cancel
Cancel Button - Press this button to cancel a dialing process.
Call Forward Icon - Indicates that Call Forwarding is enabled on the phone.
Do Not Disturb (DND) Icon - Indicates DND is enabled on the phone.
Messages Icon - Indicates you have new messages waiting in your “In Box” of your voicemail. Press this icon to access your
voicemail to listen to your messages.
Your voicemail must be setup by your System Administrator before you can access voicemail from your phone. Contact
your System Administrator for more information, or refer to the documentation of for the voicemail system you are using.
Bluetooth Icon - Indicates you have a Bluetooth device connected to your phone.
You can enter a phone number or extension using the keypad on the phone, then press “Dial” to dial that number. The
dialed number or extension appears on the screen. You can press the Cancel key at any time to cancel the outgoing call.
41-001317-05 REV01 – 06.2013 11
Page 18
Getting Started
Dial
Cancel
Connected and Active Call Screen
Call Connected
Status Icon
Indicates an
active call in
progress
Hold
Mute
Transfer
Conf
Key Description
Dial Button - Press this button after entering a phone number or extension from the phone’s keypad. The phone dials the
number you entered.
Cancel Button - Press this button to cancel a dialing process.
Bksp
Backspace Button - Press this button when entering the phone number and you want to backspace to delete characters.
Connected Call Screen
When you make a call and the far end answers, the call connected status icon displays in the upper left corner. The
phone screen displays as follows indicating an active call is in progress.
L1 John Smith 401
Home
402
DND
404
Call Forward
406
Hold
Transfer
00:45
Carol Dun
6006
Mute
Conf
Mon Jan 1
12 : 45pm
Flash
Intercom
Paging
Park
Pickup
Key Description
12 41-001317-05 REV01 – 06.2013
Hold Button - Press this button to place the active call on hold.
Mute Button - Press this button to place the active call on mute. (This puts your phone on mute so that the far end cannot
hear any audio from your phone. However, you can still hear the far end).
Transfer Button - Press this button to transfer the active call to another destination.
Conference Button - Press this button to begin a conference call between you, the current active call, and a 3rd party.
Page 19

Getting Started
Incoming Call Screen
Ringing
Status Icon
Caller ID of
incoming caller
L1 John Smith 401
12 : 45pm
Mon Jan 1
Home
DND
404
Call Forward
406
Flash
Intercom
Paging
Park
Pickup
402
Answer Reject
Silence
Carol Dun
6006
Incoming Call
keys
Answer
Reject
Silence
Incoming Call Screen
When your phone receives an incoming call, a ringing status icon displays in the upper left corner. The Caller ID of
the caller displays on the screen. The “Answer”, “Reject”, a nd “Silence” keys also display allowing you to select how you
want to handle the incoming call.
Key Description
Answer Button - Press this button to answer the incoming call.
Reject Button - Press this button to reject the incoming call and direct the call to your voicemail.
Silence Button - Press this button to silence the ringer during the incoming call.
41-001317-05 REV01 – 06.2013 13
Page 20
Getting Started
Multiple Incoming Calls Screen 1
Call in-progress
on Line 1
Caller ID of active
caller on Line 1
Dan Jones
507
L2
Pop-up of
another incoming
caller on Line 2
Multiple Incoming Calls Screen 2
Call Ringing
on Line 2
Press the name
in this pop-up
to display the
Line Keys
Line Keys
Dan Jones
507
L2
Active call on
Incoming Call
not yet answered
Line 1
on Line 2
Multiple Incoming Calls Screens
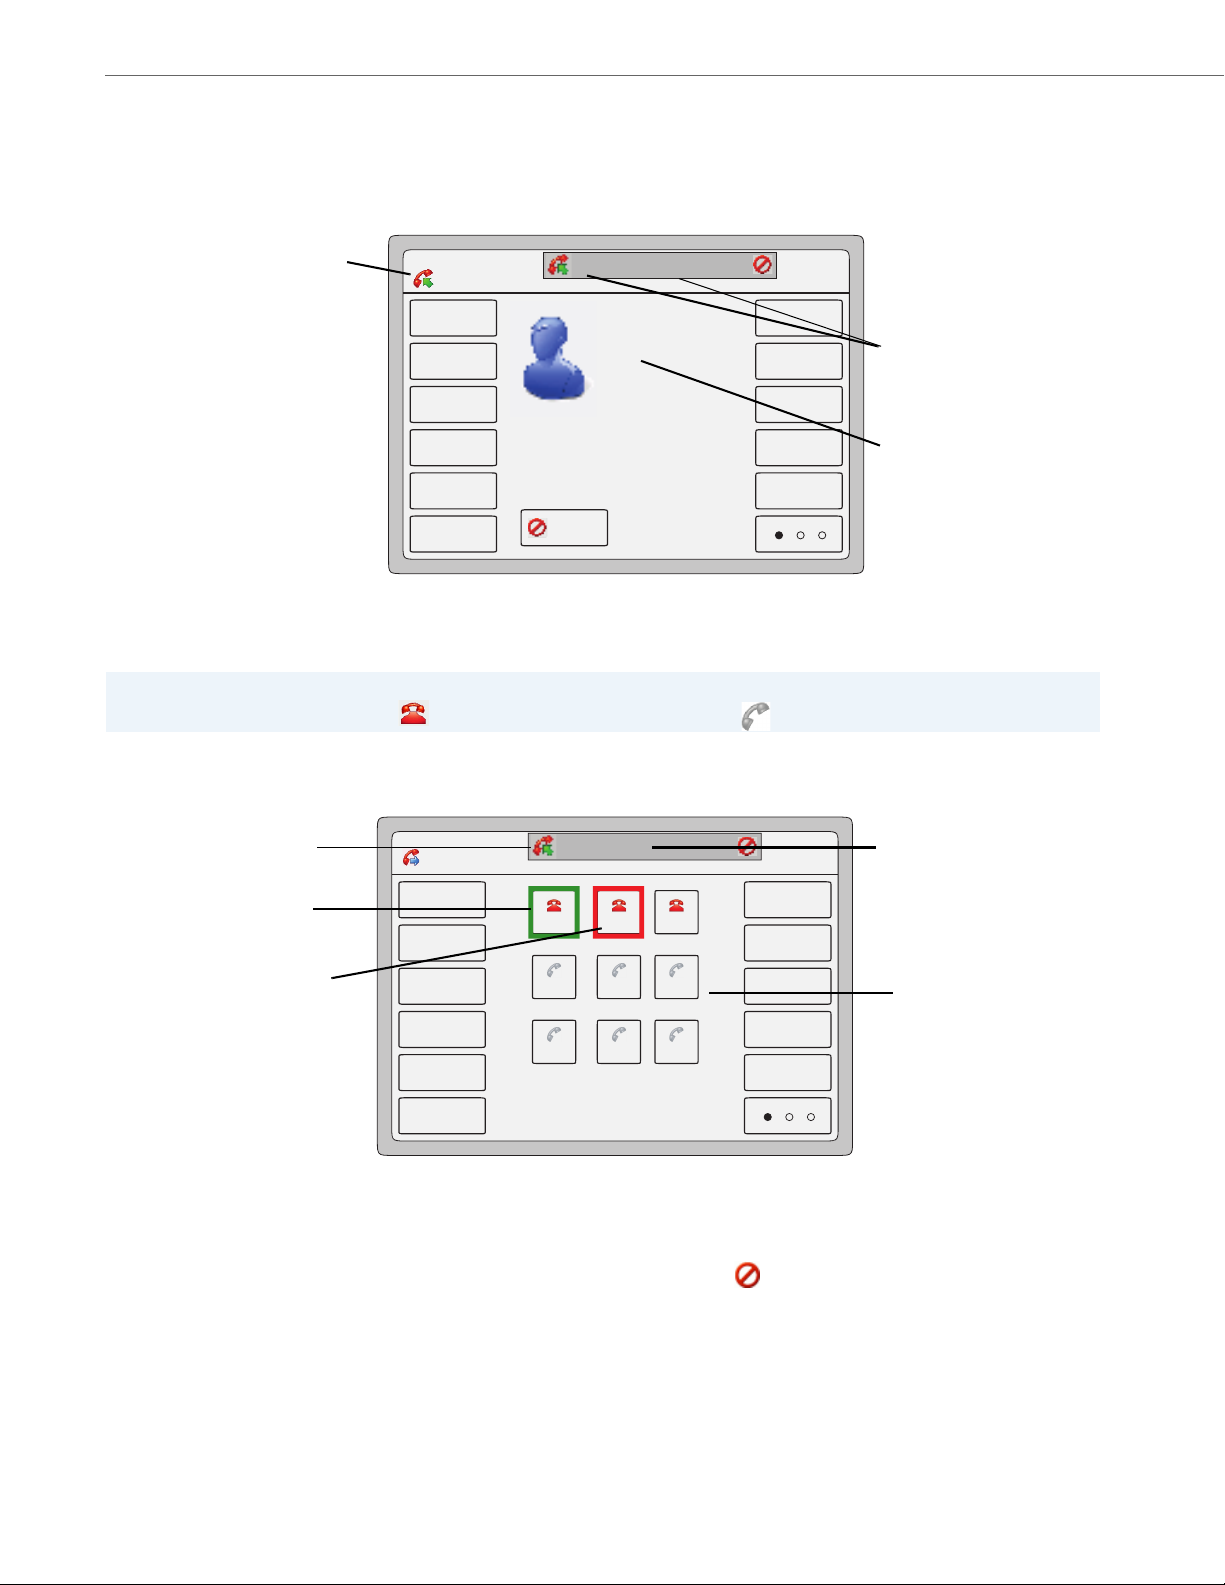
When multiple calls come into the phone, each incoming call is directed to a non-busy line on the phone. The phone
screen displays a pop-up of each incoming call in the status bar at the top of the screen (shown as incoming caller Dan
Jones 507 on Line 3” in the following example).
L1 John Smith 401
Home
402
DND
404
Call Forward
406
L2
Cancel
Dan Jones
Carol Dun
6006
507
Mon Jan 1
12 : 45pm
Flash
Intercom
Paging
Park
Pickup
Pressing the incoming call pop-up displays a Line Keys set in the center of the screen (Lines 1 through 9).
Note:
Available lines are indicated by a . Unavailable lines are indicated by a
.
The Line 1 Key is shown with a green border indicating the active call on Line 1. The Line 2 Key is shown with a red border
indicating a call is coming in on Line 2.
L1 John Smith 401
Home
402
DND
404
Call Forward
406
Dan Jones
L2
Line 1 Line 2 Line 3
Line 5Line 4 Line 6
Line 7 Line 9Line 8
507
Mon Jan 1
12 : 45pm
Flash
Intercom
Paging
Park
Pickup
Using the Line Key set, you can answer the incoming call by pressing that Line Key. For example, in the above screen,
you can put Line 1 on hold (using the Hold key on the front panel of the phone) and then press Line 2 to answer the
incoming call. You can also cancel the second incoming call by pressing the symbol in the pop-up display at the top
of the screen.
14 41-001317-05 REV01 – 06.2013
Page 21

Getting Started
Terminating Calls
There are two ways to terminate an active call.
• Place the handset in the cradle
• Press the Goodbye key.
Your Administrator can configure a feature that displays a “Call Terminated” screen on your phone when an active call is
terminated at the far-end of the line. For more information, see “Indication of Terminated Calls” on page191.
41-001317-05 REV01 – 06.2013 15
Page 22

Methods for Setting/Using Features on the Phone
There are two ways to set features on your 6739i IP Phone:
• Using the IP Phone User Interface (UI)
• Using the Aastra Web User Interface (UI)
However, there are specific features accessible through the IP Phone UI that are not accessible through the Aastra Web
UI, and vice versa. There are also features on your phone that can only be accessed by a System Administrator. For those
features, contact your System Administrator for more information.
The following table lists the features you can set on your phone using a specific method.
Feature IP Phone UI Aastra Web UI
Set audio ✔ -
Set display ✔ -
Make a call ✔ -
End a call ✔ -
Conference a call ✔ -
Transfer a call ✔ -
Hold a call ✔ -
Mute a call ✔ -
Redial a call ✔ -
Call forward a call ✔ -
Check messages in your voicemail ✔ -
View/set bluetooth settings ✔ -
Access services set up by your System Administrator ✔ -
Set intercom settings - ✔
Create softkeys ✔✔
Create a speed dial using the keypad ✔✔
Set Call Forward settings ✔✔
Set Do Not Disturb (DND) ✔✔
Set time/date format and timezone ✔✔
Set language (screen language and input language) ✔✔
View Caller Lists/Directory List and dial from these lists ✔ Allows you to
View phone status ✔✔
Set or reset a password for the phone ✔✔
Restart the phone ✔✔
download the
caller and/or
directory list to
your PC.
16 41-001317-05 REV01 – 06.2013
Page 23
Methods for Setting/Using Features on the Phone
Using the IP Phone UI
The following is an example of using the IP Phone UI
IP Phone UI
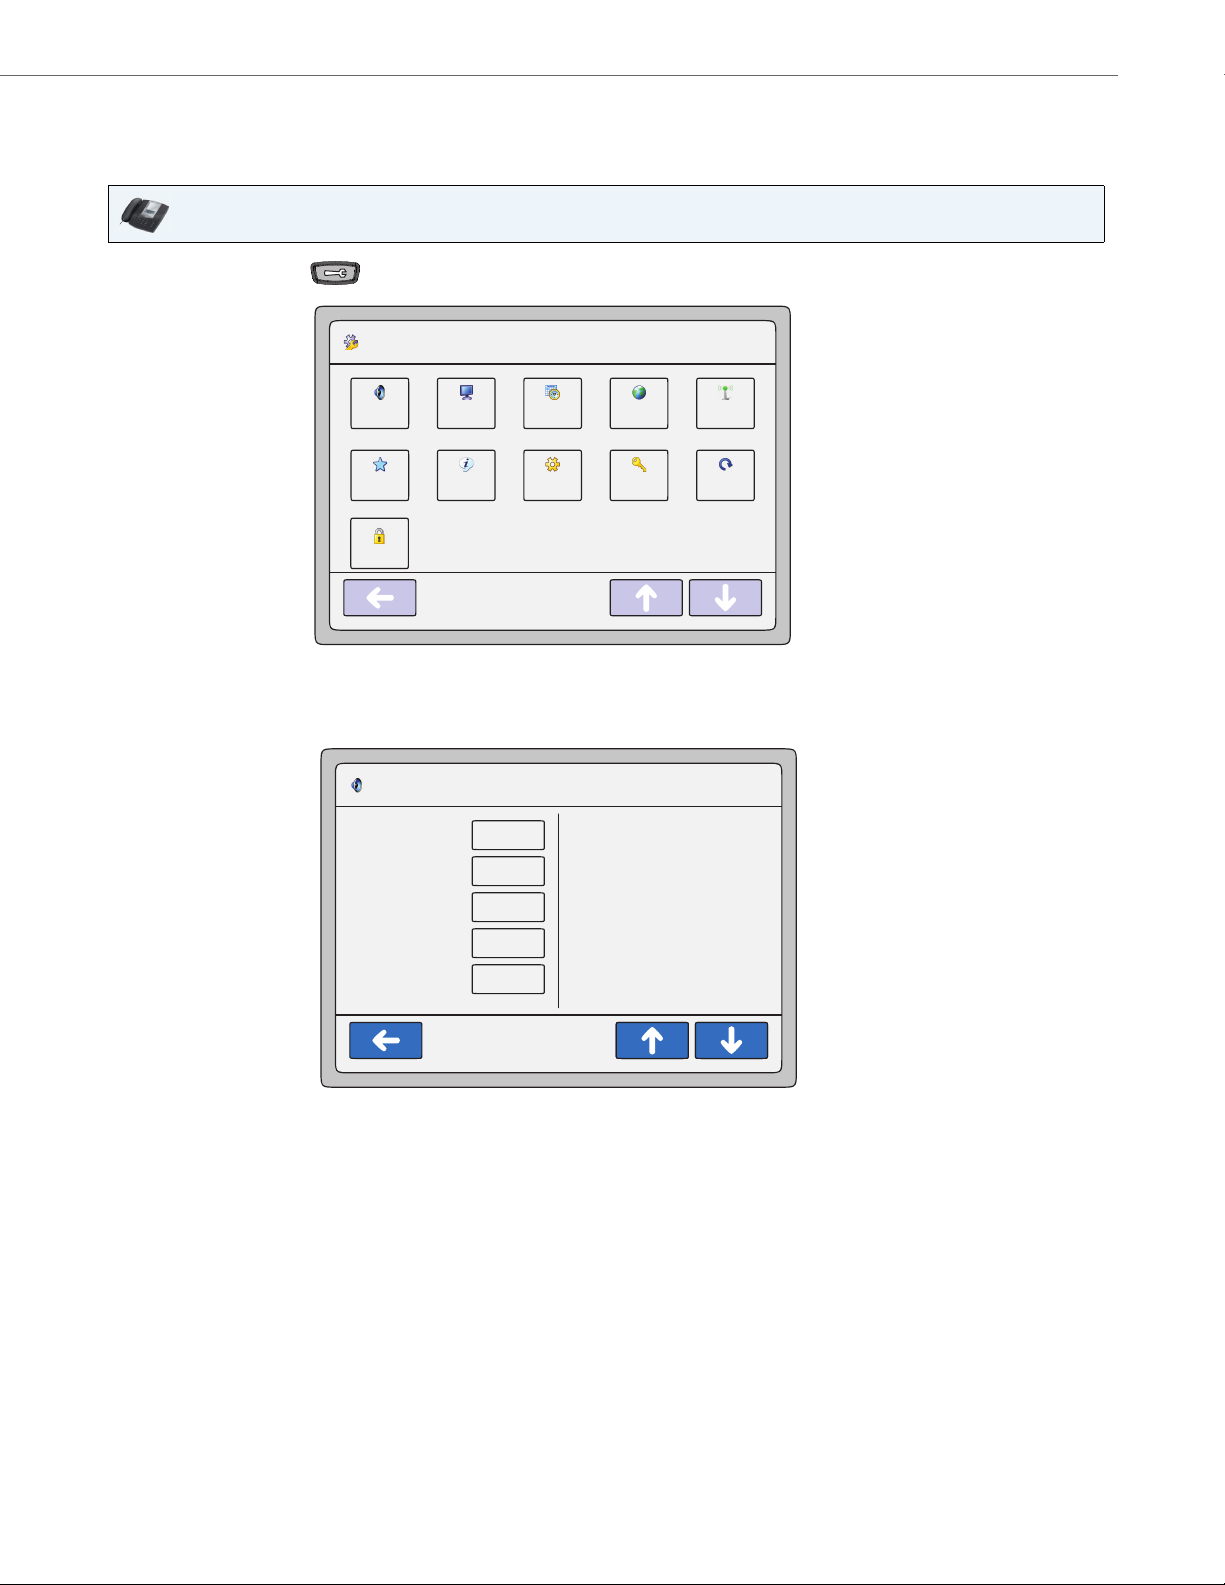
1. Press the Options Key on the phone to enter the Options List. A list of keys display.
Options List
Audio
Softkeys Status Advanced Password Restart
Lock
Display Set Time Language Bluetooth
Mon Jan 1
12 : 45pm
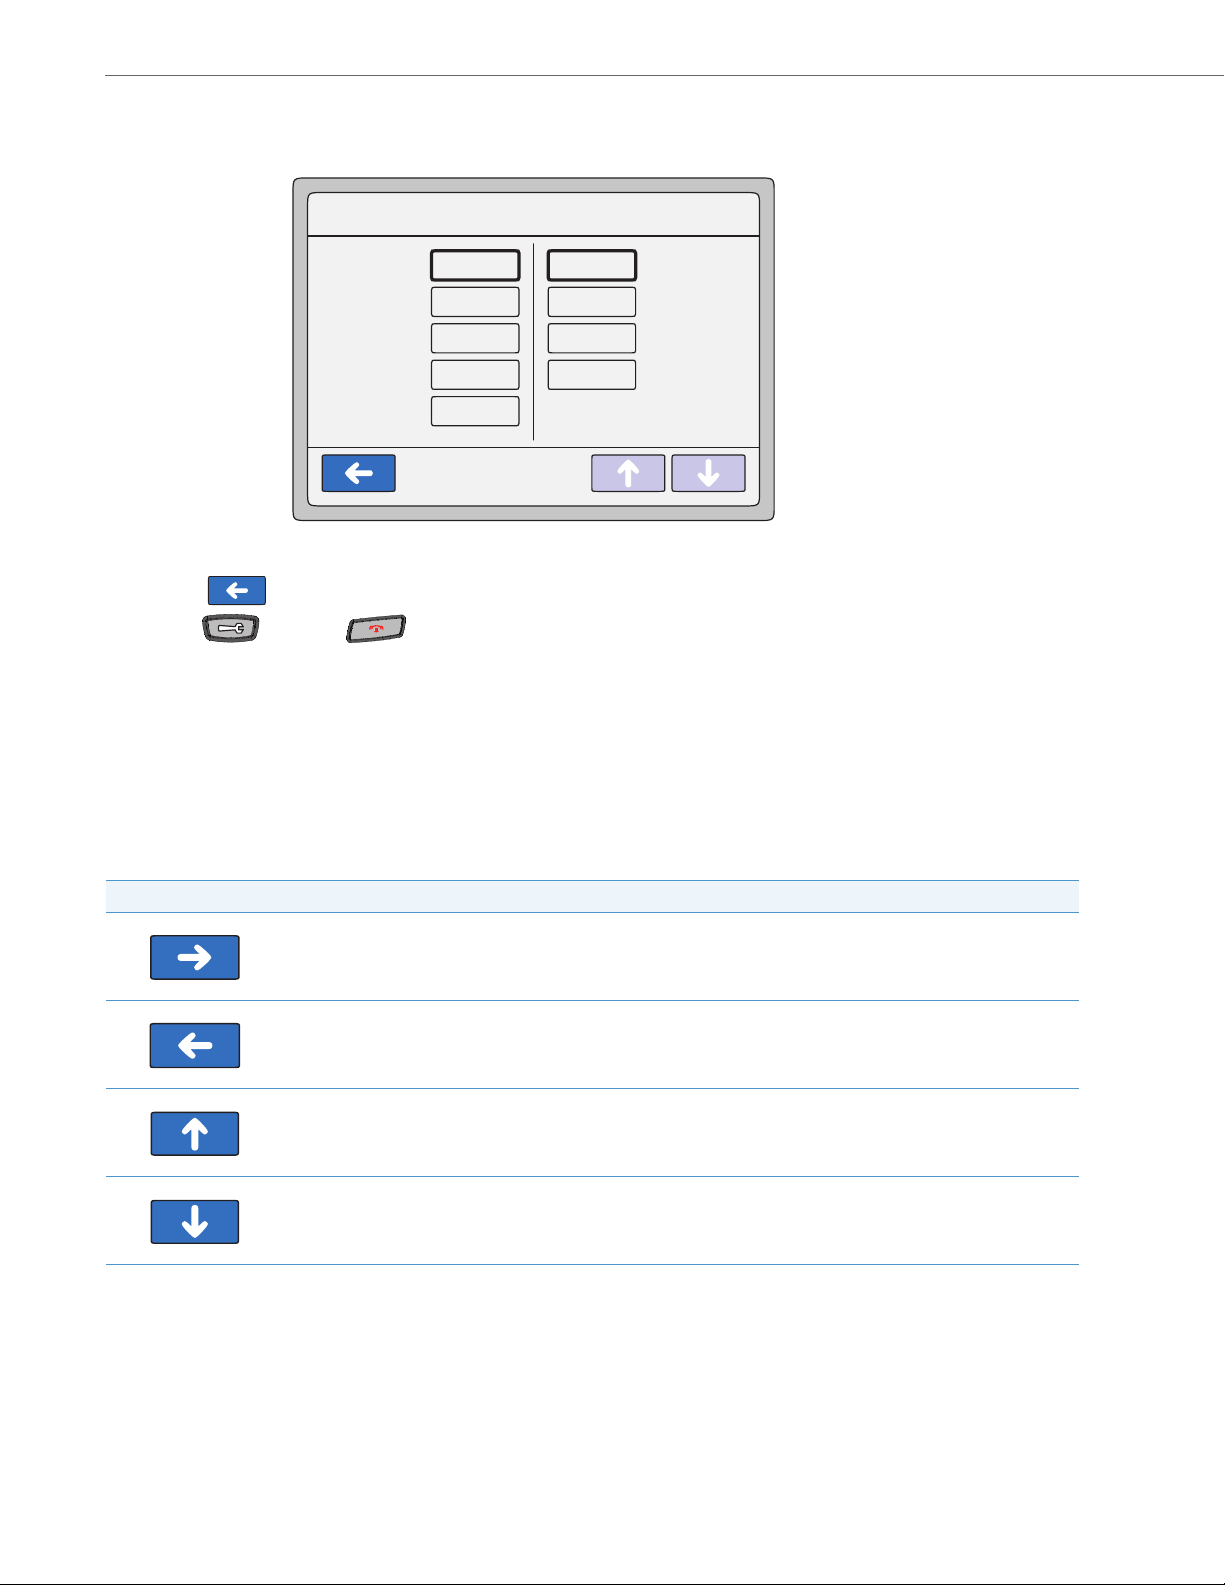
2. Press an option key to display a list of additional options. The following example shows the Audio screen when
the <Audio> option is pressed.
Audio
Headset Device
Headset Mic
Volume
Ring Tone
SpeakerAudio Mode
Wired
Medium
Tone1
Mon Jan 1
12 : 45pm
Tone Set
41-001317-05 REV01 – 06.2013 17
US
Page 24
Methods for Setting/Using Features on the Phone
Audio
12 : 45pm
Mon Jan 1
SpeakerAudio Mode
Headset Device
Headset Mic
Volu me
Ring Tone
Tone Set
Wired
Medium
Tone1
Speaker
Headset
Speaker/Headset
Headset/Speaker
US
3. Press a key to display the values for a selection or to display additional options. In the following example, audio
mode values display if pressing the <Audio Mode> key.
4. Press a value to set the option on your phone.
5. Press the to return to the previous screen.
6. Press the key or the key at any time to return to the idle screen.
References
For more information about customizing your phone using the available options from the IP Phone UI, see the section
“Options Key” on page 52.
Navigation Keys
When navigating the screens on your phone, the display shows navigation keys if they are applicable to the current
screen. The following are navigations keys you can use on your phone, if required:
Key Description
Right Navigation Key - Allows you to navigate right on the current screen.
Left Navigation Key - Allows you to exit the current screen and navigate to the previous screen.
Up Navigation Key - Allows you to navigate up on the current screen to display additional information.
Down Navigation Key - Allows you to navigate down on the current screen to display additional information.
18 41-001317-05 REV01 – 06.2013
Page 25
Methods for Setting/Using Features on the Phone
Using the Aastra Web UI
The following is an example of using the Aastra Web UI. In order to set features on your phone using the Aastra Web UI,
you need to know your phone’s IP address. Refer to “Using the IP Phone UI” on page 17 for a procedure for finding your
phone’s IP address.
Finding your phone’s IP Address.
IP Phone UI
1. Press the Options Key on the phone to enter the Options List. A list of keys display.
2. Press the <Status> key.
The status of your phone displays on the screen. The status information includes:
• Firmware information
• Network information
• Error messages
3. Press the to return to the previous menu or press the to return to the idle screen.
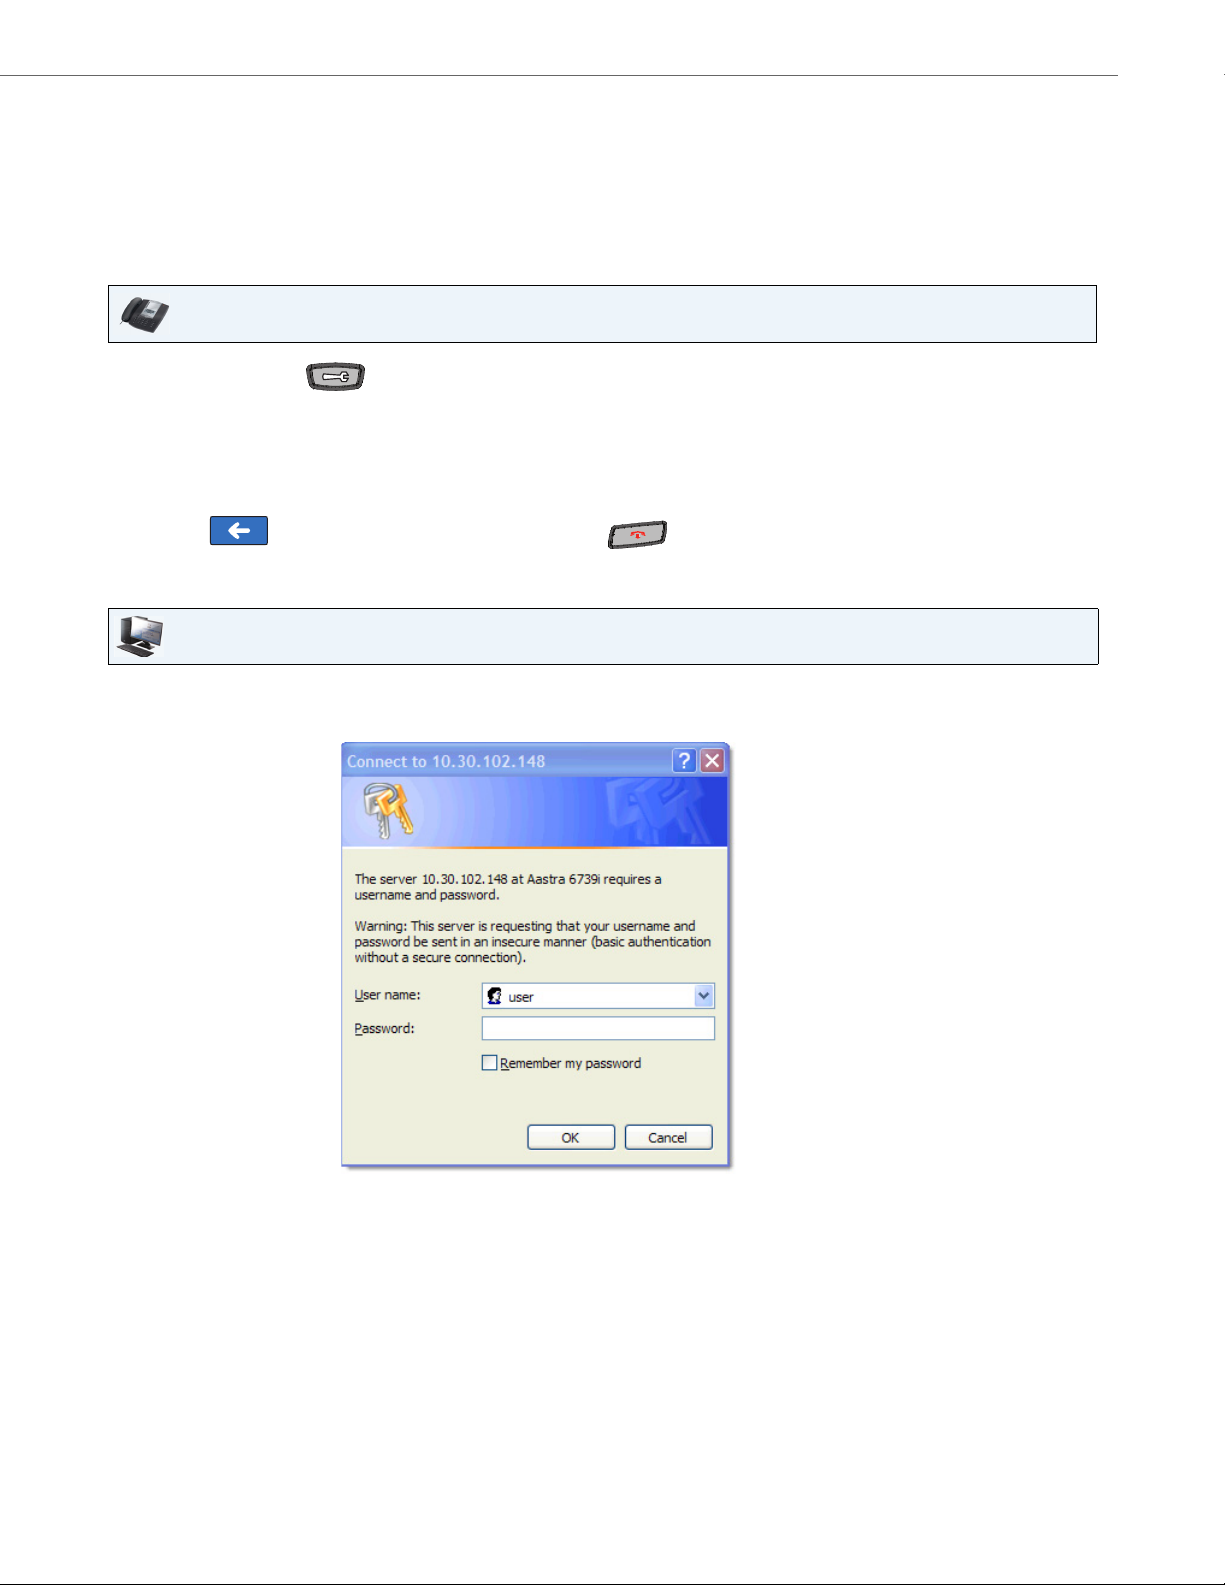
Aastra Web UI
1. Open your web browser, enter the phone’s IP address or host name into the address field and press <Enter>. The
following logon screen displays.
41-001317-05 REV01 – 06.2013 19
Page 26

Methods for Setting/Using Features on the Phone
2. At the prompt, enter your username and password and click OK.
Note:
For a user, the default user name is “user” (not case sensitive) and the password field is left blank.
The Status window displays for the IP phone you are accessing.
3. Click Log Off at any time to logout of the Aastra Web UI.
20 41-001317-05 REV01 – 06.2013
Page 27

Methods for Setting/Using Features on the Phone
None Park
Line Pickup
Speed Dial Last Call Return
Do Not Disturb (DND) Call Forward
Busy Lamp Field (BLF) BLF/Xfer
BLF List Speeddial/Xfer
Auto Call Distribution (ACD) Speeddial/Conf
Directed Call Pickup Icom (Intercom)
Extensible Markup Language (XML) Phone Lock
Flash Paging
Sprecode Empty
The following categories display in the side menu of the Aastra Web UI: Status, Operation, Basic Settings.
Headings Description
Status The Status section displays the System information such as network status, hardware information, and firmware informa-
Operation User Password - Allows you to change user password. For more information about changing User Password, see “Pass-
tion about the phone. It also displays information about the SIP account(s) currently configured on the phone. All System
information is read-only. For more information about viewing the phone’s status, see “Status” on page 124.
word” on page 128.
Phone Lock - Allows you to assign an emergency dial plan to the phone, lock the phone to prevent any changes to the
phone and to prevent use of the phone, and reset the user password.
Softkeys and XML - Allows you to configure up to 55 softkeys with functions identified in the list below. Twelve softkeys
appear on the idle screen of the phone’s LCD. If you configure more than 12 softkeys, Softkey 12 becomes a
key which allows you to toggle multiple screens that have the additional configured softkeys. You can also specify specific
states for the softkeys (idle, connected, incomi ng, outgoing, busy). For more information about softkeys, see “Softkeys” on
page 81.
Available Functions for Softkeys
Expansion Modules - Allows you to configure an additional 36 softkeys with a M670i Expa nsion Module, or an additional
60 softkeys with a M675i Expansion Module if an it is attached to the phone. This option displays on the side menu of the
Aastra Web UI only if an Expansion Module is attached. For more information about the expansion modules see “Model
M670i and M675i Expansion Modules” on page 193.
Keypad Speed Dial - Allows you to assign a speed dial number to a specific digit on the phone’s keypad for speed dialing
purposes.
Directory - Allows you to copy the Callers List and Directory List from your IP phone to your PC. For more information
about coping the Caller List and Directory from your PC to the phone, see “Downloading the Callers List to Your PC” on
page 32 and “Downloading the Directory List to Your PC” on page 41.
Reset - Allows you to restart the IP phone when required. For more information about restarting you phone, see “Restart”
on page 130.
41-001317-05 REV01 – 06.2013 21
Page 28

Methods for Setting/Using Features on the Phone
Headings Description
Basic Settings Preferences - Allows you to enable/disable the following:
• Display DTMF Digits
• Play Call Waiting Tone
• Stuttered Dial Tone
• XML Beep Support
• Status Scroll Delay (seconds)
• Call Hold Reminder During Active Calls
• Call Hold Reminder
• Call Waiting Tone Period
• Preferred Line
• Preferred Line Timeout (seconds)
• Message Waiting Indicator Line
• DND Key Mode
• Call Forward Key Mode
This category also allows you to configure:
• Incoming Intercom Call Settings
• Group Paging RTP Settings
• Ring Tones (global and per-line basis)
• Time and Date Settings
• Language Settings
Account Configuration - Allows you to configure “Do Not Disturb” (DND) and “Call Forwarding” (CFWD) by account. You
can have multiple accounts on the 6739i. For more information about Account configuration, see “Account Configuration
(DND and Call Forwarding)” on page 150.
22 41-001317-05 REV01 – 06.2013
Page 29

IP Phone Keys and Key Descriptions
IP Phone Keys
The following sections describe the various 6739i phone key functions, and how they help you make and manage your
calls and caller information.
6739i Handset
High Quality Speakerphone
Message Waiting Lamp
Options Key
Callers List Key
Directory Key
Services Key
Conference Key
Transfer Key
Hold Key
Redial Key
Goodbye Key
Messages Key
Three (3) Call Appearance Lines
Speakerphone/Headset Toggle
Key
Mute Key
Color LCD Touch Screen
Keypad
Volume Control
41-001317-05 REV01 – 06.2013 23
Page 30
IP Phone Keys and Key Descriptions
OptionsOptions
CallersCallers
DirectoryDirectory
ServicesServices
ConfConf
TransferTransfer
HoldHold
Redial
GoodbyeGoodbye
MessagesMessages
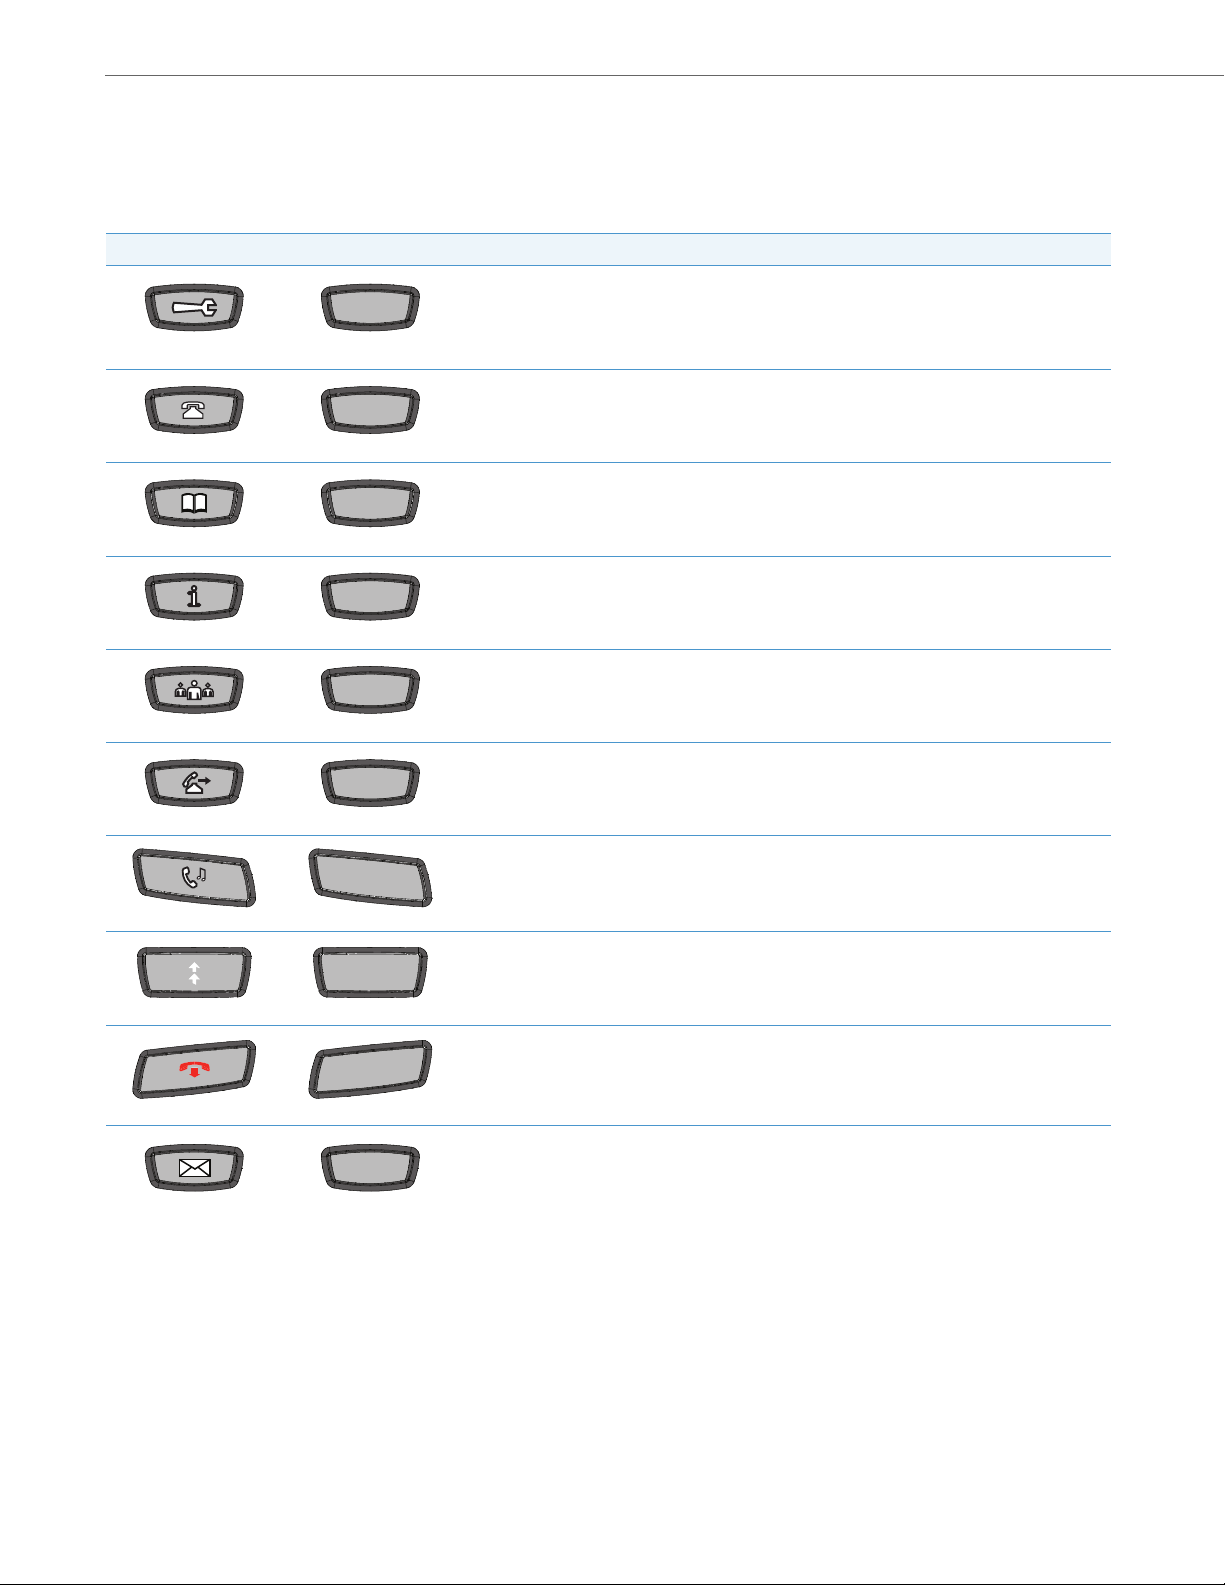
Key Descriptions
The following table identifies the keys on the key panel of your 6739i IP phone that you can use for handling calls. Your
phone may contain symbol keys or text keys, depending on which Model 6739i phone you purchased. Images of the
symbol keys and the symbol hardware platform are used throughout this document.
Symbol Keys Text Ke ys Key Description
Options Key - Accesses options to customize your phone. Your System Administrator may have
already customized some of your settings. Ch eck with your System Administrator before changing
the administrator-only options.
For more information about the Options Key, see “Options Key” on page 52.
Callers List Key - Accesses a list of calls received by the phone.
For more information, see “Callers List Key” on page 29.
Directory Key - Accesses a directory of names and phone numbers (stored in alphabetical order).
For more information, see “Directory Key” on page 33.
Services Key - Accesses enhanced features and services set up by your System Administrator.
For more information, see “Services Key” on page 45.
Redial
Conference Key - Begins a conference call with the active call.
For more information, see “Conference Key” on page 46.
Transfer Key - Transfers the active call to another number.
For more information, see “Transfer Key” on page 46.
Hold Key - P lac es a n ac ti ve ca ll on h old . To re tri eve a held call, press the call appearance key beside
the light that is flashing or press the Hold key again.
For more information about the Hold Key, see “Placing a Call on Hold” on page 139.
Redial Key - Redials previously dialed numbers. Also accesses a Redial List of up to 100 stored
numbers that called your phone.
For more information, see “Redial Key” on page 42.
Goodbye Key - Ends an active call. The Goodbye key also exits an open list, such as the Options
List.
For more information about the Goodbye Key, see “Ending Calls” on page 149.
Messages Key - Accesses your phone’s voice mailbox to retrieve and listen to stored messages.
For more information about the Messages Key, see “Voicemail” on page 165.
24 41-001317-05 REV01 – 06.2013
Page 31

Symbol Keys Text Ke ys Key Description
Line 1
Line 2
Line 3
Speaker/
Headset
MuteMute
Line/Call Appearance Keys - Connect you to a line or call. The Aastra 6739i IP Phone IP phone
Line 3
supports 3 line call appearance keys.
For more information, see “Line Keys” on page 27
Line 2
Line 1
Speakerphone/Headset Key - Activates handsfree for making and receiving calls without lifting
Speaker/
Headset
the hand set. When the audi o mod e opti on is set, this k ey is used to switc h bet ween a head set a nd
the handsfree speakerphone.
For more information about the Speakerphone/Headset Key, see
“Using Handsfree Speakerphone” on page 134.
Volume Control Key - Adjusts the volume for the handset, headset, ringer, and handsfree speaker.
For more information about the Volume Keys, see “Au di o” on page 55.
IP Phone Keys and Key Descriptions
Mute key - Mutes the microphone so that your caller cannot hear you (the light indicator flashes
when the microphone is on mute).
For more information about the Mute Key, see “Muting a Call” on page 136.
41-001317-05 REV01 – 06.2013 25
Page 32

Hard Keys
Line 1Line 1
Line 2Line 2
Line 3Line 3
CallersCallers
Directory
Redial
ServicesServices
Conf
Transfer
Messages
This section describes the hard keys you can use to manage calls. The following hard keys are located on the front panel
of your phone:
Name Symbol Keys Tex t Ke ys
Line Keys
Callers List Key
Directory Key
Redial Key
Services Key
Conference Key
Transfer Key
Messages Key
Keypad Keys
Directory
Redial
Conf
Transfer
Messages
26 41-001317-05 REV01 – 06.2013
Page 33

Hard Keys
Multiple Line/
Call Appearance
Keys (L1, L2, and L3)
Line Keys
This section describes the hard line keys (L1, L2, and L3) on your phone. These keys are also called Multiple Line/Call
Appearance Keys and are located on the bottom-right of the phone.
Multiple Line and Call Appearances
The 6739i has three line/call appearance keys (L1, L2, and L3) each with a corresponding status LED. These line/call appearance keys represent physical lines you can use to make/receive calls from/to your extension, or make/receive calls from/to
a group for which your extension belongs. The line/call appearance LED indicates the status of that line. The following
table describes the behaviour of the LED on the Line Keys.
Line/Call Appearance LED Behaviour Line/Call Appearance Status
Off Idle line or no call activity
Light flashes quickly Ringing
Light is solid Connected
Light flashes slowly Hold
Using the IP Phone UI at the path Options->Softkeys or the Aastra Web UI at the path Operation->Softkeys and XML, you
can also configure up to 6 additional Line Keys. When configured, these Line Keys appear on the softkeys on either side of
the display.
Note:
The 6739i allows up to 9 configured Line Keys - 3 hard keys (L1, L2, and L3) and 6 softkeys configured as Line Keys.
For more information about configuring “Line” softkeys, see “Line Softkey” on page 85.
41-001317-05 REV01 – 06.2013 27
Page 34

Hard Keys
Available
Line Keys
Non-available
Line Keys
Line 5 Softkey
Line 5
Available
Configured
When the phone is taken off-hook, it automatically selects Line 1 (L1) by default. If you press a hard Line Key on the front
panel of the phone (L1, L2, or L3), a set of Line Keys display in the center of the screen with the Line Key you selected
highlighted. These center keys show the available lines on the phone. The icon on the key indicates the line is available. The icon on the key indicates the line is not available. You can press any available key to select a line other
than Line 1 if required.
L1 John Smith 401
Home
402
DND
404
Call Forward
406
Line 1 Line 2 Line 3
Line 5Line 4 Line 6
Line 7 Line 9Line 8
Mon Jan 1
12 : 45pm
Flash
Intercom
Paging
Park
Pickup
If you configure a softkey to be a Line Key, the icon appears on the corresponding center Line Key panel. For example, if you configure softkey 5 to be a Line Key, then Line 5 on the center key panel displays the icon indicating it is
available for selection.
L1 John Smith 401
Home
Line 1 Line 2 Line 3
402
Mon Jan 1
12 : 45pm
Flash
Intercom
DND
404
Line 5
406
Line 4 Line 6
Line 7 Line 9Line 8
Line 5
Paging
Park
Pickup
28 41-001317-05 REV01 – 06.2013
Page 35

Hard Keys
Callers
Callers List Key
Displays the
selected
entry
Calls are grouped
by date from
newest to oldest
Callers List Key
Callers
The 6739i has a Callers List Key on the front panel of the phone. Pressing the Callers List key displays information about
each call that came into your phone.
The Callers List is a stored log of up to 200 incoming calls. Your phone logs the number and/or name (if available) of the
caller, and the date and time of the call. The Callers List displays from the newest incoming call to the oldest incoming call
and is grouped by date. The selected entry displays the number and date/time of incoming call.
A GREEN checkmark displays next to the entries that were answered. A RED exclamation point displays next to
the entries that were missed calls.
When the Callers list is full, the phone deletes the oldest call record to accommodate the addition of new call records.
Caller List
Sun Dec 31
John Doe
Jane Doe
Sat Dec 30
John Doe
09:15am
09:07am
10:38am
Jane Doe
9055551122
Sun Dec 31 09:07am
1:54
Line 1
Dial
Add to
Directory
Mon Jan 1
12 : 45pm
Delete
41-001317-05 REV01 – 06.2013 29
Page 36

Hard Keys
You can perform the following in the Callers List:
• View and scroll the Callers List
• Dial from the Callers List
• Delete a Caller record(s) from the Callers List
• Save a Caller record to the Directory
Note:
Your System Administrator can create a custom Callers List XML application allowing you to access the Callers List via
an XML Key instead of the Callers List Key. This allows you to configure the Callers List Key with other functions if
required. Contact your System Administrator for more information.
Accessing and Viewing the Callers List
Use the following procedure to access and view the Callers List.
IP Phone UI
1. Press the Callers Key on the phone to enter the Callers List.
2. Use the and keys to navigate the list to view all call records in the Callers List.
3. Press the to return to the previous menu or press the to return to the idle screen.
Dialing from the Callers List
Use the following procedure to dial from the Callers List.
IP Phone UI
1. Press the Callers Key on the phone to enter the Callers List. A list of keys display.
2. Use the and keys to navigate to the Caller record for which you want to call.
3. Press the Caller record and then press . The phone automatically dials the number from the record
you selected.
Note:
Before you dial the number you selected, you can edit the number if required.
Dial
Deleting a Single Record or All Records from the Callers List
Use the following procedure to delete a single record or all records from the Callers List.
IP Phone UI
1. Press the Callers Key on the phone to enter the Callers List. A list of keys display.
2. Use the and keys to navigate the list to find the record you want to delete.
30 41-001317-05 REV01 – 06.2013
Page 37

3. Press the Caller record and then press . The following screen displays.
Delete
12 : 45pm
Mon Jan 1
Delete
Cancel
Delete All
Delete Item
Callers List
Delete Callers List Record(s) Screen
Delete
Delete All
4. Press to delete the record you selected from the Callers List. The main Callers List screen displays.
or
Press to delete all records from the Callers List. The main Callers List screen displays.
5. Press the to return to the previous menu or press the to return to the idle screen.
Hard Keys
Saving a Caller Record to the Directory
Use the following procedure to save a Caller record to the Directory.
IP Phone UI
1. Press the Callers Key on the phone to enter the Callers List. A list of keys display.
2. Use the and keys to navigate to the Caller record for which you want to save to the Directory.
3. Press the Caller record and then press the key. The Directory displays.
4. Check that all of the information from the Callers record was entered correctly in the Directory List entry.
5. Press the key to save your entry.
6. Press the to return to the previous menu or press the to return to the idle screen.
Add to
Directory
41-001317-05 REV01 – 06.2013 31
Page 38

Hard Keys
Downloading the Callers List to Your PC
You can download the Callers List to your PC for viewing using the Aastra Web UI. When you download the Callers List,
the phone stores the callerlist.csv file to your computer in comma-separated value (CSV) format.
You can use any spreadsheet application to open the file for viewing. The following is an example of a Callers List in a
spreadsheet application. This file displays the name, phone number, and the line that the call came in on.
Downloading the Callers List
Use the following procedure to download the Callers List to your PC using the Aastra Web UI
Aastra Web UI
.
1. Click on Operation->Directory.
2. In the Callers List field, click on Save As. A File Download message displays.
3. Click OK.
4. Enter the location on your computer where you want to download the Callers List and click SAVE.
The callerslist.csv file downloads to your computer.
5. Use a spreadsheet application to open and view the Callers List.
32 41-001317-05 REV01 – 06.2013
Page 39

Hard Keys
DirectoryDirectory
Directory Key
Directory Key
The 6739i has a Directory Key on the front panel of the phone.
Pressing the Directory Key displays the Directory List on your phone. This list is your personal phone book conveniently
stored within your phone. You can enter up to 200 entries into the 6739i Directory by adding them manually, or by saving
the number and name from other lists stored on your phone. You can dial numbers directly from a directory entry.
Note:
A “picture ID” displays when you select an entry in the Directory if your System Administrator enabled this feature on
your phone. Contact your System Administrator for more information about the “picture ID” feature.
41-001317-05 REV01 – 06.2013 33
Page 40

Hard Keys
Directory
12 : 45pm
Mon Jan 1
Aastra SupportJohn Doe Bob West
Jane Doe Robert Hassle
James Devon Daniel Foster
Marcus Murphy Arash Moosam
Walter Dolaugh Kevin Hellisk
Main Directory Screen
Directory
John Doe
12 : 45pm
Mon Jan 1
Edit
9055552233
Office 1
9055551122
Home 2
Delete
9055559999
Cell 3
Dial
Lines
9055552233
Single Entry Screen
Search Screen
Directory
12 : 45pm
Mon Jan 1
Aastra SupportJohn Doe Bob West
Jane Doe Robert Hassle
q
CAP
sa
z
123
Canc
Hide Space
Enter
xcvbnm
Bksp
dfghjk l
.
we r t yu i op
Search Results Screen
Accessing and Searching the Directory
Use the following procedures to access and search for entries in your Directory List.
IP Phone UI
1. Press the Directory Key . The Directory screen displays. The screen is blank if the Directory is empty. The
following main Directory screen shows 11 entries in the Directory List.
2. Use the and keys to navigate the list to look for an entry.
3. Press the entry to display a single entry’s details.
Using the Search Feature in the Directory
IP Phone UI
1. Press the Search key on the main Directory screen. A keyboard displays.
Directory
John Doe
John Doe
Mon Jan 1
12 : 45pm
2. Enter the name or phone number of the entr y for which you are searching. As you type characters on the keyboard,
the entries beginning with those characters display on the screen. When you have completed your typing, the
entry you are looking for, displays on the screen and the characters you typed display in a text box.
34 41-001317-05 REV01 – 06.2013
Page 41

Dialing from the Directory
Directory
John Doe
12 : 45pm
Mon Jan 1
Edit
9055552233
Office 1
9055551122
Home 2
Delete
9055559999
Cell 3
Dial
Lines
9055552233
Single Entry Screen
Press a
number
key and then
the Dial key
to dial the
number
You can dial a phone number or extension directly from an entry in the Directory List.
IP Phone UI
1. Press Directory Key . The Directory screen displays.
2. Use the and keys to navigate the list to look for an entry.
or
Press the key. For a procedure on using the search key, see “Using the Search Feature in the Directory” on
page 34.
3. Select the entry you want to dial. All of the numbers display that are associated with the single entry (i.e., Cell,
Office, Home, etc.).
Hard Keys
Note:
A “picture ID” displays when you select an entry in the Directory if your System Administrator enabled this feature on your phone. Contact your System Administrator for more information about the “picture ID” feature.
4. Press a number key and then the Dial key to dial the number or extension. The phone goes off-hook and auto-
matically dials the number from the Directory. For example, pressing the “Office” key in the screen above and
then the Dial key dials “9055552233” automatically from the Directory.
Managing the Directory List
From the Directory List in the IP Phone UI, you can perform the following:
• Adding an Entry
• Editing an Entry
• Deleting an Entry
You can also save entries to the Directory from the Caller List and Redial List. For information on saving entries from the
Caller List, see “Saving a Caller Record to the Directory” on page 31. For information on saving entries from the Redial List,
see “Saving a Redial Record to the Directory” on page 44.
41-001317-05 REV01 – 06.2013 35
Page 42

Hard Keys
Adding an Entry Screen
Directory
12 : 45pm
Mon Jan 1
Aastra SupportJohn Doe Bob West
Jane Doe Robert Hassle
James Devon Daniel Foster
Marcus Murphy Arash Moosam
Walter Dolaugh Kevin Hellisk
Directory Screen
Add
This number indicates the Line number
Number
Label Line
Add
Adding an Entry
You can add up to 200 entries to your Directory. You can also store up to a maximum of 7 numbers associated with a single entry (i.e., office number, cell number, home number, etc.). You can apply custom labels to each entry as required.
IP Phone UI
1. Press Directory Key . The Directory screen displays.
2. Press the key.
Directory
Name
First Last
Add
Mon Jan 1
12 : 45pm
3. Press the “First” field, enter the first name of the person you are adding to your directory, and then press <Enter>.
Use the pop-up keyboard to enter the first name.
4. Press the “Last” field, enter the last name of the person you are adding to your directory, and then press <Enter>.
5. Press . The “Number/Label” fields display on the screen.
1
6. Press the “Number” field, enter the number of the person you are adding to your directory, and then press
<Enter>. Use the pop-up keyboard to enter the number.
7. Press the “Label” field, enter the label associated with the number you just entered, and then press <Enter>. Use
the pop-up keyboard to enter the label.
8. Press the keys to select a Line (1 through 9) to associate with the phone number and label you are
entering. When you dial the current number from the directory, the outgoing call uses the line number you
assigned it.
9. To add another phone number and label, press . An additional “Number/Label” field displays.
10. Repeat steps 6 through 8 to enter another number and label for the current entry.
11. When you are finished entering Numbers/Labels for the current entry, press . This saves the entry and
all associated numbers/labels to the Directory on your phone.
Note:
When adding an entry, number, and label to the Directory, you can press the any time to cancel the
entry. It is not saved to the Directory.
12. Press the to return to the previous menu or press the to return to the idle screen.
36 41-001317-05 REV01 – 06.2013
Page 43

Editing an Entry
Directory
John Doe
12 : 45pm
Mon Jan 1
Edit
9055552233
Office 1
9055551122
Home 2
Delete
9055559999
Cell 3
Dial
Lines
9055552233
Single Entry Screen
Directory
12 : 45pm
Mon Jan 1
John
9055552233 Office
Home9055551122
Name
First
Doe
Last
Number Label Line
1
9
q
CAP
sa
z
123
Canc
Hide
Space
Enter
xcvbnm
Bksp
dfghjk l
.
we r t y u i op
Single Entry Edit Screen
Selecting an input field at any time loads the touch keyboard
Input Fields
Touch Keyboard
You can edit a Directory entry, number, and/or label as required from a single entry screen.
IP Phone UI
1. Press Directory Key . The Directory screen displays.
2. Use the and keys to navigate the list to look for an entry.
or
Press the key. For a procedure on using the search key, see “Using the Search Feature in the Directory” on
page 34.
3. Press the entry you want to edit. The single entry screen displays.
Hard Keys
4. Press the number and/or label that you want to edit, and press the key.
5. Edit the Number and/or Label as required using the touch keypad that displays, and press .
6. Press the to return to the previous menu or press the to return to the idle screen
41-001317-05 REV01 – 06.2013 37
Edit
Page 44

Hard Keys
Single Entry Screen
Deleting an Entry
You can delete entries from the Directory List in the following ways:
• Delete a single entry and all associated numbers and labels
• Delete all entries in the Directory List
• Delete specific numbers and labels from an entry
Directory
9055552233
Office 1
9055551122
Home 2
9055559999
Cell 3
John Doe
9055552233
Dial
Lines
Delete
Edit
Mon Jan 1
12 : 45pm
38 41-001317-05 REV01 – 06.2013
Page 45

Deleting a single entry or all entries
Delete
Directory
12 : 45pm
Mon Jan 1
Delete
Cancel
Delete All
Delete Item
Delete Directory Entry(s) Screen
Delete
Delete All
IP Phone UI
1. Press Directory Key . The Directory screen displays.
2. Use the and keys to navigate the list to look for an entry.
or
Press the key. For a procedure on using the search key, see “Using the Search Feature in the Directory” on
page 34.
3. Press the entry you want to delete. The single entry screen displays.
4. Press the key. The following screen displays.
Hard Keys
5. Press to delete the entry and all associated numbers and labels from the Directory. The main Directory
screen displays.
or
Press to delete all entries from the Directory. The main Directory screen displays.
6. Press the to return to the previous menu or press the to return to the idle screen.
Deleting a number and/or label from an entry
IP Phone UI
1. Press Directory Key . The Directory screen displays.
2. Use the and keys to navigate the list to look for an entry.
or
Press the key. For a procedure on using the search key, see “Using the Search Feature in the Directory” on
page 34.
41-001317-05 REV01 – 06.2013 39
Page 46

Hard Keys
Directory
John Doe
12 : 45pm
Mon Jan 1
Edit
9055552233
Office 1
9055551122
Home 2
Delete
9055559999
Cell 3
Dial
Lines
9055552233
Single Entry Screen
Single Entry Details Screen
3. Press the entry for which you want to delete a number/label. The single entry screen displays.
Line
Mon Jan 1
1
2
9
12 : 45pm
Directory
Name
First Last
Number Label
9055552233 Office
Home9055551122
9055559999
Add
4. Press the key. All of the Numbers/Labels associated with this entry display on the screen.
Edit
Cell
Number Label Line
9055552233 Office
Home9055551122
9055559999 Cell
1
2
9
Add
5. Press the key next to the Number/Label to delete both the number and label from the entry.
or
Press the field (Number or Label) you want to delete. When the keyboard displays, press the <Backspace> key
to delete the text in the field and press <Enter>.
6. Press the key to save your change(s).
7. Press the to return to the previous menu or press the to return to the idle.
40 41-001317-05 REV01 – 06.2013
Page 47

Hard Keys
Downloading the Directory List to Your PC
You can download the Directory List to your PC via the Aastra Web UI. The phone stores the directorylist.csv file to your PC
in comma-separated value (CSV) format.
You can use any spreadsheet application to open the file for viewing. The following is an example of a Directory List in a
spreadsheet application.
The file displays the name, phone number, and line number for each Directory entry.
Note:
Your System Administrator can populate your IP phone Directory List with server directory files. Contact your System
Administrator for more details.
Downloading the Directory List
Use the following procedure to download the Directory List to your PC using the Aastra Web UI
Aastra Web UI
1. Click on Operation->Directory.
2. In the Directory List field, click on Save As. A File Download message displays.
3. Click OK.
4. Enter the location on your computer where you want to download the Directory List and click SAVE.
The directorylist.csv file downloads to your computer.
5. Use a spreadsheet application to open and view the Directory List.
.
41-001317-05 REV01 – 06.2013 41
Page 48

Hard Keys
RedialRedial
Redial List Key
The calls you
Displays the
selected
entry
Redial List
John Doe
9055552233
12 : 45pm
Mon Jan 1
Sun Dec 31 09:15am
1:54
Line 1
John Doe
Jane Doe
09:15am
09:07am
Sun Dec 31
Sat Dec 30
Delete
Add to
Dial
Directory
John Doe
10:38am
made from your
phone are grouped
by date from
newest to oldest
Redial List Screen
Redial Key
The Redial Key on the front panel of the phone allows you to automatically dial a number you previously dialed from
your phone. If you are off-hook and press the Redial Key, the last number you called is dialed back. If you are on-hook
and press the Redial Key, the Redial List displays allowing you to select which number in the list you want to redial back.
The Redial List is a stored log of up to 100 outgoing calls. Your phone logs the number and/or name (if available) of the
person you called, and the date and time of the call. The Redial List displays from the newest outgoing call to the oldest
outgoing call and is grouped by date. The selected entry displays the number and date/time of outgoing call.
When the Redial list is full, the phone deletes the oldest Redial record to accommodate the addition of new Redial
records.
42 41-001317-05 REV01 – 06.2013
Page 49

Hard Keys
Dial
You can perform the following in the Redial List:
• View and scroll the Redial List
• Dial from the Redial List
• Delete a Redial record(s) from the Redial List
• Save a Redial record to the Directory
Note:
Your System Administrator can set your Redial key to speed dial a specific number. Contact your System Administrator
for more information.
Accessing and Viewing the Redial List
Use the following procedure to access and view the Redial List.
IP Phone UI
1. Press Redial key .
2. Use the and keys to navigate the list to view all Redial records in the Redial List.
3. Press the to return to the previous menu or press the to return to the idle screen
Dialing from the Redial List
Use the following procedure to dial from the Redial List.
IP Phone UI
1. Press Redial key .
2. Use the and keys to navigate to the Redial record for which you want to redial.
3. Press the Redial record, and then press . The phone automatically redials the number from the record
you selected.
Deleting a Single Record or All Records from the Redial List
Use the following procedure to delete a single record or all records from the Redial List.
IP Phone UI
1. Press Redial key .
2. Use the and keys to navigate the list to find the Redial record you want to delete.
41-001317-05 REV01 – 06.2013 43
Page 50

Hard Keys
Delete Redial List Record(s) Screen
Delete All
3. Press the Redial record and then press . The following screen displays.
Redial List
Delete
Mon Jan 1
12 : 45pm
Delete Item
Delete
4. Press to delete the record you selected from the Redial List. The main Redial List screen displays.
Delete
Delete All
or
Press to delete all records from the Redial List. The main Redial List screen displays.
5. Press the to return to the previous menu or press the to return to the idle screen.
Cancel
Saving a Redial Record to the Directory
Use the following procedure to save a Redial record to the Directory.
IP Phone UI
1. Press Redial key .
2. Use the and keys to navigate to the Redial record for which you want to save to the Direc tory.
3. Press the Redial record and then press the . key. The Directory displays.
4. Check that all of the information from the Redial record was entered correctly in the Directory List entry.
5. Press the key to save your entry.
6. Press the to return to the previous menu or press the to return to the idle screen.
Add to
Directory
44 41-001317-05 REV01 – 06.2013
Page 51

Hard Keys
Services Key
Services
12 : 45pm
Mon Jan 1
Call Fwd DND Spd Dial
Services Screen
Services Key
The 6739i has a Services Key on the front panel of the phone. The Services key accesses enhanced features and services
provided by third parties. It also provides the ability to configure Call Forwarding and Do Not Disturb (DND) on your
phone.
Using the Services key, you can:
• Turn Do Not Disturb (DND) ON and OFF
• Set Call Forwarding (specify call forward number, call forward mode, and number of rings)
• If set up by your Administrator, select XML customized services (such as weather, stocks, etc.)
The screens that display for DND and Call Forwarding are dependant on the DND mode and Call Forwarding mode you set
on your phone. For more information about setting the modes for DND and Call Forwarding, see “DND Account-Based
Configuration” on page 150 and “Call Forward Account-Based Configuration” on page 156.
Reference
The XML customized services are created and provided by your System Administrator through the diverse web based language of XML. Availability of these services depends on your phone system or service provider and must be enabled by
your System Administrator.
For more information about setting up XML services, see “Configuring XML Services” on page 105.
Note:
Your System Administrator can create a custom Services key for your application. For more information about custom
Services, see “Customizable Callers List Key and Services Key” on page 184.
41-001317-05 REV01 – 06.2013 45
Page 52

Hard Keys
Conf
Conference Key
TransferTransfer
Transfer Key
Conference Key
The 6739i has a Conference Key on the front panel of the phone. Pressing the Conference key allows you to join multi-
ple calls into a conference.
The 6739i IP phone offers two methods of conferencing:
• Local conferencing (default method).
• Centralized conferencing (for Sylantro and Broadsoft Servers) (Administrator must enable this method)
Conf
Reference
For more information about using the Conference Key for joining calls, see “Conferencing Calls” on page 144.
Transfer Key
The 6739i has a Transfer Key on the front panel of the phone. Pressing the Transfer Key allows you to transfer calls as
required.
46 41-001317-05 REV01 – 06.2013
Page 53

Hard Keys
Messages
Messages Key
The 6739i IP phone offers two methods of transferring a call:
• Blind Transfer - Transfers an incoming call before you answer it.
• Consultative Transfer - Transfers an incoming call after you answer it.
Reference
For more information about using the Transfer Key, transferring calls, and for screens that display when you transfer a call,
see “Transferring Calls” on page 140.
Messages Key
Messages
The 6739i has a Messages Key on the front panel of the phone. Pressing the Messages Key allows you to access your
voicemail messages.
Pressing the Messages Key directly connects to a voicemail server (if configured by your Administrator) and allows you to
access your voice mailbox to access your messages.
Reference
For more information about using the Messages Key, see “Voicemail” on page 165.
41-001317-05 REV01 – 06.2013 47
Page 54

Hard Keys
Keypad Keys
The 6739i has a keypad with digits from 0 through 9, a “*” key, and a “#” key. Keys 2 through 9 contain the letters of the
alphabet. The 6739i phone keypad includes the following:
Keypad Key Description
0Dials 0
Dials the Operator on a registered phone
1 Dials 1
2 ABC Dials 2
When entering text, this key enters A with one press, B with two presses, and C with three presses
3 DEF Dials 3
4 GHI Dials 4
5 JKL Dials 5
6 MNO Dials 6
7 P QRS Dials 7
8 TUV Dials 8
9 WXYZ Dials 9
When entering text, this key enters D with one press, E with two presses, and F with three presses
When entering text, this key enters G with one press, H with two presses, and I with three presses
When entering text, this key enters J with one press, K with two presses, and L with three presses
When entering text, this key enters M with one press, N with two presses, and O with three presses
When entering text, this key enters P with one press, Q with two presses, R with three presses, and S with four
presses.
When entering text, this key enters T with one press, U with two presses, and V with three presses
When entering text, this key enters W with one press, X with two presses, Y with three presses, and Z with four
presses.
The "*" is called the "star key". The "#" is called the "number sign", "pound key", or "hash key", depending on one's nationality or personal preference. These can be used for special functions such as accessing voicemail. The “star key” and
“pound key” functions are dependant on your country’s feature availabilities. Contact your System Administrator for
more information about available functions using these keys.
These keypad keys can be used for any of the following on the phone:
• Dial a phone number to make a call (see “Dialing a Number” on page 133.)
• Enter digits or letters in the IP Phone user interface
• Program a speed dial number (see “Using a Keypad Key to Configure a Speed Dial” on page 49.)
• Press a speed dial key (see “Using the Keypad Speed Dial” on page 51.)
• Press the keys associated with a called Interactive Voice Response (IVR) system
48 41-001317-05 REV01 – 06.2013
Page 55

Hard Keys
Using a Keypad Key to Configure a Speed Dial
Pressing and holding down an unprogrammed keypad key on the phone initiates the “create a speed dial” feature.
Note:
The keypad key must have no preassigned function (key must be unprogrammed) in order to use the press-and-hold
feature to create a speed dial key. For more information about configuring a speed dial key, see “Speed Dial Softkey” on
page87.
Use the following procedure to create a keypad speed dial.
IP Phone UI
1. Press a keypad key for 3 seconds.
The following screen displays.
Speed Dial Edit:
keypad
Type
Line
Note:
You can press the "Cancel" key at anytime during the speed dial programming to cancel and not save the speed
dial information.
2. In the “Line” field, press the or to select a line to assign to the speed dial key.
Valid values are 1 through 9.
This is the line that the phone opens to dial the number after you press the speed dial key. By default, the phone
uses Line 1.
3. Press the “Number” field. A keyboard displays.
Enter a number for the speed dial key using the displayed keyboard.
1
Number
CancelSave
Mon Jan 1
12 : 45pm
41-001317-05 REV01 – 06.2013 49
Page 56

Hard Keys
Save
12 : 45pm
Mon Jan 1
OK
Speed Dial Edit:
Entry Saved: 5554343
4. Press to save the speed dial key. The following is an example of the screen that displays.
5. Press the to return to the previous menu or press the to return to the idle screen.
Configuring/Editing a Keypad Speed Dial using the Aastra Web UI
After creating a speed dial on the phone’s keypad, you can edit the configuration using the Aastra Web UI only.
Aastra Web UI
1. Click on Operation->Keypad Speed Dial.
2. Enter or edit a value in the “Va lue” field.
Note:
You can delete a keypad speed dial by removing the information from the "Valu e" field.
3. Select a line or edit the line in the “Line” field as applicable for each speed dial.
4. Click Save Settings.
50 41-001317-05 REV01 – 06.2013
Page 57

Using the Keypad Speed Dial
Key “6” has programmed
speed dial of 555-2323
Use the following procedure to dial a speed dial using a programmed key on the keypad.
IP Phone UI
1. Press the keypad key programmed as a speed dial. The phone dials the number associated with that keypad key.
For example, in the illustration above, the “6” key is programmed with a speed dial phone number of 555-2323.
After pressing “6” on the keypad, the number automatically dials on the phone.
Hard Keys
41-001317-05 REV01 – 06.2013 51
Page 58

Options Key
Options List Screen
Using the Options Key on the front panel of the phone, you can customize your phone with specific features such as setting the brightness of the display, setting a language, or activating the bluetooth device. You can also configure some of
these features using the Aastra Web UI.
Options List
After pressing the Options Key, the following Options List displays.
Options List
Audio
Softkeys Status Advanced Password Restart
Lock
Display Set Time Language Bluetooth
Mon Jan 1
12 : 45pm
52 41-001317-05 REV01 – 06.2013
Page 59

The following table lists the items available in the Options List on the phone.
Option Item Func tion
Allows you to set the following:
Audio
Display
Set Time
Language
Bluetooth
Softkeys
Status
Advanced
Password
Restart
Lock
Audio Mode
Headset Device
Headset Mic Volume
Ring Tone
Ton e Se t
Allows you to set the following:
Brightness Level
Brightness Timer
Calibrate Screen
Allows you to set the following:
Time Format
Daylight Savings
Date Format
Time Zone
Time Server 1
Time Server 2
Time Server 3
Allows you to set the following:
Screen Language
Input Language
Allows you to view the bluetooth module status, and add or delete a Bluetooth headset.
Allows you to assign specific functions to softkeys that appear on the idle screen of the phone.
Allows you to view the following information about the phone:
Firmware information
Network information
Error messages
Allows you to access the Advanced configuration features of the IP phone. This option is password protected
and can only be accessed by an Administrator.
Allows you to set or reset a password for your phone.
Allows you to restart the phone.
Allows you to lock and unlock the phone to prevent it from being used or configured.
Options Key
41-001317-05 REV01 – 06.2013 53
Page 60

Options Key
Options List
12 : 45pm
Mon Jan 1
Audio Display
Status
Lock
Bluetooth
6739i Simplified Options List
Simplified Options List
An Administrator can replace the full Options List on the Phone UI with a more simplified Options List. The following
illustrates a simplified Options List on the 6739i.
The following table lists the items available on the simplified Options List.
Option Item Functio n
Allows you to set the following:
Audio
Display
Bluetooth
Status
Lock
Audio Mode
Headset Device
Headset Mic Volume
Ring Tone
Ton e Se t
Allows you to set the following:
Brightness Level
Brightness Timer
Calibrate Screen
Allows you to view the bluetooth module status, and add or delete a Bluetooth headset.
Allows you to the view the following information and perform the following:
Firmware information
Network information
Restart phone
Reset configuration
Error messages
Allows you to lock and unlock the phone to prevent it from being used or configured.
54 41-001317-05 REV01 – 06.2013
Page 61

Audio
Audio Screen
The Audio option allows you to set the following on your phone:
• Audio Mode
• Headset Device
• Headset Mic Volume
• Ring Tone
• Tone Set
Options Key
Audio
Headset Device
Headset Mic
Volu me
Ring Tone
Tone Set
SpeakerAudio Mode
Wired
Medium
Tone1
US
Mon Jan 1
12 : 45pm
Audio Mode
The 6739i allows you to use a handset, a headset, or handsfree mode to handle incoming and outgoing calls. The audio
mode option provides different combinations of these three methods to provide maximum flexibility in handling calls.
There are four audio mode options you can set.
Audio Mode Option Description
Speaker This is the default setting. Calls can be made or received using the handset or handsfree speakerphone. In
handset audio mode, pressing the key on the phone switches to handsfree speakerphone. In Speaker
audio mode, lift the handset to switch to the handset.
Headset Choose this setting if you want to make or receive all calls using a handset or headset. Calls can be switched
from the handset to headset by pressing the key on the phone. To switch from the headset to the
handset, lift the handset.
Speaker/Headset
Headset/Speaker
Incoming calls are sent to the handsfree speakerphone first when the key is pressed. By pressing the
key again, you can switch back and forth between the handsfree speakerphone and the headset. At anytime,
lifting the handset switches back to the handset from either the handsfree speakerphone or the headset.
Incoming calls are sent to the headset first when the key is pressed. By pressing the key again, you can
switch back and forth between the headset and the handsfree speakerphone. At anytime, lifting the handset
switches back to the handset from either the headset or the handsfree speakerphone.
41-001317-05 REV01 – 06.2013 55
Page 62

Options Key
Setting Audio Mode
IP Phone UI
1. Press on the phone to enter the Options List.
2. Press the <Audio> key.
3. Press the <Audio Mode> key. The following values display:
• Speaker (default)
• Headset
• Speaker/Headset
• Headset/Speaker
4. Press the value you want to set for the Audio Mode.
5. Press the to return to the previous menu or press the to return to the idle screen.
Headset Device
The “Headset Device” option allows you to set the type of headset you are using with your phone. The 6739i allows the
following type of headsets:
• Wired headset
• DHSG headset
• Bluetooth headset
A wired headset connects to the phone using a wire from the headset to the back of the phone. For information on
installing a wired headset, see your 6739i IP Phone Installation Guide.
A DHSG headset connects a coupler to the back of the phone which permits the DHSG headset to perform wirelessly.
Yo u MUST use an Aastra-compatible DHSG headset. Refer to the DHSG installation instructions included with your Aastra-compatible DHSG headset for more information about installing and using a DHSG headset with your phone.
WAR NIN G:
Use of a non-verified DHSG headset solution is at the customer’s own discretion and the customer should be aware that
some DHSG headsets require an optional cable in order to be electrically DHSG compliant. Aastra is not responsible for
any damage to the IP phone or headset that may result from the use of non-verified headsets, or from incorrectly connecting headsets or cables.
The 6739i also allows you to use any Bluetooth-compliant headset. Bluetooth is a technology that transmits networking
data over a wireless, automatic connection. The bluetooth device must be synchronized with the 6739i phone for it to
work. For information about installing and synchronizing your bluetooth device, see “Bluetooth” on page 75.
56 41-001317-05 REV01 – 06.2013
Page 63

Setting Headset Device
IP Phone UI
1. Press on the phone to enter the Options List.
2. Press the <Audio> key.
3. Press the <Headset Device> key. The following values display:
• Wired (default)
• DHSG
• Bluetooth
4. Press the value you want to set for the headset device.
5. Press the value you want to set for the Audio Mode.
6. Press the to return to the previous menu or press the to return to the idle screen.
Headset Mic Volume
The "Headset Mic Volume" option allows you to set the volume level for the headset microphone.
Setting Headset Mic Volume
Options Key
IP Phone UI
1. Press on the phone to enter the Options List.
2. Press the <Audio> key.
3. Press the <Headset Mic Volume> key. The following values display:
• Low
• Medium (default)
• High
4. Press the value you want to set for the headset microphone volume.
5. Press the to return to the previous menu or press the to return to the idle screen.
Ring Tone
There are several distinct ring tones a user can select to set on the IP phones. You can enable/disable these ring tones on a
global or per-line basis.
The following table identifies the valid settings and default values for each type of configuration method.
41-001317-05 REV01 – 06.2013 57
Page 64

Options Key
Ring Tones Table
Configuration Method Valid Values Default Value
IP Phone UI Global
Ton e 1
Ton e 2
Ton e 3
Ton e 4
Ton e 5
Silent
Aastra Web UI Global:
Ton e 1
Ton e 2
Ton e 3
Ton e 4
Ton e 5
Silent
Lines 1 to 9 Per-Line Setting:
Global
Ton e 1
Ton e 2
Ton e 3
Ton e 4
Ton e 5
Silent
Global Setting:
Ton e 1
Global Setting:
Ton e 1
Per-Line Setting:
Global
Setting Ring Tone
IP Phone UI
Note:
When you set the Ring Tone using the IP Phone UI, all lines on the phone use the same ring tone (global basis only).
1. Press on the phone to enter the Options List.
2. Press the <Audio> key.
3. Press the <Ring Tone> key. The following values display:
• Global (per line setting)
• Tone 1 ( def a ult)
• Tone 3
• Tone 4
• Tone 5
• Silent
4. Press the value you want to set for the Ring Tone.
5. Press the to return to the previous menu or press the to return to the idle screen.
58 41-001317-05 REV01 – 06.2013
Page 65

Aastra Web UI
Note:
You can set the Ring Tones on a global or per-line basis using the Aastra Web UI.
1. Click on Basic Settings->Preferences->Ring Tones.
Options Key
For global configuration:
2. In the "Ring Tones" section, select a ring tone from the Global Ring Tone field.
Valid values are To ne 1 (default), Tone 2, Tone 3, Tone 4, Tone 5, and Silent.
Note:
See the Ring Tones Table on page 58 for valid values.
For per-line configuration:
3. In the "Ring Tone" section, select a line for which you want to set ring tone.
4. Select a value from the "LineN" field. Valid values are Global (default), Ton e 1 , To n e 2 ,
Tone 3, Tone 4, Tone 5, and Silent.
Note:
See the Ring Tones Table on page 58 for valid values.
5. Click Save Settings.
Tone Set
You can configure ring tone sets on a global-basis only on the IP phone. Ring tone sets consist of tones customized for a
specific country. When you configure the country's tone set, the country-specific tone is heard on the phone for the following events:
• dial tone
• congestion tones
• secondary dial tone
• call waiting tone
• ring tone
• ring cadence pattern
• busy tone
41-001317-05 REV01 – 06.2013 59
Page 66

Options Key
Setting Tone Set
IP Phone UI
Note:
When you set the Tone Set using the IP Phone UI, all lines on the phone use the same Tone Set (global basis only).
1. Press on the phone to enter the Options List.
2. Press the <Audio> key.
3. Press the <Tone Set> key. The following values display:
• Australia
• Brazil
• Europe (generic tones)
• France
• Germany
• Italy
• Italy2
• Malaysia
• Mexico
• Russia
• Slovakia
• UK
• US (Default - also used in Canada)
4. Press the value you want to set for the Tone Set.
5. Press the to return to the previous menu or press the to return to the idle screen.
Aastra Web UI
Note:
When you set the Tone Set using the Aastra Web UI, all lines on the phone use the same Tone Set (global basis only).
1. Click on Basic Settings->Preferences->Ring Tones.
60 41-001317-05 REV01 – 06.2013
Page 67

2. In the "Ring Tones" section, select a country from the Ton e S e t field.
Valid values are Australia, Brazil, Europe, France, Germany, Italy, Italy2, Malaysia, Mexico, Brazil, Russia,
Slovakia, UK, and US. Default is US.
3. Click Save Settings.
Options Key
41-001317-05 REV01 – 06.2013 61
Page 68

Options Key
Display Screen
Display
12 : 45pm
Mon Jan 1
Level 3Brightness Level
Brightness Timer
600
Calibrate Screen
Display
The Display option allows you to set the following on your phone:
• Brightness Level
• Brightness Timer
• Calibrate Screen
Brightness Level
The "Brightness Level" option allows you to set the amount of light that illuminates the touchscreen’s LCD display. Use
this option to set your preference of brightness.
Setting Brightness
IP Phone UI
1. Press on the phone to enter the Options List.
2. Press the <Display> key.
3. Press the <Brightness Level> key. The following options display.
• Level 1
• Level 2
• Level 3 (default)
• Level 4
• Level 5
4. Press the level of brightness you want on your phone. Level 1 is the least bright and Level 5 is the most bright.
Default is Level 3.
5. Press the to return to the previous menu or press the to return to the idle screen.
Brightness Timer
The "Brightness Timer" option allows you to set the amount of time you want the touchscreen’s LCD display to stay illuminated before turning the brightness off during a period of inactivity. For example, if you set the Brightness Timer to 60,
when the phone reaches 60 seconds of inactivity, the LCD brightness goes OFF.
62 41-001317-05 REV01 – 06.2013
Page 69

Options Key
Setting Brightness Timer
IP Phone UI
1. Press on the phone to enter the Options List.
2. Press the <Display> key.
3. Press the <Brightness Timer> key. A text box displays.
4. Press the text box. A pop-up keyboard displays.
5. Press the “123” key and enter a value, in seconds, for the Brightness Timer. You can set the Brightness Timer from
0 to 7200 seconds. Default is 600 (10 minutes).
6. Press the to return to the previous menu or press the to return to the idle screen.
Calibrate Screen
The “Calibrate Screen” option allows you to calibrate the color touchscreen. This process makes fine adjustments to the
color screen on the phone for optimal display purposes.
Calibrating the Screen
IP Phone UI
1. Press on the phone to enter the Options List.
2. Press the <Display> key.
3. Press the <Calibrate Screen> key.
A “Recalibrate touchscreen?” prompt displays.
4. Press “Ye s ” to continue or “No” to cancel the recalibration.
5. If you press “Ye s ”, the following messages display:
“Waiting for touchscreen activity to subside....”
6. Press the screen as indicated by each prompt using a SOFT fine tip stylus pen. Do not use a sharp object such
as an ink pen or pencil which may damage the touch screen:
“Touch the UPPER-LEFT corner of the screen.”
“Touch the UPPER-RIGHT corner of the screen.”
“Touch the LOWER-RIGHT corner of the screen.”
“Touch the LOWER-LEFT corner of the screen.”
If you touched the screen in the wrong location, the following message displays:
“Received unreliable data. You will be asked to touch the same point again.”
7. Retouch the screen in the correct location to continue.
When the recalibration is finished, the following message displays:
“Validating calibration data....please wait.”
8. Press the <Done> key to complete the recalibration, and return to the previous screen.
9. Press the to return to the previous menu or press the to return to the idle screen.
41-001317-05 REV01 – 06.2013 63
Page 70

Options Key
Set Time Screen
Set Time
The Set Time option allows you to set the following on your phone:
• Time Format
• Daylight Savings
• Date Format
• Time Zone
• Time Servers
Set Time
Time Format
Daylight Savings
Date Format
Time Zone
Time Server 1
12 Hour
Automatic
WWW MMM DD
CA-Eastern
128.100.102.201
Mon Jan 1
12 : 45pm
64 41-001317-05 REV01 – 06.2013
Page 71

Options Key
Time Format
The 6739i gets its clock time from the local Timer Server set up in your network by your System Administrator. You can set
the time format using the IP Phone UI or the Aastra Web UI.
Setting Time Format
IP Phone UI
1. Press on the phone to enter the Options List.
2. Press the <Set Time> key.
3. Press the <Time Format> key. The following values display:
• 12 Hour (default)
• 24 Hour
4. Press the value you want to set for the Time Format.
5. Press the to return to the previous menu or press the to return to the idle screen.
Note:
The time appears on the phone’s idle screen in the time format you set.
Aastra Web UI
1. Click on Basic Settings->Preferences->Time and Date Setting.
2. In the “Time Format” field, select the time format you want to use on your phone. Valid values are:
• 12h (12 hour format) (default)
• 24h (24 hour format)
3. Click Save Settings.
Note:
The time appears on the phone’s idle screen in the time format you set.
41-001317-05 REV01 – 06.2013 65
Page 72

Options Key
Daylight Savings
The 6739i allows you to configure the daylight savings settings on the phone.
Setting Daylight Savings
IP Phone UI
1. Press on the phone to enter the Options List.
2. Press the <Set Time> key.
3. Press the <Daylight Savings> key. The following values display:
• Off
• 30min summertime
• 1h summertime
• Automatic
4. Press the value you want to set for Daylight Savings.
5. Press the to return to the previous menu or press the to return to the idle screen.
Date Format
The 6739i gets its calendar dates from the local Timer Server set up in your network by your System Administrator. You
can set the date format using the IP Phone UI or the Aastra Web UI.
Setting Date Format
IP Phone UI
1. Press on the phone to enter the Options List.
2. Press the <Set Time> key.
3. Press the <Date Format> key. The following values display:
• WWW MMM DD (default)
• MM/DD/YY
• DD-MMM-YY
• MMM DD
• YYYY-MM-DD
• DD MMM YYYY
• DD/MM/YYYY
• WWW DD MMM
• DD/MM/YY
• DD MMM
• DD-MM-YY
• DD.MM.YYYY
4. Press the value you want to set for the Date Format.
5. Press the to return to the previous menu or press the to return to the idle screen.
Note:
The date appears on the phone’s idle screen in the date format you set.
66 41-001317-05 REV01 – 06.2013
Page 73

Aastra Web UI
1. Click on Basic Settings->Preferences->Time and Date Setting.
2. In the “Date Format” field, select the date format you want to use on your phone. Valid values are:
• WWW MMM DD (default)
• MM/DD/YY
• DD-MMM-YY
• MMM DD
• YYYY-MM-DD
• DD MMM YYYY
• DD/MM/YYYY
• WWW DD MMM
• DD/MM/YY
• DD MMM
• DD-MM-YY
• DD.MM.YYYY
3. Click Save Settings.
Note:
The date appears on the phone’s idle screen in the date format you set.
Options Key
Time Zone
The 6739i allows you to set your geographic location time zone on the phone. The time zone should be set to the country
where you are using the phone. “Appendix A - Time Zone Codes” lists all of the time zones that the phone supports.
41-001317-05 REV01 – 06.2013 67
Page 74

Options Key
Setting Time Zone
IP Phone UI
1. Press on the phone to enter the Options List.
2. Press the <Set Time> key.
3. Press the <Time Zone> key. The following list of regions display:
• America
• Asia
• Atlantic
• Australia
• Europe
• Pacific
• Others
Note:
If your Administrator has enabled Option 2 (the Coordinated Universal Time (UTC)) on your phone, you can
select Others->DP-Dhcp for the timezone setting. Contact your System Administrator for more information
about this setting.
4. Press the key of the region for which you want to set your timezone.
A list of timezones and timezone codes display for the geographic location you selected.
The default is America->US-Eastern. See “Appendix A - Time Zone Codes” for a list of timezone codes.
5. Press the key of the timezone for which you want to set on your phone.
6. Press the to return to the previous menu or press the to return to the idle screen.
Time Servers
A time server is a server computer that reads the actual time from a reference clock and distributes this information to its
clients in the network. The time server may be a local network time server or an internet time server. On the 6739i, you
can specify up to 3 local time servers for which the phone receives its time.
Setting Time Servers
IP Phone UI
1. Press on the phone to enter the Options List.
2. Press the <Set Time> key.
3. Press the <Time Server 1> key. A text box displays as well as a keyboard pop-up.
4. Use the keyboard to enter the IP address or the qualified domain name of the Time Server in your local network.
Contact your System Administrator for this value.
5. Press <Enter> on the keyboard to save the setting.
6. Press the <Time Server 2> key and repeat steps 4 and 5.
7. Press the <Time Server 3> key and repeat steps 4 and 5.
8. Press the to return to the previous menu or press the to return to the idle screen.
68 41-001317-05 REV01 – 06.2013
Page 75

Aastra Web UI
1. Click on Basic Settings->Preferences->Time and Date Setting.
2. In the “NTP Time Servers” field, enable NTP time serving by checking the checkbox or disable by unchecking
the box (default is enabled).
3. In the “Time Server 1”, “Time Server 2”, and “Time Server 3” fields, enter IP addresses or qualified domain
names for the primary, secondary, and tertiary time servers.
Note:
The “NTP Time Servers” field MUST be enabled to enter values in the Time Server # fields.
4. Click Save Settings.
Options Key
41-001317-05 REV01 – 06.2013 69
Page 76

Options Key
Language Screen
Language
The Language option allows you to set the language you want to use on the IP Phone UI. It also allows you to set the language you want to use when inputting text into the phone.
• Screen Language (IP Phone UI) or Webpage Language (Aastra Web UI)
• Input Language
Language
Screen Language
Input Language
English
English
Mon Jan 1
12 : 45pm
In the IP Phone UI, you can select a specific screen language and input language to use on your phone. These settings
do not affect the Aastra Web UI.
In the Aastra Web UI, you can select the Webpage language and input language to use in the Web UI. These settings
do not affect the IP Phone UI.
Latin 2 Character Set
The 6739i includes support for ISO 8859-2 (Latin2) of multi-national languages on the 6739i IP Phone. UTF-8 is also compatible with XML encoding on the IP Phones. The phone supports this character set in the IP Phone UI as well as the Aastra Web UI.
The following table illustrates the Latin 2 character set used on the 6739i IP Phone.
70 41-001317-05 REV01 – 06.2013
Page 77

Screen Language and Webpage Language
On the 6739i, you can set your phone and/or the Aastra Web UI to display in the following languages:
• English
• Czech
• Catalan
• Valencian
• Welsh
• German
• Danish
• Spanish
• Mexican Spanish
• Finnish
• French
• Canadian French
• Italian
• Dutch
• Dutch (Netherlands)
• Norwegian
• Polish
• Portuguese
• Portuguese Brazilian
• Russian
• Slovak
• Swedish
• Turki sh
Options Key
Note:
All languages may not be available for selection. The available languages are dependant on the language packs currently loaded on your phone. Contact your System Administrator for more information about available language packs.
The screen language settings in the IP Phone UI work independently from the Webpage language settings in the Aastra
Web UI. When you set the language to use in the IP Phone UI or the Aastra Web UI, all of the display screens (menus, services, options, configuration parameters, etc.) display in that language. The IP phones support the following languages:
Setting Language
Once the language pack(s) are available on your phone from your System Administrator, you can specify which screen language or Webpage language to use on the phone and/or the Aastra Web UI.
IP Phone UI
Note:
All languages may not be available for selection. The available languages are dependant on the language packs currently loaded to the IP phone.
1. Press on the phone to enter the Options List.
2. Press the <Language> key.
41-001317-05 REV01 – 06.2013 71
Page 78

Options Key
3. Press the <Screen Language> key.
Note:
All languages may not be available for selection. The available languages are dependant on the language packs
currently loaded to the IP phone. English is the default language and cannot be changed or removed. For more
information about loading language packs, see your System Administrator.
4. Use the navigation keys to scroll through the display. Press the screen language you want
to set on your phone.
5. Press the to return to the previous menu or press the to return to the idle screen.
Note:
The screen language setting takes affect immediately.
Aastra Web UI
Note:
All languages may not be available for selection. The available languages are dependant on the language packs currently loaded to the IP phone.
1. Click on Basic Settings->Preferences->Language Settings.
2. In the “Webpage Language” field, select a language to apply to the Aastra Web UI.
Note:
All languages may not be available for selection. The available languages are dependant on the language packs
currently loaded to the IP phone by your System Administrator. English is the default language and cannot be
changed or removed.
3. Click Save Settings.
Note:
The Webpage language setting takes affect immediately.
72 41-001317-05 REV01 – 06.2013
Page 79

Options Key
Input Language
You can enter text and/or characters into the IP Phone UI or the Aastra Web UI in a specific language if required. To do this,
you must set the input language setting. The 6739i supports the following input languages on the IP Phone UI and the
Aastra Web UI:
• English
• German
• French
• Spanish
• Italian
• Portuguese
• Russian
• Nordic
Setting Language Input
IP Phone UI
Note:
All languages may not be available for selection. The available languages are dependant on the language packs currently loaded to the IP phone.
1. Press on the phone to enter the Options List.
2. Press the <Language> key.
3. Press the <Input Language> key. The following values display:
• English (default)
• Français (French)
• Español (Spanish)
• Deutsch (German)
• Italiano (Italian)
• Português (Portuguese)
• Русский (Russian)
• Nordic
Note:
Available input languages are dependent on the configuration enabled by your System Administrator.
4. Press the input language you want to set on your phone.
5. Press the to return to the previous menu or press the to return to the idle screen.
Note:
The input language setting takes affect immediately.
41-001317-05 REV01 – 06.2013 73
Page 80

Options Key
Aastra Web UI
Note:
All languages may not be available for selection. The available languages are dependant on the language packs currently loaded to the IP phone.
1. Click on Basic Settings-> Preferences->Language Settings.
2. Select a language from the "Input Language" field. Setting this field allows you to specify the language to use
when entering text and characters in the Aastra Web UI. Valid values are:
• English (default)
• Français (French)
• Español (Spanish)
• Deutsch (German)
• Italiano (Italian)
• Português (Portuguese)
• Русский (Russian)
• Nordic
Note:
All languages may not be available for selection. The available input languages are dependant on the configuration enabled by your System Administrator.
3. Click Save Settings.
Note:
The input language setting takes affect immediately.
74 41-001317-05 REV01 – 06.2013
Page 81

Options Key
Bluetooth
Settings
Bluetooth Status Device Name
12 : 45pm
Mon Jan 1
Bluetooth Devices
Bluetooth Screen
Bluetooth
Settings
Bluetooth Status Device Name
12 : 45pm
Mon Jan 1
Add new device. . .
Bluetooth Devices
Bluetooth
The 6739i supports the use of a Bluetooth headset as an alternate headset device. You can turn the Bluetooth capability
ON and OFF on your phone as required. You can also add or delete a Bluetooth headset as applicable.
Note:
When using a Bluetooth device with your phone, make sure that the phone’s headset device is set to “Bluetooth”. F or
more information on setting the audio headset device, see “Headset Device” on page 56.
Enabling/Disabling Bluetooth Device
You can enable or disable a bluetooth device as required using the IP Phone UI.
IP Phone UI
To turn ON the Bluetooth feature:
1. Press on the phone to enter the Options List.
2. Press the <Bluetooth> key. The following screen displays.
The <Bluetooth Status> key indicates the Bluetooth feature is OFF.
3. Press the <Bluetooth Status> key to turn the Bluetooth feature ON . A screen displays with the
message “Please Wait....” and allows you to cancel if required. A screen then displays that indicates the Bluetooth
feature is ON.
Bluetooth
41-001317-05 REV01 – 06.2013 75
Please Wait. . .
Cancel
Mon Jan 1
12 : 45pm
Page 82

Options Key
Bluetooth
Settings
Bluetooth Status Device Name
12 : 45pm
Mon Jan 1
Add new device. . .
Bluetooth Devices
Bluetooth
Settings
Bluetooth Status Device Name
12 : 45pm
Mon Jan 1
Bluetooth Devices
6739i
q
CAP
sa
z
123
CancHide Space
Enter
xcvbnm
Bksp
dfghjk l
.
we r t yu i op
To turn OFF the Bluetooth feature:
1. Press the Bluetooth Status key . The key changes to to indicate the Bluetooth feature is OFF.
Adding a Bluetooth device
IP Phone UI
1. Press on the phone to enter the Options List.
2. Press the <Bluetooth> key. The Bluetooth screen displays.
3. (Optional) In the “Device Name” field, assign a name to the bluetooth device you are adding to the phone using
the touch keypad that displays.
76 41-001317-05 REV01 – 06.2013
Page 83

4. Press the <Add new device> key .
Bluetooth
12 : 45pm
Mon Jan 1
Cancel Searching. . . 60%
A screen displays that allows you to search for the Bluetooth device.
Options Key
Bluetooth
Search 0%
Mon Jan 1
12 : 45pm
5. Press the <Search> key to search for the Bluetooth headset connected to the phone. The phone proceeds to
search for a local bluetooth headset.
When the search is complete, and the phone has found a Bluetooth device(s), the type of device(s) display.
41-001317-05 REV01 – 06.2013 77
Bluetooth
Search
1 device(s) found. Press on a device to start pairing.
GN6110Hs
Searching. . . 100%
Mon Jan 1
12 : 45pm
Page 84

Options Key
Pairing a Bluetooth Device
1. Press a Bluetooth device to begin pairing it with the phone. The following screen displays.
Bluetooth
Mon Jan 1
12 : 45pm
Enter PIN
OK
2. Using the phone’s keypad, enter a PIN in the text box and press <OK>.
The default PIN is 0000.
Note:
If your phone does not accept the “0000” PIN code for the Bluetooth device you are adding, consult your Bluetooth headset owners manual for the applicable PIN to enter in this text box.
The phone proceeds to pair the Bluetooth device with the phone.
Bluetooth
Cancel
Mon Jan 1
12 : 45pm
Please Wait. . .
Cancel
78 41-001317-05 REV01 – 06.2013
Page 85

When pairing is complete, the following screen displays.
Bluetooth
Settings
Bluetooth Status Device Name
12 : 45pm
Mon Jan 1
Add new device. . .
GN6110Hs
Bluetooth Devices
Connected: GN6110Hs
GN6110Hs
Active Bluetooth Device
GN6110Hs
GN6110Hs
Successful Pairing
Unsuccessful Pairing
If the pairing was successful, the Bluetooth device displays on a key with a GREEN box indicating this device is
the active Bluetooth device on your phone. If the pairing was unsuccessful, the Bluetooth device displays on a
key with a RED box indicating the pairing failed.
Options Key
The Bluetooth icon displays in the status bar of the screen when a Bluetooth device is active on your phone.
3. Press the to return to the previous menu or press the to return to the idle screen.
Deleting a Bluetooth Device
1. Press on the phone to enter the Options List.
2. Press the <Bluetooth> key. The following screen displays.
Bluetooth
Settings
Bluetooth Status Device Name
Bluetooth Devices
GN6110Hs
Add new device. . .
GN6110Hs
Connected: GN6110Hs
Mon Jan 1
12 : 45pm
41-001317-05 REV01 – 06.2013 79
Page 86

Options Key
Bluetooth
12 : 45pm
Mon Jan 1
1 device(s) found. Press on a device to start pairing.
Search
GN6110Hs
3. Press the next to the Bluetooth device you want to unpair from the phone. The following screen displays.
Bluetooth
Mon Jan 1
12 : 45pm
Are you sure?
Yes
4. Press <Ye s > to unpair the Bluetooth device from the phone.
or
Press <No> to cancel the unpairing of the Bluetooth device.
When you unpair the Bluetooth device from the phone, the following screen displays.
No
5. Press the to return to the previous menu or press the to return to the idle screen.
80 41-001317-05 REV01 – 06.2013
Page 87

Options Key
Softkeys
More
(state-based)
Softkeys
Softkeys
On the 6739i, you can configure up to 55 multi-functional softkeys using the IP Phone UI or the Aastra Web UI. The idle
screen displays up to 12 softkeys. If you configure more than 12 softkeys, the 12th key displays as a “More” key. Pressing
the “More” key allows you to toggle between multiple screens of configured softkeys.
L1 John Smith 401
Home
402
John Smith
Mon Jan 1
12 : 45pm
503
Office
401
403
404
405
406
BLF
Park
Pickup
Note:
If an Expansion Module is attached to the phone, you can configure additional softkeys. For more information about
expansion modules, see “Model M670i and M675i Expansion Modules” on page 193.
The following table lists the functions you can set on the softkeys and provides a description for each function,.
Key Function Description
None Indicates no setting for the key.
Line Indicates the key is configured for line use.
Speed Dial Indicates the key is configured for speed dial use. You can also configure a prefix for a speed dial number.
Do Not Disturb Indicates the key is configured for "do not disturb" on the phone.
Busy Lamp Field (BLF) Indicates the key is configured for Busy Lamp Field (BLF) use. User can dial out on a BLF configured key.
(Maximum of 50 BLFs allowed on M670i Expansion Module.)
BLF/List Indicates the key is configured for BLF list use. User can dial out on a BLF/List configured key.
Auto Call Distribution (ACD) (For Sylantro Servers)
Indicates the key is configured to allow the Sylantro server to distribute calls from a queue to registered IP phone
users (agents).
Directed Call Pickup (DCP)/
Group Call Pickup (GCP)
XML Indicates the key is configured to accept an XML application for accessing customized XML services. You can also
Flash Indicates the key is set to generate a flash event when it is pressed on the 6739i. The IP phone generates flash
Sprecode Indicates the key is configured to automatically activate specific services offered by the server. For example, if the
Park Indicates the key is configured to park incoming calls when pressed.
(Feature dependant on your call manager)
Indicates the key is configured to allow you to intercept - or pickup - a call on a monitored extension(s).
specify an XML key URL for this option.
events only when a call is connected and there is an active RTP stream (for example, when the call is not on hold).
sprecode value of *82 is configured, then by pressing the sprecode key, *82 automatically activates a service provided by the server. Contact your System Administrator for available services.
Your System Administrator must set configuration parameters before you can use the Park feature.
41-001317-05 REV01 – 06.2013 81
Page 88

Options Key
Softkeys
L1 John Smith 401
12 : 45pm
Mon Jan 1
John Smith
401
Home
403
404
405
406
503
Office
BLF
Park
Pickup
402
More
Softkeys
(state-based)
Key Function Description
Pickup Indicates the key is configured to pick up parked calls when pressed.
Last Call Return Indicates the key is configured for “last call return” when pressed.
Call Forward Indicates the key is configured as a Call Forward key. When pressed, the IP Phone UI displays the Call Forward
BLF/Xfer Indicates the key is configured as a simplified BLF key and a transfer key. You can use this key to perform the BLF
Speeddial/Xfer Indicates the key is configured as a simplified speed dial key and a transfer key. You can use this key to perform
Speeddial/Conf Indicates the key is configured as a speed dial key and a conference key. You can use this key to speed dial from
Icom (Intercom) Indicates the key is configured to be used for intercom calls.
Phone Lock Indicates the key is configured as a phone lock key, allowing you to press this key to lock/unlock the phone.
Paging Indicates the key is configured as a Paging key. When pressed, the phone can send Real Time Transport Protocol
Empty Indicates the key has no function assigned.
State-Based Softkeys
All of the softkeys on the 6739i are state-based except for the “None” softkey. You can use the softkey when the phone is
in the state specified for that softkey.
Your System Administrator must set configuration parameters before you can use the Pickup feature.
menus.
function, or you can use it as a transfer key to transfer calls.
speed dial functions, or you can use it as a transfer key to transfer calls.
within a conference call, and add the new call directly to the conference.
(RTP) streams from a pre-configured multicast address without involving SIP signalling. You can also receive RTP
streams from pre-configured multicast addresses (can specify up to 5 addresses) using the "Paging Listen
Addresses" at the path, Basic Settings->Preferences->Group Paging RTP Settings in the Aastra Web UI. For more
information about setting this parameter, see “Group RTP Paging (receives RTP streams)” on page 180.
82 41-001317-05 REV01 – 06.2013
Page 89

The following Aastra Web UI screen shows the states you can configure for your phone.
Configurable Softkey States
The following table describes the states available to configure for the softkeys.
Options Key
State Description
idle The phone is not being used.
connected The current line is in an active call (or the call is on hold).
incoming The phone is ringing.
outgoing The user is dialing a number, or the far-end is ringing.
busy The current line is busy because the line is in use or the line is set as “Do Not Disturb”.
The following table identifies the applicable default states for each softkey type on the IP phone
Key Function Description
None All states disabled.
Line idle, connected, incoming, outgoing, busy
Speed Dial idle, connected, incoming, outgoing, busy
Do Not Disturb idle, connected, incoming, outgoing, busy
Busy Lamp Field (BLF) connected
BLF/List connected
Auto Call Distribution (ACD) idle
Directed Call Pickup (DCP)/
Group Call Pickup (GCP)
XML connected
Flash All states disabled
Sprecode connected
Park connected
Pickup idle, outgoing
Last Call Return idle, connected, incoming, outgoing, busy
Call Forward idle, connected, incoming, outgoing, busy
BLF/Xfer connected
Speeddial/Xfer idle, connected, incoming, outgoing, busy
idle, connected, incoming, outgoing, busy
41-001317-05 REV01 – 06.2013 83
Page 90

Options Key
Key 12 configured as a speed dial
Key Function Description
Speeddial/Conf idle, connected, incoming, outgoing, busy
Intercom idle, connected, incoming, outgoing, busy
Phone Lock All states disabled.
Paging All states disabled.
Empty idle, connected, incoming, outgoing, busy
Note:
Softkey states can only be enabled/disabled using the Aastra Web UI. The states for each softkey display enabled
by default. To disable a state, you uncheck the box.
Key Display Behaviour
On the 6739i IP Phone, you can configure 55 softkeys with specific functions. If you have no softkeys configured on the IP
Phone, and you assign softkey functions to higher number keys in the Aastra Web UI, the key functions automatically
appear in the first available position on the LCD display.
For example, if softkey 1 is set to BLF/Xfer and softkeys 2 through 11 are set to "None" and you configure softkey 12 as
the following:
Typ e: speed dial
Label: LAB
Value: 3456
after saving the settings, the "LAB" label actually appears in position 2 of the LCD.
A softkey function of "None" does not display on the idle screen at all.
The following illustrations show the configuration of Key 12 and how that key displays on the phone.
84 41-001317-05 REV01 – 06.2013
Page 91

Options Key
Key 12 displays in
softkey position 2
on the phone
Line Keys
configured as
softkeys
Call Status
Icon
L1 John Smith 401
BLF/Xfer
LAB
John Smith
Mon Jan 1
12 : 45pm
503
Office
401
403
404
405
406
BLF
Park
Pickup
Line Softkey
You can set a softkey to act as a line/call appearance key on the 6739i. This key acts as a line that behaves the same as a
hard line key (L1, L2, and L3). For more information about the hard line keys and behaviour of line keys, see “Line Keys” on
page27. The following illustration shows the first four softkeys configured as Lines 4, 5, 6, and 7.
L1 John Smith 401
Line 4
Mon Jan 1
12 : 45pm
503
Depending on the phone configuration, the maximum number of total line/call appearances allowed on the 6739i is 9 (3
line/call appearance hard keys plus 6 softkeys). If all line/call appearances have been set up between two different numbers, a total of 8 lines can be configured.
You can press any line key to dial an outgoing call. During incoming calls, a pop-up appears at the top of the screen indicating the current line that is ringing. You can press the ringing line to answer the call. A set of 9 keys display in the center
of the screen indicating the lines that are available and not available. If all lines are in use, one call is connected while the
rest are on hold. No further outgoing or incoming calls can be made until one of the line/call appearances becomes available.
The status of the active call displays in the upper left corner of the screen.
For more information about multiple incoming calls, see “Multiple Incoming Calls Screens” on page 14.
Configuring a Line Softkey
You can configure a softkey as a Line Key on the 6739i. The key acts as a line that behaves the same as a hard line key. For
more information about the behaviour of line keys, see “Multiple Line and Call Appearances” on page 27.
Line 5
Line 6
Line 7
405
406
John Smith
401
Office
BLF
Park
Pickup
41-001317-05 REV01 – 06.2013 85
Page 92

Options Key
Softkeys
12 : 45pm
Mon Jan 1
None
None
None
None
None
None
None
None
None
None
None
None
None
None
None
None
None
None
None
12 : 45pm
Mon Jan 1
None
Type
Line
1
CancelSave
Label
Value
Softkeys
You can use the IP Phone UI or the Aastra Web UI to create Line softkeys on your phone.
IP Phone UI
1. Press on the phone to enter the Options List.
2. Press the <Softkeys> key. By default, all of the softkeys that display are configured as “None”.
3. Press a <None> key. A softkey configuration screen displays.
4. In the “Typ e” field, press the <None> key. A screen displays with softkey keys.
5. Press the <Line> function key to apply to the softkey.
Note:
A total of 9 Line Keys can exist on the 6739i (3 hard keys (Line 1, 2, and 3) and 6 softkeys
6. In the “Label” field, enter a label to assign to this softkey.
7. In the “Line” field, press the or to select a line to assign to the softkey. Valid values are 4 through 9.
8. Press <Save> to save the softkey. The softkey applies to your phone immediately and displays on your idle screen.
9. Press the to return to the previous menu or press the to return to the idle screen.
Aastra Web UI
1. Click on Operation->Softkeys and XML.
or
Click on Operation->Expansion Module.
Softkeys
2. Select from “Key 1” through “Key 55.
Note:
A total of 9 Line Keys can exist on the 6739i (3 hard keys (Line 1, 2, and 3) and 6 softkeys.
3. In the "Type" field, select Line to apply to the key.
4. In the "Label" field, enter a label to apply to this key.
5. In the "Line" field, select a line to apply to this key. Valid values are 4 through 9.
6. In the state fields, check (enable) or uncheck (disable) the states you want to apply to this softkey.
Expansion Module Keys
7. Select an expansion module key.
8. In the "Type" field, select Line to apply to the key.
86 41-001317-05 REV01 – 06.2013
Page 93

Options Key
9. In the "Label" field, enter a label to apply to this key.
10. In the "Line" field, select a line to apply to this key. Valid values are 4 through 9.
11. Click Save.
Speed Dial Softkey
A speed dial key allows you to output a number quickly by pressing a key configured for speed dialing. You can program a
softkey on the 6739i to speed dial outside numbers, dial directly to another person’s line or extension, or to quickly access
features such as Caller ID (*69) and Voicemail.
Note:
You can use a speed dial key while on an active call by placing the active call on hold first, and then pressing the speed
dial key.
You can create speed dial keys using any of the following methods:
• IP Phone UI at the path:
– Options->Softkeys
– Services->Speed Dial
– Press-and-hold a softkey/expansion module key
• Aastra Web UI at the paths:
– Operation->Softkeys and XML or Expansion Module Keys to create a softkey
Note:
You can also press-and-hold a keypad key to program a speed dial. For more information, see “Keypad Keys” on
page 48.
You can save up to 30 speed dial numbers on the 6739i.
Speed Dial Prefix
The speed dial feature also allows you to specify a preset string of numbers followed by a “+” that the phone pre-dials
automatically. After pressing the speed dial key, the phone automatically dials the prefix and then waits for further digits
to be input by the user. You can use this feature for frequently dialed numbers that start with the same set of digits or long
international numbers, which contain long prefixes.
For example, if you had the following speed dial configuration:
Key 1
Typ e=speed dial
Label=Europe Office
Value=1234567+
Line=2
then, after you press key 1 on the phone, the prefix number displays on the phone screen. The phone proceeds to output the prefix number automatically and then pauses for you to enter the remaining phone number using the keypad
on the phone.
You can use the IP Phone UI or the Aastra Web UI to create speed dial softkeys on your phone.
41-001317-05 REV01 – 06.2013 87
Page 94

Options Key
Configuring a Speed Dial Softkey/Expansion Module key using Options->Softkeys on the IP Phone
IP Phone UI
1. Press on the phone to enter the Options List.
2. Press the <Softkeys> key. By default, all of the softkeys that display are configured as “None”.
3. Press a <None> softkey. A softkey configuration screen displays.
4. In the “Typ e” field, press the <None> key. A screen displays with softkey keys.
5. Press the <Speed Dial> function key to apply to the softkey.
6. In the “Label” field, enter a label to assign to this softkey.
7. In the “Value” field, enter a value to assign to this softkey.
8. In the “Line” field, press the or to select a line to assign to the softkey. Valid values are 1 through 9.
9. Press <Save> to save the softkey. The softkey applies to your phone immediately and displays on your idle screen.
10. Press the to return to the previous menu or press the to return to the idle screen.
Editing a Speed Dial Softkey/Expansion Module key Using the IP Phone UI
IP Phone UI
1. Press on the phone to enter the Options List.
2. Press the <Softkeys> key.
3. Press the speed dial softkey you want to edit. The speed dial softkey screen displays.
4. Edit the fields as applicable and press <Save>.
5. Press the to return to the previous menu or press the to return to the idle screen.
Creating a Speed Dial Key on a Softkey/Expansion Module Key (using the press-and-hold feature)
Pressing and holding down a blank softkey or expansion module key on the phone initiates a speed dial feature.
Notes:
1.The softkey or expansion module key must have no preassigned function (key must be set to None) in order to use
the press-and-hold feature to create a speed dial key.
2.You can also press-and-hold a keypad key to program a speed dial. For more information, see “Keypad Keys” on
page 48.
88 41-001317-05 REV01 – 06.2013
Page 95

Options Key
12 : 45pm
Mon Jan 1
Type
Line
1
CancelSave
Number
Speed Dial Edit:
Spddial Name
12 : 45pm
Mon Jan 1
OK
Speed Dial Edit:
Entry Saved: 5554343
Configuring a Speed Dial on a Softkey/Expansion Module Key (using the press-and-hold feature) Using the IP Phone UI
Use the following procedure to configure a speed dial key on a softkey or expansion module key.
IP Phone UI
1. Press an unprogrammed softkey or expansion module key.
The following screen displays.
Note:
You can press the "Cancel" key at anytime during the speed dial programming to cancel and not save the speed
dial information.
2. In the “Line” field, press the or to select a line to assign to the speed dial key.
Valid values are 1 through 9.
This is the line that the phone opens to dial the number after you press the speed dial key. By default, the phone
uses Line 1.
3. Press the “Name” field. A keyboard displays.
Enter a name for the speed dial key using the displayed keyboard.
4. Press the “Number” field.
Enter a number for the speed dial key using the displayed keyboard.
5. Press <Save> to save the speed dial key. The following is an example of the screen that displays.
6. Press the to return to the previous menu or press the to return to the idle screen.
41-001317-05 REV01 – 06.2013 89
Page 96

Options Key
Configuring/Editing a Speed Dial Softkey/Expansion Module Key (press-and-hold feature) using the Aastra Web UI
Use the following procedure to create or edit a speed dial softkey in the Aastra Web UI.
Aastra Web UI
1. Click on Operation->Softkeys and XML.
or
Click on Operation->Expansion Module.
Softkeys
2. Select from “Key 1” through “Key 55”.
3. In the "Type" field, select Speed Dial to apply to the key.
4. In the "Label" field, enter or edit the label to apply to this key.
5. In the "Valu e" field, enter or edit the phone number, extension, or speed dial prefix to apply to this key. If you
enter a speed dial prefix, you must enter the "+" character at the end of the prefix number (for example, "123456+").
Note:
You can delete a speed dial key by removing the information from the "Va lue" field.
6. In the "Line" field, select or edit the line to apply to this key. Valid values are 1 through 9.
7. In the state fields, check (enable) or uncheck (disable) the states you want to apply to this softkey.
Expansion Module Keys
8. Select an expansion module key.
9. In the "Type" field, select Speed Dial to apply to the key.
10. In the "Label" field, enter or edit a label to apply to this key.
11. In the "Value " field, enter or edit the phone number, extension, or speed dial prefix to apply to this key. If you
enter a speed dial prefix, you must enter the "+" character at the end of the prefix number (for example, "123456+").
Note:
You can delete a speed dial key by removing the information from the "Va lue" field.
12. In the "Line" field, select or change the line to apply to this key. Valid values are
1 through 9.
13. Click Save Settings.
"Do Not Disturb" (DND) Softkey
The IP phones have a feature you can enable called "Do Not Disturb (DND). DND allows you to place a single account or
all accounts on the phone in a “Do Not Disturb” status, depending on the DND mode set on the phone (Phone mode
(default), Account mode, Custom mode). You can configure the DND softkey to turn DND ON and OFF.
If DND is ON, callers calling into the phone hear no ring and then the call is dropped. If call forward is configured on the
phone, the call can be forwarded to voicemail. For more information about setting the DND modes on your phone, see
“DND Account-Based Configuration” on page 150.
You can use the IP Phone UI or the Aastra Web UI to create a DND softkey on your phone.
Configuring a DND Softkey
IP Phone UI
1. Press on the phone to enter the Options List.
2. Press the <Softkeys> key. By default, all of the softkeys that display are configured as “None”.
90 41-001317-05 REV01 – 06.2013
Page 97

3. Press a <None> key. A softkey configuration screen displays.
DND enabled
DND status icon
for account
in focus
4. In the “Type ” field, press the <None> key. A screen displays with softkey keys.
5. Press the <Do Not Disturb> function key to apply to the softkey.
6. Press <Save> to save the softkey.
7. Press the to return to the previous menu or press the to return to the idle screen.
The softkey applies to your phone immediately and displays on your idle screen. If DND is enabled for the account
in focus, a RED border around the key indicates that DND is enabled on the softkey. You can toggle DND ON and
OFF by pressing the DND softkey. The DND status icon displays in the status bar when DND is enabled.
Options Key
L1 John Smith 401
Home
402
John Smith
401
DND
404
Call Forward
406
Aastra Web UI
1. Click on Operation->Softkeys and XML.
or
Click on Operation->Expansion Module.
Softkeys
2. Select from “Key 1” through “Key 55”.
3. In the "Type " field, select Do Not Disturb to apply to the key.
Mon Jan 1
12 : 45pm
Flash
Intercom
Paging
Park
Pickup
4. In the state fields, check (enable) or uncheck (disable) the states you want to apply to this softkey.
Expansion Module Keys
5. Select an expansion module key.
6. In the "Type " field, select Do Not Disturb to apply to the key.
7. Click Save Settings.
41-001317-05 REV01 – 06.2013 91
Page 98

Options Key
Busy Lamp Field (BLF) Softkey
The BLF feature on the IP phones allows a specific extension to be monitored for state changes. BLF monitors the status
(busy or idle) of extensions on the IP phone.
Note:
BLF feature availability is dependant on your call manager. Contact your System Administrator for more information
Example
A Supervisor configures BLFs on his phone for monitoring the status of a worker’s phone use (busy or idle). When the
worker picks up his phone to make a call, a busy indicator on the Supervisor’s phone shows that the worker’s phone is in
use and busy.
On the 6739i, the busy and idle indicators show on the IP phone screen display next to the key programmed for BLF
functionality. When the monitored user is idle, an icon with the handset on-hook shows next to the BLF key. When the
monitored user is on an active call, a small telephone icon is shown with the handset off-hook.
Note:
You can also use a BLF configured key to dial out. Contact your System Administrator for more information.
You can use the IP Phone UI or the Aastra Web UI to create a BLF softkey on your phone.
Configuring a BLF Softkey
IP Phone UI
1. Press on the phone to enter the Options List.
2. Press the <Softkeys> key. By default, all of the softkeys that display are configured as “None”.
3. Press a <None> key. A softkey configuration screen displays.
4. In the “Typ e” field, press the <None> key. A screen displays with softkey keys.
5. Press the <BLF> function key to apply to the softkey.
6. In the “Label” field, enter a label to assign to this softkey.
7. In the “Value” field, enter a value to assign to this softkey.
8. In the “Line” field, press the or to select a line to assign to the softkey. Valid values are 1 through 9.
9. Press <Save> to save the softkey. The softkey applies to your phone immediately and displays on your idle screen.
10. Press the to return to the previous menu or press the to return to the idle screen.
92 41-001317-05 REV01 – 06.2013
Page 99

Aastra Web UI
1. Click on Operation->Softkeys and XML.
or
Click on Operation->Expansion Module.
Softkeys
2. Select from “Key 1” through “Key 55”.
3. In the "Type " field, select BLF to apply to the key.
4. In the "Label" field, enter a label to apply to this key.
5. In the "Value " field, enter the phone number or extension you want to monitor.
6. In the "Line" field, select a line for which to apply this key. Valid values are 1 through 9.
7. In the state fields, check (enable) or uncheck (disable) the states you want to apply to this softkey.
Expansion Module Keys
8. Select an expansion module key.
9. In the "Value " field, enter the phone number or extension you want to monitor.
10. In the "Label" field, enter a label to apply to this key.
11. In the "Line" field, select a line for which to apply this key. Valid values are 1 through 9.
Options Key
12. Click Save Settings.
BLF/List Softkey
(For use with the BroadSoft Broadworks Rel 13 or higher platform only).
The BLF/List feature on the IP phones is specifically designed to support the BroadSoft Broadworks Rel 13 Busy Lamp Field
feature.
This feature allows the IP phone to subscribe to a list of monitored users defined through the BroadWorks web portal.
Note:
Your System Administrator must have BLF/List enabled on the BroadWorks Server. Contact your System Administrator
for more information.
In addition to monitoring the idle and busy state, the BLF/List feature also supports the ringing state. When the monitored
user is idle, there is a small telephone icon shown with the handset on-hook. When the monitored user is on an active call,
a small telephone icon is shown with the handset off-hook.
Note:
You can use a BLF/List configured key to dial out.
Example
A receptionist has a 6739i running Broadsoft firmware that subscribes to a list of extensions from the BroadWorks Application Server. On the 6739i, the key LEDs illuminate either flashing, solid, or turn off depending on the state of those extensions.
Note:
The Broadworks BLF feature is not the same as the Broadworks Shared Call Appearance (SCA) feature and does not permit call control over the monitored extension.
41-001317-05 REV01 – 06.2013 93
Page 100

Options Key
Configuring a BLF/List Softkey
If you set a key to use BLF/List, you must also enter a BLF List URI in the Aastra Web UI at the path Operation->Softkeys
and XML->Services, or in the IP Phone UI at the path Options->Softkeys. The BLF List URI is the name of the BLF list
defined on the BroadSoft BroadWorks Busy Lamp field page for your particular user.
For example, sip:9@192.168.104.13. The value of the BLF/List URI parameter must match the list name configured. Otherwise, no values display on the 6739i screen and the feature is disabled
The BLF List function can be configured on the 6739i using the IP Phone UI or the Aastra Web UI.
IP Phone UI
1. Press on the phone to enter the Options List.
2. Press the <Softkeys> key. By default, all of the softkeys that display are configured as “None”.
3. Press a <None> key. A softkey configuration screen displays.
4. In the “Typ e” field, press the <None> key. A screen displays with softkey keys.
5. Press the <BLF/List> function key to apply to the softkey.
6. In the “Line” field, press the or to select a line to assign to the softkey. Valid values are 1 through 9.
Note:
The "Label" and "Value" field are not required. The BroadWorks BLF List name is configured in the "BLF List URI"
field instead.
7. Press <Save> to save the softkey. The softkey applies to your phone immediately and displays on your idle screen.
8. Press the to return to the previous menu or press the to return to the idle screen.
Aastra Web UI
1. Click on Operation->Softkeys and XML.
or
Click on Operation->Expansion Module.
Softkeys
2. Select from “Key 1” through “Key 55”.
3. In the "Type" field, select "BLF/List" (BroadSoft BroadWorks).
4. In the "Line" fie ld, se lec t a l ine num ber that i s ac tiv ely regi stered to the appropriate SIP proxy you are using. Valid
values are:
• global
• 1 through 9
Note:
The "Label" and "Value" field are not required. The BroadWorks BLF List name is configured in the "BLF List URI"
field instead.
5. In the state fields, check (enable) or uncheck (disable) the states you want to apply to this softkey.
6. In the "BLF List URI" field, enter the name of the BLF list defined on the BroadSoft BroadWorks Busy Lamp field
page for your particular user. For example, sip:9@192.168.104.13.
Note:
Contact your System Administrator for the BLF List URI.
Expansion Module Keys
7. Select an expansion module key.
94 41-001317-05 REV01 – 06.2013
 Loading...