


Operating Instructions
2-DOOR FRIDGE
|
|
|
|
|
|
|
|
|
|
|
|
|
|
|
|
|
|
Contents |
|
||
|
|
|
|
|
|
|
GB |
|||
|
|
|
|
|
|
|
|
|
||
|
|
|
|
|
|
|
Installation, 12 |
|
||
|
I |
|
GB |
|
F |
|
|
|||
|
|
|
|
Positioning and connection |
||||||
|
|
|
|
|
|
|
Reversible doors |
|||
Italiano, 1 |
English,11 |
Français, 21 |
||||||||
Description of the appliance, 13 |
||||||||||
|
|
|
|
|
|
|
||||
|
E |
|
P |
|
|
|
Overall view |
|||
|
|
|
|
|
Accessories, 14 |
|||||
|
|
|
|
|
|
|
||||
|
|
|
Portuges, 41 |
|
|
|||||
Espanol, 31 |
|
|
||||||||
|
|
|
|
|
||||||
|
|
|
|
|
|
|
Start-up and use, 15-16 |
|||
|
|
|
|
|
|
|
Starting the appliance |
|||
|
|
|
|
|
|
|
Chiller system |
|||
|
|
|
|
|
|
|
Using the refrigerator to its full potential |
|||
|
|
|
|
|
|
|
Using the freezer to its full potential |
|||
TAN 13 NF TAN 13 NF PS TAN 14 NF P TAN 14 NF PS
Maintenance and care, 17
Switching the appliance off Cleaning the appliance
Avoiding mould and unpleasant odours Defrosting the appliance
Replacing the light bulb
Precautions and tips, 18
General safety Disposal
Respecting and conserving the environment
Troubleshooting, 19
Assistance, 20
Installation
! Before placing your new appliance into operation please GB read these operating instructions carefully. They contain
important information for safe use, for installation and for care of the appliance.
! Please keep these operating instructions for future reference. Pass them on to possible new owners of the appliance.
Positioning and connection
Positioning
1.Place the appliance in a well-ventilated humidity-free room.
2.Do not obstruct the rear fan grills. The compressor and condenser give off heat and require good ventilation to operate correctly and save energy.
3.Leave a space of at least 10 cm between the top part of the appliance and any furniture above it, and at least 5 cm between the sides and any furniture/side walls.
4.Ensure the appliance is away from any sources of heat (direct sunlight, electric stove, etc.).
5.In order to maintain the correct distance between the appliance and the wall behind it, fit the spacers supplied in the installation kit, following the instructions provided.
Levelling
1.Install the appliance on a level and rigid floor.
2.If the floor is not perfectly horizontal, adjust the refrigerator by tightening or loosening the rear feet.
Electrical connections
After the appliance has been transported, carefully place it vertically and wait at least 3 hours before connecting it to the electricity mains. Before inserting the plug into the electrical socket ensure the following:
•The appliance is earthed and the plug is compliant with the law.
•The socket can withstand the maximum power of the appliance, which is indicated on the data plate located on the bottom left side of the fridge (e.g. 150 W).
•The voltage must be in the range between the values indicated on the data plate located on the bottom left side (e.g. 220-240V).
•The socket is compatible with the plug of the appliance. If the socket is incompatible with the plug, ask an authorised technician to replace it (see Assistance). Do not use extension cords or multiple sockets.
!Once the appliance has been installed, the power supply cable and the electrical socket must be easily accessible.
!The cable must not be bent or compressed.
!The cable must be checked regularly and replaced by authorised technicians only (see Assistance).
!The manufacturer declines any liability should these safety measures not be observed.
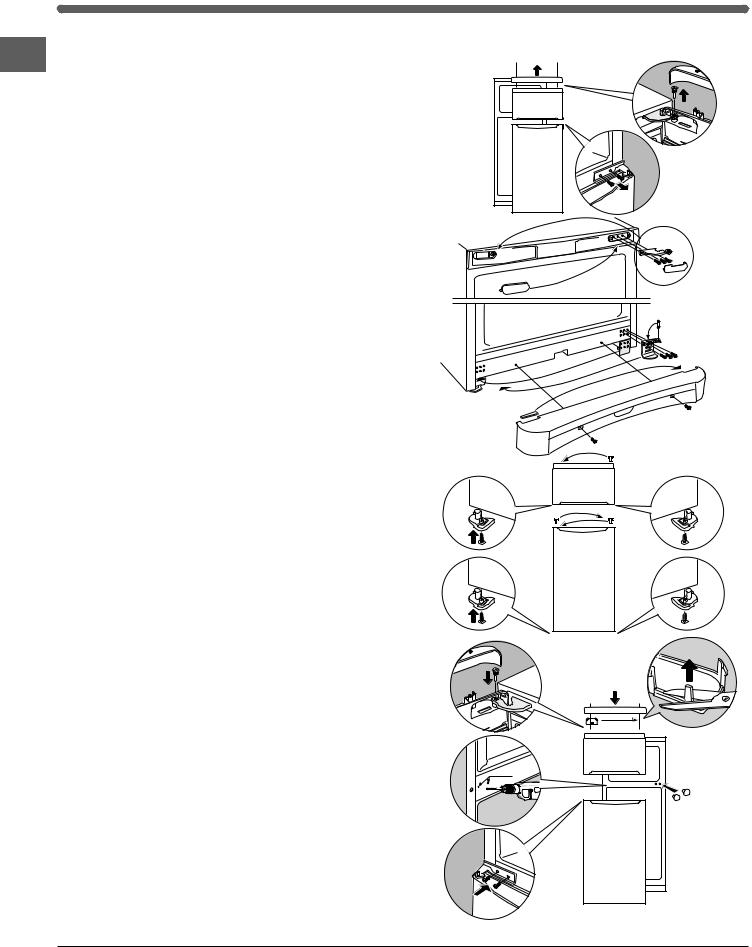
Reversible doors
1
2
3
4
3mm
5
12

Description of the appliance
Overall view
GB
The instructions contained in this manual are applicable to different model refrigerators. The diagrams may not directly represent the appliance purchased. For more complex features, consult the following pages.
FREEZER |
|
OPERATION |
|
Knob |
|
FREEZER |
|
compartment |
|
|
Removable lidded |
SHELVES• |
shelf with EGG TRAY |
|
|
REFRIGERATOR |
|
OPERATION |
Removable |
Knob |
|
|
multipurpose |
LAMP |
SHELVES• |
(see Maintenance) |
|
MULTI-USE* bin |
|
|
BOTTLE shelf |
FRUIT and |
|
VEGETABLE bin |
|
Levelling FEET
• Varies by number and/or position. * Available only on certain models.
13
Accessories
GB |
1 |
|
|
|
2 |
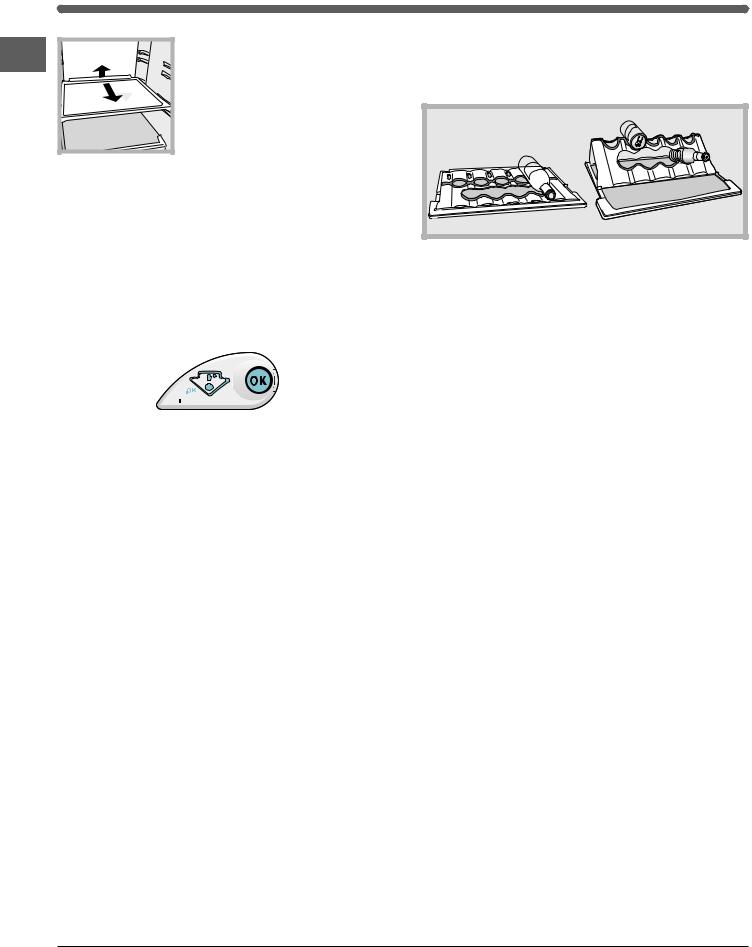
SHELVES: with or without grill. Due to the special guides the shelves are removable and the height is adjustable (see diagram), allowing easy storage of large containers and food. Height can be adjusted without complete removal of the shelf.
MULTI-USE* bin: to store food (such as cold meats) for a long time and also prevent odours from lingering in the refrigerator.
TEMPERATURE* Indicator light: to identify the coldest area in the refrigerator.
1.Check that OK appears clearly on the indicator light (see diagram).
vert
noir consulter la notice
2.If the word “OK” does not appear it means that the temperature is too high: adjust the REFRIGERATOR OPERATION knob to a higher (colder) position and wait approximately 10 hours until the temperature has stabilised.
3.Check the indicator light again: if necessary, readjust it following the initial process. If large quantities of food have been added or if the refrigerator door has been opened frequently, it is normal for the indicator not to show OK. Wait at least 10 hours before adjusting the REFRIGERATOR OPERATION knob to a higher setting.
* Available only on certain models.
PLAY ZONE*: Thanks to the new “Play Zone” bottle rack, you can cool several bottles, cans and energy drinks quickly to have them constantly at hand.
If the “Play Zone” is placed on the glass shelf, you can store large and medium sized bottles on it simply by laying the bottle on the flat rack. This is ideal for storing wine bottles. When folded and secured in place on either side of the shelf, the rack can be used to store cans (at the top), energy drinks (in the centre) and other cans and energy drinks can be rested horizontally on the remaining part of the shelf. When placing cans (onto the Play zone rack), make sure they do not touch the back of the refrigerator interior.
The “Play Zone” can be used just like a normal shelf (when placed flat) and moved up or down along the fridge walls together with the rest of the shelf. It can be washed easily, and is also dishwasher safe. The ideal position for the Play zone rack is the central shelf.
14
 Loading...