

Page 1
© 2013 ZOOM CORPORATION
Copying or reproduction of thi s User
Gu ide in par t o r i n who le wi th out
permission is prohibited.
User Guide
Safety and Operation
Precautions must be read
before using the unit.
Page 2

1
Included items
• Lithium-ion battery
(BT-02)
• LCD unit
• USB cable • Hairy windscreen •
Hairy
windscreen
attachment
screw
• User Guide
(this document)
© 2013 ZOOM CORPORATION
Copying or reproduction of this User
Guide in par t or in wh ole wit hou t
permission is prohibited.
User Guide
Safety and Operation
Precautions must be read
before using the unit.
Included items
• main unit
Page 3
2
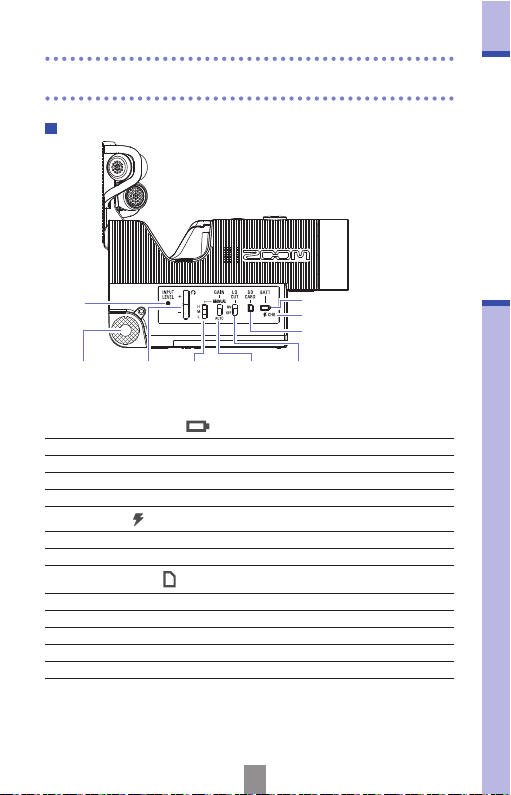
Parts of the recorder
Accessory
mount
INPUT
LEVEL
LED
Remaining SD LED
Remaining battery LED
VOL
+/–
keys
MANUAL
GAIN
switch
POWER
button
HDMI
connector
REC
button
GAIN
switch
Charging LED
LO
CUT
switch
Parts of the recorder
Remaining battery LED
Green 50% or more remaining battery charge
Orange 20-50% remaining battery charge
Red 20% or less remaining battery charge
Blinking red Almost no remaining battery charge
Charging LED
Red Battery charging
Unlit Charging complete or not charging
Remaining SD LED
Green 50% or more SD card space open
Orange 20-50% space open
Red 20% or less space open
Blinking red No space open or unusable
Unlit No SD card loaded
Right side view
Page 4

3
Parts of the recorder
Tripod mounting
screw
Battery/SD card
cover
Battery lock
SD card slot
Battery slot
Parts of the recorder (continued)
Installing the battery
Open the battery/SD card cover. Make sure the battery is facing the
correct direction and push it in completely until it locks.
After confirming that the battery is locked, securely close the battery/SD
card cover.
Unlock the battery before removing it.
Bottom
POWER
button
REC
button
Top
Page 5
4
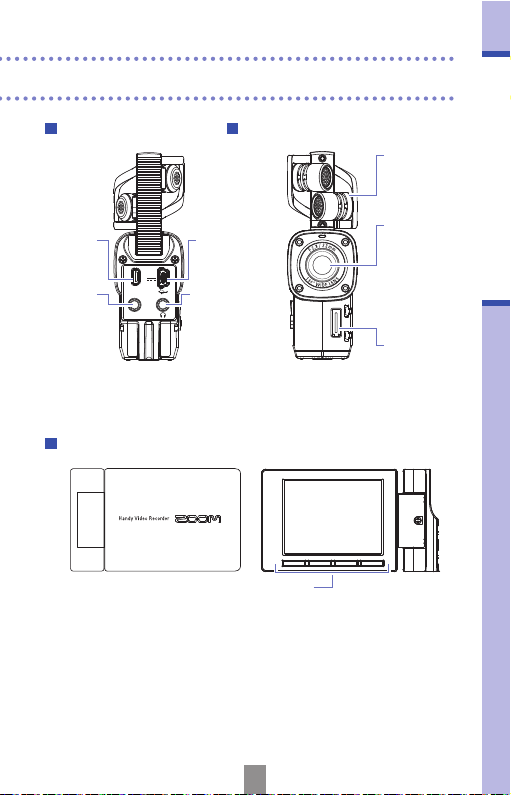
Parts of the recorder
EXT IN
HDMI OUT
DC5V
Tripod mounting
screw
HDMI
connector
External
input
jack
Headphones
jack
USB
port
XY mic
Lens
LCD unit
connector
Battery/SD card
cover
Battery lock
SD card slot
Battery slot
EXT IN
HDMI OUT
DC5V
Tripod mounting
screw
HDMI
External
input
jack
Headphones
jack
USB
port
XY mic
Lens
LCD unit
connector
Operation buttons
Battery/SD card
cover
Battery lock
SD card slot
Battery slot
XY mic
Raise when recording.
Back
LCD unit
Front
Page 6

5
Parts of the recorder
Attaching and detaching the LCD unit
Parts of the recorder (continued)
6
Attaching the LCD unit
1. Align the LCD unit with the guide rail
and push it in until it is attached.
Detaching the LCD unit
1. On the menu screen, select SETTING
and press
.
(See "Working with menus" on page 7.)
2. Use / to select "Remove LCD".
3. Press .
4. Use / to select "Yes".
5. Press .
The LCD becomes blank.
6. Wh ile pressing the UNLOCK button
in the recorder connection area, slide
the LCD unit off.
NOTE
Recording is possible when the LCD
unit is detached.
32
54
Page 7
6
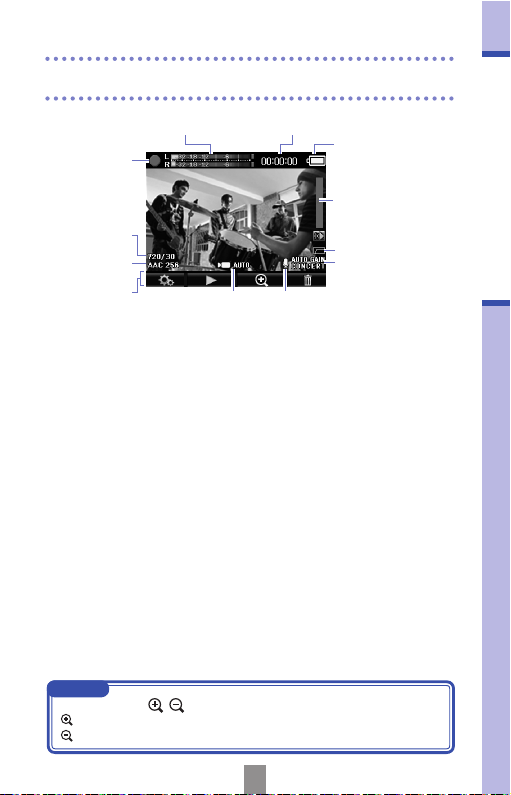
Main screen
Monitoring volume
Mic gain
Status icon
Navigation
buttons
SCENE setting Input settings
LO CUT setting
Level meters
Video quality
setting
Audio quality
setting
Timecode
Remaining battery
charge
Status icon
Th is sh ow s the curr en t opera ti on
status.
Level meters
These show the volum e of the input
audio. If the volume is too loud, peak
indicators will stay lit.
Timecode
Wh e n re co rdi ng , th is sh ow s the
rec ord in g time .When pause d, th is
shows the possible recording time.
Remaining battery charge
This shows the amount of remaining
battery charge.
Monitoring volume
This show s the volu me level (when
using the VOL +/− keys).
Video quality setting
Th is sh o w s th e vi d e o si z e an d
number of frames.
Audio quality setting
This shows the audio format and bit
rate.
Navigation buttons
Thes e icons show the functi ons of
the LCD unit operation buttons. They
chan ge accord ing to the operat ion
state.
SCENE setting
Th is sh ows th e cam era SC ENE
setting (VIDEO menu).
Input settings
This sho ws the audio input setti ng
(b ui lt -in mi c, exte rnal mic or lin e
input).
LO CUT setting
This shows the use of noise reduction.
Mic gain
This shows the recording level setting.
Main screen
NOTE
You can use the
/ navigation buttons to change the angle of view.
: Make the angle of view narrower.
: Make the angle of view wider.
Page 8
7
Working with menus
Use the menu to make detailed settings.
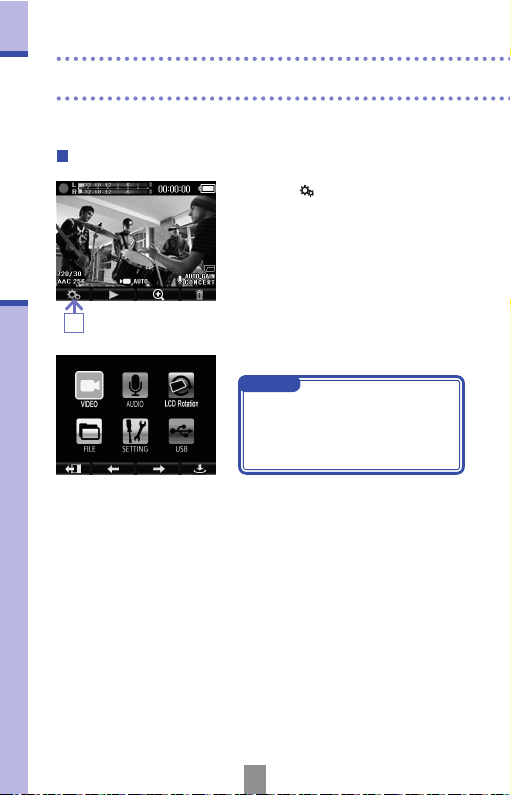
Open the menu screen
Working with menus
1. Press while the mai n screen is
open.
This opens the menu.
1
NOTE
If the LCD unit is tur ned, the
navigation button display will
change according to the positions of
the unit operation buttons.
Page 9
8
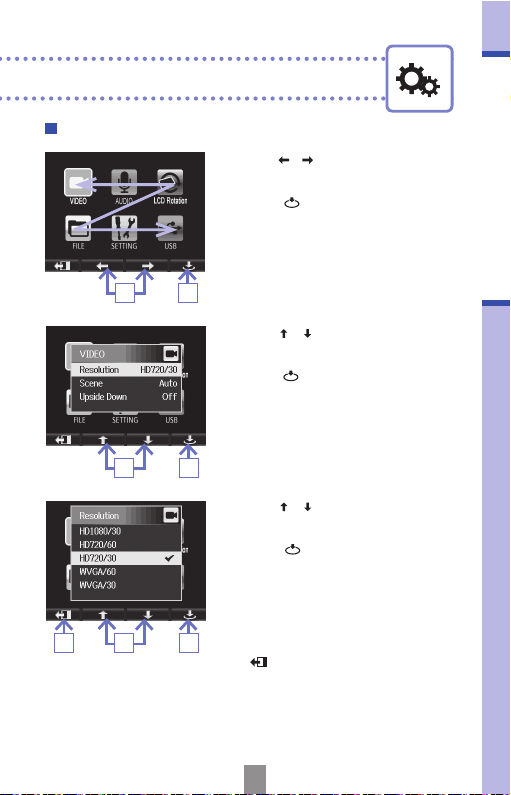
Working with menus
Working with menus
2
1
1. Use / to select a menu item.
2. Press to confirm a menu selection.
The setting item list opens.
3. Use / to select a setting item.
4.
Press to confirm a setting selection.
The setting value list opens.
5. Use / to select a setting value.
6. Press to confirm a setting value.
A check mark appears on the selected
setting value.
7. To return to t he main scree n, press
several times.
43
67 5
Page 10
9
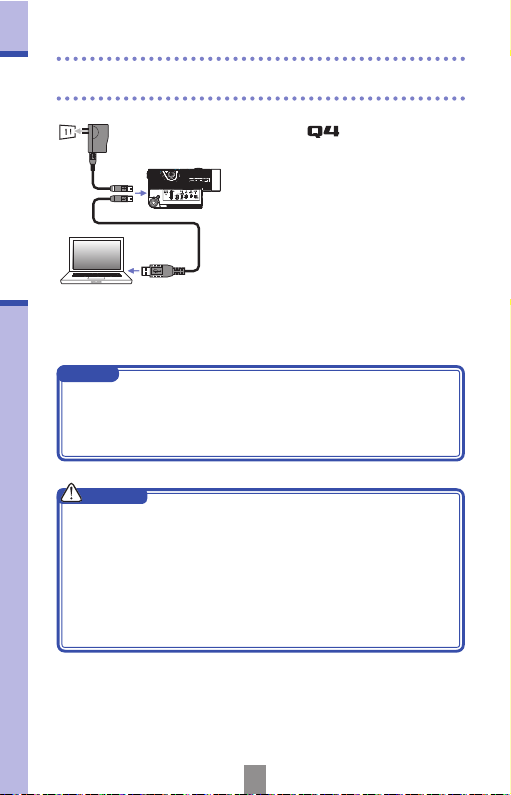
Charging the battery
Charging the battery
1. Turn the off.
2. C on nec t to a US B po wer sup pl y
(running computer or ZOOM AD-1 7
AC adapter (sold separately)).
The Charging LED stays lit while th e
battery is charging.
3. After charging completes, disconnect the
cable from the USB power supply.
After charging completes, the Charging
LED becomes unlit.
2
2
NOTE
Charging a battery to 100% requires about three hours when connected
to a computer and about two hours fifteen minutes when using an AC
adapter.
(The amount of time required will vary depending on the conditions.)
CAUTION
• The recorder does not charge when it is on.
• The surrounding temperature should be between 5°C and 35°C
(41°F and 95°F) when charging. At other temperatures, the battery
could become hot, damaged or weakened.
• Do not leave the cable connected for a long time after charging
completes.
• You mu s t a ls o f o ll ow th e ha n dl in g i n st ru ct io n s i n "Warnings and
requests regarding safe batte ry use" on pa ge 30.
Page 11

10
Setting the time
When the date and time are set, the recorder can store accurate
recording date and time information in files.
Setting the time
46 5
32
1. On the menu screen, select SETTING
and press
.
2. Use / to select Set Date.
3. Press .
4. Use to select each item.
5. Use / to set the values for the
current date and time.
6. Af ter com ple tin g the set tin g, press
.
Page 12

11
Formatting SD cards
Formatting SD cards
54
32
SD cards must be formatted by the for use with it.
1. On the menu screen, select SETTING
and press
.
2. Use / to select SD Format.
3. Press .
4. Use / to select "Yes" .
5. Press .
The SD card will be formatted.
Select “No” to return to the SETTING
menu.
After formatting completes, "Done" will
app ear and the SETTI NG menu will
reopen.
NOTE
If the SD ca rd ’s wr it e-p ro te cti on
sw it ch is ON, the card ca nn ot be
formatted.
CAUTION
• After purchasing a new SD card, always format it using the to
maximize performance.
• Be aware that all data previously saved on the SD card will be deleted
when it is formatted.
Page 13

12
Adjusting the recording level
You can adjust the recording level to suit the recording conditions.
Adjusting the recording level manually
Adjusting the recording level
1. Slide the GAIN switch to the MANUAL
position.
Thi s turns aut oma tic rec ord ing lev el
adjustment off.
2. U se th e M AN UA L GAI N swi tc h to
adjust the recording level.
H High sensitivity (for field recording)
M Medium sensitivity (for solo and
chamber music performances)
L
Low sensitivity (for band
performances and concerts)
NOTE
The MANUAL GAIN setting also
affects external mics and line inputs.
1. Sl ide the GAIN swit ch to the AUTO
position.
The
wil l au to mat ic all y se t a
suitable recording level.
Adjusting the recording level automatically
1
12
NOTE
Use the AUDIO menu Auto Gain item to set how the recording level is
automatically adjusted.
(See "AUDIO settings" on page 15)
Page 14

13
Reducing noise/Monitoring audio
Tur n t he lo w- cu t fi lte r o n t o re du ce wi nd so un ds a nd ot he r n ois e.
Using headphones, you can monitor the audio being recorded.
Reducing noise
Monitoring audio
1
1. Slide the LO CUT switch to ON.
NOTE
Cove r the mic with the include d
wi nds cre e n to fu rth er re d uc e
noise.
1. Connect headphones or other audio
equipment to the headphones jack on
the back of the recorder.
2. Us e the VOL +/– keys to adjust the
monitoring volume.
1
2
Page 15

14
VIDEO settings
Resolution: resolution and frame rate used when recording
Setting
Picture
dimensions
Frames/
second
Main applications File size
HD1080/30 1920 x 1080 30 Playback on HD TVs Larger
HD720/60 1280 x 720 60 Recording fast movement
HD720/30 1280 x 720 30
P l a yb ac k o n HD TV s a n d
computers
WVGA/60 848 x 480 60
Sa vin g SD ca rd sp ace a nd
recording fast movement
WVGA/30 848 x 480 30 Saving SD card space Smaller
Scene: Camera setting for lighting conditions when recording
Setting Main applications
Auto Adjusts to lighting conditions automatically.
Concert Lighting
Best setting for live shows, concerts and other situations with
bright lights.
Night Best setting for night and other dark situations.
Upside Down: Reverse vertical orientation when recording
Setting Main applications
On
Video will be saved with the image rotated 180°.
Use when the
is recording upside down, for example.
Off The image is not rotated.
23 1
VIDEO settings
1. Use / to select an item.
2. Press .
3. Af ter com ple tin g the set tin g, press
.
You can set the resolution, frame rate and other recording settings.
Increasing the resolution decreases the possible recording time.
Page 16

15
AUDIO settings
Format: audio quality when recording video
Setting Description File size
WAV 96kHz/24bit
Record in an uncompresse d WAV f ormat when
audio quality is important.
The high er the sampling frequency (kHz) and b it
rate, the better the audio quality.
Larger
WAV 96kHz/16bit
WAV 48kHz/24bit
WAV 48kHz/16bit
WAV 44.1kHz/24bit
WAV 44.1kHz/16bit
AAC 320kbps
Record in a compressed AAC form at when you
need to save SD card space.
The higher the bit rate (kbps), the better the audio
quality.
AAC 256kbps
AAC 192kbps
AAC 128kbps
AAC 64kbps Smaller
Plugin Power: supply power to an external mic connected to the external
input jack
Setting Description
On Activate plug-in power
Off Deactivate plug-in power
Auto Gain: setting used to adjust recording levels automatically
Setting Main applications
Concert Use for band performances, concerts and other loud situations.
Solo Use for solo performances and other quiet sounds.
Meeting Use for meetings and field recordings.
23 1
AUDIO settings
1. Use / to select an item.
2. Press .
3. Af ter com ple tin g the set tin g, press
.
You can set the audio quality to use when recording video.
Increasing the audio quality decreases the possible recording time.
Page 17

16
Recording video
1. After preparing to record, press .
This starts video recording.
2. Press again to stop recording.
Recording video
H
M
L
–
+
INPUT
LEVEL
GAIN
MANUAL
AUTO
LO
CUT
SD
CARD
ON
OFF
BATT
CHG
NOTE
• If the transfer speed to the card is not fast enough during audio/
video recording, “Low Speed Card!” appears on the screen and
recording stops. To av oid this , we recom mend usi ng cards that
are Class 4 or faster. Information about SD cards that can be used
with this unit can be found at www.zoom.co.jp.
1, 2
From the main screen, you can start recording video by pressing a
single button.
Page 18
17
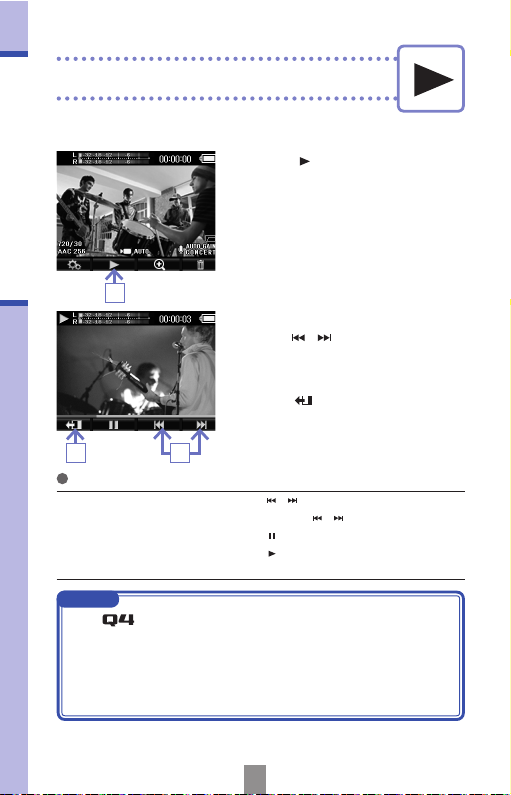
Playing recordings
Functions of other buttons
Play previous/next recording …
Press
/ during playback
Search backward/forward ……
Press and hold
/ during playback
Pause ……………………………
Press
during playback
End pause ………………………
Press
when paused
Adjust the volume …………… Press +/–
NOTE
• The
can only play back videos that it recorded.
• By connecting a n HDMI cable (sold s eparat ely) to the HDMI OUT,
video can be output to an external device. (See "HDMI output" on
page 21)
• The FILE menu shows a thumbnail list of videos that you can use for
playback selection. (See "FILE list" on page 24)
1
3
Playing recordings
You can play back recorded video.
1. Press on the main screen.
This starts playback of the last recorded
video.
2. Use / if you want to pl ay a
different file.
3. Press to stop playback.
The main screen reappears.
2
Page 19

18
Deleting recordings
Deleting recordings
1
You can delete videos to increase the open space on the media.
1. Press on the main screen.
A list of videos appears.
2. Use / to select the video that
you want to delete.
3. Press .
A check mark appears on the selected
video.
Repe at steps 2 and 3 to a dd check
marks to multiple videos.
4. Press .
5. Use / to s e le ct " D el et e
Selected Files".
6. Press .
You can also use "Play File" to play a
selected file.
34 2
65
Page 20

19
Deleting recordings
Deleting recordings (continued)
7. Use / to select "Yes" .
8. Press .
The selected video will be deleted.
Select "No" to cancel.
9. Use / to se lec t "Exit Tras h"
and press
to return to the main
screen.
10
. Press .
8
7
10
9
Page 21

20
Connecting to the external
input jack
Audio from an external mic or other audio equipment can be input
and recorded.
Connecting to the external input jack
1. C on ne ct an exte rn al mic or oth er
audio equipment to the EXT IN jack.
2. Press .
This starts recording.
NOTE
When an external device is connected to EXT IN, the built-in XY mic is
disabled.
When using a mic that supports plug-in power
Make the following setting before connecting the mic.
EXT IN
1
2
1. On the menu screen, select AUDIO
and press
.
2. Use / to select "Plugin Power".
3. Press .
4. Use / to select "On" .
5. Press .
54
32
Page 22

21
Headphones/line output jack/
HDMI output
Use an HDMI cable to connect with an HDMI TV to show recordings
in high definition.
You can listen to the audio with headphones or an external audio
amplifier.
Headphones/line output jack
HDMI output
1. C on n e ct he ad p ho n e s or a u d io
equipment to the
headphones
jack using a stereo mini plug cable.
2. Start video playback on the .
1. Connect the H DM I j ac k
wi th a TV usi ng an H DM I ca bl e
(commercially-available).
2. Start video playback on the .
EXT IN
HDMI OUT
DC5V
EXT IN
HDMI OUT
DC5V
NOTE
Some TVs support different audio formats, so correct playback might
not be possible with them.
CAUTION
The HDMI jack uses a Type D Micro connector.
When using an HDMI cable (sold separately), be sure to use a High
Speed HDMI (category 2) cable that has a Type D Micro connector
on one end to connect to the
and a connector that matches
your TV’s HDMI input on the other.
Page 23

22
USB connections
1. Select USB on the menu screen and
press
.
2. Use / to select "Card Reader"
or "USB Mic".
3. Press .
4. Use / t o selec t "PC/MA C" or
"iPad" according to the type of device
connected.
5. Press .
6. Us e a US B ca bl e to co nnec t a
computer or an iPad.
7. To end use, cond uct the nec essa ry
p ro c e d u re s to e nd t he U SB
conn ect ion fro m the com put er and
then disconnect the USB cable.
By connecting with a computer or iPad using a USB cable, you can
use this recorder as a USB mic and to stream audio and video as a
web camera.
Using as a card reader or mic (computer/iPad)
32
5
4
USB connections
NOTE
• Use the EXIT TO HOME menu item to return to the main screen.
• When c onnected to a computer, powe r can be sup plied by USB.
When connected to an iPad, power cannot be supplied by USB.
• An iPa d Cam era Connecti on Kit ( sold separ atel y) is ne cessa ry to
connect an iPad.
Page 24

23
USB connections
Using as a web camera (computer)
NOTE
Download the audio driver necessary for use as a web camera from the ZOOM
website (www.zoom.co.jp).
1. Use the USB cable to connect to the
comp uter, select USB on the menu
screen and press
.
2. Use / to select "WebCam".
3. Press .
4. Use the as a web c ame ra
for compute r stre am in g and othe r
applications.
5. To end use as a w eb camera , stop
st rea min g on th e com put er an d
disconnect the USB cable.
NOTE
• Use the EXIT TO HOME menu item to return to the main screen.
• The recorder can simultaneously transmit video of up to HD720p and
48kHz/16bit quality PCM audio to a computer.
• The
cannot output computer playback signals.
Delay setting
When using the recorder as a web camera, if the streaming application
does not have a lip synchronization function, you can use
/ to set
the audio delay time so that it matches the timing of the video.
3
2
USB connections (continued)
Page 25

24
LCD Rotation settings/FILE list
23 1
LCD Rotation settings
1. Use / to select an item.
2. Press .
3. Af ter com ple tin g the set tin g, press
.
Setting Description
Unlock Rotate the screen according to LCD unit orientation.
Lock Keep the screen in the current state.
You can lock the rotation of the LCD screen.
FILE list
1. Use / to select a video.
2. Press to st art pl aybac k of th e
selected video.
3. Press to return to the FILE menu
from video playback.
4. Press to re t ur n t o th e men u
screen.
21
Use this me nu to view vide o files sa ve d on the SD card in a
thumbnail list and play them back.
Page 26

25
System settings
System settings
1. Use / to select an item.
2. Press .
3. Af ter com ple tin g the set tin g, press
.
Make settings related to the system.
Setting Description
Set Date
Set the date and time of the
internal clock.
(See "Setting the time" on page 10.)
Beep
Set whether a beep sound is made when the
starts and
is operated. Select Off, Small or Large.
HDMI Out
Set the format of the video output from the HDMI jack to NTSC
or PAL.
Auto Power Off
Set whether t he power turns off automatically when r unning
on batteries if no recording or other operation has occurred for
some time. Select Off or 2, 5 or 10 minutes.
SD Format Format an SD card. (See "Formatting SD cards" on page 11.)
Reset
Res tore vide o reso lut ion, aud io qua lit y, scen e and othe r
settings to the
factory default values.
Remove LCD
Select before removing the LCD unit during operation.
(See "Attaching and detaching the LCD unit" on page 5.)
Information
View the
syst em vers ion an d spa ce avai labl e fo r
recording.
23 1
Page 27
26
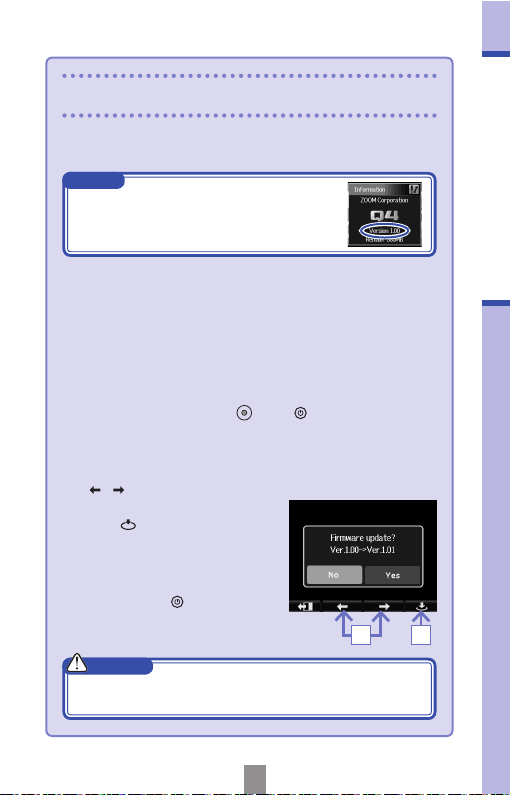
Upgrading the firmware version
Upgrade the firmware version when necessary.
NOTE
You c an check the fir mware ver sion using the
Information item in the Setting menu.
1. Copy the file for upgrading the firmware to the root directory on
the SD card.
• The latest version of the firmware can be downloaded from www.
zoom.co.jp.
2. Insert the SD card into the unit’s card slot.
3. While pressing and holding , press until the unit starts and
the Firmware update screen opens.
4. If the contents of the version update shown are as desired, use
/ to select “Yes”.
Upgrading the firmware version
54
5. Press .
6. W he n u p da ti ng t h e v e r si on
c o m p l e te s an d " C o m pl e t e !"
appears, press for at least one
second to shut down.
CAUTION
Upgrading the firmware version is not possible if the remaining
battery power is low.
Page 28

27
Specifications
Recording media SD/SDHC/SDXC cards (up to 128 GB)
Image sensor 1/3-inch 3-megapixel CMOS sensor
Lens Fixed focus (55cm – d), F2.8,
focal distance about 22 mm (35 mm equivalent)
Video format MPEG-4 AVC/H.264 (MOV)
Video resolutions HD 1080p 30fps, HD 720p 60fps, HD 720p 30fps, WVGA 60fps,
WVGA 30fps
Audio formats WAV (16/24-bit quantization, 44.1/48/96kHz sampling frequency)
AAC (64–320kbps bit rate, 48kHz sampling frequency)
Audio functions Low-cut filter, auto gain (Concert/Solo/Meeting)
Image functions
Angle of view adjustment, scene selection (Auto/Concert Lighting/Night)
Display 2.0" full-color LCD
Built-in mic XY stereo format (120°)
Maximum sound pressure input: 130 dB SPL
Input gain: +7db – +47dB
Input connector Combined line/mic stereo mini jack (can supply plug-in power)
Input gain: +0db – +26dB
Output connector Combined line/headphones stereo mini jack
Type D micro HDMI
Built-in speaker 400mW 8 mono speaker
USB Mini B type
Operation as mass storage
Class: USB 2.0 High Speed
Operation as audio interface
Class: USB 1.0 Full Speed
Specifications: 44.1kHz sampling rate, 16-bit
Operation as webcam
Specifications: WVGA/720p video size, 48kHz 16-bit audio
Note: Operation as audio interface and mass storage supported
with iPad
Note: USB bus power supported
Power supply Lithium-ion battery: DC 4.2V maximum voltage, DC 3.7V nominal
voltage, 1050mAh capacity
AC adapter (ZOOM AD-17, sold separately): DC 5V/1A
Recharging times By USB: about 3 hours
Using ZOOM AD-17: about 2 hours 15 minutes
Battery operation
time
3 hours (when recording 720p/30fps video with LCD unit detached)
External dimensions Recorder: 106.4 mm (W) × 57.8 mm (H) × 30.4 mm (D)
(when XY mic stored), 167 g (without battery)
LCD unit: 40.1 mm (W) × 48.4 mm (H) × 73.6 mm (D), 51 g
Included accessories User guide (this document), LCD unit, Lithium-ion battery (BT-02),
USB cable, Hairy windscreen, Hairy windscreen attachment screw
Specifications
Page 29

28
Safety Precautions
In this User Guide, symbols are used to highlight warnings and cautions that you must
read to prevent accidents. The meanings of these symbols are as follows.
Warning
Something that could cause serious injury or death
Caution
Something that could cause injury or damage to the equipment
Other symbols used
An action that is mandatory
An action that is prohibited
Warnings
Operation using an AC adapter
Use only a ZOOM AD-17 AC adapter (sold separately) with this unit.
Do not do anything that could exceed the ratings of outlets and other electrical
wiring equipment.
Alterations
Do not open the case or modify the product.
Precautions
Product handling
Do not drop, bump or apply excessive force to the unit.
Be careful not to allow foreign objects or liquids enter the unit.
Operating environment
Do not use in extremely high or low temperatures.
Do not use near heaters, stoves and other heat sources.
Do not use in very high humidity or where it could be splashed by water.
Do not use in places with frequent vibrations.
AC adapter handling
When disconnecting the power plug, always pull on the power plug itself.
When not using the unit for a long time, disconnect the p ower plug from the
outlet.
You might need this User Guide in the future.
Always keep it in a place where you can access it easily.
Safety Precautions
Page 30

29
Usage Precautions
Interference with other electrical equipment
In consideration of safety, the
has been designed to minimize its emission of
electromagnetic waves and to suppress interference from external electromagnetic
waves. However, equipme nt th at is very suscepti ble t o inte rference or t hat e mits
powerful electromagnetic waves could result in interference if placed nearby. If this
occurs, place the
and the other device farther apart.
With any type of electronic device that uses digital control, including the
,
electromagnetic interference could cause malfunction, corrupt or destroy data and
result in other unexpected trouble. Always use caution.
Cleaning
Use a soft cloth to clean the exterior of the unit if it becomes dirty. If necessary, use
a damp cloth that has been wrung out well.
Never use abrasive cleansers, wax or solvent s such as alcohol, benzene or paint
thinner.
Breakdown and malfunction
If the unit becomes brok en or mal func tio ns, immed iat ely disco nne ct the AC
adapter, turn the power OFF and disconnect other cables. Contact the store where
you bought the unit or ZOOM service with the following information: product model,
serial number and specific symptoms of breakdown or malfunction, along with your
name, address and telephone number.
Copyrights
Windows is a trademark of Microsoft Corporation (USA). A pple, Macint osh, iPad,
QuickTi me and the QuickT ime logo are registered trademar ks or tradema rks of
Apple Inc. in the USA and other countries.
The SD, SDHC and SDXC logos are trademarks. HDMI (High-Definition Multimedia
Interface) and
are trademarks of HDMI Licensing, LLC. Other product
names , registered trad emark s and c ompan y names in this document are the
property of their respective companies.
Recordi ng for any pu rpose other than personal use fro m copyri ghted sources,
including C Ds, records, tapes, live performances, video wo rks and broadcas ts,
without permission of the copyright holder is prohibited by law.
Zoom Corporation will not assume an y responsibil ity related to infr ingements of
copyrights.
Usage Precautions
Page 31

30
Warnings and requests regarding
safe battery use
Carefully read the following warni ngs in order to avoid serious
injuries, burns, fires and other problems caused by leaking, heat
generation, combustion, rupture or accidental swallowing.
DANGER
Do not charge the lithium-ion battery (BT-02) in an y way other than using the
and either an AD-17 (sold separately) or a USB port.
Do not disassemble the battery, put it in fire, or heat it in a microwave oven or
conventional oven.
Do not leave the battery next to a fire, in strong sunlight, inside a vehicle that
has become hot or similar conditions. Do not recharge in conditions like these.
Do not carry or store the battery with coins, hairpins or other metal objects.
Do not allow the battery to be made wet by water, seawater, milk, soft drinks,
soapy water or other liquids. Do not charge or use a battery that is wet.
CAUTION
Do not hit the battery with a hammer or other object. Do not step on it or drop
it. Do not otherwise impact or apply force to the battery.
Do not use the battery if it becomes deformed or damaged.
Do not remove or damage the outer seal. Never use a battery that has had all
or part of its outer seal removed or a battery that has been torn.
Please recycle batt eries to help conserve resources. When d iscarding used
batteries, always cover their te rminals and follow all laws and regulations that
are applicable to the location.
Warnings and requests regarding safe battery use
The contents of this document and the specifications of the product could be changed
without notice.
Page 32

ZOOM CORPORATION
4-4-3 Surugadai, Kanda, Chiyoda-ku, Tokyo 101-0062 Japan
http://www.zoom.co.jp
=,
For EU Countries
Declaration of Conformity:
This product complies with the requirements of
EMC Directive 2004/108/EC and
RoHS Directive 2011 / 65 / EU
Disposal of Old Electrical & Electronic Equi pment (Applicable in
European countries with separate collection systems)
Produc ts and batter ies th at hav e been marke d with the symbol
of a crossed-outwheele d waste bin must not be disposed of with
household waste.
Old electrical/electronic equipment and batteries should be recycled
at facilities thatare able to process them and their byproducts.
Contact the local government for information about nearby recycling
facilities .Conducting recycling an d waste disposal p roperly help s
conserve resources andprevents harmful impacts on human health
and the environment.
THIS PRODUCT IS LICENSED UNDER THE AVC PATENT PORTFOLIO LICENSE FOR THE PERSONAL AND NONCOMMERCIAL USE OF A CONSUMER TO
(i) ENCODE VIDEO IN COMPLIANCE WITH THE AVC STANDARD (“AVC VIDEO”) AND/OR
(ii) DECODE AVC VIDEO THAT WAS ENCODED BY A CONSUMER ENGAGED IN A PERSONAL AND NONCOM-
MERCIAL ACTIVITY AND/OR WAS OBTAINED FROM A VIDEO PROVIDER LICENSED TO PROVIDE AVC
VIDEO.
NO LICENSE IS GRANTED OR SHALL BE IMPLIED FOR ANY OTHER USE. ADDITIONAL INFORMATION MAY BE OBTAINED FROM MPEG LA, L.L.C. SEE HTTP://WWW.MPEGLA.COM
FCC regulation warning (for U.S.A.)
This equipment has been tested and found to comply with the limits for a Class B digital
device,pursuant to part 15 of the FCC Rules. These limits are designed to provide reasonable protection against harmful interference in a residential installation.This equipment generates, uses and
can radiate radio frequency energy and, if not installed and used in accordance with the instructions, may cause harmful interference to radio communications. However, there is no guarantee
that interference will not occur in a particular installation. If this equipment does cause harmful
interference to radio or television reception, which can be determined by turning the equipment off
and on, the user is encouraged to try to correct the interference by one or more of the following
measures:
Reorient or relocate the receiving antenna.
Increase the separation between the equipment and receiver.
Connect the equipment into an outlet on a circuit different from that to which the
receiver is connected.
Consult the dealer or an experienced radio/ TV technician for help.
 Loading...