

Page 1
User Guide
Q2HD
Safety and Operation
Precautions must be read
before using the unit.
© ZOOM CORPORATION
Copying or reproduction of this User
Guide in part or in whole without
permission is prohibited.
Page 2
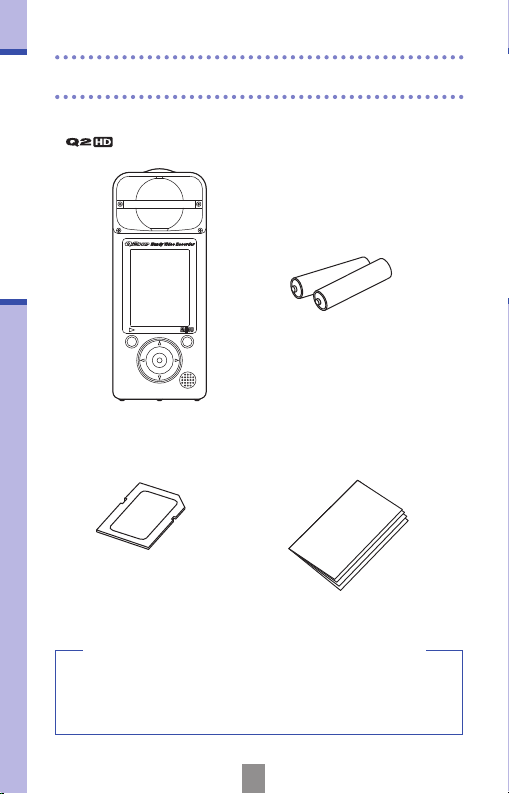
Items included with this product
Items included with this product
• unit
• 2 AA batteries
(for testing the unit)
Note: Use alkaline batteries or
rechargeable NiMH batteries.
• SD card
• User Guide
(this manual)
HandyShare software for video editing and sharing
Install HandyShare on your computer to use it. Access the included SD card from
the computer and double-click the HandyShare installer on it. If your computer
does not already have QuickTime installed, follow the instructions that appear on
your screen after starting HandyShare to install it.
1
Page 3
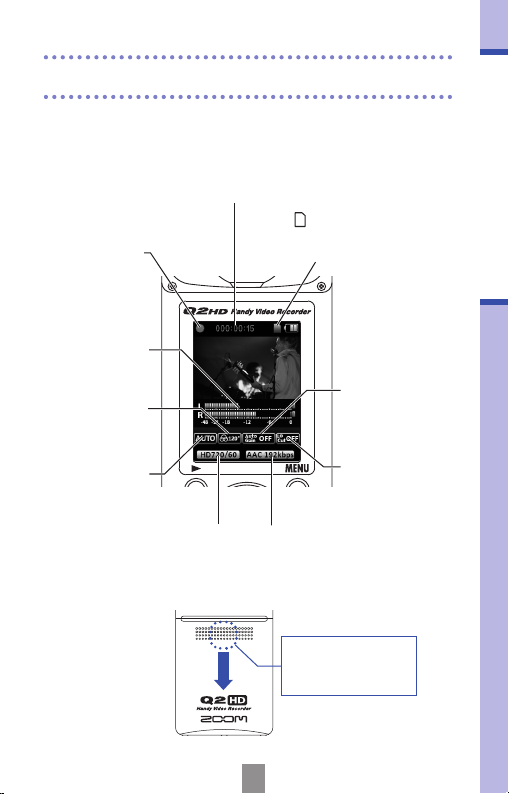
Part functions
■Parts of the unit
Recording time or remaining
recordable time for video or audio
Current operation
status
Input volume level
Mic angle setting
Scene setting for
video recording
Image size/frame rate
during video recording
■Installing batteries
icon appears when an SD
The
card is loaded in the unit (no icon
if no SD card is loaded)
Recording level
setting
Lo-cut lter setting
Sound quality when
recording audio or video
Open the case while
pressing here and then
install the batteries.
Note: Use alkaline batteries or
rechargeable NiMH batteries.
Part functions
2
Page 4
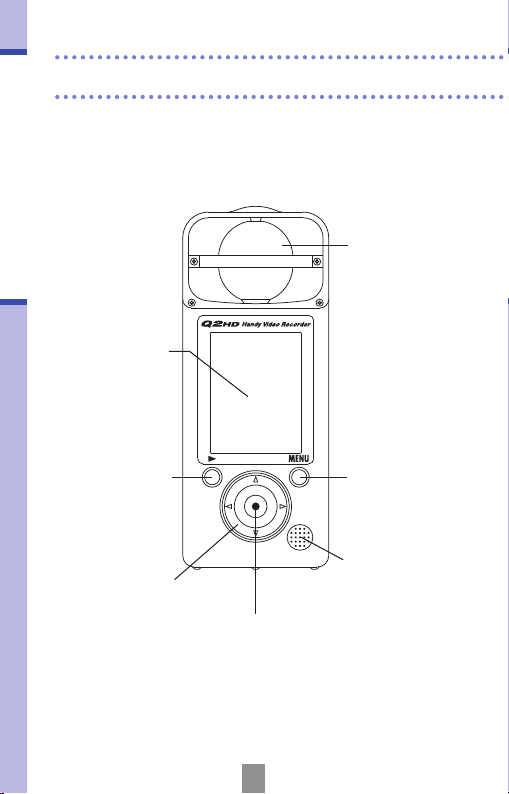
Part functions
Part functions
■Parts of the unit
View video and
information about
operation.
Play and pause
recorded video and
audio.
Select items and adjust
the volume.
(continued)
Start and stop recording video
and audio. Conrm selections.
Sound from the
camera side of the
unit can be recorded
in mono or in stereo
with a maximum
width of 150º.
Open various setting
menus.
Listen to startup and
shutdown sounds
and recorded audio.
3
Page 5
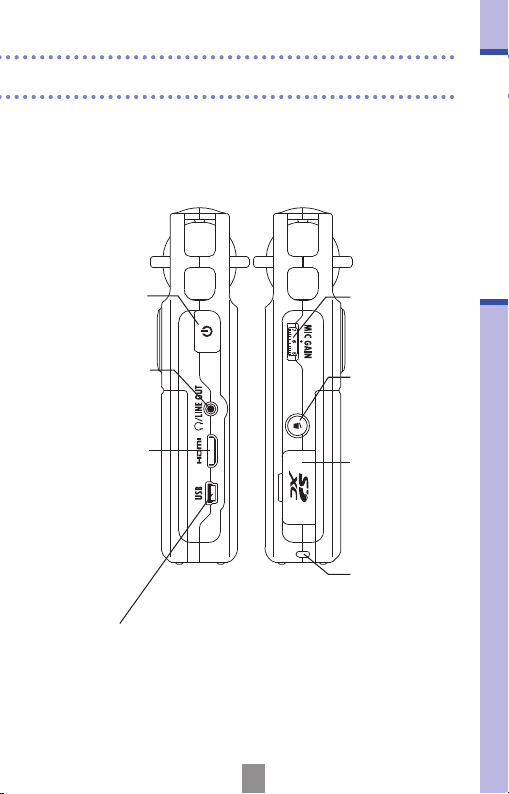
Part functions
Turn the power
ON and OFF.
Output sound to
headphones or
other external
equipment.
Output digital
video and audio
to an HDMI TV or
other compatible
device.
• Connect to a computer to power the recorder and use it as
a card reader, USB mic or web camera.
• Connect to an
• A ZOOM AD-17 AC adapter (sold separately) can also be
connected here.
iPad to use as a USB mic.
4
Set the mic
recording level.
Delete recorded
video and audio.
Insert an SD,
SDHC or SDXC
card into this slot.
Attach a strap to
help prevent accidental dropping.
Page 6
Setting the date & time
Setting the battery type
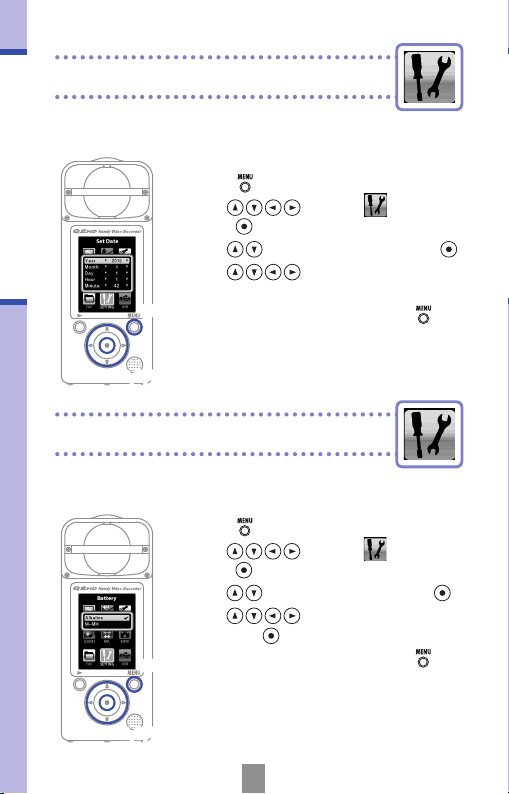
Setting the date & time
The date and time are added to recorded video and
audio les, so set it accurately before recording.
Press to open the Main Menu.
1.
Use to select
2.
press
.
Use to select Set Date and press .
3.
Use to set the current date
4.
and time.
1,5
After completing the setting, press .
5.
2,3,4
Setting the battery type
Set the battery type so that the amount of remaining
battery life can be shown accurately.
Press to open the Main Menu.
1.
Use to select
2.
press
.
Use to select Battery and press .
3.
Use to set the battery type
4.
and press
After completing the setting, press .
5.
1,5
and
SETTING
and
SETTING
.
Note: Use alkaline batteries or rechargeable NiMH batteries.
2,3,4
5
Page 7
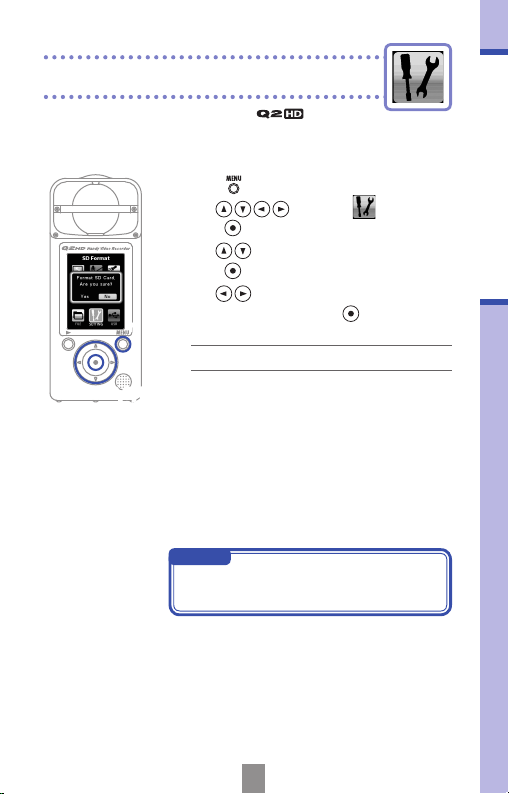
Formatting SD cards
You must format SD cards in the to make
them usable with the recorder.
Note: Formatting a card will permanently erase all
data on it.
Press to open the Main Menu.
1.
Use to select
2,3,4
2.
press
.
Use to select SD Format and
3.
4.
1
5.
If the SD card’s write-protection switch is
ON, the card cannot be formatted.
.
press
Use to select “Yes ” to format or
“No” to cancel and press
• Select “Yes” to start formatting.
• Select “No” to return to the SETTING menu.
After formatting completes, “Done” appears
on screen and the SETTING menu reopens.
NOTE
SETTING
Formatting SD cards
and
.
6
Page 8
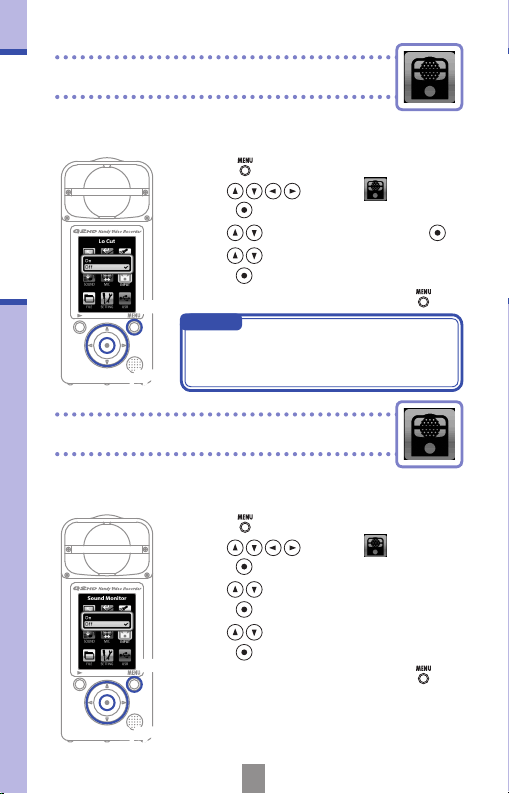
Turning sound monitoring on or off
Reducing noise
Turn the low-cut lter function on to reduce wind
Reducing noise
sounds and other noise.
Press to open the Main Menu.
1.
Use to select
2.
press
.
Use to select Lo Cut and press .
3.
Use to select On or Off and
1,5
2,3,4
4.
5.
Use the windscreen included in the APQ2HD accessory package to further reduce
noise.
.
press
After completing the setting, press .
NOTE
Turning sound monitoring on or o
Turn this on to listen to the sound being recorded
through the line/headphones and HDMI outputs.
Press to open the Main Menu.
1.
Use to select
2.
press
.
Use to select Sound Monitor and
1,5
3.
4.
5.
.
press
Use to select On or Off and
.
press
After completing the setting, press .
INPUT
INPUT
and
and
2,3,4
7
Page 9
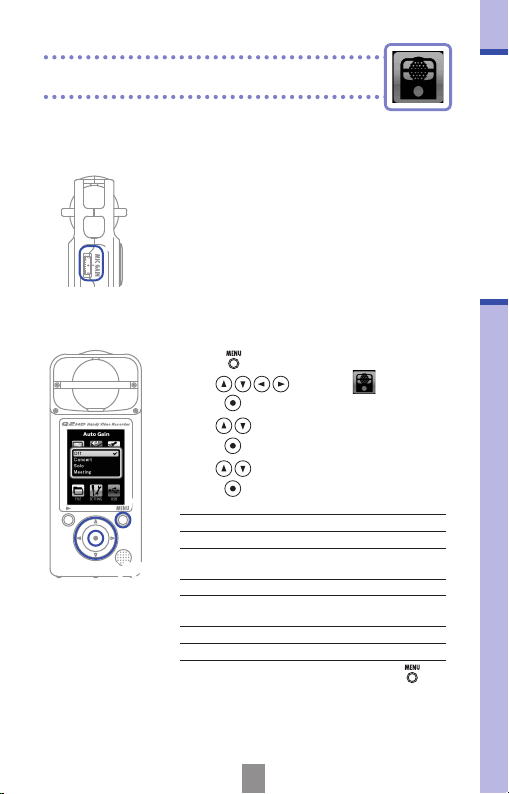
Adjusting the recording level
By changing the recording level gain, you can record
anything from quiet sounds to loud rock shows at
the optimal level. You can set the gain manually or
let the recorder set it automatically.
Use the MIC GAIN dial to adjust the mic
•
sensitivity to suit the recording conditions.
1
■Using the Auto Gain setting
Press to open the Main Menu.
1.
Use to select
2,3,4
2.
press
.
Use to select Auto Gain and
3.
4.
1
5.
.
press
Use to set the mic sensitivity and
.
press
Off
Use the MIC GAIN dial to adjust manually.
Concert
Use for band performances, concerts and
other loud situations.
Solo
Use for solo performances and other quiet
situations.
Meeting
Use for meetings and other eld recordings.
After completing the setting, press .
INPUT
Adjusting the recording level
and
8
Page 10
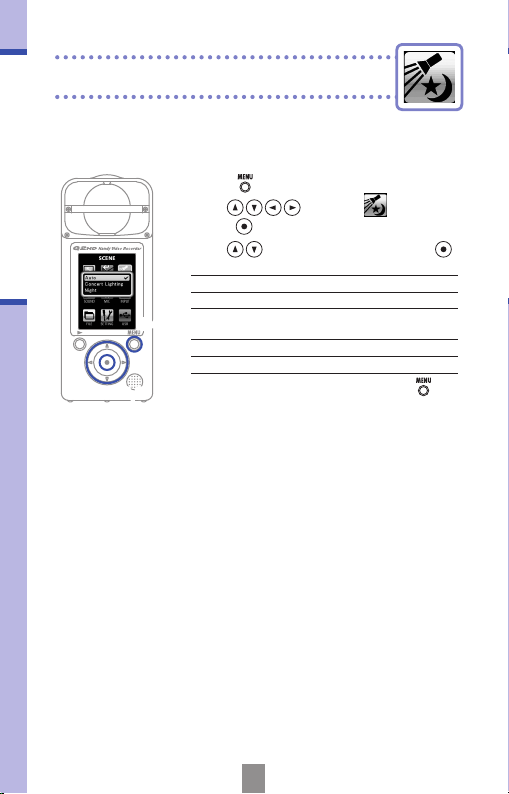
Video scene setting
Video scene setting
You can set the camera light sensitivity to suit the
video recording conditions. This allows the unit to
record video optimally even in dark places and on
stages with bright lights.
Press to open the Main Menu.
1.
Use to select
2.
press
.
Use to set the mode and press .
3.
Auto
Adjusts to lighting conditions automatically.
Concert lighting
Best for concerts and other situations with
1,4
2,3
bright lights.
Night
Best for nighttime and other dark situations.
After completing the setting, press .
4.
SCENE
and
9
Page 11

Setting the image quality
You can set the resolution and frame rate used for
recording. The amount of available recording time
decreases as the image quality is increased.
Press to open the Main Menu.
1.
Use to select
2,3
2.
press
.
Use to select the video quality and
3.
frame rate and press
After completing the setting, press .
4.
1,4
VIDEO
.
Setting the image quality
and
Setting Resolution
HD1080/30 1920 x 1080 30 HD TV playback Larger
HD720/60 1280 x 720 60
HD720/30 1280 x 720 30
WVGA/60 800 x 480 60
WVGA/30 800 x 480 30
Frames/second
Main uses
Recording fast
movement
HD TV and computer
playback
Saving SD card space
recording fast
and
movement
Saving SD card space
File size
Smaller
10
Page 12

Setting the sound quality
Setting the sound quality
You can set the sound quality to use for recording
video and audio. The amount of available recording
time decreases as the sound quality is increased.
Press to open the Main Menu.
1.
Use to select
2.
press
.
Use to set the audio quality and
3.
4.
1,4
2,3
Setting Description File size
PCM 96/24
PCM 96/16
PCM 48/24
PCM 44.1/24
PCM 48/16
PCM 44.1/16
AAC 320kbps
AAC 256kbps
AAC 192kbps
AAC 128kbps
AAC 64kbps Smaller
Record in an uncompressed PCM WAV format
when recording quality is important.
The higher the sampling frequency (kHz) and bit
rate values, the better the audio quality.
Record in a compressed AAC format when you
need to save SD card space.
The higher the bit rate (kbps) value, the better
the audio quality.
.
press
After completing the setting, press .
SOUND
and
Larger
11
Page 13

Setting the mic angle
You can set the stereo width recorded by the built-in
stereo mic.
Press to open the Main Menu.
1.
Use to select
2,3
2.
press
.
Use to set the mic angle.
3.
MONO
Record in mono
30°, 60°, 90°, 120°, 150°
Record using the set stereo width
1
After completing the setting, press .
4.
NOTE
You can also use to set the mic
angle while recording or using the USB
mic function.
MIC
Setting the mic angle
and
12
Page 14

Recording audio and video
Recording audio and video
From the main operation screen, you can start
recording audio or video by pushing a single button.
After preparing to record audio or video,
1.
to start recording.
press
• To set whether to record
video with audio or
audio only, use
CAMERA
.
• Use to zoom in
Zoom in and out
Adjust the volume
Audio only
1,2
and out, and use
to adjust the monitoring
volume.
After completing the setting, press to
2.
return to the main operation screen.
NOTE
If the transfer speed to the card is not fast enough during
video/audio recording, “Low Speed Card!” appears on the
screen and recording stops. To avoid this, we recommend
using cards that are Class 4 or faster.
Information about SD cards that can be used with this unit
can be found at www.zoom.co.jp.
13
Page 15

Playing recordings
You can play back recorded audio and video.
When the main operation screen is open,
1.
.
press
If you want to play a dierent le,
2.
use
1,2
2
NOTE
• Only les that have been recorded with
• During video playback, press and hold
to select it and press .
Functions of other buttons
Adjust the volume
Press and hold during playback to
search backward/forward.
Press to pause during playback and
restart when paused.
the
In this mode, use
volume and
backward. Press and hold
return to vertical display.
can be played back on it.
to show the video in landscape view.
to search forward/
Playing recordings
to adjust the
again to
14
Page 16

Deleting recordings
Deleting recordings
You can delete recorded video and audio les to increase the
amount of open space on the media card.
Press while the le that you want to
1.
delete is playing.
• If you press this when on the main
operation screen, the last recorded or
played le will be selected for deletion.
When the conrmation screen opens,
2.
1
2
select “Yes” to delete the recording or “No”
to cancel, and then press
.
15
Page 17

■Deleting multiple recordings at the same time
Press when on the main operation
1.
screen or while playing to show the
“Delete this le?” message.
• Press
Use to select a recording that
1,4
3
2.
you want to delete and press
Repeat step 2 as many times as necessary
3.
to select more les to delete.
• To delete all les on the card,
Press when you are done selecting
4.
les.
When the conrmation screen opens,
5.
select “Yes” to delete the recordings or
“No” to cancel, and then press
again to open the le
selection screen
.
press
.
2,5
Deleting recordings
.
16
Page 18

Editing recordings
Editing recordings
Recorded video and audio les can be divided and trimmed.
Press to open the Main Menu.
1.
Use to select
2.
press
.
Thumbnails of the recorded les are
3.
shown. Use
that you want to edit and press
The editing menu opens. Use to
4.
1,6
select the item you want and press
• See the following page for the editing
options.
After editing, a conrmation screen opens.
2,3,4,5
5.
Select “Yes ” to execute the change or “No”
to cancel, and then press
When you are done editing, press .
6.
and
FILE
to select the le
.
.
.
17
Page 19

DIVIDE
TRIM (partial deletion)
INFORMATION (about the le)
Change the le dividing point
Play/pause
Conrm the le dividing point
Move trim points to set how much of
the le beginning/end to delete
Switch between beginning and end
trim points
Play/pause
Conrm the trim points
Return to the editing menu
Editing recordings
18
Page 20

Connecting external devices
Connecting external devices
This unit can be connected to various external devices
as needed.
■Connect to a computer (by USB) to use as a card
reader, USB mic or Web camera
Use a USB cable to connect to a computer or iPad.
See "Connecting by USB" on page 20.
■Listen with headphones or audio equipment
(LINE OUT connection)
Use this connector when you
want to use headphones or
an external audio device’s
amplier to listen. Turn monitoring on to listen through
headphones to sound input
during recording.
See "Turning sound monitoring
on or off" on page 7.
■View on a TV (HDMI connection)
Use an HDMI cable to connect
the unit to an HDMI TV to view
recordings in high denition.
NOTE
Some TVs might not support
the audio format and correct
playback might not be possible.
CAUTION
The HDMI uses a Type C Mini connector.
When using an HDMI cable (purchased separately), be sure
to use a High Speed HDMI (category 2) cable that has a Type
C Mini connector on one end to connect to the
connector that matches your TV’s HDMI input on the other.
and a
19
Page 21

Connecting by USB
Connect with a computer using a USB cable to use this
recorder as a card reader or USB mic. You can also use it as a
web camera to stream video and audio. Connected to an iPad,
you can use it as a USB mic.
NOTE
• When connected to a computer, power can be supplied by
USB. The recorder will not turn on just by connecting the
cable. Press
• When connected to an iPad, power is not supplied by USB.
■Using with a computer as a card reader or USB mic
Card reader
USB mic
NOTE
While using the recorder as a USB mic, you can use the
functions and adjust the mic angle.
to turn it on.
Connect the recorder to a Windows PC or
1.
Macintosh with a USB cable.
Press to turn it on.
2.
• The USB operation screen will appear.
To use as a card reader, use to
3.
select the card icon and press
To use as a USB mic, select the mic icon
and press
• The computer should recognize the
recorder.
After you have nished using the recorder
4.
with the computer, disconnect it properly.
• After use as a card reader, unmount the
card reader volume from the computer
before disconnecting the USB cable.
• After use as a USB mic, just disconnect
the USB cable.
.
.
INPUT
Connecting by USB
20
Page 22

Connecting by USB (continued)
Connecting by USB
■Using the recorder as a Web camera
Connect the recorder to a Windows PC or
1.
Macintosh with a USB cable.
Press to turn it on.
2.
• The USB operation screen will appear.
Use to select the video icon and
3.
3
4.
5.
.
press
After the connects to the
computer, you can use it as a web camera
for video streaming and other applications.
When you have nished using the recorder
with the computer, unmount the unit from
the computer before disconnecting the
USB cable.
21
Page 23

NOTE
• The can simultaneously transmit video and audio of
up to HD720p and 48kHz/16bit WAV quality.
• Computer playback cannot be output from the
• A driver stored on the included SD card is necessary to use
.
the unit as a web camera. (This driver can also be downloaded from www.zoom.co.jp.)
• When connected as a web camera, you can use the
functions, set the scene type and adjust the mic
INPUT
angle. You cannot, however, change settings while
streaming.
■Delay setting
When using the recorder as a
web camera, if the a streaming
application does not have a lip
synchronization function, use
to set the audio delay so that it
matches the timing of the video.
Connecting by USB
22
Page 24

Using as a USB mic with an iPad
Using as a USB mic with an iPad
You can use this recorder as a USB mic by connecting it to an
iPad using an Apple Camera Connection Kit.
Press to open the Main Menu.
1.
Use to select
2.
press
.
Use to select the mic icon and
3.
3
4.
5.
CAUTION
• If the does not have batteries or enough
remaining battery charge, it cannot be used as a USB
mic with an iPad.
• While using the recorder as a USB mic, you can use
functions and adjust the mic angle.
.
press
Use the Apple Camera Connection Kit to
connect the recorder with an iPad by USB
cable.
• The iPad should recognize the recorder.
When you have nished, disconnect the
USB cable.
and
USB
INPUT
23
Page 25

Display brightness/power saving
You can adjust the brightness of the display and set
the screen to turn off automatically to save power.
Press to open the Main Menu.
1.
Use to select
2.
press
.
Use to select Backlight and
3.
1
press
.
2,3,4,5
■Adjusting the display brightness
Use to select Brightness and
4.
5.
Brightness
.
press
Use to set the brightness and
press
.
■Set the power saving mode
Use to select Power Saving and
Power saving
4.
5.
• When on, the display will darken if no
• When using an AC adapter, this setting
.
press
Use to select On or Off and
.
press
NOTE
operation has occurred for 30 seconds.
is ignored.
SETTING
Display brightness/power saving
and
24
Page 26

Setting HDMI video output
Setting HDMI video output
Set the HDMI video output format to suit the TV.
Press to open the Main Menu.
1.
Use to select
2.
press
.
Use to select HDMI Out and
3.
4.
1
5.
.
press
Use to select NTSC or PAL and
.
press
After completing the setting, press .
2,3,4
NOTE
NTSC is used in North America. Most
other English-speaking regions use PAL.
SETTING
and
25
Page 27

Viewing information
You can check the rmware version and remaining
recordable memory.
Press to open the Main Menu.
1.
Use to select
2.
press
.
Use to select Information and
1,5
3.
4.
5.
.
press
Check the information.
When you are done checking, press .
SETTING
2,3
Restoring default settings
You can reset the settings, including the
scene type and video and audio quality, to their
factory defaults.
Press to open the Main Menu.
1.
Use to select
2.
press
.
Use to select
3.
Use to select “Yes ” to reset or “No”
4.
to cancel, and press
After resetting completes, “Done” appears
5.
1,4
and the SETTING menu reopens.
SETTING
Reset
and press .
.
Restoring default settings
Viewing information
and
and
2,3
26
Page 28

NOTE
using the Information item in the
Setting menu.
•
from www.zoom.co.jp.
1.
directory on the SD card.
Insert the SD card into the unit’s card slot.
2.
While pressing and holding , press until the unit
3.
starts and the FIRMWARE UPDATE screen opens.
If the version upgrade shown is
4.
the one desired, select “Yes” and
press
.
When “Complete!” appears after the
5.
version upgrade completes, press
CAUTION
remaining battery power is low.
27
Page 29

Safety and Operation Precautions
This indicates something that could cause serious
injury or death.
WARNING
This indicates something that could cause bodily
injury or damage to property.
CAUTION
Explanation of icons
This must be done.
This must not be done.
WARNING
■Power and batteries
Use only a ZOOM AD-17 AC adapter (sold separately).
Unplug the AC adapter when the unit will not be used for a long time.
When using batteries, insert two commercially-available AA-size alkaline
batteries or NiMH rechargeable batteries with the correct orientations.
Remove batteries from the unit if they will not be used for a long time.
■Handling
Do not disassemble or modify this device.
CAUTION
■Operation environment
Do not use in places that become extremely hot or cold.
Do not use near heating devices or other sources of heat.
Do not use in places that are extremely humid or exposed to water.
Do not use in sandy or dusty places.
Do not use in places with frequent vibrations.
■Handling
Do not apply excessive force to buttons or other moving parts.
Safety and Operation Precautions
You might need this User Guide in the future.
Always keep it in a place where you can access it easily.
28
Page 30

FCC regulation warning (for U.S.A.)
This equipment has been tested and found to comply with the limits for a Class B digital
device, pursuant to part 15 of the FCC Rules. These limits are designed to provide reasonable
protection against harmful interference in a residential installation. This equipment generates,
uses and can radiate radio frequency energy and, if not installed and used in accordance with
the instructions, may cause harmful interference to radio communications. However, there is
no guarantee that interference will not occur in a particular installation. If this equipment does
cause harmful interference to radio or television reception, which can be determined by turn-
ing the equipment o and on, the user is encouraged to try to correct the interference by one
or more of the following measures:
• Reorient or relocate the receiving antenna.
• Increase the separation between the equipment and the receiver.
• Connect the equipment to an outlet on a circuit dierent from that to which the
receiver is connected.
• Consult the dealer or an experienced radio/TV technician for help.
For EU Countries
THIS PRODUCT IS LICENSED UNDER THE AVC PATENT PORTFOLIO LICENSE FOR THE
PERSONAL AND NONCOMMERCIAL USE OF A CONSUMER TO
(i) ENCODE VIDEO IN COMPLIANCE WITH THE AVC STANDARD (“AVC VIDEO”) AND/OR
(ii) DECODE AVC VIDEO THAT WAS ENCODED BY A CONSUMER ENGAGED IN A PERSONAL AND
NONCOMMERCIAL ACTIVITY AND/OR WAS OBTAINED FROM A VIDEO PROVIDER LICENSED TO
PROVIDE AVC VIDEO.
NO LICENSE IS GRANTED OR SHALL BE IMPLIED FOR ANY OTHER USE. ADDITIONAL
INFORMATION MAY BE OBTAINED FROM MPEG LA, LLC. SEE HTTP://WWW.MPEGLA.COM
Windows is a trademark of Microsoft Corporation (USA). Apple, Macintosh, iPad, QuickTime and the
QuickTime logo are registered trademarks or trademarks of Apple Inc. in the USA and other countries.
The SD, SDHC and SDXC logos are trademarks. HDMI (High-Denition Multimedia Interface) and
are trademarks of HDMI Licensing, LLC. Other product names, registered trademarks and
company names in this document are the property of their respective companies. The contents of this
document and the specications of the product could be changed without notice.
Declaration of Conformity:
This product complies with the requirements of
EMC Directive 2004/108/EC and
Low Voltage Directive 2006/95/EC and
RoHS Directive 2011/65/EU
29
Page 31

Page 32

4-4-3 Kanda-Surugadai, Chiyoda-ku, Tokyo 101-0062 Japan
ZOOM CORPORATION
www.zoom.co.jp
Q2HD-5000-1
 Loading...