

Page 1

Operation Manual
Safety Precautions ••••••••••••••••••••••••••••••••••• 2
Features
•••••••••••••••••••••••••••••••••••••••••••• 3
What the PS-02 Can Do
•••••••••••••••••••••••••••••• 4
Names and Connectors
•••••••••••••••••••••••••••••• 8
Quick Guide
•••••••••••••••••••••••••••••••••••••••• 10
Listening to the Demo Song ••••••••••••••••••••••••• 10
Using the Effects
•••••••••••••••••••••••••••••••••• 12
Recording an Audio Track
••••••••••••••••••••••••••• 14
About SmartMedia/Operating the Unit on Batteries •••• 16
Operation Guide
•••••••••••••••••••••••••••••••••••• 17
Select an empty song •••••••••••••••••••••••••••••• 17
Program pattern change information
•••••••••••••••••• 18
Program chord change information
••••••••••••••••••• 23
Record guitar signals on the audio tracks
•••••••••••••• 27
Finish up the song
••••••••••••••••••••••••••••••••• 36
Reference Guide •••••••••••••••••••••••••••••••••••• 40
Song Menu ••••••••••••••••••••••••••••••••••••••• 40
Rhythm Menu
••••••••••••••••••••••••••••••••••••• 44
Audio Menu
••••••••••••••••••••••••••••••••••••••• 50
Effect Menu
••••••••••••••••••••••••••••••••••••••• 61
Utility Menu
••••••••••••••••••••••••••••••••••••••• 69
Special Operations •••••••••••••••••••••••••••••••••• 75
Troubleshooting
••••••••••••••••••••••••••••••••••••• 78
Technical Information
•••••••••••••••••••••••••••••••• 79
Specifications
••••••••••••••••••••••••••••••••••••••• 85
INDEX
••••••••••••••••••••••••••••••••••••••••••••• 86
Usage Precautions
Thank you for selecting the ZOOM PS-02 Palmtop
Studio (simply called the "PS-02" in this manual).
In order to get the most out of this sophisticated product,
please read this manual carefully before use.
We recommend that you keep the manual at
hand for future reference.
Introduction
Contents
Page 2

2
Safety Precautions
Safety Precautions
About power
• Since power consumption of this unit is
fairly high, we recommend the use of an
AC adapter whenever possible. When
powering the unit from a battery, use
only an alkaline type.
AC adapter operation
• Be sure to use only an AC adapter which
supplies 9 V DC, 300 mA and is
equipped with a "center minus" plug
(Zoom AD-0006). The use of an adapter
other than the specified type may damage
the unit and pose a safety hazard.
• Connect the AC adapter only to an AC
outlet that supplies the rated voltage
required by the adapter.
• When disconnecting the AC adapter from
the AC outlet, always grasp the adapter
itself and do not pull at the cable.
• If the unit is not to be used for a long
time, disconnect the AC adapter from the
outlet.
Battery operation
• Use four IEC R03 AAA 1.5 V batteries
(alkaline/manganese).
• The PS-02 cannot be used for recharging.
Pay close attention to the labelling of the
battery to make sure you choose the
correct type.
• If the PS-02 is not to be used for an
extended period of time, remove the
battery from the unit.
• If batteries leakage has occurred, wipe
the battery compartment and the battery
terminals carefully to remove all
remnants of battery fluid.
• While using the unit, the battery
compartment cover should be closed.
Environment
Avoid using your PS-02 in environments
where it will be exposed to:
• Extreme temperature
• High humidity or moisture
• Excessive dust or sand
• Excessive vibration or shock
Handling
• Since the PS-02 is a precision electronic
device, avoid applying excessive force to
the controls. Do not operate the keys or
controls with your foot.
• Take care that no foreign objects (coins
or pins etc.) or liquids can enter the unit.
• Be sure to turn the power to all
equipment off before making
connections.
• Before moving the unit, turn the power
off, and disconnect all cables and the AC
adapter.
Alterations
Never open the case of the PS-02 or attempt
to modify the product in any way since this
can result in damage to the unit.
This symbol indicates explanations about extremely dangerous matters.
If users ignore this symbol and handle the device the wrong way, serious
injury or death could result.
This symbol indicates explanations about dangerous matters. If users
ignore this symbol and handle the device the wrong way, bodily injury
and damage to the equipment could result.
In this manual, symbols are used to highlight warnings and cautions for you to read so that
accidents can be prevented. The meanings of these symbols are as follows:
Please observe the following safety tips and precautions to ensure hazard-free use of the PS-02.
Warning
Caution
Caution
Caution
Warning
Caution
Page 3

3
Features
Features
The PS-02 has the following features.
• Three great functions in one unit
The PS-02 combines a drum/bass machine, a digital multi-recorder,
and a multi-effect device in a single compact unit. Tailor the sound of
your guitar, program a rhythm track, record guitar and vocal parts,
and perform final mixdown, all on the same unit. The PS-02 is a
totally new kind of hyper device.
• Versatile effects built in
The impressive palette of 50 built-in effects includes modulation
effects, spatial effects, as well as an amp simulator. Up to six effects
can be combined in an effect program, and 120 effect programs can
be stored in the memory of the unit. The PS-02 is handy as a standalone effect device for guitar or as an effect device for
guitar/bass/vocal recording. A Special effect lets you control the
sound and spatial ambience during mixdown.
• Program the rhythm track for 100 songs
The PS-02 incorporates more than 200 rhythm patterns using realistic
drum and bass sounds. By combining patterns and chords, you can
create up to 100 songs, ideal for practice and for composing.
• Integrated 3-track digital recorder
The built-in 3-track recorder lets you record and play a variety of
sources including guitar and vocals, as well as the signal from a CD
player or from the built-in microphone. Recorded data is stored on
SmartMedia for superior convenience. You can for example overlay a
guitar and a vocal part with a rhythm track that you created earlier,
for use as a professional sounding demo tape. Additional features
include auto punch in/out and track bouncing.
• Convenient dual power design
The PS-02 can be powered from the AC adapter or from four IEC
R03 (size AAA) batteries. This lets you use the unit anywhere,
whether for personal practice, creating arrangements, or for idea
recording.
Page 4

4
What the PS-02 Can Do
What the PS-02 Can Do
Add realistic sounding drum and bass
backing, and overlay guitar and vocal
parts to create your original song.
1
Use as a digital multi-track recorder.
Simply connect an instrument, select
the built-in effects, and record.
The PS-02 is digital MTR (multi-track recorder) using
SmartMedia for recording. You can store up to 100 songs on a
single SmartMedia card. A song can consist of two rhythm
tracks from the built-in rhythm machine (drums and bass) and
three audio tracks.
By programming the rhythm track, you can create your
original backing material. Then record instruments or vocals
on the three audio tracks.
After recording is completed, you can adjust panning and
volume for each audio track separately, and you can control
the balance of drums, bass, and audio tracks to create the final
song.
Built-in drum &
bass machine
Track 1
Track 2
Track 3
Pattern Pattern Pattern Pa
Effect
Keyboard
Rhythm track
Audio track
Song
Page 5

What the PS-02 Can Do
5
What the PS-02 Can Do
2
Create rhythm accompaniment without
cumbersome input, simply by selecting
patterns and chords
Programming the rhythm track could not be
easier: simply choose from a wide variety of
available rhythm patterns and specify the
chords. You'll get the hang of it in a few
minutes and create great backing tracks,
even without any sequencer experience.
The PS-02 incorporates more than 200 ready-to-use drum
and bass rhythm patterns for all sorts of musical genres,
including rock, blues, dance music, and many more. Just line
up the patterns in the desired order for playing and specify
the chords. The result is a solid rhythm track.
The built-in drum & bass patterns can be updated via
SmartMedia. New drum & bass sounds and patterns will be
published in future on the ZOOM web site
(http://www.zoom.co.jp). This will let you expand your
library of sounds and patterns.
Combination of drum pattern
and bass line
Bass line changes
according to chord
Pattern A
A
F#m
Pattern B Pattern C
D
Pattern
Chord
Rhythm track
Page 6

6
What the PS-02 Can Do
The audio tracks 1 - 3 of the PS-02 each have ten virtual
tracks (called "takes"). For recording or playback, you select a
take. For example, you might record several takes of a guitar
solo and then compare these later to choose the one you like
best.
The "bounce function" lets you perform digital collating of
several tracks onto tracks 1 and 2.
Take 1 - 10
Audio track 1 track 2 track 3
Selected take
[Bounce function example]
(1) Monaural
Bounce
Bounce
Bounce
Bounce
A
B
C
D
E
A+B+C
F
G
A+B+C+D+E
(2) Stereo
A
B
C
D
A+B+C(L)
A+B+C(R)
E
A+B+C+D(L)
A+B+C+D(R)
3
Digital MTR concept makes possible
virtual track (take) function and bounce
without affecting the sound quality
The PS-02 can record up to 10 takes per track,
for a total of 30 takes. A bounce function that
acts as a digital ping-pong effect is also
available, so that the number of record takes is
virtually unlimited.
Page 7

7
What the PS-02 Can Do
The PS-02 has numerous effects built in, allowing you to use
up to six effect modules such as DRIVE, CAB (cabinet
simulator), MOD (modulation), and REV (reverb)
simultaneously.
The effect output signal is present not only to the internal
recorder but also appears at the OUTPUT jack, so that you
can record the processed signal or use the PS-02 as a standalone effect device. The mixdown effect lets you apply
special processing on a completed song. Working with the
mixed signal consisting of audio track, drums and bass track,
you can add ambience or emphasize highs and lows, to get
exactly the sound that you're after.
Track 1
Track 2
Track 3
Effect
Audio track
[OUTPUT] jack
Page 8

8
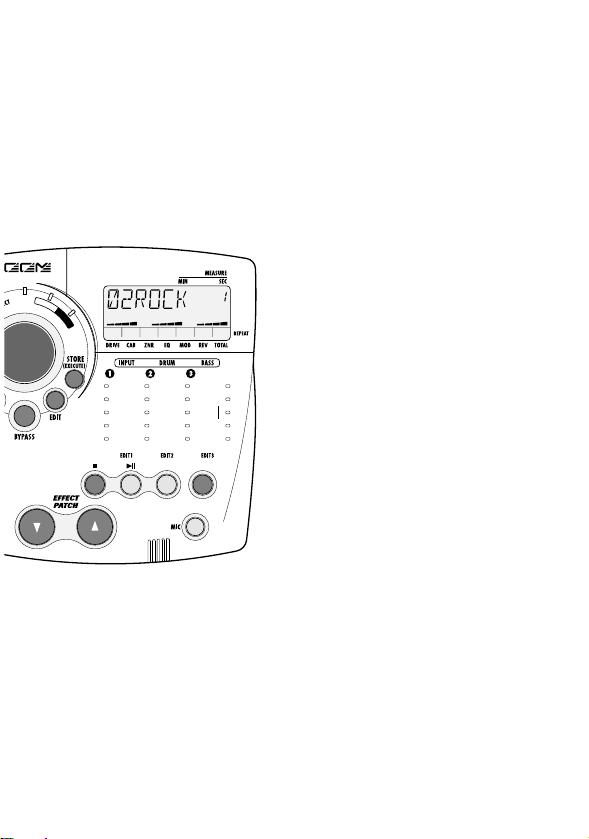
Names and Connectors
Names and Connectors
Page 9
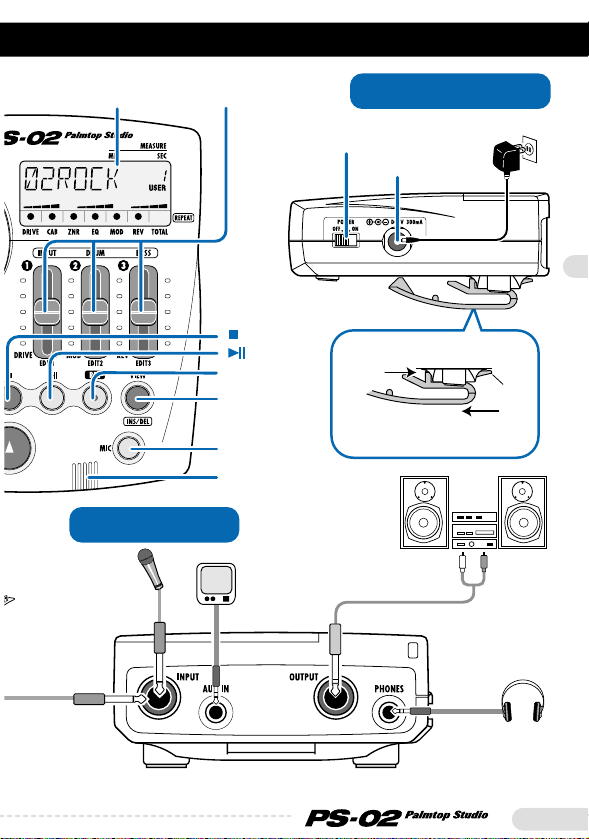
Names and Connectors
9
Names and Connectors
[PHONES] jack
[OUTPUT] jack
[AUX IN] jack
[INPUT] jack
Dynamic
microphone
CD player etc.
Built-in microphone
[MIC] key
[VIEW]/
[INS/DEL] key
Slider 1 - 3
Display
Right Side Panel
[DC 9V] jack
[POWER] switch
Rear Panel
Playback system
Headphones
AC adapter
[ ] key
[REC] key
[ ] key
Belt clip
To remove, slide off while
pushing the latch.
Latch
Attach
Page 10
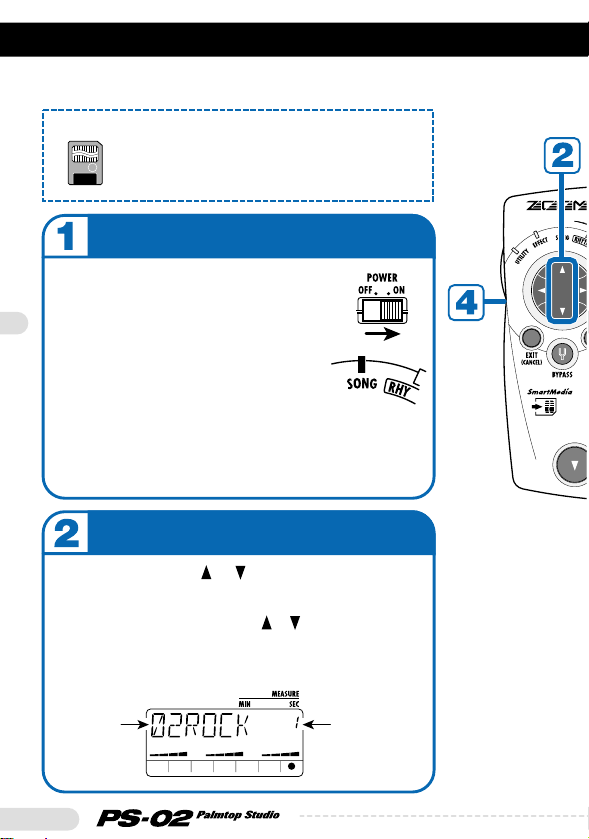
10
Quick Guide (1)
Listening to the Demo Song
Quick Guide (1) Listening to the Demo Song
This section shows how to play the demo song stored on the supplied
SmartMedia card.
Select a song
To use the PS-02, the SmartMedia card is
required. Before turning on power to the
unit, verify that the supplied SmartMedia
card is inserted in the [DATA CARD] slot.
Pressing one of the cursor [ ]/[ ] keys cycles
through song numbers 1 - 100. On the supplied
SmartMedia card, song number 1 is a demo
song using the audio tracks + rhythm tracks.
Use the cursor [ ]/[ ] keys to select
song number 1.
CAUTION
Turn on the power
Set the [POWER] switch on the
right side panel to ON.
Make sure that the VOLUME control
is turned fully down.
Turn on the system in the order PS02 ➝ playback equipment.
While the system is being read from
the SmartMedia, the indication
"LODING" is shown on the display.
When the read-in process is
completed, the PS-02 starts up and
the SONG menu LED lights up.
Song name
Song number
Page 11

Quick Guide (1) Listening to the Demo Song
11
Quick Guide (1)
Listening to the Demo Song
Page 12

Page 13

Page 14
Page 15
Page 16
16
About SmartMedia
Operating the Unit on Batteries
About SmartMedia / Operating the Unit on Batteries
SmartMedia contents
Besides the demo song play data and audio data, the SmartMedia card
supplied with the PS-02 contains the system data necessary for operation
of the PS-02. Note that the PS-02 will only start up when a suitable
SmartMedia card is inserted in the [DATA CARD] slot.
SmartMedia work card
When recording with the PS-02, all audio data is stored on SmartMedia.
In the condition as shipped from the factory, the supplied SmartMedia
card has a certain amount of free space, but for longer recordings, you
will need to erase demo songs or use another SmartMedia card (32MB or
higher is recommended).
If the system program contained on the original supplied SmartMedia
card is accidentally damaged or erased, the PS-02 will not be able to
operate normally. It is therefore strongly recommended to format a new
SmartMedia card to create a working card. After doing this, store the
original supplied SmartMedia card in a safe place.
For information on how to erase a song, see page 43.
For information on how to format a working SmartMedia card, see page 75.
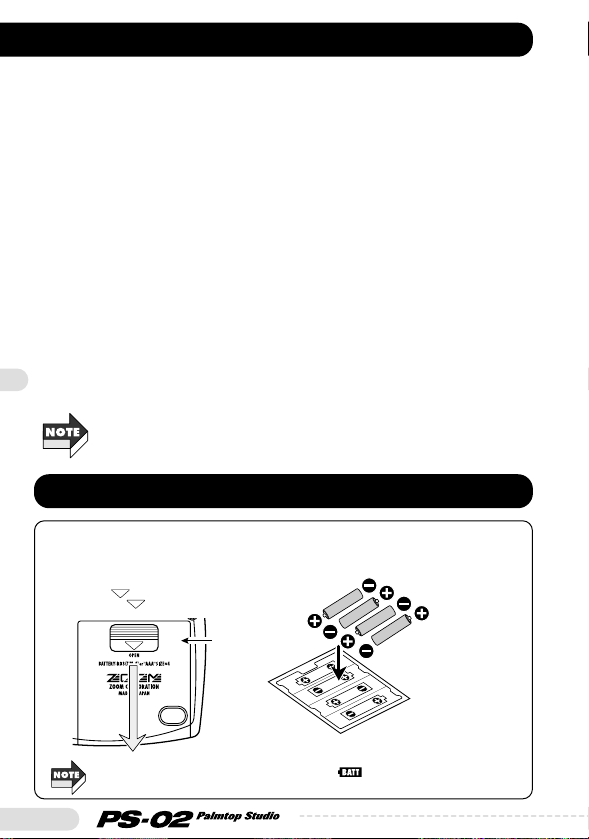
Four IEC R03 (size AAA)
batteries
Battery
compartment cover
2. Turn the PS-02 over and open the cover
of the battery compartment.
Push the tab down and then slide the
cover in the direction.
3. Insert four IEC R03 (size AAA) batteries (the
use of alkaline batteries is recommended)
into the compartment, taking care to
establish correct +/- orientation.
4. Slide the battery compartment cover in the opposite direction
to close it.
When the batteries are getting low, the battery indication ( ) appears on the display.
When not using the PS-02, do not forget to turn the unit off to preserve battery power.
1. Verify that power to the unit is turned off.
Page 17

Operation Guide
Operation Guide
17
This section describes how to create a song, starting from zero. The
process can be divided into four main steps:
• Step 1 (PATTERN) Program a pattern
(Create drum pattern)
• Step 2 (CHORD) Program chords on the rhythm track
(Create bass chord progression)
• Step 3 (RECORD) Record audio tracks 1 - 3
• Step 4 (MIXDOWN) Mix the drum, bass and audio tracks
At the top of each page in the operation guide, you will see a diagram
with four blocks corresponding to the four steps. The block shown in
black shows your current position in the process.
The explanations in the operation guide assume that there is a certain
amount of free space on the SmartMedia. When using the supplied
SmartMedia card, erase unneeded songs first (
➝ p. 43).
To create a new song, you must first select an empty song (or erase an
existing song as described on page 43). The example shows how to select
the song from song number 51 - 100 on the supplied SmartMedia card.
1.Use the cursor [ ]/[ ] keys to cause the SONG menu
LED to light up.
The Song menu appears on the display.
If the menu LEDs do not change, press the [EXIT] key several times. If the
[REC] key is lit, press the [
■] key and then press the [EXIT] key.
2.Use the cursor [ ]/[ ] keys to select a song from number
51 - 100.
When an empty song is selected, the indication "EMPTY" is shown
in the song name field.
Page 18

18
Operation Guide
On the rhythm track of the song, you can program information about
switching patterns (pattern change information).
In this example, let's program the pattern change information shown in
the diagram below.
◆
Creating an empty measure (inserting a measure)
When programming the rhythm track from zero, you must first insert the
required number of measures (song length) in the rhythm track.
1.Use the cursor [ ]/[ ] keys to cause the RHYTHM menu
LED to light up.
The display switches to the Rhythm menu. This menu allows you to
make various settings for programming the rhythm track.
2.Press the [REC] key.
Program pattern change information
PATTERN CHORD
RECORD MIXDOWN
Measure number
Chord change
Pattern change
1
DABmA
MAIN08 / ROCK /
M8-1-1
5
DABmA
MAIN08 / ROCK /
M8-1-1
9
D
ENDING / GLOBAL /
EN-1-1
2 3 4
6 7 8
10
FILL08 / ROCK /
F8-1-1
FILL08 / ROCK /
F8-1-1
Page 19
Operation Guide
19
When you select an empty song and press the [REC] key, a 2-measure
rhythm track is automatically created. Measure 1 contains the "oo" pattern
change information and the "Am" (A Minor) chord change information.
3.Press the cursor [ ] key twice.
With the cursor [ ]/[ ] keys you can move backward and forward
from the current measure in the rhythm track. By pressing the cursor
[ ] key twice, you move to measure 3, and the indication "END"
appears on the display (no measure number is shown in the top right
of the display). "END" is special information that marks the end of
the rhythm track. In this example, because we want to create a 10measure rhythm track, 8 more measures must be added.
4.Press the [INS/DEL] key.
The display for inserting measures appears.
5.Move slider 3 to specify 8 as the number of measures to
insert.
• The input range for inserting measures is 1 - 99. To specify the measure
number, use slider 2 for the higher digit and slider 3 for the lower digit.
•
The rhythm track length can be reduced later by deleting measures (➝ page 22).
PATTERN CHORD
RECORD MIXDOWN
First 2 measures
12
1234 910
Add 8 measures
END
END
Inserted 8 measures
Page 20
20
Operation Guide
6.Press the [STORE (EXECUTE)] key.
The specified number of measures is added.
To cancel the measure insertion, press the [EXIT (CANCEL)] key.
◆
Entering pattern change information
In the measure where you want to change a pattern, you must insert
pattern change information.
1.
Press the cursor [ ] key repeatedly to return to measure 1.
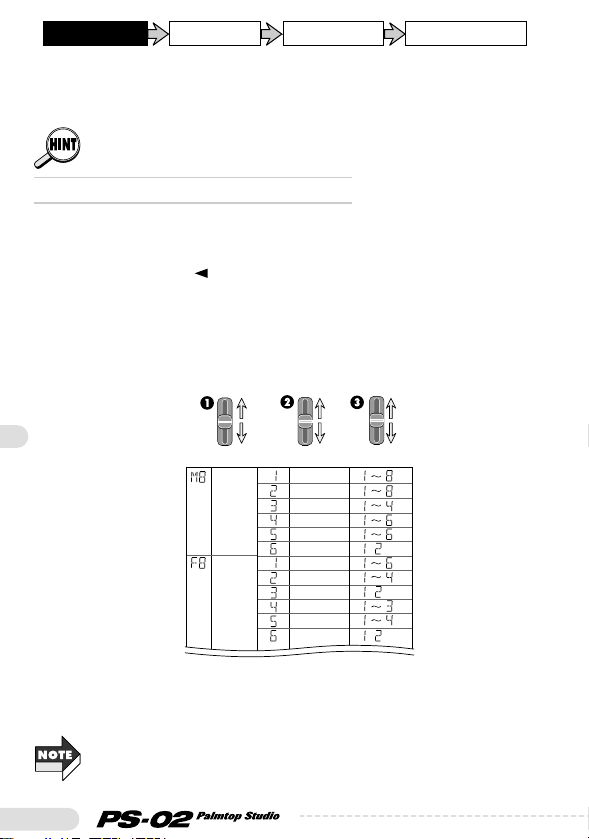
2.Using sliders 1/2/3, select "MAIN08 / ROCK / M8-1-1" as
rhythm pattern for measure 1.
Patterns incorporated in the PS-02 are divided into the three elements
section/style/variation, which can be selected with slider 1/2/3.
In this example, you use sliders 1/2/3 to select MAIN08 / ROCK /
M8-1-1 in sequence.
For the rhythm pattern display, the variation name has priority.
The section name and style name are shown only immediately after being
selected with slider 1/2.
PATTERN CHORD
RECORD MIXDOWN
Section Style Variation
MAIN08
FILL08
ROCK
HARDRK
POP
MOTOWN
BALLAD
SHUFLE
ROCK
HARDRK
POP
MOTOWN
BALLAD
SHUFLE
,
,
,
Page 21
Operation Guide
21
• For information on available rhythm patterns, see the "Rhythm Pattern
List" on page 83.
• During programming, you can use the [ ] and [
■] key to play and stop
the pattern.
• When pattern change information is entered in a measure, that pattern will
be repeated until the measure where the next pattern change information
is input.
• The EFFECT PATCH [
▲]/[▼] keys can also be used to change the pattern.
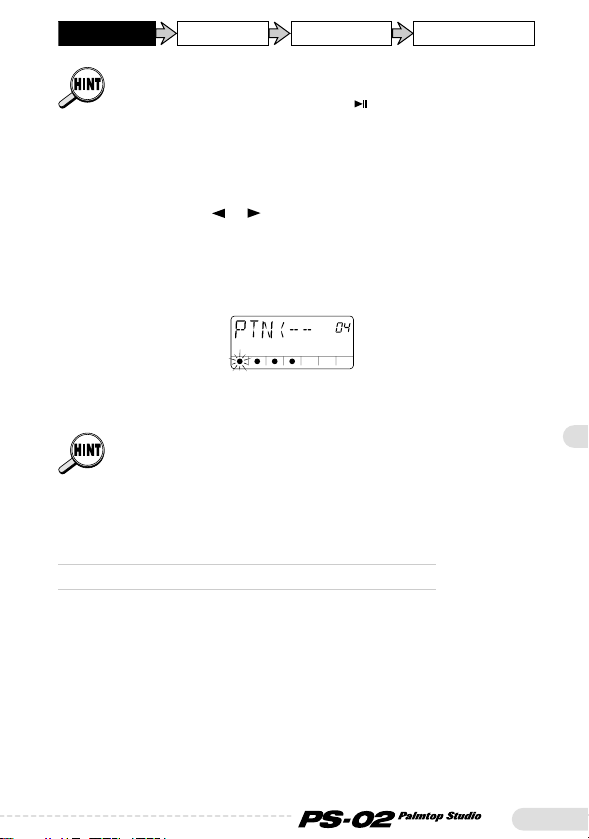
3.Use the cursor [ ]/[ ] keys to move to the number of the
measure where the pattern should change next ("4" in this
example).
For measures where no pattern change information is input, the
display shows "PTN<--" as in the illustration below.
4.Use slider 3 to enter the pattern change information for
measure 4 ("FILL08 / ROCK / F8-1-1" in this example.
When entering a pattern change information where only the variation is
different from the immediately preceding pattern, you can omit the style and
section input.
5.In the same way, enter pattern change information for
measures 5, 8, and 9.
◆
Editing/deleting pattern change information
• To edit entered pattern change information, use the pattern input
display and go to the measure number whose contents you want to
change. Then use sliders 1 - 3 to specify the desired new pattern.
• To delete entered pattern change information, use the pattern input
display and go to the measure number whose contents you want to
delete. Then set slider 1 to the full down position.
• The indication "------" is temporarily shown on the display and then
changes to "PTN<--". The selected pattern change information has
now been erased.
PATTERN CHORD
RECORD MIXDOWN
Page 22

22
Operation Guide
When the pattern change information of measure 1 was deleted, the
pattern for playback will be "MAIN08 / ROCK / M8-1-1".
◆
Deleting unneeded measures
1.To delete an unneeded measure, use the pattern input
display and go to the first measure you want to delete.
Then press the [INS/DEL] key twice.
The display for deleting measures is shown.
With each push of the [INS/DEL] key, the display cycles through the
following functions: measure insert
➝ measure delete ➝ pattern input.
2.Use sliders 2/3 to specify the number of measures to
delete.
The input range for deleting measures is 1 - 99. To specify the
measure number, use slider 2 for the higher digit and slider 3 for the
lower digit.
3.To carry out the delete process, press the [STORE
(EXECUTE)] key.
Starting from the measure specified in step 1, the number of measures
specified in step 2 is deleted.
To cancel the delete process, press the [EXIT (CANCEL)] key.
Page 23
Operation Guide
23
After the pattern has been input, you should program chord change
information following the diagram on page 18. Unlike pattern change
information, chord change information can be specified in beat units.
◆
Entering chord change information
1.At the pattern input display, press the cursor [ ] key (or
[ ] key).
The display switches to the chord change information input mode.
While programming the rhythm track, each push of the cursor [ ] ([ ]) key
toggles between the pattern input display and chord input display.
2.Use the cursor [ ]/[ ] keys to move to measure 1.
In the initial condition, only the chord change information "Am" (A
Minor) is entered in measure 1.
3.Use sliders 1/2 to specify the chord for measure 1 ("D" in
this example).
In chord input mode, slider 1 specifies the root and slider 2 the type
of the chord (Major, Minor, etc.).
Program chord change information
PATTERN CHORD
RECORD MIXDOWN
Page 24

24
Operation Guide
• Each pattern is preprogrammed with a dedicated bass phrase which is
based on the root of the chord and transposed up or down. For some
chords, partial phrase transformation is also employed.
• When a pattern is selected for which only the root is played, or when
"NON" has been selected as chord type, only transposition is carried out,
without transformation.
• Note that depending on the selected chord, the transformation may result
in a bass line that is not well suited for the pattern.
• In the same way as for the pattern change information, when chord
change information is entered for a measure, the chord will be played until
the point where the next chord change information is entered. For
measures where no chord change information was entered, the indication
"CHD<--" is shown on the display.
4.Use the cursor [ ] key to move to measure 2.
Next, enter the chord change information "A" (A Major) for beat 3 of
measure 2. To enter a chord change information at a point other than
the beginning of a measure, first move to the desired measure and
then specify the input position in units of single beats. The position
within the measure is indicated by flashing dots, as shown below.
PATTERN CHORD
RECORD MIXDOWN
No display
Chord type
No transformation
Minor Major 7th
Major 9th
Minor 9th
Major 6th
Minor 6th
Minor 7th flat 5
Suspended 4th
7th Suspended 4th
Diminished
Augment
Major 7th
Minor 7th
Dominant 7th
Minor Triad
Major Triad
Root
B
A#
A
G#
G
F#
F
E
D#
D
C#
C
erase
Setting slider 1 to the full down position
erases the chord change information
Current measure
Beat position within measure
Beat 1 3 42
Page 25

Operation Guide
25
5.Press the EFFECT PATCH [▲] key twice.
In chord input mode, the EFFECT PATCH [▼]/[▲] keys serve for
moving in 1-beat steps within the measure. The flashing dot that
indicates the position within the measure moves to beat 3.
6.Use sliders 1/2 to specify the "A" (A Major) chord.
7.In the same way, enter chord change information for other
measures as shown in the diagram on page 18.
◆
Editing/deleting chord change information
• To edit entered chord change information, use the chord input display
and go to the position whose contents you want to change. Then use
sliders 1/2 to specify the new chord.
• To delete entered chord change information, use the chord input
display and go to the position whose contents you want to delete.
Then set slider 1 to the full down position.
The indication "CHD<--" appears on the display and the selected
chord change information is deleted.
If the pattern change information for measure 1 was deleted, playback will
use the "Am" (A Minor) chord.
◆
Listening to the completed rhythm track
1.
To listen to the completed rhythm track, press the [■] key to
terminate chord input mode, and then press the [ ] key.
2.To adjust the tempo, press the [EDIT] key.
The current tempo (BPM) is displayed.
PATTERN CHORD
RECORD MIXDOWN
Page 26
26
Operation Guide
3.Use the cursor [ ]/[ ] keys or sliders 1 - 3 to adjust the
BPM value.
The cursor [ ]/[ ] keys increase or decrease the BPM value by 1.
Sliders 1 - 3 adjust the digit at the respective position.
4.When the tempo is as you want it, press the [EXIT
(CANCEL)] key.
5.To stop the rhythm track playback, press the [■] key.
When the rhythm track or audio track information of the PS-02 was
changed, the change is automatically saved on the SmartMedia. There is no
need for the user to perform a manual save. (However, when the contents of
an effect patch were changed, the change must be saved by the user.)
PATTERN CHORD
RECORD MIXDOWN
Page 27

Operation Guide
27
Now that rhythm track programming is completed, you are ready to
record effect processed guitar signals on audio tracks 1 - 3.
First, let's record some rhythm guitar backing as shown below on audio
track 1.
◆
Preparations for recording
1.Use the cursor [ ]/[ ] keys to cause the EFFECT menu
LED to light up.
The display switches to the Effect menu. This menu serves for
selecting and easy editing of effect patches.
The Audio menu also allows you to make patch changes.
2.Use the EFFECT PATCH [▲]/[▼] keys to select the effect
patch.
Recording rhythm guitar 1
Record guitar signals on the audio tracks
D
D
ABm A
Page 28

28
Operation Guide
In this example, we'll select a distortion patch.
3.Press the [ ] key.
The song menu comes up automatically, and the rhythm track is
played. While listening to the rhythm track, practice the score
example on page 27.
4. To adjust the tempo of the rhythm track, press the cursor
[ ]key once to move to the rhythm menu, and then
change the tempo.
You must decide on the tempo of the rhythm track before starting to record
the audio track. If you change the tempo of the rhythm track after recording
the audio track, there will be a tempo mismatch between the audio and
rhythm tracks.
◆
Recording audio track 1
1.Press the [■] key to stop the rhythm track of the song.
2.Use the cursor cursor [ ]/[ ] keys to cause the AUDIO
menu LED to light up.
The display switches to the Audio menu. This menu serves for
recording and editing of audio tracks.
3.Press the [REC] key.
The display for selecting the track appears. In this mode, the dots at
the bottom of the display function as a level meter.
PATTERN CHORD
RECORD MIXDOWN
The higher the input signal level, the more the lit dots move towards the right.
Page 29

Operation Guide
29
4.Verify that the indication "R-1" (audio track 1 selected as
recording track) is shown on the display.
If "R-2" or "R-3" is shown, use the cursor [ ]/[ ] keys to select
audio track 1.
5.While playing your guitar, adjust slider 1 so that the center
area dots light up when you play the instrument at a high
level.
In the recording standby condition, sliders 1 - 3 serve to adjust the
recording level in audio tracks 1 - 3. For details, see page 14.
6.When you are ready to record, press the [ ] key.
After a click precount of 4 beats (1 measure), the rhythm track of the
song is played, and recording on audio track 1 starts.
The precount duration and sound can be adjusted as desired (➝ page 72).
7.To stop recording, press the [■] key.
• Also after the rhythm track playback is completed, recording on the
audio track continues for as long as there is room on the SmartMedia,
unless the [
■] key is pressed. If you continue to record until the
SmartMedia becomes full, the indication "FULL" is shown on the display.
• If you have used up the SmartMedia capacity by mistake, delete the
audio track (
➝
p. 54).
8.To listen to the recorded session, press the [ ] key.
The rhythm track of the song and the recorded audio track 1 are
played back from the beginning. To redo the recording, repeat the
process from step 3.
If desired, you can keep the current take and record another take. For
details, see page 53.
PATTERN CHORD
RECORD MIXDOWN
Page 30

30
Operation Guide
While listening to the rhythm track audio track 1, record another rhythm
guitar track on audio track 2.
1.Use the cursor [ ]/[ ] keys to cause the EFFECT menu
LED to light up, and select an effect patch.
For rhythm guitar 2, let's use a clean type patch.
2.Press the [ ] key.
The rhythm track of the song and the recorded audio track 1 are
played. While listening to these tracks, practice the above score
example.
You should never change the tempo of the rhythm track at this stage.
Otherwise there will be a tempo mismatch between the rhythm track and
audio track 1.
3.Use the cursor [ ]/[ ] keys to cause the AUDIO menu
LED to light up.
4.Press the [REC] key.
The display for selecting the track appears.
5.Use the cursor [ ]/[ ] keys to select audio track 2 for
Recording rhythm guitar 2
PATTERN CHORD
RECORD MIXDOWN
D
D
AABm
Page 31

Operation Guide
31
recording.
6.While playing your guitar, use slider 2 to adjust the
recording level.
The level after effect processing may differ, depending on the selected
patch. You should therefore readjust the recording level if you have
switched patches.
7.When you are ready to record, press the [ ] key.
After a precount of 4 beats (1 measure), the rhythm track of the song
and audio track 1 are played, and recording on audio track 2 starts.
8.To stop recording, press the [■] key.
Also after the rhythm track and audio track 1 playback is completed,
recording on audio track 2 continues, unless the [
■] key is pressed.
9.To listen to the recorded session, press the [ ] key.
To redo the recording, repeat the process from step 4. For information
on how to delete an audio track, see page 54.
When recording of audio tracks 1 and 2 is completed, record a guitar adlib solo on audio track 3.
1.Use the cursor [ ]/[ ]keys to cause the EFFECT menu
LED to light up, and select an effect patch.
Select any desired patch here.
2.Press the [ ] key.
The rhythm track of the song and the recorded audio tracks 1 + 2 are
Recording the lead guitar
PATTERN CHORD
RECORD MIXDOWN
Page 32

32
Operation Guide
played. While listening to the backing provided by these tracks,
practice the lead part.
3.Use the cursor [ ]/[ ] keys to cause the AUDIO menu
LED to light, and press the [REC] key.
4.Use the cursor [ ]/[ ] keys to select audio track 3.
5.While playing your guitar, use slider 3 to adjust the
recording level.
6.When you are ready to record, press the [ ] key.
After a precount of 4 beats (1 measure), the rhythm track of the song
and audio tracks 1 + 2 are played, and recording on audio track 3
starts.
7.To stop recording, press the [■] key.
8.To listen to the recorded session, press the [ ] key.
To redo the recording, repeat the process from step 3.
During playback, you can press the [ ] key to pause the song and
then press the [REC] key followed by the [ ] key to restart
recording from that point. However, it is not possible to start
recording from a point where nothing is recorded.
• Using the punch-in/punch-out feature, you can rerecord only a part of an
audio track (
➝ p. 55).
• If you wish to record more parts, you can use the bounce feature of the
PS-02 to combine the contents of the 3 tracks on track 1 - 2 (
➝ p 58).
PATTERN CHORD
RECORD MIXDOWN
Page 33

Operation Guide
33
The previous pages covered recording a guitar signal connected to the
[INPUT] jack. Sometimes you may want to record vocals or an acoustic
guitar via a microphone. You can use either the built-in microphone of
the PS-02 or an external microphone connected to the [INPUT] jack.
Proceed as follows.
◆
Preparations
1.To use an external microphone, connect the microphone
cable to the [INPUT] jack.
2.Use the cursor [ ]/[ ] keys to cause the EFFECT menu
LED to light.
3.Use the EFFECT PATCH [▲]/[▼] keys to select the patch
where the mic icon ( ) is shown on the display.
This patch is designed specially for microphone recording. When
using the built-in microphone or an external microphone connected to
the [INPUT] jack, this patch must be selected.
• The "MICPRE" effect type in the DRIVE module is the dedicated
microphone input patch.
• If another patch is selected, the built-in microphone cannot be used, and
an external microphone connected to the [INPUT] jack will not be heard
with sufficient gain.
4.To use the built-in microphone, press the [MIC] key.
The [MIC] key lights up and the signal from the built-in microphone
is used as recording source.
While the [MIC] key is lit, the [INPUT] jack cannot be used. To use an
external microphone, omit step 4 and proceed to the next step.
Mic icon
Recording from a microphone
PATTERN CHORD
RECORD MIXDOWN
Page 34

34
Operation Guide
◆
Adjusting the microphone input gain
5.Press the cursor [ ] key to cause the UTILITY menu LED
to light up.
The display switches to the Utility. This menu serves for making
general PS-02 settings.
6.Press the [EDIT] key and then use the curso [ ]/[ ] keys
to bring up the indication "MIC-G" on the display.
The current microphone input gain setting is shown at the top right of
the display.
This setting is only effective when the microphone input patch is selected.
7.Use the cursor [ ]/[ ] keys or slider 1 to adjust the
microphone input gain (Lo or HI).
• When using the built-in microphone
• Lo
This is a gain setting for on-mic recording. It is suitable for
holding the PS-02 in your hand while doing a vocal, or for
placing the PS-02 very close to an acoustic guitar (about 30 cm
from the sound hole).
• HI
This is a gain setting for off-mic recording, such as when
capturing an entire band in a studio.
PATTERN CHORD
RECORD MIXDOWN
Page 35

Operation Guide
35
• When using an external microphone
• Lo
This setting is suitable for high-output microphones.
• HI
This setting is suitable for low-output microphones.
8.When the microphone gain setting is completed, press the
[EXIT (CANCEL)] key.
The unit returns to the Utility menu.
9.Return to the audio menu, select a track, adjust the
recording level, and start recording.
The actual recording procedure is the same as for electric guitar.
PATTERN CHORD
RECORD MIXDOWN
Page 36

36
Operation Guide
After the recording of audio tracks is completed, you can put the
finishing touches on the song, such as adjusting the balance of rhythm
track and audio tracks.
You can adjust the volume level of the drums and bass played on the
rhythm track as follows.
1.Use the cursor [ ]/[ ] keys to cause the RHYTHM menu
LED to light up.
The display switches to the Rhythm menu.
2.Press the [ ] key.
The rhythm track of the song and audio tracks 1 - 3 are played back.
3.Using sliders 2 and 3, adjust the drum/bass level of the
rhythm track.
The bar graph in the lower part of the display shows the approximate
level balance.
When playing the song while the Rhythm menu is displayed, slider 1 adjusts
the level of the input signal.
You can adjust the level balance and panning (stereo position) of audio
tracks 1 - 3 as follows.
◆
Adjusting the level of each audio track
1.Use the cursor [ ]/[ ] keys to cause the AUDIO menu
LED to light up.
Adjusting the audio track level balance and panning
Adjusting the rhythm track level balance
Finish up the song
PATTERN CHORD
RECORD MIXDOWN
Page 37

Operation Guide
37
The display switches to the Audio menu.
2.Press the [ ] key.
The rhythm track of the song and audio tracks 1 - 3 are played back.
3.
Use sliders 1 - 3 to adjust the audio track 1 - 3 level balance.
The bar graph in the lower part of the display shows the approximate
level balance.
◆
Adjusting the panning of each audio track
4.Press the [EDIT] key.
The display switches to the Audio Edit menu for making audio track
settings. You can now adjust the panning.
Also while the Audio Edit menu is displayed, the [ ] key and [■] key can
be used for song playback/stop.
5.Use sliders 1 - 3 to adjust the panning for audio track 1 - 3
in the range from "10L" (hard left) - "C" (center) - "10r"
(hard right).
When slider 1 - 3 is moved, the panning position is shown on the
display. The bar graph in the lower part of the display shows the
approximate level balance.
6.When the pan setting is completed, press the [EXIT
(CANCEL)] key.
The unit returns to the Audio menu.
PATTERN CHORD
RECORD MIXDOWN
Page 38

38
Operation Guide
The effects of the PS-02 also include a "mixdown" effect for adding
ambience to the entire song (rhythm track + audio track) and for
boosting and cutting the upper or lower frequency range. This section
shows how to apply the mixdown effect to a completed song.
1.Use the cursor [ ]/[ ] keys to cause the EFFECT menu
LED to light.
The display switches to the Effect menu.
2.Use the EFFECT PATCH [▲]/[▼] keys to select the patch
where the mic icon ( ) flashes on the display.
This patch is the dedicated mixdown patch.
• The "MIXEFX" effect type in the DRIVE module is the dedicated mixdown
patch.
• The dedicated mixdown patch cannot be combined with effects from
other modules.
• While the dedicated mixdown patch is selected, the input signal from the
[INPUT] jack and the built-in microphone is muted.
3.Press the [ ] key to play the song.
The song (rhythm track + audio tracks) processed by the mixdown
effect is output from the [OUTPUT]/[PHONES] jack.
Moving slider 1 - 3 while the Effect menu is shown lets you easily adjust the
intensity of the mixdown effect (Easy Edit).
Finally, give a name to the song you have created.
1.Use the cursor [ ]/[ ] keys to cause the SONG menu
Adding a name to a song
Using the mixdown effect
PATTERN CHORD
RECORD MIXDOWN
Mic icon
Page 39

Operation Guide
39
LED to light up.
The display switches to the Song menu.
When a blank song was selected and the rhythm track was programmed,
the name "SNGxxx" is automatically assigned. ("xxx" is the song number.)
2.Press the [EDIT] key.
The display switches to the Song Edit menu, and the indication
"NAME" is shown.
3.Press the [EDIT] key once more.
The song name can now be edited. The character that is to be edited
is flashing.
4.Use the cursor [ ]/[ ] keys to select the character you
want to change, and use slider 1 - 3 to edit the character.
Sliders 1 - 3 have the following function.
• Slider 1: A - Z (capital letters)
• Slider 2: 0 - 9 (numerals)
• Slider 3: <Space> / + / - / @ (symbols)
5.To confirm the new song name, press the [STORE
(EXECUTE)] key.
The unit returns to the condition of step 1.
To cancel the song name editing process, press the [EXIT (CANCEL)] key.
PATTERN CHORD
RECORD MIXDOWN
Page 40

40
Reference Guide
Reference Guide
This section explains all menus and functions of the PS-02.
The Song menu is the basic menu of the PS-02. It lets you control
operations such as start/stop of song playback. From this menu, you can
also call up the Song Edit menu which lets you edit song names and
delete songs.
To switch to the Song menu from another menu, use the cursor [ ]/[ ]
keys to cause the SONG menu LED to light up (or press the [EXIT
(CANCEL)] key repeatedly). When you turn the PS-02 off and then on
again, the Song menu will automatically be selected.
When the Song menu is selected, the front panel controls operate as
follows. (Other keys are inactive.)
(1) Display
For the Song menu, the display shows the following information.
(Items in [ ] brackets are shown during playback only.)
(2) Sliders 1 - 3
• Slider 1
Adjusts the input signal ([INPUT] jack/built-in microphone) level.
Front panel controls and functions (Song menu)
Song Menu
Song name
Song number
[current measure number]
Input signal level
[Current beat]
Bass track level
Drum track level
Page 41

Reference Guide
41
• Slider 2
Adjusts the drum track volume level.
• Slider 3
Adjusts the bass track volume level.
(3) [■] key
Stops the currently playing song.
(4) [ ] key
Starts playback of the song from the current position. (If the song is
currently playing, the key pauses playback.)
(5) [VIEW] key
Pressing this key during song playback cycles the display through the
following functions: Chord name
➝ Tempo ➝ Pattern name (Form
only)
➝ Song menu.
(6) [MIC] key
Activates the built-in microphone. (The signal from the [INPUT] jack
is muted.) .
This key is only active when the " " (mic icon) is shown for the
selected patch.
(7) Cursor [ ]/[ ] keys
Serve to switch the menu.
(8) Cursor [ ]/[ ] keys
• When song is playing/stopped
Select the song.
• When song playback is paused
Move the play position in the current song backward or forward, in
units of 1 measure.
(9) [BYPASS] key
Bypasses (mutes) effect processing.
(10)
[EDIT] key
Calls up the Song Edit menu.
(11)
Patch [▼]/[▲] keys
Serve to switch effect patch numbers (user patches 1 - 60 ➝preset
patches 1 - 60). Shortly after switching the patch, the display reverts
to the Song menu.
Page 42

42
Pressing the [EDIT] key at the Song menu while song playback is
stopped brings up the Song Edit menu. The Song Edit menu lets you
change the name of the currently selected song, or delete the song.
◆
Changing the song name
1.At the Song menu, use the cursor [ ]/[ ] keys to select
the song whose name you want to change.
2.Press the [EDIT] key.
The unit switches to the Song Edit menu, the indication "NAME"
appears on the display, and the "EDIT" mark is shown, indicating the
Song Edit menu.
3.Press the [EDIT] key once more.
The current song name is displayed, and the first character flashes.
This indicates that this character can be changed.
4.Use sliders 1 - 3 to select the desired character.
Sliders 1 - 3 have the following function.
• Slider 1: A - Z (capital letters)
• Slider 2: 0 - 9 (numerals)
• Slider 3: <Space> / + / - / @ (symbols)
5.Use the cursor [ ]/[ ] keys to move the flashing
indication to the next character you want to edit, and edit
the rest of the name in the same way.
Song Edit Menu
Reference Guide
Page 43

43
6.To confirm the edited song name, press the [STORE
(EXECUTE)] key.
The unit returns to the Song menu.
• To cancel the song name changes, press the [EXIT (CANCEL)] key.
• To return to the Song menu from the Song Edit menu, press the [EXIT
(CANCEL)] key.
◆
Deleting a song
1.At the Song menu, use the cursor [ ]/[ ] keys to select
the song you want to delete.
2.Press the [EDIT] key to switch to the Song Edit menu, and
press the cursor [ ] key once.
The indication "ERASE" appears on the display.
3.Press the [EDIT] key once more.
The "ERASE" indication flashes.
4.To delete the song, press the [STORE (EXECUTE)] key.
The unit returns to the Song menu, and the indication "EMPTY" is
shown as the song name.
To cancel the song delete process, press the [EXIT (CANCEL)] key to return
to the Song Edit menu.
Proceed with care, because a song cannot be restored after it has been
deleted.
Page 44

44
The Rhythm menu serves for programming the rhythm track. It also lets
you call up the Rhythm Edit menu for adjusting the tempo and selecting
the drum kit or bass sound.
To switch to the Rhythm menu from another menu, use the cursor [ ]/[ ]keys
to cause the RHYTHM menu LED to light up.
When the Rhythm menu is selected, the front panel controls operate as
follows. (Other keys are inactive.)
(1) Display
For the Rhythm menu, the display shows the following information.
(Items in [ ] brackets are shown during playback only.)
(2) Sliders 1 - 3
• Slider 1
Adjusts the level of the input signal ([INPUT] jack/built-in
microphone).
• Slider 2
Adjusts the drum track volume level.
• Slider 3
Adjusts the bass track volume level.
(3) [■] key
Stops song playback. Also quits the pattern input display or chord
input display and returns the unit to the Rhythm menu.
Front panel controls and functions (Rhythm menu)
Rhythm Menu
Reference Guide
Rhythm track length (number of measures)
[Currently playing measure number]
Repeat Play On/Off
(lit when Repeat Play is On)
Level of signal from [INPUT] jack (or built-in microphone)
Bass track level
Drum track level
Page 45

45
(4) [ ] key
Starts/pauses song playback (rhythm track + audio tracks).
While the song is paused ([ ] key is flashing), you can use the cursor [ ]
([ ]) key to change the current position. Pressing the [ ] key then starts
playback from the new position.
(5) [REC] key
Pressing the [REC] key while the song is stopped calls up the pattern
input display for programming the rhythm track.
For details on programming the rhythm track, see the Operation Guide,
pages 18 - 26.
(6) [VIEW] key
Pressing this key during song playback cycles the display through the
following functions: Chord name
➝
Tempo ➝Pattern name (Form
only)
➝
Rhythm menu.
(7) [MIC] key
Activates the built-in microphone. (The signal from the [INPUT] jack
is muted.) This key is only active when the " " (mic icon) is
shown for the selected patch.
(8) Cursor [ ]/[ ] keys
Serve to switch the menu.
(9) Cursor [ ]/[ ] keys
Move the play position in the current song backward or forward, in
units of 1 measure.
(10)
[EXIT (CANCEL)] key
Switch the mode in the order Rhythm Edit menu ➝Rhythm menu
➝
Song Menu.
(11)
[BYPASS] key
Bypasses (mutes) effect processing.
(12)
[EDIT] key
Activates the Rhythm Edit menu (➝page 46).
(13)
Patch [▲]/[▼] keys
Serve to switch effect patch numbers (user patches 1 - 60 ➝preset
patches 1 - 60). Shortly after switching the patch, the display reverts
to the Rhythm menu.
Reference Guide
Page 46

46
Pressing the [EDIT] key at the Rhythm menu calls up the Rhythm Edit
menu. This menu allows you to adjust the rhythm track tempo, change
the drum kit/bass sound, and make other settings for the rhythm track.
◆
Basic operation steps for Rhythm Edit menu
1.From the Rhythm menu, press the [EDIT] key.
This calls up the Rhythm Edit menu. The first item that can be set
with the rhythm Edit Menu (BPM) is shown on the display.
2.Use the cursor [ ]/[ ] keys to select the item you want to
set. The following items are available.
• BPM ••••••••••Adjusts the tempo of the rhythm track.
• KITSEL••••••Selects the drum kit to be used for the drum track.
• BASSEL ••••Selects the bass sound to be used for the bass track.
• REPEAT•••••Sets repeat play for the rhythm track to On or Off.
• IMPORT ••••Imports a rhythm track from another song.
• TRANSP••••Transposes the rhythm track.
3.After selecting the item, use the cursor [ ]/[ ] keys and
the sliders to change the setting (or press the [EDIT]
key/[STORE (EXECUTE)] key to execute the function).
The actual setting method is different, depending on the item. For
details, see the sections on the respective items.
4.To return to the Rhythm menu, press the [EXIT (CANCEL)]
key.
The Rhythm Edit menu can be called while a song is playing or stopped.
However, if it is called while a song is playing, items other than "BPM",
"KITSEL", or "BASSEL" cannot be selected.
Rhythm Edit menu
Reference Guide
Page 47

47
◆
Adjusting the tempo of the rhythm track (BPM)
This item lets you adjust the tempo of the rhythm track.
When "BPMxxx" is shown on the display (where "xxx" is the BPM
value), you can use the cursor [ ]/[ ] keys or sliders 1 - 3 to adjust the
tempo as follows.
• Cursor [ ]/[ ] keys: Increment or decrement BPM value in steps
of 1.
• Sliders 1 - 3: Adjust 100/10/1 digit of BPM value.
The tempo change applies only to the rhythm track. It does not affect the
audio tracks.
◆
Selecting a drum kit for the rhythm track (KITSEL)
This item lets you select a drum kit for the rhythm track.
While the indication "KITSEL" is shown on the display, you can use the
cursor [ ]/[ ] keys or slider 1 to select the drum kit number (1 - 6)
shown at top right. For a listing of drum kits, see page 83.
◆
Selecting a bass sound for the rhythm track (BASSEL)
This item lets you select a bass sound for the rhythm track.
While the indication "BASSEL" is shown on the display, you can use the
cursor [ ]/[ ] keys or slider 1 to select the bass sound number (1 - 5)
shown at top right. For a listing of bass sounds, see page 83.
Items on the Rhythm Edit menu
Reference Guide
Drum kit number
Bass sound number
Page 48
48
◆
Setting repeat play to On or Off (REPEAT)
This item lets you switch repeat play for the rhythm track On and Off.
While the indication "REPEAT" is shown on the display, you can use the
cursor [ ]/[ ] keys to toggle the setting shown at right between "on"
and "oF".
When repeat play is On, the rhythm track from the first measure to the
measure immediately before "END" is automatically repeated. (The audio
tracks are not repeated).
◆
Importing the rhythm track from another song (IMPORT)
This item lets you import the rhythm track used by another song to the
currently selected song.
While "IMPORT" is shown on the display, press the [EDIT] key and then
use the cursor [ ]/[ ] keys to select the number of the song from which
you want to import the rhythm track. Press the [STORE (EXECUTE)]
key to conclude the process and import the record track.
To cancel the import process, press the [EXIT (CANCEL)] key.
When importing is carried out, the rhythm track of the current song will be
deleted.
◆
Transposing chord change information (TRANSP)
This item lets you transpose the chord change information of the rhythm
track in semitone steps. While the indication "TRANSP" is shown on the
display, press the [EDIT] key and then use the cursor [ ]/[ ] keys to
change the transpose value shown at the top right (-6 - 0 - 6). Press the
[STORE (EXECUTE)] key to carry out the transpose process. The chord
Song number from
which to import
Page 49

49
change information of the rhythm track will be transposed accordingly.
To cancel the transpose process, press the [EXIT (CANCEL)] key.
The transpose change applies only to the rhythm track. It does not affect
the audio tracks.
Reference Guide
Transpose value
Page 50

50
The Audio menu serves for recording or erasing audio tracks, and for
setting various recording options. It also lets you call up the Audio Edit
menu for editing the audio tracks.
To switch to the Audio menu from another menu, use the cursor
[ ]/[ ]
keys to cause the AUDIO menu LED to light up.
When the Audio menu is selected, the front panel controls operate as
follows. (Other keys are inactive.)
(1) Display
(2) Sliders 1 - 3
Adjust the volume level of audio tracks 1 - 3.
(3) [■] key
Stops the song.
(4) [ ] key
Starts/pauses playback of the song (rhythm track + audio tracks).
While the song is paused ( [ ] key is flashing), you can use the cursor [ ]
([ ]) key to change the current position. Pressing the [ ] key then starts
playback from the new position. This function can also be used to start
recording from the pause mode.
(5) [REC] key
Pressing the [REC] key in the stop mode sets the unit to standby
mode for audio track recording.
(6) [VIEW] key
Pressing this key during playback cycles the display through the
Elapsed audio track playing time
(minutes/seconds)
Approximate volume level
of track 1 - 3
Input level of recording source
(The higher the input signal level, the more the lit dots move towards the right.)
Menu name [recording track]
Front panel controls and functions (Audio menu)
Audio Menu
Reference Guide
Page 51

51
following functions: Chord name ➝Tempo ➝Audio menu.
Pressing this key in stop mode cycles the display through the
following functions: Track 1 recording option settings
➝
Track 2
recording option settings
➝
Track 3 recording option settings
➝
Audio menu.
(7) [MIC] key
Activates the built-in microphone. (The signal from the [INPUT] jack
is muted.) This key is only active when the " " (mic icon) is
shown for the selected patch.
(8) Patch [▲]/[▼] keys
Serve to switch effect patch numbers (user patches 1 - 60 ➝preset
patches 1 - 60).
(9) Cursor [ ]/[ ] keys
Serve to switch the menu.
(10)
[EXIT (CANCEL)] key
Switch the mode in the order Audio Edit menu ➝Audio menu
➝
Song menu.
(11)
[BYPASS] key
Bypasses (mutes) effect processing.
(12)
[EDIT] key
Calls up the Audio Edit menu (➝page 54).
The Audio menu lets you make various settings before starting to record,
such as selecting the recording track and setting the recording quality.
These options are explained below.
1.From the Audio menu, press the [REC] key.
The unit switches to recording standby mode.
Setting recording options
Recording quality (H = HiFi, L = LONG)
Track recording time
(minutes/seconds)
Track being recorded
[Example for track 1 option settings]
Reference Guide
Page 52

52
2.
Use the cursor [ ]/[ ] keys to select one of the following items,
and then use the cursor [ ]/[ ] keys to make the setting.
• R- Select record track
• CAP Show remaining recording time
• GRADE Select recording quality
• SOURCE Select recording source
• NEW TK Select whether to use a new take (virtual track)
For details, see the sections on the respective items.
3.
Page 53

53
◆
Recording quality (GRADE)
Sets the sound quality grade of the recording. While the indication
"GRADE" is shown on the display, use the cursor [ ]/[ ] keys to select
on of the following two settings.
• HF (HiFi) High-quality recording (default setting)
• LG (LONG) Lower-quality recording which yields twice the
recording time
Within a single song, it is possible to select a different grade setting for
different audio tracks.
◆
Select recording source (SOURCE)
Selects the recording source. While the indication "SOURCE" is shown
on the display, use the cursor [ ]/[ ] keys to select one of the following
source settings.
• In Signal from [INPUT] jack is used as recording source
(default setting)
• AU Signal from [AUX IN] jack is used as recording source
• Ai Signal from [INPUT] jack and [AUX IN] jack is mixed and
used as recording source
◆
Switch to new take (NEW TK)
Selects whether to use a new take when recording again on the currently
selected audio track. While the indication "NEW TK" is shown on the
display, use the cursor [ ]/[ ] keys to select "n" (overwrite current take
when recording; default setting) or "y" (switch to new take when recording).
Reference Guide
Recording sound quality
Recording source (In/AU/Ai)
Record on new take (n/y)
Page 54

54
When takes 1 - 10 have all been recorded for an audio track, the indication
"y" at the top right of the display changes to "FL". This means that all takes
are full and the currently selected take will be overwritten.
Recorded audio tracks that are no longer needed can be erased as
follows.
1.From the Audio menu, press the [REC] key.
The unit switches to recording standby mode, and the recording track
number is shown on the display.
2.Use the cursor [ ]/[ ] keys to select the track to erase.
3.Press the [INS/DEL] key.
The "ERASE" indication flashes on the display.
4.To carry out the erase process, press the [STORE
(EXECUTE)] key.
The track is erased, and the unit returns to the recording standby mode.
To cancel the erase process, press the [EXIT (CANCEL)] key.
When a track was erased with this method, only the currently selected take
is erased. To erase other takes, see page 60.
From the Audio menu, press the [EDIT] key to call up the Audio Edit
menu. This menu allows you to set panning options for each track, and to
select and erase individual takes. The auto punch-in and punch-out
functions and the bounce function are also available from this menu.
◆
Basic operation steps for Audio Edit menu
1.From the Audio menu, press the [EDIT] key.
This calls up the Audio Edit menu.
Audio Edit Menu
Erasing an audio track
Reference Guide
Number of track to erase
Page 55

55
2.Use the cursor
[ ]/[ ]
keys to select the item you want to
set (or execute the respective function). The following
items are available.
• PAN (Stereo panning for each track)
While "PAN" is shown on the display, use sliders 1 - 3 to set the stereo
panning position for audio tracks 1 - 3. The setting range is "10r" (hard
right ) - "C" (center) - "10L" (hard left ). The display shows the setting
for the most recently operated audio track.
• P-I/O (Auto punch-in/punch-out function)
"Auto punch-in/punch-out" lets you redo recording on a specified
range of the audio tracks. For details, see below.
• BOUNCE (bounce function)
"Bounce" is the capability to collate several audio tracks on track 1 - 2.
For details, see page 58.
• TKSEL1 - TKSEL3 (Select take)
While "TKSEL1" - "TKSEL3" is shown on the display, use the curso
[ ]/[ ] keys to select the take number (1 - 10) to use for audio tracks
1 - 3. (Take numbers for unrecorded takes cannot be selected.)
3.To return to the Audio menu, press the [EXIT (CANCEL)]
key.
The Audio Edit menu can be called while a song is playing or stopped.
However, if it is called while a song is playing, items other than "PAN"
cannot be selected.
◆
Using the auto punch-in/punch-out function
This section explains how to use the auto punch-in/punch-out function to
rerecord only part of a track.
1.From the Audio menu, press the [REC] key to set the unit to
recording standby mode, and then use the cursor [ ]/[ ]
keys to select the track which to rerecord.
2.Press the [■] key to cancel the recording standby mode.
3.Press the [EDIT] key to activate the Audio Edit menu, and
Reference Guide
Page 56

56
use the cursor
[ ]/[ ]
keys to bring up the indication "P-
I/O" on the display.
4.Press the [EDIT] key once more.
The indication "PIx" (where x is the track number) is shown. This
allows you to set the punch-in point.
5.Press the [ ] key to play the song. While listening to the
rhythm track and the recorded track, press the [REC] key
at the desired punch-in point.
The indication "P-IN" is briefly shown on the display, and the punchin point is set.
Instead of immediately pressing the [REC] key at the desired punch-in
(punch-out) point, you can also press the [ ] key to pause the song, and
then later press the [REC] key to set the punch-in (punch-out) point. This
method allows you to shift the point in units of 1 second while in pause
mode, using the cursor [ ] ([ ]) keys.
While setting or executing the auto punch-in/punch-out function, only the
current recording track can be monitored.
6.At the desired punch-out point, press the [REC] key once
more.
The indication "P-OUT" is briefly shown on the display, and the
punch-out point is set.
After setting the punch-in point, it is also possible to stop the song, and
later only set the punch-out point by pressing the [ ] key.
7.When the punch-in/punch-out points have been set, press
the [
■] key to stop the song.
The unit moves to a point 3 seconds before the punch-in point and
goes into the auto punch-in/punch-out standby mode. The [ ] key is
flashing.
Reference Guide
Track number
Current position (minutes/seconds)
Page 57

57
If the interval between the punch-in and punch-out points exceeds the
recording capacity of the SmartMedia card, the indication "FULL" will
appear and recording will stop when attempting to carry out punchin/punch-out. Take the recording capacity into consideration when setting
the punch-in/punch-out points.
To redo the punch-in/punch-out point setting, press the [EXIT (CANCEL)]
key and then repeat the procedure from step 5.
8.To do a practice run for auto punch-in/punch-out, press
the [ ] key. To actually carry out the function, press the
[REC] key.
• When [ ] key was pressed
From a point 3 seconds before the punch-in point, playback of the rhythm
track + recorded track starts. Between the punch-in and punch-out points,
the recorded track is muted (actual recording is not carried out).
• When [REC] key was pressed
From a point 3 seconds before the punch-in point, playback of the
rhythm track + recorded track starts. Between the punch-in and punchout points, recording is carried out. (During playback, the [REC] key is
flashing, and during recording, the key is lit.)
9.After passing the punch-out point, press the [■] key.
The unit returns to a point 3 seconds before the punch-in point. If
necessary, press the [ ] key to check the recording.
10.
When wishing to retain the recording, press the [STORE
(EXECUTE)] key.
The recording contents are saved (the indication "PRCING" appears
on the display), and the unit returns to the Audio menu.
To redo auto punch-in/punch-out, press the [EXIT (CANCEL)] key.
The auto punch-in/punch-out recording contents are canceled, and the
unit returns to the condition of step 7. To return to the Audio menu,
press the [EXIT (CANCEL)] key repeatedly.
The time before the punch-in point (preroll time) to which the unit moves
automatically can be set with the Utility menu (
➝
page 73).
Track number
Reference Guide
Current position (minutes/seconds)
Page 58

58
◆
Using the bounce function
This section explains how to move the contents of several tracks onto 1
or 2 tracks.
The audio tracks created with the bounce function (destination tracks) retain
the volume level and pan settings of the original audio tracks (source
tracks). (The pan setting is retained only if the destination track setting is
"23".) Consequently, audio track mixing should be completed before using
the bounce function.
1.Press the [EDIT] key and use the cursor [ ]/[ ] keys to
call up the indication "BOUNCE" on the display.
2.Press the [EDIT] key once more.
The numbers of the bounce source tracks are shown at the top right of
the display.
3.Use the cursor [ ]/[ ] keys to select the source tracks
from "123/12/23/13", and then press the [STORE
(EXECUTE)] key.
The number of the bounce destination track is shown at the top right
of the display.
4.Use the cursor [ ]/[ ] keys to select the destination track
from "1/2/3/23", and then press the [STORE (EXECUTE)]
key.
The confirmation message "SURE?" is shown on the display.
The destination track setting "23" can only be selected when the source
track setting is "123". In this case, a stereo mix of tracks 1 - 3 is created on
tracks 2/3.
Reference Guide
Source tracks
Destination track
Page 59

59
5.Press the cursor [ ] key.
A confirmation message asking whether to use a new take for the
destination track is shown on the display. To overwrite the current
take, select "n" (default setting). To bounce to a new take, select "y".
Bounce is possible also when the source track and destination track
settings overlap. However, when selecting overwrite of the current take, the
original recorded content of the source track will be lost. When wishing to
retain the content of the source track, select "y".
6.To execute the bounce function, press the [STORE
(EXECUTE)] key.
The bounce function is carried out ("BOUNCE" is shown on the
display), and the unit returns to the Audio menu. To cancel the
bounce function, press the [EXIT (CANCEL)] key.
Bounce processing takes a certain amount of time.
◆
Bounce function precautions
Before executing the bounce function, make sure that there is sufficient
recording capacity on the SmartMedia. If there is insufficient capacity,
the indication "FULL" appears on the display.
The required recording capacity for the bounce function can be
calculated as follows.
(Time from bounce source start to end point) x Number of
bounce destination tracks)
Reference Guide
[Bounce example]
(1) Monaural
(2) Stereo
A
B
C
Bounce Bounce
A
B
C
Bounce Bounce
D
E
A+B+C
D
A+B+C(L)
A+B+C(R)
F
G
A+B+C+D+E
E
A+B+C+D(L)
A+B+C+D(R)
Page 60

60
If any of the bounce source tracks is recorded with the HiFi (high
recording grade) setting, the bounce destination tracks will automatically
also use the HiFi setting.
For example, when executing bounce for 3 minutes x 2 tracks = 6
minutes of HiFi recording time will be required.
◆
Erasing a take
Recorded takes can be erased as follows, if no longer needed.
1.From the Audio menu, press the [EDIT] key to activate the
Audio Edit menu, and then use the cursor [ ]/[ ] keys to
call up "TKSEL1" - "TKSEL3" on the display.
2.Use the cursor [ ]/[ ] keys to select the take number (1 -
10) you want to erase. (Unrecorded take numbers cannot
be selected.)
3.Press the [INS/DEL] key.
The indication "ERASE" flashes on the display.
4.To erase the take, press the [STORE (EXECUTE)] key.
To cancel the erase process, press the [EXIT (CANCEL)] key.
Reference Guide
3 minutes 3 minutes
Audio track 1 (HiFi)
Audio track 2 (LONG)
Audio track 3 (LONG)
Bounce
Audio track 2 (HiFi)
Audio track 3 (HiFi)
Number of take to erase
Page 61

61
The Effect menu serves for selecting effect patches, and for using the
easy edit function which lets you quickly adjust major effect parameters.
It also lets you call up the Effect Edit menu for detailed editing of effect
patches.
To switch from another menu to the Effect menu, use the cursor [ ]/[ ]
keys to cause the EFFECT menu LED to light up.
When the Effect menu is selected, the front panel controls operate as
follows. (Other keys are inactive.)
(1) Display
The display of the Effect menu shows the following information.
(2) Sliders 1 - 3
Serve to edit a major parameter of the DRIVE, MOD, and REV
module (Easy Edit).
(3) [REC] key
Activates the Audio menu from the Effect menu. The unit switches to
recording standby mode.
(4) [ ] key
Activates the Song menu from the Effect menu. The unit begins to
play the selected song from the start.
Page 62

62
(5) Cursor [ ]/[ ] keys
Serve to switch the menu.
(6) [STORE (EXECUTE)] key
Serves to store a patch (➝page 66).
(7) [EXIT (CANCEL)] key
Cycles through the following modes: Effect Edit menu ➝Effect
menu
➝
Song menu.
(8) [BYPASS] key
Bypasses (mutes) effect processing and is used for the tuner function
(
➝
page 67).
(9) [EDIT] key
Activates the Effect Edit menu (see below).
(10)
Patch [▼]/[▲] keys
Switch the patch number (user patches 1 - 60 ➝preset patches 1 - 60).
Pressing the [EDIT] key from the Effect menu calls up the Effect Edit
menu. This menu allows detailed editing of the currently selected patch,
and storing of an edited patch as a user patch.
◆
Effect configuration
The PS-02 has six effect modules called DRIVE, CAB, ZNR, EQ, MOD,
and REV. In addition, there is the TOTAL module which adds the patch
name and patch level setting. The result of processing the sound via
these modules is called a "patch".
Within each effect module, you select the effect type and the effect
parameters. For some modules, it is also possible to use more than one
effect type simultaneously. For example, the MOD (modulation) module
has the effect types CHORUS, FLANGE, PHASE, etc. of which you can
Effect Edit menu
Reference Guide
Patch
DRIVE CAB ZNR EQ MOD REV TOTAL
IN OUT
Effect module
Page 63

63
select one. The effect parameter setting changes, depending on the
selected effect type.
The Effect Edit menu lets you select the On/Off setting for each effect
module and change the value of the effect parameters.
◆
Basic operation steps for Effect Edit menu
1.From the Effect menu, use the patch [▼]/[▲] keys to select
the patch to edit.
2.Press the [EDIT] key.
The unit switches to the Effect Edit menu, and the indication "EDIT"
is shown on the display.
The dot corresponding to the module currently selected for editing
flashes, and the name and setting of the parameter that was last edited
for that module (or the effect type used by that module) are shown on
the display.
• If the Edit menu was called immediately after switching patches, the
DRIVE TYPE is displayed. If the Edit menu was called after performing
Easy Edit, the last edited module is displayed.
• If the currently selected module is Off, the indication "-OFF-" is shown.
3.To select the effect module for editing, use the cursor
[ ]/[ ] keys.
The flashing dot moves left or right, and the parameter name (or
effect type used in the module) shown on the display changes
accordingly.
Reference Guide
Last edited parameter name (or effect type name)
Last edited
parameter value
Currently selected
Approximate setting of parameter that can be adjusted with sliders 1 - 3
module
DRIVE CAB ZNR EQ1 EQ2 MOD REV TOTA L
Page 64

64
Because the EQ module has many parameters, the display consists of two
screens. When switching between these two screens, the flashing dot
position does not change.
4.To switch the effect type of the currently selected module,
use the cursor [ ]/[ ] keys.
The DRIVE, MOD, and REV modules comprise several effect types,
of which you can select one. (When you select a different effect type,
the usable effect parameters change accordingly.) For a listing of
modules, selectable effect types, and parameters, see page 79 - 83.
The cursor [ ]/[ ] keys have no effect on modules which are currently Off
or modules for which there is only one effect type.
5.To change the parameter of the currently selected module,
operate sliders 1 - 3.
In the Effect Edit menu, sliders 1 - 3 serve to edit the effect
parameters of the currently selected module.
When a slider is moved, the corresponding parameter name and
setting value are shown on the display.
You can also check the setting of the current parameter without moving the
slider. To do this, press the [EDIT] key while in the Effect Edit menu. Each
push of the key causes the display to cycle through parameter 1
➝
parameter 2 ➝ parameter 3 ➝ effect type.
6.To toggle the currently selected module between On and
Off, press the [BYPASS TUNER] key.
When the effect module is set to Off, the indication "-OFF-" appears
on the display.
7.To set the final patch level, use the cursor [ ]/[ ] keys to
select "P-LVL" of the TOTAL module, and then use slider 1
to make the adjustment (setting value 1 - 30).
Reference Guide
Effect parameter name
Parameter setting
Page 65

65
8.To stop editing and return to the Effect menu, press the
[EXIT (CANCEL)] key.
If you switch to another effect patch in this condition, any changes you have
made to the previous patch will be lost. When wanting to keep the results of
your editing session, store the effect patch. For details, see page 66.
◆
Changing the patch name
1.At the Effect menu, press the [EDIT] key to call up the
Effect Edit menu.
2.Use the cursor [ ]/[ ] keys until the first character of the
patch name shown on the display flashes.
3.Use sliders 1 - 3 to select the desired character.
Sliders 1 - 3 have the following function.
• Slider 1: A - Z (capital letters)
• Slider 2: 0 - 9 (numerals)
• Slider 3: <Space> / + / - / @ (symbols)
4.Use the cursor [ ]/[ ] keys to move the flashing to the
next character you want to edit, and edit the rest of the
name in the same way.
5.To return to the Effect menu, press the [EXIT (CANCEL)]
key.
If you switch to another effect patch in this condition, any changes you have
made to the previous patch will be lost. When wanting to keep the results of
your editing session, store the effect patch.
Reference Guide
Page 66

66
The changes you have made using the Effect Edit menu are only
temporary. When you switch patches, the settings will revert to previous
condition. If you have made changes you wish to keep, store the patch as
follows.
1.At the Effect menu or Effect Edit menu, press the [STORE
(EXECUTE)] key.
The display alternately shows the store target patch name and the
indication "STORE".
2.To overwrite an existing patch, use the patch [▼]/[▲] keys
to select the desired patch.
• Only user patches 1 - 60 can be selected as store target.
• When you have edited one of preset patches 1 - 60, user patch 1 is
selected as default store target. You can change this to any patch among
the user patches.
3.Press the [STORE (EXECUTE)] key.
The indication "STORE" is shown on the display and the patch is
stored. When the store process is complete, the unit returns to the
Effect menu.
The DRIVE module of the PS-02 comprises two special effect types
called "MIXEFX" and "MICPRE". This section explains how these
effect types are used.
◆
MIXEFX
"MIXEFX" is a mixdown effect that lets you tailor the overall song
output signal (rhythm track + audio tracks). You can add reverb or
emphasize highs and lows.
When you select "MIXEFX" as the effect type of the DRIVE module,
only the DRIVE and TOTAL modules can be used. Note that the signal
Special effect types
Storing an effect patch
Reference Guide
Page 67

67
from the [INPUT] jack, [AUX IN] jack and the built-in microphone also
can not be used.
When a patch that uses "MIXEFX" is selected, the " " (mic icon)
flashes on the display.
◆
MICPRE
The "MICPRE" effect type lets you use the DRIVE module as a
preamplifier for microphone input. The signal can either be from the
built-in microphone or a microphone connected to the [INPUT] jack.
When you select "MICPRE" as effect type of the DRIVE module, the
microphone input gain setting (MIC-G) of the Utility page becomes
effective (
➝
page 71). Therefore, if you select a patch where the " "
(mic icon) lights up while a guitar, synthesizer, or similar instrument is
connected, the sound will be distorted due to input overload.
When the "MICPRE" patch is selected, the " " (mic icon) appears on
the display.
The PS-02 incorporates an auto-chromatic tuner for guitars. To use the
tuner function, the built-in effects must be bypassed (temporarily turned
off) or muted (original sound and effect sound turned off).
1.At the Effect, Song, Rhythm, or Audio menu, press the
[BYPASS (TUNER)] key.
When you press and immediately release the [BYPASS (TUNER)]
key, the unit is set to the bypass condition, and the indication
"BYPASS" appears on the display.
Using the bypass (mute)/tuner function
Mic icon
Mic icon
Page 68

68
If you press the [BYPASS (TUNER)] key for longer than 1 second
and then release it, the unit is set to the mute condition, and the
indication "MUTE" appears on the display.
2.Play the open string you want to tune, and watch the
display.
The PS-02 automatically detects the pitch and the display shows the
note which is closest to the current pitch.
3.When the display shows the desired note, perform fine
tuning of the pitch until a triangle mark is displayed on
both sides of the note.
The triangle and dot indication of the display changes as follows,
depending on the pitch.
4.When wishing to change the reference pitch of the tuner,
use the cursor [ ]/[ ] keys.
The current reference pitch is briefly shown on the display. After
power to the unit is turned on, the setting is always "440Hz" (center
A = 440 Hz).
5.While the reference pitch setting is displayed, you can use
the cursor [ ]/[ ] keys to change the reference pitch.
The setting range is "435Hz" - "445Hz" in steps of 1 Hz. When you
turn the PS-02 off and on again, the reference pitch is reset to
"440Hz".
6.Pressing the [BYPASS (MUTE)] key, [EXIT] key, or one of
the patch [
▼]/[▲] keys returns you to the original menu.
Reference Guide
Note
Display
C
C# D D# E F F#
G G# A A# B
Could not
Pitch is low Pitch is correct Pitch is high
detect
Page 69

69
The Utility menu lets you make various settings that affect the entire
unit.
To switch from another menu to the Utility menu, use the cursor [ ]/[ ]
keys to cause the UTILITY menu LED to light up. (The menu name
"UTILTY" is shown on the display.)
When the Utility menu is selected, the front panel controls operate as
follows. (Other keys are inactive.)
(1) Display
At the setting screen of the Utility menu, the following information is
shown on the display.
(2) Slider 1
Changes the setting value of the currently selected item.
(3) Cursor [ ]/[ ] keys
Select the item to be shown on the display.
(4) Cursor [ ]/[ ] keys
Serve to change the value of the currently selected item.
(5) [EXIT (CANCEL)] key
Switch the mode in the order Utility menu setting screen ➝Utility
menu name
➝
Song menu.
(6) [EDIT] key
Activates the setting screen from the Utility menu name display
(
➝
page 70).
Front panel controls and functions (Utility menu)
Utility Menu
Reference Guide
Currently selected item Setting value of that item
Page 70

70
◆
Basic operation steps for Utility menu
1.When the Utility menu name "UTILTY" is displayed, press
the [EDIT] key.
The first setting item "GTR-G" is displayed.
2.Use the cursor [ ]/[ ] keys to select one of the following
items.
• GTR-G (Guitar gain): Sets the gain for a guitar/synthesizer connected
to the [INPUT] jack.
• MIC-G (Mic gain): Sets the gain for the built-in microphone or a
microphone connected to the [INPUT] jack.
• BAKLIT (Backlight): Controls the backlight when operating the PS-02
on batteries.
• PRECNT (Precount): Controls the precount function.
• CNTTYP (Precount type): Sets the precount duration.
• PREROL (Preroll): Sets the preroll time for auto punch-in/punch-out.
• LOAD (Load): Reads specified play/sound character/patch data from
the SmartMedia.
• FORMAT (Format): Formats (initializes) a SmartMedia card and
creates a work SmartMedia.
3.When the desired item is displayed, use the cursor [ ]/[ ]
keys, slider 1, [EDIT] key etc. to change the setting. (For
details, see the section on the respective item.)
For the setting procedure, see the section on the respective item.
4.When the setting of each item is completed, press the
[EXIT (CANCEL)] key.
The unit returns to the Utility menu name display.
◆
Items on Utility menu
• Setting the [INPUT] jack gain (GTR-G)
Sets the gain for a guitar or synthesizer or similar connected to the
How to set items on the Utility menu
Reference Guide
Page 71

71
[INPUT] jack. While the indication "GTR-G" is displayed, use the
cursor [ ]/[ ] keys or slider 1 to select one of the following
settings, to match the connected instrument.
• Lo: For instrument with high output, such as a guitar with built-in
preamp or a synthesizer
• HI: For instrument with low output, such as a passive guitar (default
setting)
When the effect type "MICPRE" is selected for the DRIVE module, this
setting is inactive (
➝ page 67).
• Setting the microphone gain (MIC-G)
Sets the gain for the built-in microphone or a microphone connected
to the [INPUT] jack. While the indication "MIC-G" is displayed, use
the cursor [ ]/[ ] keys or slider 1 to select one of the following
settings, to match the microphone.
[Using the built-in microphone]
• Lo: This is a gain setting for on-mic recording. It is suitable for holding
the PS-02 in your hand while doing a vocal, or for placing the PS-02
very close to an acoustic guitar (about 30 cm from the sound hole).
• HI: This is a gain setting for off-mic recording, such as when capturing
an entire band in a studio.
[Using an external microphone]
• Lo: This setting is suitable for high-output microphones.
• HI: This setting is suitable for low-output microphones.
This setting is only valid when "MICPRE" is selected as effect type for the
DRIVE module (
➝ page 67).
Reference Guide
Page 72

72
• Backlight operation when running on battery power
(BAKLIT)
When using the PS-02 on batteries, this setting can be used to control
the backlight operation. While the indication "BAKLIT" is displayed,
use the cursor [ ]/[ ] keys or slider 1 to select one of the following
settings.
• OF (OFF): Always Off
• At (AUTO): On for 10 seconds when a key or slider is operated (default
setting)
• On (ON): Always On
• Precount operation (PRECNT)
Precount is a series of clicks that are heard before starting playback or
recording. While the indication "PRECNT" is displayed, use the cursor
[ ]/[ ] keys or slider 1 to select one of the following settings.
• OF (OFF): No precount
• rC (REC): Use precount only during recording (default setting)
• rP (REC/PLAY): Use precount during recording and playback
• Select precount number (CNTTYP)
This setting determines the number of clicks that are heard when
precount is enabled. While the indication "CNTTYP" is displayed,
use the cursor [ ]/[ ] keys or slider 1 to select one of the following
settings.
• 2 - 8: Sets number of precount clicks (default setting = 4).
• SP (Special): A special pattern is heard, as shown below.
Reference Guide
Page 73

73
• Set preroll time for punch-in (PREROL)
This setting determines the number of seconds for which playback is
carried out before auto punch-in/punch-out. While the indication
"PREROL" is displayed, use the cursor [ ]/[ ] eys or slider 1 to set
the value.
• 0 - 8: 0 seconds - 8 seconds (default setting = 3 seconds)
• Loading a file from SmartMedia (LOAD)
This function allows you to load rhythm track data, sound character
data, or effect patch data stored on SmartMedia into the PS-02. In
future, ZOOM will make available new pattern data and drum & bass
sound data at locations such as its web site (http://www.zoom.co.jp).
• Formatting a SmartMedia card (FORMAT)
By formatting the SmartMedia supplied with the PS-02, you can
erase all recorded audio data.
By formatting the SmartMedia supplied with the PS-02, you can erase all
recorded audio tracks and takes. To do this, proceed as follows.
When you perform the following steps, all recorded audio data are erased
from the SmartMedia card and cannot be restored. Use this function with
care.
1.While the Utility menu name "UTILITY" is displayed, press
the [STORE] key.
2.Use the cursor [ ]/[ ] keys to bring up the indication
"FORMAT" on the display, and then press the [STORE] key.
Formatting the supplied SmartMedia
Page 74

74
The confirmation message "SURE?" appears.
3. To carry out the format process, press the [STORE
(EXECUTE)] key.
The indication "FMTING" flashes on the display, and formatting
starts. When formatting is completed, the display shows "DONE".
4.Press the [EXIT (CANCEL)] key.
The unit returns to the Utility menu.
• A SmartMedia card formatted as described above can be used to start up
the PS-02 and as work card to store recording data.
• When you format the SmartMedia card as described above, rhythm track
pattern data + song data, drum & bass sound character data, and patch
data currently stored in the memory of the PS-02 are copied to the
SmartMedia card.
• The above procedure is not suitable for formatting a newly purchased
SmartMedia card. For information on how to format a newly purchased
SmartMedia card to create a work SmartMedia, see page 75.
• If the PS-02 is operated on battery power and the batteries are exhausted
during formatting, the files on the SmartMedia may be damaged. If
possible, you should power the PS-02 from the AC adapter during
formatting.
Reference Guide
Page 75

Special Operations
Special Operations
75
This section explains how to format a newly purchased SmartMedia card
to create a work SmartMedia, and how to force format a SmartMedia
card that has become unreadable.
If the SmartMedia supplied with the PS-02 is damaged or lost, the
system files contained on the card will no longer be accessible, and the
PS-02 will no longer be able to start up correctly. Therefore we strongly
recommend that you create a work SmartMedia as described below.
(32MB or higher is recommended).
1.With the supplied SmartMedia inserted in the PS-02, turn
power to the PS-02 on.
The PS-02 starts up and the Song menu is displayed.
2.Remove the SmartMedia from the [DATA CARD] slot of the
PS-02.
The indication "NOCARD" appears on the display.
3.Insert a new SmartMedia card into the [DATA CARD] slot
of the PS-02.
The indication "FOMAT?" appears on the display.
If the indication "LOAD" flashes on the display after the SmartMedia was
inserted, the card has already been formatted by the PS-02. Verify whether
the desired card was inserted. (Pressing the [STORE (EXECUTE)] key in this
condition will cause the PS-02 to start up from this card.)
4.To carry out the formatting process, press the [STORE
(EXECUTE)] key.
Creating a Work SmartMedia
Page 76

76
Special Operations
The indication "FMTING" flashes on the display, and formatting starts.
When formatting is completed, the unit switches to the Song menu.
You now have created a working card. From now on, you should use this
card and store the original supplied SmartMedia card in a safe place.
• A SmartMedia card formatted as described above can be used to start up
the PS-02 and as work card to store recording data.
• When you format the SmartMedia card as described above, rhythm track
pattern data + song data, drum & bass sound data, and patch data
currently stored in the memory of the PS-02 are copied to the SmartMedia
card. (However, recorded audio data are not copied.)
The formatting procedure described above requires that the PS-02 has
started up normally. If for any reason the SmartMedia card has become
unreadable, startup itself will not be possible.
In such a case, you can force format the SmartMedia and then copy over
the system files, provided that these have been backed up for example on
the hard disk of a computer. This will result in a SmartMedia card that is
functionally identical to the supplied card.
To perform force formatting, proceed as follows.
1.Turn power to the PS-02 off and insert the SmartMedia to
force format into the [DATA CARD] slot.
2.While holding down the [REC] key and the [STORE
(EXECUTE)] key, turn power to the PS-02 on.
The indication "FORMAT" flashes on the display.
3.Press the [STORE (EXECUTE)] key.
The confirmation message "SURE?" appears on the display.
4.To execute the force format process, press the [STORE
(EXECUTE)] key once more.
The indication "FMTING" flashes, and the formatting process starts.
To cancel the force format process, turn the PS-02 off. When
formatting is completed, turn power to the PS-02 off, remove the
SmartMedia and copy the required files to it.
Force Formatting a SmartMedia Card
Page 77

Special Operations
77
• A SmartMedia card created by this process can only be used for startup if
the various system files required by the PS-02 have been backed up
(copied) first.
• Take care to not accidentally format the SmartMedia card supplied with
the PS-02.
◆
Technical information: SmartMedia file information
The SmartMedia card supplied with the PS-02 contains the following
files in the factory default condition.
File name Purpose
SYSTEM.SYS PS-02 system file
RECORDER.SYS Audio tracks system file
SOUNDS.SYN Drum & bass sound character data used for rhythm
track
UTILITY.UTY Utility menu setting data
FACSONGS.PTS Factory default song (rhythm track) and pattern data
SONGS.PTS Currently selected song (rhythm track) and pattern
data
PRESET.PCH Preset patch setting data
FACPATCH.PCH Factory default user setting data
USER.PCH Currently selected user patch setting data
If you have a computer equipped with a SmartMedia card reader, you should
copy the above files to the hard disk of the computer as a backup. This will
allow you to restore the files on a force formatted SmartMedia card, if the
original SmartMedia card supplied with the PS-02 has become unreadable or
has been lost. (For details, see the preceding section.) By copying these files
back to the SmartMedia card, you can create a card that is functionally
identical to the factory supplied card.
The above files are also available for free download at the web site of ZOOM
Corporation. In future, ZOOM will also make available new pattern data and
drum & bass sound data (SOUNDS.SYN file) and factory default song
(rhythm track ) and pattern data (FACSONGS.PTS file) at the web site.
◆ Web site of ZOOM Corporation: http://www.zoom.co.jp
Page 78

78
Troubleshooting
Troubleshooting
Problem Remedy
Batteries are used up
quickly
"CRDERR" (Card Error) is
displayed
"NOCARD" is displayed
when SmartMedia card is
inserted
"FULL" is displayed
Rhythm and audio track
sound is not heard, also
when turning slider up
Signal from [INPUT] jack
is not heard
Sound from [INPUT] jack
(guitar etc.) is extremely
distorted
CAB (Cabinet Simulator)
module cannot be used
Cannot record signal
from [AUX] jack
Bouncing to stereo was
carried out, but sound
stage is narrow
Built-in microphone
cannot be used
Are manganese batteries being used? Alkaline
batteries are recommended.
The contact strip of the SmartMedia may be
dirty. Clean it by lightly wiping it with a soft
cloth.
Card may not be fully inserted. Remove card
and insert again.
Newly bought SmartMedia card without system
data was inserted. Format card and place system
data on it (➝ page 73).
Remaining capacity of SmartMedia is
insufficient. Erase unneeded audio data
(➝ page 54, 59, 60).
Wrong menu is selected. Change menu and then
operate slider.
MIXEFX effect is being used.
Input level slider is turned down. Turn up slider
1 at Song menu.
MICPRE effect is being used.
If amp modeling effect type is selected in
DRIVE module, CAB module cannot be used.
"AUX" not selected as recording source
(➝ page 53).
PAN setting was not carried out for bounced
tracks (➝ page 55).
If MICPRE is not selected for DRIVE module,
built-in microphone cannot be used.
Page 79

Technical Information
Technical Information
79
Effect Types and Parameters
DRIVE MODULE
Amp Modeling Sounds
TYPE PARAMETER 1 PARAMETER 2 PARAMETER 3
J-CLN
SENS TONE LEVEL
Clean sound modeled on a transistor combo amplifier
US-CLN
GAIN TONE LEVEL
Clean sound modeled on a built-in type tube amplifier
US-DRV
GAIN TONE LEVEL
Drive sound modeled on a built-in type tube amplifier
TWEED
GAIN TONE LEVEL
Compact combo tube amplifier with dry distortion
CLASSA
GAIN TONE LEVEL
British type combo amplifier with unique crunch sound
UK-CRU
GAIN TONE LEVEL
Crunch sound of a British tube stack amplifier
UK-DRV
GAIN TONE LEVEL
Drive sound of a British tube stack amplifier
CMB335
GAIN TONE LEVEL
Tube combo amplifier with long sustain
MTLPNL
GAIN TONE LEVEL
High-gain drive sound of a tube stack amplifier
BLKBTM
GAIN TONE LEVEL
Tube stack amplifier with fat bass and detailed distortion
SLDN
GAIN TONE LEVEL
High-gain amp drive sound suitable for lead
FZ-STK
GAIN TONE LEVEL
Typical sixties sound of stack amplifier with fuzz
TE_B
SENS TONE LEVEL
Clean sound with mid/low emphasis for bass
FDR_B
GAIN TONE LEVEL
Vintage drive bass amplifier sound
Distortion / Dynamics Sounds
SANS_B
GAIN TONE LEVEL
Trebly drive sound for bass
COMP
SENS ATTACK LEVEL
Compressor for level reducing differences
DYN-CR
GAIN COMP LEVEL
Combination of vintage compressor and crunch sound
DYN-TS
GAIN COMP LEVEL
Combination of vintage compressor and vintage overdrive sound
DYN-GV
GAIN COMP LEVEL
Combination of vintage compressor and distortion
MTZONE
GAIN TONE LEVEL
Rich sustain with high-gain type distortion
9002
GAIN COMP LEVEL
Distortion sound modeled on the ZOOM 9002
ACOSIM
TOP BODY LEVEL
Changes the sound of an electric guitar into that of an acoustic guitar.
MICPRE
LIMIT COLOR LEVEL
Mic preamplifier for using external or built-in microphone
Page 80

80
Technical Information
MIXEFX
Shaded sections indicate parameters that can be adjusted with Easy Edit in effect mode.
* The mixdown effect affects only the rhythm track and audio tracks.
* When the mixdown effect is selected, the signal from the INPUT and AUX IN jacks is not used.
* When the mixdown effect is selected, only the DRIVE module can be used.
* Because gain is automatically set for microphone input when MICPRE is selected, the sound
will be distorted when a guitar signal or similar is output.
HIGH LOW REVMIX
Allows bass/treble balance adjustment and adds reverb for final mixdown.
Mixdown Effect
DRIVE MODULE parameter description
Parameter name
SENS
GAIN Adjusts the distortion gain. 1-30
TOP Adjusts the string sound. 1-30
LIMIT Adjusts the limiter sensitivity. 0-10
HIGH Adjusts the high-range mixing balance. -12 - 12
TONE Adjusts the tone quality. 0-10
ATTA CK Adjusts the compression onset speed. 0-10
COMP Adjusts the compression effect depth. 0-10
BODY Adjusts the body sound. 0-10
COLOR
For use of built-in microphone with acoustic guitar 1
For use of built-in microphone with vocals 2
LOW Adjusts the low-range mixing balance. -12 - 12
LEVEL Adjusts the module output level. 1-8
REVMIX Adjusts the reverb mix. 0-30
Adjusts the compression input sensitivity. 0-10
Adjusts the microphone preamplifier sound character.
Flat characteristic, for connection of external microphone 0
Parameter description Setting range
PARAMETER 1
PARAMETER 2
PARAMETER 3
CABINET SIMULATOR MODULE
TYPE PARAMETER 1 PARAMETER 2 PARAMETER 3
CABINET SIM CABINET SPEAKR DEPTH
CABINET SIMULATOR MODULE parameter description
Parameter name
Combo: Combo type cabinet simulation
CM
br Bright Combo: Brighter sound than with Combo
Ft Flat: Cabinet with flat characteristics
St Stack: Stack type cabinet
bC BassCombo: Combo type cabinet for bass
bS BassStack: Stack type cabinet for bass
C1
COMBO 1: Combo guitar amp with 12-inch speaker x 1
C2 COMBO 2: Combo guitar amp with 12-inch speaker x 2
C3 COMBO 3: Combo guitar amp with 10-inch speaker x 1
GS Gt Stack: Guitar amp stack with 10-inch speaker x 4
GW Gt Wall: Multiple amp stack sound
bC Bs Combo: Combo type bass amp with 15-inch speaker x 1
bS Bs Stack: Stack type bass amp with 6.5-inch speaker x 4
DEPTH
* When an amp modeling type effect is selected for the DRIVE module, the CABINET module cannot be used.
DEPTH Adjusts the speaker cabinet ringing.
Parameter description
PARAMETER 1 (CABINET)
PARAMETER 2 (SPEAKER)
PARAMETER 3
Page 81

Technical Information
81
TYPE
Parameter name
Parameter description Setting range
EQ MODULE (3BAND EQ)
TYPE PARAMETER 1 PARAMETER 2 PARAMETER 3 PARAMETER 4
EQ HIGH MID LOW LEVEL
Parameter name
Parameter description Setting range
HIGH
Provides high-range boost/cut. -12 - 12
MID
Provides mid-range boost/cut. -12 - 12
LOW
Provides low-range boost/cut. -12 - 12
EQ LVL
Adjusts the module output level. 1-8
Adjusts the Zoom Noise Reduction sensitivity
Select a setting that is as high as possible without causing
the sound cutoff to become unnatural.
0-15
THRESH
THRESHZNR
ZOOM Noise Reduction (ZNR) is an original technology
developed by Zoom to minimize noise in play pauses.
ZNR MODULE
PARAMETER 1
MODULATION MODULE
TYPE PARAMETER 1 PARAMETER 2 PARAMETER 3
CHORUS
DEPTH RATE MIX
Stereo chorus with impressive wide spread.
FLANGE
DEPTH RATE FB
Pronounced flanger effect produces undulating sound.
PHASE
POSI RATE COLOR
Phase shifter produces breathing sound.
TREMOL
DEPTH RATE CLIP
Tremolo effect with periodic treble variation.
A-WAH
POSI RESO SENS
Wah effect changes with play dynamics.
PITCH
PITCH TONE BALANC
Shifts the pitch of the original sound.
SLOW-A
POSI TIME CURVE
Makes attacks slower.
VIBE
DEPTH RATE BALANC
Vibrato effect.
STEP
DEPTH RATE RESO
Creates an auto arpeggio type sound.
RING-M
POSI RATE BALANC
Creates a metallic sound.
CRY
POSI RESO SENS
Changes the sound like a talking modulator.
EXCIT
FREQ DEPTH LOWBST
Enhances the sound outline.
AIR
SIZE TONE MIX
Creates a spatial impression with room character.
WIDE
TIME WETLVL DRYLVL
Creates a wide sound as if recorded with 2 stereo microphones.
Shaded sections indicate parameters that can be adjusted with Easy Edit in Effect mode.
Page 82

82
MODULATION MODULE parameter description
Parameter name
Parameter description Setting range
PARAMETER 1
DEPTH
Adjusts the effect depth. 0-10
Swaps the insertion position of DRIVE module and
bF
POSI MOD module.
bF : MOD ➝ DRIVE AF : DRIVE ➝ MOD AF
Sets the pitch shift in semitone steps. -12 - -1
PITCH
Pitch can be shifted in the range from 1 octave down to dt
2 octaves up. 1-12
dt creates a detune effect. 24
FREQ Adjusts the frequency. 1-5
SIZE Adjusts the spatial expansion. 1-10
TIME Adjusts the distance to the mic. 0-63
PARAMETER 2
RATE
Adjusts the speed of the effect. 1-30
RESO Gives a special character to the effect. 1-10
TONE Adjusts the tone quality. 0-10
TIME Adjusts the time until the attack. 1-30
DEPTH Adjusts the effect depth. 0-30
WETLVL Adjusts the effect sound mixing balance. 0-30
PARAMETER 3
MIX
Adjusts the effect mix. 0-30
FB Adjusts the feedback level. -10 - 10
COLOR Changes the phase sound type. 1-4
CLIP Stresses the effect. 0-10
SENS Adjusts the effect sensitivity. -10 - 10
BALANC
Adjusts the balance between original sound and
0-30
effect sound.
CURVE Sets the volume level change curve until the attack. 0-10
RESO Gives a special character to the effect. 0-10
LOWBST Emphasizes the bass. 0-10
DRYLVL Adjusts the original sound mix. 0-30
REVERB MODULE
TYPE PARAMETER 1 PARAMETER 2 PARAMETER 3
HALL
TIME TONE
MIX
Reverb effect which gives a concert hall sound.
ROOM
TIME TONE MIX
Reverb effect which gives room sound.
SPRING
TIME TONE MIX
Simulates a spring type reverb device.
PP-DLY
TIME FB MIX
Ping-pong delay where the sound moves between left and right.
MN-DLY
TIME FB MIX
Monaural delay of up to 1 second
DLYHAL
DLYTIME DLYMIX REVMIX
Combination of hall reverb and delay
DLYROM
DLYTIME DLYMIX REVMIX
Combination of room reverb and delay
AIR
SIZE TONE MIX
Creates a spatial impression with room character and depth.
WIDE
TIME WET LVL DRY LVL
Creates a wide sound as if recorded with 2 stereo microphones.
Shaded sections indicate parameters that can be adjusted with Easy Edit in Effect mode.
Technical Information
Page 83

83
REVERB MODULE parameter description
Parameter name
Parameter description Setting range
PARAMETER 1
TIME(REVERB)
Adjusts the reverb time. 1-30
TIME(DELAY) Adjusts the delay time. (TIME = setting value x 10 ms) 2-170
DLY TIME Adjusts the delay time. (TIME = setting value x 10 ms) 1-100
SIZE Adjusts the size of the simulated space. 1-10
TIME Adjusts the distance to the mic. 0-63
PARAMETER 2
TONE Adjusts the tone quality. 0-10
FB Adjusts the feedback level. 0-10
DLYMIX Adjusts the delay mix. 0-15
WETLVL Adjusts the effect sound mix. 0-30
PARAMETER 3
MIX Adjusts the reverb and delay mix. 0-30
REVMIX Adjusts the reverb mix. 0-15
DRYLVL Adjusts the original sound mix. 0-30
Drum Kits/Bass Programs
Drum Kits
Drum kit numbers
Name
1 Standard kit
2 Rock kit
3 Jazz kit
4 Analog kit
5 Power kit
6 Funk kit
Bass Programs
Bass program numbers
Name
1 Finger bass
2 Pick bass
3 Slap bass
4 Acoustic bass
5 Synth bass
Slider 1 Slider 2 Slider 3
Section No Style Variation Display Number
MAIN08
1 ROCK 1,2,3,4,5,6,7,8 M8-1-1 8
(8BEAT) 2 HARDRK 1,2,3,4,5,6,7,8 M8-2-1 8
3 POP 1,2,3,4 M8-3-1 4
4 MOTOWN 1,2,3,4,5,6 M8-4-1 6
5 BALLAD 1,2,3,4,5,6 M8-5-1 6
6 SHUFLE 1,2 M8-6-1 2
FILL08 1 ROCK 1,2,3,4,5,6 F8-1-1 6
(8BEAT) 2 HARDRK 1,2,3,4 F8-2-1 4
3 POP 1,2 F8-3-1 2
4 MOTOWN 1,2,3 F8-4-1 3
5 BALLAD 1,2,3,4 F8-5-1 4
6 SHUFLE 1,2 F8-6-1 2
Rhythm Edit Pattern Sequence and Display Examples
Technical Information
Page 84

84
MAIN16 1 ROCK 1,2,3,4,5,6,7,8 M6-1-1 8
(16BEAT) 2 POP 1,2,3,4 M6-2-1 4
3 SHUFLE 1,2,3,4, M6-3-1 4
FILL16 1 ROCK 1,2,3,4 F6-1-1 4
(16BEAT) 2 POP 1,2,3 F6-2-1 3
3 SHUFLE 1,2 F6-3-1 2
MAIN 1 R'NR 1,2,3,4,5,6,7,8 M-01-1 8
2 BLUES 1,2,3,4,5,6,7,8 M-02-1 8
3 R'NB 1,2,3,4,5,6,7,8 M-03-1 8
4 DISCO 1,2,3,4 M-04-1 4
5 TECHNO 1,2 M-05-1 2
6 HIPHOP 1,2 M-06-1 2
7 FUNK 1,2 M-07-1 2
8 HALFTM 1,2 M-08-1 2
9 4BTJAZ 1,2 M-09-1 2
10 JAZWLT 1,2 M-10-1 2
11 CONTRY 1,2 M-11-1 2
12 BOSSA 1,2 M-12-1 2
13 LATIN 1,2,3,4 M-13-1 4
14 REGGAE 1,2 M-14-1 2
FILL 1 R'NR 1,2,3,4,5 F-01-1 5
2 BLUES 1,2,3,4,5 F-02-1 5
3 R'NB 1,2,3,4,5 F-03-1 5
4 DISCO 1,2 F-04-1 2
5 TECHNO 1 F-05-1 1
6 HIPHOP 1,2 F-06-1 2
7 FUNK 1,2 F-07-1 2
8 HALFTM 1,2 F-08-1 2
9 4BTJAZ 1,2 F-09-1 2
10 JAZWLT 1,2 F-10-1 2
11 CONTRY 1,2 F-11-1 2
12 BOSSA 1,2 F-12-1 2
13 LATIN 1,2 F-13-1 2
14 REGGAE 1,2 F-14-1 2
INTRO 1 8Beat 1,2,3,4,5,6,7,8,SHFUL IN-1-1 9
2 16Beat 1,2,3,SHFUL1,2 IN-2-1 5
3 OTHER JAZZ,BOSSA,LATIN,BLUES,DANCE IN-3-1 5
ENDING 1 GLOBAL 1,2,3,4,5 EN-1-1 5
2 OTHER BALLAD,LATIN EN-2-1 2
OTHER 1 METRO 2/4,3/4,4/4,5/4 OT-1-1 4
2 REST 1/4,2/4,3/4,4/4,5/4 OT-2-1 5
3 DEMO 0,1,2,3,4,5,6,7,8,9 OT-3-1 10
Technical Information
Page 85

85
Specifications
Specifications
Sampling frequency
A/D conversion
D/A conversion
DSP
Audio recording time
(Mono, converted to 1 track)
Data card
Maximum number of songs
Rhythm patterns
Effect patches
Effect modules
Number of effects
Inputs
Outputs
Display
Power requirements
Dimensions
Weight
Supplied accessories
31. 25kHz
20-bit 64-times oversampling converter
20-bit 8-times oversampling converter
ZOOM original DSP ZFX-2 (internal 24-bit processing)
8 MB
3 m 12 s
6 m 24 s
16 MB
7 m 30 s
15 m 0 s
32 MB
16 m 11 s
32 m 23 s
64 MB
33 m 33 s
67 m 7 s
128 MB (support planned)
Approx. 67 m
Approx. 134 m
SmartMedia
100
211
Preset 60, User 60, Total 120 patches
6
50
Input jacks
Standard phone jack (mono)
Rated input level
GUITAR GAIN LOW
GUITAR GAIN HIGH
MIC GAIN LOW
MIC GAIN HIGH
Input impedance
Built-in microphone
Non-directional condenser microphone
AUX input
Mini stereo phone jack
Rated input level
Input impedance
Output jack
Standard phone jack (stereo)
Rated output level
-10 dBm (with load impedance of 10 kilohms or higher)
Output impedance
Headphones
Mini stereo phone jack
PS-02 original LCD
Supplied AC adapter 9 V DC, 300 mA AD-0006
Batteries IEC R03 (size AAA) x 4
Battery life: 4 hours continuous operation (with alkaline batteries)
90 mm (D) x 85 mm(W) x 35 mm(H)
140 g (excluding batteries)
SmartMedia (8 MB)
Belt clip
AC adapter (AD0006)
HiFi
Long mode
HiFi
Long mode
HiFi
Long mode
HiFi
Long mode
HiFi
Long mode
3.3V specification
-10 dBm
-16 dBm
-40 dBm
-50 dBm
500 kilohms
-10dBm
40 kilohms
1 kilohm or less
0 dBm = 0. 775 Vrms
Design and specifications subject to change without notice.
Page 86

86
INDEX
INDEX
A
Ai ••••••••••••••••••••••••••••• 53
At
•••••••••••••••••••••••••••••• 72
AU
••••••••••••••••••••••••••••• 53
Audio edit menu
••••••••••••••• 54
Audio track volume adjustment
••••••••••••••••••••••• 36
Auto punch-in/punch-out
••••••• 55
B
BAKLIT ••••••••••••••••••• 70, 72
Bass sound list
••••••••••••••••• 83
Bass sound selection
•••••••• 46, 47
BASSEL
••••••••••••••••••• 46, 47
Batteries
••••••••••••••••••••••• 16
BOUNCE
•••••••••••••••••• 55, 58
Bounce
•••••••••••••••••• 6, 55, 58
BPM
••••••••••••••••••• 25, 46, 47
Bypass/mute
••••••••••••••••••• 67
C
CAP ••••••••••••••••••••••••••• 52
Chord change, editing/deleting
••••••••••••••••••••••• 25
Chord change, inputting
•••••••• 23
Chord types
•••••••••••••••••••• 24
CNTTYP
••••••••••••••••••• 70, 72
CRDERR
•••••••••••••••••••••• 78
D
Display backlight ••••••••••• 70, 72
Drum kit list
••••••••••••••••••• 83
Drum kit, selecting
••••••••• 46, 47
E
Easy Edit ••••••••••••••••••••••• 61
Effect parameters
••••••••••••••• 62
Effect types and parameters (table)
••••••••••••••••••••••• 79
F
FOMAT? ••••••••••••••••••••••• 75
FORMAT
•••••••••••••••••• 70, 73
Formatting
•••••••••• 70, 73, 75, 76
FULL
•••••••••••••••••••••••••• 78
G
GRADE •••••••••••••••••••• 52, 53
GTR-G
••••••••••••••••••••••••• 70
Guitar gain
••••••••••••••••••••• 70
H
HF ••••••••••••••••••••••••••••• 53
I
IMPORT ••••••••••••••••••• 46, 48
Importing
•••••••••••••••••• 46, 48
In
•••••••••••••••••••••••••••••• 53
K
KITSEL •••••••••••••••••••• 46, 47
L
LG ••••••••••••••••••••••••••••• 53
LOAD
•••••••••••••••••••••• 70, 73
Load function
•••••••••••••• 70, 73
M
Measure, deleting •••••••••••••• 22
Measure, inserting
•••••••••••••• 18
MIC-G
••••••••••••••••• 34, 70, 71
MICPRE
••••••••••••••••••• 33, 67
Microphone effects
••••••••• 33, 67
Microphone gain
•••••••• 34, 70, 71
Microphone, built-in
••••••••••• 33
Mixdown effects
••••••••• 7, 38, 66
MIXEFX
••••••••••••••••••••••• 66
Page 87

Page 88

Usage Precautions
ZOOM CORPORATION
NOAH Bldg., 2-10-2, Miyanishi-cho, Fuchu-shi, Tokyo 183-0022, Japan
PHONE: +81-42-369-7116 FAX: +81-42-369-7115
Web Site: http://www.zoom.co.jp
Printed in Japan PS-02-5000
• Electrical interference
For safety considerations, the PS-02 has been designed to provide
maximum protection against the emission of electromagnetic radiation from
inside the device, and protection from external interference. However,
equipment that is very susceptible to interference or that emits powerful
electromagnetic waves should not be placed near the PS-02, as the
possibility of interference cannot be ruled out entirely.
With any type of digital control device, the PS-02 included, electromagnetic
interference can cause malfunctioning and can corrupt or destroy data. Care
should be taken to minimize the risk of damage.
• Cleaning
Use a soft, dry cloth to clean the PS-02. If necessary, slightly moisten the
cloth. Do not use abrasive cleanser, wax, or solvents (such as paint thinner
or cleaning alcohol), since these may dull the finish or damage the surface.
Please keep this manual in a convenient place for future reference.
 Loading...