

Page 1

Software License
Zoom Corporation grants the right to use the ZOOM MRS-8 Card Manager software (hereafter called
"the software"), provided that you agree with all conditions listed below. Using the software is
considered acceptance of these conditions.
• Zoom Corporation holds the copyright to the software and the accompanying documentation,
and all associated rights. All rights revert to Zoom Corporation.
• Unauthorized redistribution, sale, leasing, renting, alteration, and reverse engineering of the
software is prohibited.
• The software may not be used for purposes that infringe on the copyright of third parties.
Zoom Corporation does not bear liability for cases where the software is used for any such
purpose.
• Zoom Corporation does not bear liability for any damages or claims from third parties arising
from the use of the software, whether directly or indirectly. If the contents of a hard disk are lost
due to use of the software, Zoom Corporation does not accept any claims for restoring or
preserving such contents.
• Features and specifications of the software and the contents of the documentation may be
changed without notice.
Apple and the Apple logo are registered trademarks of Apple Computer.
Macintosh is a registered trademark of Apple Computer.
Adobe and Adobe Acrobat are registered trademarks of Adobe Systems Incorporated.
Real-time resample library © 2003 by Dominic Mazzoni and © 1994-2002 by Julius O. Smith III
All other trademarks, product names, and company names are the property of their respective owners.
Page 2
Introduction
About the MRS-8 Card Manager
The MRS-8 Card Manager is an Apple Macintosh application designed to manage projects and V-takes
of the MRS-8 on an Apple Macintosh. When a MRS-8 SD card is inserted into a SD USB Reader
connected to your Macintosh, the MRS-8 Card Manager can perform the following functions:
• Convert V-takes into AIFF files
The audio data recorded on any V-take of the MRS-8 can be converted into an AIFF file
(Macintosh standard audio file). This makes it possible to edit them for example with a waveform
editor.
• Convert WAV/AIFF files into V-take files
WAV files (Windows standard audio files) and AIFF files (Macintosh standard audio files) can be
converted into any desired V-take for the MRS-8. This allows you for example to edit data on a
computer with a waveform editor and then load them back onto the MRS-8.
• Export a stereo mix to an AIFF file
You can select up to four V-takes (one per track), set the volume and pan for each and export a
mix of them to an AIFF file. You could burn for instance a music mix that you have created on the
MRS-8 onto a CD-R disc
• Wrong operation steps or system and driver software problems can lead to the loss of all
audio data stored on the MRS-8 SD card. For important projects, be sure to create a
backup before editing with the MRS-8 Card Manager.
• Zoom Corporation will not accept any claims for restoring or preserving the contents of
SmarMedia card.
System Requirements
The MRS-8 Card Manager has the following hardware and software requirements:
• USB SD Reader
• Apple Macintosh computer with USB support running Mac OS 9.1 or higher (OS X supported).
• Display Monitor 1024 x 768 or higher
• Free hard disk space: 4 MB or more (plus space for converted data etc.)
• RAM: 64 MB or more
Page 3

Installing the Software
Installing the MRS-8 Card Manager
Double-click on the MRS-8 Card Manager Installer to start the Installer application, and then perform
the following steps:
• After the initial screen click on “Continue”
• Read the Software License, and then click on “Continue”
• You will be asked if you agree with the Software License. If you do click on “Agree”
• Select your destination volume, and then click on “Install”
• When the installation is finished click on “Quit”
The installer will create a folder on you hard drive with the “MRS-8 Card Manager” application. If you
are running Mac OS 9, the installer application may also update the “CarbonLib” extension in the
System’s “Extensions” folder with a more recent version.
Page 4
Quick Tutorial
After installing the software (with Mac OS 9 you may need to restart your computer), connect your SD
USB Reader to your computer, and then insert the MRS-8 SD card that you wish to manage. At this
point you should see the SD card mounted on your Macintosh.
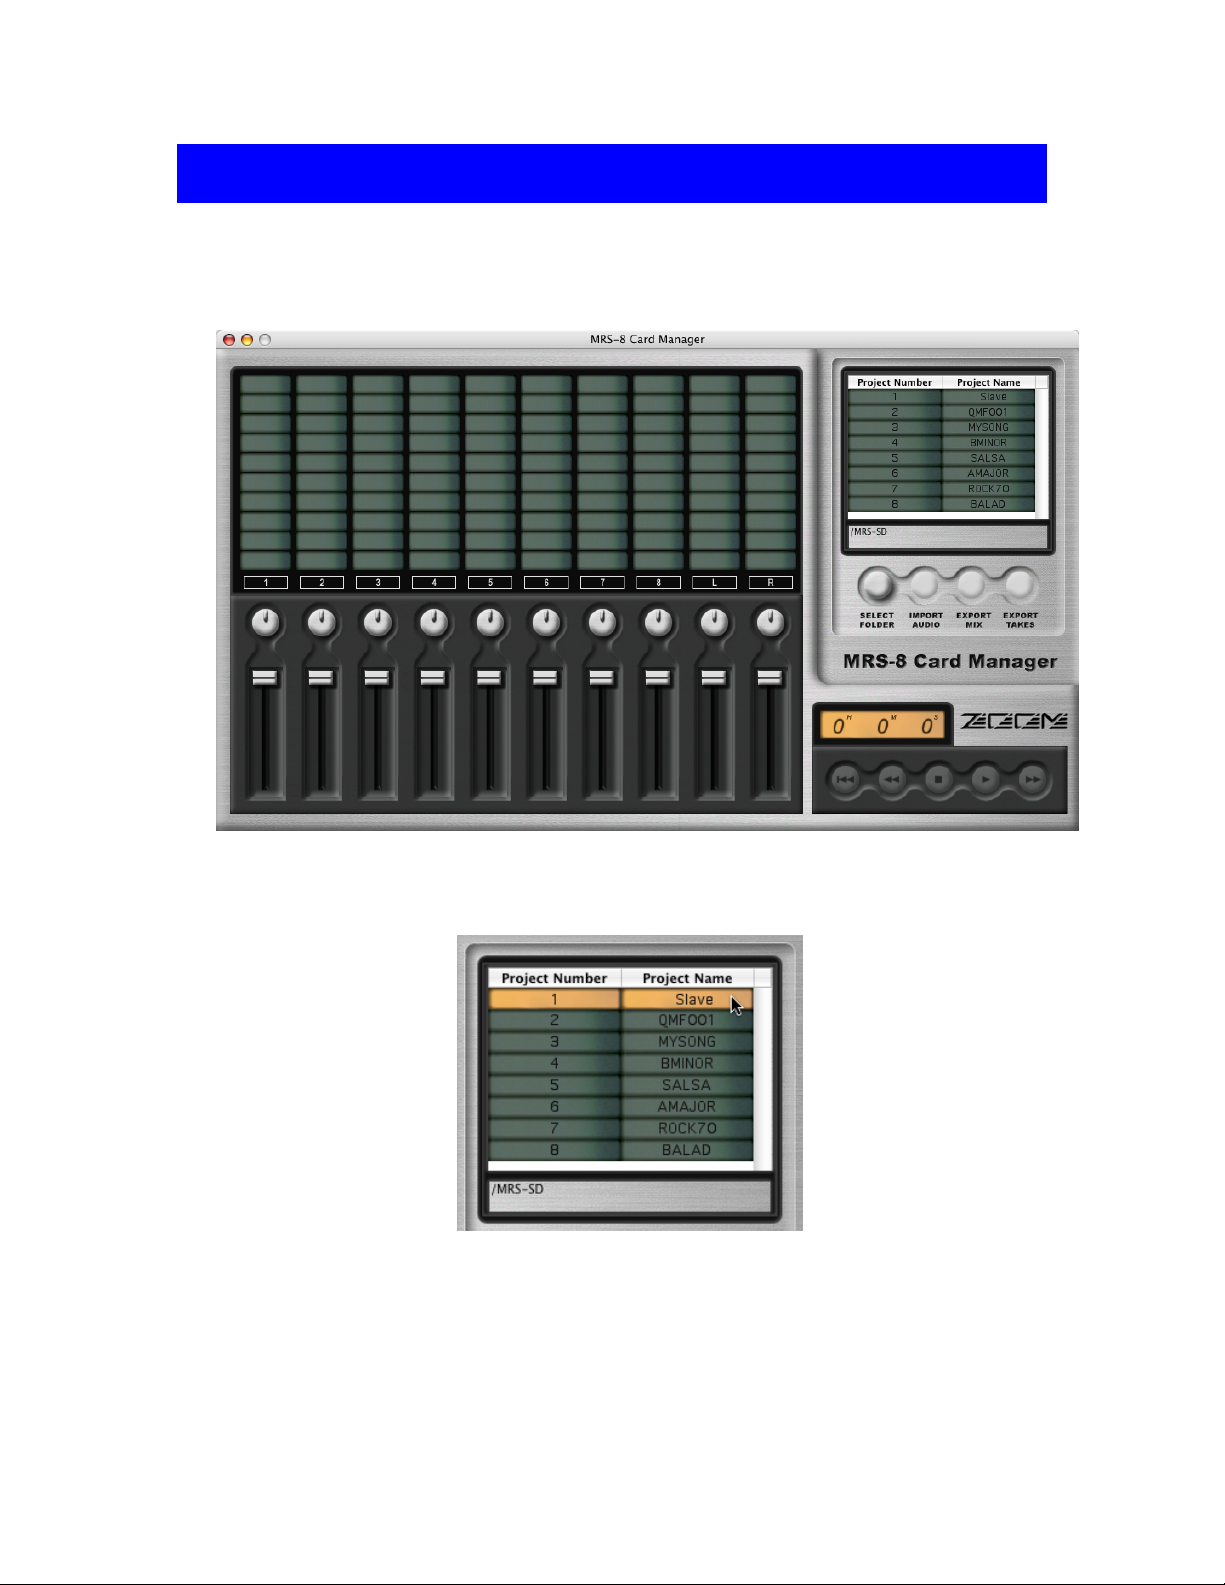
Start the MRS-8 Card Manager application. You should see the following window (or similar):
In the top right corner of the window you will see a list of your MRS-8 Projects. If you still have the
demo project that ships with the MRS-8, your will see “Slave” as your first projects. Click on it to
select it:
Page 5

On the left hand side of the window there is a grid with all the V-takes of the project. Now that project
“Slave” is selected you can see that it has eight takes, one per track. Click on the first take of track 1 to
select it:
While holding down the SHIFT key click on the other takes until all of them are selected:
Notice that the transport buttons (lower right corner of the window) became enabled:
Click on the PLAY ( ) button and you should hear a mix of the eight takes. You can fast forward,
rewind, or return to the beginning of the song by clicking on FF( ), REW ( ), or ZERO ( )
button. To stop playback click on the STOP ( ) button.
Page 6

Use the volume sliders and the pan knobs located underneath the V-Takes section to set the volume
and pan settings for each track to your liking:
Drag the volume knobs up and down to increase or decrease the volume of a track. Click inside a pan
rotary knob, then drag up to pan left and drag down to pan right.
Now that you have set the volume and pan for each track, you are ready to export your stereo mix to
an AIFF file. Click on any one of the selected takes, hold the mouse button down, and drag the
selection to your Macintosh desktop or to a folder. As you drag, you will see a translucent image that
shows the name “Slave.aiff:”
After dropping your selection on the desktop or in a folder, a progress dialog will appear indicating
how the operation is advancing. After the stereo mix was exported, notice that a file called “Slave.aiff”
was created (the name will be different if you selected a different project):
Next you are going to import a stereo file. In the Finder click to select the “Slave.aiff” file, or
another stereo AIFF or WAV file, hold the mouse button down and drag the file onto the MRS-8 Card
Manager window and over the V-Takes area. Since the file you are dragging is stereo, two adjacent
takes will get highlighted at a time. Drag the file over an empty take, for instance track 2, take 3.
Notice where the file will be imported, the left channel to track 2, take 3, and the right channel to track
3, take 3:
Page 7

After you let go of the mouse button, a progress dialog will appear indicating how the operation is
advancing. After the audio file has been imported, you can see that two new takes have been created:
Now you are ready to export eight individual takes, each to a separate mono AIFF file. Click again
on track 1, take 1. Holding down the SHIFT key click on the first take of tracks 2 to 8. This time hold
down the OPTION key and drag your selection to the Finder.
A progress dialog will appear for each of the eight tracks. At the end of the operation you will notice
that 8 mono AIFF files have been created named “Slave-Tr1-Tk1.aiff,” “Slave-Tr2-Tk1.aiff,” an so
on:”
Page 8

Working with Projects
Selecting a SD Card or Projects Folder
When you start the MRS-8 Card Manager it will look for a SD card. If it finds one, then all your
projects will be displayed in the Project List area of the window:
However, you can select other folders containing MRS-8 projects, like SD cards that you have copied
to the hard drive of your Macintosh. To select a different projects folder, click on the SELECT
FOLDER button. A “Choose” dialog will be displayed (this dialog may look different depending on
your Mac OS version):
Navigate until you see the Folder you wish to select, and then click the “Choose” button. Once you
have chosen a SD card or a projects folder, you can select a project in the Project List Area by clicking
on its name or number.
Page 9

As an alternative to the SELECT FOLDER button you can use the menu item “File>Select MRS-8
Card or Folder.” The full path to the selected card or folder is displayed right under the list of projects.
Sorting Projects
Each project is displayed on a row of the Project List. There are two columns. The first one shows the
number of the project, the second one shows the name of the project. You can sort the projects by
project number, or project name. To sort by number, click in the “Project Number” header column. To
sort by project name, click in the header column labeled “Project Name:”
To toggle between ascending order and descending order:
• In Mac OS 9, click on the triangle in the top right corner of the Project List (above the scroll bar).
• In Mac OS X, click again on the column header you wish to toggle:
Page 10

Working with V-takes
Once you selected a project from the Project List, its non-empty V-takes will show up in the Tracks
and V-Takes grid of the MRS-8 Card Manager window.
Selecting V-takes
To make a single selection, click on a V-take. You may select either a non-empty V-Take or an empty
one. A non-empty V-Take may be exported to an AIFF file or it can be used as the target for importing
a WAVE or AIFF file. An empty V-Take may be used only as the target for importing an audio file.
To make multiple selections hold the SHIFT key as you click in the V-Takes you want selected. You
can select up to ten V-Takes, but only one V-Take in each track, master left, or master right may be
part of the selection. Here is an example of eight selected V-Takes, one in each track:
When importing a stereo file you can indicate which two V-Takes should be the target of your import
by selecting exactly two V-Takes. Those can be either empty, non-empty, or a combination. If you
drag a stereo file over one of the two selections, that V-Take will be the target for the left channel of
the stereo file, while the other V-Take will be the target for the right channel.
Playback
You can use the transport buttons to play a mix of your selected V-takes, to fast-forward, or rewind.
When your selection contains at least one non-empty V-Take, the transport buttons become enabled:
Click on the PLAY ( ) button to hear a mix of the selection. To stop the playback, click on the STOP
( ) button. To go back to the beginning of the song click on the ZERO ( ) button. If you click on the
ZERO button while playing, the playback will not stop – it will simply continue from he beginning. To
stop the playback, click on the STOP button.
To fast forward click on the FF button ( ); to rewind click on the REW ( ) button. During fastforward or rewind you will not hear the sound. Click on PLAY to hear the sound again or click on
STOP to stop. The counter on top of the transport buttons will show the location in hours, minutes, and
seconds.
Page 11

You can also use menu items or keyboard shortcuts for playback. To play choose “File Manager>Play”
from the menu bar, or command-P. To stop choose “File Manager>Stop” from the menu bar, or
command-S. Each transport button has a corresponding menu item in the “File Manager” menu and a
keyboard shortcut.
Adjusting Volume and Pan
You can adjust the volume level and pan position of each track with the volume sliders and pan rotary
knobs:
Drag the volume knobs up and down to increase or decrease the volume of a track. Click inside a pan
rotary knob, then drag up to pan left and drag down to pan right. You can adjust volume and pan in
real-time while playing back a mix of your selected V-Takes. Those settings will be included when
you export your mix as a stereo AIFF file.
However, when you export each track individually, the volume and pan settings will be ignored. Each
V-Take will be exported full volume to a mono AIFF file.
Page 12

Importing and Exporting
Once you selected one or more non-empty V-take(s) you can export a mix of your selection to a stereo
file or you can export each track individually to a separate mono file. You can import a mono file to an
empty or a non-empty V-Take. You can also import a stereo file and each channel will go to a different
V-Take.
There are three different ways you can import or export audio: drag-and-drop, using the IMPORT
AUDIO, EXPORT MIX, or EXPORT TAKES buttons, or using menu commands.
Importing AIFF or WAV files
You can import both into empty V-takes and non-empty V-takes. Importing into non-empty V-takes
will permanently erase the previous audio content. You can import AIFF or WAV files, mono or
stereo, 8-bit or 16-bit.
To import a mono file by drag-and-drop, start by selecting the mono file in the Finder. Drag the file to
the MRS-8 Card Manager window and over the V-Take where you want to import the file. The VTake does not have to be selected:
When you release the mouse button a dialog will show you the progress of the operation. After the
file has been imported it will show as a new V-Take.
To import a mono file with the IMPORT AUDIO button or a menu command, start by selecting the
V-Take where you want to import the file. Click on the IMPORT AUDIO button or select the “File
Manager>Import AIFF/WAV to Take” menu command. A dialog will allow you to select the mono
file you want to import. The file will be imported in the selected V-Take.
To import a stereo file by drag-and-drop, start by selecting the stereo file in the Finder. Drag the file
to the MRS-8 Card Manager window and over the V-Take where you want to import the left channel
of the file. The right channel will be imported in the adjacent V-Take:
To import a stereo file with the IMPORT AUDIO button or a menu command, start by selecting the
V-Take where you want to import the left channel of the file. Click on the IMPORT AUDIO button
or select the “File Manager>Import AIFF/WAV to Take” menu command. A dialog will allow you to
select the stereo file you want to import. The left channel will be imported in the selected V-Take,
while the right channel will be imported in the adjacent V-Take.
If you want to import a stereo file to two V-Takes that are not adjacent, select one of the V-Takes, and
then while holding down the SHIFT key click to select the other V-Take. Drag-and-drop the stereo
file over the V-Take that will receive the left channel. You can also use the IMPORT AUDIO button
or the “Import AIFF/WAV to Take” menu command. In this case the left channel will be imported to
the V-Take with the lowest track number.
Page 13

Exporting a Mix
Select all the V-Takes that you want to mix. Remember, you can make multiple selections by holding
down the SHIFT key while you click to add to the selection. You can select up to ten V-takes, but
only one per track, master left, or master right.
Adjust the volume and pan settings of each track with the volume sliders and pan rotary knobs. You
can use the playback function to listen to your mix while you adjust volume and pan.
When you are satisfied, click on one of the selected V-Takes and drag it to the Macintosh desktop or
to a folder. A dialog will show you the progress of the operation. The resulting file will be named
after the name of the selected project.
Alternately, you can use the EXPORT MIX button or the “File Manager>Export Mix to AIFF” menu
command. Select the V-Takes you want to mix, adjust the volume and pan settings, then click on the
EXPORT MIX button or select the “Export Mix to AIFF” menu command. In the “Save As” dialog
that appears, select the destination folder, optionally name your file, and then click “Save.” A
progress dialog will indicate how the export operation is advancing.
Exporting Raw V-Takes
Select the V-Takes you want to export. You can select up to ten V-takes, but only one per track,
master left, or master right. Click on one of the selected V-Takes and while holding down the
OPTION key drag the selection to the Macintosh desktop or to a folder. The selected V-Takes will be
exported each in a separate mono file. The volume and pan settings will be ignored.
Alternately, you can use the EXPORT TRACKS button or the “File Manager>Export Takes to AIFF”
menu command. Select the V-Takes you want to export, then click on the EXPORT TRACKS button
or select the “Export Tracks to AIFF” menu command. In the “Save As” dialog that appears, select a
destination folder for your exported V-Takes, and then press “Choose.” A dialog will indicate the
progress of the export operation.
 Loading...