

Page 1
Operation Manual
You must read the Usage and Safety Precautions before use.
© 2018 ZOOM CORPORATION
Copying or reprinting this manual in part or in whole without permission is prohibited.
Page 2

Notes about this Operation Manual
You might need this manual in the future. Always keep it in a place where you can access it easily.
The contents of this document and the specications of the product could be changed without notice.
• Windows® is a trademark and registered trademark of Microsoft® Corporation.
• Macintosh, macOS and iPad are trademarks or registered trademarks of Apple Inc.
• The microSD, microSDHC and microSDXC logos are trademarks.
• The Bluetooth® word mark and logo are registered trademarks of Bluetooth SIG, Inc. and these marks are used
under license by Zoom Corporation. Other trademarks and trade names are the property of their respective
companies.
• Other product names, registered trademarks and company names in this document are the property of their
respective companies. All trademarks and registered trademarks in this document are for identication purposes
only and are not intended to infringe on the copyrights of their respective owners.
• Recording from copyrighted sources, including CDs, records, tapes, live performances, video works and broadcasts, without permission of the copyright holder for any purpose other than personal use is prohibited by law.
Zoom Corporation will not assume any responsibility related to infringements of copyrights.
• Google Spatial Audio HRIRs
Copyright 2016 Google Inc. All Rights Reserved.
This product includes HRTFs (head related impulse responses) developed by Google Inc.
Google Spatial Audio is released under Apache License 2.0.
http://www.apache.org/licenses/LICENSE-2.0
THESE HRTFs WERE MODIFIED BY ZOOM.
Length: rst 64 samples
Filter: low shelf
2
Page 3
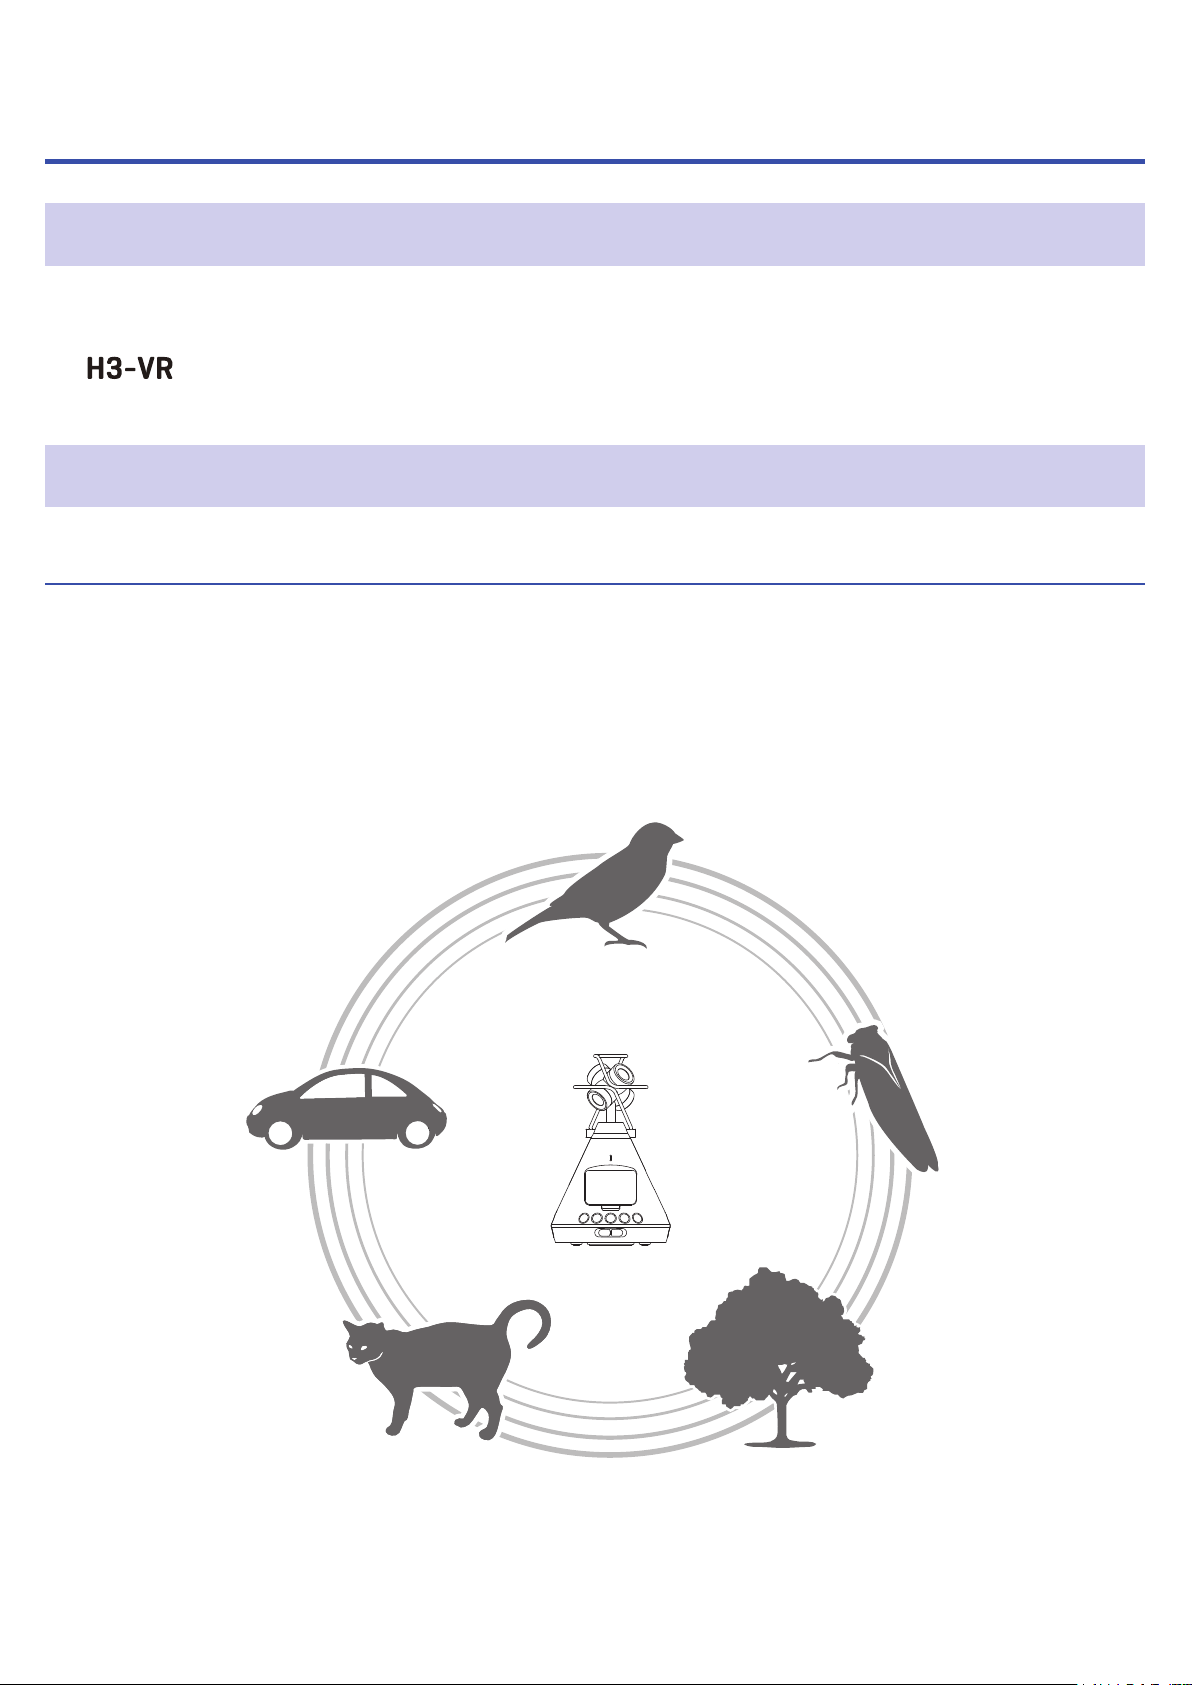
Introduction
Thank you very much for purchasing a ZOOM Handy Recorder (hereafter, " ").
The has the following features.
Capture 360° audio with the high-quality Ambisonic mic
The Ambisonic mic, which can handle sound pressure input up to 120 dB SPL, can record 360° audio in
every direction, including above and below, at high resolutions up to 24-bit/96kHz. With data recorded in
an Ambisonic format, you can turn the sound image during playback and extract the sounds of specic
directions.
Easily record spatial audio for virtual-reality content
Along with Ambisonics A, Ambisonics B FuMa and AmbiX formats are also supported.
The mic position can be detected automatically when recording starts. Simply adjust the placement
angle while checking the built-in electronic tilt indicator for worry-free playback.
Simply orient the to listen to the desired direction during playback
By orienting the when in tracking playback mode, it can use the built-in motion sensor to generate the playback sound for the desired direction from the data recorded in every direction.
Re-create the feeling of being there with binaural audio
Binaural recording, which is intended for playback through headphones, is supported. This recording
format recreates the sound that not only reaches the ears of a person directly, but also the sound that is
transmitted through the head, face and body.
360° USB mic and audio interface
When live streaming, conducting video meetings and recording to DAW software, for example, using the
audio interface functions of the , you can connect it to a computer to use it as a 360° USB mic or
an iOS device to use it as a stereo mic.
Remote operation from an iPhone/iPad
By installing a dedicated wireless adapter (BTA-1), and using the H3 Control iOS app, you can control the
from a short distance away. Using an iPhone or iPad, wirelessly operate the transport, set levels
and input metadata, for example, without worrying about noise from touching the built-in interface.
Unrestricted post-production
Using the free ZOOM Ambisonics Player application for Windows and Mac, you can convert Ambisonic
les to ordinary stereo, binaural and 5.1 surround, for example, and play them back. Moreover, you can
extract audio from specic directions to write stereo audio les.
3
Page 4

Contents
Notes about this Operation Manual ......................................................................................................................2
Introduction .............................................................................................................................................................3
Contents ..................................................................................................................................................................4
What is 3D sound? ..................................................................................................................................................7
3D sound overview .............................................................................................................................................7
Ambisonics formats ..........................................................................................................................................7
Features ...........................................................................................................................................................7
Recording formats ..........................................................................................................................................8
Binaural format ................................................................................................................................................ 10
Features ........................................................................................................................................................ 10
Recording examples ....................................................................................................................................... 11
Example 1: studio recording ........................................................................................................................ 11
Example 2: live recording ............................................................................................................................. 11
Example 3: eld recording ........................................................................................................................... 12
Names of parts .................................................................................................................................................... 13
Preparations ......................................................................................................................................................... 17
Supplying power .............................................................................................................................................. 17
Using batteries ............................................................................................................................................. 17
Using an AC adapter .................................................................................................................................... 19
Inserting microSD cards ................................................................................................................................. 20
Turning the power on/off ................................................................................................................................ 22
Turning the power on ................................................................................................................................... 22
Turning the power off ................................................................................................................................... 22
Preventing misoperation (HOLD function) .................................................................................................... 23
Activating the HOLD function ...................................................................................................................... 23
Deactivating the HOLD function .................................................................................................................. 23
Setting the language shown (rst time starting up) ..................................................................................... 24
Setting the date and time (rst time starting up) .......................................................................................... 25
Recording ............................................................................................................................................................. 26
Home Screen (in recording standby) ............................................................................................................. 26
Preparing to record ......................................................................................................................................... 27
Setting the mic position ............................................................................................................................... 27
Setting the recording mode ......................................................................................................................... 30
Setting the recording format ....................................................................................................................... 32
Monitoring the input sound ......................................................................................................................... 34
Setting Ambisonic monitoring ..................................................................................................................... 35
Adjusting input levels ................................................................................................................................... 37
Setting low-frequency cutoff lter ............................................................................................................... 38
Setting the limiter ......................................................................................................................................... 40
Setting le names ........................................................................................................................................ 45
4
Page 5

Enabling the sound marker function ........................................................................................................... 47
Setting the recording time display .............................................................................................................. 49
Recording ......................................................................................................................................................... 51
Playback ............................................................................................................................................................... 52
Playing recordings .......................................................................................................................................... 52
Changing the playback mode ......................................................................................................................... 53
Setting the playback time display .................................................................................................................. 58
Managing folders and les ................................................................................................................................. 60
Creating folders ............................................................................................................................................... 60
Selecting folders and les .............................................................................................................................. 62
Changing folder and le names ..................................................................................................................... 65
Checking le information ............................................................................................................................... 67
Checking le marks......................................................................................................................................... 69
Deleting marks ............................................................................................................................................. 72
Deleting folders and les ................................................................................................................................ 73
Adjusting connected equipment levels (playing test tones) ........................................................................... 75
Using USB functions............................................................................................................................................ 77
Using as a card reader .................................................................................................................................... 77
Connecting to a computer ........................................................................................................................... 77
Disconnecting from a computer ................................................................................................................. 79
Using as an audio interface ............................................................................................................................ 80
Connecting to a computer or iOS device. ................................................................................................... 80
Disconnecting from a computer or iOS device .......................................................................................... 82
Audio interface settings ................................................................................................................................. 83
Enabling direct monitoring .......................................................................................................................... 83
Enabling the loop back function .................................................................................................................. 84
Operating with an iOS device.............................................................................................................................. 85
Pairing with an iOS device .............................................................................................................................. 85
Disconnecting from an iOS device .............................................................................................................. 86
Inputting characters ............................................................................................................................................ 87
Setting the type of batteries used ...................................................................................................................... 88
Setting the display backlight .............................................................................................................................. 90
Adjusting the display contrast ............................................................................................................................ 92
Setting the language shown ............................................................................................................................... 94
Setting the date and time .................................................................................................................................... 95
Formatting microSD cards .................................................................................................................................. 98
Testing microSD card performance ................................................................................................................. 100
Conducting a quick test ................................................................................................................................ 100
Conducting a full test .................................................................................................................................... 103
5
Page 6

Restoring default settings (Factory Reset) ..................................................................................................... 106
Checking the rmware versions....................................................................................................................... 108
Updating the rmware ....................................................................................................................................... 110
Responding to Alert Messages ........................................................................................................................ 112
Troubleshooting ................................................................................................................................................. 114
Recording/playback trouble ...................................................................................................................... 114
Other trouble ............................................................................................................................................... 114
Metadata list ...................................................................................................................................................... 116
Specications .................................................................................................................................................... 118
6
Page 7
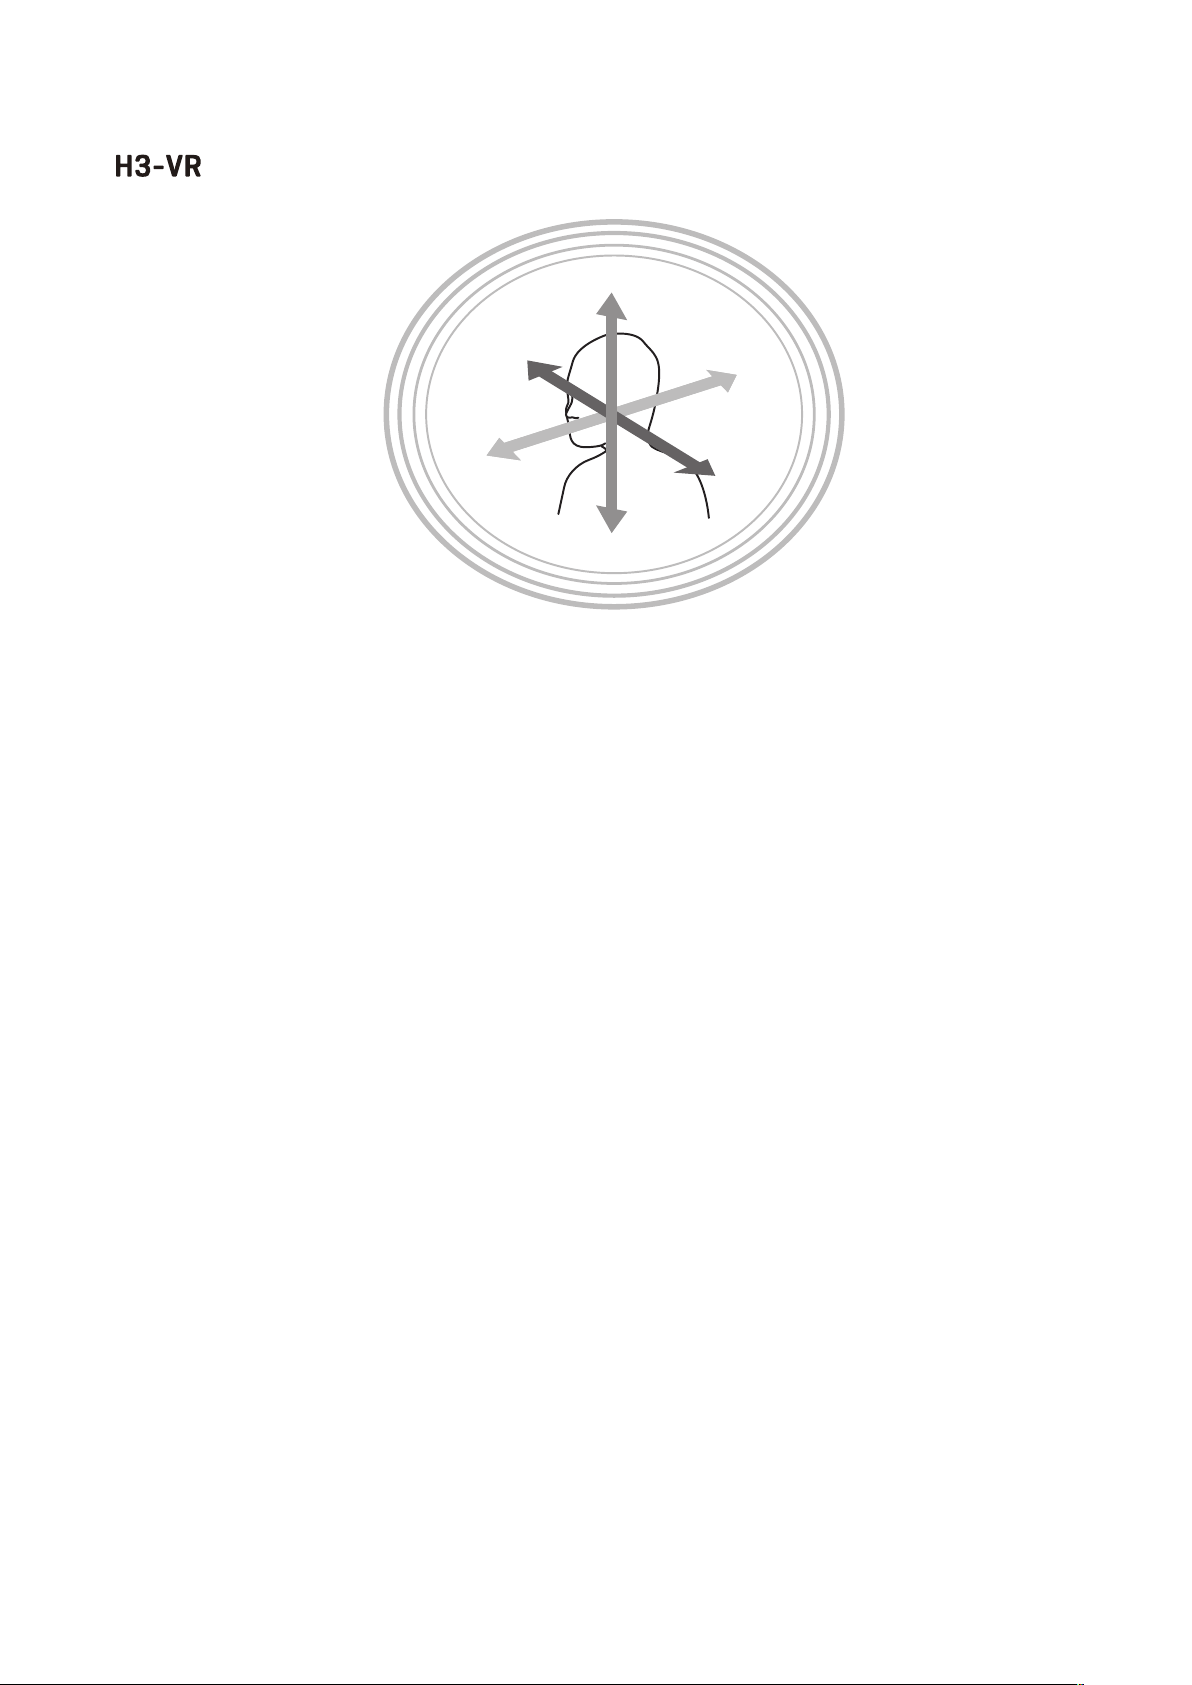
What is 3D sound?
3D sound overview
While traditional stereo sound captures horizontal placement, three-dimensional sound recording methods also
capture up-down and front-back placement to create 3D sound images.
The supports two 3D methods: Ambisonics and binaural.
Ambisonics formats
Features
• Multiple mics capture sound in all directions: left, right, up, down, front and back.
• Audio sources captured on multiple tracks can be processed, and sound can be extracted from any chosen
direction.
• The sound can be rotated. For example, sound can be continuously re-created as the listener turns around to face
the opposite direction.
7
Page 8
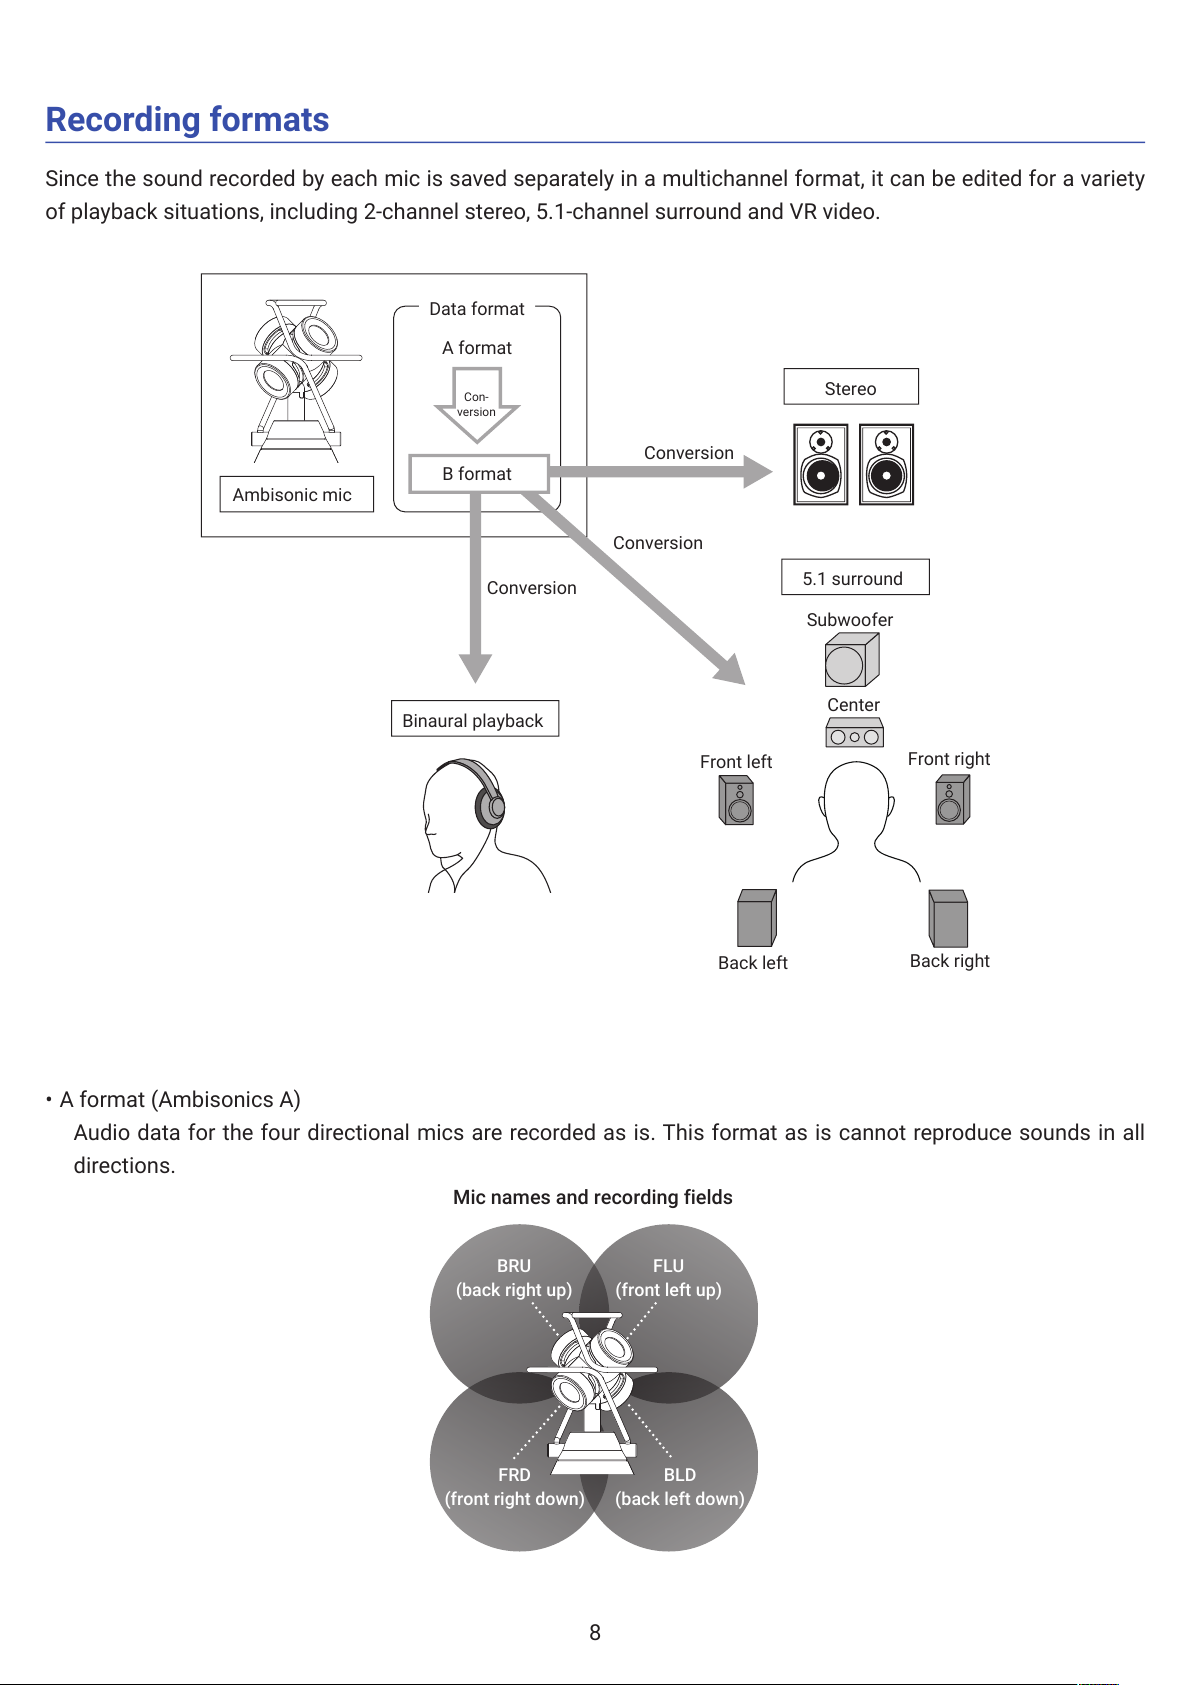
Recording formats
Since the sound recorded by each mic is saved separately in a multichannel format, it can be edited for a variety
of playback situations, including 2-channel stereo, 5.1-channel surround and VR video.
A format
Data format
Stereo
Binaural playback
5.1 surround
Ambisonic mic
Back left
Center
Front right
Subwoofer
Front left
Back right
Con-
version
Conversion
Conversion
Conversion
B format
• A format (Ambisonics A)
Audio data for the four directional mics are recorded as is. This format as is cannot reproduce sounds in all
directions.
Mic names and recording fields
FLU
(front left up)
BRU
(back right up)
BLD
(back left down)
FRD
(front right down)
8
Page 9
• B format (Ambisonics B)
A format data is processed and distributed to four channels (W/X/Y/Z) to produce this audio data.
The supports FuMa and AmbiX.
Z
Y
Y
X
WW
X
X
Z
X
Y
Y
9
Page 10
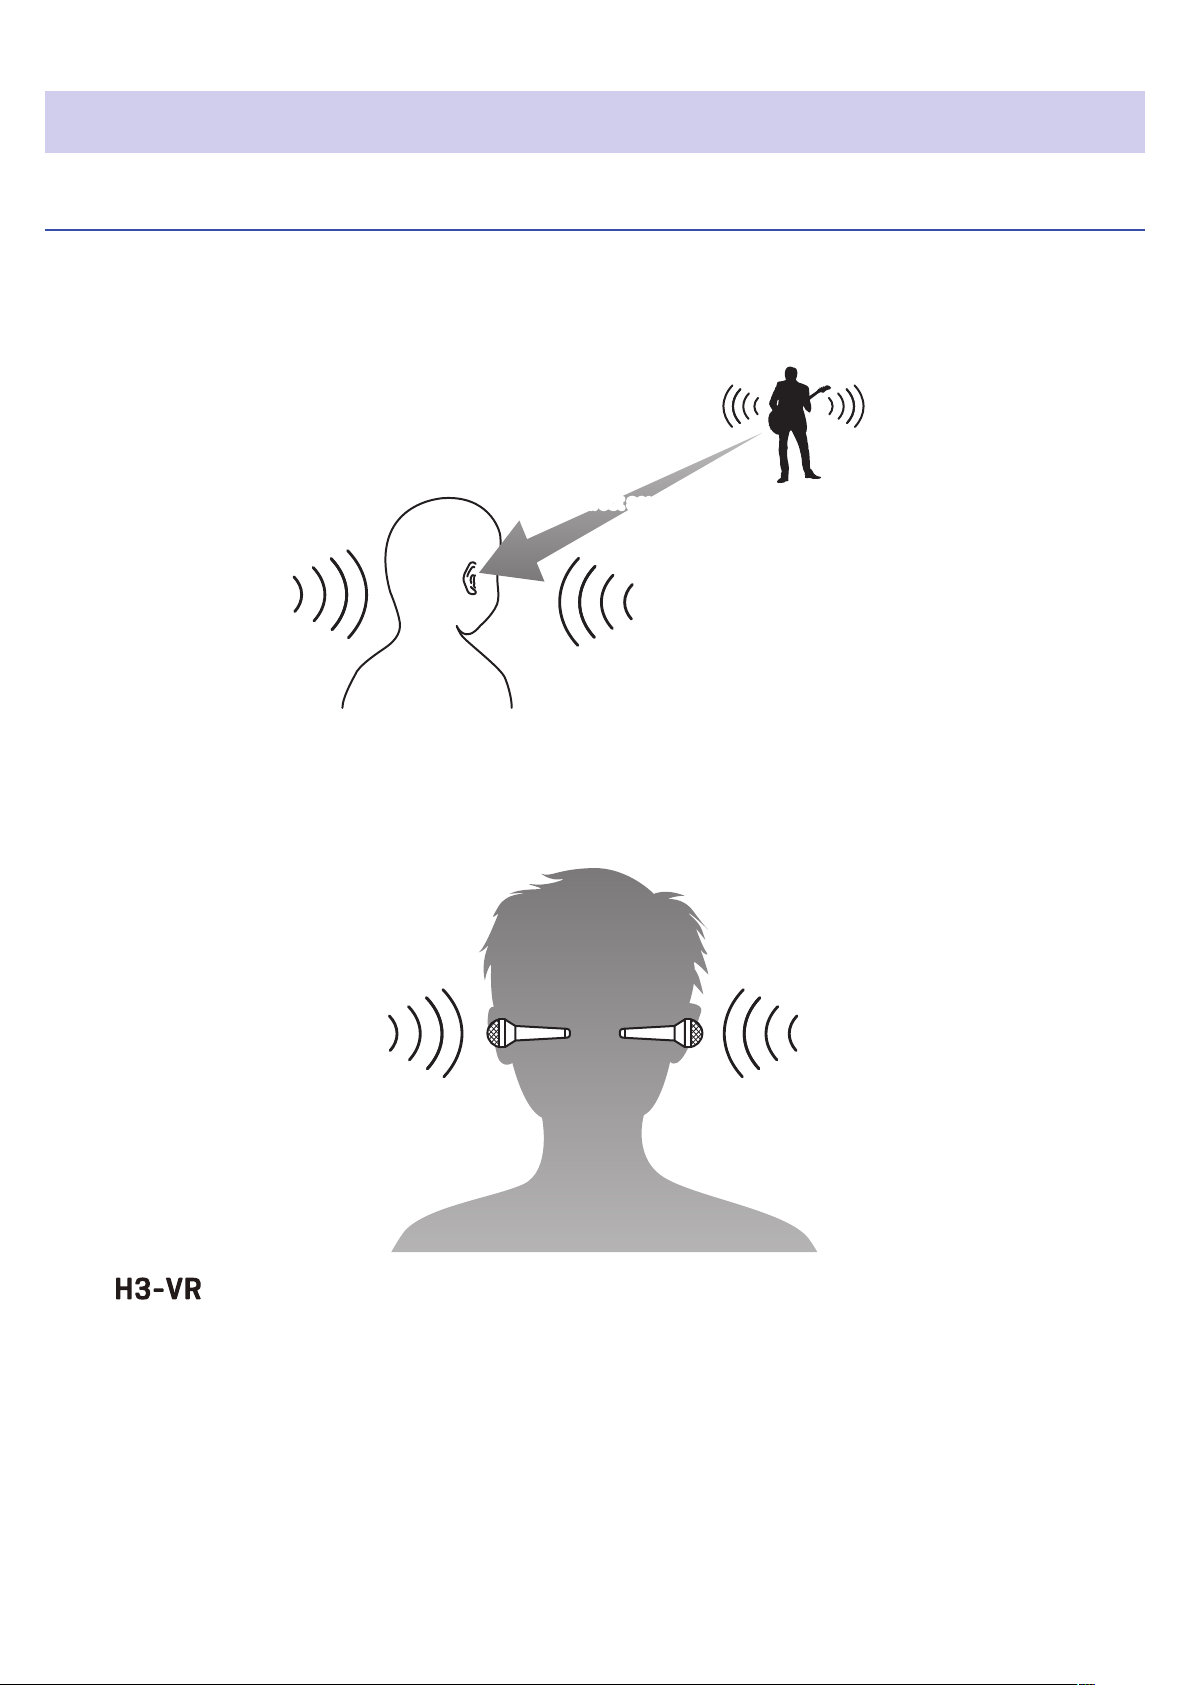
Binaural format
Features
• The binaural format records the sound that not only reaches the ears of a person directly, but also the sound that
is transmitted through the head, face and body.
Direct soundDirect sound
• In principle, this is sound recorded as though mics were placed inside both ears of a person. This type of mic
setup also exists.
The converts audio data recorded with the four mics into binaural format recordings.
10
Page 11
Recording examples
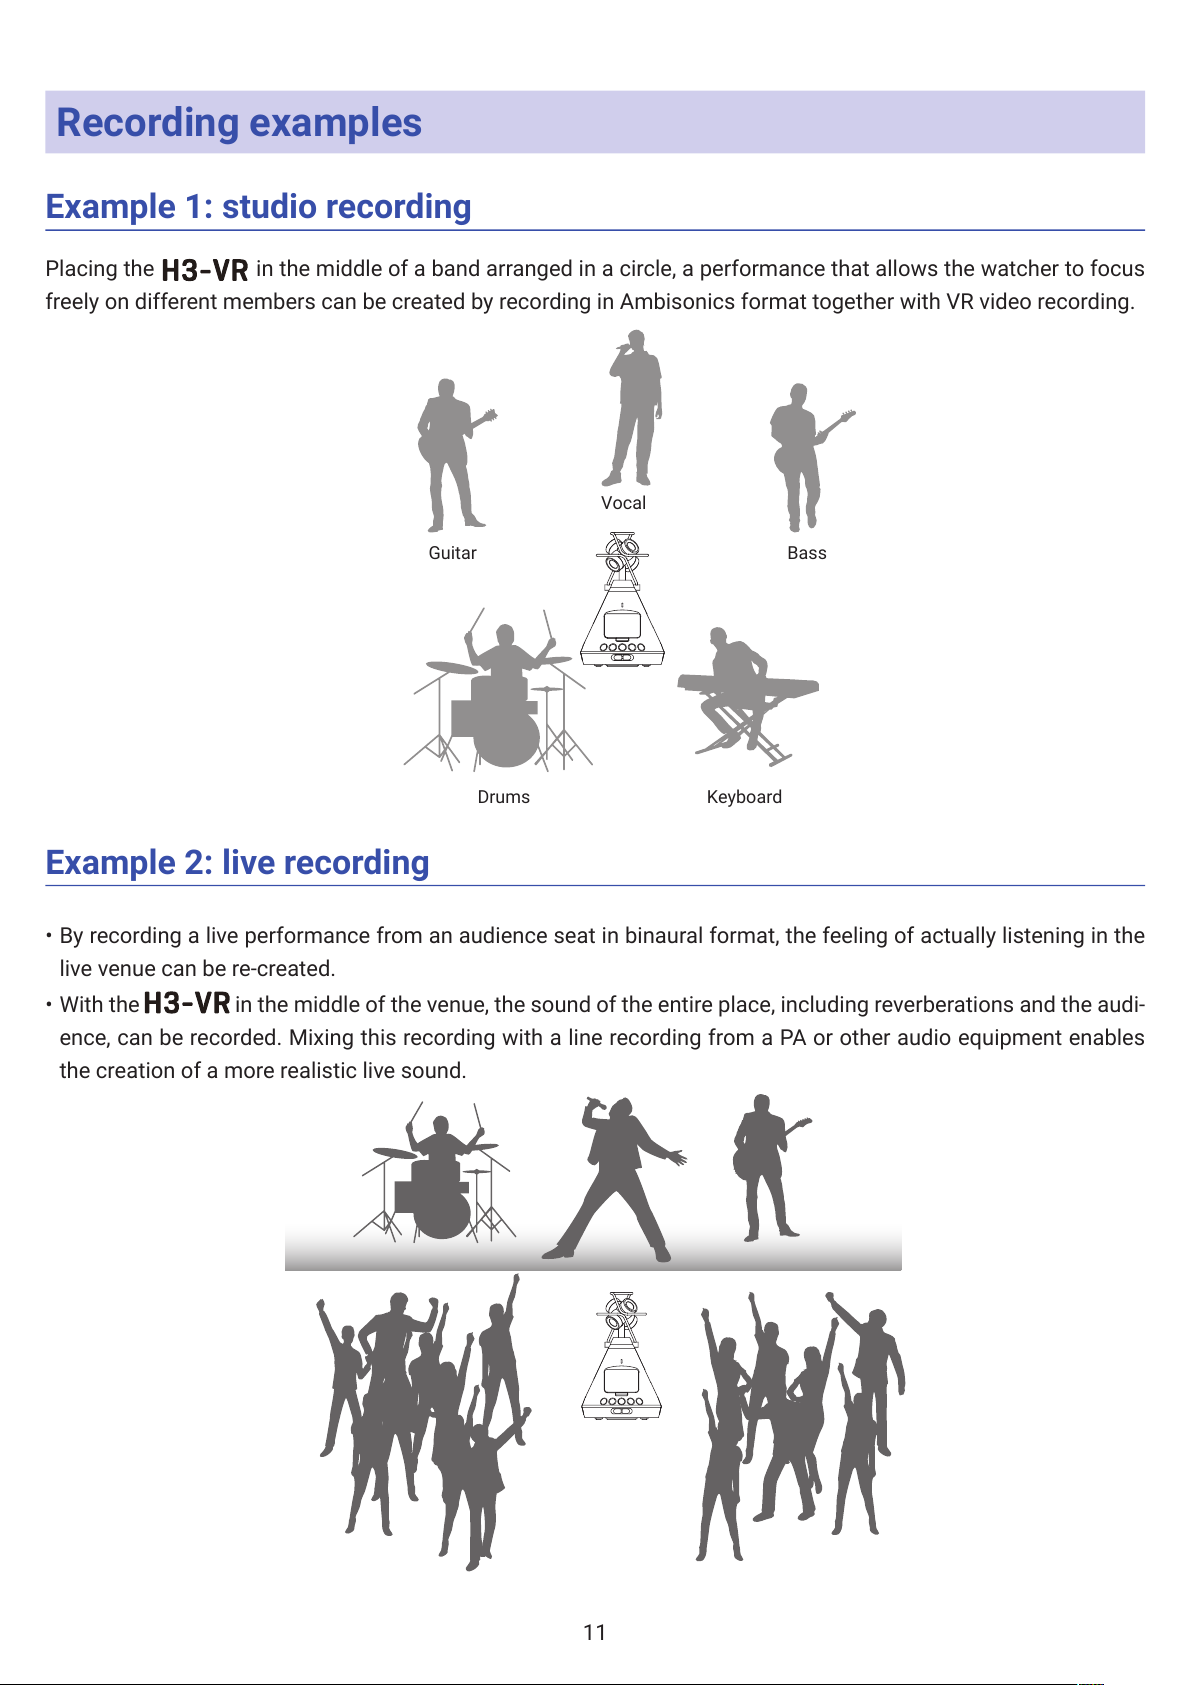
Example 1: studio recording
Placing the in the middle of a band arranged in a circle, a performance that allows the watcher to focus
freely on different members can be created by recording in Ambisonics format together with VR video recording.
Guitar Bass
Vocal
Drums Keyboard
Example 2: live recording
• By recording a live performance from an audience seat in binaural format, the feeling of actually listening in the
live venue can be re-created.
• With the in the middle of the venue, the sound of the entire place, including reverberations and the audi-
ence, can be recorded. Mixing this recording with a line recording from a PA or other audio equipment enables
the creation of a more realistic live sound.
11
Page 12
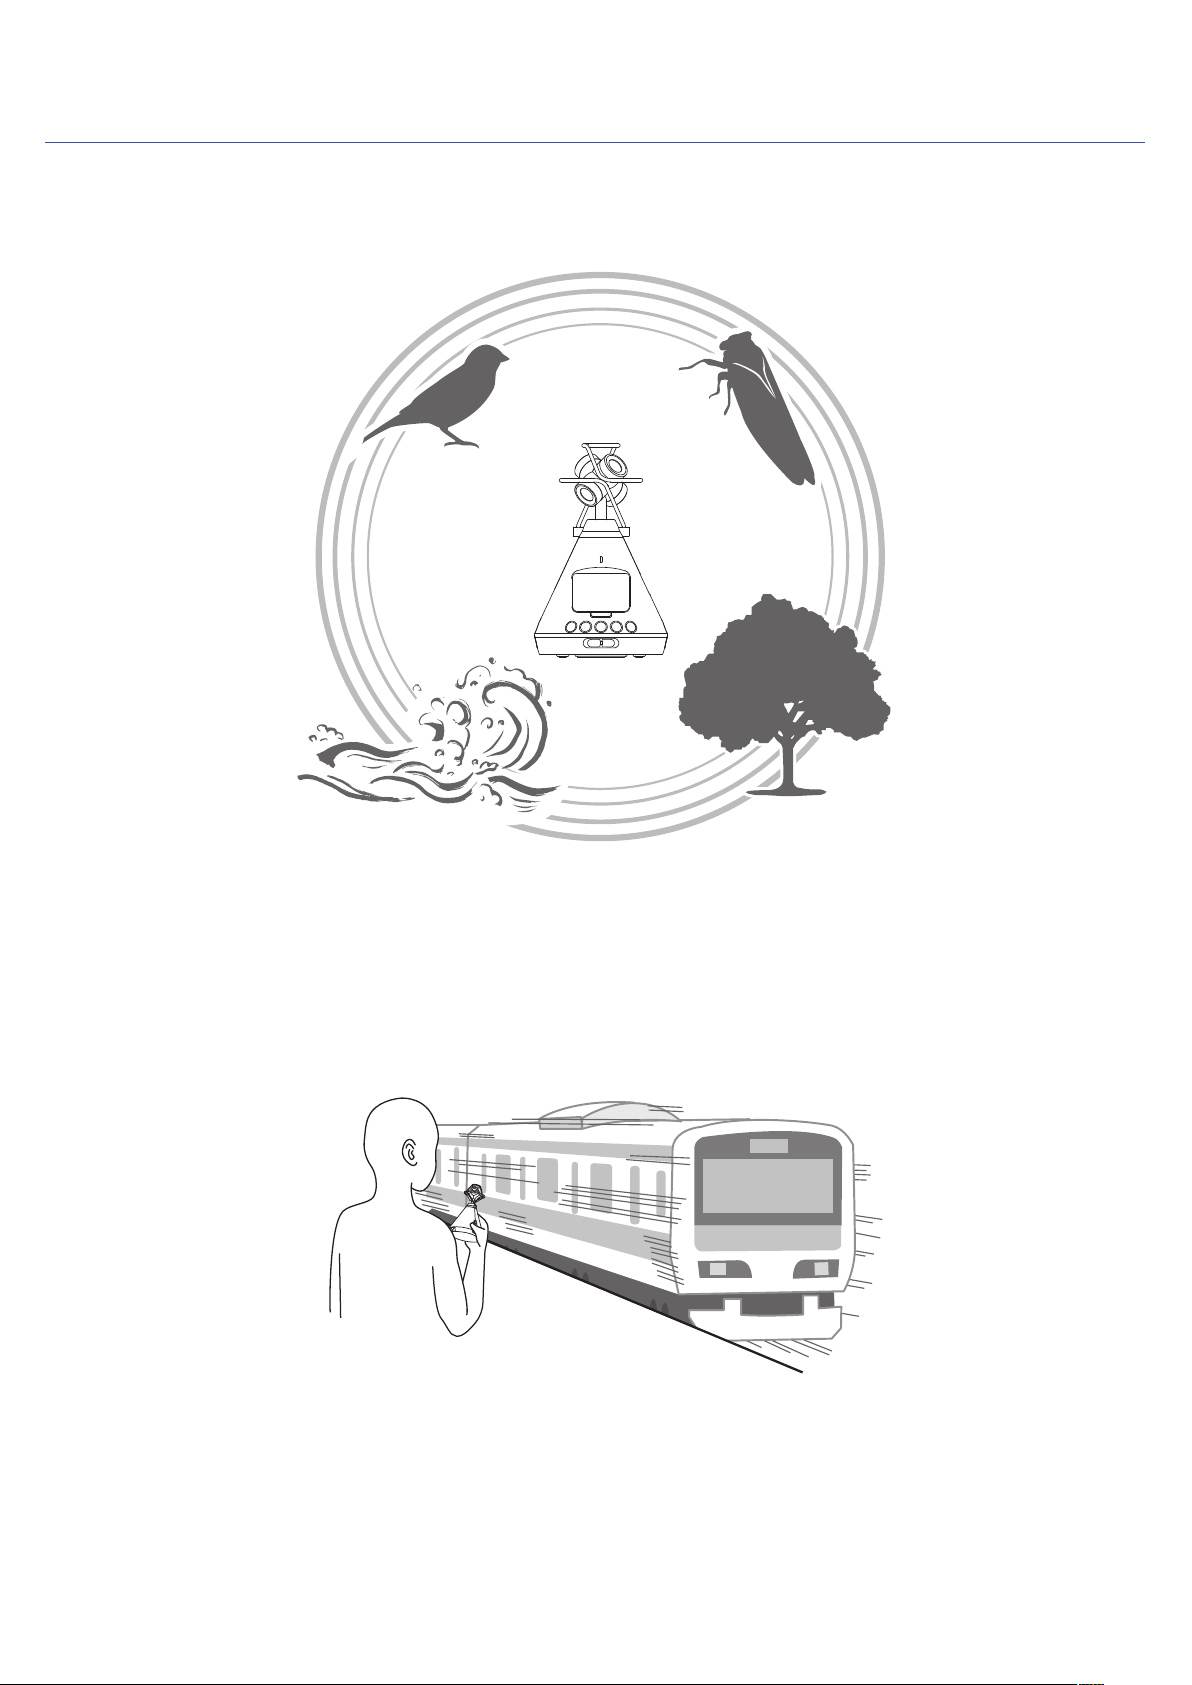
Example 3: eld recording
• When recording in nature, instead of just focusing on a bird, a stream or another sound source, the complete
sound of the natural setting, including reections from trees, rocks and other objects, can be captured.
• When recording the sound of a train, in addition to the sound of it moving horizontally, vertical changes and rever-
berations and other sounds from the surrounding space can also be recorded. By turning the sound away from
the tracks during playback, the sound of the train passing behind the listener can be re-created realistically.
12
Page 13
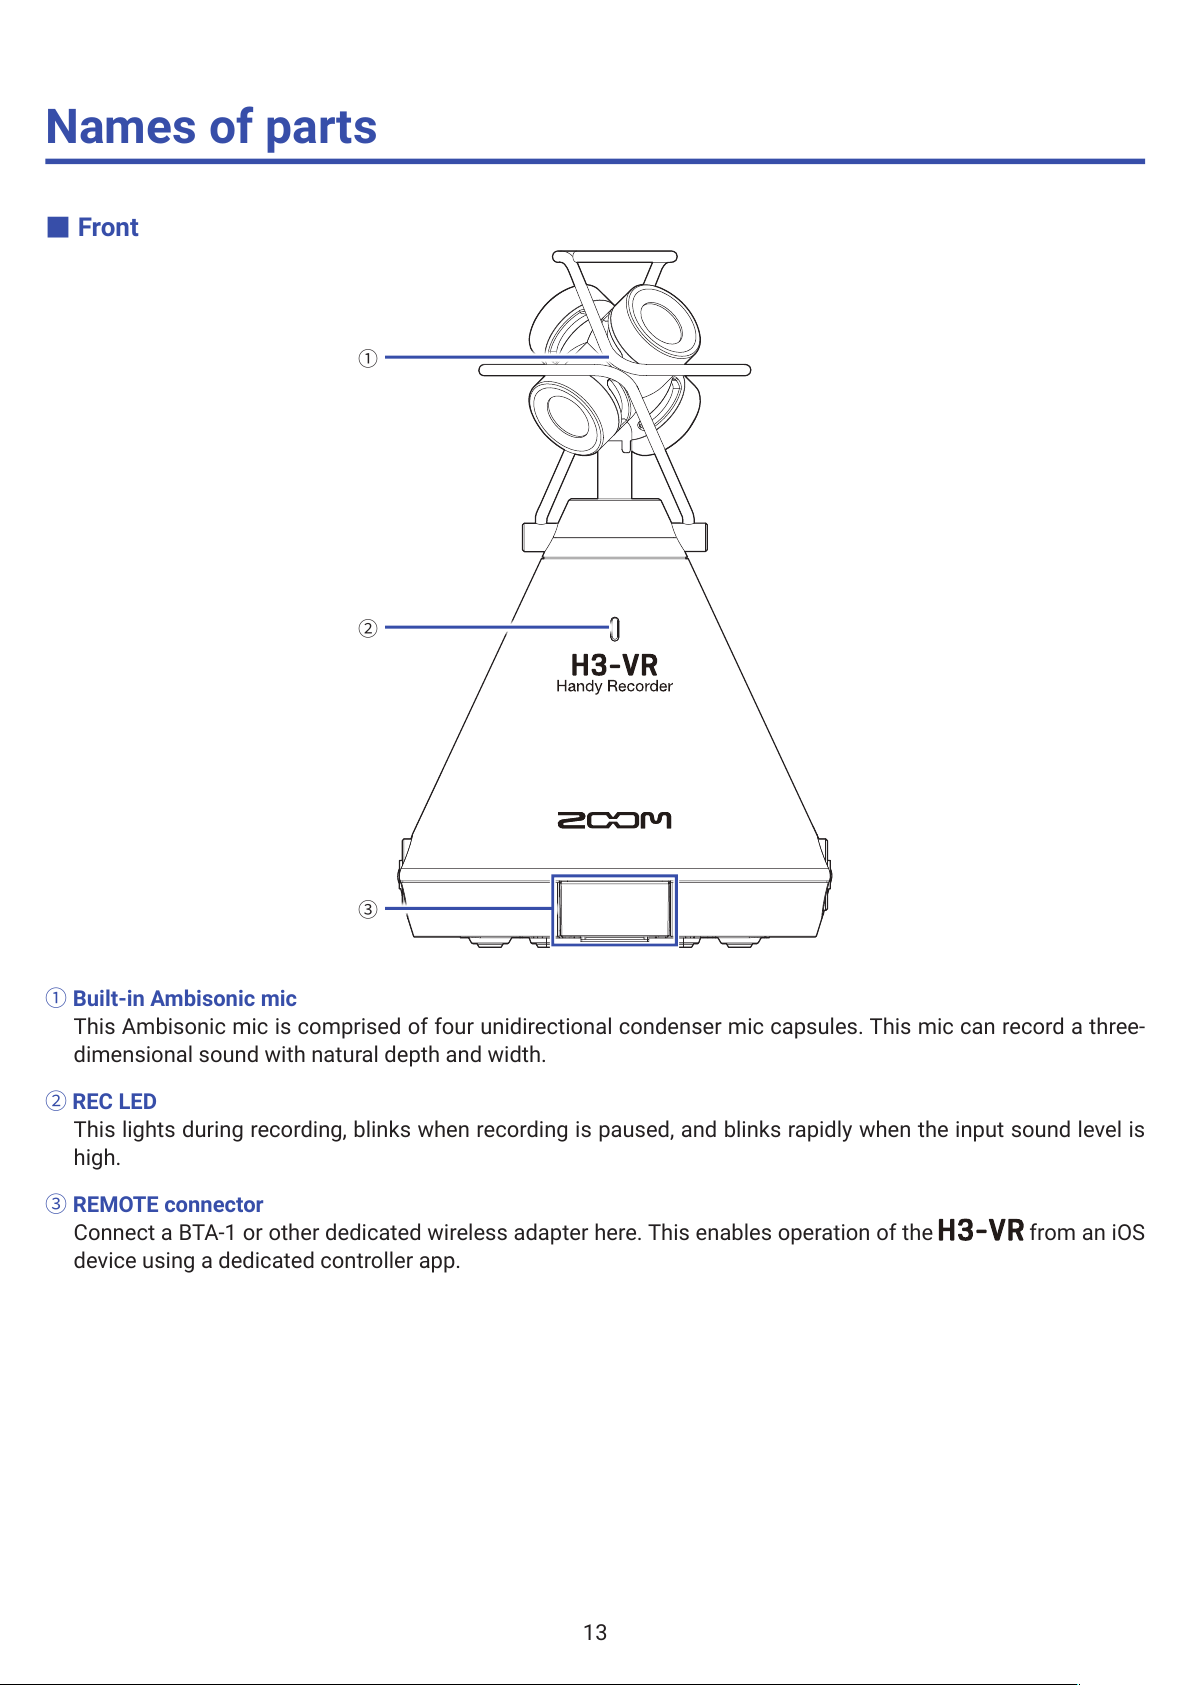
Names of parts
Ӎ
Front
Ύ
Ώ
Built-in Ambisonic mic
This Ambisonic mic is comprised of four unidirectional condenser mic capsules. This mic can record a three-
dimensional sound with natural depth and width.
ΎREC LED
This lights during recording, blinks when recording is paused, and blinks rapidly when the input sound level is
high.
Ώ REMOTE connector
Connect a BTA-1 or other dedicated wireless adapter here. This enables operation of the from an iOS
device using a dedicated controller app.
13
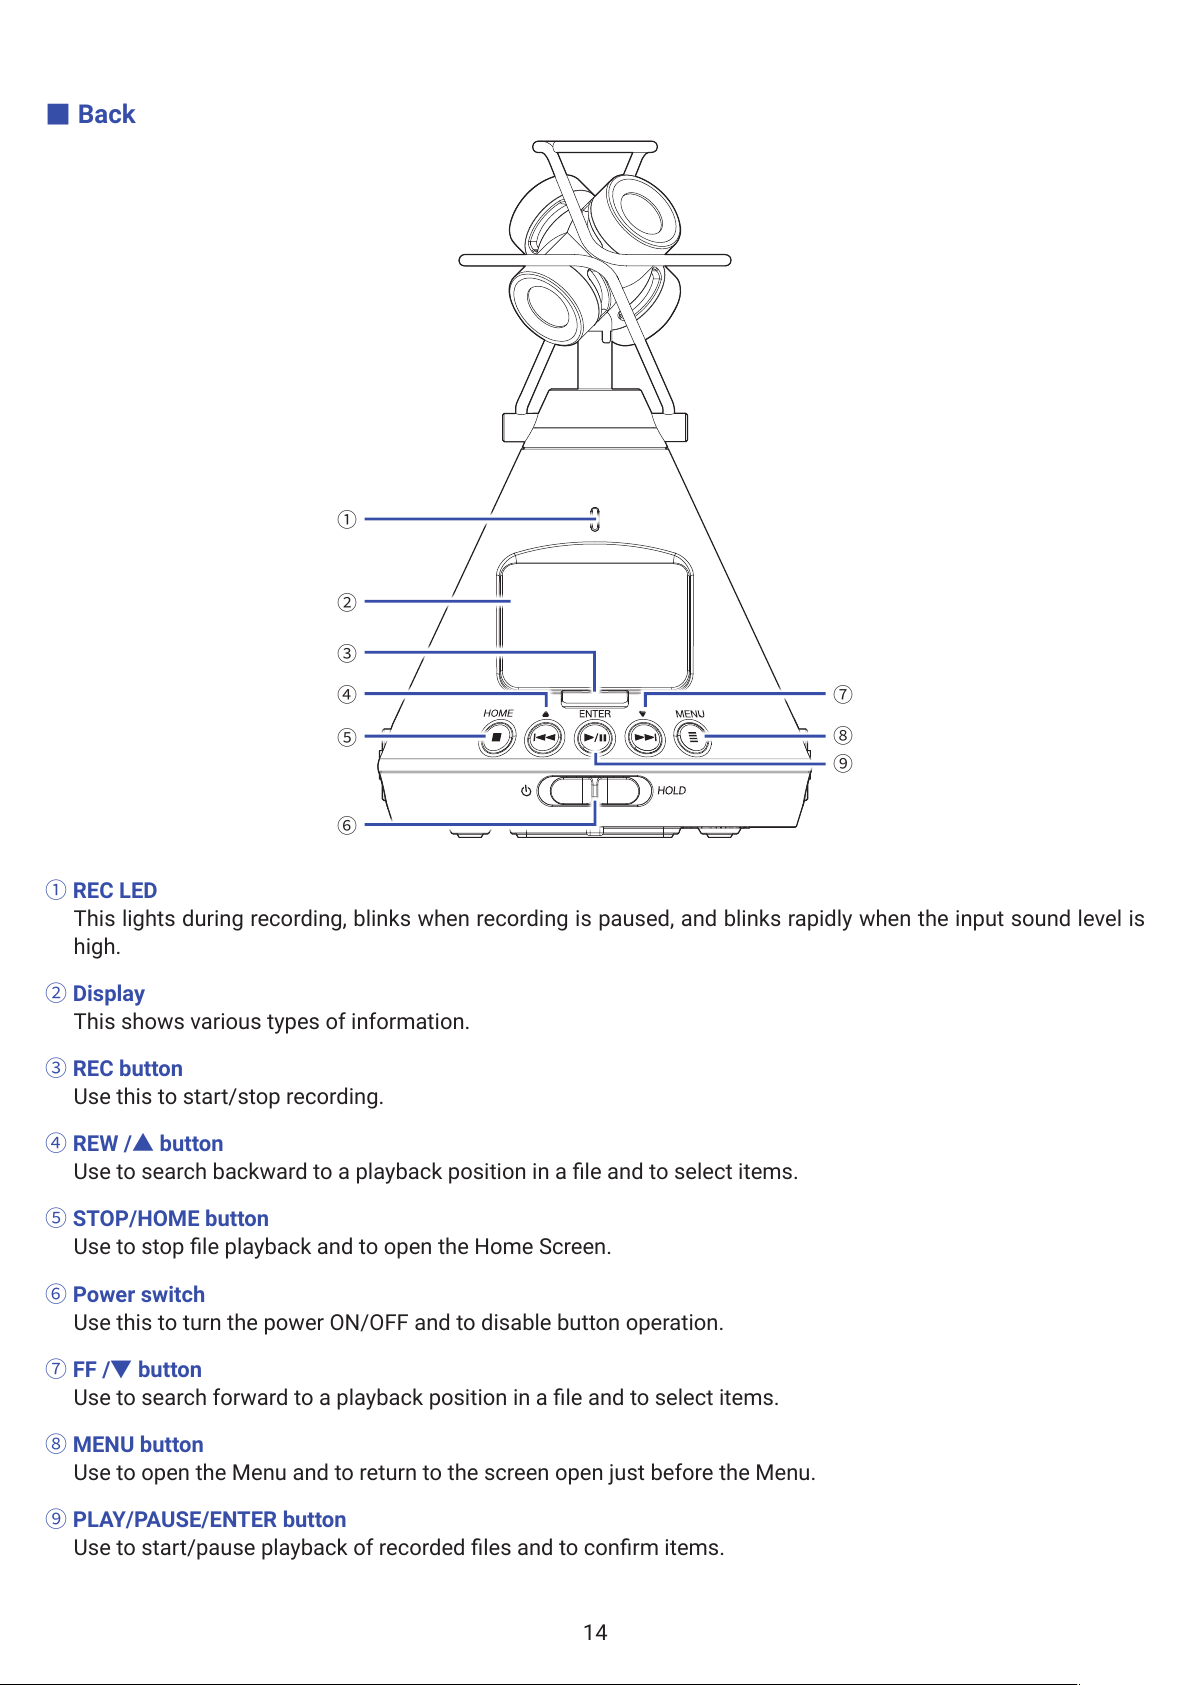
Page 14
Ӎ
Back
Ύ
ΐ Γ
Δ
Ε
Α
Β
Ώ
REC LED
This lights during recording, blinks when recording is paused, and blinks rapidly when the input sound level is
high.
Ύ Display
This shows various types of information.
Ώ REC button
Use this to start/stop recording.
ΐ REW /Ӛ button
Use to search backward to a playback position in a le and to select items.
Α STOP/HOME button
Use to stop le playback and to open the Home Screen.
Β Power switch
Use this to turn the power ON/OFF and to disable button operation.
Γ FF /Ӟ button
Use to search forward to a playback position in a le and to select items.
Δ MENU button
Use to open the Menu and to return to the screen open just before the Menu.
Ε PLAY/PAUSE/ENTER button
Use to start/pause playback of recorded les and to conrm items.
14
Page 15

Ӎ
Left and right sides
Ύ
Ώ
Α
ΐ
VOLUME buttons
Use to adjust the volume.
Ύ PHONE OUT jack
This can output sound to headphones.
Ώ MIC GAIN dial
Use to adjust the mic gain.
ΐ USB port
Connect this to a computer or iOS device to use the as an audio interface or card reader.
The dedicated AC adapter (ZOOM AD-17) can also be connected here to use AC power.
Α LINE OUT jack
This can output sound to a connected device.
15
Page 16
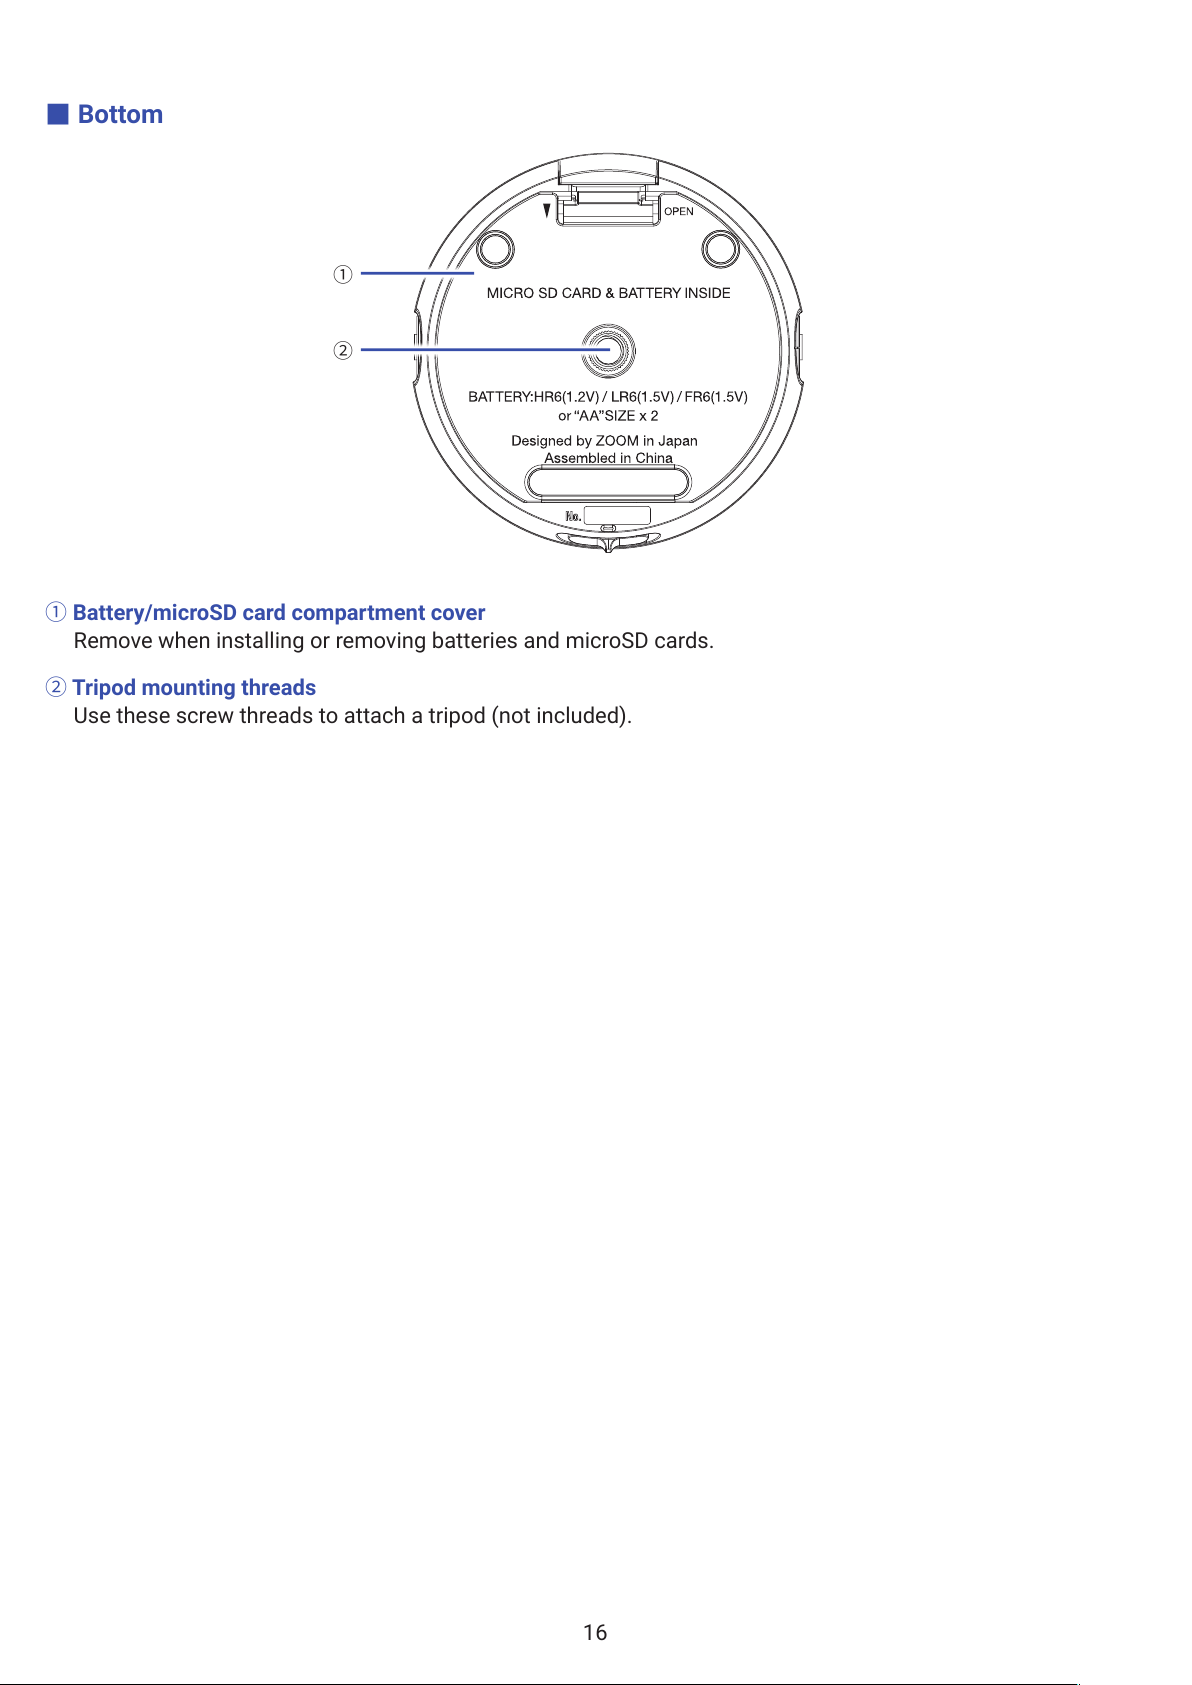
Ӎ
Bottom
Ύ
Battery/microSD card compartment cover
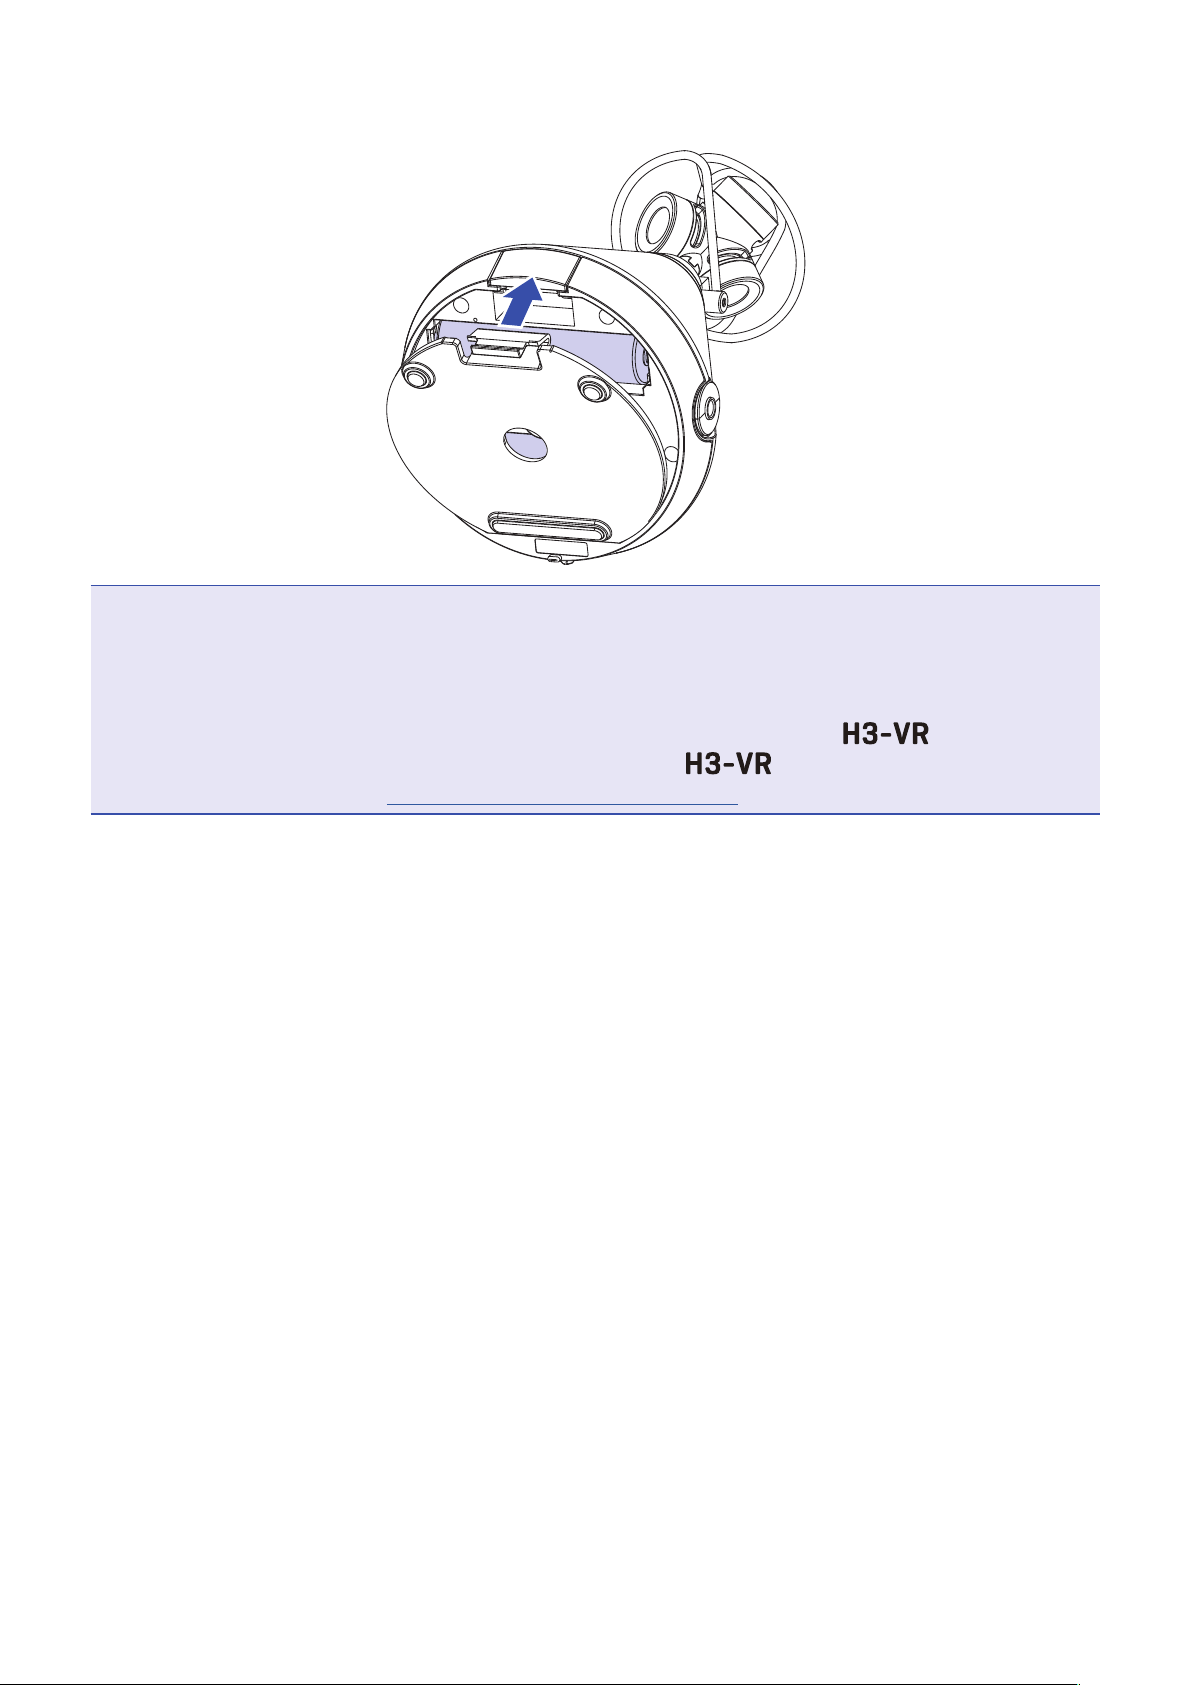
Remove when installing or removing batteries and microSD cards.
Ύ Tripod mounting threads
Use these screw threads to attach a tripod (not included).
16
Page 17
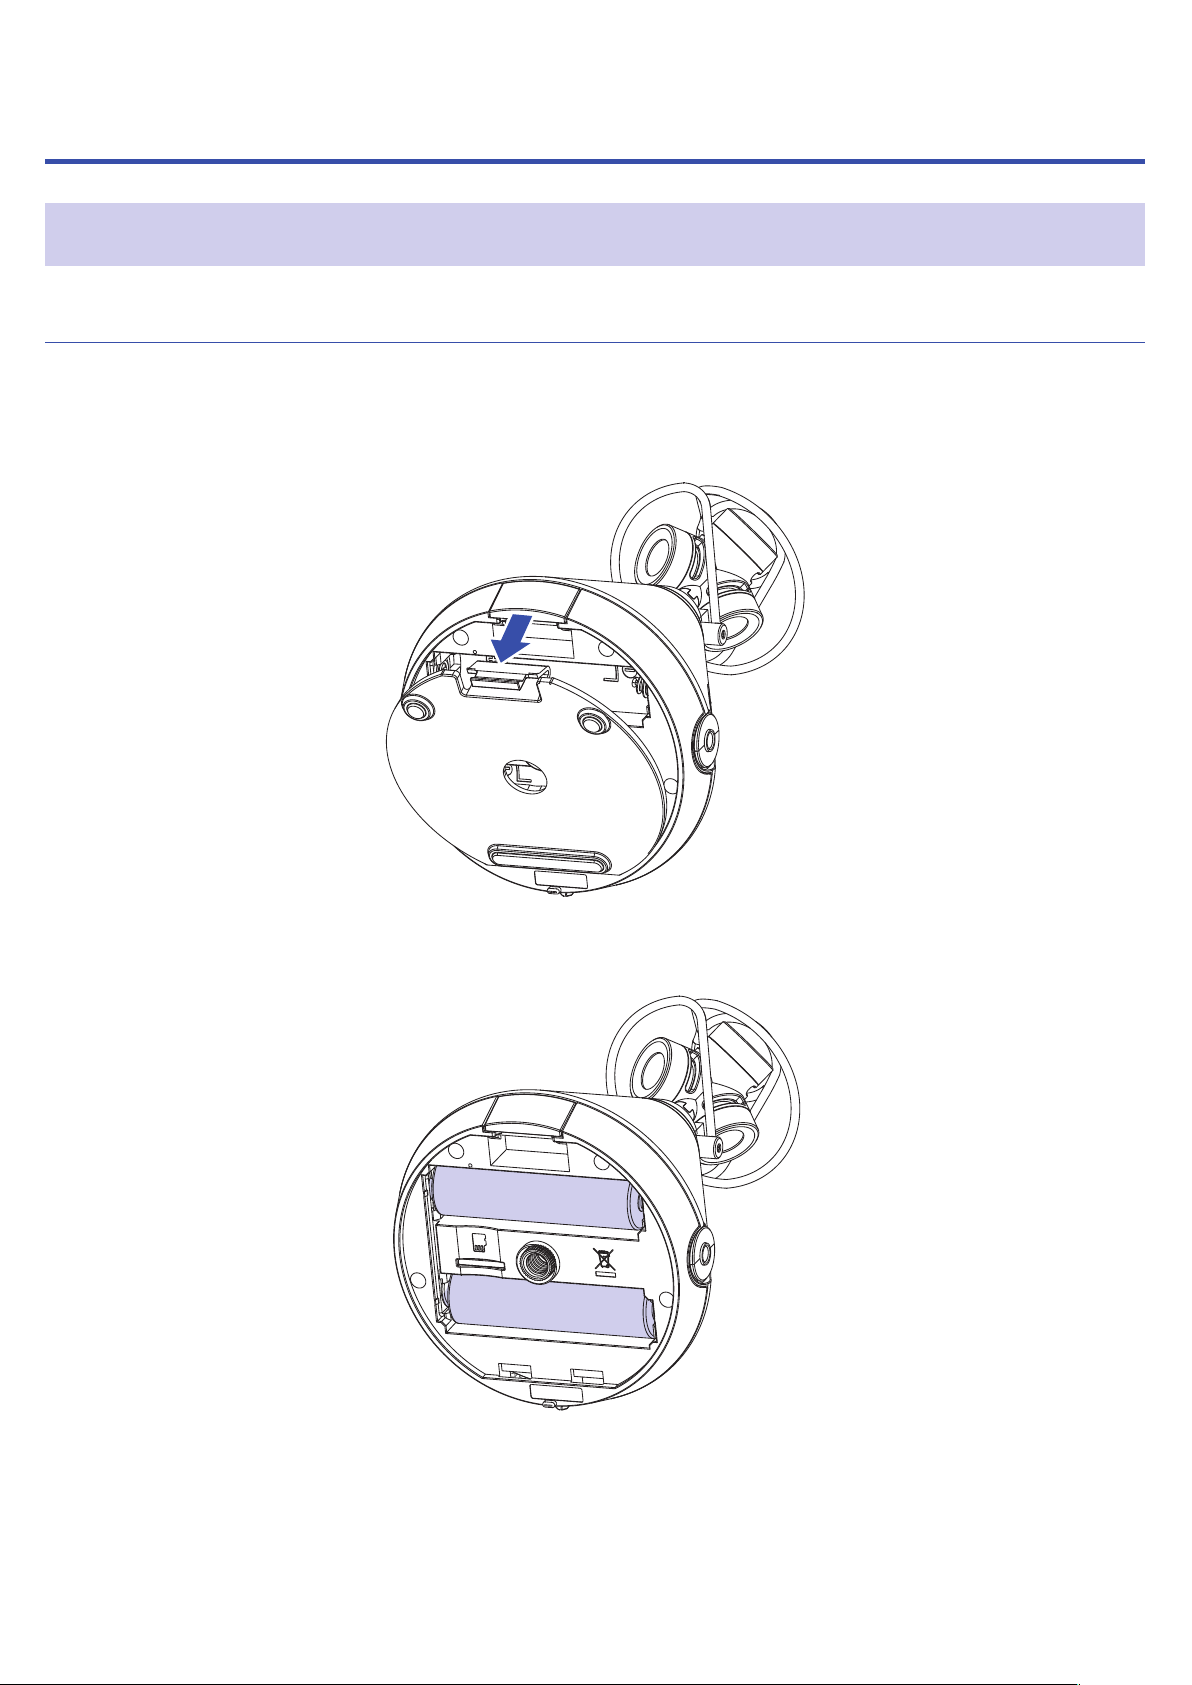
Preparations
Supplying power
Using batteries
1. After turning the power off, push the battery/microSD card compartment cover down to open
it.
2. Install the batteries.
+
+
17
Page 18
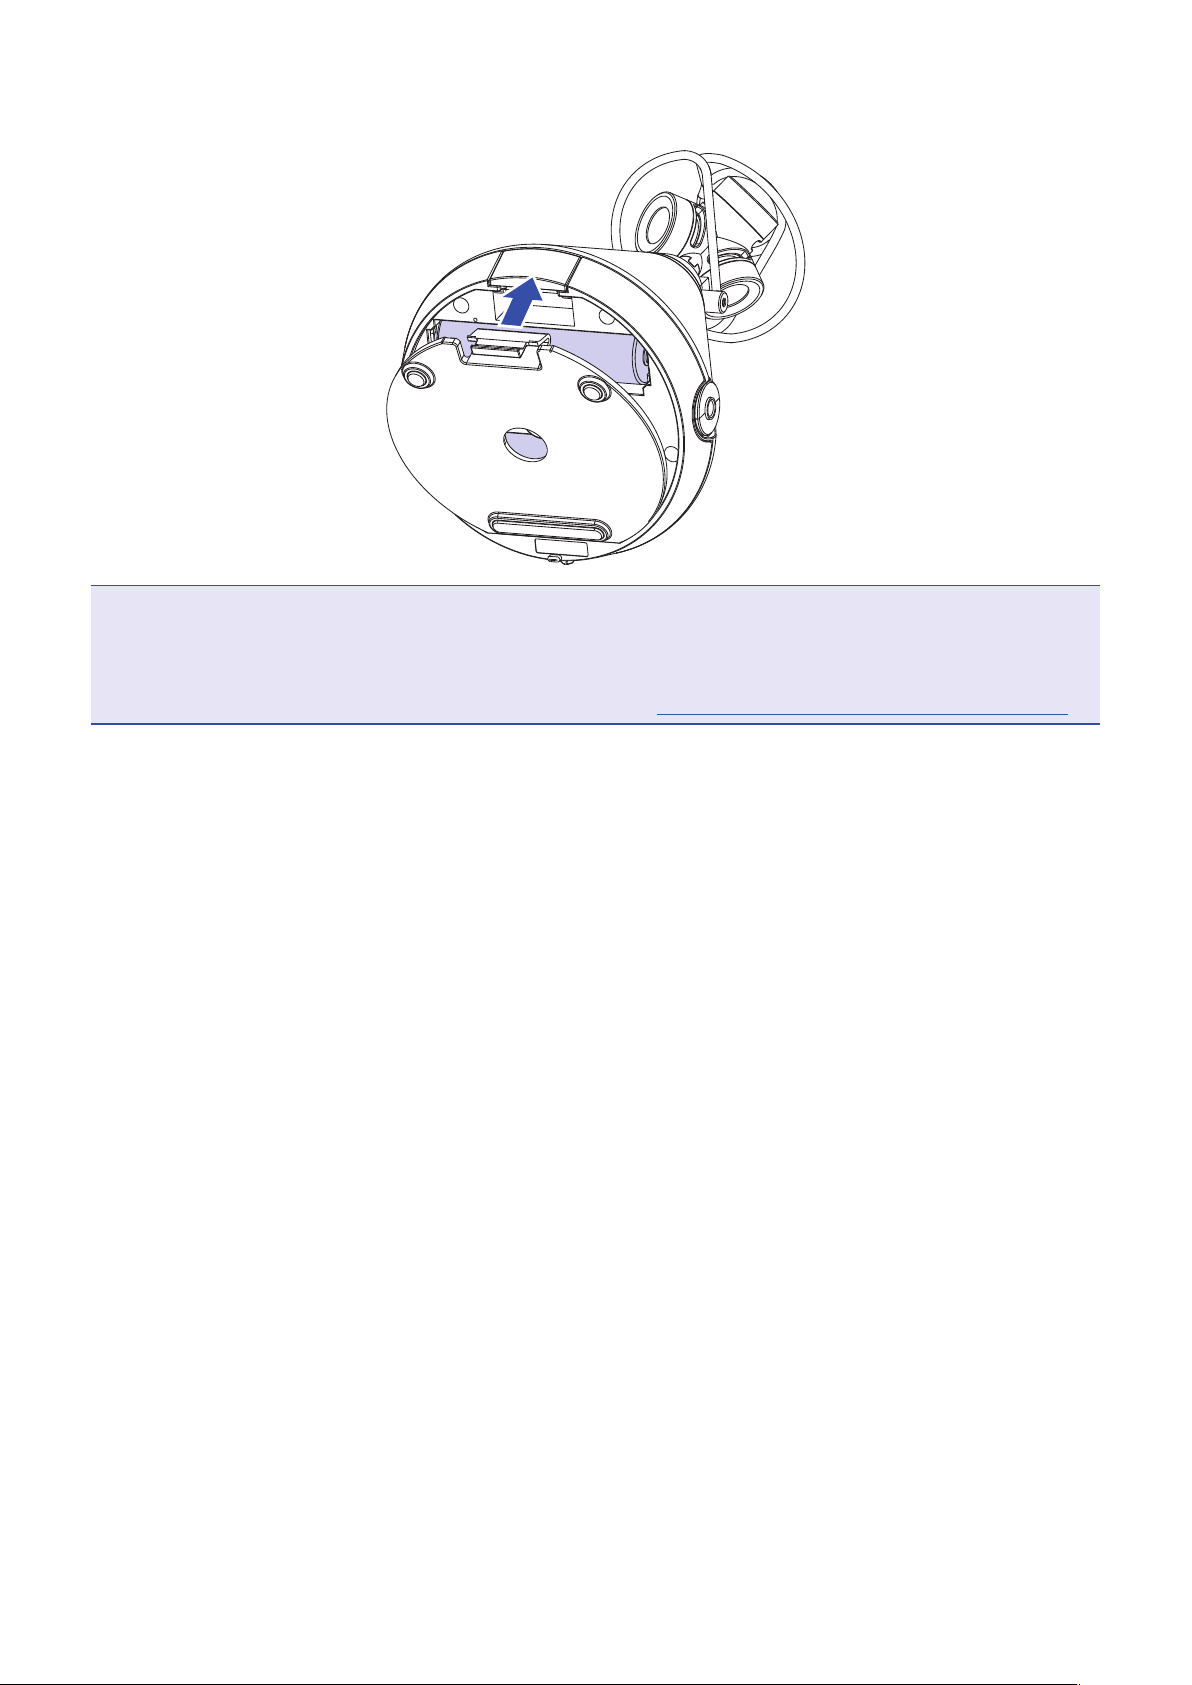
3. Close the battery/microSD card compartment cover.
NOTE
• Use only one type of battery (alkaline, NiMH or lithium) at a time.
• If the remaining battery power indicator drops to 0, turn the power off immediately and install new batteries.
• After installing the batteries, set the battery type correctly ( “Setting the type of batteries used” on page 88).
18
Page 19
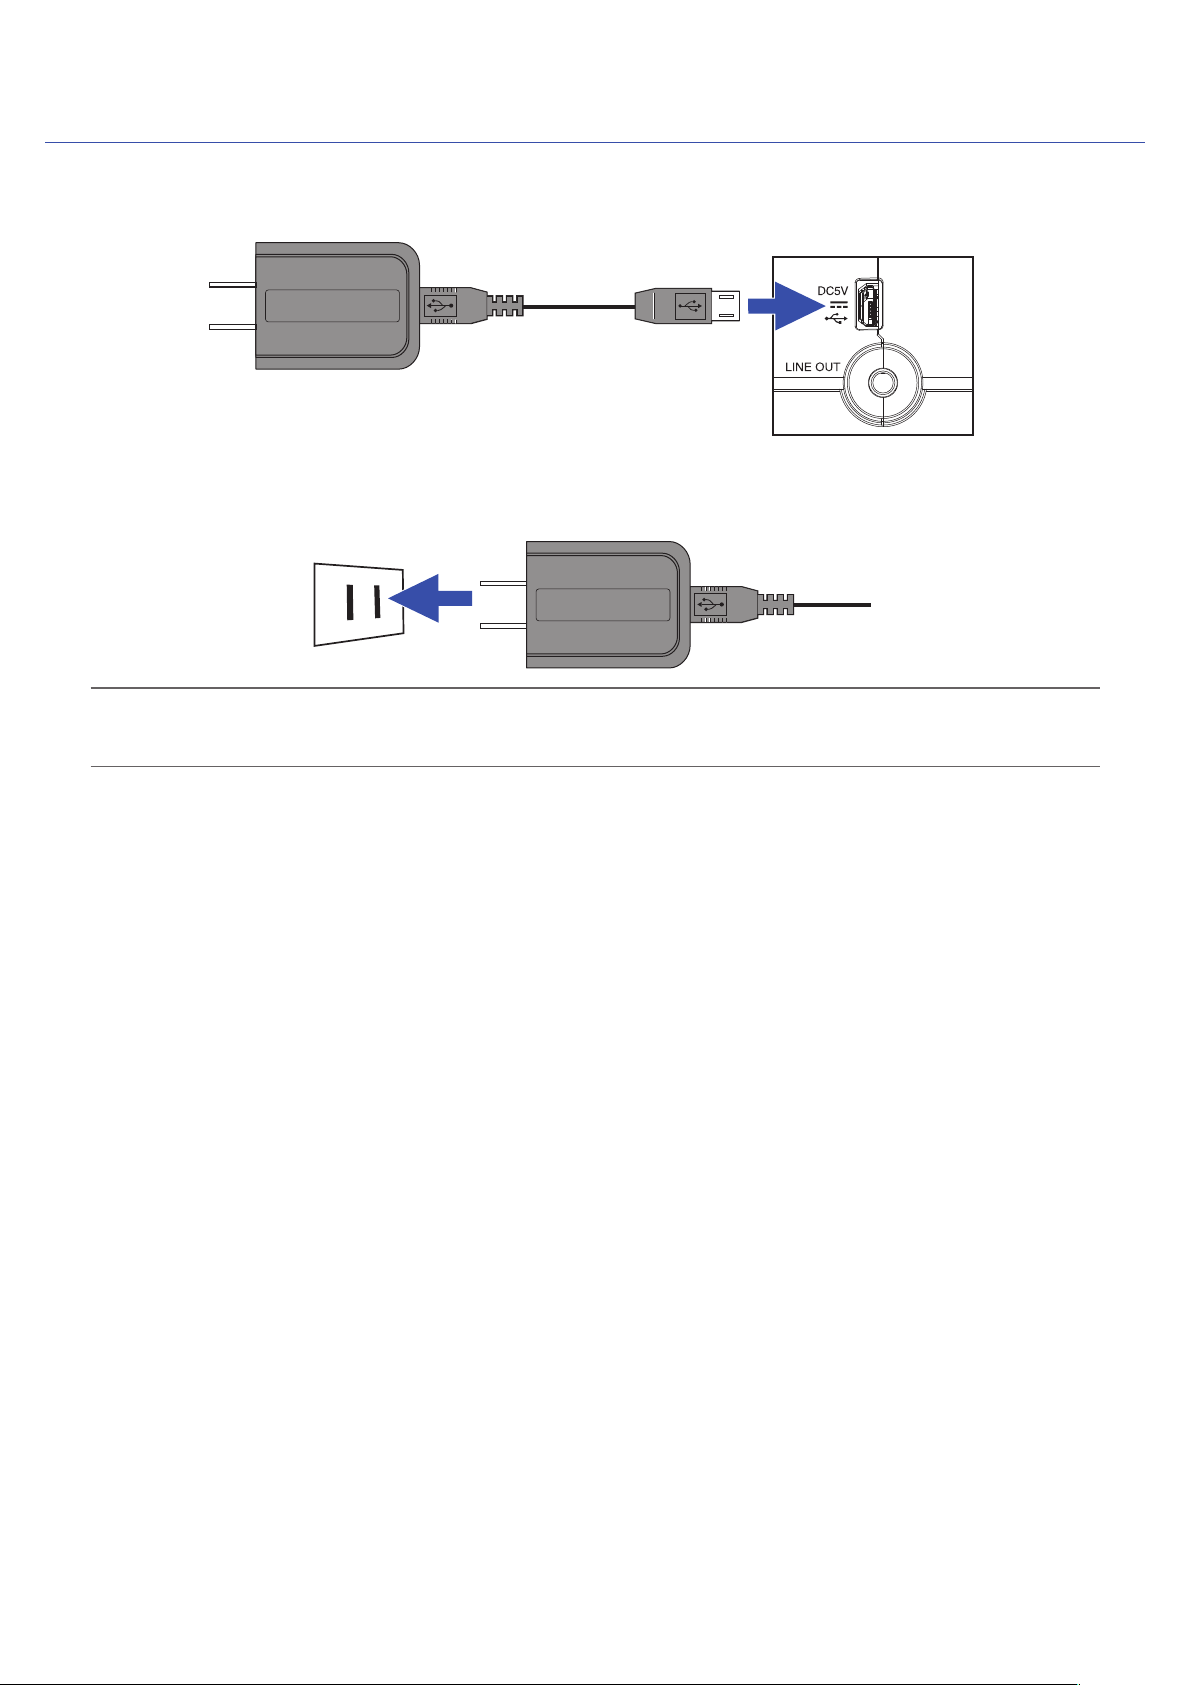
Using an AC adapter
1. Connect the cable of the dedicated AD-17 AC adapter to the USB port.
2. Plug the dedicated AC adapter into an outlet.
HINT
• When connected to a computer, power can be supplied by USB.
19
Page 20
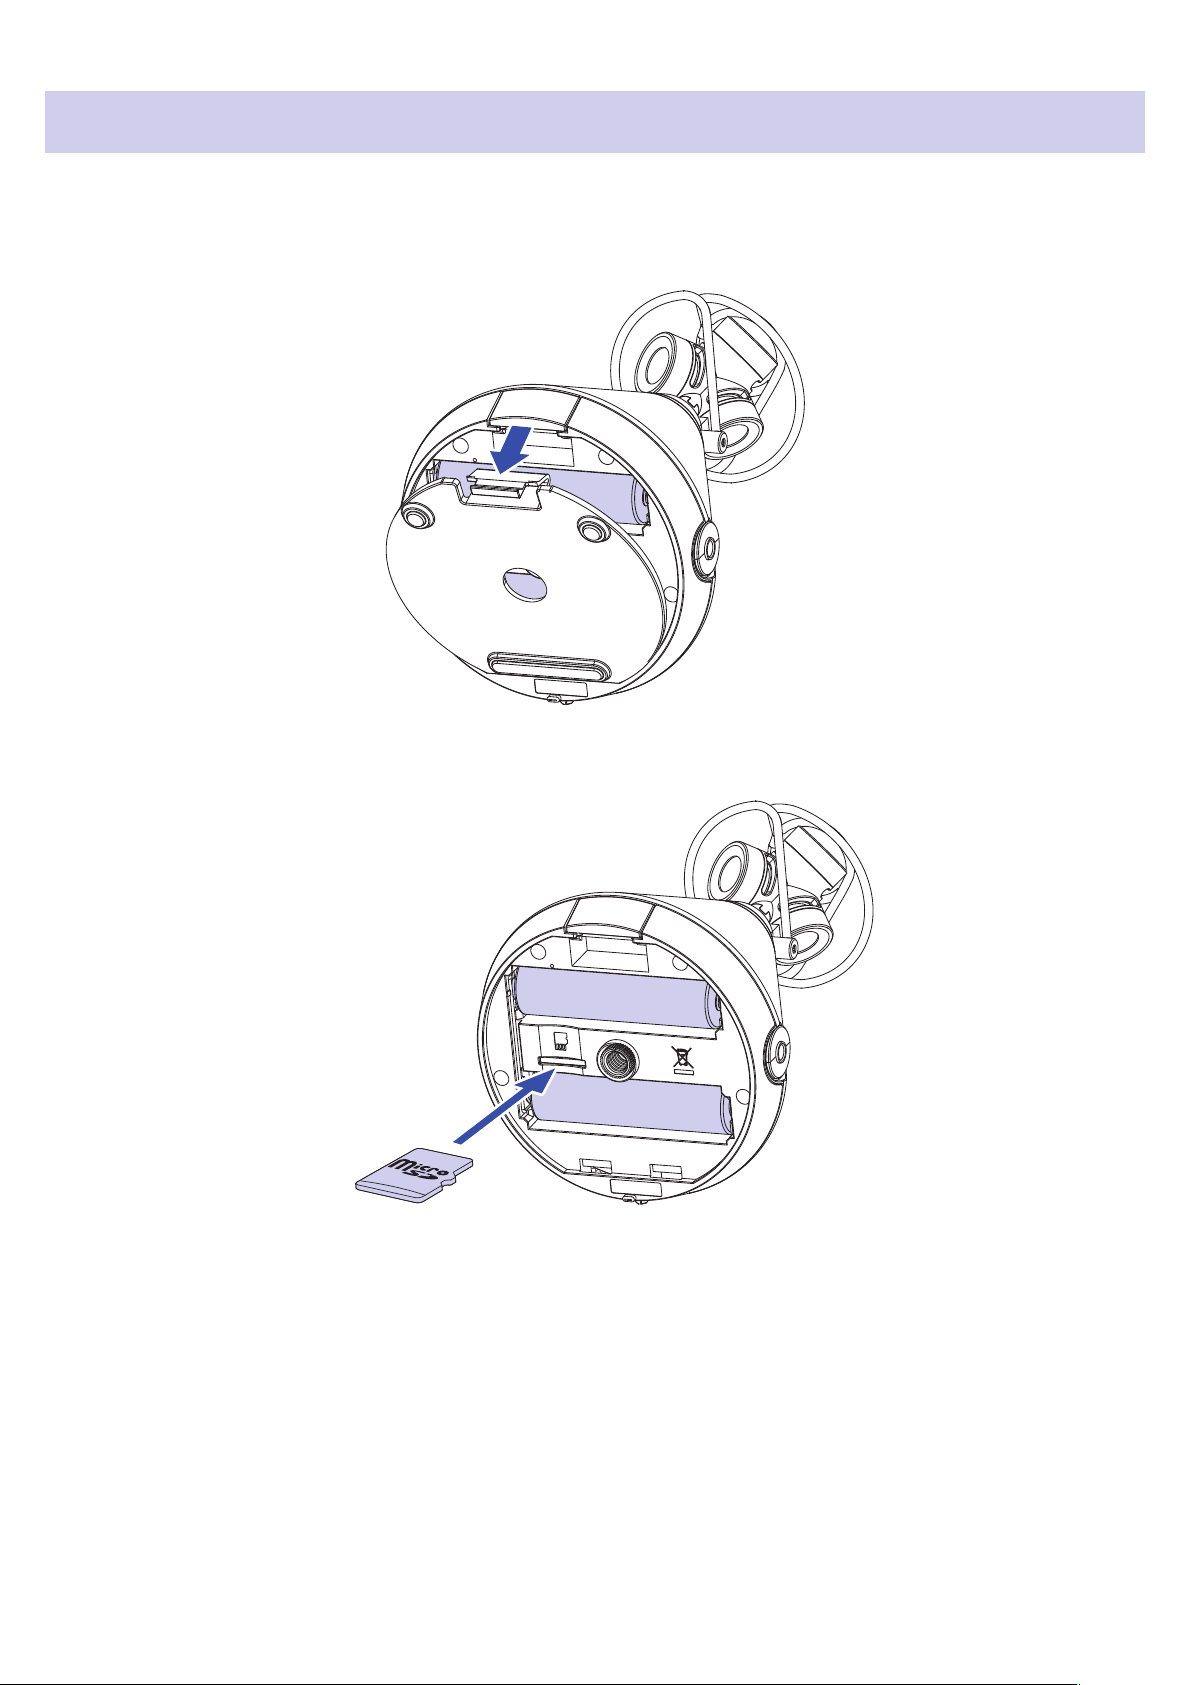
Inserting microSD cards
1. After turning the power off, push the battery/microSD card compartment cover down to open
it.
+
+
2. Insert the microSD card into the card slot.
+
+
microSD card
To remove a microSD card, push it further into the slot and then pull it out.
20
Page 21
3. Close the battery/microSD card compartment cover.
NOTE
• Always make certain that the power is off when inserting or removing a microSD card. Inserting or removing a
card while the power is on could result in data loss.
• When inserting a microSD card, be sure to insert the correct end with the top side up as shown.
• Recording and playback are not possible when a microSD card is not loaded in the .
• After purchasing a new microSD card, always format it using the to maximize performance.
To format a microSD card, see “Formatting microSD cards” on page 98.
21
Page 22
Turning the power on/off
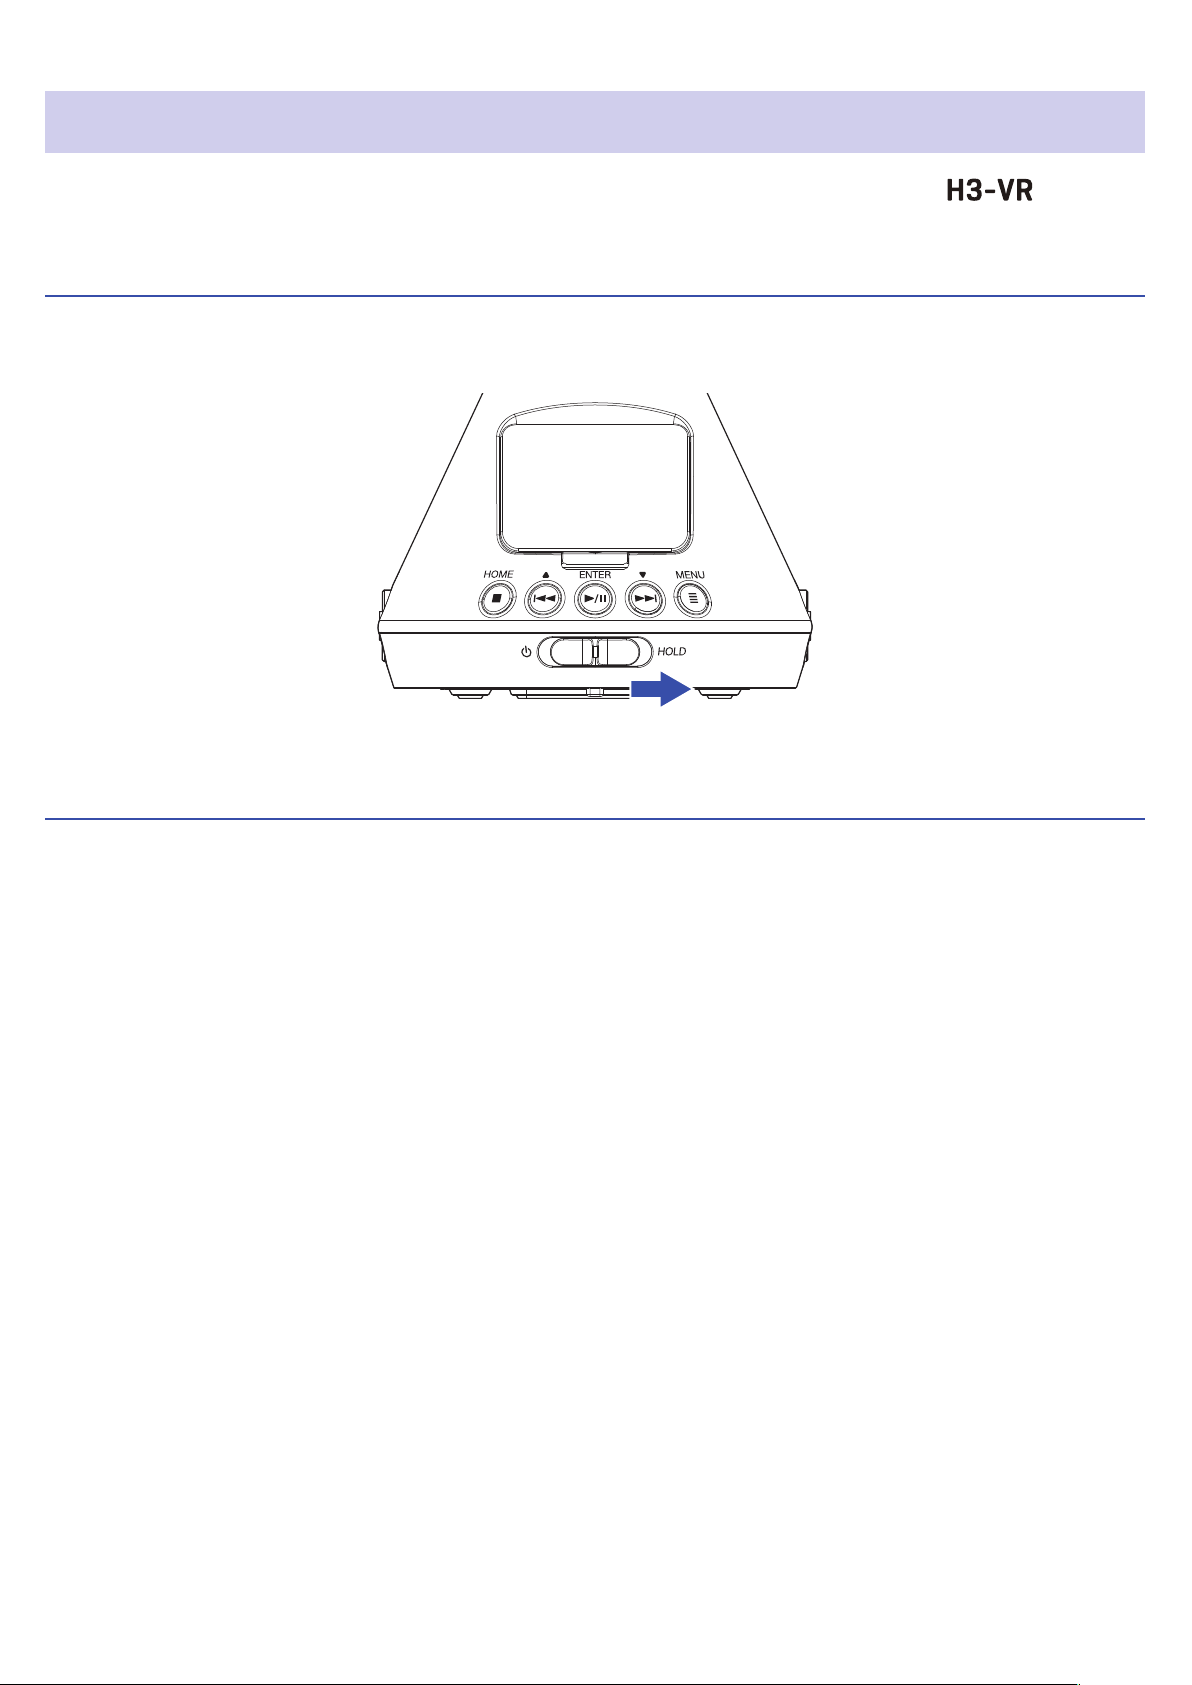
Turning the power on
1. Slide the power switch toward until the display becomes active.
NOTE
• If “No SD Card!” appears on the display, conrm that a microSD card is inserted properly.
• If “Invalid SD Card!” appears on the display, the card is not formatted correctly. Format the microSD card
( “Formatting microSD cards” on page 98) or use a different microSD card ( “Inserting microSD cards” on
page 20).
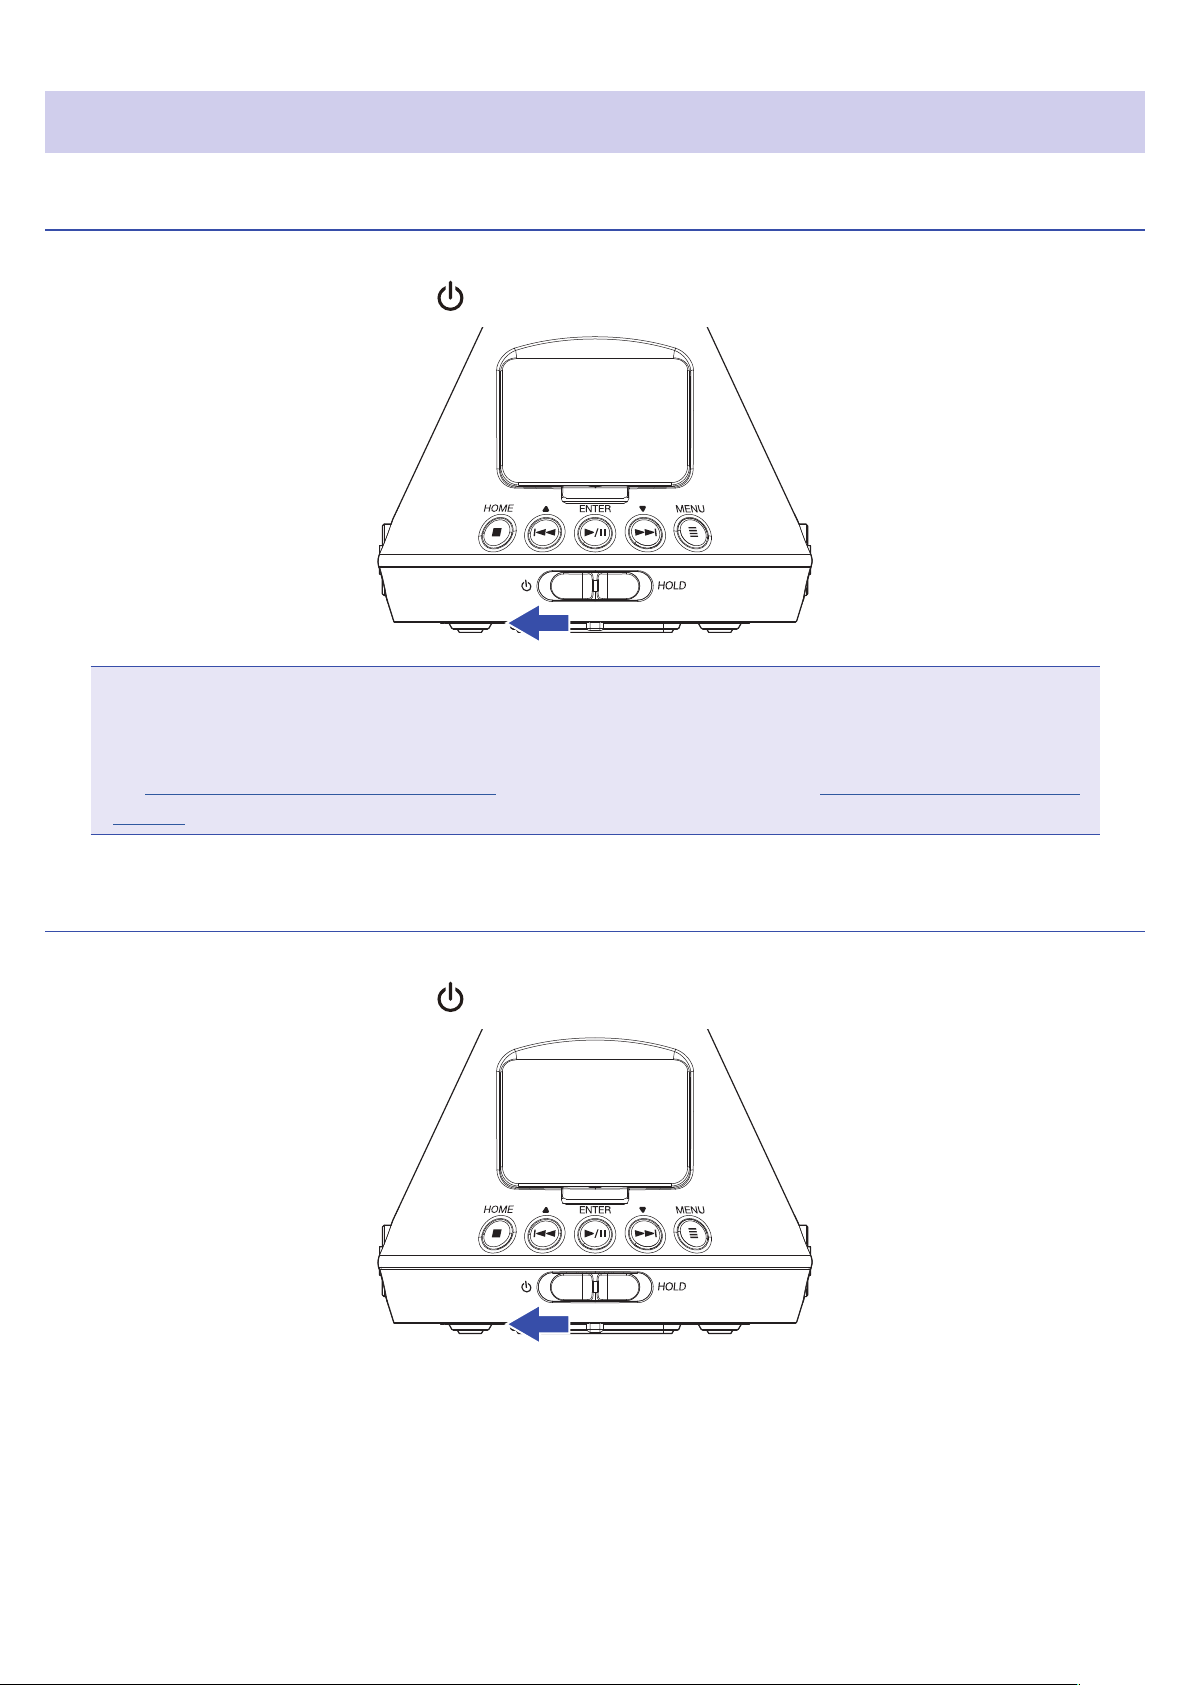
Turning the power off
1. Slide the power switch toward until “Goodbye! See You!” appears on the display.
22
Page 23
Preventing misoperation (HOLD function)
In order to prevent misoperation, the hold function can be used to disable the buttons on the .
Activating the HOLD function
1. Slide the power switch to HOLD.
Deactivating the HOLD function
1. Slide the power switch back to the middle.
23
Page 24
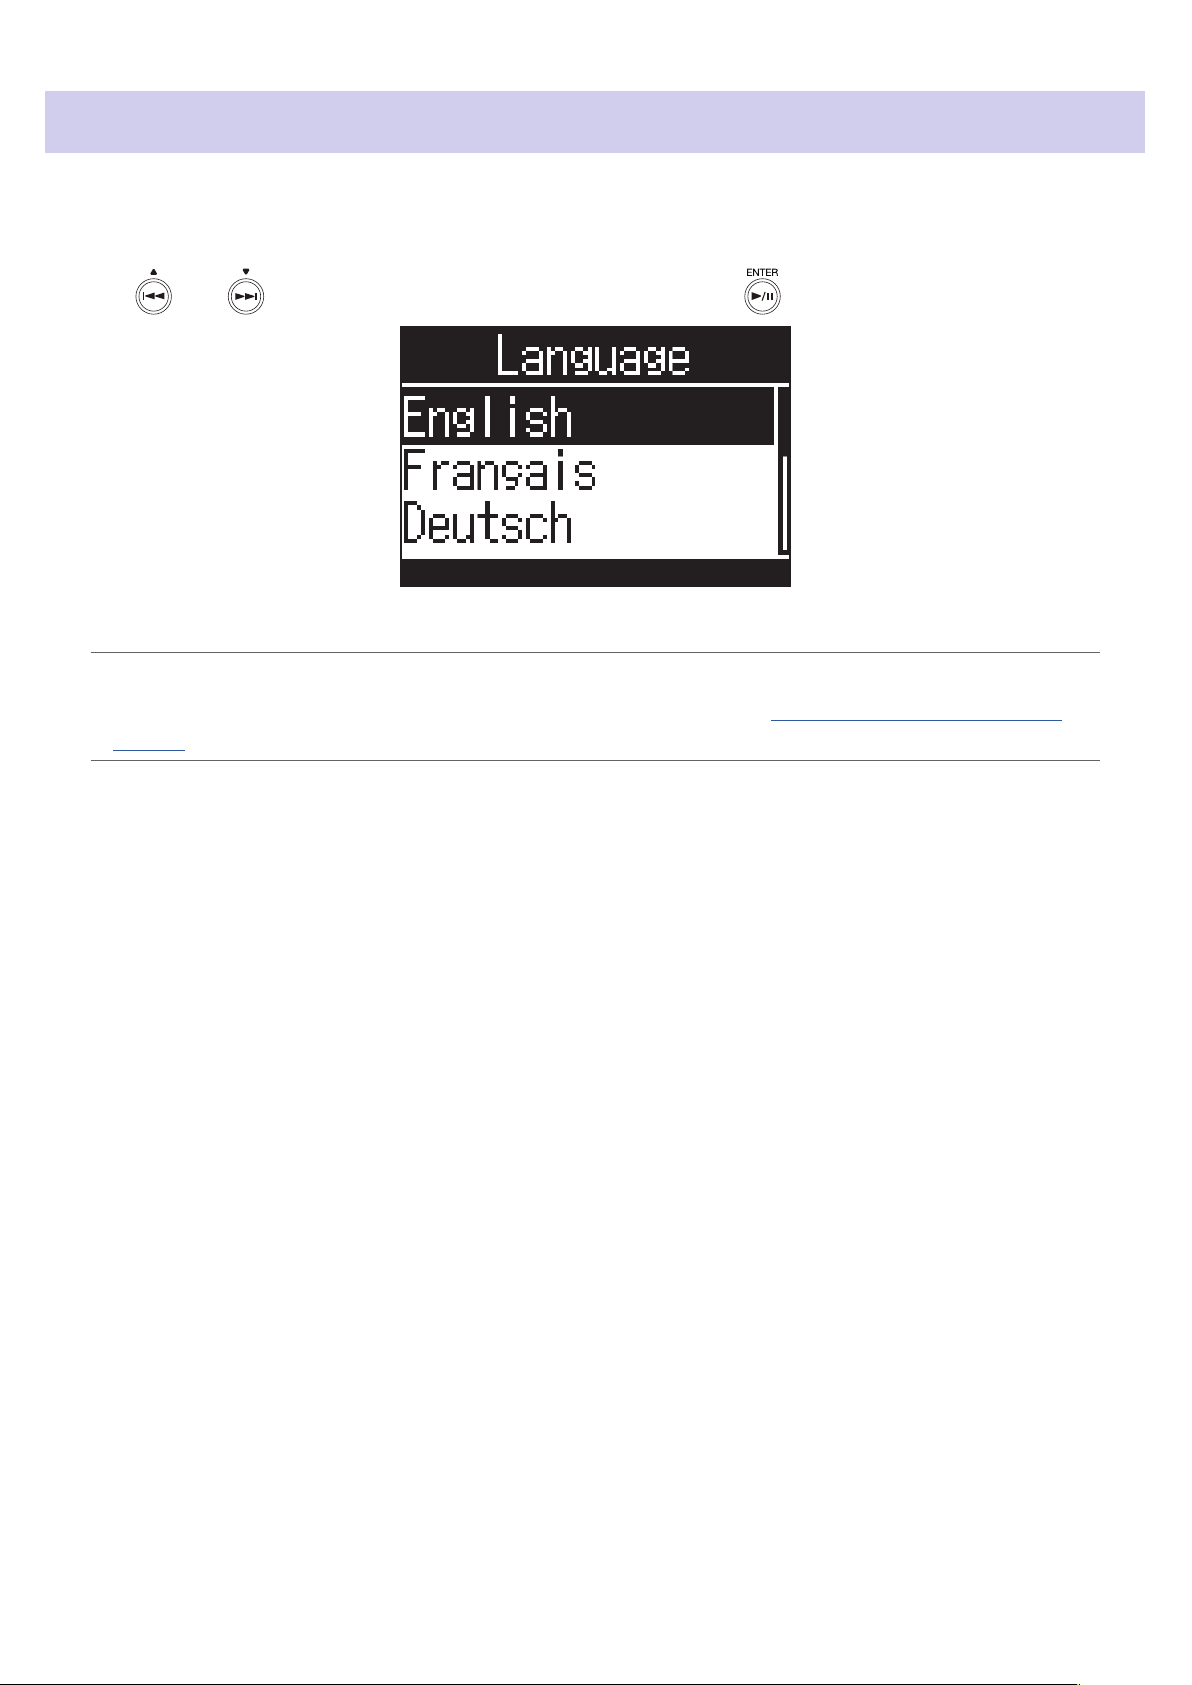
Setting the language shown (rst time starting up)
The rst time you turn the power on after purchase, set the display language when the Language setting screen
opens.
1. Use and to select the display language, and press .
This completes setting the language.
HINT
• The display language can also be changed later from the Menu screen ( “Setting the language shown” on
page 94).
24
Page 25
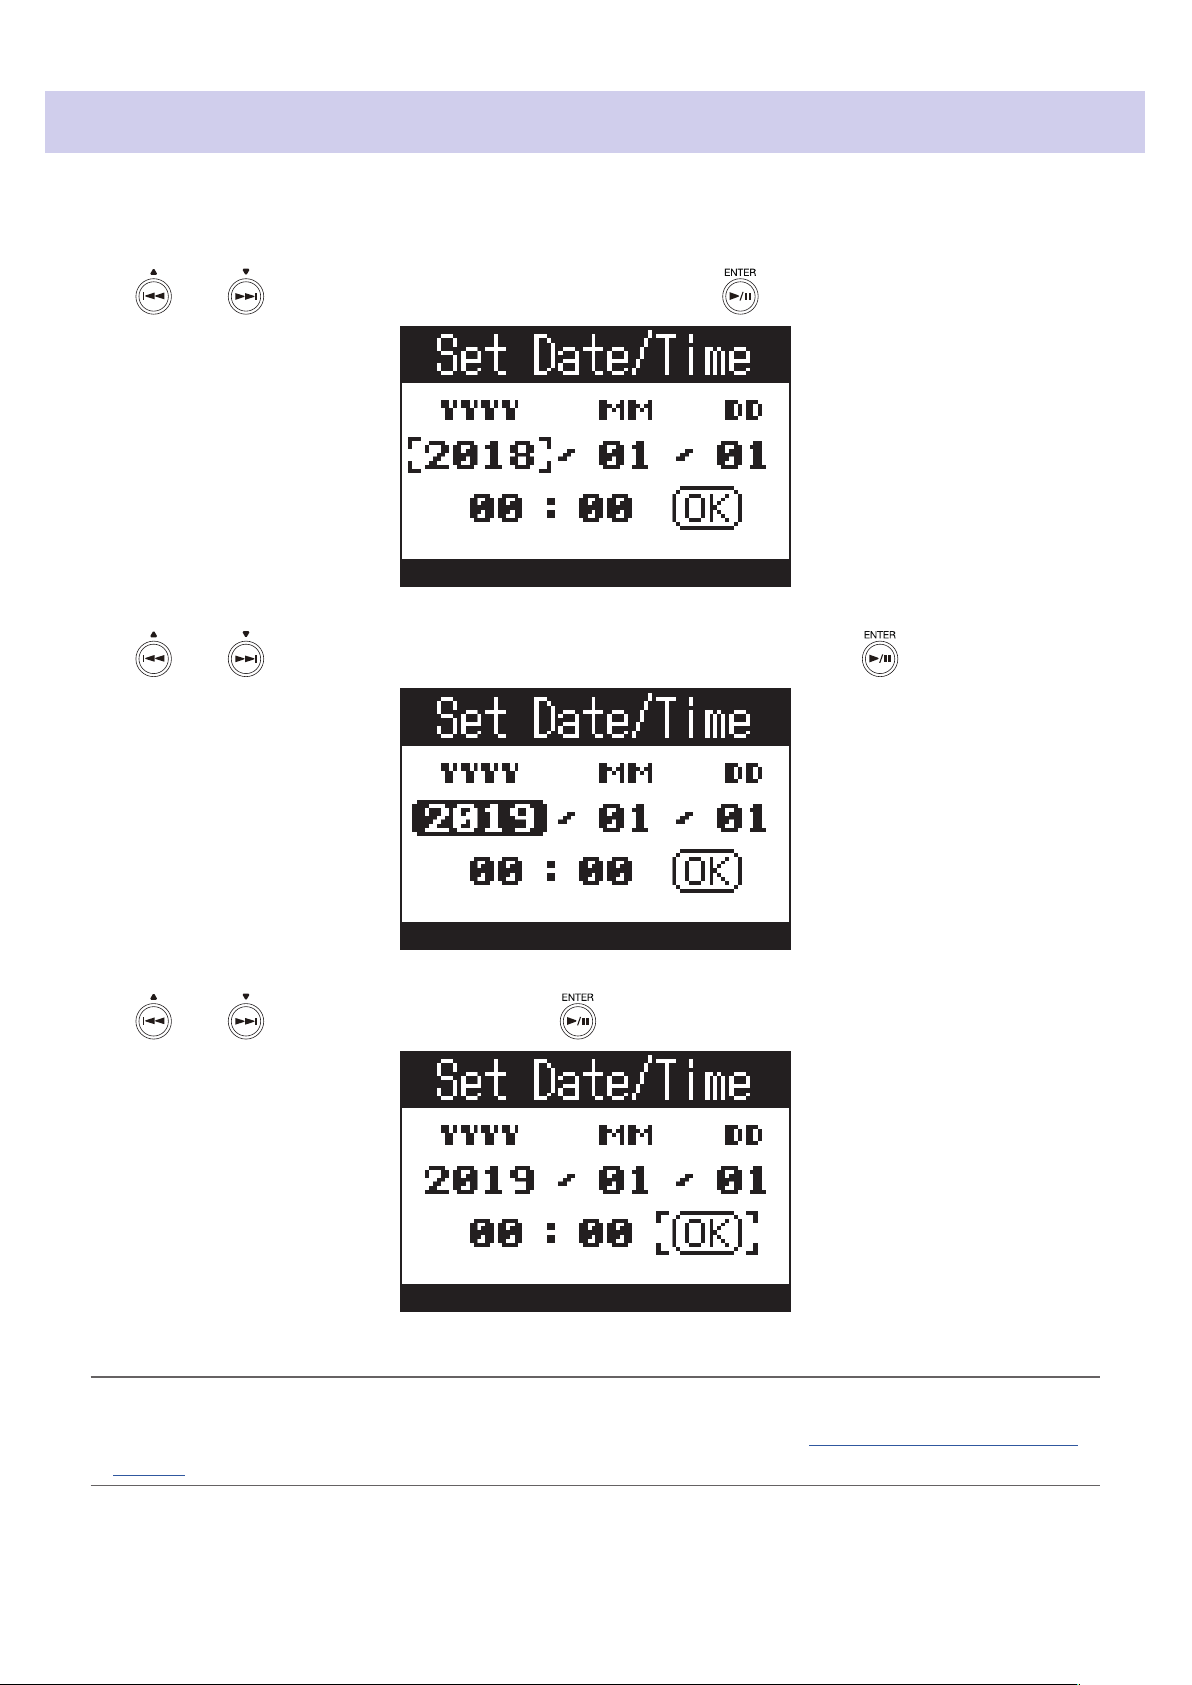
Setting the date and time (rst time starting up)
The rst time you turn the power on after purchase, set the date and time when the Set Date/Time screen opens
after the Language setting screen. This data is used to add the date and time to recorded les.
1. Use and to select the item to change, and press .
2. Use and to change the value of the selected item, and press .
3. Use and to select “OK”, and press .
This sets the date and time and opens the Home Screen.
HINT
• The date and time setting can also be changed later from the Menu screen ( “Setting the date and time” on
page 95).
25
Page 26
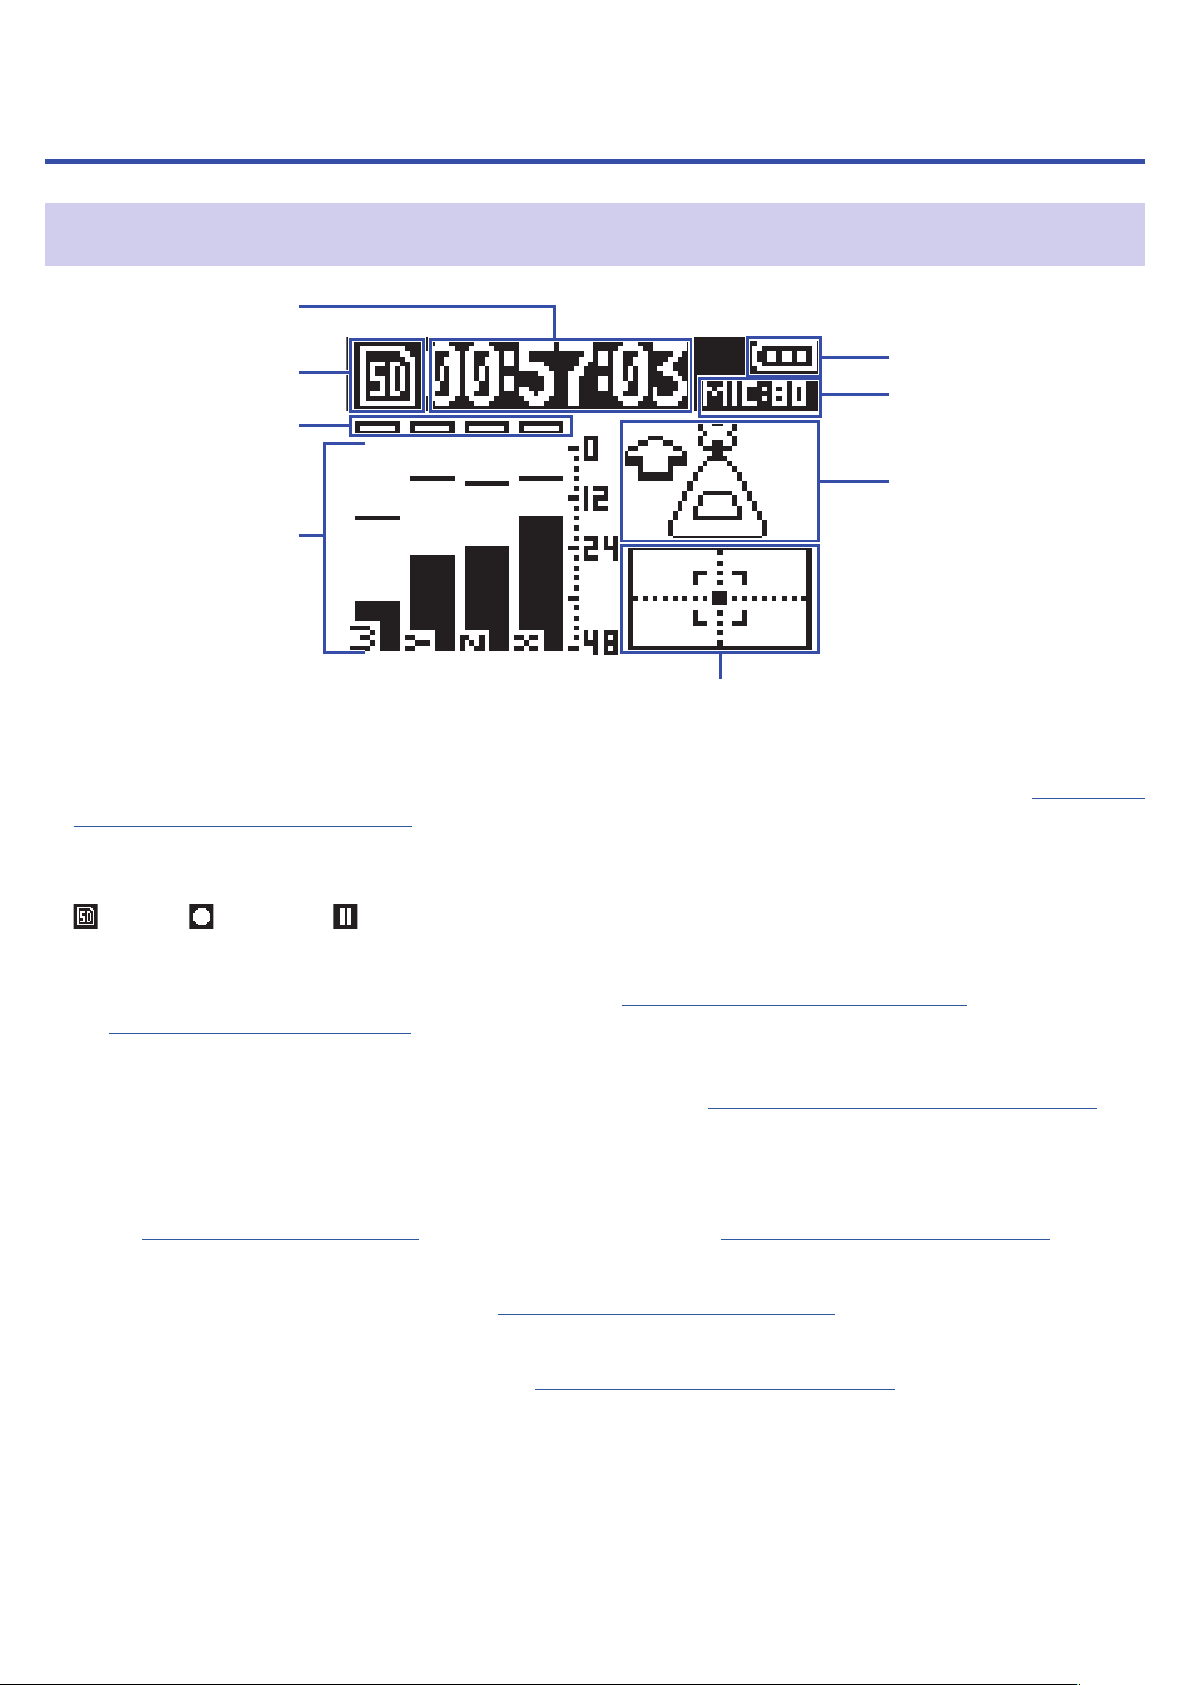
Recording
Home Screen (in recording standby)
Ύ
Ώ
ΐ
Δ
Time display
This shows either the current elapsed recording time or the remaining available recording time ( “Setting the
recording time display” on page 49).
Ύ Status icon
This shows the recording status.
Ready Recording Paused
Α
Β
Γ
Ώ Clipping indicators
If the clipping indicators light, adjust the input level ( “Adjusting input levels” on page 37) or set the limiter
( “Setting the limiter” on page 40).
ΐ Track names and level meters
These show the track names according to the recording mode ( “Setting the recording mode” on page 30) and
current input levels of each track.
Α Remaining battery charge
This shows the remaining battery charge. When the remaining battery charge becomes low, replace the batteries ( “Using batteries” on page 17) or connect an AC adapter ( “Using an AC adapter” on page 19).
Β Mic gain
This shows the current mic gain setting ( “Adjusting input levels” on page 37).
Γ Mic position
This shows the current mic position setting ( “Setting the mic position” on page 27).
Δ Tilt indicator
This shows mic tilt compared to the optimal mic position.
26
Page 27

Preparing to record
Setting the mic position
The can record sound in every direction, including forward, backward, left, right, up and down.
Use Mic Position to set the orientation of the mic and recorder in relation to the forward direction.
When Mic Position is kept at its default setting, which is Auto, the built-in motion sensor allows it to always
record with normal forward/backward, left/right and up/down position relationships regardless of whether the
mics are oriented up, down or forward.
1. Press .
This opens the Menu Screen.
2. Use and to select “Mic Position”, and press .
27
Page 28
3. Use and to select the mic position, and press .
Forward
Forward
Forward
Forward
The following mic orientations can be set.
Setting
Auto −
Mic/recorder
orientation
Explanation
The automatically sets the mic position according to its
orientation at the start of recording.
Upright
Upside Down
Endre
Use this setting to record with the upright.
Use this setting to record with the upside down.
Use this setting to record with the oriented horizontally
with its display up.
Endre Invert
Use this setting to record with the oriented horizontally
with its display down.
The orientation of the is detected by the motion sensor and shown on the Home Screen.
Adjust the angle of the so that the tilt indicator is centered.
Tilt indicator
28
Page 29

NOTE
• If the Mic Position setting and the mic orientation during recording are not the same, the recording le cannot
be made the correct orientation and the front orientation will be off during playback.
• The Mic Position setting can be checked on the Home Screen.
• When the Mic Position setting is “Auto”, an animation will appear guiding you to orient the mic so that it
matches the closest of the other four mic position settings. When the mic orientation approaches the correct
angle, the tilt indicator will appear on the Home Screen.
• The Mic Position setting becomes xed when recording starts. The Mic Position setting will not change during
recording even if the mic orientation is changed.
HINT
• To minimize reections, we recommend placing the as far from walls and the oor as possible when
recording.
29
Page 30
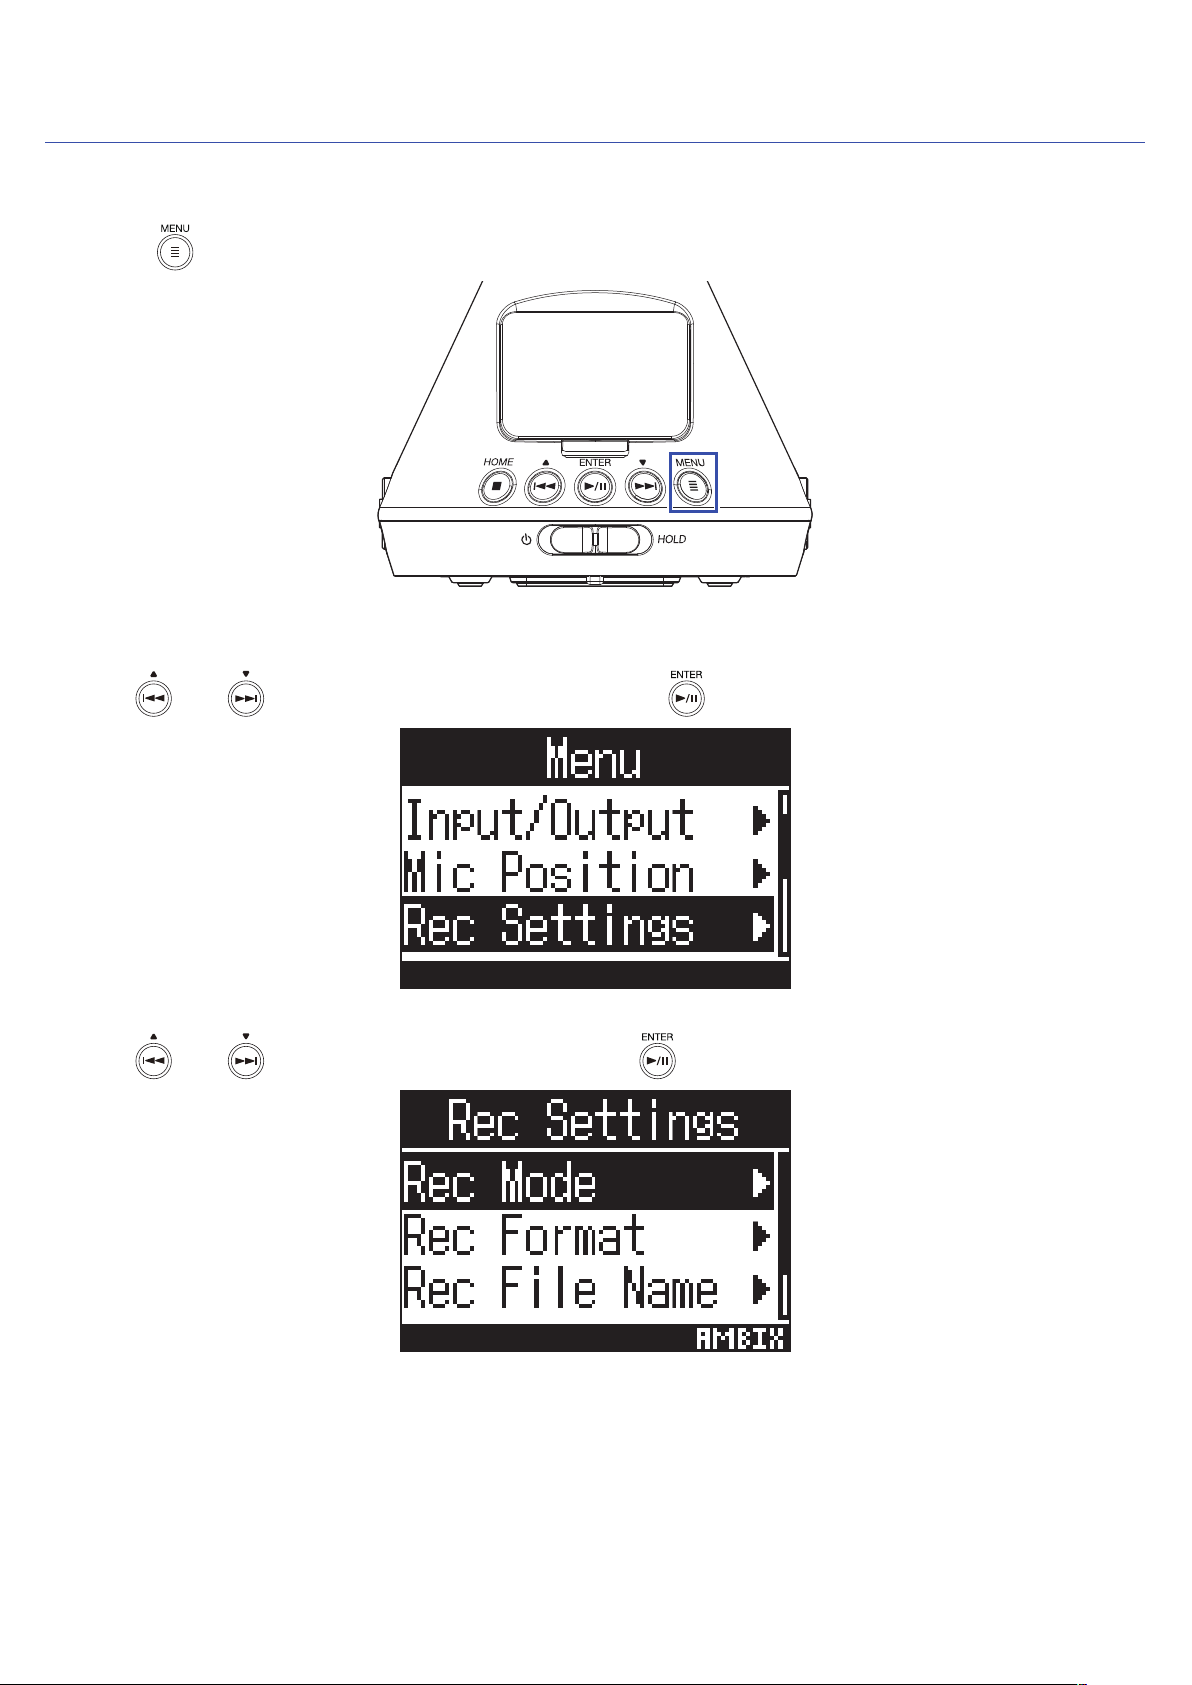
Setting the recording mode
Set the le format used to record les.
1. Press .
This opens the Menu Screen.
2. Use and to select "Rec Settings", and press .
3. Use and to select "Rec Mode", and press .
30
Page 31

4. Use and to select the recording mode, and press .
The following recording modes can be set.
Setting Explanation
FuMa Record as Ambisonics B FuMa format (4-channel).
AmbiX Record as Ambisonics B AmbiX format (4-channel).
Ambisonics A Record as Ambisonics A format (4-channel).
Stereo Record as an ordinary stereo (2-channel) le.
Binaural Record as a stereo (2-channel) le that has been converted to binaural.
NOTE
• "Binaural“ cannot be selected when the recording format is "96k/16bit” or "96k/24bit".
• When using the as an audio interface, "Rec Mode” cannot be set. Instead, the Menu can be used to
set the following according to the audio interface mode.
Stereo: Binaural (Select "Off” for ordinary stereo or “On” for binaural.)
4ch Ambisonics: Ambisonic Mode (FuMa, AmbiX or Ambisonics A can be selected.)
HINT
• The recording mode used to record can be checked in the le information ( “Checking le information” on
page 67).
31
Page 32

Setting the recording format
Set the sampling frequency (kHz) and bit rate (bit) in consideration of the audio quality and le size.
1. Press .
This opens the Menu Screen.
2. Use and to select "Rec Settings", and press .
3. Use and to select "Rec Format", and press .
32
Page 33

4. Use and to select the recording format, and press .
The recording formats that can be set are shown in order of audio quality (from low to high) and le size (from
small to large).
Setting Explanation
44.1k/16bit
44.1k/24bit
48k/16bit
48k/24bit
96k/16bit
96k/24bit
The higher the sampling frequency (kHz) and bit rate, the better the audio quality.
NOTE
• When the recording format is "96k/16bit” or "96k/24bit", the "Binaural” recording ( “Setting the recording
mode” on page 30) and "Binaural” Ambisonic Monitoring ( “Setting Ambisonic monitoring” on page 35)
modes cannot be used.
33
Page 34

Monitoring the input sound
Use headphones, for example, to monitor the input sound and adjust the volume.
1. Connect headphones, for example, to the PHONE OUT jack on the .
2. Use to adjust the volume.
34
Page 35

Setting Ambisonic monitoring
This sets the conversion format when outputting input signals from the PHONE OUT and LINE OUT jacks.
1. Press .
This opens the Menu Screen.
2. Use and to select "Input/Output", and press .
3. Use and to select "Ambisonic Monitor", and press .
35
Page 36

4. Use and to select the Ambisonic monitoring mode, and press .
The following Ambisonic monitoring modes can be set.
Setting Explanation
Stereo The input sound is converted to ordinary stereo for monitoring.
Binaural The input sound is converted to binaural for monitoring.
NOTE
• "Binaural“ cannot be used when the recording format is "96k/16bit” or "96k/24bit".
36
Page 37

Adjusting input levels
The input level used during recording can be adjusted.
1. Turn to adjust the input level.
The changed input level is shown on the display.
Adjust so that peak levels on the level meters stay around −12 dBFS.
HINT
• Lower the input level if the clipping indicator lights because the sound could become distorted.
• Press to clear the clipping indicator.
37
Page 38

Setting low-frequency cutoff lter
This function can reduce noise, including air-conditioning, wind and vocal pops.
1. Press .
This opens the Menu Screen.
2. Use and to select "Input/Output", and press .
3. Use and to select “Lo Cut", and press .
38
Page 39

4. Use and to set the cutoff frequency.
HINT
• This can be set from 10 to 240 Hz or Off.
39
Page 40

Setting the limiter
time
Threshold
Input signal
time
Time
The limiter can prevent distortion by reducing input signals that have excessively high levels.
When the limiter is ON, if the input signal level exceeds the set threshold value, the input signal level will be suppressed to prevent the sound from distorting.
The amount of time after the input signal exceeds the threshold until compression of the output signal is maximized is called the “attack time”. The amount of time after the input signal goes below the threshold until the limiter stops compressing the signal is called the “release time”. Change these two to adjust the audio quality.
Level
Signal after
limiter
Attack
Release
1. Press .
This opens the Menu Screen.
2. Use and to select "Input/Output", and press .
40
Page 41

3. Use and to select “Limiter”, and press .
Turning the limiter on
Ӎ
4. Use and to select "On/Off", and press .
5. Use and to select "On", and press .
HINT
• The ratio of compression used on the input signal is 20:1.
41
Page 42

Setting the threshold
Ӎ
The threshold for limiter operation can be set.
4. Use and to select "Threshold", and press .
5. Use and to set the threshold.
HINT
• This can be set from −16 to −2 dBFS.
42
Page 43

Setting the attack time
Ӎ
This sets the amount of time after the input signal exceeds the threshold until compression of the post-limiter
signal is maximized.
4. Use and to select “Attack Time", and press .
5. Use and to set the attack time.
HINT
• This can be set from 1 to 4 ms.
Setting the release time
Ӎ
This sets the amount of time until compression of the post-limiter signal stops after the input signal goes below
the threshold.
4. Use and to select “Release Time", and press .
43
Page 44

5. Use and to set the release time.
HINT
• This can be set from 1 to 500 ms.
44
Page 45

Setting le names
This sets the le name used for recorded les.
1. Press .
This opens the Menu Screen.
2. Use and to select "Rec Settings", and press .
3. Use and to select "Rec File Name", and press .
45
Page 46

4. Use and to select the le name format, and press .
The following le name formats can be used.
Setting Explanation
Files are named with a "date_number" format.
Auto (Date)
The "Date Format" setting will be used for the date (“Setting the date format” on page
97).
Example: YYMMDD_001.WAV – YYMMDD_999.WAV
User Dened
Files are named with a "user input text string_number" format.
Example: ZOOM_001.WAV – ZOOM_999.WAV
5. If "User Dened” was selected, input the text string to use for le names ( “Inputting char-
acters” on page 87).
HINT
• If no character string is input, le names will be numbers only.
NOTE
• You cannot put a space at the beginning of a character string.
46
Page 47

Enabling the sound marker function
Half-second tone signals (sound markers) can be output from the PHONE OUT and LINE OUT jacks when record-
ing is started. Since sound markers are also written to recorded les, when recording audio for video with the
, adding tone signals to the camera audio can make synchronizing audio and video easier.
1. Press .
This opens the Menu Screen.
2. Use and to select "Rec Settings", and press .
3. Use and to select “Sound Marker", and press .
47
Page 48

4. Use and to select "On", and press .
NOTE
• Be careful with the volume if you are monitoring the input sound with headphones, for example.
48
Page 49

Setting the recording time display
During recording, either the elapsed recording time or the remaining possible recording time can be shown.
1. Press .
This opens the Menu Screen.
2. Use and to select "System", and press .
3. Use and to select "Time Display", and press .
49
Page 50

4. Use and to select "Recording", and press .
5. Use and to select “Elapsed Time” or “Remaining Time”, and press .
50
Page 51

Recording
1. Press when the Home Screen is open.
The recording le name is shown and recording starts.
The following operation is possible during recording.
Function Operation
Pause/resume
Press
NOTE
• Marks are added at points where recording is paused. Marks are used as cue points. During playback, press
or to move to a mark position.
• Up to 99 marks can be added to a single recording le.
• Marks can be deleted from the mark list ( “Deleting marks” on page 72).
• If the le size exceeds 2GB during recording, a new le will be created automatically and recording will con-
tinue without pause.
1. Press .
This ends recording.
HINT
• Even if the power is interrupted or another problem occurs during recording, playing the recorded le with the
( “Playing recordings” on page 52) should repair it to a valid recording le.
51
Page 52

Playback
The has three playback modes: tracking, manual and binaural. The appearance of the display depends
on the playback mode.
Playing recordings
1. Press when the Home Screen is open.
This opens the Playback Screen and starts playback.
2. Press .
This ends playback.
HINT
• Use to adjust the volume.
• If there is no le that can be played back, a “No File!” message will appear.
52
Page 53

Changing the playback mode
How audio is extracted from audio les recorded in Ambisonics A and Ambisonics B (FuMa and AmbiX) formats
and how it is processed can be changed.
1. Press during playback
Press repeatedly until the desired playback mode is selected.
Ӎ
Tracking playback mode
By changing the orientation of the , sound from specic directions can be extracted and played.
ΐ
Α
Β
Γ
Ύ
Ώ
Time display
This shows either the current elapsed playback time or the remaining playback time ( “Setting the playback
time display” on page 58).
Ύ Status icon
This shows the playback status.
Playing Playback paused
Searching backward Searching forward
Moving to previous le Moving to the next le
Ώ Orientation of sound extracted
This shows the current orientation setting for sound extraction.
ΐ Playback mode
This shows the current playback mode setting.
53
Page 54

Α Horizontal angle
This shows the horizontal angle of the extracted sound orientation.
Β Vertical angle
This shows the vertical angle of the extracted sound orientation.
Γ Roll angle
This shows the roll angle (rotation) of the extracted sound orientation.
HINT
• The detects changes in angles based on its orientation when playback started. We recommend
placing the on a at surface, for example, before starting playback.
The following operations are possible during playback in tracking playback mode.
Function Operation
Pause/resume
Search forward
Search backward
Move to the previous mark (if one exists)
Move to the beginning of the le (if no mark exists)
Move to the next mark (if one exists)
Play the next le (if no mark exists)
Play the previous le
Press
Press and hold
Press and hold
Press
Press
Press twice
HINT
• The longer you press and hold / , the faster the backward/forward search speed becomes.
• If the selected le is not valid, an “Invalid File!” message will appear.
54
Page 55

Ӎ
Manual playback mode
By using to specify the horizontal angle and to specify the vertical angle, sound from a specic direction
can be extracted in stereo and played back.
ΐ
Α
Β
Ώ
Ύ
Time display
This shows either the current elapsed playback time or the remaining playback time ( “Setting the playback
time display” on page 58).
Ύ Status icon
This shows the playback status.
Playing Playback paused
Ώ Orientation of sound extracted
This shows the current orientation set for sound extraction.
ΐ Playback mode
This shows the current playback mode setting.
Α Horizontal angle
This shows the horizontal angle of the extracted sound orientation.
Β Vertical angle
This shows the vertical angle of the extracted sound orientation.
The following operations are possible during playback in manual playback mode.
Function Operation
Pause/resume
Press
Change horizontal angle
Press
Change vertical angle
Press
HINT
• The horizontal and vertical angles can be adjusted in 0–360° ranges.
55
Page 56

Ӎ
Binaural playback mode
The sound can be converted to binaural and played back.
Ώ
Ύ
Time display
This shows either the current elapsed playback time or the remaining playback time ( “Setting the playback
time display” on page 58).
Ύ Status icon
This shows the playback status.
Playing Playback paused
Searching backward Searching forward
Moving to previous le Moving to the next le
Ώ Playback mode
This shows the current playback mode setting.
NOTE
• Binaural mode playback is not possible with les recorded in "96k/16bit” or "96k/24bit” format.
• Files recorded in binaural mode will be played back without processing.
56
Page 57

The following operations are possible during playback in binaural playback mode.
Function Operation
Pause/resume
Search forward
Search backward
Move to the previous mark (if one exists)
Move to the beginning of the le (if no mark exists)
Move to the next mark (if one exists)
Play the next le (if no mark exists)
Play the previous le
Press
Press and hold
Press and hold
Press
Press
Press twice
HINT
• The longer you press and hold / , the faster the backward/forward search speed becomes.
• If the selected le is not valid, an “Invalid File!” message will appear.
57
Page 58

Setting the playback time display
During playback, either the elapsed playback time or the remaining playback time can be shown.
1. Press .
This opens the Menu Screen.
2. Use and to select "System", and press .
3. Use and to select "Time Display", and press .
58
Page 59

4. Use and to select "Playing", and press .
5. Use and to select “Elapsed Time” or “Remaining Time”, and press .
59
Page 60

Managing folders and les
Creating folders
Folders for saving recorded les can be created.
1. Press .
This opens the Menu Screen.
2. Use and to select "Finder", and press .
3. Use and to select "New Folder", and press .
60
Page 61

4. Input the folder name ( “Inputting characters” on page 87).
A new folder will be created.
61
Page 62

Selecting folders and les
1. Press .
This opens the Menu Screen.
2. Use and to select "Finder", and press .
3. Use and to select a folder or le.
62
Page 63

The following operations are possible when using the Finder.
Function Operation
Move down a level
Move up a level
Show options
Play a le
Press when a folder is selected
Press
Press and hold
Press when a le is selected
NOTE
• Check marks will appear on the le currently being played, the destination folder for recorded les and the
folder where the le currently being played is saved.
HINT
• Playback operations are the same as usual when a le is played back from the Finder ( “Playback” on page
52).
4. Press and hold .
5. Use and to select "Select", and press .
6. Use and to select "Execute", and press .
This selects the le or folder and opens the Home Screen.
63
Page 64

HINT
• If an SD card or folder is selected, the rst le inside it will be selected.
• “Select” shown inside an SD card or folder can be used to select that card or folder itself.
64
Page 65

Changing folder and le names
1. Press .
This opens the Menu Screen.
2. Use and to select "Finder", and press .
3. Use and too select the folder or le to change, and press and hold .
65
Page 66

4. Use and to select "Rename", and press .
5. Change the folder or le name ( “Inputting characters” on page 87).
NOTE
• You cannot put a space at the beginning of a folder or le name.
• Folder and le names cannot be changed if they use characters other than ordinary (halfwidth) English letters
and numbers.
• If a “File Number Reset!” message appears, the number used for recorded les has been reset.
66
Page 67

Checking le information
1. Press .
This opens the Menu Screen.
2. Use and to select "Finder", and press .
3. Use and to select the le to check, and press and hold .
67
Page 68

4. Use and to select "Information", and press .
5. Use and to check the le information.
The following le information can be checked.
Item Explanation
Date/time Date and time recorded
Format Recording format
Format Recording mode and mic position
Size Recording le size
Time Recording time
NOTE
• The mic position will not be shown if the recording mode is "Binaural".
68
Page 69

Checking le marks
You can view a list of the marks in a recording le. You can also start playback from the position of a selected
mark.
1. Press .
This opens the Menu Screen.
2. Use and to select "Finder", and press .
3. Use and to select the le, and press and hold .
69
Page 70
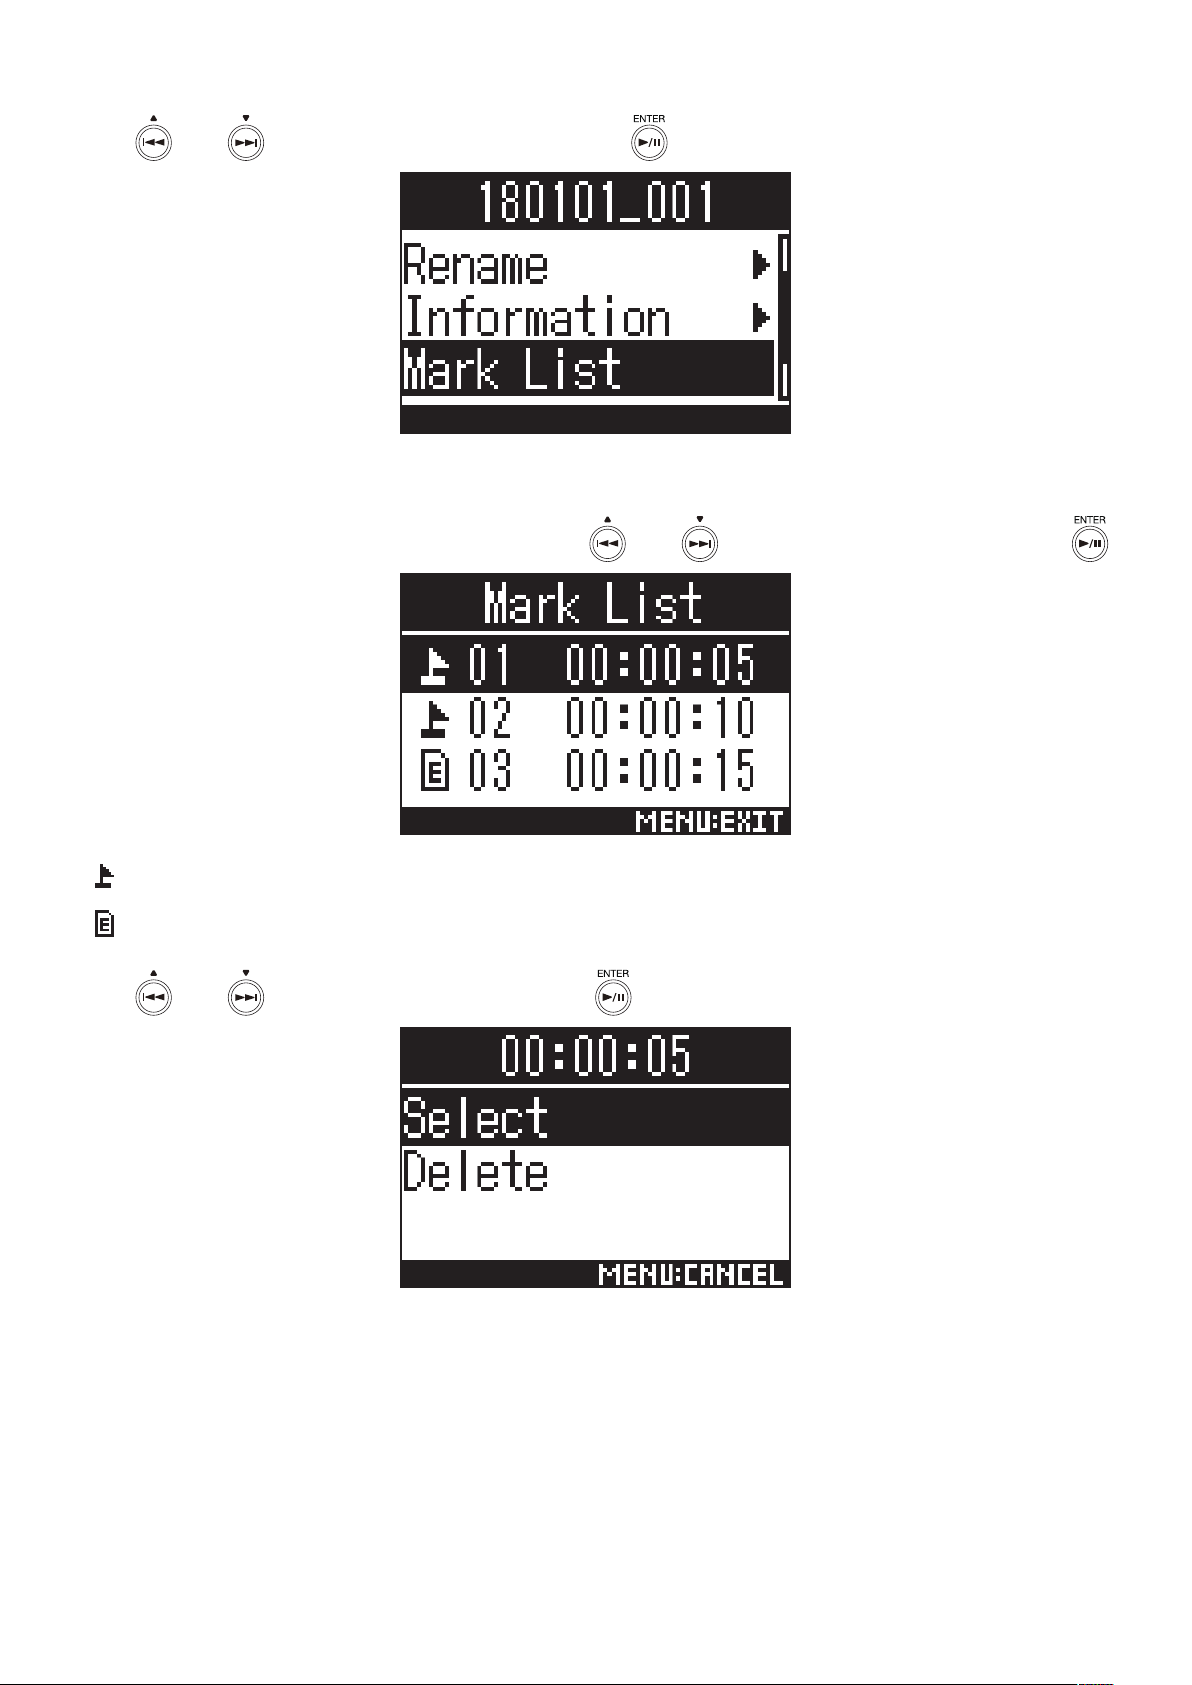
4. Use and to select "Mark List", and press .
The marks are shown in a list.
5. To start playback from a specic mark , use and to select that mark, and press .
Mark added when paused during recording
Mark added when skipping occurred during recording
6. Use and to select "Select", and press .
70
Page 71

7. Use and to select "Execute", and press .
The Home Screen will reopen, and playback will start from the position of the selected mark.
71
Page 72

Deleting marks
1. In the mark list, use and to select a mark, and press .
2. Use and to select "Delete", and press .
3. Use and to select "Execute", and press .
The selected mark will be deleted.
72
Page 73

Deleting folders and les
1. Press .
This opens the Menu Screen.
2. Use and to select "Finder", and press .
3. Press and hold .
73
Page 74

4. Use and to select "Delete", and press .
5. Use and to select a le or folder to delete, and press .
A check mark appears on the selected le or folder.
HINT
• To delete multiple les and folders, repeat step 5.
• By selecting “Select All” at the bottom of the list in step 5 and pressing , you can select/deselect all les
and folders at once.
• Press to cancel deletion of les and folders.
6. Press and hold .
7. Use and to select "Execute", and press .
This deletes the selected les and folders.
74
Page 75

Adjusting connected equipment levels (playing test tones)
The line output level can be adjusted.
Test tones can be played in order to adjust the level for a digital SLR camera or other device.
1. Minimize the input gain of the other device.
2. Use an audio cable to connect the external mic jack of the other device with the LINE OUT jack
of the .
3. Press .
This opens the Menu Screen.
4. Use and to select "Input/Output", and press .
5. Use and to select "Line Out Level", and press .
75
Page 76

6. Use and to select "Set (with Tone)", and press .
This starts output of the test tone.
No test tone will be output if “Set” is selected.
7. Use and to adjust the line output level.
While checking the audio level meter of the other device, adjust the audio signal level so that it never
exceeds −6 dB.
HINT
• This can be set from -40 to 0 dB.
8. Adjust the input gain of the other device.
While checking the audio level meter of the connected device, make adjustments to the input gain of that
device until the audio signal level is about −6 dB.
9. Press .
This stops test tone output.
NOTE
• See the operation manual of the connected device being used for information about its operation.
• If the automatic gain control function on the other device is on, turn it off.
• The test tone is output from both the LINE OUT and PHONE OUT jacks.
• Be careful with the volume if you are monitoring the sound with headphones, for example.
HINT
• The test tone is a 1kHz sine wave at -6 dBFS.
76
Page 77

Using USB functions
Using as a card reader
Use a computer to check the les saved on the microSD card and copy those les to the computer.
Connecting to a computer
1. Press .
This opens the Menu Screen.
2. Use and to select "USB", and press .
77
Page 78

3. Use and to select "Card Reader", and press .
4. Use a USB cable to connect the and the computer.
78
Page 79

Disconnecting from a computer
1. Disconnect on the computer.
On Windows, select from "Safely Remove Hardware".
On Mac operating systems, drag the icon to the Trash and drop it.
NOTE
• Always conduct computer disconnection procedures before removing the USB cable.
2. Press .
This opens the Menu Screen.
3. Use and to select "Exit", and press .
This ends card reader operation and reopens the Home Screen.
4. Disconnect the USB cable from the and the computer.
79
Page 80

Using as an audio interface
Sounds being recorded by the can be input to a computer or iOS device, and playback signals on a computer or iOS device can be output from the .
Connecting to a computer or iOS device.
1. Press .
This opens the Menu Screen.
2. Use and to select "USB", and press .
3. Use and to select "Audio I/F", and press .
80
Page 81

4. Use and to select the mode and type of connected device, and press .
The modes and devices that can be selected are as follows
Setting Explanation
Stereo
4ch Ambisonics
Stereo (iOS)
Input signals 1–4 are sent as a stereo mix in this 2-in/2-out connection mode
for Windows/Mac. The bus power of the connected device will be used.
Input signals 1–4 are sent as converted tracks 1–4 in this 4-in/2-out connection
mode for Windows/Mac. To use with Windows, download the driver from the
ZOOM website (www.zoom.co.jp). The bus power of the connected device will
be used.
Input signals 1–4 are sent as a stereo mix in this 2-in/2-out connection mode
for iOS devices. The use its batteries for power.
5. Use a USB cable to connect the and the other device.
NOTE
• A Lightning to USB Camera Adapter is necessary to connect an iOS device.
• After selecting "Stereo (iOS)” in step 4, follow the instructions on the display and disconnect the cable once.
Then, select "Stereo (iOS)" again and reconnect the cable.
81
Page 82

Disconnecting from a computer or iOS device
1. Press .
This opens the Menu Screen.
2. Use and to select "Exit", and press .
3. Use and to select "Execute", and press .
This ends audio interface operation and reopens the Home Screen.
4. Disconnect the USB cable from the and the other device.
82
Page 83

Audio interface settings
The following settings can be made when using the as an audio interface.
Enabling direct monitoring
This directly outputs the sound being recorded by the from it before sending it to the computer or iOS
device. This enables monitoring without latency.
1. When connected as an audio interface, press .
This opens the Menu Screen.
2. Use and to select “Direct Monitor", and press .
3. Use and to select "On", and press .
This turns direct monitoring on.
83
Page 84

Enabling the loop back function
This function mixes the playback sound from the computer or iOS device with the input and sends the
mix back to the computer or iOS device (loop back). You can use this function to add narration to music played
back from the computer or iOS device and record the mix or stream it using software, for example.
NOTE
• This function cannot be used when the audio interface mode is "4ch Ambisonics".
1. When connected as an audio interface, press .
This opens the Menu Screen.
2. Use and to select “Loop Back", and press .
3. Use and to select "On", and press .
This turns the loop back function on.
84
Page 85

Operating with an iOS device
Pairing with an iOS device
By connecting a BTA-1 or other dedicated wireless adapter and using the dedicated controller app, the
can be operated from an iOS device.
NOTE
• The dedicated app must be installed on the iOS device beforehand.
The dedicated app can be downloaded from the App Store.
• See the manual for the app for procedures to set and operate it.
1. Remove the REMOTE connector cover and connect a BTA-1 or other dedicated wireless
adapter.
A password that is used to identify the BTA-1 or other dedicated wireless adapter will be shown.
2. Launch the dedicated app on the iOS device, and enter the password shown on the
display.
This starts pairing.
When pairing completes, “Connected” will appear on the display.
HINT
• Entering a password will not be necessary when launching the app again in the future.
• Use the and the iOS device as close together as possible to make communication more reliable.
85
Page 86

Disconnecting from an iOS device
Disconnecting the and iOS device disables operation of the from the iOS device.
1. Press .
This opens the BTA-1 screen.
2. Use and to select "Off", and press .
HINT
• After disconnecting, to control the with the iOS device again, select "BTA-1” from the Menu.
86
Page 87

Inputting characters
A character input screen will open when you select a function that allows character input, including setting and
changing le names.
Select “abc”
Select “#+=”Select “ABC”
The following operations are possible on character input screens.
Function Operation
Select characters
Conrm characters
Change character type
Move the character input field
cursor
Delete input characters
End character input
Use and .
Press .
Use and to select “abc”, “#+=” or “ABC", and press .
• When "abc” is selected, lowercase English letters can be input.
• When "#+=” is selected, numbers and symbols can be input.
• When "abc” is selected, uppercase English letters can be input.
Use and to select "” or “", and press .
Use and to select "Del", and press .
Use and to select "Enter", and press .
Cancel character input
Press .
87
Page 88

Setting the type of batteries used
Set the type of battery used by the to alkaline, Ni-MH or lithium so that the amount of remaining battery
charge can be accurately displayed.
1. Press .
This opens the Menu Screen.
2. Use and to select "System", and press .
3. Use and to select "Battery", and press .
88
Page 89

4. Use and to select the battery type, and press .
This sets the battery type.
89
Page 90

Setting the display backlight
Set the time after the last operation until the display backlight turns off to conserve energy.
1. Press .
This opens the Menu Screen.
2. Use and to select "System", and press .
3. Use and to select "LCD", and press .
90
Page 91

4. Use and to select "Backlight", and press .
5. Use and to set the amount of time until the backlight turns off, and press
The following times to turn off the backlight can be set.
Setting Explanation
Off The backlight always stays off.
On The backlight always stays on.
30 sec
1 min
2 min
3 min
4 min
5 min
The backlight turns off if no operation occurs for the set amount of time.
91
Page 92

Adjusting the display contrast
The contrast (display brightness level differences) can be set.
1. Press .
This opens the Menu Screen.
2. Use and to select "System", and press .
3. Use and to select "LCD", and press .
92
Page 93

4. Use and to select "Contrast", and press .
5. Use and to set the display contrast.
This sets the contrast.
HINT
• This can be set from 1 to 10.
93
Page 94

Setting the language shown
1. Press .
This opens the Menu Screen.
2. Use and to select "Language", and press .
3. Use and to select the display language, and press .
This completes setting the language.
HINT
• The rst time you turn the power on after purchase, this screen opens automatically.
94
Page 95

Setting the date and time
Set the date and time added to recording les.
1. Press .
This opens the Menu Screen.
2. Use and to select "System", and press .
3. Use and to select "Date/Time", and press .
95
Page 96

Setting the date and time
Ӎ
4. Use and to select "Set Date/Time", and press .
5. Use and to select the item to change, and press .
HINT
• The rst time you turn the power on after purchase, this screen opens automatically after you set the language
used.
6. Use and to change the value of the selected item, and press .
96
Page 97

7. Use and to select “OK”, and press .
This completes setting the date and time.
Setting the date format
The date format can be changed. This is used when adding dates to le names and when showing the date on
the display.
4. Use and to select "Date Format", and press .
5. Use and to select the date format, and press .
The following date formats can be used.
Setting Explanation
YYMMDD Year, month, day order
MMDDYY Month, day, year order
DDMMYY Day, month, year order
97
Page 98

Formatting microSD cards
Format microSD cards to use them with the .
1. Press .
This opens the Menu Screen.
2. Use and to select "System", and press .
3. Use and to select "SD Card", and press .
98
Page 99

4. Use and to select "Format", and press .
5. Use and to select "Execute", and press .
This formats the microSD card for use with the .
NOTE
After purchasing a new microSD card, always format it using the to maximize performance.
•
• Be aware that all data previously saved on a microSD card will be deleted when it is formatted.
99
Page 100

Testing microSD card performance
You can test whether a microSD card can be used with the .
NOTE
• Even if a performance test result is "Pass", there is no guarantee that writing errors will not occur.
Conducting a quick test
You can quickly test whether a microSD card can be used with the .
1. Press .
This opens the Menu Screen.
2. Use and to select "System", and press .
100
 Loading...