

Quick Guide
You must read the Usage and
Safety Precautions before use.
The Operation Manual can be downloaded from the ZOOM website (www.zoom.
jp/docs/h2n).
This page has files in PDF and ePub formats.
The PDF file format is suitable for printing on paper and reading on a computer.
The ePub format can be read with electronic document readers and is designed
for reading on smartphones and tablets.
© 2020 ZOOM CORPORATION
Copying or reprinting this manual in part or in whole without permission is prohibited.
Product names, registered trademarks and company names in this document are the property of
their respective companies.
All trademarks and registered trademarks in this document are for identification purposes only and
are not intended to infringe on the copyrights of their respective owners.
You might need this manual in the future. Always keep it in a place where you can access it easily.
The contents of this manual and the specifications of the product could be changed without notice.
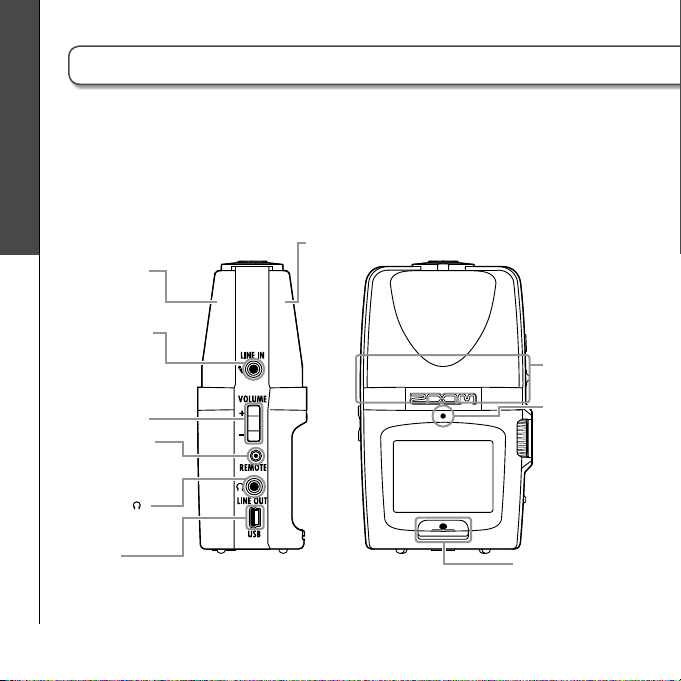
Part names
Part names
MS stereo mic
LINE IN jack for
mic/line input
(can provide
plug-in power)
Volume control
Remote control
jack (Remote
control sold
separately)
Headphones
/LINE OUT jack
Left side Front
XY stereo mic
Speaker
Recording
indicator
02
USB port
Record button
MENU button
H2n Handy Recorder
Right side To p
MS mic indicator Lights
when the
MS mic (rear) is ON.
Flashes when the input
signal is distorting.
Part names
PLAY control
Press to play/pause
(in menu, set item)
Shift up/down to search
forward/backward
(in menu, select item)
MIC GAIN dial
Adjusts mic
input gain
Power
/HOLD switch
Strap attachment
(Use to prevent dropping)
Recording mode
selection dial
XY mic indicator Lights when
the XY mic (front) is ON.
Flashes when the input signal is
distorting.
Battery
compartment
cover
SD card slot cover
Tripod mounting socket
Bottom
03
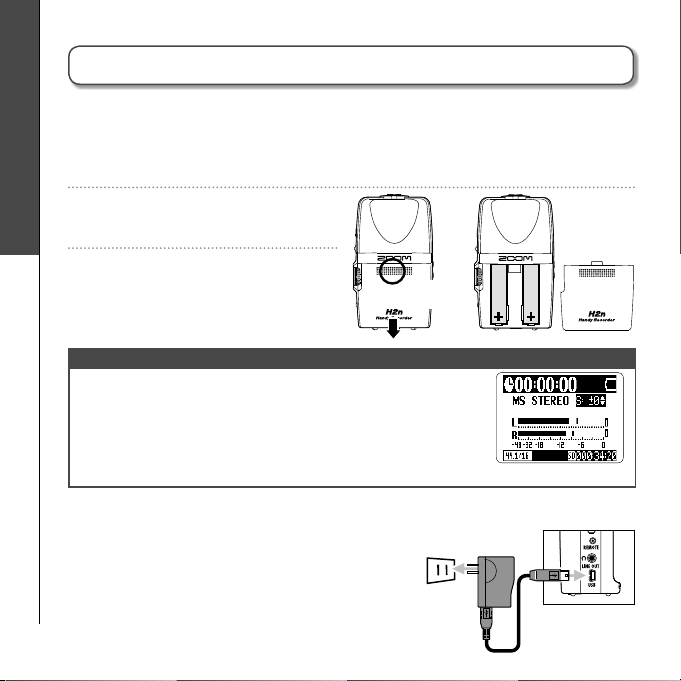
Preparation
Powering the recorder
Using batteries
Turn the power OFF, and then remove the battery cover.
1.
2.
Insert batteries.
Powering the recorder
Close the cover.
3.
NOTE
· Use alkaline or nickel-metal hydride batteries.
· If the “Low battery!” warning appears, turn the power OFF
soon and put in new batteries.
· Use MENU > SYSTEM > BATTERY TYPE to set the type of
battery so that the amount of remaining battery charge can
be shown accurately.
Using an AC adapter (sold separately)
Connect the cable to the USB port.
1.
Plug the adapter into a power outlet.
2.
04
Press here
and slide down
H2n Handy Recorder
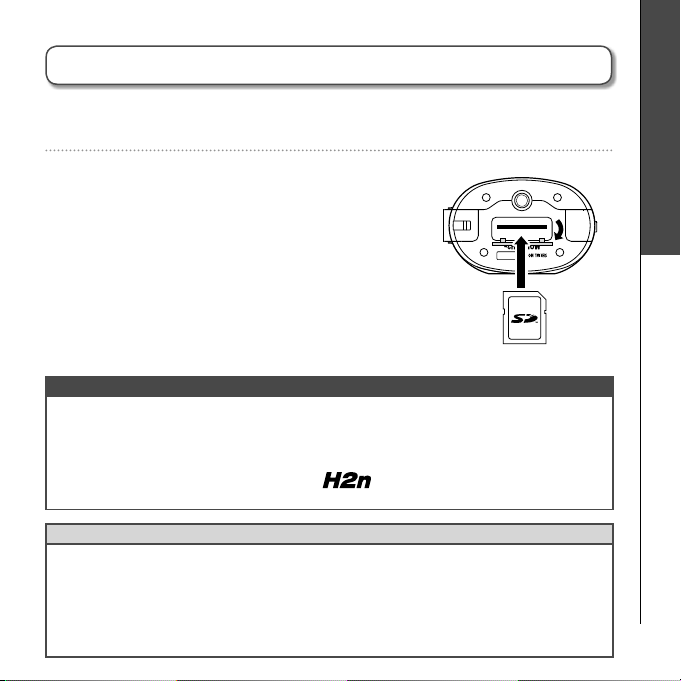
Installing an SD card
After turning the power OFF, open the SD card slot cover.
1.
Insert the card into the slot.
2.
To remove a card, push it further into
the slot and then pull it out.
NOTE
· Be sure to insert the SD card correctly, using the cut-off corner illustration next to the
slot as a guide.
· The built-in memory will be used if no SD card is in the recorder.
· Before using SD cards that have just been purchased or that have been formatted on a
computer, they must be formatted by the
SD CARD > FORMAT.
HINT
Built-in memory
· The built-in memory only keeps the most recent recording.
· The recording format is fixed at 96kbps MP3.
· It cannot be used to record in 4ch surround or MS-RAW modes.
· Recording time is limited to 1 minute.
· Recordings saved to the built-in memory cannot be copied to an SD card or a computer.
. To format an SD card, use MENU >
Preparation Installing an SD card
05
Preparation
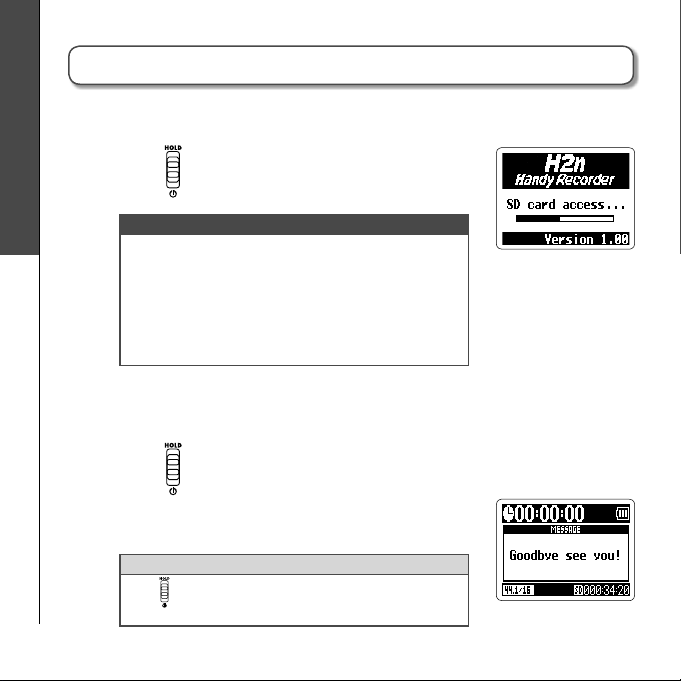
Turning the power ON and OFF
Turning the power ON
Slide down.
1.
NOTE
· If “No SD card!” appears, confirm that an SD card is
Turning the power ON and OFF
correctly inserted into the recorder.
· If “Card Protected” appears, SD card write
protection is ON. Turn write protection OFF by
sliding the “Lock” switch on the card.
· If “Invalid card” appears, the card format is
incorrect. Use a different card or format the card.
Turning the power OFF
Slide down and hold it until “Goodbye
1.
see you!” appears on the screen.
HINT
Slide
toward HOLD to disable the keys and prevent
misoperation during recording.
06

H2n Handy Recorder
Setting the date and time
The date and time is added to recording files automatically, so set it correctly
whenever the batteries are replaced.
Press .
1.
Use
2.
Use to select DATE/TIME, and then
3.
press .
Adjust the settings.
4.
Use to select OK, and then press .
5.
to select SYSTEM, and then press
Use to move the cursor
Press to select the item
Use to change the value
Press to confirm the setting
.
Preparation Setting the date and time
07

Preparation
Playback level
(Appearance in 4ch surround mode)
Display
Home (recording) screen
Recording modeRecording mode
(File name shown during recording)
Recording time
Display
LINE IN jack in
use indicator
Recording format
(WAV example)
(MP3 example)
Recording level
(Appearance in 4ch surround mode)
LO CUT
indicator
COMP/LIMITER
indicator
MS mic recording level
XY mic recording level
AUTO GAIN/AUTO REC indicator
(When AUTO REC enabled)
Remaining
battery level
indicator
Clipping
indicator
Empty
Side level adjustment
(When set to MS-RAW)
Remaining recordable time
(When using built-in memory)
Full
08

Playback screen
Playback time
H2n Handy Recorder
Preparation Display
Playing
(Playback paused)
Playback speed Key control
Playback level
(Appearance in 4ch surround mode)
File name
AB repeat
Side mic level
Mixer
(when in 4ch surround mode)
09

Recording
Recording mode overview
The has four recording modes that can be selected according to your
purposes.
Mid-side (MS) stereo mode
This mode uses a mid mic to capture the sound
directly ahead and a bidirectional side mic to
capture sound from left and right.
Recording mode overview
The recording level of the side mic (S level) can
be adjusted, allowing the stereo width to be
changed. If you record with the S level set to
MS-RAW, you can also adjust the S level after
recording.
MS mics can capture a rich stereo image, so it is ideal for recording sounds in
wide and open conditions, including orchestras, live concerts and soundscapes.
L R
Side
(Adjustable)
XY stereo mode
This mode records in stereo with mics at 90º angles.
This allows a natural, deep and accurate sound image
to be captured, making it optimal for recording
sources nearby, including solo performances,
chamber music, interviews, live rehearsals and field
recordings.
10
Mid
Display
(front) side
Display
(front) side
90°
LR

2ch and 4ch surround modes
H2n Handy Recorder
Recording Recording mode overview
Sound can be captured in all directions using
both MS and XY mics.
You can select 2ch, which mixes the signals
L
Side
(adjustable)
Mid
from the MS and XY mics, or 4ch, which
records the signals from the MS and XY mics
separately.
With 4ch surround, you can adjust the balance
between the MS and XY signals after recording.
The S level can be adjusted for both 2ch and
4ch recordings.
90°
Display
(front) side
LR
These modes are suitable for recording live
rehearsals, studio sessions, business meetings and soundscapes, for example.
R
11

Recording
Selecting the recording mode
Selecting the recording mode
Turn so that the triangle points to the desired mode.
1.
NOTE
· The 4ch surround mode can only be used
when an SD card is in the unit.
· In 4ch surround mode, only WAV formats
(44.1/48kHz, 16/24bit) can be used.
· In 4ch surround mode, two stereo files are
created (MS mic recording and XY mic
recording).
Make settings for the recording mode.
2.
Adjusting the S level (MS stereo, 2ch/4ch surround modes)
You can adjust the stereo width (S level) before recording.
Use to adjust the stereo width.
1.
Wide NarrowThe graphic changes along with the value
NOTE
12
Set to OFF or between –24 and +6 dB.

H2n Handy Recorder
Using MS-RAW mode (MS stereo mode/WAV format only)
If you want to adjust the stereo width after recording, record using MS-RAW
mode.
Hold down until RAW appears.
1.
Selecting where recordings are saved
Press .
1.
Use to select FOLDER, and then
2.
press .
Use to select the folder where you want
3.
to save files, and then press .
Recording Selecting where recordings are saved
NOTE
Select from among 10 folders. There are separate sets of folders for stereo and 4ch recordings.
13

Recording
Setting the recording format
Setting the recording format
You can set the recording format according to your sound quality and file size
needs.
Press .
1.
Use to select REC, and then press .
2.
Use to select REC FORMAT, and then
3.
press .
Use to select the recording format, and
4.
then press .
NOTE
· Use WAV formats for higher audio quality.
· Use MP3 formats, which are compressed and have much smaller file sizes, to
save space on the SD card. Beware, however, that MP3 compression reduces
14
audio quality.

H2n Handy Recorder
Recording Setting the recording format
Only these formats
can be selected
when using 4ch
recording mode
WAV96kHz/24bit
WAV96kHz/16bit
WAV48kHz/24bit
WAV44.1kHz/24bit
WAV48kHz/16bit
WAV44.1kHz/16bit
MP3 320kbps
MP3 256kbps
MP3 224kbps
MP3 192kbps
MP3 160kbps
MP3 128kbps
MP3 112kbps
MP3 96kbps
MP3 80kbps
MP3 64kbps
MP3 56kbps
MP3 48kbps
Sound quality
High
File size
Large
SmallLow
15

Recording
Recording manually
3
1
2, 4
Recording manually
16
Turn to adjust the input level.
1.
Press to start recording.
2.
Press to add a mark.
3.
Press to stop recording.
4.
HINT
· Adjust the MIC GAIN so that the peak level stays around -12 dB.
· If an input signal is too strong, the MS/XY indicator on the top will flash
immediately.
NOTE
· One file can have a maximum of 99 marks.
· During recording, if the size of the file exceeds 2 GB, recording will continue in
a new file that will be created automatically.

H2n Handy Recorder
Playing back recordings
You can play files in the current folder. Change the folder to play files in a
different folder.
Press .
1.
2
Use to jump between marks and files
Hold to search forward or backward
Press to pause and restart playback
Use to adjust the volume
HINT
The longer you hold the PLAY control the faster it will
search in that direction.
Press and hold to return to the home
2.
screen.
1
1
Playback Playing back recordings
17

Specifications
Recording media 16MB–2GB SD cards, 4GB–32GB SDHC cards
Built-in memory Can be used to record up to 1 minute in 96 kbps MP3 format (recording to this memory
Recording Mic arrangements MS stereo with adjustable side mic level
Microphones Types Directional (XY, MS mid mics)
Specifications
File formats
Digital processing A/D conversion 24-bit 128× oversampling
Recording time 2GB card example 3:08:00 (44.1kHz/16bit WAV)
Features LO CUT 80Hz high-pass filter
18
(Cards that can be used with this recorder are to be verified individually)
overwrites any previous recording in it)
Modes MS, XY, MS+XY (stereo) and MS+XY (4ch)
Maximum sound
pressure input
Stereo
Uncompressed PCM 44.1/48/96kHz, 16/24bit WAV (BWF)
Compressed MP3
(recording)
Compressed MP3
(playback)
4ch
Uncompressed PCM 44.1/48kHz, 16/24bit WAV (BWF)
D/A conversion 24-bit 128× oversampling
Signal processing 32-bit
COMP/LIMITER 3 types of compressors and 3 types of limiters
AUTO GAIN Automatic input gain adjustment
PRE REC 2 seconds of pre-recording
AUTO REC Automatic recording start/stop, continuous standby
TUNER Chromatic, guitar, bass and alternate (A/E/G/D/DADGAD) tunings
METRONOME 40–250 BPM range, five tones, pre-count
SPEED Playback speed adjustable between 50–150%
90º XY stereo
Bidirectional (MS side mic)
120 dB spl (directional)
122 dB spl (bidirectional)
44.1kHz, 48/56/64/80/96/112/128/160/192/224/256/320kbps
(Not compatible with MS-RAW recording)
44.1/48kHz, 32/40/48/56/64/80/96/112/128/160/192/224/256/
320kbps
Two stereo files for each recording
34:43:00 (128kbps MP3)
with automatic string detection

H2n Handy Recorder
Features KEY CONTROL Playback pitch adjustable ±6 semitones (cannot be used with
AB REPEAT Repeats playback between selected points in a file
FILE DIVIDE Divides a file into two
FILE NORMALIZE Maximizes file volume (cannot be used with MP3s)
FILE MP3 ENCODE WAV files can be converted to MP3 formats at fixed bit rates
MARK Up to 99 marks can be added as desired when recording WAV
SURROUND MIXER Mix balance can be adjusted when playing back 4ch surround
Display Graphic LCD (128×64 pixels) with backlight
Input gain 0 to +39 dB
Input jack Line/mic stereo mini jack can supply plug-in power
Output jack Line/headphone stereo mini jack
Built-in speaker 400mW, 8Ω, mono
USB Mini-B type
Power AD-17 USB to AC adapter (DC 5V 1A), operates using two AA batteries
Physical features Tripod mounting socket, strap attachment
* Recording concerts and public performances, for example, without permission from rights holders is prohibited by law.
* Product specifications and appearance might be changed for the purpose of improvement without warning.
* 0 dBm = 0.775 Vrms
2 kΩ impedance at input levels of 0 to –39 dBm
Rated output level: −10 dBm (output impedance 10 kΩ or more)
Headphones: 20 mW + 20 mW (into 32 Ω load)
Card reader operation
USB 2.0 High Speed
Audio interface operation
USB 1.0 Full Speed
Supports 44.1/48kHz sampling rates and 16-bit rate
Note: Use a USB cable that supports data transfer.
Bus power operation supported
Continuous operation of 20 or more hours when recording 44.1kHz/16-bit WAV files using
alkaline batteries
Dimensions (mm): 67.6 (W) × 113.85 (H) × 42.7 (D)
Weight: 130 g (without batteries)
96kHz files)
files
recordings
Specifications
19

ZOOM CORPORATION
4-4-3 Kanda-surugadai, Chiyoda-ku, Tokyo 101-0062 Japan
www.zoom.co.jp
Z2I-4054-01
 Loading...