

Page 1

600479-001 Rev 2 1/147
Operation Manual
Page 2

600479-001 Rev 2 2/147
Copyright © 2009 ZOLL Circulation, Inc..
All rights reserved. Printed in U.S.A.
Trademarks
Alsius, CoolGard, CoolGard 3000, Thermogard XP, Cool Line, Fortius, and
Icy are trademarks of ZOLL Circulation, Inc.
Mallinckrodt is a registered trademark of Mallinckrodt Inc.
Windows is a registered trademark of Microsoft Corporation.
Other products and names listed in this document may be trademarked by their
owners and no representation is made by ZOLL Circulation, Inc. as to rights
thereto.
U.S. Patents Pending
This product is covered by or for use under one or more of the following U.S.
patents. Other U.S. and foreign patents pending:
4,290,428 4,648,384 4,689,041 4,850,969 4,865,581
4,917,667 4,927,412 5,011,468 5,033,998 5,059,167
5,908,407 6,019,783 6,126,684 6,149,670 6,165,207
6,287,326 6,290,717 6,299,599 6,338,727 6,368,304
6,393,320 6,405,080 6,409,747 6,416,533 6,419,643
6,432,124 6,436,130 6,447,474 6,450,990 6,451,045
6,454,792 6,454,793 6,458,150 6,460,544 6,494,903
6,516,224 6,520,933 6,529,775 6,530,945 6,530,946
6,554,797 6,572,640 6,581,403 6,582,398 6,585,692
6,589,271 6,602,243 6,620,131 6,641,602 6,641,603
6,645,233 6,645,234 6,652,565 6,682,551 6,699,268
6,706,060 6,709,448 6,716,188 6,716,236 6,719,724
6,726,653 6,726,710 6,733,517 6,749,585 6,749,625
6,755,851 6,786,916 6,796,995 6,872,222 6,878,156
6,893,419 6,893,454 6,942,644 7,001,418 7,014,651
7,070,612 7,090,792 7,097,657 7,101,388 7,144,407
ZOLL Circulation, Inc.
650 Almanor Avenue
Sunnyvale, California 94085
U.S.A.
Telephone: +1-408-541-2140
Facsimile: +1-408-541-1030
Page 3

600479-001 Rev 2 3/147
Contents
1. Safety Information
2. Introduction
3. Receiving, Inspection, and Assembly
4. Operation
Overview
Alarms & Alerts
Your First Case
Setup - Variations
Ending Treatment
Temperature Trend Data
Mechanical Components
Accessory: HMIA
5. TempTrend CSV Program User’s Guide
6. Alarms and Corrective Actions
7. Troubleshooting
8. Maintenance
9. Warranty and Service
10. Specification
Page 4

Safety Information
600479-001 Rev 2 4/147
Safety Information
1
Page 5

Safety Information
600479-001 Rev 2 5/147
Contents
Safety Information 3
Overview 3
Warnings, Cautions, and Notes 3
Definitions of Symbols and Labels Used on the Product and in the Manual 4
General Safety Precautions 5
Shipping and Storage Conditions 6
Ignition of Flammable Anesthetic Mixtures 6
Electrical Hazards 6
Primary Patient Temperature Probe (T1) Failure 7
Configuration Changes 7
Priming the Saline Circuit 7
Air Entry Into the Tubing Circuit 8
Check the Integrity of the Catheter 8
Check the Integrity of the Start-up Kit Tubing 8
Interference 9
Product Label 9
2
Page 6
Safety Information
600479-001 Rev 2 6/147
Safety Information
Overview
Safety is of primary concern to ZOLL Circulation, Inc.. This chapter provides
information on safely using the System. You must read and understand the
information in this chapter before operating the System. Always follow the
warnings, cautions, and notes throughout this document.
If you have questions about the safe or effective use of the System, please
contact the manufacturer.
Warnings, Cautions, and Notes
This document uses the following conventions to indicate important information.
WARNING!
Warnings are accompanied by symbols surrounded by a triangle and are
printed in the text in bold italics. Warnings indicate events or conditions
that can result in serious injury or death or severe damage to the
equipment.
CAUTION!
Cautions are accompanied by symbols surrounded by a triangle and are
printed in the text in bold italics. Cautions indicate information for safe
operation, proper performance, or avoiding actions that may result in
damage to the equipment.
NOTE:
Notes are accompanied by a symbol of the letter “i” surrounded by a circle
and are printed in the text in italics. Notes clarify understanding, aid in the
proper operation of the product, and prevent problems or errors from
occurring.
3
Page 7
Safety Information
600479-001 Rev 2 7/147
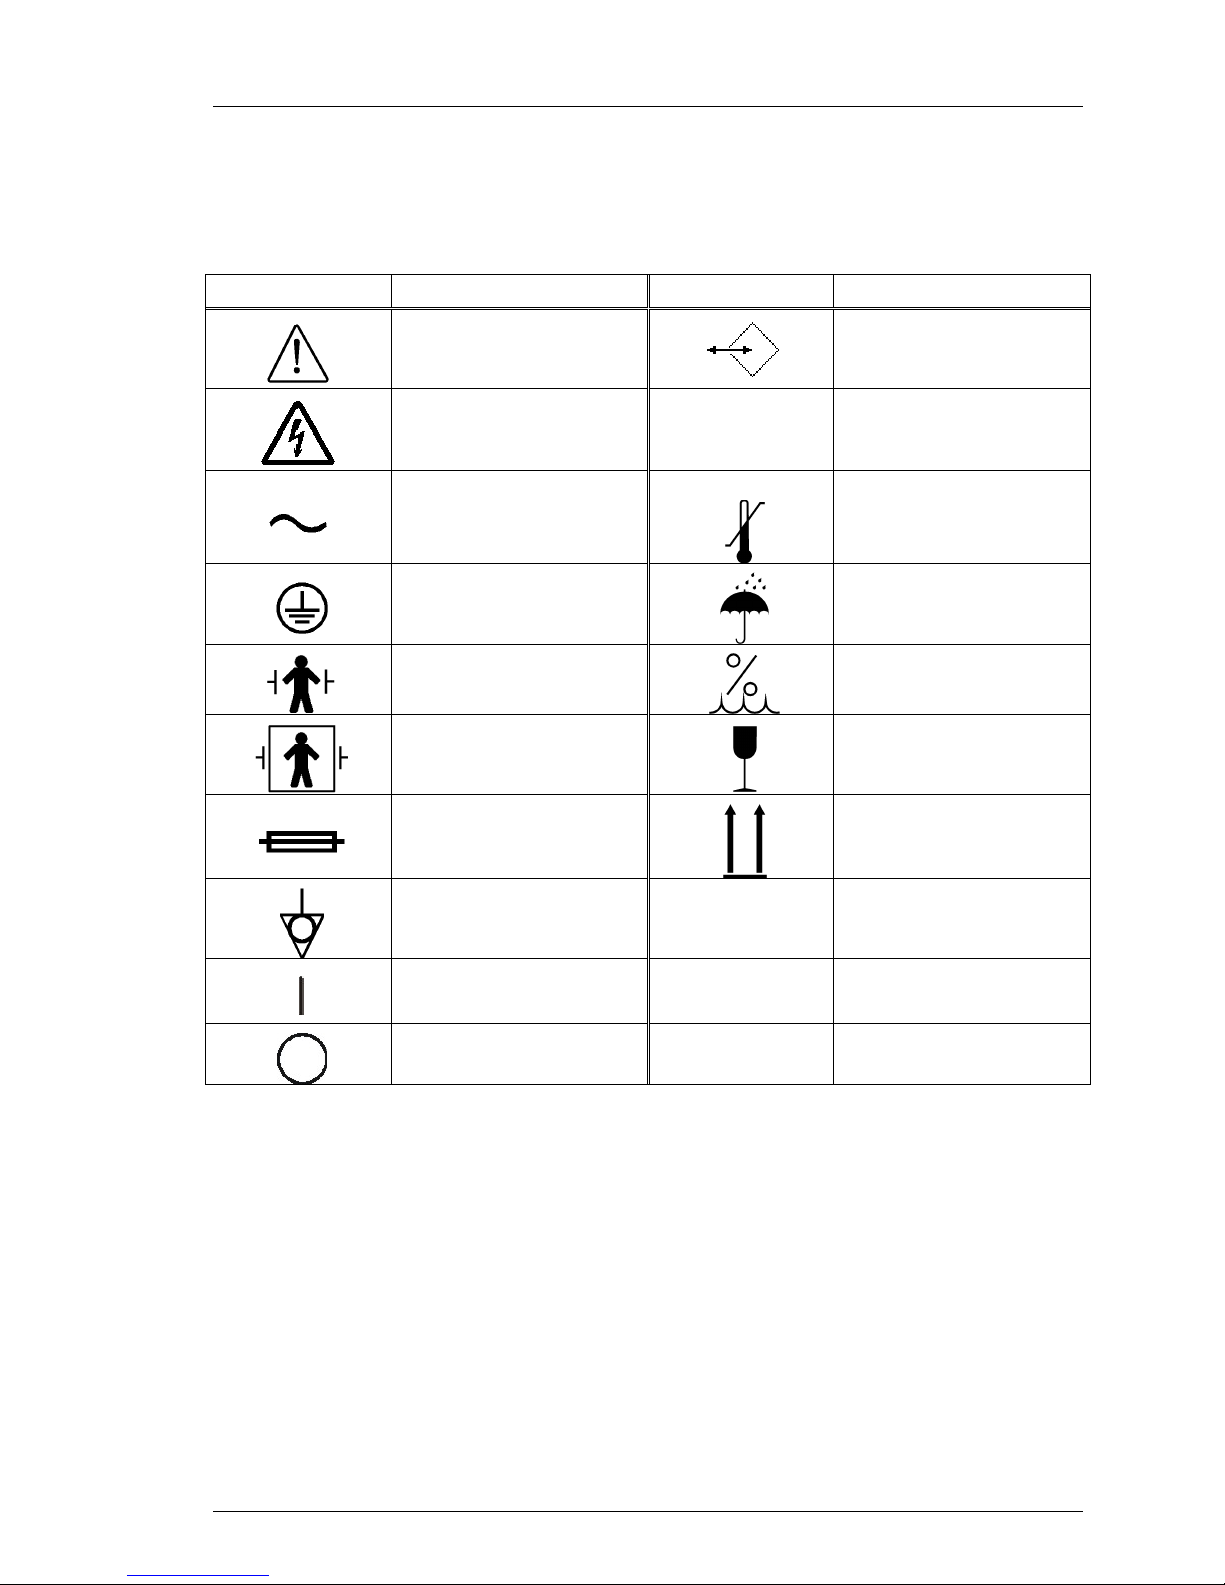
Definitions of Symbols and Labels Used on
the Product and in the Manual
Symbol Definition Symbol Definition
Attention. Consult
accompanying
documents.
Electrical warning or
electrical caution.
Alternating current.
Protective earth (ground).
Type B applied part.
Defibrillator protected.
Type BF applied part.
Defibrillator protected.
Fuse.
This symbol designates
the connector for the data
acquisition cable.
Indicates notes intended
to clarify understanding.
Temperature and
pressure range.
Do not allow liquids to spill
on the product or
package.
Humidity range.
Fragile contents.
Top facing up.
Ground equipment.
On.
Off.
Lo
Hi
The low patient
temperature alarm limit.
The high patient
temperature alarm limit.
4
Page 8

Safety Information
600479-001 Rev 2 8/147
General Safety Precautions
WARNING! SYSTEMIC HYPOTHERMIA RISKS.
Systemic hypothermia may cause cardiac arrhythmia, patient shivering, or
other system or organ complications. Systemic hypothermia should only be
utilized under the supervision of a qualified physician.
When treating a patient with the System, appropriately qualified medical staff
must routinely and closely monitor the patient and must comply with the following
procedures:
Audible and visual alarms generated by the System require the
authorized individual to remain in close proximity to the patient
throughout the procedure.
Always verify the function of the System prior to insertion of an Alsius
catheter. In the event of a malfunction, have other means of cooling
available.
When combining the use of the System and other adjunctive means
of cooling, ensure that close observation of the patient is maintained.
Do not use the ZOLL System in conjunction with other temperature
maintenance devices that have an automatic temperature controller.
Temperature oscillations may occur that are dangerous to the
patient.
Performance of installation, operation, or maintenance procedures
other than those described in this manual may create hazards and
may cause the manufacturer’s warranty to become void.
Sterile components are designed for a single use only. If
unauthorized disposable components are used, proper operation
cannot be guaranteed and harm to the patient may result.
Proper aseptic technique must be used while making all sterile
connections to the System.
Never operate damaged or leaking equipment.
Never operate the equipment without coolant fluid in the coolant well.
Never use pure water, pure propylene glycol, or alcohol as a coolant
fluid.
Never operate the equipment while smoking or in the presence of
open flame.
5
Page 9
Safety Information
600479-001 Rev 2 9/147
Shipping and Storage Conditions
When shipping or storing the System, follow these recommendations:
Temperature range: -20ºC (-4ºF) to 60ºC (140ºF).
Atmospheric pressure range: 50 kPa to 106 kPa.
Do not allow liquids to spill on the System or its packaging.
Humidity range: 10% to 90% noncondensing.
Fragile contents, handle with care.
Always handle and store with the top facing up.
Ignition of Flammable Anesthetic Mixtures
The System is not category AP or APG equipment and must not be used in
environments where flammable anesthetic gas mixtures are present.
Electrical Hazards
This equipment has been tested and found to comply with the EMC limits of the
international standard EN 60601-1-2. These limits are designed to provide
reasonable protection against interference in a typical medical installation. The
equipment can radiate radio frequency energy if not installed in accordance with
the instructions, and may cause harmful interference to other devices in the
vicinity. There is no guarantee that interference will not occur in a particular
installation. Always comply with the following:
To avoid the risk of electrical shock, do not remove any panels of the
product.
Refer servicing to qualified personnel.
Never operate equipment with damaged power line cords.
Refer service and repairs to a qualified technician.
CAUTION! ELECTRIC SHOCK HAZARD.
Electric shock hazard. Always turn off the System and disconnect the
power line cord from the source before performing any service or
maintenance procedures, or before moving the System.
6
Page 10
Safety Information
600479-001 Rev 2 10/147
Primary Patient Temperature Probe (T1)
Failure
The System relies upon the patient temperature reading from a YSI-400 type
thermistor connected to the Primary Patient Temperature Probe (T1). There are
rare failures of this type of thermistor that cannot be detected by the System with
100% reliability. Failure of the T1 can result in either patient hypo- or hyper-
thermia. Death or serious injury to the patient may result. A secondary patient
temperature probe (T2) connection is therefore built into the system. For patient
safety, either use both the T1 and T2 connections or employ the T1 probe with
an independent frequent check of patient core temperature.
WARNING! NEVER CLINICALLY USE A RESISTOR IN PLACE
OF THE T1 TEMPERATURE PROBE
ZOLL supplies fixed value resistors and variable resistor test boxes (e.g the
TP-400 FOGG Box) for testing, training and demonstration purposes. These
can be plugged into the Primary Patient Temperature Probe T1 connection on
the front of the System to represent a patient. Never use this device, or other
method, to circumvent the normal patient temperature feedback control when
the system is connected to the patient. Doing so exposes the patient to the
hazards associated with hypo- or hyper- thermia. Death or serious injury may
result.
Configuration Changes
CAUTION! CONFIGURATION CHANGES MUST BE
CERTIFIED.
Equipment connected to the analog and digital interfaces must be certified to
the respective IEC standards (i.e., IEC 950 for data processing equipment
and IEC 60601-1 for medical equipment). Furthermore, all configurations shall
comply with the system standard IEC 60601-1. Any person who connects
additional equipment to the signal input part or the signal output part configures a medical system and is therefore responsible that the system complies with the requirements of the system standard IEC 60601-1.
Priming the Saline Circuit
WARNING! DO NOT PRIME THE SALINE CIRCUIT WHILE
CONNECTED TO A PATIENT
During the priming operation, the air-trap alarm will be disabled. Air present in
the saline line may be circulated through the indwelling catheter.
Before priming the circuit or during troubleshooting for possible leak,
disconnect the heat exchange catheter, then connect the inflow and outflow
luer fittings of the saline circuit together.
7
Page 11
Safety Information
600479-001 Rev 2 11/147
Air Entry Into the Tubing Circuit
Air entry may occur with the failure of any part of the start-up kit, between the
saline bag and the outflow of the pump. In such cases, the integrity of the
catheter prevents air entry into the patient. In the rare event of a second,
simultaneous failure of the catheter, air entry into the patient is possible.
Air entry into the tubing circuit will usually, but not always, be associated with an
air trap alarm that will stop the System. Always investigate air trap alarms. The
cooling circuit is a closed loop–usually air trap alarms indicate a breach
somewhere in this closed loop (occasionally an air trap alarm can be caused by
condensation forming on the air trap exterior). With any air trap alarm, check both
the integrity of the catheter and the start-up kit (see below).
Periodically check the start-up kit for significant air bubbles and re place the kit if
necessary.
WARNING! NEVER CLINICALLY CIRCUMVENT THE AIR
TRAP ALARM
ZOLL supplies air trap “dummies” for testing, training and demonstration
purposes. These are fluid filled air trap assemblies that are separate from a
standard Start-up Kit assembly. Never use this device, or other method, to
circumvent the air trap alarm when the system is connected to the patient.
Doing so exposes the patient to the hazards associated with air embolism
should the catheter fail. Death or serious injury may result.
Check the Integrity of the Catheter
To check the integrity of the catheter, perform these steps in the indicated order:
1. Stop the System.
2. Using aseptic technique, disconnect the tubing from the catheter and
properly cap both the catheter and the tubing set.
3. Fill a sterile 10 ml syringe with sterile saline.
4. Connect the syringe to the INFLOW lumen of the catheter and
disconnect the outflow cap.
5. Infuse the 10 ml of saline – it should flow out the outflow lumen.
6. Cap the OUTFLOW lumen and pull and hold 5 ml of vacuum for at least
10 seconds. Approximately 4 ml of saline, but not blood, should enter the
syringe and you should be able to maintain the vacuum.
7. Ease the vacuum, disconnect the syringe, and recap the INFLOW lumen.
Check the Integrity of the Start-up Kit Tubing
To check the integrity of the start-up kit tubing, perform these steps in the
indicated order:
1. Stop the System.
2. Look for obvious leakage.
3. Remove the tubing from the pump and check it for damage. Replace it in
the pump if it is undamaged.
4. Inspect the tubing from the pump to the patient for sources of fluid loss:
8
Page 12
Safety Information
600479-001 Rev 2 12/147
Look for damage to the tubing and/or the presence of air inside the
tubing.
Inspect, and tighten if necessary, each Luer fitting (do not use
instruments to tighten the fittings).
5. Inspect the tubing that returns to the pump from the patient.
6. Examine the saline bag to ensure that it has not been accidentally
compromised (for example, the spike may have damaged the bag wall).
7. Inspect the tubing from the saline bag to the saline reservoir and the
pump.
Interference
If this equipment does cause interference with other devices, which can be
determined by turning the equipment off and on, the user is encouraged to try to
correct the interference by one or more of the following measures:
Reorient or relocate the receiving device.
Increase the separation between the equipment.
Connect the equipment into an outlet on a circuit different from that
to which the other device(s) is connected.
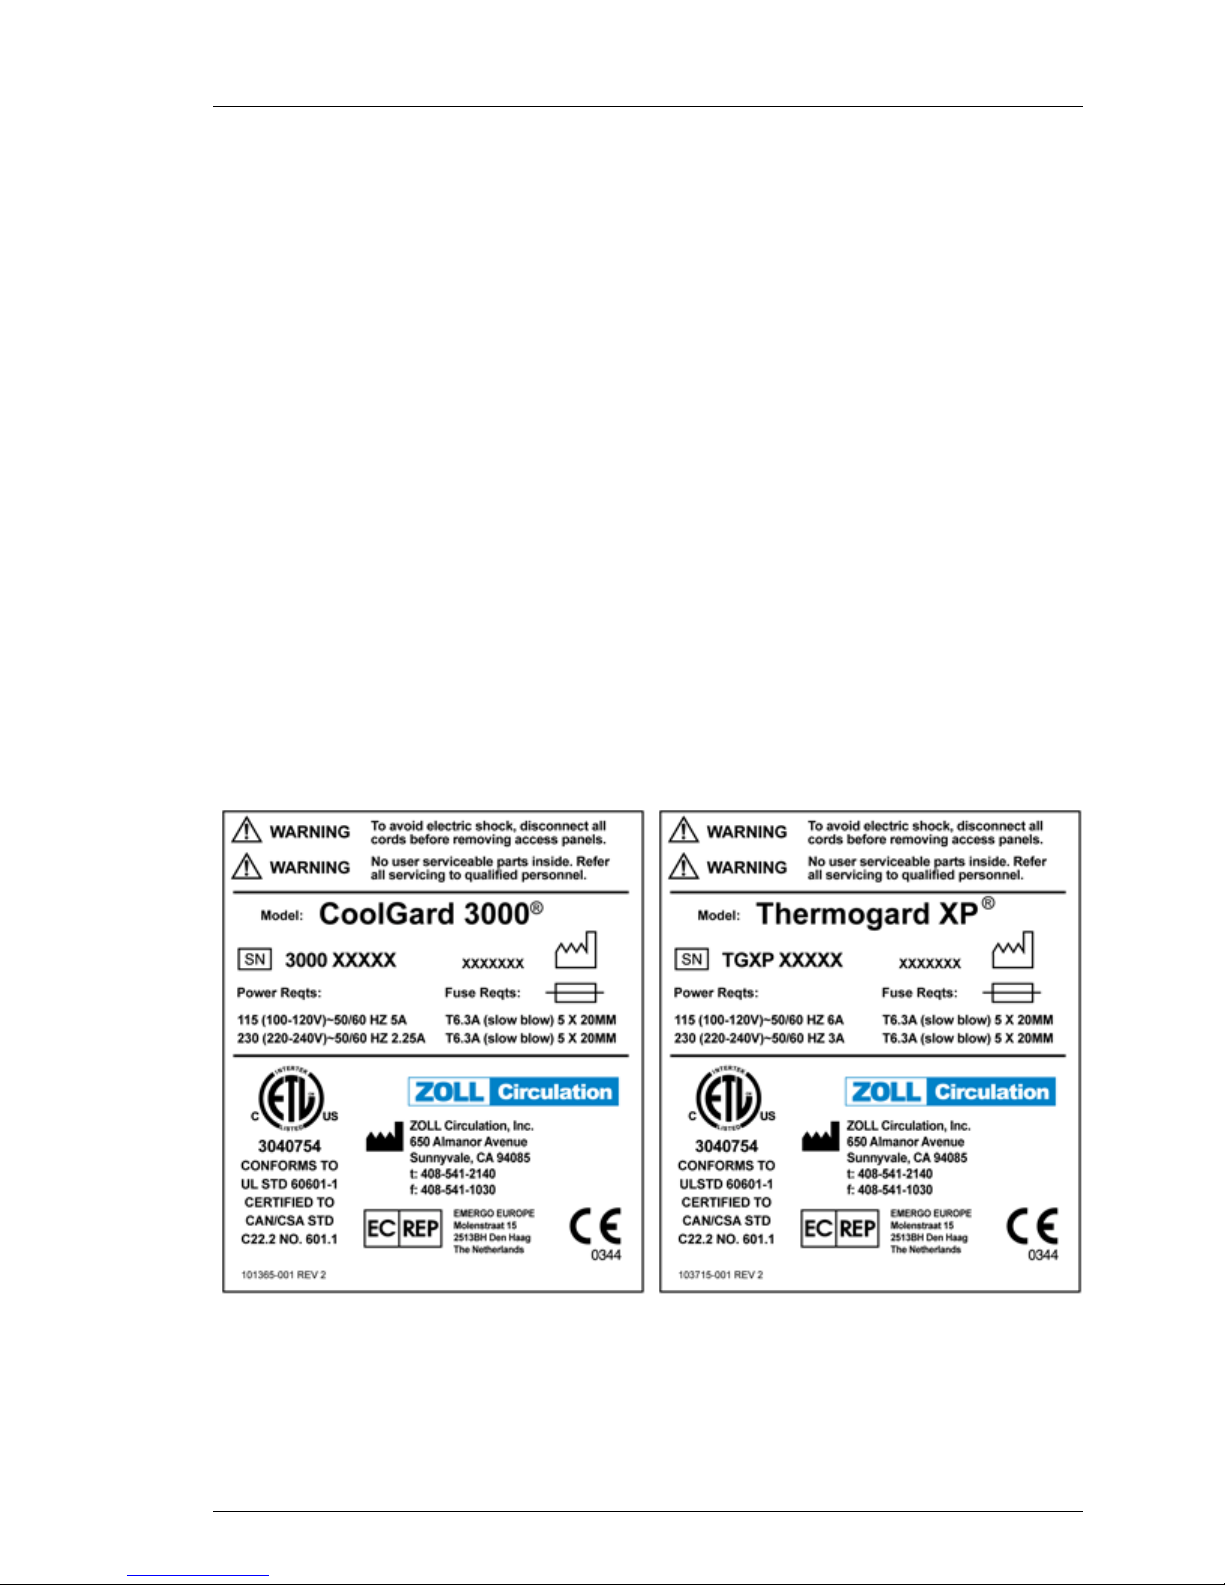
Product Label
An identifying label is attached to the outside of the System console near the
power cord inlet. The label is illustrated in Figure 1-1.
The label provides safety information and identifies the manufacturer, model
number, serial number, power requirements, fuse capacity, and m anufacturing
date for the System.
9
Figure 1-1. Product Label .
Page 13

Introduction
600479-001 Rev 2 13/147
Introduction
1
Page 14

Introduction
600479-001 Rev 2 14/147
Contents
Introduction 3
Use of the System 3
Operating Life 3
Functional Description 3
System Components 4
Controls and Display 4
Display 4
Power Indicators 5
Alarm Indicators 5
Control Buttons 5
Control Knob 6
Serial Interface Connector 6
Recirculating Chiller 6
Temperature Controller 7
Temperature Probe Connectors 7
Pump 7
Prime Switch 8
Start-up Kit 9
Data Memory 10
Saline Circuit Diagram 10
2
Page 15
Introduction
600479-001 Rev 2 15/147
Introduction
Use of the System
WARNING! PATIENTS MUST BE CONTINUOUSLY MONITORED.
Patients being treated with the System must be checked frequently (hourly)
when the System is operating. It is possible for malfunctions or misuse of the
System to result in patient injury or death.
The ZOLL Thermal Regulating System is comprised of an external heat
exchange system (CoolGard 3000 or Thermogard) and an Alsius endovascular
heat-exchange catheter connected via a sterile heat exchanger and tubing circuit
(the Alsius Start-up Kit). These components together comprise a patient
temperature-regulation apparatus employing feedback control. The catheter and
the Start-up Kit (its heat exchange coil, air trap, and tubing) are single-use
disposable devices.
This manual provides operating instructions for the System and the start-up kit.
Catheter components are referenced where it is necessary to assure proper use
with the system components. Always refer to the catheter’s Instructions for Use
for additional specific information.
Operating Life
The operating life of the catheters may vary according to design as indicated by
the model designation. Always refer to the catheter’s Instructions for Use for
information about the catheter’s operating life.
The disposable components of the Alsius start-up kit are designed for continuous
use for a period not to exceed seven (7) days. After seven days of use, all startup kit components must be removed and replaced with component s from a new
start-up kit.
CAUTION! START-UP KIT LIFETIME IS SEVEN (7) DAYS.
The designed operating lifetime for start-up kit components is seven (7) days
of continuous operation. If a patient must be treated for a longer period, a new
start-up kit must be installed in the System. Failure to adhere to this time limit
may cause injury to the patient.
Functional Description
The System can be described in terms of three major components: a
recirculating chiller, a sterile fluid roller pump, and a temperature control system.
The System is connected to the temperature-controlled catheter by two smallbore plastic tubes. One tube supplies temperature-controlled sterile saline
solution to the catheter, and the other tube returns the saline solution to the
System. The sterile saline is pumped through a continuous recirculating loop by a
peristaltic pump inside the console. The saline solution acts as an intermediate
heat-transfer medium between the patient and the System. Sterile saline is used
because it is biologically compatible with the patient and in the unlikely event of a
leak in the catheter, the possibility of harming the patient is reduced to a practical
minimum.
3
Page 16
Introduction
600479-001 Rev 2 16/147
Patient temperature feedback is used to control the system. The patient’s
temperature is measured by an indwelling YSI 400 thermistor temperature
sensor. In response to the patient’s measured temperature, the System employs
both cooling and heating. Cooling occurs when the patient’s temperature is
above the set point target temperature. Heating occurs when the patient’s
temperature is below the set point target temperature. The amount of heating or
cooling power is proportional to the difference in temperature between the set
point target temperature and the patient’s measured temperature.
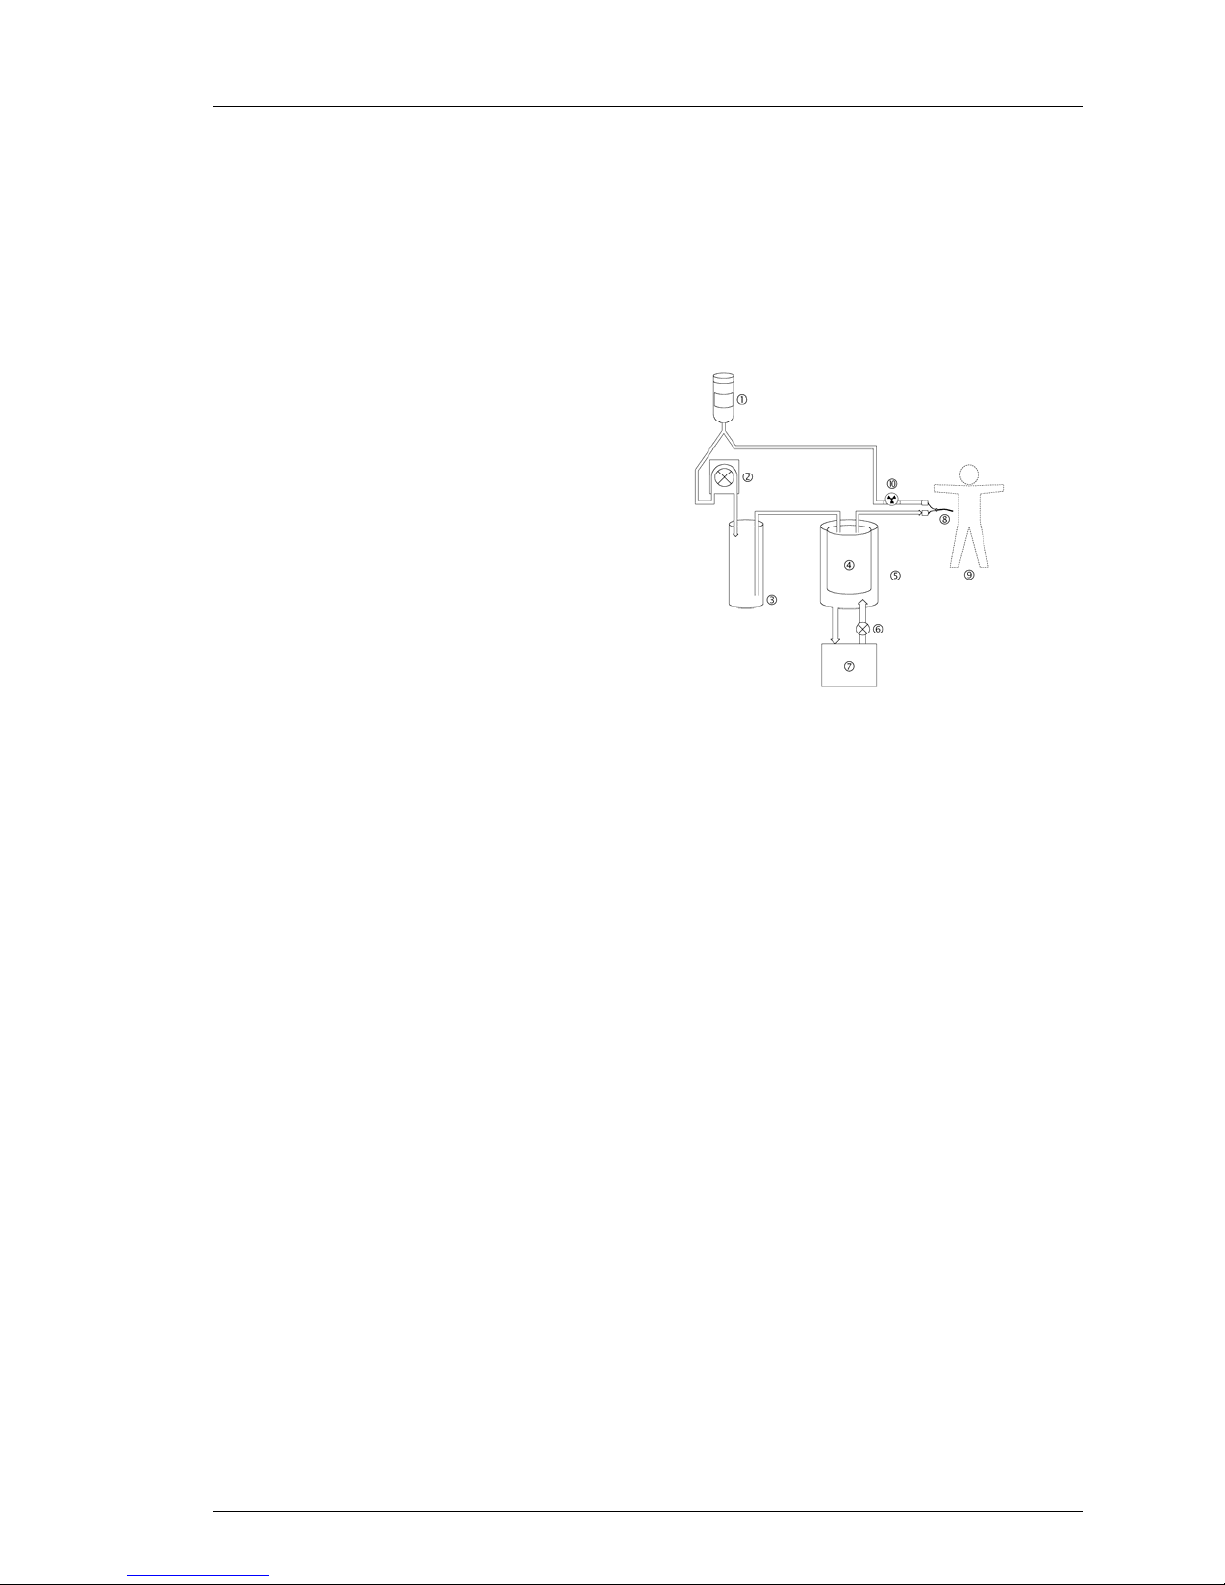
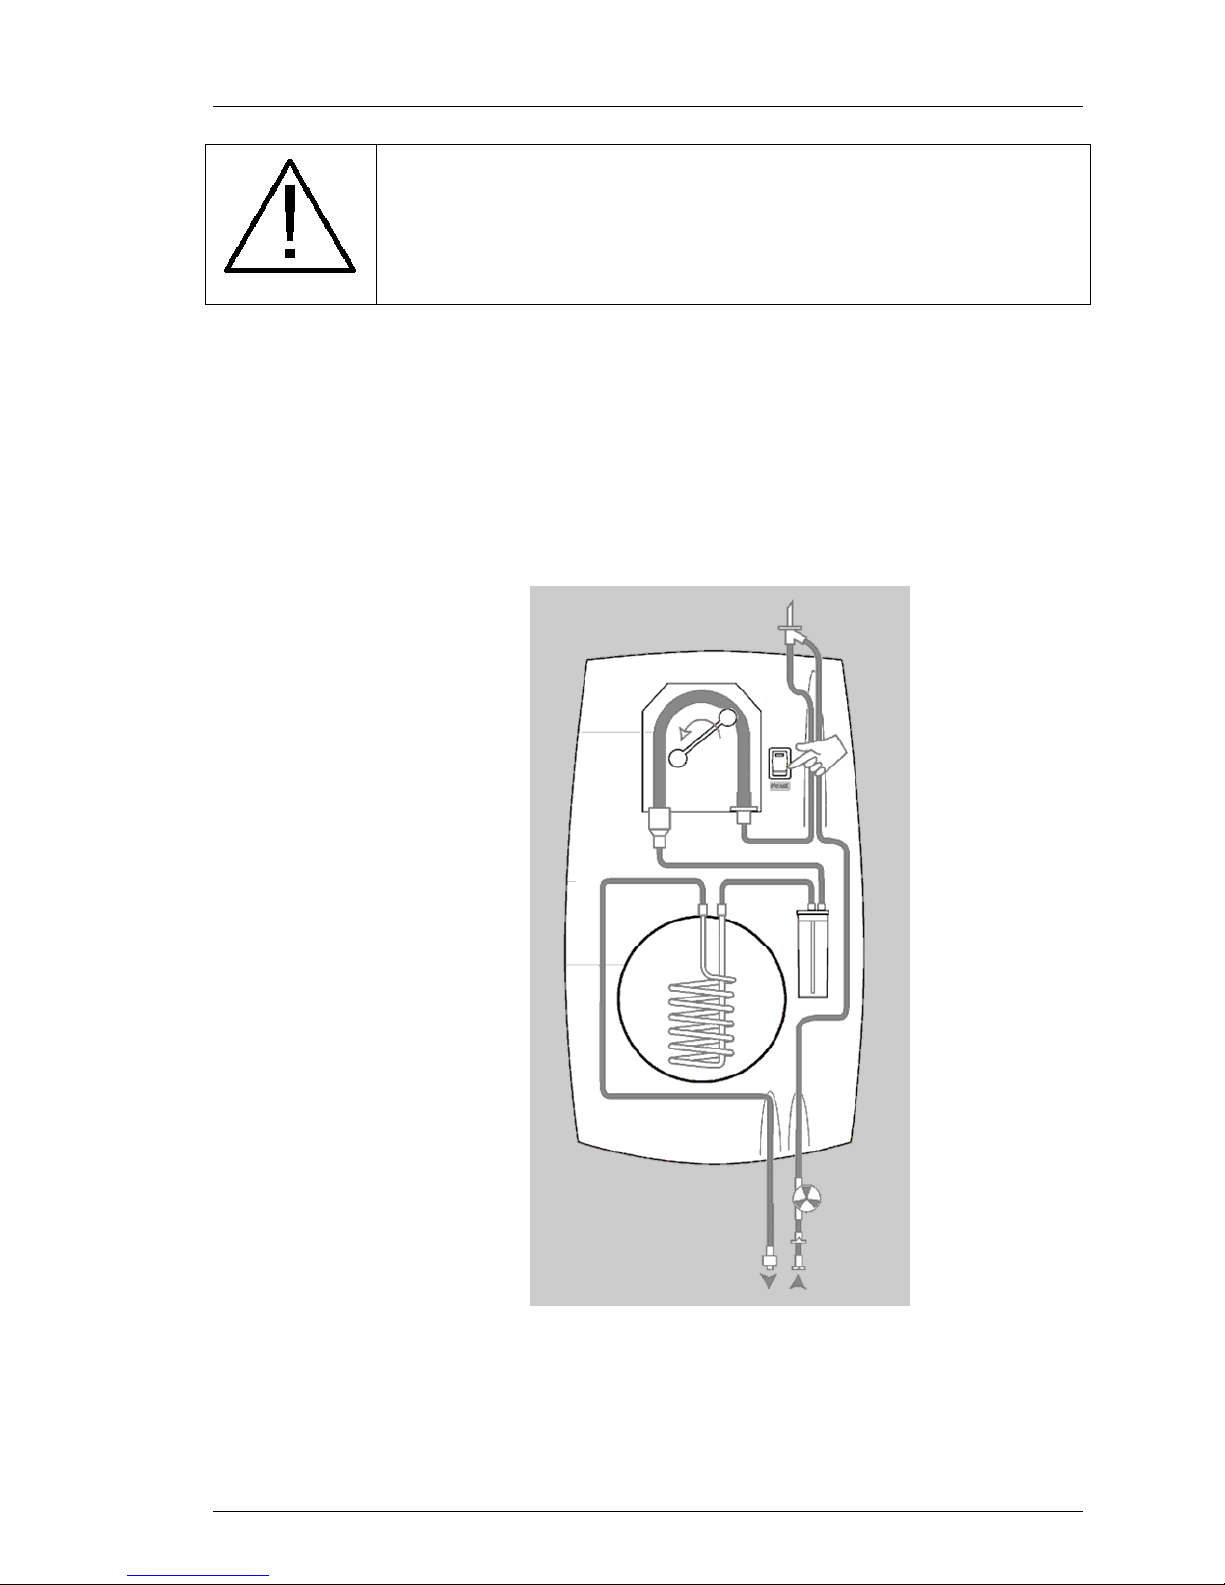
A basic diagram of the System is illustrated in the following figure.
1. Saline bag.
2. Peristaltic pump
3. Air trap
4. Heat exchange coil
5. Coldwell
6. Coolant pump
7. Chiller & Heater
8. Catheter
9. Patient
10. Pin wheel flow indicator
Figure 2-1. Simplified Flow Diagram.
System Components
Controls and Display
The operator’s display panel contains four buttons and one knob used to access
functions and adjust settings with the aid of the menus and messages displayed
on the screen. The controls and display are illustrated in figure 2-2 and explained
in the following text.
Display
The display is a backlit color LCD panel that can be easily read in all ambient
lighting conditions. It is used to display status, menus, messages, alarms, and
patient temperature trend graphs.
The display head is attached to the mast by an adjustable swivel/tilt mounting
clamp. The user can adjust the tilt and rotation of the display head and lock it into
position by using this clamp.
4
Page 17
Introduction
600479-001 Rev 2 17/147
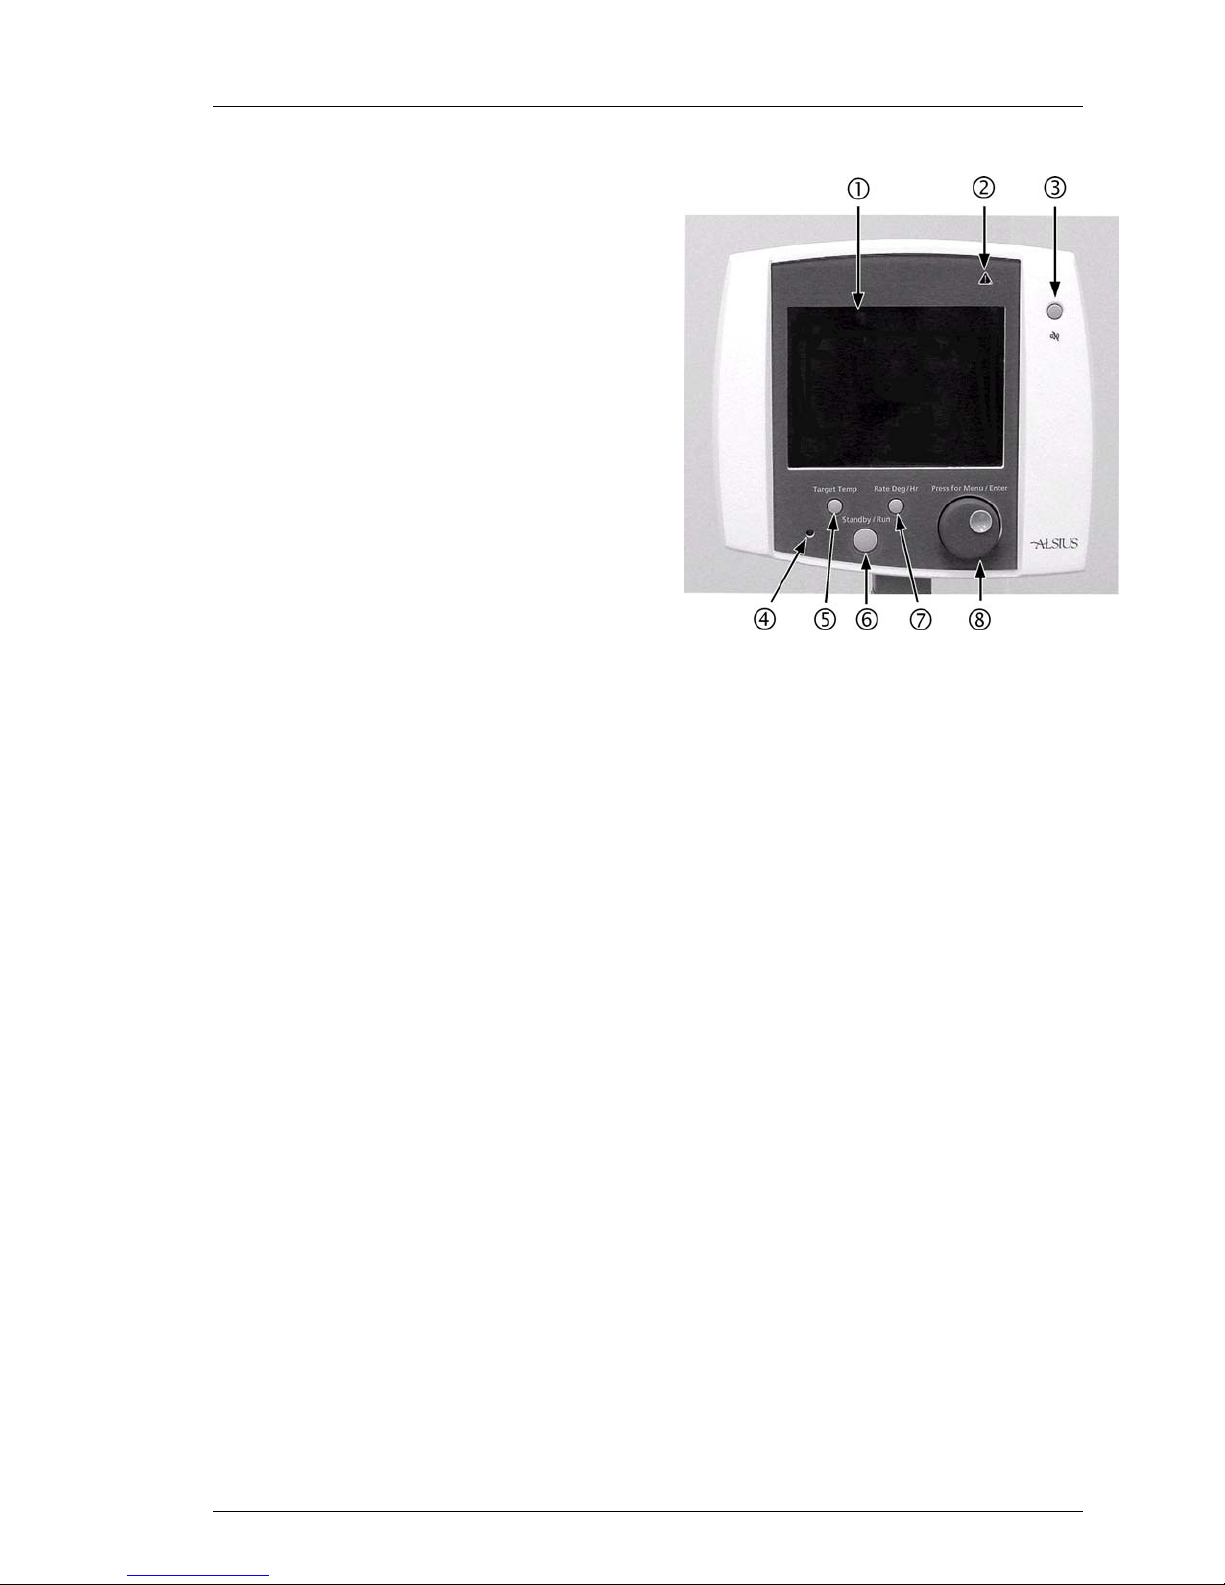
1. Display Screen
2. Alarm Indicator LED.
3. Mute Button
4. Power On Indicator LED.
5. Target Temp Button.
6. Standby / Run Button.
7. Rate Deg / HR Button.
8. Press for Menu / Enter Knob
Figure 2-2. Controls and Display.
Power Indicators
An indicator lamp on the control panel is illuminated when power is switched on.
A second power-on indicator is mounted directly above the power swit ch on the
rear of the console.
Alarm Indicators
The System typically notifies users of alarm conditions in two ways. When an
alarm occurs, the screen displays an alarm message, and an alarm annunciator
produces an audible alarm tone (beep). The alarm tone can be temporarily
muted by the user, but it cannot be turned off.
If the nature of the failure prevents the System from displaying an alarm
message, the alarm indicator on the control panel will be illuminated.
Control Buttons
The display head features four pushbuttons that are used to control System
functions. To provide confirmation, each time a button is pressed, a “key click”
sound is produced by the annunciator.
Target Temp
Press the “Target Temp” button to display a screen that allows you to set the
patient’s target temperature. You may set a target temperature between 31º C
and 38º C (87.8º F and 100.4º F).
Rate Deg/Hr
Press the “Rate Deg/Hr” button to display a screen that allows you to set the
cooling/warming rate (expressed in degrees per hour). You may set a cooling/
warming rate between 0.10º C/hr and 0.65º C/hr (0.18º F/hr and 1.17º F/hr).
Standby/Run
5
Page 18
Introduction
600479-001 Rev 2 18/147
Press the “Standby/Run” button to toggle the operation of the System between
standby mode (the pump is stopped) or run mode.
An alarm or fault can place the System into standby mode automatically. After
remedying the condition that caused the alarm, press this button to return to run
mode.
Silence Alarm
Press the silence alarm button to silence the audible alarm tone for two minutes
(120 seconds). If the alarm condition has not been cleared during this two -minu te
period, the audible alarm will sound again.
Control Knob
The “Press for Menu/Enter” control is a dual-function control knob and
pushbutton.
Press the knob to display a menu screen or to indicate the completion of a
selection.
Turn the knob to scroll between selections or to scroll temperature trend graphs.
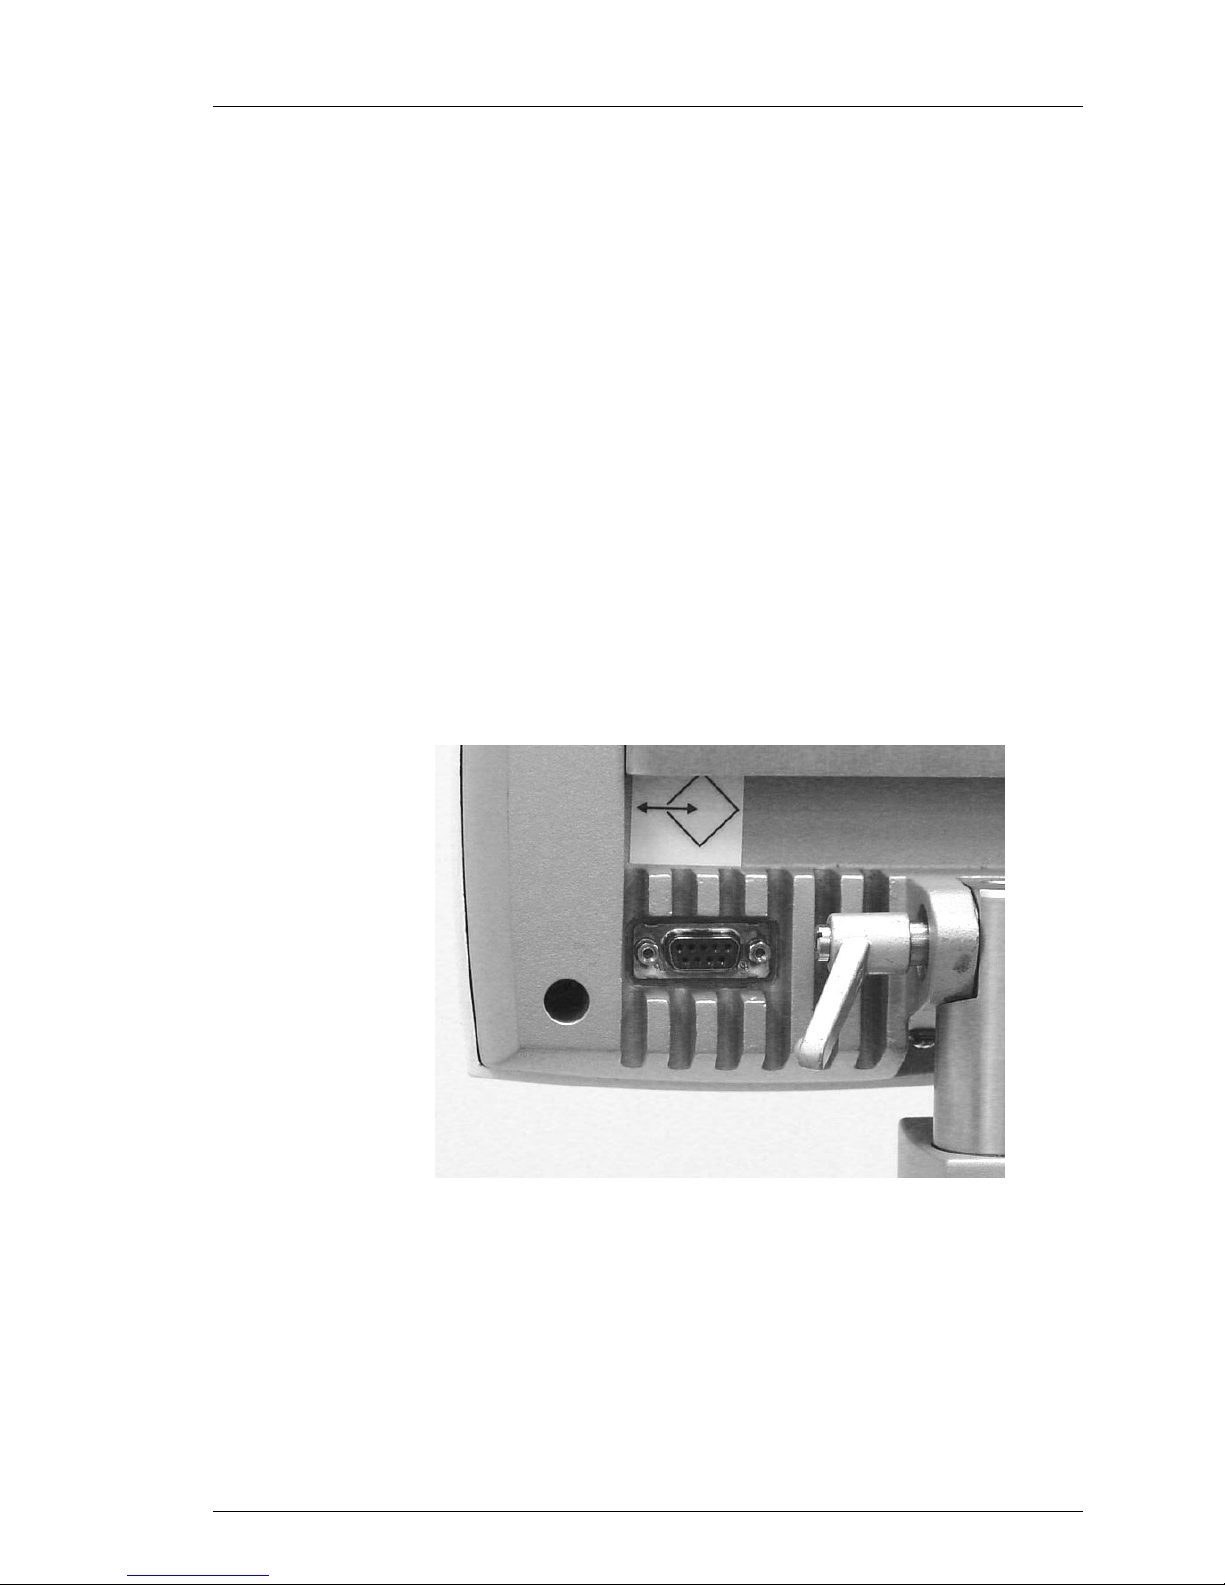
Serial Interface Connector
A female 9-pin subminiature D connector is mounted on the lower left corner of
the rear of the display head. Use this connector to attach a serial interface cable
between the System and a laptop computer. Once connected, the computer can
download patient temperature trend data stored by the System.
Recirculating Chiller
The chiller consists of an air-cooled refrigeration system, reservoi r heater,
circulation pump, stainless steel reservoir, reservoir cover, and a temperature
controller.
6
Figure 2-3. Serial Interface Connector.
Page 19
Introduction
600479-001 Rev 2 19/147
Temperature Controller
The temperature controller uses input from the patient’s temperature probe and
the operator-selected patient temperature setpoint to regulate the coolant
temperature of the recirculating chiller. The temperature controller constantly
adjusts the coolant temperature by means of a closed-loop control system. The
operator enters a setpoint that represents the patient’s target temperature. The
controller cools or heats the coolant, in a range between 0º and 42º C (32º and
107.6º F) to optimally achieve and maintain the target temperature. The controller
constantly displays the measured patient temperature and the target
temperature.
An optional mode can command the controller to approach the target
temperature at a user-selected rate.
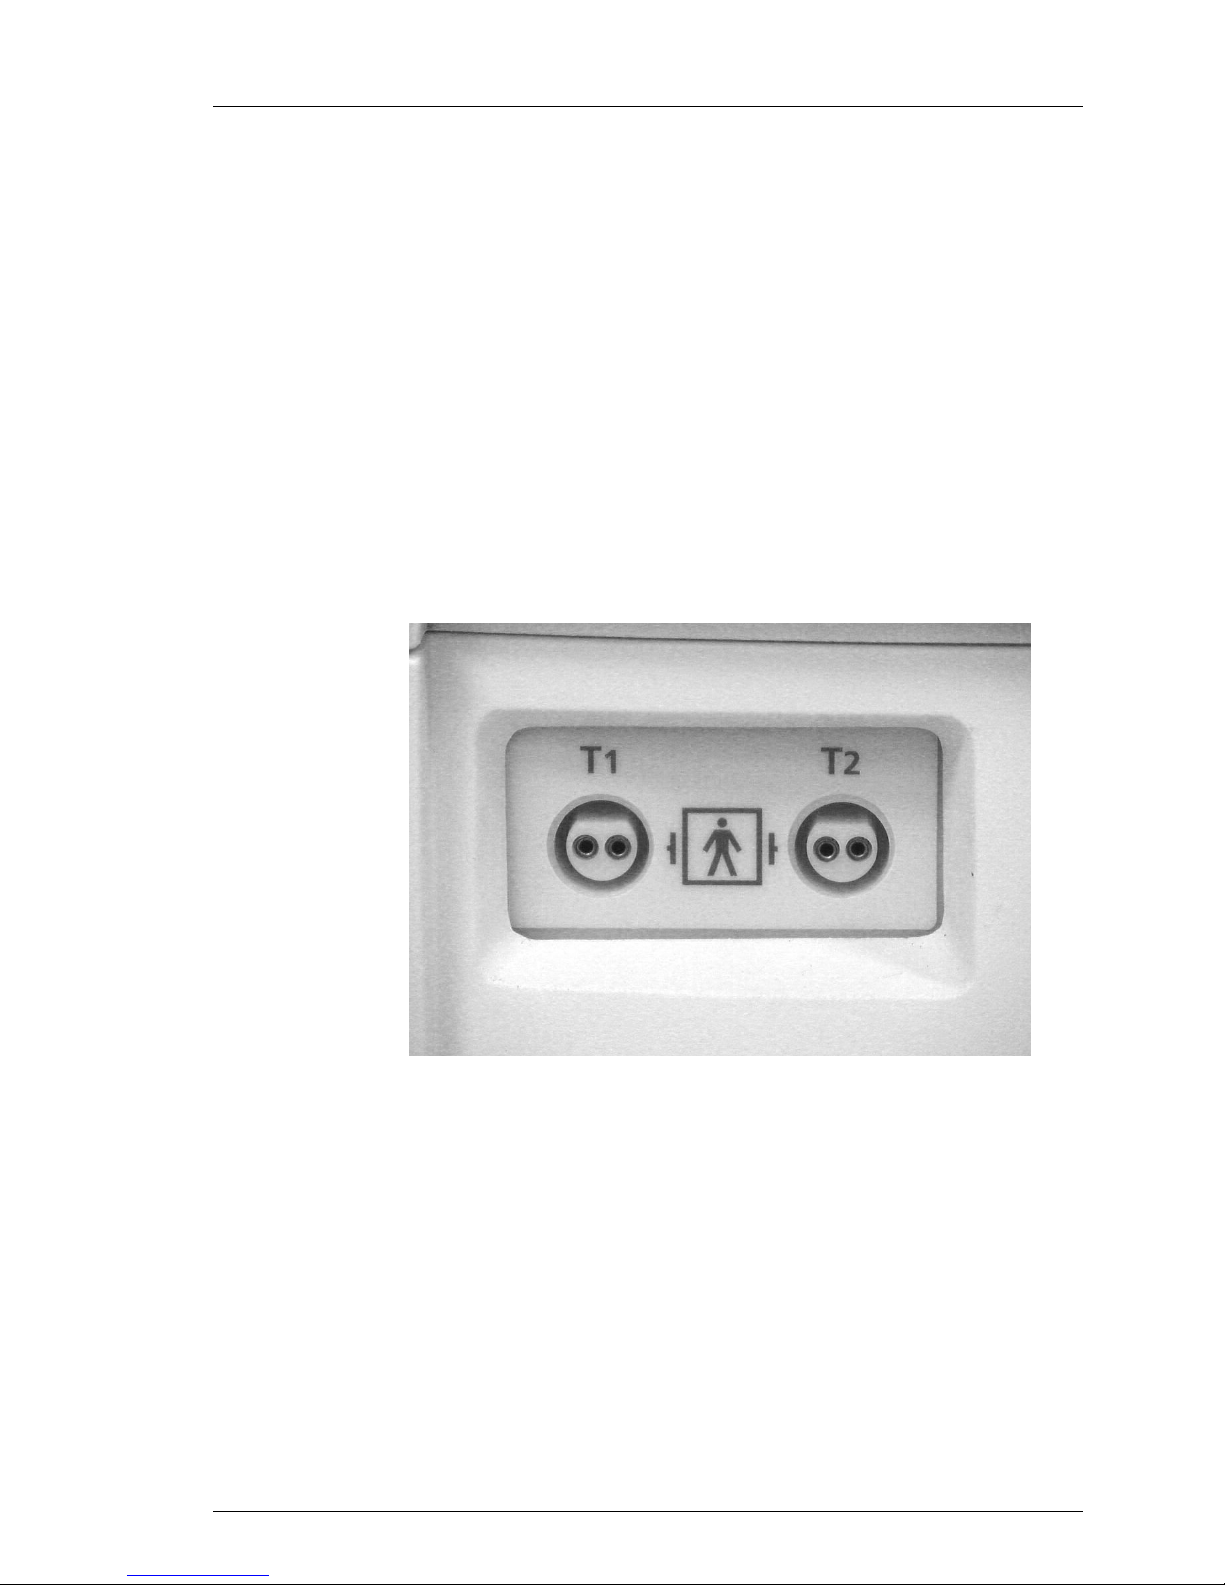
Temperature Probe Connectors
The front of the System console features two connectors, labeled “T1” and “T2”
which are used for connection to patient temperature probes. The primary patient
temperature probe is plugged into connector T1. The secondary probe is plugged
into connector T2.
Pump
Sterile saline solution is circulated through the heat exchanger coil and the
catheter by a high-performance, compact roller pump. It pumps by peristaltic
action on the tubing installed in the pump head. The pump rotation speed is
accurately controlled by an electronic speed control system. The pump flow rate
can be selected by the user.
7
Figure 2-4. Temperature Probe Connectors.
Page 20
Introduction
600479-001 Rev 2 20/147
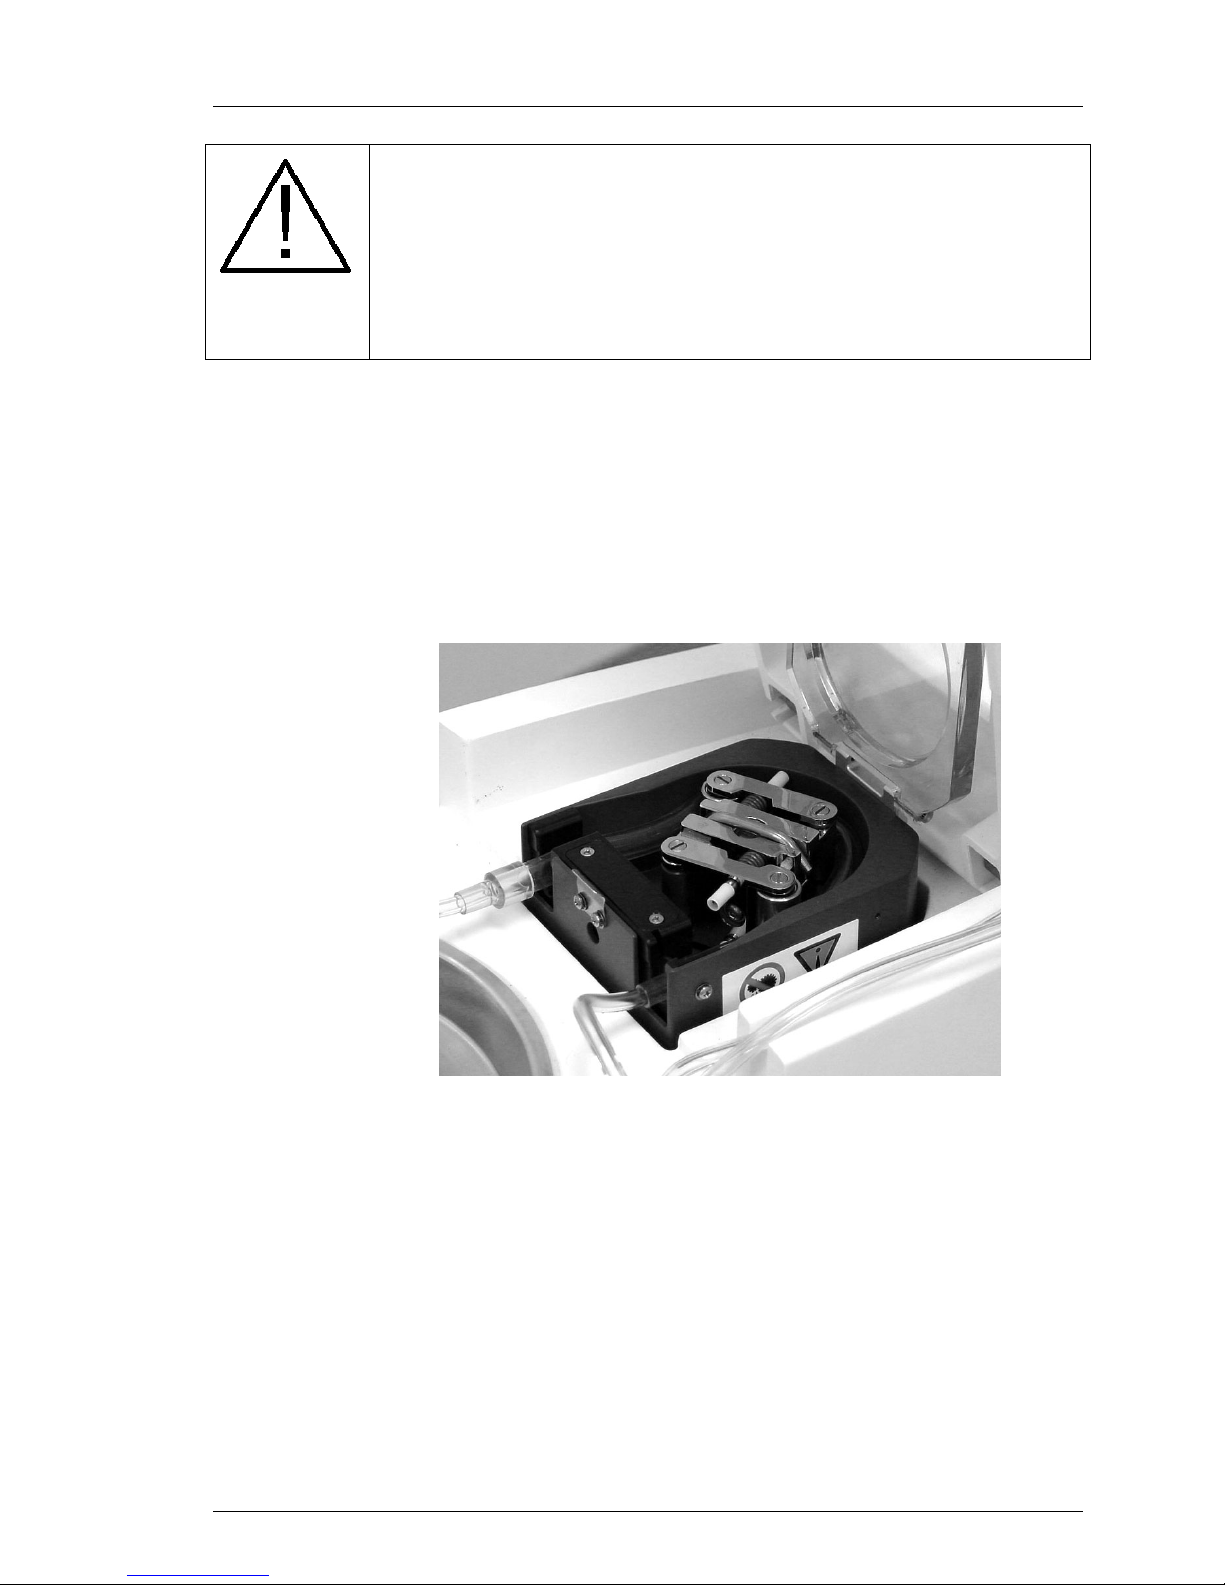
WARNING! FINGER INJURIES
Be careful when inserting the pump tubing that you do not catch your fingers
with the roller.
When the System is operating DO NOT attempt to circumvent the safety
interlocks on the peristaltic pump lid. DO NOT place fingers or foreign objects
into the pump raceway when the pump is turning. The peristaltic pump has
sufficient torque to severely damage a finger.
If a tubing leak or failure occurs in the pump raceway, the saline solution will
cause corrosion in the moving parts of the rotor.
1. Remove the pump rotor (refer to Pump Rotor removal instructions in
System Service Manual).
2. Rinse the rotor in clean water and thoroughly dry the rotor.
3. Apply a few drops of light machine oil to the moving parts of the rotor.
4. Reinstall the rotor (refer to pump rotor installation instructions in System
Service Manual).
Prime Switch
The prime switch is located next to the pump under the top cover. The switch is
used to operate the pump to prime the tubing with sterile saline solution from the
saline source. When the switch is held down, the pump runs; when the switch is
released, the pump stops.
8
Figure 2-5. Pump.
Page 21

Introduction
600479-001 Rev 2 21/147
Start-up Kit
The Alsius start-up kit contains the sterile disposable components for this
system. Each kit contains a heat exchanger coil, air trap, saline coolant delivery
lines, saline container connectors, catheter connectors, and the roller pump
tubing. These components are described in detail in later chapters of this
document. The components in the start-up kit are designed to operate
continuously for seven days, after which they must be replaced.
Figure 2-6. Prime Switch
.
9
Figure 2-7. Start-up Kit.
Page 22
Introduction
600479-001 Rev 2 22/147
CAUTION! START-UP KIT LIFETIME IS SEVEN (7) DAYS.
The designed operating lifetime for start-up kit components is seven (7) days
of continuous operation. If a patient must be treated for a longer period, a new
start-up kit must be installed in the System. Failure to adhere to this time limit
may cause injury to the patient.
Data Memory
The System is capable of continuously recording patient temperature and system
activity for up to 21 days. This stored data can be downloaded to an attached
computer over a serial interface using optional software furnished by ZOLL.
Saline Circuit Diagram
A flow diagram is printed on the inside of the top cover. Use this diagram to
assure that the start-up kit has been installed correctly.
10
Figure 2-8. Flow Diagram.
Page 23

Introduction
600479-001 Rev 2 23/147
Indications for Use - USA
The Indications for Use listed below have clearance within the USA for the
following models of ZOLL Thermal Regulation System:
The CoolGard 3000
The Thermogard XP
These systems can be used with any of the Alsius Catheters. The indications for
use are specific to the catheter. Please refer to the Indications for Use statement
in the catheter specific Instructions for Use.
Indications for Use – Cool Line Catheters
The ZOLL Thermal Regulation System using the Alsius Cool Line™ Catheter is
indicated for use in fever reduction, as an adjunct to other antipyretic therapy, in
patients with cerebral infarction and intracerebral hemorrhage who require
access to the central venous circulation and who are intubated and sedated.
Warning – Fever Reduction
The safety of this device has not been demonstrated for fever reduction in
patients presenting with subarachnoid hemorrhage or primary trau m atic brain
injury. The safety and effectiveness of this device was examined in a randomized controlled trial of 296 patients. The mortality results reported in this trial,
for the four patient cohorts enrolled, are presented in the table below (CI –
cerebral infarction, ICH – intracerebral hemorrhage, PTBI – primary traumatic
brain injury, SAH – subarachnoid hemorrhage).
Table 1-1. Mortality by Diagnosis (ITT).
Cool Line Control
n N % n N % p-value*
CI 3 16 18.8 3 14 21.4 0.74
ICH 8 33 24.2 7 27 25.9 1.00
PTBI 10 44 22.7 4 38 10.5 0.24
SAH 13 61 21.3 7 63 11.1 0.15
*Fischer’s exact test
For more details on the results of this study please refer to Physician’s Manual –
“Normothermia for the Neuro-critically Ill Stroke Patient” #101416-001.
1
Page 24

Introduction
600479-001 Rev 2 24/147
Indications for Use – All Other Catheters
The ZOLL Thermal Regulation System, using one of the Icy ®, Quattro ™ or
Fortius
®
model catheter, is indicated for use:
in cardiac surgery patients to achieve and or maintain normothermia
during surgery and recovery/intensive care, and
to induce, maintain and reverse mild hypothermia in neurosurgery
patients in surgery and recovery/intensive care.
2
Page 25

Receiving, Inspection & Assembly
600479-001 Rev 2 25/147
Receiving, Inspection
& Assembly
1
Page 26

Receiving, Inspection & Assembly
600479-001 Rev 2 26/147
Contents
Receiving, Inspection, and Assembly 3
Overview 3
Inspection for Damage 3
Required Tools 3
Unpacking 3
Assembly 4
Hook 4
Handle 5
Control Head 5
Control Cable 6
Power Cord 7
Condensate Pan 7
Saline Container Insulating Jacket 7
2
Page 27

Receiving, Inspection & Assembly
600479-001 Rev 2 27/147
Receiving, Inspection, and Assembly
Overview
This chapter provides information on how to receive, unpack, and assemble the
System. If your System was delivered and set up by an ZOLL representative, you
may skip this chapter and turn to Chapter 4.
Inspection for Damage
Each System is carefully inspected before it is shipped. When the carrier
delivers your System, ensure that the shipping containers are not damaged.
Visually inspect the outside of the shipping container for any damage. If
damage is detected, please notify ZOLL’s customer service department and
file a damage claim with the carrier.
Required Tools
To safely unpack, inspect, and assemble the System, you will need the following
tools:
Phillips screwdriver (included in shipping container).
3/16-inch Allen wrench (included in shipping container).
5/32-inch Allen wrench (included in shipping container).
7/64-inch Allen wrench (included in shipping container).
Scissors or box knife.
Unpacking
CAUTION! AVOID LIFTING INJURY.
The System weighs 115 lb (52 kg). Never attempt to lift the equipment without
assistance. Use safe lifting practice when handling the equipment.
To unpack the System, follow these steps in the indicated order.
1. Remove the straps from the carton and pallet.
2. Open the top flaps of the carton and remove the inner carton containing
3. Remove the protective inserts and lift the outer carton up and off.
4. Use scissors or a box knife to carefully cut away the moisture barrier bag
5. With the help of an assistant, grasp the base of the console just above
the control head. This carton also contains the handle, attachment
hardware, spare fuses, the condensate pan, the saline container
insulating jacket, and other miscellaneous parts.
surrounding the console. Use care to avoid scratching the console.
the casters, carefully lift the console off the platform, and set it on the
floor.
3
Page 28
Receiving, Inspection & Assembly
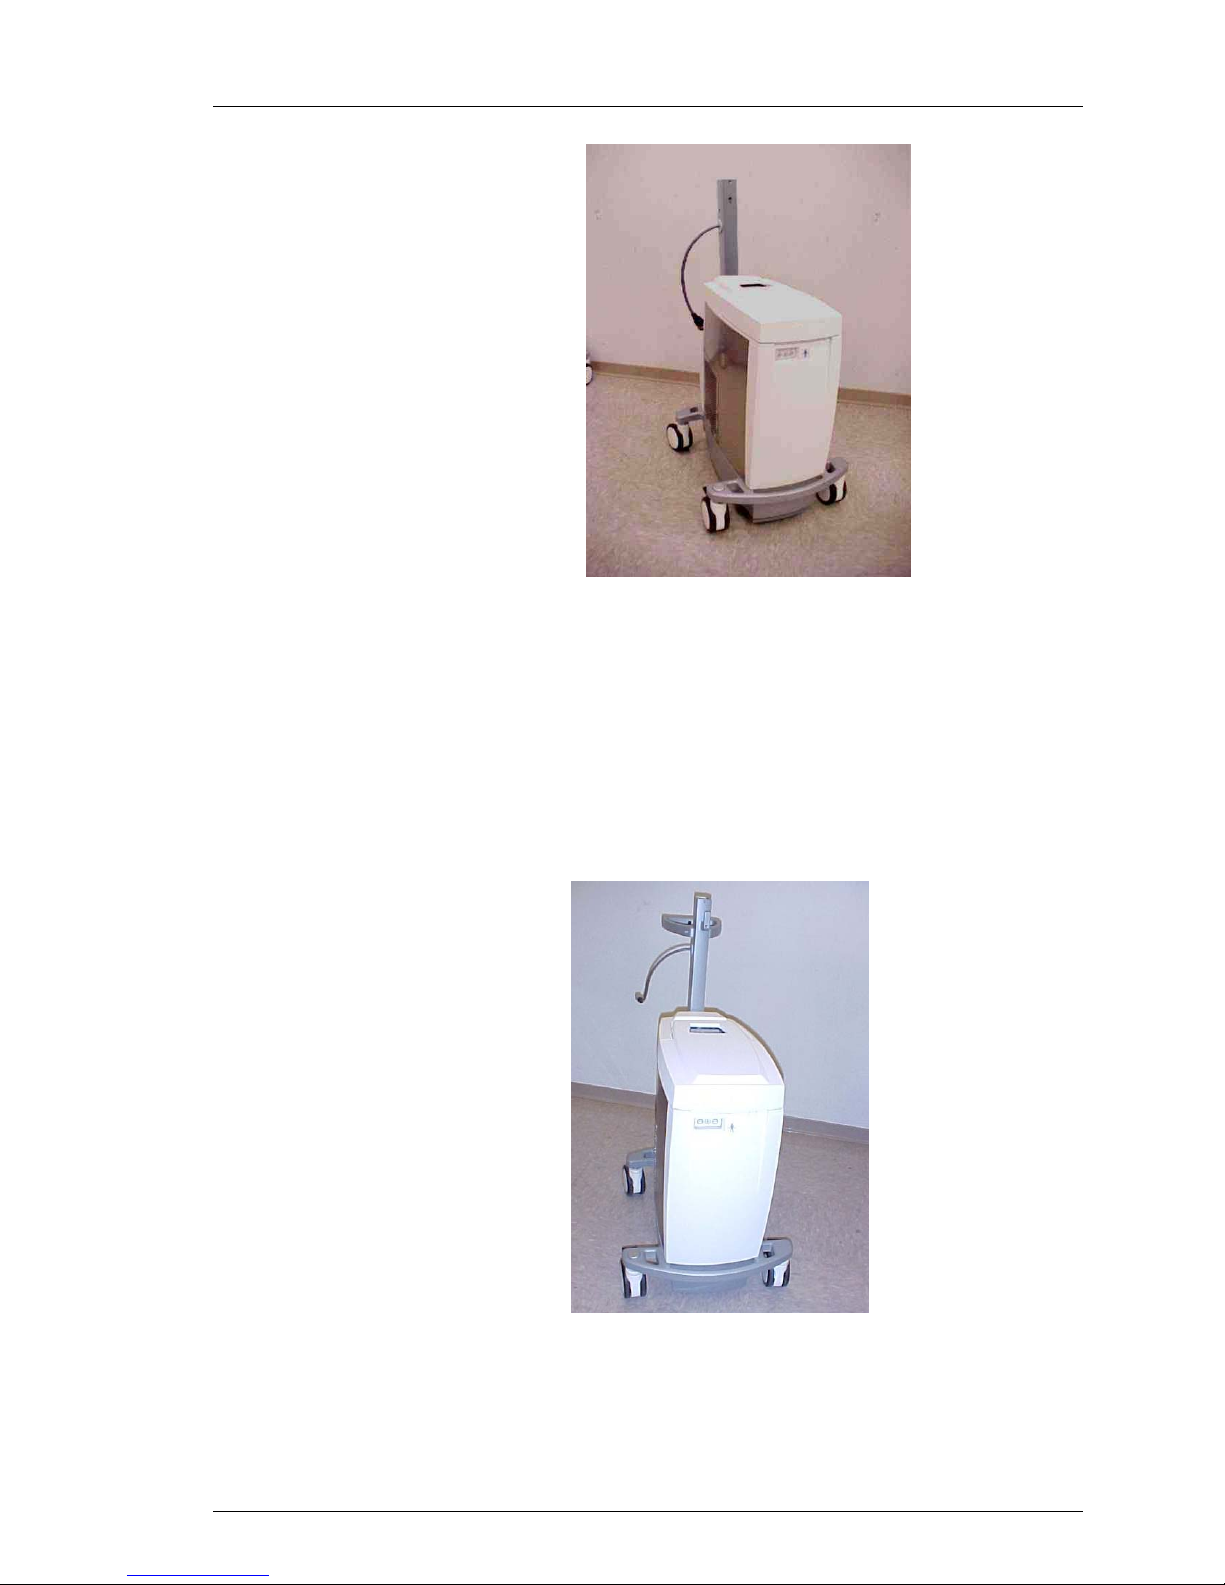
600479-001 Rev 2 28/147
Figure 3-1. System Unpacked and Ready for Assembly.
Assembly
To assemble the unpacked System, follow these steps in the indicated order.
Hook
1. Attach the gray hook to the front of the mast using the short bolt
provided. Use a 7/64-inch Allen wrench to tighten the bolt securely (see
figure 3-2).
4
Figure 3-2. System With Hook Attached.
Page 29
Receiving, Inspection & Assembly
600479-001 Rev 2 29/147
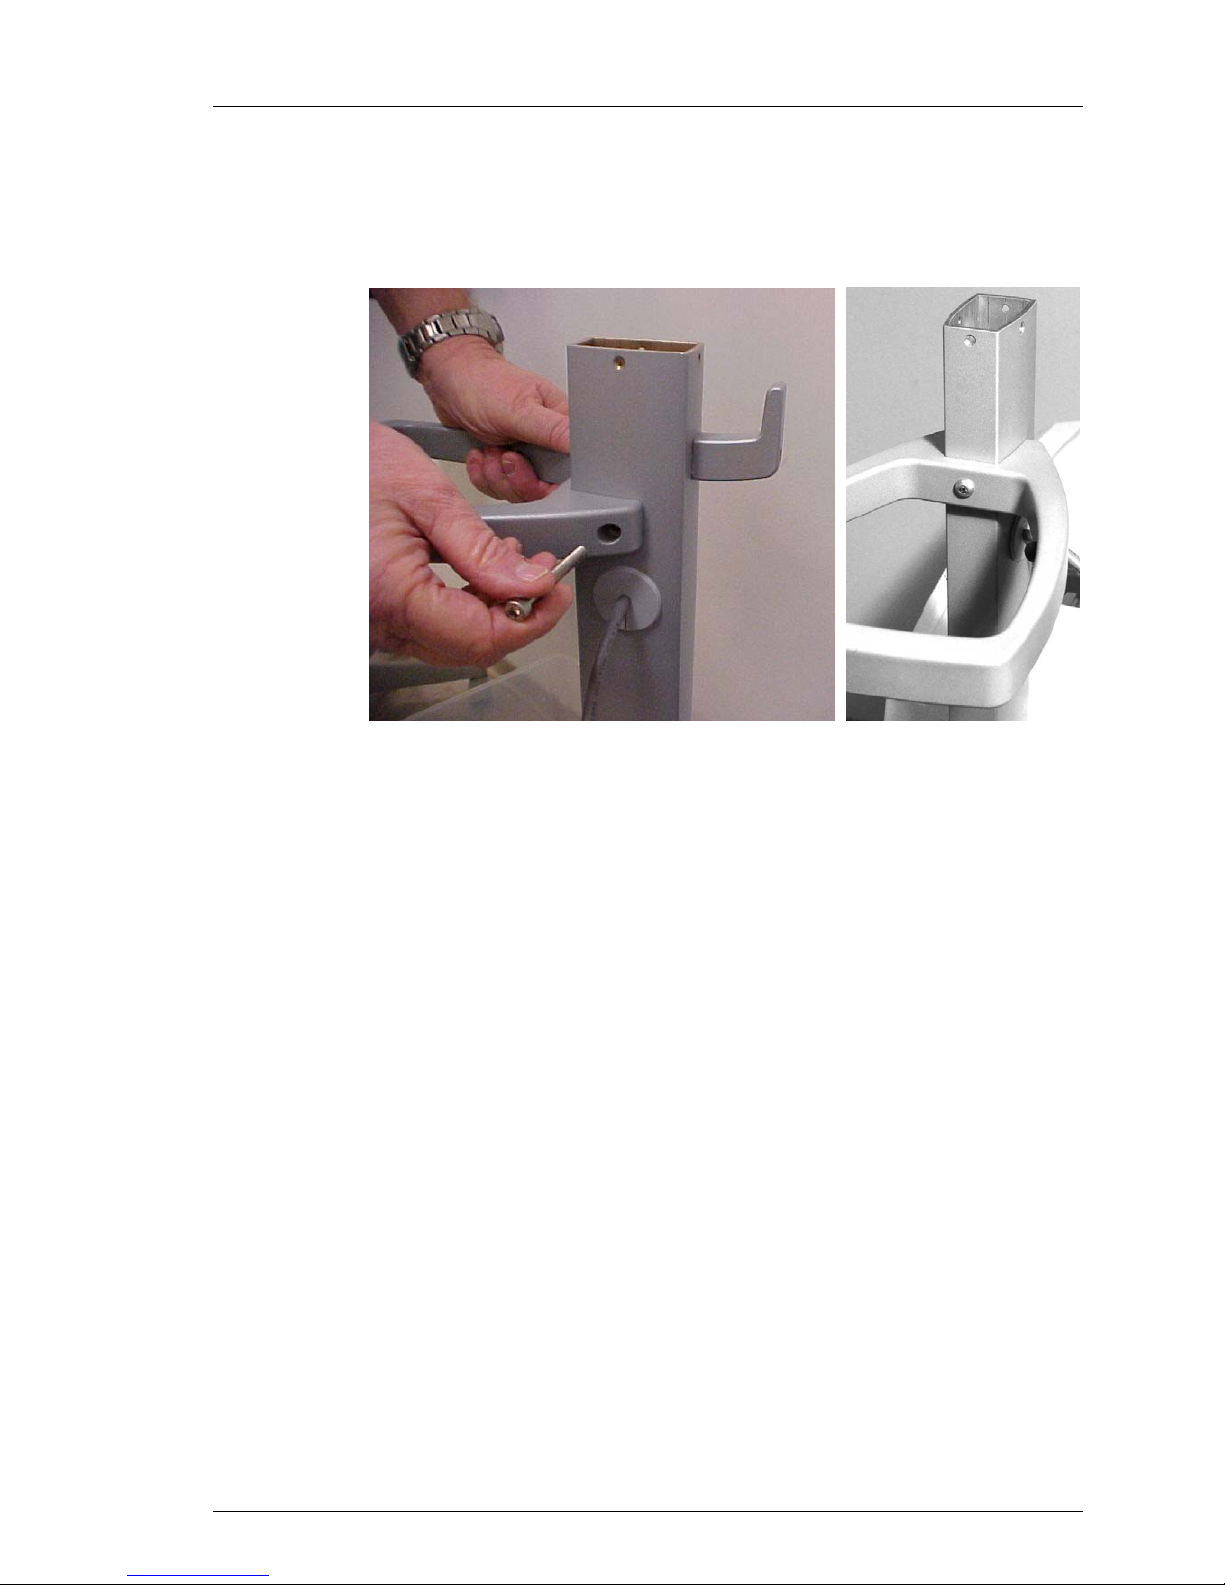
Handle
2. Attach the handle to the mast using the long bolt and the short screw
provided. Use a 3/16-inch Allen wrench to tighten the bolt securely. Use
a 5/32-inch Allen wrench to tighten the screw (see figure 3-3). Do not lift
the System by the handle.
Figure 3-3. Use the Long Bolt and Center Screw to Attach the Handle.
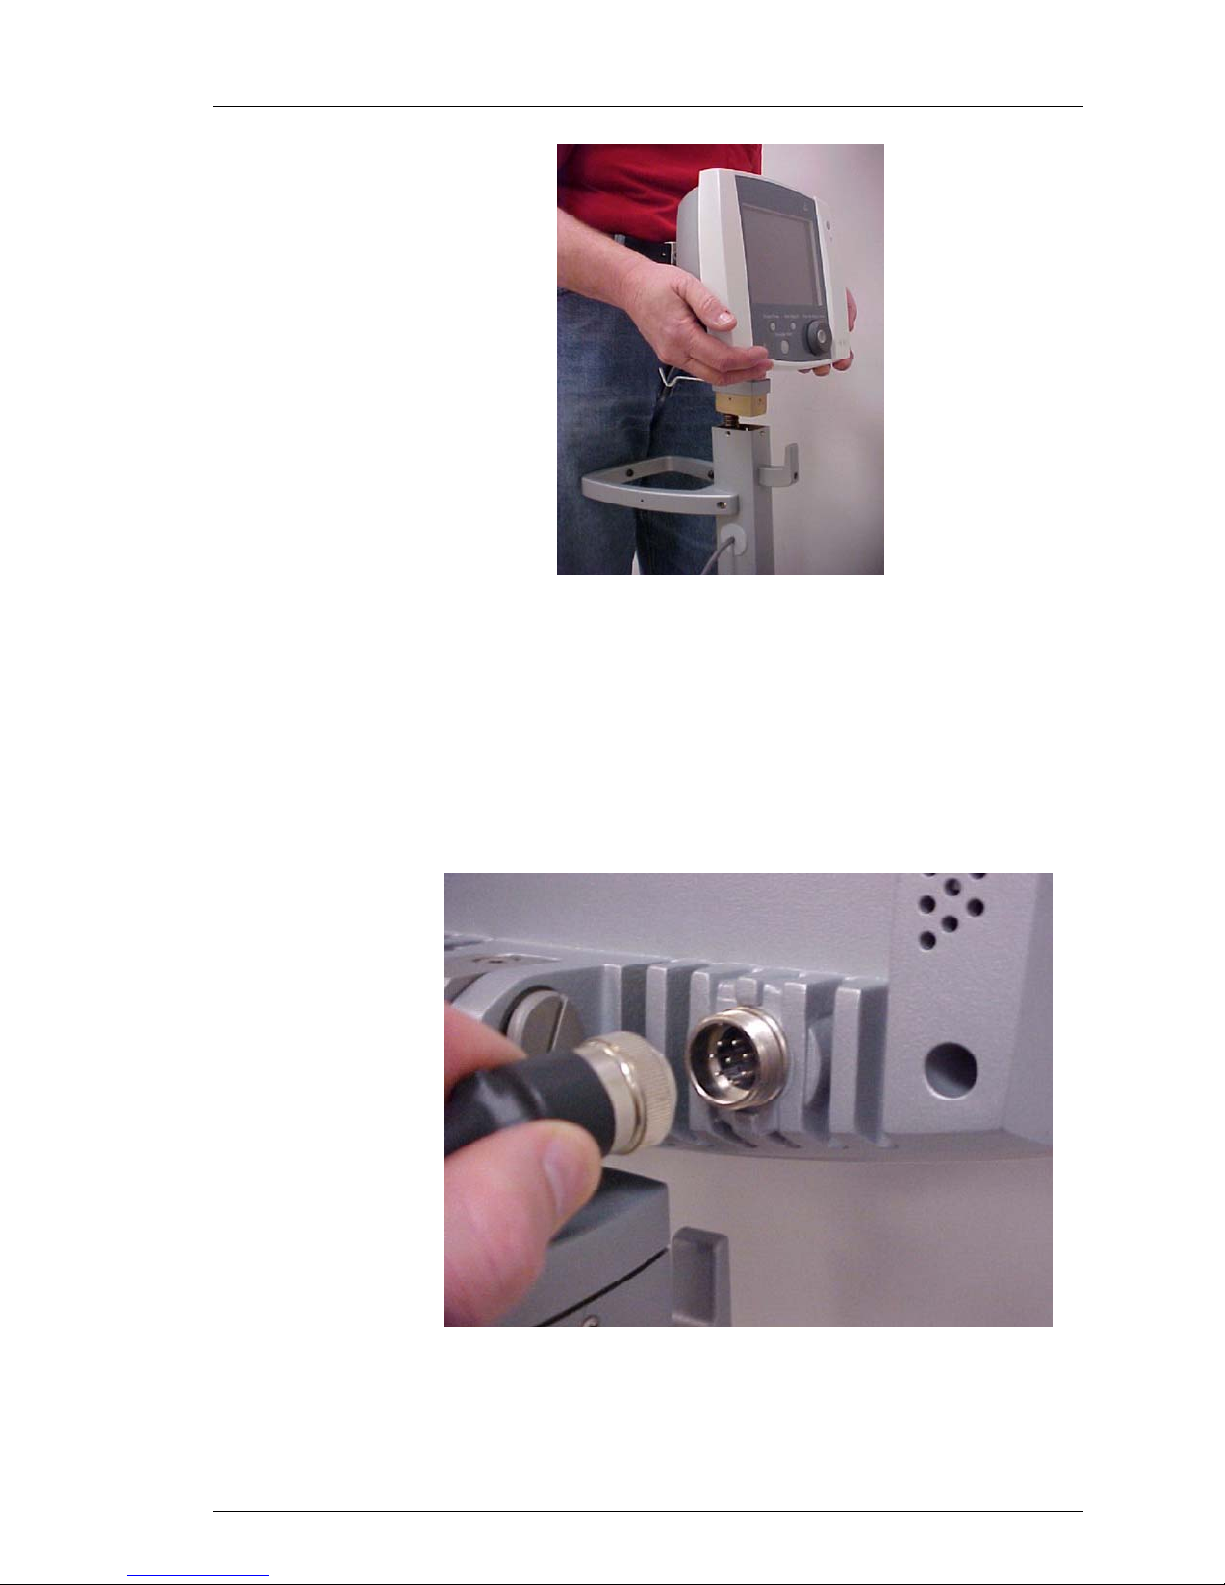
Control Head
3. Carefully remove the control head from its packaging.
4. Attach the control head to the mast. Hold the pivot assembly perfectly
vertical and slide it into the mast opening by applying even, gradual
pressure. The pivot assembly fits into the mast only in one direction.
5
Page 30
Receiving, Inspection & Assembly
600479-001 Rev 2 30/147
Figure 3-4. Attach the Control Head to the Mast.
5. Secure the control head to the mast by installing four screws in the holes
provided at the top of the mast. Use a Phillips screwdriver to tighten the
screws securely.
Control Cable
6. Connect the control cable to the socket on the lower right rear corner of
the control head. Align the plug with the socket and gently push the plug
into the socket until it is seated. Turn the retaining collar approximately
two full turns clockwise to lock the plug in the socket.
6
Figure 3-5. Plug the Control Cable Into the Socket.
Page 31

Receiving, Inspection & Assembly
600479-001 Rev 2 31/147
Power Cord
7. Plug the female end of the power cord into the recessed power inlet
connector. Wrap the power cord around the two cord hooks on the rea r
of the console.
Condensate Pan
8. Remove the condensate pan from its packaging and install it in the slot
under the front of the console (refer to figure 8-1).
Saline Container Insulating Jacket
9. Remove the saline container insulating jacket from its packaging and
hang it on the saline container hook.
Assembly is complete.
7
Page 32

600479-001 Rev 2 32/147
Operation
Operation
1
Page 33

Contents
600479-001 Rev 2 33/147
Overview 5
Operating States in the System 5
SETUP 5
STANDBY 7
RUN - Treatment Modes 8
User Interface 9
System Controls 9
The System Display Screen 10
Changing Target Temperature 11
Changing Treatment Mode 12
System Menu System 14
Hi/Lo Patient Temperature Alarms 16
Bath Pre-set 17
Time and Date 18
ºC/ºF (Temperature Notation) 19
Language 20
STANDBY Timer 20
Operation
System Self Tests 5
Thermometer Functions Self Test 5
Cooling Engine Self Test 6
Sensor Checks 6
Max Power (MAX) 8
Controlled Rate 8
FEVER (FVR) 8
Main Menu 14
Settings Menu 15
Setting the Alarms 16
Nature of the Alarm 16
Pre-Cool 18
Pre-Warm 18
None 18
Exit 18
Time Setting 18
Date Setting 19
T1/T2 Behavior - New 22
2
Page 34

First Use Warning – No T2 Probe 22
600479-001 Rev 2 34/147
T2 Probe Disconnection/Reconnection 23
Accidental Disconnection T1/T2 Probe 23
Alarms & Alerts 24
Alerts 24
Alarms 25
Your First System Case 26
What you need 26
Preparing the System for Treatment 26
Installing the Start-up Kit 32
Hang the Saline Bag 32
The Top Cover 32
The Coldwell 34
The Alsius Start-up Kit 35
The Persitaltic Pump 36
Cover the Coldwell 38
Spike the Saline Bag 38
Prime & Fill the Air Trap 39
Connecting the Patient to the System 42
Operation
Setup - Variations 45
System Setup Sequence 45
Time From Last Power Down 45
Downloading Data After Improper Shutdown 46
Ending Treatment 51
End Procedure 51
Data Download 51
New Patient – No Power Down 54
Change the Start-up Kit 54
Delete Previous Patient Data 54
Disposal of Used Components 54
Temperature Trend Data 57
Overview 57
Displaying the Temperature Trend Graph 57
3
Page 35

Temperature Trend Graph 58
600479-001 Rev 2 35/147
Patient Temperature 58
System Activity 58
Cursor 59
Status Bar 59
Setting the Time Scale 59
Mechanical Components 61
Top Cover 61
Control Head Tilt 62
Casters 63
Operation
4
Page 36

Overview
600479-001 Rev 2 36/147
This chapter explains how to start treatment and change target temperature and
rate settings during treatment. It provides instructions on the proper way to end
treatment, including how to download patient temperature trend data to a laptop
computer and how to remove used components and dispose of them safely.
Subsections at the end of this chapter provide detailed procedures for recovering
from improper shutdowns, including special procedures for downloading patient
temperature trend data.
In this Overview section, we will present the main features of system as they are
presented to the user on the display of the system. This section will help you be
familiar with the features of the System before starting to use it.
After the Overview, you will find sections that describe in detail the operation of
the System - see Operating the System. The sequence of events that you must
pass through in starting the System varies with the way it was last turned off.
Within this section we will review the different patterns of interaction you will
experience. Specifically we will review:
Your first case with the System.
Variations in the SETUP sequence of the System
Ending procedures.
Operation
Operating States in the System
The System has three operating states: SETUP, STANDBY and RUN.
SETUP
When the System is first powered up, it goes through a sequence of self tests. It
tests its own electronics and internal sensors. These tests are called the POST
(Power On Self Test). It is normal to hear two beeps during POST. Then the
System tests its thermometer functions and its cooling engine. The extent of the
testing during SETUP and the interactions required of you by the system both
vary depending upon the state of the system when it was last turned off.
You can pre-set the bath temperature so that the system is either coolingor
warming the bath in SETUP.
Patient temperature alarms are not active in SETUP.
System Self Tests
The System performs self tests both at initial power-on and then hourly during
operation. These tests allow the system to check its own performance.
Thermometer Functions Self Test
The Primary Patient Temperature monitoring circuit (T1) is checked during
SETUP and then hourly against the System internal high resolution calibration
resistor. This is a quick test.
5
Page 37

Operation
600479-001 Rev 2 37/147
Cooling Engine Self Test
During SETUP and then every four hours, during run, the System will
dynamically test its cooling engine. This test will take a few minutes.
Cooling Engine Self Test - The Pump Will Stop
Each hour the System tests its cooling engine dyn amically during RUN. These
tests are brief. The system will stop the pump during these tests to remove the
heat load from the patient during the test.
THE PUMP WILL STOP DURING THIS TEST - THIS IS NORMAL.
During these tests, the peristaltic pump is stopped (to remove the patient’s heat
load from the equation). The tests that are conducted depend upon the state of
the System at the time of the test. The test(s) done is(are) as follows:
Coolant Temperature Heating Test Cooling Test
<10 °C
10 °C - 38 °C
> 38 °C
= will be performed = will not be performed
You will not see any screen messages unless there is an abnormal result in
which case the appropriate alarm state will be called.
Sensor Checks
For the system to enter the next state, STANDBY, the following sensors must be
checked and found normal.
6
Figure 4-1. System Setup Screen
Page 38

Operation
600479-001 Rev 2 38/147
Table 4-1. Setup Sensor Checks
Air Trap There is no Start-up Kit installed or there is a large amount of air in the
Start-up Kit chamber.
Roller Pump Lid The clear plastic roller pump lid is not closed properly.
Check Prime Switch The Prime Switch is being depressed (as when you use it to prime the
system) or has been jammed in the ‘on” position.
Coolant The coolant level is low. Top up the coldwell with coolant.
If any of these sensor states are not correct you will see the “System Setup” and
the problem sensor state will be highlighted in red (see Figure 4-1 above). Once
you rectify the identified problems, the System will progress to STANDBY.
NOTE: Change in Design – Patient Temperature Probes
In earlier versions, the System would not enter STANDBY without at least a
Primary Patient Temperature Probe (T1) connected to the System. For XP
Systems, the System will enter STANDBY without a T1 probe being
connected; however, the System will NOT enter RUN without at least the
Primary Patient Temperature Probe (T1) connected to the System (see below:
T1/T2 Behavior - New).
STANDBY
Figure 4-2. System Operating Display - Standby
In STANDBY you can interact with the full user interface of the System. You can
select the target temperature, the rate and the treatment mode.
Patient temperature alarms are active in STANDBY if the primary patient
temperature probe (T1) is connected.
The coolant bath temperature graph is active in STANDBY (a new feature
compared to earlier versions of the System).
7
Page 39

From STANDBY you may toggle into and out of RUN. You may only return to
600479-001 Rev 2 39/147
SETUP by powering down the system.
RUN - Treatment Modes
Once you are ready to begin treatment, you may move from STANDBY to RUN.
The System will become fully operational provided that all its sensors indicate
that it is ready. Alerts will trigger if it is not.
There are three treatment modes in RUN: “Max Power”, “Controlled Rate” and
“FEVER”.
Max Power (MAX)
In this treatment option, the System seeks to make the patient’s temperature the
same as the selected target temperature. It will keep the peristaltic pump
operating unless the patient’s temperature “inverts”. This occurs whenever:
A. Bath Temperature > Patient Temperature > Target Temperature,
B. Bath Temperature < Patient Temperature < Target Temperature.
Controlled Rate
Operation
OR
In this treatment option, the System will attempt to move the patient’s
temperature to the target temperature at the programmed rate of heat exchange
(°C /hr). When the patient reaches the target temperature, the System will revert
to the MAX treatment option i.e. it will attempt to make the patient’s temperature
the same as the selected target temperature.
NOTE: Controlled Rate
Controlled rate operates in both warming and cooling modes.
FEVER (FVR)
In this treatment option, the System will start cooling the patient once the patient
temperature is above the target temperature. It does this by keeping the bath at
its coldest permissible temperature and then operating the peristaltic pump
whenever the patient’s temperature moves above the target temperature.
WARNING! “Lo” patient temperature alarm limit with “FEVER”
The System will NOT heat the patient when the “FEVER” treatment option has
been selected. The “Lo” patient temperature alarm limit ensures that an alarm
occurs should the patient stop regulating his/her own body temperature. Such
patients will cool to room temperature. This can occur when the patient dies
or becomes comatose.
INVESTIGATE ALL PATIENT TEMPERATURE ALARMS.
8
Page 40

User Interface
600479-001 Rev 2 40/147
The primary controls for the System are mounted in the display head of the
system. The next sections describe:
The controls available to the user
The System display screen
The System menu system available to the user.
System Controls
1. Display Screen
2. Alarm Indicator LED.
3. Mute Button
4. Power On Indicator LED.
5. Target Temp Button.
6. Standby / Run Button.
7. Rate Deg / HR Button.
8. Press for Menu / Enter
Knob
Operation
The use of each of the controls is described in the table below.
Power Indicator Glows green when the display has power.
System Alarm Indicator Flashes red during alarm states
Standby/Run button Toggles between RUN and STANDBY
Target Temperature button Press this to change the target temperature
Rate Deg/Hr button Press this to change the rate and/or treatment mode.
“Press & Rotate” knob This knob operates the menus on the System display.
9
Figure 4-3. Controls and Display.
Table 4-2. System Controls
Rotate the knob to scroll between selections. Press and
release the knob to select.
Page 41

The System Display Screen
600479-001 Rev 2 41/147
The System features a color display screen. The figure below shows the screen
as it appears during RUN.
Operation
Figure 4-4. Operating Screen.
The upper left hand of the screen displays:
The patient temperature
The “Lo” and “Hi” patient temperature alarm values.
The lower left hand of the screen displays:
The programmed Target Temperature for the System
The programmed treatment mode/controlled rate value
The right hand side of the screen is used either:
To display the temperature of the coolant in the System coldwell (as
depicted above), or,
To present menu selections. The main menu of the System is
presented in the figure below.
10
Page 42

Figure 4-5. System Main Menu
600479-001 Rev 2 42/147
Operation
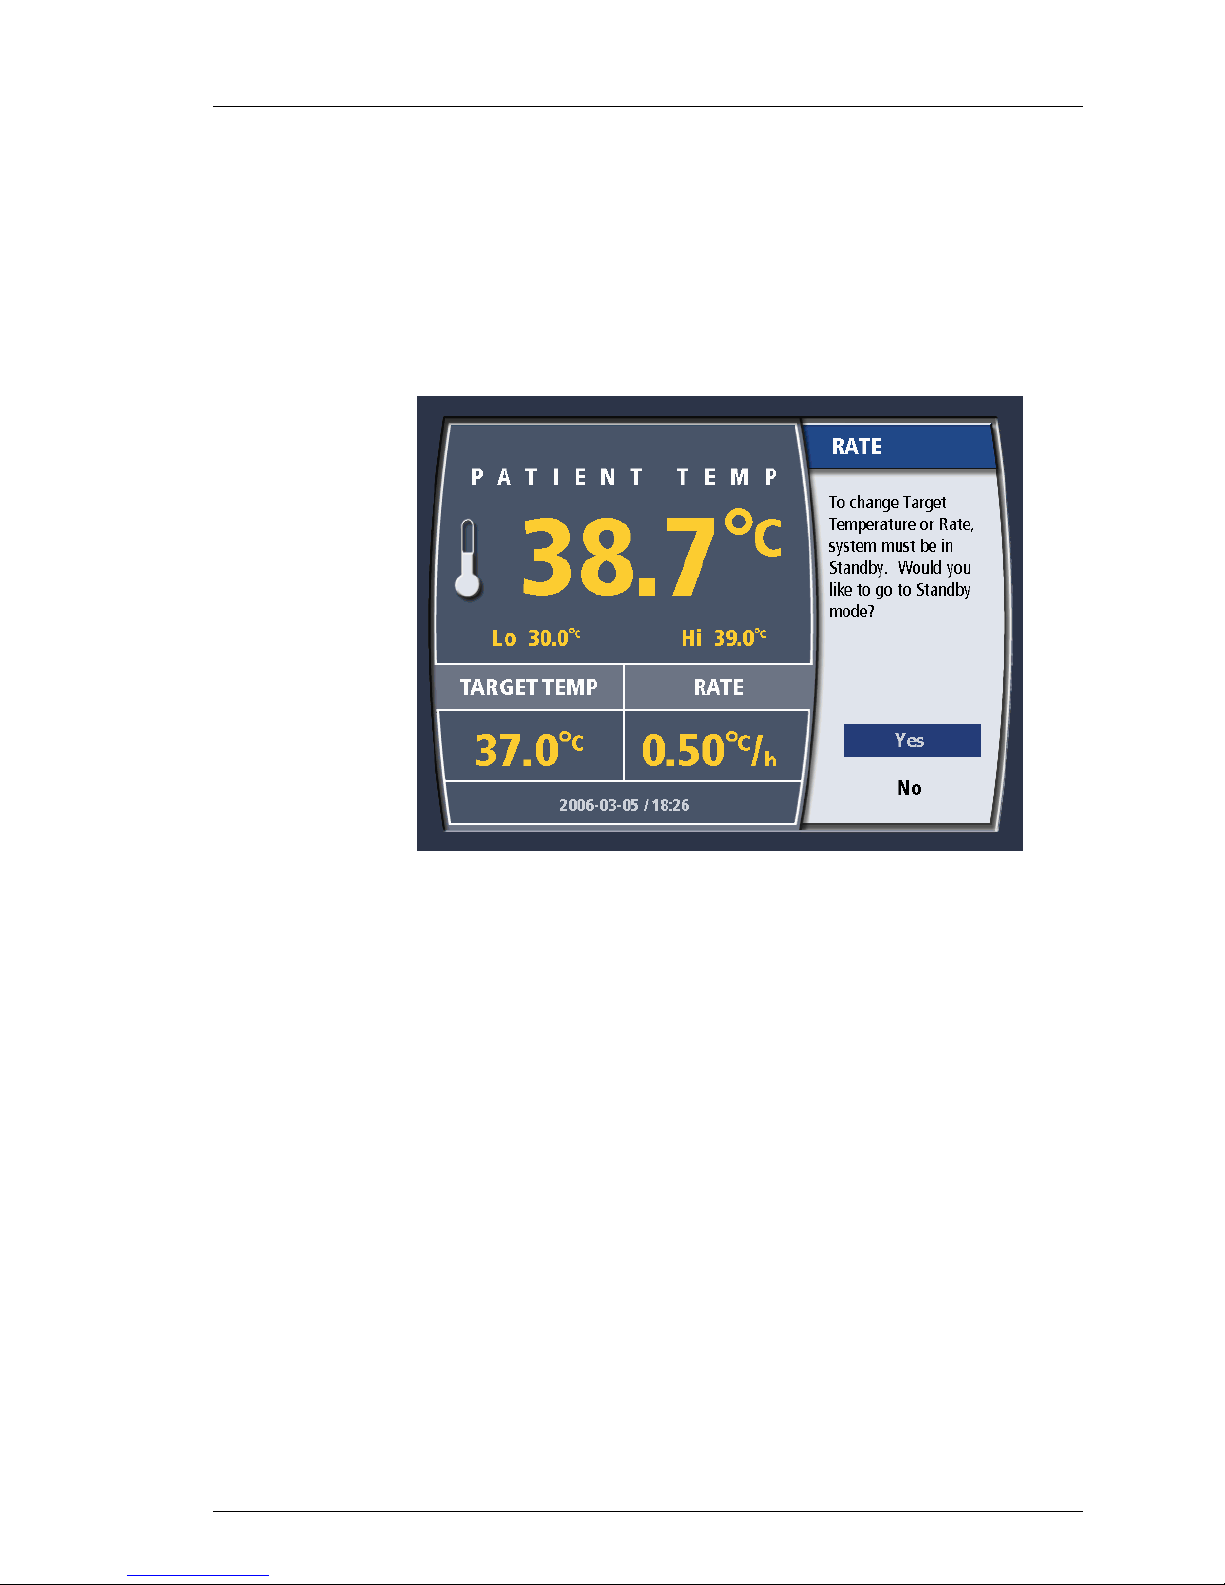
Changing Target Temperature
1. Press the Target Temp button once. If you are in RUN, you will be taken
to STANDBY. The Target Temperature value may only be changed in
STANDBY.
2. To change the target temperature, turn the knob until the desired
11
Figure 4-6. Change Target Temperature in RUN
temperature is displayed. You may choose a temperature from 31º C to
38º C (87.8º F to 100.4º F). When the correct selection is displayed,
press the knob once to enter the selection.
Page 43
3. The target temperature setting is updated on the Operating screen.
600479-001 Rev 2 43/147
Changing Treatment Mode
As explained above, there are three treatment modes: “MAX”, “Controlled
Rate” and “FEVER”. To select the Treatment Mode, including one particular
value of “Controlled Rate” you use the “Rate Deg/Hr” button.
1. Press the “Rate Deg/Hr”r button once. If you are in RUN, you will be
taken to STANDBY. The Treatment Mode value may only be changed in
STANDBY.
Operation
Figure 4-7. Change Rate/Mode Temperature in RUN
2. Turn the knob until the desired Treatment Mode selection is displayed.
When the correct selection is displayed, press the knob once to enter the
selection.
12
Page 44

Operation
600479-001 Rev 2 44/147
Figure 4-8. Select Mode
3. If you select Controlled Rate, a second menu screen will be presented.
To change the controlled cooling/rewarming rate, turn the knob until the
desired selection is displayed. You may choose a rate from 0.10º C/hr to
0.65º C/hr. When the correct selection is displayed, press the knob once
to enter the selection.
4. If you have selected FEVER Mode, you will be asked to confirm your
13
Figure 4-9. Select Controlled Rate
selection with the reminder that FEVER Mode only cools and does not
warm as per the figure below.
Page 45

Operation
600479-001 Rev 2 45/147
Figure 4-10. FEVER Mode Confirmation message
5. The Operating screen will be updated to reflect your selection.
NOTE: Target Temperature in FEVER Mode
The System keeps the bath cold and starts the peristaltic pump when the
patient temperature is greater than the target temperature
System Menu System
Main Menu
The main menu of the System is displayed in Figure 4-5 above. To call up the
main menu, press the knob from the operating screen. Some settings are
accessible only in Standby Mode.
The options available to you are as follows:
Table 4-3. System Main Menu
View Graphs
New Patient
End procedure
Settings
Exit menu
Takes you to a display of the patient temperature data log. See:
Temperature Trend Data
Indicates to the System that you are starting a new patient case.
Downloading or deleteing the existing patient data log is required
Indicates to the System that you are finishing a patient case. You will be
prompted to save the existing patient data log. See: Ending Treatment
Takes you to the Settings menu. See below
Returns you to the operating display. The bath temperature meter display
will replace the menu.
14
Page 46
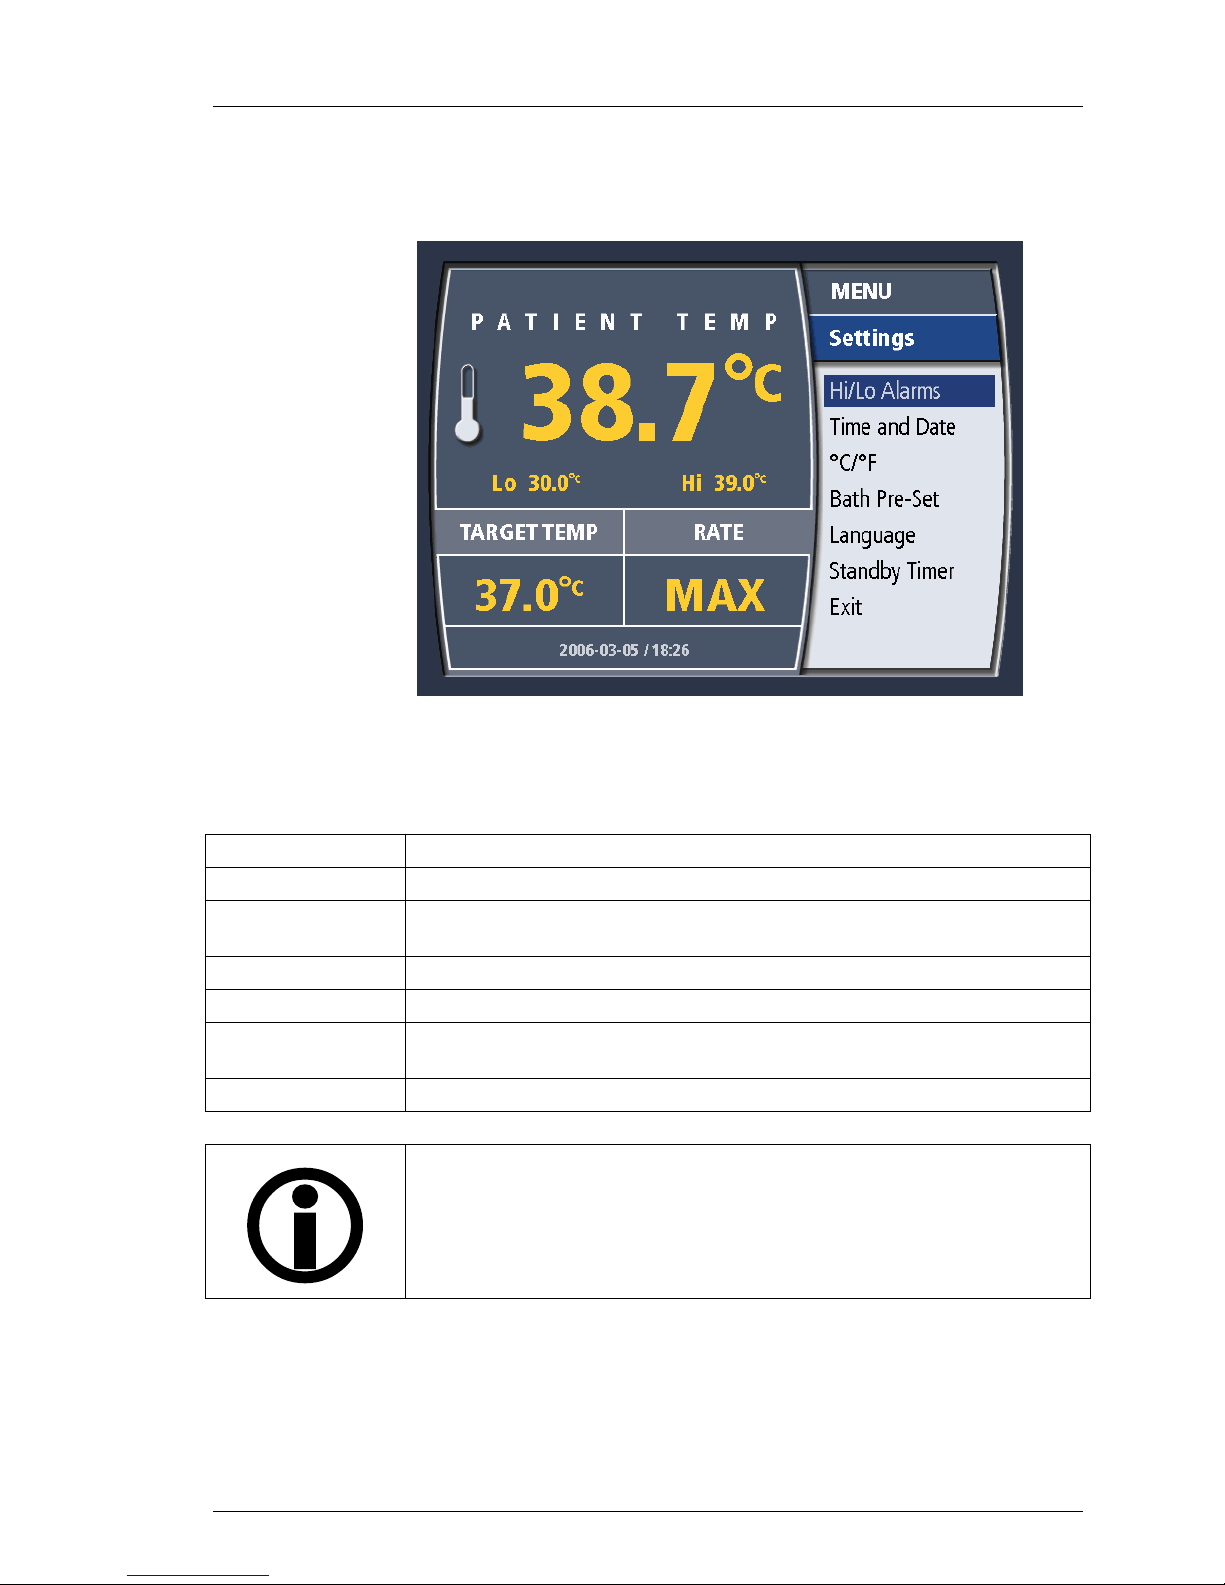
Settings Menu
600479-001 Rev 2 46/147
The settings menu allows you to modify the information displayed on the
operating display. It appears as in Figure 4-11.
Operation
The options offered by the settings menu are listed and described below.
Hi/Lo Alarms
Time and Date
°C / °F
Bath Pre-Set
Language
Standby Timer
Exit
Figure 4-11. System Settings Menu
Table 4-4. System Settings Menu
Allows you to modify the low (Lo) and high (Hi) patient temperature alarms.
Allows you to modify the System time and date.
Allows you to toggle between displaying temperatures in degrees Celsius
or degrees Farhenheit.
Allows you to set the system to either HEAT or COOL during STANDBY.
Allows you to select the display language.
Provides you with a warning alarm after the system has been in STANDBY
for either 15 or 60 minutes. This alarm can be deactivated.
Returns to the operating display.
NOTE:
There is no Pump Rate Selection in ZOLL XP systems.
ZOLL has validated that the Cool Line catheter can be safely used at a
pump rate of 240 ml/min.
15
Page 47
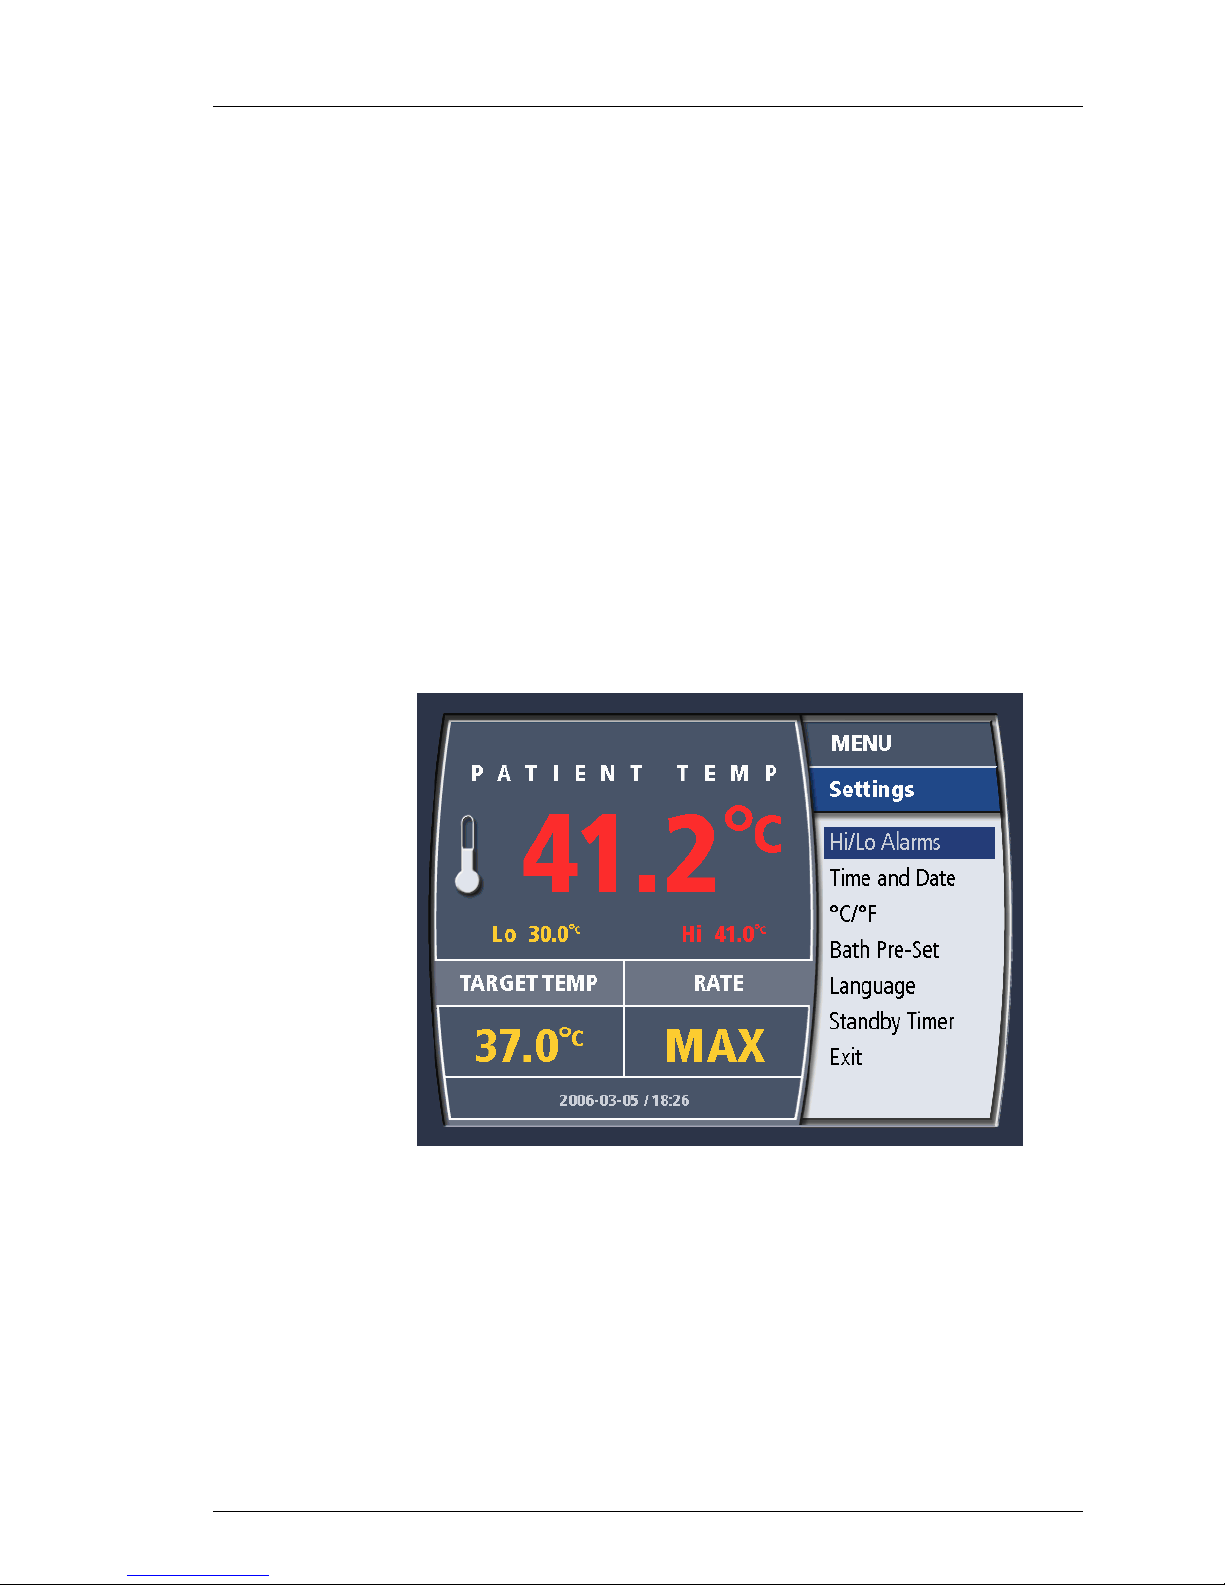
Hi/Lo Patient Temperature Alarms
600479-001 Rev 2 47/147
The System features two patient temperature alarms: “Hi” and “Lo”. If the alarms
are set, the System will alarm whenever the patient’s temperature is higher than
the “Hi” Patient Temperature Alarm value and whenever the patient’s
temperature is lower than the “Lo” Patient Temperature Alarm value. The range
of values for both alarms is 28 ºC – 45 ºC (82.4 ºF – 113.0 ºF).
Setting the Alarms
The alarm values are set as follows in either STANDBY or RUN mode. Set the
“Lo” and “Hi” Patient Temperature Alarms to appropriate values.
1. Press the knob and the Main Menu will appear.
2. Select the “Settings” option and press the knob.
3. Select the “Hi/Lo Alarms” option.
4. The “Lo” Alarm value will be presented. Turn the knob until the desired
value is displayed and press the knob.
5. The “Hi” Alarm value will be presented. Turn the knob until the desired
value is displayed and press the knob.
Nature of the Alarm
Operation
The alarms are both visual and audible. The alarms will not clear until the
patient’s temperature no longer triggers the alarm state.
The audible alarm may be temporarily muted for 2 minutes by pressing the Mute
button. The alarm will continue after that time unless it has cleared.
The visual alarm is effected by writing the patient temperature area on the screen
in RED text and flashing the text. The visual alarm will not stop until the alarm
has cleared.
16
Figure 4-12. “Hi” Patient Temperature Alarm
Page 48

WARNING! Change to Initial Specification of System.
600479-001 Rev 2 48/147
In the initial release of the System there were no settable patient temperature
alarms. There were fixed high and low patient temperature alarms. These
fixed alarms have been made programmable.
The patient temperature alarms MAY NOT be deactived. They may be muted
for a 2 minute period.
NOTE: Patient Temperature Alarms in STANDBY
If the System is in STANDBY and the T1 temperature probe is connected to
the System but NOT inserted into the patient you will experience “Lo” patient
temperature alarms if the ambient temperature of the exposed probe is below
the alarm limit. To avoid the annoyance of the alarm under these conditions,
simply unplug the T1 temperature probe from the System until you are ready to
connect to the patient. You may not enter RUN without the probe connected
to the System.
Bath Pre-set
Operation
The menu allows the user to select from either: Pre-Cool, Pre-Warm or None.
This selection operates only in STANDBY and is cancelled when the system
enters RUN.
Figure 4-13. Bath Pre-Set Menu
17
Page 49

Operation
600479-001 Rev 2 49/147
Pre-Cool
Pre-Warm
None
The System bath is cooled to its lowest permitted temperature and maintained
at that temperature.
The System bath is heated to its highest possible temperature and maintained
at that temperature.
The Bath Pre-set is not activated or is cancelled. If cancelled, the bath is
maintained at the temperature that was measured at the time of cancellation.
Exits the menu without a change in System status or programming.
Exit
Time and Date
This menu displays the current time and date settings.
Figure 4-14. Time and Date Settings.
The time is divided into two fields: hours (designated “HH”) and minutes (“MM”).
The System uses only 24-hour time notation (e.g., 3:00 p.m. is 15:00).
The date is divided into three fields: year (designated “YYYY”) - month
(designated “MM”) - day (designated “DD”). For example, the 24
would be shown as: 1959-02-24.
th
February, 1959
Time Setting
1. The screen first displays the message “Select Hour. Press Enter to set.”
2. The numbers displayed in the hour field will change as you turn the knob.
When the correct hour is displayed, press the knob once to enter your
selection.
3. The screen next displays the message “Select Minute. Press Enter to
set.”
4. Turn the knob until the correct minute is displayed. Press the knob once
to enter your selection.
18
Page 50

Date Setting
600479-001 Rev 2 50/147
1. The screen displays the message “Select Day. Press Enter to set.”
2. The numbers displayed in the day field will change as you turn the knob.
When the correct day is displayed in the field, press the knob once to
enter your selection.
3. The screen next displays the message “Select Month. Press Enter to
set.”
4. Turn the knob until the correct month is displayed. Press the knob once
to enter your selection.
5. The screen next displays the message “Select Year. Press Enter to set.”
6. Turn the knob until the correct year is displayed. Press the knob once to
enter your selection.
7. The time and date settings will be updated and the screen will display the
settings menu.
ºC/ºF (Temperature Notation)
This menu displays the options setting for temperature notation. The currently
selected setting is highlighted.
Operation
To keep the current selection, press the knob once. The current setting will not
be changed and the settings menu will be displayed.
To change the current setting, turn the knob to highlight the desired setting.
Press the knob once to enter the selection. The setting will be changed and the
settings menu will be displayed.
19
Figure 4-15. Temperature Notation Settings.
Page 51

Language
600479-001 Rev 2 51/147
Operation
NOTE: Change in Design – Pump Rate
In earlier versions of the System, there was the option to set the pump rate to
either 200 or 240 ml/min. ALL Alsius catheters have been validated to
operate safely at a pump rate of 240 ml/min. This control is not longer
presented to the operator.
NOTE: Change in Design - Alarm Volume & Key Press
Volume
In earlier versions of the System, there was the option to set the alarm volume
and the key press volume. In this version:
1. The Alarm Volume is always set to High
2. The Key Press Volume is always set to Medium
This menu displays the current setting for the language used for displayed text.
The currently selected setting is highlighted.
To keep the current selection, press the knob once. The current setting will not
be changed and the settings menu will be displayed.
To change the current setting, turn the knob to highlight the desired setting.
Press the knob once to enter the selection. The setting will be changed and the
settings menu will be displayed.
STANDBY Timer
The STANDBY Timer provides the User with an alarm as a reminder when the
System has been left in STANDBY for 15 or 60 minutes. The STANDBY Timer
20
Figure 4-16. Language Settings.
Page 52

Operation
600479-001 Rev 2 52/147
presents the User with the opportunity to select from the following values: No
Alarm, 15 minutes, 60 minutes.
Figure 4-17. STANDBY Timer Menu
If the system has been left in STANDBY for more than the specified time, an
alarm will sound to remind the User that the System remains in STANDBY.
Pressing the knob will reset the timer. The Standby Timer function will continue
until either:
The System is placed into RUN.
The STANDBY Timer Menu is used to deactivate the STANDBY
Timer.
The STANDBY Timer alert may be silenced for two (2) minutes by pressing the
mute button.
21
Figure 4-18. STANDBY Timer Alert
Page 53

T1/T2 Behavior - New
600479-001 Rev 2 53/147
XP Systems differ from earlier ZOLL Heat Exchange Systems in their T1/T2
behavior i.e. in how the Primary and Secondary Temperature probes are
monitored and alarmed.
WARNING! Dislodged Foley Catheter Temperature Probe
The System can detect when a patient temperature probe is dislodged
suddently from the patient.
However it is possible for the Foley catheter patient temperature probe (T1) to
become dislodged from the bladder to rest on the perineum or within the fold of
the thighs. In such a position the System may not detect the dislodgement
from the patient and will underestimate the patient’s core temperature. As a
result the System may inappropriately heat the patient.
Failure to use a second temperature probe may result in patient injury.
First Use Warning – No T2 Probe
For each time the System is powered on:
1. The System will check to see if the Primary (T1) and Secondary (T2)
Temperature Probes are present. The System will enter STANDBY
without probes being present. The System will not enter RUN unless the
T1 probe is present.
2. When the System is first put into RUN, it will check to see which probes
are present.
3. If there is no T2 present, the System will ask the User to verify that this is
intentional. See image below.
Operation
The System remembers the User’s preference.
22
Figure 4-19. No T2 Probe Connected
Page 54

T2 Probe Disconnection/Reconnection
600479-001 Rev 2 54/147
If the User connects a T2 probe at any time during the operation of the System
(in STANDBY or RUN), the System will assume that the use of the T2 probe is
desired. If the T2 probe is then disconnected the System will alarm – see below.
If the User disconnects a T2 Probe in STANDBY, the System will NOT assume
that this is intentional. When the System is placed into RUN WITHOUT a T2
Probe present, the User will again see the Warning as described above.
Accidental Disconnection T1/T2 Probe
Disconnection of the T1 probe during RUN results in
an Alarm. Press the knob to silence the alarm. The
System moves to STANDBY. Treatment cannot
continue until the T1 probe has been replaced..
Note that the patient temperature is displayed as
“---“ and the yellow warning banner covers the bath
temperature display.
Operation
Absence or disconnection of the T1 probe during
STANDBY results in a warning display WITHOUT a
persistent audible alarm. The system CANNOT
enter RUN until a T1 probe has been connected.
Note that the patient temperature is displayed as
“---“ and the yellow warning banner DOES NOT
cover the bath temperature display.
Disconnection of the T2 probe during RUN results in
an Alarm. Press the knob to silence the alarm. The
System moves to STANDBY. If you attempt to
return to RUN without reconnecting the T2 probe,
you will be asked to verify your intention.
Note that the patient temperature will be displayed
correctly if the T1 probe remains connected. The
yellow warning banner covers the bath temperature
display.
23
Page 55

Alarms & Alerts
600479-001 Rev 2 55/147
A detailed description of the alarms of the System is provided in later sections of
this manual. See:
Section 6. Alarms and Corrective Actions
Section 7. Troubleshooting
Alerts
Alerts can be cleared by reverting the state that caused them to occur. For
example, a low coolant alert can be cleared by adding coolant to the coldwell of
the System. In most cases, the System will identify and notify you to rectify alert
states at power up.
In STANDBY, Alerts are displayed across the lower half of the display screen,
with the bath temperature display not obscured, against a yellow background
(See Figure 4-20 – Right). Alerts in STANDBY are generally NOT accompanied
by an audible alarm tone.
Operation
Figure 4-20. T1 Disconnect alerts in RUN (left) and STANDBY (right)
In RUN, Alerts are displayed across the full lower half of the display screen
against a yellow background with the bath temperature display is partially
obscured (See Figure 4-20 – Left). If an alert occurs in RUN, the System will
generally revert to STANDBY and an audible alarm tone will sound. The
exception to this is that if you depress the prime switch during run – no audible
alarm will sound and the bath temperature display will not be obscured.
In both STANDBY and RUN, a message on the screen will indicate the action
required to clear the alert.
During an alert, the patient temperature display is still visible and the patient
temperature alarms are still active if the T1 Temperature probe is functional.
NOTE: In the Event of an Alert
Investigate and rectify the cause - refer to:
Section 6. Alarms and Corrective Actions
Section 7. Troubleshooting
If the alert persists, call ZOLL for service.
24
Page 56

Alarms
600479-001 Rev 2 56/147
Operation
An alarm is more serious in nature than an alert and relates to an issues that will
typically require a service call. In most cases a text message, specific to the
alarm, identifies the system code for the alarm. For example, the screen might
announce “TCM ID 01” or “MID 23” in addition to the text in the figure below.
Figure 4-21. Alarm Screen
In some cases, however, the alarm may be cleared by power cycling the system.
For example, such an alarm would occur if the pump tubing were to become
jammed in the peristaltic pump causing the pump to slow down.
If the reason for the alarm is not cleared by power cycling, the alarm will repeat
each time the System is turned back on.
During an alarm, the patient temperature display and the patient temperature
alarms are NOT active.
NOTE: In the Event of an Alarm
Investigate and troubleshoot the cause - refer to:
Section 6. Alarms and Corrective Actions
Section 7. Troubleshooting
Power cycle the System.
If the alarm persists, call ZOLL for service.
25
Page 57

Your First System Case
600479-001 Rev 2 57/147
What you need
You will need the following for each System case:
A new ALSIUS Startup Kit
A new 500ml bag of normal saline.
A YSI-400 compatable temperature probe e.g. a Foley catheter,
rectal or esophageal temperature probe
The blue patient connection cable to connect the temperature probe
to the System
An Alsius heat exchange catheter
An aseptic work area to support catheter insertion.
CAUTION! REFER TO THE CATHETER IFU
Alsius heat exchange catheters are inserted via a Seldinger technique a s a
central venous line. There are specific instructions for use included with each
catheter. Refer to these to understand the specific unique insertion
requirements of an Alsius heat exchange catheter.
Operation
Preparing the System for Treatment
To prepare the System for treatment, follow these steps in the indicated order.
1. Roll the System to a convenient position near the patient’s bedside. Plug
the power cord into a hospital-grade receptacle.
2. Lock the right front caster by stepping down on the tab above the wheel.
3. At the rear of the console, near the upper left corner is the power on/off
switch. Turn the switch ON.
Figure 4-22. Power Switch and Power Indicator Lamp.
4. The green power indicator lamp will be illuminated and the alarm will
beep one long beep followed by a shorter softer beep.
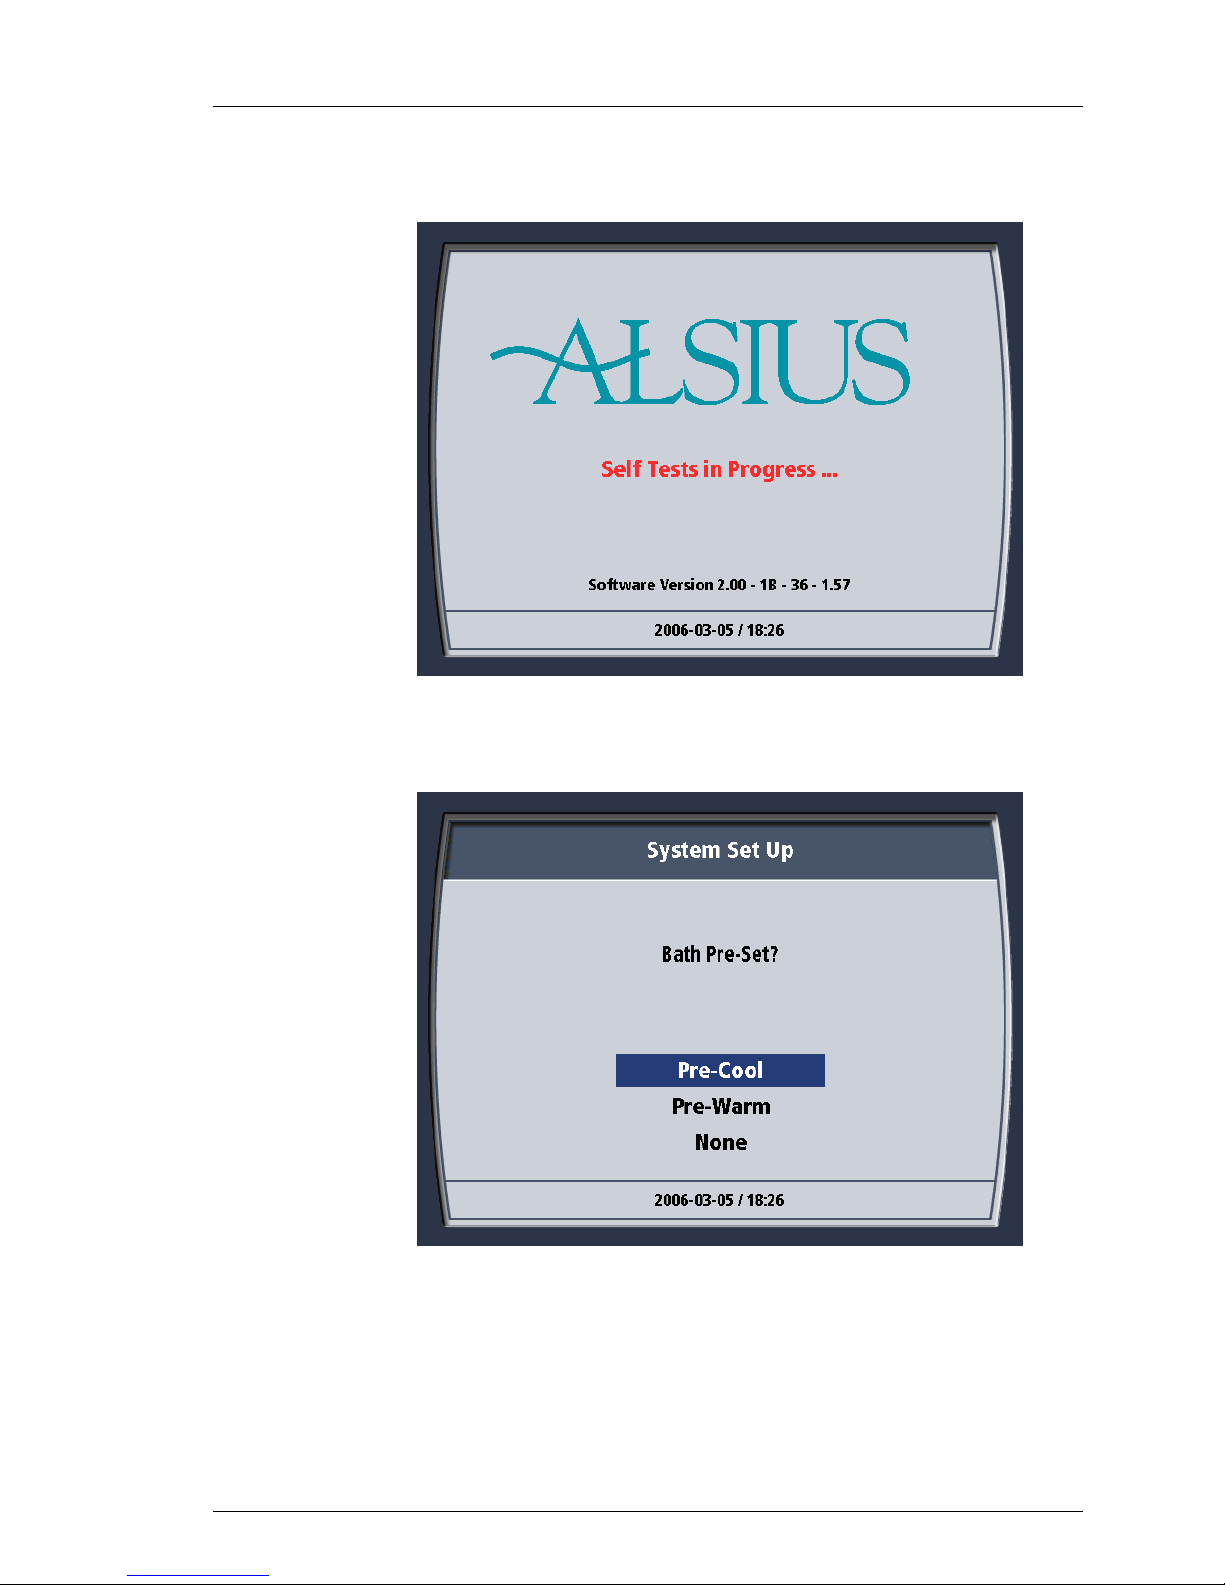
5. The System performs a self-test. During this interval, the self-test screen
appears on the display. If the self-test detects a problem, an error
26
Page 58
Operation
600479-001 Rev 2 58/147
message will be displayed. If this occurs, refer to Chapter 6–Alarms and
Corrective Actions for assistance. At the end of the self-test there will be
two short beeps.
Figure 4-23. Self-Test Screen.
6. When the self-test is finished, the System Set Up screen displays the
message “Bath Pre-Set?”
Figure 4-24. System Pre-Cool?
7. To start cooling or heating the coolant reservoir immediately, choose the
27
desired option and press the “Press for Menu/Enter” knob (the “knob”)
once to enter the selection. If you do not wish to begin cooling or
warming the coolant reservoir now, choose “None” and press the knob
once to enter the selection.
Page 59
Operation
600479-001 Rev 2 59/147
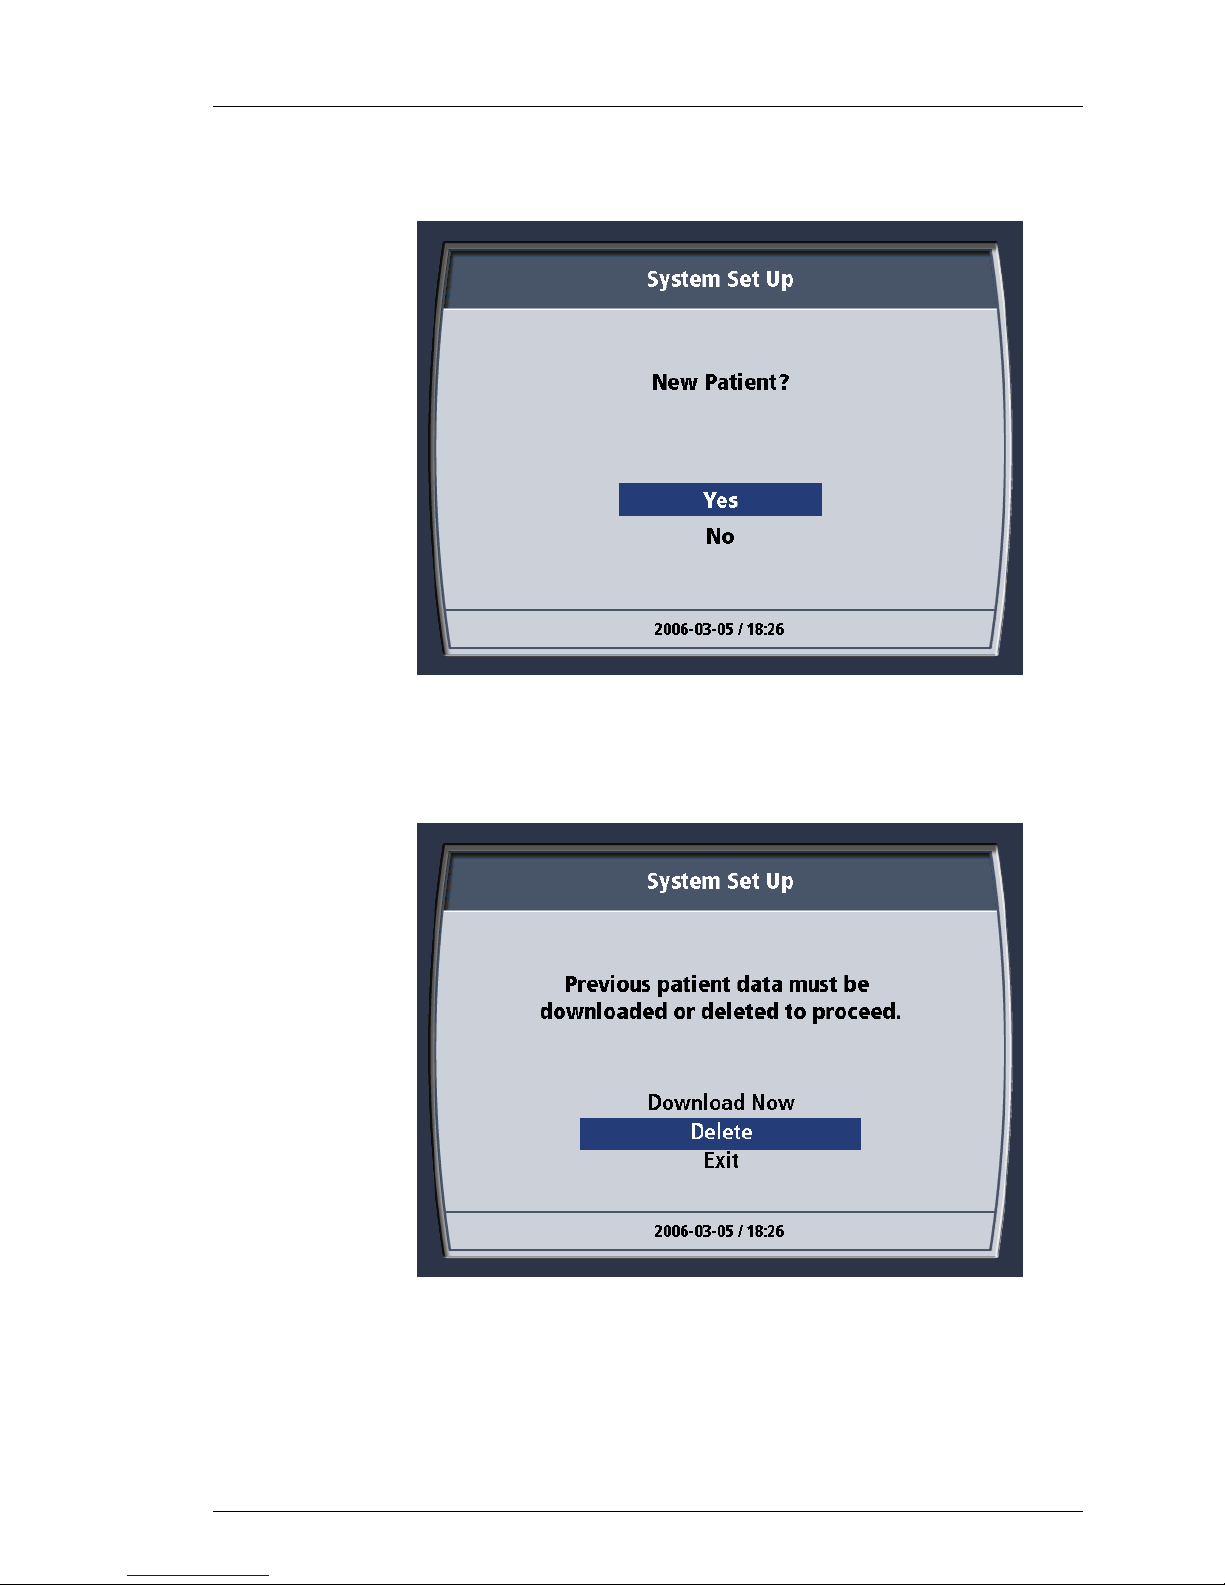
8. You may be asked questions relating to the downloading of patient data.
This is a new patient. Delete any old data left from the inservice you
received.
Figure 4-25. New Patient? Message.
9. Choose “Yes.”
10. The screen displays the message “Previous patient data must be
downloaded or deleted to proceed.”
11. Choose “Delete”. You will be asked to confirm your choice to delete the
28
Figure 4-26. Patient Data Message.
data file. Choose “Yes”. A brief confirmation message will appear and
then automatically close. See below.
Page 60

Operation
600479-001 Rev 2 60/147
Figure 4-27. Delete Previous Patient Data
12. The System Set Up screen then displays the message “Select Target
Temp.”
13. Turn the knob until the target patient temperature is displayed. When the
14. The System Set Up screen displays the message “Select Treatment
29
Figure 4-28. Select Target Temp Message.
desired value is displayed, press the knob once to enter the selection.
Mode” Note that you have three choices: “Max Power”, “Controlled
Rate” or “FEVER”.
Page 61

Operation
600479-001 Rev 2 61/147
Figure 4-29. Select Treatment Mode Message.
15. Turn the knob to highlight the desired mode. Press the knob once to
enter the selection. Controlled rate should not be selected when using
the Cool Line catheter.
16. If you select “Controlled Rate” for the Treatment Mode, you will be
prompted to “Select Rate. Press Enter to Set”. Use the knob to scroll
through to the desired rate and then press the knob to select it.
17. If the System has not yet finished its self tests, the Self-Test screen is
30
Figure 4-30. Select Rate Screen
displayed.
Page 62

Operation
600479-001 Rev 2 62/147
Figure 4-31. Self-Test Screen.
18. Install the Start-up Kit now. If the system finishes its self test before you
complete installing the Start-up Kit, you will see the following Check
Screen. An item in RED requires your attention.
31
Figure 4-32. Check the Following Screen.
Page 63
Operation
600479-001 Rev 2 63/147
Setup Sensor Checks
Air Trap There is no Start-up Kit installed or there is a large amount of air in the
Start-up Kit chamber.
Roller Pump Lid The clear plastic roller pump lid is not closed properly.
Check Prime Switch The Prime Switch is being depressed (as when you use it to prime the
system) or has been jammed in the ‘on” position.
Coolant The coolant level is low. Top up the coldwell with coolant.
Installing the Start-up Kit
Hang the Saline Bag
To install the System Start-up Kit, follow these steps in the indicated order.
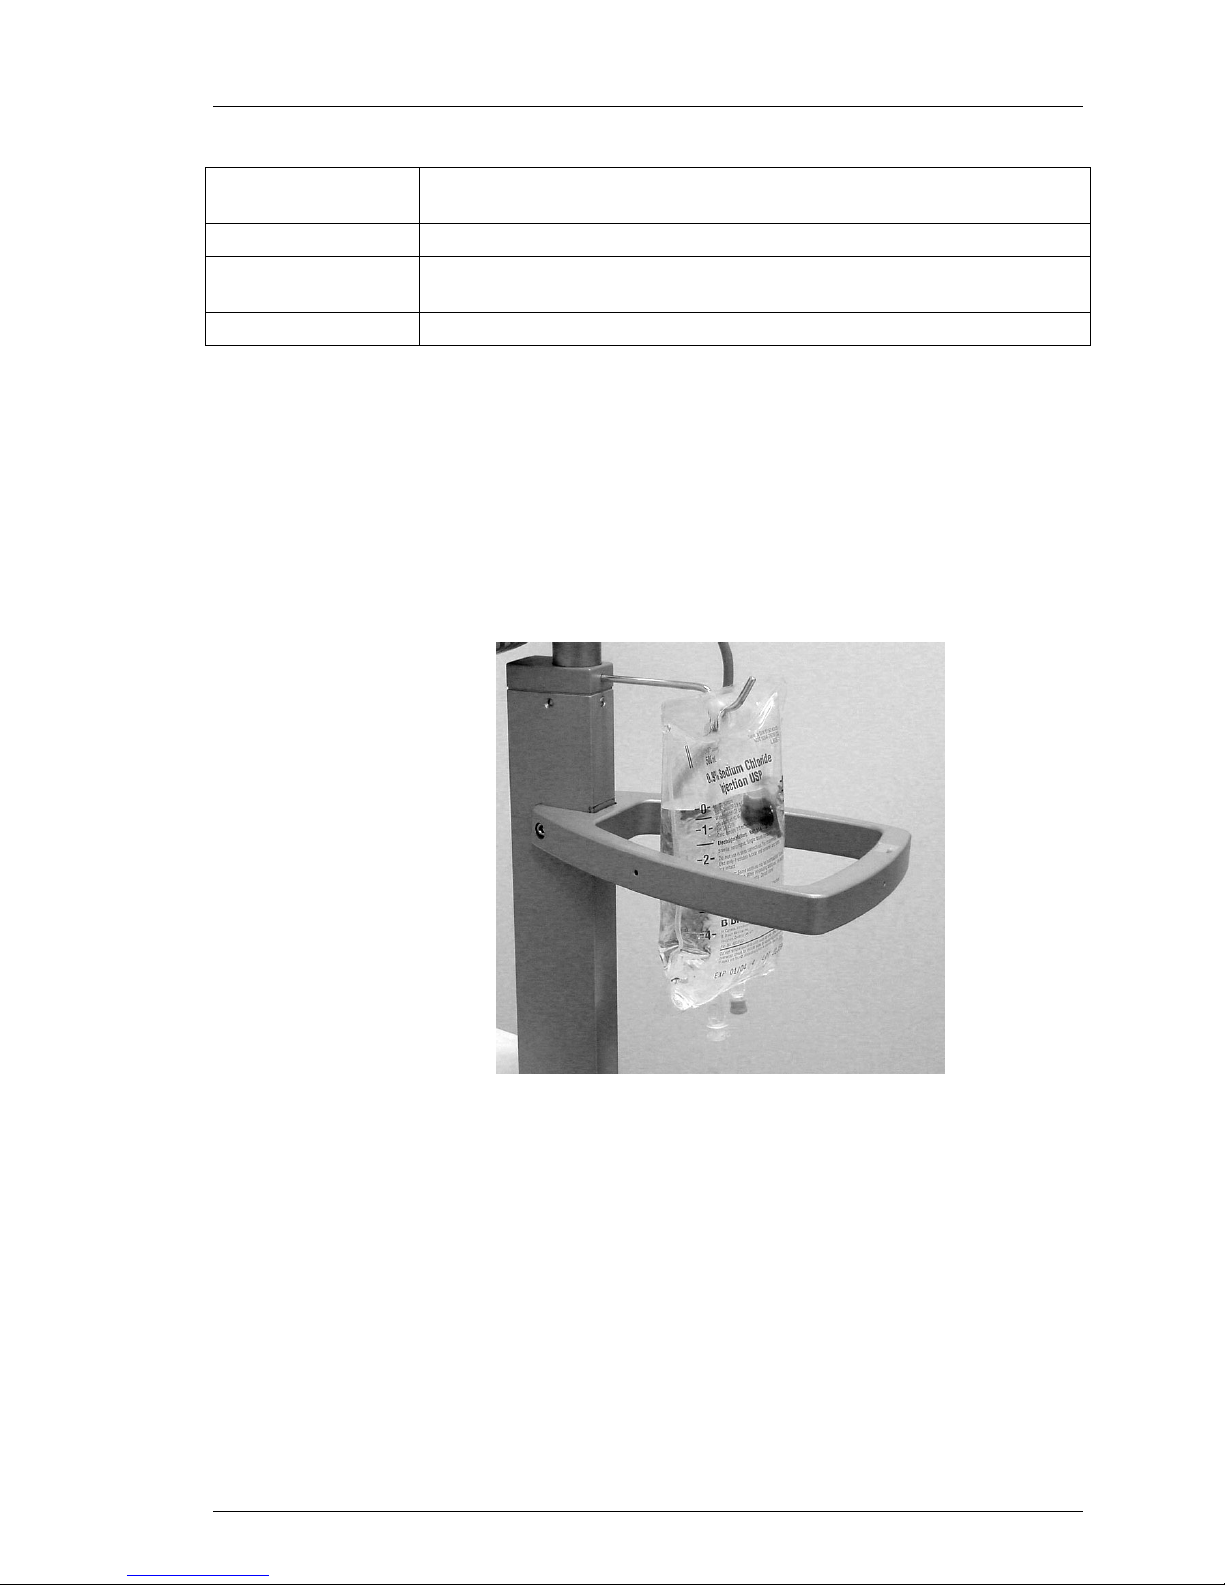
1. Obtain an IV bag or bottle of sterile normal saline solution. The bag or
bottle must contain no more than 0.5 liter (500 ml) of solution. Hang the
saline container on the hook mounted on the rear of the display post.
The container hangs inside the circumference of the handle.
The Top Cover
2. Open the top cover of the System. Open the transparent top cover of the
32
Figure 4-33. 500ml Saline Bag on Hook.
roller pump.
Page 64

Operation
600479-001 Rev 2 64/147
Figure 4-34. Covers Open.
3. A tubing circuit diagram is printed on the inside of the System top cover.
Refer to this diagram when installing the Start-up Kit.
33
Figure 4-35. Tubing Circuit Diagram.
Page 65

Operation
600479-001 Rev 2 65/147
The Coldwell
4. Remove the cap from the coolant well and set it aside in a clean location.
Figure 4-36. Coolant Well Cap.
5. Check the level of the coolant. The liquid level should be between the
two indicator lines on the wall of the coolant well. If the level is below the
bottom indicator line, add distilled water until the liquid is at the top
indicator line. If the coolant level is unusually low because of spillage,
add premixed propylene glycol and water until the liquid is at the top
indicator line.
34
Figure 4-37. Coolant Well Liquid Level Indicator Lines.
Page 66

Operation
600479-001 Rev 2 66/147
The Alsius Start-up Kit
6. Open the System Start-up Kit. For convenience and sterility, all items in
the kit are preconnected.
Figure 4-38. System Start-up Kit.
7. Insert the heat exchanger coil into the coolant well.
Figure 4-39. Installing the Heat Exchanger Coil.
8. Temporarily slide the air trap into the holder.
35
Page 67

Figure 4-40. Air Trap Placed In Holder.
600479-001 Rev 2 67/147
The Persitaltic Pump
Operation
WARNING! FINGER INJURIES
Be careful when inserting the pump tubing that you do not catch your fingers
with the roller.
When the System is operating DO NOT attempt to circumvent the safety
interlocks on the peristaltic pump lid. DO NOT place fingers or foreign objects
into the pump raceway when the pump is turning. The peristaltic pump has
sufficient torque to severely damage a finger.
9. Locate the pump tubing and route it to the right side of the roller pump.
Do not stretch or pull on the tubing. The tubing lengths and flanged
connector allow the tubing to fit into the pump in only one direction.
10. Lift the handle on the pump rollers.
36
Page 68

Operation
600479-001 Rev 2 68/147
Figure 4-41. Lift the Pump Rollers Handle.
11. Place the flanged connector of the pump tubing into the slot on the right
side of the pump head.
1. Place flanged connector
into socket on right hand
side of pump raceway.
Figure 4-42. Flanged Connector Fits Into Recess.
12. Load the pump tubing around the rollers and into the channel of the
pump head. You must turn the handle counterclockwise as you feed the
tubing into the channel. Press down firmly on the tubing until it settles
into the bottom of the channel. Once the tubing is installed, press the
handle down onto the rollers until it presses into its detent.
37
Page 69

Figure 4-43. Pump Tubing Installation.
600479-001 Rev 2 69/147
13. Close the top cover on the pump. It will snap shut.
Operation
Cover the Coldwell
14. Replace the cap on the coolant well. Position the cap so that the heat
exchanger coil and tubing fits into the notch. Press down on the cap to
create a tight seal.
Figure 4-44. Replace the Cap on the Coolant Well.
Spike the Saline Bag
15. Using aseptic technique, connect the priming line to the sterile saline
38
container. The priming line is equipped with a “spike” connector. Hang
the saline container on the hook provided.
Page 70

600479-001 Rev 2 70/147
Figure 4-45. Making a Sterile Connection to the Saline Container.
CAUTION! START-UP KIT SPIKE
Operation
The spike on the Start-up Kit is relatively long. Be careful not to puncture the
side wall of the saline bag when connecting to the Start-up Kit.
Prime & Fill the Air Trap
16. Remove the air trap from its holder and hold it upside down (with the
tubing connections pointing downward).
17. Prime the air trap and the tubing circuit by pressing and holding the
39
Figure 4-46. Hold the Air Trap Upside Down.
PRIME switch. The roller pump will slowly start and take about 20
Page 71

Operation
600479-001 Rev 2 71/147
seconds to come up to operating speed. Observe the movement of
saline until it fills the air trap and the entire length of the tubing. The
PRIME switch will only function after the system self-tests are
completed.
Figure 4-47. Use the Prime Switch to Prime the Tubing Circuit.
18. Continue to hold the PRIME switch. When the air trap is completely filled
with saline, tap it to dislodge any remaining air bubbles. Observe the 500
ml saline bag. When bubbles are no longer seen in the saline bag,
priming is complete. Release the PRIME switch.
NOTE: Air Trap
The air trap must be completely filled for proper system operation.
19. Turn the air trap right side up and insert it in the holder.
20. Place the tubing to the catheter in the two notches at the front of the
console. Place the priming line and the saline return line in the channels
leading to the rear of the console. Close the top cover of the System.
CAUTION! Damage to Top Cover
Do not sit on the top cover or place heavy objects on the top cover.
40
Page 72

Operation
600479-001 Rev 2 72/147
Figure 4-48. Route the Tubing Out of the System.
21. Lift the saline container off the hook and slip the insulating jacket around
the container. Carefully close the hook-and-loop fasteners at the top and
bottom of the jacket. Rehang the container on the hook.
22. When the self tests are completed and the Start-up Kit is loaded and
primed, the System will enter STANDBY. The System is ready to be
connected to the patient.
41
Figure 4-49. STANDBY Screen – T1 Probe Not Connected.
Page 73

Connecting the Patient to the System
600479-001 Rev 2 73/147
CAUTION! Verify System Function First
Ensure proper functioning of the System and initiate pre-cool or pre-warm (if
applicable) prior to placing the catheter in the patient.
When the System has been prepared as directed in the preceding sections, it
may be moved to the patient’s bedside and connected to the patient. Follow
these steps in the indicated order.
1. Position the System near the patient’s bed. It must be close enough so
that the temperature probe cables and the tubing can conveniently reach
the patient. Route the cables and tubing safely.
2. If the primary and secondary patient temperature probes have not been
placed in the patient, this should be done now. Refer to the Instructions
for Use that accompany the temperature probes for information about the
probes.
3. Connect the blue patient temperature cable to the YSI-400 primary
temperature probe (e.g. Foley catheter, rectal or esophageal ). Connect
the plug at the end of the blue patient temperature cable into the
connector labeled “T1” on the front of the System console.
Operation
4. If you are using a secondary patient temperature probe, connect the blue
5. Place the Alsius catheter in the patient now. Refer to the Instructions for
6. The tubing to the catheter is supplied with the supply and return
42
Figure 4-50. Temperature Probe Connections.
patient temperature cable to the YSI-400 secondary temperature probe.
Connect the plug at the end of the blue patient temperature cable into
the connector labeled “T2” on the front of the System console. If you are
not using a secondary temperature probe, the patient MUST be
monitored by a separate hospital patient temperature monitor.
Use for information about the catheter.
connectors connected to each other. Using aseptic technique,
disconnect the two connectors.
Page 74
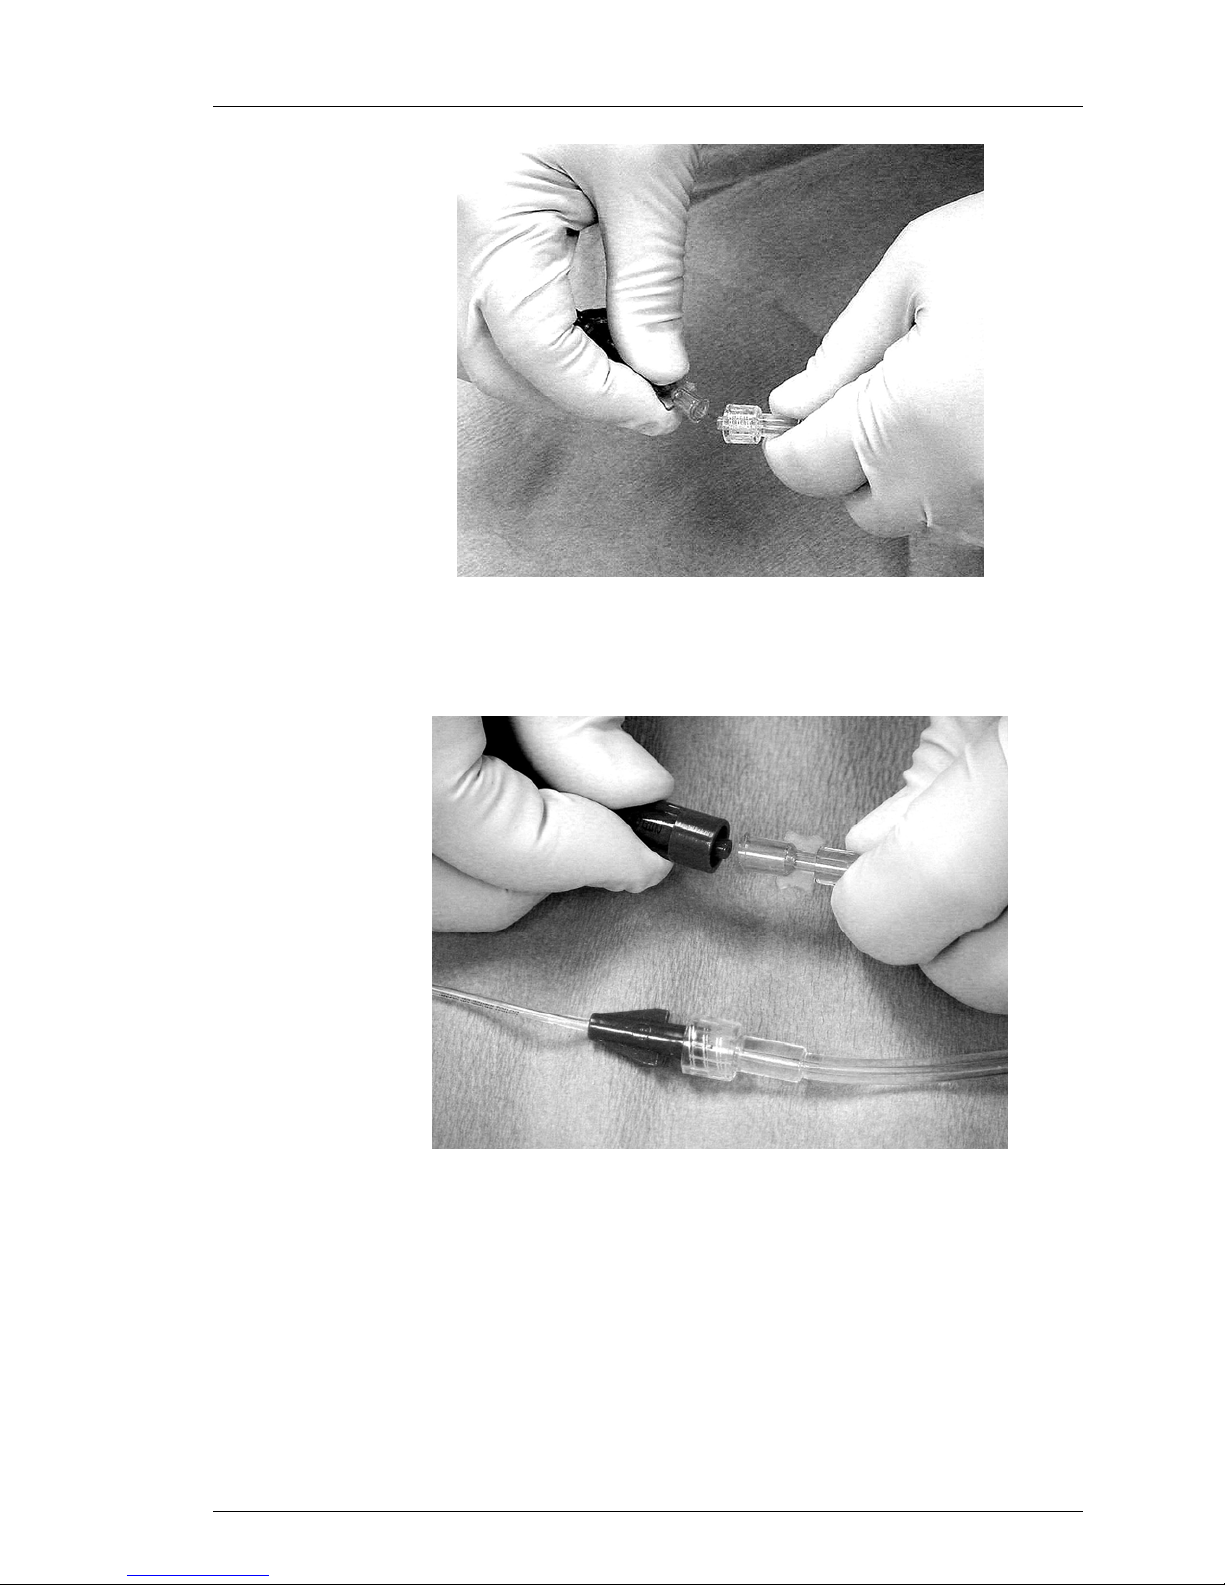
Operation
600479-001 Rev 2 74/147
Figure 4-51. Disconnect the Connectors Using Aseptic Technique.
7. Connect the female tubing connector to the male connector on the
catheter. The gender of the tubing connectors and the catheter
connectors assures that they cannot be connected backwards.
8. Connect the male tubing connector to the female connector on the
9. Safely route the tubing so that it is not kinked or obstructed and cannot
The System is now ready to begin treatment.
Once treatment has begun, confirm that saline is flowing through the tubing and
catheter circuit by observing the rotation of the inline flow indicator (see figure). If
43
Figure 4-52. Connect the Tubing to the Catheter.
catheter. Note that the return line is equipped with an inline flowindicator.
be easily dislodged by a patient’s movement.
Page 75
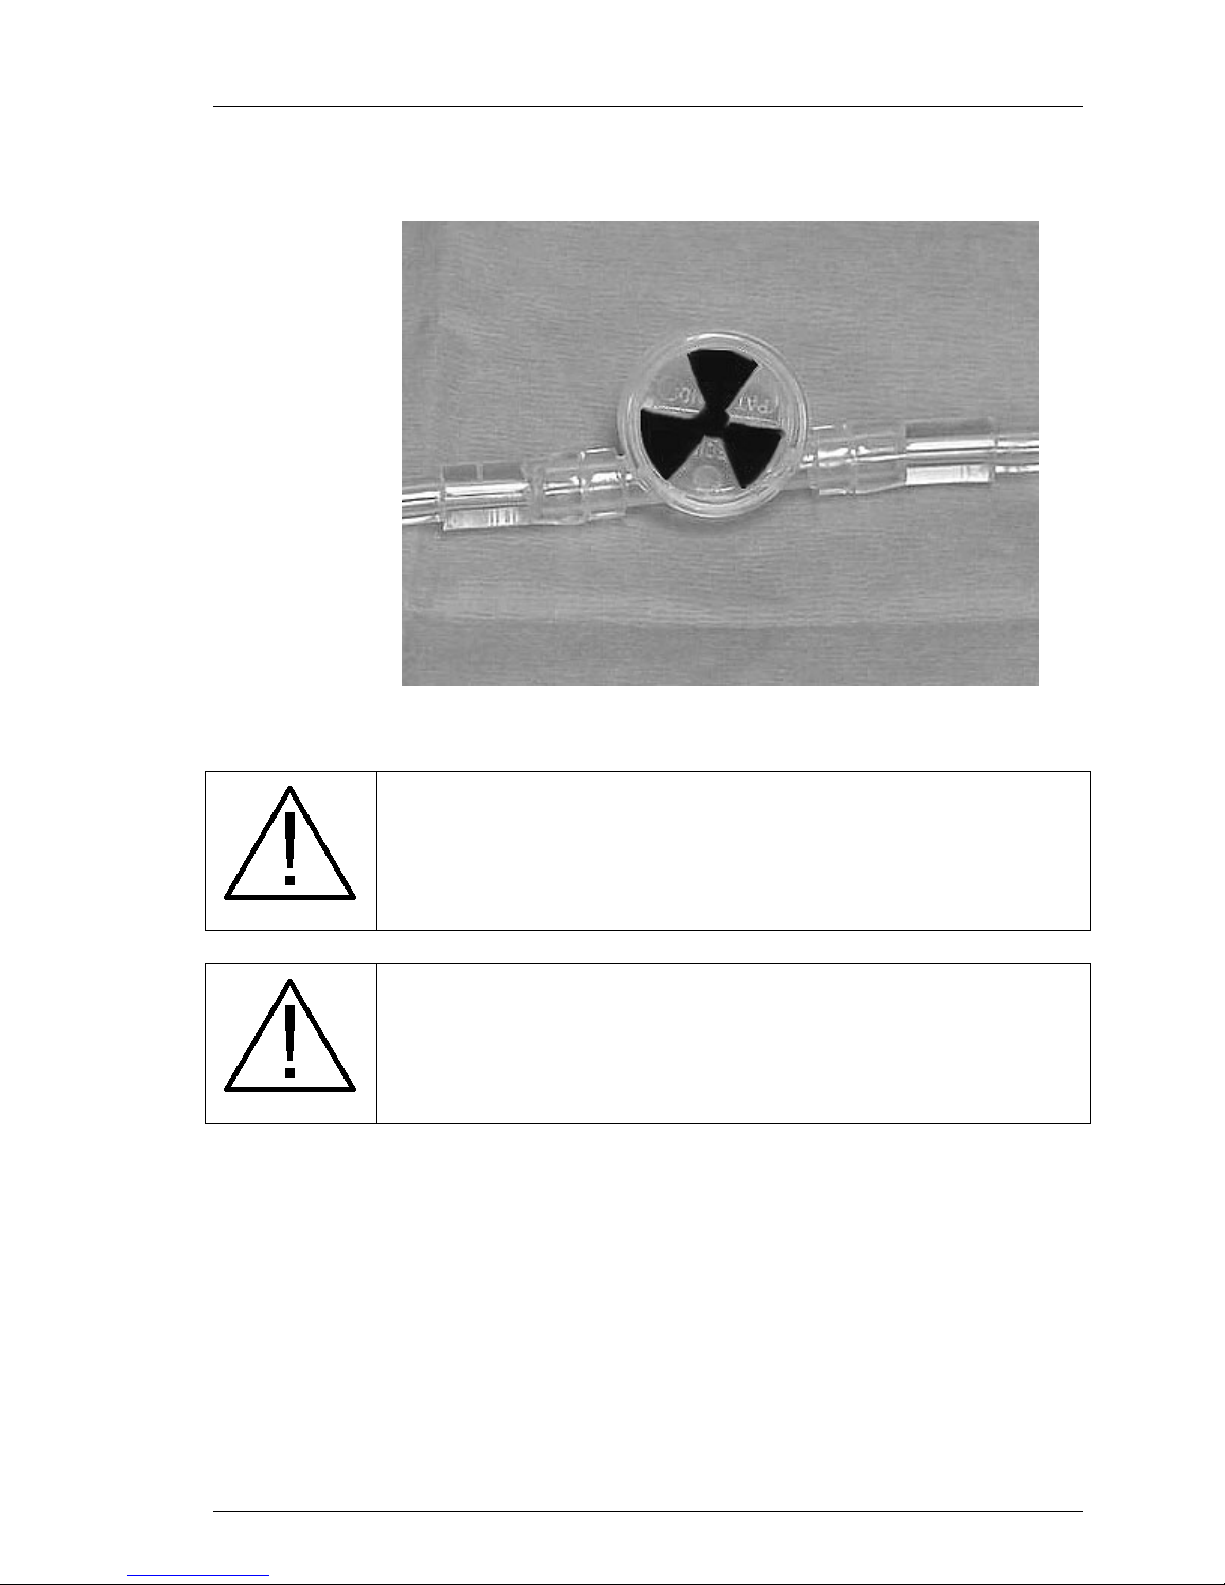
Operation
600479-001 Rev 2 75/147
the flow indicator does not rotate freely during patient treatment, inspect the
entire tubing circuit for kinks or other restrictions to flow. Tapping on the flow
indicator will liberate any trapped air bubbles and return them to the saline bag.
Figure 4-53. Inline Flow Indicator.
WARNING! INVESTIGATE AIR TRAP ALARMS.
If an “Air Trap Fault” alarm occurs, it is likely that there is a leak in the tubing
circuit or the catheter has failed. Refer to Chapter 6 – Alarms and Corrective
Actions for assistance. Do not keep replenishing saline that is being rapidly
depleted–a problem exists that must be immediately remedied.
WARNING! START-UP KIT LIFETIME IS SEVEN (7) DAYS.
The designed operating lifetime for Start-up Kit components is seven (7) days
of continuous operation. If a patient must be treated for a longer period, a new
Start-up Kit must be installed in the System. Failure to adhere to this time limit
may cause injury to the patient.
44
Page 76

Setup - Variations
600479-001 Rev 2 76/147
System Setup Sequence
The System Setup sequence varies depending upon the following factors:
1. The time from the last power down.
2. Whether or not you used the “End Procedure” menu option when you
terminated the previous case.
Time From Last Power Down
If the System detects that it is less than 3 minutes since the last time it was
powered down it will dispense with some of its self tests depending upon the
state of the cooling engine at the time of power down. The idea being that, with
such a short time, it is more likely than not that the power down was either
unintentional (you tripped over the power cord) or an intentioned brief adjustment
that required the system to be powered off (you moved the System to a new
position).
The System will give you the option to use the last programmed settings. If you
elect to do this you may still use the menu system to change system settings in
STANDBY.
Operation
At power on of the system, if it has been less than 3 minutes since the last power
down, then you will be presented with the screen above.
1. If you select “Yes” and press the knob, you will proceed directly to
2. If you select “No” and press the knob, you will continue to be presented
45
Figure 4-54. Operate at Current Settings
STANDBY once the system self checks have completed.
with screens that allow you to select operating parameters for the
System prior to entering Standby starting at Figure 4-57 – see below.
Page 77

Operation
600479-001 Rev 2 77/147
If the System detects that it is more than 3 minutes since the last time it was
powered down it will conduct all its self tests. You will not be offered the option
of operating the system at the current settings.
Downloading Data After Improper Shutdown
To help prevent the accidental loss of patient trend data, the System is designed
to store patient trend data if power to the system is interrupted or lost. If the
System has not been properly shut-down, all patient trend data will be preserved.
The next time the System is switched on, the self-test program detects the saved
patient data and offers the user the option to download the data to a laptop
computer. If the user does not wish to download the saved data, the System will
delete the data before permitting set up for a new patient.
To download patient trend data after an improper shutdown, follow these steps in
the indicated order.
1. Plug in and switch on the System. The self-test screen appears on the
display.
2. When the self-test is finished, the System Set Up screen displays the
46
Figure 4-55. Self-Test Screen.
message “Bath Pre-Set?”
Page 78
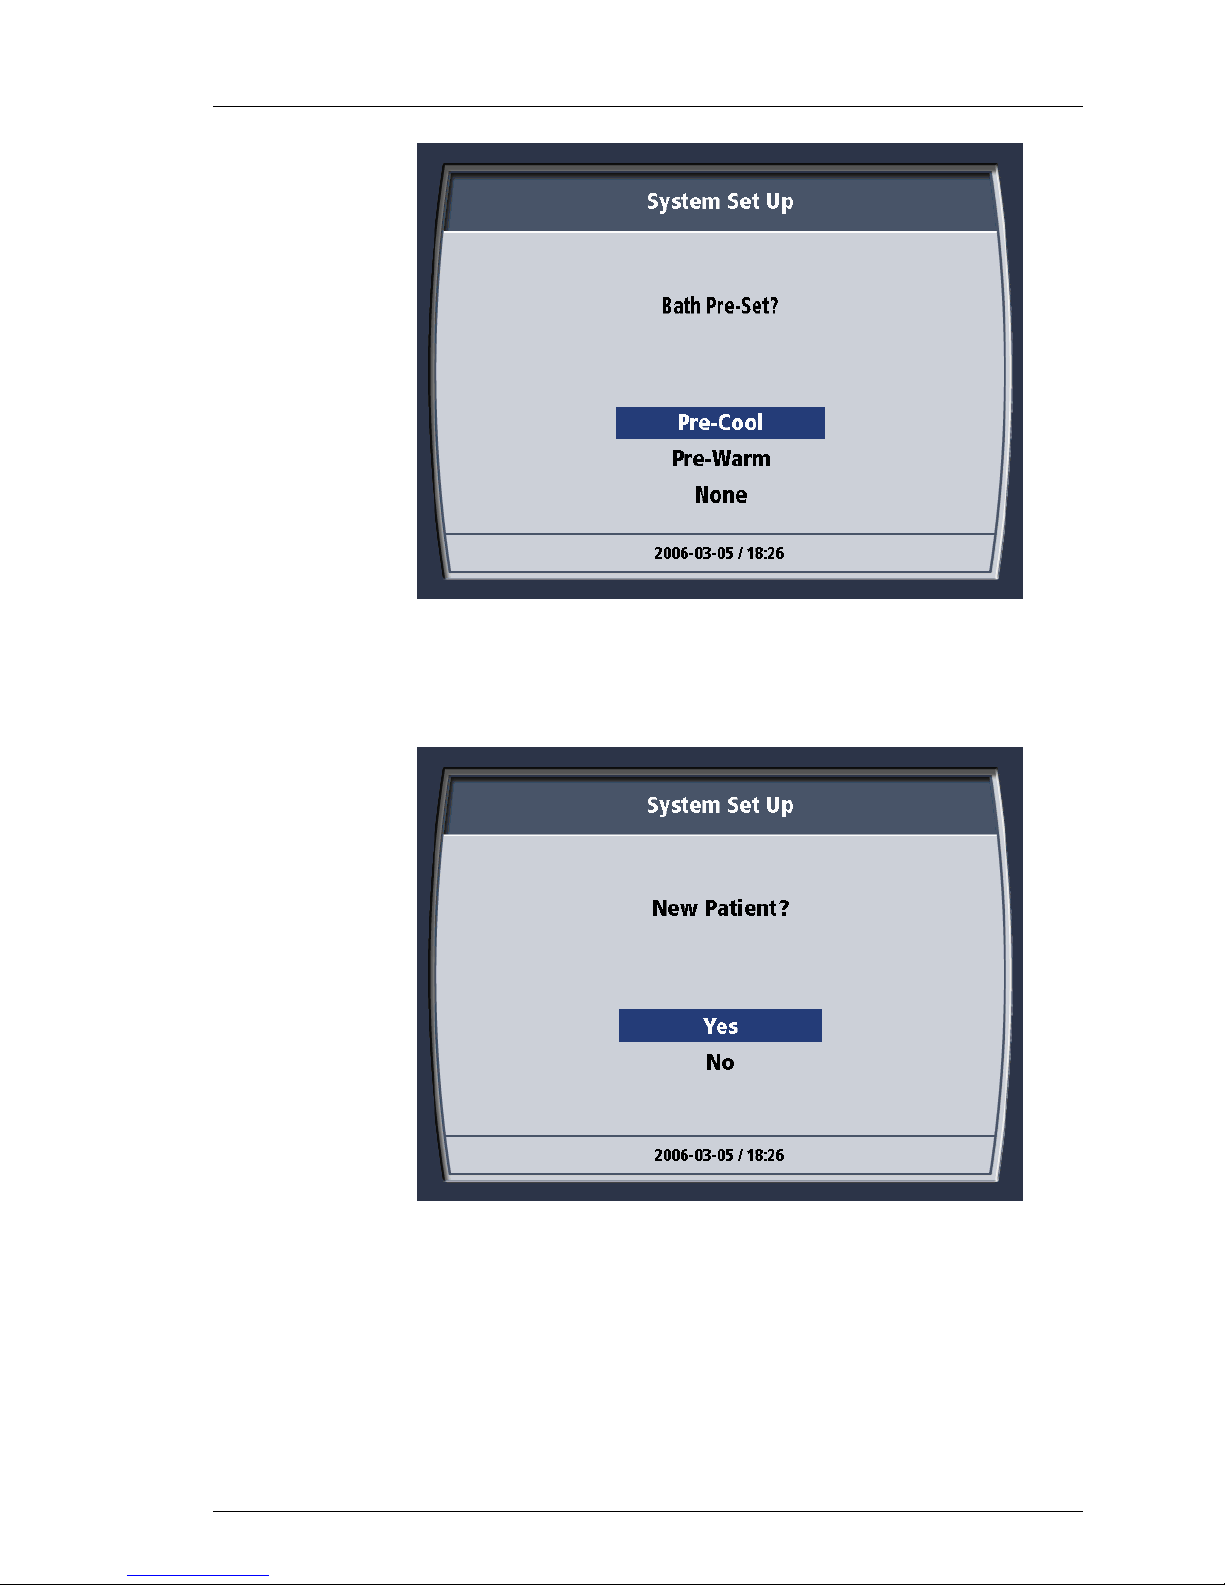
Operation
600479-001 Rev 2 78/147
Figure 4-56. Bath Pre-Set?
3. Choose “Pre-Warm”, “Pre-Cool” or “None” as desired.
4. When the System detects the presence of saved patient trend data, the
System Set Up screen displays the message “New Patient?”
5. Choose “Yes.”
6. The screen displays the message “Previous patient data must be
47
Figure 4-57. New Patient? Message.
downloaded or deleted to proceed.”
Page 79

Figure 4-58. Patient Data Message.
600479-001 Rev 2 79/147
7. Choose “Download Now.”
8. The screen displays the message “Prepare data link.”
Operation
9. Connect one end of a serial interface cable to the laptop computer’s
10. Attach the other end of the cable to the serial interface connector on the
48
Figure 4-59. Prepare Data Link Message.
serial interface connector.
System. The male 9-pin subminiature “D” connector is located on the
rear of the control head.
Page 80

Operation
600479-001 Rev 2 80/147
Figure 4-60. Location of the Serial Interface Connector.
11. Start the TempTrend CSV program on the laptop computer. Refer to
Chapter 5 - TempTrend CSV.
12. If a problem occurs during downloading, the System screen will display
the message “Download error. Please check external computer.” Check
the serial cable connections and the operation of the laptop computer
and choose “Try again.” If repeated failures occur, choose “Cancel.”
Repeated failures indicate a problem with the TempTrend program or the
System; contact your ZOLL representative for assistance.
13. When the data download is complete, the System screen briefly displays
49
Figure 4-61. Download Error Message.
the message “Download Complete.” At this time, the patient trend data
saved from the improper shutdown is deleted.
Page 81

Operation
600479-001 Rev 2 81/147
14. After about two seconds, System Set Up screen displays the message
“Set up system now. Press Enter to proceed.”
15. Disconnect the serial interface cable from the System and the laptop
computer.
Downloading of patient trend data is now complete. To set up the System for a
new patient, return to the section in this chapter titled Preparing the System for
Treatment.
CAUTION! There is no “Undelete”
If you choose “Delete,” the patient’s trend data will be permanently deleted
and cannot be recovered later.
50
Page 82

Ending Treatment
600479-001 Rev 2 82/147
End Procedure
Use of the “End Procedure” menu option ensures that the patient data log is
closed and cleared so that the System is ready to receive the next patient. If the
“End Procedure” menu option is not used to terminate a case, then the System is
programmed to ensure that you make active decisions as to what is to happen to
the patient data log when you next power on the system. See: Downloading
Data After Improper Shutdown.Error! Reference source not found.
We refer to the use of the END PROCEDURE menu option as “PROPER
SHUTDOWN” in this manual.
Data Download
Data may be downloaded at the end of a case. To download patient trend data
from the System to a laptop computer, follow these steps in the indicated order.
1. When you choose to end the procedure, the screen displays the
message “Patient data must be downloaded or deleted to proceed.”
Operation
2. Choose “Download Now.”
3. The screen displays the message “Prepare data link.”
51
Figure 4-62. Patient Data Message.
Page 83

Operation
600479-001 Rev 2 83/147
Figure 4-63. Prepare Data Link Message.
4. Connect one end of a serial interface cable to the laptop computer’s
serial interface connector.
5. Attach the other end of the cable to the serial interface connector on the
System. The female 9-pin subminiature “D” connector is located on the
rear of the display head.
6. Start the TempTrend program on the laptop computer. Refer to Chapter
7. If a problem occurs during downloading, the System screen will display
52
Figure 4-64. Location of the Serial Interface Connector.
5 – TempTrend CSV.
the message “Download error. Please check external computer.”
Check the serial cable connections and the operation of the laptop
Page 84

Operation
600479-001 Rev 2 84/147
computer and choose “Try again.” If repeated failures occur, choose
“Cancel” and contact your ZOLL representative for assistance.
Figure 4-65. Download Error Message.
8. When the data download is complete, the System screen briefly displays
the message “Download Complete.”
9. If you are downloading data after treatment has ended, the patient trend
data in the System will be deleted. After about two seconds, the
message is automatically cleared and the screen displays the message
“Turn power off”.
10. At the rear of the console, turn the power on/off switch to OFF.
53
Figure 4-66. Turn Power Off Message.
Page 85

11. Disconnect the serial interface cable from the System and the laptop
600479-001 Rev 2 85/147
computer. Patient trend data downloading is now complete.
New Patient – No Power Down
Change the Start-up Kit
The system does not have to be powered down to start a new case. A new
catheter, patient temperature probe and Start-up Kit are required for each patient
– see Disposal of Used Components. To immediately start a new case without
power down.
1. Place the System is Standby.
2. Delete the previous Patient Data – see below.
3. Verify the System Settings.
4. You may select to Pre-Cool or Pre-Warm the coolant using the settings
menus.
5. Connect the New Patient.
6. Place the System in RUN when desired.
Operation
Delete Previous Patient Data
To delete a previous patient’s data and prepare the System for immediate use
with a new patient, without powering off the system, follow these steps in the
indicated order:
1. Press the “Press for Enter/Menu” knob once. The menu is displayed.
2. Turn the knob until the “New Patient” selection is highlighted. Press the
knob once to enter the selection.
3. The New Patient menu will appear. The screen displays the message
“Select Yes to Delete Previous Patient Data.” Press the knob once to
enter “Yes.”
4. The screen displays the message “Are you sure you want to delete the
previous patient data?” Press the knob once to enter “Yes.”
5. The screen briefly displays the message “Previous patient data deleted”
and then displays the standby screen.
Disposal of Used Components
WARNING! SINGLE USE DEVICE–DO NOT REUSE.
Alsius catheters and System Start-up Kit components are single-use device s
and may not be reprocessed or reused. The cyclical stresses of the peristaltic
pump on the catheter and Start-up Kit cause fatigue failures.
DO NOT Use Catheters or Start-up Kits Beyond the Labeled Usage Time.
Failure of the product will result.
54
Page 86

Operation
600479-001 Rev 2 86/147
CAUTION! AVOID CONTACT WITH USED COMPONENTS.
Handle used components as medical waste.
To remove used components from the System and dispose of them properly,
follow these steps in the indicated order.
1. Assure that the patient has been disconnected from the System and that
the power switch has been turned off.
2. Cross connect the loose ends of the Start-up Kit when you disconnect it
from the catheter. This will reduce the amount of fluid that has to be
cleaned up later.
3. Position a large empty medical waste container or collection bag near
the System.
CAUTION! DO NOT DISASSEMBLE STARTUP KIT.
Do not disconnect the tubing connecting the components. They are removed
and disposed of as a complete unit. To avoid injury, do not disconnect the
saline solution container.
4. Open the top cover of the System. Open the transparent top cover of the
roller pump.
5. Remove the cap from the coolant well and set it aside in a clean location.
6. Remove the insulating jacket from the saline container and set it aside.
7. Lift the handle on the pump rollers.
8. Grasp the pump tubing and gently pull it up and out of the channel while
rotating the pump head.
9. Pull the tubing out of the pump head. Press the handle down onto the
rollers until it press into the detent and close the top cover of the roller
pump.
10. Loosely coil the disconnected ends of the catheter tubing.
11. Lift the heat exchanger coil out of the coolant well. Hold the coil above
the coolant well to allow coolant to drip back into the well.
12. Pull the air trap up and out of the holder.
13. Unhook the saline solution container from the hook.
14. Bundle up the collection of components, still connected together, and
gently deposit them in the medical waste container. Take care to avoid
contact with the IV container “spike.”
15. Use a disposable tissue to wipe up any spilled coolant from the top of the
coolant well. Place the tissue in the medical waste container.
16. Replace the insulated cap on the coolant well. Replace the insulating
jacket on the hook.
Removal and disposal of the used components is complete. The System may
now be stored or moved to its next treatment location.
55
Page 87

Operation
600479-001 Rev 2 87/147
NOTE: Disposal of System
When the System itself has reached the end of its useful life, it must be
disposed of in accordance with local governing ordinances and recycling plans
for refrigerated appliances.
56
Page 88

Temperature Trend Data
600479-001 Rev 2 88/147
Overview
During operation, the System continuously collects and stores temperature trend
data, storing a record each minute. This data is stored in memory and can be
downloaded to an attached laptop computer for later analysis or plotting.
The memory will hold up to 21 days of data. Data can be collected for 21 days
before the memory is filled and a download of data is necessary to preserve all of
the stored data. If data is not downloaded when memory is full, the newest data
will overwrite the oldest data and only data from the past 21 days will be stored.
At any time during operation, the complete record of temperature trend data can
be displayed as a graph on the screen. This chapter explains how to display
temperature trend data and provides details about the format and structure of the
downloaded data.
Displaying the Temperature Trend Graph
To display the temperature trend graph, follow these steps:
1. Press the Press for Enter/Menu knob once. The screen displays the
menu. The selection “View Graphs” will be highlighted.
Operation
2. Press the knob once. The screen will display the temperature trend graph.
57
Figure 4-67. Menu.
Page 89

Temperature Trend Graph
600479-001 Rev 2 89/147
Temperature trend data can be displayed as an interactive graph on the screen.
The display is a time-series of patient temperature (from the primary temperature
probe) and System activity, plotted in two graphs. The patient temperature graph
plots temperature vertically and time horizontally. The System activity graph plots
cooling/warming activity vertically and uses the same time scale horizontally. An
example of the patient temperature trend display is shown below.
Operation
Patient Temperature
The patient temperature graph (labeled “Patient Temp”) is scaled for any
temperature between 31º C and 41º C (87.8º– 105.8º F). The time scale can be
set to any of four intervals (refer to Setting the Time Scale, later in this chapter,
for details). Figure 4-68 shows the vertical temperature displayed in degrees
Celsius, and the horizontal time scale displayed for a 4-hour interval.
System Activity
The System activity graph (labeled “System”) is scaled for any System activity,
from maximum cooling to maximum warming. The horizontal time scale is the
same as that set for the Patient Temperature graph. The vertical scale uses a
colored activity indicator:
The red zone indicates coolant temperatures between 36º C and 42º C.
The neutral point (between red and blue) indicates coolant temperature of
36º C and also indicates when the pump is not operating.
The blue zone indicates coolant temperatures between 0º C and 36 º C.
Figure 4-68. Temperature Trend Display.
58
Page 90

Cursor
600479-001 Rev 2 90/147
Status Bar
Operation
The cursor is a fixed vertical line that runs through the center of both graphs.
When the temperature trend graph is displayed, you may turn the Press for
Enter/Menu knob to scroll the display to the left or right. As data scrolls under
the cursor, the top of the screen shows the time and date of the data under the
cursor.
Turn the knob clockwise to scroll to the right. As you scroll to the right, the time
and date display will indicate later data. By scrolling right to the end, you can
display the most current data.
Turn the knob counterclockwise to scroll to the left. As you scroll to the left, the
time and date display will indicate earlier data. By scrolling left to the end, you
can display the data collected when treatment began.
Across the bottom of the display is a status bar which displays the patient’s
temperature, the status of the System, and the target temperature for the data
point under the cursor.
The patient’s temperature and target temperature are displayed using the current
temperature notation setting (Celsius or Fahrenheit).
The System status field uses colors to display one of nine status messages that
are described in the following table.
Table 4-5. System Status Bar Messages.
Status
Message
STBY Black The System was in standby mode (pump off).
MAX Red
MED Red The System was warming.
LOW Red
0 Black The System was neither warming nor cooling.
LOW Blue
MED Blue The System was cooling.
MAX Blue
OFF Black The System was turned off.
Message
Color
Setting the Time Scale
The time scale displayed by the temperature trend graph can be set to any of
four intervals: 4 hours, 12 hours, 24 hours, or 72 hours. To set the time scale,
follow these steps:
1. Display the temperature trend graph.
2. Press the Press for Enter/Menu knob once. The screen displays a pop-
up menu with the choice “Set Time Scale” highlighted.
Explanation
59
Page 91

Operation
600479-001 Rev 2 91/147
Figure 4-69. Set Time Scale.
3. Press the knob once. The screen displays the message “Select interval”
followed by four interval choices. The most recent choice will be
highlighted.
4. Turn the knob to highlight your desired selection. When it is highlighted,
5. The screen displays the pop-up menu again. Turn the knob to highlight
6. Press the knob once. The menu will disappear and the temperature trend
60
Figure 4-70. Select Interval.
press the knob once.
the “Cancel/Exit” selection.
graph will be displayed using the interval you selected.
Page 92

Mechanical Components
600479-001 Rev 2 92/147
Top Cover
When access to the tubing or Coldwell of the System is required, lift the top cover
to a fully upright position.
Operation
61
Figure 4-71. Top cover fully open.
Page 93
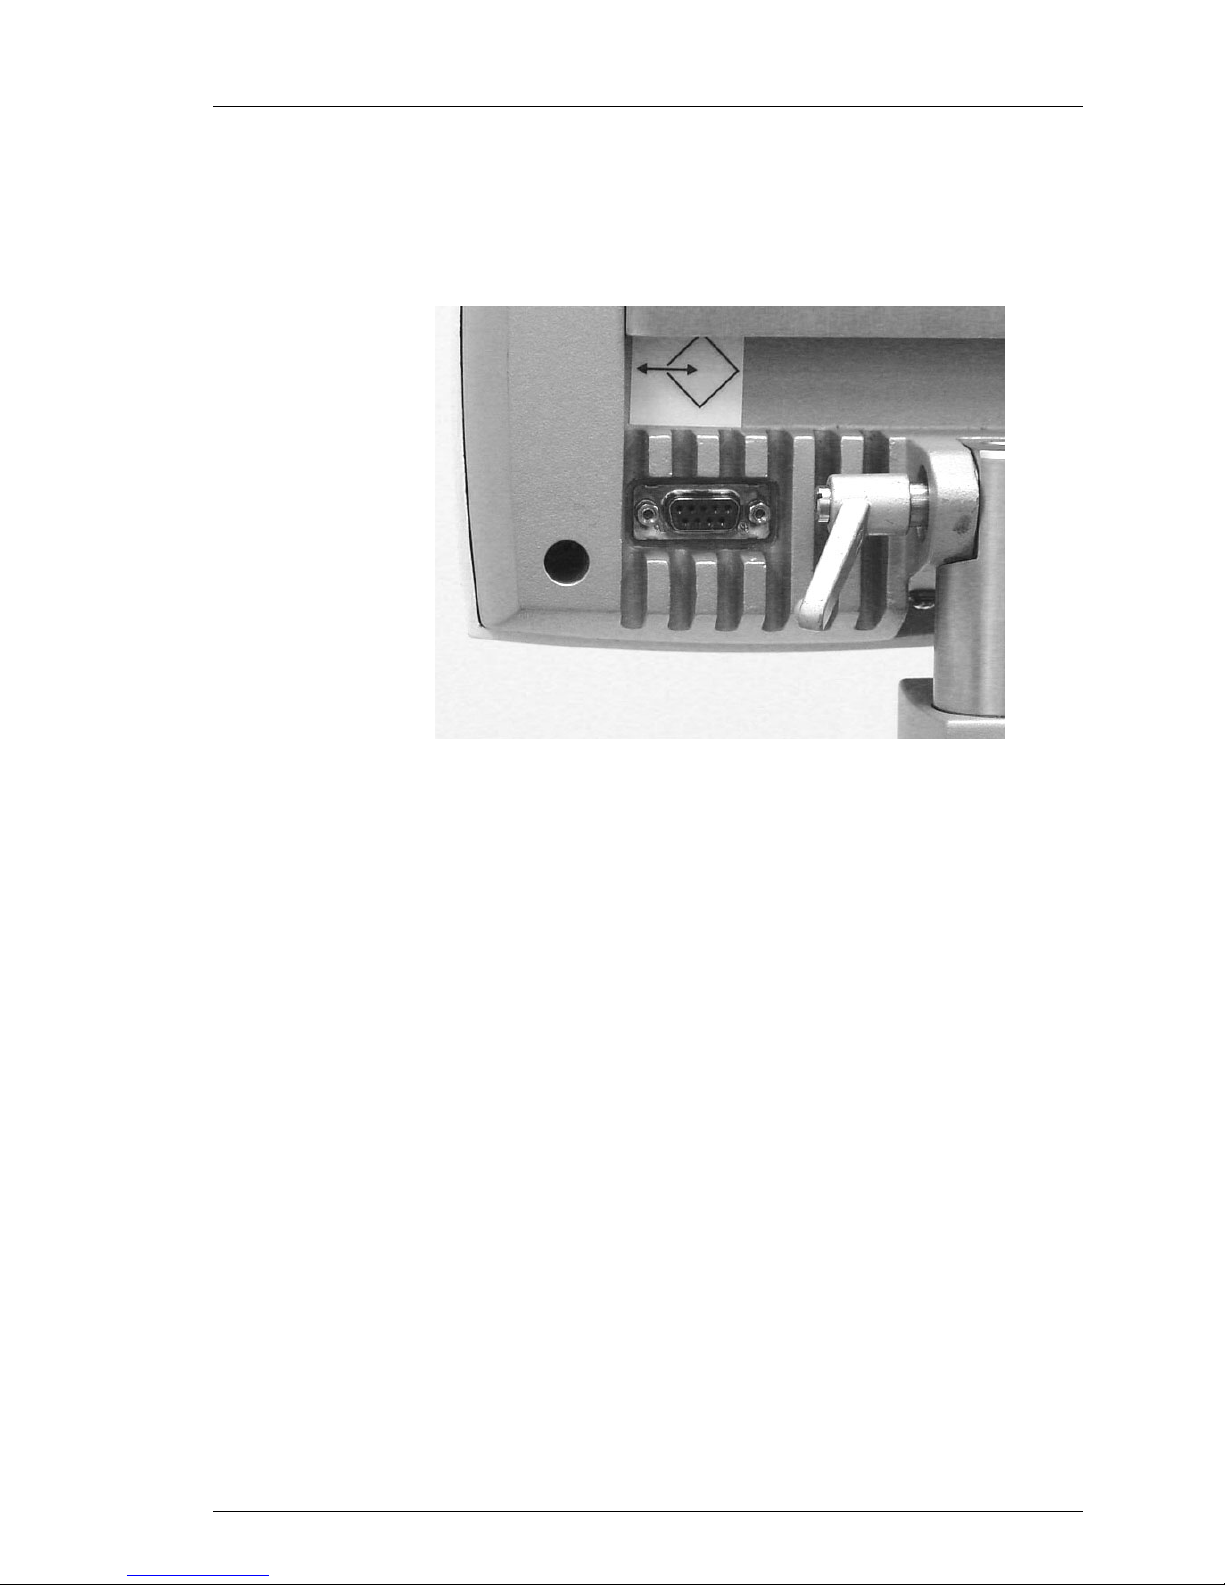
Control Head Tilt
600479-001 Rev 2 93/147
To modify the tilt of the Control Head,or to lock the Control Head in place use the
lever located at the swivel point. Turn the lever clockwise to tighten or
counterclockwise to loosen. The position of the lever may be changed, without
adjusting the tightness, by pulling the lever towards you.
Operation
Figure 4-72. Control Head Tilt Lever.
62
Page 94
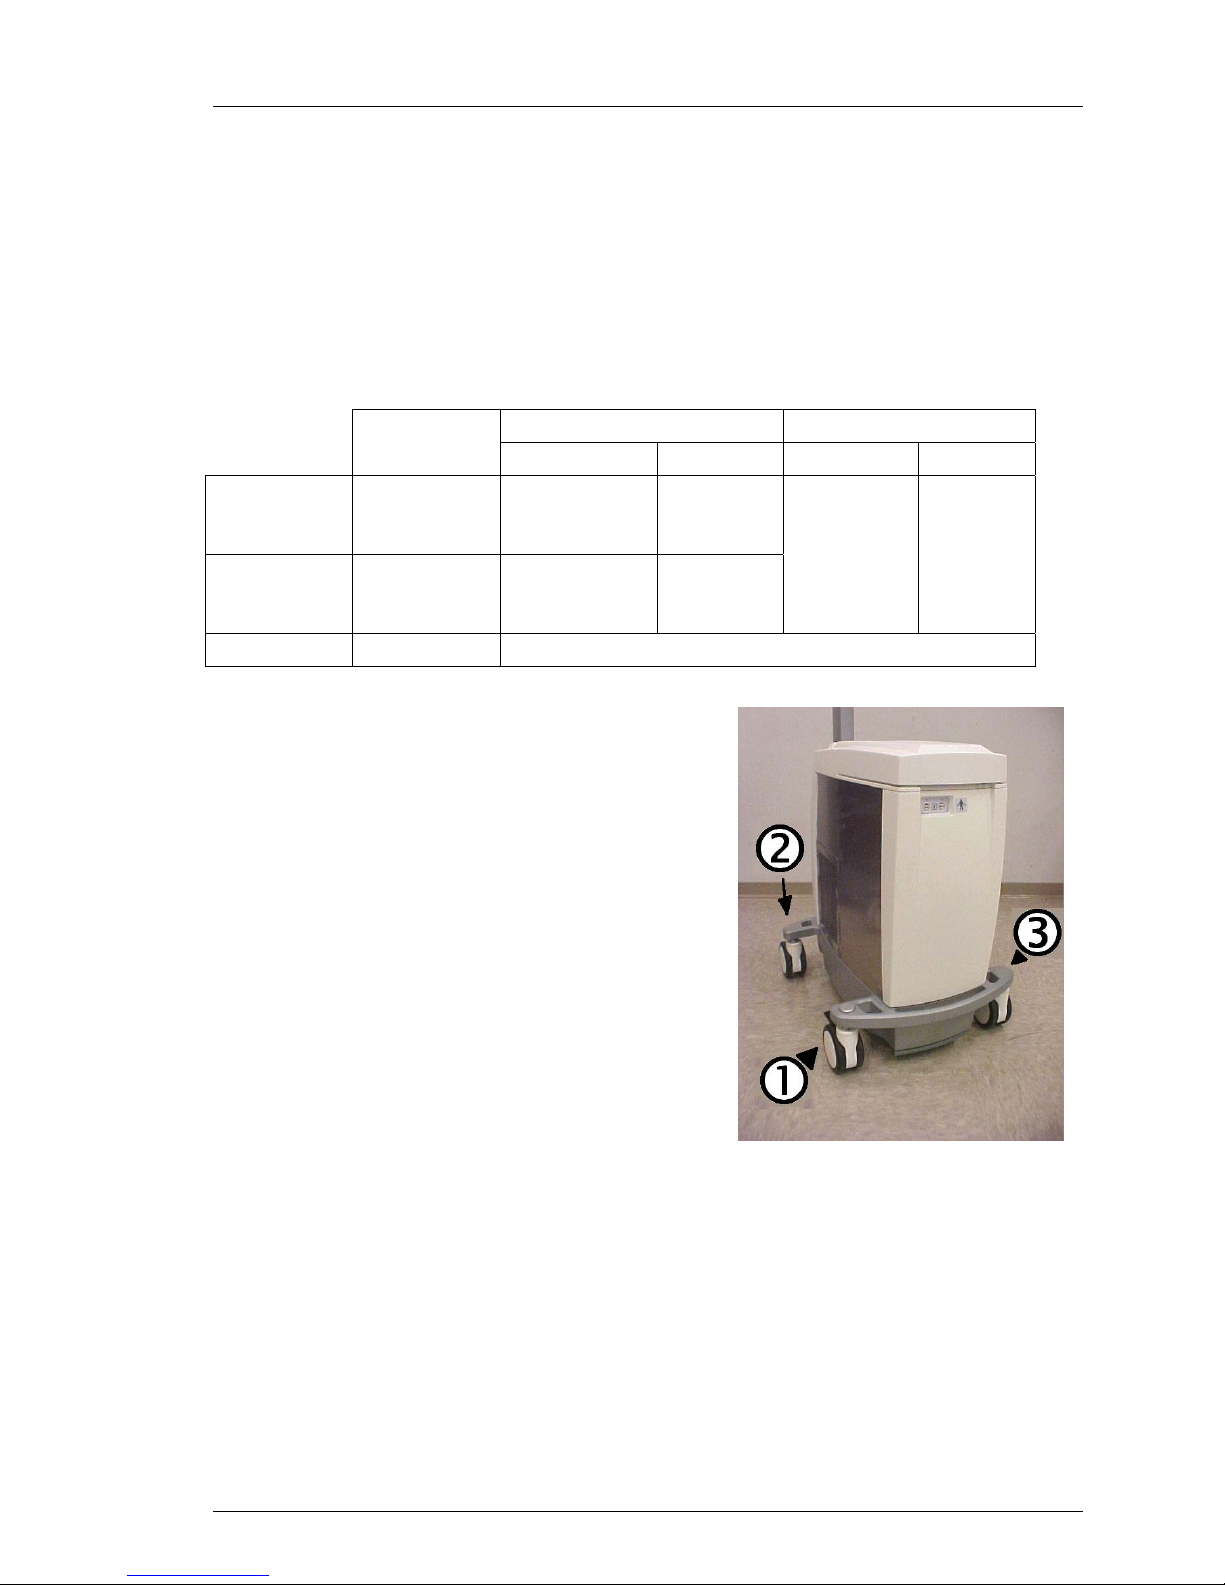
Casters
600479-001 Rev 2 94/147
Operation
There are three different types of casters (wheels) on the System.
1. The right front has a free swivel and brake feature.
2. The left front has a free swivel and a directional lock feature.
3. The rear casters do not lock and are free to rotate at all times.
The figure below shows the operation of the casters.
Table 4-6. Caster Operation.
Right Front
Left Front
Rear (both)
1. Direction Locking Caster.
Note dome above caster axle
2. Free Swivel Casters at rear of system
3. Kick-Stop Caster (Free swivel caster with
brake)
Kick Stop
Attached?
Yes
Yes
No Not Applicable
Kick-Stop Down Kick-Stop Up
Steering Brake Steering Brake
Locked in
current
position
Will lock when
next straight
ahead
On
Free swivel Off
Off
63
Figure 4-73. Casters on the System
Page 95

Accesories - HMIA
600479-001 Rev 2 95/147
Hospital Monitor Interface
Accessory (HMIA)
1
Page 96

Accesories - HMIA
600479-001 Rev 2 96/147
Contents
Overview 3
Operating the HMIA 3
Connecting to the Hospital Monitor 3
To begin operation 4
Controls and indicators on the HMIA 5
Operating States 6
START-UP 6
RUN 6
Calibration 6
Installation 6
Installation Equipment 7
Installation Procedure 7
Removal of the HMIA 10
Connection Cable Part Numbers 10
Data Download 11
Troubleshooting 11
Errors 12
Green LED OFF 12
Flashing Red LED 12
No Temperature Reported On Hospital Monitor 12
Incorrect Temperature Reported On Hospital Monitor 12
Temperature jumps between 26OC and 49OC On Hospital Monitor 13
Hirose Connector does not fit 13
YSI-400 Temperature vs. Resistance 14
2
Page 97

Accesories - HMIA
600479-001 Rev 2 97/147
Overview
This chapter explains the installation, operation, and maintenance of the Hospital
Monitor Interface Accessory (HMIA).
The sole function of the HMIA module is to simulate the patient temperature
probe connected to the T1 port on the front of the System. Connection of the
HMIA to a hospital temperature monitor using one of the Alsius custom cables,
will permit the display of an identical patient temperature on both the System and
the hospital temperature monitor, while using only a single patient temperature
probe.
WARNING:
The HMIA is not a replacement for the T2 Temperature probe on the System.
It simply simulates the T1 Temperature probe. Use of the HMIA does not
obviate the need for a second patient temperature monitoring method. Failure
to use a second patient temperature monitoring method can result in injury to
the patient in the event of a T1 Temperature Probe failure.
Operating the HMIA
Connecting to the Hospital Monitor
The HMIA simulates a standard YSI 400 temperature sensor, such as in a patient
temperature sensing Foley catheter or rectal probe.
The HMIA is connected to a hospital monitor via an Alsius custom interface
cable included with the HMIA. These cables have connectors that are identical to
the connectors of Foley and rectal patient temperature probes.
One end of the Alsius interface cable plugs directly into the standard patient
cable of the hospital monitor. In this way, the hospital monitor connects to the
HMIA interface cable in the same fashion as it would connect to a Foley or rectal
temperature probe. (See Figure 1).
3
Page 98

Accesories - HMIA
600479-001 Rev 2 98/147
Figure 1 Cables and Connections
The other end of the Alsius interface cable plugs into the HMIA connector
labelled T1 out. (See Figure 2).
To begin operation
The operation of the HMIA is very simple. There is no independent on/off switch.
As soon as the System is switched on, the HMIA automatically begins
functioning.
Connect the custom Alsius interface cable to the patient cable of the hospital
monitor. (See Figure 1). Plug the other end of the Alsius interface cable into the
HMIA connector labelled “T1 out”.
4
Figure 2 HMIA with T1 out connection
Page 99

Accesories - HMIA
600479-001 Rev 2 99/147
The set-up is now complete.
Controls and indicators on the HMIA
The HMIA has the following control/indicators: a reset switch, a green power
indicator and a red warning light.
The front panel of the HMIA is illustrated in the figure below.
Figure 3 Front Panel of the HMIA
The meaning of the symbols on the front panel are as described in the table
below
Table 1 HMIA Control/Indicators
Symbol Description Function
RST
Reset Button
Caution LED
This is a reset button. Lightly push the tip of a
paperclip, or similar sized device, into the hole
until you feel a “click” and then withdraw the
paper clip.
This red light indicates that there is a
malfunction in the HMIA.
Power LED
This green light indicates that the HMIA is
receiving power from the System.
RS232
T1 out
SYSTEM
RS-232 Serial port connector
cable
Patient temperature output
connector
System umbilical cord
connections
This short extension cable is connected to the
RS-232 data port connector on the back of the
display head of the System.
This connector accepts the custom Alsius
interface cable.
One connector is attached to the round, multipin connector on the back of the display head
of the System via a short cable. The other
connector mates with the umbilical cord of the
System.
5
Page 100

Accesories - HMIA
600479-001 Rev 2 100/147
Operating States
The HMIA has the following operating states: START-UP and RUN.
START-UP
When the System is powered on, illumination of the Green LED is indication that
power has been supplied to the HMIA. If there is no power to the HMIA the
Green LED is not lit and the hospital monitoring system, if attached to the HMIA,
should detect this as a probe disconnection or temperature probe error.
Once powered, the HMIA immediately establishes its link with the System and
performs a series of self tests including self-calibration – see belo w.
RUN
The HMIA is designed to provide a variable resistance value that is interpreted by
YSI-400 compliant hospital monitors as patient temperature. The patient
temperature is obtained via the T1 connection of the System.
Calibration
HMIA performs a self-calibration at START-UP. It will also perform a selfcalibration upon reconnection of the RS-232 port (for example, you might
temporarily disconnect the HMIA to allow access for data download). Selfcalibration takes less than half a second. During self-calibration, it may be
detected by the hospital monitor as a disconnected probe. At the end of selfcalibration the HMIA will automatically return to RUN.
Inst allation
The HMIA is quickly and easily installed.
Prior to installation of the HMIA, verify that the System has the correct software
to support the HMIA. The software version is displayed during initial start-up of
the System as per the figure below. The first number in the Software Version
must be equal to or greater than 1.04 (See Figure 4).
6
 Loading...