

Page 1
Präzisions-Thermometer
Precision thermometer
Thermomètre de précision
TFX 422
Page 2
TFX 422
Deutsch
Lieber Kunde,
wir gratulieren Ihnen zum Erwerb eines
ebro Produkts.
Wir hoffen, dass Sie den Nutzen dieses
Produkts lange genießen können und das
es Ihnen bei Ihrer Arbeit hilft.
Bitte nehmen Sie sich die Zeit die Bedienungsanleitung sorgfältig zu lesen und
machen Sie sich mit dem Gerät vertraut,
bevor Sie es verwenden.
Normen:
Dieses Produkt erfüllt
laut Konformitätsbescheinigung das EMVG.
Dieses Produkt erfüllt die Richtlinien
gemäß Norm EN 13485.
Eignung:
S (Lagerung), T (Transport)
Umgebung:
A (Lebensmittellager - und Verteileinrichtung) und E (Transportable Thermometer)
Genauigkeitsklasse:
1 zur Messung der Lufttemperatur und
0,5 zur Messung der Produktinnentemperatur.
Messbereich:
-50 ... +200°C
Bitte beachten Sie, dass bei diesem Gerät nach
EN 13485 eine regelmäßige Überprüfung gemäß
EN 13486 (jährlich) durchgeführt werden muss.
© Copyright by ebro Electronic GmbH & Co. KG
2
Page 3
English Français
Dear customer,
Congratulations on the purchase of an
ebro product.
We hope than you can make use of this
product for a long time and that it helps
you with your work.
Information that are useful and important
for understanding the function are
highlighted in the instructions text.
Standards:
The conformity certificate confirms
that this product fulfills CE
guidelines.
This product fulfills the guidelines in
accordance with EN 13485.
Suitability:
S (Storage), T (Transport)
Location:
A (Food storage and distribution systems)
and E (Transportable thermometer)
Cher client,
Nous vous remercions d’avoir acquis un
produit ebro.
Nous espérons que vous pourrez profiter longtemps de ce produit et qu’il vous
aidera dans votre travail.
Les informations utiles et importantes
pour la compréhension du fonctionnement de l’instrument sont repérées par
une bordure à gauche du texte.
Normes :
Le certificat de la conformité
confirme que ce produit suit les
directives de CE.
Ce produit répond aux directives selon
la norme EN 13485.
Aptitude:
S (Stockage), T (Transport)
Environnement:
A(Entreposage et distribution) et E
(thermomètre transportable)
Accuracy classification:
1 for measurement of the air temperature
and 0.5 for the measurement of the
internal product temperature.
Measurement range:
-50 ... +200°C
In accordance with EN 13485, this device is
subject to regular (yearly) inspections as per EN
13486.
.
1340– 5410– 5422– 04/05 3010-0353
Classe d’exactitude:
1 pour la mesure de la température
ambiante et 0,5 pour la mesure de la
température interne des produits.
Plage de mesures:
-50 ... +200°C
Veuillez prendre garde que cet appareil doit être
soumis d’après la norme EN 13485 à un contrôle
régulier (annuel) conformément à la norme EN
13486.
3
Page 4

TFX 422
Deutsch
Inhaltsverzeichnis
1 Einführung .......................... 6
1.1 Allgemein ....................................6
1.2 Sicherheitshinweise .................... 8
1.2 Vorsichtsmaßnahmen ................ 10
2 Lieferumfang .................... 10
3 Beschreibung ................... 12
3.1 Allgemein .................................. 12
3.2 User Menü ................................ 14
3.2.1 Einstellmöglichkeiten ...............14
3.2.2 Menübedienung ....................... 16
4 Bedienung......................... 18
4.1 Thermometer einschalten .......... 18
4.2 Anzeige ..................................... 18
4.3 Temperatur messen .................. 20
4.4. Messwertspeicher .................... 22
4.4.1 Speicherinhalt abrufen ............. 22
4.4.2 Momentanwert speichern .........22
4.4.3 Messwertspeicher löschen ...... 22
5 Was tun wenn... ................ 24
6 Kalibrierservice ............... 26
7 Wartung und Entsorgung 26
7.1 Reinigung .................................. 26
7.2 Entsorgung ................................ 26
7.3 Batteriewechsel ........................28
8 Eichung ............................. 32
9 Anhang .............................. 32
I Zubehör .................................... 32
II Technische Daten ..................... 34
CE Erklärung
4
Page 5

English Français
Table of contents
1 Introduction ............................. 7
1.1 General ....................................... 7
1.2 Safety instructions ......................9
1.2 Precautions ............................... 11
2 Scope of Delivery ................... 11
3 Description ............................. 13
3.1 General ..................................... 13
3.2 User menu ................................15
3.2.1 Configuration options ............... 15
3.2.2 Menu operation ........................ 17
4 Operation ................................ 19
4.1 Switching on thermometer .........19
4.2 Display ..................................... 21
4.3 Measuring temperature .............21
4.4. Measurement memory ................. 23
4.4.1 Retrieving memory contents ....23
4.4.2 Storing current value ................ 23
4.4.3 Deleting measurement memory 23
Tables des matières
1 Introduction ........................ 7
1.1 Informations générales ................7
1.2 Consignes de sécurité ................9
1.2 Mesures de précaution ............. 11
2 Contenu de l’emballage ......... 11
3 Description ............................. 13
3.1 Informations générales .............. 13
3.2 Menu User ................................15
3.2.1 Possibilités de réglage .............15
3.2.2 Utilisation du menu .................. 17
4 Utilisation ............................... 19
4.1 Allumer le thermomètre ................19
4.2 Affichage...................................21
4.3 Mesurer la température .............21
4.4. Mémoire des valeurs mesurées ..........23
4.4.1 Afficher le contenu de la mémoire 23
4.4.2 Mémoriser la valeur courante ... 23
4.4.3 Effacer la mesure mémorisée .. 23
5 What do I do if ........................ 25
6 Calibration servicing .............. 27
7 Servicing and waste disposal 27
7.1 Cleaning ....................................27
7.2 Waste disposal ......................... 27
7.3 Replacing the battery................29
8 Adjustment........................ 33
9 Appendix ........................... 33
I Accessories .............................. 33
II Technical information ................ 35
CE Declararion
5 En cas de problèmes ............. 25
6 Service de calibrage ............... 27
7 Entretien et mise au rebut ..... 27
7.1 Nettoyage ................................. 27
7.2 Mise au rebut............................27
7.3 Changement de la pile .............. 29
8 Étalonnage........................ 33
9 Annexe .................................... 33
I Accessoires .............................. 33
II Caractéristiques techniques ..... 35
Déclaration CE
5
Page 6

TFX 422
Deutsch
1 Einführung
1.1 Allgemein
Lesen Sie diese Bedienungsanleitung
aufmerksam durch, bevor Sie Ihr neues
Präzisions-Thermometer in Betrieb nehmen.
Die Anleitung führt Sie mit klaren und einfachen Anweisungen in den Umgang mit
dem Thermometer ein.
Informationen, die für das Verständnis
der Funktionsweise nützlich und wichtig
sind, finden Sie im Anleitungstext durch
Balken markiert.
Beachten Sie im Interesse eines gefahrlosen Umgangs mit dem Thermometer
die mit dem Zeichen versehenen
Sicherheitshinweise.
6
Page 7

English Français
1 Introduction
1.1 General
Please read these operating instructions
carefully before using your new precision
thermometer.
These instructions guide you through
working with the thermometer with clear
and simple directions.
Any information which is useful or relevant in the understanding of the
functionality is headlined as such in the
instructions.
To ensure safe operation of the
thermometer, follow all those safety
instructions as indicated by the
symbol.
1 Introduction
1.1 Informations générales
Veuillez lire attentivement le présent mode
d’emploi avant d’utiliser votre thermomètre
de précision.
Ce mode d’emploi vous donne des
instructions claires et simples concernant
l’utilisation du thermomètre.
Les informations utiles et importantes pour
la compréhension du fonctionnement de
l’instrument sont mises en évidence par une
barre dans le texte de la notice.
Respectez les consignes de sécurité
marquées par un symbole dans l’intérêt
d’une manipulation du thermomètre sans
danger.
7
Page 8

TFX 422
Deutsch
1.1 Sicherheitshinweise
• Setzen Sie das Gerät niemals hohen
Temperaturen aus!
• Messen sie mit dem Gerät und externen Fühlern niemals an spannungs
führenden Teilen!
• Messen Sie mit dem Gerät nicht in
explosionsgefährdeten Bereichen.
• Betreiben Sie das Gerät nur innerhalb
der in den Technischen Daten vorge-
gebenen Parametern.
• Öffnen Sie das Gerät nur, wenn dies
zu Wartungszwecken ausdrücklich in
der Bedienungsanleitung beschrieben
ist.
• Wenden Sie niemals Gewalt an!
• Geben Sie leere Batterien an den
dafür vorgesehenen Sammelstellen ab.
• Senden Sie das Gerät nach Ende
der Nutzungszeit direkt an uns. Wir
sorgen für eine umweltgerechte
Entsorgung.
Garantie
24 Monate
8
Page 9
English Français
1.1 Safety notes
• Never expose the device to high tem
peratures!
• Under no circumstances measure live
components with this device and
external sensors
• Do not use the device in explosionendangered areas!
• The instrument should only be operated
within the parameters specified in the
Technical data.
• The instrument should only be opened
if expressly described in the
instruction manual for maintenance
purposes.
• Force should never be applied.
• Please dispose exhausted batteries
according environment regulations.
• Do not put into trash-bin.
• You can return the instrument directly
to us at the end of its service life. We
shall recycle it according rules.
Warranty
2 years
1.1 Consignes de sécurité
• N’exposez pas l'instrument à de
hautes températures !
• N’effectuez jamais de mesures avec
l’appareil et les sondes externes sur
des éléments sous tension!
• N’utilisez pas l'instrument en atmo
sphère explosive!
• Utilisez l'instrument seulement selon
les paramètres spécifiés dans les
Caractéristiques techniques.
• Ouvrez l'instrument seulement si
expressément décrit dans le mode
d´emploi pour but de la maintenance.
• Utilisez l´instrument sans le forcer.
• Ne jetez pas la pile dans la poubelle.
Débarrassez-vous des piles vides
selon les rêglementations de
l´environnement.
• Vous pouvez nous retourner
l'instrument directement à la fin de sa
vie de service. Nous recyclons
l´instrument selon les règlements en
vigueur.
Garantie
2 ans
9
Page 10

TFX 422
10
Deutsch
1.2 Vorsichtsmaßnahmen
DasThermometer TFX422 muss vor folgenden Einflüssen geschützt werden:
l Statischer Elektrizität
l „Thermischer Schock“ verursacht
durch große oder plötzliche
Temperaturänderungen – Gerät vor
Gebrauch 30 Miuten lang stabilisieren lassen
l Gerät nicht auf oder in der Nähe von
heißen oder sehr kalten Objekten aufbewahren.
2 Lieferumfang
Überprüfen Sie den Inhalt der Verpackung
auf Vollständigkeit und Unversehrtheit.
Wenn Sie einen Schaden vorfinden oder
Grund zur Beanstandung haben, wenden
Sie sich bitte an:
ebro Electronic GmbH & Co. KG
Peringerstr. 10
85055 Ingolstadt
Tel.: (0841) 9 54 78–0
Fax: (0841) 9 54 78 80
E-mail: info@ebro.de
Internet: http://www.ebro.de
Teileliste:
Thermometer mit:
• Kalibrierzertifikat
• Bedienungsanleitung
• Zubehör siehe Anhang I
Optional:
• Eichschein
Page 11

English Français
1.2 Cautions
The thermometer TFX422 should be
protected from the following:
l Electro Static Discharge
l “Thermal shock”
caused by large or abrupt ambient
temperature changes — allow 30
minutes for unit to stabilize before
use when exposed to “thermal
shock”.
l Do not leave the unit on or near
objects of high temperature.
2 Extent of supply
Check contents of the packing for
completeness and integrity.
If you discover any damage or have any
reason for complaint, please contact your
distributor or:
ebro Electronic GmbH & Co. KG
Peringerstr. 10
85055 Ingolstadt
Tel.: (0841) 9 54 78–0
Fax: (0841) 9 54 78 80
E-mail: info@ebro.de
Internet: http://www.ebro.de
Parts list:
Thermometer with:
• Calibration certificate
• Instruction manual
• For accessories see appendix I
optionally:
• Certification of adjustment
1.2 Précautions
Le thermométre TFX422 doit être protégés contre :
l l’électricité statique
l Les chocs thermiques causés par
d’importants ou de brusques
changements de température laissez le thermomètre se stabiliser
pendant 30 minutes avant de
l’utiliser
l Ne laissez pas le thermomètre sur
ou à proximité d’objets à
température élevée.
2 Contenu de l’emballage
Veuillez vérifier que le contenu de
l’emballage est complet et intact.
Si vous constatez un dommage ou si
vous avez un motif de réclamation, adressez-vous à votre fournisseur ou à:
ebro Electronic GmbH & Co. KG
Peringerstr. 10
85055 Ingolstadt
Tel.: (0841) 9 54 78–0
Fax: (0841) 9 54 78 80
E-mail: info@ebro.de
Internet: http://www.ebro.de
Liste des pièces:
Thermomètre avec:
• Certificat de calibrage
• Mode d’emploi
• Accessoires voir annexe I
En option :
• Certificat d’étalonnage
11
Page 12

3
TFX 422
Deutsch
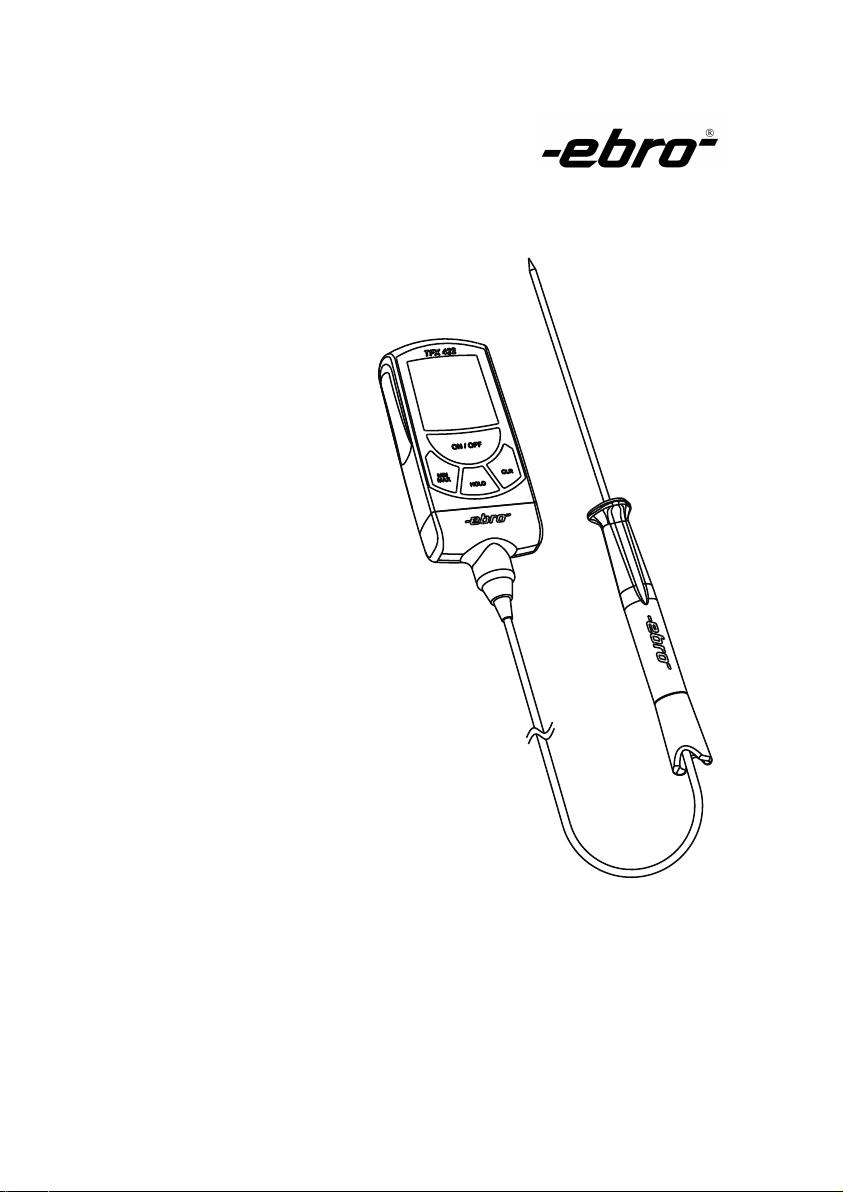
3 Beschreibung
3.1 Allgemein
Das Präzisions-Thermometer ist ein
handliches, wasserdichtes und mit einer austauschbaren Lithiumbatterie betriebenes Temperaturmessgerät für
vielfältige Mess- und Kontrollaufgaben
im Labor und in der Industrie.
Die Elektronik wird durch einen Mikroprozessor gesteuert. Dies garantiert eine
1
hohe Messgenauigkeit und Linearität
über den gesamten Messbereich.
2
Das geeichte Thermometer darf als amtliches Kontrollthermometer zur Überwa-
5
chung der Temperaturen von
4
tiefgefrorenen Lebensmitteln gemäß
Richtlinie 92/2/EWG verwendet werden.
6
12
TFX422:
1 ........... Display (LCD)
2 ........... Taste ON/OFF
3 ........... Taste MIN/MAX / User Menü
4 ........... Taste HOLD / User Menü
5 ........... Taste CLR / User Menü
7
6 ........... Eichzeichen
7 ........... Fühler
Page 13

English Français
3 Description
3.1 General
Powered by a replaceable lithium
battery, the precision thermometer is a
handy, watertight temperature
measurement device for a whole range
of measurement and control applications
in the laboratory and in industry.
A micro-processor controls the
electronics, guaranteeing maximum
measurement precision and linearity over
the entire measurement range.
The adjusted thermometer may be used
as official control thermometer for
controlling the temperatures of deep
frozen food in accordance with 92/2/EWG
directive.
TFX422:
1 ........... Display (LCD)
2 ........... Key ON/OFF
3 ........... Key MIN/MAX / User menu
4 ........... Key HOLD / User menu
5 ........... Key CLR / User menu
6 ........... Mark of adjustment
7 ........... Sensors
3 Description
3.1 Informations générales
Ce thermomètre de précision est un
instrument maniable et étanche alimenté
par une pile au lithium échangeable,
destiné à de multiples prises de
mesures et tâches de contrôle au
laboratoire et dans l’industrie.
L’électronique est commandée par un
microprocesseur. Ceci garantit des
valeurs exactes et linéaires sur toute la
plage de mesures.
Ce thermomètre étalonné peut être utilisé
comme thermomètre de con-trôle officiel
pour la surveillance de la température
des denrées alimentaires surgelées
conformément à la directive 92/2/CEE.
TFX422:
1 ........... Affichage (LCD)
2 ........... Touche ON/OFF
3 ........... Touche MIN/MAX / menu User
4 ........... Touche HOLD / menu User
5 ........... Touche CLR / menu User
6 ........... Symbole d’étalonnage
7 ........... Sonde
13
Page 14

TFX 422
Deutsch
3.2 User Menü
Um in den Konfigurationsmodus zu gelangen, ist folgende Prozedur durchzuführen:
1 Gerät ist ausgeschaltet.
2 ON/OFF-Taste (2) drücken und ge-
drückt halten. Der Segmenttest erscheint für etwa 1 Sekunde.
3 Sobald am Display der Gerätetyp
„TFX422“ angezeigt wird, muss die
ON/OFF-Taste (2) losgelassen wer-
den.
Danach die untere Taste solange ge-
drückt halten, bis am Display „USER“,
gefolgt von „MENU“, angezeigt wird.
Das Gerät befindet sich nun im User
Menü.
14
3.2.1 Einstellmöglichkeiten
UNIT: aktive Temperatureinheit,
umschaltbar von °C auf °F
SHDWN: automatische Abschaltung
nach 2 Std. Betriebsdauer
ON --> automatische Abschaltung
akiviert
OFF --> automatische Abschaltung
deakiviert
Page 15

English Français
3.2 User menu
Follow this procedure to enter
configuration mode:
1 Ensure device is switched off.
2 Press ON/OFF key (2) and keep
depressed. The segment test is
displayed for approx. 1 second.
3 Release the ON/OFF key (2) as soon
as device model „TFX422“ is
displayed.
Then keep the lower key depressed
until „USER“, followed by „MENU“ is
displayed.
Das Gerät befindet sich nun im User
Menü.
3.2.1 Configuration options
UNIT: active temperature unit,
switchable between °C and °F
3.2 Menu User
Effectuez la procédure suivante pour
parvenir au mode de configuration :
1 L’appareil est éteint.
2 Appuyez sur la touche ON/OFF (2) et
tenez-la pressée. Le test des
segments s’affiche environ 1 seconde.
3 Dés que le type de l’appareil
« TFX422 » s’affiche sur le display,
relâchez la touche ON/OFF (2).
Appuyez ensuite sur la touche inférieure et
tenez-la appuyée jusqu’à ce que « USER »
puis « MENU » s’affichent sur le display.
Das Gerät befindet sich nun im User
Menü.
3.2.1 Possibilités de réglage
UNIT: unité de température active,
commutable de °C en °F.
SHDWN: automatic switch-off after 2
hours operation.
ON --> automatic switch-off
activated
OFF --> automatic switch-off
deactivated
SHDWN: arrêt automatique après 2
heures de fonctionnement
ON --> arrêt automatique
activé
OFF --> arrêt automatique
désactivé
15
Page 16

TFX 422
Deutsch
RATE: Messtakt in Sekunden,
einstellbar von 1 Sekunde
bis 15 Sekunden. Der an
gezeigte Wert entspricht
dem eingestellten Messtakt in Sekunden.
Um die Batterielebensdauer zu verlängern, ist die automatische Abschaltung zu aktivieren. Wollen Sie
jedoch Langzeitmessungen mit dem
TFX 422 durchführen, ist die Abschaltung zu deaktivieren.
3.2.2 Menübedienung
- Mit der rechten Taste (5) kann der
jeweils nächste Menüpunkt angewählt werden.
- Mit der linken Taste (3) kann der
jeweils vorangehende Menüpunkt angewählt werden.
- Mit unteren Taste (4) wird die gewählte Menüoption ausgeführt
und gespeichert.
- Mit der ON/OFF-Taste (2) kann
das Menü verlassen werden.
Das Gerät schaltet sich ab.
16
Page 17

English Français
RATE: Measurement frequency in
seconds, adjustable from 1
second up to 15 seconds.
The value displayed
is the pre-set measurement
frequency in seconds.
Activate automatic switch-off to
extend battery life. Deactivate the
automatic switch-off if prolonged
measurements are required with the
model TFX 422.
3.2.2 Menu operation
- Select the next menu option with
the right key (5).
- Select the previous menu option
with the left key (3).
- Carry out and store the current
menu option with the down key
(4).
- Exit the menu with the ON/OFF
key (2). The device switches itself
off.
RATE: Fréquence de mesure en
secondes, réglable de 1 à
15 secondes. La valeur
affichée correspond à la
fréquence de mesure en
secondes programmée.
Pour prolonger la durée de vie des
piles, activez l’arrêt automatique. Si
en revanche vous désirez effectuer
des mesures sur de longues durées,
veuillez désactiver l’arrêt
automatique.
3.2.2 Utilisation du menu
- La touche droite (5) permet de
sélectionner le prochain point du
menu.
- La touche gauche (3) permet de
retrouver le point précédent du
menu.
- La touche inférieure (4) permet de
développer l’option sélectionnée du
menu, celle-ci sera également
mémorisée.
- La touche ON/OFF (2) permet de
quitter le menu. L’appareil
s’éteint automatiquement.
17
Page 18

TFX 422
Deutsch
4 Bedienung
2
3
4
5
6
1
4.1 Thermometer einschalten
Zum Einschalten des Thermometers
muss die Taste »ON/OFF« (2) etwa eine
Sekunde gedrückt werden.
Das Gerät führt zunächst einen Systemtest durch, wobei auch alle bei dem
Thermometertyp verwendeten Segmente
etwa 1 Sekunde lang in der Anzeige
sichtbar werden.
Danach wird der Messkanal getestet. In
der Anzeige lesen Sie »REF«.
Anschließend erscheint der erste Messwert in °C. Das Thermometer ist
messbereit.
Wird im Display eine Fehlermeldung
angezeigt, beachten Sie Kapitel 6
„Was tun, wenn...“.
4.2 Anzeige
Die notwendigen Informationen werden
auf einem LCD (Liquid Crystal Display)
angezeigt.
Die einzelnen Symbole haben die folgende Bedeutung:
1 = Anzeige für aktuelle Messwerte
2 = Batteriezustandsanzeige
3 = Trendanzeige positiv
4 = Minuszeichen (negativer Messwert)
5 = Trendanzeige negativ
6 = Anzeige für gespeicherte Messwerte
und Texte
18
Page 19

English Français
4 Operation
4.1 Switching on thermomether
To switch the thermometer on, keep key
»ON/OFF« (2) pressed for approx. 1
second.
The device performs a system test first,
displaying all segments used by this
thermometer model for approx. 1
second.
After this the measuring channel is
tested. The display shows “REF“.
Afterwards the first measured value will
appear in °C. The thermometer is ready.
If an error message is displayed,
please refer to chapter 6 „What do I
do if ...“.
4.2 Display
All necessary information is displayed on
an LCD (Liquid Crystal Display).
4 Utalisation
4.1 Allumer le thermomètre
Pour allumer le thermomètre, la touche
« ON/OFF » (2) doit être pressée pendant
environ une seconde.
L’appareil réalise en premier lieu un test
du système, pendant lequel tous les
segments employés selon le type de
thermomètre s’affichent pendant environ
1 seconde.
Ensuite, le canal de mesure est testé.
L’affichage indique « REF ».
Enfin s’affiche la première valeur mesurée en °C. Le thermomètre est prêt à
fonctionner.
Si un message d’erreur s’affiche,
veuillez vous reporter au chapitre 6,
«En cas de problèmes».
4.2 Affichage
Les informations utiles s’affichent sur le
LCD (Liquid Crystal Diyplay).
The individual symbols have the
following meanings:
1 = Display for current measured values
2 = Battery status indicator
3 = Trend display positive
4 = Minus sign (negative measured values)
5 = Trend display negative
6 = Stored measurement and text display
Les symboles ont la signification
suivante :
1 = Affichage des valeurs mesurées
actuelles
2 = Etat de charge de la pile
3 = Indicateur de tendance positif
4 = Signe moins (valeur mesurée
négative)
5 = Indicateur de tendance négatif
6 = Affichage des valeurs mesurées et
des textes mémorisés
19
Page 20

TFX 422
Deutsch
4.3 Temperatur messen
Legen Sie im UserMenü (Kapitel 3.2) die
von Ihnen benötigte Maßeinheit °C oder
°F fest.
Positionieren Sie den Messfühler.
Setzen Sie den Messfühler immer
bestimmungsgemäß ein. Nur so vermeiden Sie Fehlmessungen.
Warten Sie bis sich der Messwert stabilisiert hat. Als Trendanzeige erscheint ein
auf der Spitze stehendes Dreieck für
abnehmende (4) Temperaturen und ein
auf der Basis stehende Dreieck für zunehmende (3) Temperaturen.
Ist eine Stabilität des Messwertes erreicht, erlischt die Trendanzeige.
Ist die Messung beendet, schalten Sie
das Gerät mit »ON/OFF« aus.
20
Page 21

English Français
4.3 Measuring temperature
Select the required unit of measurement,
°C or °F, from the user menu (chapter 3.2).
Position the measuring sensor.
Use the measuring sensor only as
intended so as to eliminate erroneous
measurements.
Wait until the measured value has
stabilised. The trend display shows a
downward pointing triangle for
decreasing (4) temperatures and an
upward-pointing triangle for increasing (3)
temperatures.
The trend display disappears once the
measurement value becomes stable.
Switch the device off with »ON/OFF«
when measurements are complete.
4.3 Mesurer la température
Fixez dans le menu User (chapitre 3.2)
l’unité de mesure souhaitée (°C ou °F).
Mettez la sonde en position.
N’employez la sonde que conformément
aux usages prévus. Vous éviterez ainsi
tout risque de fausse mesure.
Attendez que la valeur mesurée soit
stabilisée. Les symboles suivants s’affichent
pour indiquer la tendance: un triangle avec
la pointe vers le bas pour les températures
décroissantes (4) et un triangle avec la pointe
vers le haut pour les températures
croissantes (3).
Quand la valeur mesurée se stabilise,
l’indicateur de la tendance s’éteint.
À la fin de la mesure, éteignez l’instrument
en appuyant sur «ON/OFF».
21
Page 22

TFX 422
Deutsch
4.4 Messwertspeicher
Der maximale und minimale Messwert werden während einer Messung
gespeichert. Löschen Sie den Inhalt
des Messwertspeichers vor einer neuen Messung.
4.4.1 Speicherinhalt abrufen
Drücken Sie zunächst die Taste »MIN/
MAX« (3) einmal. In der Anzeige erscheinen der Schriftzug „MIN“ und der
niedrigste Messwert der aktuellen Messung.
Drücken Sie die Taste »MIN/MAX« erneut.
Der Schriftzug „MAX“ und der größte
Messwert der aktuellen Messung werden
angezeigt.
Um wieder zur Temperaturmessung zurückzukehren, drücken Sie die Taste
»MIN/MAX« nochmals.
22
4.4.2 Momentanwert speichern
Drücken Sie die Taste »HOLD« (4).
Der Schriftzug „HOLD“ erscheint.
Der aktuelle Messwert wird nun gespeichert und solange angezeigt, bis Sie die
HOLD-Funktion durch erneutes Drücken
der Taste »HOLD« wieder ausschalten.
4.4.3 Messwertspeicher
löschen
Drücken Sie die Taste »CLR« (5). Der Inhalt des Speichers wird gelöscht.
Page 23

English Français
4.4 Measurement value
The maximum and minimum
measurement values are stored during
a measuring. Delete the content of the
measurement value memory before
starting a new measuring.
4.4.1 Retrieving memory contents
Press the »MIN/MAX« key once (3). „MIN“
is displayed along with the lowest
measurement of the current measuring.
Press the key »MIN/MAX« again. „MAX“
is displayed along with the largest
measurement value in the current
measuring.
Press »MIN/MAX« again to return to the
temperature measurement.
4.4.2 Storing current value
Press key »HOLD« (4). „HOLD“ is
displayed. The current measurement is
now stored. It is also displayed until the
HOLD function is deactivated by
repressing the »HOLD« key.
4.4.3 Deleting measurement
value memory
Press key »CLR« (5). The memory content
is deleted.
4.4 Mémoire des valeurs
mesurées
Pendant une mesure, les valeurs maximale et minimale sont mémorisées.
Effacez le contenu de la mémoire
avant de procéder à une nouvelle
mesure.
4.4.1
Appuyez d’abord une fois sur la touche
« MIN/MAX » (3). L’affichage indique
« MIN » et la valeur la plus basse
recueillie pendant la mesure en cours.
Appuyez une nouvelle fois sur la touche
« MIN/MAX ». L’affichage indique
« MAX » et la plus haute valeur recueillie
pendant la mesure en cours.
Pour revenir à la mesure de la
température, appuyez une nouvelle fois
sur la touche «MIN/MAX».
4.4.2 Mémoriser la valeur courante
Appuyez sur la touche « HOLD » (4).
L’indication « HOLD » s’affiche. La valeur
courante est alors mémorisée et reste
affichée jusqu’à ce que vous désactiviez
la fonction HOLD en appuyant de nouveau
sur la touche « HOLD ».
4.4.3 Effacer la mesure
Appuyez sur la touche « CLR » (5). Le
contenu de la mémoire est effacé.
Afficher le contenu de la mémoire
mémorisée
23
Page 24
TFX 422
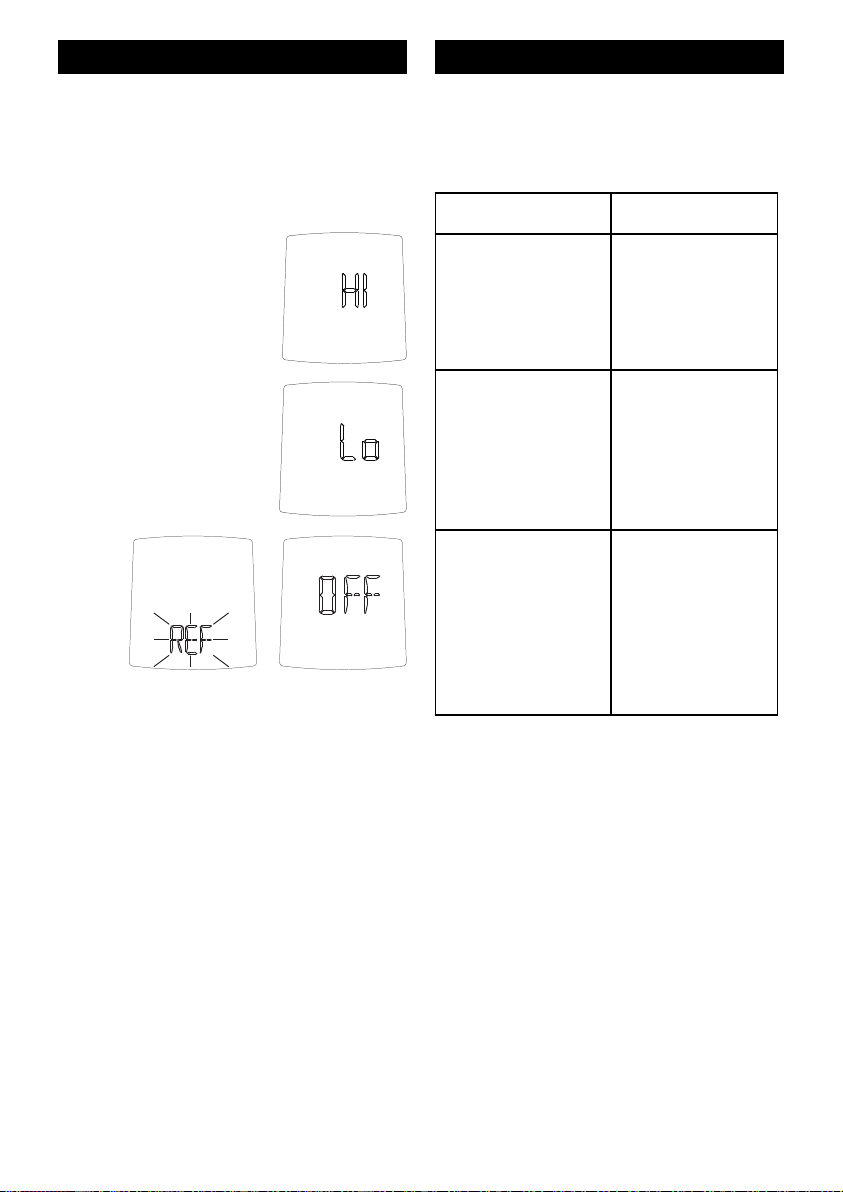
Mögliche Ursache Störung beheben
Messbereich
überschritten
Fühler defekt
Messbereich
beachten
Service anrufen
Messbereich
unterschritten
Kurzschluss des
Messfühlers
Messbereich
beachten
Service anrufen
REF blinkt 3x,
anschließend
deaktiviert sich
das Gerät
Referenzmessung
fehlgeschlagen,
Gerät zur
Reparatur
einsenden
Deutsch
5 Was tun wenn...
24
Page 25

English Français
Possible cause Remedy
Measuring range
exceeded
Probe defective
Consider
measuring range
Call service
Below
measuring range
Short circuit of
sensor
Consider
measuring range
Call service
REF blink 3 times,
afterwards the
device deactivate
itself
Reference
measurement
failued,
send in the
device for repair
Cause possible Remède
Plage de mesure
dépassée
Sonde
defecteus
Respectez la
plage de mesure
Appelez le SAV
Plage de mesure
non atteinte
Court-circuit de la
sonde
Respectez la
plage de mesure
Appelez le SAV
Clignotement de
référence 3 fois,
après le dispositif
se mettent hors
tension
La mesure de
référence failue,d
Introduisez le
appareil pour la
réparation.
5 Trouble shooting 5 En cas de problèmes
25
Page 26

TFX 422
Deutsch
6 Kalibrierservice
Um eine hohe Messgenauigkeit zu garantieren, muss das Thermometer jährlich kalibriert werden. Dazu bietet die
ebro Electronic GmbH & Co. KG einen
Kalibrierservice an.
• Füllen Sie die beiliegende Servicekarte aus.
• Nach einem Jahr rufen wir Ihr Thermometer zur Kalibrierung ab.
• Innerhalb einer Woche erhalten Sie
das Thermometer kalibriert zurück.
7 Wartung und Entsor-
gung
7.1 Reinigung
Reinigen Sie das Gerät mit einem feuchten Lappen. Verwenden Sie kein Lösungsmittel, z.B. Aceton, da dieses den
Kunstsstoff angreift.
Zum Desinfizieren können Sie
Isopropylalkohol verwenden.
26
7.2 Entsorgung
Sollte das Gerät gebrauchsuntauglich geworden sein, müssen sie es fachgerecht
entsorgen lassen.
Entsorgen Sie das Gerät keinesfalls über
den Hausmüll.
Entsorgen Sie die Batterie an den dafür
vorgesehen Sammelstellen.
Page 27

English Français
6 Calibration service
In order to guarantee a high measuring
precision, the thermometer must be
calibrated every year. Therefore ebro
Electronic GmbH & Co. KG offers a
calibration service.
• Fill in the enclosed service card.
• After one year we will recall your
thermometer for calibration.
• The calibrated thermometer will be
returned within one week.
7 Servicing and waste
disposal
7.1 Cleaning
Clean the device with a damp cloth. Do
not use any solvents such as Aceton as
they corrode the plastic.
Isopropyl alcohol may be used to
disinfect.
6 Service de calibrage
Pour garantir une bonne précision de la
mesure, le thermomètre doit être calibré
chaque année. Pour cela, ebro
Electronic GmbH & Co. KG vous
propose un service de calibrage.
• Remplissez la carte-service jointe.
• Au bout d’une année, nous rappelons votre thermomètre pour procéder à son calibrage.
• Nous vous retournons le thermomètre
calibré sous huit jours.
7 Entretien et mise au
rebut
7.1 Nettoyage
Essuyez l’appareil avec un tissu humide. N’utilisez aucun dissolvant, comme
par ex. l’acétone, car il attaque le
plastique.
Vous pouvez utiliser de l’alcool isopropyl
pour désinfecter.
7.2 Waste disposal
Should the device become unsuitable for
use, it must be disposed of
professionally, such as at recycling
centres that accept electronic scrap.
Never dispose of the device in household
waste.
Please dispose of spent batteries
responsibly.
7.2 Mise au rebut
Si l’appareil ne peut plus fonctionner,
pour quelque raison que ce soit, veuillez
le mettre au rebut de manière
appropriée.
Les déchetteries allemandes vous seront
ici d’une grande utilité car elles acceptent
tous les déchets électroniques.
Ne jetez en aucun cas l’appareil avec
vos déchets ménagers.
Veuillez se débarasser des batteries
épuisées de façon responsable.
27
Page 28

TFX 422
Deutsch
7.3 Batteriewechsel
Das Batteriesymbol im Display (in der
Abbildung auf Seite 18 die Nr. 2) zeigt
Ihnen an, dass die Batterie gewechselt
5
werden muss.
Batterie in Ordnung
Batterie in Ordnung
Batterie bald verbraucht
6
22
1
1
Um die Batterie wechseln zu können,
muss das Thermometer geöffnet werden.
Entfernen Sie zunächst mit einem spit-
Batteriewechsel notwendig
zen Werkzeug (Nadel, usw.) die beiden
Kunststoffstopfen (1).
Die beiden jetzt sichtbaren Kreuzschlitzschrauben (2) drehen Sie mit einem passenden Kreuzschlitz-Schraubendreher
7
(PZ 1) vollständig heraus.
Nehmen Sie jetzt das Thermometer am
4
Unterteil (6) in die eine Hand und entfernen Sie mit der anderen Hand das Ober-
3
teil (5). Ziehen Sie es nach oben ab.
Sie sehen jetzt auf der Platine (7) die
Batteriehalterung (3) mit der Batterie (4).
Ziehen Sie die verbrauchte Batterie in
Pfeilrichtung aus der Halterung.
Nehmen Sie die neue Batterie mit fett-
freien Fingern und schieben sie in die
Halterung. Dabei muss das Pluszeichen
auf der Batterie nach oben zeigen, also
sichtbar sein.
28
Page 29

English Français
7.3 Replacing the battery
The battery symbol on the display (Figure
2 on page 18) indicates that the battery
needs to be replaced.
Battery operational
Battery operational
Battery shortly exhausted
Battery needs to be replaced
The thermometer must be opened to
replace the battery.
Remove both plastic plugs (1) with a
sharp implement (needle, etc.).
Using a suitable cross-head screwdriver
(PZ 1), remove both the visible crosshead screws. (2)
Hold the bottom of the thermometer (6)
in one hand and remove the upper part
with the other hand (5). Pull it out
upwards.
You can now see the battery holder (3)
with battery (4) on the circuit board (7).
Pull the used battery out of the holder in
direction of arrow.
Ensuring fingers are free of grease, insert
the new battery into the holder. The
positive sign on the battery must be
pointing upwards, i.e. visible.
7.3 Changement de la pille
Quand le symbole de la pile s’affiche
sur le display (n°2 sur l’illustration page
18), vous devez remplacer la pile.
Pile chargée
Pile chargée
Pile sous peu épuisé
Changement de pile nécessaire
Pour procéder au remplacement de la
pile, le thermomètre doit être ouvert.
Eloignez tout d’abord les deux bouchons
en plastique (1) à l’aide d’un instrument
pointu (aiguille, etc).
Dévissez ensuite entièrement les deux
vis cruciformes (PZ 1) visibles (2) avec
un tournevis adéquat.
Tenez alors la partie inférieure du
thermomètre (6) dans une main et
éloignez avec l’autre main la partie
supérieure (5). Tirez-la vers le haut.
Vous voyez maintenant le support de la
pile (3) avec la pile (4) sur la platine (7).
Eloignez la pile usagée du support en
suivant la direction indiquée par la flèche.
Prenez la nouvelle pile avec des mains
propres et sèches et insérez-la dans le
support. Le signe plus de la pile doit
indiquer le haut, et donc être visible.
29
Page 30

TFX 422
Deutsch
Bauen Sie das Thermometer in umgekehrter Reihenfolge wieder zusammen und
achten Sie auf das richtige Anzugsmoment von 0,4 Nm.
Achten Sie darauf, dass die Dichtung
zwischen Gehäuseunterteil und -oberteil
richtig in der Nut liegt. Nur dann kann
die Wasserdichtigkeit erreicht werden.
Vergessen Sie nicht, zum Schluß die
beiden Kunststoffstopfen wieder in die
dafür vorgesehenen Bohrungen zu stecken (die leicht abgeschrägte Fläche
nach aussen).
Bitte vermeiden Sie elektrostatische
Entladungen während des Batteriewechsels!
30
Page 31

English Français
Reassemble the thermometer in reverse
order, noting the correct tightening torque
of 0.4 Nm.
To ensure device is fully water-tightness,
make sure the seal between lower and
upper housing is seated correctly in the
groove.
Finally, do not forget to insert both plastic
plugs back into their drill-holes (slightly
chamfered surfaces outward).
Please avoid any electrostatic
discharging during the battery
replacement process.
Remontez le thermomètre en suivant les
instructions dans l’ordre inversé et ne
dépassez pas le couple de serrage de
0,4 Nm.
Prenez garde que le joint d’étanchéité
repose bien dans la rainure entre les
parties supérieure et inférieure du boîtier.
C’est la condition sine qua non pour
garantir l’étanchéité.
N’oubliez pas de réinsérer les deux
bouchons de plastique dans les
perforations prévues à cet effet (la partie
légèrement biseautée vers le haut).
Evitez toute décharge électrostatique
pendant le changement de la pile !
31
Page 32

TFX 422
Deutsch
8 Eichung
Das Thermometer TFX 422 ist von der
Physikalisch-Technischen Bundesanstalt
Berlin zur Eichung zugelassen.
Die Eichung können Sie bei jeder Landeseichbehörde beantragen.
Die Eichung ist zwei Jahre gültig und wird
Ihnen mit dem Eichschein und dem Eichzeichen auf dem Thermometer bestätigt.
Hinweis:
Die Eichung ist nur für die Temperatureinheit „°C“ gültig!
9 Anhang
I Zubehör
32
Folgendes Zubehör ist auf Anfrage erhältlich:
Beschreibung Bezeichnung
Kunstlederetui, lang AG120
Koffer AG130
Schutzhülle AG140
Kunststoffhalterung AG150
Edelstahlhalterung AG160
Page 33

English Français
8 Adjustment
The thermometer TFX 422 is accredited
for adjustment from the Physical and
Technical Federal Office in Berlin.
You can file an application for adjustment
in every Landeseichbehörde (State
Calibration Office).
The adjustment is validated for two years
and is approved with the adjustment
certification and adjustment mark on the
thermometer.
Note:
The adjustment is only valid for
temperature unit „°C“.
9 Appendix
I Accessories
The following Accessories are available
on request:
8 Étalonnage
Le thermomètre TFX 422 est homologué
pour l’étalonnage par l’Office technique
fédéral de physique de Berlin.
Vous pouvez demander cette homologation auprès de toutes les autorités
nationales d’étalonnage.
L’étalonnage est valable deux ans et
vous est attesté par le certificat
d’étalonnage et le marquage sur le
thermomètre.
Indication:
L'étalonage est seulement valide pour
l'unité „°C“ de la température.
9 Annexe
I Accessoires
Accessoires demande en différentes
versions:
Description Identifier
Artificial leather case, long AG120
Portable case AG130
Protective casing AG140
Synthetic material mount AG150
Logger holder, stainless steel AG160
Description Dénomination
Étui en similicuir, long AG120
Coffret AG130
Enveloppe de protection AG140
Support plastique AG150
Support acier inox AG160
33
Page 34

TFX 422
Deutsch
II Technische Daten
Messbereich .................. -50 bis +200 °C
(-58 bis +392 °F)
Messfühler .................... Pt 1000
Messprinzip .................. 2-Leiter-Technik
Betriebstemperatur ....... -25 bis +50 °C
(-13 bis +122 °F)
Lagertemperatur ........... -30 bis +70 °C
(-22 bis +158 °F)
Auflösung ..................... 0,1 °C / 0,2 °F
Messgenauigkeit ...........±0,3 °C (±0,5°F)
Messintervall .................1 - 15 Sekunden
Eichfehlergrenzen ......... ±0,5 °C
Kabellänge .................... 600 mm
Messfühler:
Länge ......................... 120 mm
Eintauchtiefe .............. min. 25 mm
Thermische Zeitkonstante T
bewegtes Wasser ....... ca. 8 s
Anzeigetest ................... REF
Batterie ......................... Lithium-Knopf-
Batterielebensdauer ...... bis 5 Jahre
Abschaltung ................. automatisch nach
Abmessungen (LxBxH) . 109 x 54 x 22 mm
Gehäusematerial ........... ABS
Schutzklasse ................ IP 67
Gewicht......................... ca. 90 g
99
zelle 3 V / 1 Ah, Typ
CR 2477
2 Std
34
Technische Änderungen vorbehalten
Page 35

English Français
II Technical data
Measuring range ........... -50 to +200 °C
(-58 to +392 °F)
Sensor ........................... Pt 1000
Measuring principle ...... 2 wire technology
Operating temperature . -25 to +50 °C
(-13 to +122 °F)
Storage temperature ..... -30 to +70 °C
(-22 to +158 °F)
Resolution .................... 0.1 °C / 0.2 °F
Measuring precision ..... ±0,3 °C (±0,5°F)
Measuring interval ........ 1 to 15 s
Limitsof
adjustment fault ............ ± 0.5 °C
Length of cable ............. 600 mm
Sensor:
Length ........................ 120 mm
Depth of submerging ... at least25 mm
Thermal time constant T
moved water............... approx. 8 s
Display test ................... REF
Battery .......................... Lithium coin cell
Life time of battery ....... 5 years
Power off ......................automatically after
Dimensions (LxWxH) .... 109 x 54 x 22 mm
Housing material .......... ABS
Safety class................... IP 67
Weight ........................... approx. 90 g
:
99
3 V / 1Ah, type CR
2477
2 hours
II Caractéristiques techniques
Plage de mesures .......... de -50°C à +200°C
(de -58°F à +392°F)
Capteur ......................... Pt 1000
Principe de mesure ........ 2 conducteurs
Température
de service .................... de -25°C à +50°C
(de -13°F à +122°F)
de stockage ................. de -30°C à +70°C
(de -22°F à +158°F)
Résolution ..................... 0,1°C / 0,2°F
Exactitude ...................... ±0,3 °C (±0,5°F)
Intervalle de mesure ....... 1 à 15 s
Limitesd ’erreur
d étalonnage ................ ± 0,5 °C
Longueur de câble .......600 mm
Sonde :
Longueur ..................120 mm
Profondeur d’immersion min 25 mm
Temps de réponse T
Eau en mouvement ...8 s env.
Test d’affichage ........... REF
Pile ................................ Lithium
Durée de vie de la pile .... 5 ans
Extinction ...................... automatique après 2
Dimensions (Lxlxh) ......... 109 x 54 x 22 mm
Boîtier ............................ABS
Indice de protection ....... IP 67
Masse ............................ 90 g env.
99
3 V / 1 Ah, type CR
2477
heures
Subject to technical change
Sous réserve de modifications techniques
35
Page 36

Konformitätserklärung
Conformity declaration
Déclaration de conformité
ebro Electronic GmbH & Co. KG
Peringerstraße 10
D-85055 Ingolstadt
erklärt in alleiniger Verantwortung, dass das Produkt
declares in sole responsibility that the product
déclare sous sa seule responsabilité que le produit
Geräteart:
Type of device:
Type d‘appareil:
Richtlinie:
Guideline:
Directive:
Thermometer
Thermometer
Thermomètre
Typ:
Type:
Modèle:
TFX 422
auf das sich diese Erklärung bezieht, mit der folgenden Richtlinie
übereinstimmt:
to which this declaration refers, complies with the following
guideline:
auquel cette déclaration se réfère, est conforme aux directive
EMV-Richtlinie 2004/108/EG
EMC-Guiedeline 2004/108/EG
CEM-Directive 2004/108/EG
Prüfstellen:
Inspected by:
Organisme de
contrôle:
SCHWILLE Elektronik
Produktions- u. Vertriebs GmbH
Benzstrasse 1A
85551 Kirchheim
®
Ingolstadt, 26.07.2005
Wolfgang Klün
Geschäftsführer
Managing director
Directeur gérant
 Loading...