


 Loading...
Xerox WORKCENTRE 275, WORKCENTRE PRO 245, WORKCENTRE 265, WORKCENTRE 255, WORKCENTRE 245 Manual
...
Version 3.0 09/11
Xerox® Smart Card
Installation Guide
Xerox® WorkCentre and
WorkCentre Pro232/238/245/255/265/275
©2011 Xerox Corporation. All Rights Reserved. Unpublished rights reserved under the copyright laws of the United States. Contents of this publication may not be reproduced in any form without permission of Xerox Corporation.
XEROX® and XEROX and Design® are trademarks of Xerox Corporation in the United States and/or other countries.
Changes are periodically made to this document. Changes, technical inaccuracies, and typographic errors will be corrected in subsequent editions.
Document version 3.0: September 2011
Table of Contents
1Introduction
Compatibility . . . . . . . . . . . . . . . . . . . . . . . . . . . . . . . . . . . . . . . . . . . . . . . . . . . . . . . . . . . . . . . . . . . . . . . . . . . . .6
Supported Card Types . . . . . . . . . . . . . . . . . . . . . . . . . . . . . . . . . . . . . . . . . . . . . . . . . . . . . . . . . . . . . . . . . . . . . 7
Supported Card Readers . . . . . . . . . . . . . . . . . . . . . . . . . . . . . . . . . . . . . . . . . . . . . . . . . . . . . . . . . . . . . . . . . . . 7
Documentation and Support . . . . . . . . . . . . . . . . . . . . . . . . . . . . . . . . . . . . . . . . . . . . . . . . . . . . . . . . . . . . . . . 8
2Preparation
Server Specifications . . . . . . . . . . . . . . . . . . . . . . . . . . . . . . . . . . . . . . . . . . . . . . . . . . . . . . . . . . . . . . . . . . . . 10
Electrical Requirements . . . . . . . . . . . . . . . . . . . . . . . . . . . . . . . . . . . . . . . . . . . . . . . . . . . . . . . . . . . . . . . . . . 10
3Installation
Software Installation . . . . . . . . . . . . . . . . . . . . . . . . . . . . . . . . . . . . . . . . . . . . . . . . . . . . . . . . . . . . . . . . . . . . 12
Configuring the Smart Card . . . . . . . . . . . . . . . . . . . . . . . . . . . . . . . . . . . . . . . . . . . . . . . . . . . . . . . . . . . . . . 16
Hardware Installation . . . . . . . . . . . . . . . . . . . . . . . . . . . . . . . . . . . . . . . . . . . . . . . . . . . . . . . . . . . . . . . . . . . 25
Using Smart Card . . . . . . . . . . . . . . . . . . . . . . . . . . . . . . . . . . . . . . . . . . . . . . . . . . . . . . . . . . . . . . . . . . . . . . . 33
4Troubleshooting
Fault Clearance . . . . . . . . . . . . . . . . . . . . . . . . . . . . . . . . . . . . . . . . . . . . . . . . . . . . . . . . . . . . . . . . . . . . . . . . . 36
Locating the Serial Number . . . . . . . . . . . . . . . . . . . . . . . . . . . . . . . . . . . . . . . . . . . . . . . . . . . . . . . . . . 36
Troubleshooting Tips . . . . . . . . . . . . . . . . . . . . . . . . . . . . . . . . . . . . . . . . . . . . . . . . . . . . . . . . . . . . . . . . 37
A Retrieving the Certificate from a Domain Controller or OCSP Server B Determining the Domain in which your Card is Registered
CDownloading the Xerox WorkCentre Software
Xerox® Smart Card |
3 |
Installation Guide |
|
4Xerox® Smart Card Installation Guide
Introduction |
1 |
The Xerox Smart Card solution brings an advanced level of security to sensitive information. Organizations can restrict access to the walk-up features of a Xerox device. This ensures only authorized users are able to copy, scan, email and fax information.
The key benefit of this solution is its two-factor identification requirement. Users must insert their access card and enter a unique Personal Identification Number (PIN) at the device. This provides added security in the event that a card is lost or stolen.
Once validated, a user is logged into the Xerox device for all walk-up features. The system allows for functions to be tracked for an added layer of security.
The Xerox Smart Card enablement kit integrates with Xerox multifunction printers and existing smart and personal identity verification cards and readers.
This guide explains how to install and configure the Smart Card solution. It identifies the resources and equipment required to complete a successful installation.
Should you require any further information, please contact your Local Xerox Representative.
Xerox® Smart Card |
5 |
Installation Guide |
|
Introduction
Compatibility
This solution is compatible with the following Xerox WorkCentre and WorkCentre Pro 232/238/245/255/265/275 configurations:
Configuration |
Software Level |
|
|
WorkCentre Basic Multifunction |
12.xx.xxx.xxx |
|
|
WorkCentre Pro Advanced Multifunction |
13.xx.xxx.xxx |
|
|
WorkCentre Basic Multifunction with PostScript |
14.xx.xxx.xxx |
|
|
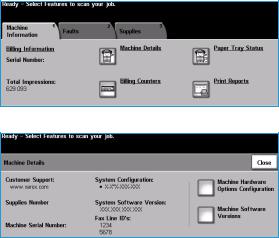
To identify the software level on your machine, perform the following steps:
1.Press the  button on the control panel.
2.Select Machine Details.
The System Software Version number displays.
6Xerox® Smart Card Installation Guide
Introduction
Supported Card Types
The customer is responsible for purchasing and configuring the access cards. The following card types are recommended:
•Gemalto TOP DL GX4 144K V2.6.2b Applets
•Oberthur ID-One Cosmo v5.2 128K V2.6.2 Applets
•Oberthur ID-One Cosmo v5.2 72K V2.6.1 Applets
•Oberthur ID-One Cosmo v5.2D 72K V2.6.1 Applets
•Oberthur ID-One Cosmo v5.2 72K V2.6.2 Applets
•Gemalto GemCombiXpresso R4 dual interface 72K V2.6.2 Applets
•Axalto Access 64KV1
•Axalto Access 64KV1
•Gemplus GXP3 64V2N V2.6.1 Applets
•Gemalto Cyberflex Access V2C 64K V2.6.1 Applets
•Oberthur ID-One Cosmo V5.2D 64K
•Oberthur OCS Galactic V1 32K V1 Applets
•Oberthur Cosmo V4 32K V1 Applets
•Schlumberger / Axalto Cyberflex V2 32K V1 Applets
Other card types may function with the solution, but have not been validated.
Supported Card Readers
The customer is responsible for providing a card reader for each Xerox WorkCentre device. The following card readers are compatible with the solution:
•Gemplus GemPC USB SL
•Gemplus GEMPC Twin
•SCM Micro SCR3310
•SCM Micro SCR3311
•OmniKey Cardman 3021 USB
•OmniKey Cardman 3121 USB
•ActivCard USB Reader V2 with SCR-331 firmware
Other CCID compliant readers may function with the solution, but have not been validated.
Additional information from your System Administrator may be required to validate which card reader works best in your environment.
Xerox® Smart Card |
7 |
Installation Guide |
|
Introduction
Documentation and Support
The following information resources are also available:
•System Administration CD (CD1)
Contained in the CD Pack delivered with your machine, the System Administration CD (CD1) offers detailed information on configuring your machine for network printing and instructions on installing any of the optional features.
The System Administration CD (CD1) is intended for System/Machine Administrators.
•Training and Information CD (CD2)
For detailed information on any of the features or functions available on your machine, please refer to the Training and Information CD (CD2), contained in the CD Pack delivered with your machine.
•Utilities CD (CD3)
Contained in the CD Pack, the Utilities CD (CD3) contains a utility for upgrading to new versions of software on the machine.
•Xerox Welcome Center
For further information or advice, contact the Xerox Welcome Center.
8Xerox® Smart Card Installation Guide
Preparation |
2 |
This section explains the preparation and resources required to install the Smart Card.
The installation will take approximately one hour for each device. The following items are required in order to complete the installation:
|
Item |
Supplier |
|
|
|
Compatible Card Reader (refer to Supported Card Types on |
Customer |
|
page 7) |
|
|
|
|
|
Compatible Access Card (refer to Supported Card Readers on |
Customer |
|
page 7) |
|
|
|
|
|
Smart Card Enablement Kit 498K17541 |
Xerox |
|
|
|
|
WorkCentre Software Upgrade Files |
Xerox / Customer |
|
(refer to Downloading the Xerox WorkCentre Software on page 47 |
|
|
for download instructions) |
|
|
|
|
|
TCP/IP enabled on the WorkCentre |
Customer |
|
|
|
|
DNS Host name or static IP address assigned |
Customer |
|
|
|
|
Network Settings to be checked to ensure network is fully |
Customer |
|
functional |
|
|
|
|
|
Domain Controller (DC) information: |
Customer |
|
• Domain Controller authentication environment |
|
|
• lP address or Host Name |
|
|
• |
Domain information |
|
• Domain Controller Root and Intermediate certificates |
|
|
• Check that all certificates are in 64 bit X.509 format |
|
|
• Determine if the DC is registered with the OCSP at this site |
|
|
|
|
|
OCSP Server Information: |
Customer |
|
• |
OCSP Server URL |
|
• OCSP - Root and Intermediate Certificates |
|
|
• Check that all certificates are in 64 bit X.509 format |
|
|
|
|
|
Proxy Server configuration details |
Customer |
|
|
|
|
To set up the Domain Controller (DC) validation, you will need to determine if your site validates the DC against the OCSP server. Many sites use OCSP to validate individuals, but do not register the DC with it. If you set up the Xerox WorkCentre device to validate the DC and it isn't registered, the procedure will fail.
Xerox® Smart Card |
9 |
Installation Guide |
|
Preparation
If your site does register the DC with OCSP, you will need to decide whether:
•to validate the DC against OCSP before validation of the user, or
•to validate the DC after validation of the user
The first method requires installation of the DC certificate as part of this procedure and is the more accepted method for validation. The second method retrieves the DC certificate automatically for each authentication and doesn't require installation of the DC certificate onto the Xerox WorkCentre device.
An additional option is to combine the first and second options and compare the retrieved DC certificate to the one stored at installation. This provides the most security as it prevents rogue DCs masquerading as the real DC.
Note: Certificates are often obtained from the Information Technology professionals that support your organization. If you are unable to obtain the required certificates, refer to the process outlined in Appendix A. You can determine the domain that you are registered in using the process outlined in Appendix B.
Server Specifications
Prior to installation, ensure your network infrastructure supports Smart Card or Personal Identification Verification (PIV).
Names or IP addresses of all servers and domains are required during setup.
Electrical Requirements
The USB port on the back of the Xerox WorkCentre network controller provides the power required for any of the supported card readers.
10Xerox® Smart Card Installation Guide
Installation |
3 |
This section provides instructions for installing and configuring the Smart Card solution.
There are 4 main installation procedures to follow in sequence.
•Software Installation:
Upgrading the Xerox WorkCentre software to enable the Smart Card to be configured.
•Configuring Smart Card:
Enabling the Smart Card function and customizing the settings.
•Hardware Installation:
Unpacking the Smart Card enablement kit and installing the card reader device.
•Using the Smart Card:
Instructions on how to use the card reader device to access the Xerox WorkCentre functions.
Xerox® Smart Card |
11 |
Installation Guide |
|
Installation
Software Installation
Ensure you have downloaded the Xerox WorkCentre software required prior to performing these instructions. For further information, refer to Downloading the Xerox WorkCentre Software on page 47.
If your policy is to use a Proxy Server to reach external addresses, ensure the proxy is turned off at your browser before beginning the software install process. You also have the option of sending the Xerox WorkCentre to the list of exceptions that do not use the Proxy Server.
Follow the instructions below to install the Xerox WorkCentre software.
Note: Some of the steps shown may require the System Administration password for the Xerox WorkCentre to be entered.
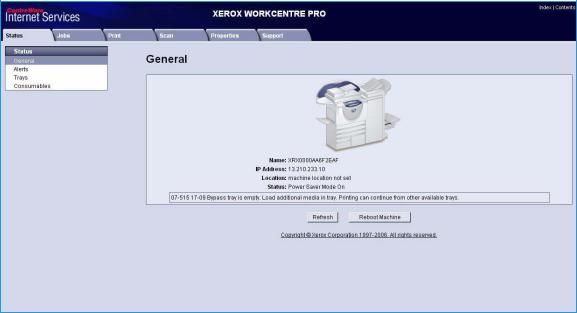
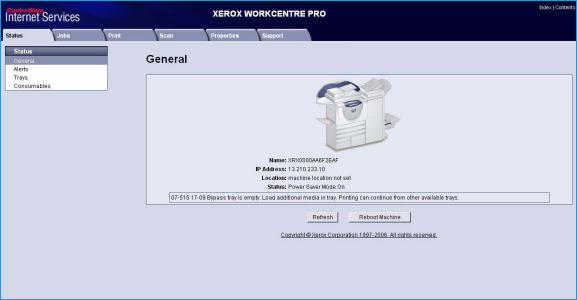
1.Access CentreWare Internet Services
a.At the workstation open your web browser.
b.In the URL field, enter http:// followed by the IP Address of the device. For example: If the IP Address is 192.168.100.100, enter the following into the URL field: http://192.168.100.100.
c.Press the Enter key on your workstation keyboard.
The default Status window displays.
12Xerox® Smart Card Installation Guide
Installation
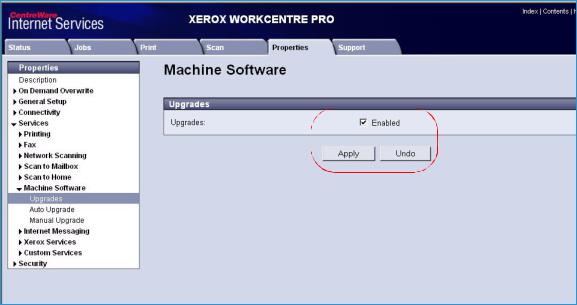
2.Enable software upgrades
a.To ensure software Upgrades is enabled, select Properties. A pop-up window prompts for administrator log on.
b.Enter User name and Password and select OK.
c.Once authenticated, select Services.
d.Select Machine Software then Upgrades.
e.Ensure the Enabled box is checked, then select Apply.
Xerox® Smart Card |
13 |
Installation Guide |
|
Installation
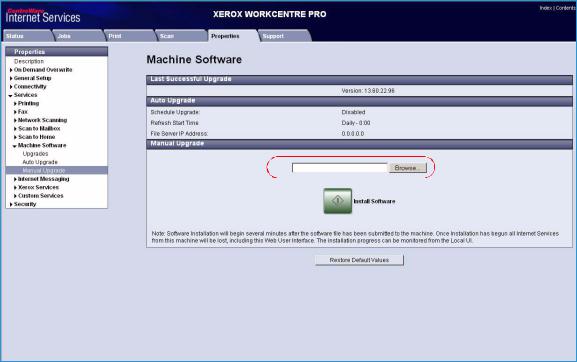
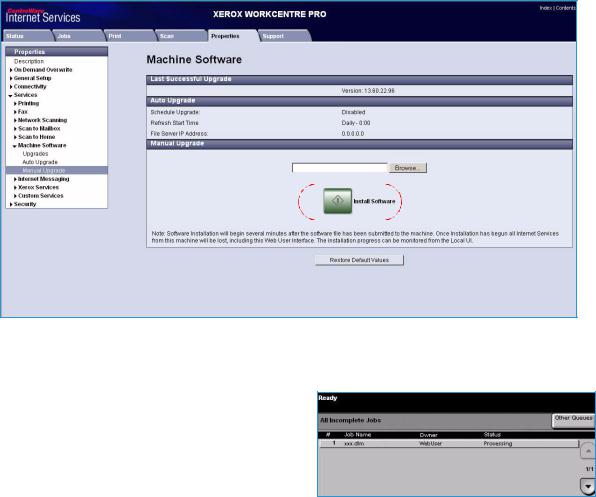
3.Locate the software
a.To locate the software file for uploading, select Properties then Services.
b.Select Machine Software then Manual Upgrade.
c.Browse to the location of the software which was downloaded from the Xerox website and select the file.
The path to the software file displays in the browse window.
14Xerox® Smart Card Installation Guide
Installation
4.Install the software on the Xerox WorkCentre a. Select Install Software.
The software file is uploaded and takes approximately 10 minutes.
Once the software file has been uploaded a pop-up window displays File has been Submitted.
The status of the upgrade is shown at the Xerox WorkCentre and the CentreWare Internet Services interface is no longer accessible.
b.Close the browser.
5.Check the upgrade status
a.At the Xerox WorkCentre local user interface, the xxx.dlm job appears and starts processing. The software upgrade begins.
b.Once the software has been upgraded, the Xerox WorkCentre reboots automatically.
Note: The system may reboot more than once, depending on the software level of the machine before the upgrade.
c.Once the installation is complete, the Xerox WorkCentre prints a Software Upgrade Report to indicate a successful upgrade.
d.A Configuration Report is also printed which shows the new software level.
Note: These reports only print if the Printing Configuration Reports setting has been enabled.
The Smart Card settings are now ready for configuring using the CentreWare Internet Services interface.
Xerox® Smart Card |
15 |
Installation Guide |
|
Installation
Configuring the Smart Card
Once the Xerox WorkCentre has received the software upgrade, the Smart Card can be configured and enabled using CentreWare Internet Services.
Follow the instructions below to enable and configure the Smart Card:
1.Access CentreWare Internet Services
a.At the workstation open your web browser.
b.In the URL field, enter http:// followed by the IP Address of the device. For example: If the IP Address is 192.168.100.100, enter the following into the URL field: http://192.168.100.100.
c.Press the Enter key on your workstation keyboard.
The default Status window displays.
16Xerox® Smart Card Installation Guide
Loading...