

WolfVision VZ-C6, VZ-C3D Installation Manual
Check out our Internet Homepage for additional information
www.wolfvision.com/support
INSTALLATION MANUAL
MONTAGEANLEITUNG
INSTALLATION MANUAL
MONTAGEANLEITUNG
ENGLISH / DEUTSCH
VZ-C6
VZ-C6
R
Precautions
ENGLISH
Please observe the following:
Risk of electric shock
Dangerous voltage inside
WARNING!
CAUTION! INSTALLATION AND SERVICING OF THE VISUALIZER MUST BE PERFORMED BY
QUALIFIED SERVICE/INSTALLATION PERSONNEL FOLLOWING THE MANUFACTURER'S
INSTALLATION INSTRUCTIONS AND IN COMPLIANCE WITH THE NATIONAL ELECTRIC CODE,
ALL LOCAL BUILDING AND SAFETY CODES AND ALL OTHER APPLICABLE CODE PROVISIONS
OR REGULATIONS.
USE THIS UNIT ONLY WITH THE CORRECT VOLTAGE AS SHOWN ON THE TYPE LABEL !
DO NOT EXPOSE THE UNIT TO HEAT OR MOISTURE !
PROTECT THE UNIT FROM EXCESSIVE SHOCKS !
USE SECURITY ROPE TO PREVENT IT FROM FALLING DOWN !
Make sure that sufficient air circulation for cooling the unit is possible (ventilation slots on top of
the unit)!
If there is any abnormality (abnormal noise, smell, smoke etc.) disconnect the unit from mains
immediately and contact your Visualizer dealer!
Do not use a damaged power cord. This may cause short circuits or electrical shocks!
To prevent danger, do not modify the unit or operate without the cover panel firmly in place!
Do not expose the unit to water, metallic objects or any flammable material.
Avoid installing the unit in locations exposed to strong magnetic fields or electrical currents.
Avoid installing the unit in environments where there is radiation. This could cause monitor image
distortion or damage to the camera sensor.
Do not pull the plug from the power socket with wet hands!
If the unit is not used for a long time, disconnect it from mains!
1
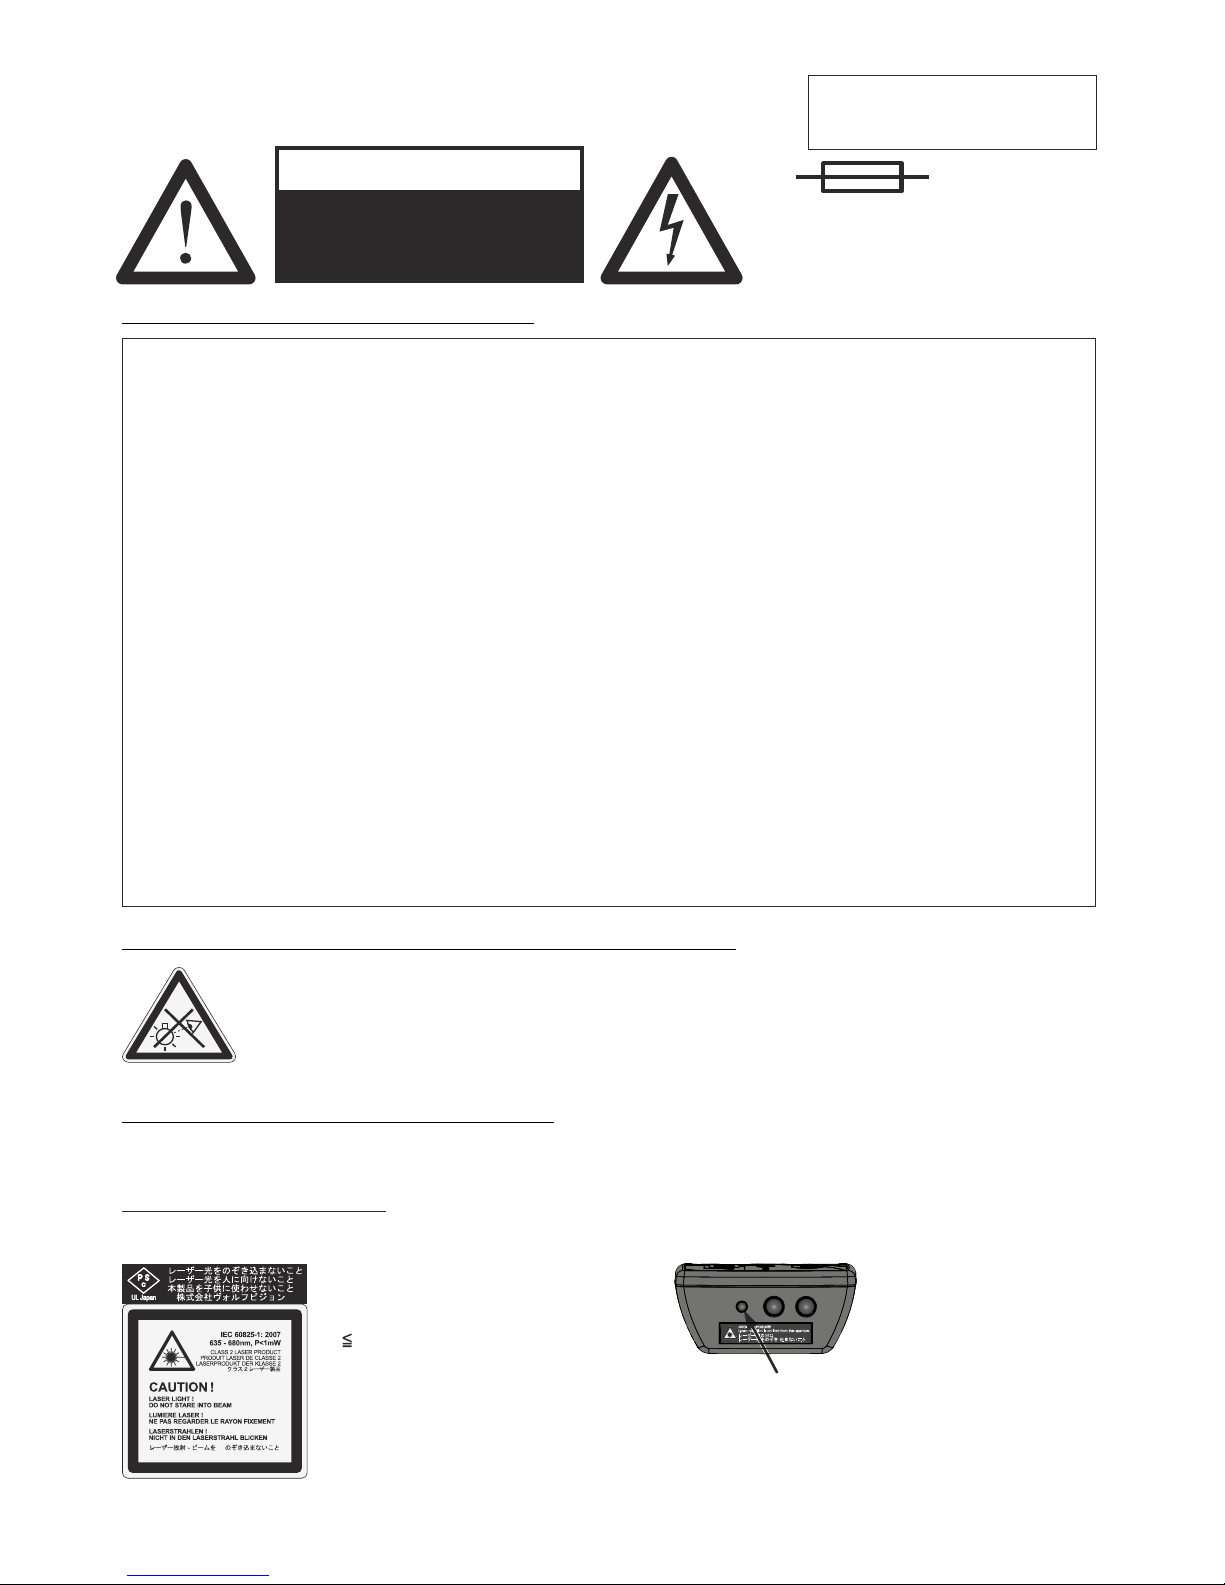
Precautions for the laser pointer:
Laser light - Do not stare into beam!
Do not modify the laser! Do not view the laser beam with optical instruments!
Information for laser pointer
FDA accession number: 9912688-00
This device complies with 21 CFR 1040.10 and 1040.11
The laser beam exits the
remote control through the
smaller (left) opening on
the front.
Technical data:
λ = 635 - 680nm
P< 1mW
Θ 2mrad
This label will be found on the
underneath of the remote
control.
Precautions for LED light according EN62471:
LED lighting system - Do not stare into beam!
Do not modify the LED lighting system!
Do not view the light beam with optical instruments!
Ne pas regarder dans l'objectif lorsque le visualiseur est en marche!
N
CAUTION
Double pole / neutral fusing.
ATTENTION
Double pôle / fible sur le neutre
2
EU 0 362 737 KR 128059 AU 765617
DE P58907684.1-08 US 5,027,219 CN ZL99118847.0
CN 89107780.4 EU 0 987 874 and others
JP 1725033 JP 3 544 900
FCC information:
This device complies with part 15 of the FCC rules. Operation is subject to the following two conditions: (1)
this device may not cause harmful interference, and (2) this device must accept any interference received,
including interference that may cause undesired operation.
Note:
This equipment has been tested and found to comply with the limits for a class A digital device, pursuant to
part 15 of the FCC rules. Operation of these equipment in a residential area is likely to cause harmful
interference in which case the user will be required to correct the interference at his own expense.
Information to user:
The user manual or instruction manual for an intentional or unintentional radiator shall caution the user that
changes or modifications not expressly approved by the party responsible for compliance could void the
user's authority to operate the equipment.
This product is built according to Directive EMC and to Directive electrical equipment.
Inspections, tests and evaluation are according to UL 60950. CSA 22.22-60950
Inspections, tests and evaluation are according to the CB-Scheme
Inspections, tests and evaluation are according to the PCT-Scheme
Marks on the unit:
Approval
Worldwide Patents
Copyright Information
Copyright © by WolfVision. All rights reserved.
WolfVision, Wofu Vision and are registered trademarks of WolfVision Holding AG, Austria.
No part of this document may be copied, reproduced, or transmitted by any means, without prior written
permission from WolfVision. Except documentation kept by the purchaser for backup purposes.
In the interest of continuing product improvement, WolfVision reserves the right to change product
specifications without notice.
Information in this document may change without notice.
Disclaimer: WolfVision shall not be liable for technical or editorial errors or omissions.
The units are "MADE IN EU/AUSTRIA”
Printed in Austria, October 2015
Tested to comply
with FCC standards
Warning!
This is a class A device. Operation of these equipment in a residential area is likely to cause harmful
interference in which case the user will be required to correct the interference at his own expense.
This symbol marks safety instruction procedures where a High Risk of Personal Injury is
present. Be sure to read all directions very carefully and exercise extreme caution! Also be sure
to follow proper health and safety rules in accordance with applicable local and federal laws.
This symbol marks instructions that require special attention in order to avoid possible
Equipment Damage.
The Ceiling Visualizer is built with state-of-the-art technology and is safety engineered. Regardless of this,
operational risks may be present if proper safety procedures are not obeyed.
It is essential that all safety and instruction procedures are read and followed accordingly!
- Store all operation manuals in an easily accessible area !
- The unit must be installed or repaired by authorized and certified personnel only !
- Always follow safety and operational procedures when working with the unit !
- Respect all warning and operation signs !
- Security features must not be disabled or removed !
1.) Inspect the unit for any transport damage. In the event that damage is found, call your
WolfVision dealer immediately and do not attempt installation of the Ceiling Visualizer !
2.) Confirm that all parts and are present.accessories
Read through the entire Installation Manual before beginning with the installation !
Due to the diverse installation possibilities of our ceiling mounting bracket, WolfVision kindly requires you to
mount the appliance only on a concrete ceiling capable of carrying heavy load. Please study the following
installation steps carefully. Should you encounter any problems (not covered in the installation
instructions), please contact your WolfVision representative for assistance. Take special notice regarding
the weight of the Ceiling Visualizer and the potential for personal injury, as well as the possibility for damage
to the Ceiling Visualizer or other objects that may occur if proper mounting precautions are not followed !
Failure to follow instructions can lead to severe injury!
To avoid possible injury, ensure that the ceiling construction is able to support five times
the required Visualizer weight !
Attention
Attention
Warning
G
G
Symbol Legend
Safety Procedures
Preparation
Ceiling Preparation
3
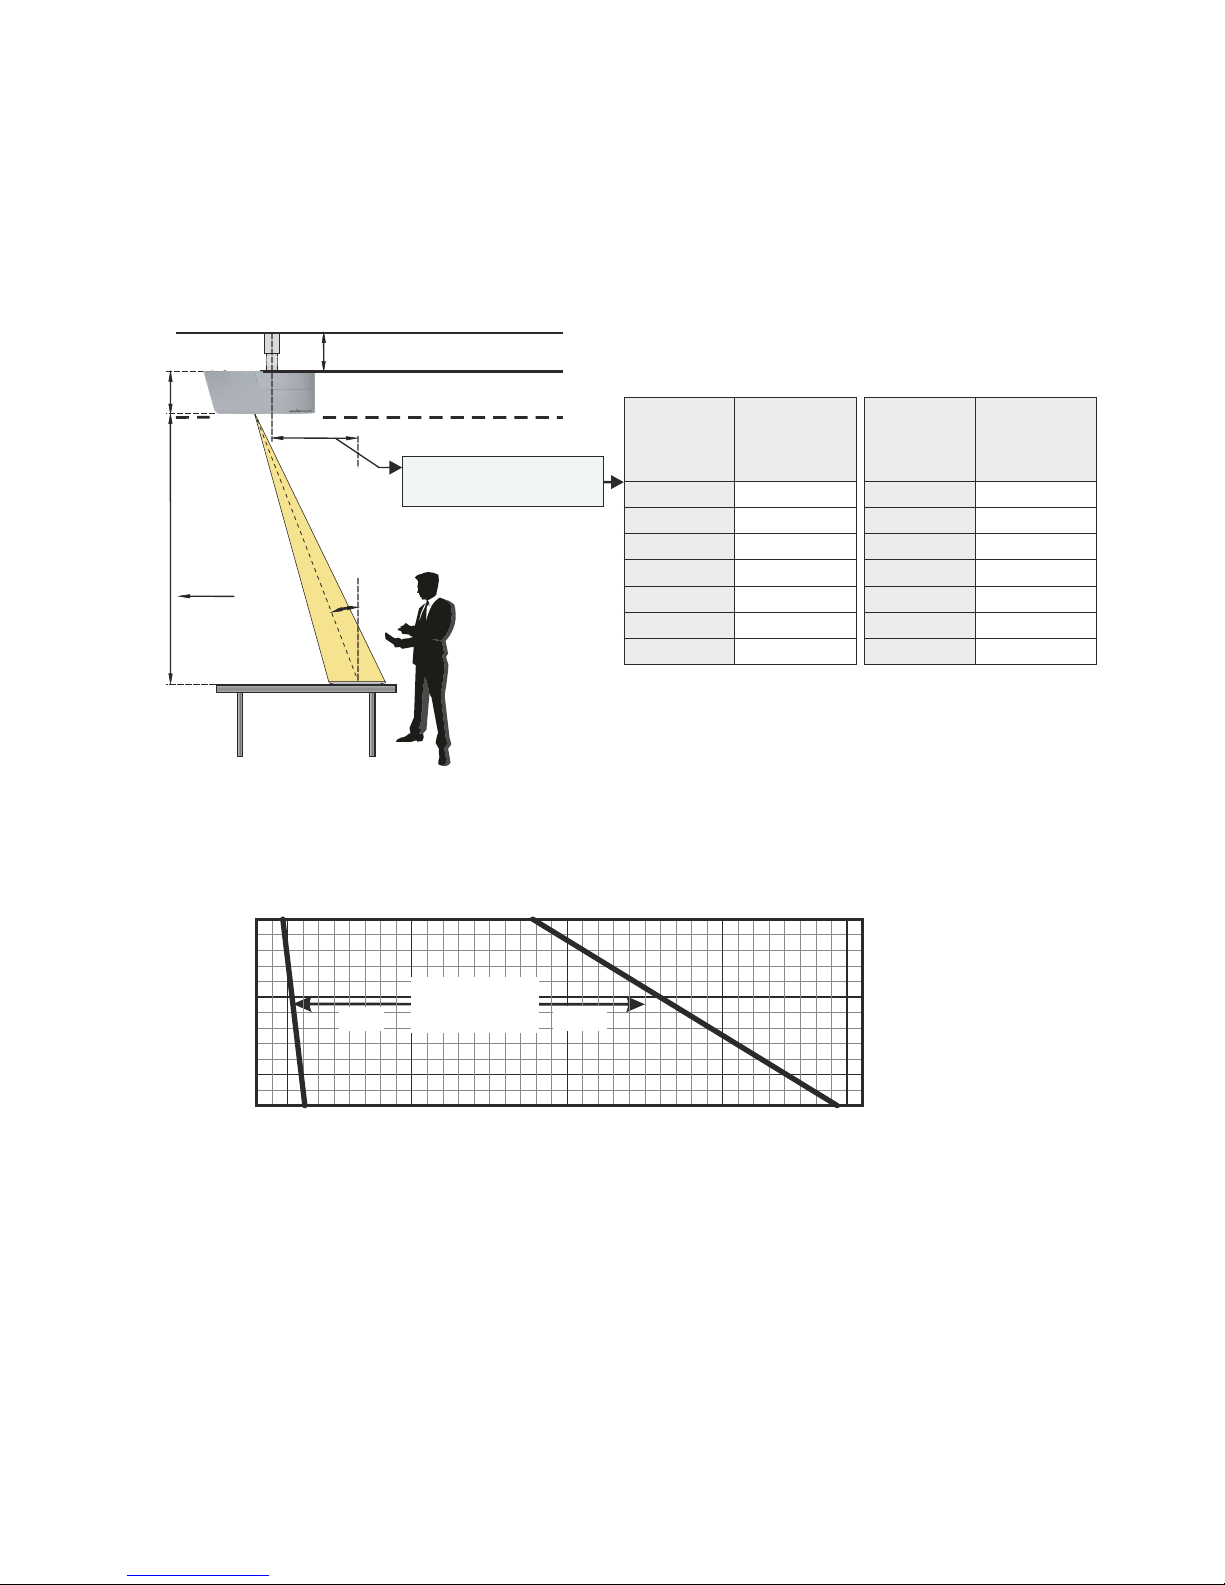
A difference between Ceiling- and "Desktop-"Visualizers is that the size of the smallest and largest image
the unit can pick up is not fixed. This depends on how high above the working surface the Visualizer is
mounted. It is very important to know which image sizes you would like to pick up with the Ceiling
Visualizer before installing the unit, in order to correctly calculate the respective mounting height.
Please refer to the calculation program on WolfVision's homepage (see page 5).
Installation Position
Distance to image center
4
The following chart shows image size (optical zoom range) in relation to the mounting height:
Picture Size Chart (Regular Distance From m / 47" to 95")1.2m to 2.4
0.00m
0.10m
0.20m
0.30m
0.40m
0.50m
0.60m
0.70m
0.80m
0.90m
1.00m
1.10m
1.20m
1.30m
1.40m
1.50m
1.60m
1.70m
1.80m
1.90m
47.24"
" /
66.99" /
70.87" /
78.74" /
86.61" /
94.49" /
/
55.12
0.00" /
3.94" /
7.87" /
11.81" /
15.75" /
19.69" /
23.62" /
27.56" /
31.50" /
35.43" /
39.37" /
43.31" /
47.24" /
51.18" /
55.12" /
59.06" /
62.99" /
66.93" /
70.87" /
74.80" /
Object distance
Horizontal image size
1.2
.4m
1.6m
1.8m
2.0m
2.2m
2.4m
m
1
Picture Center
15°
public
Distance from bottom of the Ceiling
Visualizer to top of the working surface
200 mm
[8 inch]
x
suspended ceiling
(if required)
distant ceiling
ceiling
size of ceiling mount
(depending on model)
x mm = distance * tan 15° - 50.68mm
[x" = distance * tan 15° - 1.99"]
(tan 15° = 0.2679)
The table shows the distance which is called "x"
in the illustration on the left side:
in mm in mm [in inches][in inches]
1,200 217 47 8.49
1,400 271
1,600 324
1,800 378
2,000 432
50 9.29
60 11.97
70 14.65
80 17.33
2,200 485 90 20.01
2,400 539 95 21.35
Distance
Visualizer to
working
surface
Distance
Visualizer-
center to
image center
Distance
Visualizer-
center to
image center
Distance
Visualizer to
working
surface
Zoomrange
optical
Tele
Wide
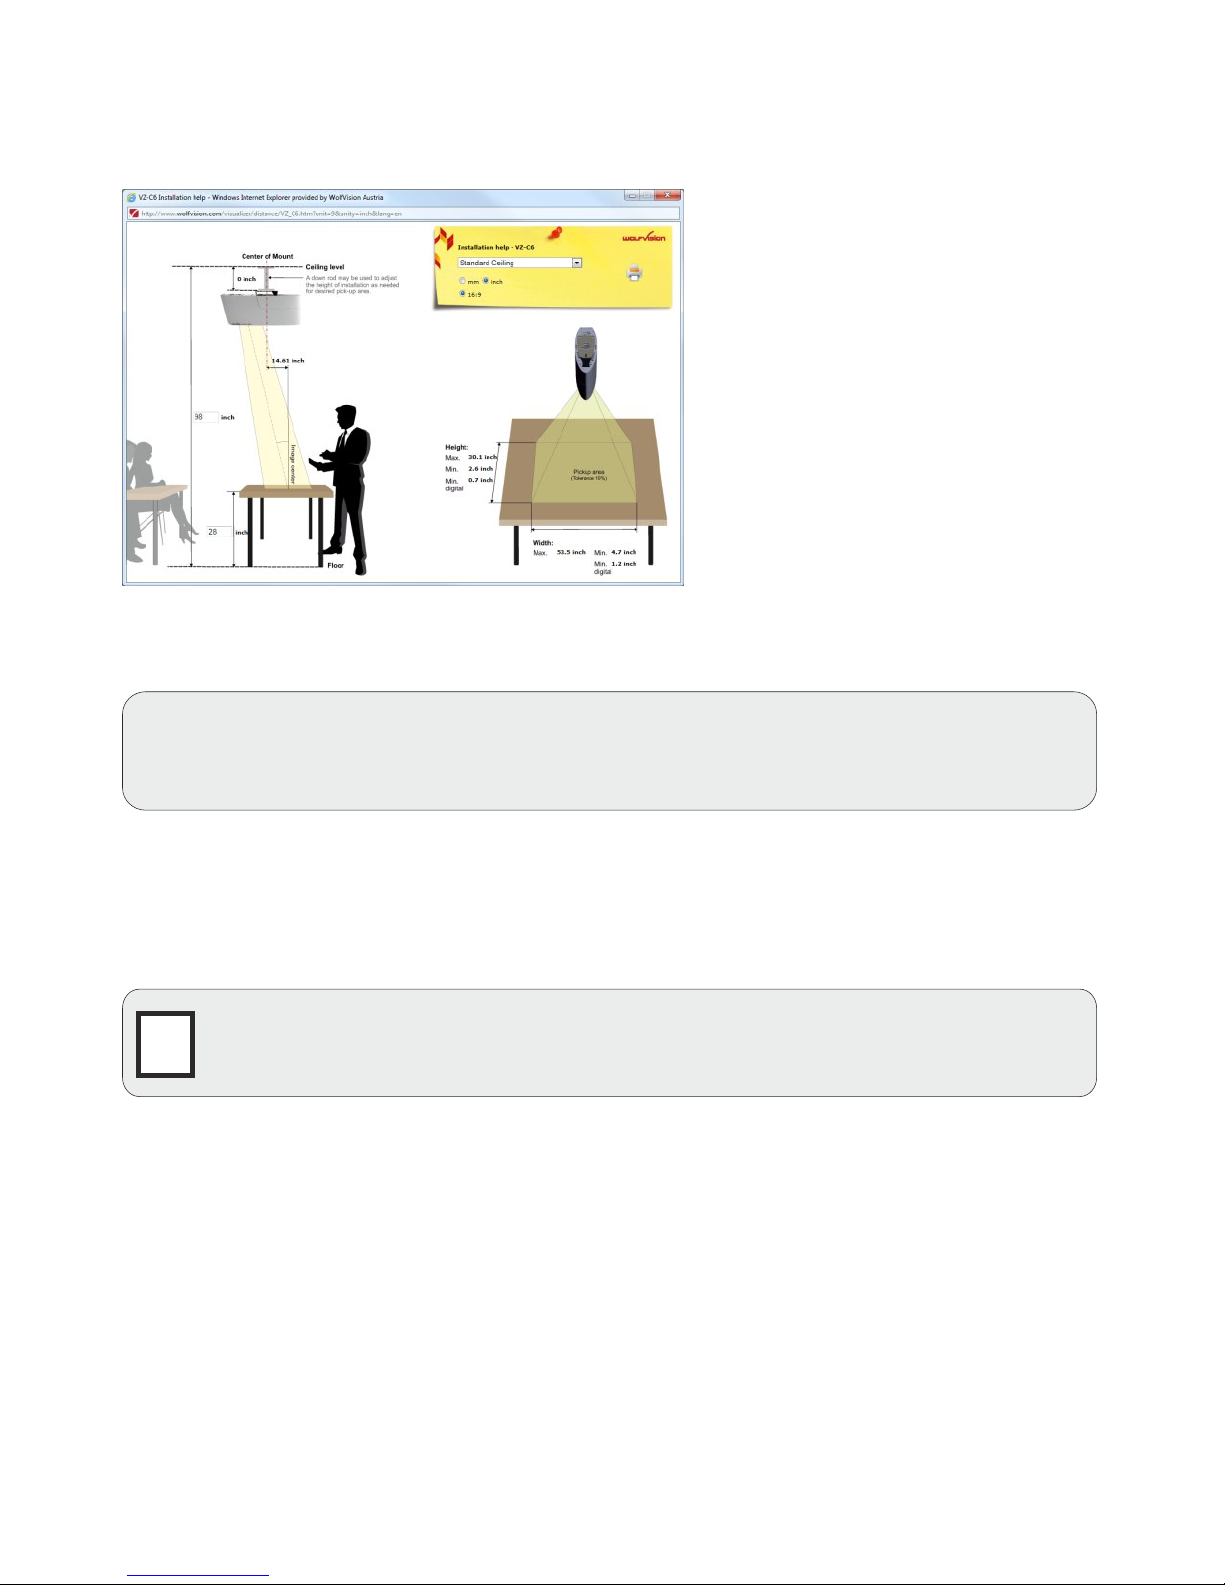
A very useful method to calculate the exact positioning and the possible image sizes is a dedicated
calculation program on WolfVision's homepage:
Calculation program on WolfVision Homepage
5
If the Visualizer needs to be suspended further from the ceiling than with the supplied ceiling mount (in
order to allow greater magnification), a standard ceiling mount or ceiling lift for projectors may be used.
An adapter plate, suitable for weight and screw fittings for the Visualizer, might be necessary.
Designed for Ceiling-mount with VESA standard (□75)
Fixing the assembly to the ceiling is dependent on the respective construction and desired mounting
location. Ensure that the ceiling construction is able to carry a weight of 26kg (58lbs) and that possible
collision accidents are prevented.
Important: Please give special attention to the country specific regulations for training and
conferencing rooms!
G
IMPORTANT: Ensure solid mounting and secure connection of all parts to avoid the
possibility that the unit detaches itself from the ceiling.
Installation of an Additional Ceiling Mount (third-party)
When the unit is built-in into the ceiling or into a plenum box, the infrared receiver may be covered. If the
internal infrared receiver is insufficient, the optional external infrared receiver should be connected to the
"IR-SENSOR" port.
Alternatively, the unit can be controlled via LAN.
The Ceiling Visualizer is plenum rated and a plenum box is not necessary. However when the Ceiling
Visualizer will be installed in a Plenum box keep enough clearance around to enable mechanical fineadjustment of the Visualizer by moving and rotating.
Installation in a Suspended Ceiling or Plenum Box
www.wolfvision.com (Support)
6
Technical Specifications are Subject to Change!
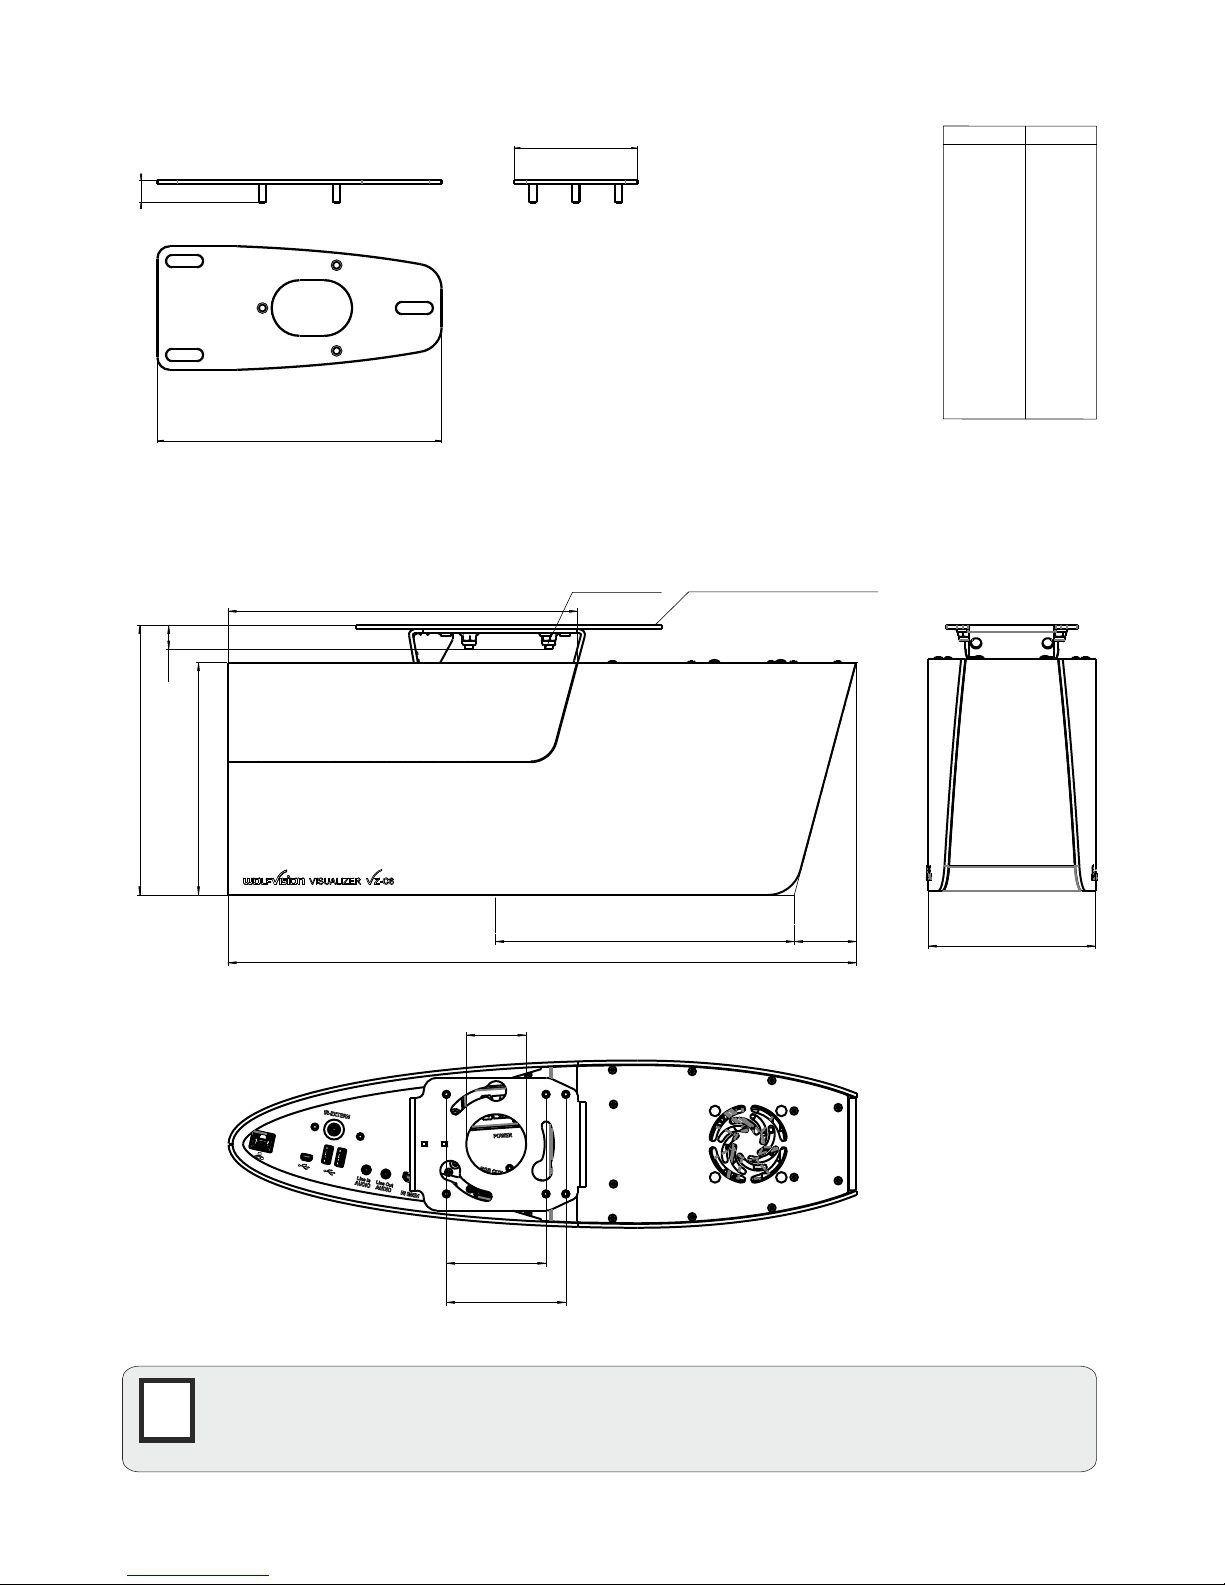
Dimensions of the Ceiling Mount Assembly (see list for dimensions in inches)
Dimensions of Ceiling Visualizer (see list for dimensions in inches)
IMPORTANT
Sufficient ventilation is to be provided, otherwise it can result in damage to the
equipment.
G
18
Inch
mm
area for camera & light
area for cable
adapter for mounting
to ceiling
M6 thread
bolt
mounted on Ceiling-mount with VESA standard (□75)
473.46
225 47
263
175
18
203
Speaker
Audience
□75 /M4
89.9
Ø 45mm
126
100
230
18 0.709
Ø 45 1.772
47 1.847
75 2.953
89.9 3.539
100 3.937
126 4.961
175 6.89
203 7.99
225 8.858
230 9.055
263 10.371
473.46 18.64
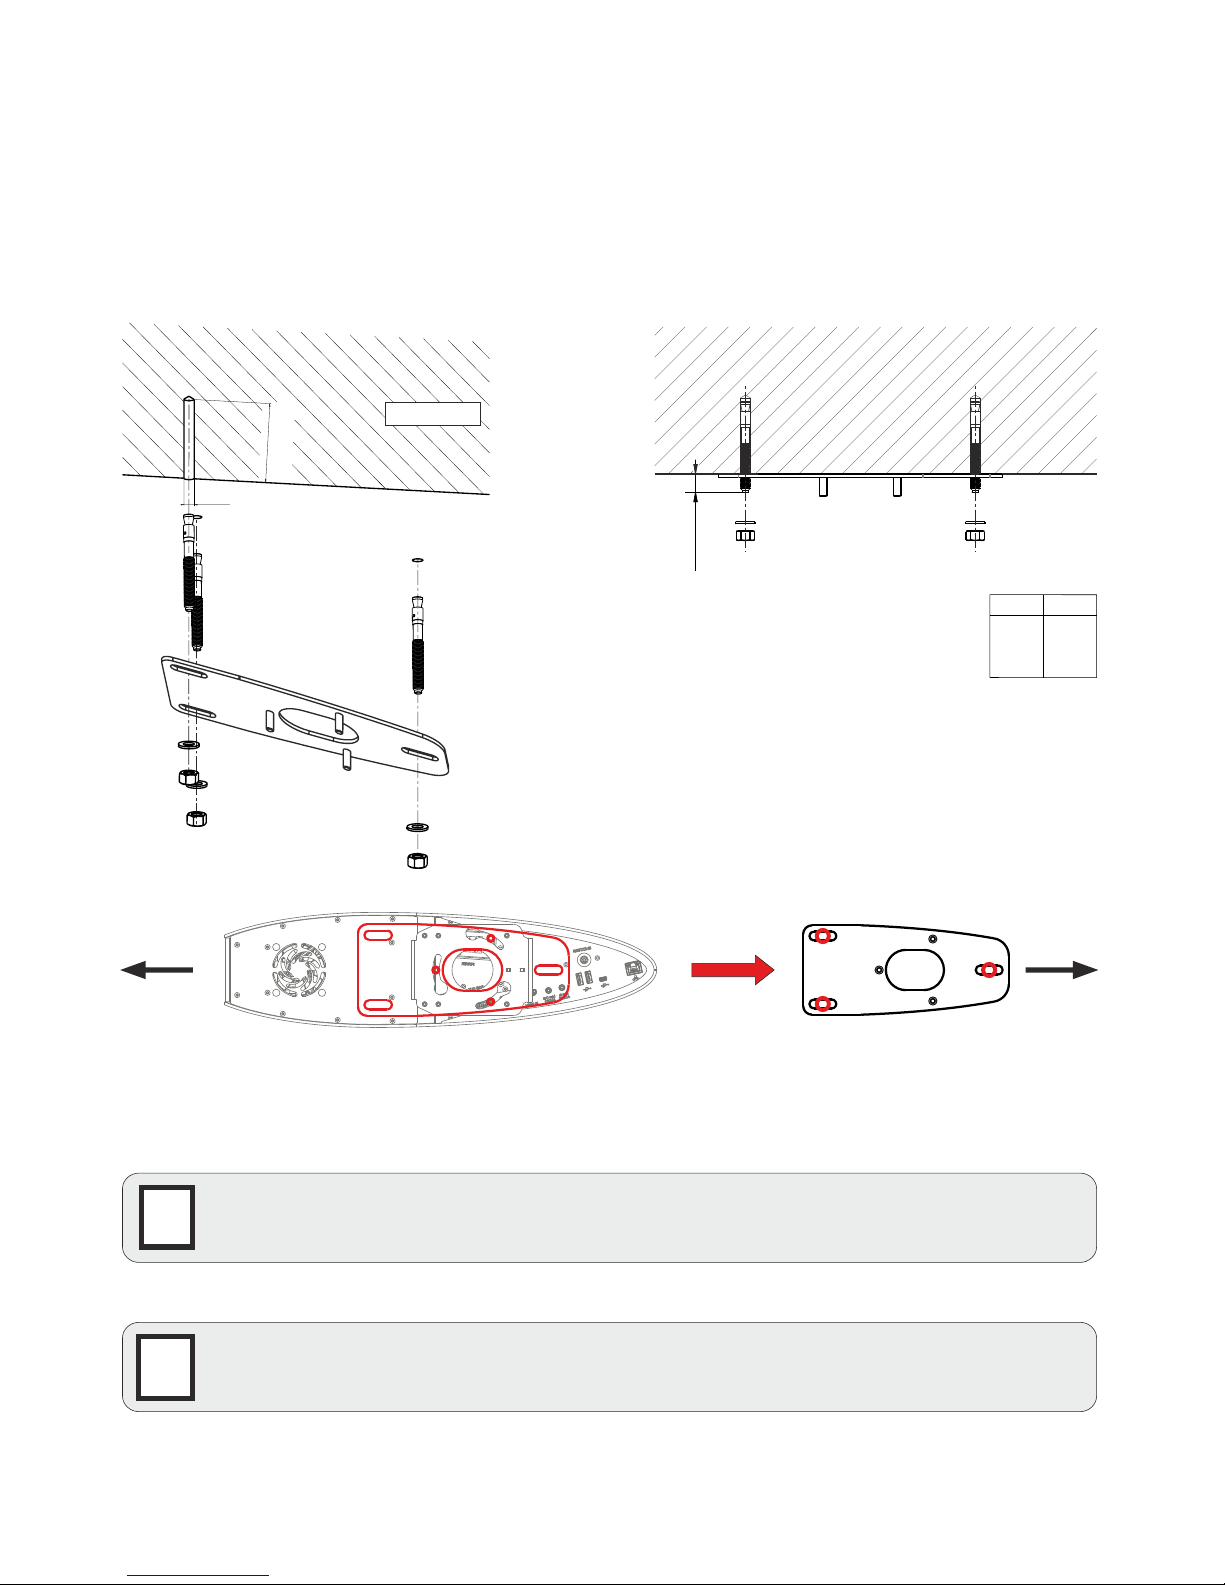
Mounting the Visualizer on the ceiling using WolfVision's ceiling mount can be done very quickly and easily.
IMPORTANT!
The ceiling mount must be affixed directly to concrete with three steel anchors as illustrated, to ensure a
secure mounting and operation of the Visualizer! Ensure that the ceiling construction is able to carry a
weight of 26kg (58lbs) and that possible collision accidents are prevented.
direction
of speaker
Final position of
the Visualizer
with ceiling mount
Inch
mm
8 0.315
15 0.59
17 0.67
61 2.4
IMPORTANT: Please give special attention to the country specific regulations for
training and conferencing rooms.
G
G
IMPORTANT: Ensure solid mounting and secure connection of all parts to avoid the
possibility that the unit detaches itself from the ceiling.
Installation of WolfVision‘s Ceiling Mount
7
min. 15
max. 17
direction
to audience
concrete
min. 61
Ø 8
 Loading...