

Page 1
R
Instructions
Bedienungsanleitung
Mode d´emploi
Istruzioni utilizzo
VZ-7D
VZ-5D
VZ-5F
English - Deutsch - Francais - Italiano
Page 2
WARNING!
Risk of electric shock
Dangerous voltage inside
ACHTUNG!
Elektroschockrisiko -
Gefährliche Spannung
im Gerät
WARNING!
WARNING!
Risque de dècharge
Risque de dècharge
èlectrique - Tension
èlectrique - Tension
dangereuse à l´intérieur
dangereuse à l´intérieur
ATTENZIONE!
Rischo di shock
elettrico - Voltaggio
pericoloso all´interno
Precautions - Vorsichtsmassnahmen - Précautions - Precauzioni
Caution
To reduce the risk of electric shock, do
not open the unit. No userserviceable
parts inside. Refer servicing to qualified
service personal only
Achtung
Öffnen Sie nie das Gerät Elektroschockrisiko
Servicearbeiten dürfen nur von
qualifizierten Servicetechnikern
durchgeführt werden
Précautions
Pour réduire le risque électrique, ne pas
ouvrir l´unité. Vous ne trouverez aucunes
pièces practiques pour l´utilisateur à
l´intérieur. Voir le service d´entretien (de
révision, SAV) seulement si vous avez
besoin d´un service personnel adapté
Warning
To reduce the risk of electric shock, do
not expose this appliance to rain or
moisture
Achtung
Elektroschockrisiko!
Setzen Sie das Gerät nicht Regen oder
Feuchtigkeit aus
Précautions
Pour réduire le risque d´incendie ou de
décharge électrique, ne pas exposer cet
appareil à la pluie ou à l´humidité
Cautela
Per ridurre il rischio di shock elettrico, non
aprire l´unita. Non ci sono parti assistibili /
riparabili dall´utente. Per assistenza tecnica
riferisi soltanto a personale qualificato
This product is built according to Directive EMC and to Directive electrical equipment.
Proofments according to UL 1950. CSA - C 22.2 No. 950-95
This equipment has been tested and found to comply with the limits for a Class A digital device, pursuant to Part
U
15 of the FCC Rules. These limits are designed to provide reasonable protection against harmful interference when
L
®
the equipment is operated in a commercial environment. This equipment generates, uses, and can radiate radio
frequency energy and, if not installed and used in accordance with the instruction manual, may cause harmful
FCC
interference to radio communications. Operation of this equipment in a residential area is likely to cause harmful
interference in which case the user will be required to correct the interference at his own expense.
Attenzione
Per ridurre il rischio di shock elettrico o
incendio, non esporre l´apparecchiatura
a pioggia o polvere
Page 3

List of contents
Inhaltsangabe
Table des matières
Indice
English
ENGLISH
Deutsch
DEUTSCH
Francais
FRANCAIS
Italiano
ITALIANO
DIP switches
CONTACTS:
Manufacturer:
Wolf Vision GmbH
Vlbg. Wirtschaftspark
A-6840 Götzis / AUSTRIA
Tel.: ++43-5523-52250
Fax: ++43-5523-52249
E-Mail: [email protected]
American distribution:
Wolf Vision Inc
655 Sky Way, Suite 119
San Carlos, CA 94070 / USA
Tel.: (650)802-0786 or 1-800-356WOLF
Fax: (650)802-0788
E-Mail: [email protected]
Asian distribution:
WolfVision Rep office
27 Woodlands Ind. Park E1
#01-04 Hiang Kie Ind. Bldg. IV
Singapore 757718
Tel.: ++65 - 366 9288
Fax: ++65 - 366 9280
E-mail: [email protected]
page
Seite
page
pagina
page.
Australian distribution:
WolfVision Pty Ltd
P.O.Box 59, West Lindfield (near Sydney)
NSW 2070, Australia
Tel.: (02) 9410 3388
Fax: (02) 9410 3388
E-mail: [email protected]
Canadian distribution:
WolfVision Canada Inc.
140 Route 202, Noyan QC JOJ 1B0
Tel.: (450)294-9999
Tollfree: 1-877-513-2002
Fax: (450)294-2228
E-Mail: [email protected]
4
9
14
19
24
Internet Homepage: http://www.wolfvision.com, Technical support by E-mail: [email protected]
Made in: Austria (EC) Printed in Austria October 2000
3
Page 4

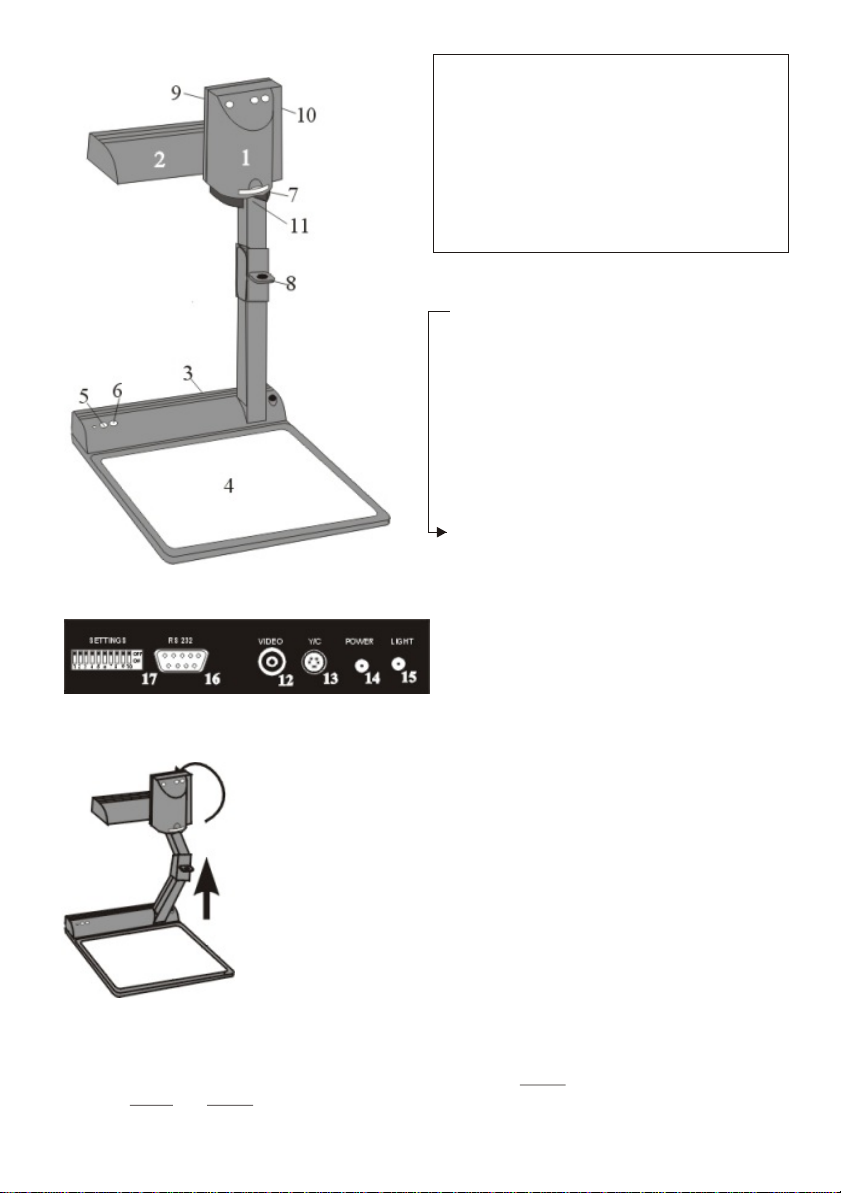
Connectors (3)
ENGLISH
Check which model you have!
This is a combined manual for the
Visualizers VZ-7D, VZ-5D and VZ-5F.
.
Pages 4-5 and 8 apply for all units.
The additional features of VZ-7D (5D)
are described on pages 6-7 and 24.
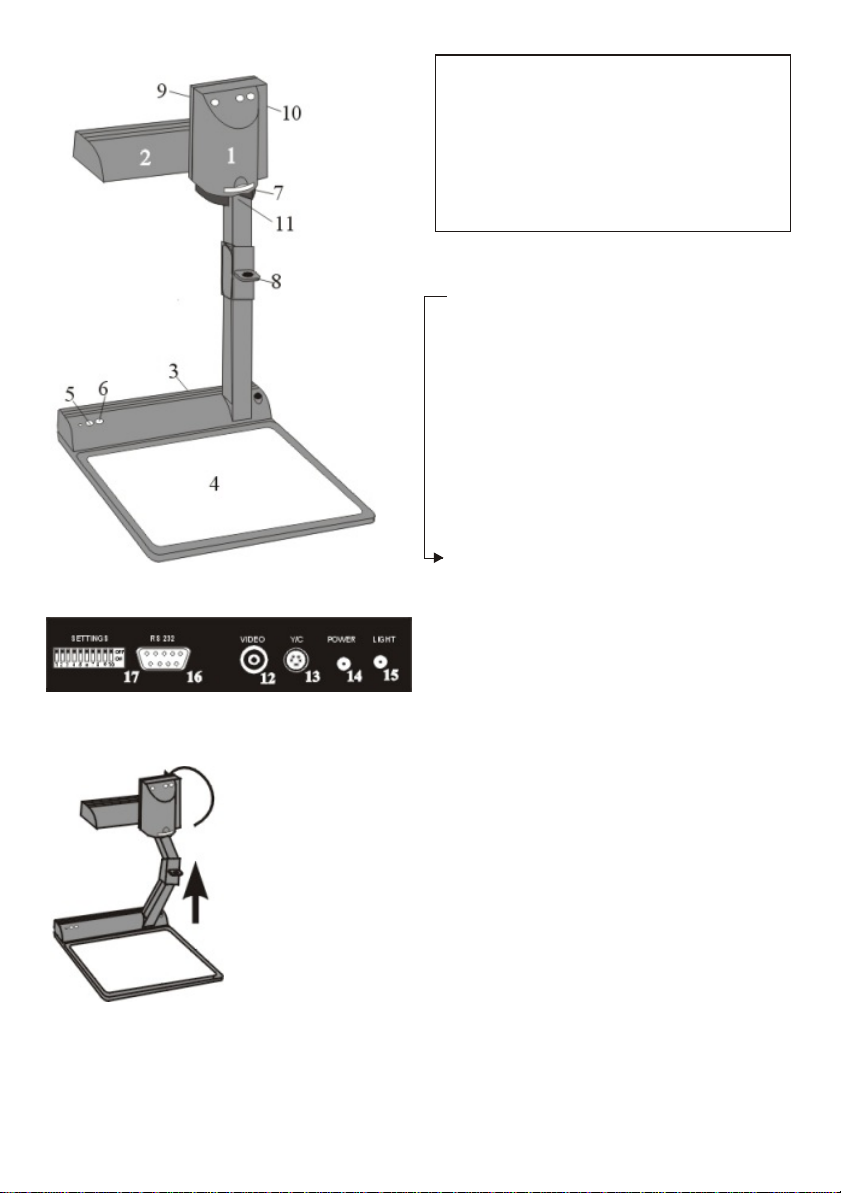
1 Video camera head
2 Light
3 Connectors (on the back, see below)
4 Working surface
5 Power on/off key
6 Light key
7 Close up lens for camera
8 Pull ring
9 Auto focus on/off key
(a light above this key shows
that the auto focus is on)
10 Zoom keys
11 Slide drawer (VZ-7D only)
12 Composite video output (VBS)
13 Y/C (S-video) output
14 DC input (12 V)
15 DC output for lightbox
16 Serial control input RS232 (VZ-7D only)
17 DIP switches (VZ-7D only) - see detailed
list on last page - experienced user only
Setting up
1. Pull the arm upwards using the special pull ring (8)
2. Turn the video camera head (1) and point it at the working surface
3. Connect the power adaptor to the DC-input (14).
4. Connect a TV-monitor, a video projector or a video recorder to
the video output (12) or the Y/C-output (13)*
5. Switch on the Visualizer with the power switch (5)
Power-on Preset
The power-on preset is automatically activated when switching on
the unit. The settings are: Zoom size approx. 20 x 15 cm (A5),
Autofocus on, Autoiris on, Image on
* The picture quality is much better if you use the Y/C (S-video) output (13) rather then
the composite video output (12). Especially with typed material in black and white. When
using the composite video output please make sure that a dedicated video cable (75 with
RCA plugs is used, and not an audio cable with RCA plugs !!!
4
W)
Page 5
Autofocus
When switching on the unit the
autofocus is automatically switched
on too. The correct focus is
continuously adjusted at a very high
speed. The green light beside the
autofocus on/off switch (9) indicates if
the autofocus is on.
o
Please note that objects with very
Manual focusing
If you work with a VZ-7D you can use the FOCUS-
.
keys of the remote control for manual focusing. If
the remote control is not available or if your
Visualizer is a VZ-5D / VZ-5F, use this method:
1. Place an object at the level you wish to focus
The autofocus is now focusing the object.
2. Switch off the autofocus with the on/off switch (9).
The focus remains unchanged from now on.
low contrast (like a blank sheet of
paper) are difficult to focus. If the
autofocus does not work just move
the object slightly.
.
For special applications the
autofocus can also be switched off
using the on/off switch (9). The
autofocus is also switched off when
the manual zoom keys of the VZ-7D's
remote control are used.
WolfVision Lightboxes (optional)
Connect the power cord to the Lightbox
connector (15) on the back side of the
Visualizer. The light switch (6) of the Visualizer
can now be used to switch between the light
of the Visualizer and the light of the Lightbox.
Other Lightboxes
In order to prevent reflections the light of the
Visualizer always has to be switched off
when working with lightboxes.
Automatic white balance
When the Visualizer is switched on it works with a precise automatic white balance.
Please note that immediately after the unit is switched on, the white balance adjustment
may not be 100% correct. In this case just move any object in the picture. From this
moment on it works perfect.
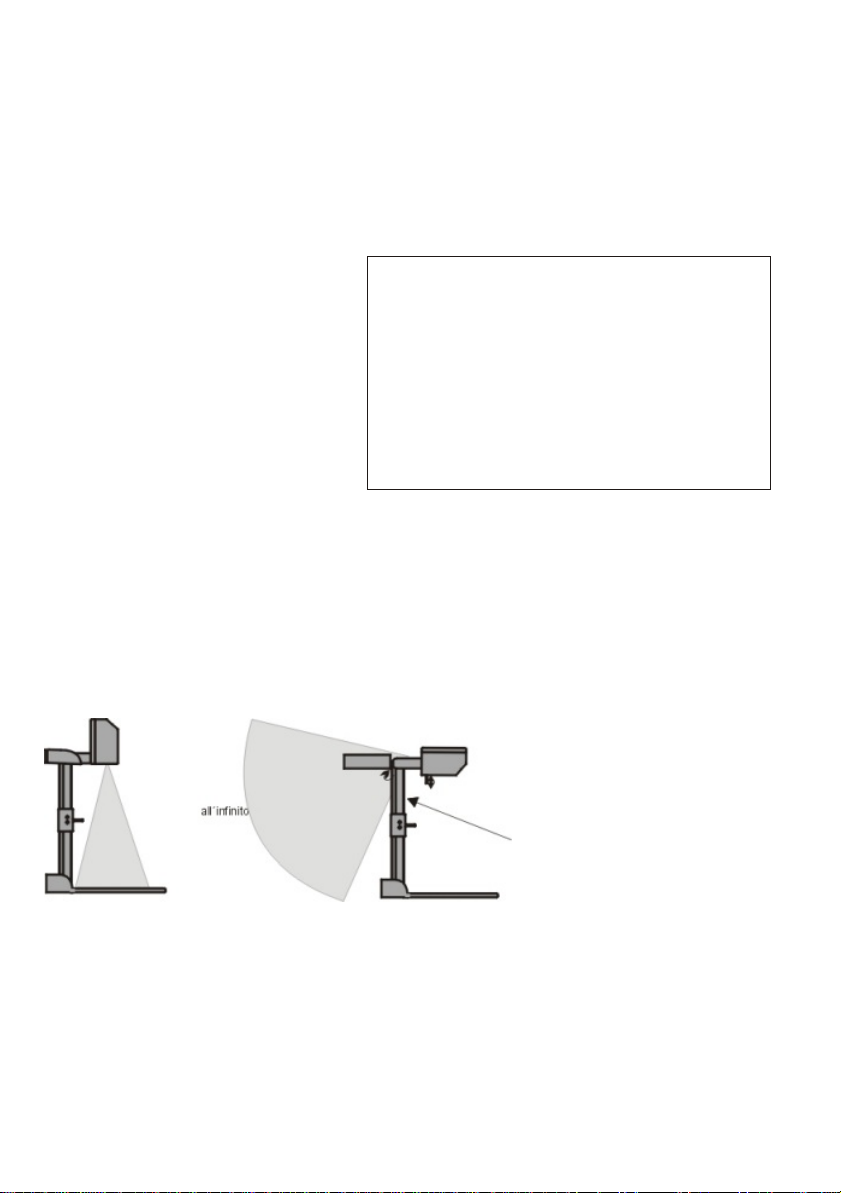
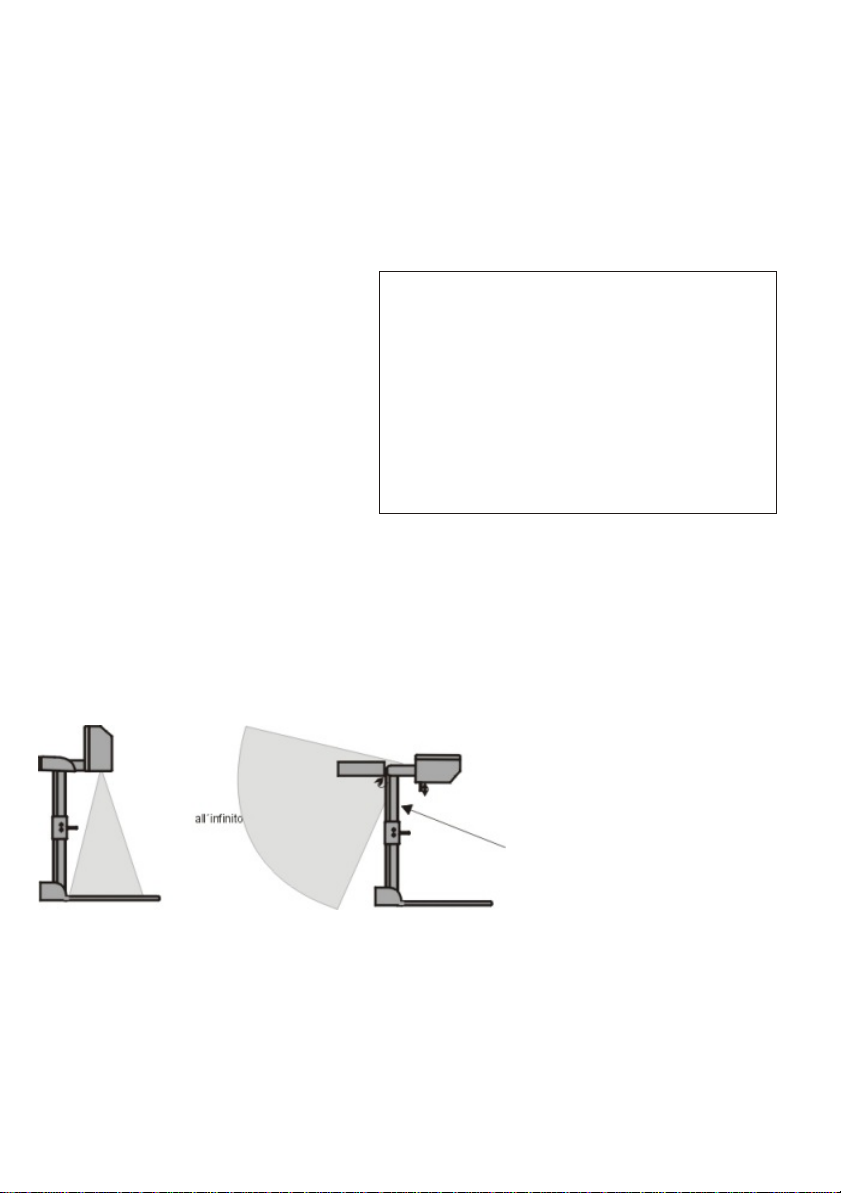
Shooting area on
the working surface
Eliminating reflections
-
In order to eliminate reflections
(on high gloss photographs
etc.) just turn the light
backwards slightly.
.
Please note that reflections
can also be caused by the
room light.
Shooting area outside
of the working surface
Turning the light backwards
In order to enable recordings
with illumination outside of
the working surface, the light
of the Visualizer can be
horizontally turned an angle
of up to 250°.
Close-up adaptor lens-
For shooting an object outside the working surface, in
a further distance to the unit, the close up lens (7) has
to be removed. In this case just pull the lens away
from the main optic of the camera until it reaches the
locked position. It is impossible to remove the lens
completely from the unit, thus it can not get lost.
Before turning back the camera into the standard
working position push the close up lens back in.
5
Page 6
ADDITIONAL FEATURES OF VZ-7D
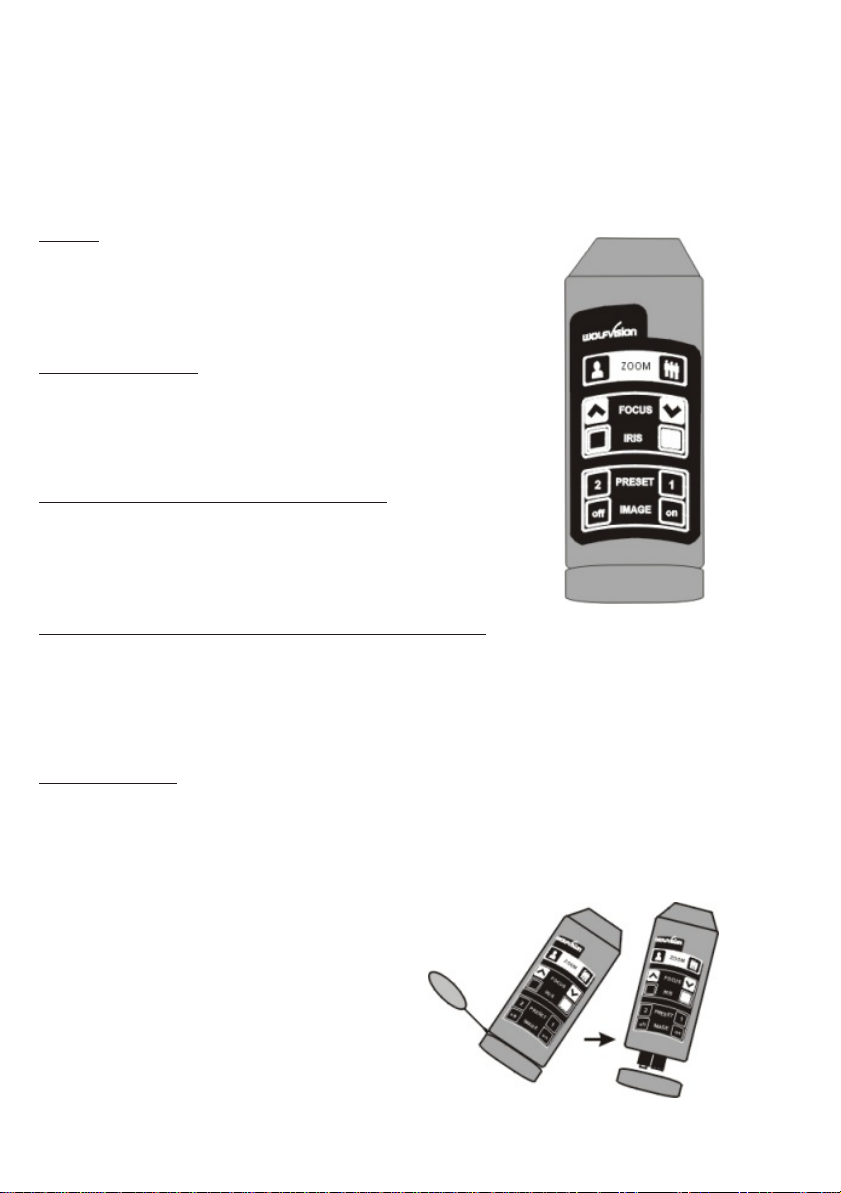
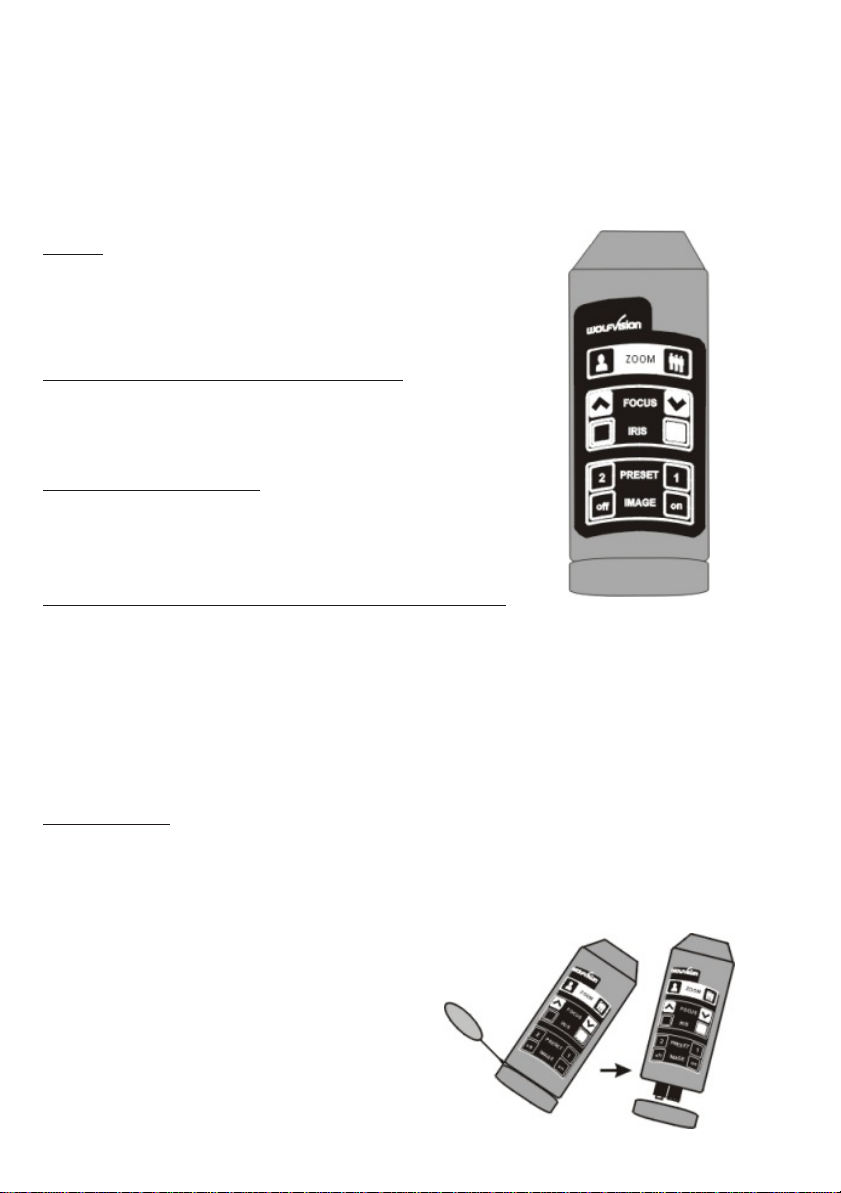
Infrared remote control
One of the unique features of WolfVision's portable Visualizers is that there are only 5
buttons on the unit. Therefore anyone can use it without any instructions. For more
experienced users there are some additional functions on the remote control:
ZOOM
The Zoom keys are the most important keys on the IRremote control. That is why they stand out in white
color. ZOOM keys are also on the camera head of the
Visualizer.
FOCUS (manual)
When the Focus keys are pressed the Visualizer
switches off the autofocus function.
The next time the zoom keys are pressed the
autofocus is switched on again.
IRIS (manual brightness adjustment)
When the Iris keys are pressed the Visualizer switches
off the auto iris function.
The next time the zoom keys are pressed the auto iris
is switched on again.
PRESETS (pre-programmable camera settings)
Two zoom positions and camera settings can be recalled by quickly (!) pressing the Preset 1
or Preset 2 key. A user has the opportunity to store his own presets. By pressing one of the
Preset keys for more than 3 seconds, the present camera and zoom settings are stored as a
preset. Please note that if the Visualizer is not used for a long time the factory presets
reappear when the unit is switched on again.
IMAGE on / off
The Visualizer's image output by the video output (12) or Y/C-output (13) can be switched on
and off with these keys. There is absolutely no monitor image distortion when switching on
and off, because the Visualizer actually outputs a black signal in the off position.
Changing the batteries
If the VZ-7D can only be controlled from a
close distance or if it cannot be controlled at
all with the infrared remote control you may
have to change the battery.
Open the cover of the remote control with a
flat object (for example a coin or a big
screwdriver) and replace the two 1.5 V AA
batteries with new ones.
6
Page 7
ADDITIONAL FEATURES OF VZ-7D / VZ-5D
Digital Zoom (VZ-7D, VZ-5D)
All portable Visualizers have an optical 12 x zoom lens. In addition the VZ-7D and the
VZ-5D have a 2x digital zoom extension, which increases the overall zoom range to
24 x zoom. The smallest pickup size on the working surface without (!) digital zoom is 23 x
31mm (0.9"x1.2"). When you zoom in further the digital zoom is automatically activated and
the smallest pickup size is 12x16mm (0.5"x0.6").
However please be aware that when the digital zoom is used the resolution of the picture is
not as good as before.
Manual white balance (VZ-7D only)
Automatic white balance adjustment is described on page 5. For some applications you
may require a manual white balance setting. This can be done by pressing the LIGHT-key
(6) for 3 seconds. When the unit is switched off and on again it is set back to automatic
white balance.
(Other white balance settings for specialists see page 24 - for experienced users only)
Slide Drawer (VZ-7D only)
(This is a new function of the VZ-7D which can only be found on units produced after June 2000.)
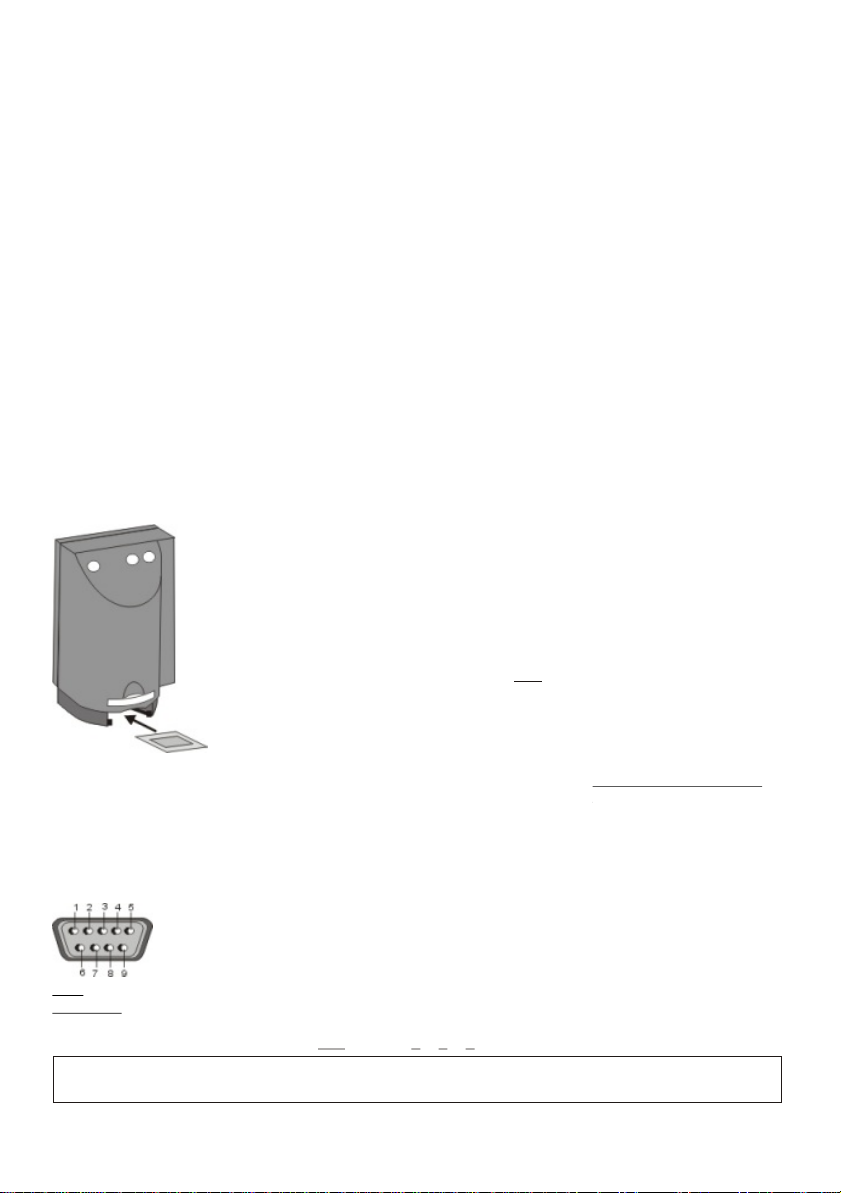
First make sure that you remove any object from the working
camera
head
slide
surface (very important!). Then insert a slide in the slide drawer.
The camera automatically recognizes the slide and focuses on
the slide.
.
In case the slide is out of focus:
- Make sure that the slide is firmly in place
- Make sure that the ZOOM is not in the maximum tele
position (=smallest picture). Use the ZOOM-keys (10).
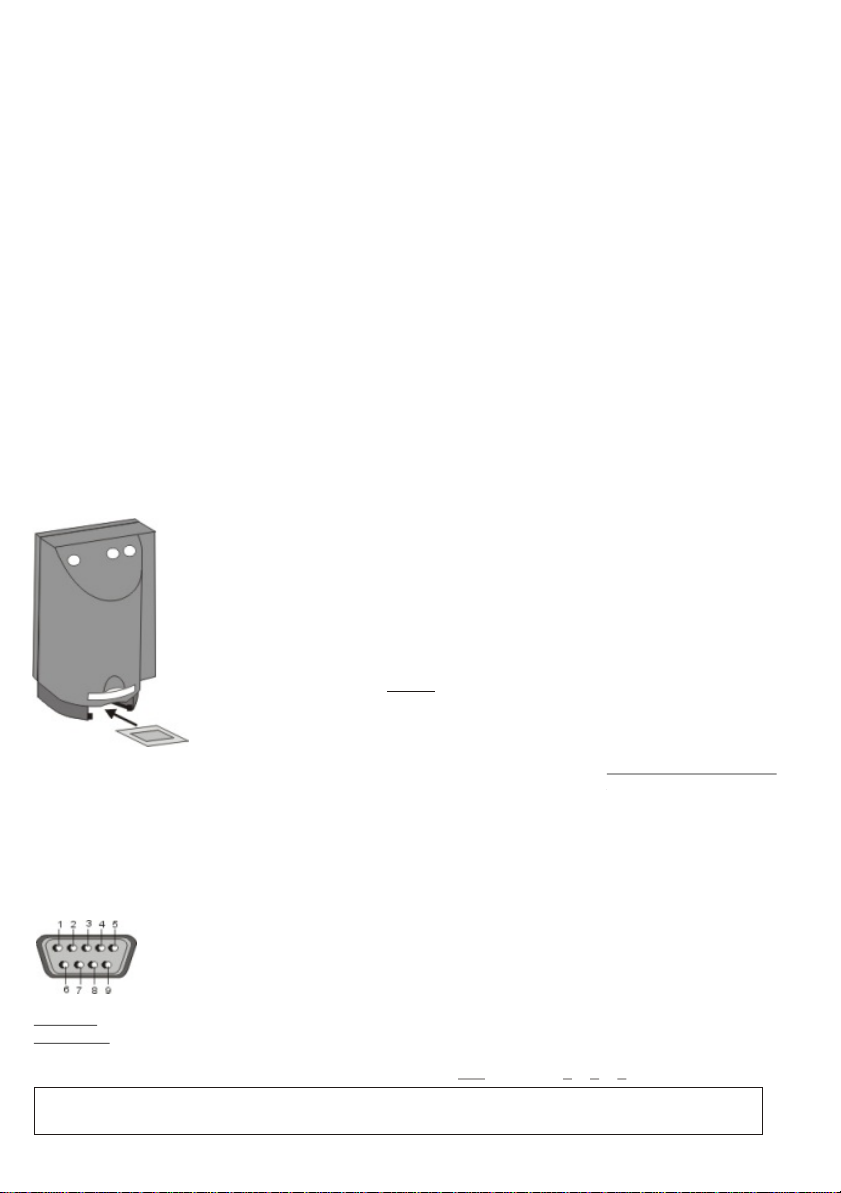
Serial control input, RS 232 (VZ-7D only)
The serial port can be used to control the Visualizer through an
external device, like a remote control system for a whole
conferencing room.
It can also be used to control the Visualizer through a computer.
A special Windows-software for PC is available from WolfVision.
9-pin D-Sub connector on unit
male, front side
Pins: 2: RX, 3: TX, 5: GND, 7: RTS, 8: CTS
Baud rate: 19200 or 9600, databits: 8, stopbit: 1, parity: no
Please note that DecimaI-Codes (=ASCII-Codes or Hex-Codes)
must be sent as one single byte (e.g. 199 and not: 1 + 1 + 9) !
A detailed description of the serial protocol can be found on our internet homepage:
www.wolfvision.com
7
Function: Decimal-Code :
Image on
Iris open
Focus far
Zoom wide
Image off
Iris close
Focus near
Zoom tele
Preset 1
Preset 2
Save Preset 1
Save Preset 2
Preset max. wide
Preset A5
Preset A6
Preset max. tele
192
193
194
195
196
197
198
199
202
203
216
217
229
231
232
235
Page 8
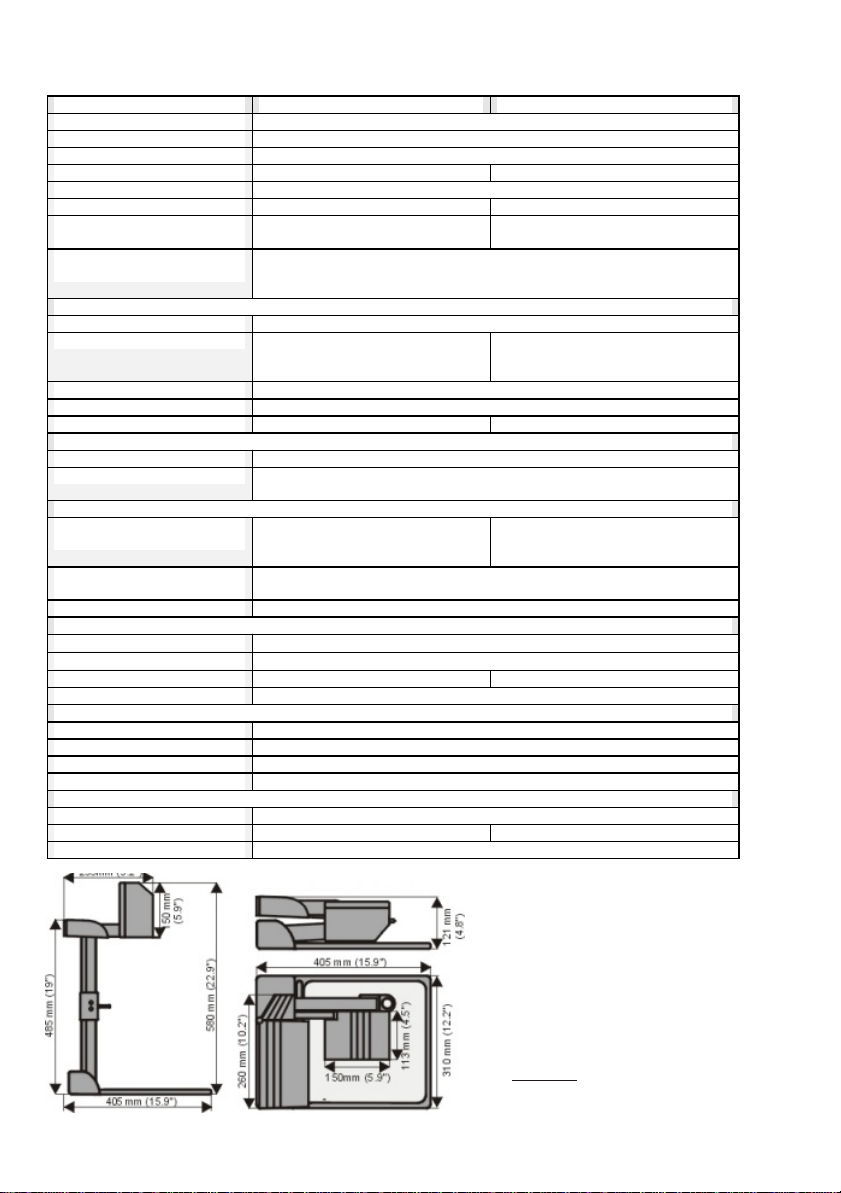
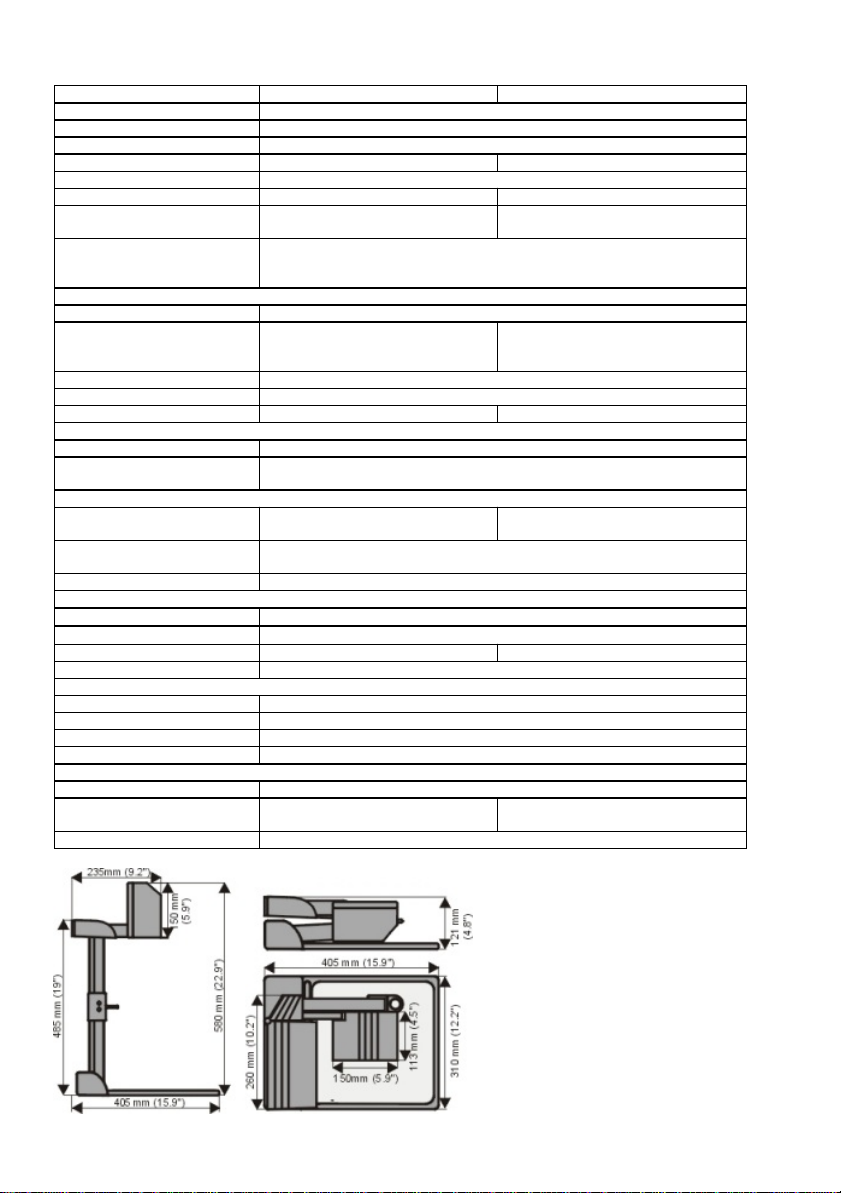
Pick-up element / video: VZ-7D VZ-5D / VZ-5F
Built-in camera system: 1 CCD unit – 1/3" interline transfer
Effective pixels: PAL models: 752x582 / NTSC models: 768x494
Horizontal resolution: > 470 TV lines
Iris: automatic and manual automatic
Autofocus: dynamic high speed, on/off switch
White balance: automatic and manual automatic
Optics
(5,4 – 64,8mm, f=1,8~2,7):
24x zoom
(12x optical + 2x digital)
VZ-5F: 12x optical zoom
VZ-5D: 24x zoom 12x opt.+ 2x digital
Depth of focus
(depth of field):
VZ-7D/5D: 14mm (0,6") on smallest picture, size: 16x12mm (0,6"x0,5")
All: 18mm (0,7") on small picture, size: 42x33mm (1,7"x1,3")
200mm (8") on largest picture, size: 360x270mm (14,4"x10,8")
Operation:
Camera control panel: functions: zoom in, zoom out, autofocus on/off
Infrared remote control: included (functions: zoom, iris,
manual focus, presets, image
on/off)
not available
Power and light controls: power on/off, light on/off or light on lightbox
Power-on preset: autofocus on, autoiris on, pick-up size: 210x140mm
Special drawer for slides: included not available
Lighting element:
Light source: high frequency fluorescent lamp
Light system: light either on working surface or in front of the unit, no blinding of audience
or speaker, very low stray light
Scanning area:
Objects on working surface
(length x width):
min.: 16x12mm (0,6"x0,5"),
max:360x270mm (14,4"x10,8")
VZ-5F: min.: 32x24mm (1,2"x0,9")
max.: 360x270mm (14,4"x10,8")
VZ-5D: see measurement VZ-7D
Objects on working surface
(height):
up to 370mm (15") in wide position - 110mm (4,4") in tele position
Objects in a room: length, width, and height to infinity
Connections:
Y/C (S-video) output:
4-pin connector, Y-signal: 1 Vpp 75W, C-signal: 0,3 Vpp 75W
Composite video output:
RCA-connector, VBS 1,0 Vpp 75W
Serial control input: Configuration: RS-232 not available
12 V DC output: for external lightbox or LCD-monitor
General specifications:
Power consumption: max. 25 VA
Power source: 12 V DC
Made in: Austria (European Community)
Weight: Visualizer: 4,6kg (10lbs), Power pack: 0,7kg (1,1lbs)
Accessories (Scope of supply):
Mains power pack: 90 – 240 V AC / 12 V DC, 1,5 A
Carrying case (Soft case) with pocket f.projector included (standard edition)
Other supplied accessories: Y/C (S-video) cable, instructions
Specifications and availability subject to change
Technical data:
Changing the lamp of the
Visualizer:
1. Remove the power cord of
the Visualizer.
2. Remove lamp housing glass.
(1 Screw)
3. Remove the safety clip
4. Change the lamp.
CAUTION: Hot when used!
Lamp type: Osram Dulux S/E
9W/21 or equivalent
8
Page 9
Anschlüsse (3)
Beachten Sie, welches Modell Sie
DEUTSCH
besitzen!
Diese Bedienungsanleitung gilt für die
Modelle VZ-7D, VZ-5D und VZ-5F.
.Die Seiten 9-10 sowie 13 beziehen sich
auf alle Geräte.
Die zusätzlichen Funktionen des VZ-7D
(5D) sind auf den Seiten 11-12 sowie
24 beschrieben.
1 Videokamera-Kopf
2 Licht
3 Anschlüsse (rückwärts, unten)
4 Arbeitsfläche
5 Power-Schalter
6 Lichtschalter
7 Nahlinse für Kamera
8 Ziehvorrichtung
9 Autofokus Ein/Aus Schalter
(grünes Licht leuchtet, wenn der
Autofokus eingeschalten ist)
10 Zoom Tasten
11 Diahalter (nur VZ-7D)
12 Video-Ausgang (FBAS, VBS)
13 Y/C (S-Video)-Ausgang
14 DC Eingang (12V)
15 DC Ausgang für Lichtbox
16 Serielle Schnittstelle RS-232
(nur VZ-7D)
17 DIP Schalter (nur VZ-7D)
Details siehe letzte Seite - nur für
Spezialisten
Positionierung
1. Arm mit der speziellen Ziehvorrichtung (8) nach oben ziehen
2. Kamerakopf (1) in Richtung Arbeitsfläche drehen
3. Netzgerät am DC-Eingang (14) anschliessen
4. Einen TV-Monitor, Videoprojektor oder Videorecorder am
....
Video-Ausgang (12) oder Y/C-Ausgang (13) anschliessen*
5. Mit dem Netzschalter (5) das Gerät einschalten
Power-on Preset
Mit Einschalten des Visualizers werden automatisch folgende
Einstellungen hergestellt: Aufnahmefläche ca. 20x15 cm (A5),
Autofokus ein, Autoiris ein, Bild ein.
* Die Bildqualität des Y/C (S-Video)-Ausgang (13) ist wesentlich besser als die des
normalen Video-Ausganges (12). Dies gilt besonders bei schwarz/weiß Schriftstücken
(kein Farbrauschen).
Beim Video-Ausgang ist sehr wichtig, dass ein spezielles Video-Kabel (75 ) verwendet
wird und nicht ein Audio-Kabel mit denselben Anschlüssen (RCA/Cinch)!
9
W
Page 10
Autofokus
Der Autofokus ist nach Einschalten
des Gerätes automatisch in Betrieb
und stellt sehr schnell die optimale
Schärfe ein. Wenn der Autofokus
eingeschaltet ist, leuchtet das grüne
Licht über dem Autofokus- Ein/AusSchalter (9).
Bitte beachten Sie, dass kontrastschwache Objekte (z.B. leeres
Papierblatt) dem Auto-fokus immer
Probleme bereiten. In einem solchen
Fall bewegen Sie das Objekt leicht.
Für spezielle Anwendungen kann der
Autofokus mit dem Ein/Aus-Schalter
(9) abgeschaltet werden.
Der Autofokus wird ebenfalls
ausgeschaltet, sobald die manuelle
Fokus-Tasten auf der Fernbedienung
des VZ-7D verwendet werden.
t
Manueller Fokus
Beim VZ-7D können Sie die FOKUS-Tasten auf der
Fernbedienung für die manuelle Fokussierung verwenden. Falls die Fernbedienung nicht verfügbar
ist, bzw. beim VZ-5D und VZ-5F keine vorhanden,
gehen Sie bitte folgendermassen vor:
.
.
1. Bringen Sie das Objekt in die zu fokussierende
Position (Höhe) - Der Autofokus stellt scharf.
2. Schalten Sie den Autofokus mit dem Ein/Aus
Schalter (9) aus - Der Fokus bleibt unverändert.
WolfVision Lichtboxen (optional):
Schliessen Sie das Stromkabel der Lichtbox an
den DC-Ausgang (15) auf der Rückseite des
Visualizers an. Mit dem Lichtschalter (6) kann
nun zwischen dem Licht für die Arbeitsfläche
und dem Licht der Lichtbox umgeschaltet
werden.
Andere Lichtboxen:
Um Reflektionen zu vermeiden, muss das Licht
des Visualizers immer ausgeschaltet sein,
wenn eine Lichtbox verwendet wird.
Automatischer Weißabgleich
Der automatische Weißabgleich des Visualizers wird mit dem Einschalten des Gerätes
automatisch aktiviert. Bitte beachten Sie, dass der Weißabgleich möglicherweise unmittelbar
nach dem Einschalten des Gerätes noch nicht 100% korrekt ist. In diesem Fall bewegen Sie
ein Gegenstand im Bild und von da an arbeitet der Weißabgleich präzise.
Aufnahmen auf
der Arbeitsfläche
Vermeidung von Reflektionen
Um Reflektionen (auf glänzendem
Material wie z.B. Photos) zu
vermeiden, muss oft nur das Licht
des Visualizers leicht nach hinten
geschwenkt werden. Bitte
beachten Sie, dass auch das
normale Raumlicht Reflektionen
bewirken kann.
Aufnahmen außerhalb
der Arbeitsfläche
Das Licht nach hinten
schwenken
Um Aufnahmen mit Beleuchtung
außerhalb der Arbeitsfläche zu
ermöglichen, kann das Licht des
Visualizers horizontal bis zu 250
Grad geschwenkt werden.
Nahlinse
Um Objekte außerhalb der Arbeitsfläche in einer grösseren Entfernung aufzunehmen muss die Nahlinse (7)
entfernt werden. In diesem Fall ziehen Sie die Nahlinse
aus dem Kamerakopf. Es ist nicht möglich die Linse
komplett zu entfernen. (Damit sie nicht verloren werden
kann). Um wieder Aufnahmen auf der Arbeitsfläche
machen zu können, schieben Sie die Nahlinse wieder in
die ursprüngliche Position (vor der Kameraoptik).
10
Page 11
ZUSÄTZLICHE FUNKTIONEN DES VZ-7D
Infrarot Fernbedienung
Eines der einzigartigen Features der tragbaren WolfVision Visualizer ist die einfache
Bedienung: Es sind nur 5 Tasten am Gerät selbst. Dadurch kann jedermann das Gerät
ohne Einschulung sofort bedienen. Für erfahrene Anwender gibt es zusätzliche Funktionen
die über die Fernsteuerung bedient werden können.
ZOOM
Die Zoom-Tasten sind die wichtigsten Tasten auf der
Fernsteuerung. Aus diesem Grunde sind sie mit weißer Farbe
hervorgehoben. Zoom-Tasten sind ebenso am Kamerakopf des
Visualizers angebracht.
FOKUS (manuelle Schärfeeinstellung)
Sobald die Fokus-Tasten gedrückt werden, schaltet der
Visualizer die Autofokus-Funktion ab. Beim nächsten Betätigen
der Zoom Tasten wird die Autofokus wieder eingeschaltet.
IRIS (manuelle Blende)
Wenn die IRIS-Tasten gedrückt werden, schaltet das Gerät die
Autoiris-Funktion ab. Beim nächsten Betätigen der ZoomTasten wird die Autoiris-Funktion wieder eingeschaltet.
PRESETS (programmierbare Kameraeinstellung)
Zwei Zoom-Positionen und Kameraeinstellungen können durch ein kurzes(!) Drücken der
Preset 1 oder Preset 2 Tasten abgerufen werden. Die Werkseinstellungen sind:
Preset 1: 80mm x 60mm, Preset 2: 290mm x 217mm.
.
Der Anwender hat aber auch die Möglichkeit, sich seine eigenen Presets zu speichern.
Wird eine der Preset-Tasten für mehr als 3 Sekunden gedrückt, wird die aktuelle Kameraund Zoomeinstellung als Preset gespeichert. Bitte beachten Sie, dass wieder die
ursprünglichen Werkseinstellungen erscheinen, falls der Visualizer über einen längeren
Zeitraum nicht eingeschaltet wird.
IMAGE on/off
Das Visualizer-Bild, das über den Video-Ausgang (12) oder Y/C-Ausgang (13) ausgegeben
wird, kann mit diesen Tasten ein- und ausgeschaltet werden. In der OFF-Position wird ein
Schwarz-Signal ausgegeben, wodurch es beim Schalten zu keinerlei Bildstörungen
kommen kann.
Wechseln der Batterien
Wenn die Fernsteuerung nur noch sehr nahe
am Gerät oder gar nicht mehr funktioniert,
sollten die Batterien gewechselt werden.
Öffnen Sie das Gehäuse der Fernsteuerung
mit einem flachen Gegenstand (z.B. Münze
oder Schraubenzieher) und ersetzen Sie die
beiden 1,5 V AA Batterien durch zwei neue.
11
Page 12
ZUSÄTZLICHE FUNKTIONEN DES VZ-7D / VZ-5D
Digitales Zoom (VZ-5D, VZ-7D)
Alle Modelle verfügen über ein optisches 12-fach Zoom, wobei beim VZ-5D und VZ-7D durch
ein zusätzliches Digitalzoom (2-fach) der Zoombereich auf 24-fach erhöht werden kann.
kleinste Aufnahmebereich auf der Arbeitsfläche ohne(!) digitales Zoom ist 23x31mm. Wenn
weiter hineingezoomt wird, w
ird das digitale Zoom automatisch aktiviert. Der kleinste Aufnahmebereich ist somit 12x16mm.
Wichtig: Wenn Sie das digitale Zoom einsetzen ist die Bildauflösung nicht mehr so gut wie
vorher.
Manueller Weißabgleich (VZ-7D)
Der
Der automatische Weißabgleich wird auf der Seite 10 beschrieben. Für gewisse Anwendungen könnten Sie eine manuelle Weißabgleich-Einstellung benötigen. Drücken Sie die LICHTTaste 3 Sekunden lang um einen manuellen Weißabgleich durchzuführen. Sobald Sie das
Gerät aus und wieder einschalten, werden die Einstellungen zurückgestellt.
(Weitere Weißabgleich- Grundeinstellungen siehe Seite 24 - nur für Spezialisten)
Diahalter (VZ-7D)
(Diese neue Funktion ist nur bei Geräten, die ab Juni 2000 produziert wurden, vorhanden.)
Zu Beginn vergewissern Sie sich bitte, dass sich kein Objekt
auf der Arbeitsfläche befindet (sehr wichtig).
Kamerakopf
Legen Sie anschliessend das Dia in die Halterung.
Die Kamera erkennt und fokussiert das Dia automatisch.
Sollte das Dia nicht fokussiert werden, vergewissern Sie sich,
- dass das Dia exakt eingelegt wurde
- dass der Zoom nicht auf die maximale Position eingestellt ist
Dia
Serielle Schnittstelle, RS 232 (VZ-7D)
Die serielle Schnittstelle kann verwendet werden um den
Visualizer durch ein externes Gerät zu steuern (z.B. eine Fernbedienung für einen gesamten Konferenzraum). Ebenso kann
sie als Computersteuerung verwendet werden.
Eine spezielle Windows-Software zur Steuerung über PC ist
bei WolfVision erhältlich.
9-Pol D-Sub Stecker am Gerät
männlich, Vorderseite
Kontakte: 2: RX, 3: TX, 5: GND, 7: RTS, 8: CTS
Baud Rate: 19200 or 9600, databits: 8, stopbit: 1, parity: no
Bitte beachten Sie, dass Dezimal-Codes (=ASCII-Codes oder Hex-Codes)
immer als ein einziges Byte gesendet werden müssen (z.B. 199 und nicht: 1 + 1 + 9)!
Eine detaillierte Beschreibung finden Sie in unserer Homepage:
(= kleinstes Bild). Verwenden Sie die Zoom-Tasten (10).
Funktion: Dezimal-Code :
Image on
Iris open
Focus far
Zoom wide
Image off
Iris close
Focus near
Zoom tele
Preset 1
Preset 2
Save Preset 1
Save Preset 2
Preset max. wide
Preset A5
Preset A6
Preset max. tele
www.wolfvision.com
192
193
194
195
196
197
198
199
202
203
216
217
229
231
232
235
12
Page 13
Aufnahmeteil / Video: VZ-7D VZ-5D / VZ-5F
Kamerasystem: 1 CCD Einheit – 1/3" Interline transf er
Effektive Pixel: PAL Modelle: 752 x 582 / NTSC Modelle: 768 x 494
Horizontale Auflösung: > 470 TV Linien
Iris: automatisch und manuell automatisch
Autofokus: permanent, sehr hohe Geschwindigkeit, ein-/ausschaltbar
Weissabgleich: automatisch und manuell automatisch
Optik
(5,4 – 64,8mm, f=1,8~2,7):
24-fach Zoom
(12x optisch + 2x digital)
VZ-5F:12x optisches Zoom
VZ-5D:24-fach Zoom 12xopt.+ 2x dig.
Tiefenschärfe: 14mm beim kleinsten Bild (16x12mm) - VZ-7D / VZ-5D
18mm bei kleinem Bild (42x33mm) alle 3 Modelle
200mm beim grössten Bild (360x270mm) alle 3 Modelle
Bedienfeld:
Kamerabedienfeld: Funktionen: Zoom +/-, Autofokus ein/aus
Infrarot Fernsteuerung: inkludiert - Funktionen: Zoom, Iris,
manueller Fokus, Presets,
Bild ein/aus
nicht verfügbar
Netz- und Lichtschalter: Netz ein/aus, Licht ein/aus oder Licht auf Lichtbox
Power-on Preset: Autofokus ein, Autoiris ein, Aufnahmegrösse: 210x140mm
Spezieller Diahalter: inkludiert nicht verfügbar
Beleuchtungsteil:
Lichtquelle: Hochfrequenz Neonlicht
Lichtsystem: Licht entweder auf Arbeitsfläche oder vor Gerät, Publikum und Vortrag ender
werden nicht geblendet, sehr wenig Streulicht
Aufnahmebereich:
Objekte auf der Arbeitsfläche
(Länge x Breite):
min.: 16x12mm
max.: 360x270mm
VZ-5F min:32x24mm max 360x270
VZ-5D min:16x12mm max 360x270
Objekte auf der Arbeitsfläche
(Höhe):
bis zu 370mm in Weitwinkelposition,
110mm in Teleposition
Objekte im Raum: Länge, Breite und Höhe nicht limitiert
Anschlüsse:
Y/C (S-Video) Ausgang:
4-Pol Anschluss, Y-Signal: 1 Vpp 75W, C-Signal: 0,3 Vpp 75W
Composite Video Ausgang:
RCA-Anschluss, FBAS 1,0 Vss 75W
Serielle Schnittstelle: Konfiguration: RS-232 nicht verfügbar
12 V DC Ausgang: für Lichtbox oder LCD-Monitor
Allgemeine Daten:
Anschlussleistung: max. 25 VA
Stromversorgung: 12 V DC
Hergestellt in: Österreich (Europäische Union)
Gewicht: Visualizer: 4,6kg, Netzteil: 0,7kg
Mitgeliefertes Zubehör:
Netzteil: 90 – 240 V AC / 12 V DC, 1,5 A
Koffer (Softcase) inkludiert,
mit Einschubtasche für Projektor
inkludiert (Standardausführung)
Weiteres Zubehör: Y/C (S-Video) Kabel, Bedienungsanleitung
Technische Daten:
13
Technische Änderungen und Lieferbarkeit vorbehalten
Wechseln der Lampe des Visualizers
1. Entfernen Sie das Netzkabel vom
Visualizer
2. Entfernen Sie die PlexiglasAbdeckung
des Lampengehäuses (eine
Schraube)
3. Lösen Sie denSicherungsbügel
4. Wechseln Sie die Lampe
ACHTUNG: Nach Gebrauch heiss
Lampentype: Osram Dulux S/E
9W/21 oder baugleiche
Page 14
Connecteurs (3)
Installation
FRANCAIS
Vérifiez le modèle en
votre possession!
Ceci est un manuel concu à la fois pour
les visualiseurs VZ-7D,VZ-5D et le VZ-5F
.
Les pages 14-15 et 18 font références
aux unités de les caractéristiques
supplémentaires du VZ-7D sont décrites
en pages 16-17 et 24.
1 Tête de caméra vidéo
2 Lumière
3 Connecteurs (sur l´arrière comme
montré ci-dessous)
4 Surface de travail
5 Bouton marche / arrêt
6 Interrupteur pour la lumière
7 Lentille de fermeture pour caméra
8 Anneau de traction
9 Interrupteur de l´autofocus
(une lumière au dessus de
l´interrupteur montre que l´autofocus
est allumé)
10 Commandes du zoom
11 Cassette à diapositives pour VZ-7D
12 Sortie de vidéo composite (VBS)
13 Sortie Y/C (S-vidéo)
14 Entrée DC (12V)
15 Sortie DC pour boitier lumineux
16 Entrée périodique RS 232 (seulement
pour les visualisers VZ-7D)
17 Inverseurs (VZ-7D)
(pour des utilisateurs expérimentés:
voir la liste détaillée à la dernière page)
1. Tirer le bras le haut en utilisant l´anneau spécial de traction (8)
2. Tourner la tête de la caméra et la diriger vers le plan de travail
3. Connecter l´adaptateur à l´entrée DC (14)
4. Connecter un écran télé, un projecteur vidéo ou un
magnétoscope à la sortie vidéo (12) ou la sortie Y/C (13)*
5. Allumer le visualiser en activant le bouton de mise en marche (5)
Mise en route du pré-réglage:
La mise en route du pré-réglage est automatiquement activée
quand vous allumez l´unité. Les arragements sont : la taille
approximative du zoom: 20x15 cm (A5), l´allumage de l´autofocus,
l´allumage de l´auto iris, l´allumage de l´image
* La qualité de l´image est meilleure si vous utiliser une sortie Y/C (S-vidéo) au lieu
d´une sortie vidéo composite. Surtout si vous utilisez des supports en noir et blanc. Quand
vous utilisez la sortie vidéo composite, assurez-vous que l´on utilise un câble vidéo (75W)
avec des prises RCA et non pas un câble audio avec des prises RCA.
14
Page 15
Autofocus
Quand vous allumez l´unité, l´autofocus se met automatiquement en
marche. Le focus correct est en
permanence réglé à une très
grande vitesse.
La lumière verte qui est près du
bouton de mise en marche de
l´autofocus (9) se met à briller si
l´autofocus est allumé. Veuillez
noter qu´il est difficile de se
concentrer sur des objets qui ont
en contraste très faible (comme
une feuille de papier blanc). Si
l´autofocus ne fonctionne pas,
déplacer légèrement l´objet. Pour
des applications spéciales
l´autofocus peut également être
éteint en utilisant le bouton de mise
en marche (9). L´autofocus s´éteint
ègalement quand on utilises la
télécommande pour VZ-7D.
Mise au point manuelle
Si vous travaillez avec un VZ-7D, vous pouvez utiliser
la télécommande pour un réglage manuel du foyer.
Si la télécommande n´est pas disponible ou si vous
utilisez un VZ-5D ou VZ-5F, essayez cette méthode:
.
1. Placer un objet au niveau auquel vous souhaiter
faire la mise au point - l´autofocus se concentre
sur l´objet.
2. Eteignez l´autofocus en utilisant le bouton de
mise en marche (9) - le focus reste inchangé.
Les boîtiers lumineux de WolfVision
Relier le cordon d´alimentation au connecteur du
boîtier lumineux (15) sur l´arrière du visualiser.
L´interrupteur de lumière du visualiser peut
être utilisé pour commuter entre la lumière du
visualiser et la lumière du boîtier lumineux.
Autres boîtiers lumineux:
Afin d´empêcher les réflexions, la lumière du
visualiser doit toujours être éteinte quand vous
travaillez avec des boîtiers lumineux.
Balance des blancs automatique:
Quand les visualiser est allumé, il fonctionne avec une balance des blancs automatique
précise. Notez qu´immédiatement après la mise en marche de l´unité, l´ajustement de la
balance des blancs peut ne pas être correct à 100%. Dans ce cas, déplacer simplement
n´importe quel objet dans l´image. Dès lors, il fonctionnera parfaitement.
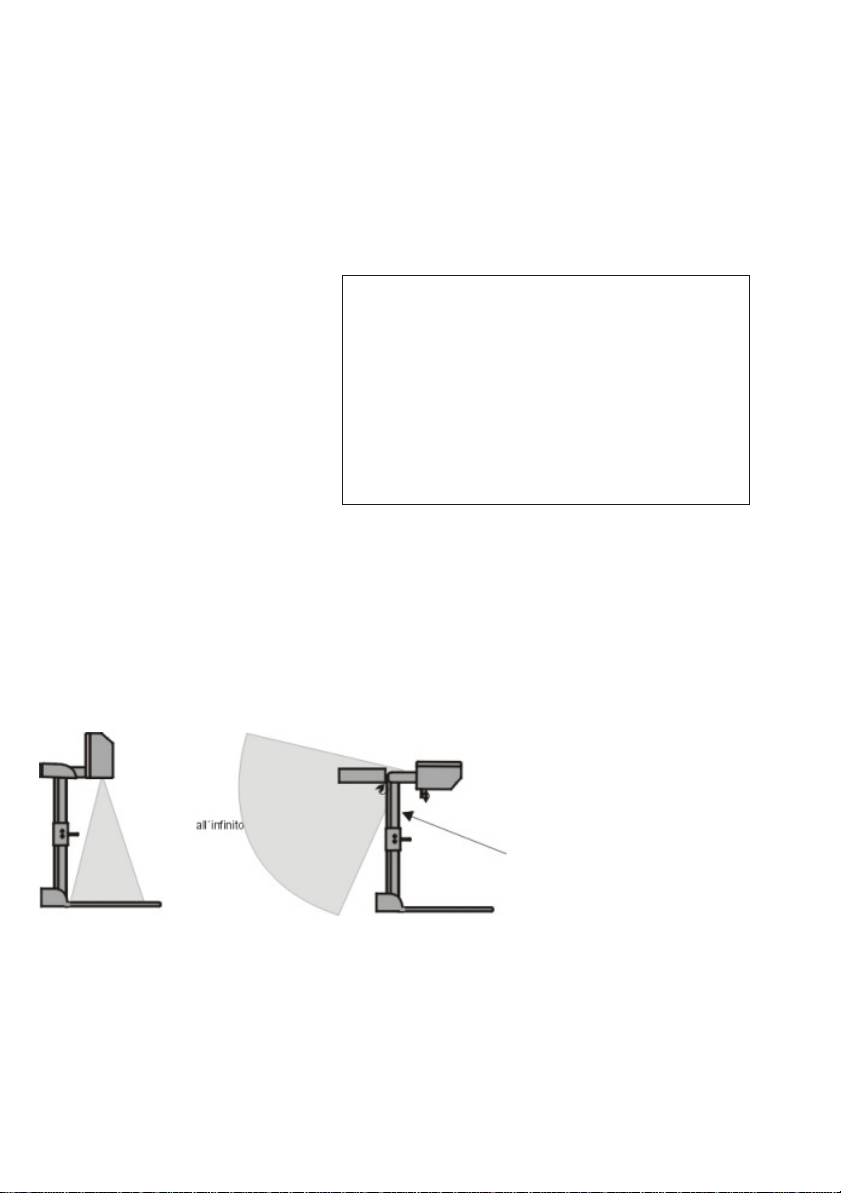
Zone de projection sur
la surface de travail
Éliminer le réflexions
Afin d´éliminer les réflexions (sur
photographies surbrillantes, etc.)
tourner simplement la lumière
légèrement vers l´arrière.
Veuillez noter que les réflexions
peuvent également être
provoquées par la lumière de la
pièce.
Zone de projection en dehors
de la surface de travail
Faites pivoter la lumière vers
l´arrière
Afin de permettre des enregistrements avec l´éclairage en dehors
de la surface de travail, la lumière
du visualiser peut être placée
horizontalement dans un angle
pouvant aller jusqu´à 250 degrés.
Lentille d´adaptateur de proximité
Pour projeter un objet en dehors de la surface de travail,
à une certaine distance, la lentille de proximité (7) doit
être enlevée. Dans ce cas, éloignez la lentille de
l´optique principal de la caméra jusqu´à ce qu´il se ferme.
Il est impossible d´enlever complètement la lentille de
l´unité, par conséquent elle ne peut se perdre. Avant de
remette la caméra dans sa position standard de travail
remettez en place la lentille de proximité.
15
Page 16
CARACTÈRISTIQUES SUPPLÈMENTAIRES DU VZ-7D
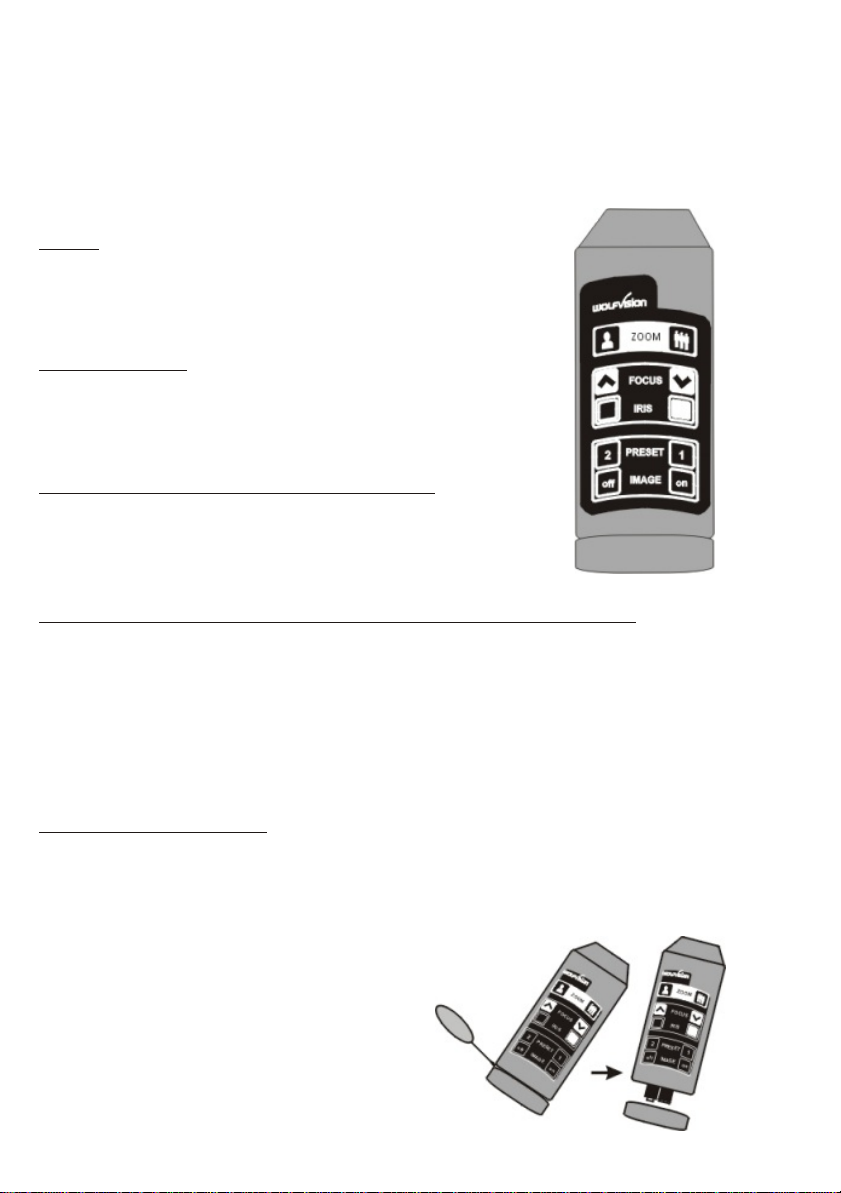
Télécommande à infrarouge (pour VZ-7D seulement)
L´une des caractéristiques unique des visualiser portables de WolfVision, est que l´unité ne
possède que 5 boutons. Par conséquent n´importe qui peut l´utiliser sans aucune instructions.
Pour des utilisateurs plus expérimentés, il y a quelques fonctions additionnelles sur la
télécommande:
ZOOM
Les commandes du zoom sont les plus importantes sur la
télécommande à infrarouge. C´est pourquoi elles ressortent
en blanc. On retrouve également les commandes du zoom sur
la tête de caméra du visualiser.
Focus (manuel)
Quand les commandes du focus sont enclenchées, le
visualiser annule les fonctions de l´autofocus.
Quand les commandes du zoom seront à nouveau
enlenchées, l´autofocus se remettra en marche.
IRIS (ajustement manuel de la luminosité)
Quand les commandes de l´iris sont enclenchées, le
visualiser annule les fonctions de l´autoiris.
Quand des commandes du zoom seront à nouveau
enclenchées, l´autoiris se remettra en marche.
PRÉ-RÉGLAGES (arragements pré-programmables de caméra)
Deux positions de zoom et des arragements de caméra peuvent être rappelés rapidement
en enclenchant les commandes de pré-réglages 1 ou 2.
En outre un utilisateur a l´opportunité de mémoriser ses propres pré-réglages. En appuyant
sur l´une des touches de commandes de pré-réglage pendant plus de 3 secondes, la
caméra utilisée et les arragements de zoom sont mémorisés comme pré-réglages.
Veuillez noter que si le visualiser n´est pas utilisé pendant longtemps les pré-réglages
d´usine réapparaissent quand l´unité est rallumée.
IMAGE: fonctionnement
Le rendement de l´image du visualiser par la sortie (12) ou sortie Y/C (13) peut être activé
ou désactivé par ces commandes.
Il n´y a absolument aucune déformation d´image à l´écran quand on allume ou éteint
l´appareil, parce que le visualiser ne produit en fait qu´un signal noir quand il est éteint.
Changer les piles
Si vous ne pouvez contrôler le visualiser que sur une
courte distance ou s´il n´y a aucun moyen de
contrôle avec la télécommande à infrarouge,
il se peut alors que vous ayez à changer la pile.
Oter le couvercle de la télécommande avec un
objet plat et remplacer les piles de 1,5 V AA par
des piles neuves.
16
Page 17
CARACTÈRISTIQUES SUPPLÈMENTAIRES DU VZ-7D
Zoom numérique (VZ-5D, VZ-7D)
Toutes les visualisers possèdent tous les deux une lentille du zoom optique 12x. De plus,
le VZ-7D / VZ-5D sont muni d´une extension de zoom numérique 2x, ce qui augmente la
longueur totale du facteur d´agrandissement du zoom 24x. Sans zoom numérique, la
superficie minimale de traitement est du 23x31 mm. Quand vous faites un zoom éloigné,
le zoom numérique est automatiquement activé et la superficie minimale de traitement est
de 12x16mm. Cependant, sachez que lorsque vous utilisez le zoom numérique, la
resolution de l´image n´est plus aussi bonne qu´avant.
Equilibre blanc manuel (pour VZ-7D seulement)
L´ajustement automatique de l´équilibre blanc est décrit à la page 15. Vous aurez peut-être
besoin d´un réglage manuel de l´équilibre blanc pour certaines applications. Vous pouvez
réaliser ce réglage en maintenant enfoncée la touche "Light" pendant 3 secondes. Quand
vous èteignez puis rallumez l´unité, l´équilibre blanc se remet en place automatiquement.
(pour les plus avisés, consulter la page 24 pour plus de détails concernant les
réglages de l´équilibre blanc).
Cassette à diapositives (pour VZ-7D seulement)
(Ceci est une nouvelle fonction du VZ-7D que l´on retrouve sur les appareils mis en service après juin 2000.)
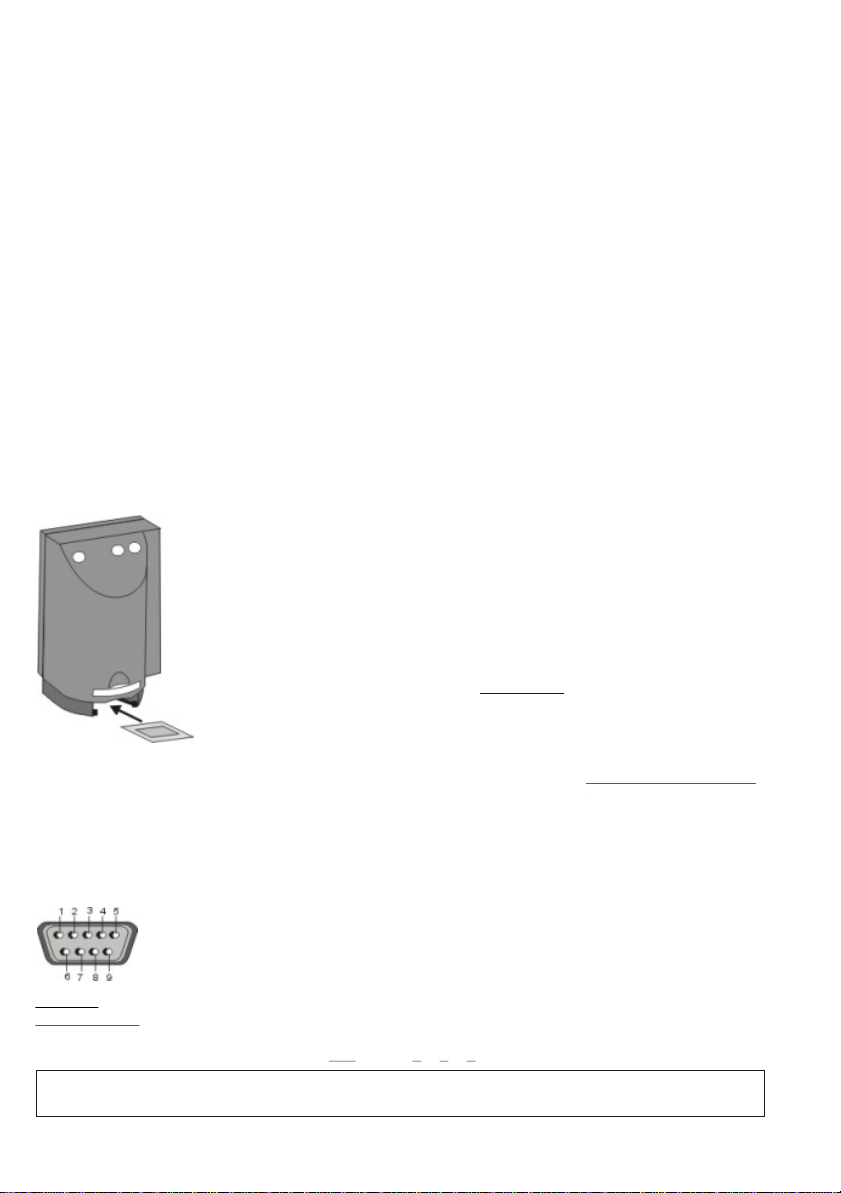
Premièrement, assurez-vous que tout objet encombrant a été
Tête de
caméra
vidéo
Diapositif
enlevé de la surface de travail (très important!) Insérez alors une
diapositive dans la cassette à diapositives. La caméra reconnaît
automatiquement la diapositive et se concentre sur cette dernière.
.
Si la diapositive est en dehors du foyer:
- assurez-vous que la diapositive est bien en place.
- assurez-vous que le zoom n´est pas en position maximale
(=plus petite image). Utilisez les commandes du zoom (10).
L´entrée périodique, RS 232 (VZ-7D)
Le port en série peut être utilisé pour contrôler le visualiser à partir
d´un diapositif externe, comme un système de télécommande pour
toute une salle de conférence. On peut l´utiliser également pour
contrôler le visualiser à partir d´un ordinateur. Un logiciel spécial
de Windows pour PC est disponible chez WolfVision.
Connecteur à 9 broches,
D-Sub sur l´unité mâle, partie avant
Broches: 2: RX, 3: TX, 5: GND, 7: RTS, 8: CTS
Débit de baud: 19200 or 9600, databits: 8, stopbit: 1, parité: aucune
Veuillez noter que les codes décimaux (=codes ASCII ou Hex) doivent être
envoyés en un unique byte (par exemple 199 et pas: 1 + 1 + 9)!
Vous pouvez trouver une description détaillée de notre protocole d´usage sur notre site internet:
www.wolfvision.com
17
Funktion: Dezimal-Code :
Image on
Iris open
Focus far
Zoom wide
Image off
Iris close
Focus near
Zoom tele
Preset 1
Preset 2
Save Preset 1
Save Preset 2
Preset max. wide
Preset A5
Preset A6
Preset max. tele
192
193
194
195
196
197
198
199
202
203
216
217
229
231
232
235
Page 18
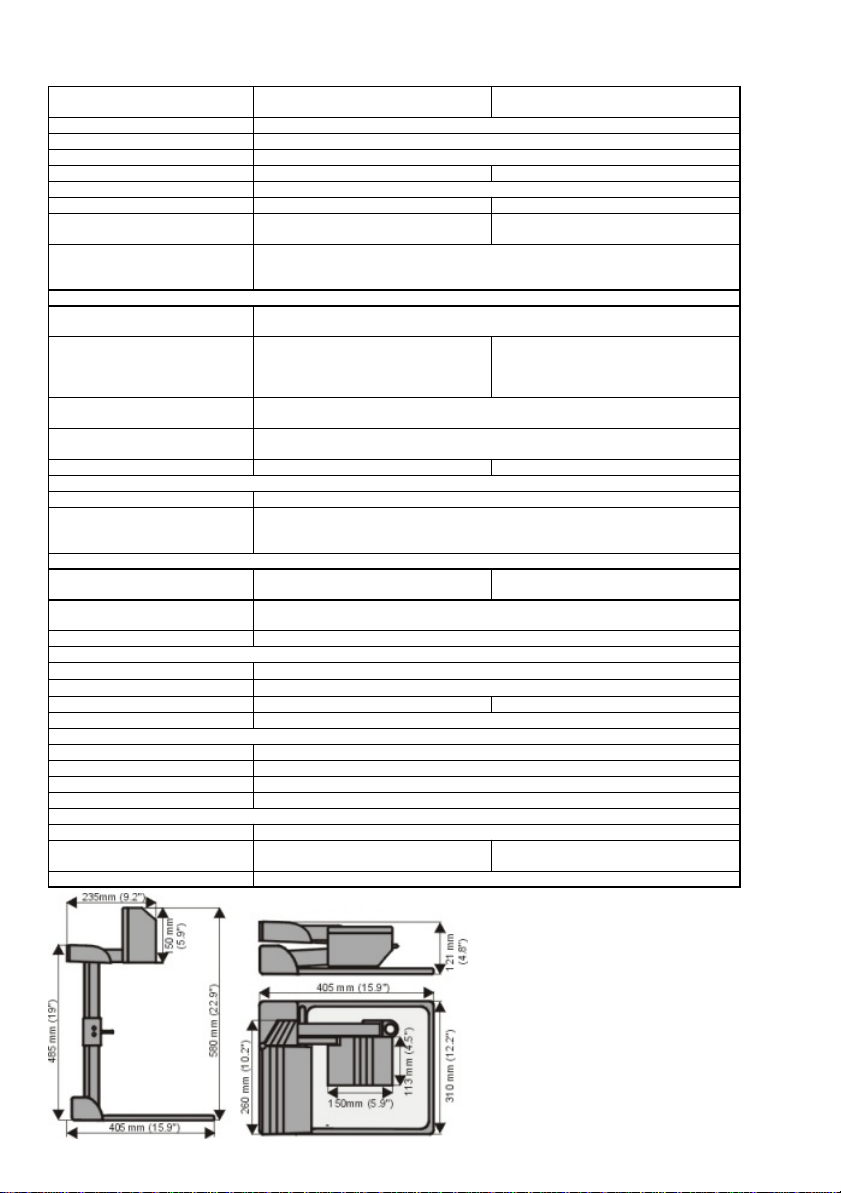
Elément de prise de vue /
vidéo:
VZ-7D VZ-5D / VZ-5F
Système de caméra: 1 unité CCD 1/3" interline transfer
Eléments d´images effectifs: modèles PAL: 752 x 582 / modèles NTSC: 768 x 494
Résolution horizontale: > 470 lignes TV
Diaphragme iris: automatique et manuel automatique
Focalisation automatique: permanent, très haute vitesse, enclencheable/déclencheable
Equilibrage des blancs: automatique et manuel automatique
Optique:
(5,4 – 64,8mm, f=1,8~2,7):
24x zoom
(12x optique + 2x digitale)
VZ-5F:12x zoom optique
VZ-5D:24x zoom (12x opt. + 2x digitale)
Profondeur de champ: 14mm image minimale (16x12mm) – (pour VZ-7D / VZ-5D)
18mm image petite (42x33mm)
200mm image maximale (360x270mm)
Fonctions:
Tableau de commande pour
caméra:
fonctions: zoom +/-, focalisation automatique enclenchée/déclenchée
Commande à distance
infrarouge:
fonctions: zoom, focalisation manuelle,
diaphragme iris,
pré-réglages, image
enclenchée/déclenchée
-
Commutateur principal at
commutateur lumière:
réseau enclenche/déclenche, lumière enclenchée/déclenchée ou lumière sur
boîtier lumineux
Power-on preset: l´autofocus enclenche/déclenche, l´iris automatique enclenche/déclenche, taille
de la surface de prise de vue: 210 x 140 mm
Cassette à diapositives: inclus -
Elément luminescent:
Source luminescente: fréquence de l´éclairage au néon
Système d´illumination: La lumière est dirigée soit sur la surface de travail, soit devant l´apparail. Le public
et le conférencier ne sont pas éblouissés, un minimum de lumière diffusée est
produit.
Rayon de prise de vue:
Objets sur la surface de travail
(longueur x largeur):
min.: 16x12mm
max: 360x270mm
VZ-5F min: 32x24mm, max: 360x270
VZ-5D min: 16x12mm, max: 360x270
Objets sur la surface de travail
(hauteur):
jusqu´à 110mm en position télé
jusqu´à 370mm en position de grand angle
Objets dans une salle: largeur, longueur et hauteur jusqu´au infini
Connections:
Y/C (vidéo-S) sortie:
connection à 4 pôles, signal Y: 1 Vpp 75W, signal C: 0,3 Vpp 75W
Sortie composit vidéo:
connection RCA, FBAS 1,0 Vss 75W
Interface sérielle: configuration: RS-232 Sortie 12 V DC: pour boîtier lumineux ou LCD-moniteur
Données générales:
Puissance connectée: max. 25 VA
Alimentation électrique: 12 V DC
Fabriqué en: Autriche (CE)
Poids: Visualizer: 4,6kg, alimentation: 0,7kg
Accessoires délivrés:
Alimentation: 90 – 240 V AC / 12 V DC, 1,5 A
Valise: compris, avec une poche extèrieure
coudre sur la valise (projecteur )
compris (fabrication du standard)
Accessoires délivrés: câble Y/C, instructions d´opération
Caractéristiques techniques:
Sous réserve de modification techniques et de livraison
Changer l´ampoule du visualiser
1. Enlever le cordon d´alimentation
du visualiser
2. Enlever le verre de protection de
l´ampoule (1 vis)
3. Enlever l´attache de sécurité
4. Changer l´ampoule
ATTENTION: brûlante après usage!
Type de lampe: Osram Dulux S/E
9W/21 ou équivalent
18
Page 19
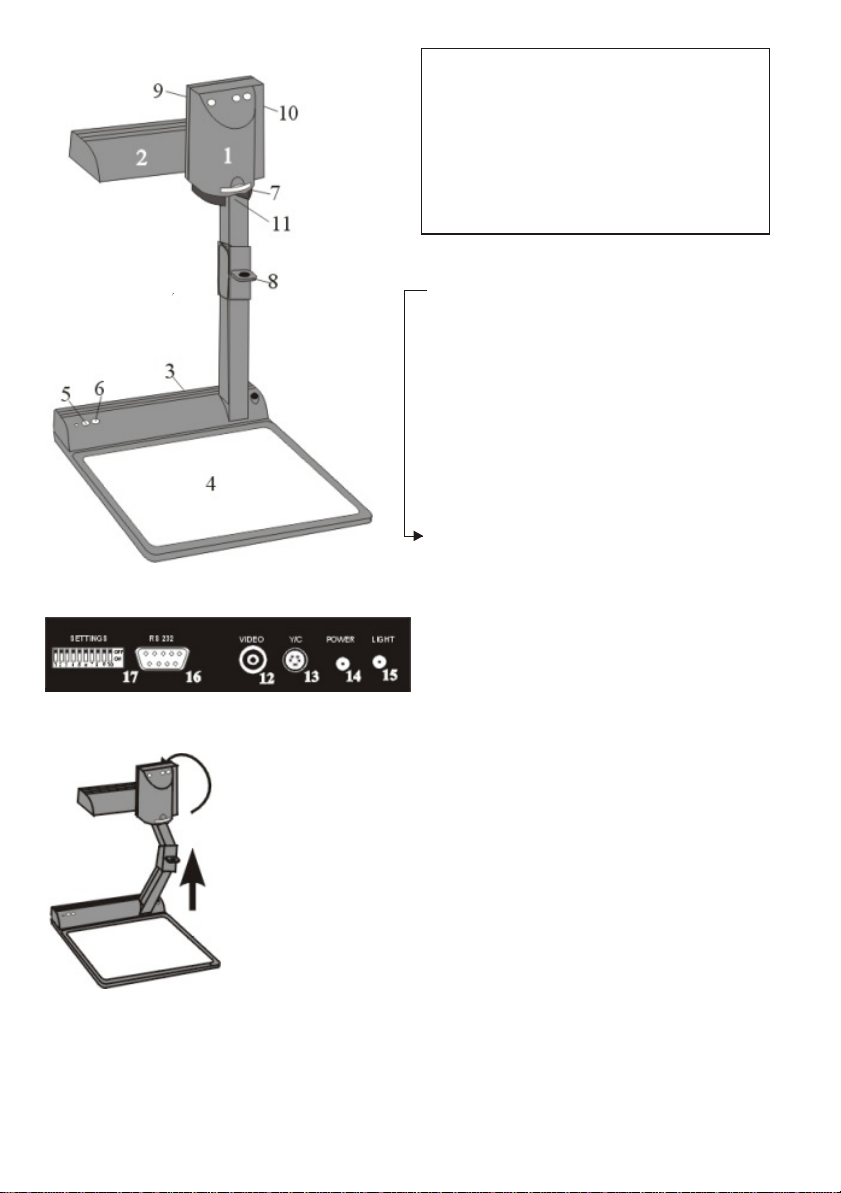
Connettori (3)
Controllare l´esatta denominazione
ITALIANO
del Vostro modello!
Questo è un manuale combinato per i
Visualizer modello VZ-7D, VZ-5D e VZ-5F.
.
Le pagine da 19-20 e 23 sono comuni ad
entrambe i modelli, le caratteristiche
addizionali del modello VZ-7D sono
descritte alle pagine 21-22 e 24.
1 Testa con telecamera
2 Sistema di illuminazione
3 Connettori (sulla parte posteriore)
4 Piano di lavoro
5 Interruttore acceso/spento
6 Interruttore sistema di illuminazione
7 Lente per represe esterne al piano di
lavoro
8 Anello per apertura Visualizer
9 Tasto autofocus inserito/disinserito
(un led é acceso quando la funzione
é attiva)
10 Tasti zoom
11 Alloggiamento diapositiva (solo VZ-7D)
12 Uscita videocomposito (FBAS, VBS)
13 Uscita Y/C (S-VHS)
14 Ingresso alimentazione (12V)
15 Uscita alimentazione per lightbox
16 Ingresso controllo seriale (solo VZ-7D)
17 DIP switches (VZ-7D) vedi lista nella
ultima pagina - solo per utenti esperti
Utilizzo
1. Aprire il Visualizer tirando il braccio tramite l´apposito anello(8)
2. Ruotare la telecamera (1) ed inquadrare il piano di lavoro
3. Collegare l´alimentatore alla presa DC (14)
4. Colegare un monitor TV, un videoproiettore o un video registratore all´uscita videocomposito (12) o Y/C (S-VHS) (13)
5. Accendere il Visualizer tramite l´apposito interruttore (5)
Impostazioni all´accensione
Le impostazioni automatiche attivate all´accensione sono: zoom
cm 20x15 (A5) autofocus attivo, autoiris attivo, immagine attiva.
* La qualità dell'immagine é migliore se utilizzate l'uscita Y/C (13), piuttosto che
quella videocomposito (12), specialmente con materiale dattilografato in bianco e nero.
Se utilizzate l'uscita videocomposito, assicuratevi di usare un cavo video 75 Ohm con
connettori RCA e non un cavo audio con connettori RCA.
19
*
Page 20
Autofocus
Al l'accensione dell' unit, l'autofocus é
già operativo. La corretta messa a
fuoco é regolata costantemente ad
alta velocità. Il led verde (9) dietro il
pulsante dell' autofocus si illumina se
la funzione é attiva.
Si prega notare che oggetto con
contrasto molto basso (p.esempio un
foglio vuoto di carta) sono molto difficili
da focalizzare: in questo caso,
muovere leggermente l'oggetto fino ad
ottenere la corretta focalizzazione.
Per applicazioni particolari, l'autofocus
puo essere disinserito utilizzando il
relativo tasto (9). L´autofocus è
attivato automaticamente quando
vengono utilizzati i pulsanti di zoom
sul telecomando. Se lavorate sul
modello VZ-7D potete utilizzare i
comandi FOCUS sul telecomando per
la focalizzazione manuale.
Messa a fuoco manuale
Qualora il telecomando non sia disponibile, o siate
in possesso del modello VZ-5D/VZ-5F, operate come
segue:
.
1. Posizionate un oggetto al livello al quale
desiderate l messa a fuoco.
2. Disattivate il comando autofocus con l´interruttore
ON/OFF (9). La focalizzazione rimane invariata
da questo momento.
Lightbox WolfVision (opzionale):
.
Collegare il cavo al connettore lightbox (15)
sul panello posteriore. L`ínterruttore del sistema
di illuminazione (6) del Visualizer puo essere ora
utilizzato per effettuare la commutazione tra la
luce del Visualizer e quella del lightbox.
Altri lightbox:
Per evitare fastidiose riflessioni, il sistema di
illuminazione del lightobx deve sempre essere
spento quando si utilizza in alternativa un
lightbox.
Bilanciamento automatico del bianco
All´accensione, il Visualizer lavora con un preciso bilanciamento automatico del bianco.
Si prega notare che all´accensione dell´unità il bilancamento potrebbe non essere corretto
al 100%. In questo caso, muovere un oggetto all´interno dell´immagine per una perfetta
regolazione.
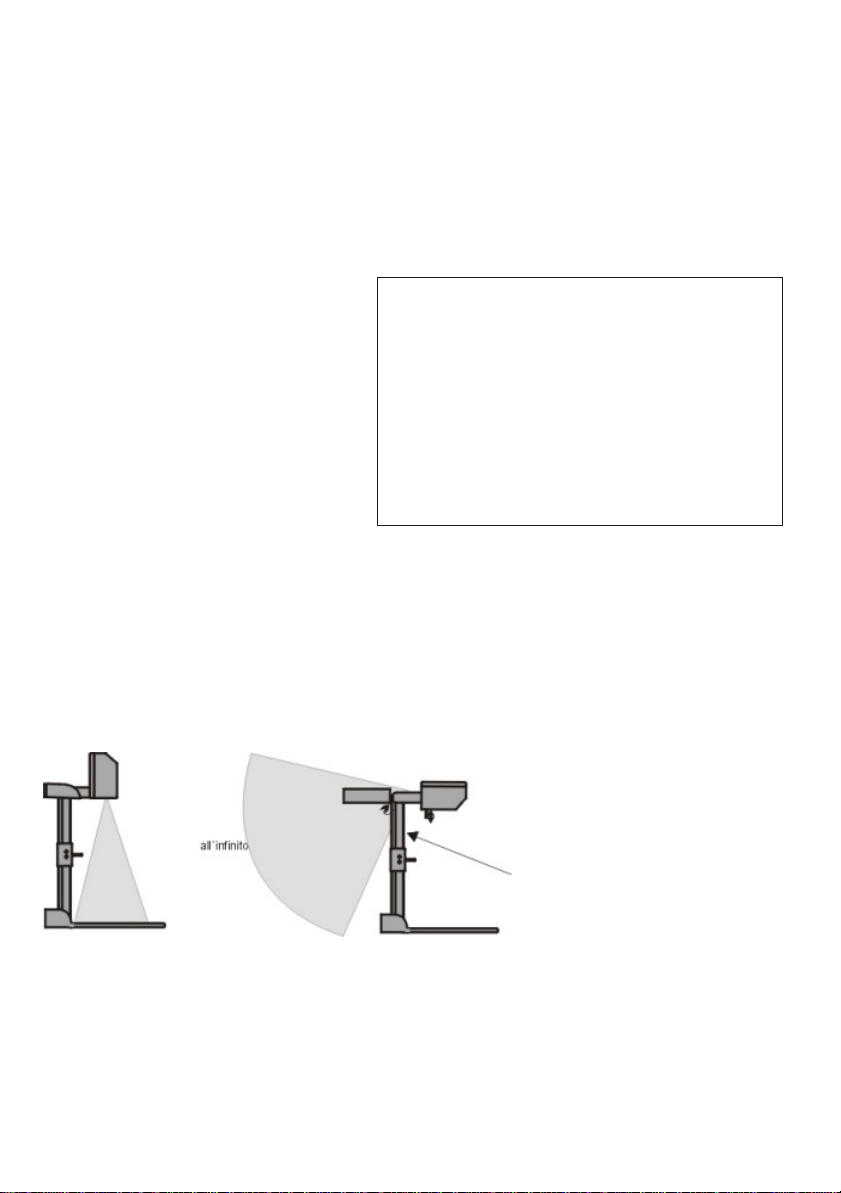
Area di ripresa sul
piano di lavoro
Eliminazione riflessioni
Per eliminate le riflessione (per
esempio su fotografie molto
lucide), ruotare leggermente il
sistema di illuminazione verso la
parte posteriore.Si prega notare
che le riflessioni possono anche
essere causate da luce ambiente.
-
Area di ripresa esterna
al piano di lavoro
Ruotare la luce verso la parte
Posteriore per abilitare la
corretta illuminazione e ripresa
degli ogetti al di fuori del piano
di lavoro. Il sistema di
illuminazione pu essere ruotato
fino a 250°.
Lente per primi piani
Per riprese al di fuori di lavoro, ad una certa distanza
dall´unità, la lente per primi piani (7) deve essererimossa. In questo caso, rimuovere la lente dall´ottica
della telecamera fino al punto di blocco. É impossibile
rimuovere completamente la lente dalla sua sede,
perciò non può essere persa. Prima di ruotare
nouvamente la telecamera nella posizione standard di
lavoro, premere la lente nella sua sede originale.
20
-
Page 21
CARATTERISTICHE ADDIZIONALI DEL VZ-7D
Telecomando a infrarossi
Una delle caratteristiche uniche dei Visualizzatore portabili Wolfvision é quella di
avere soltanto 5 tasti sull'unitá. Perci chiunque pu utilizzarli senza particolari istruzioni.
Comunque, per gli utilizzatori pi evoluti, sono disponibili sul
telecomando ad infrarossi alcune funzioni addizionali:
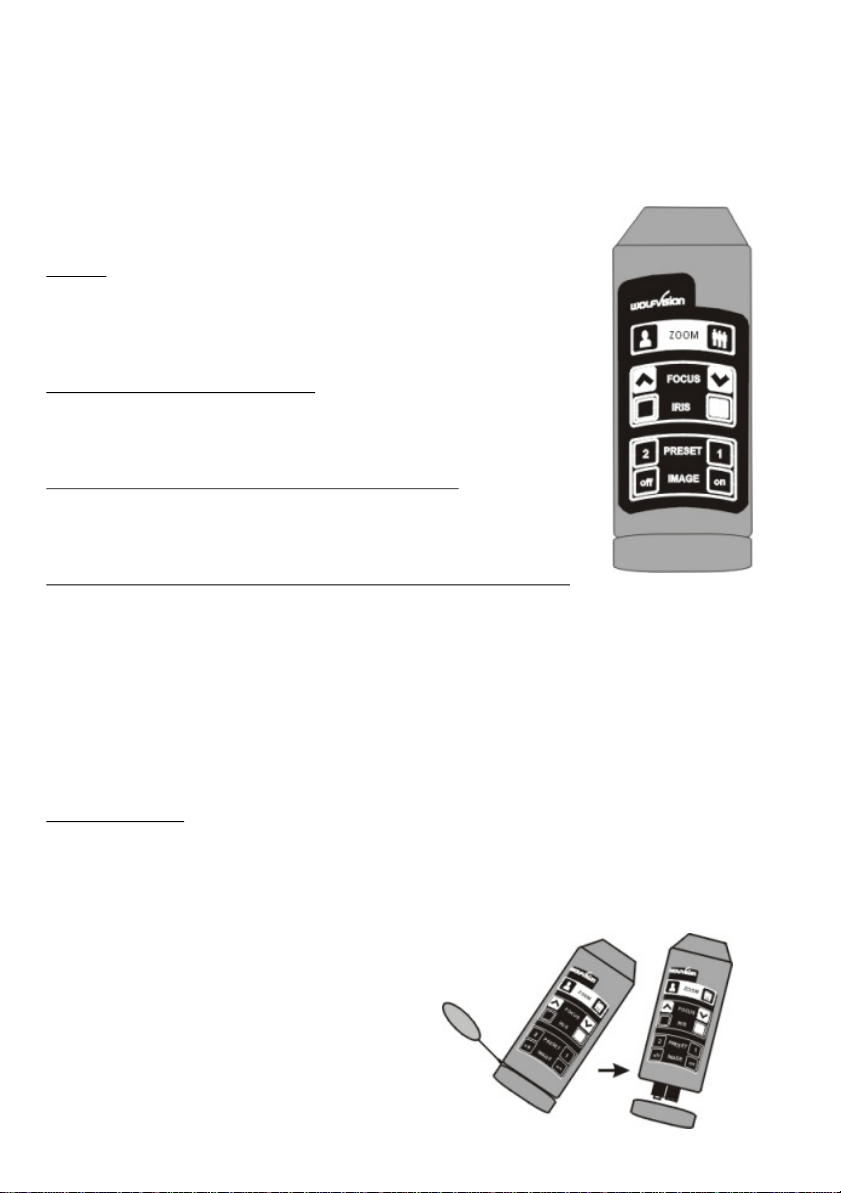
ZOOM
I tasti zoom sono i piu importanti sul telecomando IR.
Questa é la ragione per cui sono evidenziati in bianco.
Gli stessi comandi sono ripetuti sulla telecamera del
Visualizzatore.
ü
MESSA A FUOCO (manuale)
Quando i tasti focus sono premuti, la funzione autofocus è
disattivata. Non appena si attivano i tasti zoom, la funzione
autofocus viene ripristinata.
Ü
IRIS (regolazione manuale della luminosità)
Quando i tasti IRIS sono premuti, la funzione automatica di
iris é disattivata. Non appena si attivano i tasti zoom, la
funzione automatic di iris viene ripristinata.
ü
PRESETS (regolazioni programmabili della telecamera)
Due impostazioni di zoom e telecamera possono essere
richiamate semplicemente premendo i tasti Preset 1 o Preset 2.
I valori impostati di default sono:
Preset 1 - 80 x 60mm, Preset 2 - 290 x 217mm
Inoltre, l'utilizzatore ha la possibilità di memorizzare le proprie
impostazioni. Premendo uno dei due tasti Preset per piu di 4
secondi, i valori di zoom e regolazioni telecamera utilizzati in quel
momento vengono memorizzati come preselezioni. Qualora il Visualizer non venga
utilizzato per un lungo periodo di tempo, i valori di default vengono ripresentati al
momento della nuova accensione.
ü
IMAGE on / off
La visualizzazione dell'immagine tramite i connettori videocomposito (12) o
Y/C S-VHS (13), puo essere attivata / disattivata premendo questi tasti. Non c'é
assolutamente nessun disturbo sulla immagine monitor, in quanto il Visualizer
genera una immagine nera se in posizione off.
Sostituzione delle batterie
ü
Qualora il Visualizer fosse utilizzabile tramite
telecomando IR soltanto da breve distanza o
non lo fosse affatto, si rende necessaria la
sostituzione delle batterie.
ü
Aprire lo sportello con un oggetto piatto (un
cacciavite o una moneta) e sostituire le due
batterie 1.5V misura AAA con delle nuove.
21
Page 22
CARATTERISTICHE ADDIZIONALI DEL VZ-5D / VZ-7D
Zoom digitale (VZ-5D, VZ-7D)
Sia il modello VZ-7D, VZ-5D che il VZ-5F hanno uno zoom ottico 12x (12 ingrandimenti). Oltre a
ciò, il modello VZ-7D, anche il VZ-5D possiedono una estensione 2x che incrementa lo zoom
totale a 24x (24 ingrandimenti). L´area di represa più piccola sul piano di lavoro senza utilizzare
lo zoom digitale è di mm. 23x31. Quando si zooma ulteriormente, la dimensione diventa
addirittura mm 12x16. Si prega notare che in questo caso la risoluzione dell´immagine video non
è altrettanto definita come in precedenza.
Bilanciamento del bianco manuale (VZ-7D)
Il bilanciamento del bianco automatico è descritto a pagina 20. Per alcune applicazioni, potreste
invece necessitare di una regolazione manuale. Ciò può essere realizzao premendo il tasto
LIGHT per 3 secondi. Spegnendo e riaccendendo l´unità, si ritorna comunque alla modalità
automatica.
Per altre regolazioni particolari del bilanciamento, vedere pagina 24.
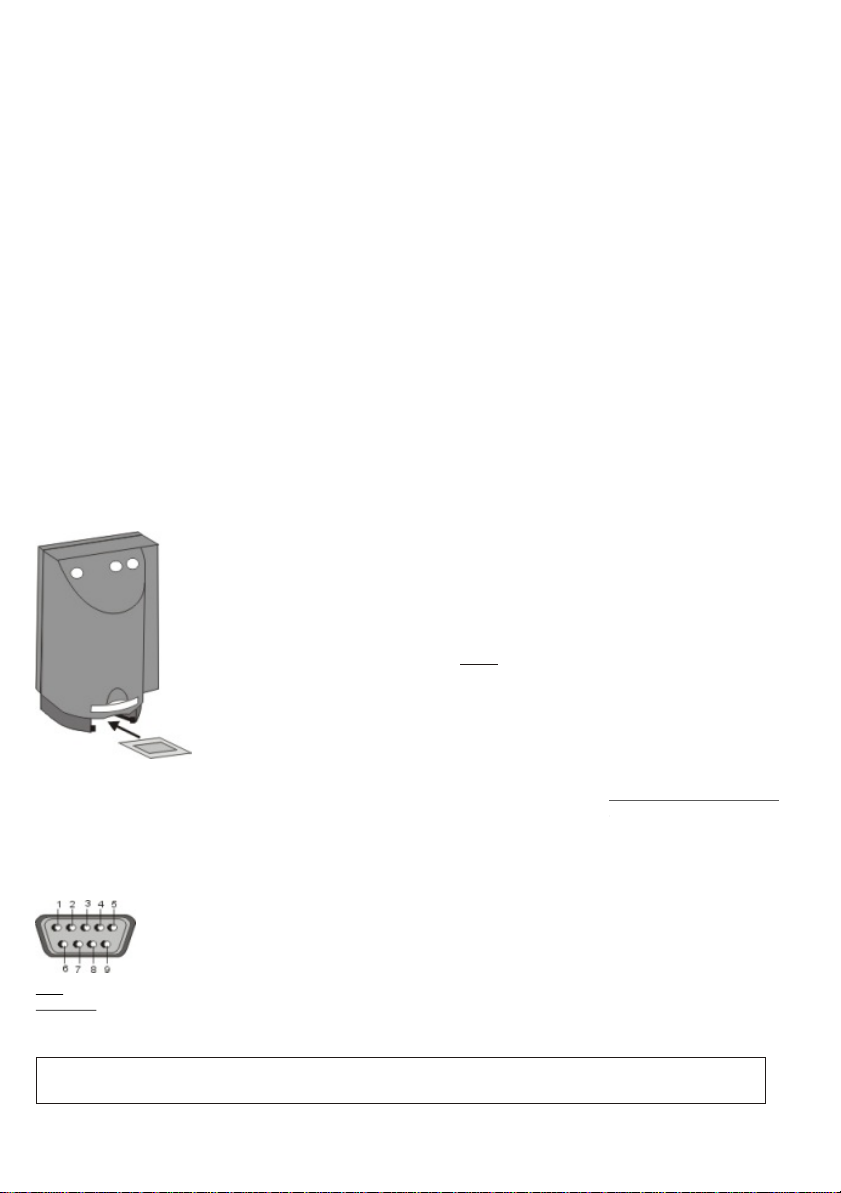
Alloggiamento diapositiva (VZ-7D)
(Questa è una nuova funzione disponibile sulle unità prodotte a partire da Giugo 2000.)
Assicuratevi prima di non avere oggetti sul piano di lavoro (molto
importante!). Quindi, inserite la diapositiva nell´alloggiamento.
testa
La telecamera riconosce automaticamente la diapositiva e si
focalizza su di essa.
Nel caso la diapositiva fosse fuori fuoco: assicuratevi che sia
perfettamente inserita e bloccata nella sua sede
-assicuratevi che lo zoom non sia in posizione tele (=immagine
ridotta). Utilizzate i tasti ZOOM (10).
diapositiva
Ingresso controllo seriale RS 232 (VZ-7D)
La porta seriale pu essere utilizzata per controllare il Visualizer
attraverso un sistema esterno, come per es. un telecomando
remoto per il controllo totale di una sala conferenze. Pu inoltre
essere utilizzata per il controllo del Visualizer tramite computer.
Uno speciale software di controllo per Windows
é disponibile come accessorio.
9-pin connettore femmina 9 pin tipo D-SUB sull´unità
lato frontale
Pins: 2: RX, 3: TX, 5: GND, 7: RTS, 8: CTS
Baud rate: 19200, databits: 8, stopbit: 1, parity: no
Si prega notare che i codici decimali (codici ASCII o HEX) devono essere inviati
come un byte singolo (es. 199 e non 1 + 9 + 9)
Una descrizione dettagliata del protocollo seriale può essere trovata presso la nostra pagina Internet:
www.wolfvision.com
22
Function: Decimal-Code :
Image on
Iris open
Focus far
Zoom wide
Image off
Iris close
Focus near
Zoom tele
Preset 1
Preset 2
Save Preset 1
Save Preset 2
Preset max. wide
Preset A5
Preset A6
Preset max. tele
192
193
194
195
196
197
198
199
202
203
216
217
229
231
232
235
Page 23
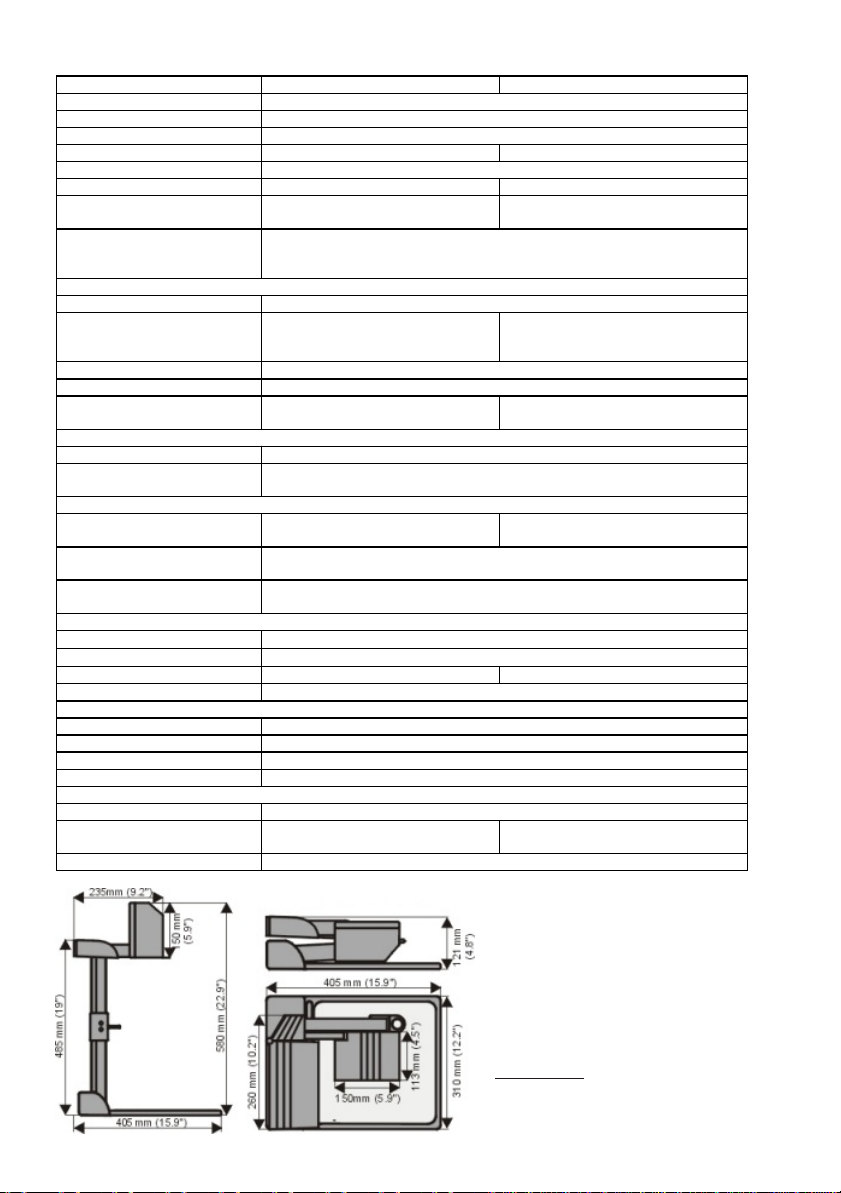
Dati tecnici:
Sistema di ripresa video: VZ-7D VZ -5F / VZ-5D
Telecamera: sensore 1 CCD 1/3" transfer interlinea
Pixel effettivi: modello PAL: 752 x 582 / modello NTSC: 768 x 494
Risoluzione orizzontale: > 470 linee TV
Iris: automatico e manuale automatico
Autofocus: funzionamento automatico, ad alta velocità, disinseribile
Bilanciamento del bianco: automatico e manuale automatico
Ottica:
(5,4 – 64,8mm, f=1,8~2,7):
24x zoom
(12x ottico + 2x digitale)
VZ-5F: 12x zoom
VZ-5D: 24x (12x ottico + 2x digitale)
Profondità di campo: 14mm su immagine minima (16x12mm) – (VZ-7D / VZ-5D)
18mm su immagine ridotta (42x33mm)
200mm su immagine maximo (360x270mm)
Controlli:
Pannello telecamera: funzioni zoom +/-, autofocus on/off
Telecomando a infrarossi: incluso – funzioni: zoom, fuoco,
diaframma, preselezioni, immagine
on/off
-
Alimentazione e controllo luce: accensione on/off, luce on/off o accensione lightbox
Preselezioni all´accensione: luce e autofocus inseriti, area di ripresa 210x140mm
Allogiamento speciale per
diapositiva:
incluso -
Illuminazione:
Sorgente luminosa: lampada neon ad alta fre quenza
Sistema luminoso: luce sia sul piano di lavoro che frontalmente, retro schermato per evitare
l´abbagliamento, pochissima luce diffusa all´esterno
Area di ripresa:
Soggetti sul piano di lavoro
(lunghezza x larghezza):
minimo: 16x12 mm
maximo: 360x270mm
minimo: VZ-5F: 32x24mm / VZ-5D:
16x12mm, maximo: 360x270mm
Soggetti sul piano di lavoro
(altezza):
fino a 370mm in posizione grandangolo,
110mm in posizione tele
Soggetti fuori della superficie
di lavoro:
lunghezza, larghezza e altezza da 0 a infinito
Collegamenti:
Uscita Y/C (S-VHS):
connettore 4 pin, (Y: 1 Vpp 75W, C: 0,3 Vpp 75W)
Uscita videocomposito:
connettore RCA, VBS 1,0 Vpp 75W
Ingresso controllo seriale: configurazione: RS-232 12 V DC uscita: per lightbox o LCD-monitore
Caratteristiche generali:
Assorbimento: maximale 25 VA
Alimentazione: 12 V DC
Paese di origine: Austria (Comunità Europea)
Peso: Visualizer: 4,6kg, alimentat ore: 0,7kg
Accessori forniti:
Alimentatore: 90 – 240 V AC / 12 V DC, 1,5 A
Borsa morbida: incluso (con la stessa borsa si trova
anche una custodia per il proiettore)
incluso (modello standard)
Accessori forniti: cavo Y/C, istruzioni d´uso
23
Caratteristiche tecniche e disponibilità soggette a modifiche
Cambio lampada del visualizer:
1. Togliere il cavo di alimentazione
2. Rimuovere il vetro del portalampada
3. Rimuovere la chiusura di sicurezza
4. Cambiare la lampada
ATTENZIONE: la lampada potrebbe
essere incandescente
Lampada tipo: Osram Dulux S/E
9W/21 o equivalente
Page 24
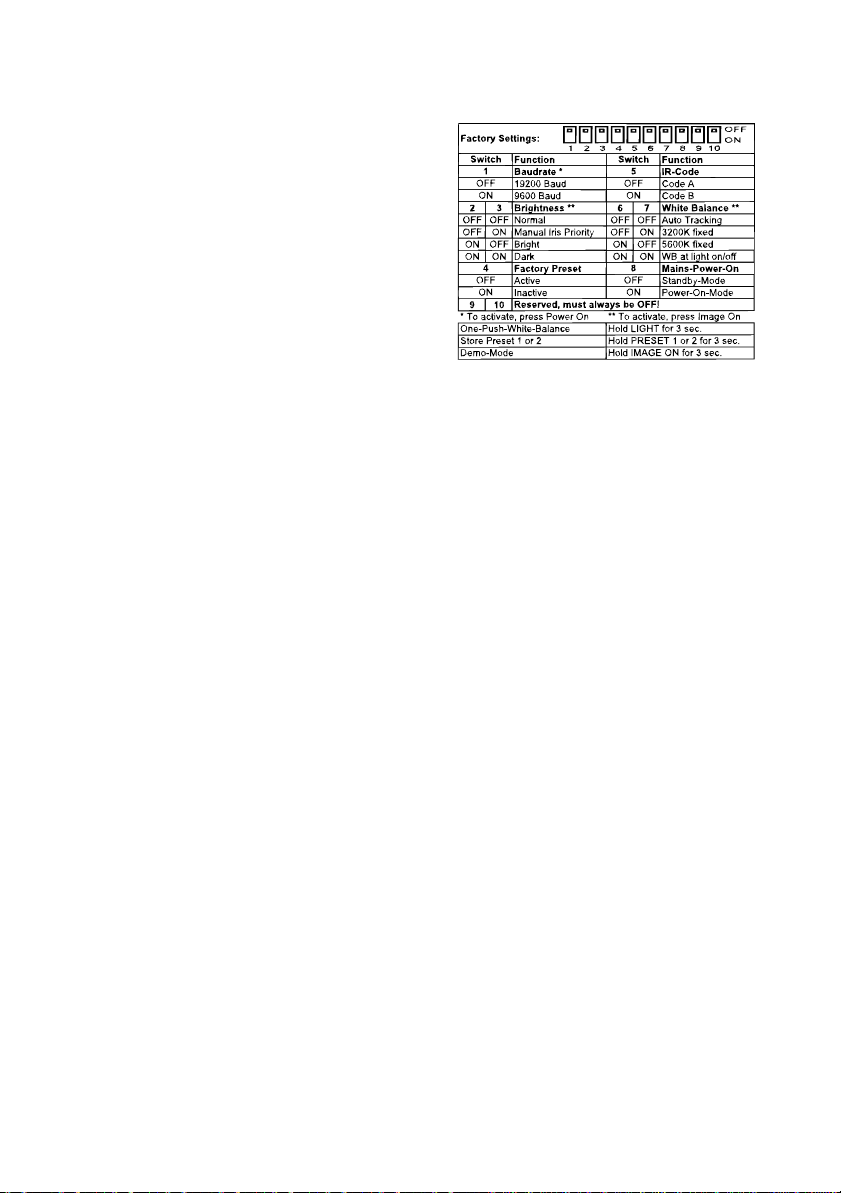
DIP-Switches of VZ-7D (for specialists only)
Introduction
.
On the VZ7D there are ten DIP-switches mounted behind
the connector panel (labeled with SETTINGS). With this
switches the behavior of the unit can be changed in various
ways. The default setting (as shipped from the factory) for
all switches is the OFF-position (upper-position).
Baudrate (Switch 1)
.
When switch 1 is OFF the baudrate is set to 19200 baud
(default). However, in some applications a 9600 baud are
required. To change to 9600 baud you have to toggle switch
1 to the ON-position. The new baudrate is activated after
the unit has been switched off and on again.
Brightness and Manual-Iris-Priority-Mode (Switch 2 and 3)
.
When switch 2 and 3 are OFF the default brightness of the picture is used which is a good setting for most
applications. But if you often use white sheets of papers you may try to set switch 2 to the ON-position. This results in
a brighter picture. If you think that the picture is to bright with the default setting, you can change switch 2 and 3 to the
ON-position. Then you will get a darker picture. To activate the new setting you should press Image On (on the remote
control) or turn the unit off and on again. Normally the Auto-Iris is turned on each time you press a zoom-button. In
some applications (e.g. when displaying x-rays) this may be disturbing. When you change switch 3 to the ON-position
the manual-iris-priority-mode is selected. Press Image On to activate this setting (or turn the unit off and on). In this
mode the zoom-buttons do not switch on the Auto-Iris. If you want to switch on the Auto-Iris again you have to press
the Image On. After turning the unit on the Auto-Iris is activated too.
Factory Preset (Switch 4)
.
When switch 4 is OFF (default setting) the unit performs a factory-preset (i.e. the unit zooms to A5-position) when
it is switched on. If you would prefer that the unit remembers the last position when it was switched off you can
change switch 4 to the ON-position.
IR-Code (Switch 5)
.
When switch 5 is OFF the unit operates with the default IR-code (A). If you want to use two Visualizers at the same
time you can select IR-code B by changing switch 5 to the ON-position. You also have to toggle the switch inside the
IR-remote-control so that the remote-control uses code B too. To do so, open the remote-control (as in this manual)
and pull out the printed-circuit-board. Toggle the switch in the bottom-right-hand corner and close the remote-control.
White Balance (Switch 6 and 7)
.
When switch 6 and 7 are OFF (default) the normal auto-tracking-white-balance is used. An intelligent algorithm
is used which detects if there is a colored object. If a colored object is recognized no white-balance is performed.
However, if you often change between the Visualizer-light and a lightbox, the slow reaction-time may be disturbing.
In this case you can change switch 6 and 7 to the ON-position and press Image On to activate the new setting.
With this setting a white balance is performed each time you turn the light on or off and when the unit is switched
on. After the white-balance is performed it remains unchanged until the next time when the light-button is pressed.
Please make sure that you have a white object when turning the light off or on. If you have a colored object the
white-balance may be incorrect. If this is the case, remove the colored object and hold the light-button for three
seconds (until the power-LED starts to blink). This performs a white-balance too (One-Push-White-Balancefunction). When you only change switch 6 to ON the 5600K-fixed-white-balance is selected. If you only toggle
switch 7 to ON the 3200K-fixed-white-balance is chosen. To activate one of these settings press Image On (or
switched the unit off and on again).
Mains-Power-On-Behavior (Switch 8)
.
When switch 8 is OFF (default setting) the unit is in the standby-mode after power is supplied to the unit. (The powerLED is flashing for half a second to indicate that the power is OK.) Then you have to press the Power-button to turn
on the unit. If you want that the unit is switched on immediately after the power is supplied you have to change switch
8 to the ON-position. This might be useful in applications where the whole video-installation can be switched on with
a common switch.
24
 Loading...