

Page 1
INSTRUCTIONS
VZ-8
R
English
Page 2
PRECAUTIONS
RISK OF ELECTRIC SHOCK
DANGEROUS VOLTAGE INSIDE
WARNING!
This product is built according to Directive EMC and to Directive electrical equipment.
Proofments according to UL 1950. CSA - C 22.2 No. 950-95
This equipment has been tested and found to comply with the limits for a Class A digital device, pursuant to Part
U
15 of the FCC Rules. These limits are designed to provide reasonable protection against harmful interference when
L
®
the equipment is operated in a commercial environment. This equipment generates, uses, and can radiate radio
frequency energy and, if not installed and used in accordance with the instruction manual, may cause harmful
FCC
interference to radio communications. Operation of this equipment in a residential area is likely to cause harmful
interference in which case the user will be required to correct the interference at his own expense.
Manufacturer:
WolfVision GmbH, Vlbg. Wirtschaftspark, A-6840 Götzis, Austria
Tel. ++43-(0)5523-52250-0, Fax ++43-(0)5523-52249
E-Mail: [email protected], Internet Homepage: www.wolfvision.com
Made in: Austria (EC) Printed in Austria September 2001
2
Page 3
9
10
22
11
11
7
8
6
5
3
4
SVGA/XGA/SXGA
Connectors (3):
EXTERN IN
11
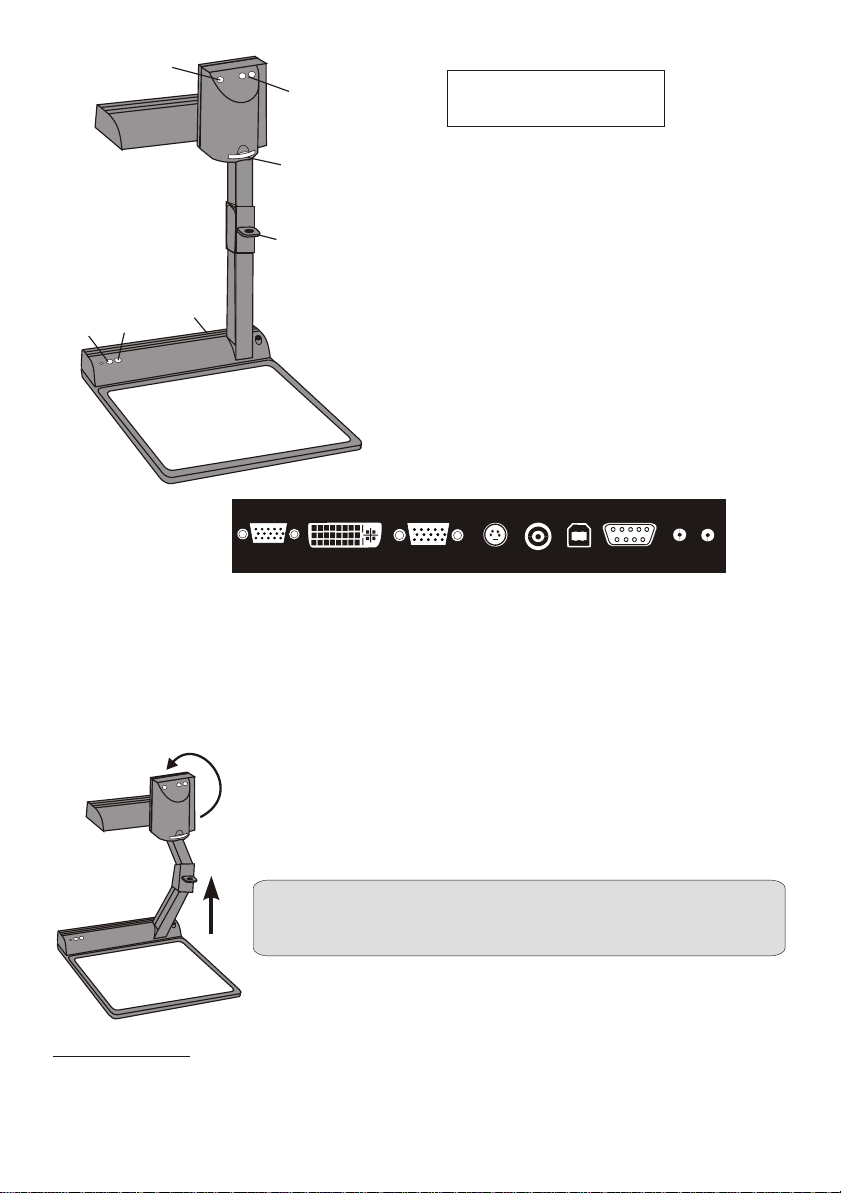
11 External input for Computers (see page 9)
13 RGBHV output (switchable)
15 PAL/NTSC Composite video output
17 Serial control input RS232 (see page 10)
19 DC-output for lightbox
DVI
7
12
ENGLISH
1 Camera head
2 Light
3 Connectors (on the back
as shown below)
4 Working surface
5 Power on/off key
6 Light key (Also works as White
Balance key if pressed for 3
seconds - see page 7)
7 Close up lens for camera
8 Pull ring
9 Auto focus on/off key
(a light above this key shows
that the auto focus is on)
10 Zoom keys
USB
16
RS 232
17 18 19
VIDEO
Y/C
13 14 15
12 DVI output (see page 10)
14 PAL/NTSC Y/C (S-Video) output
16 USB-port (see page 8)
18 Power connection 12V
POWER
LB
Setting up
1. Pull the arm upwards using the special pull ring (#8)
2. Turn the camera head (#1) and point it at the working surface
3. Connect the power adaptor to the DC-input (#18).
4. Connect your output unit (projector, monitor, video conferencing
unit etc.) to the appropriate output of the Visualier (#12, #13, #14,
#15 or #16).
IMPORTANT:
For choosing the right output please read the detailled
description on page 5!
5. Switch on the Visualizer with the power switch (#5)
Power-on preset:
The power-on preset is automatically activated when switching on the unit. The settings are:
Zoom size approx. 20 x 15 cm (A5), Autofocus on, Autoiris on.
3
Page 4
Infrared remote control
One of the unique features of WolfVision's portable Visualizers is that there are only
5 buttons on the unit. Therefore anyone can use it without instructions. For more
experienced users there are some additional functions on the remote control:
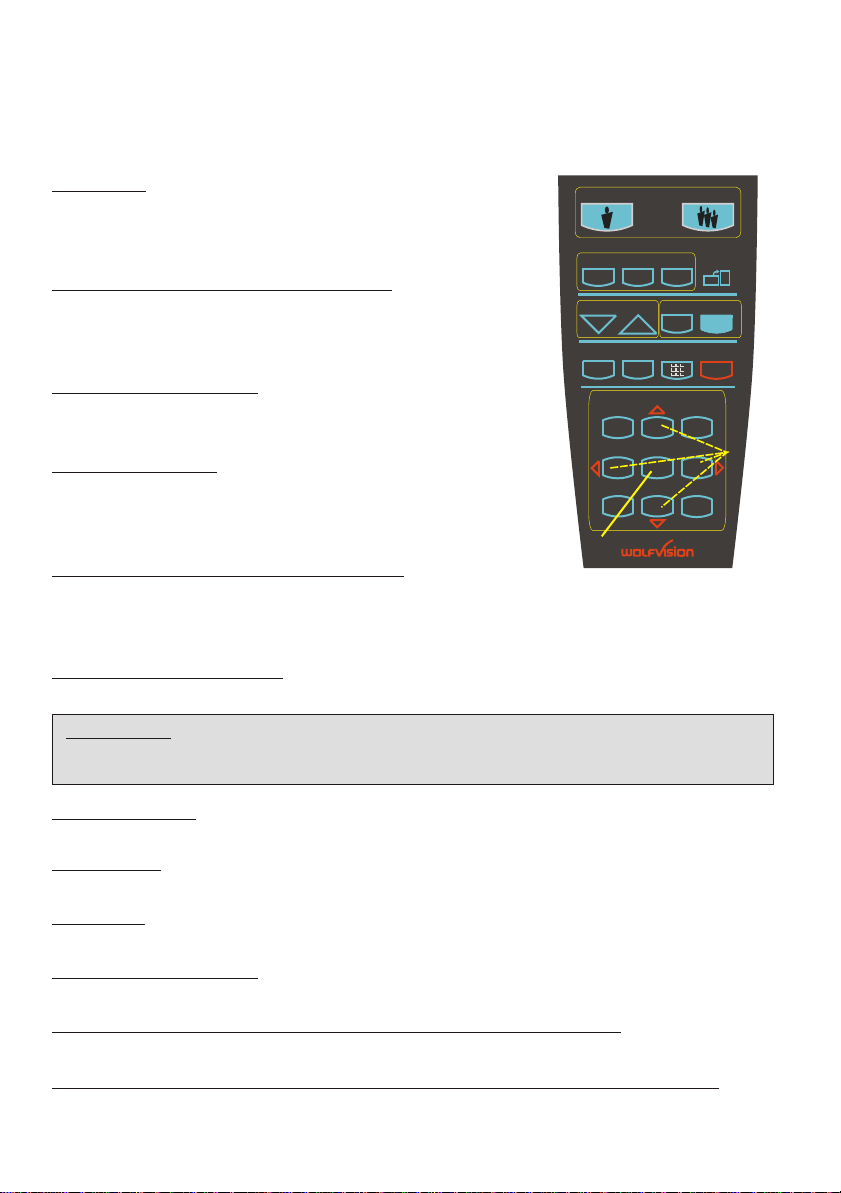
#20 ZOOM
The Zoom keys are the most important keys on the
IR-remote control. That is why they stand out colored.
ZOOM keys are also on the camera head of the Visualizer.
#21 PRESETS (programmable settings)
21
For storing a preset press one of the PRESET keys for more
than 2 seconds. For recalling a preset press the preset key
23
quickly. (Details see page 7)
#22 IMAGE TURN Mode
For picking up vertical (Portrait) pages with higher
resolution (see page 8)
#23 Manual FOCUS
When the Focus keys are pressed the Visualizer switches
off the autofocus function. The next time the zoom keys
are pressed the autofocus is switched on again.
#24 Manual IRIS (brightness adjustment)
When the Iris keys are pressed, the Visualizer switches off the auto iris function.
The next time the zoom keys are pressed the auto iris is switched on again.
For specialists: The overall iris level can be lowered in the on-screen menu (see page 9)
PRESETS
1
2 3
FOCUS
EXT / INT MENUALLTEXT
25
1 2 3
4 5 6
7 8 9
31
ZOOM
26
MEMORY
IMAGE TURN
IRIS
27
29
20
A
A
22
24
28
30
#25 TEXT ENHANCEMENT
Improves the contrast for better readability (especially with text - see page 7)
IMPORTANT: If the colors on your screen appear to be too dark, you may be in the Text
Enhancement mode. In this case switch off the Text Enhancement mode. Do NOT try
to correct this with the manual iris adjustment!
#26 EXT/INT key
Switches between Visualizer image and external input (see page 9).
#27 ALL key
For displaying all 9 pictures of the memory as split image (see page 8).
#28 MENU
Activates the on-screen menu (see page 9).
#29 MEMORY keys 1 - 9
For saving and recalling pictures (see page 8).
#30 SELECT keys (Double function of MEMORY keys 2, 4, 6 and 8)
For navigating through the on-screen menu (see page 9).
#31 HELP/RESET key for on-screen menu (Double function of MEMORY key 5)
While you are in the on-screen menu you can activate the on-screen help by pressing the
Number 5 key. Pressing this key for 2 seconds resets the selected menu item (see page 9).
4
Page 5

Choosing the right output mode (SXGA/XGA/SVGA at 75 or 60Hz)
The RGBHV- and DVI-output (#13 and #12) can output signals in the following formats:
- SXGA (1280x1024 pixel) at 60Hz
- XGA (1024x768 pixel) at 75Hz (default setting when resetting the resolution)
- XGA (1024x768 pixel) at 60Hz (default setting if auto resolution does not work)
- SVGA (800x600 pixel) at 75Hz
- SVGA (800x600 pixel) at 60Hz
.
The default setting is that the "Auto resolution" function is activated. In this mode the
Visualizer constantly checks which units are connected to RGBHV- (#13) and DVI-output
(#12) and automatically sets the output to the mode that fits best for all connected units.
Please note that the Visualizer can not check the possible resolution, if the connected units
or the cables* are not "Plug and Play" compatible. If the Visualizer can not detect the
resolution of ALL units connected, the outputs are set to the default of XGA (1024x768) at
60 Hz. (*Cables with plug and play compatibility must have a 15-pin plug on both ends with all pins connected)
If you can not use the "Auto resolution" function, you can select the output mode manually
in the on-screen menu of the Visualizer (see page 9) or with the following key combinations:
For a lower mode simultaneously press both ZOOM keys on the camera head (#10)
together with the number 8 (arrow-down) key (#29) on the remote control. For a higher
mode press both ZOOM keys on the camera head (#10) together with the number 3 (arrowup) key (#29) on the remote control. In order to reset the output to the default setting (start
point) of XGA (1024x768) at 75Hz, press both ZOOM keys on the camera head (#10)
together with the number 5 key (middle of the number keys #31) on the remote control.
In order to achieve the best picture quality you must set the outputs of the Visualizer to
match the native resolution of your display unit (e.g. LCD or DLP projector or monitor).
Important: What matters is the native resolution of the projector or monitor, not the
maximum resolution that it can display (in compressed mode). The native resolution is the
actual number of pixels of the built in LCD display or DLP chip of a projector or monitor.
Most LCD or DLP projectors can also display higher resolutions than their native resolution,
but only in compressed mode and with inferior picture quality. Do NOT set the output of
the Visualizer to a higher standard than the native resolution of your display unit!
If you output the Visualizer image on a CRT-monitor or CRT-projector, use an output mode
with 75Hz, because 60Hz may show a slight image flickering. For LCD/DLP projectors or
monitors and video conferencing units 60Hz is the best choice. If you are unsure what is the
best mode read the user manual of the connected units.
PAL/NTSC video outputs
You can switch the Y/C (S-video) (#14) and Composite (#15) video outputs between the
video standards PAL and NTSC in the units on-screen menu (see page 9). Switching can
also be done by pressing both ZOOM keys on the camera head (#10) together with the Preset
1 (for PAL) or Preset 2 (for NTSC) (#21) key on the remote control.
Please note that the picture quality of both video outputs is NOT AS GOOD as the picture
quality of the data outputs (#12 and #13). This is because of the limitations of the PAL/
NTSC video system and because of the fact that this is just a converted Progressive Scan
signal and not an original video signal. The picture quality of the Y/C (S-video) (#14) output
is still MUCH BETTER than the quality of the Composite (#15) video output. Please note
that images from the EXTERNAL INPUT (#11) are not output at the Y/C (S-video) and
Composite output!
5
Page 6
Autofocus:
When switching on the unit the
autofocus is automatically switched
on too. The correct focus is
continuously adjusted. The green
light beside the autofocus on/off
switch (#9) shines if the autofocus is
on.
.
Please note that objects with a very
low contrast (like a blank sheet of
paper) are difficult to focus. If the
autofocus does not work just move
the object slightly.
.
For special applications the autofocus
can also be switched off using the
on/off switch (#9). The autofocus is
also switched off when the manual
zoom keys of the remote control are
used.
Manual focusing
You can use the focus-keys on the remote control
for manual fokus. If the remote control is not
available you can use this method:
1. Place an object at the level you wish to
focus - The autofocus is focusing the object.
2. Switch off the autofocus with the on/off
switch (#9) - The focus remains unchanged
from now on.
WolfVision lightboxes (optional)
Connect the power cord to the light box
connector (#19) on the back side of the
Visualizer. The light switch (#6) of the Visualizer
can now be used to switch between the light
of the Visualizer and the light of the lightbox.
Other lightboxes:
In order to prevent reflections the light of
the Visualizer always has to be switched
off when working with lightboxes.
Digital Zoom
Please note that the VZ-8 has an optical 12x zoom, which is digitally increased to a 24x
zoom. The smallest pickup size on the working surface without (!) digital zoom is 23 x 31mm
(0.9" x 1.2"). When you zoom in further the digital zoom is automatically activated and the
smallest pickup size is 12 x 16mm (0.5" x 0.6"). However please be aware that when the
digital zoom is used the resolution of the picture is not as good as before. The default setting
is that a message appears on-screen when you are in the digital zoom mode.
.
You can change the behaviour of the Visualizer in the digital zoom mode in the on-screen menu (see page 9).
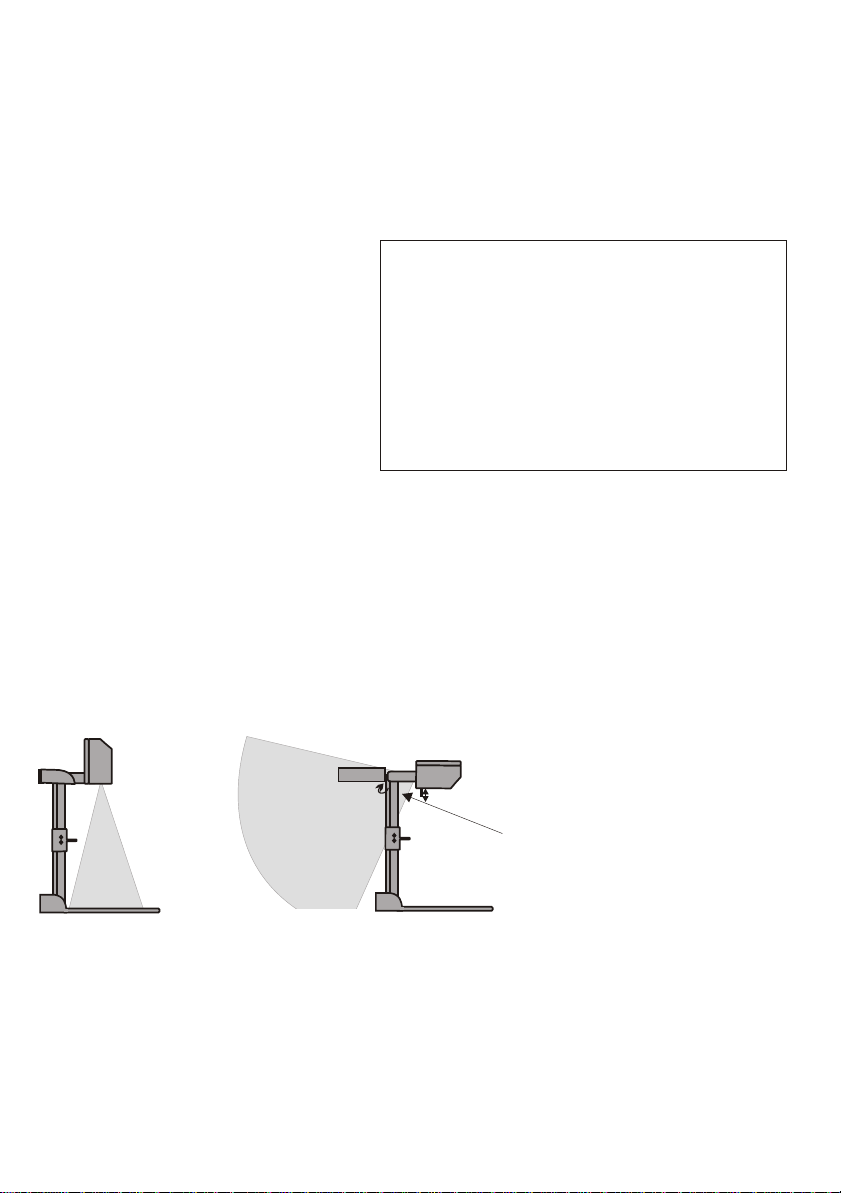
Shooting area on
the working surface:
to infinity
Eliminating reflections
In order to eliminate reflections
(on high gloss photographs etc.)
just turn the light backwards
slightly.
Please note that reflections can
also be caused by the room light.
Shooting area outside
of the working surface:
Turning the light backwards
In order to enable recordings with
illumination outside of the working
surface, the light of the Visualizer
can be horizontally turned an
angle of up to 250 degrees.
Close-up adaptor lens
For shooting an object outside the working surface,
in a further distance to the unit, the close up lens (#7)
has to be removed.
In this case just pull the lens away from the main optic of
the camera until it reaches the locked position. It is
impossible to remove the lens completely from the unit,
therefore it can not get lost. Before turning back the
camera into the standard working position push the close
up lens back in.
6
Page 7
White balance:
Correct white balance adjustment is important for true colors! The default white balance
setting when the VZ-8 is shipped is "Auto Tracking". This means that the white balance is
continuously adjusted. If the colors appear to be wrong try to
However an "Auto Tracking" white balance can never be 100% correct.
.
For a more precise white balance adjustment use the "One Push" white balance. This can
be done by completely zooming in a white paper on the working surface and pressing the
LIGHT-key (#6) for 3 seconds. When the white balance is stored an on-screen message
appears. Setting a "One Push" white balance switches off the "Auto Tracking" mode and the
current white balance setting remains in the memory even when the unit is switched off.
When the lighting conditions change (e.g. different room light or sunlight) the white balance
should be readjusted!
For specialists:
in the on-screen menu (see page 9)
If you work with negative transparencies and an external light box, use a blank (dark) piece of the negative film for
white balance adjustment!
The VZ-8 can be switched between "Auto Tracking", "One Push" and "Manual" white balance mode
move any object in the picture.
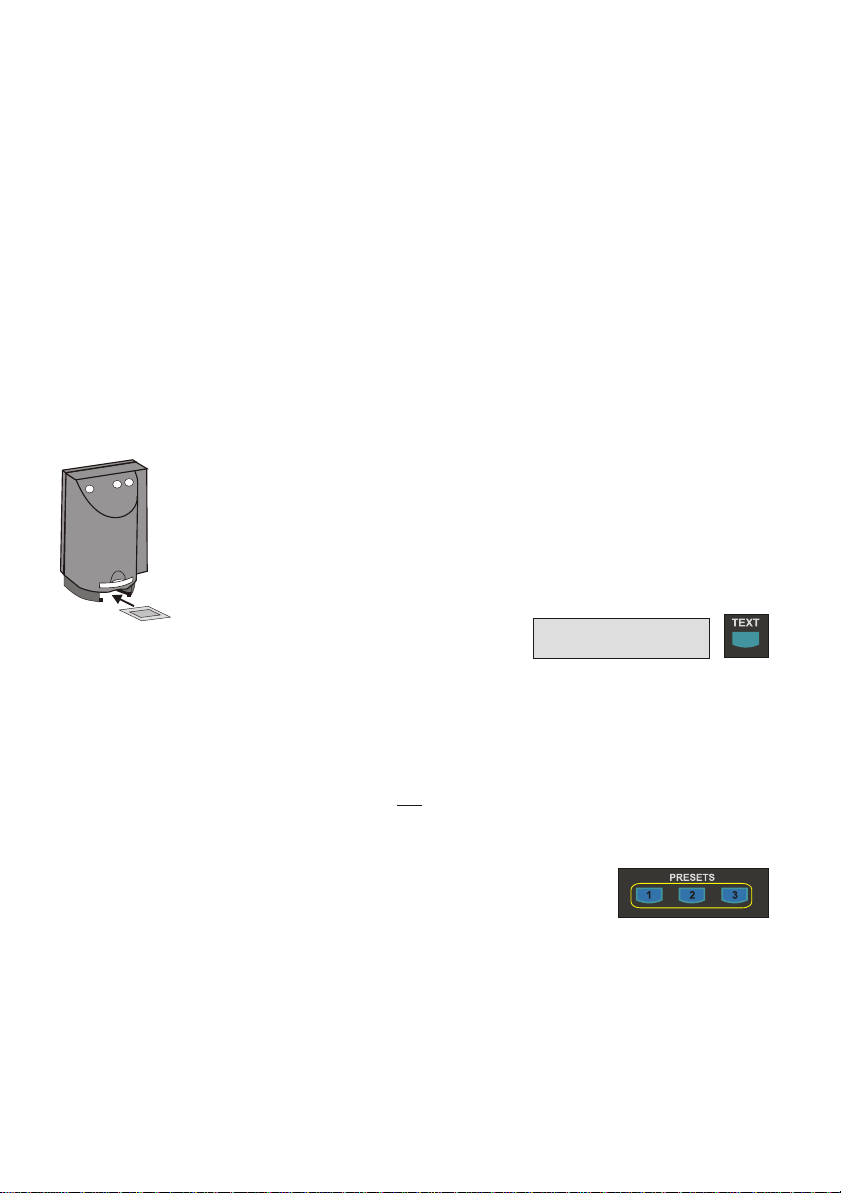
Slide Drawer
First make sure that you remove any object from the working surface
(very important!). Then insert a slide in the slide drawer. The camera
camera
head
automatically recognizes the slide and focuses on the slide.
.
In case the slide is out of focus:
- Make sure that the slide is firmly in place
- Make sure that the ZOOM is not in the maximum tele
slide
Text Enhancement
position (=smallest picture). Use the ZOOM-keys (#10 or #20)
IMPORTANT
For improving the readability of text, sketches or x-rays press the TEXT-key (#25). This mode
enhances the contrast of the picture. Please note that the colors are now darker than usual.
To switch off the Text Enhancement mode, press the TEXT-key again. While the Text
Enhancement mode is on, the message "TEXT MODE" is constantly displayed in the picture.
This should remind a user to switch off this mode when it is not needed anymore. The
constant display of the word "TEXT MODE" could be switched off in the on-screen menu of
the Visualizer (see page 9) however we do not recommend to do so. Because without this
message users may tend to open the IRIS, instead of pressing the TEXT-key, if the picture
appears to be too dark. This would cause a misadjusted picture.
Preset Function
The VZ-8 offers the possibility to store the current settings as a Preset and recall them by
just pressing one of the three PRESET keys (#21) on the remote control. For storing a
Preset just adjust every function as required and then keep one of the PRESET keys
pressed for more than 2 seconds. The on-screen menu tells you when the preset is stored.
When the Presets are stored as mentioned above, all current settings like zoom, focus, iris
etc. are stored. Contrary to this, a user also has the opportunity to assign only specific
functions such as "Negative", "Negative/Blue", "Black/White" etc. to a PRESET key. This can
be done in the on-screen menu of the Visualizer (see page 9).
7
Page 8
USB-PORT
The USB output of the VZ-8 can be used to transfer Visualizer
images onto a computer. No additional computer hardware
(like a grabber card) is required. In this way the Visualizer
can be used as a 3-D scanner for your computer.
Just connect the USB port (#16) of the Visualizer and the USB
port of your computer, using the supplied USB cable.
A dedicated WolfVision USB-software can be found on the CD-ROM. Please check our Internet
homepage at: www.wolfvision.com/wolf/techinfo.html if an update of this software is
available as a free-download. The software works under Windows 98/ME/2000. Windows XP
will also be supported. Windows 95 and NT will not work, because they do not support USB.
9-IMAGE MEMORY
You can store 9 images and recall them by just pressing
one of the numerical keys (#29) on the infrared remote control:
Storing an image: Press one of the memory keys (#29)
for more than 2 seconds
Recalling an image: Press one of the memory keys (#29)
quickly
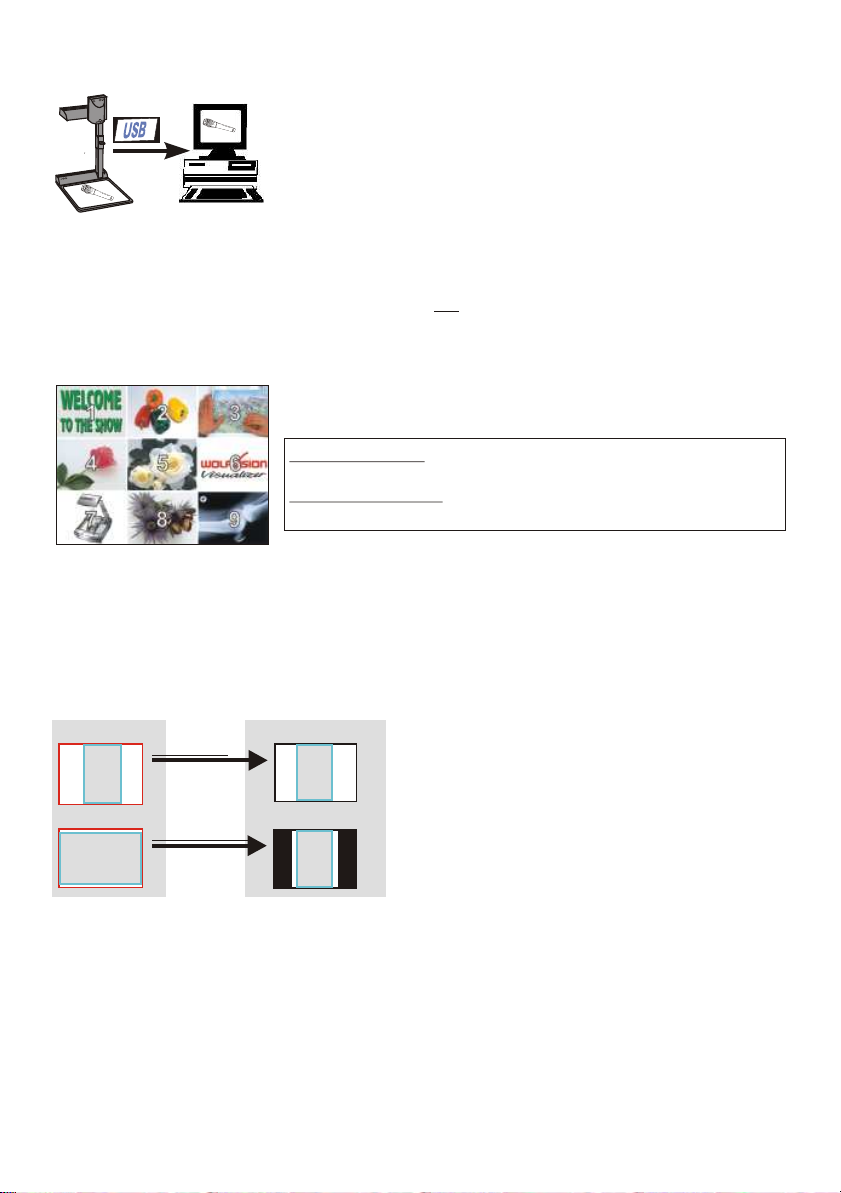
Split image of 9 picture memory
If you would like to fill all 9 memories quickly (e.g. with your company logo or a black image)
just press the ALL key (#27) for 4 seconds. Then a new picture is stored every second until
the memory is full.
By pressing the "All" key (#27) a split image with all 9 pictures
of the memory can be displayed.
IMAGE TURN MODE (for higher resolution)
Working surface:
A
Just place your letter (or other vertical object)º on the working surface horizontally and zoom
in on it completely, so that about 90% of the pixels of the built-in camera are used to pick
up the letter. Then press the IMAGE TURN key (#22). The Visualizer turns the picture
electronically 90 and outputs it the right way up with 40% higher resolution than in
normal mode. The left and right margins are black.
Normal mode:
Only 50% of the
pixels are used to
pick up the letter
Image turn mode:
90% of the pixels
A
are used to pick
up the letter
Output picture:
A
A
Picking up a complete vertical (portrait) letter
or A4 page has always been a critical issue for
a Visualizer, because the image is always
picked up in a horizontal (landscape) format.
So the camera could only use 50% of its pixels
to pick up a vertical (portrait) page. WolfVision's
new "Image turn" mode solves this problem.
8
Page 9

EXTERNAL INPUT
A Computer can be connected to the External RGBHV input (#11) of the Visualizer.
With the Ext/Int switch (#26) a user can switch between the Visualizer and Computer
image to be displayed to the audience.
The signal from the computer is just looped through the Visualizer and is not processed
in any way. In order to avoid that your projector or monitor adjusts itself when switching,
it is recommended that you set the output of the computer to the same signal format
(SXGA, XGA or SVGA) and vertical frequency (75 or 60Hz) as the Visualizer. The default
output settings of the Visualizer is: XGA (1024x768) at 75Hz.
DVI-output: Please note that the image from the External RGBHV input (#11) can only be displayed on the analog
section of the DVI-output (#12) and not on the digital section of this output (see page10).
The following chapters are for experienced users only:
ON-SCREEN MENU / ON-SCREEN HELP
For standard use of the WolfVision Visualizer it is not necessary to go into the Visualizer's
menu and change settings. Inexperienced users should not make any adjustments there.
To enter the on-screen menu press the MENU-key (#28) for one second. Settings of the
Visualizer's basic functions and the built-in camera can be made here using the 4 select
keys (=the numerical keys with red arrows - #30). Please note that some basic settings in
the menu can only be changed you set the menu item "Format protect" to "OFF" first.
If you require more information on a function in the on-screen menu just set the cursor in the
respective line and press the HELP key (#31, This is a double function of the Number 5
key). Than a detailed description of this function appears on the screen. If you want to reset
the selected item to the default setting, just press the Number 5 key (#31) for 2 seconds!
The functions of the on-screen menu are not described in detail in this user manual as the
help menu is an integrated part of the Visualizer's software. The information you see on your
screen always belongs to the current Visualizer software (firmware).
RESET OF ON-SCREEN MENU SETTINGS
All settings in the on-screen menu can be set back to the factory defaults. "Reset" is one
item in the on-screen menu. In case you can not read the menu on a screen you can also
set the unit back to the factory defaults by simultaneously pressing both ZOOM-keys on the
camera head (#10) and the Number 4 (back-arrow) key (#29) on the remote control.
If you only want to reset the item that is currently selected to the default setting, press the
Number 5 (#31) key for 2 seconds!
SWITCHING TO NEGATIVE, NEGATIVE/BLUE and
BLACK/WHITE
The output image of the Visualizers can be switched from positive to negative in the
on-screen menu. In addition the background of a negative image can be switched to
blue for better readability of text. You can also switch between color and black and white
in the on-screen menu.
TIP: If you switch often to negative, negative/blue or black/white images you can
assign this function to one of the Preset keys (see page 7) in the on-screen menu.
9
Page 10
Auto Power off
In the "Power control" settings of the on-screen menu you can select that the Visualizer
will be automatically switched off, if it is not used for a certain time.
Changing the standard contrast (color) settings
If the picture or the colors on your screen appear to be too dark, you can lower the
overall contrast of the picture in the "Color settings" menu of the on-screen menu. The
settings can be made separately for the normal mode and the text-mode.
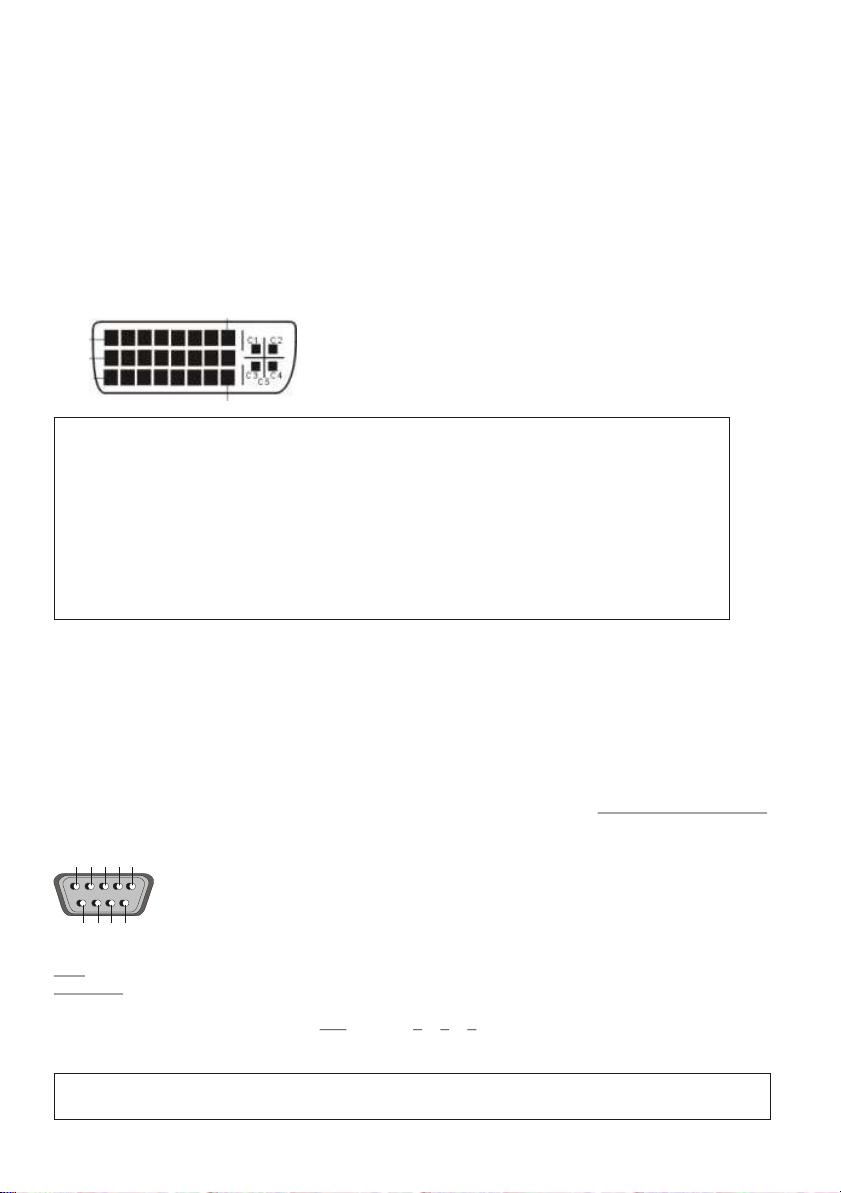
DVI PORT
Pin 1
Pin 9
Pin 17
1 - T.M.D.S. Data2 2 - T.M.D.S. Data2+
3 - T.M.D.S. Data2/4 Shield
4 - T.M.D.S. Data4- (not used)
5 - T.M.D.S. Data4+(not used)
6 - DDC Clock
7 - DDC Data
8 - Analog Vertical Sync
C1 - Analog Red
C4 - Analog Horizontal Sync
Pin 8
Pin 24
DVI ports are divided into a digital and an analog
section. Please note that the image of the
External input (#11) is only output at the analog
DVI section!
9 - T.M.D.S. Data110 - T.M.D.S. Data1+
11 - T.M.D.S. Data1/3 Shield
12 - T.M.D.S. Data3- (not used)
13 - T.M.D.S. Data3+ (not used)
14 - +5V Power
15 - Ground (return for +5V,
HSync and VSync)
16 - Hot Plug Detect
C2 - Analog Green
C5 - Analog Ground
(analog R, G & B return)
17 - T.M.D.S. Data018 - T.M.D.S. Data0+
19 - T.M.D.S. Data0/5 Shield
20 - T.M.D.S. Data5- (not used)
21 - T.M.D.S. Data5+ (not used)
22 - T.M.D.S. Clock+
23 - T.M.D.S. Clock24 - Analog Vertical Sync
C3 - Analog Blue
Firmware Upgrades
The firmware (software) of your Visualizer can be upgraded to the latest version. This
can be done by connecting a computer or a modem to the RS232 port of your Visualizer.
Please consult your WolfVision dealer or check the WolfVision homepage at:
www.wolfvision.com/wolf/techinfo.html.
Serial control input, RS 232
The serial port can be used to control the Visualizer through an external
device, like a remote control system for a whole conferencing room.
3
5
2
4
1
9-pin D-Sub connector on unit
6
7
8
male, front side
9
Pins: 2: RX, 3: TX, 5: GND, 7: RTS, 8: CTS
Baud rate: 19200 or 9600, databits: 8, stopbit: 1, parity: no
Please note that DecimaI-Codes (=ASCII-Codes or Hex-Codes)
must be sent as one single byte (e.g. 199 and not: 1 + 1 + 9) !
A detailed description of the serial protocol can be found on our internet homepage:
www.wolfvision.com /wolf/techinfo.html
Function: Decimal-Code :
Image on 192
Iris open 193
Focus far 194
Zoom wide 195
Image off 196
Iris close 197
Focus near 198
Zoom tele 199
Preset 1 202
Preset 2 203
Save Preset 1 216
Save Preset 2 217
Preset max. wide 229
Preset A5 231
Preset A6 232
Preset max. tele 235
10
Page 11
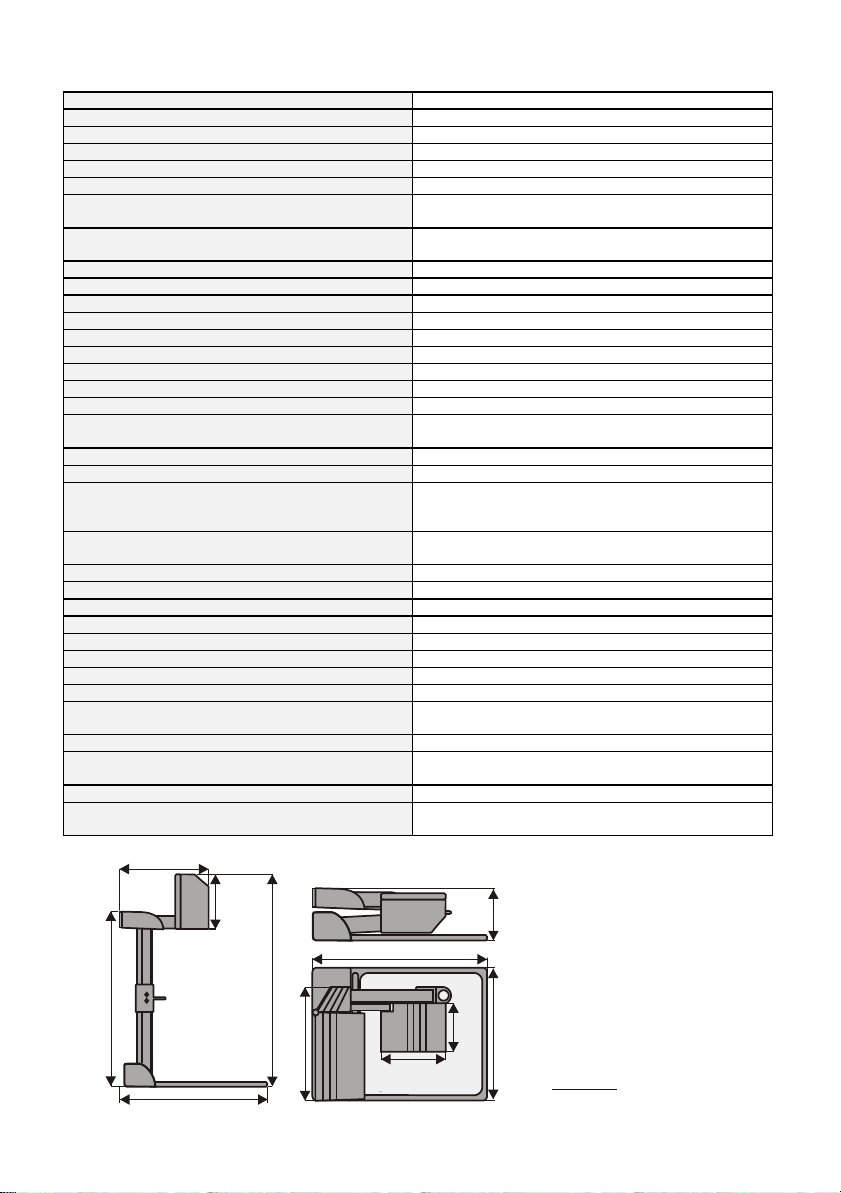
Technical data:
Camera 1/3" 1-CCD Progressive Scan
Output signals SXGA / XGA / SVGA, PAL / NTSC, DVI, USB
Pictures per second (as picked up by the camera) 20
Horizontal resolution 640 lines (center)
Vertical resolution 490 lines (center) - 640 lines in Image Turn Mode
Image Turn mode 40% increased resolution of full pages
Effective Pixel (=pixels which are act ually used for the
image information)
810,000
Vertical image-frequency
Prog.Scan: 75 Hz und 60 Hz,
PAL: 50 Hz, NTSC: 60 Hz
Horizontal image-frequency 15,7 und 37.3 - 80,2 kHz
Signal format non-interlaced und interlaced
Iris automatic and manual
White balance adjustment Auto tracking, one push or manual
Autofocus yes (one push)
Manual focus yes
Text enhancement function yes (in color)
User programmable b asic setup yes (with on-screen menu)
Lens / Zoom 24 x zoom (12 x optical + 2 x digital)
Max. pick-up area
On working surface: 360 x 270mm (14.4" x 10.8")
Outside of working surface: unlimited
Min. pick-up area (in full resolution) 32 x 24 mm (1.2" x 0.9")
Min. pick-up area (in digital zoom) 16 x 12 mm (0.6" x 0.5")
Max object height on working surface
110mm (4.4") in tele position / 370mm (15") in wide
position
Depth of focus
18mm (0.7") on small objects (42 x 33 mm) / 200mm
(8") on large objects (360 x 270 mm)
Light source high frequency fluorescent lamp
Reflection free area on working surface 360 x 230 (17,3"x9,2")
Recording outside working surface yes
User programmable presets 3
Slide drawer yes
Image memory 9 pictures
Split-image of all 9 pictures in memory yes
Positive/Negative and Black-White switch yes (in menu)
Outputs
RGBHV (15-Pin VGA-Plug), DVI, USB, composite
video (RCA-Plug) and s-video (4-Pin), 12V
Inputs RGBHV (15-Pin VGA-Plug) for PCs, serial control input
Professional RS232 protocol with position setting and
status report
yes
Weight / Portability 5 kg, (11lbs), portable
Supplied accessories
infrared remote control, power pack, 15-pin RGBHV
cable, USB cable, USB software, carry case
235mm (9.2")
(5.9")
150 mm
405 mm (15.9")
485 mm (19")
580 mm (22.9")
405 mm (15.9")
260 mm (10.2")
150mm (5.9")
11
Specifications and availability subject to change.
Changing the lamp of the
(4.8")
Visualizer:
121 mm
1. Remove the power cord of
the Visualizer.
2. Remove lamp housing glass.
(1 Screw)
3. Remove the safety clip
4. Change the lamp.
113 mm (4.5")
CAUTION: Hot when used!
310 mm (12.2")
Lamp type: Osram Dulux S/E
9W/21 or equivalent
Page 12
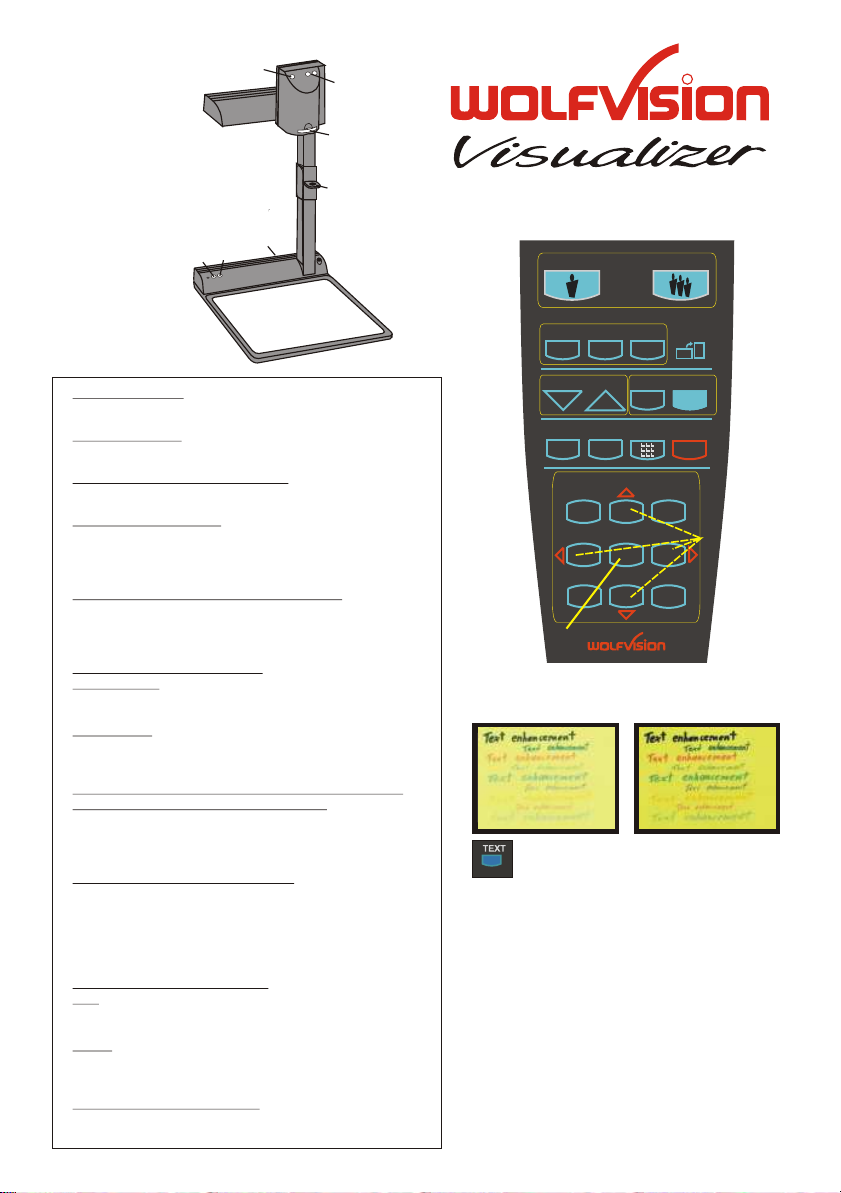
9
22
10
11
R
7
8
3
6
5
4
CODES:
Storing Presets:
Press one of the PRESET keys (#21) for 2 sec.
.
Storing Images:
Press one of the MEMORY keys (#29) for 2 sec.
.
Activating the on-screen menu:
Press the MENU-key (#28) for 1 sec.
.
Sync on green on/off:
Simultaneously press both ZOOM-keys (#10) on the
camera head and the Number 1 (#29) key on the
remote control
.
Switching the sync mode (C or VD/HD):
Simultaneously press both ZOOM-keys (#10) on the
camera head and the Number 3 (#29) key on the
remote control
.
Switching the output mode:
Higher mode: Simultaneously press both ZOOM-keys
(#10) on the camera head and the Number 2 (arrow-up)
(#29) key on the remote control
Lower mode: Simultaneously press both ZOOM-keys
(#10) on the camera head and the Number 8 (arrowdown) (#29) key on the remote control
.
Resetting the output mode to the default of XGA
1024x768 at 75Hz (with HD/VD-Sync):
Simultaneously press both ZOOM-keys (#10) on the
camera head and the Number 5 key (the middle of the
number keys) (#31) on the remote control
.
Resetting the Visualizer's menu:
For resetting the whole menu simultaneously press
both ZOOM-keys (#10) on the camera head and the
Number 4 key (back arrow) (#29) on the remote control.
For resetting only the selected item press the Number
5 key (31) on the remote control for 2 seconds.
.
Video output (PAL or NTSC):
PAL: Simultaneously press both ZOOM-keys (#10)
on the camera head and the Preset 1 (#2) key on
the remote control
NTSC: Simultaneously press both ZOOM-keys (#10)
on the camera head and the Preset 2 (#2) key on
the remote control
.
Filling the memory quickly:
Press the ALL-key (#27) for more than 4 sec.
Remote Control:
ZOOM
20
21
23
PRESETS
1
FOCUS
EXT / INT MENUALLTEXT
25
1 2 3
2 3
26
MEMORY
IMAGE TURN
IRIS
27
A
A
22
24
28
30
4 5 6
7 8 9
29
31
Text enhancement (in color)
25
By pressing the "TEXT" button (#25), the
contrast to the picture is improved
dramatically, resulting in much better
readability of text, sketches and x-rays.
Printed in Austria - September 2001
 Loading...