

Page 1
Ceiling Tile
Ceiling Tile
WolfVision Support
2055 Sugarloaf Circle, Suite 125
Duluth, GA 30097
(877) 873-WOLF
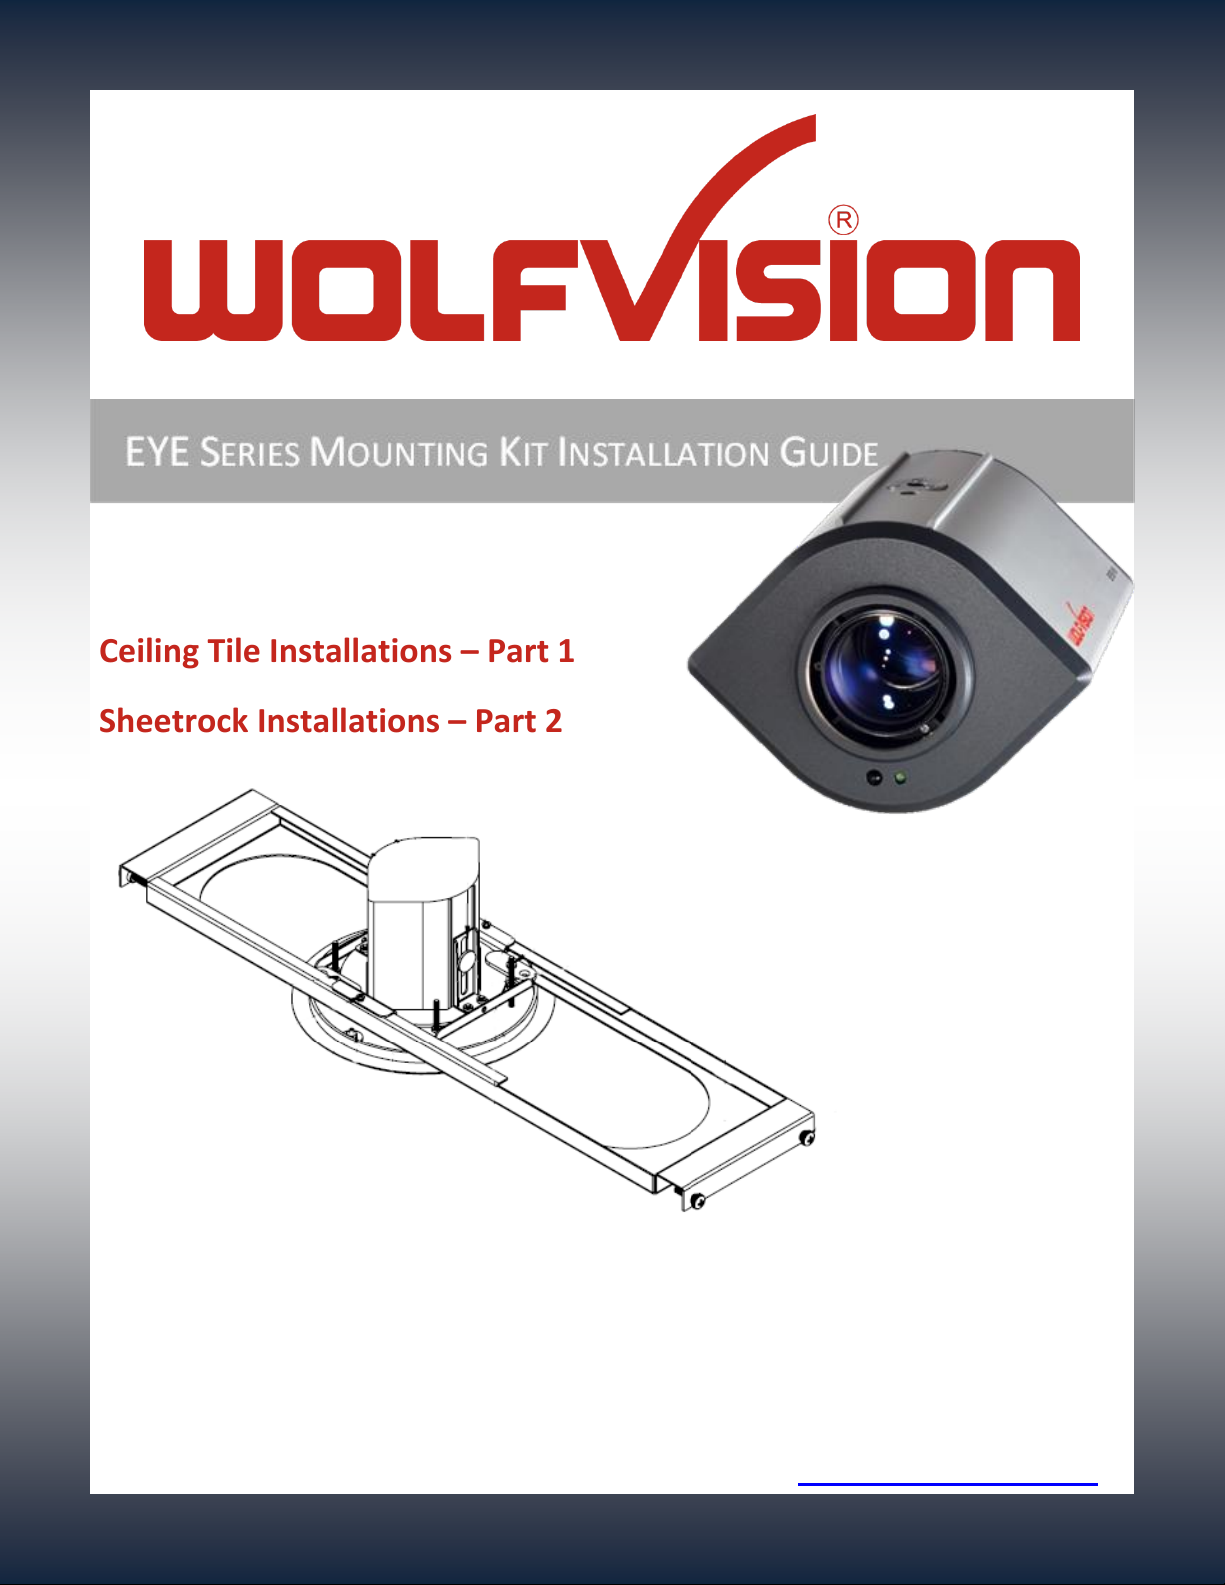
Ceiling Tile Installations – Part 1
Sheetrock Installations – Part 2
0
Page 2
Ceiling Tile
Steps:
I Inspect Installation Location
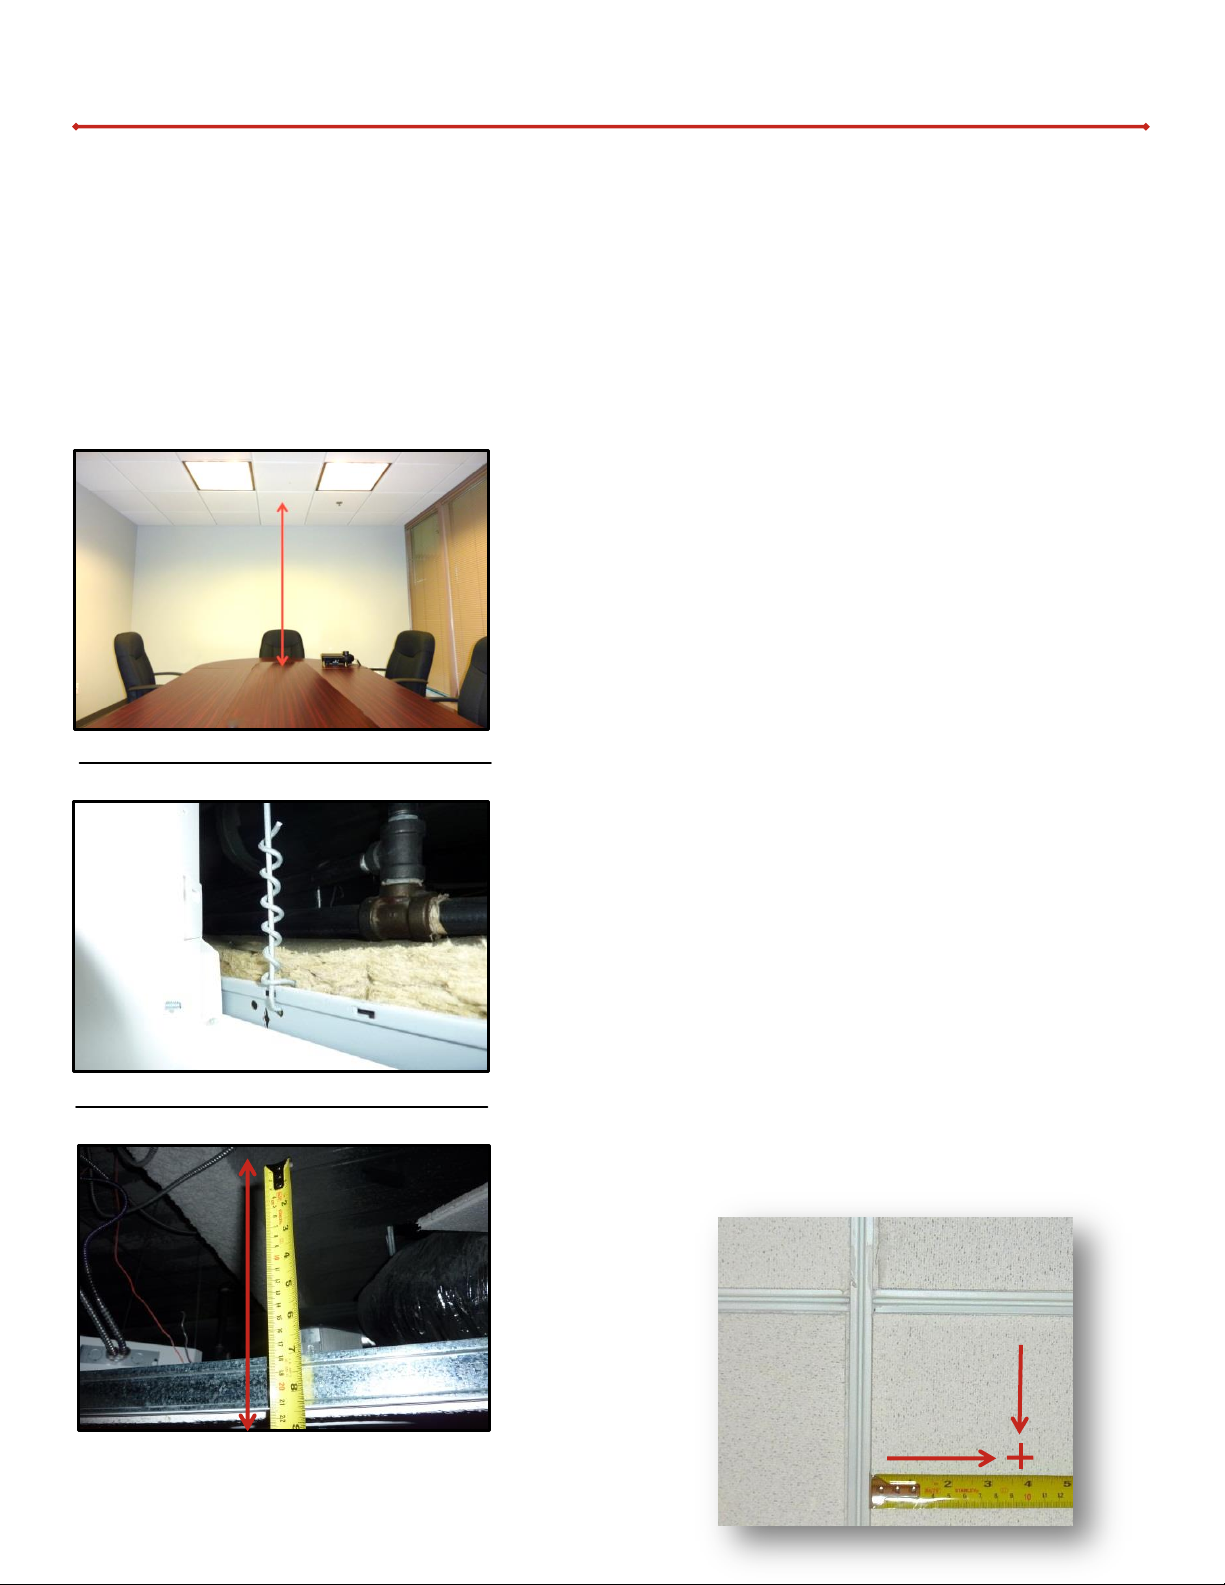
1) Determine mounting location within T-
grid ceiling based upon the center of the
desired focal point on the working
surface.
Note: An adjacent tile will also have to
removable for access.
2) Verify structural support (T-grid wire
above the ceiling tile). Check overhead
clearance. A minimum of 8 1/2’’ above
Ceiling tile is required. After you have
verified all clearances, replace the ceiling
tile.
Note: Center of installation must be at least
3 11/16’’ from both ceiling grid structures
to allow for hole clearance.
8 ½ ’’
3 11/
‘’
3 11/
‘’
EYE Series Mounting Kit
Part 1: Tile Bridge Installation
The Ceiling Tile Bridge is designed to support the WolfVision EYE Series models only. T-Grid ceilings are not
designed to support weight loads – support wires must be attached to the structural ceiling above. It is the
responsibility of the installer to ensure this product is properly supported and meets all local building codes
and plenum requirements. Make sure the ceiling structure is capable of holding at least 12 lbs. (4x the
combined weight of the mount and camera).
1
Page 3
Ceiling Tile
Ceiling Tile
A C B
G
F
E
D
II Assemble Unit
3)
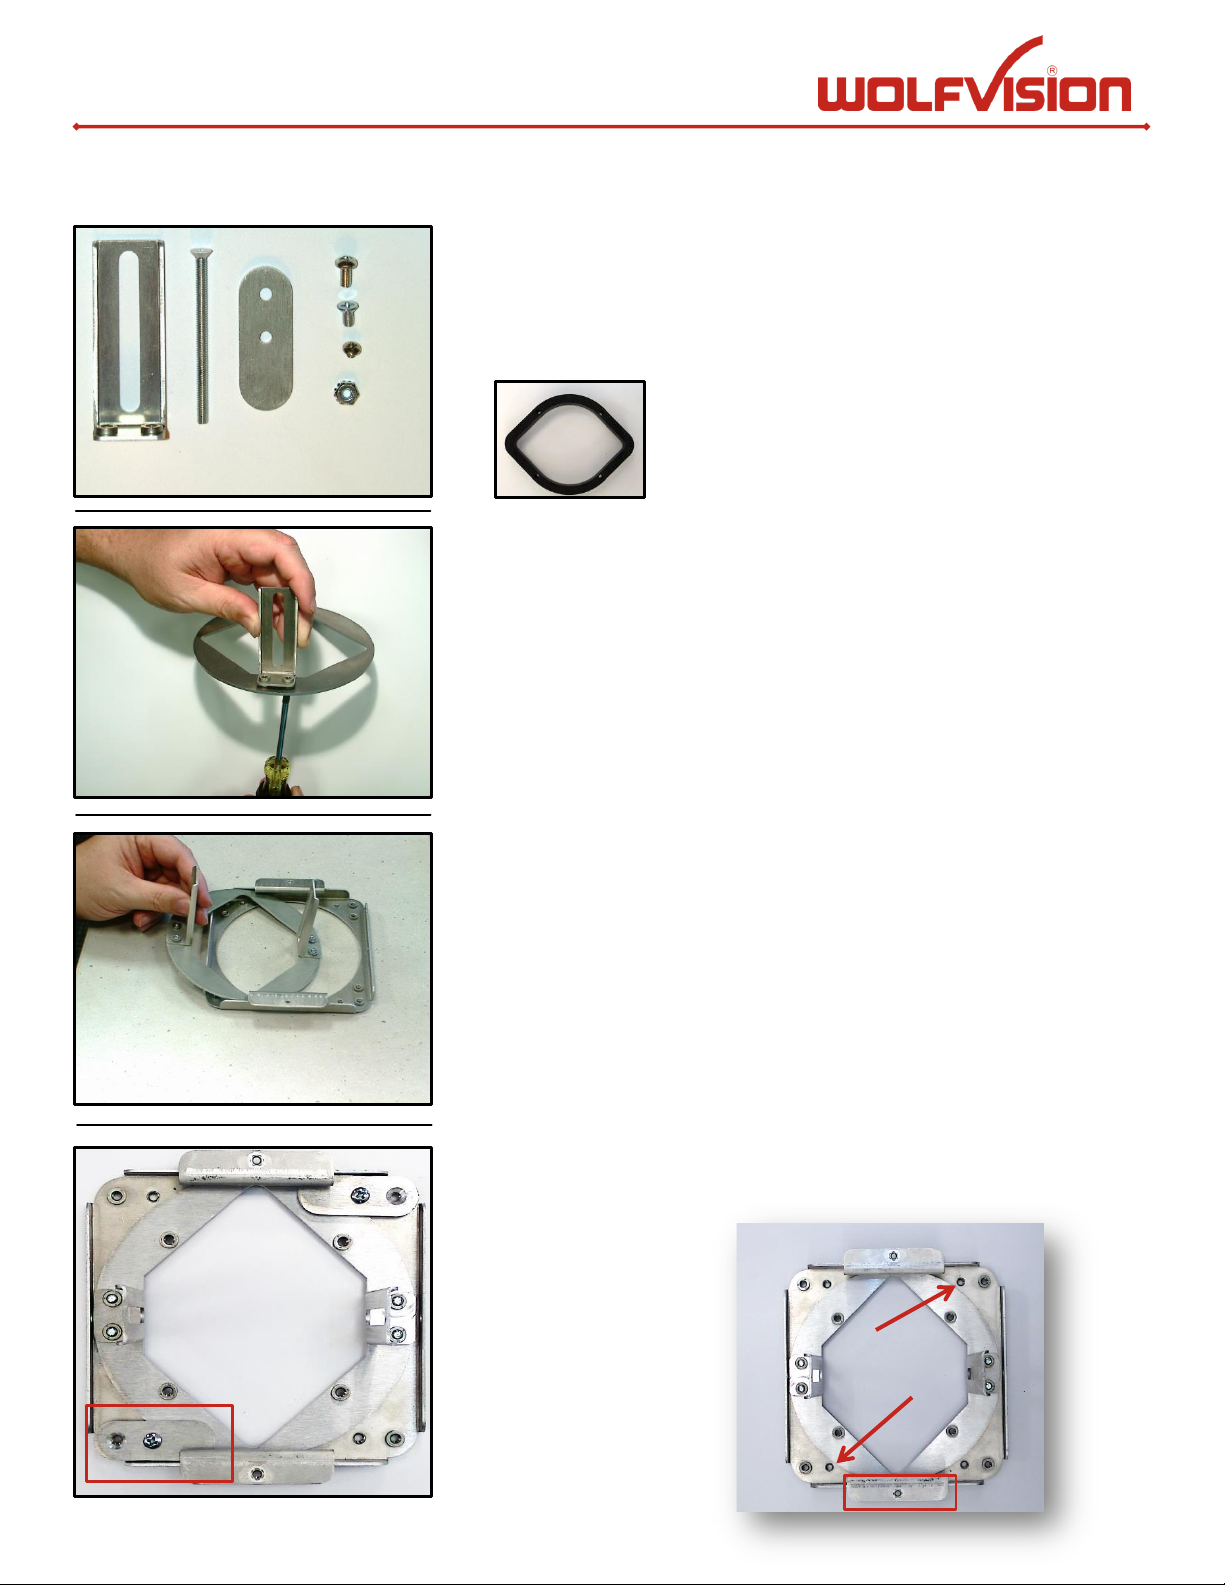
A Camera Bracket
B Trim Mounting Screw
C Mounting Tab
D Mounting Screw
E Mounting Screw
F Rail Clamp Screw
G Alignment Ring Nut
H (Optional) Light Mask
4) Using Mounting Screw (E), attach Camera
Bracket (A) to circular plate.
Note: For installations using optional lenses,
longer brackets are available for purchase.
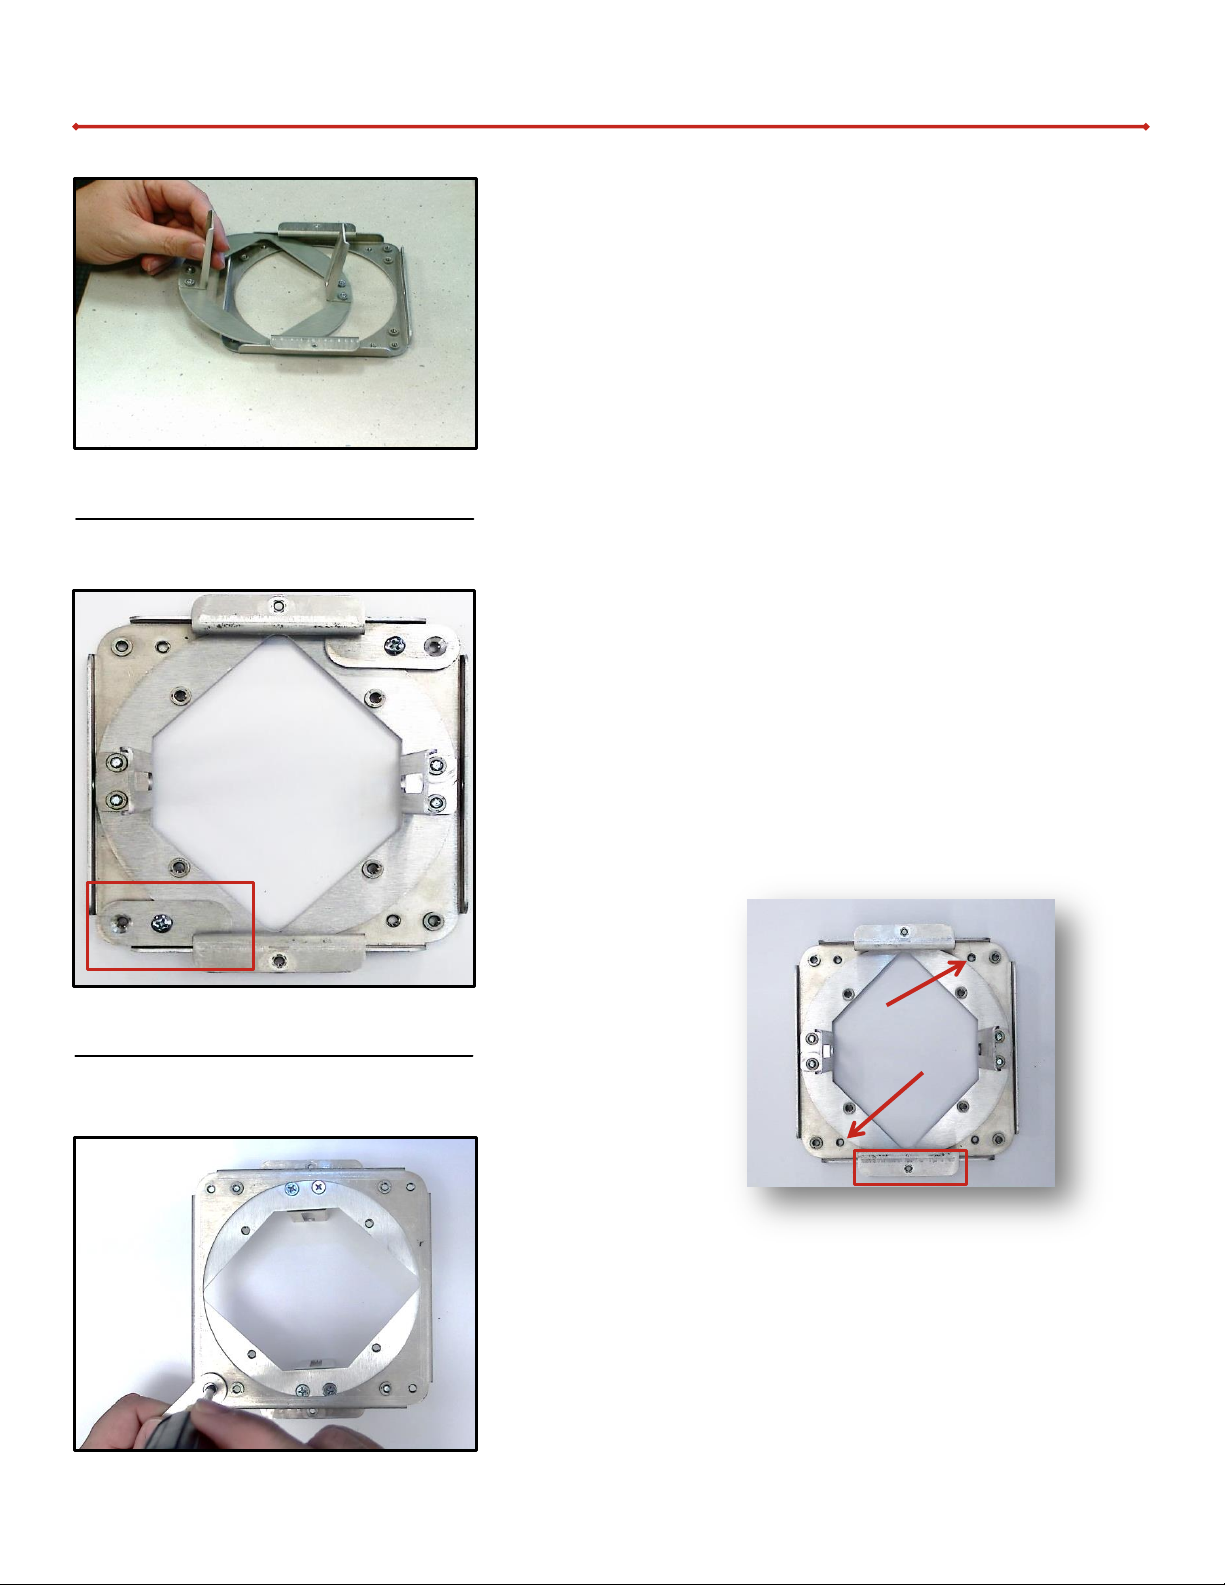
5) Slide circular plate into mounting
assembly.
6) Secure circular plate into mounting
assembly using Mounting Tabs (C) and
Mounting Screws (D).
Note: Use the center hole of the Mounting Tab
(C). (Countersunk screw hole is not
needed in this step). Only 2 Tabs are
required. You must use the screw holes
closest to rail clamps (see photo).
H
Rail Clamp
2
Page 4
Ceiling Tile
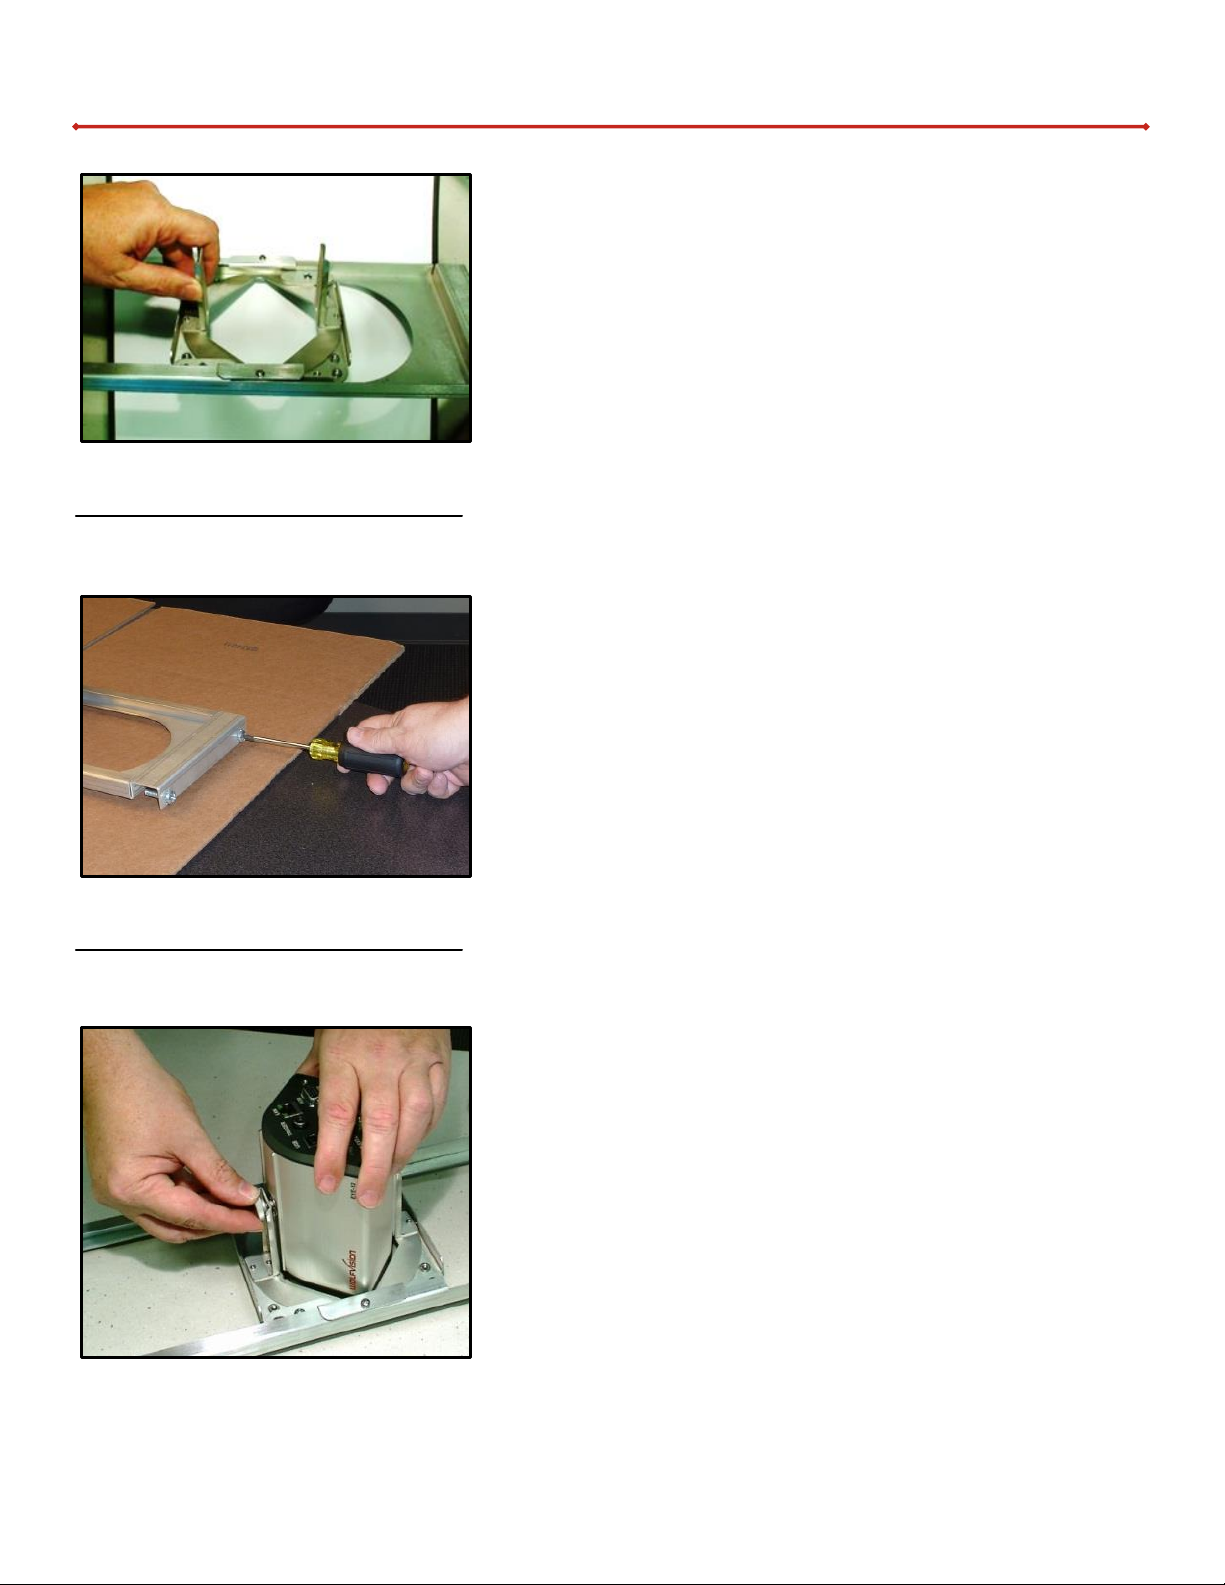
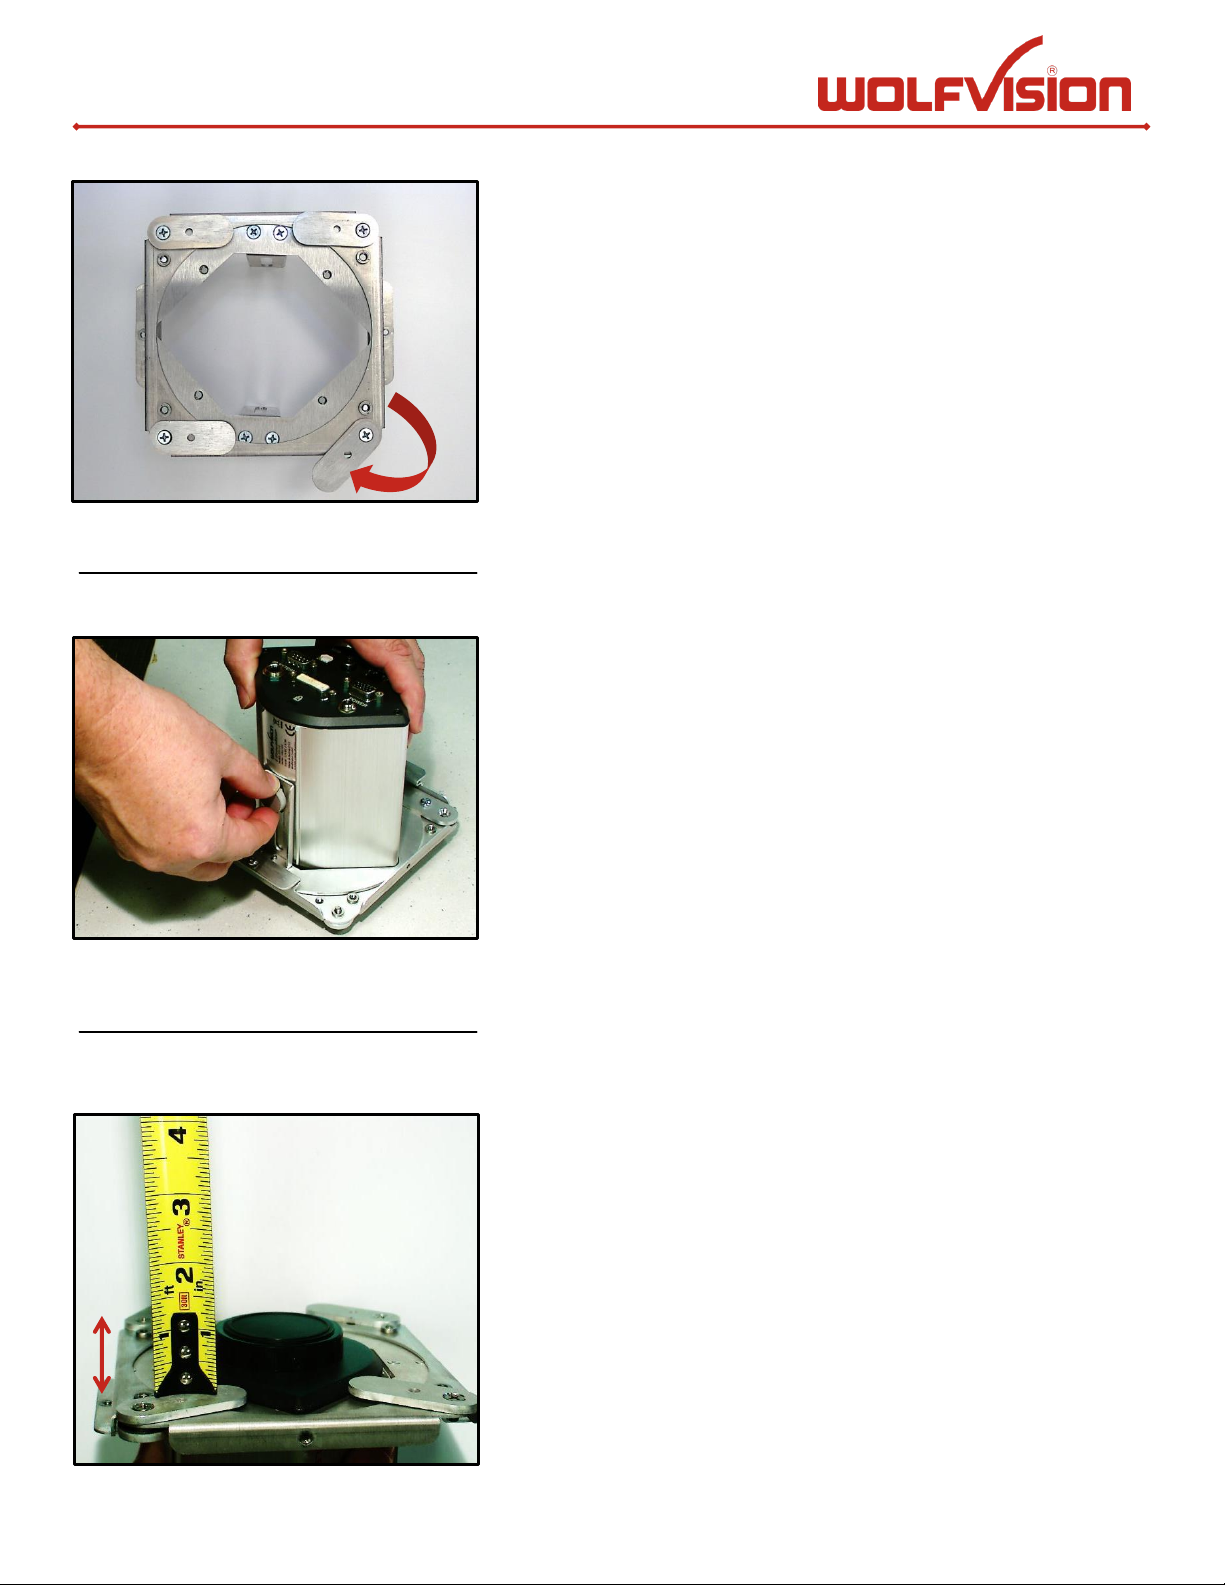
7) Slide assembly into the frame.
Note: After assembly is in place, insert the two
Rail Clamp Screws (F).
8) Loosen frame screws.
9) Install camera into the assembly – tighten
¼ - 20 knurled screws (supplied with
camera).
Note: It is recommended that the lens cap be
left on for the entire installation process.
3
Page 5
Ceiling Tile
Ceiling Tile
III Mounting Instructions
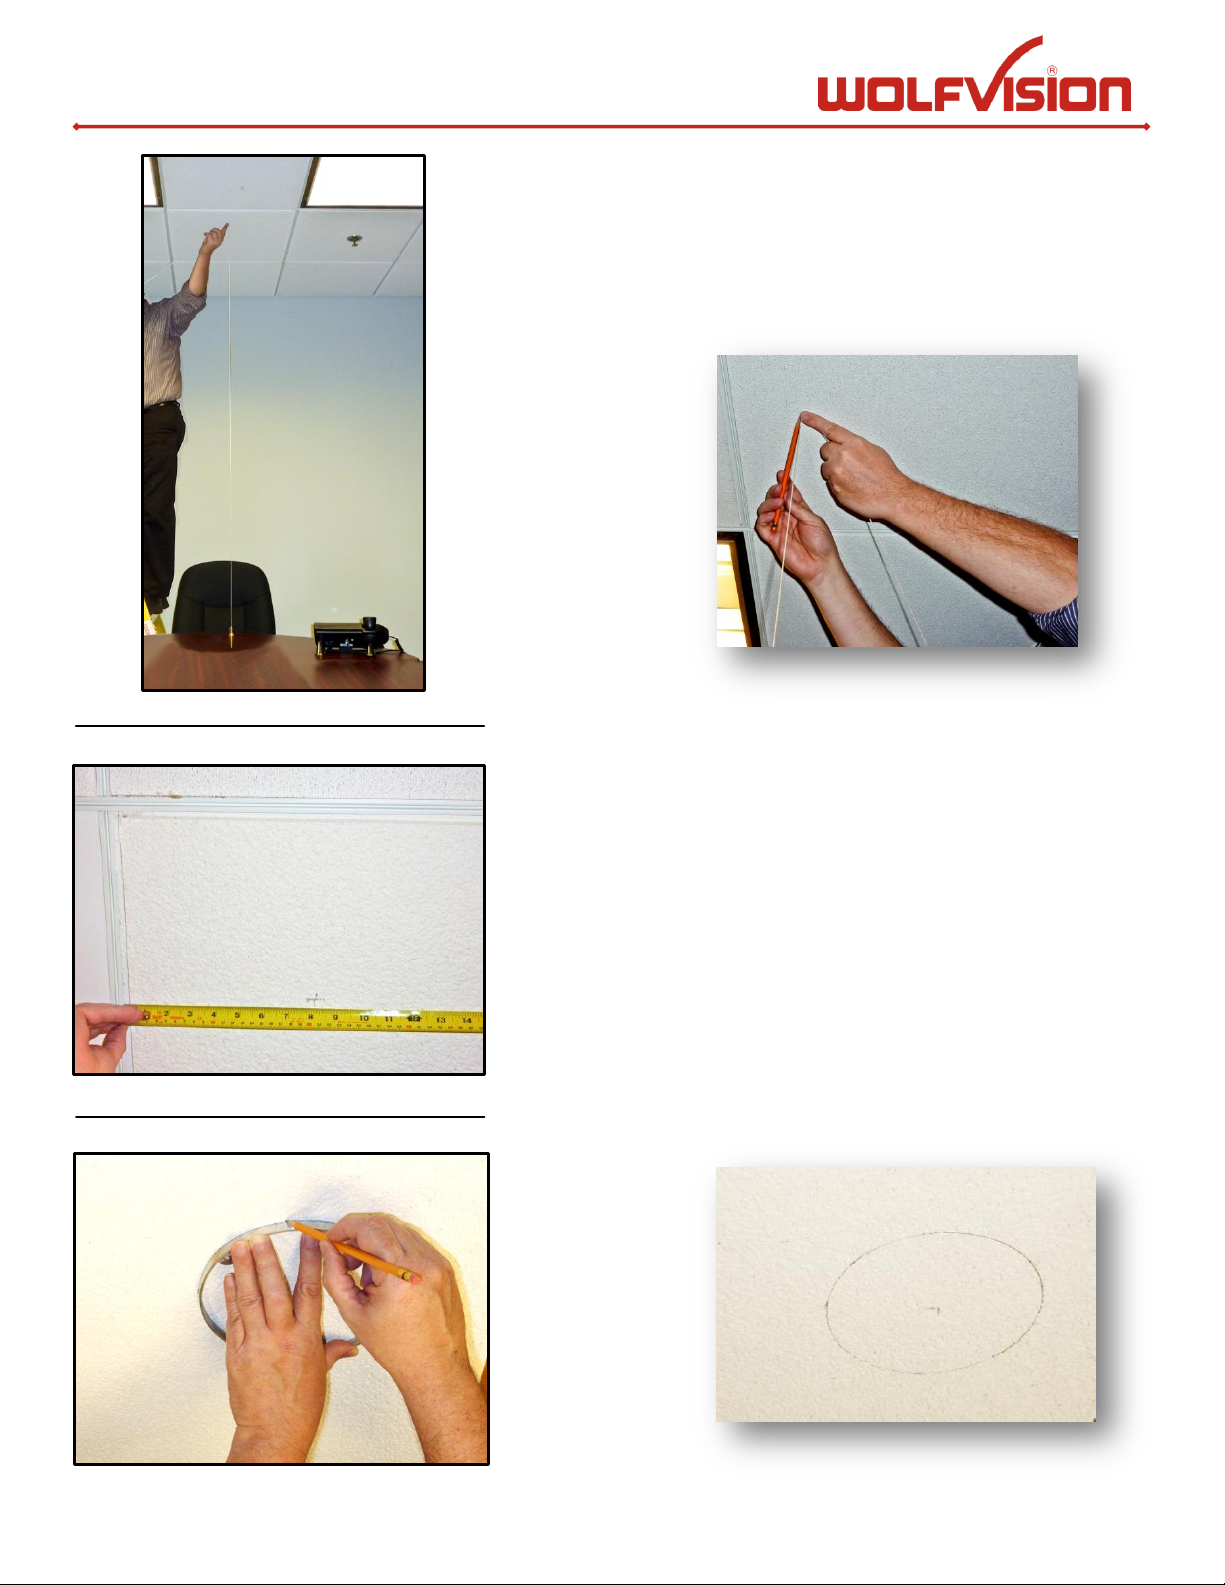
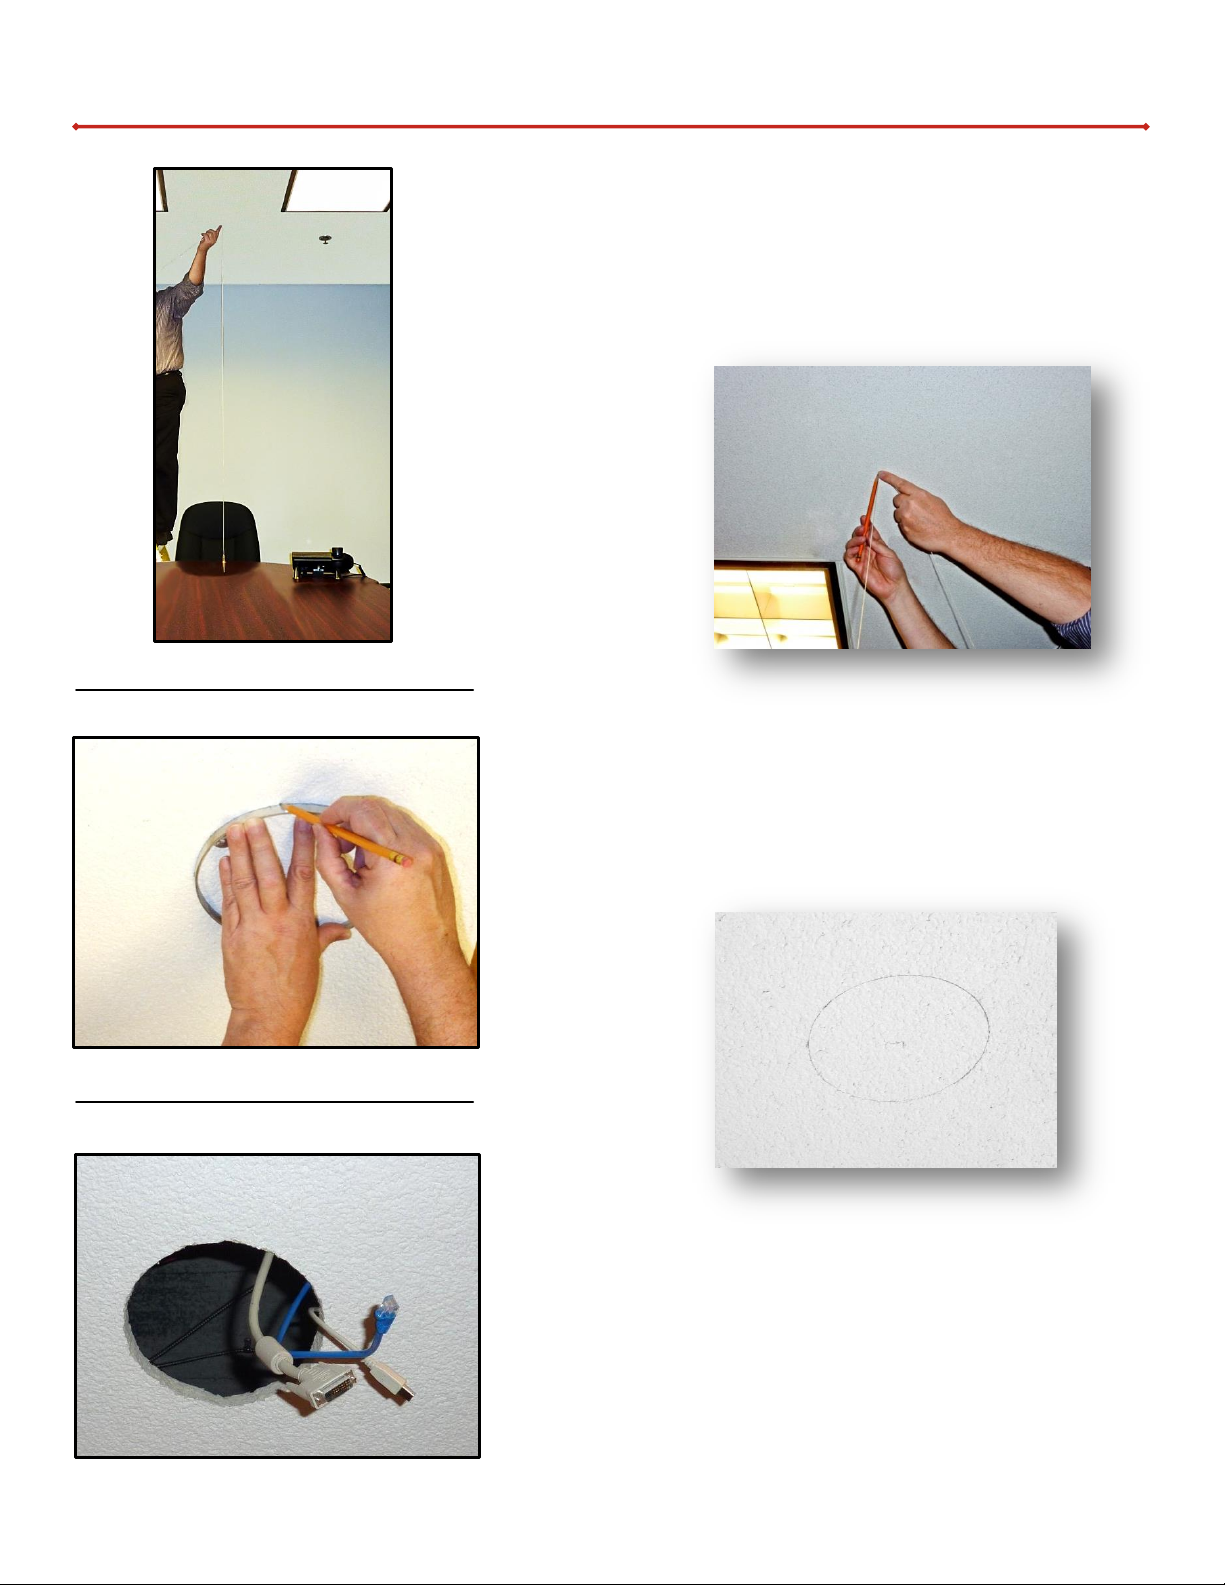
10) Using the center focal point on the table,
run a plum-line to the ceiling tile and mark
the center point where the camera will
mount.
11) At this point you are ready to cut the hole.
Be sure you have checked the clearances
side to side and above the tile.
(As stipulated in step 2)
12) Cut a 7 3/8’’ diameter hole. The alignment
ring may be used as a template.
4
Page 6
Ceiling Tile
of the image to match the architectural
specifications of the room, loosen the
Mounting Tabs (
assembly as needed. Secure Tabs.
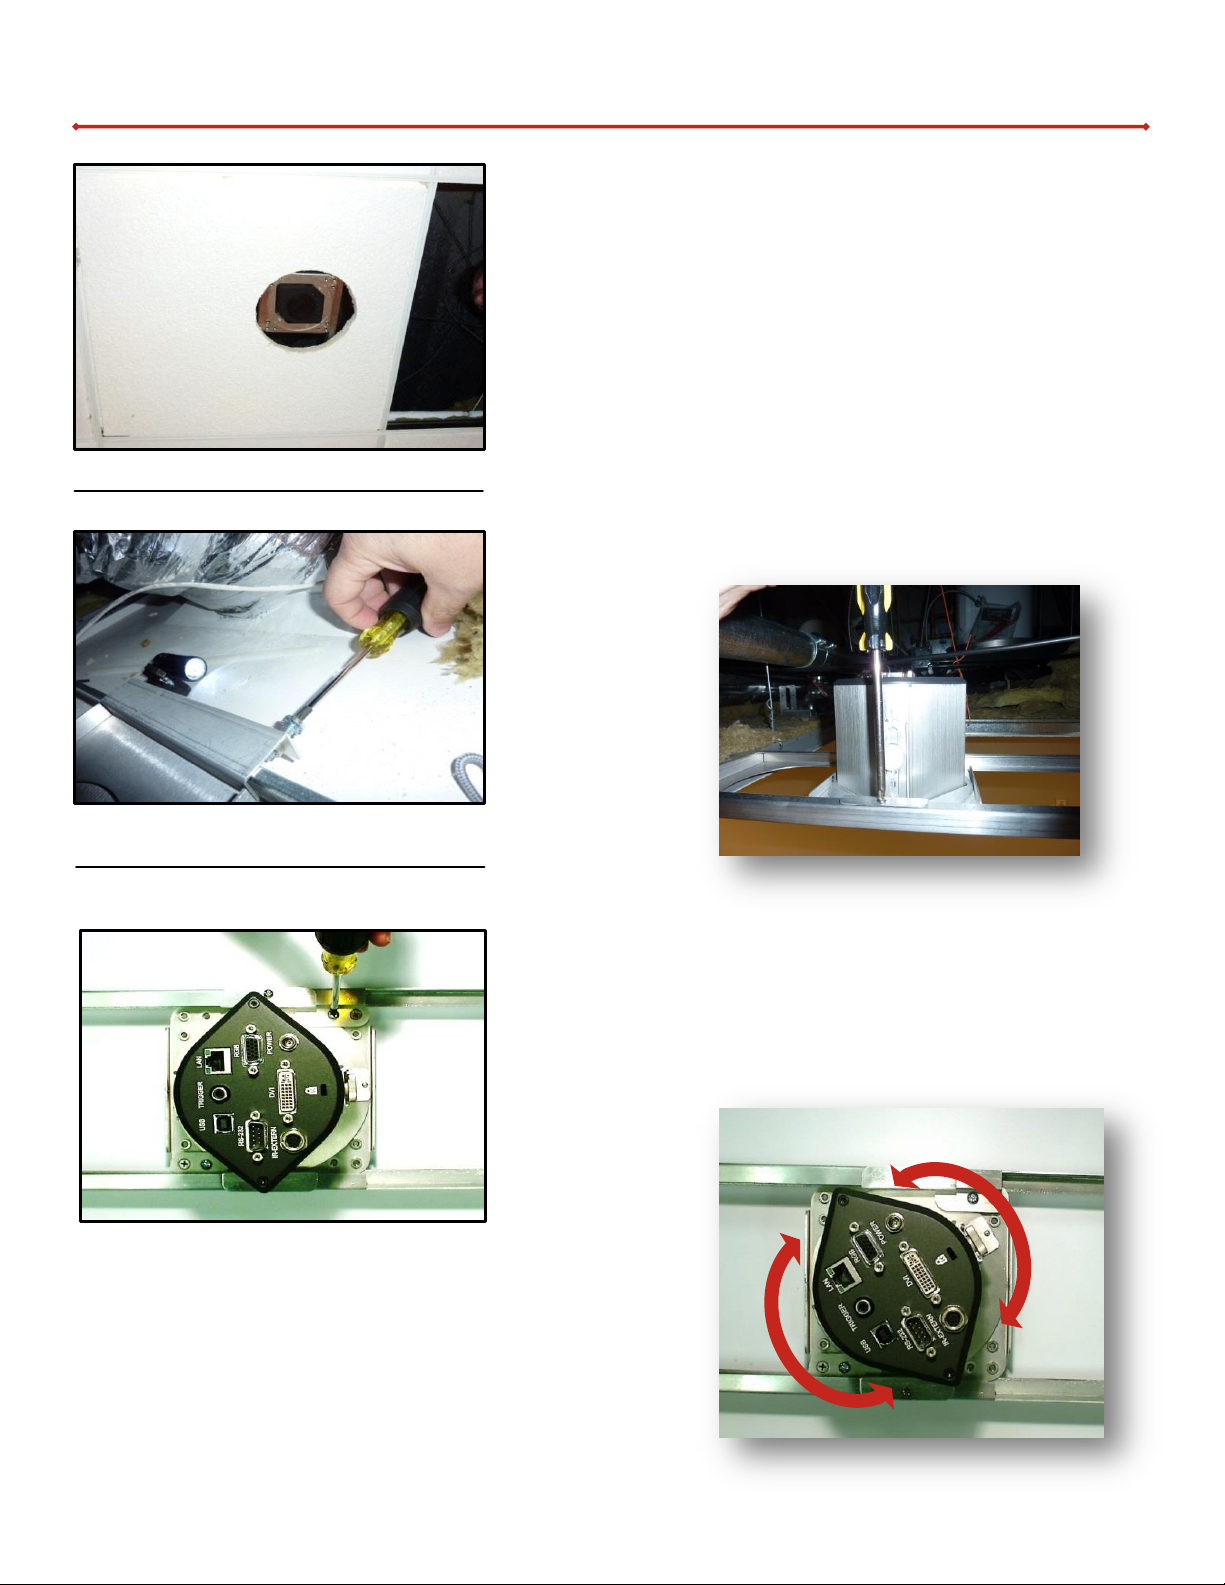
13) Install assembly above ceiling tile.
Verify the hole alignment.
14) Secure assembly by tightening the Frame
Screws onto the grid and tightening the
Rail Clamp Screws (F).
Note: If you need to change the orientation
5
C) and rotate the camera
Page 7
Ceiling Tile
Ceiling Tile
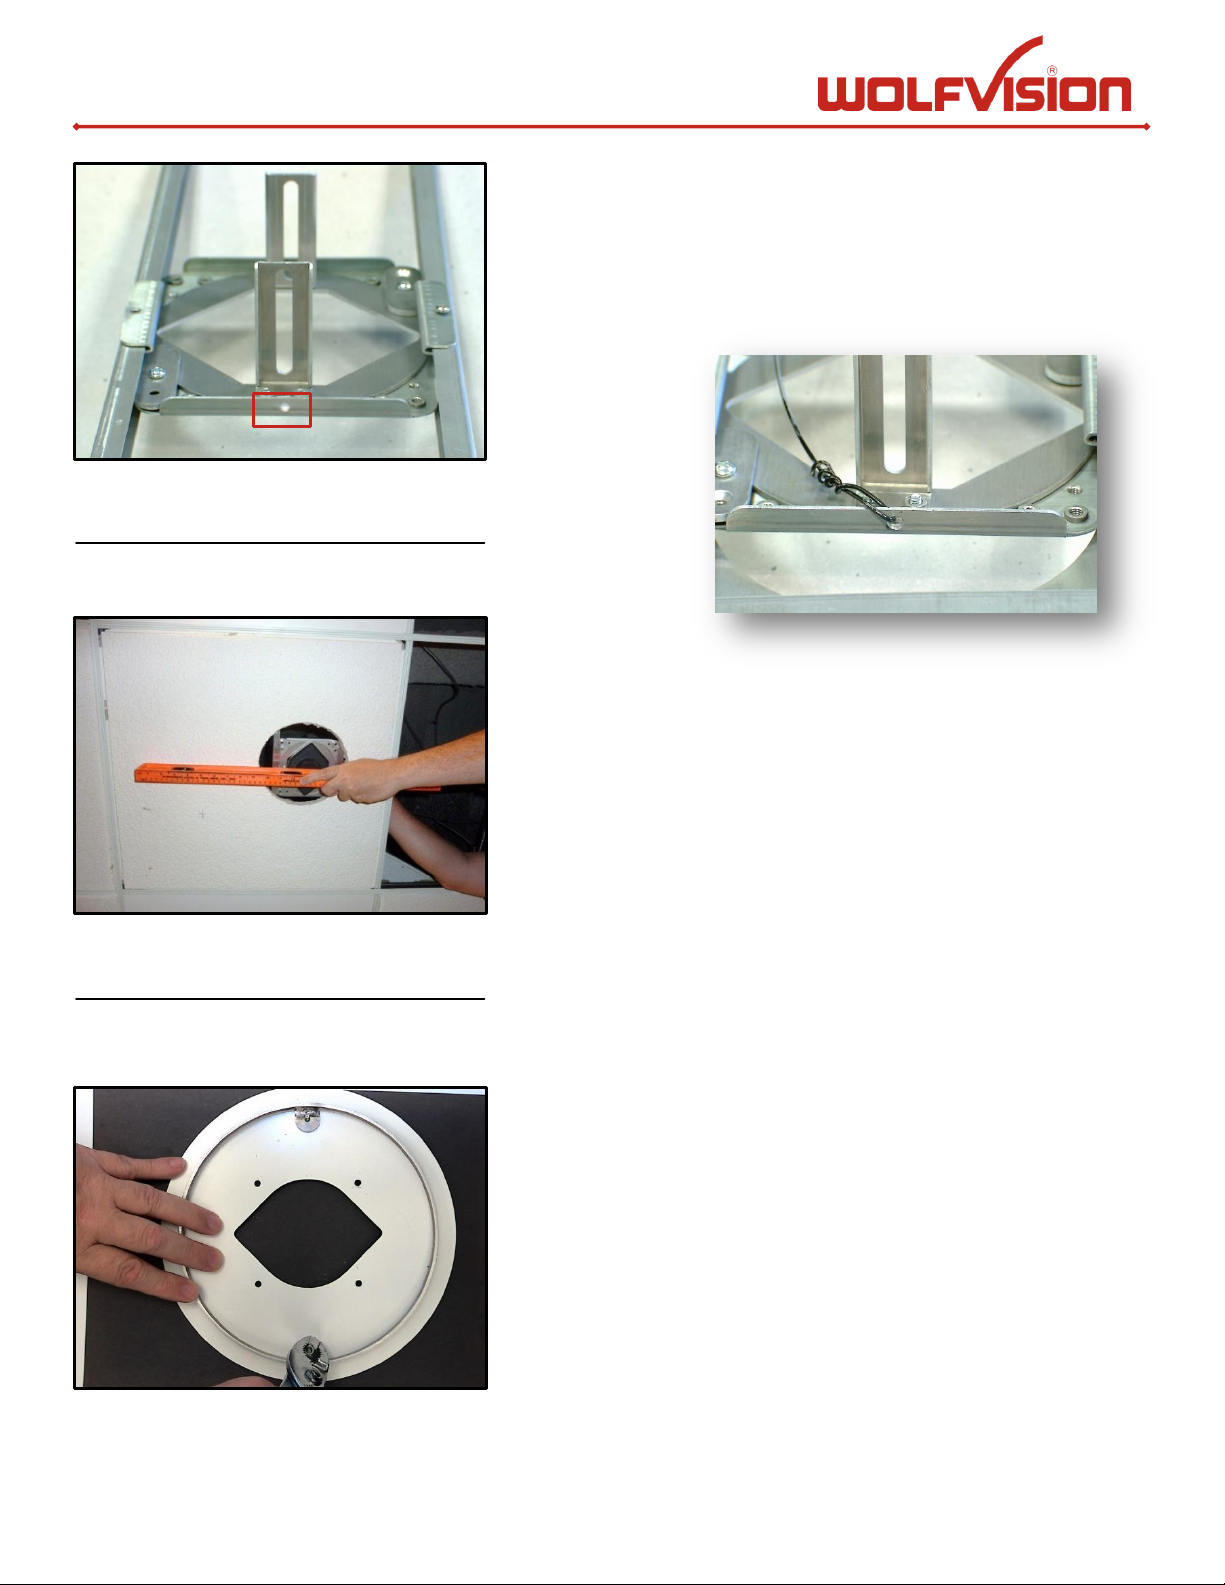
15) Using this anchor point, attach safety cable
to building structure.
(Safety cable not included)
16) Loosen knurled screws and lower camera
until flush with bottom of ceiling tile. A
straight edge may be used to verify.
17) Attach alignment ring to face-plate with
Nuts (G) provided.
6
Page 8
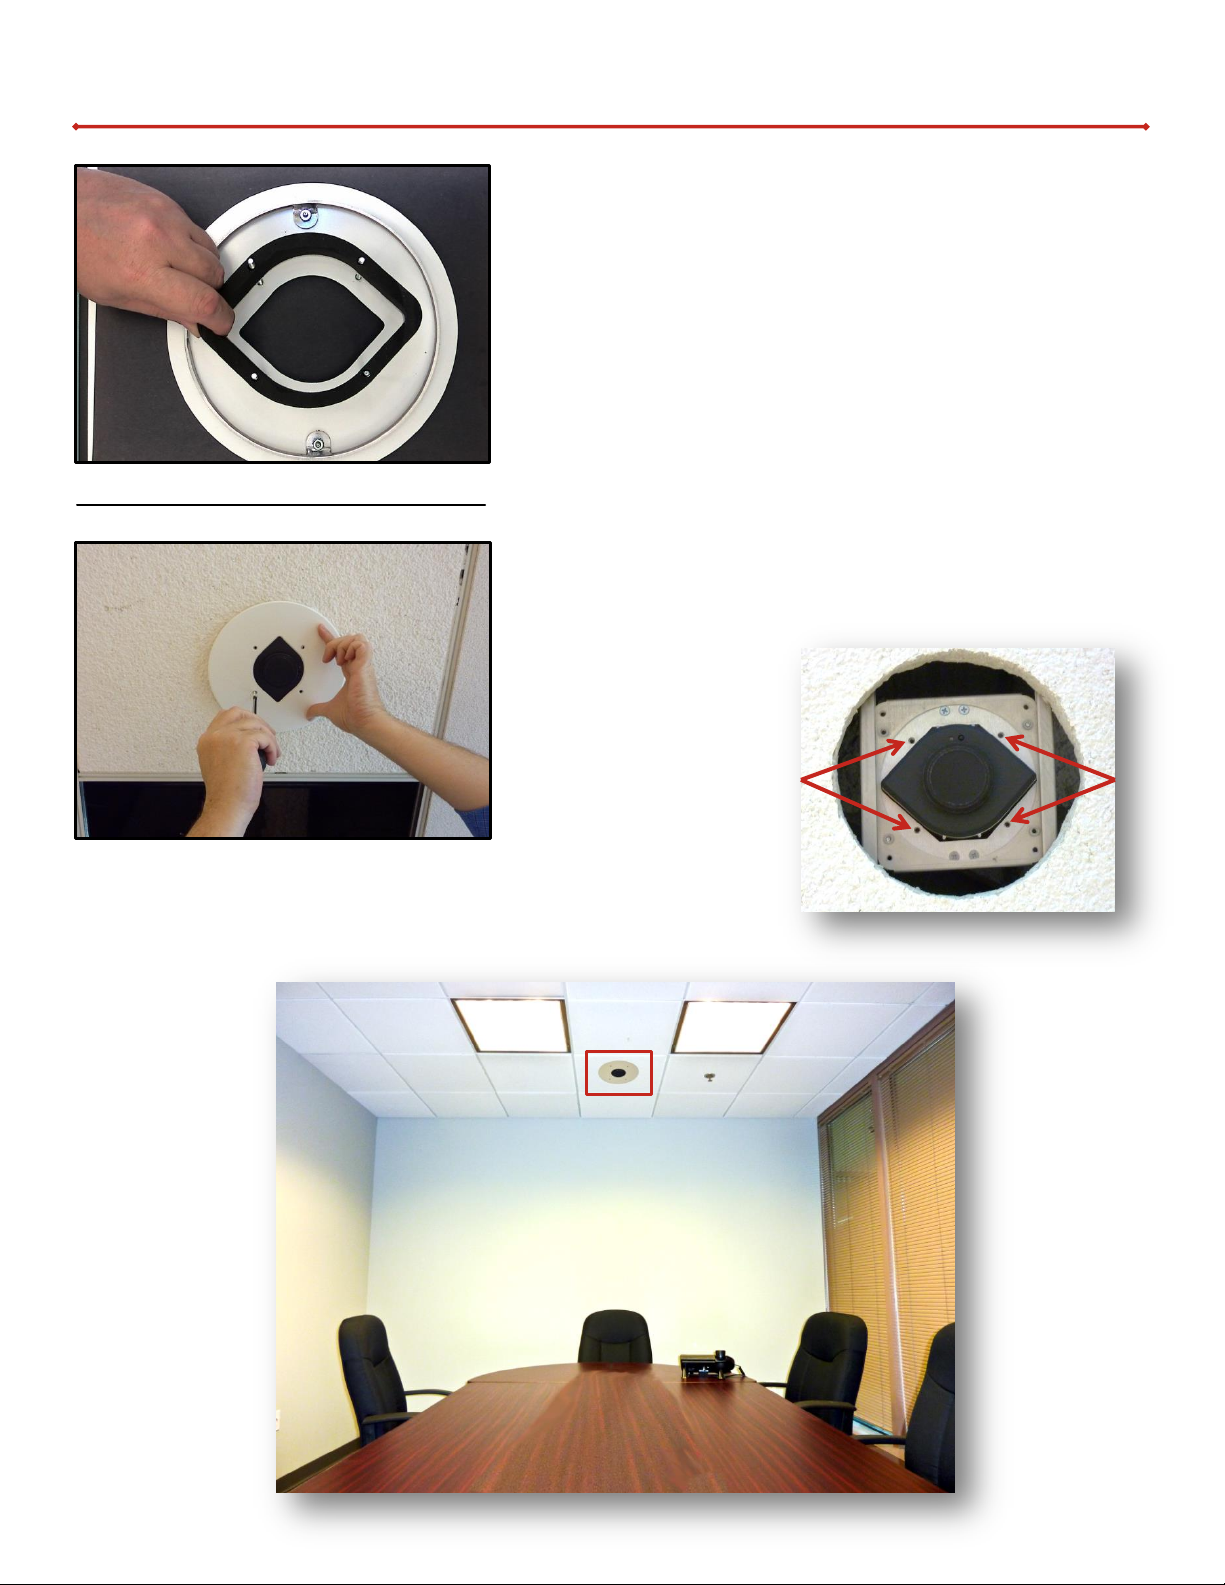
Ceiling Tile
).
19) Install face-plate ring using Trim Mounting
Screws (
Final Product
18) (Optional)
Note: The Light mask (H) is optional. It may be
Place the four Trim Mounting Screws (B)
though the trim ring. Peel back the
adhesive backing from the Light Mask (H
Use the four screws (B) to align the mask
properly and adhere to rear of trim ring.
used to block light and/or airflow from
the camera opening.
B).
7
Page 9
Ceiling Tile
Ceiling Tile
Steps:
I Inspect Installation Location
1) Determine mounting location ceiling based
upon the center of the desired focal point
II Assemble Unit
(Not used in sheetrock installation)
longer brackets are available for purchase.
A C B G F
E
D
1
Sheetrock
H
EYE Series Mounting Kit
Part 2: Sheetrock Installation Guide
This lightweight mounting bracket is designed to support the WolfVision EYE Series models above sheetrock
ceilings. A safety cable anchor point is provided to secure the unit to the building structure. It is the
responsibility of the installer to ensure this product is properly supported and meets all local building codes
and plenum requirements. Make sure the ceiling structure is capable of holding at least 12 lbs. (4x the
combined weight of the mount and camera).
2)
on the working surface.
A minimum of 8 1/2’’ clearance above
ceiling is required.
Center of installation must be at least 3
11
/16’’ from structural members in ceiling
to allow for hole clearance.
A Camera Bracket
B Trim Mounting Screw
C Mounting Tab
D Mounting Screw
E Mounting Screw
F Rail Clamp Screw
G Alignment Ring Nut
H (Optional) Light Mask
3) Using Mounting Screw (E), attach Camera
Bracket (A) to circular plate.
Note: For installations using optional lenses,
8
Page 10
Ceiling Tile
). (Countersunk screw hole is not needed
Sheetrock
Rail clamp
4) Slide circular plate into mounting
assembly.
5) Secure circular plate into mounting
assembly using Mounting Tabs (C) and
Mounting Screws (D).
Note: Use the center hole of the Mounting Tab
6) Attach the four Mounting Tabs (C) with
Mounting Screws (E). Do not tighten
(C
in this step). Only 2 Tabs are required. You
must use the screw holes closest to rail
clamps (see photo).
screws.
9
Page 11
Ceiling Tile
Ceiling Tile
7) Rotate Tabs inward until inside the edge of
20 knurled screws (supplied with camera).
Note: It is recommended that the lens cap be left
3
Sheetrock
the assembly.
8) Install camera into the assembly using ¼ -
on for the entire installation process.
9) Adjust the camera until the distance from
the front of the Mounting Tab (C) to the
end of the camera matches the ceiling
thickness. Then secure camera with
knurled screws.
10
Page 12
Ceiling Tile
II Mounting Instructions
3
/8” diameter hole. The alignment ring may
4
Sheetrock
10) Using the center focal point on the table,
11) Be sure you have checked the clearances
run a plum-line to the ceiling tile and mark
the center point where the camera will
mount.
side to side and above the ceiling. Cut a 7
be used as a template.
12) Any cables needed for camera must be
pre-installed.
11
Page 13
Ceiling Tile
Ceiling Tile
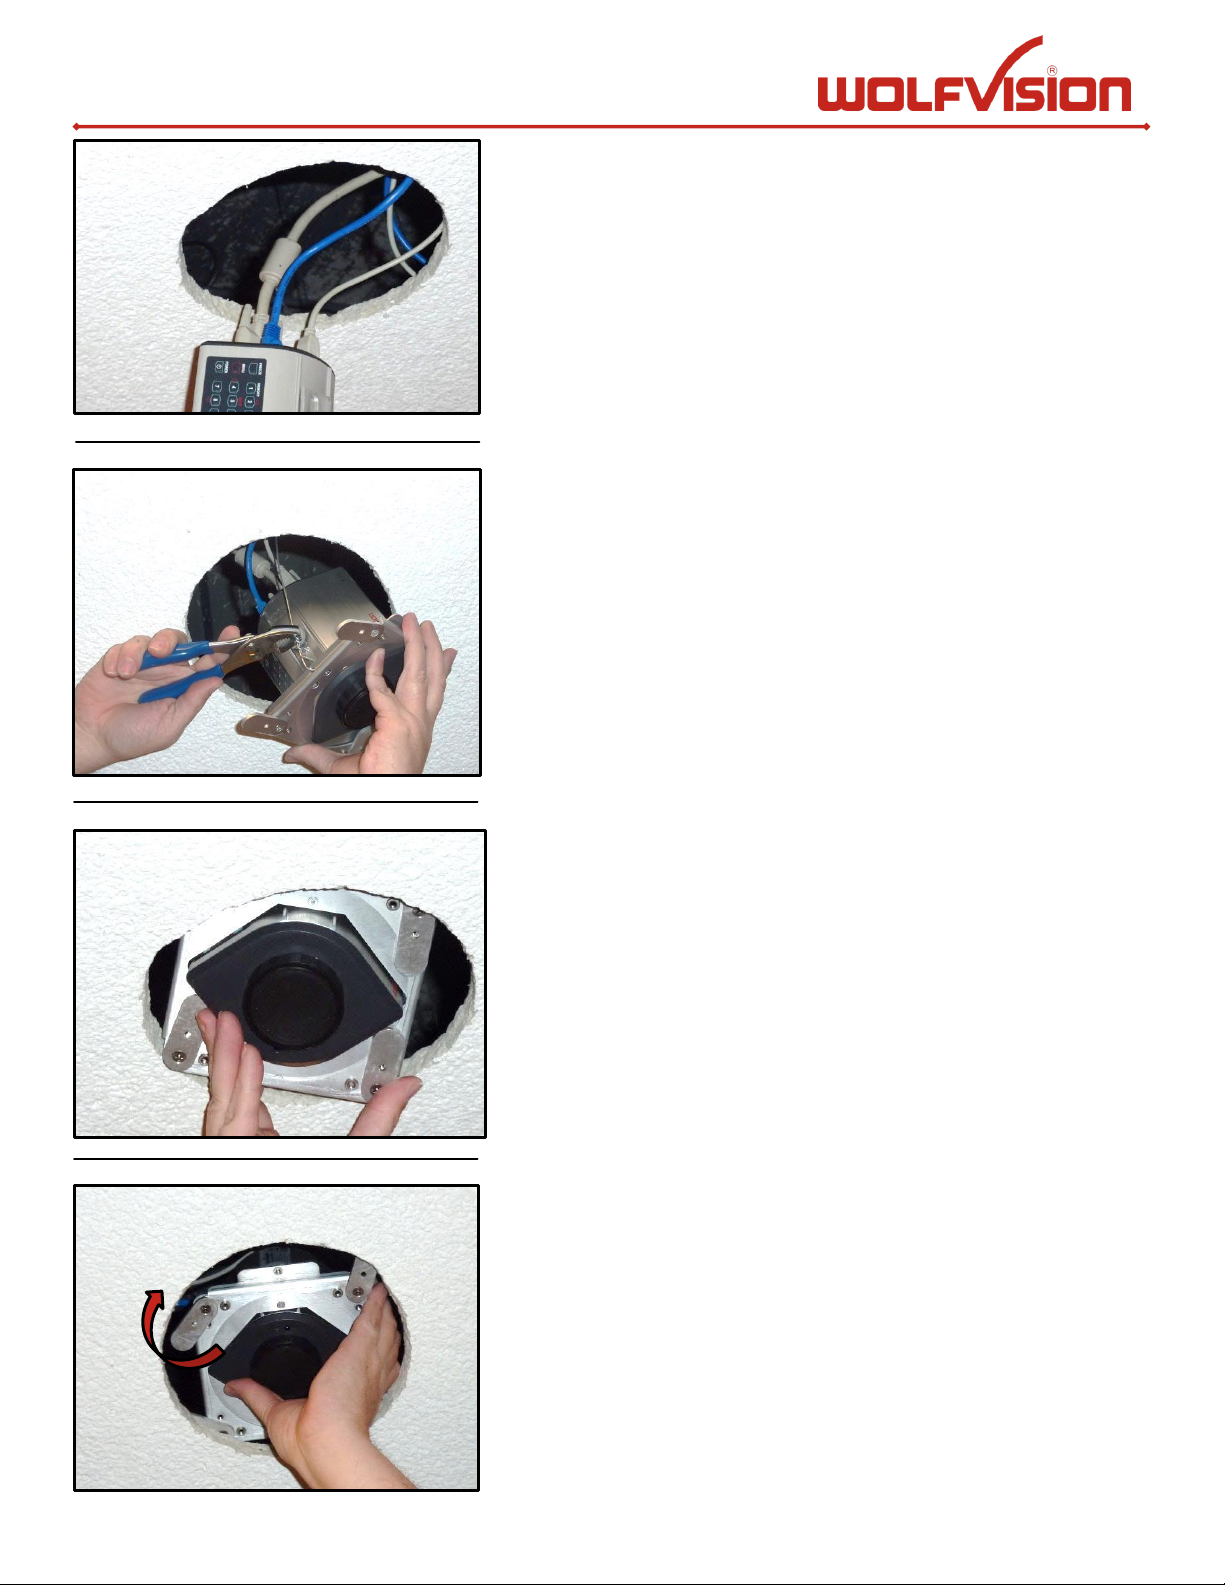
13) Connect all necessary cables to the camera
14) Using this anchor point, attach safety cable
15) Carefully insert assembly with all cables
5
Sheetrock
at this time.
to building structure.
attached into the hole.
16) Rotate Mounting Tabs outward so they
support the weight of the assembly above
the ceiling.
12
Page 14
Ceiling Tile
used to block light and/or airflow from the
6
Sheetrock
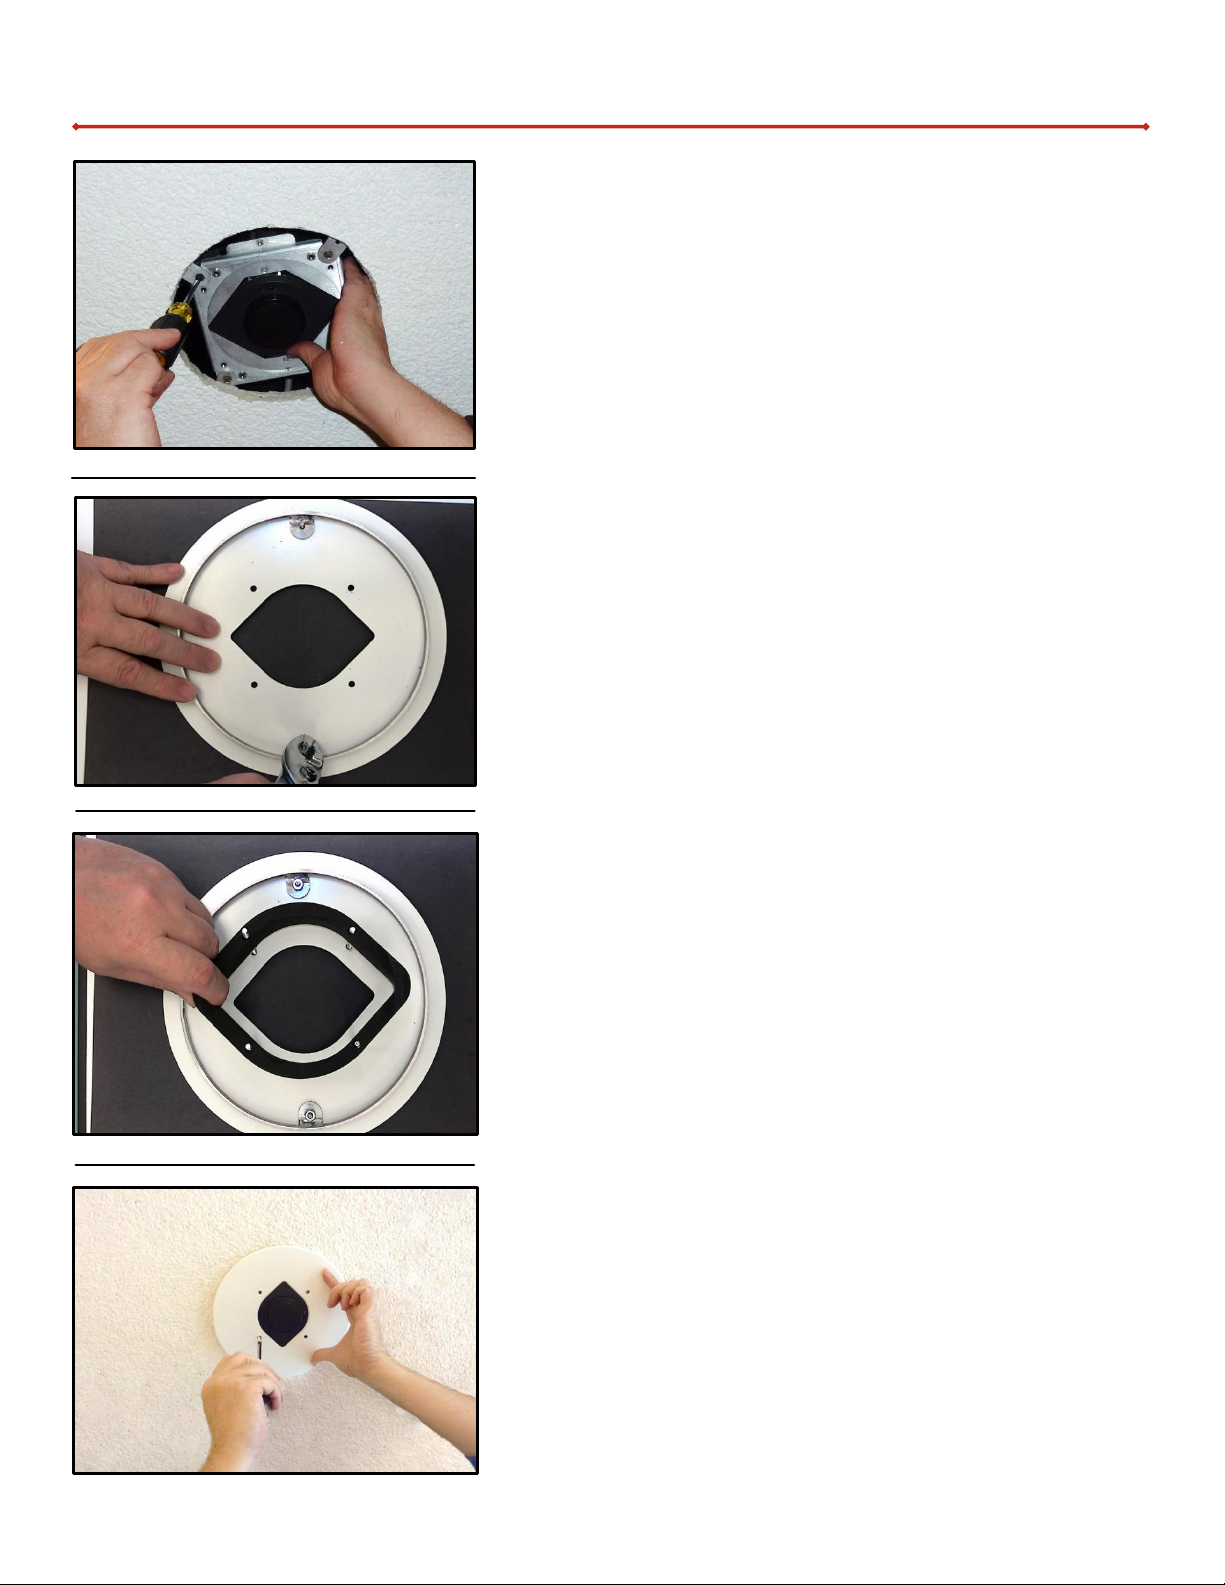
17) Tighten Screws on Mounting Tabs.
18) Attach alignment ring to face-plate with
Nuts (G) provided.
This ring centers and stabilizes the
assembly once the face-plate is installed.
19) (Optional)
Place the four Trim Mounting Screws (B)
though the trim ring. Peel back the
Note: The Light mask (H) is optional. It may be
20) Install face-plate using Trim Mounting
adhesive backing from the Light Mask (H).
Use the four screws (B) to align the mask
properly and adhere to rear of trim ring.
camera opening.
Screws (B).
13
Page 15
Ceiling Tile
Ceiling Tile
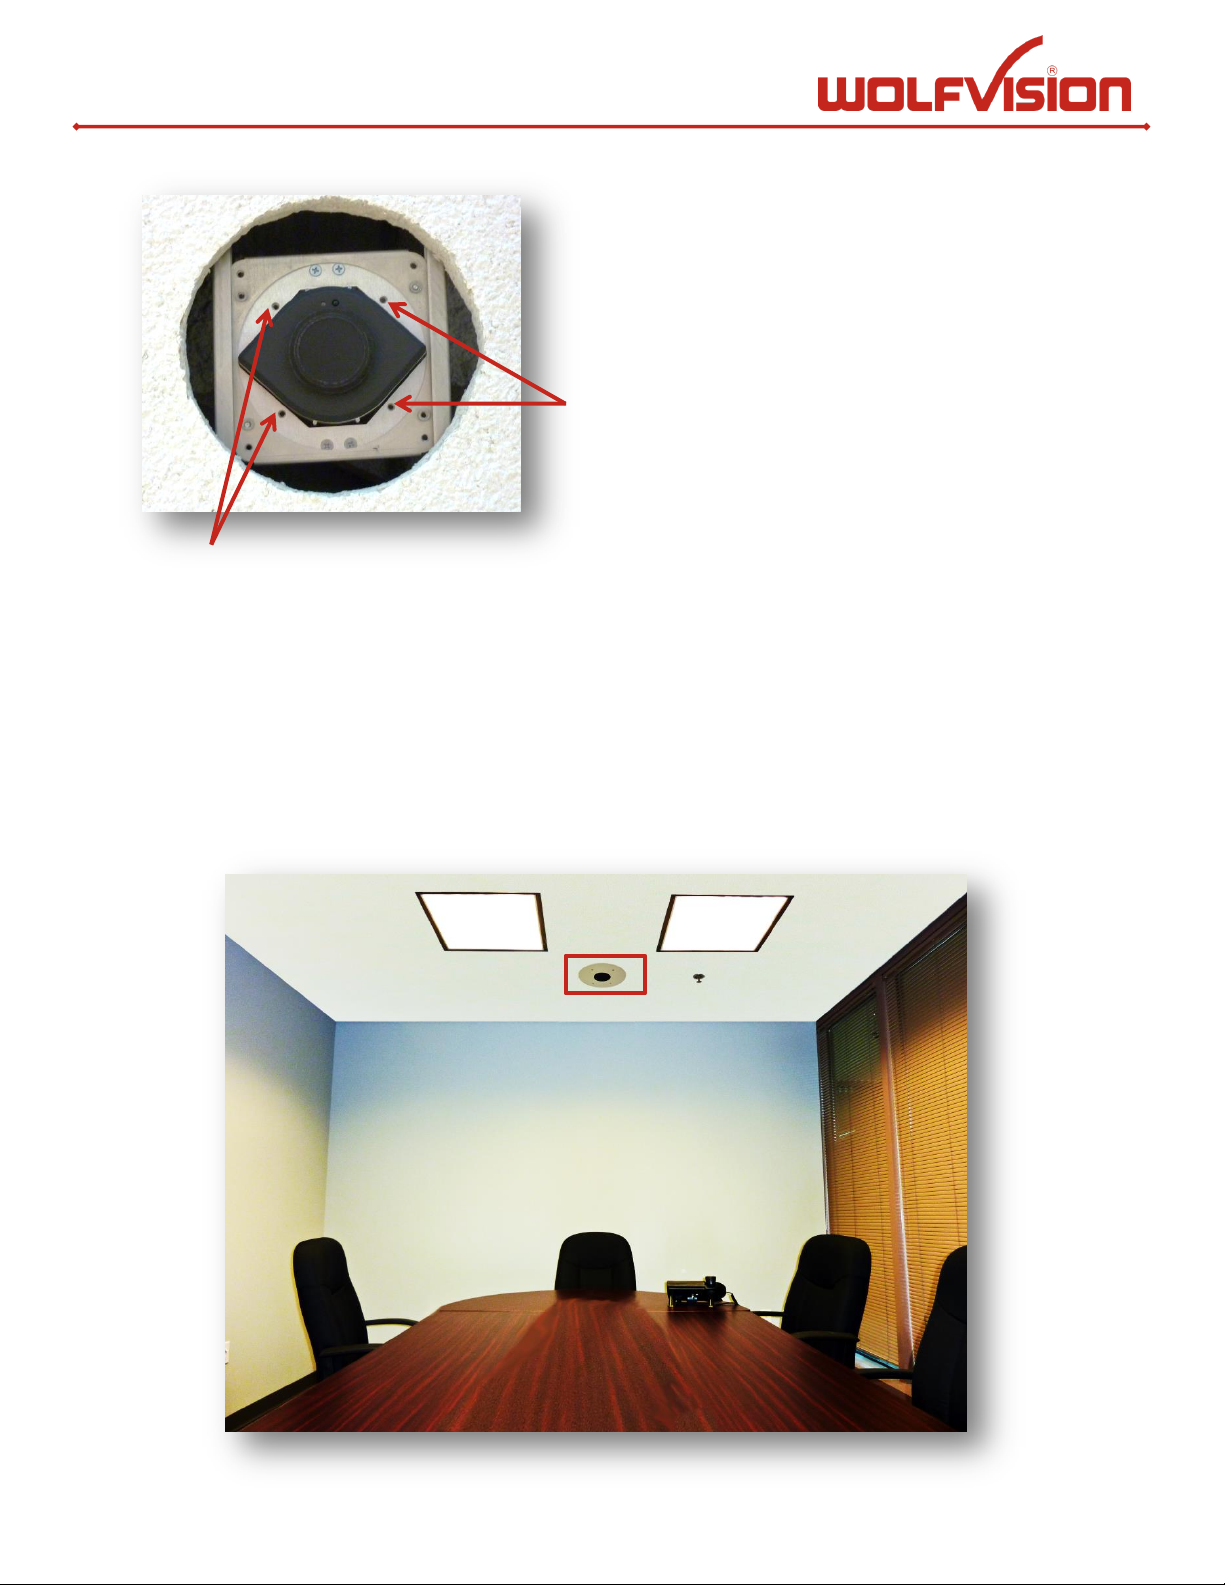
Note: Screws must go into the holes designated
Trim Mounting Screws
Trim Mounting Screws
7
Sheetrock
by these arrows.
Final Product
14
Page 16

Ceiling Tile
WolfVision Support
2055 Sugarloaf Circle,
Suite 125
Duluth, GA 30097
(877) 873-WOLF
15
 Loading...