

Page 1
INSTRUCTIONS
VZ-7 / VZ-5N / VZ-5b
R
English
Page 2
PRECAUTIONS
RISK OF ELECTRIC SHOCK
DANGEROUS VOLTAGE INSIDE
WARNING!
This product is built according to Directive EMC and to Directive electrical equipment.
Tested under VDE, ÖVE.
Proofments according to UL 1950.
This equipment has been tested and found to comply with the limits for a Class A digital device, pursuant to Part
U
15 of the FCC Rules. These limits are designed to provide reasonable protection against harmful interference when
L
®
the equipment is operated in a commercial environment. This equipment generates, uses, and can radiate radio
frequency energy and, if not installed and used in accordance with the instruction manual, may cause harmful
FCC
interference to radio communications. Operation of this equipment in a residential area is likely to cause harmful
interference in which case the user will be required to correct the interference at his own expense.
Manufacturer / Hersteller:
WolfVision GmbH & Co KG, Vlbg. Wirtschaftspark, A-6840 Götzis, Austria
Tel. ++43 / (0)5523 / 52 250-0, Fax ++43 / (0)5523 / 52249
E-Mail: [email protected], Internet Homepage: www.wolfvision.com
Made in: Austria (EC) Printed in Austria July 1997
Page 3
33
9
10
22
11
7
8
3
6
5
4
11
M
O
O
Z
S
U
C
O
F
IS
R
I
1
T
E
S
E
R
P
n
o
2
E
G
A
M
I
ff
o
Connectors (3):
POWER LIGHTY/CVIDEO
1414
1212
1313
1515
Autofocus:
When switching on the unit the
autofocus is automatically switched
on too. The correct focus is
continuously adjusted at a very high
speed. The green light beside the
autofocus on/off switch (9) shines if
the autofocus is on.
o
Please note that objects with a very
low contrast (like a blank sheet of
paper) are difficult to focus. If the
autofocus does not work just move
the object slightly.
For special applications the autofocus
can also be switched off using the
on/off switch (9). The autofocus is
also switched off when the manual
zoom keys of the remote control are
used.
ENGLISH
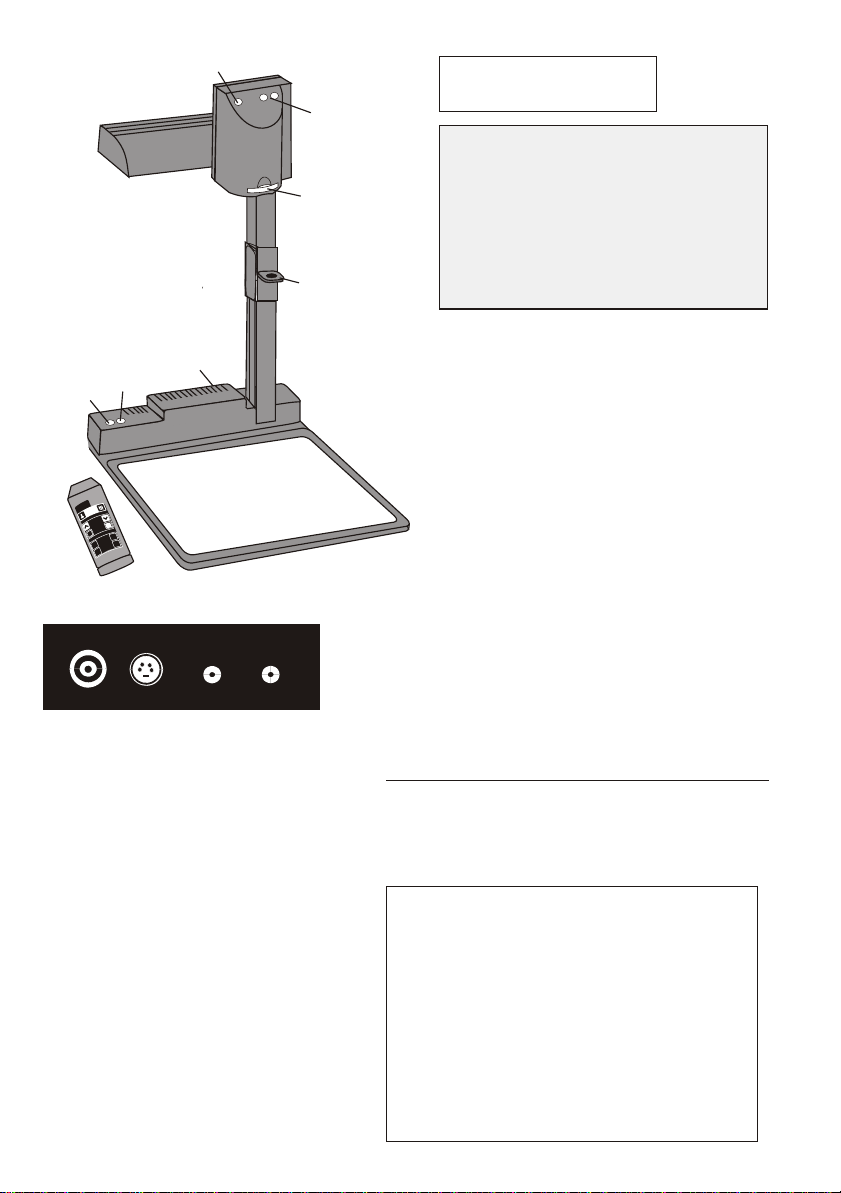
Portable Visualizer models:
VZ-7 Visualizer with remote control
and serial control input RS232
VZ-5b Visualizer without remote
control and serial input RS232
VZ-5N Japanese Version (with remote
control and serial input RS232)
1 Video camera head
2 Light
3 Connectors (on the back
as shown below)
4 Working surface
5 Power on/off switch
6 Light switch
7 Close up lens for camera
8 Pull ring
9 Auto focus on/off key
(a light above this key shows
that the auto focus is on)
10 Zoom keys
11 Infrared remote control
12 Composite video output (VBS)
13 Y/C (S-VHS) output
14 DC input (12 V)
15 DC output for light box
Manual focusing (if remote control not available):
1. Place an object at the level you wish to
focus - The autofocus is focusing the object.
2. Switch off the autofocus with the on/off
switch (9) - The focus remains unchanged
from now on.
Lightbox Handy (optional):
Connect the power cord to the light box
connector (15) on the back side of the
Visualizer.
The light switch (6) of the Visualizer can
now be used to switch between the light of
the Visualizer and the light of the lightbox.
Other lightboxes:
In order to prevent reflections the light of
the Visualizer always has to be switched
off when working with lightboxes.
Page 4
Setting up
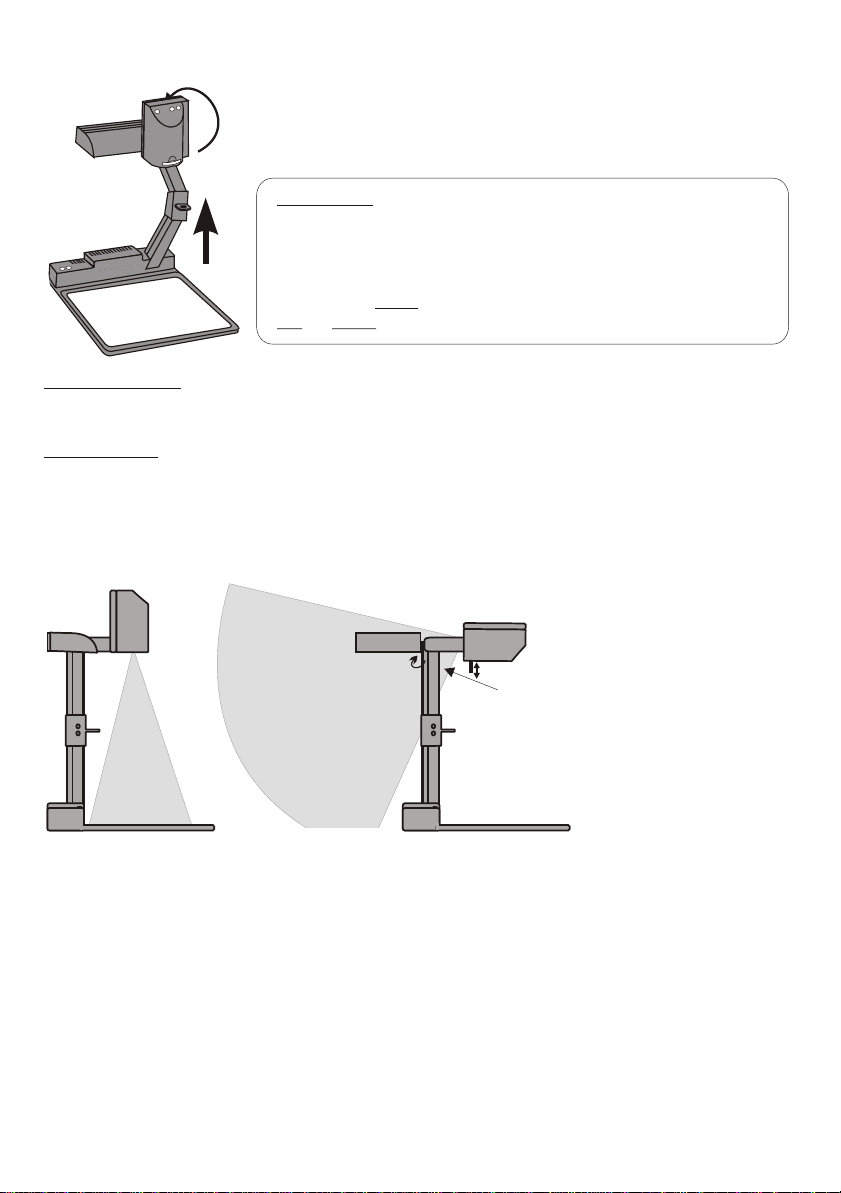
1. Pull the arm upwards using the special pull ring (8)
2. Turn the video camera head (1) and point it at the working surface
3. Connect the power adaptor to the DC-input (14).
4. Connect a TV-monitor, a video projector or a video recorder to
the video output (12) or the Y/C-output (13)
Please note:
The picture quality is much better if you use the Y/C
(S-VHS) output (13) rather then the composite video output
(12). Especially with typed material in black and white.
When using the composite video output please make sure that
a dedicated video cable (75 with RCA plugs is used, and
not an audio cable with RCA plugs !!!
W)
Power-on preset:
The power-on preset is automatically activated when switching on the unit. The settings are:
Zoom size approx. 20 x 15 cm (A5), Autofocus on, Autoiris on, Image on
White balance:
Please note that the white balance adjustment may not be correct when switching on the unit.
In this case just move any object in the picture. Then it will work correctly.
Shooting area on
the working surface:
Eliminating reflections
In order to eliminate reflections
(on high gloss photographs etc.)
just turn the light backwards
slightly.
Please note that reflections can
also be caused by the room light.
5. Switch on the Visualizer with the power switch (5)
Shooting area outside
of the working surface:
Turning the light backwards
to infinity
Close-up adaptor lens
For shooting an object outside the working surface,
in a further distance to the unit, the close up lens (7)
has to be removed.
In this case just pull the lens away from the main
optic of the camera until it reaches the locked position.
It is impossible to remove the lens completely from
the unit, therefore it can not get lost.
x
x.
Before turning back the camera into the standard
working position push the close up lens back in.
In order to enable recordings with
illumination outside of the working
surface, the light of the Visualizer
can be horizontally turned an
angle of up to 250 degrees.
Page 5
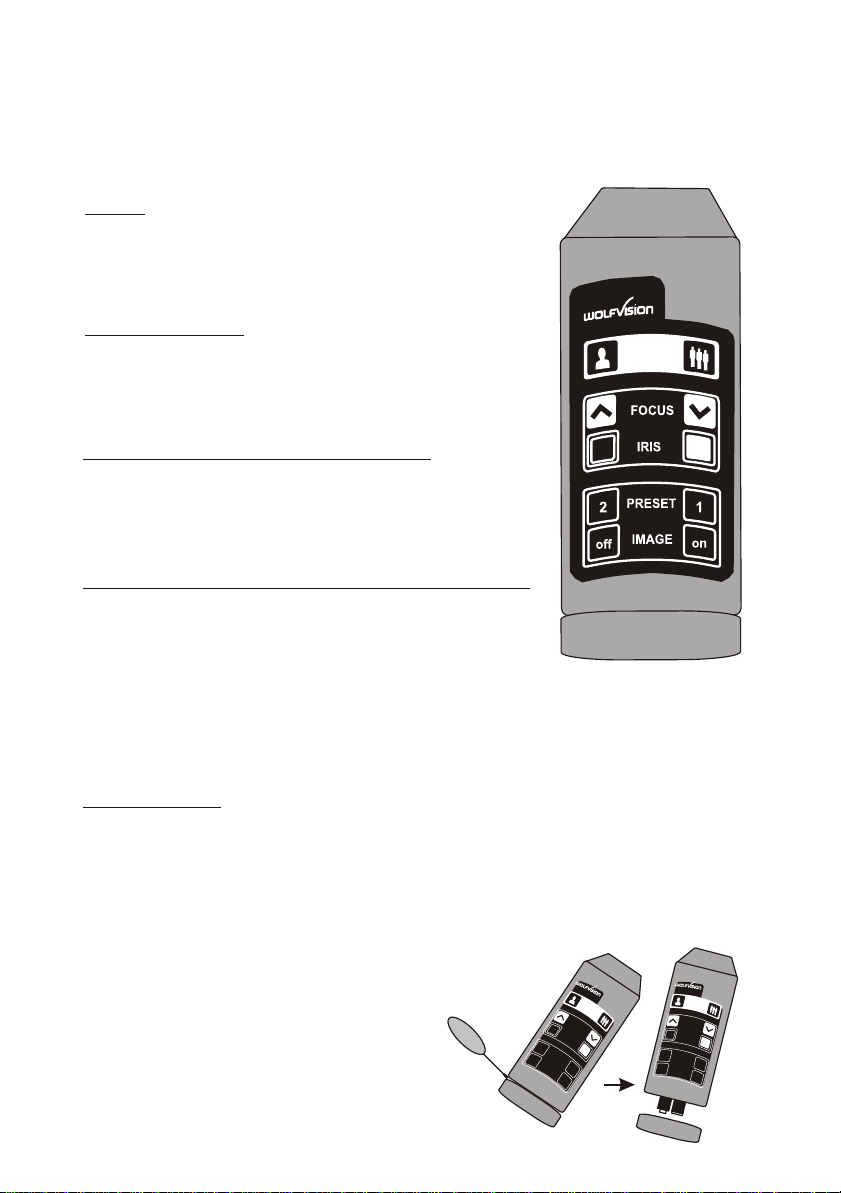
Infrared remote control (not included with VZ-5b)
One of the unique features of WolfVision's portable Visualizers is that there are
only 5 buttons on the unit. Therefore anyone can use it without any instructions.
For more experienced users there are some additional functions on the remote
control:
ZOOM
The Zoom keys are the most important keys on
the IR-remote control. That is why they stand out
in white color. ZOOM keys are also on the camera
head of the Visualizer.
FOCUS (manual)
When the Focus keys are pressed the Visualizer
switches off the autofocus function.
The next time the zoom keys are pressed the
autofocus is switched on again.
IRIS (manual brightness adjustment)
When the Iris keys are pressed the Visualizer
switches off the auto iris function.
The next time the zoom keys are pressed the
auto iris is switched on again.
PRESETS (pre-programmable camera settings)
Two zoom positions and camera settings can be recalled
by quickly (!) pressing the Preset 1 or Preset 2 key:
The factory presets are:
Preset 1: 80mm x 60mm, Preset 2: 290mm x 217mm
Furthermore a user has the opportunity to store his own presets. By pressing one
of the Preset keys for more than 4 seconds, the present camera and zoom settings
are stored as a preset. Please note that if the Visualizer is not used for a long time
the factory presets reappear when the unit is switched on again.
ZOOM
IMAGE on / off
The Visualizer's image output by the video output (12) or Y/C-output (13) can be
switched on and off with these keys.
There is absolutely no monitor image distortion when switching on and off,
because the Visualizer actually outputs a black signal in the off position.
Changing the batteries
If the Visualizer can only be controlled from a
close distance or if it cannot be controlled at
all with the infrared remote control you may
have to change the battery.
Open the cover of the remote control with a
flat object (for example a coin or a big
screwdriver) and replace the two 1.5 V AA
batteries with new ones.
Z
O
O
M
F
O
CU
S
I
R
I
S
2
P
R
E
S
o
E
f
f
T
I
M
A
1
G
E
o
n
Z
OO
M
F
OC
U
S
I
R
I
S
2
P
R
E
S
E
T
1
o
f
f
I
M
A
G
E
o
n
Page 6
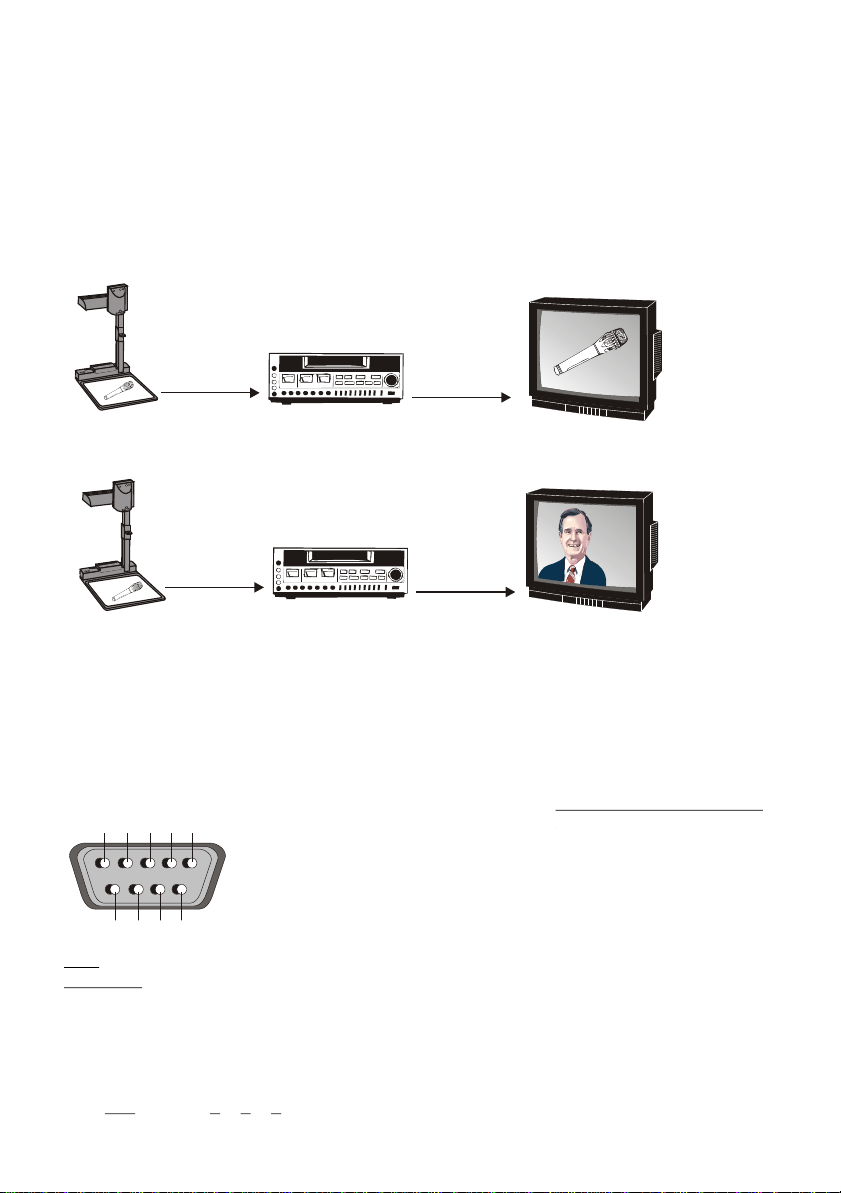
Switching to playback of a video recorder
WolfVision Visualizers do not have an input switch because the following method of
connecting a video recorder is much easier and requires no switching at all:
Connect the video output (12) or the Y/C (S-VHS) output (13) of the Visualizer to the
according input of the video recorder. Connect the video or Y/C (S-VHS) output of the
video recorder with the input of your monitor or video projector.
Adjust the video recorder so that the picture of the Visualizer will be shown
(Make sure that the input switch of the video recorder is in the right position.
If the video recorder has a TV-tuner switch to channel "0" or "AV"):
Visualizer picture:
Position: "Stop"
out
video
in
Position: "Play"
video
out
video
in
video recorder picture:
video
When the video recorder is switched to "Play", the picture of the video recorder
is shown (without any separate switching):
out
video
in
video
out
video
in
video
When the video recorder is switched to "Stop" again, the picture of the visualizer
reappears (without separate switching).
Serial control input, RS 232 (not included with VZ-5b)
The serial port can be used to control the Visualizer through an external device, like a
remote control system for a whole conferencing room.
It can also be used to control the Visualizer through a computer. A special Windowssoftware for PC is available from WolfVision.
3
2
1
6
5
4
9-pin D-Sub connector on unit
male, front side
7
9
8
Pins: 2: RX, 3: TX, 5: GND, 7: RTS, 8: CTS
Baud rate: 19200, databits: 8, stopbit: 1, parity: no
Between sending codes should be a break of
250ms minimum !
Please note that DecimaI-Codes (=ASCII-Codes
or Hex-Codes) must be sent as one single byte
(e.g. 199 and not: 1 + 1 + 9) !
Function: Decimal-Code :
Image on 192
Iris open 193
Focus far 194
Zoom wide 195
Image off 196
Iris close 197
Focus near 198
Zoom tele 199
Preset 1 202
Preset 2 203
Save Preset 1 216
Save Preset 2 217
Preset max. wide 229
Preset A5 231
Preset A6 232
Preset max. tele 235
(detailed description of serial
protocol available on request)
Page 7
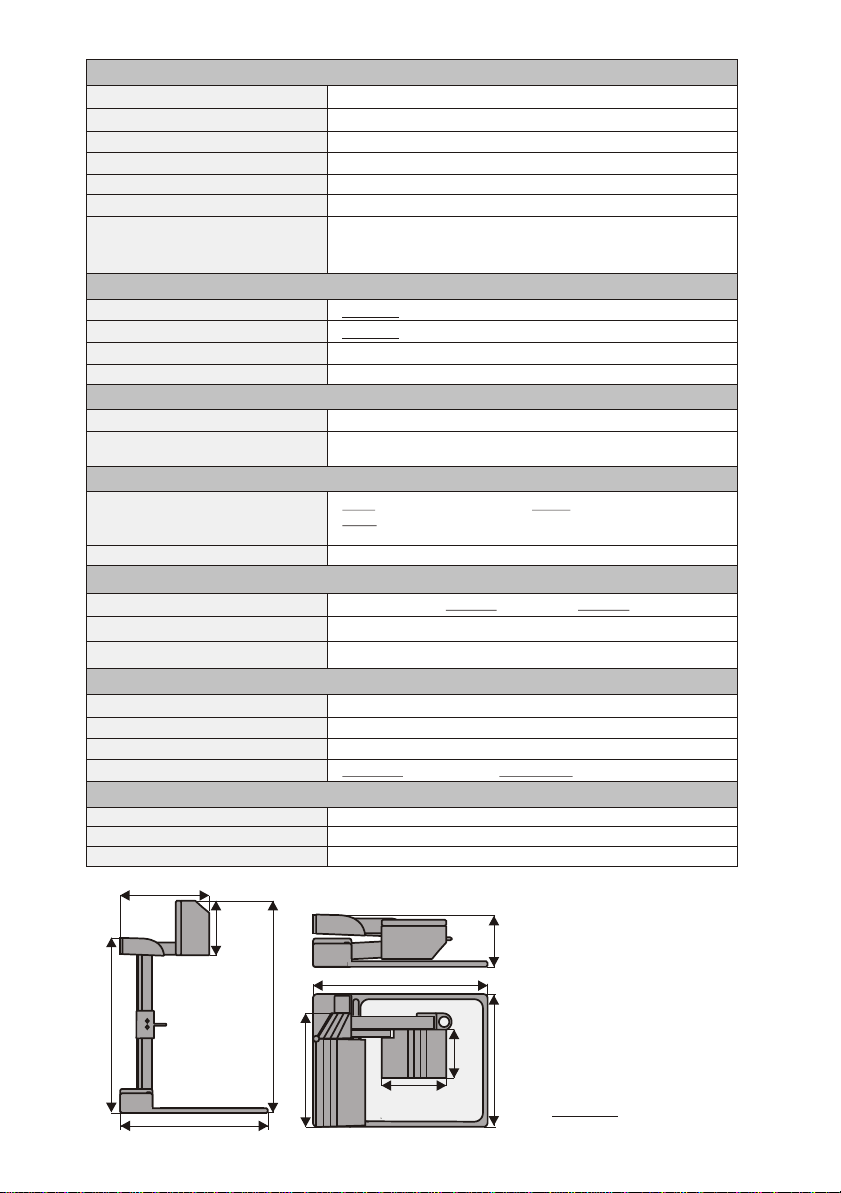
Technical data:
Pick-up element / video: VZ-7 / VZ-5N / VZ-5b
Built-in camera system: 1 CCD unit - 1/3" interline transfer
Effective pixels: PAL models: 752 x 582, NTSC models: 768 x 494
Horizontal resolution: > 460 TV lines
Iris: automatic and manual (only automatic on VZ-5b)
Autofocus: continously working with high speed, on/off switch
Optics: 12 x telezoom, 5.4 - 64.8mm, f =1.8~2.7
Depth of focus
(depth of field):
Operation:
Camera control panel:
Infrared remote control (not on VZ-5b)
Power and Light controls:
Power-on preset:
Lighting element:
Light source:
Light system:
Scanning area:
Objects on working surface:
Objects in a room: length, width and height to infinity
Connections:
Y/C (S-VHS) output:
Composite video output:
Serial control input:
General specifications:
Power consumption:
Power source:
Made in:
Weight:
Accesories (Scope of supply):
Mains power pack:
Carrying case (leather imitation):
Other supplied accessories:
235mm (9.2")
14mm (0.6") on smallest picture, size: 31 x 23mm (1,2" x 0.9")
18mm (0.7") on small picture, size: 42 x 33mm (1.7" x 1.3")
200mm (8") on largest picture, size: 360x270mm (14,4"x10.8")
functions: zoom in, zoom out, autofocus on/off
functions: zoom, manual focus, iris, presets, image on/off
power on/off, light on / off or light on lightbox
autofocus on, autoiris on, pick-up size: 210 x 140mm
high frequency neon light
light either on working surface or in front of the unit,
no blinding of audience or speaker, very low stray light
width: 23-270mm (0.9"-10.8"), length: 31-360mm (1.2"-14.4"),
height: up to 110mm (4.4") in tele position (smallest picture)
up to 370mm (15") in wide position (largest picture)
4-pin connector, Y-signal: 1 Vpp 75 C-signal: 0.3 Vpp 75W, W,
RCA-connector, VBS 1.0 Vpp 75W
Configuration: RS 232 (not available on VZ-5b)
max. 25 VA
12 V DC
Austria (European Community)
Visualizer: 4.6kg (10lbs), Power pack: 0.7kg (1.5lbs)
100V or 110-120 V or 220-240 V AC / 12 V DC, 1.5 A
450x350x130mm (17.7"x13.8"x5.1"), black, side and inside pockets
Y/C (S-VHS) cable, instructions,IR-remote control (not on VZ-5b)
Specifications and availability subject to change.
485 mm (19")
405 mm (15.9")
(5.9")
150 mm
405 mm (15.9")
580 mm (22.9")
260 mm (10.2")
150mm (5.9")
113 mm (4.5")
Changing the lamp of the
(4.8")
Visualizer:
121 mm
1. Remove the power cord of
the Visualizer.
2. Remove lamp housing glass.
(1 Screw)
3. Remove the safety clip
4. Change the lamp.
CAUTION: Hot when used!
310 mm (12.2")
Lamp type: Osram Dulux S/E
9W/21 or equivalent
 Loading...