

WolfVision VZ-9.4F, VZ-9.4L Instruction Manual
Check out our Internet Homepage for additional information
www.wolfvision.com/support
VZ-9.4F
INSTRUCTIONS
BEDIENUNGSANLEITUNG
INSTRUCTIONS
BEDIENUNGSANLEITUNG
ENGLISH / DEUTSCH
VZ-9.4F
R
ENGLISH
Please observe the following:
Risk of electric shock
Dangerous voltage inside
WARNING!
Precautions
1
Use this Visualizer only with the correct voltage as shown on the type label !
Do not expose the Visualizer to heat or moisture !
Protect the Visualizer from excessive shocks !
Make sure that sufficient air circulation for cooling the Visualizer is possible (ventilation slots on
the lamp housing)!
If there is any abnormality (abnormal noise, smell, smoke etc.) disconnect the Visualizer from
mains immediately and contact your Visualizer dealer!
Do not use a damaged power supply / power cord. This may cause short circuits or electrical
shocks!
To prevent danger, do not modify the Visualizer or operate without the cover panel firmly in place!
Do not expose the Visualizer to water, metallic objects or any flammable material.
Avoid installing the Visualizer in locations exposed to strong magnetic fields or electrical
currents.
Avoid installing the Visualizer in environments where there is radiation. This could cause
monitor image distortion or damage to the camera sensor.
Do not pull the plug from the power socket with wet hands!
If the Visualizer is not used for a long time, disconnect it from mains!
The external power supply has to be approved by CSA or UL in accordance to CSA 22.2-60950 or
UL 1950. The outputs have to be LPS (limited power source) rated!
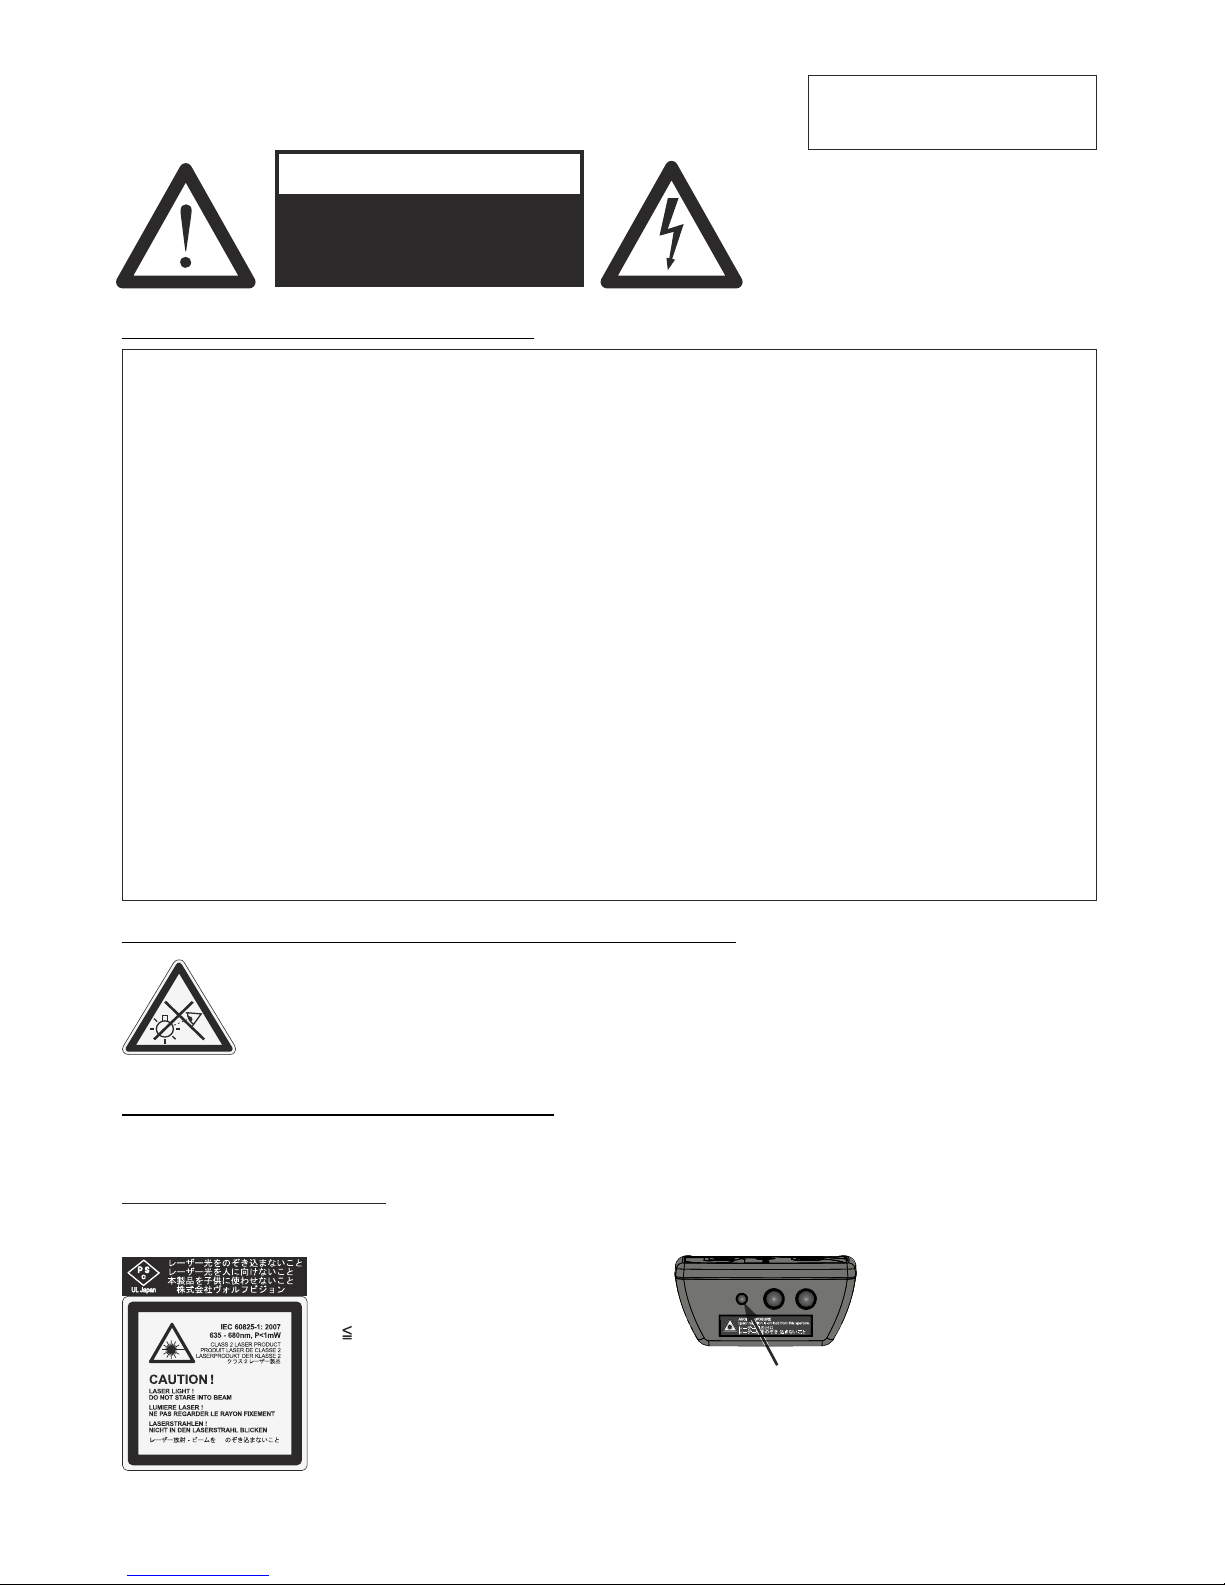
Precautions for the laser pointer:
Laser light - Do not stare into beam!
Do not modify the laser! Do not view the laser beam with optical instruments!
Information for laser pointer
FDA accession number: 9912688-00
This device complies with 21 CFR 1040.10 and 1040.11
Precautions for LED light according EN62471:
The laser beam exits the
remote control through the
smaller (left) opening on
the front.
Technical data:
λ = 635 - 680nm
P< 1mW
Θ 2mrad
This label will be found on the
underneath of the remote
control.
LED lighting system - Do not stare into beam!
Do not modify the LED lighting system!
Do not view the light beam with optical instruments!
Ne pas regarder dans l'objectif lorsque le visualiseur est en marche!

FCC information:
This device complies with part 15 of the FCC rules. Operation is subject to the following two conditions: (1)
this device may not cause harmful interference, and (2) this device must accept any interference received,
including interference that may cause undesired operation.
Note:
This equipment has been tested and found to comply with the limits for a class B digital device, pursuant to
part 15 of FCC rules. These limits are designed to provide reasonable protection against harmful
interference when the equipment is operated in a residential installation. This equipment generates, uses,
and can radiate radio frequency energy and, if not installed and used in accordance with the instruction
manual, may cause harmful interference to radio communications. However, there is no guarantee that
interference will not occur in a particular installation. If this equipment does harmful interference to radio or
television reception, which can be determined by turning the equipment off and on, the user is encouraged
to try to correct the interference by one or more of the following measures:
- Reorient or relocate the receiving antenna.
- Increase the separation between the equipment and receiver.
- Connect the equipment into an outlet on a circuit different from that to which the receiver is connected.
- Consult the dealer or an experiences radio/ TV technician for help.
Information to user:
The user manual or instruction manual for an intentional or unintentional radiator shall caution the user that
changes or modifications not expressly approved by the party responsible for compliance could void the
user's authority to operate the equipment.
This product is built according to Directive EMC and to Directive electrical equipment.
Inspections, tests and evaluation are according to UL 60950. CSA 22.22-60950
Inspections, tests and evaluation are according to the CB-Scheme
Inspections, tests and evaluation are according to the PCT-Scheme
Marks on the unit:
Approval
Tested to comply
with FCC standards
2
3
4

5
EU 1 483 529 RU 2265284 FR 03 02886
RU 2279602 US 7,035,011 JP 3 096 342
US 7,104,512 TW I 226969 and others
TW I 247964 DE 202 03 785.1
KR 0576806 AT-U 7841
Worldwide Patents
Copyright Information
Copyright © by WolfVision. All rights reserved.
WolfVision, Wofu Vision and are registered trademarks of WolfVision Holding AG, Austria.
No part of this document may be copied, reproduced, or transmitted by any means, without prior written
permission from WolfVision. Except documentation kept by the purchaser for backup purposes.
In the interest of continuing product improvement, WolfVision reserves the right to change product
specifications without notice.
Information in this document may change without notice.
Disclaimer: WolfVision shall not be liable for technical or editorial errors or omissions.
The units are "MADE IN EU/AUSTRIA”
Printed in Austria, October 2015

PRESET
FREEZE
FOCUS-
FOCUS+
EXTERN
MENU
?
AF
Components of the Visualizer
#1
#8
#9
#10
#11
#12
#1 Alternative Anti-theft security (thread found underneath the unit as shown on page 26)
#2 Working surface (see page 11)
#3 IR-remote control (see pages 7, 8 and 25)
#4 Preview monitor (see page 11)
#5 Light field for slides (see page 12)
#6 Connectors (on the back and on the side as shown on next page)
#7 Pull ring to lift the arm up/down (see page 10)
#8 Close up lens for camera (see page 12)
#9 Camera keys (see page 9)
#10 Zoom wheel (see page 9)
#11 IR-receiver camera head
#12 Light source
#13 IR-receiver base
#14 Slot for Kensington lock® (see page 26)
#15 Microphone built-in (see page 22)
#16 LIGHT key (see page 9)
#17 POWER key (see page 9)
6
#17
#16
#13
#14
#2
#15
#7
#4
#5
#6
#3
7
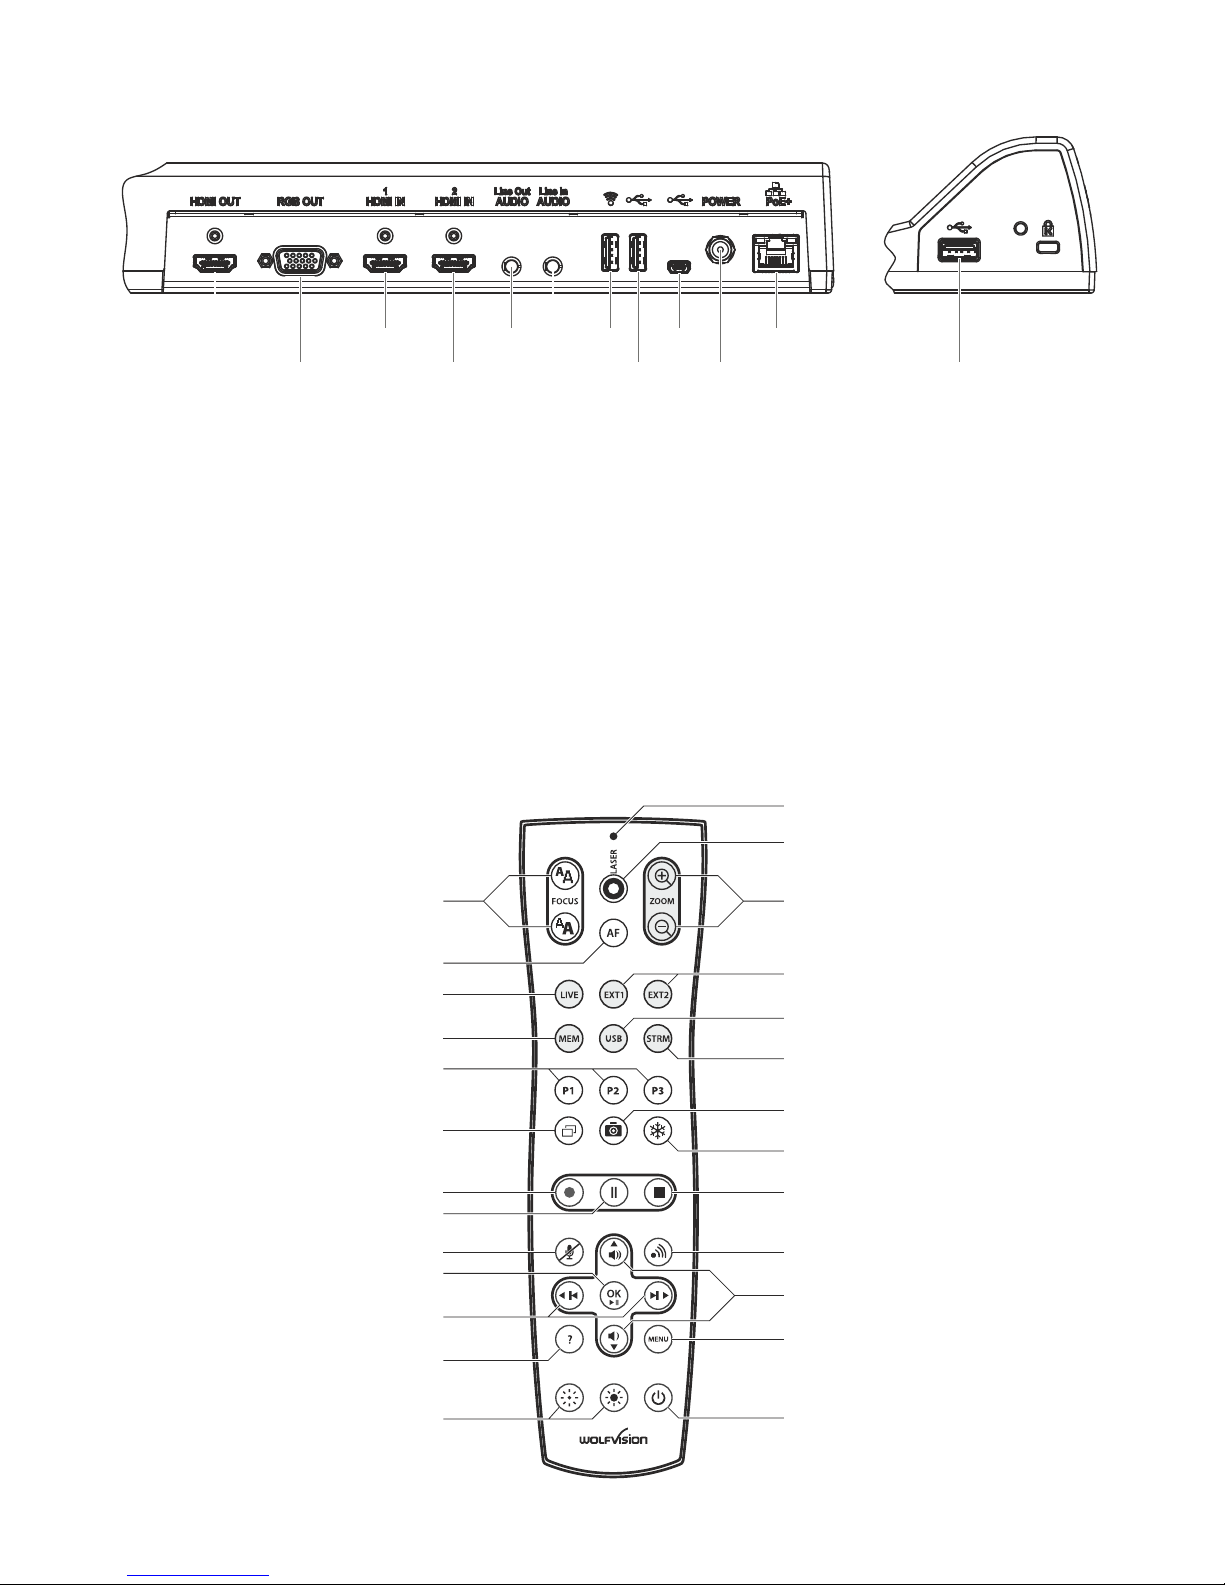
Connectors (#6)
Infrared Remote Control (#3)
#22
#21 #25
#26
#23#19
#18
#24#20
#27
#28
#29
#18 HDMI OUTput (see page 20)
#19 RGB OUTput (15pin) (see pages 20)
#20 HDMI IN 1 input (see page 21)
#21 HDMI IN 2 input (see page 21)
#22 AUDIO Line Out output (see page 22)
#23 AUDIO Line In input (see page 22)
#24
#25
#26 USB port to Host (to computer) (see page 23)
#27 Power connection 12V DC
#28 LAN port (see pages 18, 23 and 24)
#29
for external HDMI-signals
for external HDMI-signals
for audio signals
for audio signals
USB port to optional WLAN dongle (see pages 18 and 24)
USB port to Client (identical function as #24 and #29)
10/100 Base T/TX with PoE+ functionality
USB port to Client (to peripheral devices, external storage units) (see pages 15, 16, 23 and 25)
#42
#44
#50
#39
#38
#30
#45
#41
#40
#33
#48
#49
#43
#37
#47
#46
#36
#34
#31
#32
#35
#51
#54
#53
#55
#52

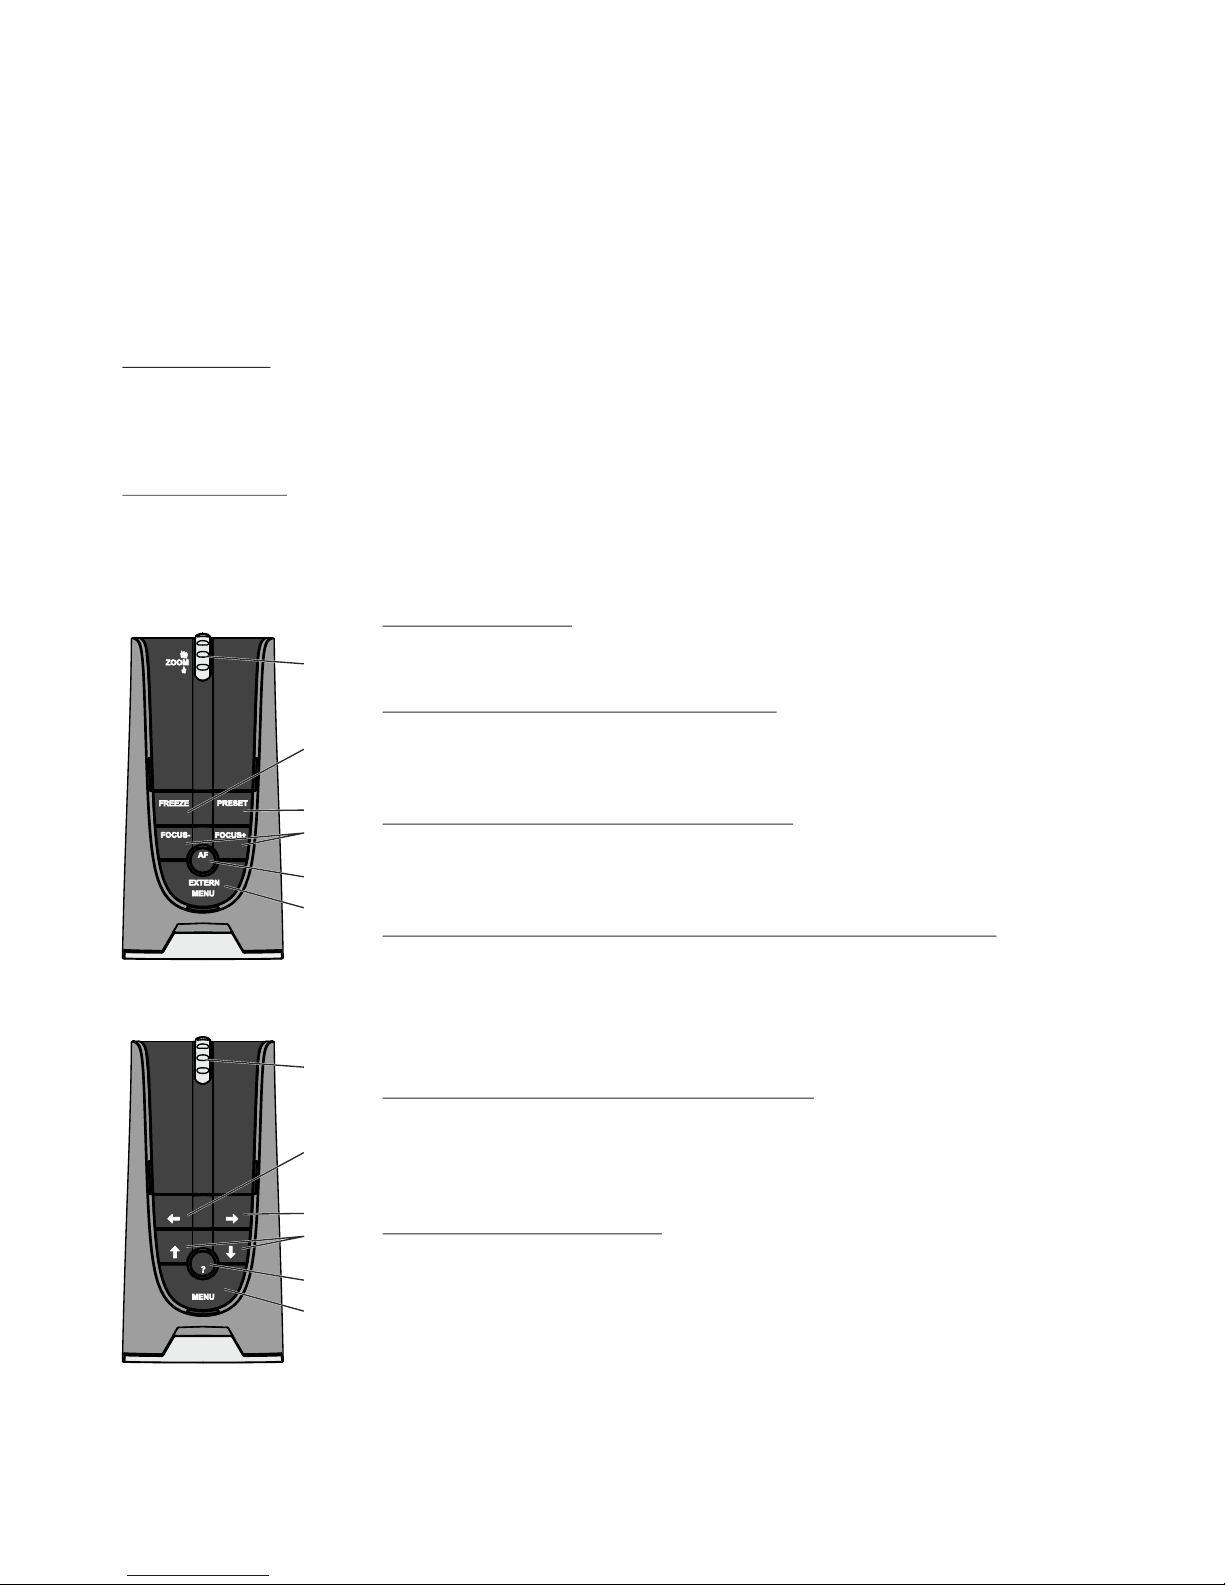
Keys on the IR-Remote Control
#30 Manual EXPOSURE keys (brightness adjustment)
When the EXPOSURE keys are pressed, the Visualizer changes the image brightness (see page 13).
#31 ? HELP / RESET key for on-screen menu (double function)
Shows the info screen to inform you about current state of recording and audio (see page 13).
While you are in the on-screen menu you can activate the on-screen help by pressing the HELP key.
Pressing this key for 2 seconds resets the selected menu item (see page 19).
#32 Backward-Forward keys / MENU NAVIGATION keys (double function)
For navigating through the memory in MEM and USB mode (see page 16).
For navigating through the on-screen menu while it is activated (see page 19).
#33 OK key
Acts as Enter key while the on-screen menu (see page 19), MEM or USB mode is activated (see page 16).
#34 Audio Mute key
Mutes the Audio inputs.
#35 Video Recording Pause key
Pauses video recording, click again to resume (see page 15).
#36 Video Recording key
Start video recording (see page 15).
#37 PiP key
For activating the Picture in Picture mode for Live to Freeze comparison (see page 17).
#38 PRESET keys (programmable settings)
For storing a preset, press one of the PRESET keys for more than 2 seconds. For recalling a preset, press
the PRESET key quickly (see page 13).
#39 MEM key
For displaying pictures and videos of the built-in memory (see page 16).
#40 LIVE key
For displaying the live image of the camera (see page 16).
#41 AUTO FOCUS (AF) key
Pressing this key toggles the Auto Focus on and off (see page 13).
#42 Manual FOCUS keys
For focusing the picture (see page 13).
#43 LASER POINTER indication LED
Indicates active Laser LED.
#44 LASER POINTER key
Important: Do not stare directly into the laser beam. This is hazardous for your eyes!
#45 ZOOM keys
Controls the camera zoom to change size of pick-up area.
#46 EXT1 and EXT2 keys
Shows the signal of the external inputs, use the LIVE key to display the live image again (see page 21).
#47 USB key
For displaying pictures and videos of the USB memory (see page 16).
#48 STRM key
Shows the signal of the received stream (see page 18).
#49 SNAPSHOT key
Pressing this key activates the SNAPSHOT function (see page 15).
#50 FREEZE key
Freezes the current image (see page 13).
#51 Video Recording Stop key
Stops video recording (see page 15).
#52 Stream key
Starts and stops streaming over the network (see page 18).
#53 Audio Volume keys / MENU NAVIGATION keys (double function)
To increase / decrease volume of audio output.
For navigating through the on-screen menu while it is activated (see page 19).
#54 MENU key
Pressing MENU key activates the on-screen menu (see page 19).
#55 POWER key
Pressing this key switches the unit on and off. When powering on, the Visualizer runs the power-on preset.
8
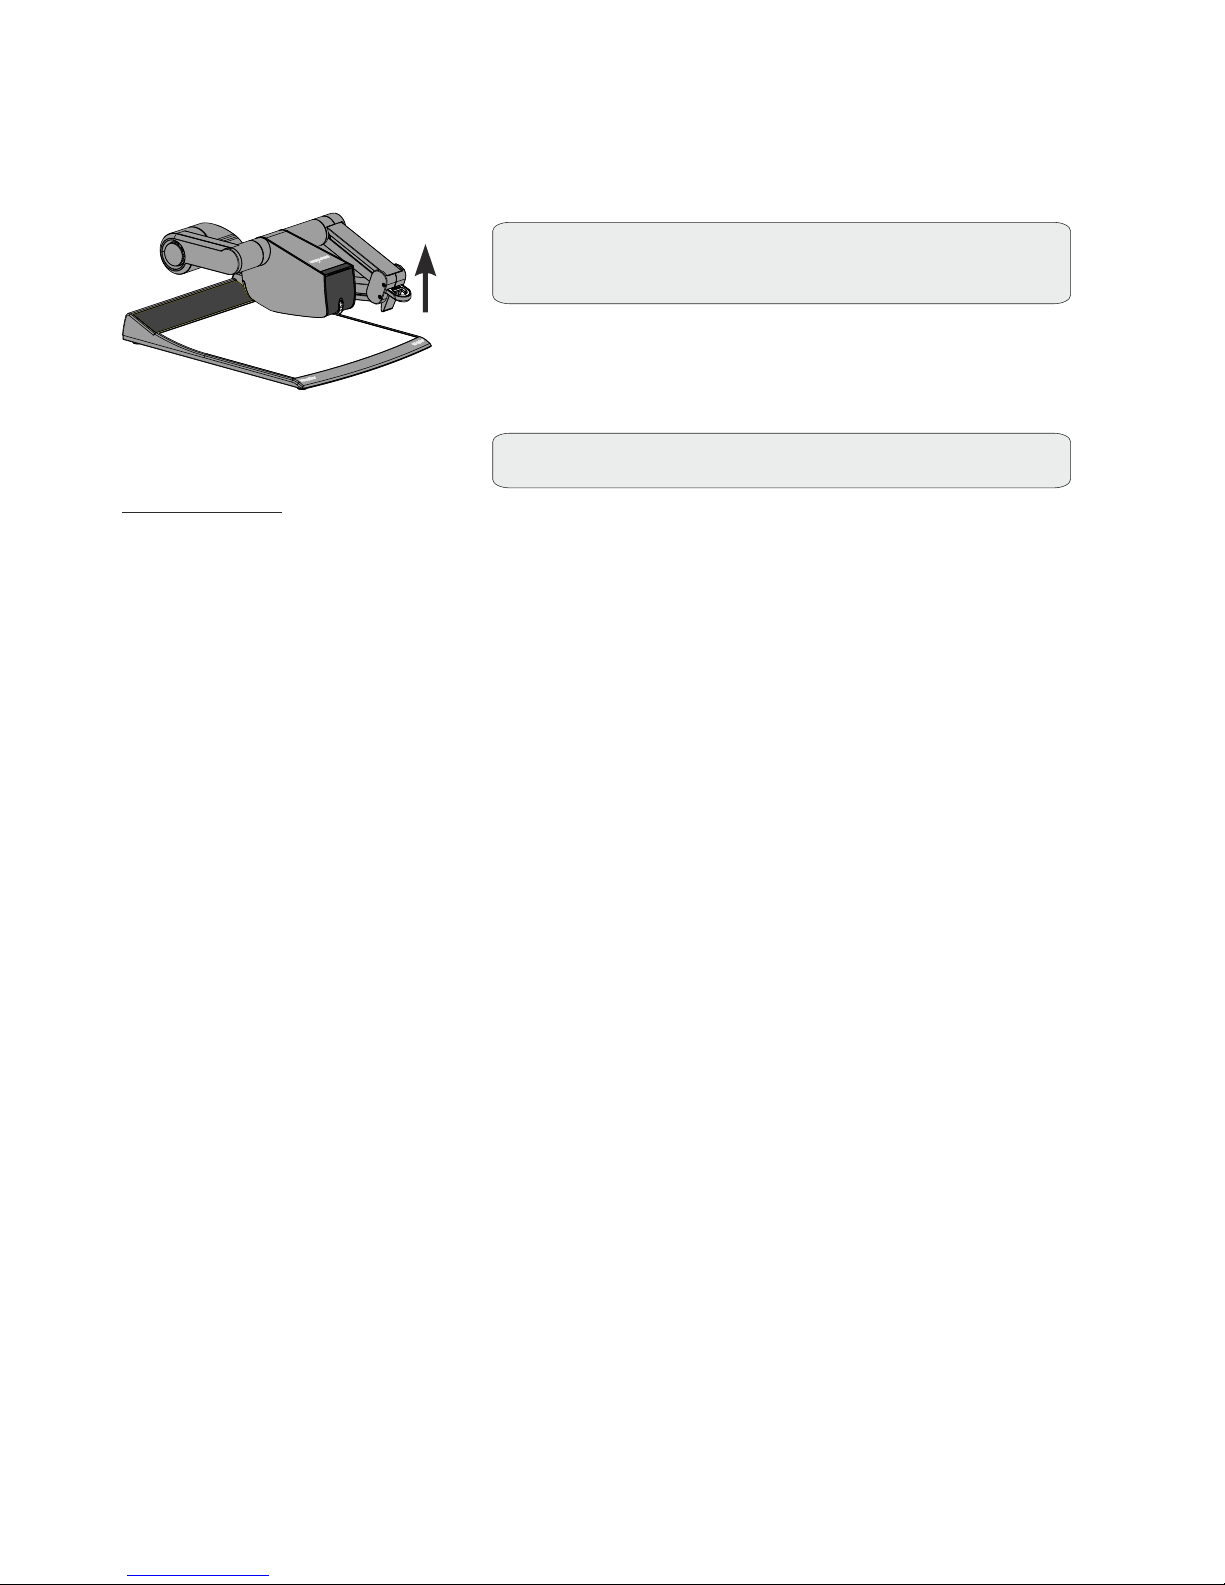
#10 ZOOM WHEEL
Turn the wheel down to zoom in (TELE), and up to zoom out (WIDE). The more
you turn the ZOOM WHEEL, the faster the zooming works.
#56 FREEZE key / menu: select key - left
Freezes the current image. The FREEZE light indicates if the FREEZE-mode
is activated.
When on-screen menu is activated, it works as select key (see page 19).
#57 PRESET key / menu: select key - right
For storing the preset, press the PRESET key for more than 2 seconds. For
recalling the preset, press the PRESET key quickly (see page 13).
When on-screen menu is activated, it works as select key
#58 Manual FOCUS keys / menu: navigation key - up and down
When the Manual FOCUS keys are pressed the Visualizer switches off the
autofocus function.
Using the AF-key switches the autofocus function on again
When the on-screen menu is activated, it functions as navigation keys
#59 AUTO FOCUS (AF) key / menu: help key
Switches the auto focus on and off. The AF light indicates if the AF is switched
on .
When on-screen menu is activated, it functions as Help key. Pressing this key
for 2 seconds resets the selected menu item
#60 EXTERN key / menu key
Switches between Visualizer image and external input (for more details - see
page 21).
The EXTERN light indicates that a signal from the external input is shown.
Pressing this key for 2 seconds activates the on-screen menu (see page 19).
(see page 19).
(see page 13).
(see
page 19).
(see page 13)
(see page 19).
Keys on the Visualizer
Base
Camera Head
One of the great features of WolfVision's Portable Visualizers is that only the most necessary keys are on
the unit itself. Therefore anyone can use it without instructions.
For more experienced users there are some additional functions on the remote control of the Visualizer.
Nearly all functions on the remote control can also be controlled through the keys on the camera head:
The POWER and the LIGHT keys are capacitive touchsensors, just touch it to switch on/off (keep sensor
area clear).
toggles between top light, light field for slides and light off.
The LIGHT key also works as ONE PUSH WHITE BALANCE key if pressed for 2 seconds
#16 LIGHT key
Switches the top light on and off.
It
Please note, when activating the slide light field, the Visualizer zooms to slide picture size.
#17 POWER key
Switches the unit on and off. When switching the unit on, the Visualizer automatically runs power-on preset.
(see page 14).
9
#60
#59
#57
#10
#58
#56
Standard mode
#60
#59
#57
#10
#58
#56
Menu mode
Power-on preset:
The power-on preset is automatically activated when switching on the unit.
The settings are: zoom size: width approx. 20cm (DIN A5), autofocus: on, auto iris: on.
As soon as the Power Indication LED stays green illuminated, you can start working with the Visualizer.
The behavior of the unit once the power has been supplied or after the POWER key has been pressed can
be changed in the unit's on-screen menu (see page 19).
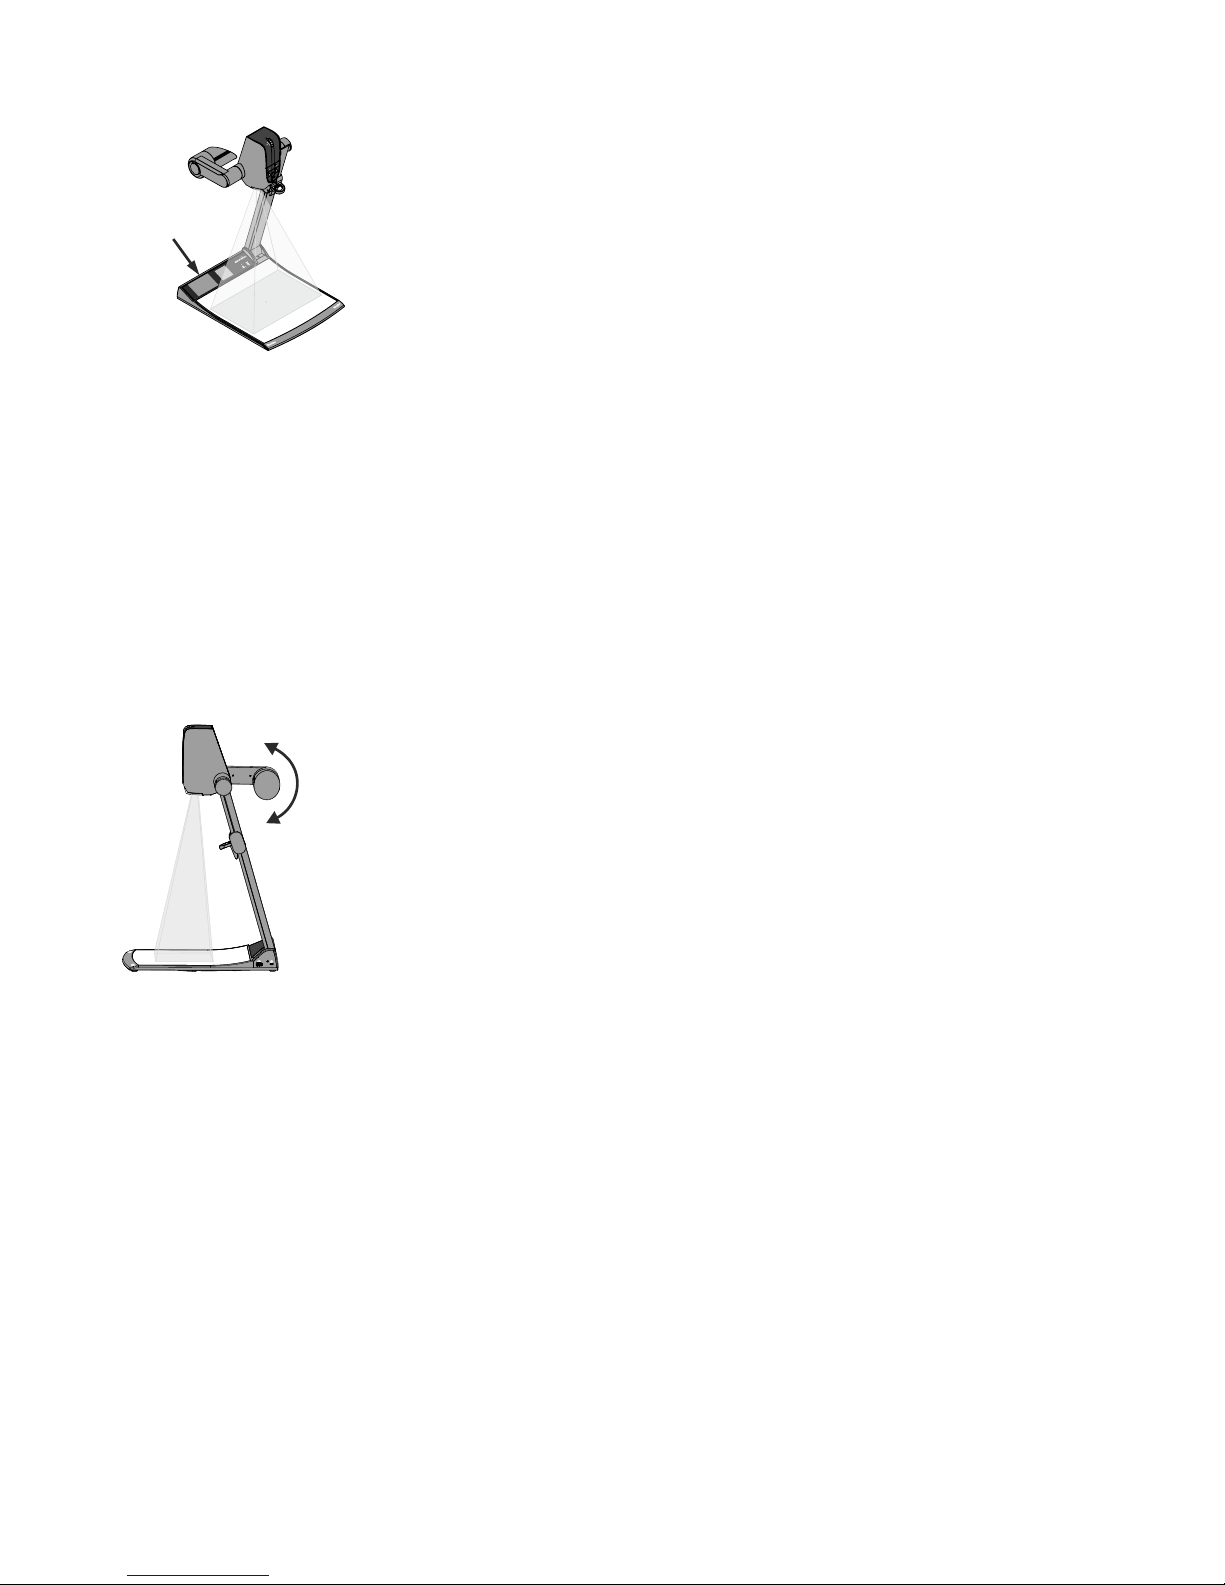
Setting Up the Visualizer
1. Connect the power pack to the power-input (#27).
2. Connect your display device (projector, monitor, video
conferencing unit etc.) to the appropriate output of
the Visualizer (#18, #19, 28 or #29).
IMPORTANT:
For choosing the right output please read the
detailed description on pages 22ff!
3. Using the pull ring (#7) only to lift the arm upwards.
Camera head and light automatically move into the
working position. The Visualizer is switched on
automatically. Alternatively the Visualizer can be switched on by
touching the POWER key .
IMPORTANT:
To fold the Visualizer, use pull ring only (#7)!
(#17 or #55)
10
When the Visualizer is switched on the first time, the Quick Setup Guide will be started automatically onscreen (visible on HDMI-, RGB output and built-in display). Use the arrow keys to navigate through the
menu
Language
Select the desired language for the on-screen menu.
Ethernet Settings
The IP-address, Subnet Mask and Gateway IP-address can be set automatically by a DHCP-server or
manually.
Time Settings
The Visualizer offers the possibility to use the internal clock or an external time server (a time valid time
server IP address and internet connection are required).
Audio Settings
Set up audio configuration. Line-In is switched off by default and can be activated when needed.
.
The settings are:
Operating the Visualizer for the first time - Quick Setup Guide
The working surface of the Visualizer has a special crystalline white color, which is especially designed for
perfect reproduction of transparencies.
In the following cases, an optional lightbox is recommended:
- If the transparency is very dark
- If the transparency is very wavy and causes reflections
- If the room light causes reflections on a transparency
The optional whiteboard foil can be used for direct annotation with special whiteboard markers. WolfVision
offers spare whiteboard foils.
More information at www.wolfvision.com (Products/Accessories)
Working Surface (#2)
Additionally the built-in LCD monitor eliminates the need for an extra
control monitor. This monitor can show different signals, like always
live image from the Visualizer, even when the signal on main output is
frozen, or always the same than the main output (selectable in the onscreen menu - see page 19). The on-screen menu is also visible on
this LCD monitor.
Shooting Area on the Working Surface
Monitor
#9
PRESET
FREEZE
FOCUS-
FOCUS+
EXTERN
MENU
?
AF
In order to eliminate reflections (on high gloss photographs etc.) just turn
the light upwards or downwards slightly (default position is horizontal).
It is also possible to move the document and rotate the camera head to
the center of the desired pick-up area to eliminate reflections.
The curvature of the working plate is specially designed to eliminate
reflections.
Please note that reflections can also be caused by general room lighting
conditions.
Reflections
11
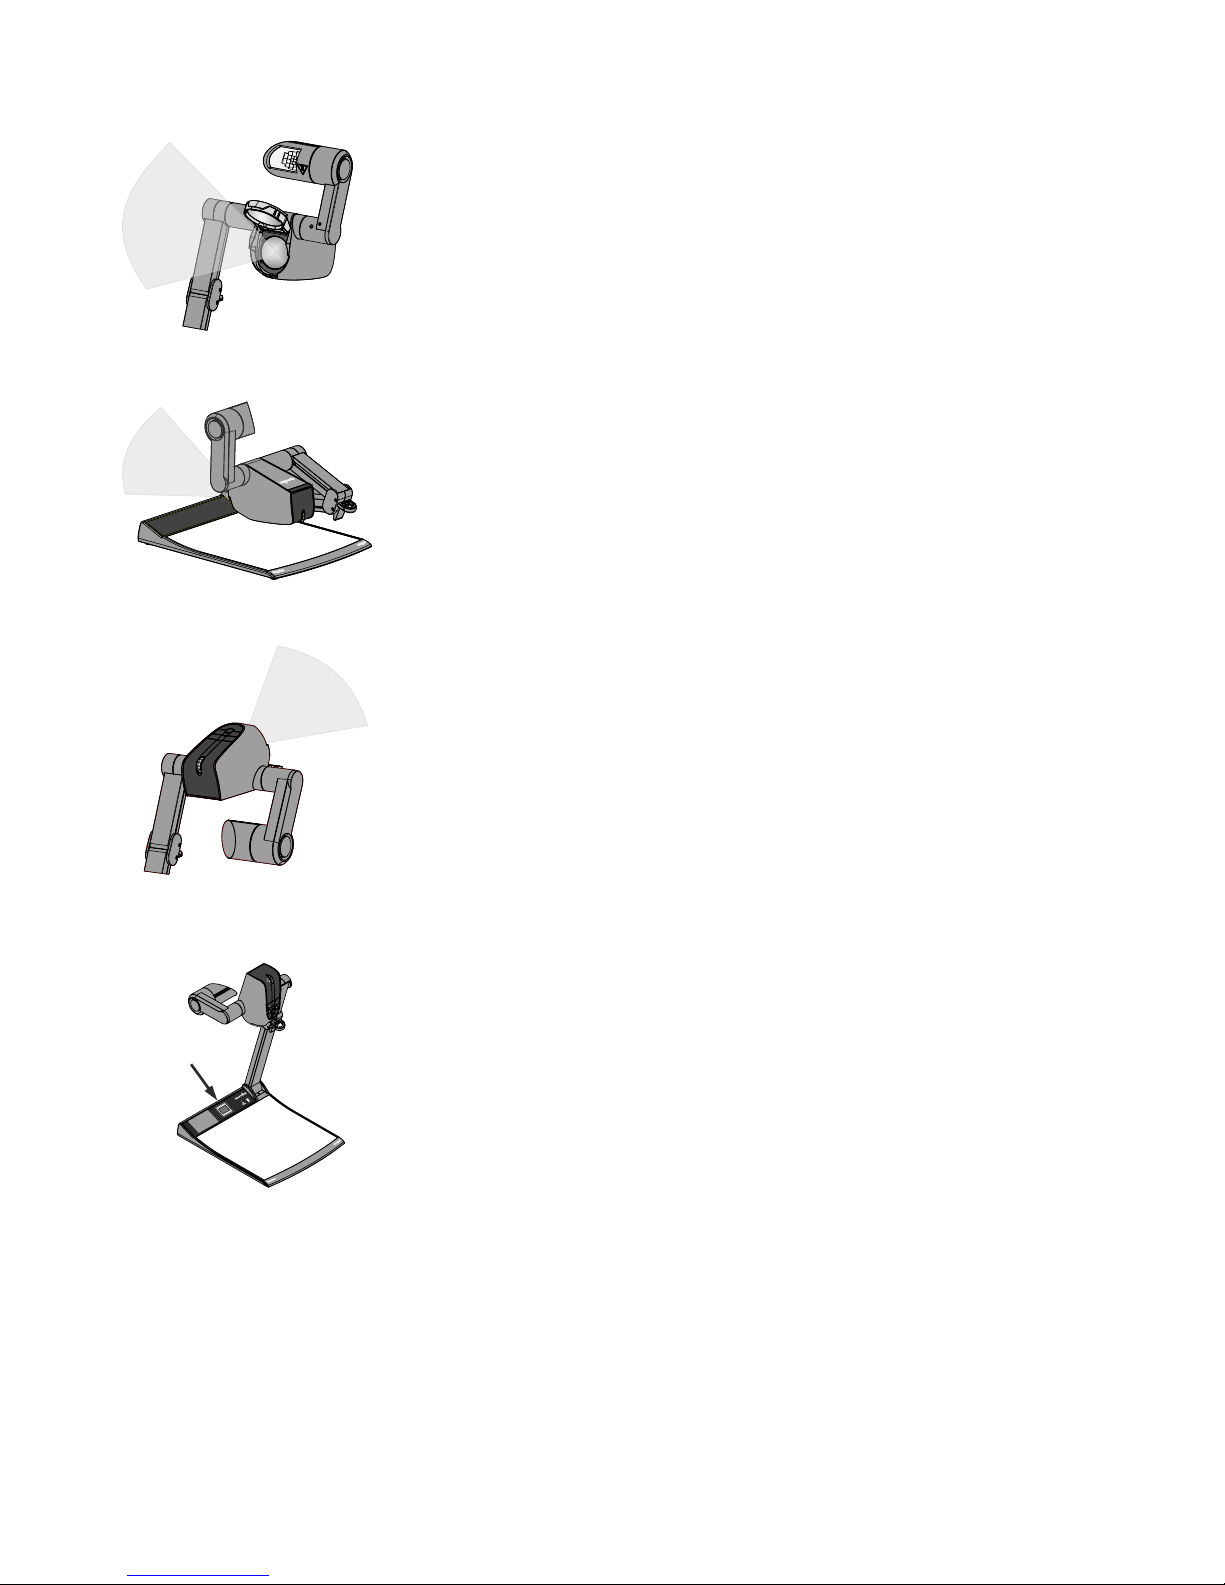
Shooting Area Outside of the Working Surface
Close-up adaptor lens
For shooting an object outside of the working surface, the close up lens
(#8) has to be tipped up. It is impossible to remove the lens completely
from the unit and therefore it cannot get lost.
When using the Visualizer to record on the working surface again, put the
close up lens back to its original position.
The camera can be tilted by 290° (110° to the speaker and 180° to the
audience).
Turning the light / flexible viewing angle
In order to enable recordings with illumination outside of the working
surface, the light of the Visualizer can be turned vertically.
To record at a lower viewing angle than the normal working position, just
fold the arm of the Visualizer as much as required, turn the camera head
and the light to pick up the desired object.
By default, the unit activates the stand by mode when the arm will be
folded. This behavior can be changed in the unit's on-screen menu (see
page 19).
Image Flip
By turning the camera head to record in front of the Visualizer, the image
will automatically be turned 180 degrees (”image flip”). This feature is
very useful for recording the face of the presenter or objects hanging on
the wall behind the unit.
12
∞
Slide
Place the slide onto the built-in light field, turn the camera head until
the slide is in the middle of the recorded image and switch on the back
light by touching the LIGHT key (#16). The camera zooms in and
focuses on the the slide automatically.
Picking-up Slides
#9
PRESET
FREEZE
FOCUS-
FOCUS+
EXTERN
MENU
?
AF

Please note that the Visualizer has an optical 16x zoom. The digital 4x zoom increases the overall zoom
range to a 64x zoom. The smallest pickup size on the working surface without digital zoom is 25 x 19mm
(1" x 0.8"). When you zoom in further the digital zoom is automatically activated and the smallest pickup
size is 6 x 4mm (0.23" x 0.16"). However please be aware that when the digital zoom is used, the
resolution of the picture is not as good as before. The default setting displays a message on-screen when
you are in the digital zoom mode.
The behavior of the Visualizer in the digital zoom mode can be changed in the on-screen menu (see page
19).
Optical Zoom / Digital Zoom
WolfVision Visualizers are equipped with an auto exposure. This means that the brightness of the camera
image adjusts automatically. Using the EXPOSURE keys (#30) manually darkens or brightens the image.
The standard auto exposure level (Image Brightness) can also be set brighter or darker in the unit's onscreen menu. When picking up areas with bright spots, Back Light Compensation can be switched on in the
unit‘s on-screen menu - see page 19 and on-screen help.
Automatic / Manual Exposure
Focusing / Autofocus
Please note that objects with very low contrast (like a blank sheet of paper) are difficult to focus. If the
autofocus does not work just move the object slightly.
For special applications the autofocus can also be switched off using the on/off switch (#41 or #59). The
autofocus is also switched off when the manual FOCUS keys (#42 or #58) are used.
13
The Visualizer offers the possibility to store the current settings as a Preset and recall them by just pressing
the respective PRESET key (#38) on the remote control.
Preset 1 can be also controlled with the PRESET key on the camera head (#57).
For storing a reset adjust y function as required and then PRESET key for 2
seconds . An on-screen message inform you when the Preset is stored.
As mentioned above, when presets are stored all current settings such as zoom, focus, iris etc. are also
stored. Contrary to this, a user also has the opportunity to assign specific functions such as LIGHT”,
"NEGATIVE", "NEGATIVE/BLUE", "BLACK/WHITE", "FREEZE" etc. to a PRESET key in the on-screen
menu of the Visualizer (see page 19).
When picking up documents in portrait and lanscape orientation, assign the function „ASPECT RATIO” to a
PRESET key. This will toggle the aspect ratio of the camera between 4:3 and 16:9 mode.
p : an press any one of the s
or more will
Hint:
Preset Function
The current image can be captured by pressing the FREEZE key (#50 or #56).
This can be used to prepare the next object while the audience is watching the frozen image.
Freeze
The info screen will be displayed by pressing the ? HELP key (#31) on the remote control.
Information like currently available recording time, recording state and audio settings will be displayed.
The info screen will be hidden after a few seconds automatically.
Info Screen (status)
At the left lower corner, respective icons will inform you about active streaming, recording and mic status
Status Icons

Correct white balance adjustment is important for an exact color reproduction!
For an exact white balance, at least 10% of the recorded image should be white.
For a precise fixed white balance adjustment use the "One Push" white balance. This can be done by
pressing the LIGHT key (#16) for 2 seconds . When the white balance is stored
an on-screen message appears. Setting a "One Push" white balance switches off the "Auto Tracking" mode
(when the unit is switched off and on again the "Auto Tracking" mode will be reactivated).
For specialists: The Visualizer can be switched between "Auto Tracking", "One Push" and "Manual"
white balance mode in the on-screen menu (see page 19). If you work with negative transparencies and a
lightbox, use a blank (black in the image) part of the negative film for white balance adjustment! The "one
Push" white balance will be separately adjusted and stored for top light, slide box and external lightbox (no
light).
Each time the lighting condition changes, the Visualizer's camera must readjust its white balance, in order
to optimize the color reproduction. The lighting condition (color temperature) changes, for example, if
changing between the Visualizer's light and an external lightbox (bottom light) or if the room light is turning
on or off.
The standard setting of the Visualizer is "Auto Tracking" white balance.
Normally there is no need for a manual white balance adjustment. However, if the colors on the screen still
appear to be wrong, the white balance can be adjusted manually (one-push):
Hints to perform a One-Push white balance:
Top light:
Zoom in on a white object (e.g. a sheet of paper) until there is only white on the screen and press the
for 2 seconds.
Lightbox with transparencies:
Turn off the light of the Visualizer with the LIGHT key and switch on the lightbox. Remove everything from
the lightbox, zoom to the smallest picture size until there is only white on the screen and press the
for 2 seconds.
Lightbox with x-rays:
Turn off the light of the Visualizer with the LIGHT key and switch on the lightbox. Place an x-ray on the
lightbox, zoom out until the whole x-ray is picked up and press the for 2 seconds.
Please note: False colors can also be caused by incorrect color settings on a connected projector or
monitor. It is recommended to adjust the white balance of the Visualizer at first and if the results are still not
satisfactory, the monitor or projector should be checked.
This means that the white balance
is continuously adjusted automatically.
(or assigned PRESET key)
LIGHT key
LIGHT
key
LIGHT key
White Balance Adjustment
14
IMPORTANT
Optional: Lightbox
When a lightbox is used, the top light of the Visualizer should be switched off with the LIGHT key.
The recommended lightbox for the Visualizer is the WolfVision Lightbox LB-9.

15
By pressing the SNAPSHOT key (#49) the current image is stored in the next free memory
Built-in Memory (external storage device not connected)
The Visualizer uses internal memory with 8GB storage for snapshots and video recordings.
Pictures (and videos) can be viewed on the Visualizer in the MEM mode.
All pictures are stored in JPG format with date and time stamp (WV_JJJJMMDD_hhmmss).
Example: WV_20150919_024735.jpg
An on-screen message will tell you the file name.
External storage device connected
The Visualizer uses the external storage device for snapshots and video recordings. The available space
depends on the device used.
All pictures are stored in JPG format consecutively numbered with date and time stamp
(WVxxxxxx_JJJJMMDD_hhmm). Example: WV000001_20150919_0247.jpg
An on-screen message will tell you the file name.
Pictures (and videos) can be viewed on the Visualizer in the USB mode, or on a computer when respective
picture viewing software is installed.
The properties of the USB functions can be changed in the on-screen menu (Advanced Settings - USB Stick
Settings), like default folder (document directory) and the file names ("WV" and consecutively numbered).
.
Snapshot - Storing Single Shots
Video - Recording Video Clips
The Visualizer supports video recording in a multimedia-container format with codec H.264 inclusive audio
(video file extension is *.avi).
Just select the desired video source (camera live image, external HDMI or memory) and audio source
(HDMI-In, Line-In) in the on-screen menu and start recording with the REC key (#36). The recording can be
paused and resumed with the PAUSE key (#53) and stopped with the STOP key (#51).
A respective symbol in the left lower corner indicates active recording function.
The video files will be saved into internal memory or onto an external USB storage device when connected.
Use the Audio VOLUME keys (#46) to adjust the volume or the MUTE key (#34) to mute audio.
Hints:
The Visualizer activates codec H.264 automatically when recording will be started (Advanced Settings /
Streaming/Record Settings).
Every file will be named with date and time stamp (WV_JJJJMMDD_hhmmss).
Example: WV_20150919_024735.avi
An on-screen message will tell you the name of the recorded file after recording is stopped.
Hint: By pressing the ? key (#31) the current state of recording will be displayed on-screen, like available
recording time and audio settings.
Built-in Memory (external storage device not connected)
The Visualizer uses the internal memory with 8GB storage for snapshots and video recordings.
Videos (and Pictures) can be viewed on the Visualizer in the MEM mode.
External storage device connected
The Visualizer uses the external storage device for snapshots and video recordings. The available space
depends on the device used.
Videos (and Pictures) can be viewed on the Visualizer in the USB mode, or on a computer when respective
video viewing software is installed.
The default folder (document directory) can be changed in the on-screen menu (Advanced Settings / USB
Stick Settings).
Please note, a video file is recorded each time you press the REC key. If file size exceeds 4GB, a new file will
be created automatically.
16
MEM Mode
WV_20130919_030215.vid (1/9)
To start the MEM mode, press the MEM key (#39). A split image with the stored pictures will be displayed.
Additionally a status line with picture information is shown on the bottom of the screen.
Pressing the LIVE key (#40) returns to the camera live image temporarily. The presentation will stay at the
last picture shown. To continue, use the MEM key.
To select one of the currently displayed pictures move the picture bar with the Backward/Forward keys (#32)
and confirm it with the OK key (#33). Use Backward/Forward keys to show the previous/next picture. Use
the OK key to return to the split view.
Use the MENU key for deleting pictures and/or videos.
Stored pictures and video clips can be copied to USB stick in the on-screen menu of MEM mode.
split image
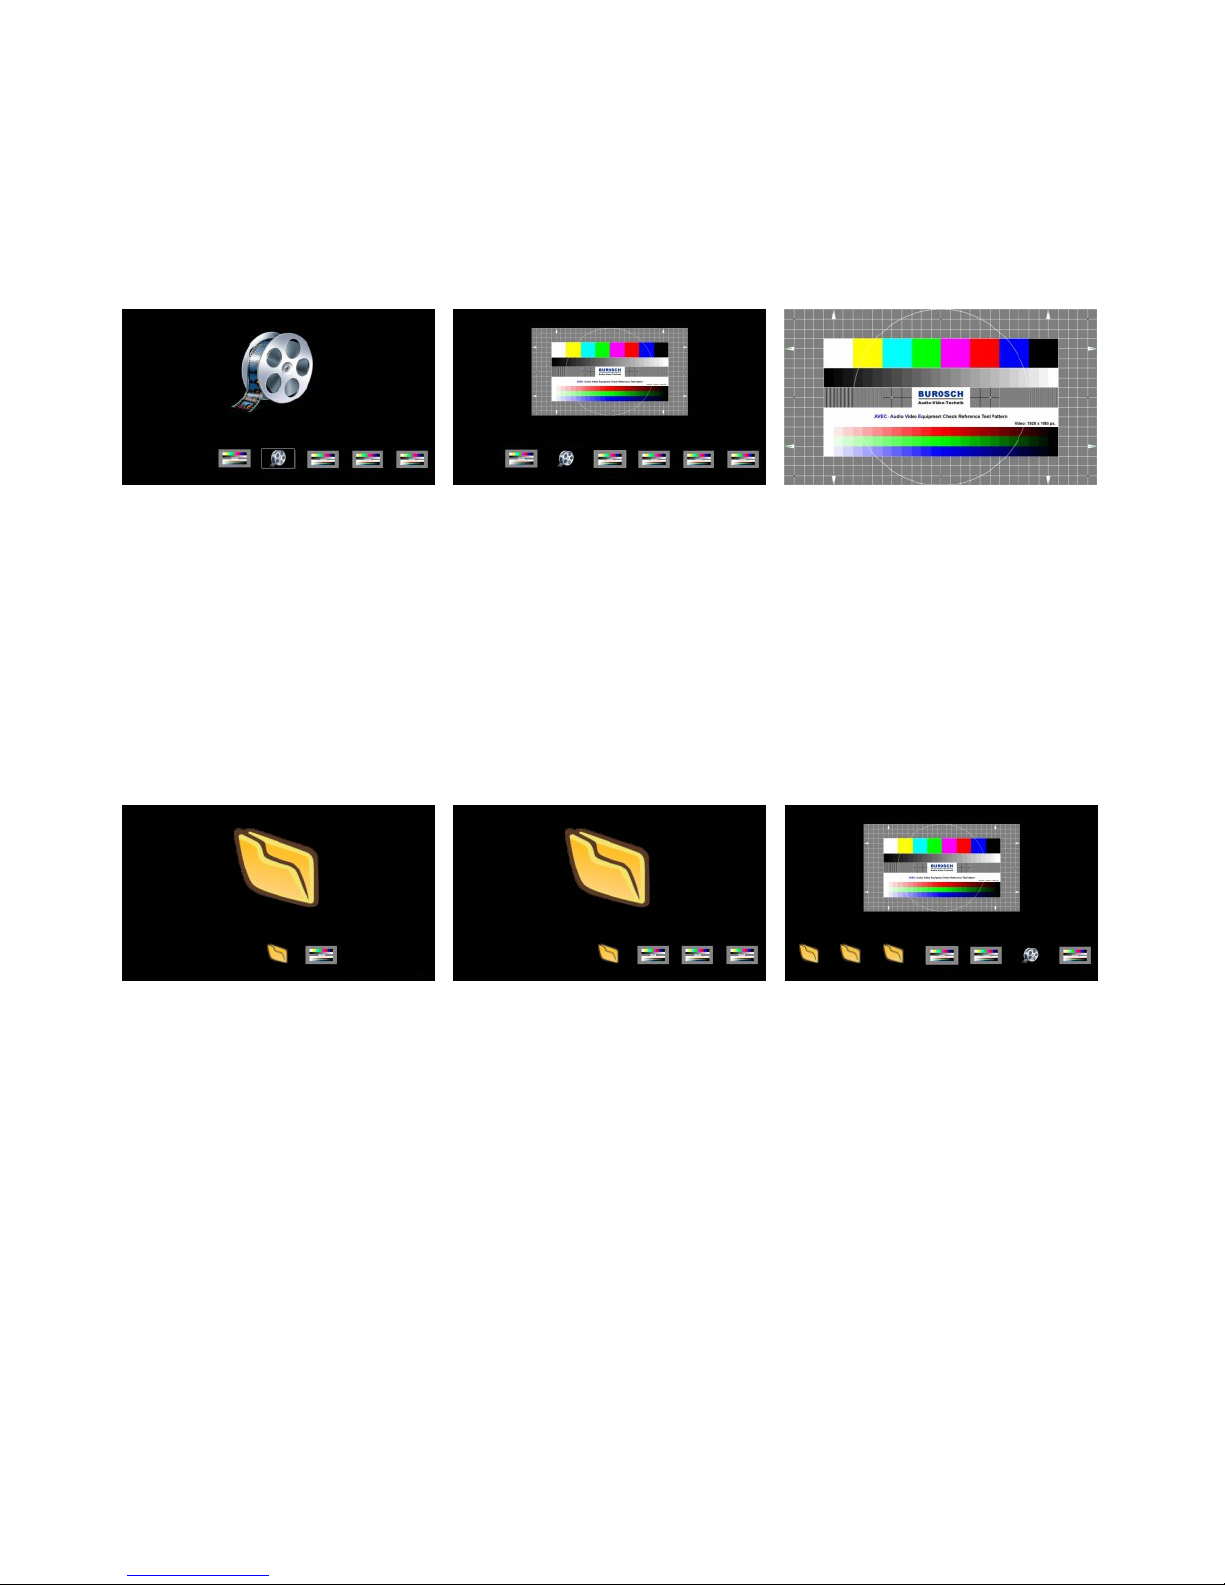
USB Mode
To start the USB mode, press the USB key (#47). A split image with the available folders and stored pictures
will be displayed. Additionally a status line with picture information is shown on the bottom of the screen.
Pressing the LIVE key (#40) returns to the camera live image temporarily. The presentation will stay at the
last picture shown. To continue, use the USB key.
To select one of the currently displayed pictures move the picture bar with the Backward/Forward keys (#32)
and confirm it with the OK key (#33). Use Backward/Forward keys to show the previous/next picture. Use
the OK key to return to the split view.
pattern.jpg (1/9)/My_Documents/My_Documents
WOLFVISION (1/9)(1/2)
selected image ”pattern.jpg”initial screen
Use the MENU key deleting single pictures or videos.
For further organization of the USB storage device use your computer; like creating or deleting folders,
moving pictures from one folder to another, deleting pictures and/or videos or formatting of the USB storage
device.
Please note formatting the USB storage device will delete all data.
Supported file systems are FAT16 and FAT32.
Supported picture file format is JPG format.
Supported video file format is AVI-container with codec H.264 (video file extension is *.avi).
(1/9)/WOLFVISION (1/4)My_Documents
selected folder ”My_Documents”
split image full image
WV_20130919_224920.jpg (1/9)

Built-in Digital Scaler (for HDMI-In, USB-Stick and vSolution Connect)
The Visualizer has a built-in digital image scaler which can process the signals from the external inputs and
output it in the same mode as the Visualizer image (For example: If the Visualizer is set to output an 1080p
(FullHD) image to the projector and the computer outputs an XGA signal, the scaler of the Visualizer
converts the XGA image of the computer to 1080p. As a result the projector does not readjust the input
mode when switching between the Visualizer and computer image).
In addition images on a connected USB-stick are automatically scaled to the current output mode of the
Visualizer.
The output resolution of the Visualizer can be changed in the on-screen menu (see page 19).
Integrated Seamless Switch
The Visualizer has an integrated Seamless Switch.
This allows for a seamless transition (fade-over/dissolve effect) when switching between the Visualizer
image, the image from the external input, the memory (internal and USB-stick), or the stream (vSolution
Connect by WolfVision).
The behavior of the Visualizer can be changed in the on-screen menu (see page 19).
The Picture in Picture Mode offers the possibility to show two different
pictures at the same time on one screen. Just press
to activate the Picture in Picture mode. The current picture (e.g.
external signal, image memory) will be shown in the lower left corner
and the live image will be shown in the upper right corner. The size of
the live image is much bigger.
The content of the live image can be changed by recalling a stored
image memory.
Following comparisons are possible: HDMI-In, image memory, live
image. The content from the small image is frozen, except when the
signal from the HDMI-In is shown, then it shows live content of the
external source.
the PiP key
e.g.
The behavior of the PiP mode can be changed in the on-screen menu,
Output Settings (see page 19).
(#37)
Picture in Picture (PiP) / Live to Freeze Comparison
17
 Loading...