


Эта инструкция была скачана с сайта http://info4help.ru/
http://info4help.ru/ -
Ваш помощник в мире бытовой техники
(Apply the label from warranty here)
IT
UK
User and maintenance manual Manuale d’uso e manutenzione Instrukcja obsługi i konserwacji
Інструкція з експлуатації і технічного обслуговування

IMPORTANT SAFETY INSTRUCTIONS
YOUR SAFETY AND THAT OF OTHERS IS VERY IMPORTANT
This manual and the appliance itself provide important safety warnings, to be read and observed at all times.
This is the danger symbol, pertaining to safety, which alerts users to potential risks to themselves and others. All safety warnings are preceded by the danger symbol and the following terms:
 DANGER
 WARNING
Indicates a hazardous situation which, if not avoided, will cause serious injury.
Indicates a hazardous situation which, if not avoided, could cause serious injury.
All safety warnings give specific details of the potential risk present and indicate how to reduce risk of injury, damage and electric shock resulting from improper use of the appliance. Carefully observe the following instructions:
-The appliance must be disconnected from the power supply before carrying out any installation work.
-Installation and maintenance must be carried out by a qualified technician, in compliance with the manufacturer’s instructions and local safety regulations. Do not repair or replace any part of the appliance unless specifically stated in the user manual.
-Regulations require that the appliance is earthed.
-The power cable must be long enough for connecting the appliance, once fitted in its housing, to the power supply socket.
-For installation to comply with current safety regulations, an all-pole disconnect switch with minimum contact gap of 3 mm must be utilized.
-Do not use multiple plug adapters or extension leads.
-Do not pull the power supply cable in order to unplug the appliance.
-The electrical components must not be accessible to the user after installation.
-Do not touch the appliance with any wet part of the body and do not operate it when barefoot.
-This appliance is designed solely for use as a domestic appliance for cooking food. No other type of use is permitted (e.g.: heating rooms). The Manufacturer declines all responsibility for inappropriate use or incorrect setting of the controls.
-The appliance is not intended for use by persons (including children) with any physical, sensory or mental impairment, or without experience and knowledge of the appliance, unless supervised or previously instructed in its use by those responsible for their safety.
-The accessible parts of the appliance may become very hot during use. Young children should be kept away from the appliance and supervised to ensure that they do not play with it.
-During and after use, do not touch the heating elements or interior surfaces of the appliance - risk of burns. Do not allow the appliance to come into contact with cloths or other flammable materials until all the components have cooled sufficiently.
-At the end of cooking, exercise caution when opening the appliance door, letting the hot air or steam exit gradually before accessing the oven. When the appliance door is shut, hot air is vented from the aperture above the control panel. Do not obstruct the vent apertures.
-Use oven gloves to remove pans and accessories, taking care not to touch the heating elements.
-Do not place flammable materials in or near the appliance: a fire may break out if the appliance is inadvertently switched on.
-Do not heat or cook sealed jars or containers in the appliance. The pressure that builds up inside might cause the jar to explode, damaging the appliance.
-Do not use containers made of synthetic materials.
-Overheated oils and fats catch fire easily. Always remain vigilant when cooking foods rich in fat and oil.
-Never leave the appliance unattended during food drying.
-If alcoholic beverages are used when cooking foods (e.g. rum, cognac, wine), remember that alcohol evaporates at high temperatures. As a result, there is a risk that vapours released by the alcohol may catch fire upon coming into contact with the electrical heating element.
Scrapping of household appliances
-This appliance is manufactured with recyclable or reusable materials. Dispose of it in accordance with local waste disposal regulations. Before scrapping, cut off the power supply cable.
-For further information on the treatment, recovery and recycling of household electrical appliances, contact your competent local authority, the collection service for household waste or the store where you purchased the appliance.
GB1

INSTALLATION
After unpacking the oven, be sure that it has not been damaged during transport and that the oven door closes properly. In the event of problems, contact the dealer or your nearest After-sales Service. To avoid any damage, only remove the oven from its polystyrene foam base at the time of installation.
PREPARING THE HOUSING UNIT
•Kitchen units in contact with the oven must be heat resistant (min 90°C).
•Carry out all cabinet cutting work before fitting the oven in the housing and carefully remove all wood chips and sawdust.
•After installation, the bottom of the oven must no longer be accessible.
•For correct appliance operation, do not obstruct the minimum gap between the worktop and the upper edge of the oven.
ELECTRICAL CONNECTION
Be sure the power voltage specified on the appliance dataplate is the same as the mains voltage. The dataplate is on the front edge of the oven (visible when the door is open).
• Power cable replacement (type H05 RR-F 3 x 1.5 mm2) must be carried out by a qualified electrician. Contact an authorized service centre.
GENERAL RECOMMENDATIONS Before use:
-Remove cardboard protection pieces, protective film and adhesive labels from accessories.
-Remove the accessories from the oven and heat it at 200° for about an hour to eliminate the smell and fumes from the insulating materials and protective grease.
During use:
-Do not place heavy objects on the door as they could damage it.
-Do not cling to the door or hang anything from the handle.
-Do not cover the inside of the oven with aluminium foil.
-Do not pour water into the inside of a hot oven; this could damage the enamel coating.
-Do not drag pots or pans across the bottom of the oven as this could damage the enamel coating.
-Be sure that the electrical cables of other appliances do not touch hot parts of the oven or become trapped in the door.
-Do not expose the oven to atmospheric agents.
SAFEGUARDING THE ENVIRONMENT 
Disposal of packing material
The packing material is 100% recyclable and is marked with the recycle symbol ( ). The various parts of the packing must therefore be disposed of responsibly and in full compliance with local authority regulations governing waste disposal.
Scrapping the product
-This appliance is marked in compliance with European Directive 2002/96/EC, Waste Electrical and Electronic Equipment (WEEE).
-By ensuring this product is disposed of correctly, you will help avoid potential negative consequences for the environment and human health, which could otherwise be caused by inappropriate waste handling of this product.
-The symbol  on the product or on the accompanying documentation indicates that it should not be treated as domestic waste but must be taken to an
appropriate collection centre for the recycling of electrical and electronic equipment.
Energy saving
-Only pre-heat the oven if specified in the cooking table or your recipe.
-Use dark lacquered or enamelled baking moulds as they absorb heat far better.
-Switch the oven off 10/15 minutes before the set cooking time. Food requiring prolonged cooking will continue to cook even once the oven is switched off.
DECLARATION OF CONFORMITY 

-This oven, which is intended to come into contact with foodstuffs, complies with European Regulation ( 
 ) n. 1935/2004 and has been designed, manufactured and sold in conformity with the safety requirements of the “Low Voltage” directive 2006/95/CE (which replaces 73/23/CEE and subsequent amendments), the protection requirements of “EMC” 2004/108/CE.
GB2

TROUBLESHOOTING GUIDE
The oven does not work:
•Check for the presence of mains electrical power and if the oven is connected to the electrical supply.
•Turn off the oven and restart it to see if the fault persists.
The door will not open:
•Turn off the oven and restart it to see if the fault persists.
•Important: during self-cleaning, the oven door will not open. Wait until it unlocks automatically (see paragraph “Cleaning cycle of ovens with pyrolysis function”).
The electronic programmer does not work:
•If the display shows the letter “  ” followed by a number, contact your nearest After-sales Service. Specify in this case the number that follows the letter “
  ”.
”.
AFTER-SALES SERVICE
Before calling the After-Sales Service:
1.See if you can solve the problem yourself with the help of the suggestions given in the “Troubleshooting guide”.
2.Switch the appliance off and back on again it to see if the fault persists.
If after the above checks the fault still occurs, get in touch with the nearest After-sales Service.
Always specify:
•a brief description of the fault;
•the type and exact model of the oven;
•the service number (number after the word Service on the rating plate), located on the right hand edge of the oven cavity (visible when the oven door is open). The service number is also indicated on the guarantee booklet;
•your full address;
•your telephone number.
If any repairs are required, please contact an authorised After-sales Service (to guarantee that original spare parts will be used and repairs carried out correctly).
CLEANING
WARNING |
- Do not use steam cleaning equipment. |
|
- Clean the oven only when it is cool. |
||
|
-Disconnect power before servicing.
Oven exterior
IMPORTANT: do not use corrosive or abrasive detergents. If any of these products unintentionally comes into contact with the appliance, clean immediately with a damp cloth.
•Clean the surfaces with a damp cloth. If it is very dirty, add a few drops of washing up detergent to the water. Finish off with a dry cloth.
Oven interior
IMPORTANT: do not use abrasive sponges or metallic scrapers or scourers. Over time, these can ruin enamelled surfaces and the oven door glass.
•After every use, allow the oven to cool then clean it preferably while it is still warm in order to remove built-up dirt and stains caused by food residues (e.g. food with a high sugar content).
•Use proprietary oven detergents and follow the manufacturer’s instructions to the letter.
•Clean the door glass with a suitable liquid detergent. The oven door can be removed to facilitate cleaning (see MAINTENANCE).
•The top heating element of the grill (see MAINTENANCE) can be lowered (some models only) to clean the roof of the oven.
N.B.: during prolonged cooking of foods with a high water content (e.g. pizza, vegetables, etc.) condensation may form on the inside of the door and around the seal. When the oven is cold, dry the inside of the door with a cloth or sponge.
Accessories:
•Soak the accessories in water with washing up detergent immediately after use, handling them with oven gloves if still hot.
•Food residues can be easily removed using a brush or sponge.
Cleaning the rear wall and catalytic side panels of the oven (if present):
IMPORTANT: do not use corrosive or abrasive detergents, coarse brushes, pot scourers or oven sprays which could damage the catalytic surface and ruin its self-cleaning properties.
•Operate the oven empty with the fan-assisted function at 200°C for about one hour
•Next, leave the appliance to cool down before removing any food residue with a sponge.
GB3
MAINTENANCE
WARNING |
- |
Use protective gloves. |
|
- |
Ensure the oven is cold before carrying out the following operations. |
||
|
|||
|
- |
Disconnect power before servicing. |
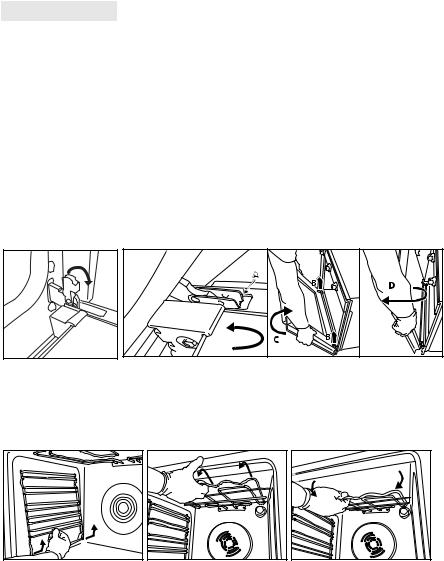
REMOVING THE DOOR
To remove the door:
1.Open the door fully.
2.Lift the catches and push them forwards as far as they will go (Fig. 1).
3.Close the door as far as it will go (A), lift it up (B) and turn it (C) until it is released (D) (Fig. 2).
To refit the door:
1.Insert the hinges in their seats.
2.Open the door fully.
3.Lower the two catches.
4.Close the door.
Fig. 1 |
Fig. 2 |
MOVING THE TOP HEATING ELEMENT (SOME MODELS ONLY)
1.Remove the side accessory holder grilles (Fig. 3).
2.Pull the heating element out a little (Fig. 4) and lower it (Fig. 5).
3.To reposition the heating element, lift it up, pulling it slightly towards you, be sure it comes to rest on the lateral supports.
Fig. 3 |
Fig. 4 |
Fig. 5 |
GB4
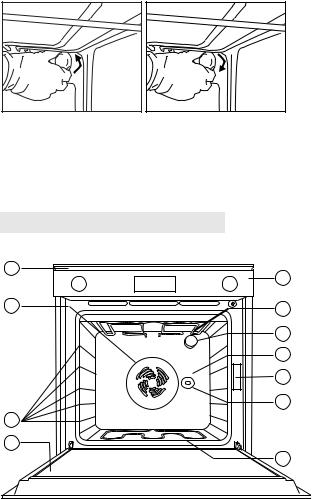
REPLACING THE OVEN LAMP
To replace the rear lamp (if present):
1.Disconnect the oven from the power supply.
2.Unscrew the lamp cover (Fig. 6), replace the lamp (see note for lamp type) and screw the lamp cover back on (Fig. 7).
3.Reconnect the oven to the power supply.
Fig. 6 |
Fig. 7 |
N.B.:
-Only use 25-40W/230V type E-14, T300°C incandescent lamps.
-Lamps are available from our After-sales Service.
IMPORTANT:
-Do not use the oven until the lamp cover has been repositioned.
INSTRUCTIONS FOR OVEN USE
FOR ELECTRICAL CONNECTION, SEE THE PARAGRAPH ON INSTALLATION
3
|
1 |
6 |
2 |
|
|
|
5 |
|
11 |
|
4 |
|
7 |
10
9
8
1.Control panel
2.Upper heating element/grill
3.Cooling system (if present)
4.Dataplate (not to be removed)
5.Light
6.Baking ventilation system (if present)
7.Turnspit (if present)
8.Lower heating element (not visible)
9.Door
10.Position of shelves
11.Rear wall
N.B.:
-At the end of cooking, after the oven has been switched off, the cooling fan may continue to run for a while.
GB5

COMPATIBLE ACCESSORIES
(for the accessories supplied with oven refer to the tech fiche)
|
|
Fig. 1 |
Fig. 2 |
6a
6b
Fig. 5 |
Fig. 6 |
Fig. 9
|
|
Fig. 3 |
Fig. 4 |
|
|
|
|
Fig. 7 |
Fig. 8 |
Drip-tray (Fig. 1)
For collecting fat and bits of food when placed under the wire shelf, or as a plate for cooking meat, chicken and fish, etc., with or without vegetables. Pour a little water into the drip-tray to avoid spatters of fat and smoke.
Baking tray (Fig. 2)
For baking biscuits, cakes and pizzas.
Wire shelf (Fig. 3)
For grilling food or as a support for pots, cake tins and other cooking receptacle. It can be placed on any available level. The wire shelf can be inserted with its curvature facing up or down.
Catalytic side panels (Fig. 4)
These panels have a special microporous enamel coating that absorbs fat spatters. It is advisable to do an automatic cleaning cycle after cooking particularly fatty food (see CLEANING).
Turnspit (Fig. 5)
Use the turnspit as indicated on Fig. 9. Also check “Recommended use and tips” section for advice.
Grill Pan Set (Fig. 6)
The set comprises a wire shelf (6a) and an enamelled recipient (6b). This set must be placed on the wire shelf (3) and used with the Grill function.
Grease filter (Fig. 7)
Use only for particularly greasy cooking. Hook it on the rear wall of the oven compartment, opposite the fan. It can be cleaned in a dishwasher and used with the fanassisted function.
Sliding shelves (Fig. 8)
They allow the wire shelves and drip-trays to be pulled half out during cooking. Suitable for all the accessories, they can be cleaned in a dishwasher.
GB6
CONTROL PANEL DESCRIPTION
|
|
|
|
|
|
|
|
|
|
|
|
|
|
|
|
|
|
2 |
3 |
||||
|
|
|
|
|
|
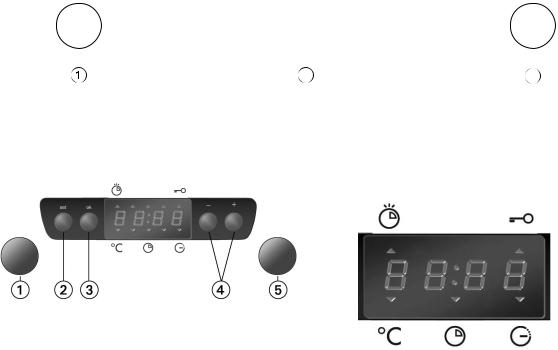
1.Function selector knob
2.Electronic programmer
3.Thermostat knob
HOW TO OPERATE THE OVEN
Electronic timer
Display
1.Function selector knob
2.Setting button (“set”)
3.Confirmation button (“ok”)
4.Buttons for changing time (“-” “+”)
5.Thermostat knob
Starting the oven
Minute minder |
|
Door lock |
Temperature indicator |
|
Cooking time |
|
End of cooking time |
When the oven is connected to the power supply for the first time, or reconnected after a power failure, the display indicates “12.00”.
Selecting and changing the clock time:
1.Press “ok”. The time of day flashes on the display.
2.Press button “-” or “+” to set the hour.
3.Press “ok” and “-” or “+” to set the minutes.
4.Press “ok” to confirm.
To change the time:
Press and hold “ok” for 2 seconds until the time flashes on the display. Repeat the steps described above.
Selecting the cooking function:
1.Turn knob (1) to the chosen function:
2.Turn knob (5) to select the temperature.
3.Press “ok” to confirm; the oven will switch on. The indicator  next to
  switches off when the selected temperature is reached.
To change the temperature:
1. Turn knob (5) and select the desired temperature.
IMPORTANT: to cancel any selection, turn knob (1) to “0”. Alternatively, press “ok” to switch the oven off, maintaining the previously selected functions.
Selecting the cooking time:
Select the cooking time (available with any function, except for the special functions) to turn the oven on for a specified period of time. At the end of the specified time the oven will switch off automatically. The maximum programmed cooking time is 6 hours.
1.Set the function and the temperature (see chapter: “Selecting the cooking function”) up to point 2 without confirming by pressing “ok”.
2.Press “set” (the indicator  on the display lights up next to the cooking time symbol
  ) and, within 8 minutes, proceed to select the desired cooking time using buttons “-” or “+”.
3.Confirm the selection by pressing “ok”; the oven switches on and the display shows the residual cooking time.
4.To change the previous temperature setting, turn knob (5). To return to the residual cooking time, wait 5 seconds.
GB7

Appearance of  on the display:
Once the set time has elapsed, an acoustic signal is heard and  appears on the display. The oven will switch off automatically.
To change the cooking time, use button “-” or “+”. Return to point 3 chapter “Selecting the cooking time”. 1. Turn knob (1) to “0”.
The time of day appears again on the display.
To increase the cooking time, use button “-” or “+”.
Selecting the end of cooking time
Using this function it is possible to preset the end of cooking time. The maximum programmed cooking time is 23 hours and 59 minutes.
1.Proceed as described in points 1 and 2 chapter “Selecting the cooking time”
2.Press “set” to set the end of cooking time: the indicator  next to the symbol
  lights up.
3.Set the end of cooking time using button “-” or “+”.
4.Press “ok” to confirm the end of cooking time.
The oven will turn on automatically at the end of cooking time minus cooking time: the 
 indicators on the display above the symbols
 will light up.
Minute minder
The timer can only be set when the oven is not in use and allows a maximum setting of 6 hours.
To set the minute minder:
1.Leave knob (1) on “0”. The display shows the time of the day.
2.Press “set”. The indicator  next to the symbol
  lights up. Use buttons “-” or “+” to set the desired time.
3.Press “ok” to confirm the selection.
Once the set time has elapsed:
An acoustic signal sounds and  flashes on the display.
Press “ok”: the acoustic signal stops. The time of day appears again on the display.
Door lock  :
:
1.With knobs (1) and (5) set to “0”, press buttons “ok” and - at the same time for 3 sec. The indicator  next to the symbol
  lights up.
2.The oven functions will not operate while the door lock is activated.
3.To deactivate the lock, repeat the sequence described in point 1.
FUNCTION DESCRIPTION TABLE
|
|
|
FUNCTION |
DESCRIPTION |
|
|
|
|
|
|
|
|
OFF |
- |
|
|
|
|
|
|
|
|
LAMP |
To switch on the oven light. |
|
|
|
|
|
|
|
|
|
Function suitable for cooking any type of dish on one shelf. Preheat the oven to the required temperature and place the food in it |
|
|
|
CONVENTIONAL |
when the set temperature is reached. It is advisable to use the second or third shelf for cooking. This function is also suitable for |
|
|
|
|
cooking frozen convenience foods; follow the instructions on the food packaging. |
|
|
|
|
|
|
|
|
PASTRY |
To bake cakes with liquid filling (sweet or savoury) on a single level. This function is ideal also for cooking on two levels. If necessary, |
|
|
|
switch the positions of the dishes to cook food more evenly. |
|
|
|
|
|
|
|
|
|
|
|
|
|
|
|
To grill steak, kebabs and sausages, to cook vegetables au gratin and to toast bread. Preheat the oven for 3 - 5 min. During cooking |
|
|
|
GRILL |
the oven door must remain closed. When cooking meat, pour a little water into the drip tray (on the first level) to reduce smoke and |
|
|
|
|
fat spatters. Ideally the meat should be turned during cooking. |
|
|
|
|
|
|
|
|
|
To grill large joints of meat (roast beef and other roast meats). The oven door must be kept closed during the cooking cycle. When |
|
|
|
TURBOGRILL |
cooking meat, it is advisable to pour water in the drip-tray placed on the first level. This will reduce smoke and spattering of fat. Turn |
|
|
|
|
the meat during grilling. |
|
|
|
|
|
|
|
|
DEFROSTING |
This function can be used to speed up the thawing of food at room temperature. The food should be placed in the oven in its |
|
|
|
wrapping to avoid it from drying out. |
|
|
|
|
|
|
|
|
|
|
|
|
|
|
BOTTOM + |
For cooking fruit, cakes, vegetables, pizza, poultry, etc. on a single level. |
|
|
|
CONVECTION BAKE |
|
|
|
|
|
|
|
|
|
|
|
|
|
|
CONVECTION BAKE |
To cook (without preheating) foods that require the same cooking temperature on one or more levels (e.g: fish, vegetables, sweets), |
|
|
|
|
without transferring odours from one foodstuff to the other. |
|
|
|
BOTTOM |
This function can be used to finish cooking filled pies or to thicken soups. Use this function for the last 10/15 minutes of cooking. |
|
|
|
|
|
|
|
|
|
|
GB8
COOKING TABLE
Recipe |
Function |
Preheating |
Shelf |
Temperature |
Time |
Accessories |
|
|
|
(from bottom) |
(°C) |
(min) |
|
|
|
|
|
|
|
|
Leavened cakes |
|
Yes |
2 |
160-180 |
35-55 |
Wire shelf + cake tin |
|
|
|
|
|
|
|
Biscuits / Tartlets |
|
Yes |
3 |
170-180 |
15-40 |
Baking tray |
|
|
|
|
|
|
|
Choux buns |
|
Yes |
3 |
180 |
30-40 |
Baking tray |
|
|
|
|
|
|
|
Vols-au-vent / Puff pastry crackers |
|
Yes |
3 |
180-200 |
20-30 |
Baking tray |
|
|
|
|
|
|
|
Meringues |
|
Yes |
3 |
90 |
120-130 |
Baking tray |
|
|
|
|
|
|
|
Lamb / Veal / Beef / Pork |
|
Yes |
2 |
190-200 |
90-110 |
Drip tray or wire shelf + pyrex dish |
|
|
|
|
|
|
|
Chicken / Rabbit / Duck |
|
Yes |
2 |
190-200 |
65-85 |
Drip tray or wire shelf + pyrex dish |
|
|
|
|
|
|
|
Turkey / Goose |
|
Yes |
2 |
190-200 |
140-180 |
Drip tray or wire shelf + pyrex dish |
|
|
|
|
|
|
|
Baked fish / en papillote |
|
Yes |
2 |
180-200 |
50-60 |
Drip tray or wire shelf + pyrex dish |
(fillet, whole) |
|
|||||
|
|
|
|
|
|
|
Lasagne / Baked pasta / Cannelloni / |
|
Yes |
2 |
190-200 |
45-55 |
Wire shelf + pyrex dish |
Flans |
|
|||||
|
|
|
|
|
|
|
Bread / Focaccia |
|
Yes |
2 |
190-230 |
15-50 |
Drip tray or baking tray |
|
|
|
|
|
|
|
Pizza |
|
Sì |
2 |
230-250 |
7-20 |
Drip tray or baking tray |
|
|
|
|
|
|
|
Toast |
|
Yes |
4 |
200 |
2-5 |
Wire shelf |
|
|
|
|
|
|
|
Vegetable gratin |
|
Yes |
3 |
200 |
15-20 |
Wire shelf + pyrex dish |
|
|
|
|
|
|
|
Grilled fish fillets and steaks |
|
Yes |
3 |
200 |
30-40 |
Wire shelf + pyrex dish |
|
|
|
|
|
|
|
Sausages / Kebabs / Spare ribs / |
|
Yes |
4 |
200 |
30-50 |
Grill + drip tray with water on 1st |
Hamburgers |
|
shelf, turn halfway through cooking |
||||
|
|
|
|
|
||
Filled pies |
|
Yes |
1 |
180-200 |
50-60 |
Drip tray or wire shelf + pyrex dish |
(cheesecake, strudel, apple pie) |
|
|||||
|
|
|
|
|
|
|
Meat & potato pies |
|
Yes |
1 |
180-200 |
35-55 |
Wire shelf + cake tin |
(vegetable pie, quiche lorraine) |
|
|||||
|
|
|
|
|
|
|
Stuffed vegetables (tomatoes, |
|
Yes |
2 |
180-200 |
40-60 |
Wire shelf + pyrex dish |
peppers, courgettes, aubergines) |
|
|||||
|
|
|
|
|
|
|
Meat & potato pies |
|
Yes |
1 & 3 |
180-190 |
45-55 |
Grill +pyrex dish, switch levels |
(vegetable pie, quiche lorraine) |
|
halfway through cooking |
||||
|
|
|
|
|
||
Pizzas / Focaccia |
|
Yes |
1 & 3 |
230-250 |
12-30 |
Baking tray+drip tray, switch levels |
|
halfway through cooking |
|||||
|
|
|
|
|
|
|
Roast chicken |
|
- |
2 |
200 |
55-65 |
Grill + drip tray with water on 1st |
|
shelf |
|||||
|
|
|
|
|
|
|
Roast potatoes |
|
- |
3 |
200 |
45-55 |
Drip tray |
|
|
|
|
|
|
|
Roast Beef rare |
|
- |
3 |
200 |
30-40 |
Grill + drip tray with water on 1st |
|
shelf |
|||||
|
|
|
|
|
|
|
Leg of lamb / Shanks |
|
- |
3 |
200 |
55-70 |
wire shelf + drip tray |
|
|
|
|
|
|
|
GB9
Recipe |
Function |
Preheating |
Shelf |
Temperature |
Time |
Accessories |
|
|
|
(from bottom) |
(°C) |
(min) |
|
|
|
|
|
|
|
|
Biscuits / Tartlets |
|
- |
1 & 3 |
160-170 |
20-40 |
Lev 3: baking tray |
|
Lev 1: drip tray |
|||||
|
|
|
|
|
|
|
Choux buns |
|
- |
1 & 3 |
180 |
35-45 |
Lev 3: baking tray |
|
Lev 1: drip tray |
|||||
|
|
|
|
|
|
|
Vols-au-vent / Puff pastry crackers |
|
- |
1 & 3 |
180-200 |
20-40 |
Lev 3: baking tray |
|
Lev 1: drip tray |
|||||
|
|
|
|
|
|
|
Lasagna & Meat |
|
- |
1 & 3 |
200 |
50-100 |
Lev 3: wire shelf + pyrex dish |
|
Lev 1: drip tray |
|||||
|
|
|
|
|
|
|
Meat & Potatoes |
|
- |
1 & 3 |
200 |
45-100 |
Lev 3: wire shelf + pyrex dish |
|
Lev 1: drip tray |
|||||
|
|
|
|
|
|
|
Fish & Vegetables |
|
- |
1 & 3 |
180 |
30-50 |
Lev 3: wire shelf + pyrex dish |
|
Lev 1: drip tray |
|||||
|
|
|
|
|
|
|
Meringues |
|
- |
1 & 3 |
90 |
120-150 |
Lev 3: wire shelf + pyrex dish |
|
|
|
|
|
|
Lev 1: drip tray |
N.B.: cooking times and temperatures are approximate for 4 portions.
RECOMMENDED USE AND TIPS
How to read the cooking table
Thetableindicatesthebestfunctiontouseforanygivenfood,tobecookedononeormoreshelvesatthesametime.Cookingtimesstartfromthemomentfoodisplaced intheoven, excluding pre-heating (where required). Cookingtemperaturesand timesarepurely for guidance and willdepend on the amount of food and type of accessory used.Usethelowest recommended values to begin with and, if the food is not cooked enough, then move on to higher values. Use the accessories supplied and preferably dark coloured metal cake tins andoventrays.Youcan also usepans andaccessoriesinpyrexor stoneware,butbearinmind that cooking timeswillbeslightlylonger.Toobtainbestresults,followtheadvicegiven in the cooking table for the choice of accessories (supplied) to be placed on the various shelves. When cooking food that contains lots of water, preheat the oven.
Cooking different foods at the same time
Using the “CONVECTION BAKE” function (if present), you can cook different foods which require the same cooking temperature at the same time (for example: fish and vegetables), using different shelves. Remove the food which requires less cooking time and leave food which requires longer cooking time in the oven.
Desserts
-Cook delicate desserts with the conventional function on one shelf only. Use dark coloured metal cake tins and always position them on the wire shelf supplied. To cook on more than one shelf, select the forced air function and stagger the position of the cake tins on the shelves, aiding optimum circulation of the hot air.
-To check whether a raising cake is cooked, insert a wooden toothpick into the centre of the cake. If the toothpick comes out clean, the cake is ready.
-If using non-stick cake tins, do not butter the edges as the cake may not rise evenly around the edges.
-If the cake “sinks” during cooking, set a lower temperature the next time, perhaps reducing the amount of liquid in the mixture and mixing more gently.
-For sweets with moist fillings (cheesecake or fruit pies) use the “CONVECTION BAKE” function (if present). If the base of the cake is soggy, lower the shelf and sprinkle the bottom of the cake with breadcrumbs or biscuit crumbs before adding the filling.
Meat
-Use any kind of oven tray or pyrex dish suited to the size of the piece of meat being cooked. For roast joints, it is best to add some stock to the bottom of the pan, basting the meat during cooking for added flavour. When the roast is ready, let it rest in the oven for another 10-15 minutes, or wrap it in aluminium foil.
-When you want to grill meat, choose cuts with an even thickness all over in order to achieve uniform cooking results. Very thick pieces of meat require longer cooking times. To avoid the meat from burning on the outside, lower the position of the wire shelf, keeping the food farther away from the grill. Turn the meat
two thirds of the way through cooking.
To collect the cooking juices it is advisable to place a drip-tray with half a litre of water directly under the grill on which the meat is placed. Top-up when necessary.
Turnspit (only in some models)
Use this accessoryto evenlyroastlargepiecesofmeatandpoultry. Placethemeat onthe spitrod, tying itwithstring ifchicken, and check thatitis securebefore inserting the rod inthe seatlocatedonthefrontwalloftheovenandrestingitontherespectivesupport.To avoid smokeandto collectcookingjuices,itisadvisableto placeadrip-traywithhalfalitreofwater on thefirst level. Therod has aplastic handlewhich mustberemovedbefore starting to cook,andusedat theendofcookingto avoid burnswhentakingthefood out ofthe oven.
Pizza
Lightly grease the trays to ensure the pizza has a crispy base. Scatter the mozzarella over the pizza two thirds of the way through cooking.
Rising function (present only in specific models)
It is always best to cover the dough with a damp cloth before placing it in the oven. Dough proving time with this function is reduced by approximately one third compared to proving at room temperature (20-25°C). Proving time for a 1 Kg batch of pizza dough is around one hour.
GB10

ISTRUZIONI IMPORTANTI PER LA SICUREZZA
IMPORTANZA DELLA SICUREZZA PER SÉ PER GLI ALTRI
Il presente manuale e l’apparecchio stesso sono corredati da importanti messaggi relativi alla sicurezza, da leggere ed osservare sempre.
Questo è il simbolo di pericolo, relativo alla sicurezza, il quale avverte dei potenziali rischi per l’utilizzatore e per gli altri. Tutti i messaggi relativi alla sicurezza saranno preceduti dal simbolo di pericolo e dai seguenti termini:
 PERICOLO
 AVVERTENZA
Indica una situazione pericolosa che, se non evitata, provoca lesioni gravi.
Indica una situazione pericolosa che, se non evitata, potrebbe provocare lesioni gravi.
Tutti i messaggi relativi alla sicurezza specificano il potenziale pericolo a cui si riferiscono ed indicano come ridurre il rischio di lesioni, danni e scosse elettriche conseguenti ad un non corretto uso dell’apparecchio. Attenersi scrupolosamente alle seguenti istruzioni:
-L’apparecchio deve essere scollegato dalla rete elettrica prima di effettuare qualunque intervento d’installazione.
-L’installazione o la manutenzione deve essere eseguita da un tecnico specializzato, in conformità alle istruzioni del fabbricante e nel rispetto delle norme locali vigenti in materia di sicurezza. Non riparare o sostituire qualsiasi parte dell’apparecchio se non specificamente richiesto nel manuale d’uso.
-La messa a terra dell’apparecchio è obbligatoria a termini di legge.
-Il cavo di alimentazione deve essere sufficientemente lungo da permettere il collegamento dell’apparecchio, incassato nel mobile, alla presa di rete.
-Affinché l’installazione sia conforme alle norme di sicurezza vigenti, occorre un interruttore onnipolare avente una distanza minima di 3 mm tra i contatti.
-Non usare prese multiple o prolunghe.
-non tirare il cavo di alimentazione per staccare la spina dalla presa di corrente.
-Una volta terminata l’installazione, i componenti elettrici non dovranno più essere accessibili dall’utilizzatore.
-Non toccare l’apparecchio con parti del corpo umide e non utilizzarlo a piedi nudi.
-L’apparecchio è destinato esclusivamente ad uso domestico per la cottura di alimenti. Non sono consentiti altri usi (es. riscaldare ambienti). Il costruttore declina ogni responsabilità per usi non appropriati o per errate impostazioni dei comandi.
-L’utilizzo dell’apparecchio non è consentito alle persone (inclusi i bambini) con ridotte capacità fisiche, sensoriali o mentali, o con mancanza di esperienza o conoscenza, a meno che non abbiano avuto istruzioni riguardanti l’uso dell’apparecchio da parte di persone responsabili della loro sicurezza.
-Le parti accessibili possono diventare molto calde durante l’uso. I bambini devono essere mantenuti a distanza e sorvegliati affinché non giochino con l’apparecchio.
-Durante e dopo l’uso non toccare gli elementi riscaldanti o le superfici interne dell’apparecchio perché possono causare ustioni. Evitare il contatto con panni o altro materiale infiammabile fino a che tutti i componenti dell’apparecchio non si siano sufficientemente raffreddati.
-A fine cottura, aprire la porta dell’apparecchio con cautela, facendo uscire gradualmente l’aria calda o il vapore prima di accedere al suo interno. Con la porta dell’apparecchio chiusa, la fuoriuscita dell’aria calda avviene dall’apertura posta al di sopra del pannello comandi. Non ostruire in nessun caso le aperture di ventilazione.
-Usare guanti da forno per rimuovere pentole e accessori facendo attenzione a non toccare gli elementi riscaldanti.
-Non riporre materiale infiammabile all’interno del forno o accanto ad esso: se l’apparecchio viene messo in funzione inavvertitamente potrebbe incendiarsi.
-Non riscaldare o cuocere nell’apparecchio cibi in barattoli chiusi. La pressione che si sviluppa all’interno potrebbe far scoppiare il barattolo, danneggiando l’apparecchio.
-Non usare recipienti in materiale sintetico.
-I grassi e gli olii surriscaldati prendono facilmente fuoco. Sorvegliare la cottura di alimenti ricchi di grasso e di olio.
-Non lasciare mai l’apparecchio incustodito durante l’essiccazione dei cibi.
-Se per la cottura degli alimenti si aggiungono bevande alcoliche (ad es. rum, cognac, vino) tenere presente che l’alcool evapora a temperature elevate. Non è quindi escluso che i vapori generati possano infiammarsi giungendo a contatto con la resistenza elettrica.
Smaltimento elettrodomestici
-Questo prodotto è stato fabbricato con materiale riciclabile o riutilizzabile. Disfarsene seguendo le normative locali per lo smaltimento dei rifiuti. Prima della rottamazione, renderlo inutilizzabile tagliando il cavo di alimentazione.
-Per ulteriori informazioni sul trattamento, recupero e riciclaggio di elettrodomestici, contattare l’idoneo ufficio locale, il servizio di raccolta dei rifiuti domestici o il negozio presso il quale il prodotto è stato acquistato.
IT11

INSTALLAZIONE
Dopo aver disimballato il forno, controllare che l’apparecchio non sia stato danneggiato durante il trasporto e che la porta si chiuda perfettamente. In caso di problemi, contattare il rivenditore o il Servizio Assistenza Clienti. Per prevenire eventuali danni, si consiglia di rimuovere il forno dalla base in polistirolo soltanto prima dell’installazione.
PREDISPOSIZIONE DEL MOBILE PER INCASSO
•I mobili della cucina adiacenti al forno devono resistere al calore (min 90°C).
•Eseguire tutti i lavori di taglio del mobile prima di inserire il forno e rimuovere accuratamente trucioli o residui di segatura.
•La parte inferiore del forno non deve più essere accessibile dopo l’installazione.
•Per un corretto funzionamento del prodotto non ostruire l’apertura minima tra piano di lavoro e il lato superiore del forno.
COLLEGAMENTO ELETTRICO
Controllare che la tensione indicata sulla targhetta matricola del prodotto sia la stessa della rete elettrica. Essa si trova sul bordo anteriore del forno (visibile quando la porta è aperta).
•Eventuali sostituzioni del cavo di alimentazione (tipo H05 RR-F 3 x 1,5 mm2) devono essere effettuate unicamente da personale qualificato. Rivolgersi ai centri di assistenza autorizzati.
RACCOMANDAZIONI GENERALI
Prima dell’utilizzo:
-Rimuovere protezioni di cartone, pellicole trasparenti ed etichette adesive dagli accessori.
-Togliere gli accessori dal forno e riscaldarlo a 200° per un’ora circa per eliminare gli odori ed i fumi del materiale isolante e dei grassi di protezione.
Durante l’utilizzo:
-Non appoggiare pesi sulla porta in quanto essi potrebbero danneggiarla.
-Non aggrapparsi alla porta o appendere oggetti alla maniglia.
-Non ricoprire l’interno del forno con fogli di alluminio.
-Non versare mai acqua nel forno caldo; lo smalto potrebbe danneggiarsi.
-Non trascinare sul fondo del forno pentole o tegami per non rovinare lo smalto.
-Accertarsi che i cavi elettrici di altri apparecchi non vadano a toccare le parti calde del forno o ad incastrarsi nella porta.
-Evitare l’esposizione del forno agli agenti atmosferici.
CONSIGLI PER LA SALVAGUARDIA DELL’AMBIENTE 
Smaltimento imballaggio
Il materiale di imballaggio è riciclabile al 100% ed è contrassegnato dal simbolo di riciclaggio ( ). Le diverse parti dell’imballaggio non devono quindi essere disperse nell’ambiente, ma smaltite in conformità alle norme stabilite dalle autorità locali.
Smaltimento prodotto
-Questo apparecchio è contrassegnato in conformità alla Direttiva Europea 2002/96/EC, Waste Electrical and Electronic Equipment (WEEE).
-Assicurandosi che questo prodotto sia smaltito in modo corretto, l’utente contribuisce a prevenire le potenziali conseguenze negative per l’ambiente e la salute.
-Il simbolo  sul prodotto o sulla documentazione di accompagnamento indica che questo prodotto non deve essere trattato come rifiuto domestico, ma deve
essere consegnato presso l’idoneo punto di raccolta per il riciclaggio di apparecchiature elettriche ed elettroniche.
Risparmio energetico
-Preriscaldare l’apparecchio solo se indicato nella tabella di cottura o nella vostra ricetta.
-Usare stampi da forno scuri, laccati o smaltati, perché assorbono molto meglio il calore.
-Spegnere il forno 10/15 minuti prima del tempo totale di cottura impostato. Nel caso di cibi che richiedono tempi lunghi, questi continueranno comunque a cuocere.
DICHIARAZIONE DI CONFORMITA 

-Questo apparecchio, destinato ad entrare a contatto con prodotti alimentari, è conforme al regolamento ( 
 ) n. 1935/2004 ed è stato progettato, costruito ed immesso sul mercato in conformità ai requisiti di sicurezza della direttiva “Bassa Tensione” 2006/95/CE (che sostituisce la 73/23/CEE e successivi emendamenti), requisiti di protezione della direttiva “EMC” 2004/108/CE.
IT12

GUIDA RICERCA GUASTI
Il forno non funziona:
•Verificare che ci sia tensione in rete e che il forno sia connesso elettricamente.
•Spegnere e riaccendere il forno, per accertare che l’inconveniente sia stato ovviato.
La porta è bloccata:
•Spegnere e riaccendere il forno, per accertare che l’inconveniente sia stato ovviato.
•Importante: durante l’operazione di autopulizia, la porta rimane bloccata. Aspettare che si sblocchi automaticamente (vedi paragrafo “Ciclo pulizia dei forni con funzione pirolisi”).
Il programmatore elettronico non funziona:
•Se sul display viene visualizzata una “ ” seguita da un numero, contattare il Servizio Assistenza più vicino. Specificare in tal caso il numero che segue la lettera “
  ”.
”.
SERVIZIO ASSISTENZA
Prima di contattare il Servizio Assistenza:
1.Verificare che non sia possibile risolvere da soli il problema sulla base dei punti descritti in “Guida ricerca guasti”.
2.Spegnere e riaccendere l’apparecchio per accertarsi che l’inconveniente sia stato ovviato.
Se dopo i suddetti controlli l’inconveniente permane, contattare il Servizio Assistenza più vicino.
Indicare sempre:
•una breve descrizione del guasto;
•il tipo e il modello esatto del forno;
•il numero Assistenza (è il numero che si trova dopo la parola Service sulla targhetta matricola), posto sul bordo interno destro della cavità del forno (visibile a porta aperta). Il numero Assistenza è anche riportato sul libretto di garanzia;
•il vostro indirizzo completo;
•il vostro numero telefonico.
Qualora si renda necessaria una riparazione, rivolgersi ad un Centro di Assistenza Tecnica autorizzato (a garanzia dell’utilizzo di pezzi di ricambio originali e di una corretta riparazione).
PULIZIA
AVVERTENZA |
- Non usare pulitrici a getto di vapore. |
|
- Procedere alla pulizia del forno solo dopo averlo lasciato raffreddare. |
||
|
-Scollegare l’alimentazione elettrica prima di effettuare interventi di manutenzione.
Esterno del forno
IMPORTANTE: non usare detergenti corrosivi o abrasivi. Se, inavvertitamente, uno di questi prodotti dovesse venire a contatto con l’apparecchio, pulirlo subito con un panno umido.
•Pulire con panno umido le superfici. Se è molto sporco, aggiungere all’acqua qualche goccia di detersivo per stoviglie. Asciugare con panno asciutto.
Interno del forno
IMPORTANTE: non usare detergenti corrosivi o abrasivi. Se inavvertitamente uno di questi prodotti dovesse venire a contatto con l’apparecchio, pulirlo subito con un panno umido.
•Dopo ogni uso, lasciare raffreddare il forno e pulirlo preferibilmente quando è ancora tiepido per rimuovere incrostazioni e macchie dovute a residui di cibo (ad es. cibi con un elevato contenuto di zuccheri).
•Usare detergenti specifici per la pulizia del forno ed attenersi alle indicazioni del Fabbricante.
•Pulire il vetro della porta con un idoneo detersivo liquido. Per facilitare la pulizia della porta è possibile rimuoverla (vedi MANUTENZIONE).
•La resistenza superiore del grill (vedi MANUTENZIONE) è abbassabile (solo in alcuni modelli) per pulire la parte superiore dell’interno dell’apparecchio.
NOTA: durante le cotture prolungate di alimenti con un elevato contenuto di acqua (pizza, verdure ripiene ecc.), si può formare condensa all’interno della porta e sulla guarnizione. Quando il forno è freddo, asciugare la parte interna della porta con un panno o una spugna.
Accessori:
•Mettere a bagno gli accessori con detersivo per piatti dopo l’uso, maneggiandoli con guanti da forno, se ancora caldi.
•I residui di cibo possono essere rimossi con una spazzola idonea o con una spugna.
Pulizia della paratia posteriore e dei pannelli laterali catalitici (se in dotazione):
IMPORTANTE: non usare detergenti corrosivi o abrasivi, spazzole ruvide, spugne per pentole o spray per forno che potrebbero danneggiare la superficie catalitica, facendole perdere le sue proprietà autopulenti.
•Far funzionare il forno a vuoto ad una temperatura di 200°C per circa un’ora con la funzione ventilato
•Al termine, lasciare raffreddare l’apparecchio ed usare una spugna per rimuovere eventuali residui di cibo.
IT13
 Loading...