


VR-5525Z_UM_cover_26 Apr 11.pdf 1 2011-4-26 18:11:02
USER’S MANUAL
MANUEL DE L’UTILISATEUR MANUAL DEL USUARIO
VR-5525Z

Contents
IMPORTANT SAFETY |
|
INSTRUCTION.......................... |
2 |
PREFACE ................................... |
4 |
SAFETY PRECAUTIONS............ |
4 |
Headphone Warning.................................... |
6 |
Where to install............................................... |
6 |
Mount the TV stand................. |
7 |
Unit and Accessories............... |
8 |
Front View......................................................... |
8 |
Side View........................................................... |
8 |
Rear View........................................................... |
9 |
Supplied Accessories.................................... |
9 |
Remote Control....................... |
10 |
Quick Installation Tips.................................. |
12 |
Using the Remote Control Unit................. |
13 |
Installing Batteries in the Remote Control |
|
Unit...................................................................... |
14 |
Connections............................. |
15 |
Connecting the Antenna or Cable........... |
16 |
Connecting external devices..................... |
18 |
Initial Setup............................. |
22 |
Source Menu............................ |
27 |
Main Menu............................... |
27 |
Main Menu Description.......... |
28 |
Menu Settings......................... |
30 |
1. Picture menu............................................... |
30 |
Picture Settings..................................................... |
30 |
Screen Size.............................................................. |
31 |
PC Settings............................................................. |
32 |
Color Temperature............................................... |
33 |
Advanced Picture Settings............................... |
33 |
2. Sound menu................................................ |
34 |
Sound Settings...................................................... |
34 |
Surround Mode..................................................... |
35 |
AVL............................................................................. |
35 |
Analog Sound........................................................ |
35 |
Digital Sound......................................................... |
35 |
Digital Audio Output.......................................... |
35 |
Equalizer Settings................................................ |
36 |
3. Channel menu............................................ |
37 |
Channel List............................................................ |
37 |
Favourite List.......................................................... |
38 |
Channel Settings.................................................. |
38 |
Signal Type............................................................. |
39 |
4. Parental Control menu............................ |
40 |
Lock Parental Control......................................... |
40 |
V-CHIP...................................................................... |
40 |
Change Password................................................. |
44 |
Keypad Lock........................................................... |
44 |
Source Lock........................................................... |
44 |
5. Setup menu................................................. |
45 |
Closed Caption...................................................... |
45 |
Digital CC Style...................................................... |
46 |
Menu Language................................................... |
46 |
Clock......................................................................... |
47 |
6. Others menu............................................... |
48 |
Blue Back................................................................. |
48 |
No Signal Power Off............................................ |
48 |
No Operation Power Off.................................... |
48 |
All Reset................................................................... |
48 |
Simple Troubleshooting......... |
49 |
Technical Specifications.......... |
50 |
1 -
RSC8-A-_GB_27 Apr 11.indd 1 |
2011-4-27 10:55:33 |
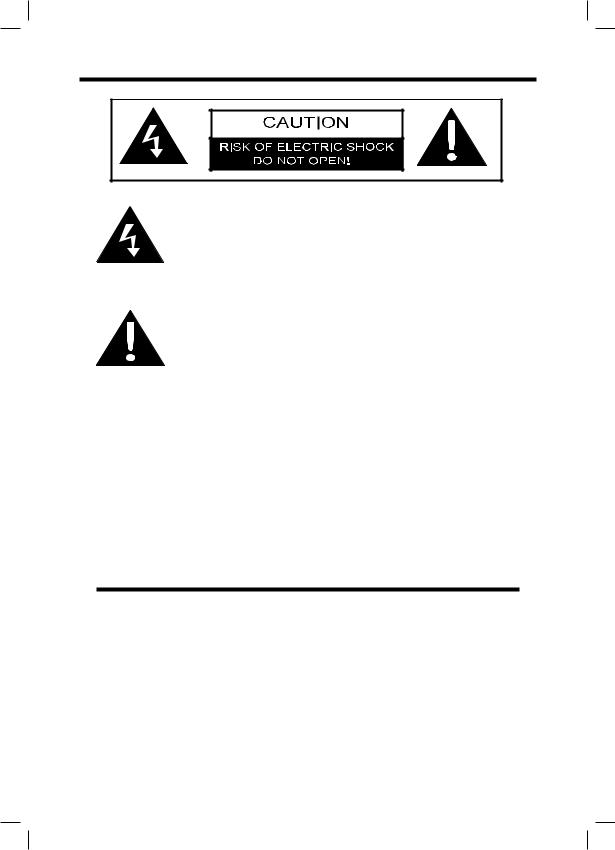
The lightning flash with arrowhead symbol, within an equilateral triangle, is intended to alert the user to the presence of un-insulated dangerous voltage within the products enclosure that may be of sufficient magnitude to constitute a risk of electric to persons.
The exclamation point within an equilateral triangle is intended to alert the user to the presence of important operating and maintenance (servicing) instruction the literature accompanying the appliance.
CAUTION: USE OF ANY CONTROLS, ADJUSTMENTS, OR PROCEDURES OTHER THAN THOSE SPECIFIED HEREIN MAY RESULT IN HAZARDOUS RADIATION EXPOSURE.
CAUTION: These servicing instructions are for use by qualified service personnel only. To reduce the risk of electric shock, do not perform any servicing other than that contained in the operating.
Refer to service manual for servicing instructions.
IMPORTANT SAFETY INSTRUCTION
Note:
1.Read these instructions.
2.Keep these instructions.
3.Heed all warnings.
4.Follow all instructions.
5.Do not use near water.
6.Clean only with dry cloth.
7.Do not block any ventilation openings. Install in accordance with the manufacturer’s instruction.
 - 2
- 2
RSC8-A-_GB_27 Apr 11.indd 2 |
2011-4-27 10:55:33 |

8.Do not install near any heat sources such as radiators, heat registers, stoves, or other apparatus (including amplifiers) that produce heat.
9.Do not defeat the safety purpose of the polarized or grounding-type plug. A polarized plug has two blades with one wider than the other. A grounding type plug has two blades and a third grounding prong. The wide blade or the third prong are provided for your safety. If the provided plug does not fit into your outlet, consult an electrician for replacement of the obsolete outlet.
10.Protect the power cord from being walked on or pinched particularly at plugs, convenience receptacles, and the point where they exit from the apparatus.
11.Only use attachments / accessories specified by the manufacturer.
12.Use only with the cart, stand, tripod, bracket, or table specified by the manufacturer, or sold with the apparatus. When a cart is used, use caution when moving the cart / apparatus combination to avoid injury from tip-over.
13.Unplug this apparatus during lightning storms or when unused for long periods of time.
14.Refer all servicing to qualified service personnel. Servicing is required when the apparatus has been damaged in any way, such as power-supply cord or plug is damaged, liquid has been spilled or objects have fallen into the apparatus, the apparatus has been exposed to rain or moisture, does not operate normally, or has been dropped.
15.Apparatus shall not be exposed to dripping or splashing and that no objects filled with liquids, such as vases, shall be placed on the apparatus.
16.WARNING: To reduce the risk of fire or electric shock, do not expose this apparatus to rain or moisture.
17.Mains plug or appliance coupler is used as the disconnect device, shall be readily operable.
18.The apparatus shall be connected to MAINS socket outlet with a protective earthing connection.
3 -
RSC8-A-_GB_27 Apr 11.indd 3 |
2011-4-27 10:55:33 |

PREFACE
Thank you for buying this TV! Please read this manual thoroughly before operating the TV. Make sure the TV was not damaged in transit. Should the TV be damaged, do not install it and contact your dealer. Check that you have all the accessories according to the model.
SAFETY PRECAUTIONS
Put the TV on a stable surface.
Do not place any material on the TV.
Do not use the TV with fixtures other than those provided or suggested by the manufacturer.
Do not block or cover the ventilation openings on the TV. If you have a wall mount, check that it is steady.
Power cord and cables must be properly routed and protected to prevent people from stepping on them
and causing the TV to fall.
 - 4
- 4
RSC8-A-_GB_27 Apr 11.indd 4 |
2011-4-27 10:55:33 |
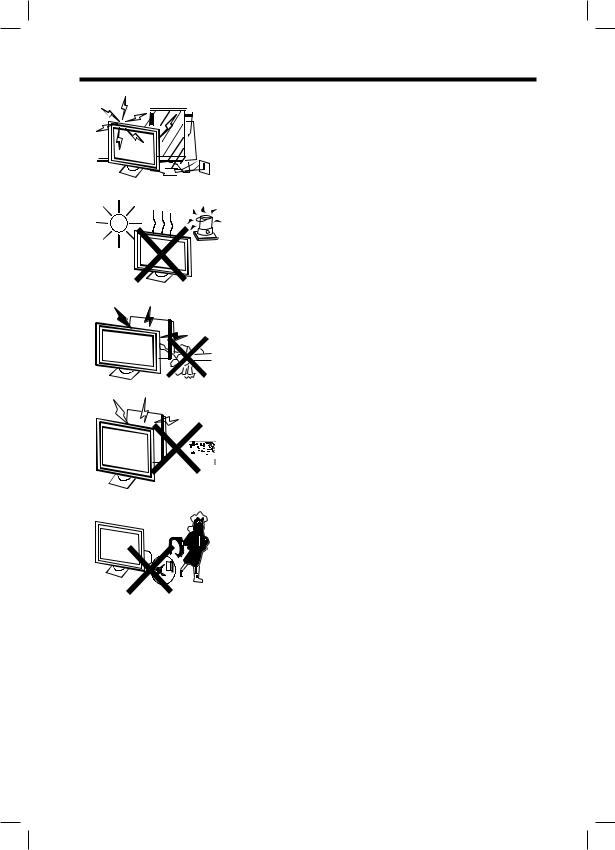
Keep the TV dry and away from humidity.
Keep the TV away from heat sources.
Unplug the TV before cleaning it. Do not use solvent
or liquid to clean the TV.
Only clean the TV with a soft and dry cloth.
In case of troubleshooting, do not use spare parts other than those suggested by the manufacturer.
 Using inadequate spare parts can lead to electric
  shocks, short-circuits, fire or other incidents.

 Unplug the TV during lightning storms or when unused for long periods of time.
5 -
RSC8-A-_GB_27 Apr 11.indd 5 |
2011-4-27 10:55:33 |

Headphone Warning
Loud music can damage your hearing irreversibly, therefore do not set the volume to a high level when listening through headphones, particularly for lengthy listening periods.
Where to install
Locate the television away from direct sunlight and strong lights, soft indirect lighting is recommended for comfortable viewing. Use curtains or blinds to prevent direct sunlight falling on the screen. Place the TV on a sturdy platform of which the surface should be flat and steady. This will prevent it from falling over.
Make sure the television is located in a position where it cannot be pushed or hit by objects, as pressure will break or damage the screen, and so that small objects cannot be inserted into the ventilation slots or openings in the cabinet.
 - 6
- 6
RSC8-A-_GB_27 Apr 11.indd 6 |
2011-4-27 10:55:33 |
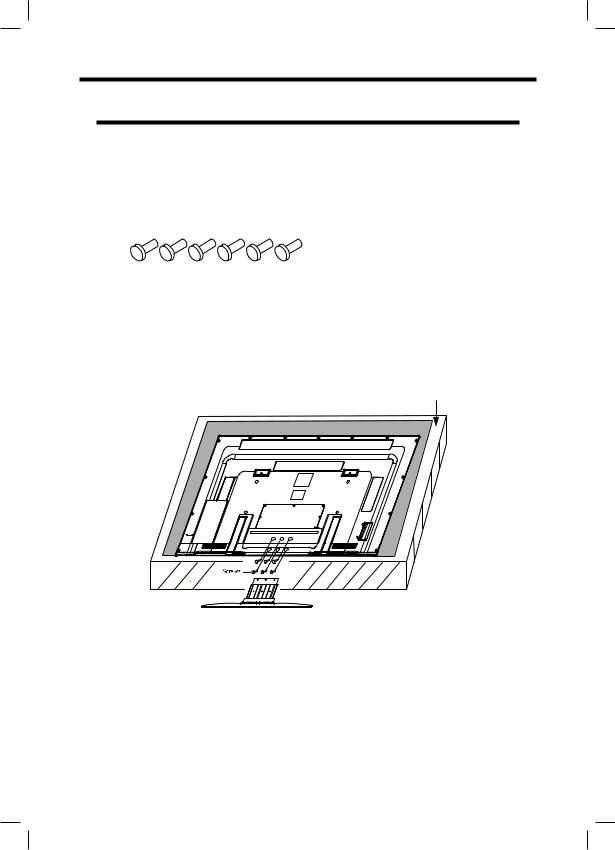
Mount the TV stand
Before performing work spread cushioning over the base area to lay the TV on, making sure the area is completely flat.
This will prevent it from being damaged.
Before attaching stand, unplug the AC cord from the AC INPUT terminal.
1.Confirm the 6 screws supplied with the TV.
2.Put the TV face down on a safe surface that is covered by a soft and smooth cloth.
3.Insert the stand into the openings on the bottom of the TV.
4.Insert and tighten the 6 screws into the 6 holes on the button of the stand.
5.Fasten the screws by using the screwdriver (Not supplied).
Soft cushion
Note:
To detach the TV stand, perform the steps in reverse order.
7 -
RSC8-A-_GB_27 Apr 11.indd 7 |
2011-4-27 10:55:33 |
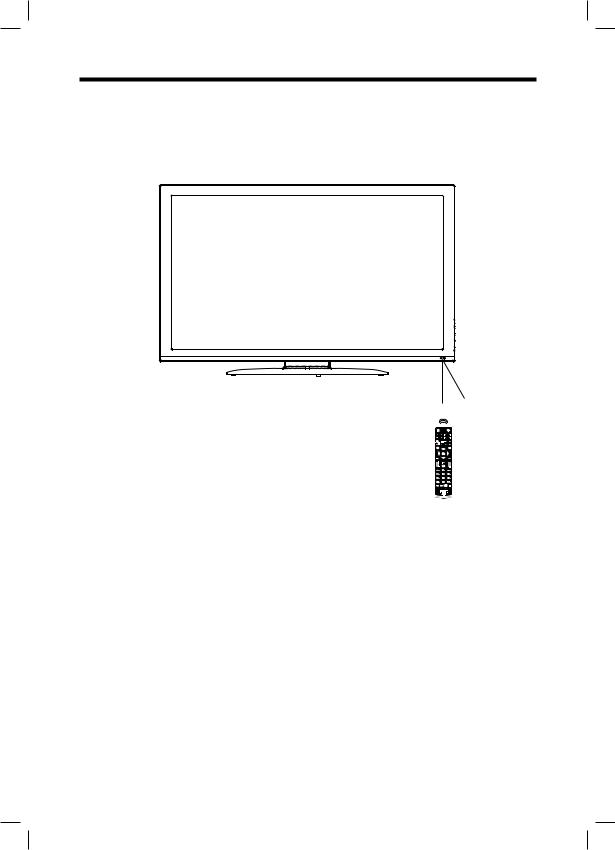
Unit and Accessories
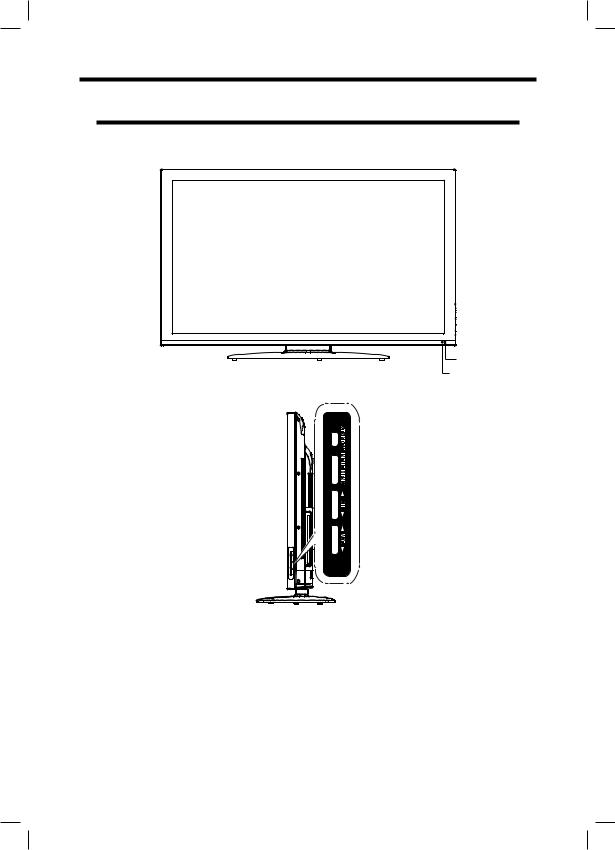
Front View
Remote Control
 Sensor
 LED Indicator
Side View
The functions of the TV buttons are described below: STANDBY: Press to switch on or off the TV.
INPUT: Select a TV input source.
MENU: Press to display the OSD menu, press again to exit the menu. CH / : Press to skip through the channels.
VOL / : Press to adjust the volume.
 - 8
- 8
RSC8-A-_GB_27 Apr 11.indd 8 |
2011-4-27 10:55:34 |

Unit and Accessories (Continued)
Rear View
Supplied Accessories
Make sure the following accessories are provided with the product.
Quick
Connect
Guide
9 -
RSC8-A-_GB_27 Apr 11.indd 9 |
2011-4-27 10:55:35 |
Remote Control
Functions of remote control buttons
Depend on the model of the TV, some keys will have no function.
1 |
6 |
2 |
7 |
3 |
8 |
4 |
9 |
5 |
0 |
6 |
1 |
7 |
2 |
8 |
|
9 |
3 |
0 |
|
1 |
4 |
2 |
|
3 |
5 |
|
6 |
4


 7 5
7 5

 - 10
- 10
RSC8-A-_GB_27 Apr 11.indd 10 |
2011-4-27 10:55:35 |

1. Mute button (  ) Mutes or unmutes audio.
2. YPbPr1 button
Quickly switch input to YPbPr 1 source.
3. TV button
Quickly switch input to TV source.
4. YPbPr2 button
Quickly switch input to YPbPr 2 source.
5. PC button
Quickly switch input to PC mode.
6. CC button
Turn on Closed Caption or off. Available at TV/AV.
7. P Mode button (  ) Quickly switch the predetermined picture mode.
Standard/Movie/User/Dynamic.
8. Favorite button
Display favourite channel list. Colour button
The action they perform is shown on the menu and changes for each menu.
9. Menu button
Press to display the menu.. Navigation( ▲▼)
Navigates through the menus. Enter button
Activates a selection or accesses the menu.
. Info button (only for DTV) Press to display the channel information.
. Input button Display all source list.
. Vol+/Volbutton
Adjust speaker volume level.. Digit (0~9), Dot buttons
Input the channel number or password. When switch to a digital channel, usually should be followed by Dot button and minor channel number. Enter button to confirm.
. DVD Control button
Not available for this model.. Standby button
Control TV to standby or on.. Video1 button
Quickly switch input to Video1 source.
. HDMI1 button
Quickly switch input to HDMI1 source.
. Video2 button
Quickly switch input to Video2 source.
. HDMI2 button
Quickly switch input to HDMI2 source.
. Sleep button (  )
)
Sets a delay after which the TV switches to standby.
. MTS button
Switch sound channel. Mono/ Stereo/SAP when analog channel. English and other languages when digital channel.
. Previous Channel/Return button Jump to last channel entered by user.
. Info button
Display information about the TV channel or accessory device.
. CH +/- button
Switches to the next or previous channel.
. Aspect button
Press to select Aspect Ration.. Enter button
Confirm a selection.
11 -
RSC8-A-_GB_27 Apr 11.indd 11 |
2011-4-27 10:55:35 |

Quick Installation Tips
1.Attach your antenna to the back of the television.
2.Connect the AC plug for the television into the AC outlet.

 AC Outlet
•Place the TV close to the AC outlet, and keep the power plug within reach.
•Connecting it to any other kind of outlet will damage the product and invalidate the warranty.
NOTE:
•TO PREVENT RISK OF ELECTRIC SHOCK, DO NOT TOUCH UNINSULATED PARTS OF ANY CABLES WITH THE AC CORD CONNECTED.
3 How to turn on the television for the first time.
A)Press Standby on the television.
B)The power indicator on the front of the television lights up.
 - 12
- 12
RSC8-A-_GB_27 Apr 11.indd 12 |
2011-4-27 10:55:39 |
Using the Remote Control Unit
Use the remote control unit by pointing it towards the remote control sensor on the TV. Objects between the remote control unit and the remote control sensor may prevent proper operation.
0°
• Cautions regarding the remote control unit
• Do not expose the remote control unit to shock. In addition, do not expose the remote control unit to liquids, and do not place in an area with high humidity.
• Do not install or place the remote control unit under
direct sunlight. The heat may cause deformation of the remote control unit.
•The remote control unit may not work properly if the remote control sensor on the TV is under direct sunlight or strong lighting. In such cases, change the angle of the lighting or the TV, or operate the remote control unit closer to the remote control sensor.
IMPORTANT:
IF THE UNIT DOES NOT POWER ON - UNPLUG THE TELEVISION FROM THE OUTLET AND REPEAT THE INSTALLATION STEPS.
13 -
RSC8-A-_GB_27 Apr 11.indd 13 |
2011-4-27 10:55:39 |
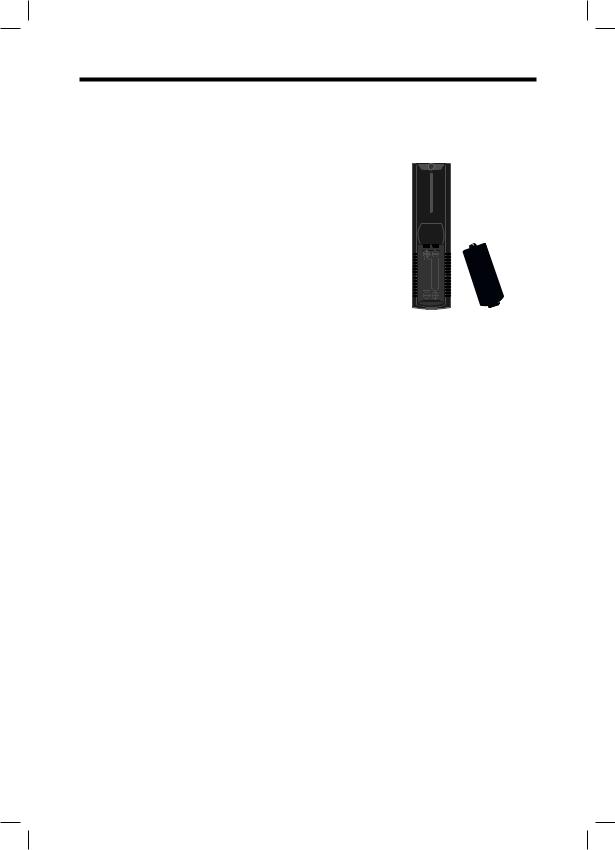
Installing Batteries in the Remote Control Unit
If the remote control fails to operate TV functions, replace the batteries in the remote control unit.
1.Open the battery cover.
2.Insert two “AA” size batteries (supplied with the product).
•Place the batteries with their terminals
corresponding to the (+) and (-) indications in the battery compartment.
3. Close the battery cover.
NOTE:
To use the remote control point it at the TV and press the required buttons. You must be within 6 meters and at an angle of less than 30 degrees from the centre of the TV.
CAUTION:
Improper use of batteries can result in chemical leakage or explosion. Be sure to follow the instructions below.
•Do not mix batteries of different types. Different types of batteries have different characteristics.
•Do not mix old and new batteries. Mixing old and new batteries can shorten the life of new batteries or cause chemical leakage in old batteries.
•Remove batteries as soon as they are worn out. Chemicals that leak from batteries come in contact with skin can cause a rash. If you find any chemical leakage, wipe thoroughly with a cloth.
•The batteries supplied with this product may have a shorter life expectancy due to storage conditions.
•If you will not be using the remote control unit for an extended period of time, remove batteries from it.
•The batteries (batteries installed) shall not be exposed to excessive heat such as sunshine, fire or the like.
 - 14
- 14
RSC8-A-_GB_27 Apr 11.indd 14 |
2011-4-27 10:55:39 |

Connections
USB device
Output to Audio amplifier
TV Signal
Satellite Box or Blue Ray DVD
15 -
RSC8-A-_GB_27 Apr 11.indd 15 |
2011-4-27 10:55:41 |
 Loading...