

Page 1
EW32S3PW
Page 2

Contents
Safety and warnings.......................................................................................2-3
Introduction.....................................................................................................4
Stand installation guide.....................................................................................5
Installation................................................................................................... 6-9
Remote Control..............................................................................................10
Operation.................................................................................................. 11-13
-1-
Page 3
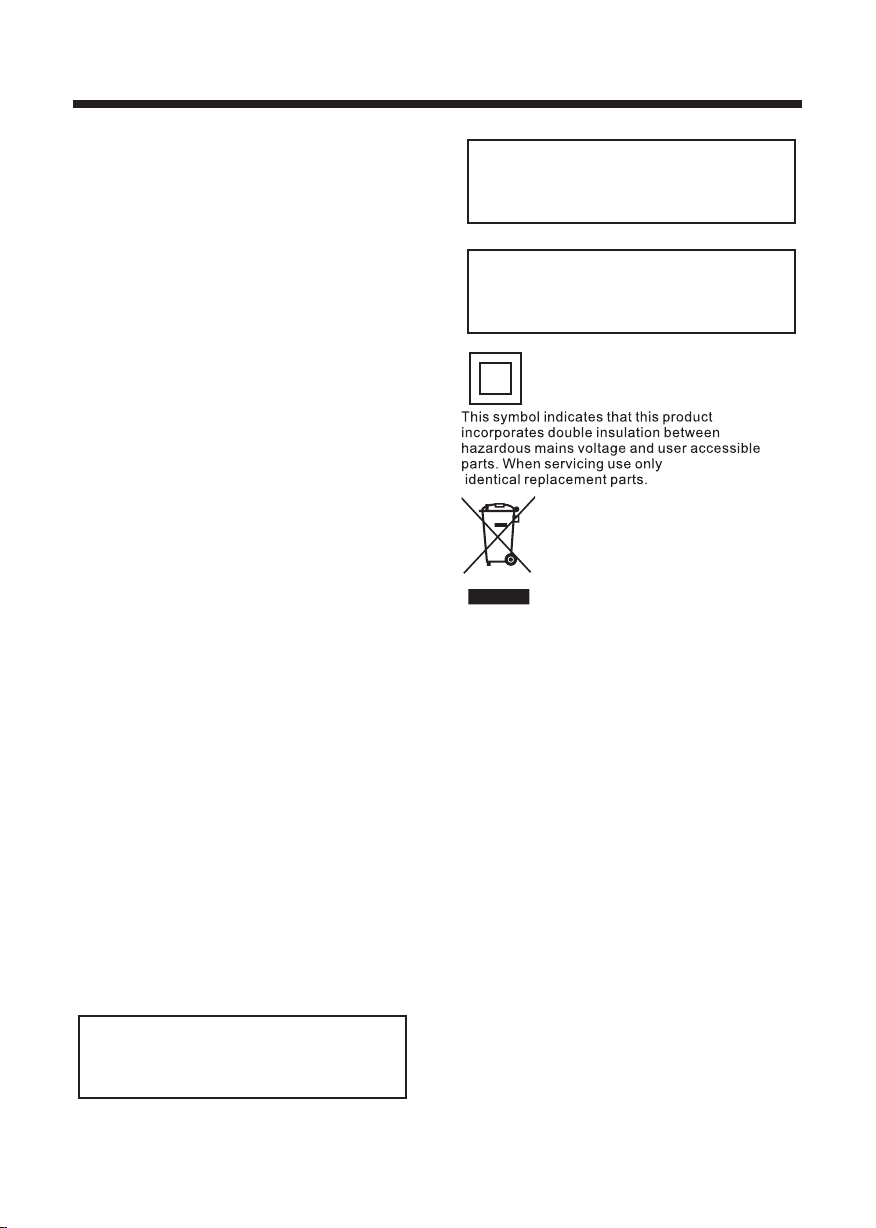
Importan t Safet y Instructions
1) Read these instructions.
2) Keep these instructions.
3) Heed all warnings.
4) Follow all instructions.
5) Do not use this Television near water.
6) Clean only with dry cloth.
7) Do not block any ventilation openings, install
in accordance with the instructions.
8) Do not install near any heat sources such as
radiations, heat registers, stoves, or other
Television (including amplifiers) that produce
heat.
9) Do not defeat the safety purpose of the
polarized plug. If the provided plug does not fit
into your outlet, consult an electrician for
replacement of the obsolete outlet.
10) Protected the power cord from being walked
on or pinched particularly at plugs, convenience
receptacles, and the point where they exit from
the Television.
11) Only use attachments/accessories specified
by the manufacturer.
12) Unplug this Television during lighting
storms or when unused for long periods of time.
13) Refer all servicing to qualified service
personnel. Servicing is required when the
Television has been damaged in any way, such
as; power-supply cord or plug is damaged,
liquid has been spilled or objects have fallen
into the Televi sion, the Television has been
exposed to rain or moisture, does not operate
normally, or has been dropped.
14) Only use attachments/accessories specified
provided by the manufacturer, the product is
supplied by AC adapter, the AC adapter is used
as disconnect device, the disconnect device
shall remain readily operable.
15) The ventilation should not be impeded by
covering the ventilation openings with items,
such as newspapers, table-cloth, curtains, etc.
16) No naked flame sources, such as lighted
candles, should be placed on the Television.
17) Attention should be drawn to the
environmental aspects of battery disposal.
18) The use of Television in moderate climate.
WARNING:
To reduce the risk of fire or electric shock, do
not expose this Television to rain or moisture.
SA FE TY AND WARNINGS
WARNING:
The batteries shall not be exposed to
excessive heat such as sunshine, fire or the
like.
WARNING:
Never place heavy or sharp objects on the
LCD panel or frame.
This marking indicates that this product should
not be disposed with other household wastes
throughout the EU. To prevent possible harm to
the environment or human health from
uncontrolled waste disposal, recycle it
responsibly to promote the sustainable reuse of
material resources. To return your used device,
please use the return and collection systems or
This Westinghouse product has earned the
ENERGY STAR® for meeting U.S. Federal
energy efficiency guidelines as set by the
Department of Energy and Environmental
Protection agency. The ENERGY STAR®
program exists to provide energy saving
guidelines and help promote energy efficient
products and practices. Changes to certain
features, settings and functions of this TV can
change and/or increase its power consumption.
Depending on how settings are changed, power
consumption may exceed the limits required
for ENERGY STAR® qualification.
-2-
Page 4
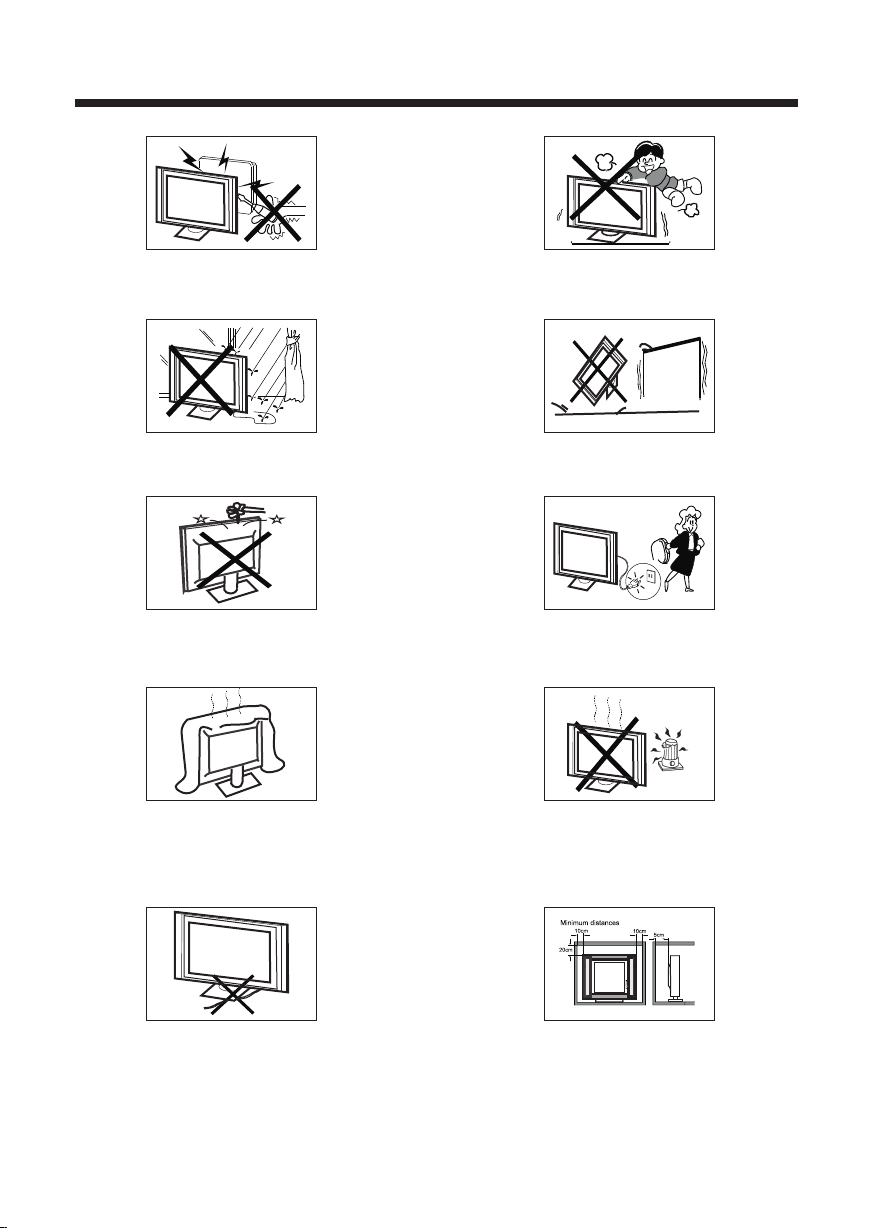
High voltages are used in the operation of this television
receiver. Do not the cabinet.
Refer servicing to qualified service personnel.
open
SA FE TY AND WARN IN GS
Never stand on, lean on, or suddenly push the television or
its stand. You should pay special attention to children.
Serious injury may result if it falls.
To prevent fire or electrical shock hazard, do not expose
the television receiver to rain or moisture.
Do not drop or push objects into the television cabinet
slots or openings. Never spill any kind of liquid on the
television receiver.
Do not block the ventilation holes on the back cover .
Adequate ventilation is essential to prevent failure of
electrical components.
of the TV
Do not place your television on an unstable cart, stand,
shelf or table. Serious injury to an individual and damage
to the television may result if it falls.
/or
When the tel evisi on receiver is not used for an
extended p eriod o f time, it is advisable to dis connect
the AC power co rd from the AC outlet.
Avoid exposing the television receiver to direct sunlight
and other sources of heat. Do not stand the television
receiver directly on other products which give off heat,
e.g. video cassette players and audio amplifiers. Do not
place naked flame sources, such as lighted candles on
the television. or near
Do not trap the power supply cord under the television
receiver s .' stand
If the television is to be built into a compartment or similar
enclosure, the minimum distances must be maintained. Heat
build-up can reduce the life of your television, and can also
be dangerous.
-3-
Dim:515*320mm(不包 括底座)
Page 5
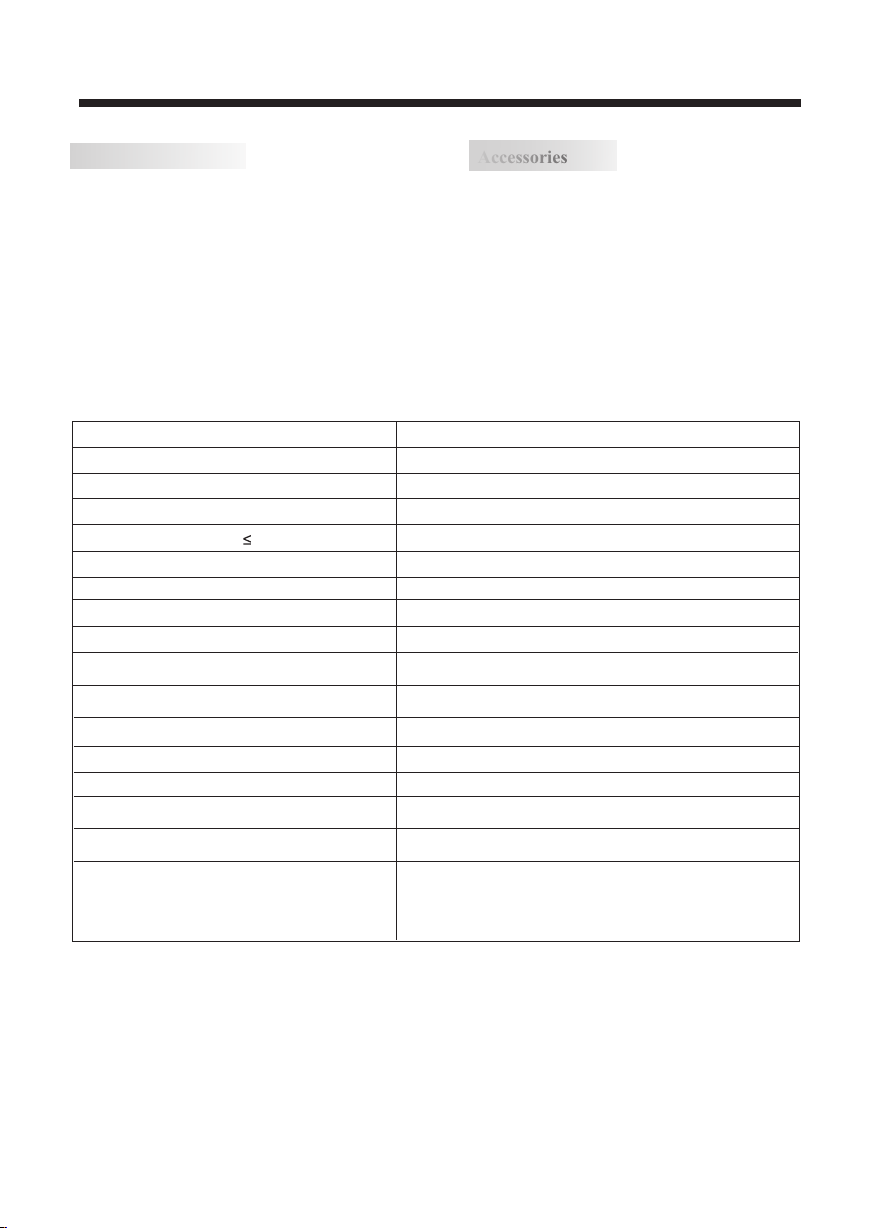
Main features
■ Integrat ed ATS C TV tuner for HDTV broad cast reception
■ High brightness provides a vivid and brilliant picture
■ Deeper blac ks and brig hter whites with high contras t
■ Wide Screen aspe ct rat io ( ) for a complete home
theater ex perie nce
■ HDMI input for true digital connec tion
■ VGA port for con nection to PC
■ Built-in s tereo sp eaker sys tem
■ Full-fun ction Remote Control
wide
Main parameter
INTRODUCTION
Accessories
Accessories
Power cabl e.... .................. ..... ........
Infrared R emote C ontrol............ ..... ...
User’s M anual .. ..... .................. ..... ...
Battery( AAA). .................. ..... ........... 2
1
1
1
Viewing Picture Size (diagonal)
Resolution:
Power supp ly
Power cons umpti on
Audio Output Power (THD 7%):
Aspect Ratio:
TV System:
Video Signal System:
Receiving Channel:
High-Definition Multimedia Interface (HDMI) Input
YCb(Pb)Cr(Pr) Input
Composite Video Input
Analog RGB (VGA) Input
Audio Input x 2
Headphone Output
Coaxial Output
Horizontal definition (TV line)
32 inches
1366 x 768
AC 100-240V 50/60Hz
75W
2x8W
Normal wide
ATSC Digital system and NTSC Analog system
NTSC, PAL
Cable :1-135/ Air: 2-69 (ATV&DTV)
x 2
x 1
x 1
x 1
x 1
x 1
Composite Video Input >=350
Video Input >=400
YCb(Pb)Cr(Pr) >=400
-4-
Page 6
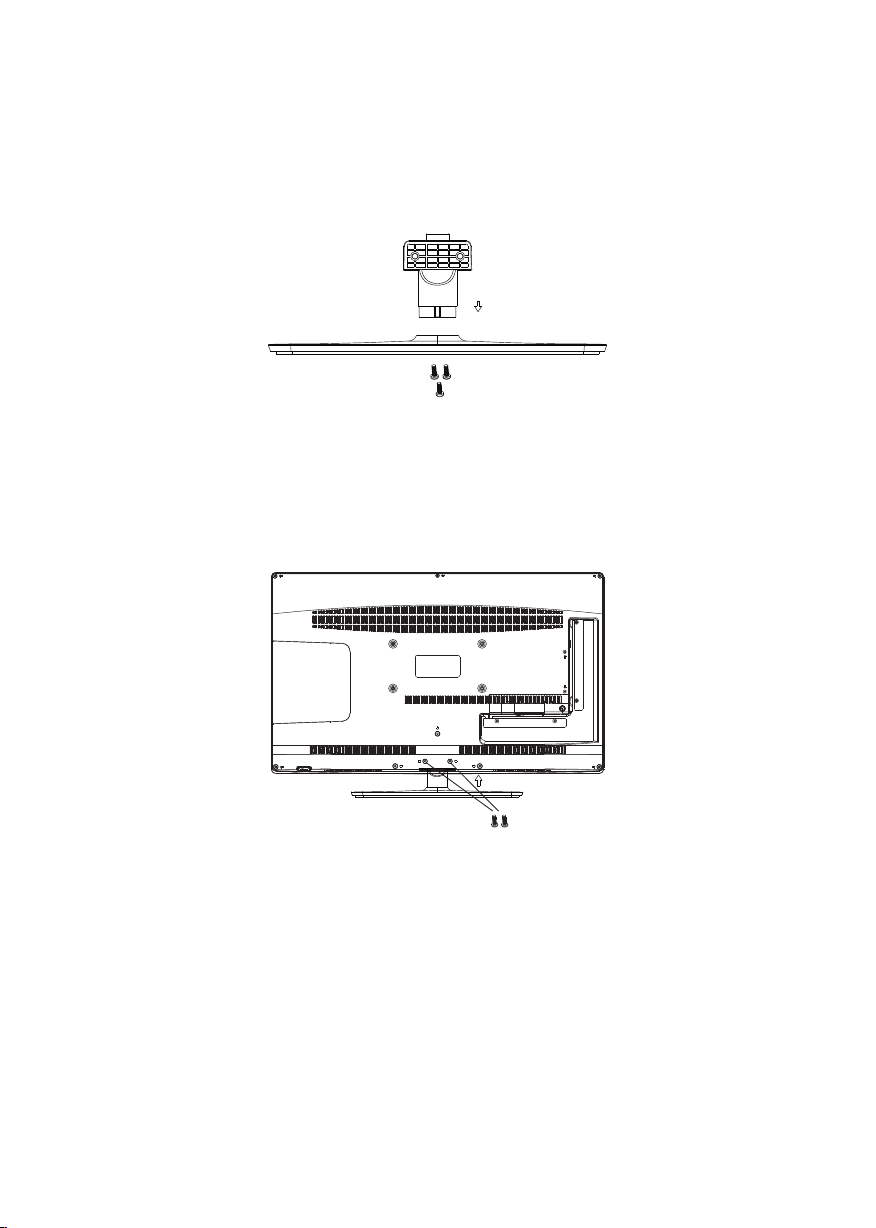
Base Stand Assembly Instruction
Attach the stand base plate to the stand pole by firmly tightening the supplied screw to be
1.
a completed stand.
2. Place the TV with the display side down on a flat surface. Use a cloth to protect .
Position the completed stand into the hole on the TV set.
the display
-5-
Page 7
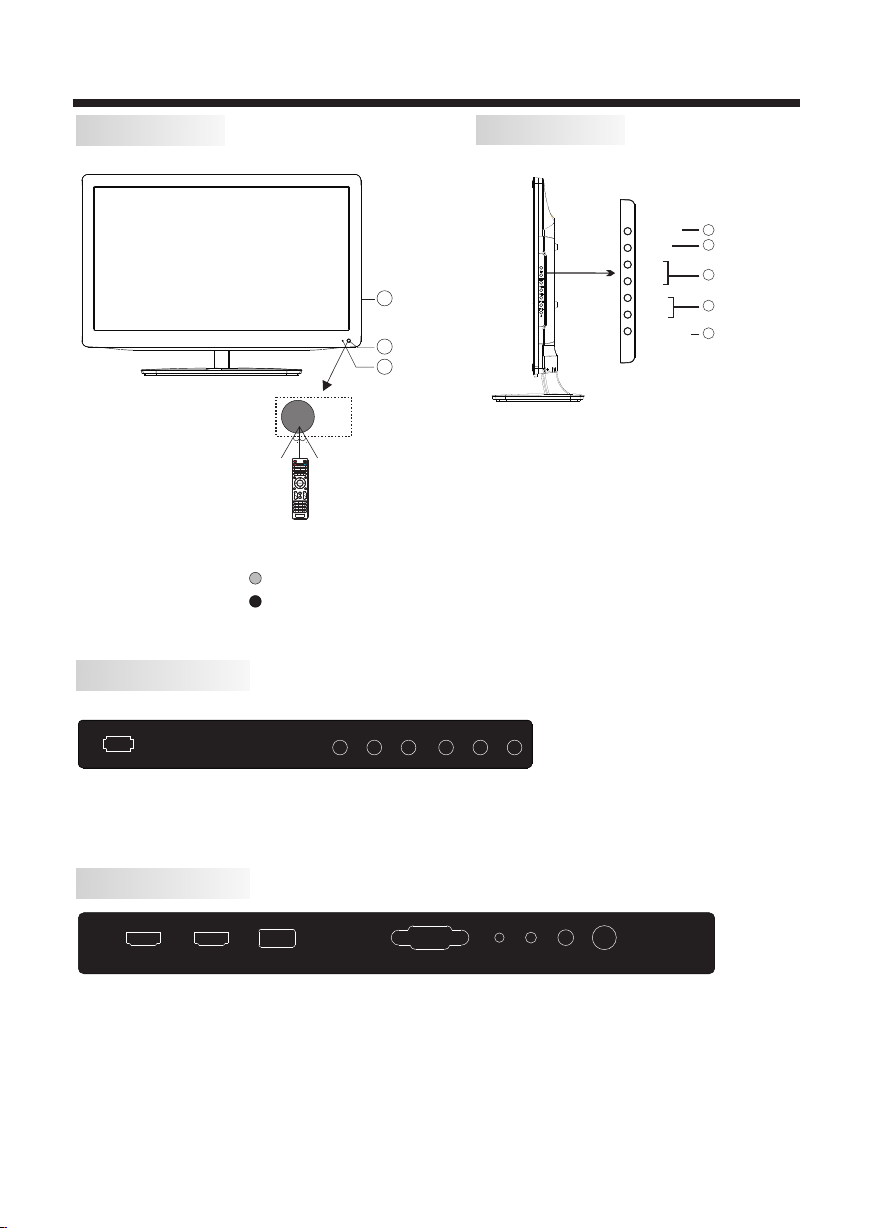
INSTALLATION
Front panel
30 30
1: Remote co ntrol s ensor.
2: Indicat or LED: B LUE POWER ON.
RED STAND BY.
3: Side panel k eys
REAR Connections
Side panel
SOUR CE
MENU
CH+
CH-
3
VOL+
VOL-
1
2
1. SOURCE: Display the input source menu.
2. MENU: Display main MENU.
3. CH+/CH-: In TV mode, press "CH+" or "CH-" to
change the channel up and down. In MENU mode, press
"CH+" or "CH-" to select items in standby mode, press
"CH+" or "CH-" to turn on the TV.
4. VOL+/VOL-: Adjust sound level. In MENU mode,
press "VOL+ " or "VOL- " to adjust the item that you
selected.
5. STANDBY: Press this button to turn the unit ON
from STANDBY mode. Press it again to turn the set
back to STANDBY.
STAND BY
1
2
3
4
5
L R Y Pb Pr
AC-I NPUT
100- 240V~ 50/60 HZ
VIDE O
All the terminals are (from left to right):
POWER SOCKET, AUDIO INPUT,
VIDEO, YPbPr INPUT
Note: AV and YPbPr share one audio channel.
SIDE Connections
HDMI 1 HDMI 2 USB VGA PC AUDI O HEAD PHONE COAX IAL R F
All the terminals are (from left to right):
HDMI1, HDMI2, USB, VGA, COAXIAL, RF.
Note: 1. When HDMI1 has an input signal coming from a DVI source then the audio input signal must be
connected to the PC audio input.
2. The USB port just used for software upgrading.
PC AUDIO, HEADPHONE,
-6-
Page 8
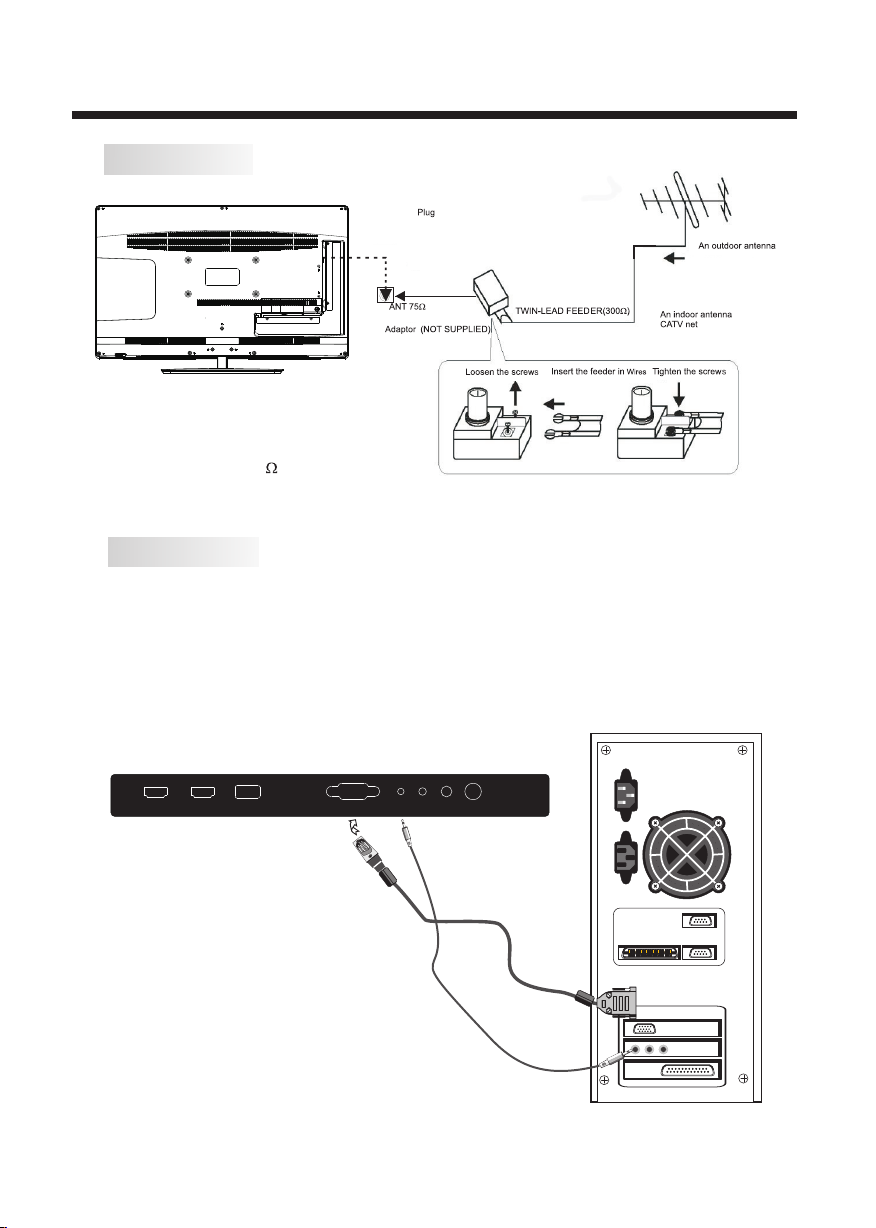
ANTENNA
Note:
Aerial connections: IEC (female).
Input impendance:75 unbalanced.
PC
STEPS:
Be sure both the TV and computer are set to
Power off.
1.Connect VGA and audio cable.
2.Connect the power cord.
3.Power on the TV, switch to PC mode.
4.Power on the PC.
This sequence is very important.
INSTALLATION
HDMI1 HDMI2 US B VGA PC AUDIO HEADPHO NE COAXIA L R F
-7-
Page 9
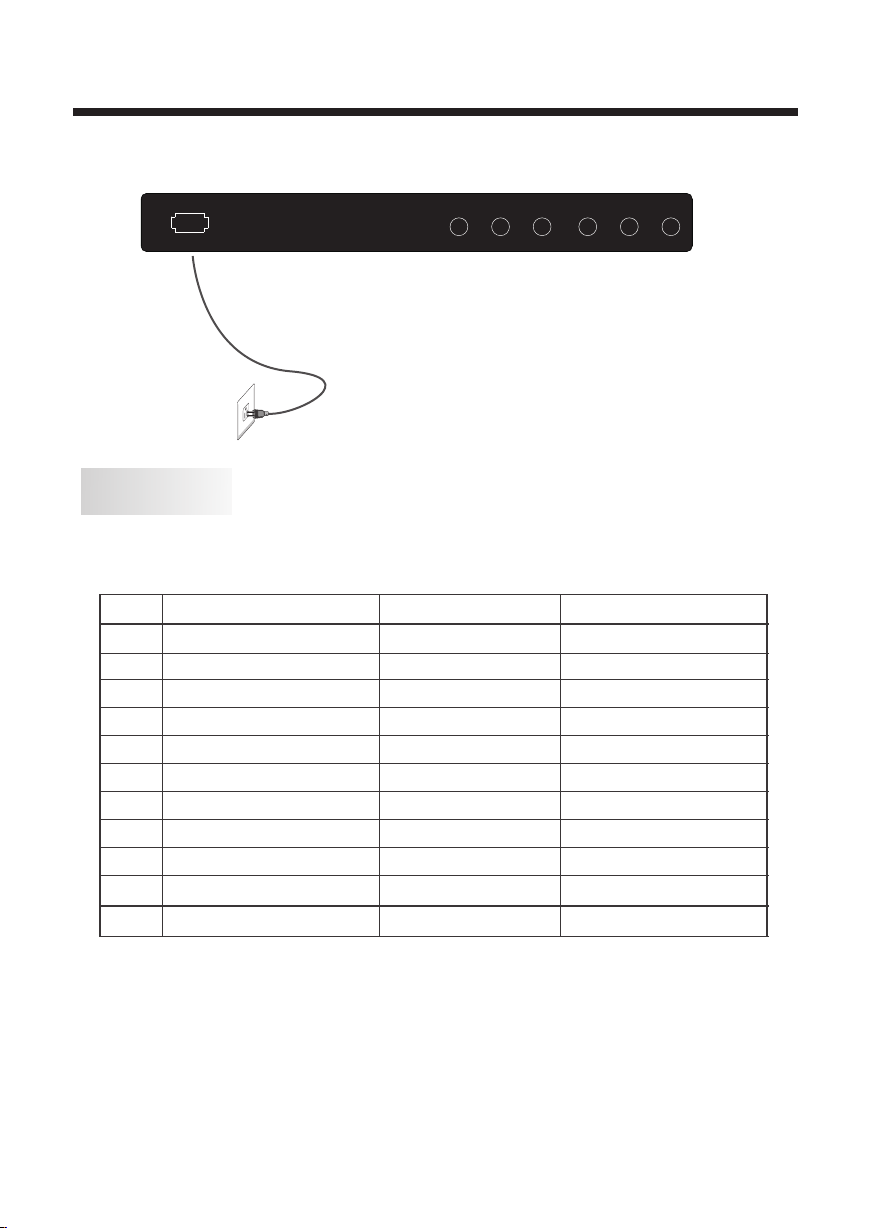
PC
PRESET MODE
RESOLUTION
1
2
3
4
5
6
7
8
9
10
11
AC- INPUT
100 -240V ~50/6 0HZ
720*400
640*480
640*480
800*600
800*600
1024*768
1024*768
1024*768
1280*1024
1280*1024
1366*768
INSTALLATION
L R Y Pb Pr
VID EO
V.Freq.(Hz) H.Freq.(KHz)
70
60
75
60
75
60
70
75
60
75
60
31.47
31.47
37.50
37.88
46.88
48.36
56.48
60.02
63.98
80.00
67.50
-8-
Page 10
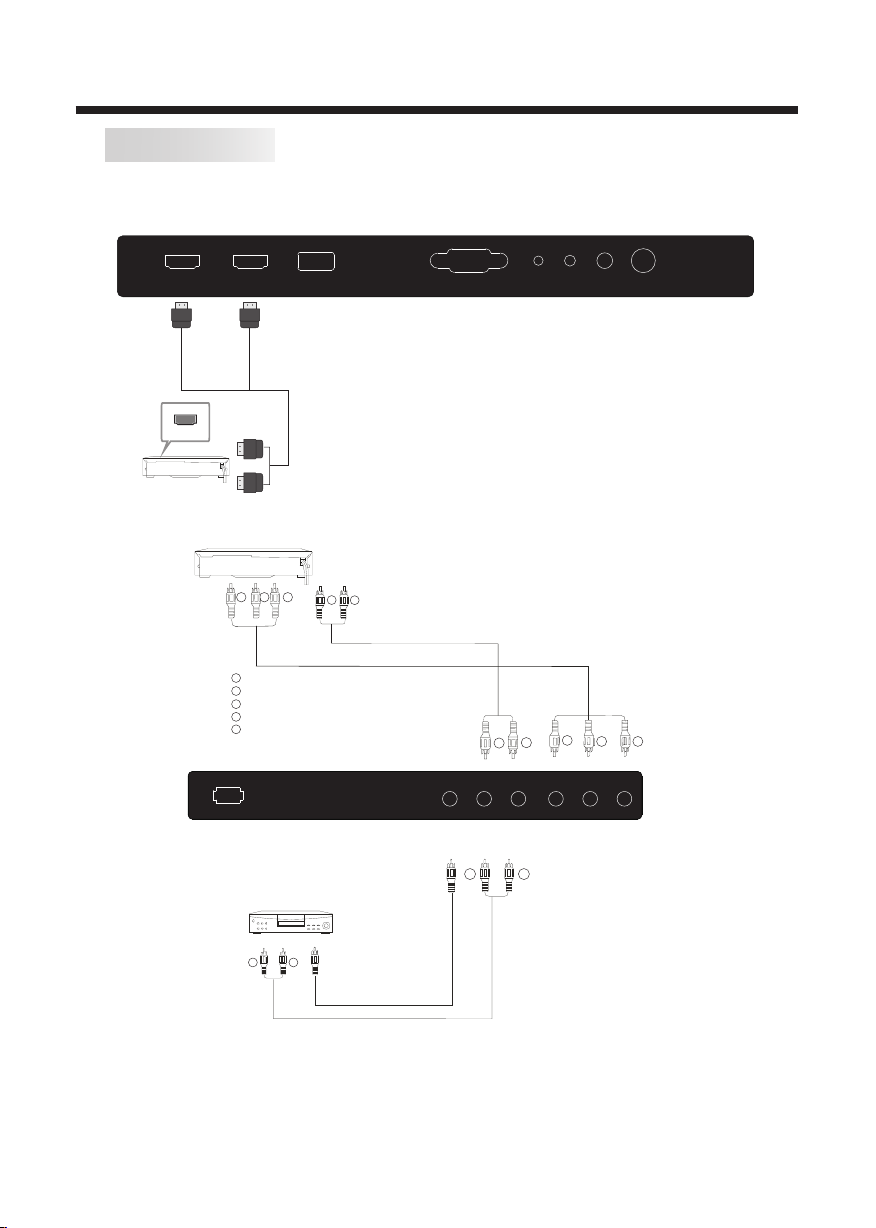
AV EQUIPMENT
You can use the input terminals on TV set rear as follows.
HDMI 1 HDMI 2 USB VGA PC AUDI O HEAD PHONE COAX IAL R F
HDMI
VIDEO EQUIPMENT with YPbPr
G
R
B
W
R
INSTALLATION
Y
Yellow (video)
W
White(audio L)
R
Red(audio R or Pr)
B
Blue(Pb)
G
Green(Y)
TO AUD IO OUTPU TS
AC-I NPUT
100- 240V~ 50/60 HZ
VIDE O EQUIP MENT
W R
TO VID EO
OUTP UTS
W
L R Y Pb Pr
VIDE O
W R
G
R
R
B
The television's inputs can be connected to the following types of equipment: VCR, multi disc player,
DVD, camcorder, video game or stereo system, etc.....
YPbPr can support these video formats:480i,576i,480p,576p,720p,1080i.
-9-
Page 11
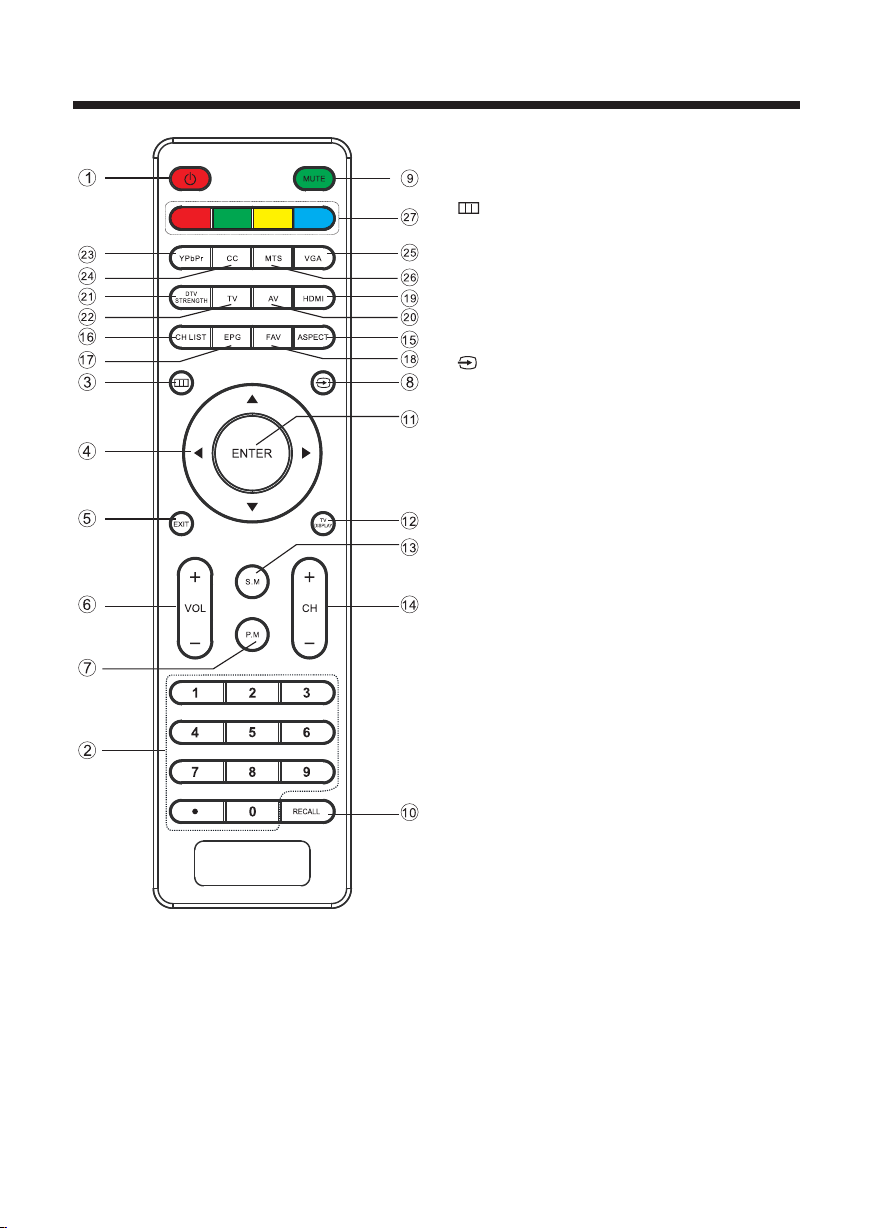
REMOTE CONTROL
1: POWER
To turn the TV on.
2: NUMBER KE Y
For direct a ccess t o .
3:
Displays t he main o n-screen menu.
4: CURSOR
To move within the m enu.
5: EXIT
To exit the menu.
6: VOL+/ To adjust sound level.
7: P.M
To switch picture mode.
8:
Press to dis play an d select the available vid eo sources.
9: MUTE
To disable or enab le the so und.
10: RECALL
To access the prev iousl y viewed channel.
11: ENTER
Confirms s elect ion.
12: TV DISPLAY
Displays /remo ves the program informat ion
13: S.M
To switch sound mode.
14: CH+/CH To access the next o r previ ous channel.
15: ASPECT
To change pictur e aspec t .
16: CH LIST
To display the cha nnel li st.
17: EPG
To display all the i nformation of DTV programs.
18: FAV
To access your favorite chann els in digital TV mode.
19: HDMI
Ho t key to go directly to HDMI sou rce.
20: AV
Hot key to go di rectl y to AV source.
21: DTV STRENGTH
To display the DTV signal stre ngth menu.
22: TV
Hot key to go directly to TV source.
23: YPbPr
Hot key to go di rectl y to YPbPr s ource .
24: CC
To enable or disab le the CC f unction.
25: VGA
Hot key to go di rectl y to VG A source.
26: MTS
To switch the sound stere o.
27: COLOR KE YS
Reserved keys
channels
-10-
Page 12
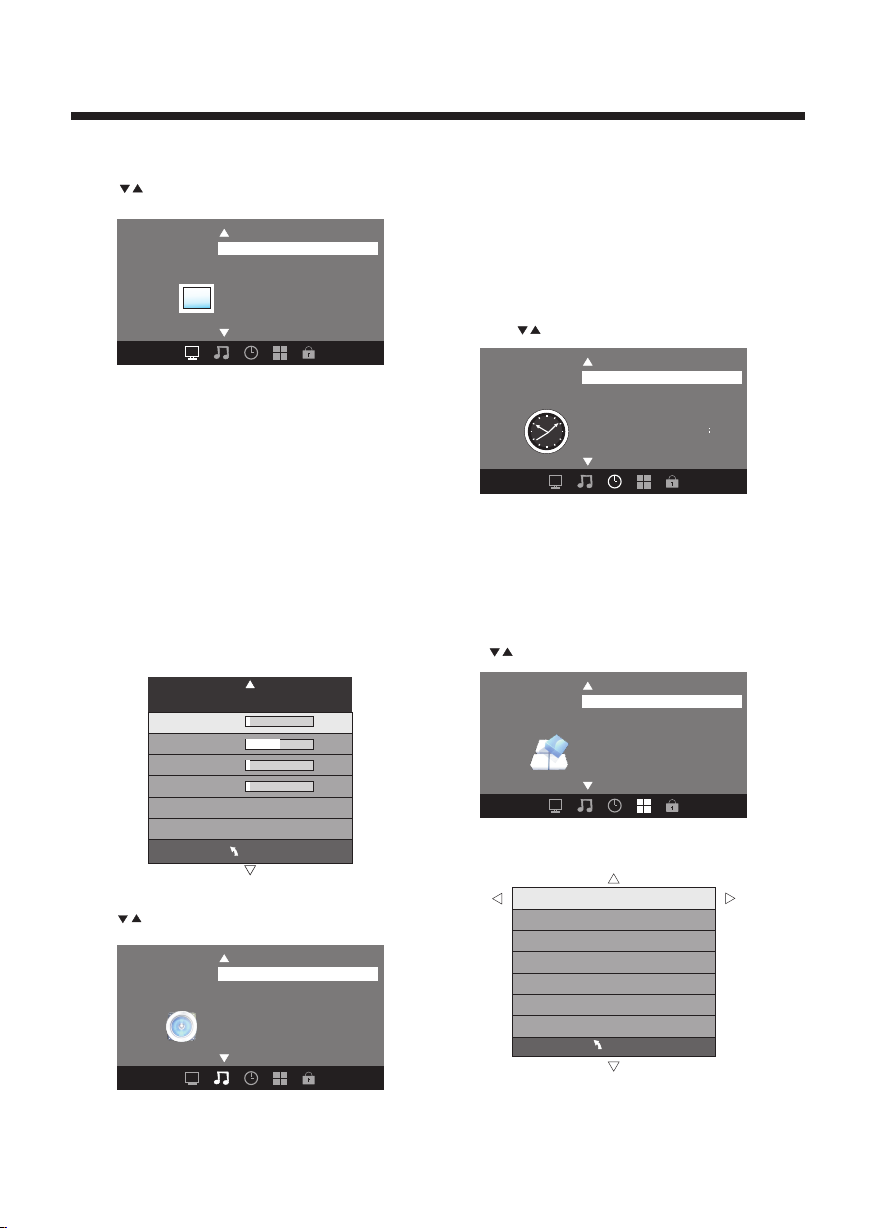
1. PICTURE MENU
In this menu ,you ca n adjust the picture effect her e,
such as cont rast, b rightness, etc.
Press to sel ect, pr ess OK to adjust.
Pic ture Mo de Stand ard
Col or Temper ature Norma l
Asp ect Rat io
Pic ture
< >
Noi se Redu ction Middle
Fil l
OPERATION
Note:
1). There are five Sound M odes can be
selected :Stan dard,Music,Movie,S ports and Personal
2).Audio l angua ge is available in ATSC/TV
Programm ing onl y.
3).Auto vo lume is a vailable only when the inp ut signal
volume is to o large or the re is distortion.
3. TIMER MENU
In this menu , you can a djust the sleep timer, time zone,
etc. Press t o selec t,press OK to adjust.
Note:
1).If you wa nt to adj ust contrast, brightne ss, color,
and sharpn ess, th e picture mode must return t o
personal s tatus .
2).Tin t is avaliable in NTSC syste m only.
3).There a re thre e color temperature mode s can be
selected :Norm al,Warm and Cool .
1.1 Advance d
When PC Mode i s avail able.
Press OK but ton to se lect PC advanced setting
1).H-Pos : Adjust the horizontal pos ition o f the screen.
2).V-Pos: Adjust the v ertical position of the sc reen.
3).Clock : Fine tu ne the screen width.
4).Phase : Fine tu ne the phase of the screen. Us ually
don't adju st this i tem.
5).Auto: Au to adjust to fit the screen.
Advan ced
_
H-P os 0
H-P os 50
Clo ck 0
Pha se 0
Aut o
MEN U
2.AUDIO me nu
In this menu , you can a just the sound effect here.
Press to sel ect, pr ess OK to adjust.
Sou nd Mode St andar d
Aud io Lang uage En glis h
Dig ital Ou tput PCM
Sur round S ound Off
Aud io
<
AVL Off
+
<
Sle ep Timer Off
Time Z one Pacif ic
DST Off
Time F ormat 12 -hour
Time
<
Note:
1). Time zone , DST and the cl ock are available in
ATSC pr ogramming only, and the Clock can't be
adjust.
4.OPTION m enu
In this menu , you can a just the Menu language, Cl ose
Caption, R estor e Default etc
Press to sel ect,p ress OK to adjust.
Opt ion
<
Clo ck - ---/ --/-- - -
.
Men u Langu age E nglis h
Tran spare nt
Clo sed Cap tion
Res tore De fault
25%
<
<
4.1 Closed C aptio n
CC Mo de CC Off
Bas ic Sele ction C C1
Adv anced S elect ion Ser vicel
Opt ion
MEN U
-11-
Page 13
OPERATION
1).CC Mode : Switc hing close caption mode.
2). Advance d selection: only ATSC p rogram is
availabl e.
3).Optio n: Used t o edit CC font.
Note:
1).Resto re Defa ult: Restore Default wil l clear all the
programs a nd rese t all the settings to defaul t value.
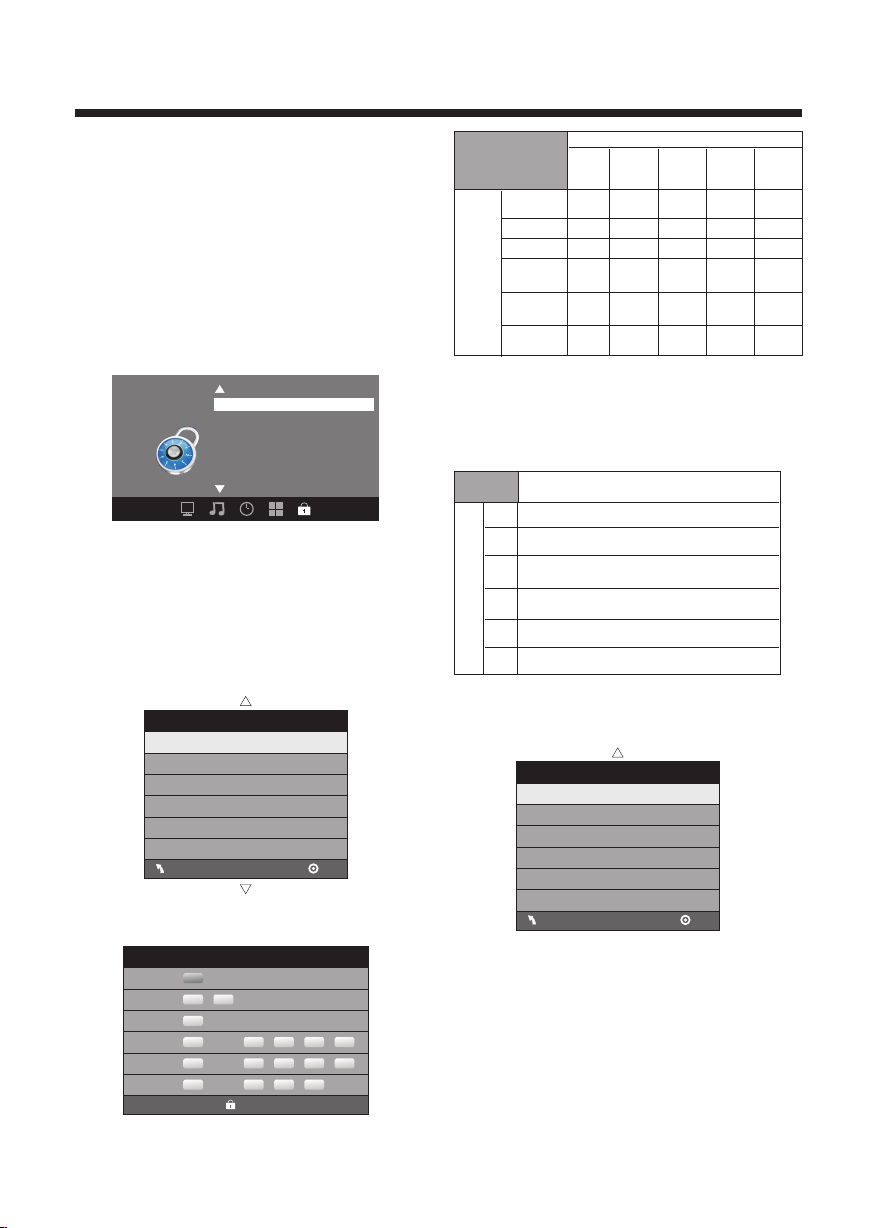
5.LOCK MEN U
In this menu , you can c hange the password and adj ust
the vchip se tting .
Enter the pa sswor d, it will go into the lock menu .
Factory de fault p assword is 6666.
Cha nge Pas sword
Sys tem Loc k
US
Can ada
Loc k
<
5.1 Change P asswo rd
1).Old pas sword : Input the old password.
2).New pas sword : Input the new password.
3).Confi rm pass word: Input the new passwo rd agai n.
5.2 System L ock
When the Sys tem Loc k switch is ON, the below
options li sted be low can be adjusted.
5.3 US
Press OK but ton the s creen will display as foll ow.
RRT Se tting
Res el RRT
Off
<
US
TV
MPAA
V
(Viol ence)
X
X
X
Des cript ion
Con tent
S
(Se xual
sit uatio n)
X
X
X
L
(Ad ult
lan guage )
X
X
X
D
(Se xuall y
sug gesti ve
dia log)
Parental
Rat ing Con tent
TV-Y (Al l
chil dren)
TV-Y7( Direc t to
orde r child ren)
Sug geste d
TV-G(G enera l
age
audi ence)
TV-PG( Paren tal
Guid ance
sugg ested )
TV-14( Paren ts
stro ngly
caut ioned )
TV-MA( Matur e
audi ence on ly)
And use the EN TER key t o switch lock/ unlock
feature.
Control
2).MPAA: Switching the mov ie-rating control leve l;
N/A, G, PG, PG -13, R, N C-17, X.
Rat ing
G Gen eral au dienc es, All Age s admit ted
PG
PG- 13
Age
R
NC- 17
X
5.4 Canada
Press OK but ton, th e screen will be displayed a s
follow:
FV
(Fa ntasy
vio lence )
X
Par ental G uidan ce sugg ested . Some ma teria l may not b e
Sui table f or chil dren.
Par ents st rongl y cauti oned. S ome mat erial . may be
Ina pprop riate f or chil dren un der 13.
Res trict . Under 1 7 requi res acc ompan ying pa rent or a dult
gua rdian (age va ries in s ome jur isdic tions )
No o ne 17 and u nder ad mitte d.
X is an o rder ra ting th at is uni fied wi th NC-1 7 but may b e
enc oded in t he data o f order m ovies .
Canada
Can ada Eng
Can ada Fre
X
X
MEN U
1).TV: Press OK bu tton, the screen will display as
follows:
TV RATIN G
ALL
TV-Y
ALL
TV-Y 7
TV-G
TV-P G
TV-1 4
TV-M A
FV
ALL
ALL
ALL
ALL
BLOC K
V
S
L D
V
S
L
V
S
L
OK
D
MEN U
1): Canada E nglis h: Switching the English r ating control
level: EXE MPT, C, C8+, G, PG, 14+, 18+.
OK
-12-
Page 14
OPERATION
Rat ing
E Exe mpt: In clude s news, s ports , docum ents an d other i nform ation
pro gramm ing: ta lk show s, musi c video s, and va riety p rogra mming .
C Chi ldren : Inten ded for y ounge r child ren und er the ag e of 8 year s.
Pay s caref ul atte ntion t o theme s that co uld thr eaten t heir se nse of
sec urity and wel l-bei ng.
C8+ C hildr en over 8 y ears ol d: Cont ains no p ortra yal of vi olenc e as the
pre ferre d, acce ptabl e, or onl y way to re solve c onfli ct; nor e ncour age
chi ldren t o imita te dang erous a cts whi ch they m ay see on t he scre en .
G Gen eral: C onsid ered ac cepta ble for a ll age gr oups, Ap propr iate
vie wing fo r the ent ire fam ily, cont ains ve ry litt le viol ence, p hysic al,
ver bal or em otion al.
PG Pa renta l Guida nce: In tende d for a gen eral au dienc e, but ma y not be
Age
sui table f or youn ger chi ldren ( under t he age of 8 ) becau se it cou ld
con tain co ntrov ersia l theme s or issu es.
14+ O ver 14 Years : Could c ontai n theme s where v iolen ce is one o f the
dom inant e lemen ts of the s toryl ine But i t must be i ntegr al to the
dev el opme nt of plo t or char acter. L angua ge usag e could b e profa ne
and n udity , p resen t withi n the con text of t heme.
18+ Ad ults: I ntend ed for vi ewers 1 8 years a nd olde r and mig ht cont ain
dep ictio ns of vio lence , which w hile re lated t o the dev elopm ent of
plo t, char acter o r theme s, are in tende d for adu lt view ing. Co uld
con tain gr aphic l angua ge and po rtray als of se creta ry and nu dity.
2).Canad a Frenc h: Switching the French- rating control
level: E, G, 8 ANS+, 1 3 ANS+, 16ANS+, 18AN S+.
Rat ing
E Exe mpt pro gramm ing
G Gen eral :A ll ages a nd chil dren, c ontai ns mini mal dir ect vio lence ,
but m ay be int egrat ed into t he plot i n a humor ous or un reali stic
man ner .
8an s+ Gene ral but i nadvi sable f or youn g child ren :Ma y be view ed by a
wid e publi c audie nce, bu t could c ontai n scene s distu rbing t o
Age
chi ldren u nder 8 wh o canno t disti nguis h betwe en imag inary a nd
rea l situa tions . Recom mende d for vie wing wi th pare n.
13a ns+ Ove r 13 year s: Coul d conta in scen es of fre quent v iolen t scene s
and i n tense v iolen ce.
16a ns+ Ove r 16 year s: Coul d conta in freq uent vi olent s cenes a nd viol ence.
18a ns+ Ove r 18 year s: Only f or adul t viewi ng. Cou ld cont ain fre quent
vio lent sc enes an d extre me viol ence.
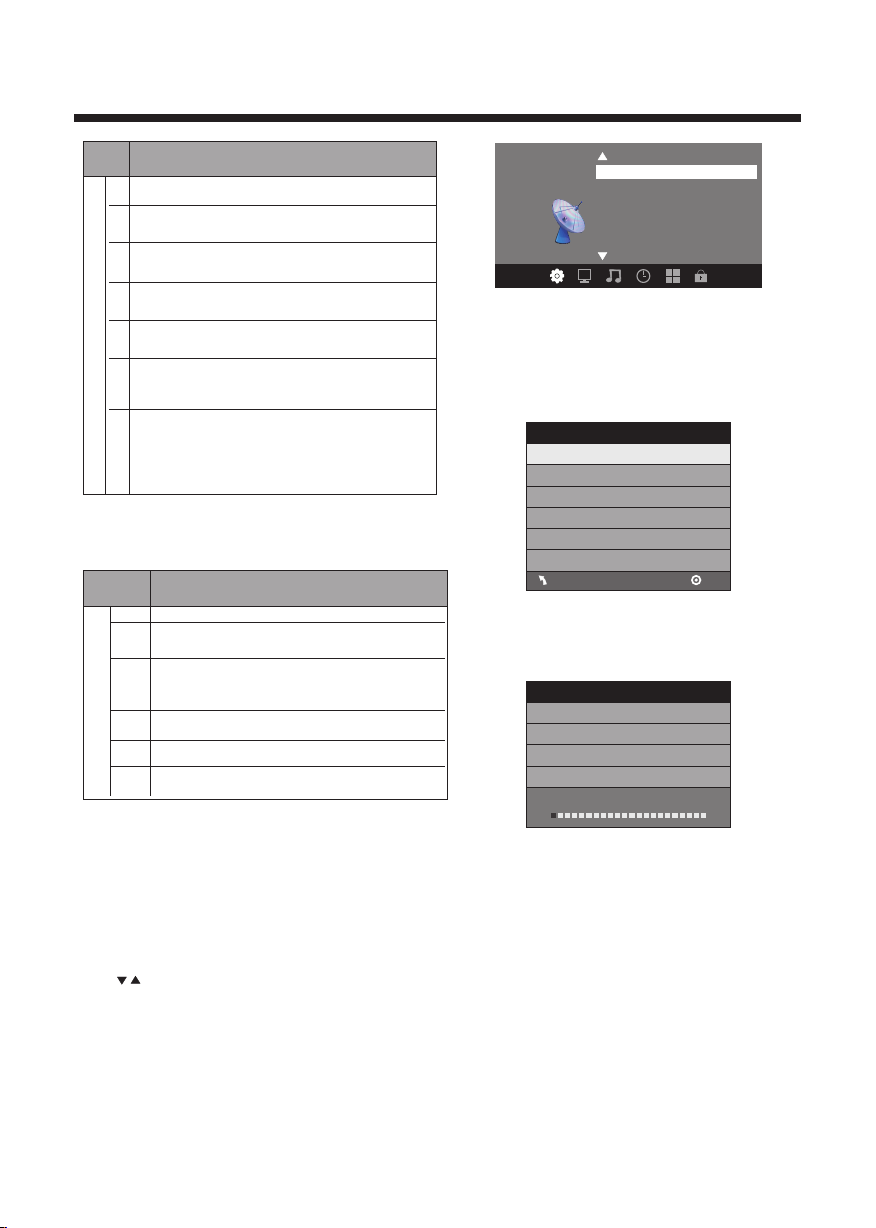
5.5 RRT setti ng
in ATSC digital TV mode, it can be adjusted
5.6 Reset RRT:
Press OK but ton, th e screen will be displayed a s
follow:
6. Channel M ENU
In this menu , you can a djust digital and analog TV
Channels .
Press to sel ect,p ress OK to adjust.
Des cript ion
Des cript ion
Air /Cabl e Cable
Aut o Scan
Fav orite
Sho w/Hid e
Cha nnel
<
6.1 Air/Cab le:
Select Air TV signal and cable TV signal.
6.2 Auto Scan :
If it's the fi rst tim e you use the TV, you should scan all
the TV channels first,
Press OK but ton to co nfirm, you will see the menu
DTV S ignal
Auto Scan
Sca n all cha nnels
Dig ital ch annel o nly
Ana log cha nnel on ly
MEN U
Press OK but ton to se lect a scan type,you will se e the
message be low whi ch indicates auto search i s in
process.
OK
Auto Scan DTV+ATV
0
0
0
Pro gramm e(S)
Pro gramm e(S)
Pro gramm e(S)
Fou nd:
Ana log:
Dig ital:
1%. .. RF CH 2 DT V
6.3 Favori te:
Press OK but ton to ch oose/delete the favori te channel.
6.4 Show/H ide
Press OK but ton to di splay or hide current chan nel.
6.5 DTV signal
Display DT V strength s ignal. It can't be selected and
adjusted .
<
-13-
Page 15
SE- UM-32 01- 0301
 Loading...