


 Loading...
V-ZUG Ltd
Combi Steam Cooker
Combi-Steam XSL
Operating instructions

Thank you for choosing to buy one of our products. Your appliance is made to high standards and is easy to use. Nevertheless, please take the time to read these operating instructions in order to familiarize yourself with the appliance and get the best use out of it.
Please follow the safety precautions.
Modifications
Text, diagrams and data correspond to the technical standard of the appliance at the time these operating instructions went to press. The right to make technical modifications for the purpose of the further development of the appliance is reserved.
Symbols used
Denotes important safety precautions. Failure to observe said precautions can result in injury or damage to the appliance or
fittings!
Indicates step-by-step instructions.
–Describes how the appliance reacts to the steps taken.
•Indicates a list.
Denotes useful tips for the user.
Validity
The model number corresponds to the first three digits on the identification plate. These operating instructions apply to the model:
Type |
Model no. |
Size system |
CST-XSLZ/60 |
864 |
60-450 |
|
|
|
© V-ZUG Ltd, CH-6301 Zug, 2011
2
Contents
1 |
Safety precautions |
6 |
|
|
1.1 |
Before using for the first time . . . . . . . . . . . . . . . . . . . . . . . . . . . . . . . . . . |
6 |
|
1.2 |
Correct use . . . . . . . . . . . . . . . . . . . . . . . . . . . . . . . . . . . . . . . . . . . . . . . . |
7 |
|
1.3 |
Children in the home . . . . . . . . . . . . . . . . . . . . . . . . . . . . . . . . . . . . . . . . |
8 |
|
1.4 |
Note on use . . . . . . . . . . . . . . . . . . . . . . . . . . . . . . . . . . . . . . . . . . . . . . . |
8 |
2 |
Appliance description |
11 |
|
|
2.1 |
Construction . . . . . . . . . . . . . . . . . . . . . . . . . . . . . . . . . . . . . . . . . . . . . . |
11 |
|
2.2 |
Operating and display elements . . . . . . . . . . . . . . . . . . . . . . . . . . . . . . . |
12 |
|
2.3 |
Cooking space . . . . . . . . . . . . . . . . . . . . . . . . . . . . . . . . . . . . . . . . . . . . |
13 |
|
2.4 |
Accessories . . . . . . . . . . . . . . . . . . . . . . . . . . . . . . . . . . . . . . . . . . . . . . |
14 |
3 |
Operating the appliance |
19 |
|
|
3.1 |
Using for the first time . . . . . . . . . . . . . . . . . . . . . . . . . . . . . . . . . . . . . . |
21 |
|
3.2 |
Example . . . . . . . . . . . . . . . . . . . . . . . . . . . . . . . . . . . . . . . . . . . . . . . . . |
21 |
|
3.3 |
Filling the water tank . . . . . . . . . . . . . . . . . . . . . . . . . . . . . . . . . . . . . . . |
22 |
|
3.4 |
Selecting the operating mode . . . . . . . . . . . . . . . . . . . . . . . . . . . . . . . . |
23 |
|
3.5 |
Changing the operating mode . . . . . . . . . . . . . . . . . . . . . . . . . . . . . . . . |
23 |
|
3.6 |
Selecting the cooking space temperature . . . . . . . . . . . . . . . . . . . . . . . |
24 |
|
3.7 |
Checking/Changing the cooking space temperature . . . . . . . . . . . . . . . |
24 |
|
3.8 |
Switching off . . . . . . . . . . . . . . . . . . . . . . . . . . . . . . . . . . . . . . . . . . . . . . |
25 |
|
3.9 |
Emptying the water tank . . . . . . . . . . . . . . . . . . . . . . . . . . . . . . . . . . . . . |
25 |
4 |
User settings |
26 |
|
|
4.1 |
Language . . . . . . . . . . . . . . . . . . . . . . . . . . . . . . . . . . . . . . . . . . . . . . . . |
28 |
|
4.2 |
Childproof lock . . . . . . . . . . . . . . . . . . . . . . . . . . . . . . . . . . . . . . . . . . . . |
28 |
|
4.3 |
Time display . . . . . . . . . . . . . . . . . . . . . . . . . . . . . . . . . . . . . . . . . . . . . . |
29 |
|
4.4 |
Acoustic signal . . . . . . . . . . . . . . . . . . . . . . . . . . . . . . . . . . . . . . . . . . . . |
29 |
|
4.5 |
Illumination . . . . . . . . . . . . . . . . . . . . . . . . . . . . . . . . . . . . . . . . . . . . . . . |
29 |
|
4.6 |
Water hardness . . . . . . . . . . . . . . . . . . . . . . . . . . . . . . . . . . . . . . . . . . . |
30 |
|
4.7 |
Temperature unit . . . . . . . . . . . . . . . . . . . . . . . . . . . . . . . . . . . . . . . . . . |
30 |
|
4.8 |
Contrast . . . . . . . . . . . . . . . . . . . . . . . . . . . . . . . . . . . . . . . . . . . . . . . . . |
30 |
|
4.9 |
Time format . . . . . . . . . . . . . . . . . . . . . . . . . . . . . . . . . . . . . . . . . . . . . . |
30 |
|
4.10 |
Flap control . . . . . . . . . . . . . . . . . . . . . . . . . . . . . . . . . . . . . . . . . . . . . . |
31 |
|
4.11 |
Factory settings . . . . . . . . . . . . . . . . . . . . . . . . . . . . . . . . . . . . . . . . . . . |
31 |
3
5 |
Time functions |
32 |
|
|
5.1 |
Setting/Changing the time . . . . . . . . . . . . . . . . . . . . . . . . . . . . . . . . . . . |
32 |
|
5.2 |
Timer . . . . . . . . . . . . . . . . . . . . . . . . . . . . . . . . . . . . . . . . . . . . . . . . . . . |
33 |
|
5.3 |
Operating time . . . . . . . . . . . . . . . . . . . . . . . . . . . . . . . . . . . . . . . . . . . . |
35 |
|
5.4 |
Delayed start . . . . . . . . . . . . . . . . . . . . . . . . . . . . . . . . . . . . . . . . . . . . . |
37 |
6 |
Operating modes |
40 |
|
7 |
Food probe |
44 |
|
|
7.1 |
Positioning the food probe . . . . . . . . . . . . . . . . . . . . . . . . . . . . . . . . . . . |
44 |
|
7.2 |
Food probe temperature . . . . . . . . . . . . . . . . . . . . . . . . . . . . . . . . . . . . |
45 |
8 |
Soft roasting |
47 |
|
9 |
BakeOmatic |
50 |
|
|
9.1 |
Degree of browning . . . . . . . . . . . . . . . . . . . . . . . . . . . . . . . . . . . . . . . . |
50 |
|
9.2 |
Cooking/Baking times . . . . . . . . . . . . . . . . . . . . . . . . . . . . . . . . . . . . . . |
50 |
|
9.3 |
Selecting and starting BakeOmatic . . . . . . . . . . . . . . . . . . . . . . . . . . . . |
52 |
10 |
GourmetSteam |
54 |
|
|
10.1 |
Selecting and starting GourmetSteam . . . . . . . . . . . . . . . . . . . . . . . . . . |
55 |
11 |
Recipes |
57 |
|
|
11.1 |
Selecting and starting a recipe . . . . . . . . . . . . . . . . . . . . . . . . . . . . . . . |
58 |
12 |
Own recipes |
60 |
|
|
12.1 |
Creating own recipes . . . . . . . . . . . . . . . . . . . . . . . . . . . . . . . . . . . . . . . |
60 |
13 |
Keeping cooked food warm |
63 |
|
14 |
Tips and tricks |
64 |
|
|
14.1 |
Hygiene . . . . . . . . . . . . . . . . . . . . . . . . . . . . . . . . . . . . . . . . . . . . . . . . . |
68 |
|
14.2 |
Saving energy . . . . . . . . . . . . . . . . . . . . . . . . . . . . . . . . . . . . . . . . . . . . |
68 |
15 |
Descaling |
69 |
|
|
15.1 |
Operating time remaining to descaling . . . . . . . . . . . . . . . . . . . . . . . . . |
69 |
16 |
Care and maintenance |
73 |
|
|
16.1 |
Cleaning the exterior . . . . . . . . . . . . . . . . . . . . . . . . . . . . . . . . . . . . . . . |
73 |
|
16.2 |
Cleaning the appliance door . . . . . . . . . . . . . . . . . . . . . . . . . . . . . . . . . |
74 |
|
16.3 |
Removing the shelf guides . . . . . . . . . . . . . . . . . . . . . . . . . . . . . . . . . . |
75 |
|
16.4 |
Replacing the door seal . . . . . . . . . . . . . . . . . . . . . . . . . . . . . . . . . . . . . |
75 |
|
16.5 |
Cleaning the accessories . . . . . . . . . . . . . . . . . . . . . . . . . . . . . . . . . . . . |
75 |
|
16.6 |
Cleaning the cooking space . . . . . . . . . . . . . . . . . . . . . . . . . . . . . . . . . |
76 |
|
16.7 |
Replacing a defective light bulb . . . . . . . . . . . . . . . . . . . . . . . . . . . . . . . |
76 |
4
17 |
Trouble-shooting |
77 |
|
|
17.1 |
What to do if … . . . . . . . . . . . . . . . . . . . . . . . . . . . . . . . . . . . . . . . . . . . . |
77 |
|
17.2 |
After a power failure . . . . . . . . . . . . . . . . . . . . . . . . . . . . . . . . . . . . . . . . |
80 |
18 |
Accessories and spare parts |
81 |
|
19 |
Technical data |
84 |
|
20 |
Disposal |
86 |
|
21 |
Notes |
87 |
|
22 |
Index |
88 |
|
23 |
Repair service |
91 |
|
5

1Safety precautions
The appliance corresponds to recognised technology standards and the relevant safety regulations. Proper use of the appliance is however essential to avoid damage and accidents. Please therefore follow the precautions given in these operating instructions.
In accordance with the requirements of IEC 60335-1:
•This appliance is not intended for use by persons (including children) with reduced physical, sensory or mental capabilities, or lack of experience and knowledge, unless supervised or unless they have been given instruction concerning the use of the appliance by a person responsible for their safety.
1.1Before using for the first time
•The appliance must be installed and connected up to the power supply in accordance with the separate installation instructions. The necessary work should be done by a qualified fitter or electrician.
•Dispose of the packaging material in accordance with local regulations.
•Before using the newly installed appliance for the first time, please follow the advice in the USING FOR THE FIRST TIME section.
•Make the desired user settings.
6

1 Safety precautions
1.2Correct use
•The appliance is designed for use in the home for preparing food. Under no circumstances flambé or cook food using a lot of fat in the cooking space! No liability is assumed for any damage caused by improper or incorrect use.
•Never use the appliance to dry animals, textiles or paper!
•Not to be used as a room heater or humidifier.
•The appliance should only be installed and operated in a room with an ambient temperature of between 5 °C and 35 °C. In the event of frost, there is a danger that residual water left in the pumps can freeze, causing damage.
•Only use the food probe supplied with this appliance.
•Any repairs, modifications or manipulations to the appliance, especially any electrically live parts, should only be carried out by the manufacturer, its Customer Services or similarly qualified persons. Repairs if carried out incorrectly may cause serious injury, damage to the appliance and fittings, as well as affect the functioning of the appliance. If the appliance is not working properly or in case of a repair order, follow the instructions given in the REPAIR SERVICE section. Please contact Customer Services if necessary.
•Only original spare parts may be used.
•Retain these operating instructions for future reference. If you sell the appliance or pass it on to a third party, please ensure these operating instructions accompany the appliance, together with the instructions on installation. In this way, the new owner can inform themselves about how to use the appliance correctly and read the pertinent safety precautions.
7

1 Safety precautions
1.3Children in the home
•Packaging material, e.g. plastic and polystyrene, can be dangerous for children. Danger of suffocation! Please keep packaging material away from children.
•The appliance is designed for use by adults who are familiar with these operating instructions. Children are often unable to recognise the danger of electrical appliances. Ensure proper supervision and do not allow children to play with the appliance – there is a danger that children can hurt themselves.
•Use the childproof locking facility.
1.4Note on use
•If the appliance is visibly damaged, do not use it. Contact our Customer Services.
•If the appliance is not operating property, disconnect it from the power supply immediately.
•Ensure the mains cables of other electrical appliances do not get caught in the door of the appliance, as the electrical cable insulation could get damaged.
•If the mains cable of the appliance is damaged, it must be replaced by Customer Services in order to avoid hazard.
•Ensure there are no foreign bodies or pets in the cooking space before closing the appliance door.
•Objects that could pose a danger if the appliance were accidentally switched on should not be stored in the cooking space. Do not store food nor any temperature-sensitive or inflammable materials, e.g. cleaning agents, oven sprays, etc., in the cooking space.
8

1 Safety precautions
Caution: Burns hazard!
•The appliance gets very hot when in use.
•Heat is produced during cooking and baking. The appliance door, especially the glass, can get hot. Burns hazard – do not touch. Keep children away!
•The appliance will remain hot for some time after it is switched off and will cool down only slowly to room temperature. Please allow sufficient time for the appliance to cool down before, for instance, cleaning it.
•Steam may escape from the cooking space when the appliance door is opened. Do not put your hands into the cooking space if there is steam in it!
•Hot steam may escape from the steam vent during operation.
•Overheated fat and oil can easily catch fire. Heating oil in the cooking space to sear meat is dangerous and should not be done. Never try to extinguish burning oil or fat with water – danger of explosion!
Smother the flames with a fire blanket and keep all doors and windows closed.
•Do not pour spirits (e.g. brandy, whisky, schnapps, etc.) over hot food – danger of explosion!
•Do not leave the appliance unsupervised when drying herbs, bread, mushrooms, etc. If the foodstuff dries out too much, this can pose a fire hazard.
•If you notice smoke possibly coming from the appliance itself or from inside the cooking space, keep the appliance door closed. Disconnect the appliance from the power supply.
•Accessories get hot in the cooking space. Always wear protective gloves or use oven cloths.
9

1 Safety precautions
Caution: Danger of injury!
•Be careful not to put fingers in the door hinges, there is otherwise a risk of injury if the appliance door is moved. Particular care should be taken when children are around.
•Only leave the appliance door open in the at-rest position. An open appliance door poses a danger of tripping or injury! Do not sit or rest on the appliance door or use it as a storage surface.
How to avoid damaging the appliance
•Close the appliance door carefully.
•Do not place any protective insert or aluminium foil on the bottom of the cooking space as this can result in an optical change in the cooking space floor.
•Do not place things on the panel flap in front of the water tank.
•Do not use knives or cutting wheels on the stainless steel tray, enamelled baking trays, in cooking utensils and on the steam insert. This will visibly damage them.
•Do not use objects that can rust in the cooking space.
•Do not use silver cutlery in the cooking space.
•To prevent corrosion, allow the cooking space to dry and leave the appliance door open in the at-rest position until the cooking space has cooled down.
•When cleaning the appliance make sure no water gets inside the appliance. Use a moderately damp cloth. Do not spray the inside or outside of the appliance with water. Do not use a steam cleaner. If water gets inside the appliance, it can cause damage.
10
2Appliance description
2.1Construction
1 |
4 |
2
3
1Operating and display elements
2Door handle
3Appliance door
4Panel flap in front of water tank
11

2 Appliance description
2.2Operating and display elements
Hot air
˚C
˚C
Button
Flap opener |
|
Adjusting knob |
Illumination |
|
Timer |
Cooking space/ |
|
Time, operating time, |
|
||
food probe temperature |
|
switch-off time |
Operating mode |
|
Off |
Displays
Temperature
Time, operating time, switch-off time, timer
Symbols
Hot air
Plain text display
Cooking space temperature |
Operating time |
Food probe temperature |
Switch-off time |
Timer |
Time |
Operating modes |
|
12

2 Appliance description
2.3Cooking space
Do not place any protective insert or aluminium foil on the bottom of the cooking space.
7 |
8 |
|
|
||
6 |
9 |
|
5 |
||
|
||
4 |
10 |
|
3 |
11 |
|
|
||
2 |
12 |
|
1 |
13 |
|
|
1 |
Appliance door |
8 |
Water tank compartment |
2 |
Door seal |
9 |
Cooking space temperature sensor |
3 |
Knurled nut |
10 |
Socket for food probe |
4 |
Illumination |
11 |
Levels |
5 |
Climate sensor |
12 |
Steam inlet |
6 |
Cooking space ventilation |
13 |
Hot air fan |
7Ventilation outlet
13
2 Appliance description
2.4Accessories
The baking trays and wire shelves are inserted into the oven between the two rails of a shelf runner.
The wire shelves have non-tip safety notches which prevent them being pulled right out when they only need to be partially pulled out. The wire shelves can then only be taken out of the oven by raising them upwards and then pulling them out.
Do not use knives or cutting wheels on the stainless steel tray, enamelled baking trays, in cooking utensils and on the steam insert. This causes visible damage.
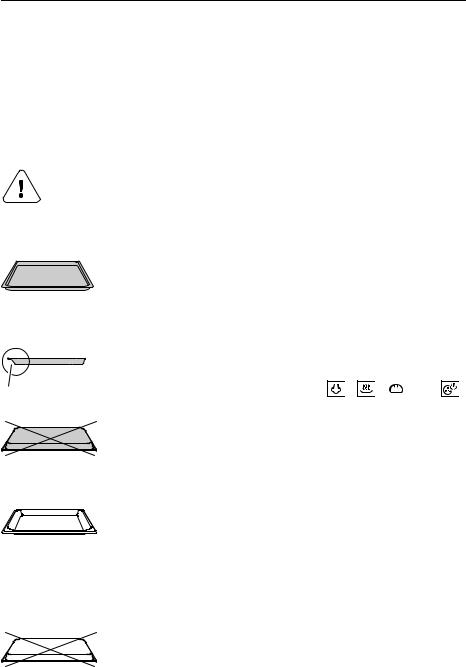
Original baking tray with TopClean
•Serves as a baking tin for flans and biscuits.
•If not fully covered by the baking, the shape of the original baking tray can become distorted during baking. This is normal. As it cools down, the original baking tray will go back to its original form.
Always push the «sloped» side 1 of the original baking tray right to the back of the cooking space.
1 |
• Not suitable for use with the |
|
, |
, |
|
and |
|
|
|||||
operating modes. |
|
|
|
|
|
|
|
|
|
|
|
|
The original baking tray is to be used the normal way round – not upside down.
Stainless steel tray
• Serves as a baking tin for aperitif nibbles and bread.
•Use together with the wire shelf or perforated cooking tray as a drip tray.
•If not fully covered by the baking, the shape of the stainless steel tray can become distorted during baking. This is normal. As it cools down, the stainless steel tray will go back to its original form.
The stainless steel tray is to be used the normal way round – not upside down.
14

|
|
2 Appliance description |
|
|
Wire shelf |
|
|
• For standing roasting and baking tins on. |
|
|
• For standing meat, frozen pizza, etc. on. |
a |
b |
• Push the wire shelf in with the shorter side b to the |
|
|
back wall of the cooking space. |
• Serves as a cooling rack.
For preparing frozen bread rolls and quiche.
Cover the wire shelf with baking paper or use a round baking tray.
Perforated cooking tray
• For cooking fresh or frozen vegetables, meat and fish.
•For standing ramekins, preserving jars, etc. on.
•For extracting juice from berries, fruit, etc.
For steaming, place the stainless steel tray underneath the perforated cooking tray to catch any food spills or condensate
15
2 Appliance description
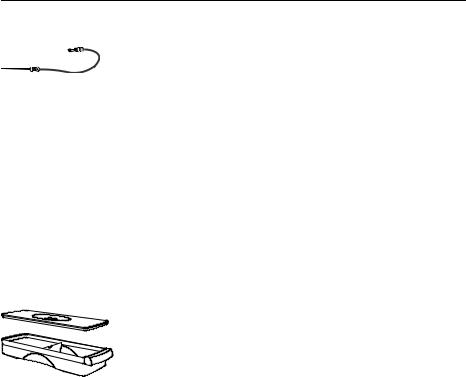
Food probe with straight handle
The food probe is suitable for measuring the core temperature of food between the range of 30 °C to 99 °C.
•As soon as the set food probe temperature is reached, the appliance switches off automatically. A guide to appropriate food probe temperatures can be found in TIPS ON SETTINGS.
•The food probe can also be simply used to measure the core temperature. In this case, the operating mode must be switched off manually.
•The food probe can be used with all operating modes.
Water tank with lid
Only fill with fresh, cold drinking water.
• Do not use demineralised (filtered) or distilled water.
16
2 Appliance description
The following accessories are not included in the scope of delivery.
Round TopClean baking tray
• Baking tin for flans and quiches.
• Not suitable for use with the 

 ,
, 

 ,
, 

 and
and 

 operating modes.
Available in 3 different sizes.
Terrine mould with lid
For preparing vegetable, fish and meat terrines.
For preparing ice cream, parfait and other sweets.
Available in 2 different designs.
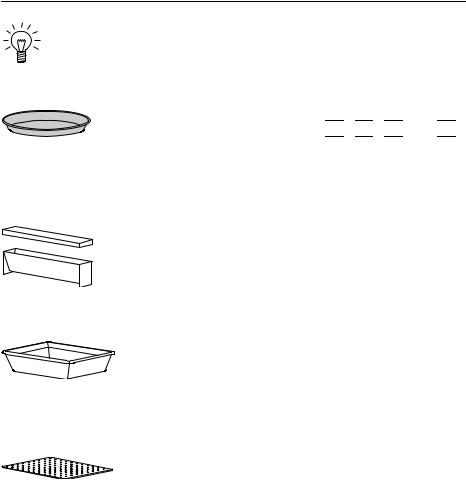
Porcelain dish
• For preparing various dishes such as lasagne, potato gratin, etc.
• For steaming and keeping food warm.
Available in 3 different sizes.
Stainless steel steam insert
• For the steaming of vegetables, potatoes, etc. in combination with a porcelain dish.
Available in 3 different sizes.
17

2 Appliance description
Unperforated cooking tray
• For cooking meat, fish, sauerkraut, rice, millet, cereal products, soaked pulses, chickpeas, etc.
Available in different sizes and depths.
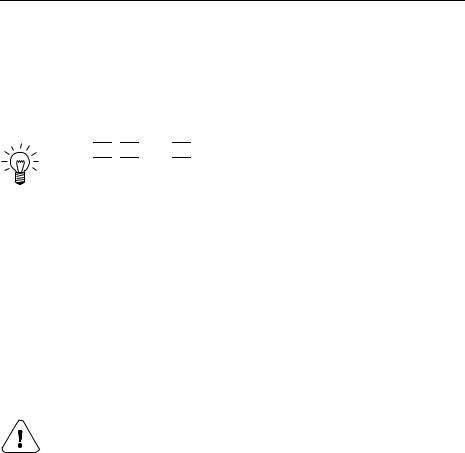
Perforated cooking tray
• For cooking fresh or frozen vegetables, meat and fish.
Available in different sizes and depths.
Unperforated cooking tray with lip
•For extracting juice from berries, fruit, etc.
•Serves as a drip tray for collecting condensate from food.
Roller runner
•For safely pulling out one or more baking trays/wire shelves in order, for instance, to baste a joint of
meat or to take out a baking tin.
18
3Operating the appliance
Using the buttons
The operating mode, the cooking space temperature, the food probe temperature, the operating time, the switch-off time and various other functions can be selected by pressing the appropriate button once or more.
•The symbol for the function selected illuminates or flashes.
•A recommendation flashes in the corresponding digital display.
•Turn the 
 adjusting knob to change the setting.
•Press the 
 adjusting knob to confirm the setting or it will be automatically accepted after 10 seconds.
•Other settings or changes can be made at any time.
•Press the  button to switch off the appliance.
Using the plain text display
When the appliance is switched off, the 
 adjusting knob is used to display text, to view the different selection options and to confirm.
•Press the 
 adjusting knob to activate the plain text display.
•Turn the 
 adjusting knob to view the selection options.
•Press the 
 adjusting knob again to confirm the selection.
•Press the  button to turn off the plain text display.
19

3 Operating the appliance
To return to the previous operating level, select «back» and press the 
 adjusting knob. The i symbol indicates additional information.
Select and press OK
 BakeOmatic
Select and press OK
 GourmetSteam
Select and press OK
 Soft roasting
Select and press OK
 Recipes
Select and press OK
 Own recipes
Select and press OK
 Keep warm
Select and press OK
 User settings
Select and press OK
 Descale
Select and press OK
 Hygiene
Select and press OK
back
20
3 Operating the appliance
3.1Using for the first time
Before using the newly installed appliance for the first time the following measures should be taken:
Remove all packaging and transport materials from the cooking space.
When  flashes in the right digital display, turn the
 adjusting knob to set the time.
Press the 
 adjusting knob to switch between hours and minutes. Turn it to set the hours and the minutes.
Press the 
 adjusting knob to confirm the setting.
Clean the cooking space and the accessories.
If necessary, adjust the water hardness in the user settings.
Heat the empty cooking space (i.e. without the wire shelves, baking trays, etc.) using the 
 operating mode for about 30 minutes at 210 °C.
3.2Example
Burns hazard from heat produced during cooking and baking! Use protective gloves or oven cloths. Keep children away.
The symbols are explained in TIPS ON SETTINGS. The tables in TIPS ON SETTINGS give:
|
A |
|
˚C |
Mins. |
|
|
|
|
|
||
Bread |
A11 |
200–210 |
no |
40–50 |
2 |
Put the stainless steel tray into the cold cooking space at level 2.
Next steps are described on the following sides.
If selecting a A «BakeOmatic» programme, operate the appliance
as described in the BAKEOMATIC section.
21

3 Operating the appliance
3.3Filling the water tank
Only fill the water tank with fresh, cold drinking water. Do not use demineralised (filtered) or distilled water.
Do not place things on the panel flap in front of the water tank when open.
Press the 
 button.
–The panel flap in front of the water tank opens.
Fill the water tank with fresh, cold water drinking water and close the lid.
Push the water tank into the special compartment.
Close the panel flap manually.
•For the 

 ,
, 

 ,
, 
 and
and 


 operating modes as well as «BakeOmatic», «GourmetSteam» «Recipes» and «Own recipes», the filled water tank must
be in position in the water tank compartment.
•For the 

 and
and 

 operating modes as well «Soft roasting», the water tank can stay in the water tank compartment without it affecting the end
cooking result.
Refilling the water tank
The contents of the water tank normally suffice for one cooking session.
If, however, the water tank needs to be refilled:
Press the 
 button.
– The panel flap in front of the water tank opens.
With the «Automatically with messages» setting, the panel flap in front of the water tank opens automatically.
The panel flap in front of the water tank can be opened at any time by pressing the 
 button.
Do not fill the water tank with more than 0.5 l water to ensure that it does not overflow when the water is pumped back.
22

3 Operating the appliance
3.4Selecting the operating mode
Select the 
 operating mode.
–«Professional baking» « i level 2 or 1+3» appears in the plain text display.
–The recommended temperature flashes in the left digital display.
–The 
 and
and  symbols flash.
Press the 
 adjusting knob to confirm.
–«Professional baking» « i Steam phase» and then «Professional baking» « i Hot air phase» appears in the plain text display.
The recommended temperature corresponds to the temperature of the hot air phase. The temperature of the steam phase is predetermined.
3.5Changing the operating mode
The operating mode selected cannot be changed during operation.
Press the  button.
–The operating mode selected is ended.
Press the  button to select a new operating mode.
23
3 Operating the appliance
3.6Selecting the cooking space temperature
Press the  button.
Turn the 
 adjusting knob to set the desired cooking space temperature.
Press the 
 adjusting knob to confirm.
–«Professional baking» «Steam phase» appear in the plain text display.
For the 

 /
/

 and
and 

 operating modes, a single acoustic signal is emitted when the set cooking space temperature is reached.
3.7Checking/Changing the cooking space temperature
Press the  button.
–«Cooking space temperature» appears in the plain text display.
–The set cooking space temperature flashes in the left digital display.
–The  symbol flashes.
The cooking space temperature can be changed by turning the 
 adjusting knob.
Removing the cooked food from the cooking space
Hot steam or hot air may escape from the cooking space when the appliance door is opened. Burns hazard!
The accessories will be hot. Burns hazard! Use protective gloves or oven cloths.
Take the bread loaf out of the cooking space when ready.
Place it on the wire shelf and allow to cool down.
24

3 Operating the appliance
3.8Switching off
Press the  button.
–The  and
and 
 symbols go out.
–For all operating modes that use steam, steam can be released at the end of the cooking process.
–The steam is gradually released from the cooking space – this take around 1 minute – so that there is no sudden rush of steam when the appliance door is opened.
–The cooling fan can continue to run.
–«Residual heat» appears in the plain text display.
When the symbols are no longer illuminated and the plain text display is dark the appliance is off.
Any condensate or food in the cooking space – after each cooking session with steam – must be dried completely or removed.
To prevent corrosion, leave the appliance door open in the at-rest position until the cooking space has cooled down.
3.9Emptying the water tank
The water in the water tank can be hot. Scalding hazard!
When the appliance is switched off, the residual water is pumped back into the water tank.
–« i Water is being pumped off» appears in the plain text display.
When the water has been pumped back, remove, empty and then dry the water tank.
If « i Do not remove water tank» is displayed in the plain text display, then the temperature of the residual water is still over 80 °C. For safety reasons, the residual water is not pumped back until its temperature drops below the 80 °C mark.
Any operating mode can be started again at any time.
25

4User settings
You can adjust the settings.
Press the 
 adjusting knob to activate the plain text display.
–«Select  and press OK» «BakeOmatic» appears in the plain text display.
Turn the 
 adjusting knob until «User settings» appears.
Press the 
 adjusting knob to confirm.
–«User settings» «Language» appears in the plain text display.
Turn the 
 adjusting knob to display the available options.
Select setting and press the 
 adjusting knob to confirm.
Press the  button to exit.
The settings are retained in the event of a power failure.
Possible settings
Select and press OK
 BakeOmatic
Select and press OK
 User settings
Select and press OK
 Descale
26

4 User settings
Select and press OK
 User settings
User settings
 Language
User settings
 Childproof lock
User settings
 Time display
User settings
 Acoustic signal
User settings
 Illumination
User settings
Water hardness
User settings
Temperature unit
User settings
Contrast
User settings
Time format
User settings
Factory settings
User settings
Flap control
User settings
 back
back
▪Text in Deutsch
▪Texte en français
▪Testo in italiano
▪...
▪off *
▪on
▪visible *
▪invisible
▪high *
▪low
▪off
▪automatically with door *
▪via button only
▪hard *
▪medium
▪soft
▪˚C *
▪˚F


 *
*
Select contrast
▪24 h *
▪12 h
▪restore
▪via button only
▪automatically with message *
* Factory setting
27

4 User settings
4.1Language
Different languages are available for selection. The language in the plain text display can be changed.
Press the  button and the
 adjusting knob simultaneously for 10 seconds.
–«Language» appears in the plain text display.
Turn the 
 adjusting knob until the desired language appears.
Press the 
 adjusting knob to confirm.
4.2Childproof lock
The childproof lock to prevent the appliance being inadvertently switched on.
If the  ,
, 
 or
or 
 buttons are pressed when the childproof lock is activated:
–A double acoustic signal is emitted.
–«Childproof lock» appears in the plain text display.
–Nothing happens when either button is pressed.
Operating the appliance when the childproof lock is activated
Hold the  button depressed and press the
  ,
, 
 or
or 
 buttons.
–The childproof lock is overridden. The appliance can be operated as normal.
–The childproof lock is automatically reactivated 10 minutes after the appliance has been switched off.
The 
 /
/ and
and  buttons can be used irrespective of whether the childproof lock is activated or not.
28
Loading...