


 Loading...
Operating instructions
Combi-Steam XSL
Combi-steam cooker with fixed water connection
Thank you for choosing to buy one of our products. Your appliance is made to high standards and is easy to use. Nevertheless, please take the time to read these operating instructions in order to familiarise yourself with the appliance and get the best use out of it.
Please follow the safety precautions.
Modifications
Text, diagrams and data correspond to the technical standard of the appliance at the time these operating instructions went to press. The right to make technical modifications for the purpose of the further development of the appliance is reserved.
Validity
The product family (model number) corresponds to the first alphanumerics on the identification plate. These operating instructions apply to:
Type |
Product family |
Size system |
|
|
|
CSTXSL60F |
23007 |
60-450 |
|
|
|
CSTXSL60FY |
23008 |
60-450 |
|
|
|
Variations depending on the model are noted in the text.
Colour operating instructions can be downloaded from the internet from www.vzug.com
© V-ZUG Ltd, CH-6301 Zug, 2015
2
Table of contents
1 |
Safety precautions |
6 |
|
|
1.1 |
Symbols used.............................................................................................. |
6 |
|
1.2 |
General safety precautions....................................................................... |
7 |
|
1.3 |
Appliance-specific safety precautions ................................................... |
8 |
|
1.4 |
Instructions for use..................................................................................... |
9 |
2 Disposal |
12 |
||
3 |
Using for the first time |
13 |
|
4 |
Appliance description |
14 |
|
|
4.1 |
Construction.............................................................................................. |
14 |
|
4.2 |
Operating and display elements........................................................... |
14 |
|
4.3 |
Cooking space ......................................................................................... |
16 |
|
4.4 |
Accessories............................................................................................... |
17 |
5 Operating modes |
19 |
||
|
5.1 |
Overview of operating modes................................................................ |
19 |
|
5.2 |
Steam ......................................................................................................... |
19 |
|
5.3 |
Hot air......................................................................................................... |
20 |
|
5.4 |
Hot air with steaming............................................................................... |
20 |
|
5.5 |
Regeneration............................................................................................. |
21 |
|
5.6 |
Hot air humid ............................................................................................ |
22 |
6 |
Using the appliance |
23 |
|
|
6.1 |
Operation with water tank....................................................................... |
24 |
|
6.2 |
Selecting and starting the operating mode......................................... |
24 |
|
6.3 |
Checking and changing the settings ................................................... |
26 |
|
6.4 |
Setting a duration..................................................................................... |
26 |
|
6.5 |
Setting a delayed start / end time........................................................ |
26 |
|
6.6 |
Food probe temperature......................................................................... |
28 |
|
6.7 |
Cancelling / ending the operating mode before time....................... |
29 |
|
6.8 |
Changing the operating mode............................................................... |
30 |
|
6.9 |
Timer........................................................................................................... |
30 |
|
6.10 |
Steam reduction....................................................................................... |
32 |
|
6.11 |
End of operation....................................................................................... |
32 |
|
6.12 |
Switching the appliance off.................................................................... |
34 |
7 GourmetGuide |
35 |
||
|
7.1 |
Recipe book.............................................................................................. |
35 |
|
7.2 |
Own recipes.............................................................................................. |
37 |
|
7.3 |
BakeOmatic............................................................................................... |
41 |
3
|
7.4 |
Professional baking................................................................................. |
43 |
|
7.5 |
Soft roasting.............................................................................................. |
44 |
|
7.6 |
RegenerateOmatic................................................................................... |
49 |
8 EasyCook |
51 |
||
|
8.1 |
Overview of food groups........................................................................ |
51 |
|
8.2 |
Selecting foods and starting.................................................................. |
52 |
9 |
Favourites |
53 |
|
|
9.1 |
Creating favourites................................................................................... |
53 |
|
9.2 |
Selecting and starting favourites........................................................... |
53 |
|
9.3 |
Changing favourites................................................................................. |
54 |
|
9.4 |
Deleting favourites ................................................................................... |
54 |
10 |
Tips and tricks |
55 |
|
|
10.1 |
Unsatisfactory cooking result................................................................. |
55 |
|
10.2 |
General tips............................................................................................... |
56 |
|
10.3 |
Saving energy........................................................................................... |
56 |
11 |
User settings |
57 |
|
|
11.1 |
Overview of user settings....................................................................... |
57 |
|
11.2 |
Adjusting user settings............................................................................ |
57 |
|
11.3 |
Language................................................................................................... |
58 |
|
11.4 |
Display........................................................................................................ |
58 |
|
11.5 |
Clock .......................................................................................................... |
58 |
|
11.6 |
Notifications............................................................................................... |
59 |
|
11.7 |
Descaling the appliance......................................................................... |
59 |
|
11.8 |
Water hardness ........................................................................................ |
59 |
|
11.9 |
Volume....................................................................................................... |
60 |
|
11.10 |
Assistance functions................................................................................ |
60 |
|
11.11 |
Temperature.............................................................................................. |
61 |
|
11.12 |
Childproof lock ......................................................................................... |
61 |
|
11.13 |
Appliance information ............................................................................. |
61 |
|
11.14 |
Demo mode .............................................................................................. |
62 |
|
11.15 |
Factory settings........................................................................................ |
62 |
12 Care and maintenance |
63 |
||
|
12.1 |
Cleaning the exterior ............................................................................... |
63 |
|
12.2 |
Cleaning the cooking space.................................................................. |
63 |
|
12.3 |
Cleaning the appliance door ................................................................. |
64 |
|
12.4 |
Cleaning the door seal............................................................................ |
65 |
|
12.5 |
Replacing the door seal.......................................................................... |
66 |
|
12.6 |
Replacing the halogen light bulb.......................................................... |
66 |
|
12.7 |
Cleaning the accessories and shelf guides........................................ |
66 |
4
|
12.8 |
Descaling................................................................................................... |
67 |
13 |
Trouble-shooting |
71 |
|
|
13.1 |
What to do if … ......................................................................................... |
71 |
|
13.2 |
After a power failure ................................................................................ |
77 |
14 |
Accessories and spare parts |
79 |
|
|
14.1 |
Accessories............................................................................................... |
79 |
|
14.2 |
Special accessories................................................................................. |
79 |
|
14.3 |
Spare parts................................................................................................ |
80 |
15 |
Technical data |
81 |
|
|
15.1 |
Note for testing institutes........................................................................ |
81 |
|
15.2 |
Temperature measurement.................................................................... |
81 |
|
15.3 |
Product data sheet................................................................................... |
82 |
|
15.4 |
Automatic energy-saving stand-by........................................................ |
83 |
|
15.5 |
Reference to «Open Source» licence .................................................. |
83 |
16 |
Index |
|
84 |
17 |
Service & Support |
87 |
|
5

1 Safety precautions
1.1Symbols used
Denotes important safety precautions.
Failure to observe said precautions can result in injury or in damage to the appliance or fittings!
Information and precautions that should be observed.
Information on disposal
 Information about the operating instructions
►Indicates step-by-step instructions.
–Describes how the appliance reacts to the steps taken.
•Indicates a list.
6

1 Safety precautions
1.2General safety precautions
•Read the operating instructions before using the appliance for the first time!
•This appliance can be used by children aged 8 and above and by persons with reduced physical, sensory or mental capabilities, or lack of experience and/or knowledge, provided they are supervised or have been instructed on the safe use of the appliance and have understood the hazards involved. Children shall not play with the appliance. Cleaning and user maintenance shall not be undertaken by children without supervision.
•If an appliance is not equipped with a mains cable and a plug or other means for disconnecting from the mains with a contact opening on each pole complying with the conditions of overvoltage category III for full isolation, an isolating device must be incorporated into the permanently installed electrical installation in accordance with the installation regulations.
•If the mains cable of this appliance is damaged, it must be replaced by the manufacturer or its Customer Services or a similarly qualified person in order to avoid hazard.
7

1 Safety precautions
1.3Appliance-specific safety precautions
•READ THE IMPORTANT SAFETY PRECAUTIONS CAREFULLY AND RETAIN FOR FUTURE USE.
•WARNING: The appliance and its accessible parts get hot during use. Be careful not to touch the heating elements. Children under 8 years of age must be kept away from the appliance unless they are constantly supervised.
•WARNING: Accessible parts can get hot during use. Keep young children away from the appliance.
•This appliance is intended for use in the home and similar settings such as: in staff kitchens in shops, offices and other commercial establishments; in agricultural establishments; by guests in hotels, motels and other accommodation establishments; in bed and breakfast establishments.
•A heatable appliance drawer and its contents get hot.
•Do not use aggressive or abrasive cleaning agents or sharp metal scrapers for cleaning the glass in the oven door as they could scratch the surface. This can destroy the glass.
•For appliances with pyrolytic self-cleaning: Excessive soiling and any and all accessories (tableware, baking trays, runners, shelf guides) must be removed before carrying out pyrolytic self-cleaning.
•Only use the food probe recommended for this oven.
•Under no circumstances use a steam cleaner to clean this appliance.
•WARNING: Before replacing the light bulb, ensure the appliance is switched off and disconnected from the mains power supply to avoid possible electric shock.
8

1 Safety precautions
•See the 'Accessories' section for the proper use of insertable parts.
1.4Instructions for use
Before using for the first time
•The appliance must be installed and connected to the electricity supply in accordance with the separate installation instructions. Have a qualified fitter/ electrician carry out the necessary work.
Correct use
•The appliance is designed for use in the home for preparing food. Under no circumstances flambé or cook food using a lot of fat in the cooking space! No liability is assumed for any damage caused by improper use or incorrect handling.
•Never use the appliance to dry animals, textiles or paper, etc.
•Do not use the appliance as a room heater.
•The appliance should only be installed and operated at an ambient temperature of 5 °C to 35 °C. If frost develops, residual water left in the pumps could freeze and cause damage.
•Any repairs, modifications or manipulations to the appliance, especially any electrically live parts, may only be carried out by the manufacturer, its Customer Services or a similarly qualified person. Repairs if carried out incorrectly may cause serious injury, damage to the appliance and fittings, as well as affect the functioning of the appliance. If the appliance is not working properly or in case of a repair order, follow the instructions given in the «Service & Support» section. Please contact our Customer Services if necessary.
•Use original spare parts only.
•Retain these operating instructions for future reference.
•The appliance corresponds to recognised technology standards and the relevant safety regulations. Proper use of the appliance is essential to avoid damage and accidents. Please therefore follow the precautions given in these operating instructions.
Note on use
• Use the childproof locking facility.
9

1 Safety precautions
•If the appliance is visibly damaged, do not use it. Contact our Customer Services.
•If the appliance is not operating properly, disconnect it from the power supply immediately.
•Ensure there are no foreign bodies or pets in the cooking space before closing the appliance door.
•Objects that could pose a danger if the appliance were accidentally switched on should not be stored in the cooking space or the heatable appliance drawer. Do not store food or any temperature-sensitive or inflammable materials, e.g. cleaning agents, oven sprays, etc., in the cooking space or the heatable appliance drawer.
•For appliances with grill: Leave the appliance door closed when grilling. The heat could otherwise damage the operating and display elements or the fitted units above.
Caution: Risk of burns!
•The appliance gets very hot when in use. The appliance door also gets hot.
•Steam and/or hot air may escape from the cooking space when the appliance door is opened.
•The appliance will remain hot for some time after it is switched off and will only cool down slowly to room temperature. Allow sufficient time for the appliance to cool down before, for instance, cleaning it.
•Overheated fat and oil can easily catch fire. Heating oil in the cooking space to sear meat is dangerous and should not be done. Never attempt to extinguish burning oil or fat with water. Danger of explosion! Smother the flames with a fire blanket. Keep doors and windows closed.
•Do not pour spirits (brandy, whisky, schnapps, etc.) over hot food. Danger of explosion!
•Do not leave the appliance unattended when drying herbs, bread, mushrooms, etc. If the foodstuff dries out too much, it can pose a fire hazard.
•If you notice smoke possibly coming from the appliance itself or from inside the cooking space, keep the appliance door closed. Disconnect the appliance from the power supply.
•Accessories get hot in the cooking space. Use protective gloves or oven cloths.
10
1 Safety precautions
Caution: Risk of injury!
•Be careful not to put fingers in the door hinges, there is otherwise a risk of injury if the appliance door is moved. Particular care should be taken when children are around.
•Only leave the appliance door open in the at-rest position. An open appliance door poses a danger of tripping or injury! Do not sit or rest on the appliance door or use it as a storage surface.
•For hobs: A hob guard can be fitted to protect small children. Hob guards are available from specialist retailers.
Caution: Risk to life!
•Danger of suffocation! Keep packaging material, e.g. plastic film and polystyrene, away from children. Packaging material can be dangerous for children.
How to avoid damaging the appliance
•Close the appliance door carefully.
•For appliances with visible bottom heating element: Do not place any objects directly on the bottom heating element.
•Do not use protective aluminium inserts with appliances with no visible bottom heating element.
•Do not use objects that can rust in the cooking space.
•Using knives or cutting wheels on the baking tray will visibly damage the surface.
•To prevent corrosion, leave the appliance door open in the at-rest position until the cooking space has cooled down.
•When cleaning the appliance, make sure no water gets inside it. Use a moderately damp cloth. Do not spray the outside or the inside of the appliance with water. If water gets inside the appliance, it will cause damage.
11

2 Disposal
Packaging
•All packaging materials (cardboard, plastic film (PE) and polystyrene (EPS)) are marked and should, if possible, be collected for recycling and disposed of in an environmentally friendly way.
Disconnection
•Disconnect the appliance from the mains. With a fixed appliance, this is to be carried out by a qualified electrician!
Safety
•Disable the appliance to prevent accidents caused by improper use, especially through children playing.
•Pull the plug out of the mains socket or have the appliance disconnected from the mains by an electrician. Then cut the mains cable off flush with the appliance.
•Remove or disable the lock on the appliance door.
Disposal
•The old appliance should not be discarded as worthless rubbish. If disposed of correctly, the raw materials can be recovered for recycling.
•The  symbol on the identification plate warns that the appliance may not be disposed of in normal household waste.
•The appliance must be disposed of in accordance with local regulations on waste disposal. For more information on the handling, disposal and recycling of the product, please contact the local authorities, the local recycling facilities for household waste or the retailer from whom you purchased the appliance.
12

3 Using for the first time
Before using for the first time the appliance must be connected to the water supply and the wastewater system as specified.
Ensure no food particles or other objects prevent the water from draining off.
Before operating the newly installed appliance for the first time, the following steps should be taken:
►Remove the packaging and transportation material as well as any blue protective film from the cooking space.
►Set the time (see page 58).
►Clean the cooking space and the accessories.
►If necessary, adjust the user settings to the water hardness (see page 59).
►Slot the water tank into position in the water tank compartment.
►Heat the empty cooking space (without wire shelves, baking trays, etc.) using the  operating mode at 180 °C for about 30 minutes.
As there is likely to be some smoke and odour given off, we recommend ventilating the room well during this phase.
►Insert the filter into the water outlet.
All temperatures in these operating instructions are in degrees Celsius. Apply the corresponding conversions via the user setting «Degrees Fahrenheit» (see page 61).
13
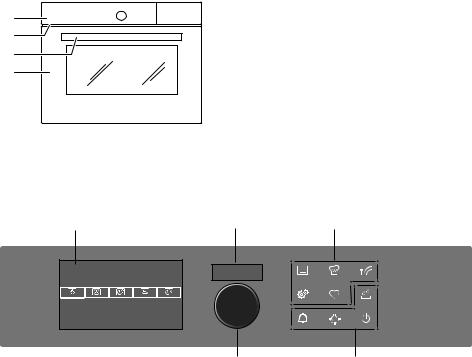
4 Appliance description
4.1Construction
1 |
1 |
Operating and display elements |
2 |
2 |
Ventilation opening |
3 |
|
|
4 |
3 |
Door handle |
|
4 |
Appliance door |
4.2Operating and display elements
1 |
2 |
3 |
2SHUDWLQ |
PR HV |
12:00 |
6WHDP |
|
|
|
|
|
|
5 |
4 |
1 |
Display |
4 |
Action buttons |
2 |
Digital display |
5 |
Adjusting knob |
|
(duration/timer/time) |
|
|
3 |
Menu buttons |
|
|
14

4 Appliance description
Overview of touch buttons
Operating modes
GourmetGuide
EasyCook
User settings
Favourites
Steam reduction/water tank
Timer
Cooking space illumination
Switch off
15
4 Appliance description
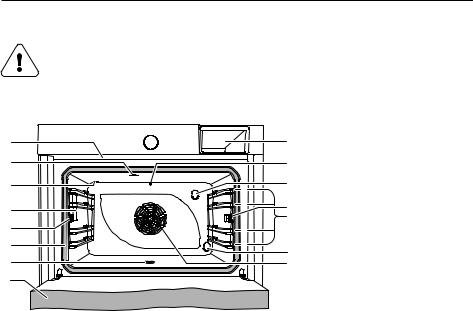
4.3Cooking space
Using protective inserts or aluminium foil can damage the appliance.
Do not place any protective insert or aluminium foil on the floor of the cooking space.
8 |
|
|
|
9 |
7 |
|
|
|
10 |
6 |
|
|
4 |
11 |
|
|
|
||
|
|
|
|
|
5 |
|
|
3 |
12 |
|
|
|
||
|
|
|
13 |
|
|
|
|
|
|
4 |
|
|
2 |
|
|
|
|
|
|
3 |
|
|
1 |
14 |
|
|
|
|
|
2 |
|
|
|
15 |
1 |
|
|
|
|
1 |
Appliance door |
9 |
|
Water tank compartment |
2 |
Water outlet with filter |
10 |
|
Temperature sensor |
3 |
Door seal |
11 |
|
Steam inlet |
4 |
Knurled nut |
12 |
|
Socket for food probe |
5 |
Cooking space illumination |
13 |
|
Levels |
6 |
Climate sensor |
14 |
|
Water inlet |
7 |
Cooking space ventilation |
15 |
|
Hot air blower |
8 |
Steam vent |
|
|
|
16
4 Appliance description
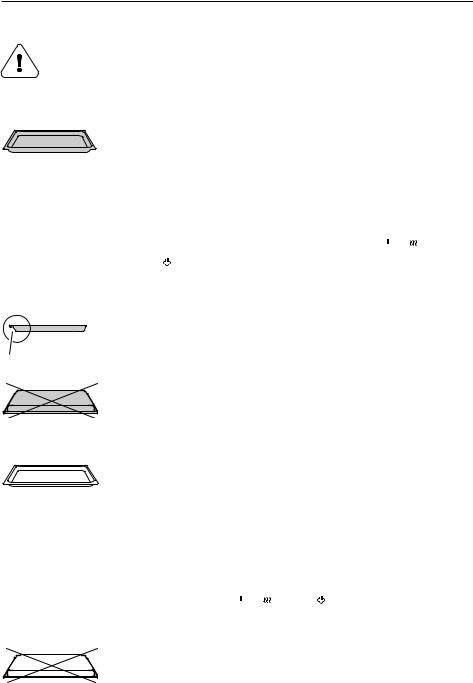
4.4Accessories
Incorrect handling can cause damage!
Do not use knives or cutting wheels on the accessories.
TopClean baking tray
• Baking tin for flans and biscuits
•Use together with the wire shelf as a drip tray
•If not fully covered, its shape can become distorted during baking. This is normal. It will go back to its original form as it cools down.
•Not suitable for the operating modes  ,
,  or
or
 , or for
  GourmetGuide.
►Use a stainless steel baking tray instead.
►Ensure that the «sloped» side 1 of the baking tray is to the back of the cooking space.
1
►Only use the normal way round – not upside down.
Stainless steel tray
• Use together with the wire shelf and perforated cooking tray as a drip tray.
•Serves as a baking tray for aperitif nibbles and bread.
•If not fully covered by the baking, its shape can become distorted during baking. This is normal. As it cools down, it will go back to its original form.
•Use with the  ,
,  and
and  operating modes as well as with
  GourmetGuide.
►Only use the normal way round – not upside down.
17

4 Appliance description
Perforated cooking tray
• For cooking fresh or frozen vegetables, meat and fish.
•For standing ramekins, preserving jars, etc. on.
•For extracting juice from berries, fruit, etc.
Wire shelf
1 • For standing roasting and baking tins on
• For standing meat, frozen pizza, etc. on
►Ensure that the cross strut 1 is to the back of the cooking space. It enables the food to be removed safely from the cooking space.
• Serves as a cooling rack
Food probe
• For measuring the core temperature of food
For recommended food probe temperatures, see «EasyCook».
Not suitable for temperatures of over 230 °C. There must be a distance between the food probe and the roof of the cooking space of at least 5 cm.
Special accessories
Place any accessories not included in the scope of delivery on the wire shelf.
►Special accessories can be found at: www.vzug.com
18
5 Operating modes
5.1Overview of operating modes
All the operating modes are described below.
Follow the advice in «Tips and tricks» (see page 55) and in «Easy Cook».
5.2Steam
|
|
|
Temperature range |
30–100 °C |
|
Recommended value |
100 °C |
|
Level |
1 to 4 |
|
The cooking space is heated simultaneously by steam and hot air. The food is heated up or cooked by steaming.
Uses
•Cooking vegetables, rice, cereal products, pulses and egg dishes
•Poaching meat, poultry and fish
•Extracting juice from fruit and berries
•Making yoghurt
•Preserving
Possible to cook on several levels simultaneously.
► Place the stainless steel tray underneath the perforated cooking tray.
19
5 Operating modes
5.3 Hot air
Temperature range |
30–230 °C |
Recommended value |
180 °C |
Level |
2 or 1 + 3 |
A heating element behind the back wall of the cooking space heats up the air inside the cooking space, which is circulated evenly.
Uses
• For cakes, savouries, biscuits, bread and roasts on 1 or 2 levels
5.4Hot air with steaming
Temperature range |
80–230 °C |
Recommended value |
180 °C |
Level |
2 or 1 + 3 |
A heating element behind the back wall of the cooking space heats up the air inside the cooking space, which is circulated evenly. With condensing steam, the energy is transferred more efficiently to the food than when cooking with hot air, which accelerates the cooking process.
Steam over 100 °C is not visible.
Uses
•Puff pastries, yeast pastries, bread, plaited bread
•Baked dishes and gratins
•Meat
•Frozen and convenience foods
Particularly suitable for cooking frozen foods, such as oven chips or spring rolls, with little fat.
20
5 Operating modes
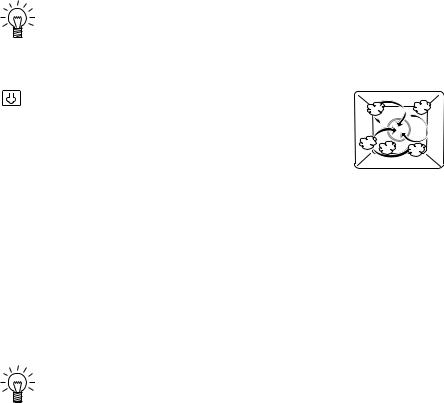
The supply of steam can be switched off and on again during operation.
►Start the operating mode.
►To switch off the supply of steam, select  «Switch steaming off» in the settings of the operating mode.
–The  symbol goes out.
►To switch the steam supply on again, select  «Switch steaming on».
–The  symbol illuminates.
5.5Regeneration
Temperature range |
80–200 °C |
Recommended value |
120 °C |
Level |
1 to 4 |
The cooking space is heated by steam and hot air. The food is reheated gently without drying it out.
Uses
• Reheating precooked foods and convenience foods
Possible to regenerate on several levels simultaneously.
21
5 Operating modes
5.6 Hot air humid
Temperature range |
30–230 °C |
Recommended value |
180 °C |
Level |
2 or 1 + 3 |
A heating element behind the back wall of the cooking space heats up the air inside the cooking space, which is circulated evenly. The steam produced is largely retained in the cooking space. The food retains its moisture.
Uses
• Roasting, braising
22

6 Using the appliance
The different main menus and functions are selected by pressing the corresponding touch button. Selected touch buttons and functions are illuminated in white; other selectable functions are illuminated in orange.
Settings and functions that cannot be selected or changed are greyed out in the various menus.
The appliance offers the following touch buttons with the following main menus and functions:
Operating modes
GourmetGuide
EasyCook
User settings
Favourites
Steam reduction/water tank
Timer
Cooking space illumination
Switch off
Adjusting knob functions
Press |
• |
Switching on the appliance |
|
• Selecting/opening a submenu, setting, etc. |
|
|
• |
Confirming/closing a message |
|
• Activating/deactivating a user setting |
|
Turn |
• |
Navigating within the submenus |
|
• Changing/setting a value or user setting |
|
23

6 Using the appliance
6.1Operation with water tank
The appliance can exceptionally also be operated using water from the water tank.
In this case, observe the following steps:
►Hold depressed the  touch button.
–The water tank is ejected.
►For all operating modes that use steam, fill the water tank with fresh, cold drinking water and close the lid.
►Slot the water tank into position in the water tank compartment.
6.2Selecting and starting the operating mode
►If the appliance is switched off, first press the adjusting knob.
►If the appliance has another menu open, press the  touch button.
–The selection of operating modes appears in the display.
►Select the operating mode.
–The operating mode settings appear in the display; a recommended value appears above the temperature.
►Set values for duration, end time and/or target temperature as required and confirm.
24
6 Using the appliance
Press and go
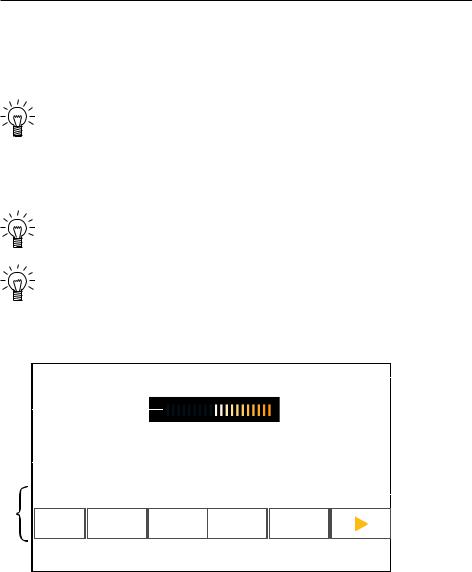
Once you have made all the necessary settings for the operating mode, a bar appears in the display and counts down 20 seconds. If no further settings are made during this time, operation starts automatically. If a setting is changed, Press and go starts again.
You can adjust the duration of Press and go or deactivate it altogether in the user settings (see page 57).
►To start operation immediately, i.e. without Press and go, select  .
.
–If it is set, the remaining time appears on the display and in the digital display.
The selected operating mode cannot be changed after operation has started.
For appliances without handles: The handle remains extended both during operation and until after operation has ended. It retracts when the appliance has cooled down sufficiently.
Display overview
|
|
|
|
|
+ |
W DLU |
|
|
|
|
|
|
4 |
|
|
|
|
|
|
|
|
|
|
|
|||
3 |
|
|
|
|
6HW WHPSHUDWXUH |
|
|
|
|||||
|
|
|
|
|
|
|
|
|
|||||
|
|
|
|
|
|
|
|
|
|||||
|
|
|
|
|
|
|
|
|
|||||
|
|
|
|
|
|
|
|
|
|
||||
2 |
|
|
|
|
|
|
|
|
|||||
|
|
|
|
|
|
|
|
|
|||||
|
|
|
|
|
|
K |
|
|
|
|
5 |
||
1 |
|
|
|
|
|
|
|
|
|
||||
|
|
|
|
|
6 |
||||||||
|
|
|
|
|
|
|
|
|
|
|
|||
|
|
|
|
|
|
|
|
|
|
|
|
||
|
|
|
|
|
|
|
|
|
|
|
|
||
|
|
|
|
|
|
|
|
|
|
|
|
|
|
|
|
|
|
|
|
|
|
|
|
|
|
|
|
1 |
|
Operating mode settings |
4 |
|
Operating mode with symbol |
||||||||
2 |
|
Current position of the |
5 |
|
Set values / recommended |
||||||||
|
|
|
adjusting knob / selected |
|
|
values |
|
|
|
||||
|
|
|
setting |
|
|
|
|
|
|
|
|
|
|
3 |
|
Press and go |
6 |
|
Symbols for settings |
|
|
|
|||||
25

6 Using the appliance
6.3Checking and changing the settings
►Select the symbol for the desired setting.
►To change the value, turn the adjusting knob to the right or left.
►Press the adjusting knob to confirm the setting.
–The operating mode settings are displayed.
–The changed value can be seen above the corresponding symbol.
The end time can only be changed during the first 60 seconds of operation.
6.4Setting a duration
The selected operating mode ends automatically when the set duration is up.
►Select the desired operating mode.
►Select 
 in the operating mode settings.
►Set the desired duration – max. 9hrs 59mins – and confirm.
–The duration is displayed in the operating mode settings as well as the end time which is calculated based on this value.
–End of operation / Duration finished (see page 32)
6.5Setting a delayed start / end time
The delayed start is activated when both the duration and the end time are set for the selected operating mode.
The appliance switches automatically on and off again at the desired times. If you use the food probe, you will need to estimate and set the duration. You will find a guide on times in «EasyCook». The appliance switches on with a delay and switches off again when the set target temperature is reached. Depending on the estimated duration, this can occur earlier or later than the end time.
Perishables should not be kept unrefrigerated.
26

6 Using the appliance
Before setting the delayed start
►Place the food in the cooking space.
►Select the desired operating mode.
►Set the temperature.
►Set the duration.
Setting a delayed start
►Select  in the operating mode settings.
–The current end time calculated using the duration is displayed.
►Set the desired end time and confirm.
–The remaining time until the start of the operation is displayed.
–After 3 minutes, the display goes out and the  touch button is illuminated in white. The display can be called up again at any time by pressing the adjusting knob.
–The appliance remains switched off until 3 minutes before the automatic start of operation.
►Checking and changing the settings (see page 26)
Example
►Select the  operating mode and 180°C.
►At 8:00, set a duration of 1 hour and 15 minutes.
►Set the end time to 11:30.
–The appliance will automatically switch on at 10:15 and off again at 11:30.
27
Loading...