


 Loading...
Operating instructions
Type CCSXSL60c | Type CCSXSL60g
SUPREMO XSL
Automatic built-in coffee machine
Thank you for choosing to buy one of our products. Your appliance is made to high standards and is easy to use. Nevertheless, please take the time to read these operating instructions in order to familiarise yourself with the appliance and get the best use out of it.
Please follow the safety precautions.
Modifications
Text, diagrams and data correspond to the technical standard of the appliance at the time these operating instructions went to press. The right to make technical modifications for the purpose of the further development of the appliance is reserved.
Validity
The product family (model number) corresponds to the first alphanumerics on the identification plate. These operating instructions apply to:
Type |
Product family |
Size system |
CCSXSL60c |
25004 |
60-450 |
|
|
|
CCSXSL60g |
25004 |
60-450 |
|
|
|
Variations depending on the model are noted in the text.
© V-ZUG Ltd, CH-6302 Zug, 2018
2
Contents
1 |
Safety warnings |
5 |
1.1 |
Symbols used......................................................... |
5 |
1.2 |
General safety precautions.................................. |
5 |
1.3 |
Appliance-specific safety precautions .............. |
7 |
1.4 |
Instructions for use................................................ |
8 |
2 |
Using for the first time |
10 |
2.1 |
Selecting language.............................................. |
10 |
2.2 |
Filling the water circuit with water .................... |
10 |
2.3 |
Cleaning the accessory parts ........................... |
11 |
2.4 |
Setting the water hardness ................................ |
11 |
3 |
Appliance description |
11 |
3.1 |
Construction ......................................................... |
11 |
3.2 |
Operating and display elements....................... |
12 |
3.3 |
Milk frother ............................................................ |
13 |
3.4 |
Hot-water/steam spout ....................................... |
13 |
3.5 |
Accessories .......................................................... |
13 |
4 |
Operating the appliance |
14 |
4.1 |
Switching the appliance on ............................... |
14 |
4.2 |
Filling the water tank........................................... |
14 |
4.3 |
Filling the beans container................................. |
15 |
4.4 |
Adjusting the coffee mill..................................... |
15 |
4.5 |
Attaching the milk frother................................... |
16 |
4.6 |
Water softener filter * .......................................... |
16 |
4.7 |
Switching the appliance off................................ |
19 |
4.8 |
Disconnecting the appliance from the mains |
...... |
|
19 |
|
5 |
Making beverages |
20 |
5.1 |
Overview of options for making beverages.... |
20 |
5.2 |
Making coffee using coffee beans................... |
21 |
5.3 |
Making coffee using ground coffee ................. |
22 |
5.4 |
Making drinks with milk...................................... |
23 |
5.5 |
Customising the aroma and quantity............... |
24 |
5.6 |
Hot water delivery................................................ |
24 |
5.7 |
Milk froth / steam delivery ................................. |
25 |
6 |
Favourites |
26 |
6.1 |
Defining profile ..................................................... |
26 |
6.2 |
Customising drinks settings ............................... |
26 |
6.3 |
Cancelling changes to settings.......................... |
27 |
7 |
User settings |
27 |
7.1 |
Overview of user settings.................................... |
27 |
7.2 |
Customising user settings................................... |
27 |
7.3 |
Rinsing.................................................................... |
27 |
7.4 |
Descaling ............................................................... |
28 |
7.5 |
Water softener filter .............................................. |
28 |
7.6 |
Drinks settings....................................................... |
28 |
7.7 |
Setting the time ..................................................... |
28 |
7.8 |
Auto-start ................................................................ |
28 |
7.9 |
Automatic shut-off................................................. |
28 |
7.10 |
Cup warmer ........................................................... |
28 |
7.11 |
Energy saving mode ............................................ |
29 |
7.12 |
Coffee temperature .............................................. |
29 |
7.13 |
Water hardness..................................................... |
29 |
7.14 |
Language ............................................................... |
30 |
7.15 |
Acoustic signal...................................................... |
30 |
7.16 |
Cup illumination .................................................... |
30 |
7.17 |
Background ........................................................... |
30 |
7.18 |
Demo mode........................................................... |
30 |
7.19 |
Factory settings..................................................... |
30 |
7.20 |
Statistics ................................................................. |
30 |
8 |
Care and maintenance |
31 |
8.1 |
Cleaning intervals ................................................. |
31 |
8.2 |
Cleaning the internal circuit ................................ |
32 |
8.3 |
Cleaning the grounds container ........................ |
32 |
8.4 |
Cleaning the drip tray .......................................... |
33 |
8.5 |
Cleaning the coffee spout................................... |
33 |
8.6 |
Cleaning the exterior............................................ |
33 |
8.7 |
Cleaning the inside of the appliance ................ |
34 |
8.8 |
Cleaning the water tank....................................... |
34 |
8.9 |
Cleaning the ground coffee funnel.................... |
34 |
8.10 |
Cleaning the infuser ............................................. |
35 |
8.11 |
Cleaning the milk frother..................................... |
36 |
8.12 |
Cleaning the hot-water/steam spout................. |
38 |
3

8.13 |
Cleaning the connection nozzle........................ |
38 |
8.14 |
Descaling .............................................................. |
38 |
9 |
Trouble-shooting |
41 |
9.1 |
Displayed messages........................................... |
41 |
9.2 |
Unsatisfactory results.......................................... |
46 |
9.3 |
Other possible problems.................................... |
47 |
10 |
Accessories |
48 |
11 |
Technical data |
48 |
12 |
Disposal |
49 |
13 |
Notes |
50 |
14 |
Service & Support |
51 |
4
1 Safety warnings
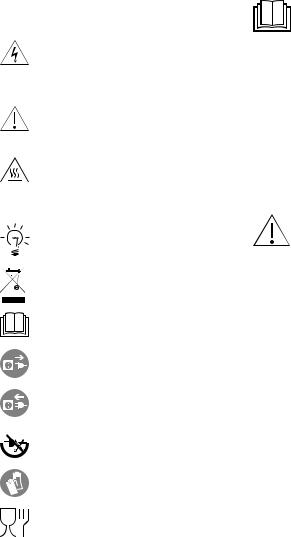
1.1Symbols used
Important warnings are identified by these symbols.
Failure to observe the Operating Instructions could result in electric shock, serious injury, burns, fire or damage to the appliance.
Danger! Failure to observe the warning could result in possibly life threatening injury from electric shock.
Important! Failure to observe the warning could result in injury or damage to the appliance.
Danger of burns! Failure to observe the warning could result in scalds or burns.
Please note: This symbol identifies 
 important advice or information for

 the user.
Information on disposal
Information about the Operating Instructions
Remove plug from mains socket / disconnect power supply
Insert plug into mains socket / connect power supply
 Do not cut off or modify mains plug
Wear protective gloves
This appliance conforms to EC Regulation 1935/2004 on materials and articles intended to come into contact with food.
Indicates step-by-step instructions.
–Describes how the appliance reacts to the steps taken.
▪Indicates a list.
1.2General safety precautions
▪Read the Operating Instructions before using the appliance for the first time.
▪Keep these Operating Instructions carefully.
▪The manufacturer is not liable for damage deriving from failure to respect these Operating Instructions.
▪The appliance is not intended for use by persons (including children) with reduced physical, sensory or mental capabilities, or lack of experience and knowledge, unless they have been given supervision or instruction concerning use of the appliance by a person responsible for their safety. Children should be supervised to ensure that they do not play with the appliance.
▪Designated use: this appliance is designed and made to prepare coffee and milk based beverages and hot water. Any other use is con-
5

1 Safety warnings
sidered improper and thus dangerous. The manufacturer is not liable for damage deriving from improper use of the appliance.
▪The surface of the heating element remains hot after use and the outside of the appliance may retain the heat for several minutes depending on use.
▪Clean all the components thoroughly, taking particular care with parts in contact with the coffee and milk.
▪Cleaning and user maintenance shall not be made by children without supervision.
▪Never immerse the appliance in water.
▪CAUTION: To prevent damage to the appliance do not use alkaline cleaning agents when cleaning, use a soft cloth and a mild detergent.
▪This is an household appliance only. It is not intended to be used in: staff kitchen areas in shops, offices and other working environments; farm houses; by clients in hotels, motels and other residential type environments; bed and breakfast type environments.
▪If the plug or power cable is damaged, it must be replaced by customer services only to avoid all risk.
▪Appliances with removable cord: avoid splashes of water on the power cord connector or socket at the back of the appliance.
▪WARNING: Models with glass surfaces: do not use the appliance if the surface is cracked.
FOR EUROPEAN MARKETS ONLY:
▪This appliance can be used by children aged from 8 years and above if they have been given supervision or instruction concerning use of the appliance in a safe way and if they understand the hazard involved. Cleaning and user maintenance shall not be made by children unless they are older than 8 and supervised. Keep the appliance and its cord out of the reach of children aged less than 8 years.
▪Appliances can be used by persons with reduced physical, sensory or mental capabilities or lack of experience and knowledge if they have been given supervision or instruction concerning use of
6
1 Safety warnings
the appliance in a safe way and understand the hazards involved.
▪Children shall not play with the appliance.
▪When not in use and before cleaning, always unplug the appliance.
▪ Surfaces marked with this symbol become hot during use (the symbol is present in certain models only).
1.3 Appliance-specific safety
precautions
Danger! The appliance is operated using electrical power. It is therefore important to observe the following safety warnings:
▪Never touch the appliance with damp hands.
▪Never touch the plug with damp hands.
▪Make sure the socket used is freely accessible at all times, enabling the appliance to be unplugged when necessary.
▪Unplug directly from the plug only.
▪Never pull the mains cable as you could damage it.
▪To disconnect the appliance completely, set the main switch on the side of the appliance in the 0 position. (see page 19)
▪If the appliance is faulty, do not attempt to repair.
▪Turn it off using the main switch (see page 19), unplug from the mains socket and contact Customer Services.
Caution!
▪Keep all packaging (plastic bags, polystyrene foam) away from children.
▪Choking hazard. The appliance may contain small parts. Certain small parts may need to be removed for cleaning or servicing. It is prudent to keep small parts away from children.
Danger of burns!
▪This appliance produces hot water and steam may form while it is in operation.
▪Avoid contact with splashes of water or hot steam. Use the buttons, knobs and handles.
Caution!
▪Do not hold on to the coffee machine when it is out of the cabinet.
▪Do not rest receptacles containing liquids or inflammable or corrosive materials on top of the appliance. Place the accessories required to make the coffee (the measure for example) in the special holder. Do not rest large objects which could obstruct movement or unstable objects on the appliance.
Caution!
▪Do not use the appliance when extracted. Make sure the appliance is switched off before extracting it. Exception: is adjusting the coffee mill which must be done with the appliance extracted (see page 15).

 Note:
Note:
▪Use original or manufacturer recommended accessories and spare parts only.
7
1 Safety warnings
|
Caution! |
▪ The packing elements (plastic bags, |
|
|
|
polystyrene foam, etc.) should be kept |
|
▪ Do not switch the appliance off during |
out of reach of children (see page |
||
descaling. |
49). |
||
1.4 |
Instructions for use |
▪ Never install the appliance in rooms |
|
where the temperature may drop to |
|||
Correct use |
0°C or lower. Customise the water |
||
hardness as soon as possible follow- |
|||
▪ This appliance is designed and made |
|||
ing the instructions in the “Water hard- |
|||
to prepare coffee and heat drinks. All |
|||
ness” section (see page 29). |
|||
other use is considered improper. |
|||
Connecting the appliance |
|||
▪ This appliance is not suitable for com- |
|||
mercial use. |
Danger! |
|
▪ The manufacturer is not liable for dam- |
||
|
||
age deriving from improper use of the |
▪ Check that the mains power supply |
|
appliance. |
||
voltage corresponds to the value indic- |
||
|
▪ This appliance can be installed over a
built-in oven if the latter is fitted with a |
ated on the rating plate on the left- |
|
hand side of the appliance. |
||
cooling fan at the rear (maximum mi- |
||
▪ Connect the appliance to an efficiently |
||
crowave power: 3 kW). |
||
Cleaning and maintenance of materials in |
earthed and correctly installed socket |
|
with a minimum current rating of 10A |
||
contact with food |
||
only. |
||
▪ The first time you use the appliance, or |
||
▪ If the power socket does not match the |
||
if it is not used for more than 3 or 4 |
||
plug on the appliance, have the socket |
||
days, rinse all removable accessories |
||
replaced with a suitable type by a qual- |
||
which may come into contact with water |
||
ified professional. To comply with |
||
or milk with hot water. |
||
safety directives, an omnipolar switch |
||
▪ If the appliance is not used for more |
||
than 3 or 4 days, before making the |
with a minimum contact distance of 3 |
|
mm must be installed. |
||
first beverage, rinse the water circuit as |
||
▪ Do not use multiple sockets or exten- |
||
described in these Operating Instruc- |
||
tions. |
sions. |
|
▪ You should carry out automatic clean- |
Built-in installation |
|
ing and guided maintenance scrupu- |
||
Important! |
||
lously when indicated by the appliance |
||
through the display or the lights (see |
▪ Verify the minimum measurements re- |
|
page 31). |
||
Installing the appliance |
quired for correct installation of the ap- |
|
pliance. The coffee machine must be |
||
Important! |
||
installed in a column and the column |
||
|
||
▪ Installation must be performed by a |
must be firmly fixed to the wall with |
|
commercially available brackets. |
||
qualified professional in compliance |
▪ Important: all installation or mainten- |
|
with legislation in force in the country |
ance operations must be performed |
|
of installation (see page 8). |
||
with the appliance disconnected from |
||
|
||
|
the mains electricity supply. |
8

1 Safety warnings
▪Kitchen furniture in direct contact with the appliance must be heat resistant (65°C min).
9
2 Using for the first time
 Coffee has been used to factory test the appliance, and so it is possible that there
may be traces of coffee in the mill. The appliance is, however, guaranteed to be completely new.
Before operating the appliance for the first time, the following steps should be taken:
2.1Selecting language
|
If you have not already done so, connect the appli- |
|
ance to the mains electricity supply: Insert the mains |
|
plug into a suitable mains socket. |
|
Slide the appliance out. |
|
Set the main switch to I. |
|
Touch . |
|
– The user settings menu appears in the display. |
|
Touch or repeatedly until the user setting ap- |
|
pears in the display. |
Set the language.
Slide the appliance in.
2.2Filling the water circuit with water
Danger of burns!
Do not leave the appliance unattended while hot water is being delivered!
When the corresponding message appears in the display: Fill the water tank and then place it back in the appliance (see page 14).
When the corresponding message appears in the display: Slide the hot-water/steam spout 1 on the connection nozzle 2 and place a 0.5-litre receptacle under the water spout.
–In the display appears: «Water circuit empty. Press  to fill»
Touch  .
.
–Hot water comes out of the hot-water/steam spout
1.
2 |
1 |
When hot water stops coming out of the hot-water/ steam spout 1:
–the main menu appears in the display.
–the appliance is ready for use.
10
3 Appliance description
2.3Cleaning the accessory parts
The following accessory parts can come into contact with water or milk and must therefore be rinsed with hot water before using for the first time:
individual parts of the milk frother (see page 36)
individuals parts of the hot-water/steam spout (see page 38).
2.4Setting the water hardness
Set the water hardness to ensure optimized descaling (see page 29).
3 Appliance description
3.1Construction
With the service door closed
5 |
6 |
7 |
8 |
9 |
4
|
I |
|
0 |
2 |
3 |
|
|
|
1 |
12 |
11 |
10 |
14 |
|
13 |
|
16 |
15 |
1 |
Service door |
9 |
Main switch |
2 |
ON/OFF button |
10 |
Connection nozzle |
3 |
Interior illumination |
11 |
Cup illumination |
4 |
Display |
12 |
Coffee spout |
5 |
Coffee mill |
13 |
IEC plug |
6 |
Beans container |
14 |
Mains cable |
7 |
Lid for beans container |
15 |
Measure holder |
8 |
Ground coffee funnel |
16 |
Heatable tray for coffee cups |
11

3 Appliance description
With the service door open
7
6
5
4
3
2
|
|
|
10 |
9 |
8 |
|
1 |
|
|
|
|
1 |
Drip tray |
6 |
Service door |
|
|
2 |
Drip plate |
7 |
Coffee spout |
|
|
3 |
Grounds container |
8 |
Tray for milk jug |
|
|
4 |
Water tank |
9 |
Tray for hot-water/steam spout |
||
5 |
Lid for water tank |
10 |
Infuser assembly |
|
|
3.2Operating and display elements
1
13:51
Aroma
1Display
2Beverage selection
|
Profile 1 |
Quantity |
|
|
|
|
|
|
|
|
|
|
|
|
|
|
|
|
|
|
|
|
|
|
|
|
|
|
|
|
|
|
|
|
|
|
|
|
|
|
|
|
|
|
Hot water Espresso |
Co ee Cappuccino |
|
|
2 |
|
|
|
|
|
|
|
|
|
|
|
|
|
|
|
|
|
|
|
|||||||||||||||||||
|
|
|
|
|
|
|
|
|
|
|
|
|
|
|
|
|
|
|
|
|
|
Buttons |
|
|
|
Displays |
|||||||||||||||||
|
Coffee aroma |
|
|
|
|
|
|
|
|
|
|
|
|
|
|
|
|
|
|
|
Coffee aroma |
|
|
|
|
|
|
|
|
|
|
|
|
|
|
|
|||||||
|
Coffee quantity |
|
|
|
|
|
|
|
|
|
|
|
|
|
|
|
|
|
|
|
Coffee quantity |
|
|
|
|
|
|
|
|
|
|
|
|
|
|
|
|
|
|
|
|
||
|
Favourites |
|
|
|
|
|
|
|
|
|
|
|
|
|
|
|
|
|
|
|
|
User settings
Profile
12
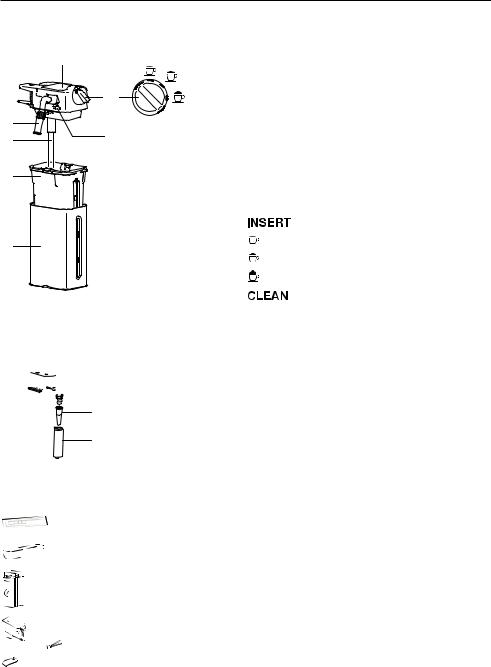
3.3Milk frother
5
|
INSERT |
|
6 |
|
CLEAN |
4 |
|
3 |
7 |
|
|
2 |
|
1
3.4Hot-water/steam spout
1 

 2
2
3
4
3.5Accessories
 1
1
 2
2

 3
3
CACO3
 4
4

 5
5
3 Appliance description
1Thermal casing
2Milk jug
3Milk tube
4Milk spout
5Lid for milk frother
6Adjusting knob
7Release button
Adjusting knob positions
Insert adjusting knob
No milk froth
A little milk froth
A lot of milk froth
Clean milk spout and milk frother lid
1Release button
2Connection with revolving head
3Nozzle
4Delivery spout
1Water hardness test strips
2Measure
3Descaler
4Cover for connection nozzle
5Cleaning brush
13
4 Operating the appliance
4 Operating the appliance
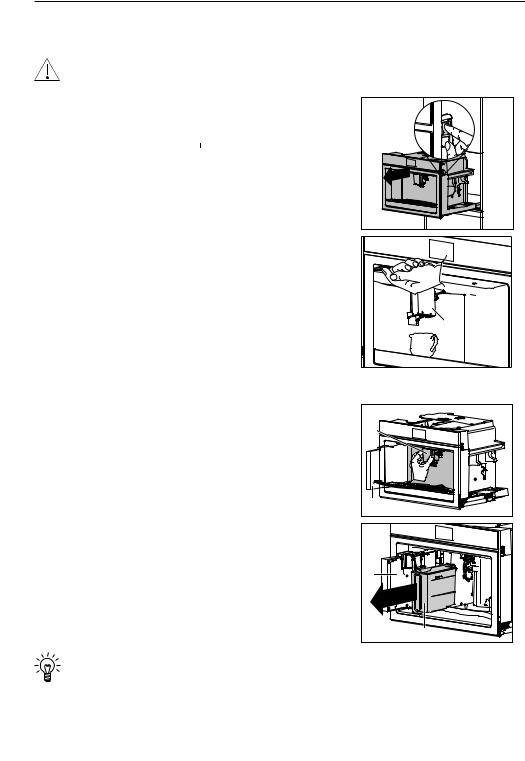
4.1Switching the appliance on
Danger of burns!
Hot water comes out of the coffee spout during rinsing.
Slide the appliance out.
Set the main switch to I.
Slide the appliance in.
Press the ON/OFF button  .
.
–In the display appears: «Heating up underway – Please wait».
When the heating-up process is completed:
–the following appears in the display: «Rinsing underway – Hot water from spouts».
–hot water comes out of the coffee spout 1.
When rinsing is completed:
–the main menu appears in the display.
–the appliance is ready for use.
1 |
4.2Filling the water tank
Hold the coffee spout 1 with one hand and pull it forward.
– The service door 2 opens .
Remove the water tank 3.
Remove the lid and fill the water tank 3 to the MAX level with fresh water.
Put the lid back on and place the water tank 3 back in the appliance.
Close the service door 2.
1 |
2 |
2 |
3 |
Empty the water tank on a daily basis to prevent the build-up of germs.
14
4 Operating the appliance
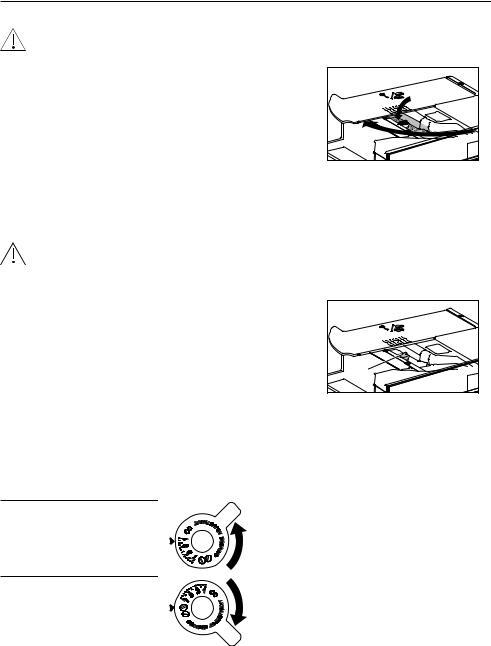
4.3Filling the beans container
Do not use green, caramelised or candied coffee beans or the like. They could clog up the coffee mill and damage it.
Twist open the lid 1 of the beans container.
Fill the beans container 2 with coffee beans.
Close the lid 1 of the beans container.
2 |
1 |
4.4Adjusting the coffee mill
The coffee mill is set by default to prepare coffee correctly the first time you use the newly installed appliance. If the coffee being prepared is too weak or not creamy enough or is being delivered a drop at a time, the coffee mill can be adjusted manually.
Incorrect handling can result in damage to the appliance!
The adjusting knob for the coffee mill may only be turned when the coffee mill is in operation. The appliance must remain pulled out for this.
Open the lid 1 of the beans container.
Make the desired coffee drink (see page 20).
While the coffee mill 2 is in operation, turn the adjusting knob for the coffee mill one position to the left or right.
Make at least 2× the desired coffee drink using the new coffee mill setting.
–The effect of the new coffee mill setting will be apparent after a third cup of coffee is delivered.
If the new coffee mill setting does not produce the desired result, turn the adjusting knob 2 for the coffee mill to the next position.
1 |
2 |
Cause |
Adjusting knob Solution |
|
▪ |
Coffee is too weak |
Turn the adjusting knob for the coffee |
▪ |
Coffee is not creamy |
mill anti-clockwise one position (to- |
|
enough |
wards «1»). |
▪Coffee is delivered a drop at a time or too slowly
Turn the adjusting knob for the coffee mill clockwise one position (towards «7»).
15
4 Operating the appliance
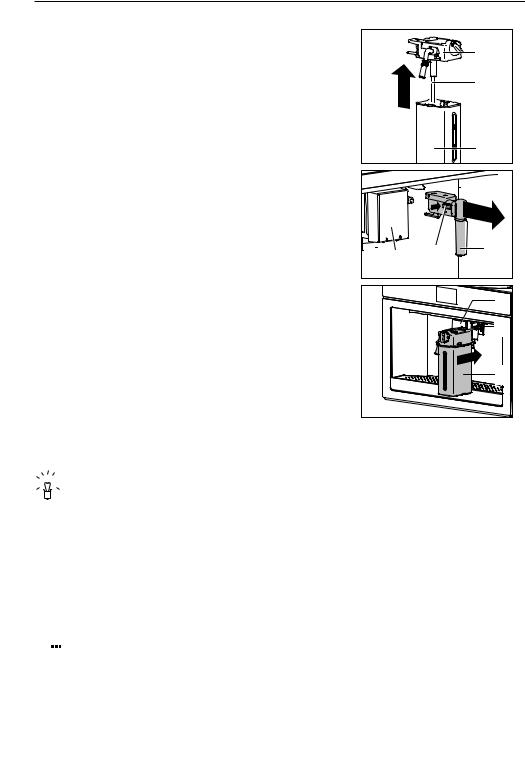
4.5Attaching the milk frother
Remove the lid 1 from the milk jug.
Fill the milk jug 3 with milk up to the MAX level.
Insert the milk tube 2 into the lid 1 of the milk jug.
Put the lid 1 back on the milk jug 3.
Push the coffee spout 4 down.
Press the release switch 5 and simultaneously extract the hot-water/steam spout 6.
Slide the milk frother 7 on the connection nozzle 8.
Place a large cup under coffee spout 4.
Make a drink with milk (see page 23).
|
1 |
|
2 |
|
3 |
|
6 |
4 |
5 |
|
|
|
4 |
|
8 |
|
7 |
4.6Water softener filter *
* Not included in the scope of delivery


 If you would like to fit your appliance with a water softener filter, you can obtain
  one from a specialist retailer.
Installing the water softener filter
If the appliance is used regularly, the service life of the water softener filter is 2 months. If the appliance is left unused, the water softener filter will last a maximum of 3 weeks.
If the appliance is switched off: Switch the appliance on (see page 14).
Touch  .
.
–The main user settings menu appears in the display.
Touch  or
or  repeatedly until the water softener filter

 appears in the display.
16
Loading...