


1068340-R02
Installation instructions
22/05/2019
Heat pump dryer
One-family household
1068340-R02
For Service and Spare Part Information please contact: V-ZUG AUSTRALIA Pty. Ltd. Tel +61 7 3209 6822
The appliance should be installed by qualified personnel only.
Each step must be carried out and checked in full in the order specified.
Validity
The installation instructions apply to the models: 12011–12013
Transport
Transport the appliance in an upright position only! Transporting it in any other position will result in damage to the appliance! When carried carefully without being shaken, the appliance may be tilted a maximum of 90° to the left (viewed from the front).
Identification plate
Open the appliance door.
– The identification plate 1 is located bottom right.
1
Supplied installation accessories
The necessary installation accessories are located in the washing drum and in the appliance packaging.
Designation |
Article no. |
Number |
See installation step |
|
|
|
|
|
|
Installation plate (incl. double-sided adhesive tape) |
W40653 |
1 |
2. |
Positioning the installation plate |
|
|
|
|
|
Tower panel |
W55687 |
1 |
2. |
Positioning the installation plate |
|
|
|
|
|
Condensate drain set (incl. screw material) |
W56298 |
1 |
6. |
Connecting condensate drain |
|
|
|
|
|
Room conditions/Ventilation
Keep all ventilation slits on the appliance clear and unobstructed. Otherwise an adequate supply of air is not guaran-
teed.
Ventilate the room well. Ensure that the temperature of the room is between 5–35 °C.
The room temperature must be kept between the range of 15–25 °C to ensure the economic running of the appliance.
Room size <10 m² (<20 m³) |
Room size ≥10 m² (≥20 m³) |
|
|
Room must be ventilated: There must be air inlet and outlet |
Condensation may form on thermal bridges! The room must |
openings to the adjacent room or to the outside, e.g. open win- |
therefore be aired after running several consecutive drying pro- |
dow, ventilation grille or slits in the door, ventilation system. |
grammes, e.g. by opening a window or door to the room. |
|
|
1
1068340-R02
Installation instructions
22/05/2019
Heat pump dryer
One-family household
1068340-R02
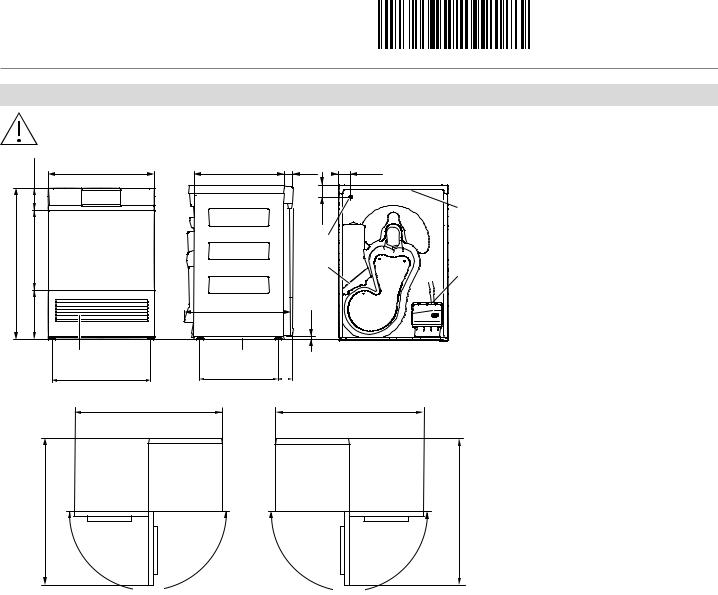
1. Dimensions
The stated dimensions do not include distances from walls. To prevent disturbing noise and vibration the appliances must not come into contact with the surrounding walls of their installation location.
|
(126) |
595 |
500 |
50 |
57.5 |
|
1 |
Cooling air inlet |
|
|
|
||||||
|
|
|
|
70 |
|
4 |
2 |
Cooling air outlet |
|
|
|
|
|
|
|
||
|
|
|
|
|
|
|
|
|
850 |
444 |
|
|
|
5 |
|
3 |
Installation plate |
|
|
|
2 |
6 |
4 |
Tower panel |
||
|
|
|
|
|
|
|
||
|
280 |
|
600 |
15 |
|
|
5 |
Electrical connection cable outlet, |
|
|
|
|
|
|
length: 1.8 m, with plug |
||
|
|
1 |
3 |
|
|
|
6 |
Condensate drain |
|
|
550 |
458 |
71 |
|
|
|
drainage connection: ø10.5 mm |
|
|
|
|
|
|
|
|
pumping height for drain pump: |
|
|
Left-hand opening |
|
Right-hand opening |
|
|
1.2 m |
|
|
|
1160 |
|
|
1160 |
|
|
condensate drain kit, |
|
|
|
|
|
|
length: 2 m |
||
|
|
|
|
|
|
|
|
|
1200* |
1200* |
180° |
180° |
* Clearance space across the whole width of the front
2

1068340-R02
Installation instructions
22/05/2019
Heat pump dryer
One-family household
1068340-R02
2. Positioning the installation plate
General tips
Use the installation plate supplied to install the appliance. It fixes the appliance in position, and is for use with both free-standing appliances and appliances positioned in a niche.
In case of underfloor heating, do not drill holes in the floor! Adhere installation plate into place!
1 |
45 |
Fold out spacers D in order to keep dis- |
|
D |
tance to the back wall. |
|
|
|
|
E |
|
2 |
|
Variant 1: Without underfloor heating: |
|
ø6 |
Fasten installation plate to the floor with |
|
|
|
|
|
3 screws. |
|
|
Dampen mounting slots E with water to |
1 |
3× |
make the appliance easier to push in. |
|
|
Variant 2: With underfloor heating: |
|
|
Holes must not be drilled in the floor if |
|
|
the room has underfloor heating. The |
|
2 |
installation plate must be adhered to the |
|
floor. |
||
|
||
|
Dampen mounting slots E with water to |
|
|
make the appliance easier to push in. |
When installing the washer-dryer tower, do not drill any holes in the washing machine! Adhere installation plate into place!
If a tumble dryer has to be installed on top of a washing machine, no holes
must be drilled in the washing machine.
The installation plate must be adhered to
the floor.
3
 Loading...