

Page 1
DSU and DSU II Series
Digital Telephone Systems
●
Non-LCD Station User’s Guide
R
ABC
DEF
2
1 3
MNO5JKL4GHI
6
PRS8TUV9WXY
7
#0*
MESSAGE
TAP
TRNS/CONF
SPEAKER
MUTE
HOLD
R
R
R
DEFABCQZ
321
MNOJKLGHI
654
TUVPRS WXY
87 9
OPER
0
#
TRNS/CNF
INTERCOM
HOLD
TAP
MUTESHIFT
SPEAKER
DEFABCQZ
321
MNOJKLGHI
6
4
5
TUVPRS WXY
87 9
OPER
0
TRNS/CNF
TAPHOLD
SHIFT
#
MUTE
SPEAKER
INTERCOM
Page 2

This user’s guide applies to the following system and
telephone models:
System Models:
• DSU systems with software 20A and later.
• DSU II systems with software 4A and later.
Telephone Models:
• Impact SCS 8212S-** Rev. A and later.
• Impact SCS 8212N-** Rev. A and later.
• Impact 8124S-** Rev. A and later.
• Impact 8112S-** Rev. A and later.
• Impact 8112N-** Rev. A and later.
If you need more information, consult the Speakerphone
Reference Manual.
Contact your Comdial dealer for updates of this as well as
other Comdial publications.
* Tri-Level Compression is
a registered trademark of
ACS Wireless, Inc.
Comdial strives to design the features in our communications systems to
be fully interactive with one another. However, this is not always possible,
as the combinations of accessories and features are too varied and extensive
to insure total feature compatibility. Accordingly, some features identified
in this publication will not operate if some other feature is activated.
Comdial disclaims all liability relating to feature non-compatibility or
associated in any way with problems which may be encountered by
incompatible features. Notwithstanding anything contained in this
publication to the contrary, Comdial makes no representation herein as to
the compatibility of features.
2/12/97
Page 3

GCA70–248 Contents
Contents
1
Introducing The Telephone ........................... 1–1
1.1 UsingThisGuide ............................... 1–1
1.2 Overview...................................... 1–3
1.3 Using YourSpeakerphone......................... 1–4
1.4 Knowing YourTelephone’s Functions ............... 1–8
1.5 UnderstandingWhatTheLightsMean.............. 1–10
1.6 UnderstandingWhatTheRingsMean.............. 1–11
1.7 AdjustingYourTelephone’sPedestal............... 1–12
2
AnsweringCalls..................................... 2–1
2.1 AnsweringCalls................................ 2–1
2.3 Answering Subdued Off-Hook
VoiceAnnouncement(SOHVA)Calls............... 2–2
3
MakingCalls ....................................... 3–1
3.1 MakingCalls................................... 3–1
3.2 UsingAutomaticCall-Back ....................... 3–4
3.3 UsingCallWaiting.............................. 3–4
4 PlacingCallsOnHold................................ 4–1
4.1 PlacingCallsOnHold............................ 4–1
5
TransferringCalls................................... 5–1
5.1 TransferringOutsideCalls........................ 5–1
6
ConferencingCalls.................................. 6–1
6.1 ConferencingStationsTogether.................... 6–1
Contents – 1
Page 4

Contents GCA70–248
7
Using The Other Telephone Features................... 7–1
7.1 UsingTheRecall/FlashFeature.................... 7–1
7.2 MakingAPagingAnnouncement................... 7–1
7.3 SwitchingBetweenPulseAndTone................. 7–3
7.4 ForwardingCalls................................ 7–3
7.5 Activating The Call Forward Outside System (CFOS)
Feature........................................ 7–4
7.6 EngagingAutomaticSetRelocation................. 7–5
7.7 UnderstandingTheDataButtonLight............... 7–6
7.8 Using The IMIST Module......................... 7–7
7.9 Background Music .............................. 7–8
7.10 Using The Dynamic Line Button Feature............. 7–8
8 Sending And Receiving Non-Verbal Messages ........... 8–1
8.1 LightingTheMessage-WaitingLight................ 8–1
8.2 SendingMessages To LCD Speakerphones ........... 8–3
8.3 Station-To-StationMessaging...................... 8–3
9
ProgrammingYourTelephone........................ 9–1
9.1 ProgrammingYourTelephone...................... 9–1
10 Operating Your Telephone With A DSS/BLF Console . . . 10–1
10.1 Operating Your TelephoneWithA DSS/BLF Console. . 10–1
1
1
Troubleshooting Your Telephone ..................... 11–1
I
ndex .............................................Index–1
Q
uickReferenceGuide.....................QuickReference–1
2–Contents
Page 5

GCA70–248 Introducing The Telephone
IntroducingTheTelephone
1
1.1 Using This Guide
This user’s guide describes your Comdial Impact telephone and tells you
how to use it. The sections in this introductory chapter help you become
familiar with your telephone’s controls and indicators. The remaining
sections are titled as follows:
1.2 Overview
1.3 Using Your Speakerphone
1.4 Knowing Your Telephone’s Functions
1.5 Understanding What The Lights Mean
1.6 Understanding What The Rings Mean
1.7 Adjusting Your Telephone’sPedestal
The operation chapters define often-used features and provide
instructions for their use. These chapters are titled as follows:
2 Answering Calls
3MakingCalls
4 Placing Calls On Hold
5 Transferring Calls
6 Conferencing Calls
The special-purpose features of the telephone are grouped into one
chapter:
7 Using The Other Telephone Features
Your telephone provides several non-verbal way to communicate using
lights and indicators. The descriptions of these methods are provided in a
separate chapter titled:
8 Sending And Receiving Non-Verbal Messages
Non-LCD Station User's Guide 1 – 1
Page 6

Introducing The Telephone GCA70–248
You can program many of the buttons on your telephone to enhance the
unit’s versatility and usability. These programming instructions are found
in the following chapter:
9 ProgrammingYour Telephone
Two DSS/BLF consoles are available for expanding a station’s memory
button capacity—a 24-button and a 48-button model. The operation of
these consoles is covered in the following chapter:
10. Operating Your TelephoneWithA DSS/BLF Console
For your convenience, a troubleshooting chart is provided in the
following chapter:
11 Troubleshooting Your Telephone
There is a quick reference chart listing the feature dialing codes in the
following chapter:
AppendixA Quick Reference Guide
1 – 2 Non-LCD Station User's Guide
Page 7

GCA70–248 Introducing The Telephone
1.2 Overview
This user’s guide covers five different telephone models. There are
several differences a s noted below.
• The 8112N and 8212N do not have speakerphone capability.
Therefore, you must lift the handset to perform any telephone
functions: making calls, answering calls, programming your
telephone, etc.
• The 8112N and 8212N cannot receive voice announce calls.
• The 8112N and 8212N cannot use the Group Listen feature.
• The 8112N and 8212N cannot use the Background Music feature.
• The 8112N does not have any LEDs beside its programmable
buttons and therefore does not provide any status indications for
these buttons.
• The 8112N does not have a mute key.
• The 8112N and 8212N does not have a handset volume control.
• The IMIST device only works with the 8212S and 8212N telephones.
• The 8124S and 8112S telephones have a rocker switch style volume
control instead of separate volume up and volume down buttons.
• Message waiting lights:
– On the 8124S and 8112S, the message waiting light is above the
HOLD button.
– On the 8112N, the message waiting light is above the dialpad.
– On the 8212S and 8212N there is a dedicated message button with
an associated light beside it.
• Only the 8212S and 8212N support the ICVOL handset with
independent volume control.
• 8212S and 8212N have adjustable pedestals.
Non-LCD Station User's Guide 1 – 3
Page 8

Introducing The Telephone GCA70–248
1.3 Using Your Speakerphone
On the speakerphone-equipped models (8124S-**, 8112S-**, and
8212S-**) the microphone and loudspeaker are farther away from you
than when you use a handset. Both the signal from the loudspeaker and
the signal to the microphone must be strengthened. When microphones
and loudspeakers are close together (such as in a speakerphone),
additional amplification typically generates a ringing sound (public
address systems do this if the volume is too high or the microphone is
too close to a loudspeaker).
Your speakerphone’s sound-activated switches allow either the
microphone or the loudspeaker to be on at a given time. This means that
sounds travel in only one direction at a particular moment.
To manually place a call using your speakerphone,
•
1. Press the line button or the INTERCOM button.
2. Dial the number.
3. When party answers, speak toward the telephone.
To autodial using your speakerphone,
•
1. Press the programmed button and talk when your party
answers.
To answer a call with your speakerphone,
•
1. Press the line button with flashing red or orange light.
2. Speak toward the telephone to answer the call.
To answer an intercom call with your speakerphone,
•
1. Press the INTERCOM button and speak toward the telephone
after hearing two short rings,
—OR—
If your system is configured for voice-first calling, speak toward the telephone to answer the call after hearing the caller’s
voice.
To end a call with your speakerphone,
•
1. Press SPEAKER.
1 – 4 Non-LCD Station User's Guide
Page 9

GCA70–248 Introducing The Telephone
Speakerphone User Guidelines
• Both parties cannot talk at the same time. You must wait for
silence out of your loudspeaker before talking. You must stop
talking to hear the other party.
• Background noise may prevent the sound-activated switches from
operating properly. Avoid placing the speakerphone where it will
detect sounds from typewriters, keyboards, printers, paging
systems, and other equipment.
• Speak slightly louder than normal and with a clear, authoritative
voice. For the microphone to best detect your voice, speak within
three feet of it and face the telephone.
• Raising the volume of the loudspeaker makes it easier for the
sound-activated switches in your telephone to select the distant
party’s voice. Lowering the volume of the loudspeaker makes it
easier for the switches to select your voice.
• Since the system takes several seconds to provide the best
switching, constant sound patterns—such as elongating your
words and playing externally-supplied music—may prevent the
sound-activated switches from operating properly.
• Place the telephone on a hard surface and away from table edges.
Do not place the telephone in corners or enclosures. Do not let
obstructions come between you and the microphone. Rooms with
hard, flat surfaces that reflect sound may affect the
sound-activated switches.
• If you are using a handset and the other party is using a
speakerphone, avoid breathing heavily into your microphone.
Avoid other sounds that may affect the distant telephone’s
sound-activated switches.
• In some situations, such as when either you or the distant party
are in a noisy environment, you may have to lift your handset to
ensure a clear conversation.
• When both you and the distant party use speakerphones, the
sound-activated switches can occasionally detect both voices
simultaneously, thus blocking out both voices.
Non-LCD Station User's Guide 1 – 5
Page 10
Introducing The Telephone GCA70–248
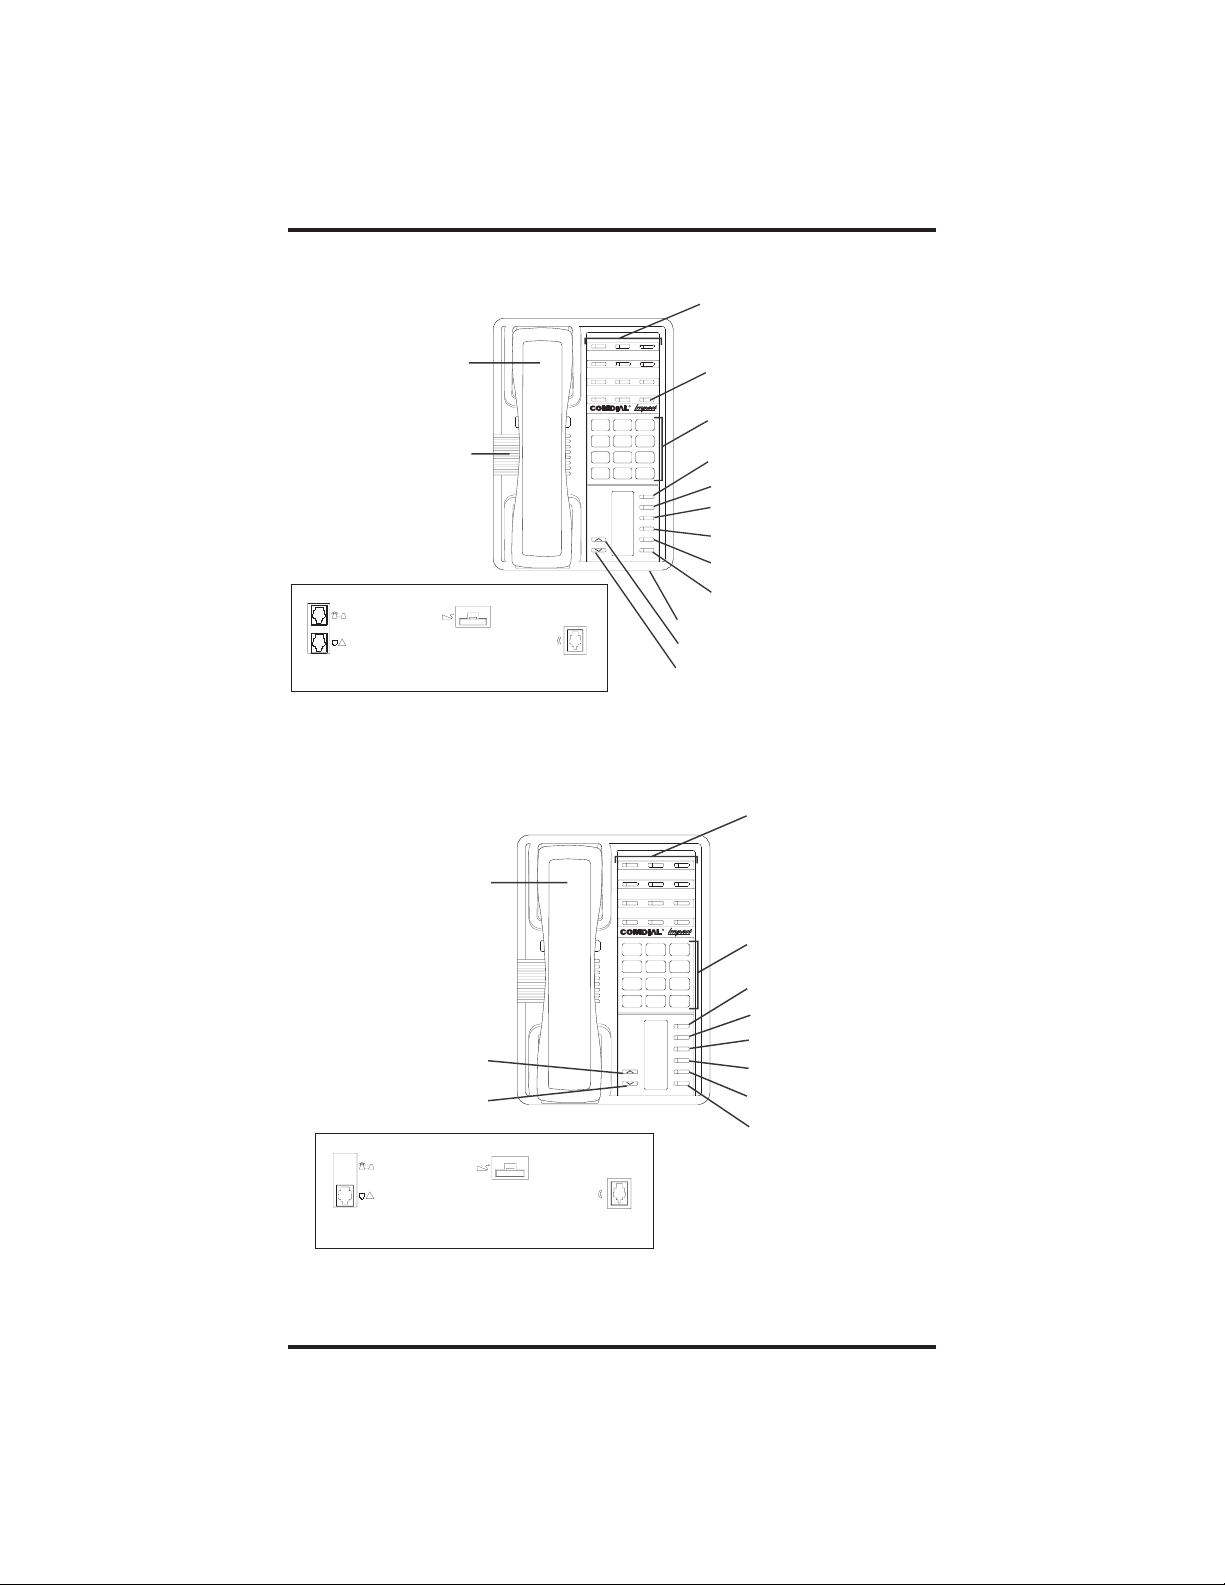
Line Buttons,
SCS001A
DSS/BLF Buttons
Programmable Buttons
Handset
Telephone Speaker
*NOTE: The INTERCOM button
can be reprogrammed..
Connectors On Bottom Of Telephone
!
Optional Console-Top
Line Cord-Bottom
Optional IST Module
Handset
Volume Up
Volume Down
Connectors On Bottom Of Telephone
R
ABC
DEF
2
1 3
MNO5JKL4GHI
6
PRS8TUV9WXY
7
#0*
MESSAGE
TAP
TRNS/CONF
SPEAKER
MUTE
HOLD
Microphone Opening
Volume Up
Handset
Volume Down
8212S Speakerphone
R
ABC
DEF
2
1 3
MNO5JKL4GHI
6
PRS8TUV9WXY
7
#0*
MESSAGE
TAP
TRNS/CONF
SPEAKER
MUTE
HOLD
SCS002A
Intercom Button*
Dialpad
Message Button
TAPButton
Transfer/Conference Button
Speaker Button
Mute Button
Hold Button
Line Buttons,
DSS/BLF Buttons
Programmable Buttons
Dialpad
Intercom Button
Message Button
TAPButton
Transfer/Conference Button
Mute Button
Hold Button
!
Line Cord
Optional IST Module
Handset
8212N Telephone
1 – 6 Non-LCD Station User's Guide
Page 11
GCA70–248 Introducing The Telephone
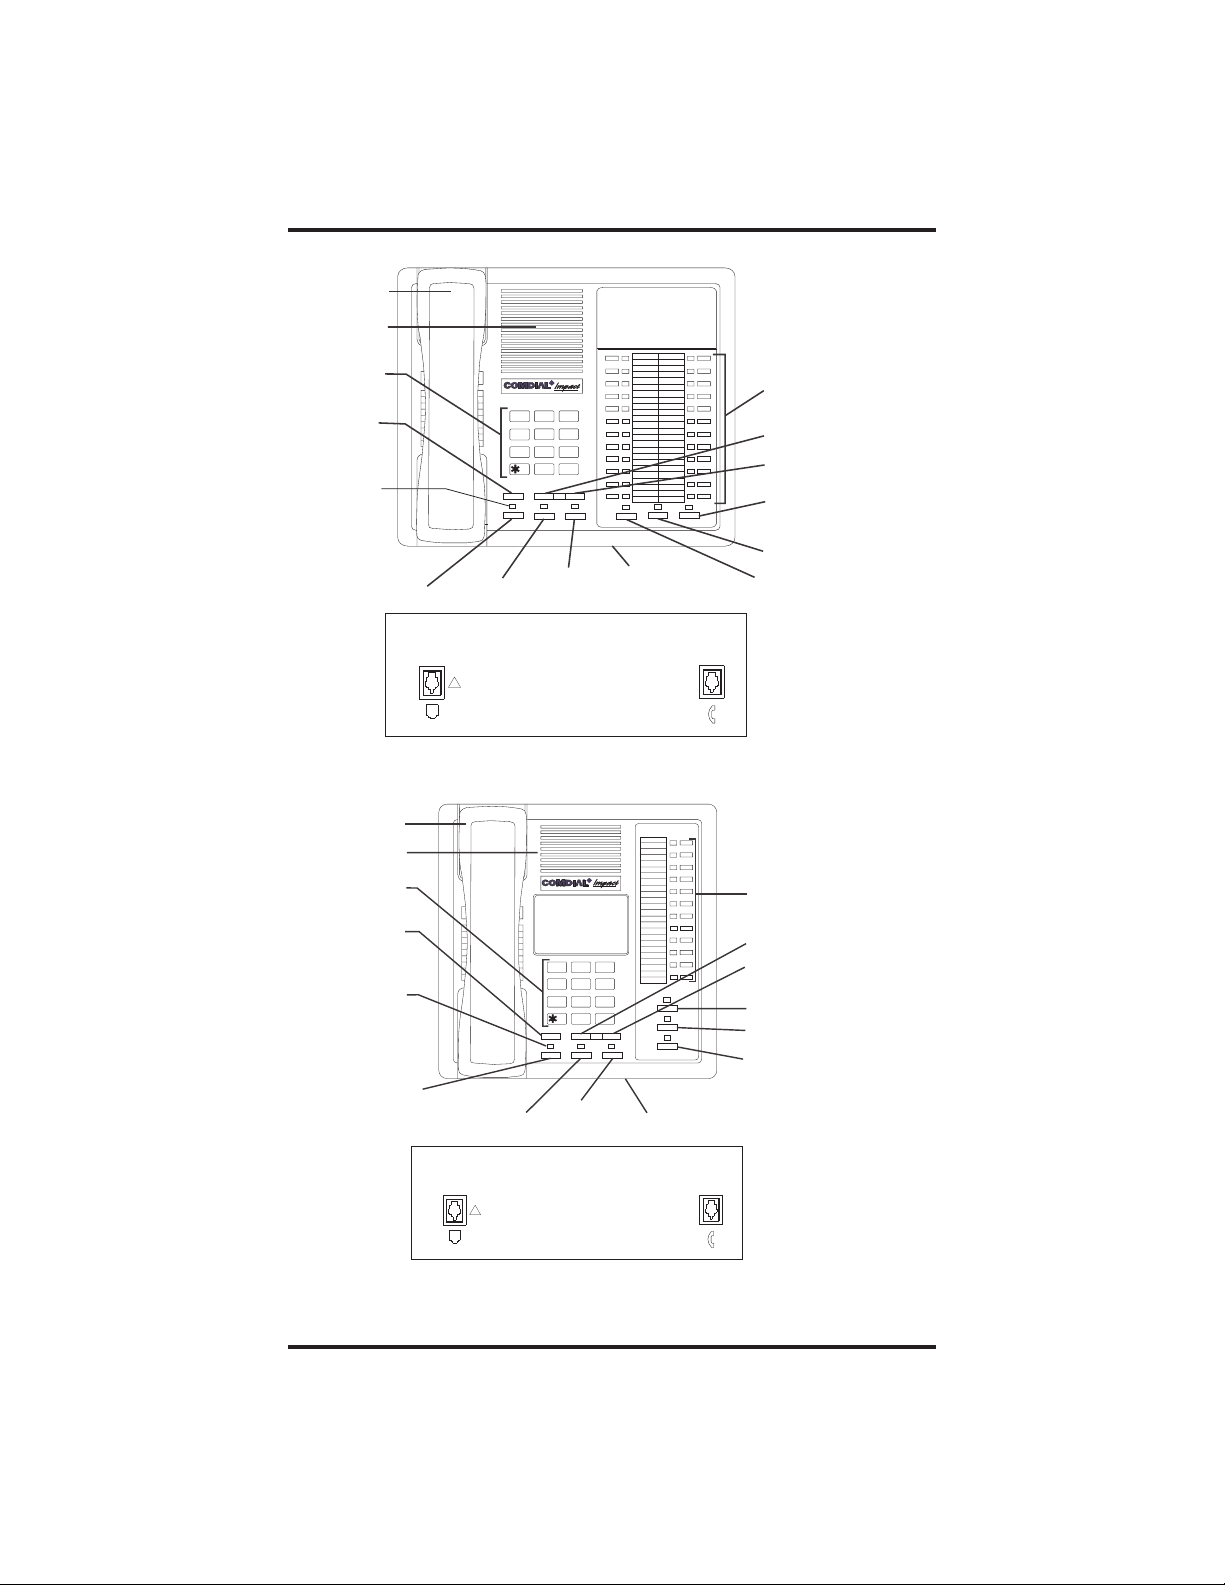
INL001
Handset
Speaker
Dialpad
Transfer/
Conference
Button
Message
Waiting
Light
Hold Button
Handset
Speaker
Dialpad
Transfer/
Conference
Message
Waiting
Hold Button
R
DEFABCQZ
321
MNOJKLGHI
654
TUVPRS WXY
87 9
OPER
0
#
TRNS/CNF
TAP Button
INTERCOM
HOLD
TAP
Intercom
Button
Connectors On Bottom Of Telephone
Line Cord
!
Impact 8124S Speakerphone
Button
GHI
4
5
Light
TAP Button
Connectors On Bottom Of Telephone
Line Cord
!
TRNS/CNF
87 9
0
TAPHOLD
Intercom
Button
R
JKL
TUVPRS WXY
OPER
321
6
#
SPEAKER
Microphone
Opening
DEFABCQZ
MNO
INTERCOM
MUTESHIFT
Handset
SHIFT
MUTE
SPEAKER
imp001
Microphone
Opening
Handset
Line Buttons,
DSS/BLF Buttons,
Programmable Buttons
Volume Down
Volume Up
Mute Button
Shift Button
Speaker
Button
Line Buttons,
DSS/BLF Buttons,
Programmable Buttons
Volume Down
Volume Up
Shift Button
Mute Button
Speaker Button
Impact 8112S Speakerphone
Non-LCD Station User's Guide 1 – 7
Page 12
Introducing The Telephone GCA70–248
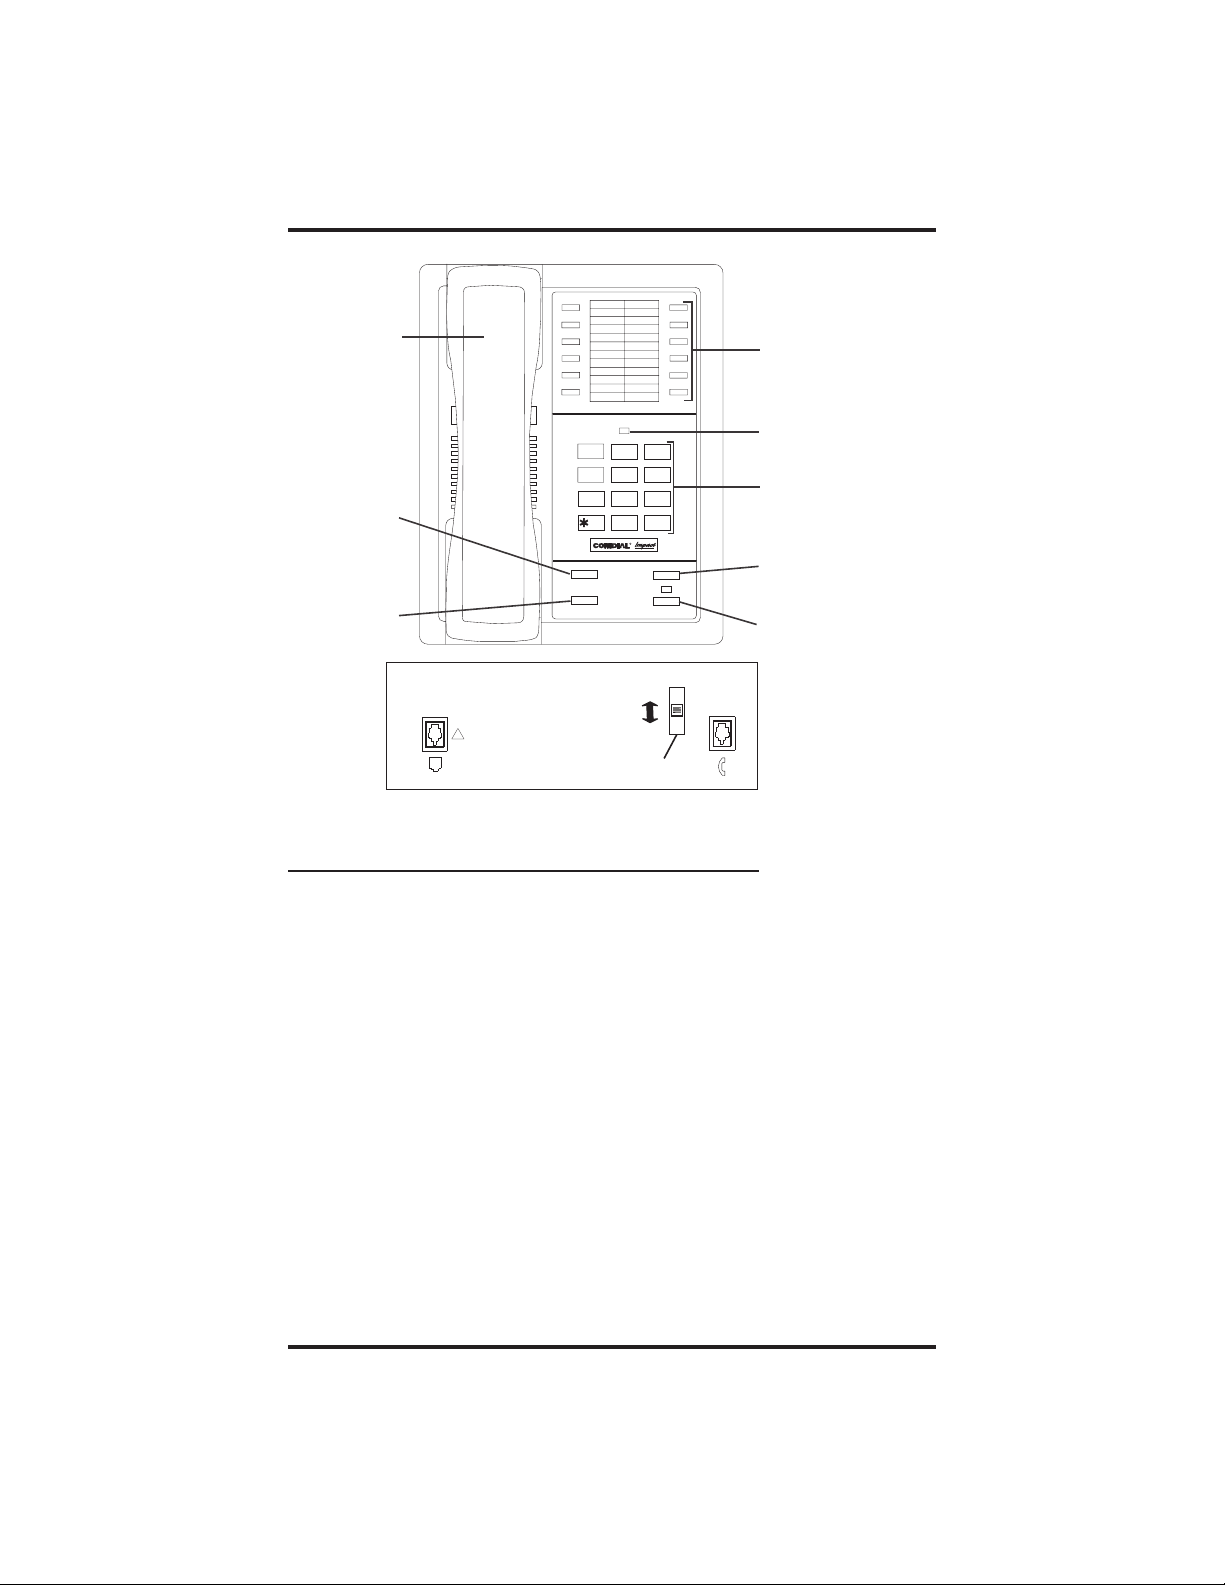
Handset
Line Buttons,
DSS Buttons,
Programmable Buttons
Message
Waiting Light
Dialpad
TAP Button
Intercom Button
Transfer/
Conference
Button
Hold Button
1 2
4
7
TRNS/CNF
HOLD
QZ
ABC DEF
3
GHI
6
5
MNO
JKL
TUV
8
PRS
WXY
9
0
OPER
#
R
TAP
INTERCOM
IMP002A
Connectors On Bottom Of Telephone
Off
Line Cord
!
Loud
Handset
Ringer Volume
Impact 8112N Telephone
1.4 KnowingYour Telephone’sFunctions
Your telephone provides many versatile features for your use. These
features are explained in terms of what they allow you to do. Refer to
section 1.5, Understanding What The Lights Mean, for information about
the lights associated with your telephone’s buttons.
Hold Button
• Places a line or Intercom call on hold.
• Stores pauses in number sequences during programming.
Intercom Button
• Selects an intercom path.
• Allows you to initiate many of the telephone’s features.
Message-Waiting Light
• Indicates that a message awaits pick up.
1 – 8 Non-LCD Station User's Guide
Page 13

GCA70–248 Introducing The Telephone
Microphone Opening
• Allows hands-free operation of speakerphone (not available on
8112N and 8212N).
Mute Button
• Keeps the person on the line from hearing your conversation (not
available on 8112N).
Programmable Buttons
• Allow you to store numbers for automatic dialing functions.
• Allow you to store telephone extension numbers for Direct Station
Selection (DSS).
• Indicate which lines are either in use, ringing, or on hold.
Shift Button
• Allows access to autodial numbers programmed under DSS buttons.
Speaker (not available on 8112N and 8212N)
• Sounds distant party’s voice.
• Sounds ringing and call-in-progress tones.
• Activates group listen feature.
Speaker Button (not available on 8112N and 8212N)
• Turns your speaker on or off.
• Disconnects a call when you are on a handsfree call.
• Ends or cancels programming.
TAP Button
• Recalls dial tone or generates a hookflash.
• Retrieves held calls or last call placed on hold.
Transfer/Conference Button
• Transfers calls
• Sets up conference calls.
Volume Control
• Regulates the volume of the ringer, speaker, handset, and group
listening mode.
Non-LCD Station User's Guide 1 – 9
Page 14

Introducing The Telephone GCA70–248
1.5 Understanding What the Lights Mean
The lights on your telephone indicate the status of lines, features, and
intercom.
Next to a Direct Station Select (DSS)/
Busy Lamp Field (BLF) button:
Steadyred=stationisinuse,orinDoNotDisturb.
Flashing red = station is receiving a call or station is
calling you.
Fluttering red = station-to-station messaging has been set.
Next to a line button:
Steady green = line is in use at your station.
Steady red = line is in use at another station.
Flashingred=acalliscominginonthisline.
Flashing orange = your line is ringing and will be answered
when you take the t elephone off hook.
Winking green = line is on hold at your station.
Winking red = line is on hold at another station.
Fluttering green = line has recalled from hold at your station.
Fluttering red = line has recalled from hold at another station
Next to a fixed feature or programmable feature button:
Steady red = the feature is on.
Steady off = the feature is off.
Next to an INTERCOM button:
Steady red with a quick flash = you are using your intercom.
Fluttering red = auto redial is in use, or system is in night
mode (station 10).
Winking red = an LCD message is set on your telephone for
others to receive when calling.
Flashing red = another station is calling you.
Next to the HOLD button:
Flashing red = message awaits pick up.
Fluttering red = automatic station relocation has been set.
1 – 10 Non-LCD Station User's Guide
Page 15

GCA70–248 Introducing The Telephone
Next to the MESSAGE button (8212S and 8212N only):
Flashing red = message awaits pickup.
Next to the SPEAKER button:
On steady (with telephone on hook and busy) = speakerphone
mode active.
On steady (with telephone on hook and idle) = background
music turned on.
On steady (with telephone off hook and busy) = group
listen is active.
Next to the MUTE button:
On steady = called party cannot hear your conversation.
Next to the SHIFT button:
On steady = shift mode is activated to allow access to second level
autodial numbers programmed at DSS locations.
1.6 Understanding What the Rings Mean
• Two short rings = intercom call.
• Single longer ring = outside call.
• One short ring burst = voice announce.
• Three short ring bursts = ring back from a held call, callback from a
queued call.
You can vary the ringing tone of your telephone, choosing from one of
six different rings. This way, you can identify your ring even though you
may not be close to your telephone.
Additionally, so you won’t be disturbed when you’re busy on a call and
another call rings at your station, the ring volume is Subdued
automatically.
Non-LCD Station User's Guide 1 – 11
Page 16

Introducing The Telephone GCA70–248
1.7 Adusting YourTelephone’s Pedestal
(Models 8212S and 8212N only)
An adjustable pedestal is provided on your telephone to allow you to
select the most comfortable viewing angle. When you receive your
telephone, it will be in its lowest position — down flush against the
pedestal. You can raise your telephone to one of three higher positions
as follows:
1. Grasp the rear of the pedestal base firmly with one hand while
lifting the rear portion of the telephone upward with your other
hand.
2. While pivoting the telephone upward with one hand, pivot the
telephone supporting arms upward with your other hand while
feeling for the notches under the telephone. Notice that there
are three sets of notches under the telephone corresponding to
the three positions available.
3. When the telephone is at your desired height, find the closest
pair of notches corresponding to that height, and engage the
supporting arms with the notches. Press down slightly on the
telephone until you feel the supporting arms snap into place.
Telephone
Supporting Arm
Pedestal Base
1 – 12 Non-LCD Station User's Guide
First Notch
Second Notch
Third Notch
(For Highest Position)
PED01
Page 17

GCA70–248 Answering Calls
2
2.1 Answering Calls
To answer a call that is ringing at your telephone,
•
1. If the light is flashing orange, lift handset.
—OR—
If the light is red, press the flashing line and lift handset.
To answer a call using the speakerphone,
•
1. Press flashing line or INTERCOM button after hearing ringing. If
you hear the caller’s voice, you can answer in the hands-free mode
by speaking toward the telephone. This is possible when the
installer has configured your system for voice-first versus
tone-first intercom calling.
To answer a call that is ringing at any telephone in the system,
•
1. Press INTERCOM and dial ✳ 4 plus extension number of ringing
telephone.
2. Speak toward telephone to answer call. Lift handset if you desire
privacy.
Answering Calls
To answer a call that is ringing at a telephone in your group,
•
1. Press INTERCOM and dial #4(ringing station must be
programmed in your call pickup group).
2. Speak toward telephone to answer call. Lift handset if you desire
privacy.
To answer a call that is ringing the loud ringer or night transfer
•
station,
1. Press INTERCOM and dial 80.
2. Speak toward telephone to answer call. Lift handset for privacy.
Non-LCD Station User's Guide 2 – 1
Page 18

Answering Calls GCA70–248
2.2 Answering Subdued-Off Hook
Voice Announcements (SOHVA) Calls
NOTE:Your telephone may be arranged to receive a subdued off-hook
voice announcement (SOHVA).If it is, an intercom caller may
break into your outside call and deliver a message to your
telephone receiver for you to hear.
To answer a SOHVA
•
1. While off-hook on an outside call, hear several quick tone bursts
followed by an announcement delivered to your ear through the
handset.
To respond verbally,
•
1. Press and hold MUTE.
2. Speak into handset.
To respond non-verbally,
•
1. Press pre-programmed button (see page 9-2 of this manual for
further instructions on programming this function).
NOTE: Announcing station must have LCD speakerphone.
To Block SOHVA,
•
1. Lift handset.
2. Press INTERCOM and dial ✳ 2.
3. Turn SOHVA back on by lifting the handset, pressing
INTERCOM, and dialing #2.
2 – 2 Non-LCD Station User's Guide
Page 19

GCA70–248 Making Calls
3
3.1 Making Calls
NOTE: If the installer has enabled your system with Specialized Route
Access (SRA), the system returns a special intercom tone when
youdialout(usingINTERCOM9,orapreprogrammedline
group button).After this SRA tone, you have ten seconds to
dial digits; otherwise, the telephone automatically returns to its
idle state. Furthermore, you only have three seconds pause
time between digits before the system automatically dials your
call.
To make a call,
•
1. Lift handset, select line (unless your telephone selects it for you),
or select intercom, and listen for dial tone,
2. Either dial number or press HOLD and then press autodial, use
speed dial feature, use redial feature, or press Direct Station Select
(DSS) if making an intercom call.
To dial autodial number,
•
1. Press preprogrammed button. If button is programmed at the
second level of a DSS button, press SHIFT before pressing
autodial button.
Making Calls
2. When called party answers, lift handset.
To dial personal or system speed dial number,
•
NOTE: If you manually choose a line for dialing, press HOLD before
using a speed dial. If you place a call on hold prior to using
your speed dial, pause several seconds before you press the
speed dial button; if you immediately press the speed dial
button, the system will choosethe line that you have on hold to
place your speed dial call.
1. Dial desired code:
1–0 = personal speed dial number,
✳01 – ✳99 = system speed dial number,
Non-LCD Station User's Guide 3 – 1
Page 20

Making Calls GCA70–248
If you select a line, press HOLD then dial code.
2. When called party answers, lift handset.
To redial the last number that you dialed at your telephone,
•
1. Dial #.
If you select a line, press HOLD then dial #.
2. When called party answers, lift handset.
To access outside line using line group feature,
•
1. Press INTERCOM, then dial line group access code:
9=group 1,
81 =group2,
82 =group3,
83 =group4.
2. Listen for outside dial tone.
3. Dial number.
4. When called party answers, lift handset.
To queue for a line group if all lines are busy,
•
1. Press INTERCOM and dial line group access code (9, 81, 82,or
83).
2. Hear busy tone and dial ✳ 8.
3. Hang up and wait for queuing ring-back.
4. When called party answers, lift handset.
To answer queuing ring-back,
•
1. Lift handset and hear dial tone for line.
To cancel queuing before it rings back at your telephone,
•
1. Lift handset.
2. Press INTERCOM and dial #8.
3. Hang up handset.
3 – 2 Non-LCD Station User's Guide
Page 21

GCA70–248 Making Calls
If you are required to enter an account code when making outside
•
calls,
1. Select line.
2.
Press INTERCOM and dial ✳ 04.
3. Dial your account, hear outside dial tone, and dial outside number.
4. When called party answers, lift handset.
To use Toll Restriction Override at a station,
•
1. Press INTERCOM.
2. Dial ✳✳6.
3. Dial your station extension number.
4. Dial your TRO code number.
5. Within 15 second timeout period, dial desired outgoing line
number.
6. Hang up handset or press SPEAKER to end call. You will have 15
seconds in which you can make another call without re-entering
your TRO code.
To clear the Toll Restriction Override code,
•
1. Press INTERCOM.
2. Dial ✳✳6.
3. Press SPEAKER.
Non-LCD Station User's Guide 3 – 3
Page 22

Making Calls GCA70–248
3.2 Using Automatic Call-Back
To arrange for the system to call back when a busy station
•
becomes idle or rings with no answer,
1. Make intercom call and hear busy signal or ring-back tone.
2. Dial ✳ 6.
3. Hang up. (When called station becomes idle or is operated by its
user, your station will ring. Call-back is canceled if you do not lift
your handset when you hear this ringing).
To answer call-back ring,
•
1. Lift handset (called station will ring; call-back is canceled if you
do not lift your handset).
To cancel automatic c all-back,
•
1. Press INTERCOM and dial #6.
3.3 Using Call Waiting
To activate call waiting,
•
1. Make intercom call and hear busy signal.
2. Dial ✳ 01(called party hears tone).
3. Wait on line for an answer.
To cancel call waiting,
•
1. Hang up handset.
To answer a call-waiting tone at your telephone,
•
1. Hear short tone burst in handset receiver.
2. Complete present call, and hang up (waiting call will begin
ringing).
3. Lift handset to answer.
3 – 4 Non-LCD Station User's Guide
Page 23

GCA70–248 Placing Calls On Hold
4
4.1 Placing Calls On Hold
To place a call on hold,
•
1. Press HOLD.
2. Hang up handset.
To return to call that is on hold,
•
1. Lift handset and press line button with flashing green light.
To place a call on exclusive hold,
•
1. Press HOLD twice and hang up handset.
To place a call on hold at another telephone,
•
1. While on line, press INTERCOM (system places call on hold).
2. Dial ✳ 90, then dial extension number of telephone to receive held
call.
3. Hang up handset.
Placing Calls On Hold
To answer a call at the extension receiving held call,
•
1. Lift handset.
2. Press INTERCOM and dial #90.
To cancel directed call hold and retrieve the call,
•
1. Lift handset.
2. Press INTERCOM,dial✳4, then dial the extension number of
the telephone to which you directed the call.
3. Retrieve the call.
Non-LCD Station User's Guide 4 – 1
Page 24

Placing Calls On Hold GCA70–248
To park a call,
•
1. When on a line, press INTERCOM.
2. Dial ✳, then dial park orbit access code (91 - 99)
(if chosen orbit is busy, dial alternative orbit number).
3. Hang up handset.
4. Use paging feature to announce call and park orbit access code if
necessary.
NOTE: If call is not retrieved within a programmable time limit, it
reverts to the parking station as a standard held call, and only
one call can be placed in an orbit at a time.
To retrieve a parked call,
•
1. Hear announcement.
2. Lift handset.
3. Press INTERCOM and dial #.
4. Dial park orbit access code (91 - 99).
5. Answer call.
4 – 2 Non-LCD Station User's Guide
Page 25

GCA70–248 Transferring Calls
5
5.1 Transferring Outside Calls
To announce a call before transferring it,
•
1. Answer outside call.
2. Press TRANSFER/CONFERENCE (call is placed on hold).
3. Dial station number.
4. Upon answer, announce the call.
5. Hang up the handset (call is transferred).
To transfer a call without first announcing it,
•
1. Answer outside call.
2. Press TRANSFER/CONFERENCE (call is placed on hold).
3. Dial station number.
4. Hang up handset. Call will re-ring your telephone if it is not
answered within a preprogrammed time.
Transferring Calls
If you hear a busy signal or receive no answer,
•
1. Press TRANSFER/CONFERENCE and return to outside call.
Non-LCD Station User's Guide 5 – 1
Page 26

This page remains blank intentionally.
Page 27

GCA70–248 Conferencing Calls
6
6.1 Conferencing Stations Together
To conference any combination of inside stations and outside lines,
•
1. Make first call.
2. Press TRANSFER/CONFERENCE.
3. Make next call and press TRANSFER/CONFERENCE to
establish conference.
4. Repeat the last two steps to add up to two more parties.
NOTE: When setting up a conference call with outside lines and inside
stations, you must call the outside lines first. Use the line
group access codes to place the outside lines in your
conference.
To drop outside lines from the conference,
•
1. First press HOLD to place all calls on hold (not doing this will
result in a tone burst interrupting the remaining conferees).
Conferencing Calls
2. Once all calls are on hold, press the line that you wish to bring
back to the conference.
3. Use steps two and three to bring back each line from hold.
Non-LCD Station User's Guide 6 – 1
Page 28

This page remains blank intentionally.
Page 29

GCA70–248 Using The Other Telephone Features
7
Using The Other
Telephone Features
7.1 Using the Recall/Flash Feature
If your system has been configured for flash,
•
1. Press TAP to generate a timed flash signal while on line.
If your system has been configured for recall,
•
1. Press TAP to disconnect as if you had hung up.
7.2 Making a Paging Announcement
To page through an external paging amplifier (if your system
•
provides this feature),
1. Lift handset.
2. Press paging line select button and dial page access code (see your
attendant for code)—if paging is connected to a dedicated paging
port, dial INTERCOM 89.
3. Make announcement.
To page through system telephones (all- call and zone paging),
•
1. Lift handset.
2. Press INTERCOM and dial all-call or zone number:
84, 85, or 86 = zones 1, 2, or 3
87 = all-call.
3. Make announcement.
4. Hang up handset or wait for an answer.
Non-LCD Station User's Guide 7 – 1
Page 30

Using The Other Telephone Features GCA70–248
To answer telephone paging from any station,
•
1. Lift handset.
2. Press INTERCOM,dial88, and meet paging party on line.
To enable or disable the Tracker pager at your station,
•
1. Press INTERCOM.
2. Dial ✳ 06 to enable, or #06 to disable.
To send a call back message to someone’s Tracker Pager after
•
receiving a ring-no-answer,
1. Make an intercom call to someone and receive no answer.
2. Dial #01.
3. After your station returns to idle (if the Tracker paging system
does not accept your action, you will hear an error tone), hang up
the handset or press SPEAKER to end. The Pager-Tracker system
will transmit your station extension number to called party’s
Tracker Pager display. (Some models will also display your station
name if the system is programmed to include station names.)
To park a call and have Tracker Pager t ell someone to retrieve the
•
call.
1. Answer call and press TRANSFER/CONFERENCE.
2. Dial extension number and hear ringback.
3. Dial #01.
4. Hang up handset or press SPEAKER to end. The Tracker paging
system will transmit orbit dialing code and caller ID information,
if available, to called party’s Tracker Pager display.
(Alpha/numeric models display #91 through #99 while
numeric-only models display -91 through -99.)
To respond when your Tracker Pager displays park orbit dialing
•
code,
1. From any system station, press INTERCOM.
2. Dial displayed orbit code (#91–99).
3. Retrieve call.
7 – 2 Non-LCD Station User's Guide
Page 31

GCA70–248 Using The Other Telephone Features
7.3 Switching Between Pulse and Tone
To convert to tone while dialing—if the local telephone service is
•
pulse (rotary),
1. Press # at point in dialing sequence where conversion to tone is
required.
NOTE: Pulse/Tone switching can be programmed into memory keys
by pressing # during number storage.
7.4 Forwarding Calls
To forward personal calls to another telephone,
•
1. Press INTERCOM and dial ✳ 05,
2. Dial extension number of telephone to which calls are to be
forwarded.
To cancel personal call forward,
•
1. Press INTERCOM and dial #05.
To forward all calls to another telephone,
•
1. Press INTERCOM and dial ✳ 5,
2. Dial extension number of station to which calls are to be
forwarded.
To cancel all-call forward,
•
1.
Press INTERCOM and dial
NOTE: For each personal call received during call forward, you will
hear a ring reminder (short tone burst) to remind you that
calls are being forwarded.
# 5.
Non-LCD Station User's Guide 7 – 3
Page 32

Using The Other Telephone Features GCA70–248
7.5 Activating
The Cal
lForward
Outside System (CFOS) Feature
The Call Forward Outside System (CFOS) feature gives DSU II station
users the ability to forward line calls to a remote location outside the
system. CFOS remains in effect in the event of a loss of power or a
system reset.
• To activate the CFOS feature,
1. Press INTERCOM ✳07.
2. Press the speed dial button programmed with the target number,
—OR—
Press a line button,
—OR—
Dial 0 for the Prime line or last used line,
—OR—
Dial 1–4 Line Group number.
3. Dial desired digits 0–9 (maximum 16 digits).
4. Press HOLD for Pause or press TAP for Flash.
5. Press SPEAKER to end.
• To deactivate the CFOS feature,
1. Press INTERCOM # 07.
7 – 4 Non-LCD Station User's Guide
Page 33

GCA70–248 Using The Other Telephone Features
7.6 Engaging Automatic Set Relocation
NOTE: If this feature has been enabled by your system programmer,
the message-waiting light will flash for several seconds when
you connect your telephone to another location. This means
that the system is waiting to automatically relocate your
extension number and other programmed features to the new
location.
If you do not want your telephone to have its old programming after
relocation, reject the automatic relocation.
To accept automatic relocation,
•
1. Do nothing and wait for the light to turn off on its own, or press the
HOLD button to immediately accept the relocation (light
immediately turns off).
To reject the automatic relocation,
•
1. Press the # button while the message waiting light is flashing.
Non-LCD Station User's Guide 7 – 5
Page 34

Using The Other Telephone Features GCA70–248
7.7 Understanding The DATAButton Light
The optional Data Interface Unit (DIU) provides connections for your
standard multiline digital telephone and an Industry Standard
Telephone (IST) device. The DIU enables you to switch between your
multiline telephone and an IST device (an industry standard telephone,
FAX machine, modem, cordless telephone, or answering machine).
When you have a DIU (either local or remote) assigned to your
multiline telephone, your telephone will have a preprogrammed DATA
button labeled DATA by the system installer. The DATA LED will
provide you with the following visual feedback on the operating status
of the DIU.
DA T A LED DIU STA TUS
Off Digital mode (multiline telephone selected)
On (green) IST device selected but not active
On (red) IST device busy
Flashing (red) IST device ringing
If the DIU has been removed or is inoperable, the DATA LED will be
off. If this occurs, plug the multiline telephone into a digital station port.
To select the multiline telephone (DATA LED on or flashing),
•
1. Press the preprogrammed DAT A button. If a call is in progress on
the IST device, it will transfer to the multiline telephone if the
multiline telephone is off hook or in speakerphone operation. If the
multiline telephone is on hook, the call will be dropped.
To select the IST device (DATA LED off),
•
1. Press the preprogrammed DAT A button. If a call is in progress on
the multiline telephone, it will transfer to the IST device if that
device is off hook. If the IST device is on hook, the call will be
dropped. You can still receive visual messages via the LEDs and
LCD on your multiline telephone, even though the voice path is
routed to the IST device.
NOTE: If you transfer a line to your own multiline telephone then
press the DATA button, the IST device will ring.
7 – 6 Non-LCD Station User's Guide
Page 35

e
GCA70–248 Using The Other Telephone Features
7.8 Using The IMIST Module
Impact SCS 8212S-** and 8212N-** speakerphones equipped with the
optional IMIST module can support an IST device (modem, FAX
machine, industry-standard telephone, etc.) in addition to the
speakerphone. Depending on system programming, the IST device may
be used to make outgoing calls and receive incoming calls.
The functionality of the IMIST module is similar to the optional Data
Interface Unit (see Section 7.7).
Functioning only on a DSU II system, the IMIST module does not have
its own extension number and does not function simultaneously with
the speakerphone.
NOTE: The IMIST module does not provide voltage to light a message
waiting light. Message waiting lights on devices plugged into
the IMIST module will not function.
If you have any other questions about IST devices, refer to
GCA70–237, Industry-Standard Telephone Station User’s Guide.
NOTE: The IMIST module has a separate power supply. The wall
transformer is a UL and CSA approved Class 2 device
operating from 120 Vac, 60 Hz, 16 watts and provides an
output of 24 Vac at 450 mA. For replacement, order Comdial
P/N DIU-PTR.
Power
IST Devic
scs04
IMIST Module
Non-LCD Station User's Guide 7 – 7
Page 36

Using The Other Telephone Features GCA70–248
7.9 Background Music
If supplied by your main system, music can be set to play through your
telephone speaker.
To turn music ON,
•
1. Press INTERCOM ✳ 1 (speaker light will turn on).
2. Adjust loudness of music with speaker volume control.
To turn music OFF,
•
1. Press INTERCOM # 1 (speaker light will turn off).
NOTE: Background music automatically turns off during calls and
returns after a call is completed.
7.10 Using The Dynamic L ine Button Feature
Certain idle buttons on your telephone (these are usually the first two
or three buttons) can be arranged by the installer as dynamic line
buttons. This feature allows the system to temporarily assign a line to
your station that you would normally not have. You will have line
appearance whenever a call appears at one of these locations.
To answer a call appearing at a dynamic line button,
•
1. Press the flashing button and lift handset.
7 – 8 Non-LCD Station User's Guide
Page 37

GCA70–248 Programming Your Telephone
8
Sending And Receiving
Non-Verbal Messages
8.1 Lighting TheMessage Light
If the system installer designates your speakerphone as a central message
desk or programs it to have message-wait originate ability, you can turn
on the message-waiting light of any other telephone. This light lets that
telephone user know that you have a message for him or her.
The message-waiting light is located in different places on the various
model telephones. On the 8124S and 8112S telephones, the message
waiting light is located above the HOLD button. On the 8112N
telephone, the message waiting light is located above the dial pad. The
8212S and 8212N telephones have a dedicated message waiting button
and light, labeled MESSAGE. For more information on button locations,
see Chapter 1.
If your telephone receives a message and has a Directed Station Select
DSS button that is programmed to call the station that left the message,
the light next to that station’s DSS button on your telephone will flash.
Non-LCD Station User's Guide 8 – 1
Page 38

Programming Your Telephone GCA70–248
To receive a message at an alerted station,
•
1. Observe flashing HOLD or MESSAGE light.
2. Press INTERCOM, then HOLD; or MESSAGE (connection to
station that left message is automatic).
To turn on the message waiting light at another station,
•
1. Press INTERCOM ✳ 3, or MESSAGE.
2. Dial extension number of station to be alerted (the message
waiting light of called station will flash).
To turn off the message waiting light at another station,
•
1. Press INTERCOM # 3,orMESSAGE.
2. Dial extension number of station that was alerted (the message
waiting light of called station will turn off).
To turn off the message waiting light during message-delivering
•
conversation,
1. Press INTERCOM.
NOTE: Any station, if programmed with “Message Wait Originate,”
can have this messaging capability.
8 – 2 Non-LCD Station User's Guide
Page 39

GCA70–248 Programming Your Telephone
8.2 Sending Messages To LCD Speakerphones
NOTE: You can set system-supplied messages to be displayed by
calling an LCD speakerphone.
To turn LCD messaging on,
•
1. Press INTERCOM.
2. Dial ✳ 02.
3. Choose message code number (0–9).
4. Press SPEAKER.
8.3 Station-To-Station Messaging
To activate station-to-station messaging (station must have BLF
•
appearance at called station),
1. Make intercom call and hear ring-back tone.
2. Dial ✳ 7; your station’s BLF light turns on at called station.
3. Hang up handset.
To cancel station-to-station messaging,
•
1. Press INTERCOM and dial #7.
2. Dial extension number of station where you left the call-back
indication.
3. Press SPEAKER.
Non-LCD Station User's Guide 8 – 3
Page 40

This page remains blank intentionally.
Page 41

GCA70–248 Programming Your Telephone
9
Programming
YourTelephone
9.1 ProgrammingYourTelephone
To store autodial numbers,
•
1. Press INTERCOM and dial ✳✳1.
2. Press programmable button.
3. Press line button, or dial 1, 2, 3,or4, to select line groups 1–4,or
dial 0 for system to select line.
4. Dial number to be stored (16 digits maximum).
To store hookflash in an autodial sequence, press TAP; press
HOLD to store pause (only if needed).
5. Press TRANSFER/CONFERENCE, then press next
programmable button, and dial another number to be stored.
6. Repeat previous step until finished then press SPEAKER.
NOTE: You can store an autodial number at a second level at a DSS
button if you wish.
To store extension numbers at DSS buttons,
•
1. Press INTERCOM and dial ✳✳3.
2. Press programmable button.
3. Dial extension number.
4. Press next programmable button and dial another extension
number.
5. Repeat previous step until finished then press SPEAKER.
Non-LCD Station User's Guide 9 – 1
Page 42

Programming Your Telephone GCA70–248
To store personal speed dial numbers,
•
1. Press INTERCOM and dial ✳✳2.
2. Dial memory location (1–0).
3. Press line button, or dial 1, 2, 3,or4to select line groups 1–4
—OR—
dial 0 for system to select line.
4. Dial number to be stored (16 digits maximum). Press TAP to store
hookflash and press HOLD to store pause (if needed).
5. Press TRANSFER/CONFERENCE, dial next location, select
line, and dial another number to be stored.
6. Repeat previous step until finished, then press SPEAKER.
To store special purpose feature buttons,
•
1. Press INTERCOM and dial ✳✳1.
2. Press programmable button.
3. Dial feature code:
5 = response messaging button (then dial 0–9 for message)
6 = transfer to voice mail button (then dial extension number)
7 = assist button (then dial 0-9 or * for message)
8 = subdued off-hook voice announce button
98 = group listen button
# = auto redial button
4. Press TRANSFER/CONFERENCE then next programmable
button and dial another feature code.
5. Repeat step 5 until finished, then press SPEAKER.
NOTE: The Federal Communications Commission (FCC) requires that
when programming emergency numbers and making test calls
to emergency numbers you do the following: (1) Remain on the
line and briefly explain to the dispatcher the reason for the
call; (2) always makesuch a test call during the off-peak
hours, such as early morning or late evening.
9 – 2 Non-LCD Station User's Guide
Page 43

GCA70–248 DSS/BLF Console
10
OperatingYourTelephone
With A DSS/BLF Console
10.1 OperatingYourTelephone
With A DSS/BLF Console
The IB24X, IB48X, and IB64X consoles have additional buttons and
status lights that extend the memory button capability of a companion
telephone. You can program the buttons for automatic dialing (speed
dial) or direct station selection (DSS) with busy lamp field (BLF) using
instructions provided in chapter 9, ProgrammingYour Telephone.
When the installer assigns a DSS/BLF console to a station port, the
system recognizes it as such and automatically assigns DSS buttons.
ib64x
IB64X DSS/BLF Console
Non-LCD Station User's Guide 10 – 1
Page 44

DSS/BLF Console GCA70–248
10.1.1 Accessing The Button Levels
The IB24X and IB48X DSS/BLF consoles have four levels of buttons,
quadrupling the consoles’button capacity. The four buttons at the bottom
of each console allow you to select which button level is currently active.
To change button levels, press one of the buttons at the bottom of the
console. The leftmost button activates level 1, the next button activates
level 2, etc. A light beside the appropriate button lights to indicate which
level is currently active. You can use one level on the IB48X and two
levels on the IB24X
Level access buttons
IB48X DSS/BLF Console
ib48x
ib24x
Level access buttons
IB24X DSS/BLF
10 – 2 Non-LCD Station User's Guide
Page 45

GCA70–248 Troubleshooting Your Telephone
11
Troubleshooting
YourTelephone
Should your Impact telephone fail to operate properly, or if you do not
understand why it is operating in a certain manner, review the following
list of symptoms and causes for help.
SYMPTOM POSSIBLE CAUSE
INTERCOM light is
flashing.
HOLD or MESSAGE light
is flashing.
MUTE light is on. MUTE is activated.
Your messaging is set. Dial
INTERCOM,then#02andhangup.
Another telephone has activated your
message waiting light. (See section 8.1.)
Press INTERCOM and then press
HOLD or MESSAGE to retrieve
message. This action will call the party
who activated light. Once you have
received message, party who activated
light (while still talking to you) must
press INTERCOM to turn off the light.
To cancel, press MUTE.
SPEAKER light on steady. Background music feature activated even
though you may not have background
music provided. Dial INTERCOM then
#1 andhanguptocancel.
Error Tone
(three steady tones)
You can not receive a voice
announce call.
May occur when incorrect buttons are
pressed during autodial or speed dial
programming. For example, if a button
has a line assigned to it, it is not available
as a programmable button and an error
tone sounds if it is pressed during
programming.
Voice announce block has been activated.
To cancel (if desired), dial INTERCOM
then #2.
Non-LCD Station User's Guide 11 – 1
Page 46

This page remains blank intentionally.
Page 47

GCA70–248 Index
Index
A
AccessingTheButtonLevels(onDSS/BLF)............... 10–2
ActivatingTheCFOSFeature............................ 7–4
Announcement, Making A Paging ......................... 7–4
AnsweringCalls....................................... 2–4
AnsweringSOHVACalls................................ 2–2
AutomaticCallBack,Using.............................. 3–4
AutomaticSetRelocation,Engaging....................... 7–5
B
BackgroundMusic..................................... 7–8
ButtonLevels(onDSS/BLF),AccessingThe............... 10–2
Button,Hold.......................................... 1–8
Button,Intercom....................................... 1–8
Button,Mute.......................................... 1–8
Button,Shift.......................................... 1–8
Button,Speaker ....................................... 1–9
Button,Tap........................................... 1–9
Button,Transfer/Conference ............................. 1–9
Buttons,Programmable................................. 1–8
C
CallWaiting,Using .................................... 3–4
Calls,Answering....................................... 2–1
Calls,Conferencing.................................... 6–1
Calls,Forwarding...................................... 7–3
Calls,Making......................................... 3–1
Calls,Transferring ..................................... 4–1
CFOSFeature,ActivatingThe............................ 7–4
ConferencingCalls..................................... 6–1
ConferencingStationsTogether........................... 6–1
Control,Volume....................................... 1–9
D
DataInterfaceUnit(DIU),Optional,....................... 7–6
DSS/BLF Console, Operating Your TelephoneWithA........ 10–1
DynamicLineButtonFeature,UsingThe................... 7–8
Index – 1
Page 48

Index GCA70–248
E
EngagingAutomaticSetRelocation ....................... 7–5
F
Feature,UsingTheRecall/Flash.......................... 7–1
Features, Using The Other Telephone ...................... 7–1
ForwardingCalls ...................................... 7–3
G
Guide,UsingThis...................................... 1–1
Guidelines,SpeakerphoneUser........................... 1–5
H
HoldButton .......................................... 1–8
Hold,PlacingCallsOn.................................. 4–1
I
IMIST Module, Using The............................... 7–7
IntercomButton....................................... 1–8
Introducing The Telephone............................... 1–1
K
KnowingYourTelephone’sFunctions...................... 1–8
L
LCD Speakerphones, Sending Messages To ................. 8–3
Light,DataButton..................................... 7–6
Light,LightingTheMessage............................. 8–1
Light,MessageWaiting.................................. 1–8
LightingTheMessageLight ............................. 8–1
Lights,UnderstandingWhatTheyMean................... 1–10
M
Making A Paging Announcement.......................... 7–1
MakingCalls.......................................... 3–1
MessageWaitingLight.................................. 1–8
MessageLight,LightingThe............................. 8–1
Messages,SendingAndReceivingNonVerbal............... 8–1
Messaging,Station-To-Station............................ 8–3
Microphone Opening ................................... 1–8
Music,Background..................................... 7–8
MuteButton.......................................... 1–8
2–Index
Page 49

GCA70–248 Index
N
NonVerbalMessages,SendingAndReceiving............... 8–1
O
Operating Your Telephone With A DSS/BLF Console ........ 10–1
OutsideCalls,Transferring .............................. 5–1
Overview............................................. 1–3
P
Paging Announcement, Making A ......................... 7–1
PlacingCallsOnHold.................................. 4–1
ProgrammableButtons.................................. 1–8
ProgrammingYourTelephone ............................ 9–1
PulseAndTone,SwitchingBetween....................... 7–3
R
Rings,UnderstandingWhatTheyMean ................... 11–1
S
SendingAndReceivingNonVerbalMessages................ 8–1
Sending Messages To LCD Speakerphones.................. 8–3
ShiftButton........................................... 1–8
SOHVACalls,Answering ............................... 2–2
Speaker.............................................. 1–9
SpeakerButton........................................ 1–9
SpeakerphoneUserGuidelines ........................... 1–5
Speakerphone,UsingYour............................... 1–4
Station-To-StationMessaging ............................ 8–3
SwitchingBetweenPulseAndTone ....................... 7–3
T
TapButton............................................ 1–9
Telephone Features, Using The Other ...................... 7–1
Telephone, Introducing The .............................. 1–1
Telephone, Programming Your............................ 9–1
Telephone, TroubleshootingYour......................... 11–1
Telephone’s Functions, Knowing Your...................... 1–8
Transfer/ConferenceButton.............................. 1–9
TransferringCalls...................................... 4–1
TransferringOutsideCalls............................... 5–1
TroubleshootingYourTelephone ......................... 11–1
Index – 3
Page 50

Index GCA70–248
U
UnderstandingTheDataButtonLight...................... 7–6
UnderstandingWhatTheLightsMean.................... 1–10
UnderstandingWhatTheRingsMean..................... 1–11
UsingAutomaticCallBack............................... 3–4
UsingCallWaiting..................................... 7–5
UsingTheDynamicLineButtonFeature....................7-8
Using The IMIST Module ............................... 7–7
Using The Other Telephone Features....................... 7–1
UsingTheRecall/FlashFeature........................... 7–1
UsingThisGuide...................................... 1–1
Using Your Speakerphone ............................... 1–4
V
VolumeControl........................................ 1–9
4–Index
Page 51

GCA70–248 Quick Reference Guide
A
Appendix A
Quick Reference Guide
This quick reference guide provides you with a list of the feature dialing
codes used on the Impact digital telephone system.
Feature To Turn On To Turn Off
Account Code
Assist Programmed Button
Attendant INTERCOM 0
Automatic Callback INTERCOM Ext. ✳ 6 INTERCOM # 6
Background Music INTERCOM ✳ 1 INTERCOM # 1
Call Forwarding:
All Calls
Personal Calls
CFOS (DSU II)
Call Pickup:
Directed
Group
Call Park INTERCOM ✳ (91–99) #91–99 to retrieve
Call Waiting INTERCOM EXT. ✳ 01 Hang Up
Directed Hold INTERCOM ✳ 90, Ext. INTERCOM # 90
Executive Override INTERCOM Ext. ✳ 03
Hookflash Code INTERCOM # 04
LCD Messaging
Line Group 1
Line Group 2
Line Group 3
Line Group 4
Line Group Queue
Message Waiting INTERCOM ✳ 3 Ext.
Programmed Button, or
INTERCOM ✳ 04
INTERCOM ✳ 5
INTERCOM ✳ 05
INTERCOM ✳ 07
INTERCOM ✳ 4plus
Ringing Ext.
INTERCOM # 4
INTERCOM ✳ 02, 0–9,
SPEAKER
INTERCOM 9
INTERCOM 81
INTERCOM 82
INTERCOM 83
INTERCOM (grp. code)
✳ 8
INTERCOM # 5
INTERCOM # 05
INTERCOM # 07
INTERCOM
INTERCOM # 02
INTERCOM # 8
INTERCOM # 3
Ext.
Quick Reference – 1
Page 52

Quick Reference Guide GCA70–248
Feature To Turn On To Turn Off
Night Answer INTERCOM 80
Paging
Zone 1 Paging
Zone 2 Paging
Zone 3 Paging
All-Call Paging
Meet-Me Paging
External Paging
Personal Ringing
Tones
Response
Messaging
Service Observe INTERCOM # 03
SOHVA O riginate Programmable Button
Station to Station
Messaging
System Speed
Dialing
Tracker Pager INTERCOM✳06 INTERCOM # 06
Tracker
Pager—Send
Tracker Page
Toll Restriction
Override
Voice Announce
Block
Volume Save INTERCOM ✳✳5
INTERCOM 84
INTERCOM 85
INTERCOM 86
INTERCOM 87
INTERCOM 88
INTERCOM 89
INTERCOM ✳✳4+1
(tone 1)
INTERCOM ✳✳4+2
(tone 2)
INTERCOM ✳✳4+3
(tone 3)
INTERCOM ✳✳4+4
(tone 4)
INTERCOM ✳✳4+5
(tone 5)
INTERCOM ✳✳4+6
(tone 6)
Programmable Button
INTERCOM Ext. ✳ 7 INTERCOM # 7
✳ 01–99
INTERCOM # 01
INTERCOM ✳✳6
Programmed Button or
INTERCOM ✳ 2
INTERCOM # 2
2 – Quick Reference
Page 53

NOTES
Page 54

NOTES
Page 55

Thismanualhasbeen developedbyComdial Corporation(the
“Company”) and is intended for the use of its customers and
service personnel. The information in this manual is subject
to change without notice. While every effort has been made
to eliminate errors, the Company disclaims liability for any
difficulties arising from the interpretation of the information
contained herein.
The information contained herein does not purport to cover
all details or variations in equipment or to provide for every
possible contingency to be met in connection with
installation, operation, or maintenance. Should further
information be desired, or should particular problems arise
which are not covered sufficiently for the purchaser’s
purposes, contact Comdial, Inside Sales Department, P.O.
Box 7266, Charlottesville, Virginia22906.
Page 56

R
Charlottesville, Virginia 22901-2829
World Wide Web: http://www.comdial.com/
Printed in U.S.A. GCA70–248.07
8/97
 Loading...