

Page 1
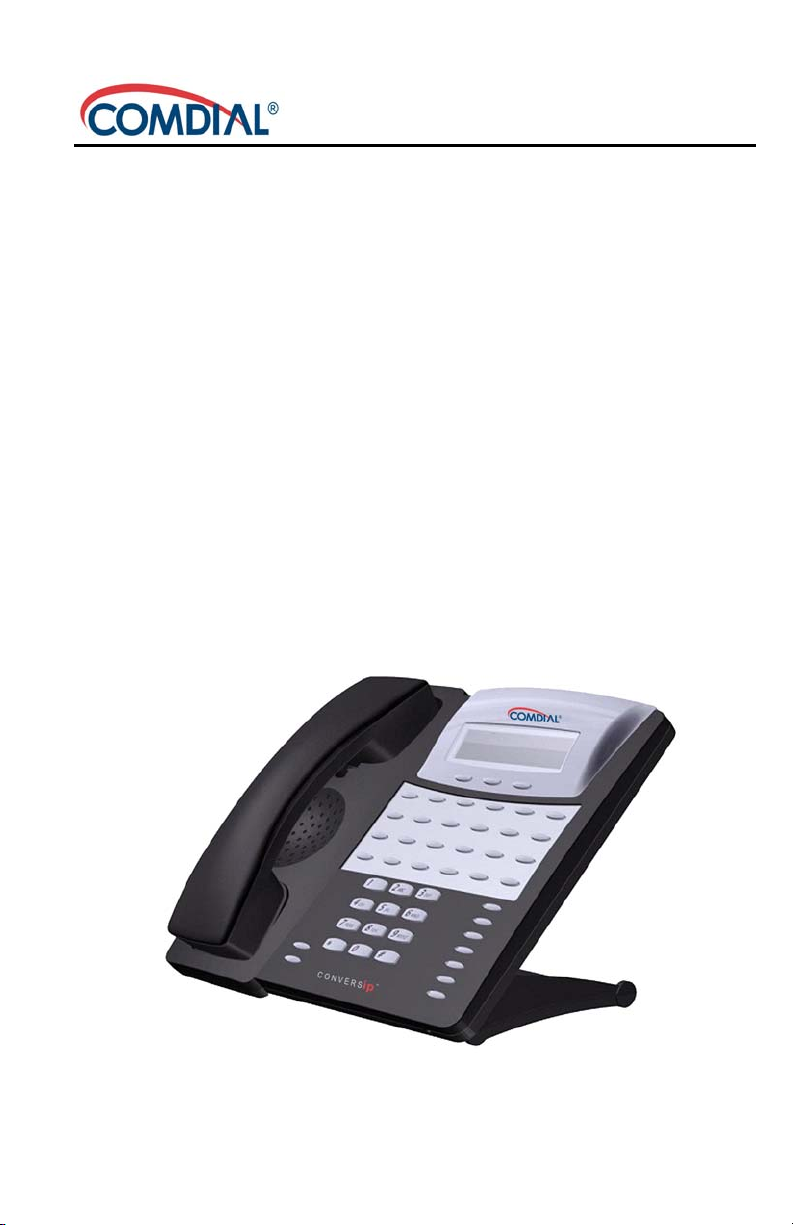
CONVERSip EP300 Voice IP Endpoint
for MP5000
User Guide
Page 2

CONVERSip EP300 Voice IP Endpoint
for MP5000
User Guide
Copyright © 2004 Comdial Corporation
All rights reserved. Unauthorized use of this
document is prohibited.
Comdial Corporation
106 Cattlemen Road, Sarasota, FL 34232
(941) 554-5000 or (800) 266-3425
-Notice-
Comdial reserves the right to make any
changes and improvements in the product
described in this document at any time and
without prior notice.
CONVERSip, MP5000, EP300 Voice IP Endpoint, and EP200 Multimedia IP Endpoint are trademarks of Comdial Corporation. All other prod-
uct names are trademarks of their respective owners.
First Edition
May, 2004
GCA70-399 May ‘04 ii
Page 3

This equipment has been tested and found to comply with the limits for a
Class B digital device, pursuant to Part 15 of the FCC Rules. These limits
are designed to provide reasonable protection against harmful interference in a residential installation. This equipment generates, uses and can
radiate radio frequency energy and, if not installed in accordance with the
instructions, may cause harmful interference to radio communications.
However, there is no guarantee that interference will not occur in a particular installation. If this equipment does cause interference to radio or
television reception, which can be determined by turning the equipment
off and on, the user is encouraged to try to correct the interference by one
or more of the following measures:
• Reorient or relocate the receiving antenna
• Increase the separation between the equipment and receiver
• Connect the equipment into an outlet on a circuit different from that
to which the receiver is connected
• Consult the dealer or an experienced radio/TV technician for help
May ‘04 Comdial iii
Page 4

This Page Intentionally Left Blank
iv Comdial May ‘04
Page 5

Revision History
Ve rs i on Changes Date
01 Initial Release 05/17/04
May ‘04 Comdial v
Page 6

This Page Intentionally Left Blank
May ‘04 Comdial vi
Page 7

CONVERSip EP300 User (MP5000)
TABLE OF CONTENTS
1. INTRODUCTION................................................................9
1.1 Positioning the EP300.......................................................10
1.2 Making the Connections...................................................12
1.3 Adjusting the Volume .......................................................13
1.4 Using the LCD Menu........................................................13
2. MAKING CALLS..............................................................19
2.1 Making a Call to Another Extension ................................19
2.2 Making a Call to an Outside Party....................................20
2.3 Redialing a Previously Dialed Number ............................22
2.4 Making a Call Using a Speed Dial Button........................23
2.5 Making a Call by Dialing a Speed Dial Bin .....................24
2.6 Making a Call to a User Name .........................................24
2.7 Calling the Attendant........................................................25
3. ANSWERING CALLS ......................................................27
3.1 Answering a Call in your Pickup Group...........................28
3.2 Answering a Call While on a Call ....................................28
4. PROCESSING CALLS .....................................................31
4.1 Muting the Microphone ....................................................31
4.2 Using Call Hold ................................................................31
4.3 Retrieving a Held Call ......................................................32
May ‘04 Comdial vii
Page 8

Contents
4.4 Parking Calls.....................................................................32
4.4.1 Placing an Outside Call in a Park Orbit....................33
4.4.2 Retrieving an Outside Call from a Park Orbit ..........33
4.4.3 Handling Park Recalls ..............................................33
4.5 Transferring a Call............................................................34
4.6 Establishing a Multi-Party Conference.............................35
4.6.1 Ad-Hoc Conferences.................................................35
4.6.2 Meet-Me Conferences...............................................36
4.7 Forwarding Calls to Another Extension ...........................37
4.8 Using Call Pickup.............................................................37
4.9 Feature Access Codes .......................................................38
APPENDIX A SPECIFICATIONS......................................39
viii Comdial May ‘04
Page 9
CONVERSip EP300 User
1. INTRODUCTION
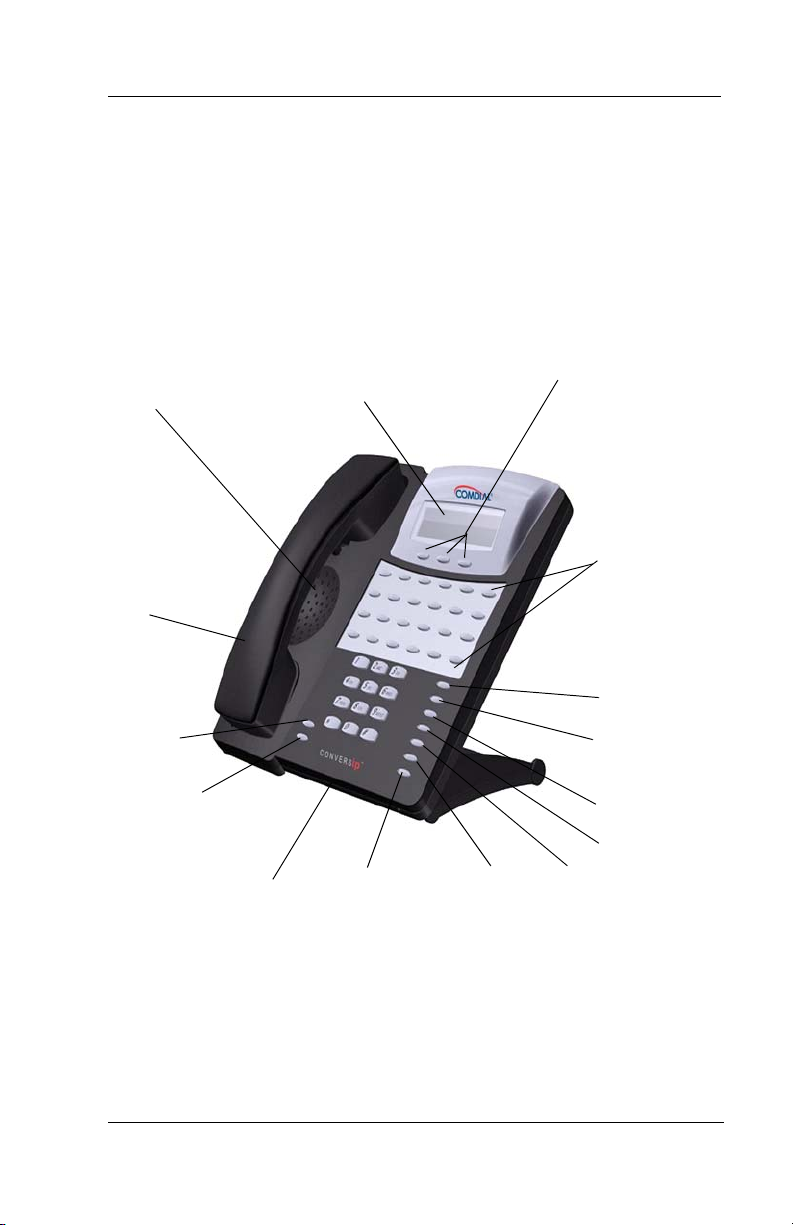
Before you start using your EP300, take a quick look at its layout.
The endpoint has three soft keys, 24 programmable buttons, seven
fixed function buttons, volume up and down buttons, an LCD, and a
standard dial pad.
speaker
handset
volume up
volume down
microphone opening
LCD
dial/answer
mute
soft keys
(not programmable)
programmable
buttons
hold
transfer/
conference
redial
headset
speaker
When your new EP300 arrives, the system installer unpacks the
phone and connects the line cord to a network jack. The following
sections describe a few initial adjustments that allow you to quickly
begin making and answering calls.
May ‘04 Comdial 9
Page 10

Introduction
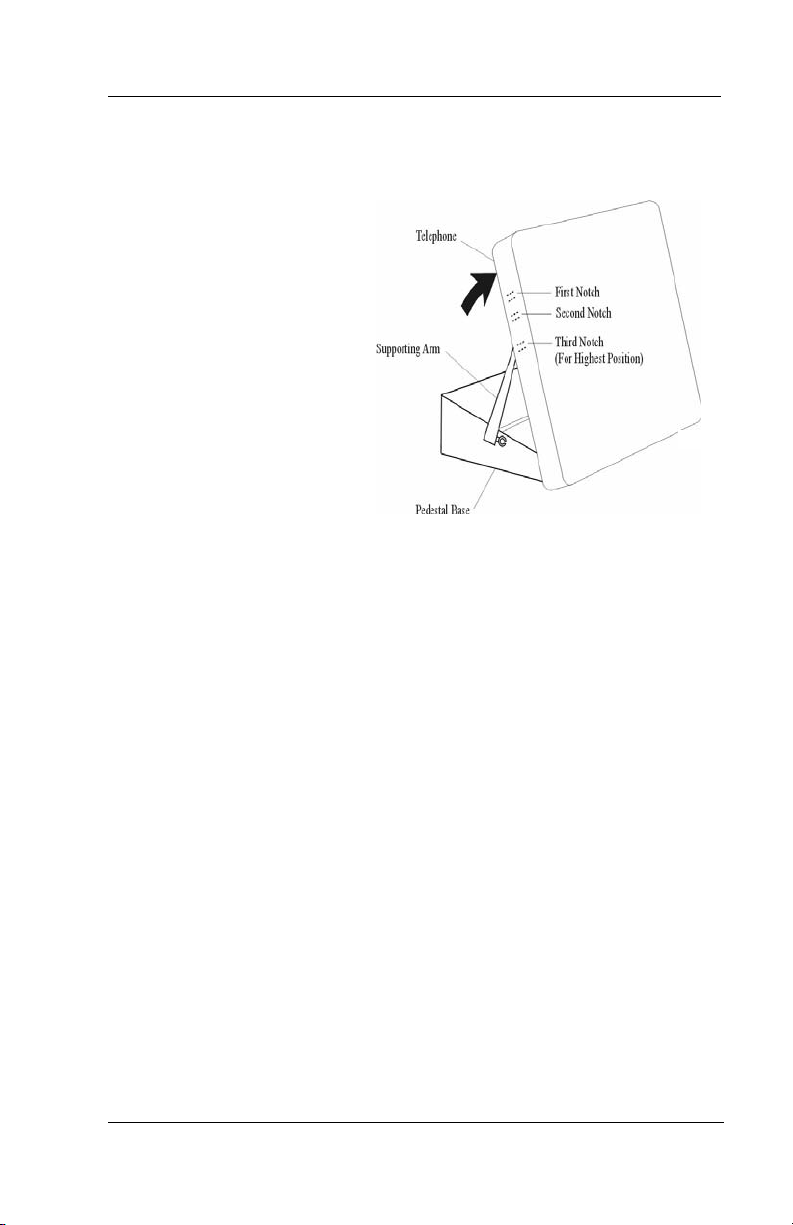
1.1 Positioning the EP300
You should adjust the position of the EP300 on your desk or table to
suit your individual needs and maximize the performance of the
sound activated features. When using your EP300 as a speakerphone,
the microphone and loudspeaker are farther from you than when you
use a handset. Some positioning tips to consider include:
• For the microphone to best detect your voice, speak within three
feet of it and face the speakerphone.
• Background noise may prevent the sound-activated switches
from operating properly. Avoid placing the speakerphone
where it will detect sounds from typewriters, keyboards,
printers, paging systems, and other equipment.
• Place the EP300 on a hard surface and away from table edges.
Do not place the EP300 in corners or enclosures. Do not let
obstructions come between you and the microphone.
The EP300 has an adjustable pedestal to allow you to select the most
comfortable viewing angle. When you receive the EP300, the pedestal is in its lowest position—flush against the pedestal.
10 Comdial May ‘04
Page 11
CONVERSip EP300 User
To adjust the pedestal, perform the following tasks.
1. Grasp the rear of the
pedestal base firmly
with one hand and
lift the rear portion
of the EP300
upward with your
other hand.
2. Lift the EP300
upward with one
hand and raise the
EP300 supporting
arms upward with
your other hand.
Notice there are
three sets of notches under the EP300 corresponding to the
three positions available.
3. When the EP300 is at the desired height, select the closest pair
of notches and insert the supporting arms in the notches. Press
down slightly on the EP300 until you feel the supporting arms
snap into place.
Also remember, as with any piece of electronic equipment, your
EP300 may be damaged by contact with liquids. So please try to
place the EP300 in an area that is free from the danger of spills.
May ‘04 Comdial 11
Page 12
Introduction
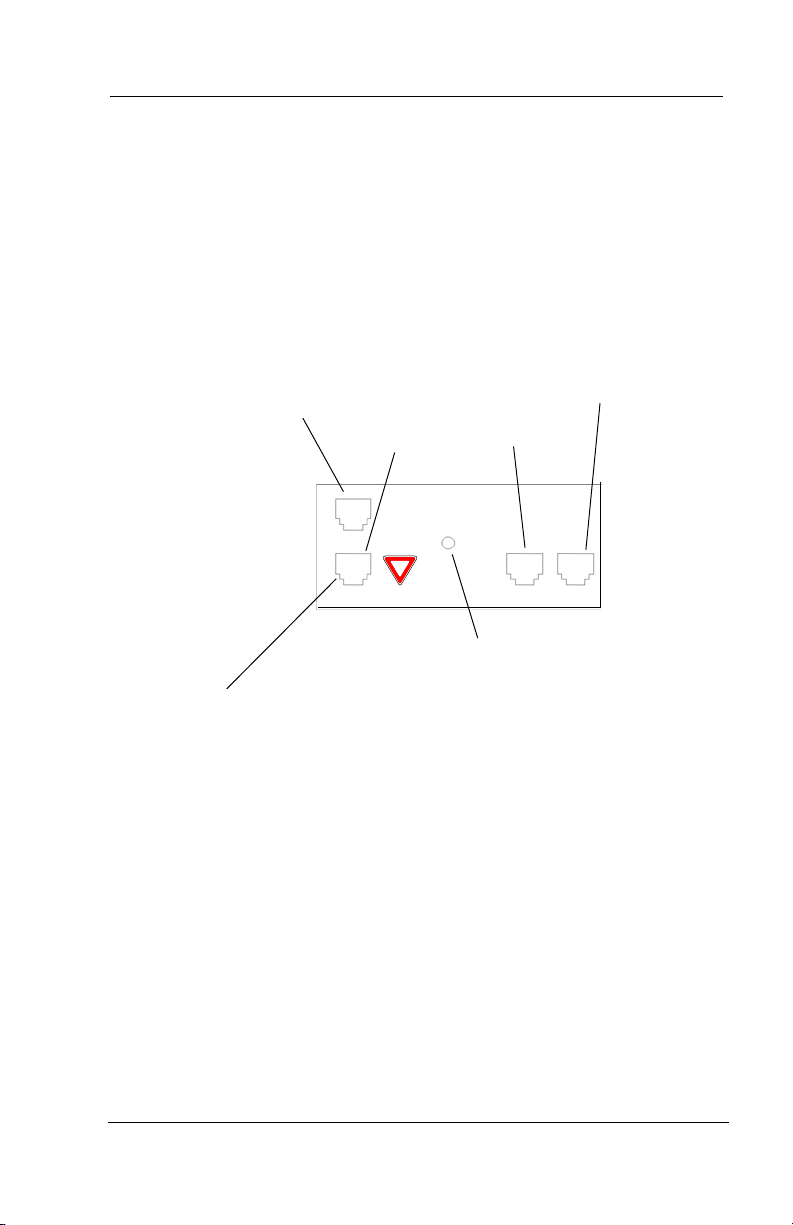
1.2 Making the Connections
The connectors for attaching your EP300 to the network are located
on the underside of the instrument. Here you will also find connectors for attaching the power supply and an optional headset. You
can also connect a cable from the EP300 to your PC so that both
devices can operate with a single network cable. The following
diagram shows the cable connection locations.
To PC
Caution: Do not connect this jack directly to a central
office line.
To LAN
connection
To Handset
Power
To Headset
Note: Some types of network equipment can provide the power for
the EP300 instrument through its Ethernet connection. In those
instances, the external power supply is not required.
12 Comdial May ‘04
Page 13

CONVERSip EP300 User
1.3 Adjusting the Volume
Adjusting the volume on the EP300-24 instrument affects the
loudness of the speaker, handset, and headset (if equipped). Refer to
Figure 1-1 for the location of the volume control.
To adjust the volume during a call, perform the following steps.
1. Press the volume up or volume down button on the EP300.
The EP300 adjusts the volume incrementally each tome you
press the button.
2. The volume setting remains in affect for the current call only.
If you want to adjust the volume for all calls, you can adjust your
default settings by using the LCD menu structure. To do so, select
Menu, 1 Hardware Settings>1 Handset Volume and set the volume
you want to use on all calls. The new setting remains in place until
you make subsequent adjustments.
1.4 Using the LCD Menu
The EP300 menu allows you to view or modify the configuration settings of your EP300, and to view the call activity log. Some items are
password protected and should only be changed by the installer or
administrator, since doing so could adversely affect the operation of
your phone.
Normal display on your EP300 LCD consists of the date and time on
the first line, and the soft key labels on the second line.
Tue Apr 20 4:22
MENU STA
May ‘04 Comdial 13
Page 14

Introduction
To enter the configuration menu, press the MENU soft key.
1 HW Settings
ENTER BACK NEXT
Press MENU to advance to the next menu choice. To select an item,
press the ENTER soft key. To return to the previous level, press the
BACK soft key. To advance to the next item on the current menu,
press NEXT.
If the displayed results extend beyond the viewing area of the LCD,
the soft key functions change to allow you to scroll to the left or right.
02:02:d0:00:11:00->
<- BACK ->
14 Comdial May ‘04
Page 15

CONVERSip EP300 User
The following selections are available from the EP300 menu.
Main
Menu
Option
HW Settings --
1
sets the default volume level for the
handset, speaker, headset, and ringer.
1
Handset Volume-allows you to set the current
volume setting for the handset, from 1 to 8, with
8 being the highest. The default is level 3.
2
Speaker Volume-allows you to set the current
volume setting for the speaker, from 1 to 8, with
8 being the highest. The default is level 3.
3
Headset Volume-allows you to set the current
volume setting for the headset, from 1 to 8, with
8 being the highest. The default is level 3.
4
Ring Volume-allows you to set the current
volume setting for the ringer, from 1 to 8, with 8
being the highest. The default is level 1.
2
Info - displays call lists, system information, and LAN
information.
Received Calls-displays the last 10 calls received
1
at your EP300.
Sent Calls-displays the last 10 calls placed from
2
your EP300.
--CONTINUED ON NEXT PAGE--
May ‘04 Comdial 15
Page 16

Introduction
Main
Menu
Option
2
Info - (continued)
System Info-displays the following system
3
information.
Network Info shows the MAC Address,
1
VSP Address, DHCP, IP Address, Net
Mask, and GW Address.
2
Codecs shows the default audio format of
your EP300.
3
Serial Number of your EP300.
4
HW Version of your EP300.
5
SW Version installed on your EP300.
6
Extension assigned to your EP300.
7
Prog Buttons allows you to check which
programmable buttons are set. Some
buttons may have been programmed by
either the system administrator or the
installing technician.
Build Date-shows the time and date of your
last EP300 build.
8
--CONTINUED ON NEXT PAGE--
16 Comdial May ‘04
Page 17

Main
Menu
Option
CONVERSip EP300 User
2
Info - (continued)
LAN Info-displays the following LAN
4
information.
Received Pkts shows the network packets
1
received by your EP300.
2
Sent Pkts shows the network packets sent
by your EP300.
Network - (requires password) - used to configure the
3
IP address settings.
1
IP Settings-sets the IP address for this station.
VSP Address (MP5000 IP address)-sets the IP
2
address of the MP5000 unit.
--CONTINUED ON NEXT PAGE--
May ‘04 Comdial 17
Page 18

Introduction
Main
Menu
Option
4
System - used to perform system functions.
1
Tests (requires password) allows you to perform
functional tests.
2
Change Passwds allows you to change the
password for this EP300.
3
Factory Defs allows you to restore this EP300 to
its factory defaults.
4
Download downloads firmware changes.
Register Mode specifies the type of registration
5
6
Register manually registers the phone with the
host.
7
Restart Phone restarts the EP300.
18 Comdial May ‘04
Page 19

CONVERSip EP300 User
2. MAKING CALLS
Comdial’s EP300 is based on a technology called Session Initiation
Protocol (SIP). This technology provides new ways to process calls
not previously available with standard telephone systems.
2.1 Making a Call to Another Extension
You can make a call to another extension by dialing the number
assigned to that extension, or by selecting the name of the intended
party from your local address book or contact list.
To make an intercom call by dialing the extension number, perform
the following steps.
1. When you lift the handset, or press the SPEAKER button, the
system plays the dial tone. The LCD display prompts you to
enter the number you want to call.
Enter Number
CLEAR
2. Enter the extension number using the dial pad. If you make a
mistake, press the BACK soft key (to backspace one digit at a
time) or CLEAR to erase all digits and cancel.
May ‘04 Comdial 19
Page 20

Making Calls
1120
DIAL BACK CLEAR
3. Press the DIAL/ANSWER button or the DIAL soft key.
4. The system begins placing your call. You can cancel the call
before it is answered by pressing the CLEAR soft key.
5. The system rings the called extension (if idle), or plays a busy
signal (if busy). If you dialed an invalid number, the system
plays an audible tone indicating that the number you dialed is
invalid.
6. When the called party answers, begin speaking.
7. When the call is complete, hang up the handset (or press the
SPEAKER button if using the speakerphone).
2.2 Making a Call to an Outside Party
You can dial outside parties by including the outside line access code
before dialing the number (95545000, where 9 is the access code), or
by first selecting the outgoing line if you have direct access from a
pre-programmed button. The default access code for outside lines is
9.
To dial an external number, perform the following steps.
1. Lift the handset, or press the SPEAKER button. The system
plays the dial tone.
2. Dial the number, preceded by the line access code. If you
make a mistake, press the BACK soft key or CLEAR soft key to
re-enter the digits.
20 Comdial May ‘04
Page 21

CONVERSip EP300 User
95545000
DIAL BACK CLEAR
3. Press the DIAL soft button or the DIAL/ANSWR button.
4. If all outside lines are busy, the system plays a fast busy signal,
indicating that there are no lines available.
5. When the called party answers, begin your conversation. Note
that the system changes the soft key options on your EP300’s
LCD once the call connects.
95545000
HOLD TRANS END
6. When the call is complete, press the END soft key, hang up the
handset, or press the SPEAKER button if using the speaker-
phone option.
May ‘04 Comdial 21
Page 22

Making Calls
2.3 Redialing a Previously Dialed Number
The system remembers the last ten numbers you dialed. If you want
to redial any of those numbers, press the REDIAL button on the
EP300.
By pressing the PREV or NEXT soft keys, you can scroll through the
list of previously called numbers, and select the number from the list.
To redial a previously dialed number, perform the following steps.
1. Lift the handset, or press the SPEAKER button. The system
plays the dial tone.
2. Press the Redial button.
3. Observe the LCD display and select the number to dial by
pressing the PREV soft key.
9415545000
PREV DIAL CLEAR
4. When you have made your selection, press the DIAL soft key.
5. The system rings the called extension (if idle), or plays a busy
signal (if busy). If you dialed an invalid number, the system
plays an audible tone indicating that the number you dialed is
invalid.
6. When the called party answers, begin your conversation. Note
that the system changes the soft key options on your EP300’s
LCD once the call connects.
22 Comdial May ‘04
Page 23

CONVERSip EP300 User
95545000
HOLD TRANS END
7. When the call is complete, press the END soft key, hang up the
handset, or press the SPEAKER button if using the speaker-
phone option.
2.4 Making a Call Using a Speed Dial Button
To use a speed dial button to make a call, perform the following steps.
1. Lift the handset, or press the SPEAKER button. The system
plays the dial tone.
2. Press a pre-programmed speed dial button.
3. The system rings the called extension (if idle), or plays a busy
signal (if busy). If you dialed an invalid number, the system
plays an audible tone indicating that the number you dialed is
invalid.
4. When the called party answers, begin your conversation.
5. When the call is complete, press the END soft key, hang up the
handset, or press the SPEAKER button if using the speaker-
phone option.
2.5 Calling the Attendant
During the initial system configuration, the system installer assigns
the extension number for the attendant. To call the attendant, either
dial their unique extension number, or you can simply press 0.
May ‘04 Comdial 23
Page 24

Making Calls
24 Comdial May ‘04
Page 25

CONVERSip EP300 User
3. ANSWERING CALLS
When your station receives an incoming call, your EP300 alerts you
with an audible and visual indication. You will hear a ringing tone
from the speaker and the LCD display will provide you with the
Caller ID information about the call. To answer a call, perform the
following steps.
1. An incoming call rings at your station.
9415545000
ANS DENY
2. Pick up the handset,
- or -
Press the ANS soft key for handsfree communications. You
may also press the DENY soft key to send the call to voice mail
(if activated) or return a busy signal to the caller.
3. Begin your conversation.
4. Hang up the handset, or press the SPEAKER button (if handsfree) to end the call.
9415545000
DENY
May ‘04 Comdial 27
Page 26

Answering Calls
28 Comdial May ‘04
Page 27

CONVERSip EP300 User
4. PROCESSING CALLS
4.1 Muting the Microphone
You have the option of muting the microphone on the EP300-24 so
that the distant party cannot hear any audio from your microphone.
This setting affects the transmitter of the handset, headset, and the
built-in microphone of the EP300. This condition remains in affect
until the call is disconnected, or you press the button again,
whichever occurs first.
To mute the microphone, press the MUTE button. To restore to
normal operation, press the MUTE button again.
4.2 Using Call Hold
You can place a call on hold and retrieve it later. To place a call on
hold, perform the following steps.
1. While on an active call, press the HOLD button on your
EP300. The lamp associated with this button blinks.
2. The system plays music on hold (if equipped) to the outside
party.
3. The lamp extinguishes if the outside party hangs up before you
retrieve the call. The LCD shows the number of calls on hold
instead of the station number.
CALLS ON HOLD: 2
MENU
May ‘04 Comdial 31
Page 28

Processing Calls
4.3 Retrieving a Held Call
Calls on hold can be retrieved by any endpoint that has a line
appearance for the held call.
1. Press the SPEAKER button or pick up the handset (if privacy
is desired).
2. Press the flashing HOLD button.
3. The system returns the call to your endpoint and the extinguishes the HOLD lamp. If multiple calls are on hold at your
station, the system does not extinguish the hold lamp until you
have retrieved all held calls.
4.4 Transferring a Call
You can answer a call at your EP300 and transfer it to another endpoint. If you first identify the caller to the party receiving the transfer,
you have made a screened or consultative transfer.
To screen and transfer a call to another endpoint in the system,
perform the following steps.
1. Receive or place a call from/to another party.
2. Press the pre-programmed TRANSFER button on your EP300.
The soft key designations reflect the choices available; either
TRANSfer, CONFerence, or CLEAR.
The system automatically places the outside party on hold.
3. Enter the extension to which you want to send the call, and
press the DIAL button.
4. When the new party answers, announce the call.
5. If the new party accepts the call, press the TRANS soft key.
6. If the new party rejects the call, press the HOLD button to
retrieve the call.
32 Comdial May ‘04
Page 29

CONVERSip EP300 User
If you transfer the call without first announcing it, you have made an
un-screened or blind transfer.
To transfer an un-screened call to another system endpoint, perform
the following steps.
1. While on a call, press the pre-programmed TRANS soft key or
TRANS/CONF button on your EP300.
The system automatically places the outside party on hold.
2. Enter the number for the intended destination and press the
Dial button on your EP300.
3. Press the TRANS soft key to transfer the call.
If the other party answers, the system connects the transferred
call to that party. If the other party does not answer, the call
follows the no-answer forward condition of the target destination.
4.5 Establishing a Multi-Party Conference
You may wish to create a conference call with other parties.
4.5.1 MEET-ME CONFERENCES
A Meet-Me conference is established when all participants dial a
code to enter the conference room. If you want to use Meet-Me conferences, your system must use Comdial's voice mail system (see
your System Administrator for more details).
To set up a Meet-Me conference, perform the following steps.
1. Dial the conference room mailbox number (default 5801, 5802,
5803, 5804, 5805).
The voice mail transfers the caller into the conference room.
2. If you are the first member to join the conference, the EP300
plays tone-on-hold beeps.
May ‘04 Comdial 33
Page 30

Processing Calls
3. When a second caller enters, the EP300 plays a double beep to
announce their entry, and you can begin your conversation.
4. When additional parties enter the conference, the EP300 plays
a double beep to announce their arrival; all parties in the room
can then communicate.
5. When all parties are present, any endpoint in the conference
can press ### while in the room to lock entrance to the room.
You can enter ### again to toggle the lock.
When the room is locked, the EP300 plays a long beep-short
beep that indicates that the room is locked. When the room is
unlocked, the EP300 plays a short beep-long beep that indicates that the room is unlocked. Note: For security reasons,
external lines in the conference room are not permitted to lock
the door.
34 Comdial May ‘04
Page 31

CONVERSip EP300 User (MP5000)
APPENDIX A SPECIFICATIONS
Technical Data:
• Certifications: FCC Part 15 Class B, RF emission compliant
• Safety Approved: OSHA Accredited NRTL (Nationally
Recognized Test Laboratory) to UL 60950 and CSA C22.2
#60950.
• Dimensions: 9.5” w x 9.25”d x 7.5” h
• Weight: 2 lbs.
• Operating Humidity: 90% NC
• Operating Temperature: 0-50 degrees C
• Power: 9VDC 1A, 120 VAC external transformer
Connectors:
• Network: RJ45 (Ethernet)
• PC: RJ45 (Ethernet)
• Handset: RJ14 Standard Handset Connector
• Headset: RJ14 Standard Headset Connector
• Power: Center pin
May, ’04 Comdial 39
Page 32

Specifications
User Interface:
• 2 x 16 character display
• 24 programmable buttons with tri-color LEDs
• Phone buttons web configurable (via MP5000 or MP1000
platforms)
• 7 fixed feature buttons (hold, transfer/conference, redial,
headset, speaker, mute, dial/answer)
• 3 soft keys
• Last calls (10 entries)
• Received calls, sent calls
• Call waiting indication
• Clock
• Caller-ID
• Call blocking
• Up to 5 lines
• Menu-driven user interface
• Log in/log out
• Speakerphone (Full Duplex)
Presence:
• Presence Indication
• Compatible with Microsoft Messenger
Codecs:
• G.711 aLaw, uLaw
• G.723
• Out-of-band DTMF (RFC2833)
40 Comdial May, ’04
Page 33

CONVERSip EP300 User (MP5000)
SIP:
• RFC3261 compliant
• UDP and TCP support
• MWI events
• Inband DTMF
• REFER (RFC3525)
Installation:
• Static IP provisioning, DHCP
• Daylight saving time, time retrieval from server
• Dynamic field-upgradable software
Ethernet:
• 2 port with switch included (802.3 10/100 BT half duplex/full
duplex with autosense)
• Power over LAN support & IEEE 802.3af
May, ’04 Comdial 41
Page 34

Specifications
42 Comdial May, ’04
Page 35

CONVERSip EP300 User (MP5000)
INDEX
A
address book, calling using 24
Ad-Hoc Conferences 35
Adjusting the Volume 13
Answering a Call in your Pickup
Group 28
Answering a Call While on a Call 28
Answering Calls 25, 27
auto redial 22
C
call forward 37
call hold 31
call hold, retrieval 32
call pickup 37
calling an outside party 20
Calling the Attendant 25
calling using speed dial bin 24
calling using speed dial button 23
calls 19
codes, feature access 38
conference 35
conferences, ad hoc 35
conferences, meet me 36
connections 12
H
Handling Park Recalls 33
hold, placing call on 31
I
Introduction 9, 27
L
LCD menu structure 15
M
Making a Call by Dialing a Speed Dial
Bin 24
Making a Call to a User Name 24
Making a Call to an Outside Party 20
Making a Call Using a Speed Dial
Button 23
Making Calls 19
Making the Connections 12
Meet-Me Conferences 36
menus on LCD 15
microphone, muting 31
multi-party conference 35
Muting the Microphone 31
E
Establishing a Multi-Party
Conference 35
F
Feature Access Codes 38
Forwarding Calls to Another
Extension 37
May ‘04 Comdial 43
park orbit, outside calls 33
park orbit, retrieving a call from 33
park recalls 33
Parking Calls 32
pickup groups, answering calls in 28
placing a call on hold 31
Placing an Outside Call in a Park
Orbit 33
P
Page 36

Index
Positioning the EP300 10
R
recalling parked calls 33
Redialing a Previously Dialed
Number 22
Retrieving a Held Call 32
Retrieving an Outside Call from a Park
Orbit 33
S
speed dial bin, calling using 24
speed dial button, calling using 23
T
Transferring a Call 34
U
Using Call Hold 31
Using Call Pickup 37
V
volume control 13
44 Comdial May ‘04
Page 37

CONVERSip EP300 User (MP5000)
May ‘04 Comdial 45
Page 38

GCA70-399 Rev 1 May ‘04
 Loading...