

Page 1
DXP, DXP Plus, FXS, and FXT
Digital Communications System
Non-LCD Speakerphone
Station User’s Guide
This publication supports both
Impact and Impact SCS LCD Speakerphones
GCA70–313.07 05/00
printed in U.S.A.
Page 2

This User’s Guide is for the following system :
DXP, DXPPlus,FXSandFXT
Digital Communication Systems.
This user’s guideappliesto the following telephone models:
Impact 8124S-** Rev. A and later.
•
Impact 8112S-** Rev. A and later.
•
Impact 8112N-** Rev. A and later.
•
Impact SCS 8212S-** Rev. A and later.
•
Impact SCS 8212N-** Rev. A and later.
•
Contact your Comdial dealer for updates of this as well
as other Comdial publications.
Page 3

GCA70-313 Contents
About This Book
This user’s guide serves as both an introduction for new speakerphone users and
a reference for experienced users.
Introduction
The first chapter of the manual describes the initial setup and adjustments
necessary to begin using your speakerphone.
1 Getting Started
The following chapters describe the basic and advanced features of the Common
Code Based DXP, DXP Plus, FXS and FXT systems.
2 Answering Calls
3 Making Calls
4 Advanced Call Handling
5 Nonverbal Messaging
6 Programming
7 Other Advanced Features
Following the advanced features descriptions are a reference table, a glossary that
defines many general phrases and abbreviations which may not be familiar to
users, tips on speakerphone use for the new user described in Appendix C and all
the features available for the DXP, DXP Plus, FXS and FXT systems are
described in Appendix E.
Appendix A Quick Reference Guide
Appendix B Glossary
Appendix C Speakerphone Characteristics
Appendix D Feature Networking Support
Finally, at the end of this publication, an index provides a detailed reference to
the feature locations.
Index
Non-LCD Station User’s Guide iii
Page 4

Contents GCA70-313
NOTE: Throughout this book, all references to fixed buttons (keypad,
DSS/BLF, SPEAKER, HOLD, etc...) are printed in upper case, italic type; for
example, “PRESS INTERCOM .”
All references to interactive buttons (which are used to make selections on
the speakerphone display) are printed in upper case, bold italic type; for
example, “SELECT
Also, to eliminate confusion, the text of this guide instructs users to
“PRESS” fixed buttons of the telephone and “SELECT” interactive buttons
as in the examples above. Instructions to “DIAL” refer to numbers or
symbols on the keypad.
OPTIONS
.”
System-to-System Network
The system also provides capabilities for either a local stand-alone system or a
system-to-system network. System-to-system networking connects several DXP,
DXP Plus, FXS and FXT systems together in an arrangement that allows unified
communications through the system. For a complete list of features and their
properties see Appendix E, Feature Networking Support.
iv Non-LCD Station User’s Guide
Page 5

GCA70-313 Contents
Contents
1 Getting Started ..................1
Setting Up Your Station ..............1
Understanding the Basic Functions ........6
Your Station’s Buttons ...............8
Your Station’s Display Lights ...........10
Supported Telephone Models ...........12
2 Answering Calls .................13
Answering Outside Calls .............13
Answering Intercom Calls ............14
Night-Transferred Calls -Line Access
From Any Station .................15
Holding Calls ...................16
Call Pickup ....................18
Receiving Subdued Off-Hook
Voice Announcements (SOHVA) .........20
Do Not Disturb Condition.............22
3 Making Calls ...................23
Making Outside Calls ...............23
Making Intercom Calls ..............24
Automatic Dialing.................25
Redialing .....................26
Paging .......................28
Camping On - Busy Station,
Automatic Callback ................29
Advanced Camping On Options .........30
Sending Subdued Off-Hook
Voice Announcements (SOHVA) .........32
Non-LCD Station User’s Guide iii
Page 6

Contents GCA70-313
4 Advanced Call Handling ............33
Waiting For A Line (Queuing) ..........33
Conferencing ...................34
Call Forwarding ..................36
Call Forward Outside System (CFOS) ......38
Account Codes ..................39
Call Parking ....................40
Call Transferring .................42
Other Call Transferring Options .........44
5 Nonverbal Messaging ..............47
LCD Message Delivery ..............47
Message Waiting Light and Messaging ......50
Response Message Delivery ...........51
6 Programming ..................53
DSS Numbers ...................53
Speed Dial Numbers ...............54
Response Message Button ............57
Feature Buttons ..................58
7 Other Advanced Features ...........61
Line Groups ....................61
Automatic Redial
(8124S, 8112S and 8212S only)..........62
Tracker Paging System ..............64
Volume Control ..................66
Default Volume Control ..............68
Background Music
(not available on 8112N or 8212N) ........69
Automatic Set Relocation .............70
DSS/BLF Console Operation ...........71
iv Non-LCD Station User’s Guide
Page 7

GCA70-313 Contents
A Feature Access Codes .............73
B Glossary .....................79
C Speakerphone Characteristics .........87
D Feature Networking Support ..........89
Non-LCD Station User’s Guide v
Page 8

Contents GCA70-313
Notes
vi Non-LCD Station User’s Guide
Page 9
GCA70-313 Getting Started
Getting Started
1
Welcome
Congratulationsandthankyoufor usingaComdial telephone!Yourdigital station is
supported by a communication system with hundreds of built-in, standard features.
This manual serves as a helpful guide for using these various functions.
The sections in this introductory chapter help you initially set up your station and
become familiar with the controls and indicators. The remaining sections are titled
as follows:
•
Setting Up Your Station
•
Understanding the Basic Functions
•
Your Station’s Buttons
•
Your Station’s Display Lights
•
Supported Telephone Models
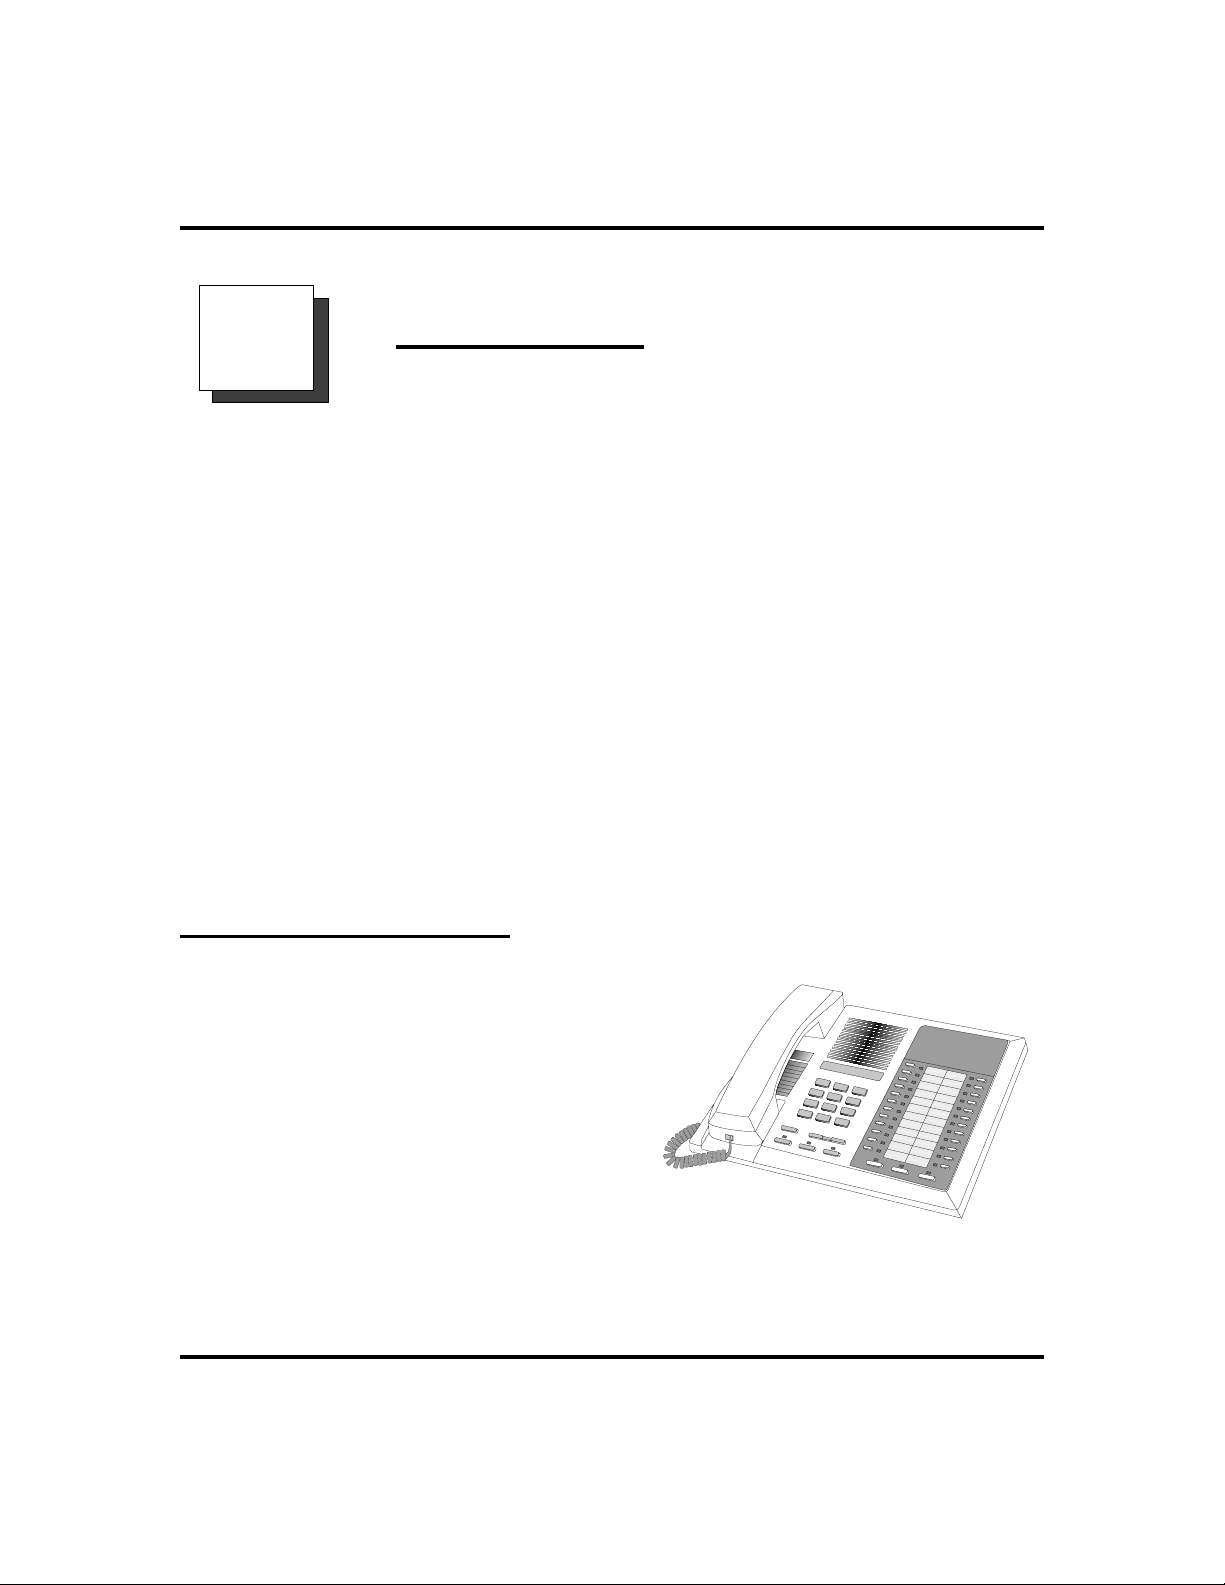
Setting Up Your Station
When your new station arrives, the system
installer unpacks your station and connects
the line to a system jack. The following
sections describe a few initial adjustments
that will allow you to quickly begin making
and answering calls with some of the most
basic features.
An Impact 8124 Station
Non-LCD Station User’s Guide 1
Page 10
Getting Started GCA70-313
Positioning YourStation
You should adjust the position of the station on your desk or table to suit your indi
vidual needs and, if applicable, maximize the performance of the sound activated
features. When using a speakerphone, the microphone and loudspeaker are farther
from you than when you use a handset. Some positioning tips for speakerphones to
consider include:
Forthe microphonetobest detectyourvoice, speak withinthree feet ofit and
·
face the station.
Backgroundnoise may prevent the sound-activatedswitches from operating
·
properly. Avoid placing the speakerphone where it will detect sounds from
typewriters, keyboards, printers, paging systems, and other equipment.
Placethespeakerphoneon a hard surface and away from table edges. Do not
·
place the telephone in corners or enclosures. Do not let obstructions come
between you and the microphone.
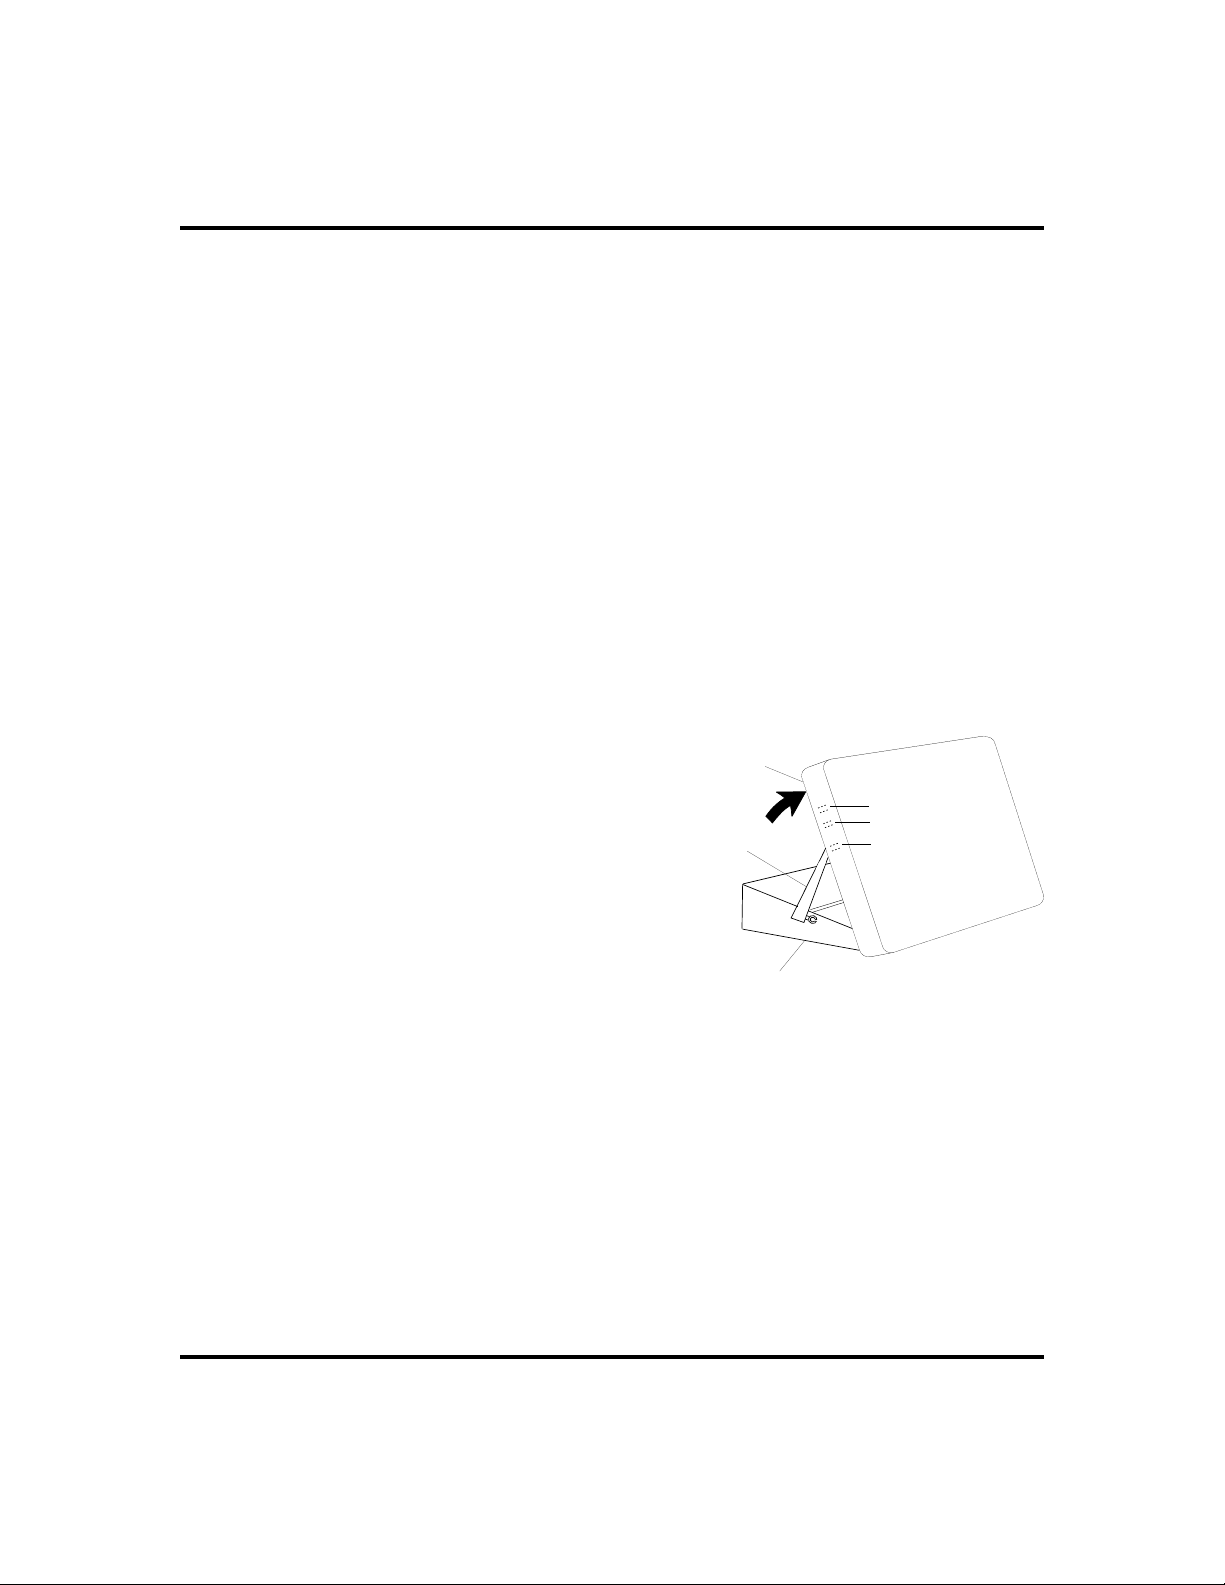
If you are using an Impact SCS model, your telephone has an adjustable pedestal to
allow you to select the most comfortable viewing angle. When you receive the
telephone, the pedestal is in its lowest
position—flush against the pedestal.
Telephone
·
To adjust the pedestal (Models
8212S and 8212N only),
1. GRASPtherear of the pedestal base
Supporting Arm
First Notch
Second Notch
Third Notch
(For Highest Position)
firmlywith onehand AND LIFTthe
rear portion of the telephone upward
with your other hand.
-
PED01
2. LIFT the telephone upward with
one hand AND RAISE the
Pedestal Base
telephone supporting arms upward
with your other hand. (Notice there
Adjusting The Pedestal
are three sets of notches under the
telephone corresponding to the three positions available.)
3. When the telephone is at the desired height, SELECT the closest
pair of notches AND INSERT the supporting arms in the notches.
PRESS DOWN slightly on the telephone UNTIL you feel the
supporting arms snap into place.
Also remember, as with any piece of electronic equipment, your telephone may be
damaged by contact with liquids. So pleasetry toplace the telephone in an area that
is free from the danger of spills.
2 Non-LCD Station User’s Guide
Page 11
GCA70-313 Getting Started
Setting a Personal Ringing Tone
You can choose one of eight different ring tones for your telephone. Often, when
several telephones are located close together, each user chooses a different personal
ring tone.
To select one of the ring tones, proceed as follows:
·
1. PRESS INTERCOM.
2. DIAL
3. DIALnumber (
4. Thenexttimeyour telephone rings,you willhear thenew ringtone.
**4.
1 to 6 ) to select ring tone.
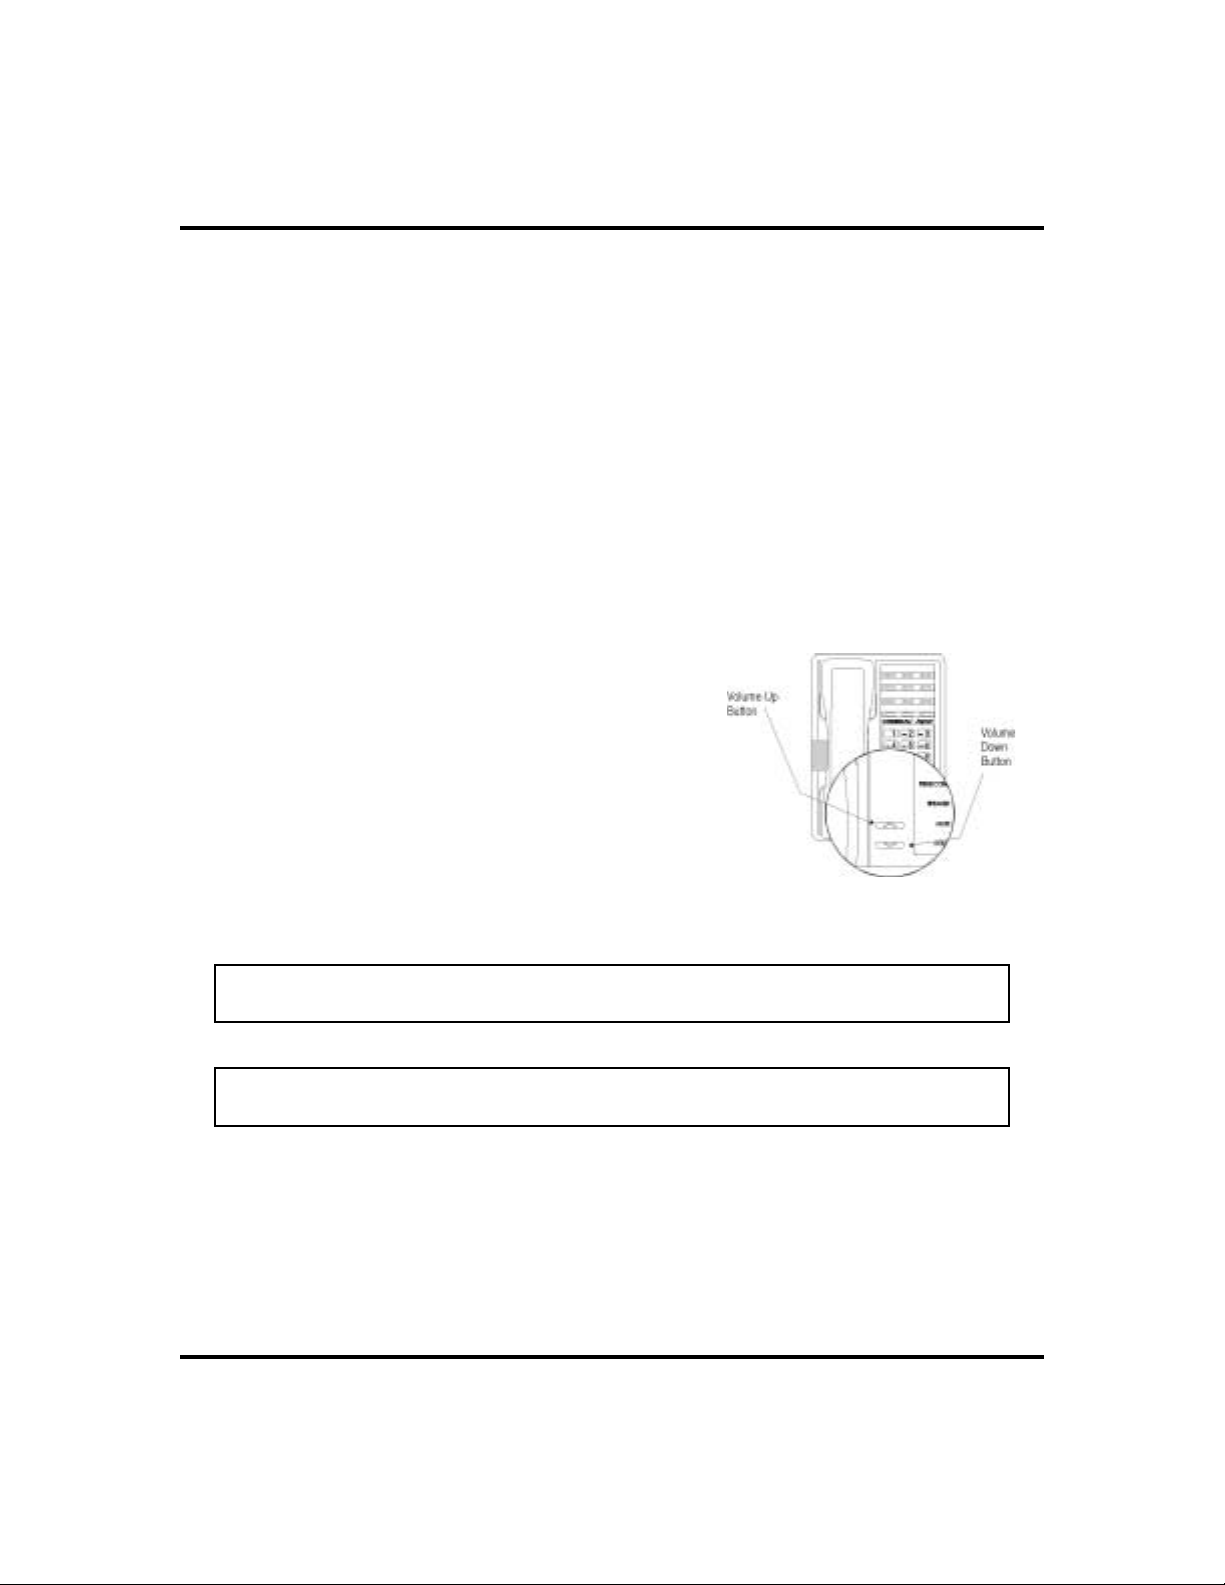
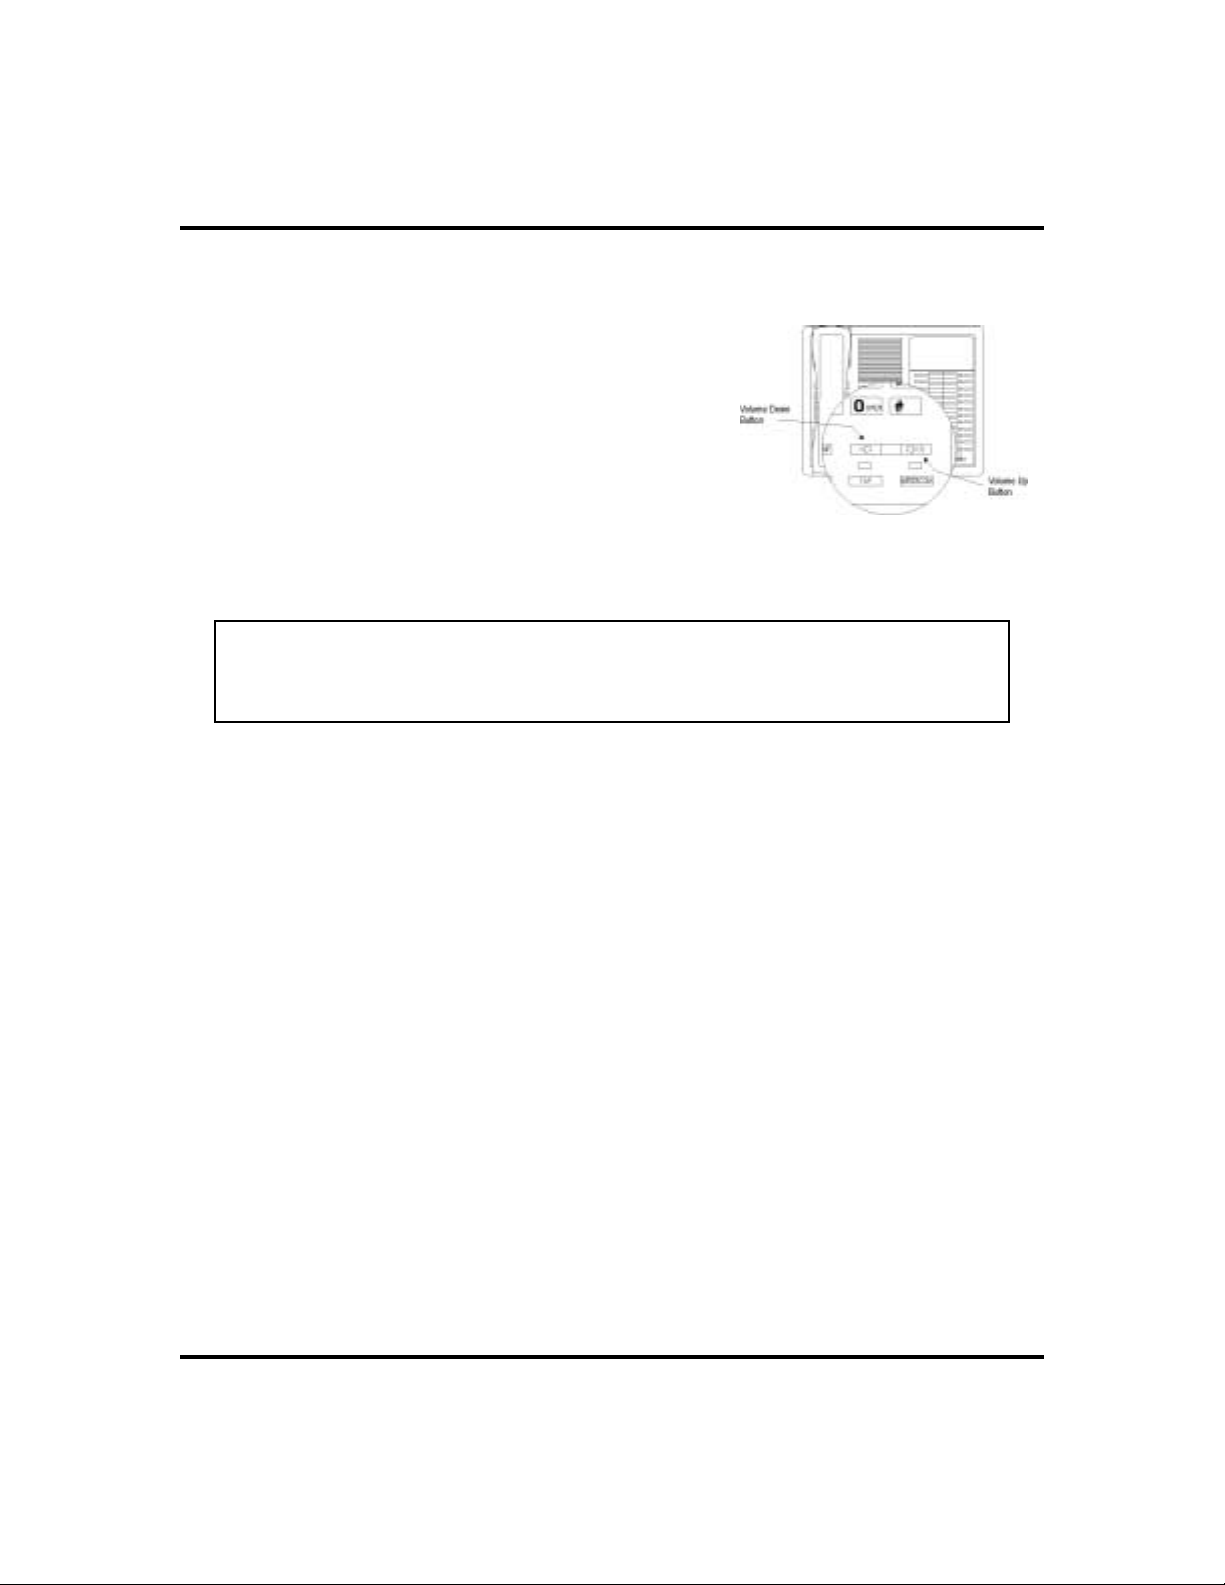
Setting VolumeLevels
The volume control on your telephone is a multipurpose control you use to set the volume (loudness) of the ringer, the speaker, and the handset.
·
To set the ringer loudness level,
1. While your telephone is on-hook and
idle, PRESS the VOLUME UP OR
VOLUME DOWN button once for each
change in loudness you desire. The
ringer sounds once for each change as
an example of the current setting.
NOTE: If you set the ringer to the “off” position, your telephone will sound
a short ring burst once for each call you receive at your station.
Impact SCS Volume Buttons
NOTE: On the 8112N, the ringer volume is controlled by a three-position
switch on the bottom of the telephone. There is no handset volume control.
Non-LCD Station User’s Guide 3
Page 12
Getting Started GCA70-313
To set the speaker and handset
·
loudness levels,
1. PRESS INTERCOM button.
2. PRESS the VOLUME UP OR VOLUME
DOWN button once for each change in
speaker volume that you desire.
3. LIFThandset.
4. PRESS the VOLUME UP OR VOLUME
DOWN button once for each change in
handset volume that you desire.
NOTE: When a call ends, the system resets the speaker and handset volume of
all future calls to the programmed (default) setting. For instructions in setting
your station’s default volume, see Default Volume Control section in the
system specific Advanced Features chapter.
Impact 8124 Volume Control
Answering and Making Calls
Your station is nowproperly configured to answer and making calls to both stations
within your system (intercom calls) and outside lines. Remember that when dialing
an outside number, you must first select a line to connect your system to the local
exchange.
·
When you hear outside ringing (two long bursts),
1. PRESS flashing line button.
2. SPEAK toward telephone OR LIFT handset if privacy is
desired.
·
When you hear intercom ringing (two short bursts),
1. PRESS INTERCOM.
2. SPEAK toward telephone OR LIFT handset if privacy is
desired.
4 Non-LCD Station User’s Guide
Page 13

GCA70-313 Getting Started
To dial an outside number manually,
·
1. PRESS INTERCOM.
2. DIAL
in the system specific Advanced Features chapters for more infor
mation on selecting an outside line).
3. LISTEN for dial tone.
4. DIALnumber.
5. LIFThandset if privacy is desired.
To dial an intercom number manually,
·
1. PRESS INTERCOM.
2. DIALextension number (called telephone will ring or tone will
be heard).
3. SPEAK toward telephone OR LIFT handset if privacy is
desired.
9 OR other line button to select line (See Line Groups
-
Non-LCD Station User’s Guide 5
Page 14

Getting Started GCA70-313
i
y
Understanding the Basic Functions
Your station provides many versatile features for your use. These features are
explained in terms of what they allow you to do.
Message-Waiting Light
Indicates that a message awaits pick up.
·
Microphone Opening (not available on 8112N and 8212N)
Allows hands-free operation of station (speak clearly toward microphone
·
opening).
Speaker (not available on 8112N and 8212N)
Sounds distant party’s voice.
·
· Sounds ringing and call-in-progress tones.
ne Buttons,
L
DSS/BLF Buttons
Programmable Buttons
Handset
Telephone Speaker
Vo l u m e U p
Volume Down
R
ABC
DEF
2
13
MNO5JKL4GHI
6
PRS8TUV9WXY
7
#0*
MESSAGE
TAP
TRNS/CONF
SPEAKER
MUTE
HOLD
SCS001
Microphone Opening
Intercom Button*
Dialpad*
Message Button*
TAP Button*
Transfer/Conference Button*
Speaker Button*
Mute Button*
Hold Button*
*NOTE: These are default button locations.
Your system installer may have reprogrammed
these buttons to better suit
our needs.
Impact SCS 8212S-** Speakerphone
6 Non-LCD Station User’s Guide
Page 15
GCA70-313 Getting Started
s
INL001
Handset
Speaker
Dialpad
Transfer/
Conference
Button
Message
Waiting
Light
Hold Button
Handset
R
DEFABCQZ
321
MNOJKLGHI
654
TUVPRS W XY
879
OPER
0
#
TRNS/CNF
TAP Button
INTERCOM
HOLD
TAP
Intercom
Button
SPEAKER
Microphone
Opening
Connectors On Bottom Of Telephone
Line Cord
!
Impact 8124S-** Speakerphone
MUTESHIFT
Handset
Line Buttons,
DSS/BLF Buttons,
Programmable Buttons
Volume Down
Vo l u m e U p
Mute Button
Shift Button
Speaker
Button
Line Buttons,
DSS Buttons,
Programmable Button
QZ
12
ABC DEF
3
GHI
Transfer/
Conference
Button
Hold Button
4
7
TRNS/CNF
HOLD
6
JKL
MNO
5
TUV
PRS
WXY
8
9
0
OPER
#
R
TAP
INTERCOM
Dialpad
TAP Button
Intercom Button
IMP002
Impact 8112N-** Telephone
Non-LCD Station User’s Guide 7
Page 16

Getting Started GCA70-313
YourStation’s Buttons
Hold Button (HOLD)
Places a line or intercom call on hold.
·
Stores pauses in number sequences during programming.
·
If multiple held calls feature is available, scans or scrolls through calls
·
placed on hold (when hold light is flashing).
Intercom Button (INTERCOM)
Selects an intercom line.
·
Allows you to initiate many of the telephone’s features.
·
Mute Button (MUTE)
· Keeps the person on the line from hearing your conversation.
Direct Station Select/Busy Lamp Field Buttons (DSS/BLF)
· Allow you to store numbers for automatic dialing functions.
· Allow you to store telephone extension numbers for Direct Station
Selection (DSS).
· May be programmed as a feature button.
· May be designated a line button by your system installer.
Message Button (MESSAGE) (8212S and 8212N only)
· Allows you to activate the message waiting light at another station by
pressing this button and dialing the extension.
·
Allows user to quickly return the call of another station that left a
message using the indicating light.
Shift Button (SHIFT)
·
Allows you to enter a second tier for storing and/or automatically dialing
speed dial numbers. (That is, you can store two speed dial numbers at
every programmable button location—one in the regular tier and one in
the second tier). You activate the shift function by pressing this button
and turning the shift light on before storing or automatically dialing a
speed dial number from the second tier.
Speaker Button (SPEAKER) (not available on 8112N and 8212N)
·
Turns your speaker on or off.
·
Disconnects a call when you are on a handsfree call.
·
Ends or cancels programming.
8 Non-LCD Station User’s Guide
Page 17
GCA70-313 Getting Started
TapButton (TA P)
Recalls dial tone or generates a hookflash.
·
Retrieves held calls or last call placed on hold.
·
Transfer/Conference Button (TRNS/CONF)
Transfers calls.
·
Sets up conference calls.
·
VolumeControl (VOLUME UP or VOLUME DOWN)
Regulates the volume of the ringer, speaker, handset, headset, background
·
music, and group listening mode.
Handset
Speaker
Dialpad
Transfer/
Conference
Button
Message
Waiting
Light
Hold Button
R
DEFABCQZ
321
MNO
GHI
JKL
6
4
5
TUVPRS WXY
879
OPER
#
0
TAP Button
TRNS/CNF
TAPHOLD
Intercom
Button
INTERCOM
SPEAKER
Microphone
Opening
Connectors On Bottom Of Telephone
Line Cord
!
SHIFT
MUTE
imp001
Handset
Line Buttons,
DSS/BLF Buttons,
Programmable Buttons
Volume Down
Vo l u m e U p
Shift Button
Mute Button
Speaker Button
Impact 8112S-** Speakerphone
Non-LCD Station User’s Guide 9
Page 18

Getting Started GCA70-313
YourStation’s Display Lights
The lights (LEDs) on your LCD speakerphone indicate the status of lines,
features, and intercoms.
Busy Lamp Field (BLF) lights (next to a Direct Station Select/Busy
Lamp Field or DSS/BLF programmable button):
Steady red = station is in use.
·
Flashing red = station is receiving a call.
·
Winking/Fluttering red = message-waiting light set for you by station
·
associated with that DSS button.
Next to a line button:
Steady green = this is your line, either on-hook (in a handsfree mode) or
·
off-hook, when the line is active.
· Steady red = another station is using this line.
· Flashing red = a call is coming in on this line.
· Flashing orange = this line will be answered when you lift the handset.
· Winking green = your line is on hold.
· Winking red = the call has been placed on hold by another station.
· Fluttering orange or green = your line has recalled from hold.
· Fluttering red = the line put on hold by another station has recalled.
NOTE: You can find the programmable buttons that the installer designates
line buttons in the same location as the DSS/BLF buttons. Ensure that these
buttons are labeled correctly to indicate their unique features.
Next to a fixed feature or programmable feature button:
·
Steady red = the feature is on.
·
Steady off = the feature is off.
NOTE: You can find the programmable buttons that the installer designates
feature buttons through user programming in the same location as the
DSS/BLF programmable buttons. Ensure that these buttons are labeled cor
rectly to indicate their unique features.
-
Above the MUTE button:
·
On steady = called party cannot hear your conversation.
10 Non-LCD Station User’s Guide
Page 19
GCA70-313 Getting Started
i
Next to INTERCOM button:
Steady green or red = you are using your intercom.
·
Fluttering red = an LCD message is set on your telephone for others to
·
receive when calling.
Flashing orange = someone is calling your extension or a call is being
·
transferred to you.
Above the HOLD button:
(Non-SCS Series models) Flashing/Fluttering red = message waiting.
·
Winking green = a line is on hold at your station (DXP, DXP Plus, FXS
·
and FXT Systems only).
Next to the MESSAGE button (SCS Series Models only):
Winking green = message awaits pick up.
·
Above the SPEAKER button:
· On steady (with the telephone on hook and busy) = speakerphone mode
· On steady (with telephone on hook and idle) = background music is
turned on.
ne Buttons,
L
DSS/BLF Buttons
Programmable Buttons
Handset
Vo l u m e U p
Volume Down
R
ABC
DEF
2
13
MNO5JKL4GHI
6
PRS8TUV9WXY
7
#0*
MESSAGE
TAP
TRNS/CONF
SPEAKER
MUTE
HOLD
SCS002
*NOTE: These are default button locations.
Dialpad*
Intercom Button*
Message Button*
TAP Button*
Transfer/Conference Button*
Mute Button*
Hold Button*
Your system installer may have reprogrammed
these buttons to better suit your needs.
Impact SCS 8212N-** Telephone
Non-LCD Station User’s Guide 11
Page 20
Getting Started GCA70-313
Supported Telephone Models
This user’s guide covers five different telephone models. The overall operation of
each of the telephones is very similar. There are, however, several differences that
are summarized in the following table.
Models Exceptions
No speakerphone capability. Therefore, you must lift the handset to perform
•
Non-speakerphone
Models
(8112Nand 8212N)
Impact
Non-speakerphone
Model
(8112N)
any telephone functions: making calls, answering calls, programming your
telephone, etc.
Cannot receive voice announce calls.
•
Cannot use the Group Listen feature.
•
Cannot use the Background Music feature.
•
No LEDs beside its programmable buttons and therefore does not provide
•
any status indications for these buttons.
No mute key.
•
No handset volume control.
•
•
Message waiting light is above the dialpad.
Impact Speakerphone
Models
(8112Sand 8124S)
Impact SCS
Speakerphone Models
(8212S and 8212N)
12 Non-LCD Station User’s Guide
•
Has a rocker switch style volume control instead of separate volume up and
volume down buttons.
•
Message waiting light is above the HOLD button.
•
The IMIST module only works with the 8212S and 8212N telephones.
•
Has a dedicated message button with an associated light beside it.
•
Supports the ICVOL handset with independent volume control.
Page 21

GCA70-313 Answering Calls
Answering Calls
2
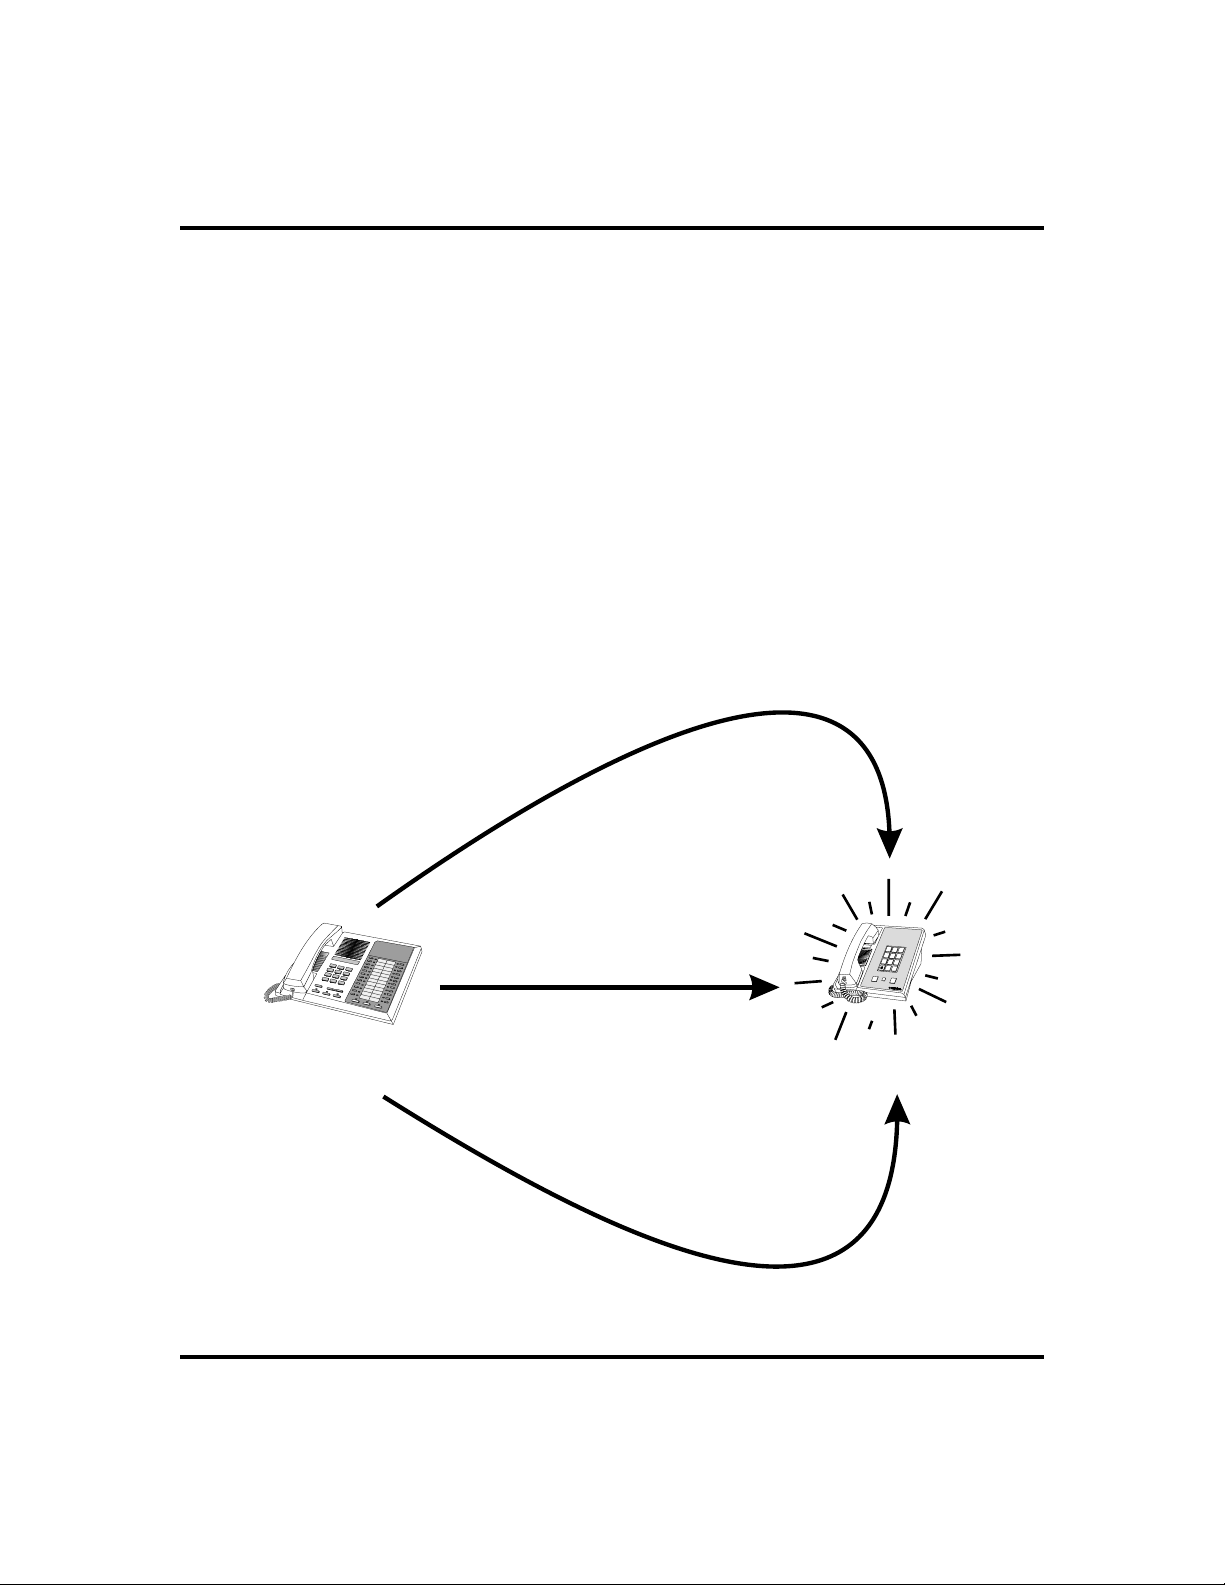
Answering Outside Calls
Acall that rings on an outside line soundslong, single-tonebursts and lights the line
status light. If the installer enabled ringing line preferenceat yourstation, an orange
lightflashes next tothe line that yourstation answers whenyoulift the handset;a red
light will flash for any other ringing line.
·
When you hear outside ringing (two long bursts) and
observe an orange
1. For privacy, LIFT handset.
2. For speakerphone, PRESS flashing line button AND SPEAK to-
ward telephone.
flashing light,
·
When you hear outside ringing (two long bursts) and
observe a red
1. PRESS flashing line button.
2. SPEAK toward telephone OR LIFT handset if privacy is
desired.
Non-LCD Station User’s Guide 13
flashing light,
Page 22

Answering Calls GCA70-313
Answering Intercom Calls
An intercom call is a call between two system stations. If a speakerphone, your
station will receive intercom calls in one of two ways depending upon system
programming. In a voice-first setting, a short tone followed by the caller’s voice
heard on the speaker. With a tone-first setting, the telephone rings in a distinctive
pattern and the receiving station must take action to answer. Of course, if either
station is not speakerphone equipped, all calls will arrive tone-first.
You can block voice-announce calls if you wish. See the discussion titled Blocking
Voice Announce Calls for details.
When you hear an intercom tone followed by a caller’s
·
voice,
1. SPEAK toward the telephone to answer, OR LIFT handset if pri
vacy is desired.
When you hear intercom ringing (two short bursts),
·
1. PRESS INTERCOM.
2. SPEAK toward telephone OR LIFT handset if privacy is
desired.
-
14 Non-LCD Station User’s Guide
Page 23

GCA70-313 Answering Calls
Night-Transferred Calls -Line Access
From Any Station
The system attendant can transfer incoming calls to a particular station or stations
for off-hour ringing.
If your telephone rings,
·
1. PRESS line button with flashing light.
2. LIFThandset to talk.
When you hear loud ringing anywhere in the system,
·
1. LIFThandset.
2. PRESS INTERCOM.
3. CHOOSE ringing zone:
•
DIAL 65 through
(1-4).
68
to select ringing zone
•
DIAL 69 to answer for any zone.
Non-LCD Station User’s Guide 15
Page 24

Answering Calls GCA70-313
Holding Calls
You canplacea call on hold and retrieveitlater.With aregularhold, you can pick up
the held call at your telephone or another user can pick the call up at a telephone
sharing the held call line.
To place a call on hold,
·
1. PRESS HOLD. The light above your HOLD button begins to
blink.
To retrieve a held call,
·
1. PRESS line button of the held call (with winking green light),
OR PRESS TAP.
2. SPEAK toward telephone OR LIFT handset if privacy is
desired.
Exclusive Hold
Withan exclusive hold condition, you must pick up the held call at your telephone;
no other telephone has access to it.
·
To place a call on exclusive hold,
1. PRESS HOLD twice.
·
To retrieve exclusive hold,
1. PRESS line button of held call (with winking green light), OR
PRESS TAP.
2. SPEAK toward telephone OR LIFT handset if privacy is
desired.
Handling Hold Recalls
After a call has been on hold for the period of time (set by the installer of your
system), the system causes four quick hold recall tone bursts to sound at your
telephone, the flash rate of the line button becomes faster and the light becomes
orange. If the call is on exclusive hold, it will revert to manual hold after the hold
recall period.
16 Non-LCD Station User’s Guide
Page 25

GCA70-313 Answering Calls
If a held line is recalling, choose one of the following:
·
1. PRESS HOLD (station button) to place the call on hold at your
station and restart hold timer.
2. PRESS line button (with flashing orange light) OR PRESS TA P
to retrieve the call.
Directed Hold
The installer can add a directed station hold feature to your telephone. With this
feature, you can place a call on hold at a distant station or pick up the held call that
has been on hold the longest length of time at another telephone.
To place a call on directed station hold,
·
1. ANSWER call.
2. PRESS INTERCOM OR TRNS/CONF if intercom call.
3. DIAL
4. DIALextension number of station to receive held call.
5. HANG UP.
To retrieve a held call at another station,
·
1. PRESS INTERCOM.
2. DIAL
3. DIALextension number of station where call is being held.
4. PRESS DSS/BLF button OR TA P to answer call.
*90.
#90.
Non-LCD Station User’s Guide 17
Page 26

Answering Calls GCA70-313
Call Pickup
The Impact system offers three distinct methods to answer incoming calls that are
ringing at other stations.
Group Call Pickup
The installer often arranges several telephones together in a user group. If your
telephone is so arranged, you can answer calls that are ringing at other stations
within your particular group.
To answer a call that is ringing within your group,
·
1. PRESS INTERCOM.
2. DIAL
3. SPEAK toward telephone, OR LIFT handset if privacy is
desired.
#4.
Directed Call Pickup
Also, you can answer calls that ring at any telephone in the system if you know the
telephone’s extension number.
·
To answer a call that is ringing at any telephone in the
system,
1. PRESS INTERCOM.
2. DIAL
3. DIALextension number of ringing telephone.
4. SPEAK toward telephone, OR LIFT handset if privacy is
desired.
*4.
Pickup For Monitored Stations
Your telephone may have the personal intercom number of another telephone
appearing at a programmable button location. You can use the light associated with
this button to monitor the status of that telephone, and you can press the button to
make a call to that telephone if you wish.
18 Non-LCD Station User’s Guide
Page 27
GCA70-313 Answering Calls
To monitor another telephone,
·
1. OBSERVE the BLF light indications next to the Direct Station
Select (DSS/BLF) button:
•
Off = Station is idle.
•
Flashing (if enabled) = Station has an incoming call.
•
On = Station is busy.
To call an idle monitored station or to answer one that is
·
ringing,
1. NOTE the BLF light condition.
2. PRESS assigned DSS/BLF button.
3. SPEAK toward telephone, OR LIFT handset if privacy is
desired.
If ringing telephone
is within your designated
calling group...
For any ringing telephone...
Your
Station
If you have programmed
a DSS/BLF button for
the ringing telephone...
...DIAL # 4
...DIAL 4 + extension codeS
...PRESS
flashing
DSS/BLF
button
Answering Calls for Other Stations
1
GHI
4
PRS
TUV
7
8
OPER
0
SHIFT
HOLD
Ringing
Station
ABC
DEF
2
3
JKL
MNO
5
6
WXY
9
#
TAP
Non-LCD Station User’s Guide 19
Page 28

Answering Calls GCA70-313
Receiving Subdued Off-Hook
VoiceAnnouncements (SOHVA)
Handling an Incoming SOHVA
SOHVAallows an intercom caller to break into your call by making an announce
ment through your handset receiver.The distant party that you are currently talking
to cannot hear the announcement made by the SOHVA caller.
To respond to a SOHVA verbally (not available on 8112N),
·
1. PRESS AND HOLD MUTE.
2. SPEAK into handset. Distant party cannot hear your response.
3. RELEASE MUTE after response is complete to return to distant
party.
To respond to a SOHVA nonverbally through Response
·
Messaging (if announcing station has an LCD
Speakerphone),
NOTE: See page 58 for instructions on programming a RESPONSE
MESSAGE button.
1. PRESS programmed RESPONSE MESSAGE button. (Message
appears in the display of the telephone making the SOHVA).
2. CONTINUE your current call with distant party. (SOHVAcaller
is automatically disconnected from your telephone. If caller is
not sending from an LCD Speakerphone, no message is sent and
call is disconnected.)
-
·
To respond to a SOHVA by blocking (see below for more
information),
1. PROGRAM Voice Announce Block when you hear SOHVA
tone. (SOHVAcall is disconnected).
NOTE: A station that is currently active in speakerphone mode can not
receive a SOHVA.
20 Non-LCD Station User’s Guide
Page 29
GCA70-313 Answering Calls
VoiceAnnounce Blocking
Ifyour system installer makes Voice Announce Blocking available,youcan prevent
voiceannouncementsfrom sounding over your telephone speaker if you wish. This
feature also blocks Subdued Off-Hook Voice Announcements (SOHVA) and
generates a tone in response to attempted SOHVAs.
To block all voice-announced calls,
·
1. PRESS INTERCOM.
2. DIAL
To unblock all voice-announced calls,
·
*2.
1. PRESS INTERCOM.
2. DIAL
#2.
INCOMING
SOHVA
Your
Station
SOHVA RESPONSES
VERBAL
NONVERBAL *
Press and Hold MUTE
While Speaking
Press Programmed
Response Message
Button
ABC
DEF
1
2
3
GHI
JKL
MNO
4
5
6
PRS
TUV
WXY
7
8
9
OPER
#
0
SHIFT
HOLD
TAP
SOHVA
Delivering
Station
BLOCK
* To respond to LCD equipped stations only
Press INTERCOM
and Dial 2S
Answering a SOHVA
Non-LCD Station User’s Guide 21
Page 30

Answering Calls GCA70-313
Do Not Disturb Condition
The Do Not Disturb (DND) feature keeps calls from ringing at your station and
makes your station appear to be busy to intercom calls.
To enable DND, choose one of the following:
·
1. PRESS programmed DO NOT DISTURB button. The light next
to the DO NOT DISTURB button turns on when the feature is
active,
2. PRESS INTERCOM AND DIAL
To override a do not disturb condition at another telephone,
·
1. MAKE intercom call AND HEAR DO NOT DISTURB tone.
2. DIAL
bursts).
3. WAIT for reply.
·
To disable DND,
1. PRESS programmed DO NOT DISTURB button. The light asso-
ciated with the DO NOT DISTURB button turns off when the
feature is disabled,
2. PRESS INTERCOM AND DIAL
NOTE: See page 58 for instructions on programming an ACCOUNT CODE
button.
*03 (called party will hear several short tone
#01.
#01.
22 Non-LCD Station User’s Guide
Page 31

GCA70-313 Making Calls
Making Calls
3
Making Outside Calls
You can manually dial a number over any telephone line you select. Or, if the
installer assigned a prime line or the idle line preference feature, your station auto
matically selects a line for use when you lift the handset.
NOTE: 8112N and 8212N users must lift handset before any dialing activity.
To dial an outside number manually,
·
1. PRESS INTERCOM OR LIFT handset if privacy is desired.
(8112N and 8212N users must lift handset.)
-
2. DIAL
in the system specific Advanced Features chapters for more information on selecting an outside line).
3. LISTEN for dial tone.
4. DIALnumber.
Ifyour stationhas beenassigneda primeline, youwillnot haveto selectaline before
dialing outside your system.
·
To dial an outside number using your prime line,
1. PRESS SPEAKER OR LIFT handset if privacy is desired.
Outside line is automatically selected. (8112N and 8212N users
must lift handset.)
2. LISTEN for dial tone.
3. DIALnumber.
Non-LCD Station User’s Guide 23
9 OR other line button to select line (See Line Groups
Page 32

Making Calls GCA70-313
Making Intercom Calls
There are two methods for making intercom calls. One method causes the called
telephoneto ring (tone-first).Theother method causesyourvoice to soundoutat the
called telephone (voice-first). Your installer can set the system to deliver either
tone-first or voice-first calling.
NOTE: The following instructions assume a tone-first setting. You can
change a call to voice announce signaling for that call simply by pressing
the INTERCOM button again after dialing the extension number or by
pressing the DSS/BLF button again.
To manually cause the other telephone to ring (tone
·
calling),
1. PRESS INTERCOM OR LIFT handset if privacy is desired.
(8112N and 8212N users must lift handset.)
2. DIALextension number (called telephone will ring).
·
To tone call automatically,
1. PRESS DSS/BLF button (called telephone will ring). (8112N and
8212N users must lift handset first.)
NOTE: The following instructions assume a voice-first default setting. You
can change a call to a tone signaling for that call simply by pressing the
INTERCOM button again after dialing the extension number or by pressing
the DSS/BLF button again.
·
To voice announce manually,
1. PRESS INTERCOM.
2. DIALextension number.
3. SPEAK your announcement.
·
To voice announce automatically,
1. PRESS DSS/BLF button.
2. SPEAK your announcement.
24 Non-LCD Station User’s Guide
Page 33

GCA70-313 Making Calls
Automatic Dialing
Automatic dialing provides one- or two-button speed dialing using programmable
buttons at which you have previously stored numbers. There are two types of speed
dial numbers: (1) numbers that you store for your own use (personal speed dial
numbers), and (2) numbers that the system attendant stores for everyone’s use
(system speed dial numbers).
NOTE: When you call from a station not equipped with a speaker (for
example, 8112N and 8212N) you must LIFT the handset AND PRESS
TAP before initiating any automatic dialing activity.
To automatically dial a speed dial number stored at one of
·
the programmable buttons on your station, choose one of
the following:
1. PRESS programmed speed dial button (line selection is usually a
part of the stored speed dial number).
2. PRESS SHIFT AND programmed speed dial button (to choose
number stored as second choice at that button).
·
To speed dial a personal speed dial number stored at the
dial pad,
1. DIALspeed dial number on dial pad ( 0 to 9).
NOTE: If you are already on a line, you must press SHIFT before dialing the
personal or system speed dial numbers that are stored at the dial pad. Also,
if a speed dial number’s preselected line is in use, the speed dial will not
engage.
·
To speed dial a system speed dial number stored at the dial
pad,
1. DIAL * AND system speed dial number.
Non-LCD Station User’s Guide 25
Page 34

Making Calls GCA70-313
Redialing
If made available by your installer, you may also program your system to automati
cally redial a busy or ring-no-answer number. See page 62 for further instructions
on setting up your station for automatic redial.
Redial - Last-Dialed Number
The system temporarily saves the first 16 digits of the last manually dialed number
for your redial use—if the last number you called is busy or is not answering, you
can redial it once or initiate repeated redialing. Subsequent dialing activity
overwrites a temporarily saved number.
To redial the last-dialed number,
·
1. PRESS SPEAKER OR HANG UP handset to disconnect current
ringing or busy tone.
2. DIAL
3. LIFThandset OR LISTEN for ringing or busy tone over the
telephone speaker:
#.
Redial Programming (Storing Numbers)
You can permanently store a number at any programmable button location that
does not currently have a number or feature associated with it.
-
NOTE: For programming of a SAVED NUMBER REDIAL button at your
station, refer to Feature Buttons section on page 58.
·
To permanently store a number you’ve just dialed,
1. DIALnumber.
2. PRESS programmed SAVED NUMBER REDIAL button (see
Feature Buttons section in system specific Programming chapter
for set up details).
26 Non-LCD Station User’s Guide
Page 35

GCA70-313 Making Calls
To dial the saved number,
·
1. PRESS SPEAKER OR LIFT handset if privacy desired.
2. PRESS button where number is saved, OR PRESS programmed
SAVE NUMBER REDIAL button.
If a distant party tells you an important telephone number and you want to immedi
ately save it for later redial, you can use a SAVE NUMBER REDIAL button to save
the first 16 digits of that number.
To store a number while you are on a call,
·
1. PRESS programmed SAVE NUMBER REDIAL button twice
(the display prompts you to dial a number).
2. DIALthe number that you wish to save (the system immediately
saves the number for later redial; it does not dial it over the line
you are on now).
·
To later redial the saved number,
1. PRESS line button to select a line.
2. PRESS programmed SAVE NUMBER REDIAL button (system
automatically dials the number that you saved earlier).
-
Non-LCD Station User’s Guide 27
Page 36

Making Calls GCA70-313
Paging
Your system provides an all-call or a zone page feature that you access by dialing
special codes. This arrangement sounds your voice announcement through the
telephone speakers or through an external paging unit.
To send a paging announcement,
·
1. LIFThandset.
2. PRESS INTERCOM.
3. DIAL
NOTE: Zone 1 (code 70 ) provides an all-call function in the default
mode.
4. MAKE announcement.
5. REMAIN on line if awaiting a reply (known as a Meet-Me page),
OR HANG UP handset.
Attimes other telephone users may page you with instructions to meet them on line.
This is known as a Meet-Me page. You can go to the nearest telephone, dial a code,
and be in contact with the paging party.
·
To reply to a Meet-Me page,
1. LIFThandset of nearest telephone.
2. PRESS INTERCOM.
3. DIAL
4. MEETpaging party on line.
70 through 77 for zones 1–8.
78.
28 Non-LCD Station User’s Guide
Page 37

GCA70-313 Making Calls
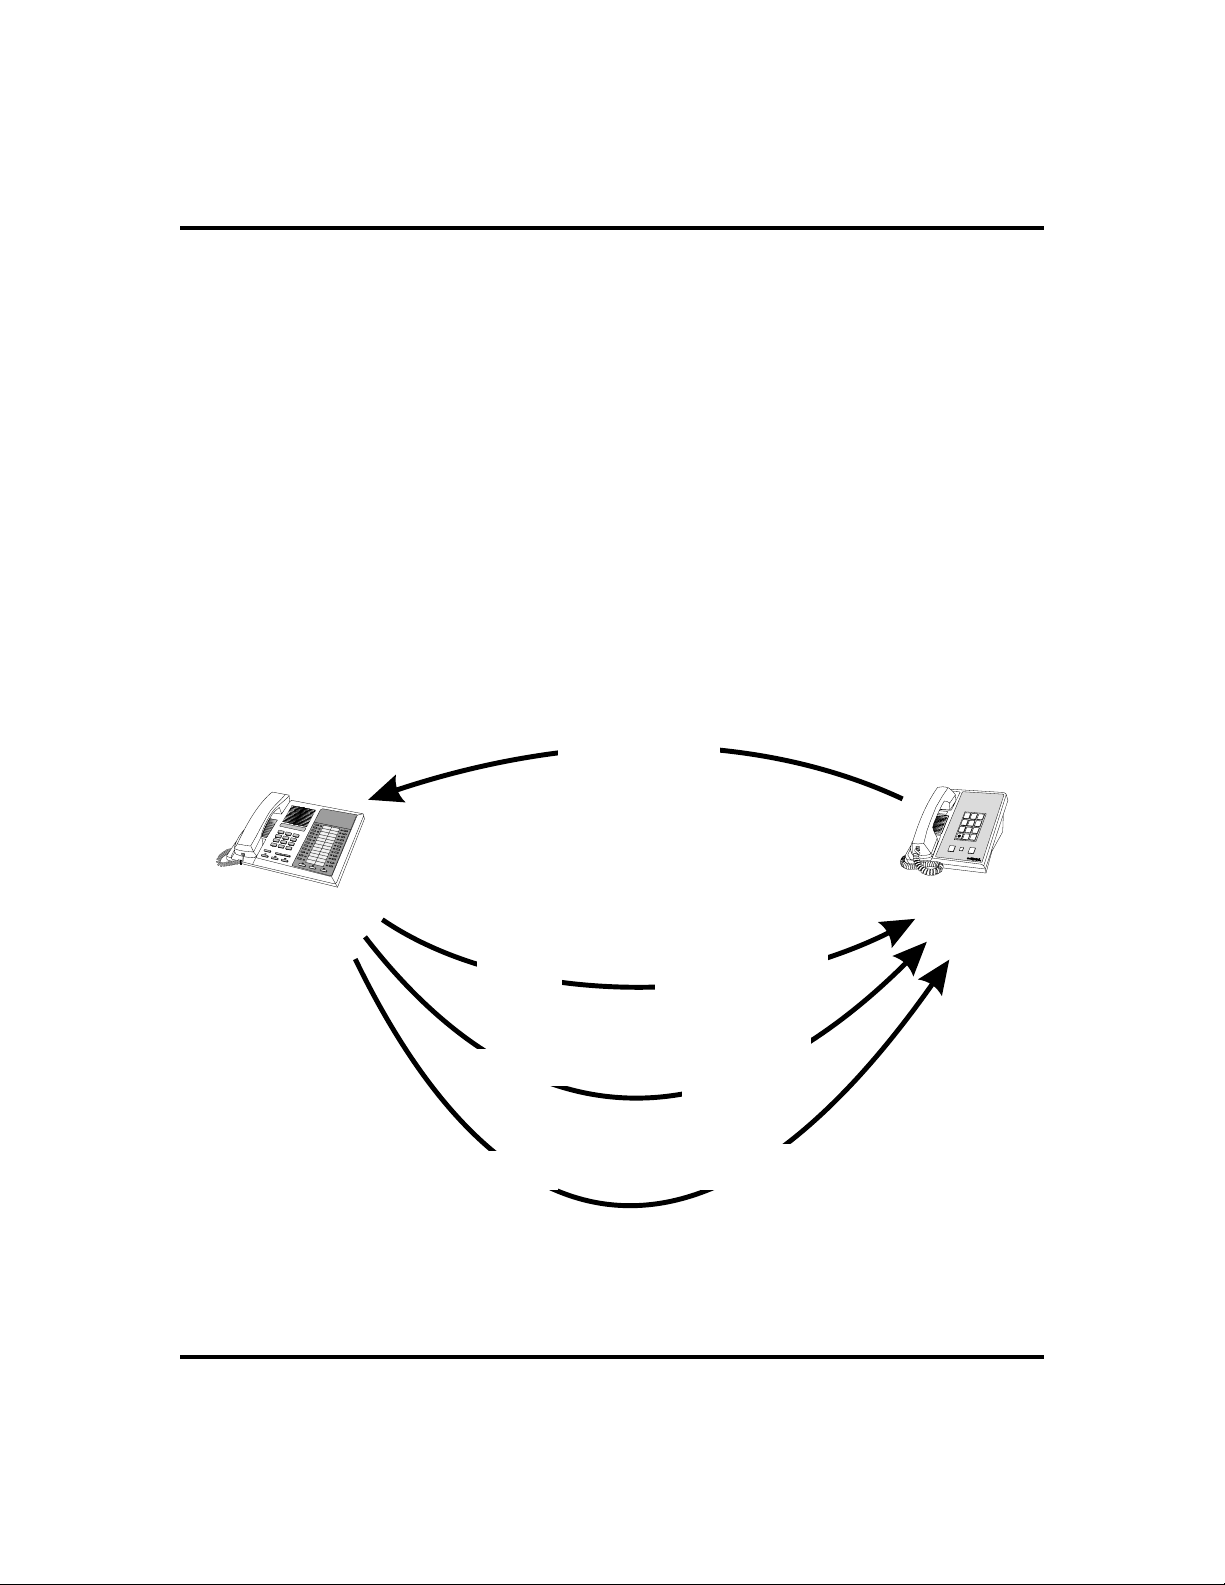
Camping On - Busy Station,
Automatic Callback
If you call another station and receive a busy signal or a Do Not Disturb tone, you
can press a button that willcause the system to ring your telephone when the station
is available.
To camp on at any busy station,
·
1. DIAL *6.
2. Your telephone immediately hangs up. When the station you
called becomes available, your telephone will ring with five short
tone bursts.
When you hear five short tone bursts,
·
1. LIFThandset OR PRESS INTERCOM. The other telephone will
start ringing.
NOTE: If after the ring back tones, you do not press INTERCOM within the
time limit set by the installer, the system cancels the call back.
·
To cancel the call back before your telephone sounds the
tone bursts,
1. PRESS INTERCOM AND DIAL #6.
·
To camp on at a station with a Do Not Disturb condition set,
1. DIAL *6 when you hear the DND tone. A call back will
occur when called station is no longer set in the Do Not Disturb
mode.
Non-LCD Station User’s Guide 29
Page 38

Making Calls GCA70-313
Advanced Camping On Options
Camping On - Idle Station, Automatic Callback
If you call another station and hear ringing but receive no answer, you can press a
button that causes the system to ring your telephone when any activity is initiated at
that station.
To camp on at a station for which you hear ringing but
·
receive no answer,
1. DIAL *6 AND HANG UPhandset. Callback will occur
after any activity is initiated at the dialed station.
To cancel the camp-on condition,
·
1. PRESS INTERCOM AND DIAL #6.
2. HANG UP OR PRESS SPEAKER to end.
Camping On - Busy Station, Wait For An Answer (Call Waiting)
If the telephone you have called is busy, you can send a call-waiting tone to the
telephone and wait on the line for an answer (you must be using the handset for this
feature to work).
·
To activate call waiting when you hear a busy signal,
1. DIAL *6 (called party hears tone).
2. WAIT on line for reply.
3. Called party can place the current call on hold or disconnect from
the call to answer your call-waiting tone, or choose to ignore your
call-waiting tone and continue current conversation.
·
To cancel call waiting,
1. PRESS INTERCOM AND DIAL #6.
2. HANG UP OR PRESS SPEAKER to end.
30 Non-LCD Station User’s Guide
Page 39

GCA70-313 Making Calls
To answer a call-waiting tone if you receive one while on a
·
call,
1. HEAR short tone burst in receiver.
2. PLACE current call on hold, OR complete call AND HANG UP
(waiting call will ring at your telephone).
3. LIFThandset to answer call.
1
2
3
4
5
6
7
8
9
*
0
#
Your
Station
BS
To Wait For
Callback...
...Dial 6
S
and Disconnect
When idle,
your call
is connected.
Busy
Station
To Send Call
Waiting Tone...
...Dial 6 and
ait For Reply
Busy station
hears tone
and may respond
or ignore.
ABC
DEF
1
2
3
GHI
JKL
MNO
4
5
6
PRS
TUV
WXY
7
8
9
OPER
#
0
SHIFT
HOLD
TAP
NO ANS E R
To Wait For
Callback...
S
...Dial 6
S
and Disconnect
When any activity
occurs at station,
your call is
connected.
ABC
DEF
1
Idle
Station
2
3
GHI
JKL
MNO
4
5
6
PRS
TUV
WXY
7
8
9
OPER
#
0
SHIFT
HOLD
TAP
Camping On Options
Non-LCD Station User’s Guide 31
Page 40

Making Calls GCA70-313
Sending Subdued Off-Hook
VoiceAnnouncements (SOHVA)
You can make a private voice announcement to another station that is off-hook and
busy on a call if the system is arranged to provide this feature.
Make a SOHVA announcement using the SOHVA button as
·
follows:
1. MAKE intercom call AND HEAR busy tone. If called station is
on outside line, ring-back tone is heard, but SOHVA is still
available.
2. PRESS programmed SOHVA button AND HEAR several quick
tone bursts.
3. MAKE announcement (busy tone means that the called telephone
is in station mode and you cannot make announcement, that your
SOHVAhas been denied through system programming, or that
the called party has blocked your SOHVA).
4. WAIT on line for reply.
32 Non-LCD Station User’s Guide
Page 41

GCA70-313 Advanced Call Handling
Advanced Call Handling
4
Waiting For ALine (Queuing)
If all the lines in a line group are busy, you can place your telephone in a queue to
await an idle line.
To queue for a line group,
·
1. PRESS INTERCOM.
2. DIALthe line group access code (see Line Group Access code
table on page 61 for your system’s codes).
3. HEAR busy tone.
4. DIAL
·
If you have line appearance for a particular line and wish to
*6.
queue for it,
1. OBSERVE the busy status light (LED).
2. PRESS INTERCOM.
3. DIAL
4. PRESS line button.
5. When line group is free, your telephone sounds several short tone
bursts. When you hear this, lift handset, hear dial tone, and place
call.
·
To cancel line queuing or line group queuing,
1. PRESS INTERCOM.
2. DIAL
*6.
#6.
Non-LCD Station User’s Guide 33
Page 42

Advanced Call Handling GCA70-313
Conferencing
When using the DXPsystem, you can make conference calls that involve up to five
parties, including you as the originating party, in any combination of outside lines
and intercom parties. When using the DXP Plus, FXS or FXT systems, you can
include up to seven parties (in various combinations) in a conference call.
To set up a conference call that includes any combination
·
of outside lines and intercom parties,
1. MAKE first call.
2. PRESS TRNS/CONF (call is placed on hold automatically).
3. SELECTnext line AND MAKE next call.
4. PRESS TRNS/CONF to establish conference.
5. PRESSTRNS/CONF button to add more parties.
To continue conversation on remaining line after other
·
outside lines have dropped out of conference,
1. PRESS HOLD.
2. PRESS the line button of the remaining party.
·
To retrieve a line from hold and bring that party back into
the conference,
1. PRESS TRNS/CONF.
2. PRESS line button.
3. PRESS TRNS/CONF.
If you are involved in a conference call with two outside lines, you can drop out of
this established conference call and leave the outside lines in the conference with
each other. This is known as an unsupervised conference call.
34 Non-LCD Station User’s Guide
Page 43

GCA70-313 Advanced Call Handling
To drop out of a conference call you initiated involving
·
outside lines (creating an unsupervised conference),
1. DIAL # (lines remain lighted and in use until one or both
outside parties disconnect; when only one party drops out of an
unsupervised conference, the other party remains on hold until he
hangs up or the line is answered).
To rejoin an unsupervised conference between two outside
·
lines,
1. PRESS TA P.
Other
Station
...Press TRNS/CNF.
ToRemoveaCaller
From A Conference...
Other
Station
ABC
DEF
1
2
3
GHI
JKL
MNO
4
5
6
PRS
TUV
WXY
7
8
9
OPER
#
0
SHIFT
HOLD
TAP
...Select Line Button
and Disconnect Line.
ToAddaCaller
to a Conference...
ABC
DEF
1
2
3
G
HI
JKL
MNO
4
5
6
PRS
TUV
WXY
7
8
9
OPER
#
0
SHIFT
HOLD
TAP
Conferencing Options
Managing a
Conference
Call
To D ro p O u t o f
A Conference...
Your
Station
...Dial #.
Non-LCD Station User’s Guide 35
Page 44

Advanced Call Handling GCA70-313
Call Forwarding
Forwarding a Call
You can forward the calls that normally ringat yourtelephone toanother telephone.
To remind you that the system is forwarding your calls, your telephone sounds a
short ring burst each time the system forwards a call.
NOTE: You can also use a pre-designated CALL FORWARD button to
quickly program your station to forward your calls. See Feature Button
section on page 58 for more information on programming.
To forward your calls,
·
1. PRESS INTERCOM.
2. CHOOSE one of the following call forwarding options:
•
DIAL *51 to forward prime line and intercom calls
•
DIAL *52 to forward all calls
•
DIAL *53 to forward prime line and intercom calls
after ring no answer or busy line.
•
DIAL *54 to forward all calls after ring no answer
or busy line.
3. DIALextension number of telephone to receive your forwarded
calls OR DIAL desired group intercom number.
4. PRESS SPEAKER OR HANG UP to end.
·
To cancel call forwarding,
1. PRESS INTERCOM.
2. DIAL
#5. Your telephone immediately hangs up.
Diverting All Incoming Calls ToAnother Station
Call diverting permits you to send an incoming call to another station that you have
previously designated. You can divert an incoming call to the designated station
whether you are busy or idle.
36 Non-LCD Station User’s Guide
Page 45

GCA70-313 Advanced Call Handling
To identify the station to receive diverted calls,
·
1. PRESS INTERCOM.
2. DIAL
*55.
3. DIALextension number of station to receive diverted call.
To divert calls to the designated station,
·
1. HEAR ringing AND/OR SEE flashing line status light.
2. PRESS programmed CALL FORWARD button (system immedi
ately forwards ringing call to station you designated).
Forward Only Your
Dial 51S
Dial 52S
Forward All Calls
Caller
Your
Station
That RIng At Your
Station
-
Prime Line and
Intercom Calls
SHIFT
HOLD
Forward
Station
ABC
DEF
1
2
3
GHI
JKL
MNO
4
5
6
PRS
TUV
WXY
7
8
9
OPER
#
0
TAP
Dial 53 Or 54SS
Forward Only Calls
That Are Not Answered
At Your Station
Call Forwarding Options
NOTE: For programming of a CALL FORWARD button at your station,
refer to Feature Buttons section on page 58.
Non-LCD Station User’s Guide 37
Page 46

Advanced Call Handling GCA70-313
Call Forward Outside System (CFOS)
TheCall Forward OutsideSystem*(CFOS) feature allowsyou to forward incoming
or transferred line calls to telephone numbers outside the system.
To activate CFOS with your LCD station,
·
1. PRESS INTERCOM AND DIAL *56.
2. CHOOSE the type of call forwarding:
•
DIAL 1 for intercom calls only.
•
DIAL 2 for prime line calls only.
•
DIAL 3 for all calls.
•
DIAL 4 for ring-no-answer intercom calls only.
•
DIAL 5 for ring-no-answer prime line calls only.
•
DIAL 6 for all ring-no-answer calls.
3. PRESS the speed dial button programmed with the target
number, OR SELECT a line AND DIAL number (max 16
digits).
4. PRESS HOLD for Pause OR PRESS TA P for Flash.
5. PRESS SPEAKER to end.
·
To deactivate CFOS, choose one of the following:
1. PRESS INTERCOM AND DIAL *56.
·
To join an active CFOS call from the CFOS-enabled station,
1. Note flashing HOLD light indicating active CFOS call, and press
TAP. Join CFOS-forwarded party and CFOS destination in a con
ference call.
* Comdial has taken reasonable steps in the design of all product features, including CFOS , which protect
against unauthorized or fraudulent access to, or use of, a system, or which protect against unauthorized,
fraudulent or unaccounted-for access to, or use of, long distance lines. However, no system is entirely
invulnerable or immune from unauthorized or fraudulent access or use, or unaccounted-for access or
use, and therefore Comdial disclaims any and all liability, and makes no warranty, express or implied,
relating to unauthorized or fraudulent access or use, or unaccounted-for access or use.
38 Non-LCD Station User’s Guide
-
Page 47

GCA70-313 Advanced Call Handling
Account Codes
If the installer has arranged your system for account code entry, your display may
prompt you to enter an account code after answering a call.
NOTE: For programming of an ACCOUNT CODE button at your station,
refer to Feature Buttons section on page 58.
To enter account code on an incoming call,
·
1. IFavailable, PRESS programmed ACCOUNT CODE button (the
call in progress is not interrupted).
2. IFnot available, PRESS INTERCOM AND DIAL
is automatically placed on hold).
DIAL account code. Your telephone automatically returns to the
3.
call after you’ve dialed the complete account code.
If the installer has arranged your system for account code entry, your display may
prompt you to enter an account code before dialing. Depending upon how the
installer has programmed your system, these account codes may be
“forced”(mandatory) for dialing outside numbers.
·
To enter account code on an outgoing call,
1. DIAL 9 OR other line button.
2. PRESS INTERCOM (call is automatically placed on hold).
3. DIAL
ACCOUNT CODE button.
4. LISTEN for dial tone AND DIAL number you are calling.
*04 AND account code. OR PRESS programmed
*04 (call
Non-LCD Station User’s Guide 39
Page 48

Advanced Call Handling GCA70-313
Call Parking
Parking a Call
You can place a call on hold in the system so that someone can answer the call from
any station that does not have a line appearance for the call. Youaccomplish this by
placing the call in one of many park orbits, where the call remains until it is
answered.
To park a call in orbit,
·
1. While on the call, PRESS INTERCOM OR PRESS TRNS/CONF if
intercom call.
2. DIAL
3. DIALcode for park orbit (
10–99).
4. Remember the code for later use or make it known to those who
need to know it in order to retrieve the call.
To park a call using a programmed PARK button,
·
1. While on the call, PRESS the programmed PARK button (the
system places the call in a preselected park orbit and lights the
PARK light).
·
To retrieve a call that was placed on hold in the system
*.
910 to 999 for orbit
(parked),
1. PRESS INTERCOM.
2. DIAL
3. DIALcode for orbit (
OR PRESS programmed PARK button.
#.
910 to 999 for orbit 10–99),
Handling Park Recalls
Whena parkedcall timesoutof thesystem, itreturnsto yourtelephone intheform of
a park recall (you will hear four short tone bursts at 12-second intervals).
·
To answer a park recall,
1. PRESS line button. The call will then connect to your station.
40 Non-LCD Station User’s Guide
Page 49

GCA70-313 Advanced Call Handling
To place a park recall on hold at your station,
·
1. ANSWER/RETRIEVE call.
2. PRESS HOLD. If the call remains on hold for a period of time, it
will ring back to your telephone as a hold recall.
To re-park a park recall and restart the park timer,
·
1. ANSWER/RETRIEVE call.
2. PRESS INTERCOM AND DIAL S and park orbit code. (the
system places the call back in its original park orbit where it
remains until it is answered or recalls again).
Your
Caller
Station
If the Parked Call
Is Not Answered
To Place Call
In a Parking Orbit...
...DIAL and
S
WithinaSetTime,
It Recalls To Your
Station
Orbit Number
(910-999)
ABC
DEF
1
2
3
GHI
JKL
MNO
4
5
6
PRS
TUV
WXY
7
8
9
OPER
#
0
SHIFT
HOLD
TAP
Parking
Orbit
To R e tr i ev e a
Parked Call From
Any Other Station...
ABC
DEF
1
2
3
GHI
JKL
MNO
4
5
6
PRS
TUV
WXY
7
8
9
OPER
#
0
SHIFT
HOLD
TAP
Other
Stations
ABC
DEF
1
2
3
GHI
JKL
MNO
4
5
6
PRS
TUV
WXY
7
8
9
ABC
DEF
1
2
3
GHI
JKL
MNO
4
5
6
PRS
TUV
WXY
7
8
9
OPER
#
0
SHIFT
HOLD
TAP
OPER
#
0
SHIFT
HOLD
TAP
...DIAL # and
Orbit Number
(910-999)
Parking Calls
Non-LCD Station User’s Guide 41
Page 50

Advanced Call Handling GCA70-313
Call Transferring
Screened Call Transfers
You can answer a call at your station and transfer it to another telephone. If you first
identifythe caller to the party receivingthe transfer (giving that user theopportunity
to prepare for the call), you have made a screened transfer.
To screen and transfer a call to another telephone in the
·
system,
1. ANSWER call.
2. PRESS TRNS/CONF (call is automatically placed on hold).
3. DIALextension number of telephone to receive transfer, OR
PRESS DSS/BLF button for that extension.
4. ANNOUNCE call when intercom party answers.
5. PRESS SPEAKER to disconnect (if in station mode), OR HANG
UP.
Theintercom party then hasthe call (if he orshe answered the screenedtransferwith
the handset). If you announce the transfer over the speaker, the intercom party’s
telephone rings with the transferred call after you hang up.
·
If the intercom party is busy or does not answer,
1. PRESS flashing line button AND LIFT handset if privacy is
desired.
42 Non-LCD Station User’s Guide
Page 51

GCA70-313 Advanced Call Handling
Unscreened Call Transfers
You can answer a call at your station and transfer it to another telephone. If you
transferthe callwithout firstannouncing it,you havemadean unscreenedtransfer.
To transfer an unscreened call to another system
·
telephone,
1. ANSWER call.
2. PRESS TRNS/CONF (call is automatically placed on hold).
3. DIALextension number of telephone to receive transfer, OR
PRESS DSS/BLF button for that extension.
4. PRESS SPEAKER to disconnect (if in station mode), OR HANG
UP. The transfer will ring at the called telephone.
If the intercom party is busy or does not answer,
·
1. PRESS flashing line button AND LIFT handset if privacy is
desired.
Non-LCD Station User’s Guide 43
Page 52

Advanced Call Handling GCA70-313
Other Call Transferring Options
Hot Transfer
A hot transfer is a type of screened transfer. This feature is useful for transferring
calls to people who need to work in a handsfree mode. Once you announce the call
and the system completes the transfer, the person receiving the transfer can simply
begin speaking toward his or her station to answer the call.
To make a hot transfer to another telephone in the system,
·
1. ANSWER call.
2. PRESS TRNS/CONF (the call is automatically placed on hold).
3. DIALextension number of telephone to receive the transfer OR
PRESS DSS/BLF button for that extension.
4. ANNOUNCE call.
5. PRESS TRNS/CONF.
6. If necessary, PRESS SPEAKER to disconnect (if in station mode)
OR HANG UP. The person receiving the transfer then has the
call.
Quick Transfer
Whenthe quick transfer method has beenprogrammedby the installer,it allows you
todo an automatictransferof an incoming linecall without pressing theTRNS/CONF
button.
·
To do a quick screened transfer,
1. ANSWER call.
2. DIALintercom number for transfer location.
3. When party at transfer location answers, ANNOUNCE call.
4. HANG UP OR PRESS SPEAKER button.
44 Non-LCD Station User’s Guide
Page 53

GCA70-313 Advanced Call Handling
To do a quick unscreened transfer,
·
1. ANSWER call.
2. DIALintercom number for transfer location.
3. HANG UP OR PRESS SPEAKER button.
Call Transferring Summary
Transferoption
Screened Transfer
Unscreened
Transfer
Hot Transfer
Quick Transfer
(with intro)
What are the sender’s
actions after answering
original call?
1. Press TRNS/CONF
2. Dial extension
3. Announce call
4. Disconnect
1. Press TRNS/CONF
2. Dial extension
3. Disconnect
1. Press TRNS/CONF
2. Dial extension
3. Announce call
4. Press TRNS/CONF
5. Disconnect
1. Dial extension
2. Announce call
3. Disconnect
How is the transferred call
delivered to the receiver?
Normal intercom ringing
(two short bursts) and the
introduction of the call; if
answered in station mode,
ringing will follow the
transfer
Normal intercom ringing
(two short bursts)
Transfer introduction
followed directly by the
incoming call
Intercom ringing (two
short bursts) and the
introduction of the call; if
answered in station mode,
ringing will follow the
transfer
Best suited for:
Normal transfers that
require introduction.
Expected transfers that
need no introduction.
Personnel who must
receive speakerphoe calls
in a hands-free mode.
Normal transfers from
attendants and operators
who handle a large number
of incoming calls which
require transfer.
Expected transfers from
Quick Transfer
(without intro)
Non-LCD Station User’s Guide 45
1. Dial extension
2. Disconnect
Normal intercom ringing
(two short bursts)
attendants and operators
who handle a large number
of incoming calls which
require transfer.
Page 54

Advanced Call Handling GCA70-313
Notes
46 Non-LCD Station User’s Guide
Page 55

GCA70-313 Nonverbal Messaging
Nonverbal Messaging
5
LCD Message Delivery
You can set system-supplied messages at your station to be received and displayed
by a calling LCD station.
To turn on a message from your telephone,
·
1. PRESS INTERCOM AND DIAL *02.
2. DIALthe desired code number from your message list (01–30)
on the next page,
•
For a “Back At” message, dial the code for time numbers
and colon from dialing codes table.
(For example, DIAL
05
•
For a “Call” message, dial code for telephone number of
your new location.
(For example, DIAL
for the time 01:45).
02 02 00 00
#00012904
# 09 07 08 15
for the number 978–2200).
NOTE: See following page for LCD dialing codes.
3. DIAL
intercom light flashes to indicate the waiting message.
·
To turn off the message and your intercom light,
1. PRESS INTERCOM AND DIAL #02.
Non-LCD Station User’s Guide 47
# AND PRESS SPEAKER to end message. Your
Page 56

Nonverbal Messaging GCA70-313
Dialing Code Table
Character Dialing Code Character Dialing Code
101 808
202 909
303 000
4 04 space 12
505 –15
606 :29
707
LCD MESSAGE LIST
(Write the attendant supplied messages here.)
Dial Code Message
01 Back at (default message 1)
02 Call (default message 2)
03 Ask them to hold (default message 3)
04 Take a message (default message 4)
05 I will call back (default message 5)
06
07
08
09
48 Non-LCD Station User’s Guide
Page 57

GCA70-313 Nonverbal Messaging
LCD MESSAGE LIST
(Write the attendant supplied messages here.)
Dial Code Message
10
11
12
13
14
15
16
17
18
19
20
21
22
23
24
25
26
27
28
29
30
Non-LCD Station User’s Guide 49
Page 58

Nonverbal Messaging GCA70-313
Message Waiting Light and Messaging
Ifthe system installerdesignates your stationtohave message-wait originateability,
you can turn on the message-waiting light of any other telephone.
To turn on the message-waiting light (and a broken dial
·
tone, if programmed) at another station that is idle or busy,
1. PRESS INTERCOM.
2. DIAL
3. DIALextension number OR PRESS DSS/BLF button of station to
be alerted. The message-waiting light of called station will flash.
To turn off the message waiting light at a busy or idle
·
*3.
station,
1. PRESS INTERCOM.
2. DIAL
3. DIALextension number OR PRESS DSS/BLF button of station
that was alerted. The message-waiting light of called station will
turn off.
·
To turn off the message-waiting light during
#3.
message-delivering conversation,
1. PRESS INTERCOM once if off-hook, twice if on-hook.
·
To receive a message at an alerted station,
1. OBSERVE flashing message waiting light or hear broken dial
tone.
2. PRESS INTERCOM AND HOLD. The station that left the message
is called automatically.
50 Non-LCD Station User’s Guide
Page 59

GCA70-313 Nonverbal Messaging
Response Message Delivery
Byprogramming one or more RESPONSE MESSAGE buttons on your station, you
can respond with a variety of messages to many calling situations. A fixed
RESPONSEMESSAGEbutton sends the same message you previously select each
time you press the button.
NOTE: For detailed instructions on programming a RESPONSE MESSAGE
button at you r station, see page 57 of the Programming chapter.
To send an LCD message when you call and receive busy
·
signal or no answer,
1. While still on the call, PRESS the appropriate RESPONSE
MESSAGE button to send a preselected message to the calling
LCD speakerphone.
·
To send an LCD message to a caller who has initiated a
SOHVA or intercom call from another LCD telephone,
1. HEAR the SOHVA tone or voice announcement in your handset
or headset.
2. PRESS the appropriate fixed RESPONSE MESSAGE button to
send a preselected message to the calling telephone.
Non-LCD Station User’s Guide 51
Page 60

Nonverbal Messaging GCA70-313
Notes
52 Non-LCD Station User’s Guide
Page 61

GCA70-313 Programming
Programming
6
DSS Numbers
Storing another station at a DSS/BLF programmable location allows a user to
monitor that station, dial with the press of one button, or pick up or hold calls at that
station quickly and conveniently. You can record your station’s programmed DSS
and speed dial numbers on page 56 for quick reference.
·
To store an intercom number as a DSS number,
NOTE: Storing DSS numbers at button locations will overwrite any previ-
ously stored numbers.
1. PRESS INTERCOM.
2. DIAL
3. PRESS programmable button to choose DSS location.
4. DIALextension number.
5. PRESS next location button AND STORE next DSS number.
6. REPEAT the previous step until all DSS numbers are stored.
Do not attempt to program interactive buttons; doing so can cause the sys
tem to make features unavailable. If you inadvertently reprogram interac
tive buttons, you can retrieve the button functions in the following manner:
3. DIAL
Non-LCD Station User’s Guide 53
**3.
CAUTION
1. PRESS INTERCOM AND DIAL
2. PRESS the interactive button to be reprogrammed
**1
91, 92,or 93 (for buttons from left to right).
-
-
Page 62

Programming GCA70-313
Speed Dial Numbers
Speeddialing is afeature that letsyou store anddialfrequently called numbersusing
one or two buttons. You can store numbers for speed dialing at a keypad number or
any programmable button that is not now assigned as a line button or other
feature by the system administrator or installer.
NOTE: The Federal Communications Commission (FCC) requires that
when programming emergency numbers and(or) making test calls to emer
gency numbers:
1. Remain on the line and briefly explain to the dispatcher the reason for the
call;
2. Perform such activities in the off-peak hours, such as early morning or
late evening.
·
To store an outside number as a speed dial number, follow
the display prompts and proceed as follows:
1. PRESS INTERCOM.
-
2. DIAL
3. PRESS programmable button OR dial pad button (0–9) to choose
storage location (remember, to access second level storage at a
programmable button, press SHIFT first).
Keypad
DIAL desired number
for personal speed dial
OR
DIAL and number
S
for system speed dial
**1.
R
ABC
DEF
2
13
MNO5JKL4GHI
6
PRS8TUV9WXY
7
#0*
MESSAGE
TAP
TRNS/CONF
SPEAKER
MUTE
HOLD
Speed Dialing Options
DSS/BLF Button
PRESS button of
desired station
to dial directly
54 Non-LCD Station User’s Guide
Page 63

GCA70-313 Programming
4. CHOOSE your speed dial route from the following list:
•
PRESS line button to select outside line.
•
DIAL 00 to select prime line or last line used.
•
DIAL 01 to 16 to select line group.
•
PRESS INTERCOM button or dial 8 to select intercom.
NOTE: You may need a pause between numbers to compensate for differ
ences in response time between your system and the host system (ask your
attendant about this). To store a pause, press HOLD, then continue dialing. If
your system is behind a host system that needs a hookflash to access a
feature, press TAP to store a hookflash, then continue dialing.
5. DIALnumber (up to 16 digits long—include
needed).
6. PRESS TRNS/CONF to store the number.
7. REPEAT previous steps until all numbers are stored.
8. PRESS SPEAKER to end.
You can record your station’s programmed DSS and speed dial numbers on page
56 for quick reference.
* and # if
-
Non-LCD Station User’s Guide 55
Page 64

Programming GCA70-313
Speed Dial Numbers, Features or DSS Locations
(Programmable Buttons)
113
214
315
416
517
618
719
820
921
10 22
11 23
12 24
As you program numbers, fill in the identification strips on your telephone as
well as these tables.
Personal Speed Dial Numbers
(Keypad Buttons)
16
27
38
49
50
56 Non-LCD Station User’s Guide
Page 65

GCA70-313 Programming
Response Message Button
You may program a RESPONSE MESSAGE button, which allows you to send an
LCD message to a caller who has initiated a SOHVA or intercom call from an LCD
speakerphone, or to send an LCD message to an LCD speakerphone that you call
and receive a busy signal or no answer.
To store a fixed RESPONSE MESSAGE button (delivers the
·
same message each time it is pressed),
1. PRESS INTERCOM.
2. DIAL
3. PRESS programmable button for RESPONSE MESSAGE button
location.
4. DIALmessage number (01-30) from list of messages.
NOTE: The system attendant creates the programmed messages available
for use that are listed in a table on page 49.
5. DIAL
6. PRESS SPEAKER to end.
7. LABELbutton location.
**6.
# to save programming.
Non-LCD Station User’s Guide 57
Page 66

Programming GCA70-313
Feature Buttons
You can create feature access buttons to make operation easier. Some features that
you may want to use frequently are defined as follows:
Account Code Button—allows you to enter an account code for call
·
record purposes.
Call Forward Button —allows you to forward all of your calls to
·
another telephone.
Camp-On With Automatic Call Back —allows you to camp on to
·
a station. The system calls you back as soon as the called station becomes
idle or occupied.
Camp-On (Call Waiting) —when calling a busy station, this feature
·
allows you to send a call waiting tone to the station and to wait on-line for
a reply.
Do Not Disturb Button —prevents other telephones from ringing
·
your telephone.
·
Group Listen Button —allows others to hear a conversation over the
telephone speaker while you use the handset or headset; the distant party
can hear only the conversation transmitted through the handset or headset
microphone.
·
Music Button —allows you to enable or disable background music;
also allows you to choose from two pre-programmed music sources.
·
Page Button —provides one-button access to paging.
·
Park Button —parks calls in preselected park orbit.
·
Pick-Up Button —allows you to pick up a call ringing elsewhere in
your system.
·
Privacy Release Button—allows other telephones which share a
line appearance for current call to join.
·
Saved Number Redial Button —redials the last number saved
·
Voice-Announce Block Button —blocks voice announcements.
58 Non-LCD Station User’s Guide
Page 67

GCA70-313 Programming
You can store feature access codes at programmable buttons to provide yourself
withone-button accessto features thatyou use quiteoften. Tofindyour featurecode
of interest, refer to Appendix A on page 73.
To manually store an access code,
·
1. PRESS INTERCOM.
2. DIAL
3. PRESS programmable button to choose storage location.
4. DIAL access code for feature.
5. LABELbutton location.
6. PRESS next location button and store next feature code.
7. REPEAT previous steps until all desired feature codes are stored.
8. PRESS SPEAKER to end.
For example, to program a button to provide group call
·
**3.
pickup (access code #4),
1. PRESS INTERCOM.
2. DIAL
3. PRESS programmable button to choose storage location.
4. DIAL
5. LABELbutton location.
6. PRESS SPEAKER to end.
**3.
#4.
Non-LCD Station User’s Guide 59
Page 68

Programming GCA70-313
Notes
60 Non-LCD Station User’s Guide
Page 69

GCA70-313 Other Advanced Features
Other Advanced Features
7
Line Groups
Some systems have telephone lines arranged into line groups that you may access
for outside calling instead of selecting an individual line button.
If your system has line groups, access them as follows:
·
1. PRESS INTERCOM.
2. DIALdesired line group access code.
Line Group Access Codes
Line Group Default Code Active Code*
1
2 through 11
12 through 16
* If your system attendant has reassigned your line group access codes, write them here for future
reference.
3. LISTEN for outside dial tone.
4. DIALdesired number.
5. LIFThandset to talk.
Non-LCD Station User’s Guide 61
80 through 89
60 through 64
9
Page 70

Other Advanced Features GCA70-313
Automatic Redial
(8124S, 8112Sand 8212S only)
Ifyour station has the multiple automatic redial feature enabled, you can place up to
10 numbers in your telephone’s redial queue.
To use the automatic redial feature to redial a busy or
·
unanswered number,
1. While the telephone is idle, DIAL *70 OR PRESS the
AUTOMATIC REDIAL button programmed by your installer.
2. The system repeatedly dials the number until you cancel the fea
ture or the system has dialed the number a preprogrammed
number of times (determined by your system installer).
3. The AUTOMATIC REDIAL light flashes between redials and
turns on steady during redialing.
4. IFyour installer has enabled answer supervision on your line, the
system automatically cancels automatic redialing and turns the
AUTOMATIC REDIAL light off.
5. IFanswer supervision is NOT enabled, PRESS the programmed
AUTOMATIC REDIAL button while on the call to cancel
automatic redialing.
6. IFyour system installer has enabled the redial multiple numbers
feature, you can have up to 10 numbers in your redial queue. To
add numbers to your redial queue, REPEAT step 1 in the above
procedure.
In order to utilize the multiple automatic redial queue, you must
AUTOMATIC REDIAL button. The system will automatically redial only the last
numberplaced into the queue, so youmustrepeatedly press the programmed button
toaccess previous numbers in the queue. (For example, pressing the AUTOMATIC
REDIAL button twice with the system idle will redial the second to last number
placed into the queue.) The user must remember all numbers which have been
designated for automatic redial.
first program a
-
·
To scroll through numbers in your redial queue if your
telephone is currently idle,
1. PRESS the programmed AUTOMATIC REDIAL button repeat
edly to select the desired number which has been previously
placed in the redial queue.
62 Non-LCD Station User’s Guide
-
Page 71

GCA70-313 Other Advanced Features
To interrupt the redialing procedure so that you can scroll
·
through numbers in your redial queue,
1. While your telephone is in the process of dialing a number,
PRESS the programmed AUTOMATIC REDIAL button twice.
This treats the number as answered, cancels automatic redialing
for that number, and puts the number back in the automatic redial
queue. The display shows the last number dialed.
2. The system will now dial the next number in the queue. IF you
would like to select a different number, repeatedly PRESS the
AUTOMATIC REDIAL button.
To cancel the automatic redial feature, choose one of the
·
following:
1. PERFORM any user activity at the station (go on-hook, select
the speaker button, etc...).
2. DIAL
3. SELECT the programmed AUTOMATIC REDIAL button while
the number you wish to remove from the redial queue is ringing.
#72 to delete all numbers from the redial queue.
Non-LCD Station User’s Guide 63
Page 72

Other Advanced Features GCA70-313
Tracker Paging System
The Tracker Paging System option allows you to send call back and parked call
messages to Tracker pagers assigned to station extension numbers.
Alongwith the parkedcallmessage, the systemparksthe call inorbitfor retrieval by
the paged party.The type of message that the system delivers (either alphanumeric
or numeric-only) is dependent upon the Tracker pager model in use at the station.
When outside callers call into a system that has both a Tracker Paging option and a
voicemail optioninstalled, thesystemgives thesecallers theoption of eitherleaving
a message or tracking the person that they are calling.
·
To track a called party after receiving a ring—no answer,
1. MAKE an intercom call to someone AND RECEIVE no answer.
2. PRESS INTERCOM AND DIAL
3. HEAR confirmation beep (Tracker page accepted) OR HEAR
busy tone (Tracker page not accepted).
4. PRESS SPEAKER to end.
·
To track a called party without first calling them,
1. PRESS INTERCOM AND DIAL *8.
2. DIALextension number.
3. HEAR confirmation beep (Tracker page accepted) OR HEAR
busy tone (Tracker page not accepted).
4. PRESS SPEAKER to end.
*8.
64 Non-LCD Station User’s Guide
Page 73

GCA70-313 Other Advanced Features
To use Tracker to transfer a call to a park orbit for retrieval
·
and transmit the call’s park orbit code and caller ID
information (if available),
1. ANSWER call AND PRESS TRNS/CONF.
2. DIALextension number.
3. PRESS INTERCOM AND DIAL
not answer or is busy.
4. HEAR confirmation beep (Tracker page accepted) OR HEAR
busy tone (Tracker page not accepted).
5. PRESS SPEAKER button to end.
To retrieve a call that you parked using the Tracker option,
·
1. PRESS TA P to retrieve.
If you receive a parked call message on your Tracker pager,
·
1. GO to any system station.
2. PRESS INTERCOM.
3. DIALTracker pager orbit code (
4. RETRIEVE call.
·
To enable or disable a Tracker pager at your station,
1. PRESS INTERCOM.
2. DIAL
#07 to enable, OR DIAL #06 to disable.
*8 IF the called station does
#800 to #899 ).
3. PRESS SPEAKER to end.
Non-LCD Station User’s Guide 65
Page 74

Other Advanced Features GCA70-313
VolumeControl
Setting Current VolumeLevel
The volume control on your telephone is a multipurpose control you can use to set
the volume (loudness) of the ringer, the speaker, the handset, the headset, back
ground music, and the group listening mode.
There are four ringer loudness levels
·
(plus an off position). Set these
levels as follows:
1. While your telephone is on-hook and idle,
PRESS the VOLUME UP OR VOLUME
DOWN button once for each change in
loudness you desire. The ringer sounds
once for each change as an example of the
current setting. (On the 8112N, the ringer
volume is controlled by a three position
switch on the bottom of the telephone.)
Impact SCS Volume Buttons
-
NOTE: If you set the ringer to the
a short ring burst once for each call you receive at your station while the
ringer is off.
·
There are eight speaker loudness levels. Set these levels
position, your telephone will sound
OFF
for the current call as follows:
1. While on a call and in station mode, PRESS the VOLUME UP OR
VOLUME DOWN button once for each change in loudness that you
desire.
·
There are at least eight handset loudness levels that you
can set for the current call as follows (not available on
8112N):
1. While on a call and in handset mode, PRESS the VOLUME UP OR
VOLUME DOWN button once for each change in loudness that you
desire.
66 Non-LCD Station User’s Guide
Page 75

GCA70-313 Other Advanced Features
NOTE: When the call ends, the system resets the loudness of all future calls
to the programmed (default) setting. For instructions in setting your sta
tion’s default volume, see Default Volume Control section in the system spe
cific Advanced Features chapter.
There are eight headset loudness levels that you can set for
·
-
-
the current call as follows:
1. While on a call and in headset mode,
PRESS the VOLUME UP OR VOLUME
DOWN button once for each change in
loudness that you desire.
There are eight group listening
·
loudness levels. Set the level for the
current call as follows:
1. While on a call and in the group listening
mode, PRESS VOLUME UP OR VOLUME
DOWN button once for each change in
loudness you desire.
Impact Volume Buttons
·
There are eight background music loudness levels. To set
the level,
1. While background music is on at your station, PRESS VOLUME
UP OR VOLUME DOWN button once for each change in loudness
you desire. This level will remain set for background music until
you change it again, even if you turn off the feature and then reac
tivate it.
-
Muting YourStation (not available on 8112N)
By using the MUTE button, you can block transmission of your voice to the distant
party. You can do this whether you are using the handset or the speaker.
·
To mute your station,
1. PRESS MUTE (mute function and light turn on). You can still
hear the distant party, but he or she cannot hear you.
·
To speak to the distant party,
1. PRESS MUTE again (mute function and light turn off).
Non-LCD Station User’s Guide 67
Page 76

Other Advanced Features GCA70-313
Default Volume Control
You can set a permanent loudness level for any volume control setting. The level
will remain at this volume (referred to as the default setting) until you change the
setting.
To set a permanent speaker,
·
headset, handset, or group listening
loudness for all future calls,
1. PRESS INTERCOM.
2. ACTIVATE speaker, headset, handset, or
group listen mode to be affected.
3. Whileinthat mode, PRESSVOLUME UP or
VOLUME DOWN button to adjust loudness.
4. DIAL
5. REPEAT this procedure in each mode until you’ve set all default
**7 ORPRESSprogrammed
SAVE buttontohold theloudness at thelast
setting for all future calls (until you change
the default again).
volume levels.
Impact Volume Buttons
Impact SCS Volume Buttons
68 Non-LCD Station User’s Guide
Page 77

GCA70-313 Other Advanced Features
Background Music
(not available on 8112Nor 8212N)
Ifthe telephone systemsuppliesbackground music, youcan turn it onat your station
while it is on-hook and idle. The system automatically turns background music off
during calls and voice announcements.
To turn the music on,
·
1. PRESS INTERCOM.
2. DIAL
source two if available (the SPEAKER light turns on when back
ground music is on).
3. ADJUSTmusic volume with the volume button.
NOTE: The system may provide music from two sources; however, this
feature must be enabled by the system installer.
To turn the music off,
·
1. PRESS INTERCOM.
2. DIAL
music is off).
*11 for music source one OR *12 for music
#1 , (the SPEAKER light turns off when background
-
Non-LCD Station User’s Guide 69
Page 78

Other Advanced Features GCA70-313
Automatic Set Relocation
If your installer has equipped your system with automatic set relocation, when you
move your telephone to a new location, the system gives you a choice (through a
display prompt) as to whether you want to keep your previous programming or use
the programming in the new location.
To maintain the extension number and programming
·
features from the old location,
1. CONNECTthe telephone line cord to the new jack.
2. OBSERVE the flashing HOLD light AND PRESS HOLD while
the light is still flashing (your telephone immediately assumed the
features from the previous location).
NOTE: If you do not select a button after installing the telephone, the
system automatically defaults to the programming from the previous
location.
·
To assume the extension number and programming
features from the new location,
1. CONNECTthe telephone line cord to the new jack.
2. OBSERVE the flashing HOLD light AND DIAL
light is still flashing (your telephone immediately assumes the
features from the new location).
70 Non-LCD Station User’s Guide
# while the
Page 79

GCA70-313 Other Advanced Features
DSS/BLF Console Operation
The IB64X, IB48X, and IB24X DSS/BLF consoles have additional buttons and
status lights that extend the memory button capability of an adjacent companion
telephone. The buttons can be programmed for automatic dialing (speed dial) or
direct station selection (DSS) with busy lamp field (BLF) using the instructions
provided previously in this guide.
Whenthe installerassignsa DSS/BLF consoletoa station port,the system recognizes
it as such and automatically clears (blanks) the console buttons sothat youcan store
numbers at the buttons as you need them.
ib64x
IB64X DSS/BLF Console
Non-LCD Station User’s Guide 71
Page 80

Other Advanced Features GCA70-313
evelaccess buttons
evelaccess buttons
Accessing The DSS/BLF Console Button Levels
The IB24X and IB48X DSS/BLF consoles have four levels of buttons, quadrupling
the consoles’ button capacity. The four buttons at the bottom of each console allow
you to select which button level is currently active. To change button levels, press
oneof the buttons at the bottom of the console.Theleftmost button activates level 1,
the next button activates level 2, etc. A light beside the appropriate button lights to
indicate which level is currently active.
ib24x
L
IB24X DSS/BLF Console
ib48x
L
IB48X DSS/BLF Console
72 Non-LCD Station User’s Guide
Page 81

GCA70-313 Feature Access Codes
A
Feature Access Codes
This chart provides you with a Quick Reference Guide of the feature dialing codes.
If you wish, you can detach these pages and keep them near your telephone to serve
as a stand alone reference. Chapter 8, Programming Your Telephone, describes a
methodto programthese codeson yourtelephone atunusedprogrammable buttons.
Feature Enable Code Disable Code
Account Code
All Call
Attendant Calling
Authorization Code
INTERCOM +
INTERCOM +
INTERCOM +
INTERCOM +
authorization code
*04 +
account code
70
0
#08 +
Automatic Callback and Call
Waiting
Background Music
INTERCOM +
INTERCOM +
*6 INTERCOM + #6
11 or
INTERCOM + #1
12
Call Divert Station
Call Forward, Personal
Non-LCD Station User’s Guide 73
INTERCOM +
extension number
INTERCOM +
extension number
*55 +
*51 +
INTERCOM +
#5
Page 82

Feature Access Codes GCA70-313
Feature Enable Code Disable Code
Call Forward, Ring-No Answer,
All Calls
Call Forward, Ring-No Answer,
Personal Calls
Call Forward, All Calls
Call Park, Orbit 910-990
Call Park, Pickup
Call Pickup, Directed
Call Pickup, Group
INTERCOM +
extension number
INTERCOM +
extension number
INTERCOM +
extension number
INTERCOM +
*54 +
*53 +
*52 +
* +
910 to 999
INTERCOM +
# +
910 to 999
INTERCOM +
extension number
INTERCOM +
*4 +
#4
INTERCOM +
INTERCOM +
INTERCOM +
#5
#5
#5
Clear Major Alarm Ring
DISA Access Installer Assigned
Do Not Disturb
Do Not Disturb Override
DSS Programming
Executive Override
Hold, Manual
74 Non-LCD Station User’s Guide
INTERCOM +
INTERCOM +
extension number +
INTERCOM +
extension number +
#09
#01
**3
HOLD
INTERCOM + #01
(repeat)
*03
*03
Page 83

GCA70-313 Feature Access Codes
Feature Enable Code Disable Code
Hold, Exclusive
Hold, Directed
Hold, Directed Pickup
LCD Messaging
Line Group 1
Line Groups 2-11
Line Groups 12-16
Line Pick Up From Any Station,
Zones 1-4
Line Pick Up From Any Station,
All Zones
HOLD + HOLD
INTERCOM +
INTERCOM +
INTERCOM +
INTERCOM +
INTERCOM +
INTERCOM +
INTERCOM +
INTERCOM +
*90
#90
*02 +
message
9
80 to 89
60 to 64
65 to 68
69
INTERCOM +
#02
Meet-Me Answer Page
Message Waiting
Message Wait Retrieval
Operator Access
Paging, All Call
Paging, Zones 2-8
Non-LCD Station User’s Guide 75
INTERCOM +
INTERCOM +
extension number
INTERCOM +
INTERCOM +
INTERCOM +
78
*3 +
#00
0
70
71 to 77
INTERCOM + #3 +
extension number
Page 84

Feature Access Codes GCA70-313
Feature Enable Code Disable Code
Paging, Meet-Me
Park Orbit Retrieve
Park Orbit Send
Personal Ringing Tones
Redial Last Dialed Number
Remote Station Disable
Response Message
INTERCOM +
INTERCOM +
78
# +
910 to 999
INTERCOM +
* +
910 to 999
INTERCOM +
code (
**4 +tone
1 to 8 )
#
INTERCOM +
extension number
INTERCOM +
button +
*05 +
**6 +
01 to 30
INTERCOM + #05 +
extension number
Service Observing
Speed Dial, Station
INTERCOM +
extension number
Keypad
5 , 6 , 7 , 8 , 9 ,or
#03 +
1 , 2 , 3 , 4 ,
0.
Speed Dial, System
Speed Dial, Programming
Station Lock
76 Non-LCD Station User’s Guide
*100 to *599
INTERCOM +
INTERCOM +
**1
#04 + code
Page 85

GCA70-313 Feature Access Codes
Feature Enable Code Disable Code
Volume Save
Voice-Announce Block
NOTE: The dialing codes provided in this quick reference guide are default
values. Your system installer has the ability to renumber these codes.
The following table details several unique dialing codes that are only applicable to
single line proprietary and industry-standard telephones.
Pick Up Last Line
Broker’s Call
Speed Dial Access Code
Saved Number Redial
INTERCOM +
INTERCOM +
Feature Enable Code
**7
*2 INTERCOM + #2
*08
*07
*01
*06
Dial Saved Number
TAP Dialing Code
Non-LCD Station User’s Guide 77
*09
##
Page 86

Feature Access Codes GCA70-313
Notes
78 Non-LCD Station User’s Guide
Page 87

GCA70-313 Glossary
B
A
Account Code
A group of numbers, up to 16 digits in length, entered by station users during
incoming or outgoing calls; the system uses account codes to identify the calls by
category, or special grouping, for call accounting purposes.
All-Call Paging
Paging through the intercoms of all stations in the system.
Assist Button
A button that you can program that will let you send a message requesting assistance to the LCD of another telephone.
Attendant
Also known as the operator; typically, the first person to answer incoming calls
and responsible for directing calls to the proper person or department.
Automatic Callback
System will ring a calling telephone when a busy called telephone becomes idle.
Automatic Dialing (or Autodialing)
Using programmable buttons to store numbers for one- or two-button dialing.
Glossary
Automatic Redialing
Turning on a program that automatically redials the last number dialed once a
minute for 10 minutes.
Automatic Route Selection (ARS)
ARS allows the system to automatically select the least costly line group
available to a station to route a call. The system modifies the dialed number, if
needed, to match the selected line group. ARS makes routing decisions (which
lines to route a call over, if and how to modify a number, and costing informa
tion) based entirely upon the programming of the system.
Automatic Station Relocation
Process by which the system automatically recognizes particular stations if they
are relocated to a different station port; the same class of service and station
features are provided the station at the new port.
Non-LCD Station User’s Guide 79
-
Page 88

Glossary GCA70-313
B
Block Programming
To eliminate the need to program each station individually, programmers can
assign features or functions to groups of stations.
Button Query
Feature which allows users to display the functions of programmable buttons on
LCD telephones.
C
Call Forward
Designating another telephone to receive intercom calls normally directed to the
user’s telephone.
Call Forward Outside System (CFOS)
Allows station users to forward incoming or transferred line calls to telephone
numbers outside the system.
Call Park
Placing an active call at a particular telephone in system hold (park orbit) and
retrieving it by any telephone.
Call Pick-Up
Answering a call at one telephone when it is ringing at another telephone.
Call Transfer
Transferring a call from one station to another. The transfer can be screened, i.e.,
you find out who is calling and announce them to the party being called; or
unscreened, i.e., you transfer the call without identifying the calling party to the
called party.
Caller ID
Allows station users to view the originating line number of incoming calls before
they are answered.
Camp On
Process that allows a user to wait for a busy or idle line to become available and
immediately be called back by the system; also allows users to send a tone to
busy telephone to notify the station that a call is waiting.
Central Message Desk
A station that has been assigned to control message waiting lights and deliver
messages to other stations in the system.
Class Of Service (COS) Programming
Customized programming of your system by the installer that establishes the
basic operating parameters of the system and individual stations.
80 Non-LCD Station User’s Guide
Page 89

GCA70-313 Glossary
D
Data Interface Unit (DIU)
This optional unit provides connections for your standard multiline digital
telephone and Industry Standard Telephone (IST) device such as a FAX machine
or answering machine.
Departmental Station Operation
The operation of stations that are organized into departments.
Dial By Name
This feature allows users to employ any two-line display, LCD speakerphone
and its interactive buttons to search through an index of names, locate a desired
station name or system speed dial name, and automatically call the located item.
Digital Voice Announcing (DVA)
The DVA is a line-powered device that provides voice prompts for auto-attendant
and transfer, or you can use it to enhance the operation of DISA and Tracker.
Direct Inward System Access (DISA)
An enhancement option that allows outside callers to directly call a station or
access certain internal system features, including all line groups and ARS. To
prevent fraudulent access and unauthorized use, the caller must use an authorization code and system access code to gain access to outside lines as well as many
of the advanced telephone features.
Direct Inward Station Dialing (DISD or DID)
This feature allows an outside party to call an intercom station directly without
an attendant’s assistance.
Direct Station Selection/Busy Lamp Field (DSS/BLF)
Programmable buttons which allow the user one button to place intercom calls to
other stations within your system; the button is sometimes referred to as a DSS
button. Busy lamp field or BLF is a term for a light that identifies current call
status of DSS station. See telephone layout drawings in Chapter 1 for location.
Do Not Disturb
A mode that disables incoming call ringing and intercom calling.
Dual Tone Multiple Frequency (DTMF)
The tones made by your telephone when you dial.
DXP, DXP Plus, FXS and FXT
Common Code Based Systems; DXP, DXP Plus, FXS and FXT Comdial
Communication Systems so named because the programmed function codes of
these systems are interchangeable.
Dynamic Line Button
System temporarily assigns a normally unassigned line to an idle line button for
certain call handling operations.
Non-LCD Station User’s Guide 81
Page 90

Glossary GCA70-313
E
E&M Tie Lines
In telephony, a separate pair of leads to your station which are used by system
operators for signaling and supervisory purposes.
Exclusive Hold
Only the telephone placing the call on hold can retrieve it.
Executive Override Breaking into a conversation at a busy called telephone. This
intrusion is announced by several quick tone bursts over the conversation.
H
Handsfree Answer Inhibit
A telephone can be set to block voice calls sent to it over the speaker.
Hookflash
Action that occurs when the TAP button is pressed. Needed for activating host
system features.
Hookswitch
The switch on a telephone which, when depressed manually or by the handset,
disconnects a call.
I
IMIST
Module which allows the connection of an external device to a Comdial digital
telephone.
Industry Standard Telephone (IST)
Analog telephone with only a basic 12 button keypad and no advanced features
Intercom
An internal communication system that allows you to dial another station at your
office or location without connecting to the outside telephone system.
K
Keypad
Buttons
82 Non-LCD Station User’s Guide
0 through 9 , * and # used for dialing.
Page 91

GCA70-313 Glossary
L
Last Number Redialing
Automatically dialing the last number dialed.
LCD
Liquid crystal display; the alphanumeric display of several Comdial Digital
Telephone models.
Line Groups
Programmers assemble and program outside lines into distinct line groups which
users must dial a certain code to access.
Line Queuing
When several telephones share a line and that line is busy, a user can dial a code
and hang up to wait for the line to become idle. When the line becomes idle, the
user’s telephone will ring.
M
Meet-Me Answer Page
Any user can dial a code in response to an all-call or zone page and be connected
to the paging party in a private conversation.
Messaging
Turning on a telephone lamp to let the user know that a message awaits pickup
and leaving a message on the display of a telephone that gives information on
your status.
Mute
A fixed feature button that keeps a distant party from hearing your conversation.
This button also lets you adjust the telephone display contrast from light to dark.
N
Night Transfer
Transferring incoming calls to a particular station(s) for off-hour answering.
O
Operator Station
Also known as the attendant station, this system station is programmed to ring
when users dial the operator; usually considered the central message desk of the
system although multiple attendant stations are possible
Non-LCD Station User’s Guide 83
Page 92

Glossary GCA70-313
P
Paging
This feature allows station users to dial-up customer provided loudspeaker
paging equipment and page over externally placed loudspeakers and determines
what paging zones, if any, a station can page over.
Prime Line
A line designated to a particular telephone and automatically selected when the
handset is lifted.
Privacy
Line feature, assigned by the programmer, to allow only one station to access a
line at any time; no other station has access to the line unless the user makes it
available through conferencing.
Programmable Buttons Each telephone or station has buttons that can be user-
programmed for autodialing numbers or feature codes, or other special purpose
dialing requirements.
Pulse/Tone Switching
Changing from pulse/rotary dial signals to tone/DTMF signals.
Q
Queue
Method by which a station user waits for an available line by dialing a code and
waiting for the system to call back.
R
Response Messaging
Responding non-verbally to a calling station by pressing a programmed button
that sends a message to the calling station’s display.
Ringing Line Preference
An automatic connection to any outside line ringing at the station when the
station handset is taken off-hook.
Ringing Tones, Personal
A telephone can be arranged to ring in one of six distinctive tones.
S
Saved Number Redialing
Saving a last manually dialed number for later autodialing.
84 Non-LCD Station User’s Guide
Page 93

GCA70-313 Glossary
Screened Call Transfer
Allows users to first announce and then transfer both line and intercom calls from
one station or group to another.
Service Observing
Class of service programming option allows users to enter an in-progress call in
an unannounced muted mode to monitor the call.
Speed Dialing
Autodialing using the keypad buttons. Speed dialing can be station calls
(personal and accessed by only one specific user) or system calls (numbers used
and accessed by anyone in the system).
Station
A single system telephone with an individual identity and feature set assigned by
the programmer.
Station Message Detail Accounting (SMDA)
Station message detail accounting provides a record of the incoming and
outgoing calls handled by the system on selected lines. This record provides
information for accounting and traffic analysis studies.
Subdued Off-Hook Voice Announce (SOHVA)
A private announcement that can be made to a busy party which they hear
through the receiver of their handset.
System Alarm Reporting
Allows you to view (through the LCD telephone screen) the various system
alarms and the stations with which those alarms are associated.
System Speed Dial
System speed dialing provides system users with a repertory of up to 500
numbers that they can dial from any telephone in the system. The installer or the
attendant is responsible for storing the system speed dial numbers.
T
TAP (Flash/Recall)
Depending on your system’s programming, this button gives you a fresh dial tone
or activates a hookflash.
Toll Restriction
Class of service feature by which the system allows or denies outgoing calls to
selected users over selected lines.
Tone Call
A ringing intercom call.
Non-LCD Station User’s Guide 85
Page 94

Glossary GCA70-313
Tracker Pager
The Tracker optional pager system allows you to send and receive messages to
Tracker pagers assigned to station extension numbers.
TRNS/CONF
A fixed feature button that allows you to transfer outside calls and set up confer
ence calls.
-
U
Unscreened Call Transfer
Allows users to transfer line or intercom calls from one station or group to
another without first announcing them.
Unsupervised Conference
After a establishing a conference between two outside parties, the originator
drops out leaving a line to line unsupervised connection with the remaining
parties.
V
Voice call
A verbal intercom call.
Voice Announce Blocking (VAB)
A telephone can be set to block voice calls sent to it over the speaker.
Z
Zone Paging
Paging through the intercoms of some stations or departments in the system.
86 Non-LCD Station User’s Guide
Page 95

GCA70-313 Speakerphone Characteristics
C
Speakerphone
Characteristics
When using your speakerphone, the microphone and loudspeaker are farther away
fromyou than when you use a handset. Both the signal from the loudspeaker andthe
signal to the microphone must be enhanced.
Whenmicrophones andloudspeakers areclose together(such as ina speakerphone),
additionalamplification typicallygenerates a ringingsound (public addresssystems
do this if the volume is too high or the microphone is too close to a loudspeaker).
Speakerphone User Guidelines
· Both parties can not talk at the same time. You must wait for silence out
of your loudspeaker before talking. You must stop talking to hear the
other party.
· Background noise may prevent the sound-activated switches from operating properly. Avoid placing the speakerphone where it will detect sounds
from typewriters, keyboards, printers, paging systems, and other equipment.
· Speak slightly louder than normal and with a clear, authoritative voice.
For the microphone to best detect your voice, speak within three feet of it
and face the telephone.
·
Raising the volume of the loudspeaker makes it easier for the soundactivated switches in your telephone to select the distant party’s voice.
Lowering the volume of the loudspeaker makes it easier for the switches
to select your voice.
·
Since the system takes several seconds to provide the best switching, con
stant sound patterns—such as elongating your words and playing
externally-supplied music—may prevent the sound-activated switches
from operating properly.
-
Non-LCD Station User’s Guide 87
Page 96

Speakerphone Characteristics GCA70-313
Place the telephone on a hard surface and away from table edges. Do not
·
place the telephone in corners or enclosures. Do not let obstructions come
between you and the microphone. Rooms with hard, flat surfaces that
reflect sound may affect the sound-activated switches.
If you are using a handset and the other party is using a speakerphone,
·
avoid breathing heavily into your microphone. Avoid other sounds that
may affect the distant telephone’s sound-activated switches.
In some situations, such as when either you or the distant party are in a
·
noisy environment, you may have to lift your handset to ensure a clear
conversation.
When both you and the distant party use speakerphones, the sound-
·
activated switches can occasionally detect both voices simultaneously,
thus blocking out both voices.
88 Non-LCD Station User’s Guide
Page 97

GCA70-313 Feature Networking Support
D
Feature Networking Support
The table below shows all the features available on Set 15A. It identifies whether
each feature is for a local stand-alone system or a system-to-system network.
System-to-system networking connects several DXP, DXP Plus, FXS and FXT
systems together in an arrangement that allows unified communications through
the system. Also provided is information on which features Comdial provides
remote networking support too.
Type
Feature Name
Abandoned Hold Release Terminating None
Account Code Both None
Alarms Local Node
A-lead Local Node
Alternate Attendant Terminating Comdial Local Node
ANI (passed across the
network but must be enabled
per node)
ANI DNIS (passed across the
network but must be enabled
per node)
ANS Detect Originating Comdial
ARS Both Comdial
Attendant Programing Both Comdial Local Node
Authorization Code Originating None Local Node
Auto Hold Terminating None
Auto Pause Terminating None
Originating/
Terminating/Both
Terminating Comdial/QSIG
Originating Comdial/QSIG
N/A None Local Node
Remote
Networking
Support
Feature
Parameters
Across
Network
Across
Network
Local (display
telephones)
Local (display
telephones)
Across
Network
Across
Network
Across
Network
Across
Network
Program
Node/COS
Node
Node
Node
Node
Node
Feature
Non-LCD Station User’s Guide 89
Page 98

Feature Networking Support GCA70-313
Type
Feature Name
Auto Redial Originating None
Aux Line
Aux Ring Local Node
Block Program
Button, Programable Both Comdial
Call Costing Originating None
Call Divert Terminating Comdial Local Node/Station
Call Forward Default
Forward
Call Forward All Immediate Terminating Comdial
Call Forward All RNA Terminating Comdial
Call Pickup Directed Terminating Comdial
Call Pickup Group Terminating None Local Node/Station
Call Time Originating None
Call Transfer Both Comdial
Call Waiting Tone Terminating None Local Node/Station
Camp On Terminating None Local Node/Station
CFOS Both None Local Node/Station
Clock Set Local Node
Conference Both Comdial/QSIG
COS Local Node
Day Night Class of Service Both Comdial Local Node
Delay Hot Line Terminating None Local Node/Station
Originating/
Terminating/Both
Terminating Comdial
Remote
Networking
Support
Feature
Parameters
Across
Network
Across
Network
Across
Network
Across
Network (with
limitations)
Across
Network (with
limitations)
Across
Network
Across
Network
Across
Network
Across
Network
Across
Network
Across
Network
Across
Network (with
limitations)
Program
Feature
Node
Node
Incoming DID
Node
Node/Station
Node/Station
Node/Station
Node/Station
Node/Station
Node/Station
Node/Station
Node/Station
Station
90 Non-LCD Station User’s Guide
Page 99

GCA70-313 Feature Networking Support
Type
Feature Name
Dist Ring Terminating None Local Node/Station
Dial by Name Originating None Local Node/Station
Directed Station Hold Both None Local Node/Station
Disable Station Local Node/Station
Disconnect Notification Both None
DND/inhibit/override Terminating Comdial/QSIG Local Node
DNIS (passed across the
Network but must be enabled
per node)
DSS/BLF Both Comdial
DTMF Signaling Both None
Enhanced Night Mode Terminating None
Enhanced Ringing Terminating None
Executive Override Both None
Extended DTMF
Feature Numbering Local Node
Group Listen Terminating None
Hands Free Both None
Hold Terminating Comdial/QSIG
Hunt Group (can access Hunt
group across Network but
members must be local to
each other)
Hunt List Terminating None Local Node/Station
Idle Line Both None Local Node
Incoming Call Routing Both Comdial
Intercom Numbering Local Node
Originating/
Terminating/Both
Both Comdial
Terminating Comdial
Remote
Networking
Support
Feature
Parameters
Across
Network
Local (display
phones)
Across
Network (with
limitations)
Across
Network
Across
Network
Across
Network
Across
Network
Across
Network
Across
Network
Across
Network
Across
Network
Program
Feature
Node
Node/Station
Node
Node
Node/Station
Node/Station
Node/Station
Node
Node
Non-LCD Station User’s Guide 91
Page 100

Feature Networking Support GCA70-313
Type
Feature Name
Intercom Speed Dial Last
Number Dialed
LCD Contrast Both None
LCD Messaging Both None Local Node
Line Group Both None
Line Monitoring Both Comdial Local Node
Line Names Both Comdial/QSIG
Line Queue Both None
Lock Both None Local Node/Station
Location Codes Both None Local Node
Mark Both None Local Node/Station
Message Deposit Both Comdial Local Node/Station
Message Waiting Terminating Comdial
Music, Background Both None Local
Music, On Hold Both None Local
Mute Both None
Operator/Network Both Comdial
Operator/Node Both Comdial Local Node
Page Both None Local Node
Park Orbit Terminating None Local Node
Personal Ring Tone Terminating None
Prime Line Originating None Local Node/Station
Privacy Terminating None Local Node/Station
Pulse Set On Originating None Local Node
Query (button) Originating None Local Node/Station
Queue Terminating Comdial Local Node/Station
Originating/
Terminating/Both
Originating None
Remote
Networking
Support
Feature
Parameters
Across
Network
Local Station
Only
Local or
Network
Channels
Across
Network
Across
Network
Across
Network
Across
Network
Local Station
Only
Program
Feature
Node/Station
Node/Station
Node
Node
Node/Station
Node/Station
Hub
Node/Station
92 Non-LCD Station User’s Guide
 Loading...