

Page 1
DSU and DSU II Series
Digital Telephone Systems
●
LCD Speakerphone
System Reference Manual
R
COMDIAL
87 9
0
TRNS/CNF
HOLD
TUVPRS WXY
OPER
TAP
DEFABCQZ
321
MNOJKLGHI
654
#
INTERCOM
MUTESHIFT
SPEAKER
MESSAGE
ABC
DEF
2
1 3
PRS8TUV9WXY
7
SHIFT
MNO5JKL4GHI
6
TAP
TRNS/CONF
SPEAKER
#0*
MUTE
R
HOLD
Page 2

This reference manual applies to the following system and
telephone models:
System Models:
DSU systems with software 20A and later.
•
DSU II systems with software 4A and later.
•
Telephone Models:
Impact 8012S-** Rev. A and later.
•
Impact 8024S-** Rev. A and later.
•
Impact SCS 8324S-** Rev. A and later.
•
Impact SCS 8312S-** Rev. A and later.
•
Impact SCS 8324F-** Rev. A and later.
•
Contact your Comdial dealer for updates of this as well as
other Comdial publications.
* Tri-Level Compression
is a registered trademark
of ACS Wireless, Inc.
Comdial strives to design the features in our communications systems to
be fully interactive with one another. However, this is not always possible,
as the combinations of accessories and features are too varied and extensive
to insure total feature compatibility. Accordingly, some features identified
in this publication will not operate if some other feature is activated.
Comdial disclaims all liability relating to feature non-compatibility or
associated in any way with problems which may be encountered by
incompatible features. Notwithstanding anything contained in this
publication to the contrary, Comdial makes no representation herein as to
the compatibility of features.
2/12/97
Page 3

GCA70–245 Contents
Contents
Page
1
Introducing The LCD Speakerphone ................... 1-1
1.1 UsingThisGuide ............................... 1-1
1.2 Using Your Speakerphone......................... 1-2
1.2.1 Using A Full-Duplex Speakerphone............ 1-3
1.2.2 Speakerphone User Guidelines................ 1-4
1.3 KnowingTheLCDAbbreviations .................. 1-8
1.4 Knowing Your Telephone’s Functions .............. 1-10
1.5 UnderstandingWhatTheLightsMean.............. 1-12
1.6 UnderstandingWhatTheRingsMean.............. 1-13
1.7 AdjustingYourTelephone’sPedestal............... 1-14
2
ProgrammingTheAttendantFeatures.................. 2-1
2.1 UsingChapterTwo.............................. 2-1
2.2 Creating The LCD Response Messages .............. 2-2
2.3 DirectInwardStationDialing...................... 2-6
2.4 NamingTheSystemTelephones.................... 2-8
2.5 SettingTheMusicOnHoldFeature................ 2-12
2.6 SettingTheNightTransferOfRingingMode........ 2-13
2.7 SettingTheNightTransferButton................. 2-14
2.8 SettingTheSystemClock........................ 2-14
2.9 Station Message Detail Accounting
(SMDA)Printout............................... 2-15
2.10 Storing The System Speed Dial Numbers ........... 2-16
2.11 System Alarm Reporting......................... 2-20
2.12 Transferring Calls To The VoiceMail System ........ 2-21
2.13 Transferring Calls ToA Secondary
Attendant Telephone............................ 2-21
2.14 Digital Voice Announcing (DVA) .................. 2-22
2.15 Operating Your Telephone WithA DSS/BLF Console. . 2-25
2.15.1 AccessingTheButtonLevels............... 2-26
Contents – 1
Page 4

Contents GCA70–245
Page
3
AnsweringCalls..................................... 3-1
3.1 AnsweringOutsideCalls ......................... 3-1
3.2 AnsweringIntercomCalls ........................ 3-2
3.3 AnsweringCallsAtMonitoredStations.............. 3-2
3.4 Answering Night Transferred Calls ................. 3-3
3.5 MakingACallPick-Up........................... 3-3
3.6 Responding ToA Subdued Off-Hook
Voice Announcement............................. 3-4
4
MakingCalls....................................... 4-1
4.1 DialingManually ............................... 4-1
4.2 DialingAutomatically............................ 4-2
4.3 Redialing...................................... 4-3
4.4 UsingLineGroups .............................. 4-4
4.5 WaitingForALine(Queuing)..................... 4-5
4.6 DisplayingCall/CostTimer ....................... 4-6
4.7 MakingIntercomCalls........................... 4-7
4.8 Camping At Another Telephone
AndWaitingForAnAutomaticCallback............. 4-8
4.9 Camping At Another Telephone And
WaitingForAnAnswer(CallWaiting)............... 4-9
4.10 Overriding A Call ............................... 4-9
4.11 Making A Subdued Off-Hook
Voice Announcement............................ 4-10
4.12 Using Dial By Name............................ 4-11
5
HoldingCalls....................................... 5-1
5.1 HoldingACall ................................. 5-1
5.2 UsingExclusiveHold............................ 5-2
5.3 UsingDirectedHold............................. 5-2
5.4 PlacingACallinAParkingOrbit................... 5-3
5.5 HandlingRecalledHoldCalls ..................... 5-3
6
TransferringCalls................................... 6-1
6.1 TransferringCalls............................... 6-1
2–Contents
Page 5

GCA70–245 Contents
Page
6.2 TransferringCalls–Screened...................... 6-2
6.3 TransferringCalls–Unscreened.................... 6-3
7
ConferencingCalls................................... 7-1
7.1 ConferencingCalls.............................. 7-1
7.2 MakingUnsupervisedConferenceCalls ............. 7-2
8
Using The Other Telephone Features................... 8-1
8.1 AdjustingTheDisplayContrast.................... 8-1
8.2 Blocking Voice Announce Calls .................... 8-2
8.3 Displaying The Functions Of Your Station’s Buttons
(ButtonQuery) ................................. 8-3
8.4 EnteringAccountCodes.......................... 8-4
8.5 ForwardingCalls................................ 8-5
8.6 Activating The Call Forward Outside System
(CFOS)Feature............................ 8-6
8.7 Identifying Your Telephone WithThe
AutomaticSetRelocation ........................ 8-7
8.8 Listening To A Call Over The Telephone Speaker
(GroupListening)............................... 8-8
8.9 Making A Call Non-Private ....................... 8-8
8.10 Monitoring a Conversation
Between TwoTelephones (Service Observing) ........ 8-9
8.11 Muting YourTelephone........................... 8-9
8.12 Operating YourTelephoneAs
ADepartmentalStation.......................... 8-10
8.13 Sending A Paging Announcement ................. 8-11
8.14 Setting A Do Not Disturb A t YourTelephone......... 8-13
8.15 Setting The Volume Control ...................... 8-14
8.16 Setting Your Personal Ringing Tones ............... 8-15
8.17 Switching The Dialing Mode
BetweenPulseAndTone......................... 8-16
8.18 Using Background Music ........................ 8-16
8.19 Using Toll Restriction Override ................... 8-17
8.20 Using The Optional Tracker Paging System.......... 8-18
8.21 Using The Auxiliary Jack ........................ 8-20
Contents – 3
Page 6

Contents GCA70–245
Page
8.22 Understanding The Data Button Light .............. 8-22
8.23 Using The IMIST Module........................ 8-23
8.24 Using The Caller ID Feature...................... 8-24
9
UsingNon-VerbalMessaging.......................... 9-1
9.1 MessageWaitingLightAndMessaging.............. 9-1
9.2 LCDMessaging ................................ 9-3
9.3 AssistButtonMessaging.......................... 9-4
9.4 Station-To-StationMessaging...................... 9-4
1
0
ProgrammingYourTelephone ....................... 10-1
10.1 Programming For Automatic Dialing............... 10-1
10.2 Storing Autodial And Speed Dial Numbers .......... 10-4
10.3 Storing A DSS Number.......................... 10-5
10.4 Storing The Feature Buttons ...................... 10-6
10.5 Storing The Special Purpose Feature Buttons ........ 10-8
10.6 Response Message Programming .................. 10-9
10.7 Automatic Redial Programming................... 10-9
10.8 Assist Button Programming ..................... 10-10
10.9 Transfer Button Programming ................... 10-10
10.10 Subdued Off-Hook Voice Announce (SOHVA)
ButtonProgramming........................... 10-11
10.11 Group Listening Button Programming............. 10-11
11 Troubleshooting Your Telephone ..................... 11-1
11.1 Using Your TroubleshootingGuide................. 11-1
G Glossary........................................... G-1
I Index...............................................I-1
4–Contents
Page 7

GCA70–245 Introducing The LCD Speakerphone
Introducing The
1
1.1 Using This Guide
Chapter One provides you with a general overview of your new
speakerphone and its functions. The other ten chapters in this guide are
clear and easy to follow.
The Chapters are numbered as follows:
Chapter Two: Programming The Attendant Features
Chapter Three: AnsweringCalls
Chapter Four: Making Calls
LCD Speakerphone
Chapter Five: Holding Calls
Chapter Six: Transferring Calls
Chapter Seven: Conferencing Calls
Chapter Eight: Using The Other Telephone Features
Chapter Nine: Using Non-Verbal Messaging
Chapter Ten: Programming Your Telephone
Chapter Eleven: Troubleshooting Your Telephone
For your convenience, a quick reference guide, a glossary, and an
alphabetical index are included in the back of this user’s guide.
NOTE: Throughout this book, all references to fixed buttons are
printed in upper case bold type, for example “Press the
INTERCOM button.”
All references to interactive buttons are printed in upper case
bold italic type, for example “Press the OPTIONS button.”
LCD Speakerphone Reference Manual 1–1
Page 8

Introducing The LCD Speakerphone GCA70–245
1.2 Using Your Speakerphone
When using your speakerphone, the microphone and loudspeaker are
farther away from you than when you use a handset. Both the signal from
the loudspeaker and the signal to the microphone must be strengthened.
When microphones and loudspeakers are close together (such as in a
speakerphone), additional amplification typically generates a ringing
sound (public address systems do this if the volume is too high or the
microphone is too close to a loudspeaker).
NOTE: The 8324F-** speakerphone can function in the full-duplex or
half-duplex mode. Both sets of guidelines (section 1.2.1 and
section 1.2.2) are applicable to the 8324F-**.
The 8012S-**, 8024S-**, 8324S-**, and 8312S-**
speakerphonesonly function in the half-duplex mode—only
section 1.2.2, Speakerphone User Guidelines, apply to these
telephones.
1–2 LCD Speakerphone Reference Manual
Page 9

GCA70–245 Introducing The LCD Speakerphone
1.2.1Using A Full-Duplex Speakerphone
The Impact SCS 8324F-** speakerphone uses the latest full-duplex
speakerphone technology. (Full-duplex technology enables both parties
on a speakerphone call to speak simultaneously—half-duplex
speakerphones allow only one person to speak at a time.) The 8324F-**
will operate in either full-duplex or half-duplex mode depending on the
current line conditions. For example, satellite calls or calls with a delay
involved may prevent the telephone from operating in full-duplex mode.
At the beginning of each call the telephone must perform a “speech
training” test. To achieve optimum performance from the full-duplex
speakerphone, Comdial recommends that each user in turn speak about
10 consecutive words to allow the telephone to “train” itself. Note that
during the “speech training” test, the speakerphone is operating in
half-duplex mode.
Depending on the telephone line conditions and the type of speakerphone
at the other end, it may not be possible for the 8324F-** to operate in
full-duplex mode. If the speakerphone at the other end is a half-duplex
speakerphone and both parties are in speakerphone mode, the half-duplex
speakerphone is the controlling factor, preventing the 8324F-** from
operating in full-duplex mode.
When using a full-duplex telephone, you must be aware of these different
situations and react accordingly when the far-end party does not respond.
However, you will discover it is much easier to interrupt the far-end
talker and have a more natural conversation than you can have with a
half-duplex speakerphone.
NOTE: Pressing any button (mute, hold, etc.) on the speakerphone
while in full-duplex mode causes the system to perform the
“speech training” test again. For example, if you press MUTE
while in full-duplex mode, when you release the call from
mute, the system will perform the entire “speech training” test
again.
LCD Speakerphone Reference Manual 1–3
Page 10

Introducing The LCD Speakerphone GCA70–245
1.2.2Speakerphone User Guidelines
NOTE: The speakerphone user guidelines in this section that do not
apply to the Impact SCS model 8324F-** when it is operating
in full-duplex mode are so noted. However, when the 8324F-**
is in half-duplex mode or in “speech training” mode, all of the
following guidelines are applicable.
Both parties can not talk at the same time. You must wait for silence
•
out of your loudspeaker before talking. You must stop talking to hear
the other party. Does not apply to model 8324F-** when in full duplex
mode.
Background noise may prevent the sound-activated switches from
•
operating properly. Avoid placing the speakerphone where it will
detect sounds from typewriters, keyboards, printers, paging systems,
and other equipment.
Speak slightly louder than normal and with a clear, authoritative voice.
•
For the microphone to best detect your voice, speak within three feet
of it and face the telephone.
Raising the volume of the loudspeaker makes it easier for the
•
sound-activated switches in your telephone to select the distant party’s
voice. Lowering the volume of the loudspeaker makes it easier for the
switches to select your voice.
Since the system takes several seconds to provide the best switching,
•
constant sound patterns—such as elongating your words and playing
externally-supplied music—may prevent the sound-activated switches
from operating properly.
Place the telephone on a hard surface and away from table edges. Do
•
not place the telephone in corners or enclosures. Do not let
obstructions come between you and the microphone. Rooms with hard,
flat surfaces that reflect sound may affect the sound-activated switches.
If you are using a handset and the other party is using a speakerphone,
•
avoid breathing heavily into your microphone. Avoid other sounds that
may affect the distant telephone’s sound-activated switches.
In some situations, such as when either you or the distant party are in a
•
noisy environment, you may have to lift your handset to ensure a clear
conversation.
1–4 LCD Speakerphone Reference Manual
Page 11

GCA70–245 Introducing The LCD Speakerphone
When both you and the distant party use speakerphones, the
•
sound-activated switches can occasionally detect both voices
simultaneously, thus blocking out both voices.
• Tomanually place a call using your speakerphone,
1. Press the INTERCOM or line button.
2. Dial the number.
3. When party answers, speak toward the telephone.
• Toautomatically dial a number using your speakerphone,
1. Press the preprogrammed speed dial or DSS button and speak
toward the telephone when your party answers.
• Toanswer a call with your speakerphone,
1. Press the INTERCOM or line button with flashing red
or orange light.
2. Speak toward the telephone to answer the call.
3. To end a call with your speakerphone, press SPEAKER.
LCD Speakerphone Reference Manual 1–5
Page 12
Introducing The LCD Speakerphone GCA70–245
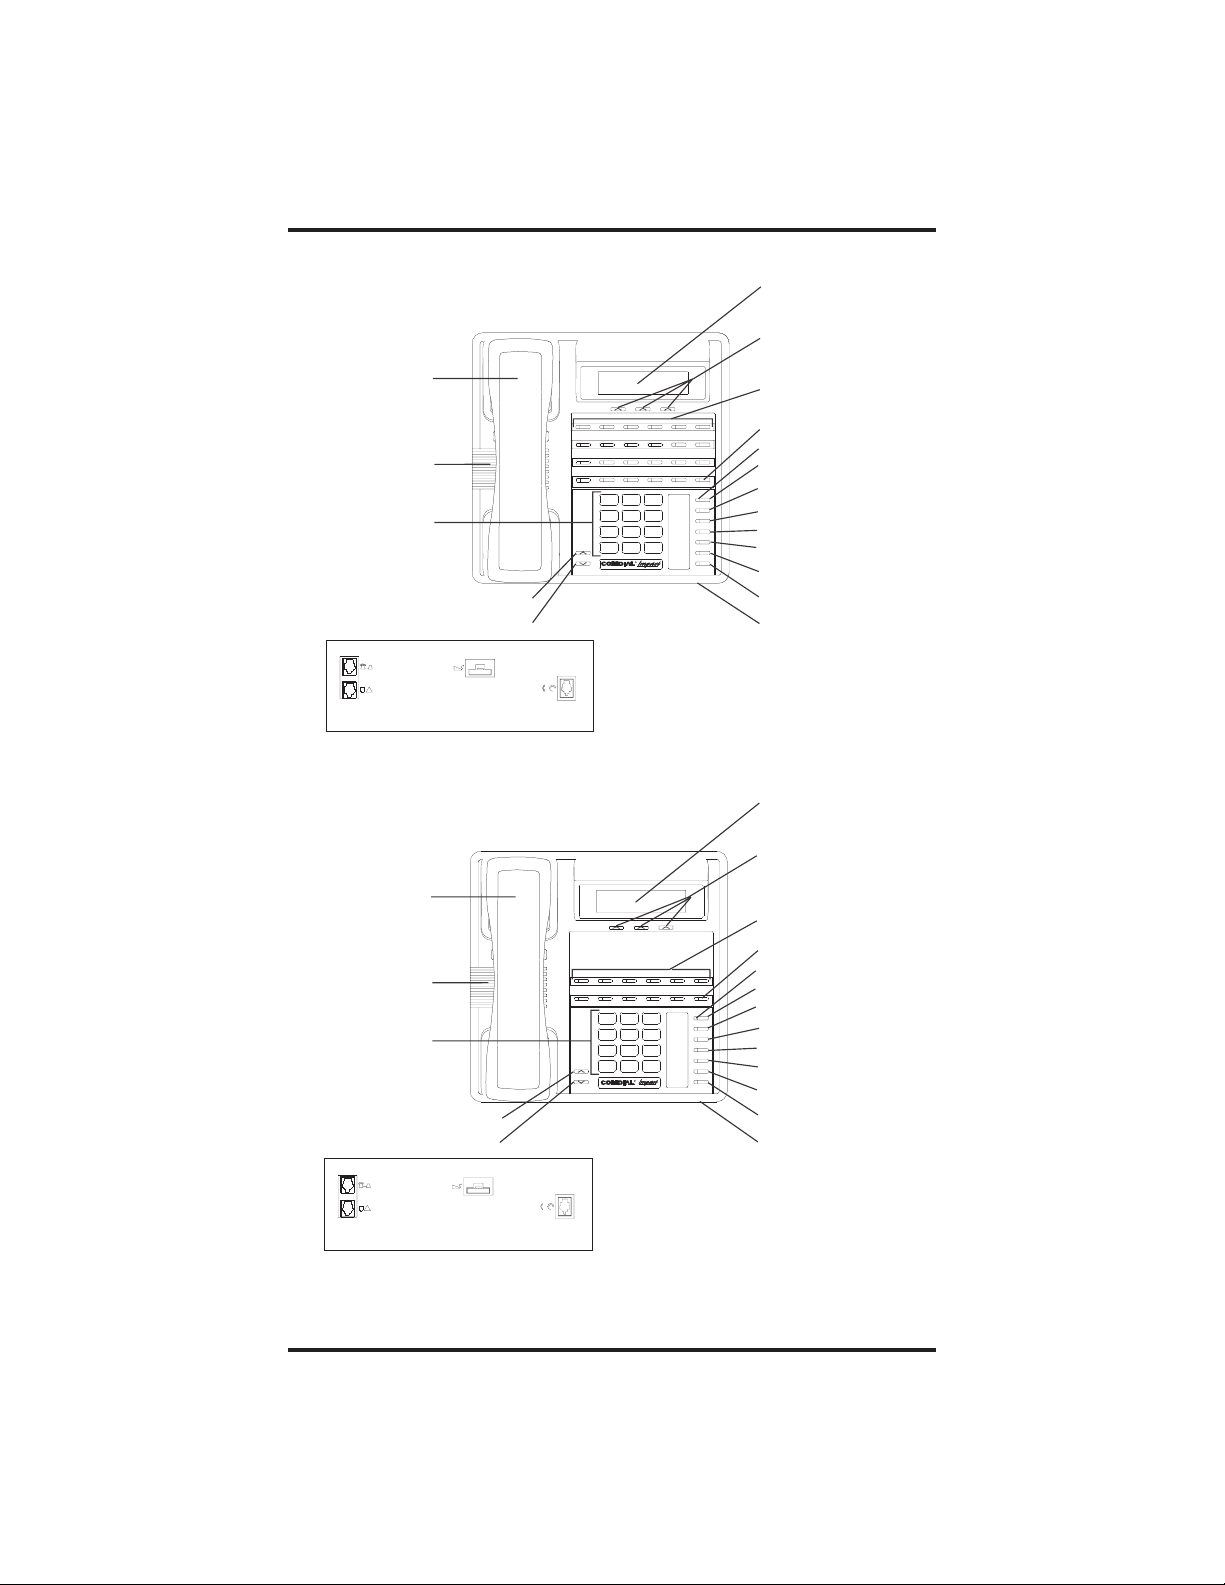
LCD Alphanumeric
Display
SCS02B
Handset
Interactive Buttons
(NOT programmable)
Programmable
Buttons
Intercom Button*
Telephone Speaker
Dialpad
Volume Up
Volume Down
ABC
2
1 3
PRS8TUV9WXY
7
R
MESSAGE
DEF
SHIFT
MNO5JKL4GHI
6
TAP
TRNS/CONF
SPEAKER
#0*
MUTE
HOLD
Message Waiting Light
Message Button
Shift Button
TAPButton
Transfer/Conference Button
Speaker Button
Mute Button
Hold Button
Microphone Opening
Connectors On Bottom Of Telephone
!
Not Used - Top**
Line Cord - Bottom
Optional IST Module
Handset or
Headset
*NOTE: The Intercom button can be reprogrammed.
**NOTE: Not used on a DSU/DSU II system.
Impact SCS 8324F-** and 8324S-**
SCS03A
Handset
Telephone Speaker
MESSAGE
ABC
DEF
2
1 3
MNO5JKL4GHI
Dialpad
PRS8TUV9WXY
7
6
TRNS/CONF
SPEAKER
#0*
R
Volume Up
Volume Down
Connectors On Bottom Of Telephone
!
Not Used - Top**
Line Cord - Bottom
Optional IST Module
Handset or
Headset
*NOTE: The Intercom button can be reprogrammed.
**NOTE: Not used on a DSU/DSU II system.
Impact SCS 8312S-**
1–6 LCD Speakerphone Reference Manual
LCD Alphanumeric
Display
Interactive Buttons
(NOT programmable)
Programmable
Buttons
Intercom Button*
Message Waiting Light
Message Button
Shift Button
SHIFT
TAP
MUTE
HOLD
TAPButton
Transfer/Conference Button
Speaker Button
Mute Button
Hold Button
Microphone Opening
Page 13
GCA70–245 Introducing The LCD Speakerphone
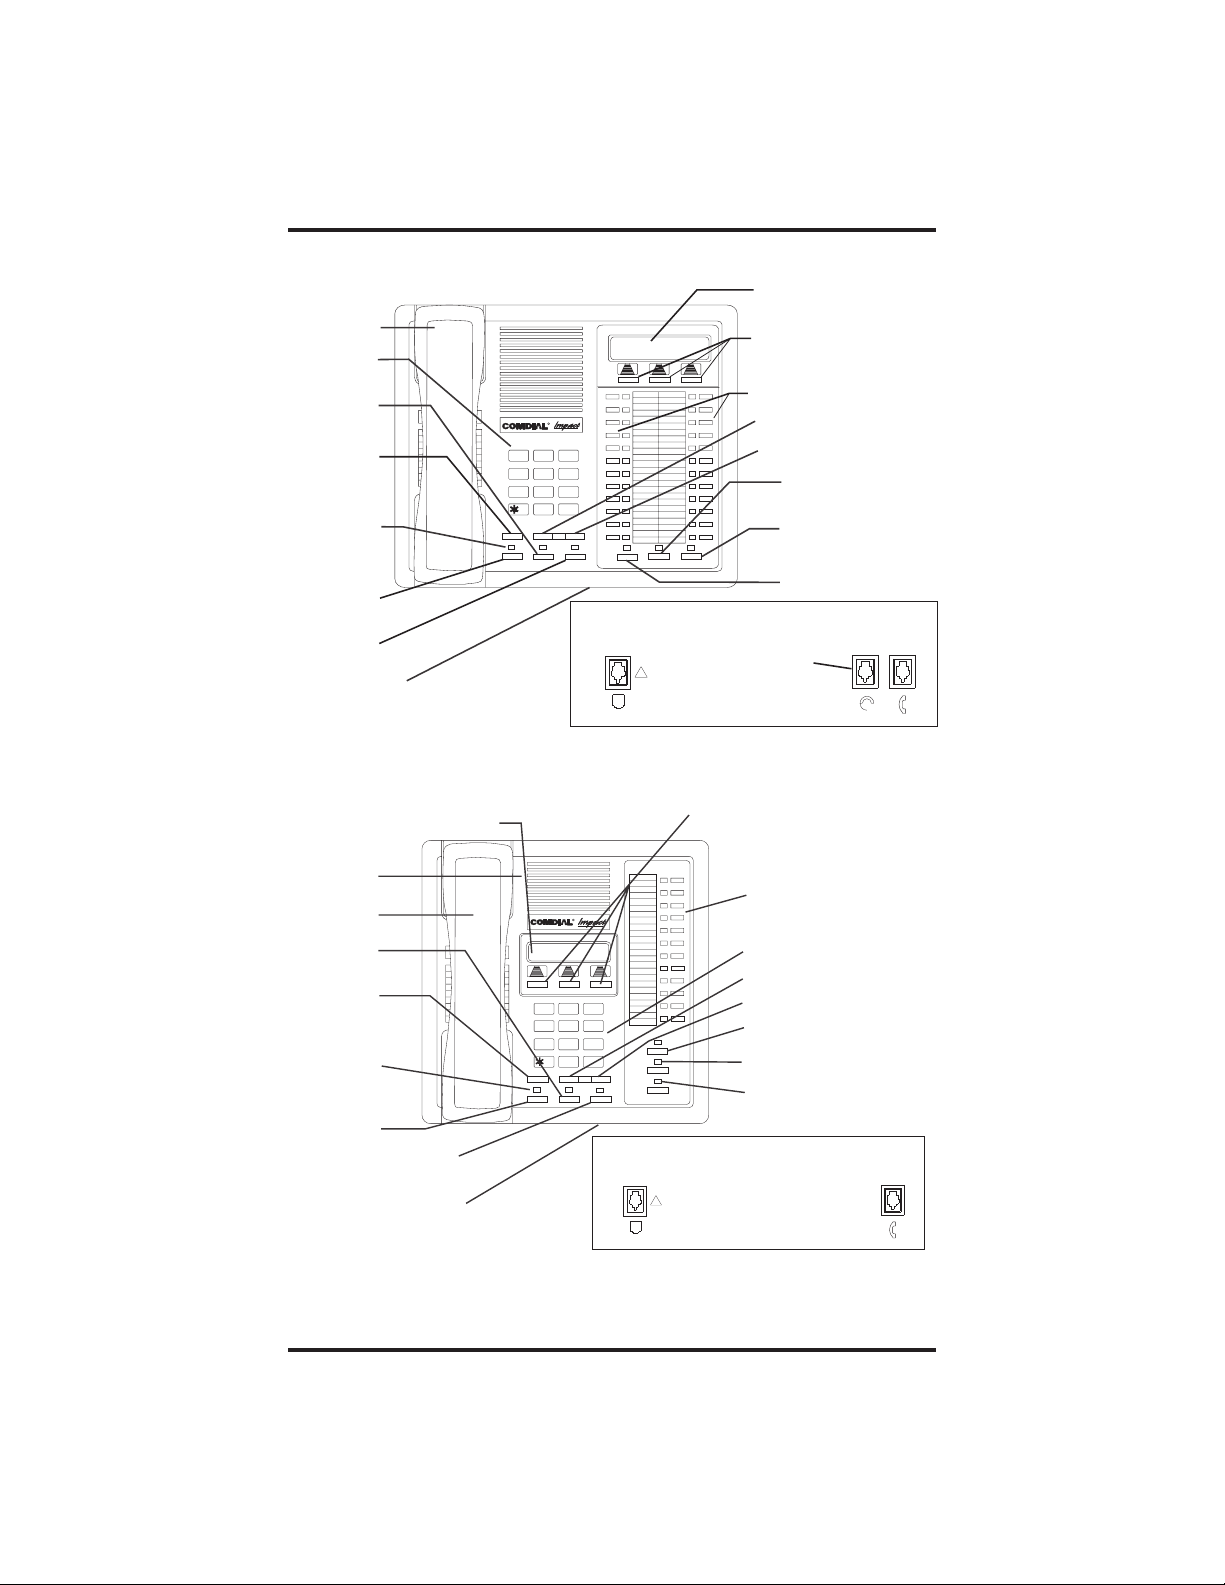
AW70 0A
Handset
Keypad
TAP
Button
Transfer/
Conference
Button
Message
Waiting
Light
Hold
Button
Intercom
Button
Microphone
Opening
LCD Alphanumeric Display
LCD Alphanumeric
Display
Interactive Buttons
(NOT programmable)
Programmable
Buttons
TRNS/CNF
R
DEFABCQZ
1
32
MNOJKLGHI
654
TUVPRS WXY
87 9
OPER
0
#
INTERCOM
HOLD
TAP
SPEAKER
MUTESHIFT
Vol ume Up
Volume Down
Connectors On Bottom Of Telephone
Line Cord
!
Optional
Headset
Impact 8024S-** LCD Speakerphone
Interactive Buttons
AW700
(NOT programmable)
Shift
Button
Mute
Button
Speaker
Button
Handset
Speaker
Handset
TAP
Button
Transfer/
Conference
Button
Message
Waiting
Light
Hold
Button
Intercom
Button
Microphone
Opening
Programmable
R
Buttons
Keypad
Volume Down
DEFABCQZ
321
MNOJKLGHI
6
4
5
TUVPRS WXY
87 9
OPER
0
#
TRNS/CNF
TAPHOLD
INTERCOM
SHIFT
MUTE
SPEAKER
Vol um e Up
Shift Button
Mute Button
Speaker
Button
Connectors On Bottom Of Telephone
Line Cord
!
Impact 8012S-** LCD Speakerphone
LCD Speakerphone Reference Manual 1–7
Handset
Page 14

Introducing The LCD Speakerphone GCA70–245
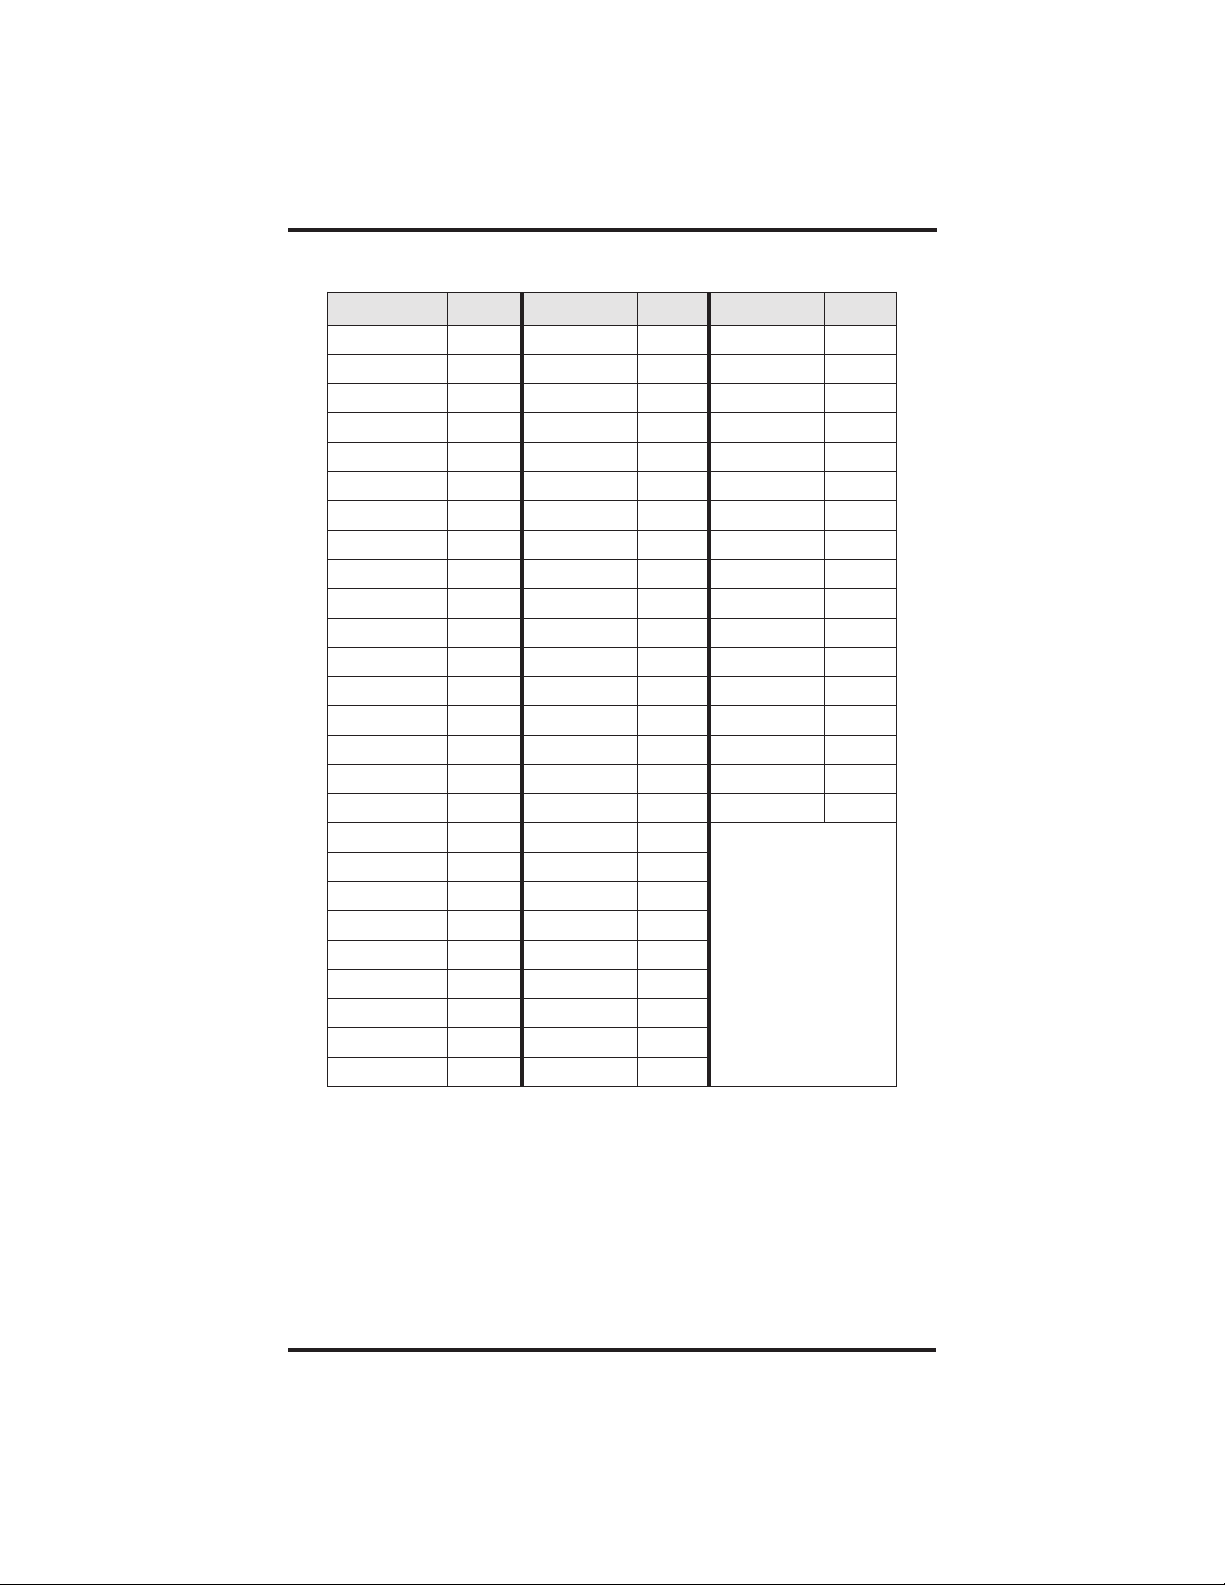
1.3 Knowing The LCD Abbreviations
The following chart identifies the abbreviations that appear above your
programmable buttons on the LCD screen.
LCD Screen Feature Section
ADIAL Automatic Dial 9.1
ALL All 7.5
ANS Answer 6.1
ARDL Automatic Redial 4.3
BKSP Back Space 9.2
BLOCK Block 7.2
CAMP Camp 4.8, 4.9
CFWD CallForward 7.5
CLBK Call Back 3.7
CLEAR Clear 7.5
CWAIT Call Waiting 4.9
DARK Da rk (Contrast) 7.1
DISP Display (Contrast) 7.1
DND Do Not Disturb 7.13
DSS Direct Station Select 9.3
EXIT Exit 9.5
EXT Speed Dial Calling 4.12
FEAT Feature 9.5
FWD Forward 7.5
G (followed by last number) Group 4.4
HOLD Hold 5.1
HVHLD Have Hold 3.7
INT Intercom Calling 4.12
L (followed by last number) Line 5.1
Last No Saved Last Number Saved 4.3
LIGHT Light (Contrast) 7.1
MUSIC Background Music 7.17
MSG Message 3.7
NEXT Next Display 4.9
1–8 LCD Speakerphone Reference Manual
Page 15

GCA70–245 Introducing The LCD Speakerphone
LCD Screen Feature Section
OVER Override 4.10
P (followed by last number) Port 7.6
PERS Personal 7.5
PREV PreviousDisplay 7.1
RECALL Recall 5.5
RECON Reconnect 6.1
RING Ring Tone 7.15
S (followed by last number) Station 5.1
SAVE Save Number 4.3
SDIAL Speed Dial 9.2
SEND Send Transfer 6.1
SET Set 7.5
SOHVA Subdued Off Hook
VoiceAnnounce
TIMER Timer 4.6
TKMSG Take Message 3.7
VAB VoiceAnnounce Block 7.2
Voice Ann. Block Voice Announce Block 7.2
4.11
LCD Speakerphone Reference Manual 1–9
Page 16

Introducing The LCD Speakerphone GCA70–245
1.4 Knowing YourTelephone’sFunctions
The LCD speakerphone provides many versatile features for your use.
Refer to the following list for the features and their functions.
Alphanumeric Display
(Liquid Crystal Display—LCD)
Displays time, day, and date
•
Keeps you apprised of the status of your telephone
•
Provides programming prompts
•
Auxiliary Jack (8024S only)
Allows you to connect a headset, an external ringer, a tape recorder, or
•
an external paging amplifier to your telephone
Hold Button
Places a line on hold
•
Stores pauses in number sequences during programming
•
Interactive Buttons
Provide quick and easy access to system features
•
Provide straightforward button programming without dialing codes
•
(the interactive buttons themselves, however, are not programmable)
Intercom Button (INTERCOM)
Selects an intercom line
•
Initiates many of the telephone’s features
•
Message Waiting Light (HOLD button on 8024, 8012; dedicated
MESSAGE button on 8324S, 8324F, 8312S)
Indicates that a message awaits pick up
•
Microphone Opening
Allows handsfree operation of speakerphone (speak clearly toward
•
microphone opening)
Mute Button
Keeps the person on the line from hearing your conversation
1–10 LCD Speakerphone Reference Manual
Page 17

GCA70–245 Introducing The LCD Speakerphone
Programmable Buttons
Allow you to store numbers for automatic dialing functions
•
Allow you to store telephone extension numbers for Direct Station
•
Selection (DSS)
Indicate which lines are either in use or on hold (green light)
•
Speaker
Sounds distant party’s voice
•
Sounds ringing and call progress tones
•
Shift Button
Allows access to autodial numbers programmed under DSS buttons
•
Speaker Button (SPEAKER)
Turns your speaker on or off
•
Disconnects a call when you are on a handsfree call
•
Ends or cancels programming
•
Activates group listen feature
•
TAP Button (must be preprogrammed for only one of the
following functions)
Recalls dial tone, or activates host system features
•
Retrieves held calls or last call placed on hold
•
Transfer/Conference Button (TRANSFER/CONFERENCE)
Transfers calls
•
Sets up conference calls
•
Volume Control
Regulates the volume of the ringer, the speaker, the handset, the
•
headset, and of the group listen feature
LCD Speakerphone Reference Manual 1–11
Page 18

Introducing The LCD Speakerphone GCA70–245
1.5 Understanding What the Lights Mean
The lights on your telephone indicate the status of lines, features, and
intercom.
Next to a Direct Station Select (DSS)/
Busy Lamp Field (BLF) button:
Steady red = station is in use, or in Do Not Disturb.
•
Flashing red = station is receiving a call or station is
•
calling you.
Fluttering red = station-to-station messaging has been set.
•
Next to a line button:
Steady green = line is in use at your station.
•
Steady red = line is in use at another station.
•
Flashing red = a call is coming in on this line.
•
Flashing orange = your line is ringing and will be answered when you
•
take the telephone off hook.
Winking green = line is on hold at your station.
•
Winking red = line is on hold at another station.
•
Fluttering green = line has recalled from hold at your station.
•
Fluttering red = line has recalled from hold at another station
•
Next to a fixed feature or programmable feature button:
Steady red = the feature is on.
•
Steady off = the feature is off.
•
Next to an INTERCOM button:
Steady red with a quick flash = you are using your intercom.
•
Fluttering red = auto redial is in use, or system is in night
•
mode (station 10 or 12).
Winking red = an LCD message is set on your telephone for
•
others to receive when calling.
Flashing red = another station is calling you.
•
1–12 LCD Speakerphone Reference Manual
Page 19

GCA70–245 Introducing The LCD Speakerphone
Above the HOLD button (models 8012S and 8024S):
Flashing red = message awaits pick up.
•
Fluttering red = automatic station relocation has been set.
•
Next to the MESSAGE button (models 8312S, 8324S, and
8324F)
Flashing red = message awaits pick up.
•
Next to the SPEAKER button:
On steady (with telephone on hook and busy) = speakerphone
•
mode active.
On steady (with telephone on hook and idle) = background
•
music turned on.
On steady (with telephone off hook and busy) = group
•
listen is active.
Next to the MUTE button:
On steady = called party cannot hear your conversation.
•
Next to the SHIFT button:
On steady = shift mode is activated to allow access to autodial
•
numbers programmed under DSS buttons.
1.6 Understanding What the Rings Mean
Two short rings = intercom call.
•
Single longer ring = outside call.
•
One short ring burst = voice announce.
•
Three short ring bursts = ring back from a held call, callback from a
•
queued call.
You can vary the ringing tone of your telephone, choosing from one of
six different rings. This way, you can identify your ring even though you
may not be close to your telephone.
Additionally, so you won’t be disturbed when you’re busy on a call and
another call rings at your station, the ring volume is Subdued
automatically.
LCD Speakerphone Reference Manual 1–13
Page 20

Introducing The LCD Speakerphone GCA70–245
1.7 Adusting YourTelephone’s Pedestal
(Models 8312S, 8324S and 8324F only)
An adjustable pedestal is provided on your telephone to allow you to
select the most comfortable viewing angle. When you receive your
telephone, it will be in its lowest position — down flush against the
pedestal. You can raise your telephone to one of three higher positions
as follows:
1. Grasp the rear of the pedestal base firmly with one hand while
lifting the rear portion of the telephone upward with your other
hand.
2. While pivoting the telephone upward with one hand, pivot the
telephone supporting arms upward with your other hand while
feeling for the notches under the telephone. Notice that there
are three sets of notches under the telephone corresponding to
the three positions available.
3. When the telephone is at your desired height, find the closest
pair of notches corresponding to that height, and engage the
supporting arms with the notches. Press down slightly on the
telephone until you feel the supporting arms snap into place.
Telephone
First Notch
Second Notch
Supporting Arm
Pedestal Base
1–14 LCD Speakerphone Reference Manual
Third Notch
(For Highest Position)
PED01
Page 21

GCA70–245 Programming The Attendant Features
ProgrammingThe
2
2.1 Using Chapter Two
The main system operator, or attendant, should be familiar with all of
the information contained in this chapter. It is user-friendly and
designed with both the attendant and the station user’s needs in mind. If
you are the system attendant, you should closely study this chapter
before you begin operating the system.
Within this chapter, you will find helpful information on programming
all of the special features on your telephone that are unique to attendant
station operation, and you will also find information on the LCD’s and
their meanings.
NOTE: If possible, read all of this chapter before you attempt to
operate your telephone system.
Attendant Features
LCD Speakerphone Reference Manual 2–1
Page 22

Programming The Attendant Features GCA70–245
2.2 Creating The LCD Response Messages
When you are busy or are away from your desk, you can set a message
at your telephone that will be received by any LCD speakerphone
within your system. Your system provides two default messages:
“Back at . . .” and “Call . . .” In addition, you can add eight customized
messages, or you can create up to ten messages if you choose not to use
the two default messages.
NOTE: If you intend to create a response message to a voice
announce, remember that this is also a message, and that it
uses one of your message locations.
• Tostore the LCD messages,
1. Write your messages on the chart on page 2-5 (each message can
have up to 16 characters).
2. Use the letter code table (on page 2-4) to assign a number to each
letter.
3. Write these numbers on the chart line beside the message letters.
4. Press INTERCOM.
5.
Dial ✳ #0 5.
6. Dial a message location number (1-0).
7. Dial # to clear current message.
8. Compose your messages by dialing the two-digit codes that relate
to the letters. See the code table on page 2-4.
9. Dial ✳ to save message.
10. Dial next location number, # to clear it, two-digit codes for the
message, and ✳ to save.
11. Repeat previous step until all messages are stored.
12. Press SPEAKER to end.
2–2 LCD Speakerphone Reference Manual
Page 23

GCA70–245 Programming The Attendant Features
Example: Create the message “TAKE MESSAGE” and program it into
message location number 3.
1.
Press INTERCOM,dial✳
2.
Dial 3
#.
#05.
3. Dial 81, 21, 52, 32 12 61, 32, 73, 73, 21, 41, 32
TA K E space ME S SAGE
4. Dial ✳, and press SPEAKER to end.
5. When you are finished creating and programming messages, fill
in the list on page 2-5 of this guide. Make a list of the stored
messages and their location numbers, and give each station user a
copy.
LCD Speakerphone Reference Manual 2–3
Page 24
Programming The Attendant Features GCA70–245
Letter Code Table
Character Code Character Code Character Code
A 21 a 24 SPACE 12
B 22 b 25 ; 17
C 23 c 26 / 18
D 31 d 34 “ 19
E 32 e 35 . 27
F 33 f 36 , 28
G 41 g 44 : 29
H 42 h 45 1 01
I 43 i 46 2 02
J 51 j 54 3 03
K 52 k 55 4 04
L 53 l 56 5 05
M 61 m 64 6 06
N 62 n 65 7 07
O 63 o 66 8 08
P 71 p 74 9 09
Q 11 q 14 0 00
R72r75
S73s76
T81t84
U82u85
V83v86
W91w94
X92x95
Y93y96
Z13z16
2–4 LCD Speakerphone Reference Manual
Page 25

GCA70–245 Programming The Attendant Features
LCD Message List
Location Code Message Letter Codes
1 Back at System Message
2 Call System Message
3
4
5
6
7
8
9
0
LCD Speakerphone Reference Manual 2–5
Page 26

Programming The Attendant Features GCA70–245
2.3 Direct Inward Station Dialing
The direct inward station dialing (DISD) feature allows an external
party to call an intercom station directly without assistance from the
attendant (over a line programmed for DISD). As the system attendant,
you may instruct callers to make DISD calls when necessary.
You may give the caller a DISD line number and the extension number
associated with the station he or she is trying to reach. Future calls
from the caller to a specific party will not have to be serviced at the
attendant’s station, although a ring-no answer or busy condition at the
called party’s station will result in the system’s handling the call in
another manner (described below).
When a caller makes a DISD call from an outside line, he or she will
initially hear ringing. The system will answer the call with a DISD
continuous dial tone; the caller can then dial an extension number.
If called station is idle, a tone is sounded and called station rings.
•
If the call is answered by another station user, the caller can ask for
•
transfer to desired station.
If ringing stops and dial tone sounds again, the caller can dial another
•
extension number.
If called station has call forward feature set, forward station rings.
•
If called station is busy, call is placed on hold and camped-on at busy
•
station. If camp-on is not answered within a transfer recall timeout
period, busy tone is given, followed by a DISD dial tone.
2–6 LCD Speakerphone Reference Manual
Page 27

GCA70–245 Programming The Attendant Features
NOTE: The system will return the caller to DISD dial tone two
additional times and then drop the line.
If called station is busy but is part of a hunt group, DISD call is
•
routed to idle station in hunt group, if available; otherwise, the call is
camped-on at dialed station. Hunt group is followed when caller hears
ringing but receives no answer.
If an invalid extension number is dialed, an error tone is sounded
•
before DISD dial tone is returned (caller can redial). If mistake in
dialing is made, caller can dial ✳ for new DISD dial tone.
If extension number dialing is not completed within the programmed
•
dial time limit, call is routed to DISD assist station i f available;
otherwise, the line is dropped.
NOTE: See section 2.14 for DVA programming used with the DISD
feature.
LCD Speakerphone Reference Manual 2–7
Page 28

Programming The Attendant Features GCA70–245
2.4 Naming The System Telephones
If you have an LCD speakerphone, this feature lets you know who is
calling you. You can assign either a personal name or a group name to
each system telephone. This name can contain up to seven letters and
will show up in the user’s display and/or in the called party’s display.
Typical names could be SRVC, MKTG 1, K SMITH.
• Name the system telephones as follows:
1. Use letter code table (page 2-9) to compose names for all
telephones requiring them (the system accepts up to seven letters
per name),
2. Press INTERCOM,
3.
Dial ✳
4. Dial the station number of the telephone to be named (10-57),
5.
Dial
6. Dial two-digit codes that correspond to letters in name,
7. Dial ✳ to continue entering station names (repeat above steps
beginning with station selection 10-57),
8. Press SPEAKER to end,
9. Record names on pages 2-10–2-11.
# 06,
# to clear current entry,
2–8 LCD Speakerphone Reference Manual
Page 29

GCA70–245 Programming The Attendant Features
Letter Code Table
Character Code Character Code Character Code
A 21 a 24 SPACE 12
B 22 b 25 ; 17
C 23 c 26 / 18
D 31 d 34 “ 19
E 32 e 35 . 27
F 33 f 36 , 28
G 41 g 44 : 29
H 42 h 45 1 01
I 43 i 46 2 02
J 51 j 54 3 03
K 52 k 55 4 04
L 53 l 56 5 05
M 61 m 64 6 06
N 62 n 65 7 07
O 63 o 66 8 08
P 71 p 74 9 09
Q 11 q 14 0 00
R72r75
S73s76
T81t84
U82u85
V83v86
W91w94
X92x95
Y93y96
Z13z16
LCD Speakerphone Reference Manual 2–9
Page 30
Programming The Attendant Features GCA70–245
Station Names
Record telephone names here. Copy this sheet for more record space.
Ext Name Ext Name Ext Name
2–10 LCD Speakerphone Reference Manual
Page 31

GCA70–245 Programming The Attendant Features
Station Names
Record telephone names here. Copy this sheet for more record space.
Ext Name Ext Name Ext Name
LCD Speakerphone Reference Manual 2–11
Page 32

Programming The Attendant Features GCA70–245
2.5 Setting The Music On Hold Feature
Music that is provided to outside lines while those lines are on hold can
be enabled and disabled through the attendant’s station:
• To set the music on hold feature,
1. Press INTERCOM.
2. Dial ✳ #04.
3. Press L1 (top, left-hand programmable button) to alternate the
feature on and off.
—OR—
— dial 1 to enable,
— dial 2 to disable,
NOTE: Associated light will turn on when music on hold is provided
and turn off when the feature is disabled,
4. Press SPEAKER to end.
2–12 LCD Speakerphone Reference Manual
Page 33

GCA70–245 Programming The Attendant Features
2.6 Setting The Night Transfer Of Ringing Mode
The day (or normal) ringing assignments of incoming lines can be
transferred to a particular station or stations for off-hour or special
purpose answering (such line/station ringing assignments are made
through class of service programming). Additionally, stations can be
arranged through class of service programming to answer any ringing
outside line. The ability to answer a line from any station is also
enabled through the night transfer of ringing mode.
• To set the night transfer mode from the attendant’s station,
1. Press INTERCOM.
2. Dial ✳ #03.
3. Press L1 (top, left-hand programmable button) to alternate the
feature between on and off.
—OR—
— dial 1 to enable,
— dial 2 to disable,
NOTE: Associated light will turn on when night transfer is active and
will turn off when the feature is disabled.
4. Press SPEAKER to end.
LCD Speakerphone Reference Manual 2–13
Page 34

Programming The Attendant Features GCA70–245
2.7 Setting A Night Transfer Button
Because Night Transfer is a commonly used feature, you may wish to
program a button to serve as the Night Transfer button.
• To program a Night-Transfer Button,
1. Press INTERCOM.
2. Dial ✳✳1.
3. Press one of the programmable buttons.
4. Press INTERCOM.
5. Dial ✳ #03.
6. Press SPEAKER to end.
To set the Night Transfer Of Ringing mode, simply press the NightTransfer button you have programmed. To return ringing to the
attendant’s station, press the Night-Transfer button again.
NOTE: When the system is in night transfer mode, the intercom light
at station 10 and station 12 will flutter with repetitive off
periods.
2.8 Setting The System Clock
You can program the system clock to maintain current date and time
information. The time and date appear on the LCD speakerphone for
display.
• To set the system clock from the attendant’s station,
1. Press INTERCOM.
2. Dial ✳ #01.
3. Dial two digits (00-99) for year.
4. Dial two digits (01-12) for month.
5. Dial two digits (01-31)forday.
6. Dial two digits (00-23) for hour.
7. Dial two digits (00-59) for minutes.
8. Press SPEAKER to end.
2–14 LCD Speakerphone Reference Manual
Page 35

GCA70–245 Programming The Attendant Features
2.9 Station Message Detail
Accounting (SMDA) Printout
If your system is connected to a printer, you can command the system
to print several different types of reports and to delete all stored SMDA
records.
• To print an SMDA report,
1. Press INTERCOM.
2. Dial ✳ #07.
3. Choose report to be printed:
— dial 1#for station report
— dial 1, port number, # for single station report
— dial 2#for line report
— dial 3#for SMDA department report
— dial 4#for account code report
— dial 5#for automatic reports
— dial 6#to print all records
— dial 7#to delete SMDA records
— dial 0#for Departmental Call Distribution (DCD) report
— dial 8 to obtain the number of free records remaining in the
system (appears in LCD display)
— dial 9 to abort printing
4. Press SPEAKER to end.
LCD Speakerphone Reference Manual 2–15
Page 36

Programming The Attendant Features GCA70–245
2.10 Storing The System Speed Dial Numbers And Names
You can store up to 99 system speed dial numbers at your attendant
telephone that every system user can access from his or her telephone.
Typically, these are numbers that are frequently called by many
different users and emergency numbers that you want readily available
to everyone. Distribute a list of these stored numbers to the system
users for their reference.
• To program system speed dial numbers from the attendant’s
station,
1. Press INTERCOM.
2. Dial ✳ #02.
3. Dial 01–99 to choose storage location.
4. Dial # to clear current entry.
5. Choose line that is to be used:
— Dial 90 for no line assignment (system will choose last line used
at calling station or prime line if one is assigned to calling station),
—OR—
— dial 01–16 for lines 1–16,
—OR—
— press HOLD then dial 17–24 for lines 17–24,
—OR—
— dial 91–94 for line groups 1–4,
—OR—
— press INTERCOM for intercom line.
6. Dial the number to be stored (32 digits maximum),
press HOLD to store pause (if required), and
press TAP to store flash (if required).
2–16 LCD Speakerphone Reference Manual
Page 37

GCA70–245 Programming The Attendant Features
7. Press TRANSFER/CONFERENCE to program a name. Enter
digits from the Letter Code Table on page 2-9 to spell name (up
to 16 characters allowed),
—OR—
— Press TRANSFER/CONFERENCE toleavenameblank.
8. Press TRANSFER/CONFERENCE to save the number and
name.
9. Repeat above steps (beginning with choice of storage location) to
store all speed dial numbers.
10. Press SPEAKER to end.
LCD Speakerphone Reference Manual 2–17
Page 38

Programming The Attendant Features GCA70–245
System Speed Dial Numbers
(Record system speed dial here. Copy this sheet if you need more
record space.)
Loc Number Name Loc Number Name
2–18 LCD Speakerphone Reference Manual
Page 39

GCA70–245 Programming The Attendant Features
System Speed Dial Numbers
(Record system speed dial here. Copy this sheet if you need more
record space.)
Loc Number Name Loc Number Name
LCD Speakerphone Reference Manual 2–19
Page 40

Programming The Attendant Features GCA70–245
2.11 System Alarm Reporting
Occasionally, the DSU system will fail to communicate with a
particular station; it could be that the station has been disconnected
from its station port or that the system printer is off line. When the
system experiences these disruptions, an alarm signal will display at
the attendant’s station or any LCD speakerphone when enabled by class
of service programming. In order to review the system alarms, the
attendant can command the system to present alarm codes on the
station display.
When this feature is provided, a flashing ✳ appears on the first line of
your telephone’s LCD to indicate that new alarms are present. It is a
good idea to write down which alarms are displayed so that you may
report the nature of the alarms to your system installer.
• To display alarm codes,
1. Press and hold ✳ for 5 seconds. The following status reports will
be displayed:
— Station disconnected from station port for more than five minutes.
Month, day, station port number, and station extension number are
shown.
Display shows: “Mo/Da Pxx xxxx A”
— Communications difficulty between a station and the common
equipment. The number of parity errors, up to 256, and the
affected station port are shown.
Display shows: “xxxPARITYPxx”
—Data printer off-line.
Display shows: “PRINTER OFF LINE”
You may press 0 to cancel the alarm report displays.
After the information has been shown on the display, the ✳ disappears
until another alarm occurs.
2–20 LCD Speakerphone Reference Manual
Page 41

GCA70–245 Programming The Attendant Features
2.12 Transferring Calls To The Voice Mail System
As the attendant, you will not always have time to hand-write messages
for all of the people in your group. Transferring some calls to a voice
mail system provides an easy, efficient way for callers to record lengthy
messages to be retrieved by individual station users later.
You can program your attendant’s telephone so that you will be able to
transfer calls to voice mail by pressing a single button (known as the
Transfer To Voice Mail autodial button).
• To program a Transfer To Voice Mail autodial button at your
telephone,
1. Press INTERCOM.
2. Dial ✳✳1.
3. Press programmable button for TransferTo Voice Mail autodial
button location.
4. Dial 6.
5. Dial extension number plus “2" of the voice mail station port.
6. Press SPEAKER to end. (Label button location.)
• To transfer calls to the voice mail system,
1. While on a call, press preprogrammed TransferToVoice Mail
autodial button.
2. Dial extension number followed by “2" of party to receive voice
mail message. The system will automatically dial into voice mail
and direct the message to the appropriate voice mail location for
later retrieval.
2.13 Transferring Recalls To A
Secondary Attendant Telephone
The system installer can arrange for another telephone (station 12) to
serve as a secondary attendant location. When this feature is enabled
through programming, incoming calls ring at the regular (or prime)
attendant’s station, but recalls from unanswered transfers or timed hold
recalls will ring at both attendant stations simultaneously. Neither the
prime attendant nor the alternate attendant can program the feature
directly; only the installer, through class of service programming, can
enable or disable the alternate attendant.
LCD Speakerphone Reference Manual 2–21
Page 42

Programming The Attendant Features GCA70–245
2.14 Digital Voice Announcing (DVA)
Digital voice announcing (DVA) plays pre-recorded announcements
and messages during an in-progress call. The DVA stores the
pre-recorded messages in its memory for recall when needed. While
the DVA is not an automatic attendant, it does provide custom-recorded
automated voice prompts and dialing instructions to callers.
You can store the customized messages into the DVA device in one of
two ways: by delivering them from the telephone handset at station 10
or 12 or by playing the contents of a professionally-supplied tape
recording into the DVA memory. (See your system installer for tape
recorder connection details.) The DVA provides up to four unique
messages. The total available message time is two minutes, and you can
divide this time as necessary among the four messages or use the entire
two minutes for one message if needed. Because of the time
constraints, it is a good practice to script your messages ahead of time
so that you can read them aloud in a clear and concise manner as you
store them in the DVA memory [see IMI66–107 (DSU) or IMI66-132
(DSU II) for more information].
In general, the voice prompt messages are of four categories illustrated
in the following examples:
• Day answer messages
— For DCD callers—"Welcome to Acme’s sales department, all of
our agents are busy. Please stay on the line and an agent will
answer your call as soon as possible."
For DISD callers—“Welcome to Acme Company. If you know
your party’s extension, dial it now; otherwise, stay on the line and
an attendant will answer your call.”
• Night answer messages
— For DCD callers—“Welcome to Acme’s sales department. Our
hours are eight to four-thirty Monday through Friday. Please call
tomorrow during those hours.”
For DISD callers—"Welcome to Acme Company. Our hours are
eight to four-thirty Monday through Friday. Please call tomorrow
during those hours."
• Recall messages
— For DCD callers—"Please hold; an agent will be with you as soon
as possible."
For DISD callers—“The party you have called is not available.
Please dial a new extension number.”
For DISD callers to systems that have the Tracker paging system
installed—“The party you have called is not available. Please
dial a new extension number or dial # plus your call-back number
followed by another # to page your party.”
2–22 LCD Speakerphone Reference Manual
Page 43

GCA70–245 Programming The Attendant Features
• Drop message
— “Thanks for calling Acme, good bye.”
• Storing DVA messages
1. Press INTERCOM,thendial✳#08.
2. Choose the message style.
— Dial 1 for DISD message style.
Dial 2 for DCD message style.
3. Select DVA station ports.
4. Dial 10–57 or press C10–C57 (LED On = Selected).
Then press #.
5. Press # to erase all four messages.
6. Dial code for message type you wish to record.
—Dial 5 to record day answer message.
—Dial 6 to record night answer message.
—Dial 7 to record recall message.
—Dial 8 to record drop message.
—Dial 9 to stop recording.
7. Read the message aloud into the telephone handset mouthpiece.
Note the length of time for the message. Remember, the
maximum allowed time for messages is two minutes.
—OR—
—Start the audio tape recorder, and play the pre-recorded message.
8. Press ✳ and repeat steps 5–7 for each message.
9. Dial code to listen to your recorded messages.
—Dial 1 to play day answer message.
—Dial 2 to play night answer message.
—Dial 3 to play recall message.
—Dial 4 to play drop message.
—Dial 9 to stop playback.
10. To erase all four messages, press #.
11. To record or play messages for another DVA, press ✳ and repeat
steps 2–8. ....Continuedonnextpage
LCD Speakerphone Reference Manual 2–23
Page 44

Programming The Attendant Features GCA70–245
2.14 Digital Voice Announcing (DVA)—continued—
12. When finished, press SPEAKER to end.
To change messages, repeat procedure and make different selection.
2–24 LCD Speakerphone Reference Manual
Page 45

GCA70–245 Programming The Attendant Features
2.15 OperatingYourTelephone
With A DSS/BLF Console
The IB64X, IB48X, and IB24X DSS/BLF consoles have additional
buttons and status lights that extend the memory button capability of an
adjacent companion telephone. The buttons can be programmed for
automatic dialing (speed dial) or direct station selection (DSS) with
busy lamp field (BLF) using the instructions provided previously in this
guide.
When the installer assigns a DSS/BLF console to a station port, the
system recognizes it as such and automatically designates the console
buttons as D SS buttons so that you can store numbers at the buttons as
you need them.
The DSS/BLF console will not operate in a bridged mode.
ib64x
IB64X DSS/BLF Console
LCD Speakerphone Reference Manual 2–25
Page 46

Programming The Attendant Features GCA70–245
2.15.1 Accessing The Button Levels
The IB24X and IB48X DSS/BLF consoles have four levels of buttons,
quadrupling the consoles’button capacity. The four buttons at the
bottom of each console allow you to select which button level is
currently active. To change button levels, press one of the buttons at the
bottom of the console. The leftmost button activates level one, the next
button activates level two, and so forth. A light beside the appropriate
button lights to indicate which level is currently active. You can use one
level on the IB48X and two levels on the IB24X.
ib24x
ib48x
Level access buttons
IB24X DSS/BLF Console
2–26 LCD Speakerphone Reference Manual
Level access buttons
IB48X DSS/BLF Console
Page 47

GCA70–245 Answering Calls
Answering Calls
3
3.1 Answering Outside Calls
A call that rings on an outside line sounds long single ring bursts and
lights the line status light. The light flashes red for any ringing line or it
flashes orange when your telephone has the ringing line preference
feature.
• When you hear outside ringing (long single ring bursts) and
observe a flashing light, answer the call as follows:
1. Press button of ringing line if flashing light is red,
2. Speak toward the telephone (lift handset if privacy is desired),
—OR—
lift handset if light is orange.
3.2 Answering Intercom Calls
An intercom call is one that is made from one system telephone to
another. An intercom party can call you through your speaker instead
of ringing your telephone or an intercom party can ring your telephone
if they desire (intercom ringing sounds two short ring bursts). You can
block voice calls. See the discussion titled 8.2, Blocking Voice
Announced Calls for details if you wish to use this feature.
• When you hear a short tone burst followed by a caller’s voice,
1. Speak toward the telephone to answer. Lift handset if privacy is
desired.
• When you hear intercom ringing (two short ring bursts),
1. Press INTERCOM to talk. Lift handset if privacy is desired.
LCD Speakerphone Reference Manual 3–1
Page 48

Answering Calls GCA70–245
3.3 Answering Calls At Monitored Stations
Your system may provide a station monitoring feature, which allows
you to monitor the status (idle, ringing, or busy) at other stations. If
your telephone has this feature, a BLF light will flash whenever a DSS
station is ringing. In this case, you can answer a call at a ringing DSS
station by pressing the DSS button.
• To answer a call at a monitored telephone,
1. Note flashing BLF light.
2. Press DSS button.
3. Speak toward telephone to answer call. Lift handset if privacy is
desired.
NOTE: If you place the call on hold or if you transfer it to another
telephone, the BLF light turns off. You can retrieve the call, if
necessary, by pressing TAP.
3.4 Answering Night Transferred Calls
The system attendant can take action that transfers incoming calls to a
particular station or stations for off-hour ringing (See section titled
Using Your Telephone to Transfer Calls). After the attendant has set up
this feature, you can answer an outside call when it rings anywhere in
the system.
• When you hear ringing,
1. Press INTERCOM.
2. Dial 80.
3. Speak toward telephone to answer call. Lift handset if privacy is
desired.
3–2 LCD Speakerphone Reference Manual
Page 49

GCA70–245 Answering Calls
3.5 Making A Call Pick-Up
Often, several telephones are arranged together in a user group by the
system installer. If your telephone is so arranged, you can answer calls
that are ringing at other stations within your particular group. Also, you
can answer a call that is ringing at any telephone in the system if you
know the telephone’s extension number.
• To answer a call that is ringing within your group,
1. Press INTERCOM.
2.
3. Speak toward telephone to answer call. Lift handset if you want
• To answer a call that is ringing at any telephone in the system,
1. Press INTERCOM.
2. Dial
3. Dial extension number of ringing telephone.
4. Speak toward telephone to answer call. Lift handset if you want
# 4.
Dial
privacy.
✳ 4.
privacy.
LCD Speakerphone Reference Manual 3–3
Page 50

Answering Calls GCA70–245
3.6 Responding ToA Subdued
Off-Hook Voice Announcement
Your installer can program your telephone to receive a Subdued
Off-Hook Voice Announcement (SOHVA), a feature that allows an
intercom caller to break into your call if you are using the handset.
Using SOHVA, a caller makes an announcement through your handset
receiver. If you are on a speakerphone call, you cannot receive a
SOHVA call; however, you will hear a ring burst and can go off-hook
to receive a SOHVA call.
The Subdued Off-Hook Voice Announcement consists of several short
tone bursts and then a message that you hear in your handset receiver.
The distant party that you are currently talking to cannot hear the
announcement made by the SOHVA caller.
• You can respond to a SOHVA call in one of two ways:
— Verbally: Press and hold MUTE button down and reply by
speaking into handset. Distant party cannot hear response.
Release button to return to distant party.
— Non-verbally: (Response Messaging): If the announcing station
has an LCD speakerphone, press MSG (message) then press
HVHLD (have them hold), TKMSG (take a message), or CLBK
(I will call back) to send the appropriate message. Autodial
buttons can be programmed to use any of the 10
attendant-programmable LCD messages.
The message appears in the display of the telephone making the
SOHVA announcement and then that telephone is automatically
disconnected from your telephone. (If the telephone to which you
attempt to send a non-verbal message is not an LCD telephone,
that station is immediately disconnected from the call.)
You can also block a SOHVA to your station by pressing BLOCK when
the SOHVA is initiated. The SOHVA call is then disconnected.
3–4 LCD Speakerphone Reference Manual
Page 51

GCA70–245 Making Calls
Making Calls
4
4.1 Dialing Manually
You can manually dial a number over a selected telephone line. Or, if
your telephone was given a prime line or idle line preference feature
when it was installed, it will automatically select a line for your use
when you lift the handset.
• To dial an outside number manually,
1. Press line button to select line (remember—selecting a line is not
necessary if a prime line or idle line preference feature has been
assigned to your telephone and if you lift the handset to begin the
call).
2. Listen for dial tone.
3. Dial number.
LCD Speakerphone Reference Manual 4–1
Page 52

Making Calls GCA70–245
4.2 Dialing Automatically
This feature provides one- or two-button autodialing using
programmable buttons at which you have previously stored numbers.
Two levels of number storage are available at each storage location, but
you cannot put two autodial numbers at one location. You can use one
or both levels as needed. Further,a line choice is usually stored as part
of an autodial number so that line selection is automatic with
autodialing. Actual button programming is discussed in Chapter Nine
of this user’s guide.
Speed dialing is autodialing using the keypad buttons. There are two
types of speed dial numbers: (1) numbers that you store for your own
use (personal speed dial numbers), and (2) numbers that are stored by
the system attendant for everyone’s use (system speed dial numbers).
• To automatically dial an autodial number,
1. Press preprogrammed button (line selection is usually a part of the
stored autodial or speed dial number),
—OR—
— press SHIFT then press preprogrammed button (to choose
number stored as a second choice at that button).
• To dial a personal speed dial number from an idle telephone,
1. Dial speed dial number (0–9).
• To dial a system speed dial number from an idle telephone,
1. Press ✳ and then dial system speed dial number (01 - 99).
NOTE: If you manually choose a line for dialing, press HOLD before
using a speed dial. If you place a call on hold prior to using
your speed dial, pause several seconds before you press the
speed dial button; if you immediately press the speed dial
button, the system will choose the line that you have on hold to
place your speed dial call.
4–2 LCD Speakerphone Reference Manual
Page 53

GCA70–245 Making Calls
4.3 Redialing
If the last number you have called is busy or is not answering, you have
several options for redialing it. You can redial it once, initiate a
repeated redialing of it, or save it for later redial using a
preprogrammed saved number redial button. Refer to the procedures
given in the programming section of this user’s guide to preprogram a
saved number redial button.
• To redial the last dialed number one time,
1. Press SPEAKER (or hang up handset) to disconnect current
ringing or busy tone.
2.
3. Listen for ringing or busy tone over the monitor speaker:
— Ringing tone: When party answers, pick up handset.
— Busy tone: Press SPEAKER to disconnect.
• To redial the number once a minute for 10 minutes,
1. Press ARDL button.
The number will be dialed once a minute for 10 minutes (INTERCOM
light flashes). Listen for ringing or busy tone over the monitor speaker.
NOTE: You must pick up the handset once the call is connected, or the
• To cancel this automatic redial action (INTERCOM light turns
off) with any of the following actions,
1. Lift and replace handset.
— use the telephone for some other function.
The system will save the first 16 digits of the last manually dialed
number so that it can be redialed later; however, subsequent dialing
activity overwrites any number the system has temporarily saved.
• To store one 16-digit number,
#.
Press
system will disconnect the call after 30 seconds.
—OR—
1. Dial the number you wish to store and press SAVE.
2. To dial the stored number, press HOLD andthenpresstheSAVED
NUMBER REDIAL button that was preprogrammed for this
purpose.
LCD Speakerphone Reference Manual 4–3
Page 54

Making Calls GCA70–245
4.4 Using Line Groups
Some systems have telephone lines arranged into line groups that are
made available at the telephone instead of individual lines. Your system
administrator can tell you how your system is arranged. When line
groups are available, you may access them for outside calling instead of
pressing a line button to select a line for use.
• To access a system line group,
1. Press INTERCOM.
2. Dial desired line group access code:
9 = line group 1
81 = line group 2
82 = line group 3
83 = line group 4
3. Listen for outside dial tone.
4. Dial desired number.
4–4 LCD Speakerphone Reference Manual
Page 55

GCA70–245 Making Calls
4.5 Waiting For A Line (Queuing)
If all the lines in a line group are busy, you can place your telephone in
a queue to await an idle line in the line group. When you share a line
with another telephone and the line is busy, you can place your
telephone in a queue to await the idle line.
• To queue for a line group,
1. Press INTERCOM.
2. Dial the line group access code (9, 81, 82, 83).
3. Hear busy tone.
4. Dial ✳ 8 and hang up.
5. When line group is free, your telephone sounds several short ring
bursts. When you hear this, lift the handset, listen for dial tone, and
place call.
• To cancel line group queuing,
1.
Press INTERCOM,dial
#8and hang up.
• To queue for a line that appears on your telephone,
1. Press HOLD.
2. Press line button of busy line.
3. Hear short tone.
4. When the line is free, your telephone sounds five short ring bursts
telling you that you can use your line. Lift handset to answer. If
you no longer need the line, ignore the ring burst.
LCD Speakerphone Reference Manual 4–5
Page 56

Making Calls GCA70–245
4.6 Displaying Call Cost /Timer
If the installer programs your LCD speakerphone to display call
costing, you can press the COST button on display to show the cost of
the current call. If your system has not been configured with call
costing, the button will show up as TIMER and will display the
running time of the current call.
• To display the cost of current call (if your system is set for call
costing),
1. After making call, press COST button (display will show cost of
current call).
• To display the running time of current call (if your system does
not have call costing),
1. After making call, press TIMER button (display will show running
time of current call.
NOTE: When telephone is idle, pressing the HOLD button will display
call Time for the last call, and pressing the HOLD twice will
display call cost for the last call.
4–6 LCD Speakerphone Reference Manual
Page 57

GCA70–245 Making Calls
4.7 Making Intercom Calls
You can dial an intercom call manually from the keypad or
automatically using a direct station select (DSS) button that you have
previously programmed. There are two methods for making an
intercom call: one causes your voice to sound out at the called
telephone and the other causes the called telephone to ring. Your system
programmer can set the system to deliver either tone-first or voice-first
calling, although all systems have tone-first as the default condition.
Keep in mind that whatever the system setting is, a called party can set
a voice announce block condition at his or her telephone to prevent all
voice announce calls.
(The following instructions assume a tone-first default setting. Any user
can change a call to voice signaling for that call simply by pressing the
INTERCOM button again after dialing the extension number or by
pressing the DSS button again.)
• To manually cause the other telephone to ring (tone calling),
1. Press INTERCOM.
2. Dial extension number (called telephone will ring).
• To tone call automatically,
1. Press DSS button (called telephone will ring).
(The following instructions assume a voice-first default setting. Any
user can change a call to a tone signaling for that call simply by
pressing the INTERCOM button again after dialing the extension
number or by pressing the DSS button again.)
• To voice call manually,
1. Press INTERCOM.
2. Dial extension number.
3. Speak your announcement.
• To voice call automatically,
1. Press DSS button.
2. Speak your announcement.
LCD Speakerphone Reference Manual 4–7
Page 58

Making Calls GCA70–245
4.8 Camping At Another Telephone
And Waiting For An Automatic Callback
If the telephone you have called on the intercom line is busy or rings
with no answer, you can have the system ring your telephone when the
called station becomes idle (if it was busy) or when there is any activity
initiated at that telephone (if it rang with no answer before).
• To camp on at a busy or no answer station,
1. Make intercom call.
2. Press CAMP.
3. Your telephone immediately hangs up. When the telephone you
called becomes idle, your telephone will ring with five short ring
bursts. When you hear the ring bursts, press INTERCOM.The
other telephone will start ringing.
If you do not press INTERCOM within the time limit, the
callback is canceled at that time; however, you can cancel
automatic callback at any time before your telephone sounds the
ring bursts.
• To cancel automatic ringback,
1. Press INTERCOM and dial #6.
NOTE: If you make a call in the voice-announce mode and receive no
answer at the called station, press INTERCOM before pressing
camp button in order to camp on at that station.
• To camp on at a station with a Do Not Disturb condition set,
1. Make intercom call.
2. Press CAMP. A callback will occur when called station is no
longer set in the Do Not Disturb mode.
4–8 LCD Speakerphone Reference Manual
Page 59

GCA70–245 Making Calls
4.9 Camping At Another Telephone
And Waiting For An Answer (Call Waiting)
If the telephone you have called is busy,you can send a call waiting
tone to a busy telephone and wait on the line for an answer.
• To camp on when you hear a busy signal,
1. Press NEXT,thenpressCWAIT.
2. Remain on line awaiting a reply.
3. The called party will hear a short tone burst. They can either place
their current call on hold or hang it up and then answer your call.
4.10 Overriding A Call
If the telephone you have called is busy, you can break into the
conversation at that telephone if the installer-programmer has enabled
the executive override feature at your telephone.
You can also override a Do Not Disturb condition at another telephone
if the installer-programmer has enabled the DND override feature at
your telephone.
• To perform an executive override,
1. Make call and hear a busy signal.
2. Press NEXT,thenpressOVER (several short tone bursts will be
heard by all parties).
3. Join in-progress call.
• To override a Do Not Disturb condition at another station,
1. Press OVER to disable the Do Not Disturb condition at the called
station.
2. Speak your announcement (if in voice-first mode) or hear
ring-back tone (if in tone-first mode).
LCD Speakerphone Reference Manual 4–9
Page 60

Making Calls GCA70–245
4.11 Making A Subdued Off-Hook
Voice Announcement (SOHVA)
You can make a voice announcement to another station that is off-hook
and busy on a call (if the system is arranged to provide this feature).
Your telephone provides a SOHVA button for your use. The system
allows you to decide whether to deliver a SOHVA message or hang up
when you hear an intercom busy tone.
• Make a SOHVA announcement using the SOHVA button
as follows:
1. Make intercom call and hear busy tone.
2. Decide whether to interrupt or not.
3. If you decide not to interrupt the called party, hang up.
—OR—
• To interrupt, press SOHVA button and hear several quick tone
bursts,
1. Make announcement (busy tone means that the called telephone is
in speakerphone mode and you cannot make announcement, that
your SOHVA has been denied through system programming, or
that the called party has voice announce block enabled).
2. Wait on line for reply (called telephone may send non-verbal reply
to your display and then disconnect from your telephone).
NOTE: The caller cannot control how the announcement is received.
This depends upon the equipment used and class-of-service
programming.
4–10 LCD Speakerphone Reference Manual
Page 61

GCA70–245 Making Calls
4.12 Using Dial By Name
The dial by name feature allows you to use the display and interactive
buttons of your LCD speakerphone to search through a preprogrammed
index of intercom or system speed dial names, locate a desired name,
and automatically call the located name.
• To use dial by name,
1. Press OPTIONS to enter the dial by name menu.
2. From the dial by name menu, press the INT button for intercom
calling,
—OR—
press EXT for system speed dial calling.
3. Dial three digits for the first three letters of the name you want to
locate (for example, dial 266 for Comdial):
4. The display shows the first existing name match to the dialed digits
or shows a No Match message if the system can not find a match.
(If the display says No Match, press PREV or enter three new
digits to select a new name.)
5. Press NEXT to display the subsequent names in the list until you
reach the name you need,
—OR—
press ALL to view the name list from the beginning.
6. Press DIAL to call the displayed name.
LCD Speakerphone Reference Manual 4–11
Page 62

This page remains blank intentionally.
Page 63

GCA70–245 Holding Calls
Holding Calls
5
You can place a call on hold and pick it back up a short time later. With
a regular hold, you can pick up the held call or another user can pick it
up at another telephone if that telephone shares the held call line with
your telephone. With an exclusive hold condition, you must pick the
held call up at your telephone as no other telephone has access to it.
You can also answer and place on hold a call that is on a line that does
not appear at your telephone (a call that is parked or transferred to you,
for instance). You can even place a call on hold at another telephone or
on hold in the system so that anyone can answer it.
After a call has been on hold for the period of time (set by the installer
of your system), the system will cause three short ring bursts to sound
at your telephone and the flash rate of the line button becomes faster. If
the call is on exclusive hold, it will revert to manual hold after the hold
recall time period.
5.1 Holding A Call
• To Place a call on hold,
1. Press HOLD.
• To retrieve a held call,
1. Press line button of the held call (with flashing light).
• To retrieve a call that you answered and placed on hold but for
which you have no line appearance (for instance, a call that was
transferred to you),
1. Press TAP.
LCD Speakerphone Reference Manual 5–1
Page 64

Holding Calls GCA70–245
5.2 Using Exclusive Hold
• To place a call on exclusive hold,
1. Press HOLD twice.
• To retrieve exclusive hold,
1. Press line button of held call (with flashing light)
—OR—
— press TAP (if station does not have line appearance).
5.3 Using Directed Hold
• To place a call on hold at another telephone (directed h old),
1. While on line, press INTERCOM.
2. Dial ✳ 90.
3. Dial extension number of telephone to receive held call.
• You can pick this call back up if you need to. To do this,
1. Dial ✳ 4.
2. Dial extension number of that telephone.
3. Service call as desired or press SPEAKER to hang up.
• To pick up a call that was placed on hold at your telephone by a
user at another telephone,
1.
Press INTERCOM and dial
5–2 LCD Speakerphone Reference Manual
# 90.
Page 65

GCA70–245 Holding Calls
5.4 Placing A Call In A Parking Orbit
• To place a call on hold within the system where it can be
answered at any telephone in the system (parking a call in orbit),
1. While on the call, press INTERCOM ✳.
2. Dial code for park location (orbit) (91–99 for orbit 1–9).
3. Remember the code for later use or make it known to those who
need to know in order to retrieve the call.
• To retrieve a call that was placed on hold in the system (parked),
1.
From any station, press INTERCOM
2. Dial code for orbit 1–9 (91– 99).
#.
5.5 Handling Recalled Hold Calls
After a call has been on hold for the period of time (set by the installer
of your system), the system will cause three short ring bursts to sound
at your telephone and the flash rate of the line button becomes faster.
If the call is on exclusive hold, it will revert to manual hold after the
hold recall time period. If the call is parked on hold, either at another
phone or in orbit within the system, it will also revert to manual hold
after the hold recall time period. When calls on exclusive hold or calls
parked on hold revert to manual hold, you will hear three short ring
bursts. Calls that revert to manual hold can be picked up from any
phone in your line group.
• If a line was placed on manual hold, exclusive hold, directed hold
or park orbit and that line is recalling,
1. Press HOLD to place the call on hold at your station and restart
HOLD timer
—OR—
press ANS to retrieve the call.
LCD Speakerphone Reference Manual 5–3
Page 66

This page remains blank intentionally.
Page 67

GCA70–245 Transferring Calls
6
6.1 Transferring Calls
You can transfer calls from one station to another in one of two ways.
If you first identify the caller to the party to receive the transfer, thus
giving that user the opportunity to prepare for the call, you have made a
screened transfer. If you transfer the call without first announcing it,
you have made an unscreened transfer.
If the telephone to which you are transferring the call is busy, you must
recover the call yourself or take one of several options that may be
available at your telephone. Also, if a transferred call is not answered
after a certain length of time (as set by the system) it recalls to your
telephone. Again, there are several options that you have available for
servicing the returning call (see the following pages for more
transferring information).
Transferring Calls
LCD Speakerphone Reference Manual 6–1
Page 68

Transferring Calls GCA70–245
6.2 Transferring Calls – Screened
• To screen and transfer a call to another telephone
in the system,
1. Answer call.
2. Press TRANSFER/CONFERENCE (call is automatically placed
on hold).
3. Dial extension number of telephone to receive transfer or press
DSS button for that extension.
4. When intercom party answers, announce call.
5. Press SPEAKER to disconnect, or hang up. Intercom party then
has the call.
• If the intercom party is busy, take one of the following steps (if
made available at your telephone by installer programming):
— press RECON to return to the call yourself,
— press SOHVA to allow you to tell the intercom party that a call
awaits,
— press CAMP to camp-on to that station,
— press OVER to allow you to join the intercom party’s current
conversation.
6–2 LCD Speakerphone Reference Manual
Page 69

GCA70–245 Transferring Calls
6.3 Transferring Calls – Unscreened
• To transfer an unscreened call to another telephone
in the system,
1. Answer call.
2. Press TRANSFER/CONFERENCE (call is automatically placed
on hold).
3. Dial extension number of telephone to receive transfer or press
DSS for that extension.
4. Press SPEAKER to disconnect or hang up. Intercom party then
has the call.
NOTE: Unscreened transfers camp-on at busy telephones and wait to
be answered. Each call automatically rings the telephone as
soon as it becomes idle.
• If a transferred call is not answered and then returns to your
telephone, you can take one of the following steps:
— press SEND to re-transfer the call,
— press HOLD to place the call on hold at your telephone,
— press ANS to return to the call.
LCD Speakerphone Reference Manual 6–3
Page 70

This page remains blank intentionally.
Page 71

GCA70–245 Conferencing Calls
7
7.1 ConferencingTelephonesTogether
When your telephone is joined together with several other telephones
on the same call, the effect is called conferencing. You can make
conference calls that involve up to five parties, including you as the
originating party, in any combination of outside lines and intercom
parties. For example, you can conference three outside lines and two
intercom parties or four outside lines and one intercom party or five
intercom parties—the combinations are up to you.
If you are involved in a conference call with two outside lines, you can
drop out of this established conference call and leave the outside lines
in the conference with each other. This is known as an unsupervised
conference call.
NOTE: When setting up a conference call with outside lines and
internal telephones, you must call the outside lines first.
• To set up a conference call that includes both outside l ines and
intercom parties, outside lines alone, or intercom
parties alone,
Conferencing Calls
1. Make first call.
2. Press TRANSFER/CONFERENCE (call is placed on hold
automatically).
3. Make next call.
4. Press TRANSFER/CONFERENCE to establish conference.
5. Repeat the last three procedures to add up to two more parties,
establishing a 5-party conference (including yourself).
• To continue conversation on remaining line after other outside
lines have dropped out of conference,
1. Press the line button of the remaining party.
LCD Speakerphone Reference Manual 7–1
Page 72

Conferencing Calls GCA70–245
• To retrieve a line from hold and bring that party back
into the conference,
1. Press TRANSFER/CONFERENCE.
2. Press line button.
3. Press TRANSFER/CONFERENCE.
NOTE: If all the conference circuits are busy, you will not be able to
add a party to the conference. The message “Conference Full” will
appear in your display.
7.2 Making Unsupervised Conference Calls
• To drop out of a conference call between you and two outside
lines (creating an unsupervised conference),
1. Dial # and hang up (lines remain lighted/in use until one or both
outside parties disconnect).
• To rejoin an unsupervised conference between two outside lines,
1. Press one of the lighted buttons where conference is taking place.
NOTE: Conference volume levels are dependent upon the
quality of the external lines.
7–2 LCD Speakerphone Reference Manual
Page 73

GCA70–245 Using The Other Telephone Features
Using The Other
8
Chapter 8 details the features that enhance the basic operation of your
telephone. All of the features in this chapter are listed in alphabetical
order for your convenience.
8.1 Adjusting The Display Contrast
You can adjust the contrast of the display to darken or lighten it for best
viewing.
• To adjust the display contrast,
1. Press OPTIONS.
2. Press NEXT until DISP appears.
3. Press DISP (display reads “contrast level”).
4. Press LIGHT or DARK to change contrast level
accordingly (press button once for each degree
of change desired).
5. Press SPEAKER to save the last level and end.
Telephone Features
LCD Speakerphone Reference Manual 8–1
Page 74

Using The Other Telephone Features GCA70–245
8.2 Blocking Voice Announce Calls
You can prevent voice announcements from sounding over your
telephone speaker. This feature also blocks subdued off-hook voice
announcements as well.
• To block voice-announced calls,
1. Press OPTIONS.
2. Press NEXT.
3. Press VAB.
4. Press ON.
5. Press SPEAKER to end.
• To un-block voice-announced calls,
1. Press OPTIONS.
2. Press NEXT.
3. Press VAB.
4. Press OFF.
5. Press SPEAKER to end.
• To block a SOHVA while you are on a call,
1. Press BLOCK.
8–2 LCD Speakerphone Reference Manual
Page 75

GCA70–245 Using The Other Telephone Features
8.3 Displaying The Functions Of Your
Station’s Buttons (Button Query)
You can use the interactive buttons on your LCD speakerphone to
access the button query feature. With this feature, you can cause your
station’s display to show the function of each of its buttons.
• To activate the button query feature,
1. Press OPTIONS until QUERY appears.
2. Press QUERY.
3. Press any button and read its function in your LCD speakerphone’s
display.
NOTE: Use the SHIFT to access autodial numbers that you have
stored under DSS buttons.
4. Press SPEAKER to end.
LCD Speakerphone Reference Manual 8–3
Page 76

Using The Other Telephone Features GCA70–245
8.4 Entering Account Codes
If your installer has arranged your system for account code entry to
enhance the SMDA reports, you may be told to enter an account code
before calling a number or after answering one. Code entry is either
forced or voluntary. If the codes are forced, you must enter the account
code to place a call; if the codes are voluntary, the call will still go
through if you do not enter a code (pre-programmed Emergency
numbers will automatically go through even with forced account codes).
NOTE: You can program a button on your telephone that will make
the account code entry process quicker if you wish. Refer to
the programming section of this user’s guide for details.
• To enter account code on an incoming call,
1. Press INTERCOM,thendial✳04(call is automatically placed
on hold),
—OR—
press preprogrammed ACCOUNT CODE button (call is not
automatically placed on hold),
2. Dial account code.
• To enter account code on an outgoing call,
1. Press line button (the display will prompt for “Account Code” if
programmed to do so).
2. Press INTERCOM,thendial✳04(call is automatically placed
on hold),
—OR—
press preprogrammed ACCOUNT CODE button (call is not
automatically placed on hold),
3. Dial account code.
4. Listen for dial tone and dial number you are calling.
NOTE: If you hear an error tone after you have dialed your account
code, check the number for validity.
8–4 LCD Speakerphone Reference Manual
Page 77

GCA70–245 Using The Other Telephone Features
8.5 Forwarding Calls
You can forward calls that normally ring at your telephone to another
telephone for answering. You can forward just your prime line and
intercom calls or you can forward any calls that ring at your telephone.
NOTE: You can program a special call forward button if you need
quick access to the feature. See the programming section of
this user’s guide for details.
• To forward your calls,
1. Press OPTIONS.
2. Press NEXT until CFWD appears.
3. Press CFWD.
4. Press PERS for prime line and intercom calls,
—OR—
press ALL for all calls.
5. Press SET to enable call forwarding.
6. Dial extension number of telephone to receive your
forwarded calls.
7. Press SPEAKER to end.
NOTE: Your telephone will ring a short ring burst each time
an intercom call is forwarded to remind you that this is
happening.
• To cancel call forwarding,
1. Press OPTIONS.
2. Press NEXT until CFWD appears.
3. Press CFWD.
4. Press PERS for prime line and intercom calls,
—OR—
press ALL for all calls.
5. Press CLEAR to disable call forwarding.
6. Press SPEAKER to end.
LCD Speakerphone Reference Manual 8–5
Page 78

Using The Other Telephone Features GCA70–245
8.6 Activating The Call Forward
Outside System (CFOS) Feature
The Call Forward Outside System (CFOS) feature gives DSU II station
users the ability to forward line calls to a remote location outside the
system. CFOS remains in effect in the event of a loss of power or a
system reset.
• To activate the CFOS feature,
1. Press INTERCOM ✳07.
2. Press the speed dial button programmed with the target number,
—OR—
Press a line button,
—OR—
Dial 0 for the Prime line or last used line,
—OR—
Dial 1–4 Line Group number.
3. Dial desired digits 0–9 (max 16 digits)
4. Press HOLD for Pause or press TAP for Flash.
5. Press SPEAKER to end.
• To deactivate the CFOS feature,
1. Press INTERCOM # 07.
8–6 LCD Speakerphone Reference Manual
Page 79

GCA70–245 Using The Other Telephone Features
8.7 Identifying Your Telephone
With Automatic Set Relocation
If your installer has equipped your system with automatic set
relocation, you can move your telephone to another location and be
given a choice (through a display prompt) as to whether you want to
keep your previous programming or use the programming in the new
location. Respond to the prompt according to your need.
• To maintain the extension number and programming features
from the old location,
1. Connect the telephone line cord to the new jack.
2. Note the flashing HOLD light and press the HOLD button while
the light is still flashing (your telephone immediately assumes the
features from the previous location),
—OR—
do nothing until the HOLD light stops flashing (your telephone
automatically assumes the features from the previous location).
• For your telephone to assume the extension number and
programming features from the new location,
1. Connect the telephone line cord to the new jack.
2. Note the flashing HOLD light and press the # button while the
light is still flashing (your telephone immediately assumes the
features from the new location).
LCD Speakerphone Reference Manual 8–7
Page 80

Using The Other Telephone Features GCA70–245
8.8 Listening To A Call Over The
Speaker (Group Listening)
You can turn on the telephone speaker while you have the telephone
handset lifted if you wish. The distant party’s voice then sounds over
the telephone speaker as well as the handset; however, only your
handset microphone is active.
• To do this while on a call,
1. Press and hold SPEAKER for two seconds.
—OR—
press pre-programmed group listening button.
• To cancel group listening,
1. Press and release SPEAKER to end.
8.9 Making A Call Non-Private
You can make a call non-private using a feature button that you have
programmed. Actual button programming is discussed in a separate
section of this user’s guide. When a call is non-private, other telephones
in the line group can join the call. Privacy returns when the call is
completed.
• To do this while on a call,
1. Press preprogrammed PRIVACY button.
8–8 LCD Speakerphone Reference Manual
Page 81

GCA70–245 Using The Other Telephone Features
8.10 Monitoring A Conversation Between
Two Telephones (Service Observing)
If your telephone provides the installer-programmed service observing
feature, you can monitor an on-going conversationat another telephone
in an undetected manner. You can use t his feature on-hook or off-hook.
You may also make a SOHVA call to a station you are actively
monitoring, enabling you to assist the station user while listening to the
distant party. For this feature, the called station must be programmed to
be “observable,” and your telephone must have a pre-programmed
SOHVA button.
• To monitor an in-progress call,
1. Press INTERCOM.
2.
3. Dial extension number of telephone to be monitored.
4. Press SPEAKER to end monitoring.
• To initiate a SOHVA while monitoring a call at
another station,
1. Press pre-programmed SOHVA button.
2. Make announcement (distant party will not hear the
NOTE: The station you are observing may not allow a SOHVA call if
# 03.
Dial
announcement; party receiving SOHVA can press MUTE button
to respond to your call).
it is in speakerphone mode. However, the voice announce
block feature, if enabled at the monitored station, will not
block a SOHVA from a monitoring station.
8.11 MutingYourTelephone
By using the MUTE button, you can block transmission of your voice
to the distant party. For example, if someone comes into your office to
talk to you and you do not want to interrupt the distant party, press the
MUTE button. The MUTE button turns on when you press it and turns
off when you press it again.
• To mute your telephone,
1. Press and engage MUTE (MUTE light turns on).
• To return to the distant party,
1. Press and disengage MUTE (MUTE light turns off).
LCD Speakerphone Reference Manual 8–9
Page 82

Using The Other Telephone Features GCA70–245
8.12 OperatingYourTelephone
As A Departmental Station
If your telephone is within a departmental group of telephones, you can
place your station in either an off-duty or a wrap-up mode.
The off-duty mode is when you leave your telephone for lunch or for
an extended time period and want another department telephone to
receive your calls.
The wrap-up mode is when you need time after a call to complete
related paperwork and want another department telephone to receive
your calls. To use the wrap-up mode, you must program a Do Not
Disturb feature button (refer to the programming section of this user’s
guide for details).
• To place your telephone in an off-duty mode,
1. Press OPTIONS.
2. Press NEXT until DND appears.
3. Press DND.
4. Press ON.
5. Press SPEAKER to end. Calls will ring at another departmental
telephone.
• To return to on-duty mode, repeat the above procedure but press
OFF instead of ON.
NOTE: When you are in the Do Not Disturb mode and a call comes in
from another station, your INTERCOM light will flash and
your LCD will display the station attempting the call. You may
choose to pick up the call; when you hang up, your telephone
returns to the Do Not Disturb mode until you turn it off.
• To place station in wrap-up mode,
1. Press HOLD.
2. Press DND feature button ( preprogrammed). Calls will ring at
another departmental telephone.
• To return to on-duty mode, repeat the above procedure.
8–10 LCD Speakerphone Reference Manual
Page 83

GCA70–245 Using The Other Telephone Features
8.13 Sending A Paging Announcement
There are several ways to make a public announcement to all or a
portion of your location. Your system might be arranged with an
external paging unit that you access by pressing a line button or by
dialing a special code. This unit sounds the announcement over an
external speaker unit.
Your system may provide an all-call or a zone page feature that you
access by dialing special codes. This arrangement sounds the
announcement through the telephone speakers. All-call sounds the
announcement through all telephones, while zone paging sounds it only
through those telephones located in a specific area. Check with your
system administrator to determine the type of paging that you should
use and the method that you should use to access it.
NOTE: You can program a special all-call/zone paging button if you
need it for quick access to the feature. See the programming
section of this user’s guide for details.
• If your system provides an external paging unit,
1. Lift handset.
2. Press INTERCOM, then dial extension number of station
equipped and enabled for paging (see programming section of this
user’s guide),
—OR—
—press paging button assigned by the installer,
—OR—
—dial INTERCOM 89 for special paging port.
3. Make announcement.
4. Hang up to end.
LCD Speakerphone Reference Manual 8–11
Page 84

Using The Other Telephone Features GCA70–245
• If your system provides all-call or zone paging,
1. Lift handset.
2. Press INTERCOM.
3. Dial 87 for all-call,
—OR—
dial 84, 85, or 86 for zone 1, 2, or 3.
4. Make announcement.
5. Stay on line if awaiting a reply (known as “meet-me” page),
—OR—
hang up to end.
NOTE: If you have programmed paging buttons, use them instead of
the dialing codes shown above.
• To make a reply to a “meet-me” page,
1. Lift handset of nearest telephone.
2. Press INTERCOM.
3. Dial 88.
4. Meet paging party on line.
8–12 LCD Speakerphone Reference Manual
Page 85

GCA70–245 Using The Other Telephone Features
8.14 Setting A Do Not Disturb
AtYourTelephone
This feature keeps calls from ringing at your telephone and makes it
appear to be busy to intercom calls. If your telephone has this feature,
you can enable it as needed.
Generally, this feature cannot be overridden by the caller.The caller
hears two quick tone bursts every three seconds when he or she calls a
telephone with this feature enabled. Some telephones, however, do have
the ability to override a do not disturb condition set at another
telephone.
NOTE: You can program a special do not disturb button if you need it
for quick access to the feature. See the programming section
of this user’s guide for details.
• To enable do not disturb, proceed as follows:
1. Press OPTIONS.
2. Press NEXT until DND appears.
3. Press DND.
4. Press ON.
5. Press SPEAKER to end.
• To disable the Do Not Disturb condition, repeat the above
procedure, but press OFF instead of ON.
NOTE: To override a Do Not Disturb condition at another telephone,
refer to the discussion titled Overriding Calls for details.
LCD Speakerphone Reference Manual 8–13
Page 86

Using The Other Telephone Features GCA70–245
8.15 Setting The VolumeControl
Your telephone has a volume control switch. This is a multipurpose
control that you can use to set the volume of the ringer, the speaker, the
handset, the headset, and the group listening mode. Your LCD displays
the new setting when you press the volume button.
NOTE: Impact 8324S-**, 8324F-**, and 8312S-** telephones support
the optional ICVOL-** handset. The ICVOL-** is an
amplified handset with its own volume control, making it
useful in noisy environments. For ordering information,
contact your Comdial dealer.
• There are four ringer loudness levels (your installer may enable
ringer off as well). Set them as follows:
while your telephone is idle, press VOLUME UP or VOLUME
DOWNonce for each change in loudness (four different levels
available) that you desire. The ringer sounds once for each change as
an example of the current setting. Your final change in volume
becomes the new default setting and will result in your telephone
ringing at that level for all future calls (until you change the default
by repeating the above procedure).
• There are eight speaker loudness levels. Set them for the current
call as follows:
while on a call, press VOLUME UP or VOLUME DOWN once for
each change in loudness (eight different levels available) that you
desire.
• There are eight handset loudness levels on all telephone models.
On the 8012S and 8024S models, the installer can program up to
13 different settings. Set them for the current call as follows:
while on a call, press VOLUME UP or VOLUME DOWN once for
each change in loudness that you desire.
• There are eight headset loudness levels on all telephone models.
On the 8012S and 8024S models, the installer can program up to
13 different settings. Set them for the current call as follows:
while on a call, press VOLUME UP or VOLUME DOWN once for
each change in loudness that you desire.
• There are eight group listening loudness levels. Set them for the
current call as follows:
while on a call, press VOLUME UP or VOLUME DOWN once for
each change in loudness (eight different levels available) that you
desire.
8–14 LCD Speakerphone Reference Manual
Page 87

GCA70–245 Using The Other Telephone Features
When you change the loudness, that change remains in effect until you
change it again (referred to as default setting).
• Set the speaker, headset, handset, or group listening loudness for
all future calls using the following steps:
1. Press INTERCOM.
2. Choose speaker, headset, handset, or group listen mode to be
affected.
3. While in that mode, press VOLUME UP or VOLUME DOWN to
adjust loudness.
4. Dial ✳✳5to hold the loudness at the last setting for all future
calls (until it is changed again).
5. Repeat this procedure in each mode until all default volume levels
have been properly set.
NOTE: You may adjust the volume of a call in any mode (over speaker,
headset, handset or group listen), at any time during the call,
by pressing VOLUME UP or VOLUME DOWN. When the call
ends, the volume of all future calls is reset to the programmed
(default) setting.
8.16 Setting YourPersonalRinging Tones
You can choose one of six different ring tones for your telephone when
it rings. Often, when several telephones are located close together, each
user chooses a different personal ring t one.
• To select one of the ring tones, proceed as follows:
1. Press OPTIONS.
2. Press NEXT until RING appears.
3. Press RING.
4. Press UP or DOWN to choose ring tone in display (a new tone will
sound at each up or down press).
5. Press SPEAKER to end. The next time your telephone rings, you
will hear the new ring tone.
LCD Speakerphone Reference Manual 8–15
Page 88

Using The Other Telephone Features GCA70–245
8.17 Switching The Dialing
Mode Between Pulse And Tone
If your local telephone service is pulse (rotary dialing), your telephone
is arranged to dial in this manner (when programmed to do so by the
installer). If you need to send tones during a dialing sequence (e.g.; to
send bank-by-phone tones, etc), you can convert to tone while dialing.
The system will switch back to pulse dialing when you end your call.
You can store a # as part of an automatic dialing number to
effect pulse-to-tone switching where needed.
• To convert to tone dialing at any time during dialing or while on
an active call,
1.
Press
#.
8.18 Using Background Music
If background music is supplied by the telephone system, you can turn
it on at your telephone speaker. Background music automatically turns
off during calls and voice announcements.
• To turn the music on,
1. Press OPTIONS.
2. Press NEXT.
3. Press MUSIC.
4. Press ON.
5. Press SPEAKER to end (the SPEAKER light turns on when
background music is on).
6. Adjust the loudness of the music with the speaker volume control.
• To turn the music off,
1. Press OPTIONS.
2. Press NEXT.
3. Press MUSIC.
4. Press OFF.
5. Press SPEAKER to end (the SPEAKER light turns off when
background music is off).
8–16 LCD Speakerphone Reference Manual
Page 89

GCA70–245 Using The Other Telephone Features
8.19 Using Toll Restriction Override
You can override one station’s toll restriction assignment by dialing a
programmed four-digit TRO code at another station prior to dialing
your desired number. When you do this, the system replaces the toll
restriction requirements of the station that you are using with those that
match your home station. After entering a TRO code at another station,
youwillgetyourownprimelineoridlelinepreferenceandits
accompanying toll restriction assignment. You then have 15 seconds to
dial an outgoing call. Once you have hung up from a call, you have 15
seconds to make another call without re-entering your TRO code. If
you transfer a TRO call or place it on hold and pick it up at another
station, the call belongs to the new station.
• To use TRO at a station,
1. Press INTERCOM,
2. Dial ✳✳6.
3. Dial your station extension number.
4. Dial your TRO code number (TRO code is not displayed— instead
an ✳ is shown).
5. Within 15 second timeout period, dial desired outgoing line
number.
6. Hang up handset or press SPEAKER to end call. You will have 15
seconds in which you can make another call without
re-entering your TRO code.
• To clear the TRO code,
1. Press INTERCOM,
2. Dial ✳✳6,
3. Press SPEAKER.
LCD Speakerphone Reference Manual 8–17
Page 90

Using The Other Telephone Features GCA70–245
8.20 Using The Optional Tracker PagingSystem
The optional Tracker paging system allows you to send and receive
messages on Tracker Pagers assigned to station extension numbers.
The Tracker system will also park calls in orbit for retrieval by the
paged party. The type of message that the system delivers (either
alpha/numeric or numeric-only) is dependent upon the Tracker Pager
model in use at the station.
If your station includes a Tracker Pager, you must enable it for your
use. Further, it is a good practice to disable it when you do not wish to
receive paged messages and when you leave your station at the end of
your day.
• To enable a Tracker Pager at your station,
1. Press INTERCOM.
2. Dial ✳ 06.
• To disable a Tracker Pager at your station,
1. Press INTERCOM.
2. Dial #06.
• To send a call back message to someone’s Tracker Pager after
receiving a ring—no answer,
1. Make an intercom call to someone and receive no answer.
2. Press preprogrammed TRACK button (or dial #01).
3. After your station returns to idle* hang up handset or press
SPEAKER to end. The Pager—Tracker system will transmit your
station extension number to called party’s Tracker Pager display.
(Some models will also display your station name if the system is
programmed to include station names.)
* If the Tracker paging system does not accept your actions, an error
tone will sound at your telephone.
8–18 LCD Speakerphone Reference Manual
Page 91

GCA70–245 Using The Other Telephone Features
• To send a call back message to someone’s Tracker Pager without
first calling them,
1. Press INTERCOM.
2. Dial #01.
3. Dial station extension number.
4. Hang up handset or press SPEAKER to end. The Pager—Tracker
system will transmit your station extension number to the caller’s
Tracker Pager display. (Some models will also display your station
name if the system is programmed to include station names.)
• To park a call and have Pager—Tracker tell someone to retrieve
the call,
1. Answer call and press TRANSFER/CONFERENCE.
2. Dial Extension.
3. Press TRACK (or dial #01).
4. Your display shows park orbit (91–99) and then
returns to idle*.
5. Hang up handset or press SPEAKER to end. The Pager—Tracker
system will transmit orbit dialing code and caller ID information,
if available, to called party’s Tracker Pager display.
(Alpha/numeric models display #91 through #99 while
numeric-only models display -91 through -99.)
• To respond when your Tracker Pager displays park orbit dialing
code,
1. From any system station, press INTERCOM.
2. Dial displayed orbit code (# 91–99).
3. Retrieve call.
* If the Tracker paging system does not accept your actions, an error
tone will sound at your telephone.
LCD Speakerphone Reference Manual 8–19
Page 92

Using The Other Telephone Features GCA70–245
8.21 Using The Auxiliary Jack
NOTE: Only the 8024S telephone has an auxiliary jack. On models
8312S and 8324, the optional headset plugs into the handset
jack.
The auxiliary jack provides an interface for a headset, a tape recorder,
an external ringer or an external pager. Any one of these auxiliary
devices may be connected by you or by your system installer. You must
program one of the programmable buttons to serve as an enable/disable
button for each auxiliary device that is or will be connected to your
telephone. Only the device displayed in the LCD will be enabled, and
you can only enable one device at a time.
The headset mode allows you to operate your telephone with a headset
instead of as a speakerphone. Lifting the handset will turn off the
headset and activate the handset.
External power is required for the equipment (i.e. recorder, external
ringer, or pager) used in the following modes:
NOTE: The recorder, external ringer, or pager requires external power.
The recorder mode allows you to send your voice and that of the
distant party to a tape recording machine.
NOTE: A recording device requires a special peripheral cord for
connection. See your system installer for details.
The ringer mode allows an external speaker to sound the ringing of
your telephone.
The pager mode allows an external paging device to sound all voice
announcements (all-call, zone paging, voice-announced intercom calls)
sent to your telephone.
CAUTION
With the exception of a headset microphone, do not connect the
audio output of any external device to the auxiliary jack. Also, do not
connect the tip and ring leads of a telephone line to the auxiliary
jack. Do not connect any devices to the auxiliary jack other than
those mentioned above.
8–20 LCD Speakerphone Reference Manual
Page 93

GCA70–245 Using The Other Telephone Features
• Program the enable/disable buttons (at any blank programmable
button location) as follows:
1. Press INTERCOM.
2. Dial ✳✳1.
3. Press programmable button.
4. Dial a feature code
94 = Headset Button,
95 = External Ringer Button,
96 = Tape Recorder Button,
97 = External Pager Button.
5. Press TRANSFER/CONFERENCE.
6. Repeatedly press programmable button and dial separate codes
repeatedly until all four buttons are programmed, if desired,
—OR—
press SPEAKER to end.
• To use a feature button,
1. Press desired button to enable mode.
When you press the button, the feature is enabled and you can use the
corresponding auxiliary device. The display denotes the feature and
shows it to be enabled. For example, when you press the HEADSET
button, the display shows “Headset Enabled” and you can operate the
telephone with a headset.
• To disable any active mode, press the corresponding feature
button to alternate off.
LCD Speakerphone Reference Manual 8–21
Page 94

Using The Other Telephone Features GCA70–245
8.22 Understanding The DATA Button Light
The optional Data Interface Unit (DIU) provides connections for your
standard multiline digital telephone and an Industry Standard
Telephone (IST) device. The DIU enables you to switch between your
multiline telephone and an IST device (an industry standard telephone,
FAX machine, modem, cordless telephone, or answering machine).
When you have DIU (either local or remote) assigned to your multiline
telephone, your telephone will have a preprogrammed DATA button
labeled DATA by the system installer. The DATA LED will provide you
with the following visual feedback on the operating status of the DIU.
DA T A LED DIU STATUS
Off Digital mode (multiline telephone selected)
On (green) IST device selected but not active
On (red) IST device busy
Flashing (red) IST device ringing
If the DIU has been removed or is inoperable, the DATA LED will be
off. If this occurs, plug the multiline telephone into a digital station port.
• To select the multiline telephone (DATA LED on or flashing),
1. Press the preprogrammed DATA button. If a call is in progress on
the IST device, it will transfer to the multiline telephone if the
multiline telephone is off hook or in speakerphone operation. If the
multiline telephone is on hook, the call will be dropped.
• To select the IST device (DATA LED off),
1. Press the preprogrammed DATA button. If a call is in progress on
the multiline telephone, it will transfer to the IST device if that
device is off hook. If the IST device is on hook, the call will be
dropped. You can still receive visual messages via the LEDs and
LCD on your multiline telephone, even though the voice path is
routed to the IST device.
NOTE: If you transfer a line to your own multiline telephone then
press the DATA button, the IST device will ring.
8–22 LCD Speakerphone Reference Manual
Page 95

e
GCA70–245 Using The Other Telephone Features
8.23 Using The IMIST Module
Impact SCS 8324F-**, 8324S-**, and 8312S-** speakerphones
equipped with the optional IMIST module can support an IST device
(modem, FAX machine, industry-standard telephone, etc.) in addition
to the LCD speakerphone. Depending on system programming, the IST
device may be used to make outgoing calls and receive incoming calls.
The functionality of the IMIST module is similar to the optional Data
Interface Unit (see Section 8.22).
Functioning only on a DSU II system, the IMIST module does not have
its own extension number and does not function simultaneously with
the speakerphone.
NOTE: The IMIST module does not provide voltage to light a message
waiting light. Message waiting lights on devices plugged into
the IMIST module will not function.
If you have any other questions about IST devices, refer to
GCA70–237, Industry-Standard Telephone Station User’s Guide.
NOTE: The IMIST module has a separate power supply. The wall
transformer is a UL and CSA approved Class 2 device
operating from 120 Vac, 60 Hz, 16 watts and provides an output
of 24 Vac at 450 mA. Forreplacement, order Comdial P/N
DIU-PTR.
Power
IST Devic
scs04
IMIST Module
LCD Speakerphone Reference Manual 8–23
Page 96

Using The Other Telephone Features GCA70–245
8.24 Using The Caller ID Feature
The number of the calling party will be displayed if your telephone has
been assigned Caller ID service and you have one of the following:
• Lines that ring audibly at your station.
• Lines that ring audibly at another station that you answer with call
pickup.
• Lines that are transferred to your station.
Incoming call numbers are displayed in the upper half of the LCD. If
caller’s name is available, it is displayed in the lower half of the LCD.
If another call rings in while on a incoming call, the second caller’s
number flashes on the LCD for five seconds.
The system stores the last caller’s number. Pressing the HOLD and
then SAVED NUMBER REDIAL button causes the system to call
back the last caller.
NOTE: If your system installer has not programmed a SAVED
NUMBER REDIAL button, refer to section 10.4, Storing The
Feature Buttons, for instructions on programming this button.
8–24 LCD Speakerphone Reference Manual
Page 97

GCA70–245 Using Non-Verbal Messaging
Using Non-Verbal
9
9.1 Message Waiting Light and Messaging
If your telephone is designated as a central message desk by the system
or has message wait originate ability, you can turn on the message
waiting light of any other telephone. This lets that telephone user know
that you have a message for him.
You can also turn on the message waiting light at another station when
that station is busy or ring not answered, using the LCD feature buttons.
• To turn on the message waiting light at another telephone when
that station is busy,
1. Hear the busy tone and remain on the line.
2. Press NEXT.
3. Press MSG.
4. Hang up handset.
• To turn on the message waiting light at another telephone when
that station rings with no answer,
Messaging
1. Press MSG.
2. Hang up handset.
LCD Speakerphone Reference Manual 9–1
Page 98

Using Non-Verbal Messaging GCA70–245
9.1 Message Waiting Light and Messaging—continued
• To turn on the message waiting light at an idle telephone,
1. Press MESSAGE. (For models 8012S and 8024S, press
INTERCOM,thendial✳3.)
2. Dial extension number of station to be alerted. The message
waiting light of called station will flash.
• To turn off the message waiting light at a busy or idle station,
1. Press MESSAGE. (For models 8012S and 8024S, press
INTERCOM,thendial#3.)
2. Dial extension number of station that was alerted. The message
waiting light of called station will turn off.
• To turn off the message waiting light during message-delivering
conversation,
1. Press INTERCOM.
• To receive a message at an alert
1. Observe flashing message waiting light.
2. Press MESSAGE. (For models 8012S and 8024S, press
INTERCOM, then HOLD.) Connection to the station that left
message is automatic.
9–2 LCD Speakerphone Reference Manual
Page 99

GCA70–245 Using Non-Verbal Messaging
9.2 LCD Messaging
You can set system-supplied messages to be received or displayed by a
calling LCD speakerphone. These messages give information on your
telephone status. Get a list of the available messages from the attendant
and write them on the blank listing chart on the next page.
• To turn message on,
1. Press INTERCOM.
2. Dial ✳ 02.
3. Dial the desired number from your message list. The default
messages of “Back At” and “Call” may be used:
For default message 1, which is “Back At,” dial time in
twelve-hour format using the # as a colon.
For default message 2, which is “Call,” dial the telephone number
of where you will be.
4. Press SPEAKER to end message. Intercom light flashes steadily.
• To turn off message and your intercom light,
1. Press INTERCOM.
2. Dial #02.
LCD Message List
(Write Attendant-provided messages here)
0
1 BackAt
2 Call
3
4
5
6
7
8
9
LCD Speakerphone Reference Manual 9–3
Page 100

Using Non-Verbal Messaging GCA70–245
9.3 Assist Button Messaging
If you have preprogrammed an ASSIST button on your telephone, you
can use it to send a message to your supervisor, asking for assistance
while you are on a call. Your message shows in the supervisor’s
telephone display.
• To send a message for assistance,
1. Press ASSIST button that you have programmed.
2. Press DSS of the telephone user you need help from. (This is not
necessary when the desired extension number was stored along
with the ASSIST button programming.)
3. If the assisting telephone is idle, a ring burst sounds and a message
appears in its display. If it is busy, the message appears when it
becomes idle.
9.4 Station-To-Station Messaging
When you call another telephone and no one answers, you may leave a
reminder that you have called. Do this by turning on the BLF light at
the called telephone. To allow this to take place, your telephone must
have previously been stored stored as a DSS/BLF button on the called
telephone. If your telephone is not stored as a DSWS at the called
telephone, your messaging call goes to the central message desk, if one
is programmed. The central message desk (usually the system
attendant) takes your message and turns on the message waiting light of
the telephone that you originally called.
• To turn on message light,
1. Make intercom call and receive no answer.
2. Dial ✳ 7 (BLF light at called station flutters).
• To turn off message light,
1. Press INTERCOM.
2. Dial #7.
3. Dial extension number of telephone. DSS/BLF light turns off.
9–4 LCD Speakerphone Reference Manual
 Loading...