

Page 1
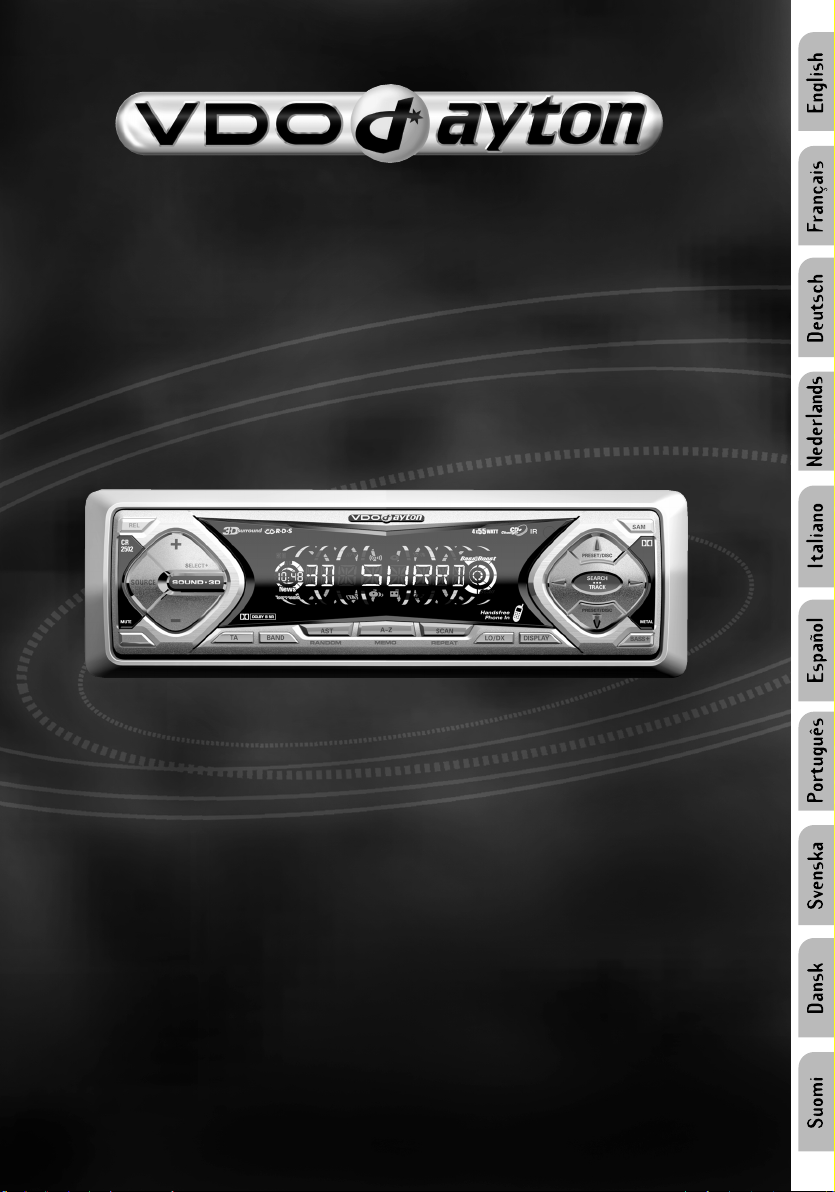
CD 2202
CR 2202
CD 2252
CD 2302
CD 2502
User manual
Mode d’emploi
Bedienungsanleitung
Gebruiksaanwijzing
Istruzioni d’uso
Instrucciones de manejo
Modo de emprego
Bruksanvisning
Betjeningsvejledning
Käyttöohje
CR 2252
CR 2302
CR 2502
www.vdodayton.com
Page 2
A
24 155 14
1 3 136 7 11 12 168 9 10
B
D
1
2
C
E
F
3
1
Page 3
SAM (Software Access Mode)
SAM
TEL OFF
CLOCKSET
REG ON
SCANTIME
* Depending on version
4
TAVOL 2TAVOL 1
...
START 2START 1
...
MUTE 1MUTE 0
...
NAV LOW* NAV HIGH*NAV OFF*
... ...
BEEP 1 BEEP 2BEEP OFF
... ...
SDVC 1* SDVC 2*SDVC OFF*
... ...
MUTE HI MUTE LO
... ...
CLK OFFCLK ON
...
MANCLOCKRDSCLOCK
...
24HCLOCK12HCLOCK
...
BRIGHT 2*BRIGHT 1*
...
BRIGHT 2*BRIGHT 1*
...
ANGLE 0 ANGLE +1ANGLE -1
... ...
GRAPH 1*GRAPHOFF*
...
LOGICOFFLOGICON
...
LED OFFLED ON
...
AMERICA ASIAEUROPE
... ...
AF OFFAF ON
...
AUTOTUNEMANUTUNE
...
REG AUTO REG OFF
... ...
PRE SCANFM SCAN
...
5 SEC 10 SEC
... ...
MWLW OFFMWLW ON
...
NEWS OFF*NEWS ON*
...
...
...
...
BRIGHT 3*
...
GRAPH 2*
...
TAVOL 3 TAVOL 31
START 3 START 31
MUTE 2 MUTE 16
...............................
...............................
...............................
...............................
...
HFREE LO*
...
...............................
RDS OFF
...
20 SEC
...
BEEP 5
SDVC 4*SDVC 3*
...
HFREE HI*
...
BRIGHT 6*
Page 4
BEFORE YOU START....
Thank you for purchasing this VDO Dayton
product which has been designed and
manufactured to the highest standards and
subjected to rigorous testing.
Kindly familiarise yourself with the product by
reading this user manual. Keep this manual handy
in your car for future reference.
ENVIRONMENT
This booklet is printed on low-chlorine recyclable
paper.
IMPORTANT
This device has been designed and produced
according to applicable Safety Regulations.
Please read carefully the instruction manual and
use the device as intended.
CONTENTS PAGE
INSTALLATION ................................................ 5
PREPARATION ................................................ 5
MOUNTING ..................................................... 7
FRONT PANEL PRESENTATION................... 8
SECURITY ....................................................... 9
AUDIO .............................................................. 9
RADIO ............................................................ 10
RADIO DATA SYSTEM (RDS) ON FM ......... 11
CASSETTE PLAYER ...................................... 12
CD PLAYER AND CD CHANGER ................ 12
SPECIAL FUNCTIONS.................................. 13
SAM (Software Access Mode) ...................... 14
TROUBLE SHOOTING ................................. 16
INSTALLATION
If your car is equipped with ISO connectors,
simply insert them in the connectors of the car
radio. If not, you can use an adaptor cable (Refer
to the table on the separate installation manual).
Ensure all cables are installed so that they cannot
be damaged by sharp edges or moving parts.
PREPARATION
Voltage and polarity: The set must be connected
to a 12V car battery with negative terminal to
earth (car chassis). Installation in vehicles not
fulfilling these requirements could result in
malfunction, damage or fire.
Warning: To prevent short-circuiting,
disconnect the negative car battery terminal
until the set has been mounted and
connected (fig.1 See separate installation
card).
CONNECTOR A (fig.2)
Power supply connections
• Red wire A7 : Connect to a permanent 12V
supply. This is the main power supply. Ensure
this connection can handle a current of 10A.
• Yellow/red wire A4 : Connect to a switched
12V supply (switched on/off by car ignition).
• Brown wire A8: Connect to earth (car chassis).
Optional connections (fig. 2)
• SDVC (Speed Dependent Volume Control)*:
SDVC automatically increases and decreases
the volume as a result of the car's speed.
• Connect pin A1 to a signal from the
speedometer of your car. Some cars are
already prepared for it (e.g. certain VW &
Vauxhall/Opel cars), please consult your dealer.
If not, you may need a more detailed installation
requiring extra equipment to enable your car to
become compatible.
This can only be accomplished by
persons familiar with automotive
electrical and mechanical systems.
After Connection, see "SPECIAL
FUNCTIONS' (page 13) for calibration
procedure.
* Depending on version
Complies with 21 CFR 1040.10
5
Page 5
• Electronic antenna/Motorised antenna :
Connect pin A5 to the power supply for an
electronic antenna or the control wire for the
replay of an antomatic motorised antenna. Use
the small connector supplied.
Do not use this connection for the supply
lead of the aerial motor!
• Pilot light :
When the car headlights are switched on, the
backlight to the power key remains illuminated
(even when the radio is switched off).
Connect pin A6 to the dashboard illumination
wiring of the car. Use the small connector
provided.
CONNECTOR B (fig.3)
Loudspeakers (use 4 ohm loudspeakers
only)
• Do not connect any of the loudspeaker leads
to earth or directly to a booster/amplifier without
high level input or via an external fader! You
can connect the loudspeaker leads directly to
an amplifier with high level input.
• Connecting 4 loudspeakers:
Front Rear
Left+ Green [B5] White [B7]
Left- Green/black [B6] White/black [B8]
Right+ Grey [B3] Blue [B1]
Right- Grey/black [B4] Blue/black [B2]
CONNECTOR C
1
Yellow Connector C1 for Line Out* (fig. 4)
• Connect a power amplifier (with 2 or 4*
additional loudspeaker) to this set with the RCA
cable.
– Connect Red socket to Right channel and white
socket to Left channel.
– Connect Blue wire to Amplifier Remote on/off.
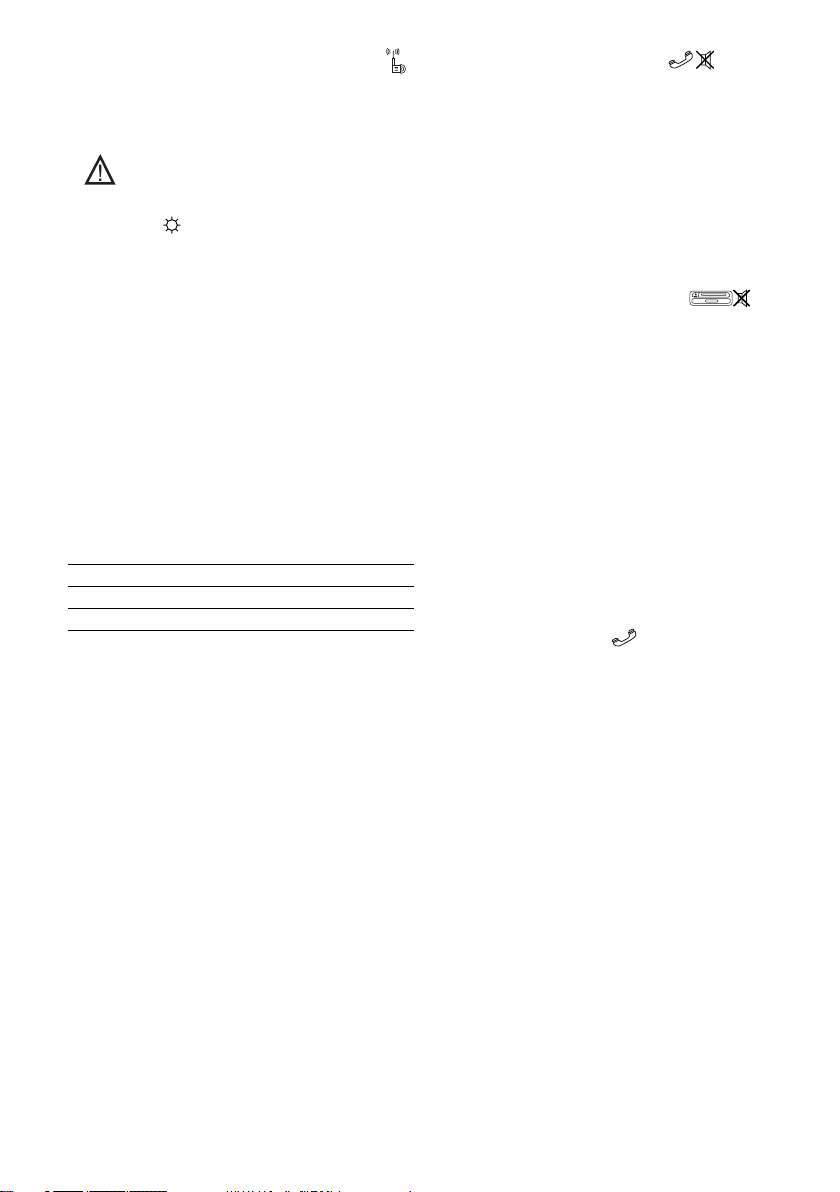
Pink wire (Telephone mute)
• If your car telephone or the car kit of your mobile
phone provides a mute signal, it can be used to
automatically interrupt the set's sound output.
– Connect the telephone mute wire to the Pink
lead wire.
– See 'SAM' (page 14); select
option 'TEL' and set 'MUTE LO' or 'MUTE HI'
(according to phone type) to automatically
interrupt the set's sound output when using
your car phone.
Green wire (Navigation mute)*
• If your car navigation computer provides a mute
signal, it can be used to automatically interrupt
the set's sound output during voice guidance.
– Connect the Navigation mute wire to the Green
lead wire.
– See 'SAM' (page 14); select
option 'NAV' and set 'LOW' or 'HIGH' according
to the navigation computer's mute signal.
Blue connector C3 for an analogue compatible
CD changer (available separately) (fig. 6)
• You can only connect an analogue compatible
CD changer to this set (see mounting
instructions for the CD changer).
OTHERS CONNECTIONS
Telephone in * (fig.7)
• You can connect a VDO Dayton hands-free kit
(available separately) via the connector D. See
mounting and connecting instructions for the
hands-free kit.
– See 'SAM' (page 14); select
option 'HFREE' and set 'HFREE LO' or 'HFREE
HI' (according to phone type) to automatically
interrupt the set's sound output when using
your car phone.
Green connector C2 (fig. 5)
Steering wheel remote control
You can connect certain car steering wheel
mounted remote control to this set via an interface.
Please consult your dealer for the correct
interface.
* Depending on version
6
Infrared remote control
You can use a VDO Dayton infrared remote control
with this set. Please consult your dealer for the
correct infrared remote control.
1
C connectors belong to accessories sold
separately. For more information, see your
dealer.
Page 6

MOUNTING
METAL SLEEVE (fig.9)
• Install the metal sleeve (dimension 182x53 mm) in
the dashboard. For optimal performance of the CD
player*, the metal sleeve should be positioned
horizontally (between -10o and +30o).
• Fix metal sleeve into place by pressing the metal
tags outwards using a screwdriver.
CONNECTING THE RADIO(fig.8)
• Ensure the battery is disconnected.
• Insert aerial plug E into aerial socket (good
reception is only possible with a good aerial).
Fix antenna adaptor if needed. Use hook (J)
on back of set to secure fixing.
• Insert power supply connector A into socket A’.
• Insert loudspeaker connector B into socket B’.
• (optional) Remove the protective cover from
socket C’.
• (optional) Insert the yellow line-out connector
C1 into socket C1’.
• (optional) Insert the blue CD changer connector
C3 into socket C3’.
• (optional) Insert the green connector C2 into
socket C2’.
The green connector slides between the yellow
connector C1 and the blue connector C3.
You need at least one of these connections to
keep C2 in place.
REAR MOUNTING (fig.13)
• Remove the trimplate around the front panel
and the side springs.
• Select a position where the screw holes of the
mounting bracket and the screw holes of the
radio become aligned and tighten the screws
at 2 places on each side.
• Only use M5 screws that are not longer than
6mm.
REPLACING FUSE (fig. 8)
• Replace with a 10A blade-type fuse. The new
fuse must be of exactly this value and type
otherwise the set will not be adequately
protected. Ignoring this procedure may lead to
damage to the set, which will invalidate the
guarantee.
INTERFERENCE SUPPRESSION
• Most modern cars have sufficient interference
suppression. If you experience interference
generated by the car, consult your garage.
MOUNTING RADIO
This radio can be properly installed either from
conventional Front Mounting or Rear Mounting.
FRONT MOUNTING
• Slide the radio into the metal sleeve until the
springs at either side of the radio snap into the
openings of the sleeve (fig.10).
• Finally reconnect the negative car battery
terminal (fig.11).
REMOVING RADIO (using the two U- brackets
supplied)
• Remove the trimplate around the front panel.
• Insert both U-brackets into the holes on the
front of the set until they lock. Pull out the radio
(fig.12).
* Depending on version
7
Page 7

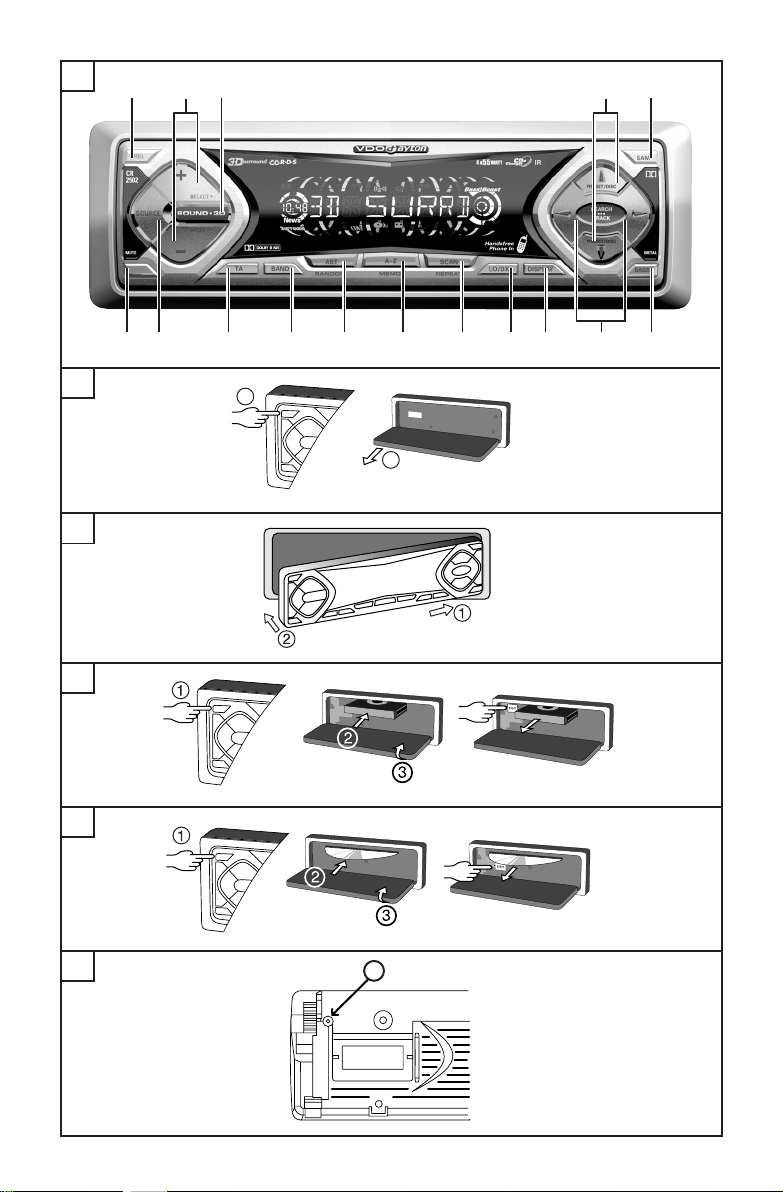
FRONT PANEL PRESENTATION
For illustration, see page 3, figure A.
1 ................ Short press: Switch on; mute/demute (when set is on)
2 ..................... Flip down the detachable panel
3 .............. Desired sound source
/
4
5 ............. Sound mode*
6 ..................... Traffic announcement
7 ................ Waveband
8 ................... Short press: Autostore
9 ................... Short press: RDS alphabetical station selection
10 ................. Short press: Tuner's Preset (frequency) scan/CD's track scan
11 ................ Local / Distant mode
12 .............. Display mode
13 .................. Search up/down (tuner);
14 / .................... Preset up/down (tuner); Next/previous disc (CD Changer); Reverse (Cassette*)
15 ................... Short press: Software Access Mode
16 ................. Short press: Bass Boost
................... Volume up/down
............. Audio mode
.............. Audio mode
............. Long press: RDS alphabetical station store
...................... Long press: Dolby B NR cassette playback*
.................. Long press: Metal / Chrome cassette playback (Cassette*)
Long press: Switch off
...... Short press: Sound mode,
Long press: 3D sound* (only applicable for CD, CD changer and Cassette mode)
......... Long press: CD random playback on/off
........... Long press: CD repeat track on/off
Next/previous track (CD*, CD Changer); MSS (Cassette*)
* Depending on version
8
Page 8

SECURITY
For theft protection this set is provided with the
following security features :
DETACHABLE FRONT
Take the detachable front with you when leaving
the car. Keep it in its protective box.
Always replace the detachable front before
starting to drive.
Removing the front (See page 3, figure B)
• Press to flip down the detachable front.
• Pull at the left hand corner of the detachable
front to remove the front.
Replacing the front (See page 3, figure C)
• Insert the detachable front starting with the righthand side of the set.
• Push the detachable front until it clicks into
position.
LOCKING THE DETACHABLE FRONT (See
page 3, figure F)
The detachable front can be locked by a D2 x10
screw.
• Remove the trimplate
• Flip down the detachable front.
• Insert a D2 x10 screw (inside the accessories
bag) in position 1 .
AUDIO
ON/OFF
• Press to switch on the set. Press
for more than 2 seconds to switch off the set.
VOLUME
Please make sure you can still hear the traffic
(horns, sirens........)
• Press / to adjust the volume. The volume
automatically increases or decreases if the
SDVC connection has been installed and
selected (See INSTALLATION, page 5).
Note : You can adjust the start-up volume. When
the start-up volume is set to maximum level, it
may be extremly loud when you switch on the
set. See 'SAM' (page 14), option 'START'.
MUTE
• Press to mute/demute the sound when
the set is switched on.
Note : You can adjust the mute level.The volume
may be louder during mute when the mute level
is higher (e.g. 16) than the current volume (e.g.
5). See 'SAM' (page 14), option 'MUTE'.
3D SURROUND SOUND* (only applicable for
CD, CD Changer and Cassette mode)
• Press * for more than 2 seconds
to activate/deactivate 3D surround sound.
SECURITY LIGHT
• The LED flashes when the detachable front is
removed when the ignition is off. You can switch
off the flashing warning light. See 'SAM' (page
14), option 'LED' .
SECURITY WARNING STICKERS
• Stick the supplied 'Security' warning stickers
on your car windows.
IDENTIFICATION NUMBER
This set has a unique identification number (stated
on the 'Security card'). This card is required as a
proof of ownership when the set is stolen, when
the detachable front is lost or when requesting
service.
• Remove the 'Security card' before installing the
set. Do not keep the 'Security Card' in your car.
* Depending on version
AUDIO MODE SETTING
• Press * or to select
desired audio mode.
• Press or to adjust the selected
audio mode.
– BASS : Bass (-7...+7)
– TRE : Treble (-7...+7)
– BAL : Balance (-7...+7)
– FAD : Fader (-7...+7)
– Sound Style (BASS-TRE, ORIGINAL, JAZZ,
VOCAL, POP, CLASSIC, ROCK)
After 5 seconds the display goes back to the
last mode of operation.
Adjustment of Bass and Treble setting is only
possible when BASS-TRE is selected as the
sound style.
BASS BOOST SYSTEMS
• Press to select desired bass boost (not
applicable when ORIGINAL is selected as the
sound style).
9
Page 9

SOURCE
• Press to select the desired source :
- TUNER
- TAPE*/CD*
- CHANGER (if connected)
- HFREE (if connected) and if option is
selected in 'SAM' and a call is active.
RADIO
WAVEBAND
• Press to select the desired waveband :
Note : You can suppress MW/LW (AM) bands
if not required. See 'SAM' (page 14), Option
'MW/LW (AM)'.
AUTOMATIC SEARCH
Use search tuning to automatically search for a
station.
• Press to tune to a station of a lower
frequency or to a higher frequency.
– You will receive a station after a short time. To
search for another station, press the key again.
Search sensitivity (only FM)
• Press to switch between LOCAL and
DISTANT mode. Select 'LOCAL' if you wish to
search only for strong stations during search
tuning.
Frequency scan / Preset scan (see 'SAM'
page 14 option 'SCAN')
Frequency scan allows you to listen to each
located station on the current waveband while
Preset scan allows you to listen to each stored
preset station on the current waveband.
• Press to activate/deactivate Frequency
scan or Preset scan.
• Press or to start the scanning.
Note : You can select how many seconds each
station is scanned, see 'SAM' (page 14); option
'SCANTIME'.
Manual tuning (if you know the frequency of
the required station)
• To switch to manual tuning :
See 'SAM' (page 14), option 'TUNING'; set
value to 'MANUTUNE'. The radio remains in
manual tuning mode until you change this setting
back to 'AUTOTUNE'.
• Press to tune to a station of a lower
frequency or to a higher frequency.
PRESELECTED STATIONS
Manually storing stations in a preset
You can manually store 20 FM stations, 10 MW
stations and 10 LW stations.
• Tune in to the desired station.
• Press for more than 2 seconds to enter preset
store mode.
• Press to select the preset number you wish
to use.
Display shows alternately preset station
number and current stored station.
• Press for more than 2 seconds to store the
station on the selected preset number.
When storing an FM station, the relevant
RDS information and AF mode (on/off) are
also stored on the preset.
Recalling a preset
• Press or to select the desired preset.
Automatically storing stations (AUTOSTORE)
This function automatically stores 10 strongest
FM stations in the FMAST band or 10 strongest
MW(AM) stations in the MW(AM)AST band. When
you use Auto Store, the new stations replace any
stations previously stored in the FMAST band or
the MW(AM)AST band.
• Press to activate autostore.
– The set gives a beep and then mutes.
– When it has finished, you hear a beep followed
by the station stored on preset 1.
– Sometimes it may not be possible to find 10
stations.
Switching the display mode (RDS station)
• Press once or repeatedly to switch
the display between station name, Band and
preset number, frequency followed by PTY and
sound style.
Switching the display mode (non RDS
station)
• Press once or repeatedly to switch
the display between frequency, Band and
preset number and sound style.
* Depending on version
10
Page 10

RADIO DATA SYSTEM (RDS) ON FM
Many FM stations broadcast RDS information.
This set uses the RDS information to offer you
many advantages including :
DISPLAY OF STATION NAME
The set displays the name of the station instead
of its frequency.
AUTOMATIC RETUNING
The set remains tuned to the current station by
continually searching for the best possible
alternative frequency for reception.
Note : You can switch off AF when not required,
see 'SAM' (page 14); option 'AF'.
ALARM MESSAGES (PTY ALARM)*
This set automatically receives emergency
messages made by the broadcaster.
– During the messages the display shows
'ALARM' and the station-name alternately.
TRAFFIC ANNOUNCEMENTS (TA)
You can activate the TA and/or NEWS* modes to
give priority so as to hear announcements related
to these subjects, (even if you play a cassette/
CD* or mute the set).
Activate/deactivate TA
• Press to select an FM waveband :
• Press to activate/deactivate TA.
RDS MEMO STORE
It is possible to store up to 50 stations in
alphabetical order in a separate FM memory.
Loading RDS memory
• Press to select FMPRE waveband.
Note : You will hear an error beep if you activate
RDS MEMO in FMAST band.
• Press for more than 2 seconds to
activate RDS MEMO:
- The set mutes. When the search is completed
the set beeps again and you hear the first
alphabetically stored station.
Scrolling through the RDS memory
• Press to select A-Z band
• Press or to select the desired station in
alphabetical order.
- If you hear a beep and cannot select station
according to alphabetical order, see 'Loading
RDS memory' to load RDS memory in the
memory first.
Note:
You can switch off RDS features if not required.
• See 'SAM' (page 14), option 'REG/RDS'.
- All above RDS related features e.g. A-Z,
MEMO, TA, etc... will be deactivated when option
'RDS' is set to 'OFF'.
Activate/deactivate NEWS*
• Press to select an FM waveband :
• See 'SAM' (page 14), select option 'NEWS' and
set the value to 'ON'.
If you activate TA/NEWS mode :
• You will hear the Traffic/NEWS* Announcements
when broadcast.
• If the tuned station does not enable the
reception of Traffic Announcements, the display
shows ‘NO TA’. The radio automatically
searches an appropriate station.
News announcements may be interrupted by
Traffic Announcements (if the TA mode is
switched on).
Interrupting Traffic Announcement/News
mode
If you do not wish to continue listening to a
particular Traffic Announcement or News mode,
you can interrupt it without switching off the mode.
• Press to interrupt TA/NEWS :
– The set will return to the previous operating
mode.
* Depending on version
11
Page 11

CASSETTE PLAYER *
PLAYBACK (See page 3, figure D)
• Press to flip down the front.
• Slide the cassette, with the open side to the
right into the cassette opening.
• Close the front.
Playback starts.
• If a cassette is already inserted, press
to select cassette as SOURCE :
Playback starts.
CHANGE SIDE
• Press or to change the side :
– At the end of the cassette, playback
automatically continues with the other side.
Dolby® B Noise Reduction (NR)*
• Press for more than 2 seconds to activate/
deactivate DOLBY B NR System.
®
Dolby Noise Reduction manufactured under
license from Dolby Laboratories Licensing
Corporation. 'DOLBY' and the double-D symbol
are trademarks of Dolby Laboratories
Licensing Corporation.
Metal-Chrome cassette
• Press for more than 2 seconds to
activate/deactivate Metal-Chrome cassette
playback.
FAST REWIND / FAST FORWARD
• Press for more than 2 seconds to activate/
deactivate fast rewind:
• Press for more than 2 seconds to activate/
deactivate fast forward:
– You hear the radio during this operation. If you
continue fast winding until the end of the
cassette, playback restarts automatically.
PREVIOUS / NEXT TRACK (MUSIC SEARCH
SYSTEM)
Select how many tracks you want to miss out
from the current playing position.
• Press to select previous tracks.
• Press to select next tracks :
– The sound is muted until the desired track is
reached. The set can only recognise tracks
when there are silent intervals of at least 3
seconds.
CASSETTE EJECT (See page 3, figure D)
• Flip down the front and press EJECT to eject
the cassette.
SWITCHING THE DISPLAY MODE
• Press once or repeatedly to switch
the display between play direction, background
station name or frequency and sound style.
CARE OF CASSETTES
– Only use good quality cassettes of 60 or 90
minutes playtime.
– Never expose cassettes to heat or direct
sunlight.
– Clean the tape head (once or twice a month)
using a wet-tape cleaning cassette.
CD PLAYER AND CD CHANGER
CD PLAYBACK (CD PLAYER) (See page 3,
figure E)
This CD player is suitable for 12cm disc, do not
use irregular shaped CD.
• Press to flip down the front.
• Slide the disc into the slot with the label facing
upwards.
• Close the front.
Playback starts.
• If a disc is already inserted :
Press to select CD as the source.
Playback starts.
CD PLAYBACK (CD CHANGER IF
CONNECTED)
• You can only connect an analogue compatible
CD changer to this set (see mounting
instructions for the CD changer).
• Check that the magazine is loaded with discs
and inserted in the CD changer:
• Press to select CD changer as the
source :
• Press or to select the desired disc.
– At the end of the disc, playback automatically
continues with the next disc. Any missing disc
is automatically skipped.
PREVIOUS/ NEXT TRACK
• Press or to select the desired track.
– Playback resumes with the chosen track.
FAST BACKWARD / FORWARD
• Press and hold or to quickly move
backward or forward through the disc .
– Normal playback resumes when you release
the key.
* Depending on version
12
Page 12

SCAN TRACK
The scan function enables you to listen to the
first few seconds of each track.
• Press to activate/deactivate Scan track.
• Press or to start the scanning.
Note : You can select how many seconds each
track is scanned, see 'SAM' (page 14); option
'SCANTIME'.
RANDOM TRACK PLAYBACK
• Press for more than 2 seconds to
activate/deactivate Random track playback.
REPEAT TRACK
To continually repeat the current track.
• Press for more than 2 seconds to
activate/deactivate Repeat current track.
DISC EJECT (CD PLAYER) (See page 3, figure
E)
• Flip down the front and press EJECT to remove
the CD from the player.
SWITCHING THE DISPLAY MODE (CD)
• Press once or repeatedly to switch
the display between track number/elapsed play
time, total track time, background station name
or frequency and sound style.
SWITCHING THE DISPLAY MODE (CD
CHANGER)
• Press once or repeatedly to switch
the display between track number/elapsed play
time, disc number/total track time, background
station name or frequency and sound style.
SPECIAL FUNCTIONS
Setting the clock (manually)
• See 'SAM' (page 14), option 'CLOCKSET' .
Note :
You can select 12 hour or 24 hour clock display.
• See 'SAM' (page 14), option 'CLOCK' .
RDS clock (auto update)
You can select an automatic update of the clock
via the RDS radio signal.
• See 'SAM' (page 14), option 'CLOCK' .
– The transmitted time via RDS can be incorrect.
SDVC (Speed Dependent Volume Control)*
See 'INSTALLATION' (page 5) for connection
instructions.
To compensate for surrounding noise, this
function automatically increases the volume of
the set with respect to the car's speed. Four
compensation levels can be selected. Level 1
gives a small increase while level 4 gives a greater
increase. See 'SAM' (page 14) option 'SDVC' to
select the level until you find one which suits your
car.
To calibrate :
To avoid unnecessary distraction we advise
that this procedure is carried out with the
help of somebody else.
1 While stationary, hold down the 'SAM' key and
turn on the set.
2 The set mutes.
Display shows 'RECALIB' and
'50KM/H' (30 MPH) alternately.
3 Now drive to 50KM/H (30 MPH).
Always obey the highway code and current
traffic restrictions and conditions!)
4 Once 50KM/H (30 MPH) is reached, press
or key.
You hear a beep and display shows 'CALIB
OK'.
5 Now turn the set off and then on again to return
to normal operation. Level 2 is chosen for SDVC
in 'SAM'.
* Depending on version
13
Page 13

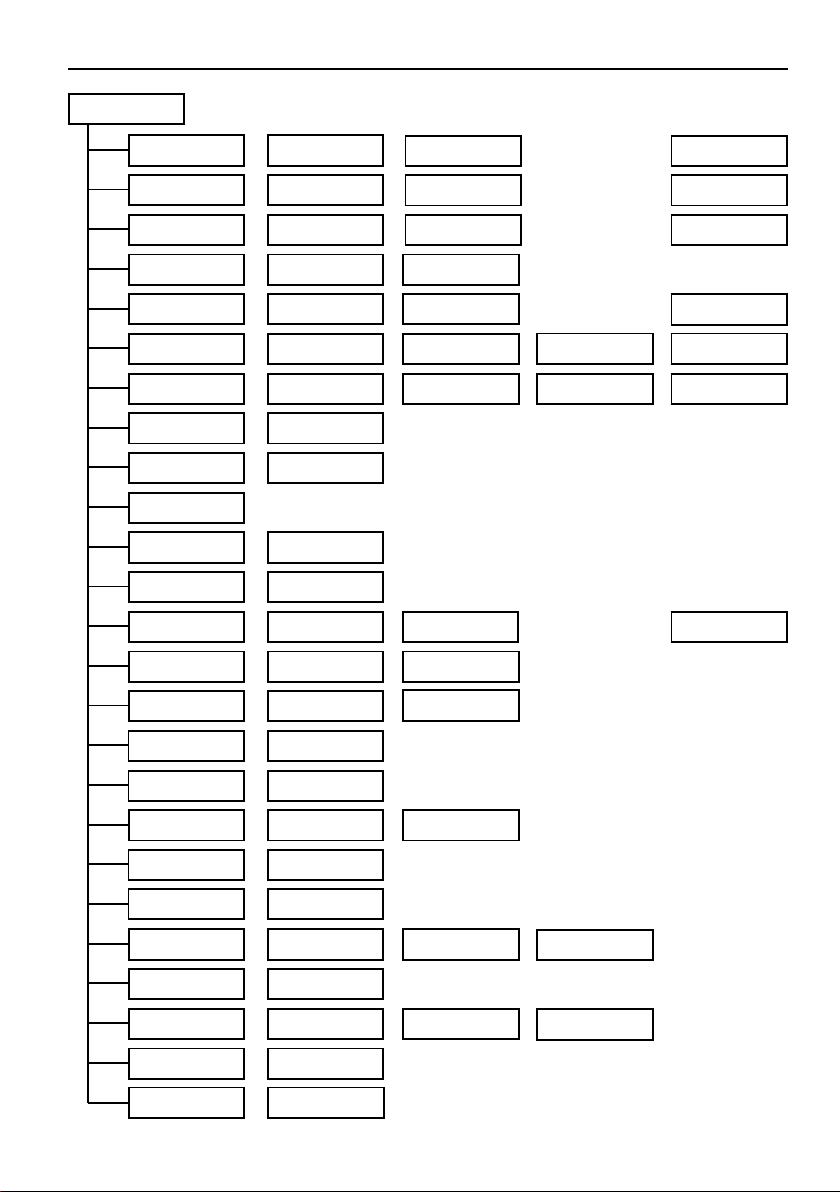
SAM (Software Access Mode)
It is possible to modify many of the set's default settings according to your preferences via 'SAM'.
• Press to enter the 'SAM' menu.
• Press or to select one of the options in the menu you want to modify.
• Press or to select the value/setting.
• Press to exit the 'SAM' menu.
The set automatically leaves this mode after 30 seconds if no key presses are made.
Option Value/Setting Usage
( or )( or )
TAVOL [1 to 31] Select volume level of Traffic Announcement, News bulletins
START [1 to 31] – Select the start-up volume when power on.
MUTE [0 to 16] Select the mute level.
NAV* [OFF, LOW, HIGH] – Select 'OFF' if no navigation computer is connected to
BEEP [0FF, 1, 2, 3, 4, 5] Select volume level of confirmation beeps.
SDVC * [OFF, 1, 2, 3, 4] Select the SDVC (Speed Dependent Volume Control)
TEL/ [TEL OFF, MUTE HI, – Select 'TEL OFF' if no car phone is connected to
HFREE MUTE LO, HFREE LO the set.
HFREE HI] – Select 'MUTE LO' or 'MUTE HI' (according to phone type)
CLK [ON, OFF] Select 'ON' to activate CLOCK feature.
CLOCK [RDSCLOCK, Select 'RDSCLOCK' to activate RDS clock or "MANCLOCK'
MANCLOCK] to set clock manually.
[CLOCKSET] If 'MANCLOCK' selected; set the time. to adjust the hour
[12HCLOCK, Select desired clock format.
24HCLOCK]
* Depending on version
14
and Alarm messages.
– After modification of the start-up volume, if the set is
switched off and on within 10 minutes, the start-up volume
reverts to the last used volume setting.
– After modification of the start-up volume, if the set is
switched off and on after more than 10 minutes later, the
start-up volume is the level defined in 'SAM'.
the set.
– Select 'LOW' or 'HIGH' according to the navigation
computer's mute signal.
compensation volume level (only when connected and
calibrated, see 'SDVC' in 'INSTALLATION' (page 5) and
'SPECIAL FUNCTIONS' (page 13)).
Level 1 gives a smaller increase while level 4 gives gives a
greater increase with respect to the car's speed.
to automatically interrupt the set's sound output when
using your car phone.
– Select 'HFREE LO' or 'HFREE HI' (according to phone
type) if your phone provides a loudspeaker connection.
digit, to adjust the minute digit.
Page 14

Option Value/Setting Usage
( or )( or )
BRIGHT* [1, 2] Select the level of display and button brightness (only when
BRIGHT* [1, 2, 3, 4, 5, 6] Select the level of display and button brightness (only when
ANGLE [-1, 0, +1] Select the viewing angle of the set's display.
GRAPH* [OFF, 1, 2] Activate/deactivate the bar graph.
LOGIC [ON, OFF] Select 'ON' to limit the use of the set to one hour when the
LED [ON, OFF] Select 'OFF' to switch off the flashing warning light when the
RADIO [EUROPE, Select the tuner according to European, American
AMERICA, ASIA] or Asia standards.
AF [ON, OFF] Select 'OFF' to prevent the radio from returning to Alternative
TUNING [MANUTUNE, Select auto or manual tuning for tuner.
AUTOTUNE]
REG/RDS [REG ON, REG AUTO, – Select 'REG ON' to maintain regional programme,
REG OFF, RDS OFF] – Select 'REG AUTO' to switch programme when the next
SCAN [PRE SCAN, – Select 'PRE SCAN' to enable Preset SCAN or
FM(MW)(LW) SCAN] FM (MW) (LW) scan to enable Frequency scan.
SCANTIME [5 SEC, 10 SEC, Select the scan time (station or track).
20 SEC]
MWLW (AM) [ON, OFF] Select 'OFF' to suppress MW/LW (AM) when not required.
NEWS* [ON, OFF] Activate/deactivate NEWS features.
car headlights are switched on and connected to pin A6,
see 'INSTALLATION' (page 5)).
car headlights are switched on and connected to pin A6,
see 'INSTALLATION' (page 5)).
car ignition is switched off. Select 'OFF' to prevent the set
from turning on when the car ignition is switched off. (Only
when A7 and A4 are connected correctly, see page 5 for
correct connection of power supply).
detachable panel is removed with ignition off.
Frequencies.
signal is stronger,
– Select 'REG OFF' to directly switch to the programme of
the next region.
– Select 'RDS OFF' to switch off RDS feature.
* Depending on version
15
Page 15

TROUBLE SHOOTING
There may be times when you suspect that your
car radio is not functioning as you would expect it
to. Before calling for service, please read the
operating / installation instructions and review the
following checklists. You may find that an apparent
malfunction can easily be rectified.
If you still have to send your set for service, always
send the complete set (with detachable front). Do
not try to open the set to service it yourself.
Audio
Set does not function. No Display.
• Check fuse (set and car) and connections.
Set functions but no sound?
• Adjust the volume of the set.
• Check fader and balance settings.
• Check aerial and its connection.
• If car phone is connected, see 'SAM' (page
14), check option 'TEL/HFREE'.
Set mutes and display shows 'TEL MUTE' or
'HFREE' but the car telephone is not in used.
• See 'SAM' (page 14), check option 'TEL/
HFREE'.
The sound from the speakers is reduced
automatically.
• A built-in safety circuit prevents the temperature
in the set from exceeding a certain level.
• Wait for the temperature to decrease before
increasing the volume.
Radio
Cannot tune to desired station?
• Check that the aerial is fully extended and
properly connected.
• Check that the negative terminal (brown lead)
is connected to earth (car chassis).
• Desired station is too weak, try Manual Tuning.
Poor tuner reception?
• In some cars (e.g. VW and Seat) there is an
active aerial on the roof that needs a 12 Volt
supply. Please ask your dealer to check
whether a 12 volt is supplied to the antenna.
Display shows frequency (not station name).
• Set is tuned to non-RDS station.
Radio mutes momentarily while display shows
'SEARCH' and station name/frequency
alternately.
• Set is checking a list of Alternative Frequencies
(AF) for the tuned radio station as reception is
weak. In case no AF is transmitted for the tuned
station, switch off AF via the 'SAM'.
* Depending on version
16
Display shows 'NO TA', and set beeps at intervals.
• The tuned station becomes too weak to enable
the reception of Traffic Announcements. Use
search tuning to find another station.
• If the TA mode is switched on, search tuning
only selects stations which enable the reception
of Traffic Announcements.
Cassette
Display shows 'TAPE ERR'.
• Check cassette for faults
Display shows 'NO TAPE'
• Check that the cassette has been inserted into
the player.
Cassette playback lacks high-notes or loss of
one channel.
• Clean cassette player tape head.
Tape Slack
• Check and make sure any slack in the tape is
taken up before inserting the tape into the unit.
A loose tape can get caught in the mechanism
and cause damage to the unit and tape itself.
Tighten the tape by using a pencil or a similar
instrument into the spindle hole and turn until all
slack has been taken up.
CD / CD Changer
Display shows 'CD ERR' or 'ERROR' and set
beeps.
• Check that the discs have been inserted in the
correct way and that you have not inserted a
damaged or dirty disc.
Distorted sound during playback.
• Player unable to read disc. CD damaged or
dirty.
CD player does not function?
• If the weather is cold, there may be some
condensation on the laser. Use the set in radio
mode for about 5 minutes to allow the moisture
to evaporate.
Display shows 'NO CD'.
• Check that the CD mechanism or CD magazine
has been loaded with disc(s).
Page 16

ADDENDUM
Playing a CD-R or CD-RW
Depending on the type of CD-R/CD-RW CD, surface condition of the disc, as well as the performance and condition of the CD
writer, certain CD-R/CD-RW CD may not operate normally on this unit.
Playing a “copy protected” non-conforming audio CD
Due to use of copy protection schemes of some audio CDs which are non conformance to international audio CDs standards
(Red Book), these type of copy protected disc(s) may not play on this unit.
Lecture d’un CD-R ou d’un CD-RW
Selon le type de CD-R/CD-RW, l’état de la surface du disque et les performances du graveur de CD, certains CD CD-R/CD-RW
peuvent ne pas être lisibles normalement sur cet appareil.
Lecture d’un CD audio non conforme aux modèles de protection contre le piratage
Certains CD audio sont gravés avec un système de protection contre le piratage qui n’est pas conforme aux standards
internationaux de CD audio (Livre Rouge) ; les CD gravés avec ce type de protection peuvent ne pas être lisibles sur cet
appareil.
Abspielen einer CD-R oder CD-RW
Je nach Art der CD-R/CD-RW, Oberflächenzustand der CD sowie Leistung und Zustand des CD-Writers könnte es sein, dass
bestimmte CD-Rs/CD-RWs auf diesem Gerät nicht normal funktionieren.
Abspielen einer “kopiergeschützten“, nicht konformen Audio-CD
Aufgrund von Kopierschutzsystemen einiger Audio-CDs, die nicht mit internationalen Audio-CD-Normen konform gehen (Red
Book), ist das Abspielen derartiger kopiergeschützter CDs evtl. auf diesem Gerät nicht möglich.
Afspelen van een cd-r of cd-rw
Afhankelijk van het type cd-r/ cd-rw, van de staat van het diskoppervlak en ook van de werking en de staat van de cd-writer,
kan het zijn dat bepaalde cd-r’s/ cd-rw’s niet goed functioneren in dit apparaat.
Afspelen van een tegen kopiëren beveiligde, niet-conforme audio-cd
Door de beveiliging tegen kopiëren bij bepaalde audio-cd’s die niet voldoen aan de international audio-cd-standaarden (Red
Book), kan het zijn dat deze types tegen kopiëren beveiligde disk(s) niet afgespeeld kan worden op dit apparaat.
Riproduzione di un CD-R o CD-RW
Secondo del tipo di CD-R/CD-RW, dello stato della superficie del disco, nonché le prestazioni e la condizione del lettore del CD,
alcuni CD-R/CD-RW potrebbero non funzionare normalmente su quest’apparecchio.
Riproduzione di un CD audio “protetto da copia” e non conformo
Dovuto a schemi di protezione di copia per alcuni CD audio che non sono conformi agli standard internazionali de CD audio
(Libro Rosso), questi tipi di dischi protetti da copia non possono essere riprodotti su quest’apparecchio.
Reproducción de un CD-R/CD-RW
Según el tipo de CD-R/CD-RW CD, la condición de la superficie del disco, así como el funcionamiento y el estado del grabador
de CD, es posible que ciertos CD-R/CD-RW CD no funcionen normalmente en esta unidad.
Reproducción de un CD de audio no cumplidor “protegido contra copia”
Debido a la utilización de sistemas de protección contra copia en CDs que no cumplen con estándares de CD de audio
internacionales (Libro rojo), es posible que este tipo de discos protegidos contra copia no funcione en esta unidad.
Reproduzir um CD-R de CD-RW
Dependendo do tipo de disco CD-R/CD-RW, do estado da superfície do disco, bem como do desempenho e do estado do
gravador de CD, alguns discos CD-R/CD-RW poderão não funcionar normalmente nesta unidade.
Reproduzir um CD de áudio “protegido contra cópia” que não obedeça às normas internacionais
Devido à utilização de esquemas de protecção contra cópia de alguns CDs de áudio que não obedecem às normas internacionais
relativas a CDs de áudio (Livro Vermelho), este tipo de discos protegidos contra cópia poderá não ser reproduzido nesta
unidade.
Spela en CD-R eller CD-RW
Det kan hända att vissa CD-R/CD-RW CD-skivor inte spelas normalt på denna enhet, på grund av typen av CD-skiva,
skivytans skick eller CD-skrivarens funktion och skick.
Spela en s.k. kopieringsskyddad audioskiva som inte följer CD-standarden:
På grund av att vissa audioskivor använder sig av kopieringsskydd som inte följer den internationella CD-standarden (Red
Book), kan det hända att denna typ av kopieringsskyddade skivor inte kan spelas på den enheten.
Afspilning af en CD-R eller CD-RW
Afhængig af typen på CD-R/CD-RW CD, diskens overfladetilstand samt CD-writerens ydelse og tilstand, kan visse CD-R/CDRW CD måske ikke fungere normalt på denne enhed.
Afspilning af en ”kopieringsbeskyttet”, ikke-kompatibel audio-CD
På grund af kopieringsbeskyttelsessystemerne, der anvendes på visse CD’er, som ikke er kompatible med internationale
standarder for audio-CD’er (den røde bog), kan disse typer kopieringsbeskyttede CD’er måske ikke afspilles på denne enhed.
CD-RW:n CD-R-levyn toisto
Riippuen CD-R/CD-RW CD -tyypistä, levyn pinnan kunnosta sekä CD-kirjoittimen suorituskyvystä ja kunnosta tietynlainen
CD-R/CD-RW CD ei ehkä toimi normaalisti tämän laitteen yhteydessä.
Uudelleenkopioimisen estolla varustetun, normaalista poikkeavan audio-CD:n toisto
Johtuen kopioinnin estosta tietyissä audio-CD-levyissä, jotka eivät ole kansainvälisten audio-CD-levyjen standardien “punaisen
kirjan” (Red Book) mukaisia, tämäntyyppiset kopioinnin estävät levyt eivät ehkä ole toistettavissa tällä laitteella.
Page 17

3139 166 21974.2 03/02 gm
 Loading...