

Van Air Systems MHL-Series Desiccant Air Dryer Operations and Maintenance Manual
MHL-SERIES
HEATLESS DRYER
INSTALLATION, OPERATION &
MAINTENANCE MANUAL
®
October 2008
32-0296 Rev A
TABLE OF CONTENTS
SECTION 1 General Information: Pg 2
Model Numbers
Serial Numbers
Description of Operation
SECTION 2 Safety Instructions: Pg 3
Installation/Maintenance Safety
Operation Safety
SECTION 3 Specifications: Pg 3
Dimensions & Weights
Air Flow Capacities
SECTION 4 Installing the Dryer: Pg 4-6
Location
Electrical Connections
Piping and Connections
Recommended Filters
Recommended Dryer Installation
SECTION 5 Start-Up Procedure Pg 7
SECTION 6 Maintenance and Repair Pg 7
SECTION 7 Troubleshooting Guide Pg 8
SECTION 8 Replacement Parts Pg 9-10
SECTION 9 Wiring Diagram Pg 11
SECTION 10 Warranty Pg 11
Page 1
Van Air Systems MHL-Series Desiccant Air Dryer Operations and Maintenance Manual
SECTION 1 GENERAL INFORMATION
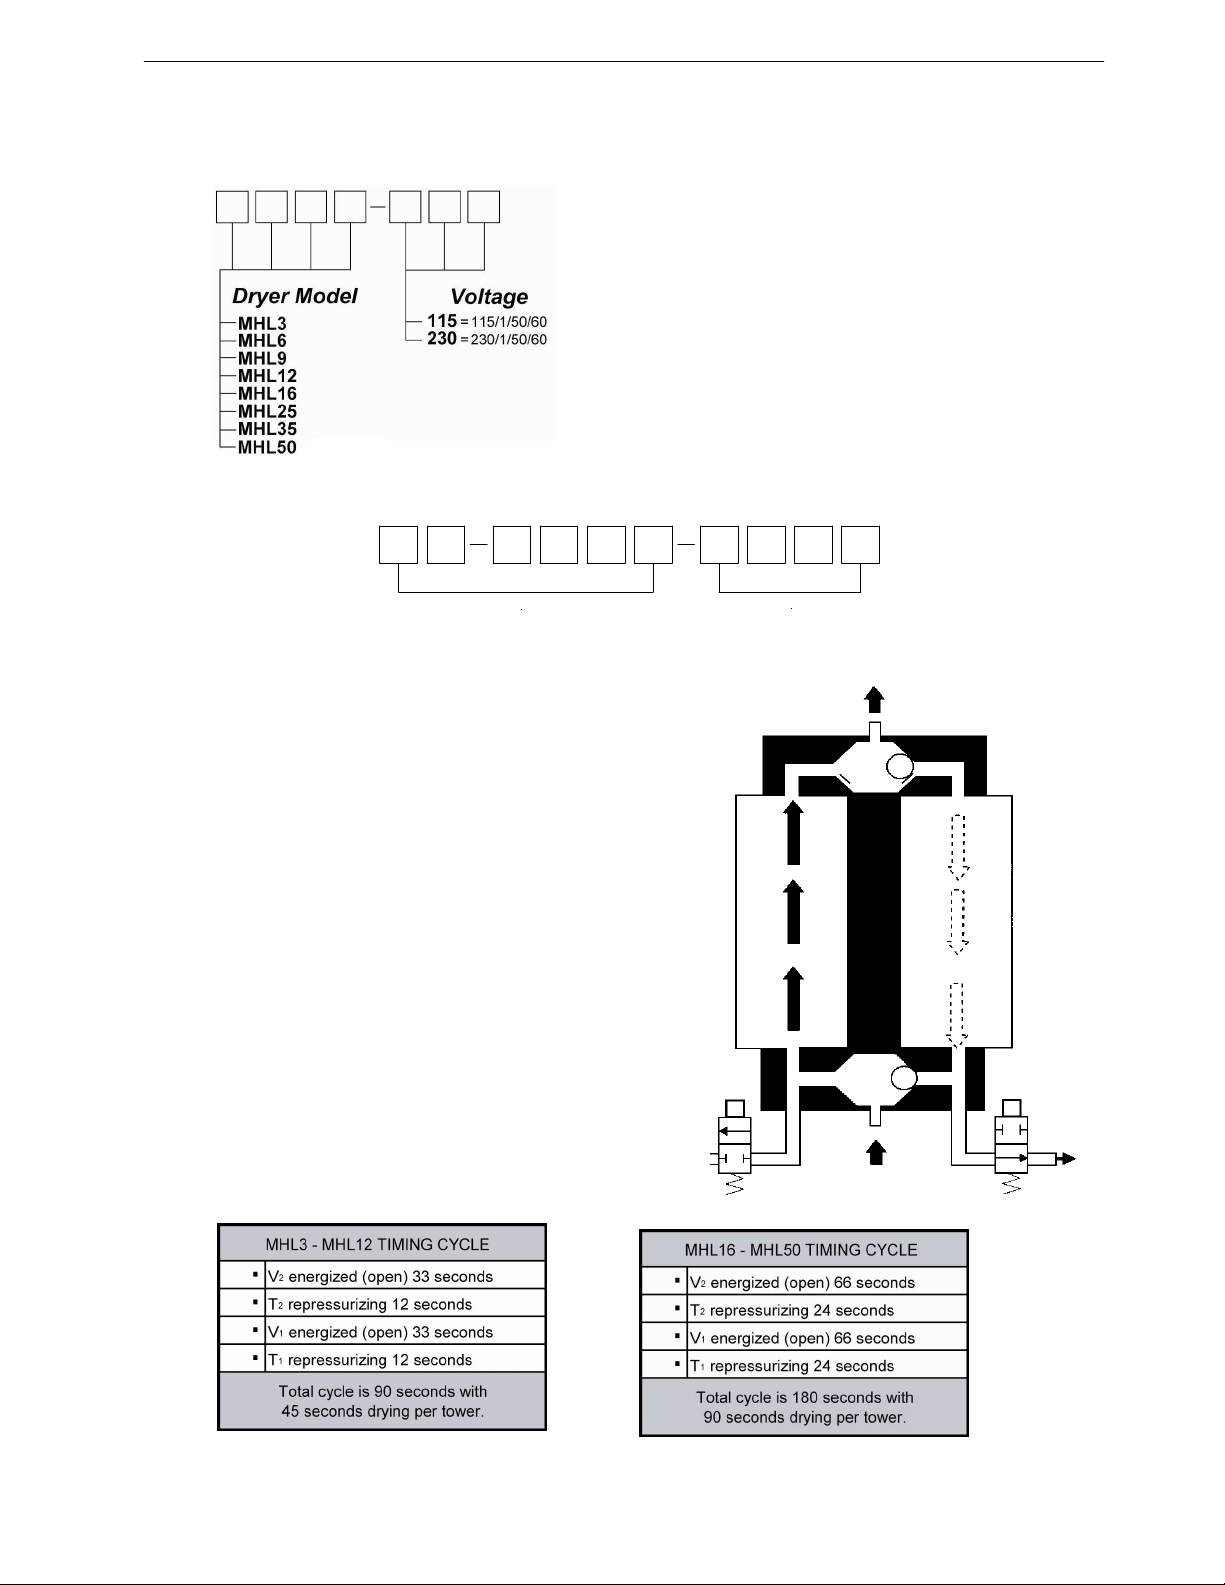
1.1 MODEL NUMBER CODING
Indicator are standard equipment.
Note: Tower Pressure Gauges & outlet Moisture
1.2 SERIAL NUMBER CODING
MONTH/YEAR OF MANUFACTURE
1.3 DESCRIPTION OF OPERATION
The MHL-SERIES Air Dryers use the pressure swing adsorption
method of drying compressed air. This requires two identical
towers containing beds of hygroscopic desiccant.
Incoming wet air enters the dryer through a shuttle valve where it
is directed to the bottom of the tower containing dry desiccant.
The desiccant in this tower removes 99.7+% of the water vapor
from the air when operated at catalog conditions. The dried air
leaving the top of the tower is directed to the outlet through a
second shuttle valve. In this outlet shuttle valve a built-in orifice
allows a portion of the dried air to flow into the other tower being
regenerated. The orifice reduces the high pressure air down close
to atmospheric pressure which lowers the dew point of the dried
air even further.
The tower being regenerated/purged of moisture is connected to
an energized solenoid valve for a controlled period of time. The
electrical signal to the solenoid is monitored by an LED light on the
solid state timer. After the desiccant is regenerated, the timer deenergizes the solenoid valve. Air continues to flow through the
orifice to repressurize the regenerated tower to line pressure. The
middle light on the timer indicates the repressurization function.
Next, the timer opens the valve on the tower containing the wet
desiccant. This shifts the shuttle valves, and the tower with the
wet desiccant is regenerated while the other tower continues to dry
the air. Examining the flow schematic to the right demonstrates
the dryer process operation.
TOWER T
DRYING
INLET AIR
VALVE V
CLOSED
1
SERIAL #
DRY OUTLET AIR
1
WET INLET AIR
SHUTTLE VALVE
WITH
FIXED ORIFICE
TOWER T
REGENERATING
(PURGING)
VALVE V
OPEN
2
2
Page 2
Van Air Systems MHL-Series Desiccant Air Dryer Operations and Maintenance Manual
MTG
8
9
10
11
29
34
59
65
SECTION 2 SAFETY INSTRUCTIONS
2.1 INSTALLATION/MAINTENANCE SAFETY
Before starting or installing the dryer, be sure that all power to
the unit is off, valves are shut, and the air circuit is at
atmospheric pressure. DO NOT remove, repair, or replace any
component, control filter, or part, while the air circuit is
energized or under pressure. Turn off the main to the dryer
and de-pressurize the unit before starting installation or
maintenance procedures.
MANUFACTURER WILL NOT BE RESPONSIBLE FOR
DAMAGE TO EQUIPMENT AS A RESULT OF IMPROPER
WIRING OR ELECTRICAL INSTALLATION. IT IS THE
CUSTOMERS RESPONSIBILITY TO ENSURE THAT THE
ELECTRICAL INSTALLATION IS CORRECT AND UP TO
APPLICABLE CODES.
When installing the dryer, ensure that the NEMA rating of the
control box is applicable to the installation.
Dryer is rated NEMA 4.
2.2 OPERATION SAFETY
DO NOT OPERATE THE DRYER ABOVE THE STATED
WORKING PRESSURE (SEE SPECIFICATION TABLE).
FAILURE, INJURY AND EQUIPMENT DAMAGE COULD
RESULT.
EXCEPT as otherwise specified by the manufacturer, this
product is specifically designed for compressed air service
and use with any other gas or liquid is a misapplication. Use
with or injection of certain hazardous liquids or gases in the
system (i.e., alcohol or liquid petroleum gas) could be
harmful to the unit and result in a combustible condition or
cause hazardous external leakage. Manufacturer’s
warranties are void in the event of a misapplication and
manufacturer assumes NO RESPONSIBILITY for any
resulting loss. Before using equipment with fluids or gases
other than air, or for non-industrial applications, consult Van
Air Systems for written approval.
SECTION 3 SPECIFICATIONS
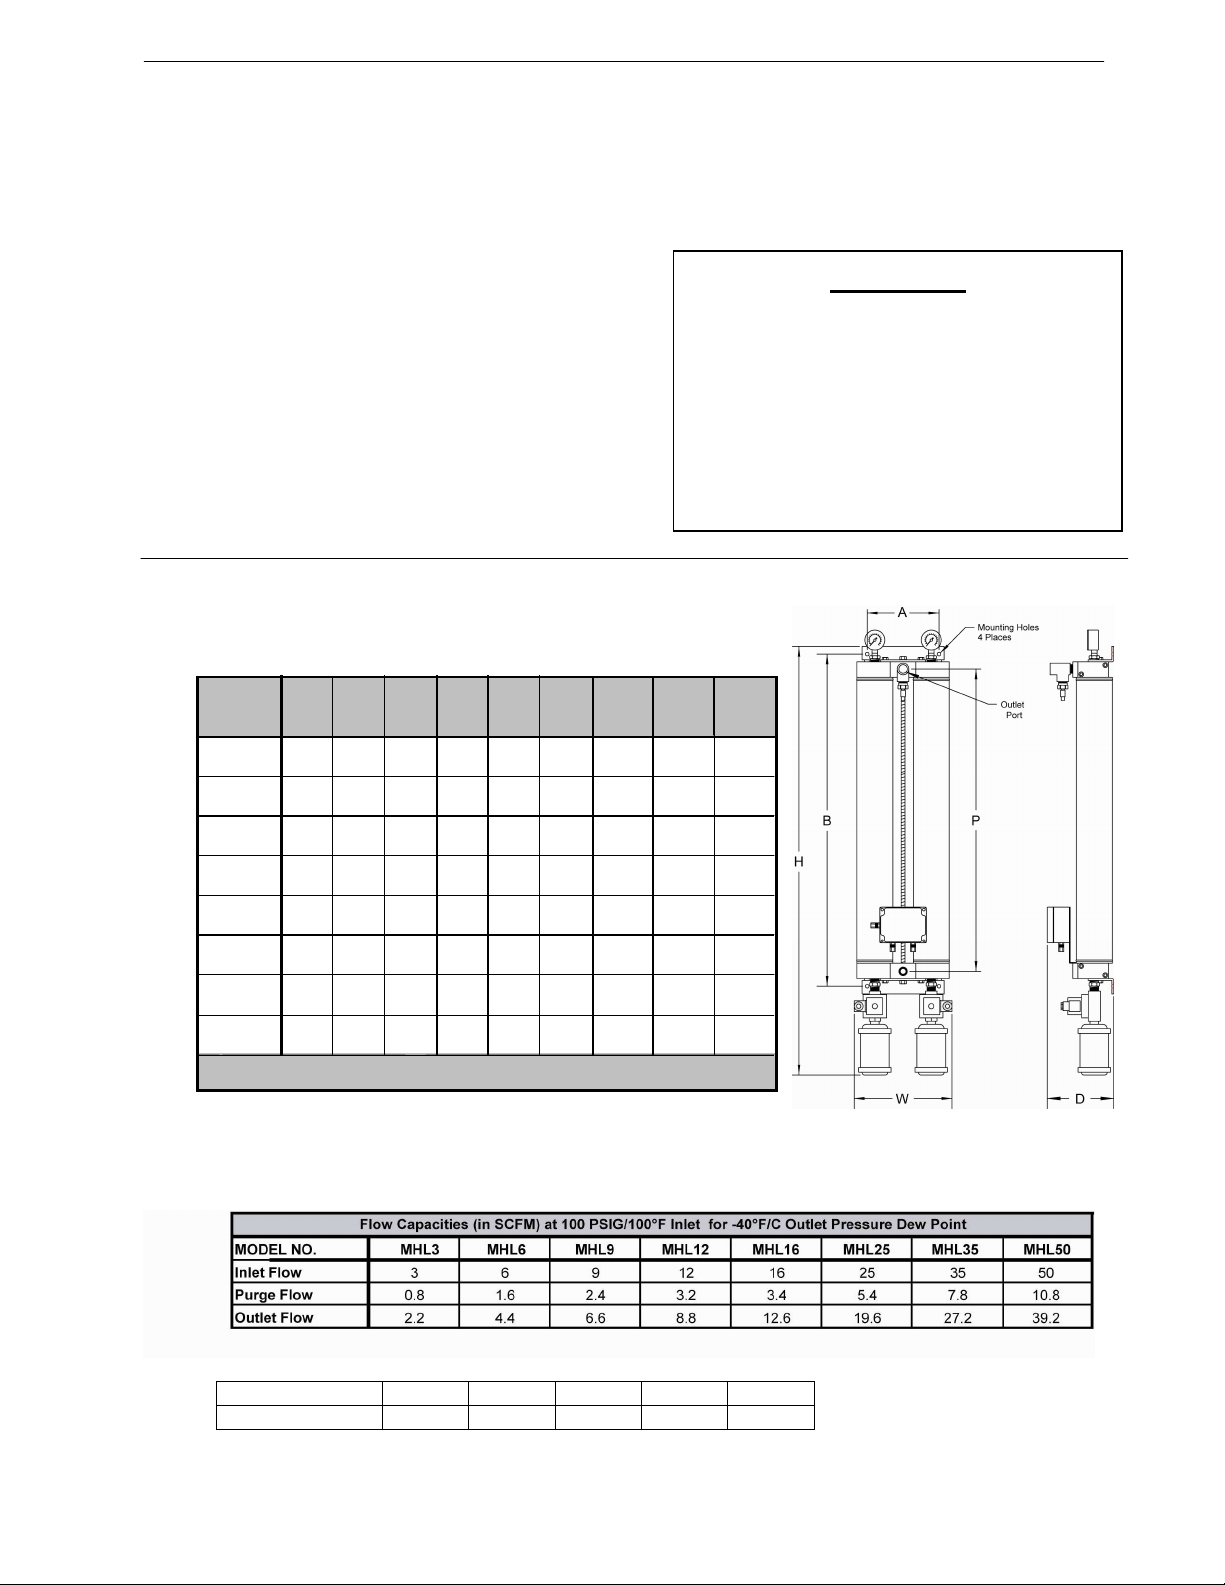
3.1 DIMENSIONS & WEIGHTS
MODEL
H W D P A B
PORTS
(npt)
MHL3
MHL6
13.6 7.4 5.2 9.3 5.8 2.8 3/8
18.2 7.4 5.2 13.0 5.8 2.8 3/8
HOLE
DIA.
0.3
0.3
WEIGHT
(lbs)
MHL9
MHL12
MHL16
MHL25
MHL35
17.3 7.4 5.2 12.1 5.8 2.8 3/8
20.1 7.4 5.2 14.9 5.8 2.8 3/8
33.0 9.5 6.5 20.7 7.0 23.6 1/2
41.9 9.5 6.5 29.5 7.0 32.5 1/2
39.3 10.0 7.0 26.5 9.0 30.1 1/2
0.3
0.3
0.4
0.4
0.4
MHL50
NOTE: MHL16-MHL35 dryer shown with bracket top and bottom. MHL3-MHL12 has single 4-hole bracket.
Maximum Working Pressure: 150 PSIG
Maximum Ambient Temperature: 120° F
47.4 10.0 7.0 33.5 9.0 37.1 1/2
Dimensions shown in inches.
3.2 AIR FLOW CAPACITIES
0.4
CAUTION:
FLOW MULTIPLIERS FOR VARIOUS PRESSURES
PRESSURE 80 90 100 110 120
MULTIPLIER 0.683 0.833 1.000 1.087 1.174
Page 3
Van Air Systems MHL-Series Desiccant Air Dryer Operations and Maintenance Manual
SECTION 4 INSTALLING THE DRYER
4.1 LOCATION
DO NOT INSTALL DRYER IN AN ENVIRONMENT OF
CORROSIVE CHEMICALS, EXPLOSIVE GASES, OR AREAS
OF HIGH AMBIENT TEMPERATURE CONDITIONS.
Install the dryer indoors. Dryers are not meant to be installed
outdoors exposed to the weather. If the dryer must be installed
outdoors, it must be in a weatherproof enclosure that provides
for proper temperature control.
When mounting, allow 2.5 inches above unit for tower removal
and replacement.
The dryer may be installed in a vertical or horizontal (laying
flat) orientation. Installation on its side may contribute to
possible shuttle valve shifting problems.
4.2 ELECTRICAL CONNECTIONS
Before wiring, check the dryer nameplate for electrical
characteristics. Standard electrical characteristics are 115
volt, 1 phase, 50/60 Hz. Models operating on 230 volts are
available.
IMPORTANT! No overload protection is provided in the dryer
and unit should be wired into a protected circuit.
IMPORTANT! When installing electrical service to this
machine, comply with the National Electrical Code as well as
state and local building codes.
NOTE: Dryer cycle timer has infinite memory capacity. Dryer
may be wired to compressor pressure switch or auxiliary
contacts to allow dryer to start and stop with compressor or
machine tool. Contacts must supply same voltage and phase
as dryer requires.
A six foot power cord is installed as standard on the dryer. The
cord on the115V dryers has a plug. The cord on the 230V
dryers does not have a plug. The control box and bulkhead
fittings are NEMA 4 rated.
• If a NEMA 1 installation is desired:
A. You may simply plug the power cord into a standard
outlet.
- or -
B. Use standard flexible conduit, and follow the
instructions for installing liquid-tight conduit below.
Use only flexible conduit as installing rigid conduit
may damage polycarbonate control box. Connect to
inlet power terminal strip with 18 gauge stranded
wire only.
• If maintaining the NEMA 4 installation is
desired:
A. Cut off the plug and use a NEMA 4 gasketed
bulkhead fitting suitable for .180” diameter power
cord to enter a NEMA 4 rated junction box.
- or -
A. To use flexible liquid-tight conduit and stranded 18
gauge wire:
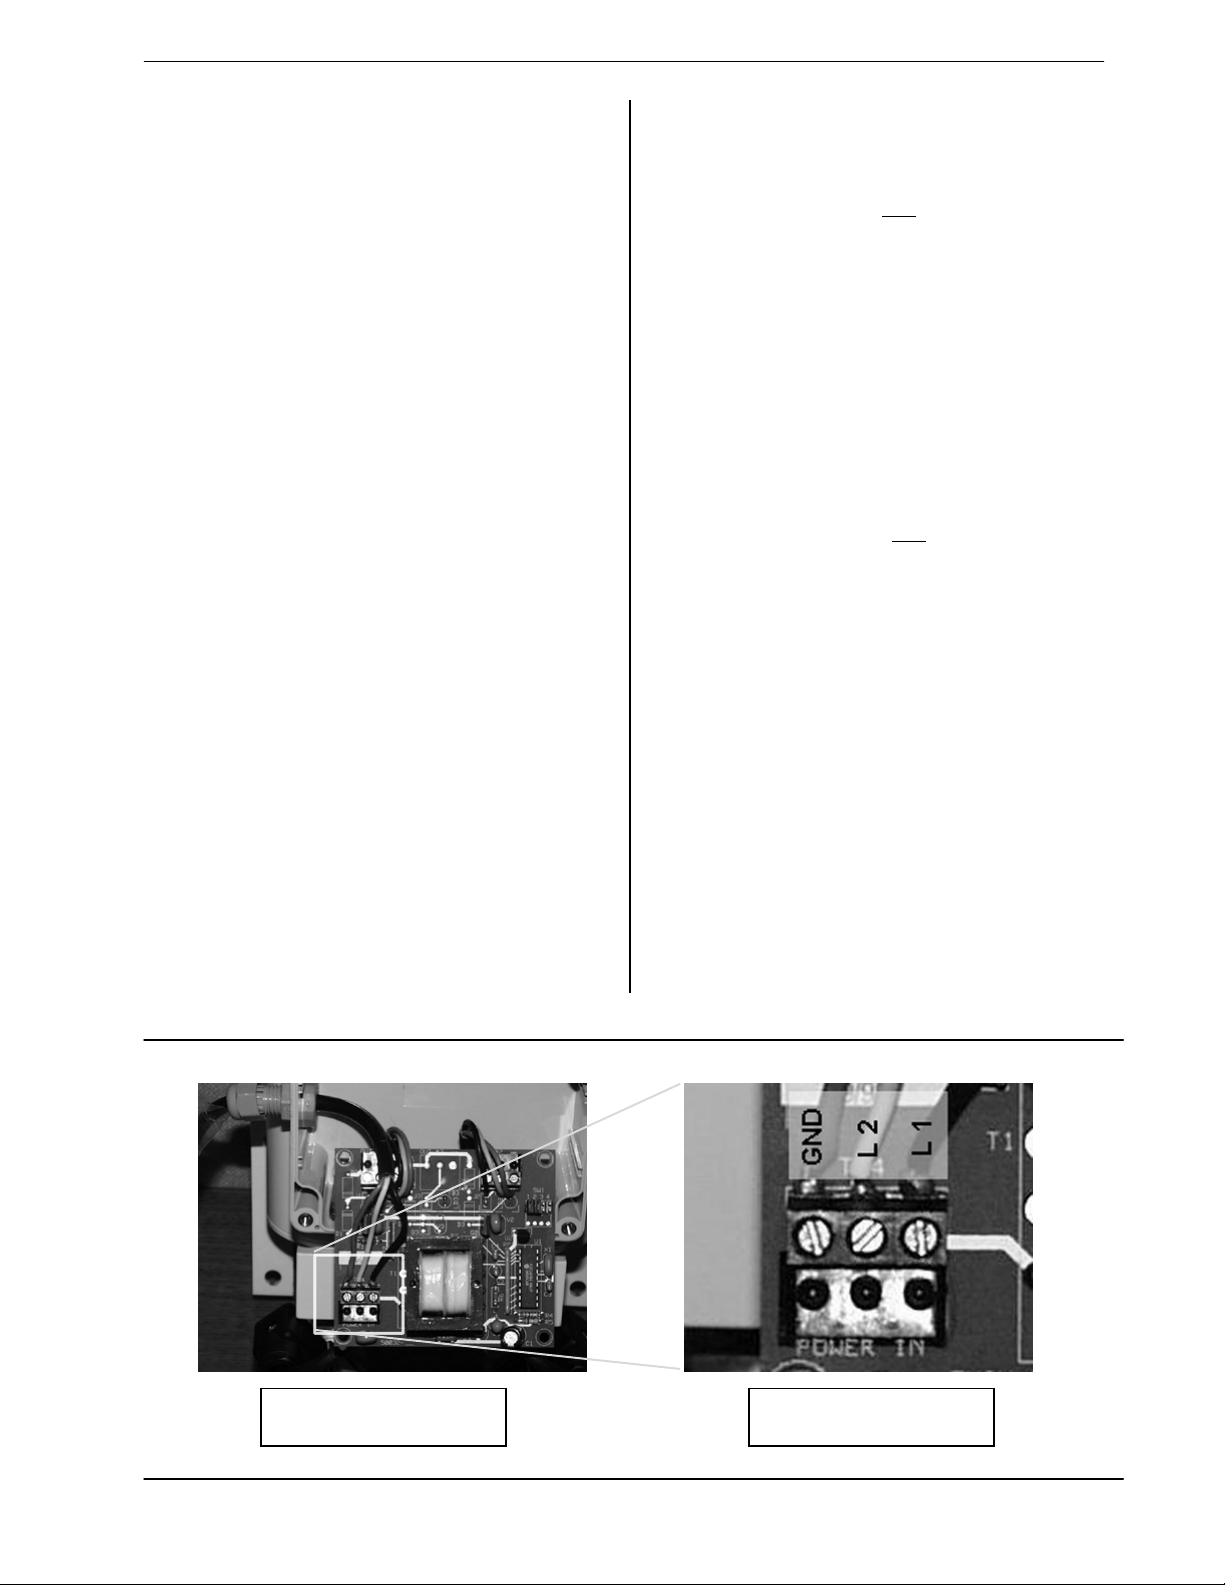
1. Remove clear cover from control box.
2. Loosen nuts on (3) bulkhead connectors and
push an inch or two of each of the electrical
cords back into the control box to allow slack to
pull out solid state timer board. Remove four
screws holding solid state timer board and pull
back gently to expose the “power in” terminal
block. With small screwdriver, loosen wire
clamps on terminal block and disconnect power
cord wires.
3. Remove (1) backing nut from inlet power cord
bulkhead fitting and remove power cord and
bulkhead fitting.
4. Enlarge existing hole to proper size to install
your own liquid-tight conduit fitting. Use only
flexible liquid-tight conduit as installing rigid
conduit may damage polycarbonate control box.
5. Connect to “power in” terminal block with 18
gauge stranded wire only.
BACK SIDE OF
TIMER BOARD
POWER IN
TERMINAL BLOCK
Page 4

Van Air Systems MHL-Series Desiccant Air Dryer Operations and Maintenance Manual
Filter
Replacement Element
Filter
Replacement Element
Filter
Replacement Element
For
Filter
Replacement Element
4.3 PIPING AND CONNECTIONS
Inlet and outlet piping should be schedule 40 pipe or equivalent
I.D. tubing. See specification chart for inlet/outlet NPT thread
size. All piping should be deburred and threaded to a proper
depth and length before installation. Threads should be
inspected for cleanliness and depth of cut. Good quality pipe
compound or Teflon tape should be used in the makeup of
joints to ensure a good, airtight fit of piping components.
Install a pipe union at the inlet and outlet ports for easy
disconnection prior to tower replacement.
NOTE ON INLET PIPING AND
PIPE JOINTS: Make sure piping is
clean inside. Apply pipe thread
sealant sparingly to the male
threads of fittings, keeping the
sealant back from the first two
threads. Contamination getting
into inlet shuttle valve could cause
dryer to malfunction.
Recommended Filters
Model
MHL3
MHL6
MHL9
MHL12
MHL16
MHL25
MHL35
MHL50
Filter
Replacement Element
Filter
Replacement Element.
Filter
Replacement Element
Filter
Replacement Element.
0.01 Micron Coalescing
F200-25-3/8-C-AD-PD6
F200-25-3/8-C-AD-PD6
F200-25-3/8-C-AD-PD6
F200-25-3/8-C-AD-PD6
F200-25-1/2-C-AD-PD6
F200-25-1/2-C-AD-PD6
F200-55-1/2-C-AD-PD6
F200-55-1/2-C-AD-PD6
It is recommended that a bypass line with shut-off valves be
installed to provide constant air flow to the system should the
dryer require servicing.
4.4 REQUIRED FILTERS
Always install a 0.01 micron coalescing prefilter with automatic
drain before dryer to remove entrained particulates, liquid
moisture and oil which can cause damage to the desiccant
beds. A 1.0 micron particulate afterfilter should be installed
after the dryer to remove any desiccant dust that may migrate
from the desiccant beds.
Pre-Filter
E200-15/25-C
E200-15/25-C
E200-15/25-C
E200-15/25-C
E200-15/25-C
E200-15/25-C
E200-55-C
E200-55-C
NOTE: If purge air is required to
be piped to a remote location, it is
necessary to use oversized tubing
or piping to prevent back-pressure.
Restricting the purge flow can
cause the dryer to malfunction.
After-Filter
1.0 Micron Particulate
F200-25-3/8-RB-MD-PD6
E200-15/25-RB
F200-25-3/8-RB-MD-PD6
E200-15/25-RB
F200-25-3/8-RB-MD-PD6
E200-15/25-RB
F200-25-3/8-RB-MD-PD6
E200-15/25-RB
F200-25-1/2-RB-MD-PD6
E200-15/25-RB
F200-25-1/2-RB-MD-PD6
E200-15/25-RB
F200-55-1/2-RB-MD-PD6
E200-55-RB
F200-55-1/2-RB-MD-PD6
E200-55-RB
Page 5

Van Air Systems MHL-Series Desiccant Air Dryer Operations and Maintenance Manual
TYPICAL POINT
-OF-
USE INSTALLATION
TYPICAL SYSTEM DRYER INSTALLATION
20 0 80 60
40 20 0
20 0 80 60
40 20 0 80 60
7
8
9
After
Aftercooler
10
11
4.5 RECOMMENDED DRYER
INSTALLATION
1
3
2
4
11
5
6
9
7
6
6
2
2
80
100
60 100
40
120
120
140
140
160
160
10
1
3
2
4
2
100
100
40
120
120
140
140
160
160
10
2
8
6
5 7
6
6
11
2
2
8
6
9
6
Ref.# Description
1 Compressor
2 Shut-off Valve
3 Flex Connector
4
5 Liquid Separator
6 Drain Valve
Ref.# Description
Pre-Filter, 0.01 Micron Coalescing, With Automatic Drain
-Filter, 1.0 Micron Particulate, With Manual Drain
Storage Tank
MHL-Series Desiccant Dryer
Check Valve
Page 6

Van Air Systems MHL-Series Desiccant Air Dryer Operations and Maintenance Manual
SECTION 5 START UP PROCEDURE
BEFORE STARTING THIS DRYER, FOLLOW THE
INSTALLATION INSTRUCTIONS AND PROCEDURES
COMPLETELY.
DO NOT REMOVE, REPAIR OR REPLACE ANY ITEM ON
THE DRYER WHILE THE DRYER IS UNDER PRESSURE.
INITIAL START UPS
1. Confirm that all piping and electrical connections are
proper.
2. Shut off electrical power.
3. If a bypass is installed around the dryer, open the inlet
and outlet isolation valves. Close the bypass valve.
WARNING - When operating this dryer without the
mufflers, use hearing protection.
4. Wait approx. 20 seconds to equalize pressure in the
desiccant chambers.
5. Turn on the electrical power. Dryer should start cycling.
6. Verify purge cycle timing as described in Dryer Operation
section.
7. Verify that a small amount of air is purging from the
moisture indicator. When sample air is dry, the silica gel
remains dark blue. If the sample air is moist, indicating a
problem, the color changes to light pink. At start-up the
moisture indicator may show pink, but it should return to
blue after 30 to 40 minutes of dryer operation.
SECTION 6 MAINTENANCE AND
REPAIR
WARNING - DO NOT REMOVE, REPAIR, OR REPLACE ANY
ITEM ON THE DRYER WHILE THE DRYER IS UNDER
PRESSURE.
BEFORE BEGINNING ANY REPAIRS, MAINTENANCE, OR
INSTALLATION WORK, VERIFY THAT THE POWER IS OFF
AND THE DRYER IS DEPRESSURIZED.
BEFORE WORKING ON THE DRYER OR RELATED
EQUIPMENT, ENSURE THAT ALL PERSONNEL HAVE
READ AND UNDERSTAND THE SAFETY AND OPERATION
INSTRUCTIONS IN THIS MANUAL.
PREVENTIVE MAINTENANCE SCHEDULE
This is a suggested schedule based on average dryer
conditions. As conditions such as dirty environment, humidity
conditions, ambient temperature, etc. change, the frequency of
the inspections may change.
Daily
1. Inspect the dryer for proper operation.
2. Inspect inlet filters and drains for proper operation.
3. Verify proper inlet and ambient air conditions.
Weekly
1. Check pop-up indicators on prefilter and afterfilter. If
indicator shows red, change filter element.
Semi-Annually
1. Inspect entire assembly for loose connections, screws,
etc.
2. Perform audible inspection of purge cycling and purge
flow.
3. Visual inspection of exhaust area for signs of oil or
desiccant attrition.
Page 7

Van Air Systems MHL-Series Desiccant Air Dryer Operations and Maintenance Manual
A1
A2
ature should not exceed 100°F.
Reduce inlet air temperature to proper level.
An aftercooler may need to be installed after
A3 Air flow through dryer in
sor output, or if installed at
use, total of air usage downstream of dryer plus purge flow)
A4
The inlet air pressure should be 100 psig.
Increase inlet pressure or call factory to
A5 Dirty or obstructed inlet
A6
ce hole of debris. Use air gun to
A7
Check magnetic field from coil operation. Place iron or steel
ote: see Section 1, for
A8 Oil contamination of
Verify coalescing inlet filtration is adequate and functioning
Towers must be replaced if contamination is
A9
t operating
Verify correct timing cycle by observing tower indicator lights on
A10
If purge air is piped away from unit,
oversized piping should be used and length
Improper operating
Dirty or obstructed inlet
Inlet or outlet shuttle not
Inlet or outlet shuttle not
Timer not operating
Timer not operating
Incoming power may not be "clean". Fluctuations in voltage can
rs
Dirty or obstructed inlet
With dryer pressurized, remove power from dryer. Check purge
SECTION 7 TROUBLESHOOTING GUIDE
A
PROBLEM: AIR DRYER DELIVERS WET AIR
POSSIBLE CAUSE
No power to unit.
High inlet air temperature. The inlet air temper
excess of rated capacity.
Low inlet pressure.
CHECK
Power supply.
Make sure inlet flow to dryer (compres
point-ofdoes not exceed inlet flow rating of dryer.
CORRECTIVE ACTION
Correct power problem.
compressor.
Reduce air usage downstream.
resize dryer for actual inlet conditions.
Check inlet airline filter elements.
air filter.
Purge orifice plugged. Remove and inspect purge orifice.
Solenoid coil burned out.
material (a screwdriver works well) at top of coil to feel the
effect when coil should be energized. (N
timing cycle for your unit.)
desiccant beds.
Timer no
properly.
Purge flow restricted. Check mufflers (or purge piping if installed) for excessive back-
B
PROBLEM: RESTRICTED FLOW THROUGH UNIT
POSSIBLE CAUSE
B1
conditions.
B2
air filter.
B3 Plugged air passages. Check inlet and outlet air passages and piping for blockages.
C
PROBLEM: EXCESSIVE PURGE / BLOWDOWN
POSSIBLE CAUSE
C1
shifting.
C2
shifting.
C3 Purge orifice plugged. See A6 above.
C4
properly.
C5
properly.
C6
air filter.
C7 Leakage.
properly.
front panel. (Note: see Section 1, for timing cycle for your unit.)
pressure. Note: unit is originally supplied with "no-clog" mufflers.
CHECK
See A2, A3, A4 above.
See A5 above.
CHECK
See A3, A4, A5, A6 above.
Check for damage or contamination of inlet and outlet shuttles.
See A9 above.
occur in power circuits shared by devices such as electric moto
and welding equipment.
See A5 above.
ports on dryer and air system connections for large leaks.
Replace.
Clean orifi
clean.
Replace.
suspected.
Replace timer if defective.
of run should be as short as possible.
CORRECTIVE ACTION
Clear restrictions.
CORRECTIVE ACTION
Clean or replace as necessary.
Supply line voltage from another source.
Repair as necessary.
Page 8

Van Air Systems MHL-Series Desiccant Air Dryer Operations and Maintenance Manual
80
80
11
1
11
SECTION 8 REPLACEMENT PARTS
1
6
60
10
40
12
20
14
0
16
5
TYP 8 PLCS
2
7
14
8
9
See chart on next page for part information.
MHL Dryer Exploded View
11
13
60
10
40
12
20
14
0
16
4
12
16
17
15
3
13
MHL3 - 12
11
BUSHING (AS REQ’D.)
TYP 2 PLCS
7
2
6
14
8
9
10
Page 9

Van Air Systems MHL-Series Desiccant Air Dryer Operations and Maintenance Manual
KIT CONTAINS
2
1
SCREW
1
2
CF CF CF CF CF CF CF
1
1
1
VITON O
CALL FACTORY
See Exploded View on previous page for reference numbers.
REPLACEMENT PARTS
REF# DESCRIPTION
QTY
MHL3
MHL6
MHL9
FOR MODEL
MHL12
MHL16
MHL25
MHL35
MHL50
1
2
3
4
5
6
7
8
8a
9
10
11
12
13
14
15
16
16a
17
not shown
not shown
not shown
not shown
TOWER GAUGE KIT
DESICCANT TOWER
SHUTTLE DISC, INLET
SHUTTLE DISC, OUT W/ORIFICE
END BLOCK, TOP-L OR BOTTOM-RT
END BLOCK, TOP-RT OR BOTTOM-L
SOLENOID VALVE ASSY 115 VOLT
SOLENOID VALVE ASSY 230 VOLT
PURGE MUFFLER KIT
TIE ROD
INLET/OUTLET SHUTTLE VALVE SEAT
SHUTTLE VALVE BODY
DRYER MOUNTING BRACKET
SOLENOID DIN CONNECTOR
CONTROL BOX BRACKET
TIMER, SS, 115 VAC
TIMER, SS, 230 VAC
CONTROL BOX ENCLOSURE
-RING KIT
Street Tee
Bushing
Moisture Indicator
50-0100
1
1
1
1
1
1
1
1
1
1
1
1
*
1
1
1
50-0102
50-0109
50-0111
50-0118
50-0120
50-0122
50-0124
50-0126
50-0128
50-0131
50-0133
50-0135
50-0137
50-0139
50-0141
50-0143
50-0145
50-0146
50-0152
50-0148
50-0154
50-0100
50-0103
50-0109
50-0112
50-0118
50-0120
50-0122
50-0124
50-0126
50-0128
50-0131
50-0133
50-0135
50-0137
50-0139
50-0141
50-0143
50-0145
50-0146
50-0152
50-0148
50-0154
50-0100
50-0104
50-0109
50-0113
50-0118
50-0120
50-0122
50-0124
50-0126
50-0128
50-0131
50-0133
50-0135
50-0137
50-0139
50-0141
50-0143
50-0145
50-0146
50-0152
50-0148
50-0154
50-0100
50-0105
50-0109
50-0114
50-0118
50-0120
50-0122
50-0124
50-0126
50-0128
50-0131
50-0133
50-0135
50-0137
50-0139
50-0141
50-0143
50-0145
50-0146
50-0152
50-0148
50-0154
50-0101
50-0106
50-0110
50-0115
50-0119
50-0121
50-0123
50-0125
50-0127
50-0129
50-0132
50-0134
50-0136
50-0138
50-0140
50-0142
50-0144
50-0145
50-0147
50-0153
50-0149
50-0154
50-0101
50-0107
50-0110
50-0116
50-0119
50-0121
50-0123
50-0125
50-0127
50-0129
50-0132
50-0134
50-0136
50-0138
50-0140
50-0142
50-0144
50-0145
50-0147
50-0153
50-0149
50-0154
50-0101
50-0108
50-0110
50-0117
50-0119
50-0121
50-0123
50-0125
50-0127
50-0129
50-0132
50-0134
50-0136
50-0138
50-0140
50-0142
50-0144
50-0145
50-0147
50-0153
50-0149
50-0154
50-0101
50-0158
50-0110
50-0157
50-0119
50-0121
50-0123
50-0125
50-0127
50-0129
CF
50-0132
50-0134
50-0159
50-0138
50-0140
50-0142
50-0144
50-0145
50-0147
50-0153
50-0149
50-0154
NOTE:
*VITON O-RING KIT INCLUDES ALL O-RING SEALS
NOTE:
CF -
Page 10

Van Air Systems MHL-Series Desiccant Air Dryer Operations and Maintenance Manual
SECTION 9 WIRING DIAGRAM
SOLID STATE TIMER
WIRE CONNECTIONS
Tower #2
Solenoid Valve
BLACK
WHITE
GND GND
SECTION 10 WARRANTY
Per Van Air Terms and Conditions
POWER IN
GROUND
NEUTRAL
HOT
GREEN
Tower #1
WHITE
BLACKGREEN
Solenoid Valve
Page 11

Van Air Systems MHL-Series Desiccant Air Dryer Operations and Maintenance Manual
Page 12
 Loading...