


Firmware Update Owner’s Manual Supplement
HD-XA1 / HD-A1 / HD-D1
Firmware Version 2.1
Thank you for your updating your HD DVD player firmware.
With the update completed, please note the following changes to your Owner’s Manual.
New setting items added to “Ethernet Setting”. |
|
Page 46 |
||||||
OWNER’S MANUAL |
||||||||
|
|
|
|
|
|
|||
|
|
|
|
|
|
|
||
“Network Speed” |
|
|
|
|
|
|
||
“Cookie Setting” |
|
|
|
|
DHCP |
On |
||
|
|
|
|
Proxy |
Off |
|||
|
|
|
|
|
|
|||
Follow the steps below to make the setting. |
Mac Address |
|
||||||
User Information |
|
|||||||
1 |
|
|
|
|
|
|
||
Press “SETUP” on the remote control. |
|
NTP Server |
Off |
|||||
2 |
Select “Ethernet Setting” by |
/ |
|
, then press “OK”. |
Network Speed |
56kbps Modem |
||
|
Cookie Setting |
Accept |
||||||
3 |
Select “Network Speed” by |
/ |
, then press “OK”. |
Network Speed |
||||
4 |
|
|
|
|
|
|||
Select the type of your line by |
/ |
/ |
/ , then press “OK”. |
28.8kbps Modem |
33.6kbps Modem |
|||
5 |
Select “Cookie Setting” by |
/ |
, then press “OK”. |
56kbps Modem |
64kbps ISDN |
|||
128kbps ISDN |
256kbps DSL/Cable |
|||||||
6 |
Select “Accept” or “Not Accept” by |
/ |
, then press “OK”. |
384kbps DSL/Cable |
512kbps DSL/Cable |
|||
768kbps DSL/Cable |
1 Mbps Cable |
|||||||
|
“Accept”: Cookies are used between the player and a Web page server. |
1.5Mbps T1 |
Over 1.0Mbps |
|||||
|
Other |
|
||||||
Cookie Setting
Accept
Not Accept
Page 59 (revised)
OWNER’S MANUAL
|
|
|
Analog out |
Digital out SPDIF |
|
Disc |
Audio Format |
|
|
||
5. |
|
|
|||
|
|
|
|
|
|
|
|
|
|
|
|
|
DD plus |
|
5. |
|
|
|
True HD |
48kHz |
2ch/2ch |
|
|
HD DVD Video |
|
96kHz |
|
|
|
|
192kHz |
2ch/2ch |
2ch PCM*1 |
2ch PCM*1 |
|
Standard |
|
||||
|
|
|
|
|
|
contents |
dts-HD |
|
5.1ch/2ch |
Bitstream |
2ch PCM |
|
L-PCM |
48kHz |
Yes |
2ch PCM |
2ch PCM |
|
|
96kHz |
Yes |
2ch PCM*1 |
2ch PCM*1 |
|
|
192kHz |
2ch/2ch |
2ch PCM*1 |
2ch PCM*1 |
|
|
|
|
|
|
|
|
|
|
|
|
5.1ch
5.1ch
up to 5.1ch PCM up to 5.1ch PCM*4
Disc |
Audio Format |
|
|
Digital out HDMI |
|
|||
Auto |
|
Bitstream |
|
|
PCM |
|||
|
|
|
|
|
|
|||
|
|
|
|
|
|
|
|
|
|
DD plus |
|
Depend on HDMI receiver |
|
Bitstream*2 |
|
up |
|
|
True HD |
48kHz |
Depend on HDMI receiver |
|
2ch PCM |
|
|
|
HD DVD Video |
|
96kHz |
Depend on HDMI receiver |
|
2ch PCM*1 |
|
2ch PCM*4 |
2ch PCM*1 |
Standard |
|
192kHz |
Depend on HDMI receiver |
|
2ch PCM*1 |
|
2ch PCM*4 |
2ch PCM*1 |
contents |
dts-HD |
|
Depend on HDMI receiver |
|
Bitstream*2 |
|
up to 5.1ch PCM*3 |
2ch PCM |
|
L-PCM |
48kHz |
Depend on HDMI receiver |
|
2ch PCM |
|
Multi PCM |
2ch PCM |

HD DVD player
OWNER’S MANUAL
Connections Introduction
(Basic) |
Playback |
(Advanced) |
Playback |
connection |
Internet |
Others |
|

Chapter1Introduction
SAFETY PRECAUTIONS
CAUTION
RISK OF ELECTRIC SHOCK
DO NOT OPEN
ATTENTION |
RISQUE DE CHOC ELECTRIQUE NE |
PAS OUVRIR |
WARNING : TO REDUCE THE RISK OF ELECTRIC SHOCK, DO NOT REMOVE COVER (OR BACK). NO USERSERVICEABLE PARTS INSIDE. REFER SERVICING TO QUALIFIED SERVICE PERSONNEL.
The lightning flash with arrowhead symbol, within an equilateral triangle, is intended to alert the user to the presence of uninsulated “dangerous voltage” within the product’s enclosure that may be of sufficient magnitude to constitute a risk of electric shock to persons.
The exclamation point within an equilateral triangle is intended to alert the user to the presence of important operating and maintenance (servicing) instructions in the literature accompanying the appliance.
WARNING: |
TO REDUCE THE RISK OF FIRE OR ELECTRIC SHOCK, DO NOT EXPOSE THIS APPLIANCE |
|
TO RAIN OR MOISTURE. DANGEROUS HIGH VOLTAGES ARE PRESENT INSIDE THE |
|
ENCLOSURE. DO NOT OPEN THE CABINET. REFER SERVICING TO QUALIFIED PERSONNEL |
|
ONLY. |
CAUTION: |
TO PREVENT ELECTRIC SHOCK, MATCH WIDE BLADE OF PLUG TO WIDE SLOT, FULLY |
|
INSERT. |
ATTENTION: |
POUR EVITER LES CHOCS ELECTRIQUES, INTRODUIRE LA LAME LA PLUS LARGE DE LA |
|
FICHE DANS LA BORNE CORRESPONDANTE DE LA PRISE ET POUSSER JUSQU’AU FOND. |
CAUTION: |
This HD DVD player employs a Laser System. |
|
To ensure proper use of this product, please read this owner’s manual carefully and retain for |
|
future reference. Should the unit require maintenance, contact an authorized service location - |
|
see service procedure. |
|
Use of controls or adjustments or performance of procedures other than those specified herein |
|
may result in hazardous radiation exposure. |
|
To prevent direct exposure to laser beam, do not try to open the enclosure. |
|
Visible and invisible laser radiation when open and interlocks defeated. |
|
DO NOT STARE INTO BEAM. |
FCC NOTICE: This equipment has been tested and found to comply with the limits for a Class B digital device, pursuant to part 15 of the FCC Rule. These limits are designed to provide reasonable protection against harmful interference in a residential installation.
This equipment generates, uses, and can radiate radio frequency energy and, if not installed and used in accordance with the instructions, may cause harmful interference to radio communications.
However, there is no guarantee that interference will not occur in a particular installation.
If this equipment does cause harmful interference to radio or television reception, which can be determined by turning the equipment off and on, the user is encouraged to try to correct the interference by one or more of the following measures:
-Reorient or relocate the receiving antenna.
-Increase the separation between the equipment and receiver.
-Connect the equipment into an outlet on a circuit different from that to which the receiver is connected.
-Consult the dealer or an experienced radio/TV technician for help.
WARNING: Changes or modifications made to this equipment, not expressly approved by Toshiba, or parties authorized by Toshiba, could void the user’s authority to operate the equipment.
2
4HEHINSTRUCTIONSISHALLSSTATEHTHAT AN !,, 0/,% -!).3 37)4#( WITH A CONTACT SEPARATIONIOF AT LEAST AMM IN EACH POLE SHALLLBE INCORPORATED IN THE ELECTRICALPINSTALLATION OF THE BUILDING
#!54)/. |
4HESEESERVICING INSTRUCTIONSIARERFOR USESBYYQUALIFIEDISERVICE PERSONNEL ONLY 4OOREDUCE THE |
|||
|
RISK OFKELECTRIC SHOCK DOTNOTIPERFORMHANYCSERVICING OTHERTTHAN THAT CONTAINED INTTHEIOPERATING |
|||
|
INSTRUCTIONS UNLESSOYOUSAREUQUALIFIEDSTO DOOSO |
|||
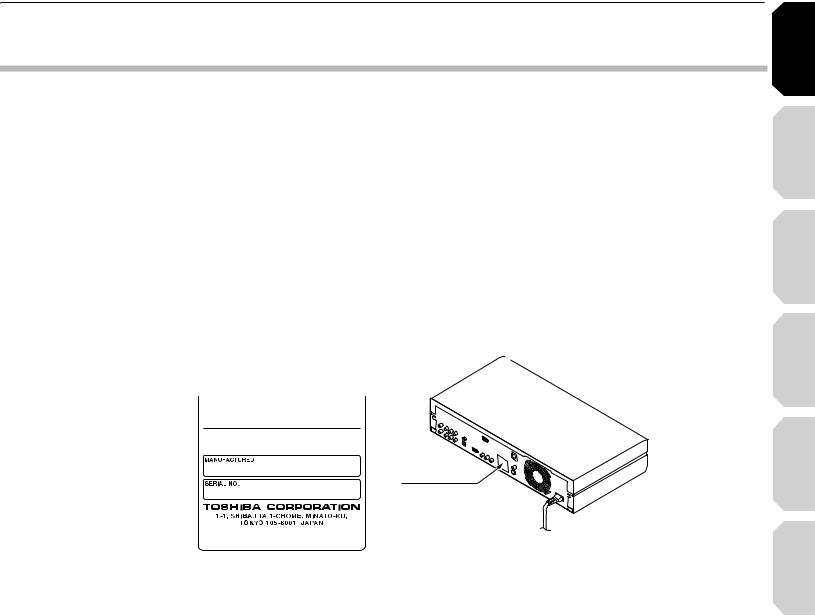
)N THEHSPACES PROVIDEDDBELOW RECORD THEH-ODELDANDN3ERIALA.O LOCATED ON THEHREAR PANELNOFFYOURUPLAYER |
||||
-ODELD.O |
|
3ERIAL .O |
|
|
2ETAIN THISNINFORMATION FORNFUTURE REFERENCE
,OCATION OFITHENREQUIRED LABEL
02/$5#45)3 #%24)&)%$ "9%4(%(-!.5&!#452%2 4/ #/-0,9 7)4( $((3 25,%, #&2 35"#(!04%2 * ). %&&%#4&!44$!4% /& -!.5&!#452%
Connections Introduction
(Basic) |
Playback |
(Advanced) |
Playback |
connection |
Internet |
Others |
|
3

Chapter1Introduction
)-0/24!.4.3!&%49 ).3425#4)/.3
2EAD THESE INSTRUCTIONS
+EEPETHESETINSTRUCTIONS
(EED ALL WARNINGS
&OLLOW ALL INSTRUCTIONS
$O NOT USE THISUAPPARATUS NEAR WATER
#LEANEONLY WITHNDRYYCLOTH
$O NOT BLOCKKANYYVENTILATION OPENINGS )NSTALL IN ACCORDANCE WITH THEHMANUFACTURER S INSTRUCTIONS
$O NOT INSTALL NEARSANYYHEAT SOURCES SUCHUAS RADIATORS HEATRREGISTERS STOVES ORGOTHER APPARATUSR INCLUDING AMPLIFIERS THATNPRODUCE HEAT
$O NOT DEFEATATHE SAFETYTPURPOSE OFETHE POLARIZED OR GROUNDING TYPE PLUG ! POLARIZED PLUG HAS TWO BLADESTWITH ONE WIDER THAN THE OTHER !!GROUNDING TYPENPLUG HAS TWOOBLADES ANDNAATHIRDIGROUNDING PRONG 4HEHWIDEDBLADE OR THEH THIRDIPRONGOARERPROVIDEDDFOR YOURUSAFETY )F THEHPROVIDED PLUGIDOES NOT FIT INTO YOUR OUTLET CONSULTSAN ELECTRICIAN FOR REPLACEMENT OFATHE OBSOLETE OUTLET
0ROTECT THE POWER CORDCFROM BEING WALKED ON OR PINCHEDCPARTICULARLY AT PLUGS CONVENIENCE RECEPTACLES AND THE POINT WHERE THEYHEXIT FROM THEHAPPARATUS
/NLY USE ATTACHMENTS ACCESSORIESESPECIFIEDEBY THEHMANUFACTURER
5SE ONLYEWITH THE CART STAND TTRIPOD OBRACKET TOR TABLEESPECIFIEDCBYYTHETMANUFACTURER OR SOLD WITH THEHAPPARATUS 7HEN A CARTTIS USED USE CAUTION WHEN MOVINGNTHE CART APPARATUS COMBINATION TO AVOIDIINJURYYFROM TIP OVER
3 !
5NPLUGLTHIS APPARATUSUDURINGNLIGHTNINGGSTORMS OR WHENWUNUSED FOR LONGLPERIODS OFSTIME
2EFER ALL SERVICING TONQUALIFIED SERVICE PERSONNEL 3ERVICING ISNREQUIRED WHENETHE APPARATUS HAS BEENADAMAGEDEIN ANY WAY SUCH AS POWER SUPPLYUCORD ORYPLUG ISRDAMAGED LIQUID HASABEEN SPILLED ORSOBJECTSLHAVEEFALLENLINTO THE APPARATUS THETAPPARATUS HAS BEENAEXPOSEDSTO RAINIOR MOISTURE DOES NOT OPERATE NORMALLY OR HASABEEN DROPPED
4

ADDITIONAL SAFETY INSTRUCTIONS
15.Do not overload wall outlets; extension cords, or integral convenience receptacles as this can result in a risk of fire or electric shock.
16.Apparatus should not be exposed to dripping or splashing and no objects filled with liquids, such as vases, should not be placed on the apparatus.
21.Do not use a cracked, deformed, or repaired disc. These discs are easily broken and may cause serious personal injury and apparatus malfunction.
22.If the apparatus should smoke or smell, immediately disconnect the power cord from the wall outlet. Wait until the smoke or smell stops, then ask your dealer for a check and repair. Neglecting to do so may cause fire.
17. Keep your fingers well clear of the disc tray as |
23. During thunderstor ms, do not touch the |
it is closing. Neglecting to do so may cause |
connecting cables or the apparatus. |
serious personal injury. |
|
18.Do not place anything on top of this unit.
19.Do not place the apparatus on amplifiers or equipment that may produce heat.
20.Do not cover the ventilating holes for the inside cooling fan.
24.Handling the cord on this product or cords associated with accessories sold with this product, will expose you to lead, a chemical known to the State of California to cause birth defects or other reproductive harm.
Wash hands after handling.
Connections Introduction
(Basic) |
Playback |
(Advanced) |
Playback |
connection |
Internet |
Others |
|
5

Chapter1Introduction
Precautions
Notes on handling
7Never disconnect the power cord from a wall outlet while the player is turned on, unless it is in an emergency. Doing so may cause malfunction.
7When shipping the player, the original shipping carton and packing materials come in handy. For maximum protection, repack the unit as it was originally packed at the factory.
7Do not use volatile liquids, such as insect spray, near the player. Do not leave rubber or plastic products in contact with the player for a long time. They will leave marks on the finish.
7The top and rear panels of the player may become warm after a long period of use. This is not a malfunction.
When not in use
7For usual absence
Be sure to remove the disc from the player and turn off the power.
7Prolonged absence
Unplug the player from a wall outlet.
Notes on locating
7Place the player on a level surface. Do not use it on a shaky or unstable surface such as a wobbly table or inclined stand. The loaded disc may dislodge from its proper position and cause damage to the player.
Before placing the player, make sure that the surface can stand the weight of the player. Never place the player in a high location to avoid damage to the product or person by an accidental fall of the player.
7When you place this player near a TV, radio, or VCR, the playback picture may become poor and the sound may be distorted depending on the condition and location of said equipment. In such an event, place the player as far away much as possible from the TV, radio, or VCR.
7To avoid damage to this product, never place or store the unit in direct sunlight; hot, humid areas; or areas subject to excessive dust, oily smoke, cigarette smoke or vibration.
Notes on cleaning
Use a soft, dry cloth for cleaning.
7Do not use any type of solvent, such as thinner or benzine, as they may damage the surface of the player.
About the volume level
The volume level of some commercial DVD discs may seem lower than that of audio CDs, other software, etc. If you turn up the volume of the TV or amplifier
to play such discs, be sure to turn it back down after playback finishes.
Playback restrictions
This owner’s manual explains the basic instructions for this player. Some HD DVD discs or DVD video discs are produced in a manner that allows specific or limited operation during playback. As such, the player may not respond to all operating commands. This is not a defect in the player. Please refer to the notes on compatible discs later in this Introduction and to the discussion of DVD playback and features later in this manual.
“ ” may appear on the TV screen during operation. “
 ” means that the operation is not permitted by the player or the disc.
About software
Because of problems and errors that can occur during the creation of HD DVD, DVD and CD software and/ or the manufacture of HD DVD, DVD and CD discs, Toshiba cannot assure that this player will successfully play every disc bearing the HD DVD, DVD and CD logos. If you happen to experience any difficulty playing an HD DVD, DVD and CD disc on this player, please contact Toshiba Customer Service.
Some differences
The HD DVD player operates more like a computer and differently than a standard DVD player, In addition to containing a microprocessor, it contains an operating system, random access memory (RAM), and an HD DVD drive. The operating system includes software that is transferred to the RAM when the machine is turned on and at other times during operation. This transfer can take time. Therefore, when you turn the HD DVD player on, it may take a little while before it is ready to use. Likewise, other functions may not be performed as quickly as they would on other AV equipment. Please take these factors into consideration as you use the HD DVD player.
6

Notes on moisture condensation
 Moisture condensation damages the unit. Please read the following carefully.
Moisture condensation occurs, for example, when you pour a cold drink into a glass on a warm day. Drops of water form on the outside of the glass.
In the same way, moisture may condense on the optical pick-up lens inside this unit, one of the most crucial internal parts of the unit.
|
|
LE OF M |
|
|
|
|
MP |
OIS |
TU |
||
A |
|
|
|
||
%X |
|
|
E |
|
RE |
|
|
OND NSATIO |
N |
||
|
C |
|
|||


 /PTICALIPICK UP
LENS
 Moisture condensation occurs during the following cases.
7When you bring the unit directly from a cold place to a warm place.
7When you use the unit in a room where you just turned on the heater, or a place where the cold wind from the air conditioner directly hits the unit.
7In summer, when you use the unit in a hot and humid place just after you move the unit from an air conditioned room.
7When you use the unit in a humid place.
)T S TOO WARM
 Do not use the unit when moisture condensation may occur.
If you use the unit in such a situation, it may damage discs and internal parts. Connect the power cord
of the unit to the wall outlet, turn on the unit, remove the disc, and leave it for two or three hours. After two or three hours, the unit will have warmed up and evaporated any moisture. Keep the unit connected to the wall outlet and moisture condensation will seldom occur.
7AI |
|
T |
7ALL OUTLET |
|
Notes on copyright
7The unauthorized recording, use, display, distribution, or revision of television programs, videotapes, HD DVDs, DVDs, CDs and other materials, is prohibited under the Copyright Laws of the United States and other countries, and may subject you to civil and/or criminal liability.
7This product incorporates copyright protection technology that is protected by method claims of certain U.S. patents and other intellectual property rights owned by Macrovision Corporation and other rights owners. Use of this copyright protection technology must be authorized by Macrovision Corporation, and is intended for home and other limited viewing uses only unless otherwise authorized by Macrovision Corporation. Reverse engineering or disassembly is prohibited.
Manufactured under license from Dolby Laboratories. Dolby and the double-D symbol are trademarks of Dolby Laboratories.
Manufactured under license from Digital Theater Systems, Inc. U.S. Pat. No's. 5,451,942; 5,956,674; 5,974,380; 5,978,762; 6,226,616; 6,487,535 and other U.S. and world-wide patents issued and pendling. "DTS" and "DTS Digital Surround" are registered trademarks of Digital Theater Systems, Inc.
Copyright 1996, 2003 Digital Theater Systems, Inc. All Rights Reserved.
HDMI, the HDMI logo and High-Definition Multimedia Interface are trademarks or registered trademarks of HDMI Licensing LLC.
SHARC is a registered trademark and Melody is a trademark of Analog Devices, Inc.
All other brand and product names mentioned in this manual are trademarks and/or registered trademarks of their respective holders.
Connections Introduction
(Basic) |
Playback |
(Advanced) |
Playback |
connection |
Internet |
Others |
|
7

Chapter1Introduction
Features
Playback of HD DVD video discs
HD DVD video discs are high-density, high-capacity discs.
7The HD DVD disc standard has been approved by the DVD forum.
7HD DVD (single layer): 15 GB
HD DVD (dual layer): Maximum capacity of 30 GB A single layer single sided disc (15 GB) has capacity of about 8 hours in 1125 line high definition picture; about 48 hours in 525 line standard definition picture (depending on bitrate of prerecorded contents).
*1GB means 1,000,000,000 bytes.
7HD DVD Twin Format Discs have both HD DVD and DVD layers on one side. HD DVD Combination DVD Discs have HD DVD material on one side and standard DVD material on the other side. Because
both disc types are new, such discs may not operate properly in this player.
7To view high-definition picture in HD DVD discs, an HDTV display (720p, 1080i) is required.
7Connect an HDTV set to the COMPONENT OUTPUT jacks or the HDMI OUTPUT jack on this player.
7Some discs may require use of HDMI OUTPUT for viewing of high resolution material.
Compatible with multiple disc types
7Playback of commercial HD DVD video disc, DVD video, and Audio CD
7Playback of DVD-RAM, DVD-RW (disc recorded in DVD VR mode or DVD video mode), and DVD-R 7Playback of CD-RW and CD-R (Audio CD of CD-DA
format, MP3 file, WMA file)
Because HD DVD is a new format, disc compatibility issues with new and existing format discs are possible. Not all discs are compatible. If you experience compatibility problems, please contact Toshiba Customer Service.
Blu-ray Discs cannot be played on this player.
Internet connection feature (LAN port)
7Some HD DVD discs enable you to access special HD DVD sites. If an HD DVD site includes content such as movie trailers, you can watch the content on the player via the Internet if your internet connection provides sufficient bandwidth.
Compatibility notes
7For compatibility, see  page 27.
Various output jacks
7An HDMI jack for connecting a single cable to output video and audio signals
7Component jacks
75.1 channel surround analog audio jacks
Certain system requirements
For high definition video playback:
7High definition display (720p and 1080i input capable).
7HD DVD disc with high definition content. 7HDMI or HDCP capable DVI input on your display
device required for some content (as specified by disc authors).
7For up-conversion of standard definition DVD, an HDMI or HDCP capable DVI input on your display device is required for copy protected content.
For Dolby® Digital Plus and DTS-HD (DTS core only) multi-channel audio playback:
7Receiver or processor/amp combination with 5.1 channel analog input or HDMI™ multi-channel LPCM capable audio input.
7Main, center, surround speakers and subwoofer as necessary for chosen format.
For on-line interactive features:
7Ethernet connection to customer supplied always-on broadband internet service.
7Some features may require higher bandwidth.
8
Customer support
To reach Toshiba Customer Support in the U.S., please call 1 (800) 319-6684 or visit www.tacp.com/customersupport.
To reach Toshiba Customer Support in Canada, please call 1 (800) 268-3404 or visit www.toshiba.ca and click on support.
This HD DVD player is manufactured under the HD DVD Format adopted by DVD Forum. DVD Forum approved AACS (Advance Access Content System) as content protection system for HD DVD Format like it approved CSS (Content Scramble System) for DVD Format. Therefore, certain restrictions are imposed on play, analog signal output, etc. of AACS protected contents.
When you use pre-recorded contents, the contents may designate whether or not to apply such restrictions.
As those restrictions may be adopted and/or changed and announced by AACS after the production of this product, the operation of this product and restrictions thereon may vary depending on the time you purchase this product.
To obtain updated information about AACS and this product, please contact the following:
*In the U.S., please call 1 (800) 319-6684 or visit www. tacp.com/customersupport.
*In Canada, please call 1 (800) 268-3404 or visit www. toshiba.ca and click on support.
Connections Introduction
(Basic) |
Playback |
(Advanced) |
Playback |
connection |
Internet |
Accessories
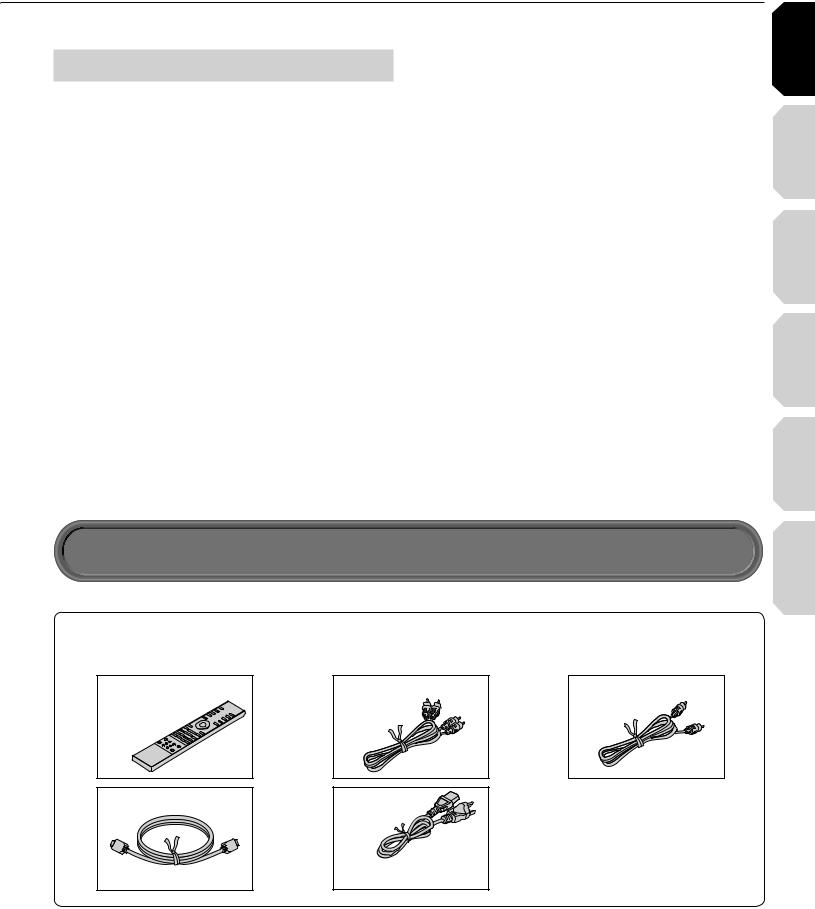
Accessories
Check that the following accessories are supplied.
Remote control |
!UDIODCABLE |
Video cable |
Batteries |
|
|
(AAA)x4 |
|
|
HDMI cable |
Power cord |
Caution
•Do not use this power cord with any device other than this player.
Others
9
Chapter1Introduction
Table of Contents
Introduction
SAFETY PRECAUTIONS ........................................................................................ |
2 |
IMPORTANT SAFETY INSTRUCTIONS.................................................................. |
4 |
Precautions ............................................................................................................. |
6 |
Features................................................................................................................... |
8 |
Accessories............................................................................................................. |
9 |
Index to parts and controls.................................................................................. |
12 |
7Front panel ................................................................................................................................................... |
12 |
7Rear panel.................................................................................................................................................... |
13 |
7Display ......................................................................................................................................................... |
14 |
7Remote control ............................................................................................................................................. |
15 |
Preparation of the remote control....................................................................... |
16 |
7Loading batteries ......................................................................................................................................... |
16 |
7Operating with the remote control................................................................................................................ |
16 |
7About the remote control backlight.............................................................................................................. |
16 |
7Programming for TV control ......................................................................................................................... |
17 |
7Operating your TV with the remote control................................................................................................... |
17 |
Hint on reading this manual ................................................................................ |
18 |
7Icons for disc compatibilty ........................................................................................................................... |
18 |
7Instructions and actual buttons.................................................................................................................... |
18 |
(Basic) Playback Connections
Connecting to a TV ............................................................................................... |
20 |
Connecting to a device with an HDMI input ....................................................... |
21 |
Connecting to a TV with component video inputs ............................................ |
22 |
Connecting to an audio system .......................................................................... |
23 |
Disc compatibility ................................................................................................. |
26 |
Powering on/Loading a disc ................................................................................ |
28 |
Playing a disc........................................................................................................ |
29 |
7Stopping playback / Pausing playback ....................................................................................................... |
29 |
7Playing from the top menu ........................................................................................................................... |
30 |
7Using A/B/C/D buttons ................................................................................................................................. |
30 |
7Playing from a recorded title menu .............................................................................................................. |
30 |
7Selecting the sound ..................................................................................................................................... |
31 |
7Selecting the sound of a disc recorded in DVD VR mode........................................................................... |
31 |
7Selecting subtitles ........................................................................................................................................ |
32 |
7Selecting the camera angle ......................................................................................................................... |
32 |
Playing at various speeds.................................................................................... |
33 |
7Locating by entering a section number ....................................................................................................... |
34 |
7Locating by entering elapsed time .............................................................................................................. |
34 |
7Resuming playback from the location last stopped (Title resume).............................................................. |
34 |
10

|
Playing repeatedly (Repeat playback) ................................................................ |
36 |
|
Playing MP3/WMA files on a CD.......................................................................... |
37 |
Playback |
|
|
|
7Playable files ................................................................................................................................................ |
37 |
|
Using EXTENSION ports ...................................................................................... |
38 |
(Advanced) |
|
|
|
Using the cursor function .................................................................................... |
38 |
|
Checking the current status and settings .......................................................... |
39 |
|
Internet connection feature (Outline).................................................................. |
42 |
|
Internet connection feature (Preparation) .......................................................... |
44 |
connectionInternet |
|
|
|
Internet connection feature (Operation) ............................................................. |
47 |
|
Customizing the function settings...................................................................... |
50 |
|
7Picture .......................................................................................................................................................... |
52 |
Others |
|
|
|
7Audio ............................................................................................................................................................ |
53 |
|
7Language ..................................................................................................................................................... |
54 |
|
7Ethernet........................................................................................................................................................ |
55 |
|
7General......................................................................................................................................................... |
56 |
|
7Firmware update .......................................................................................................................................... |
57 |
|
Language code list ............................................................................................... |
58 |
|
Output sound conversion table........................................................................... |
59 |
|
Before calling service personnel ........................................................................ |
60 |
|
Specification ......................................................................................................... |
61 |
|
Limited United States Warranty........................................................................... |
62 |
|
CANADIAN WARRANTY INFORMATION............................................................. |
64 |
|
INFORMATION ON CUSTOMER SUPPORT ......................................... |
Back cover |
Connections Introduction
(Basic) |
Playback |
(Advanced) |
Playback |
connection |
Internet |
Others |
|
11
Chapter1Introduction
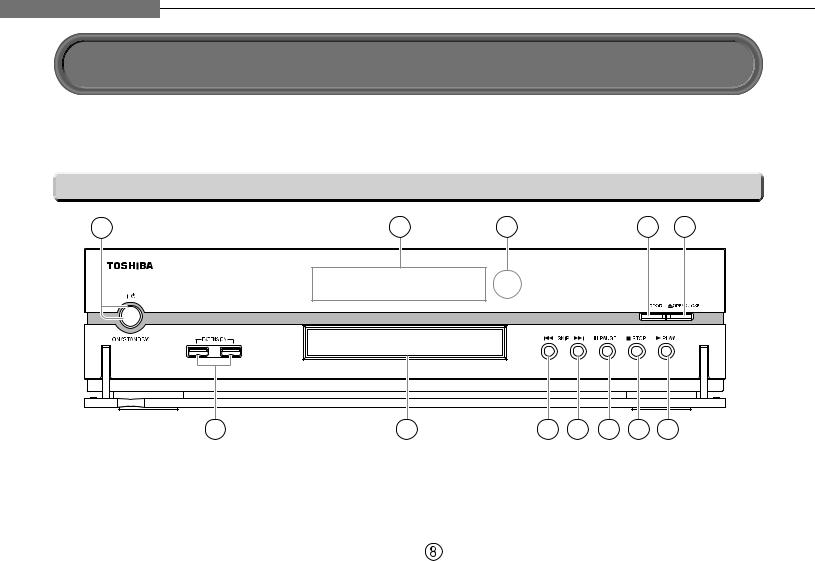
Index to parts and controls
See pages with arrows for details.
 Front panel
1 |
2 |
3 |
4 |
5 |
12
 ON/STANDBY button / ON/STANDBY indicator
  page 28
Turns the power on/restores the unit to the standby mode.
 Front panel display
  page 14
 Remote sensor
  page 16
 DOOR button
  page 28
Opens and closes the front door.
 OPEN/CLOSE button
  page 28
Opens and closes the disc tray.

 (PLAY) button
  page 29
Starts playback.
11 |
10 |
9 |
8 |
7 |
6 |

 (STOP) button
  page 29
Stops playback.

 (PAUSE) button
  page 29
Stops playback momentarily.


 (SKIP) button
  page 33
Skips to the next chapter or track.


 (SKIP) button
  page 33
Skips to the previous chapter or track.
 Disc tray
  page 28
Loads a disc into the disc drive.
 EXTENSION ports
  page 38
12
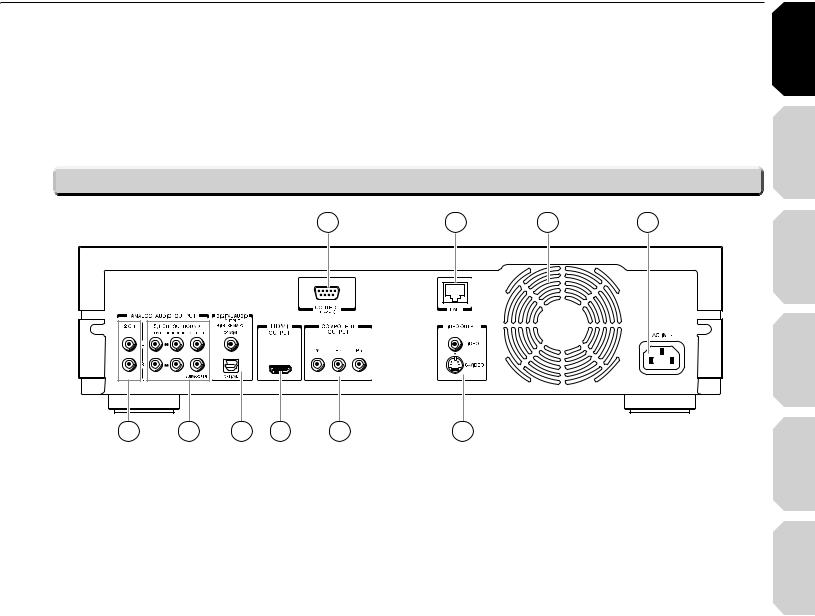
 Rear panel
1
10 |
9 |
8 |
7 |
6 |
 CONTROL (RS-232C)
Used for custom control devices.
 LAN port
  page 44
Use this to connect to a network with an alwayson broadband connection.
 Ventilation fan
Do not cover the ventilation holes.
 AC IN socket
  page 20
Connect the supplied power cord.
 VIDEO OUTPUT (VIDEO, S-VIDEO)
  page 20
Outputs video and audio signals to a connected TV or amplifier.
 COMPONENT OUTPUT jacks
  page 22
Outputs video signals to a connected TV or monitor.
Connect to a TV or monitor equipped with component video jacks.
2 |
3 |
4 |
5
 HDMI OUTPUT jack
  page 21
Outputs video/audio signals to a connected TV, monitor or AV amplifier.
Connect to a TV, monitor or AV amplifier equipped with HDMI input.
 DIGITAL AUDIO OUTPUT BITSTREAM/PCM (OPTICAL/COAXIAL) jacks
  page 23
Outputs digital audio signals.
Connect to a digital audio input on an amplifier equipped with digital audio decoder.
When connecting the optional digital cable, fit the connector into the jack firmly.
 ANALOG AUDIO OUTPUT 5.1 CH SURROUND jacks
  page 23
Connect to an amplifier equipped with 5.1 CH audio input.
 ANALOG AUDIO OUTPUT 2 CH jacks
  page 20
Outputs audio signals to a connected TV or AV amplifier.
Connections Introduction
(Basic) |
Playback |
(Advanced) |
Playback |
connection |
Internet |
Others |
|
13

Chapter1Introduction
Index to parts and controls (Continued)
 Display
|
|
|
|
|
|
|
|
|
|
|
|
|
|
|
|
|
|
|
|
|
|
|
|
|
|
|
|
|
|
|
|
 Status indicator
 : Playing II : Pausing
 Disc indicator
HD DVD : Illuminates when an HD DVD disc is loaded.
DVD : Illuminates when a DVD disc is loaded.
 TITLE indicator
Illuminates when a title number is displayed.
 CHP (Chapter) indicator
Illuminates when a chapter number is displayed.
 CD indicator
Illuminates when a CD is loaded.
 HDMI Indicator
Illuminates when selecting the HDMI output.
 TRK (Track) indicator
Illuminates when a track number is displayed.
 TOTAL indicator
Illuminates when the total playing time of the disc is displayed.
 Switching the display
 REMAIN (Remaining) indicator
Illuminates when a remaining playback time is displayed.
 2ch indicator
Illuminates when 2 channel (L/R) sound is output.
 MULTI indicator
Illuminates when 5.1 channel sound is output.
 Repeat mode indicator
Illuminates when playing in repeat mode.
 Angle icon indicator
Illuminates when playing a scene recorded with multi angles.
 Multi display
Displays the total playing time of the disc, elapsed time, remaining time, title number, chapter number or message, etc.
 Video output format indicator
Displays the video output format currently selected.
480 : 480 interlace
480 : 480 progressive
720 : 720 progressive
1080 : 1080 interlace


 Every time you press DISPLAY button on the remote control, the display changes the contents. The display may not change, depending on the disc conditions.
 Dimming the display
Pressing DIMMER button on the remote control changes the brightness of the display.
À > i` "vv
• Turning off the power resets this setting.
14

 Remote control
OPEN/CLOSE button |
page 28 |
|
|
|
|
|
|
|
|
|
|
|
ON/STANDBY button page 28 |
|||||
|
|
|
|
|
|
|
|
|
|
|
||||||||
|
|
|
|
|
|
|
|
|||||||||||
DOOR button page 28 |
|
|
|
|
|
|
|
|
|
|
|
|
|
|
AUDIO button |
page 31 |
||
|
|
|
|
|
|
|
|
|
|
|
|
|
|
|||||
|
|
|
|
|
|
|
|
|
|
|
|
|
||||||
|
|
|
|
|
|
|
|
|
||||||||||
|
|
|
|
|
|
|
|
|
|
|
|
|
||||||
|
|
|
|
|
|
|
|
|||||||||||
V.OUTPUT button |
page 21 |
|
|
|
|
|
|
|
|
|
|
|
|
|
SUBTITLE button page 32 |
|||
|
|
|
|
|
|
|
|
|
|
|
|
|
||||||
|
|
|
|
|
|
|
|
|
|
|
|
|
||||||
|
|
|
|
|
|
|
|
|
|
|
|
|||||||
|
|
|
|
|
|
|
|
|
|
|
|
|||||||
RESOLUTION button |
page 21 |
|
|
|
|
|
|
|
|
|
|
ANGLE button |
page 32 |
|||||
|
|
|
|
|
|
|
|
|
|
|||||||||
|
|
|
|
|
|
|
|
|
|
|||||||||
|
|
|
|
|
|
|
|
|
|
|||||||||
|
|
|
|
|
|
|
|
|
|
|||||||||
|
|
|
|
|
|
|
|
|||||||||||
TOP MENU button |
page 30 |
|
|
|
|
|
|
|
|
|
|
MENU button page 30 |
||||||
|
|
|
|
|
|
|
|
|
|
|||||||||
|
|
|
|
|
|
|
|
|||||||||||
|
|
|
|
|
|
|
|
|
|
|
|
|
|
|
|
|
Direction button |
page 30, 50 |
|
|
|
|
|
|
|
|
|
|
|
|
|
|
|
|
|
||
(PLAY) button |
page 29 |
|
|
|
||
|
|
|
|
OK button |
page 30, 50 |
|
RESUME PLAY button |
page 34 |
RETURN button |
page 50* |
|||
|
|
|
|
|||
button |
page 29, 33 |
(STOP) button |
page 29 |
|||
button |
page 33 |
|
button |
page 33 |
||
(SKIP) button page 34 |
(SKIP) button page 33 |
BACKLIGHT button |
page 16 |
SLOW button |
page 33 |
||
REPEAT button |
page 36 |
CURSOR button |
page 38 |
||
|
|
|
A, B, C, D button |
page 30 |
|
TV button page 17 |
TV/ DVD button |
page 17 |
|
|
|
||
TV CH buttons |
page 17 |
TV VOL. buttons |
page 17 |
TV MUTE button |
page 17 |
TV CODE button |
page 17 |
DISPLAY button |
page 39 |
DIMMER button |
page 14 |
|
|
||
|
|
T.SEARCH button page 34 |
|
|
|
CLEAR button |
page 34 |
Number buttons |
page 34 |
SETUP button |
page 50 |
|
|
||
|
Slide down to open. |
* RETURN |
|
Returns to the previous screen (the screen may be specified depending on the disc). Refer to the instructions of the disc.
Connections Introduction
(Basic) |
Playback |
(Advanced) |
Playback |
connection |
Internet |
Others |
|
15
Chapter1Introduction
Preparation of the remote control
Set up the remote control to operate the player and your TV.
 Loading batteries
1 Open the cover.
2 Insert batteries.
7Use 4 batteries (AAA sizes).
7Make sure to match the + and – on the batteries to the marks inside the battery compartment.
3 Close the cover.
 Operating with the remote control
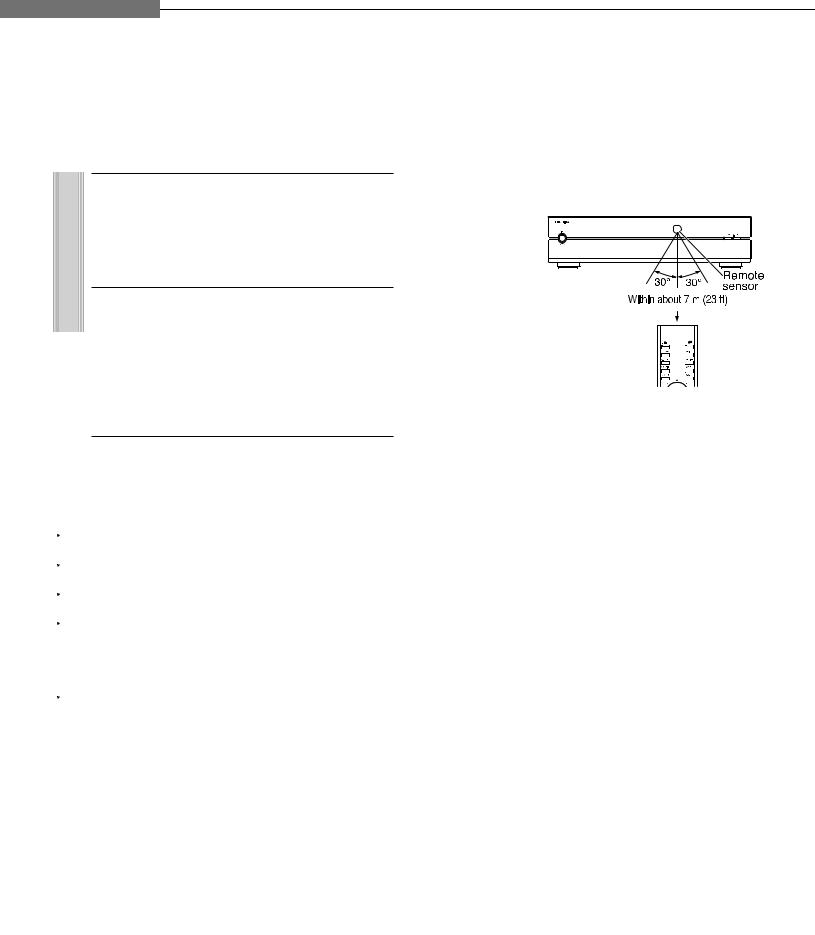
Point the remote control at the remote sensor and press the buttons.
Distance: About 7 m (23 ft) from the front of the remote sensor
Angle : About 30° in each direction of the front of the remote sensor
Notes
 Do not drop or give the remote control a shock.
Do not leave the remote control near an extremely hot or humid place.
 Do not spill water or put anything wet on the remote control.
Do not disassemble the remote control.
 Dispose of batteries in a designated disposal area.
Batteries should always be disposed of with the environment in mind.
 Always dispose of batteries in accordance with applicable laws and regulations.
If the remote control does not operate correctly, or if the operating range becomes reduced, replace all batteries with new ones.
 When necessary to replace batteries in the remote control, always replace all batteries with new ones. Never mix battery types or use new and used batteries in combination.
 Be sure to use AAA size batteries.
Always remove batteries from remote control if they are dead or if the remote control is not be used for an extended period of time. This will prevent battery acid from leaking into the battery compartment.
Caution
 Never throw batteries into a fire.
 About the remote control backlight
The remote control has a backlight function for conveniently illuminating the buttons when you use the remote control in a dark room, etc.
7Lights for approximately 10 seconds when a button is pressed.
7Lights for approximately 10 seconds when the remote control senses a certain amount of vibration (approximately 1 second for a small amount of vibration).
16
 To turn off the backlight function
Press and hold |
for at least |
approximately three seconds.
To turn back on the backlight function, press and hold again for at least approximately three seconds.
Note
 The backlight function is on by default. Using the backlight function shortens the lifespan of the batteries.
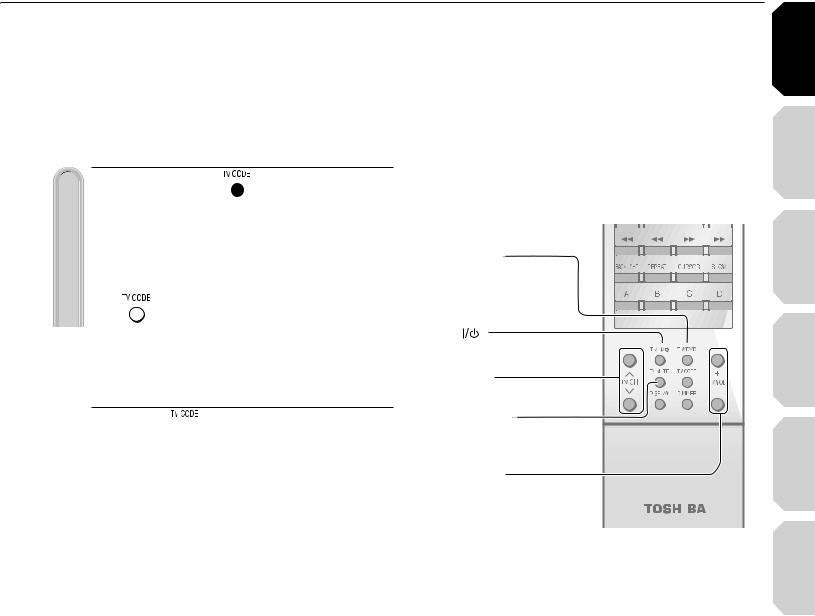
 Programming for TV control
 1
1 While holding
  , press the number buttons to enter a corresponding brand code (see below) of your TV.
e.g. To enter 0001
Hold down.
•Some brands have several codes. Try one by one until the remote control can operate your TV.
2 Release  .
.
The brand code is memorized.
Notes
 TOSHIBA code is already set when you operate this player for the first time.
 When replacing the batteries of the remote control, re-enter the brand code of your TV.
 Brand code table
Brand name |
|
|
|
Brand code |
|
|
|
Toshiba |
0001 |
0021 |
0071 |
0411 |
0431 |
0831 |
|
|
0841 |
0851 |
1341 |
1611 |
1621 |
1781 |
|
|
1951 |
2121 |
2491 |
4371 |
5951 |
5971 |
|
Bell & Howell |
6041 |
|
|
|
|
|
|
0081 |
0431 |
|
|
|
|
||
Citizen |
0051 |
0381 |
0471 |
0551 |
0621 |
0851 |
|
Curtis Mathes |
1561 |
|
|
|
|
|
|
0051 |
0431 |
0531 |
0621 |
0851 |
1521 |
||
Emerson |
1561 |
6671 |
|
|
|
|
|
0051 |
0111 |
0121 |
0141 |
0151 |
0161 |
||
|
0201 |
0211 |
0351 |
0381 |
0431 |
0521 |
|
|
0561 |
0621 |
0691 |
1241 |
1291 |
1371 |
|
Fisher |
1561 |
2481 |
4861 |
|
|
|
|
0251 |
0401 |
0431 |
1151 |
2451 |
|
||
GE |
0051 |
0091 |
0181 |
0321 |
0371 |
0591 |
|
|
0621 |
0711 |
0741 |
1041 |
1471 |
1521 |
|
Goldstar |
2481 |
4691 |
4881 |
4891 |
6671 |
|
|
0051 |
0161 |
0231 |
0451 |
0501 |
0621 |
||
|
0661 |
0771 |
0961 |
1431 |
1561 |
2491 |
|
|
|
|
|
|
|
|
|
|
|
|
|
|
|
|
|
|
|
|
|
|
Introduction |
|
Operating your TV with the remote control |
Connections |
|
||||||||||||||||||||
|
|
|||||||||||||||||||||
Point the remote control to your TV after you have |
|
|
|
|||||||||||||||||||
entered the brand code. Operate your TV with the |
|
|
|
|||||||||||||||||||
buttons below. |
|
|
|
|
|
|
|
|
|
|
|
|
|
|
|
|
|
|
|
|
||
46 $6$Ê\ |
|
|
|
|
|
|
|
|
|
|
|
|
|
|
|
|
|
|
|
(Basic) |
Playback |
|
|
|
|
|
|
|
|
|
|
|
|
|
|
|
|
|
|
|
|
||||
|
|
|
|
|
|
|
|
|
|
|
|
|
|
|
|
|
|
|
||||
|
|
|
|
|
|
|
|
|
|
|
|
|
|
|
|
|
|
|
||||
|
|
|
|
|
|
|
|
|
|
|
|
|
|
|
|
|
|
|
||||
|
|
|
|
|
|
|
|
|
|
|
|
|
|
|
|
|
|
|
|
|
||
|
/ ÊV > }iÊÌ iÊÛ `i Ê |
|
|
|
|
|
|
|
|
|
|
|
|
|
|
|
|
|
|
|
||
|
|
|
|
|
|
|
|
|
|
|
|
|
|
|
|
|
|
|
||||
|
|
|
|
|
|
|
|
|
|
|
|
|
|
|
|
|
|
|
||||
|
|
|
|
|
|
|
|
|
|
|
|
|
|
|
|
|
|
|
||||
«ÕÌ |
|
|
|
|
|
|
|
|
|
|
|
|
|
|
|
|
|
|
|
(Advanced) |
Playback |
|
|
|
|
|
|
|
|
|
|
|
|
|
|
|
|
|
|
|
|||||
|
/ ÊÃi iVÌÊÌ iÊ/6ÊV > i |
|
|
|
|
|
|
|
|
|
|
|
|
|
|
|
|
|
||||
|
|
|
|
|
|
|
|
|
|
|
|
|
|
|
|
|
|
|||||
|
|
|
|
|
|
|
|
|
|
|
|
|
|
|
|
|
|
|||||
46 6 Ê\ |
|
|
|
|
|
|
|
|
|
|
|
|
|
|
|
|
|
|
|
|
|
|
|
/ ÊÌÕÀ Ê Ê> `Ê vvÊÌ iÊ/6 |
|
|
|
|
|
|
|
|
|
|
|
|
|
|
|
|
|
|
|
||
46 #(Ê\ |
|
|
|
|
|
|
|
|
|
|
|
|
|
|
|
|
|
|
|
|
|
|
46 -54%Ê\ |
|
|
|
|
|
|
|
|
|
|
|
|
|
|
|
|
|
|
|
connection |
Internet |
|
|
|
|
|
|
|
|
|
|
|
|
|
|
|
|
|
|
|
|
||||
|
/ Ê ÕÌiÊÌ iÊ/6 |
|
|
|
|
|
|
|
|
|
|
|
|
|
|
|
|
|
|
|||
|
|
|
|
|
|
|
|
|
|
|
|
|
|
|
|
|
|
|
|
|
||
46 6/, Ê\ |
|
|
|
|
|
|
|
|
|
|
|
|
|
|
|
|
|
|
|
|
|
|
|
/ К>` ХГМКМ iКЫ Х i |
|
|
|
|
|
|
|
|
|
|
|
|
|
|
|
|
|
|
|
|
|
Notes |
|
|
|
|
|
|
|
|
|
|
|
|
|
|
|
|
|
|
Others |
|
||
|
|
|
|
|
|
|
|
|
|
|
|
|
|
|
|
|
|
|
||||
|
|
|
|
|
|
|
|
|
|
|
|
|
|
|
|
|
|
|
||||
|
For some TVs, pressing the volume button once may |
|
||||||||||||||||||||
|
|
|
||||||||||||||||||||
|
change the volume by more than one level. |
|
|
|
|
|
|
|
|
|
||||||||||||
|
Even after the player's remote control is programmed, |
|
|
|||||||||||||||||||
|
it may not operate some or all of the features on your |
|
|
|||||||||||||||||||
|
other device. |
|
|
|
|
|
|
|
|
|
|
|
|
|
|
|
|
|
|
|
|
|
|
If this happens and you wish to use those features, you |
|
|
|||||||||||||||||||
|
will need to use the device's original remote control. |
|
|
|||||||||||||||||||
|
Brand name |
|
|
|
Brand code |
|
|
|
|
|
|
|
|
|
||||||||
|
Hitachi |
0031 |
0051 |
0161 |
0191 |
0301 |
|
0601 |
|
|
||||||||||||
|
|
|
0621 |
0641 |
0671 |
0811 |
0951 |
|
1011 |
|
|
|||||||||||
|
|
|
1061 |
1241 |
1361 |
1651 |
1711 |
|
1731 |
|
|
|||||||||||
|
|
|
1741 |
1751 |
2051 |
2131 |
2381 |
|
4121 |
|
|
|||||||||||
|
Infinity |
4731 |
4911 |
4961 |
|
|
|
|
|
|
|
|
|
|
|
|
||||||
|
0631 |
|
|
|
|
|
|
|
|
|
|
|
|
|
|
|
|
|
|
|
||
|
JBL |
0631 |
|
|
|
|
|
|
|
|
|
|
|
|
|
|
|
|
|
|
|
|
|
JVC |
0101 |
0161 |
0191 |
0241 |
0331 |
|
0511 |
|
|
||||||||||||
|
|
|
0561 |
0601 |
0741 |
1321 |
1421 |
|
2161 |
|
|
|||||||||||
|
|
|
2171 |
4351 |
4701 |
4751 |
4771 |
|
4971 |
|
|
|||||||||||
|
LXI |
5031 |
5041 |
5051 |
|
|
|
|
|
|
|
|
|
|
|
|
||||||
|
0411 |
0431 |
0621 |
0631 |
1041 |
|
1171 |
|
|
|||||||||||||
|
Magnavox |
1521 |
2491 |
6671 |
|
|
|
|
|
|
|
|
|
|
|
|
||||||
|
0051 |
0271 |
0291 |
0341 |
0361 |
|
0421 |
|
|
|||||||||||||
|
|
|
0551 |
0621 |
0631 |
0661 |
0971 |
|
0981 |
|
|
|||||||||||
|
Marantz |
2221 |
5221 |
5231 |
5241 |
|
|
|
|
|
|
|
|
|
||||||||
|
0051 |
0481 |
0621 |
0631 |
0641 |
|
2491 |
|
|
|||||||||||||
|
Memorex |
0081 |
0431 |
0501 |
0621 |
2491 |
|
4421 |
|
|
||||||||||||
|
MGA |
5251 |
|
|
|
|
|
|
|
|
|
|
|
|
|
|
|
|
|
|
|
|
|
0051 |
0251 |
0261 |
0371 |
0501 |
|
0621 |
|
|
|||||||||||||
|
|
|
0661 |
0761 |
|
|
|
|
|
|
|
|
|
|
|
|
|
|
|
|
|
|
(Continued)
17

Chapter1Introduction
Preparation of the remote control (Continued)
Brand name |
|
|
|
Brand code |
|
|
|
Mitsubishi |
0051 |
0251 |
0261 |
0371 |
0491 |
0501 |
|
MTC |
0621 |
0661 |
0761 |
2231 |
5261 |
5271 |
|
0051 |
0501 |
0621 |
0851 |
|
|
||
NAD |
0411 |
0621 |
1061 |
|
|
|
|
Optonica |
0541 |
1101 |
|
|
|
|
|
Panasonic |
0631 |
0711 |
0741 |
1271 |
1351 |
1501 |
|
|
1701 |
1791 |
1801 |
2111 |
2151 |
2281 |
|
|
5281 |
5301 |
5661 |
|
|
|
|
Philco |
0051 |
0161 |
0271 |
0291 |
0361 |
0421 |
|
|
0501 |
0551 |
0621 |
0631 |
0661 |
0711 |
|
Philips |
0051 |
0161 |
0271 |
0321 |
0361 |
0421 |
|
|
0461 |
0551 |
0631 |
0661 |
0711 |
2141 |
|
|
2351 |
5221 |
5401 |
5411 |
5431 |
5451 |
|
|
5461 |
5481 |
5501 |
5531 |
5541 |
5601 |
|
Pioneer |
5621 |
|
|
|
|
|
|
0051 |
0621 |
0681 |
0721 |
0751 |
1061 |
||
|
1241 |
1581 |
1971 |
4081 |
4111 |
|
|
Proton |
0051 |
0161 |
0621 |
0651 |
2491 |
|
|
Quasar |
0711 |
0741 |
0801 |
1271 |
2281 |
5651 |
|
|
5661 |
|
|
|
|
|
|
Radio Shack |
0431 |
1521 |
2481 |
|
|
|
|
Radio Shack/Realistic |
0051 |
0161 |
0381 |
0431 |
0541 |
0621 |
|
|
1431 |
1561 |
6671 |
|
|
|
|
RCA |
0051 |
0221 |
0501 |
0621 |
0661 |
0711 |
|
|
0871 |
0921 |
0941 |
1001 |
1041 |
1071 |
|
|
1091 |
1181 |
1241 |
1301 |
1461 |
1521 |
|
|
1531 |
2481 |
4361 |
4861 |
4881 |
5681 |
|
|
6641 |
6671 |
|
|
|
|
|
Realistic |
0431 |
1521 |
|
|
|
|
|
Runco |
0011 |
|
|
|
|
|
|
Brand name |
|
|
|
Brand code |
|
|
|
Samsung |
0051 |
0161 |
0501 |
0531 |
0621 |
0661 |
|
|
0851 |
0931 |
1021 |
1141 |
1431 |
1561 |
|
|
1591 |
1601 |
1771 |
1811 |
1821 |
1831 |
|
|
1841 |
1851 |
1931 |
2081 |
2101 |
2311 |
|
|
4011 |
4061 |
|
|
|
|
|
Sanyo |
0051 |
0261 |
0401 |
0431 |
0791 |
0901 |
|
|
1151 |
|
|
|
|
|
|
Sears |
0051 |
0151 |
0191 |
0251 |
0331 |
0401 |
|
|
0411 |
0431 |
0621 |
0661 |
1041 |
1081 |
|
|
1151 |
1481 |
1521 |
2481 |
6671 |
|
|
Sharp |
0051 |
0111 |
0161 |
0351 |
0541 |
0581 |
|
|
0611 |
0621 |
0731 |
0891 |
1101 |
1561 |
|
|
1721 |
1871 |
1881 |
1941 |
2181 |
2341 |
|
|
5741 |
5751 |
|
|
|
|
|
Sony |
0441 |
1111 |
1231 |
1511 |
1901 |
2061 |
|
Soundesign |
0051 |
0151 |
0381 |
0551 |
0621 |
2481 |
|
Sylvania |
0051 |
0071 |
0271 |
0291 |
0341 |
0361 |
|
|
0421 |
0551 |
0621 |
0631 |
0661 |
0861 |
|
|
1441 |
2191 |
2201 |
4151 |
5481 |
|
|
Tandy |
1101 |
|
|
|
|
|
|
Technics |
0741 |
|
|
|
|
|
|
Teknika |
0051 |
0081 |
0151 |
0161 |
0191 |
0341 |
|
|
0381 |
0471 |
0501 |
0551 |
0621 |
0851 |
|
|
1271 |
1561 |
2481 |
|
|
|
|
Wards |
0051 |
0081 |
0141 |
0151 |
0181 |
0211 |
|
|
0271 |
0321 |
0341 |
0361 |
0421 |
0501 |
|
|
0541 |
0621 |
0631 |
0661 |
1051 |
1521 |
|
|
2491 |
6671 |
|
|
|
|
|
Zenith |
0011 |
0051 |
0081 |
0781 |
1281 |
1571 |
|
|
2091 |
2251 |
2361 |
2441 |
4821 |
6151 |
|
|
6171 |
6181 |
|
|
|
|
|
Hint on reading this manual
 Icons for function applicability
The following icons are used in this manual to indicate features and/or functions that are applicable to various types of discs.
(For disc compatibility information, see  page 26.)
|
Icon |
Disc |
|
Icon |
Disc |
||
|
|
|
|
|
|
|
|
|
|
|
HD DVD |
|
|
|
DVD-R |
|
HD DVD |
|
|
DVD-R |
|
||
|
|
video disc |
|
|
|||
|
|
|
|
|
|
|
|
|
|
|
|
|
|
|
|
|
DVD Video |
|
DVD video disc |
|
CD |
|
Audio CD |
|
|
|
|
|
|
|
|
|
|
|
|
|
|
|
|
|
|
|
|
|
|
CD-RW |
|
|
DVD-RAM |
|
DVD-RAM |
|
CD-RW |
|
|
|
|
|
(CD-DA) |
|
(CD-DA format) |
||
|
|
|
|
|
|
||
|
|
|
|
|
|
|
|
|
|
|
|
|
|
CD-R |
|
|
DVD-RW |
|
DVD-RW |
|
CD-R |
|
|
|
|
|
(CD-DA) |
|
(CD-DA format) |
||
|
|
|
|
|
|
||
|
|
|
|
|
|
|
|
 Instructions and actual buttons
Most instructions are based on remote control operation, unless otherwise noted. You can use the buttons on the remote control and those on the main unit as well when they have the same function. Some functions are available only from the remote control.
18

2 Connections
Connect your player to your A/V system.
Connecting to a TV
Connecting to a device with an HDMI input Connecting to a TV with component video inputs Connecting to an audio system
Connections Introduction
(Basic) |
Playback |
(Advanced) |
Playback |
connection |
Internet |
Others |
|
Chapter2Connections
Connecting to a TV
Connect the player to your TV to view disc contents.
To view 480 , 720
, 720 , 1080
 pictures, use the HDMI OUTPUT jack or the COMPONENT OUTPUT jacks to connect to a TV. (
  page 21, “Connecting to a device with an HDMI input”,
  page 22, “Connecting
to a TV with component video inputs”). Some discs |
VIDEO INPUT |
|
|||
may require use of the HDMI OUTPUT for viewing of |
INPUT |
INPUT |
INPUT |
||
|
|
|
|||
high resolution material. |
|
|
|
|
|
See |
page 21. |
|
White |
VIDEO |
|
If the TV has an S-video input, |
|
|
|||
|
L |
L |
|||
|
|
connect the player with an |
|
||
|
|
AUDIO |
AUDIO |
AUDIO |
|
|
|
S-video cable. When using an |
R |
|
R |
|
|
S-video cable, do not connect |
|
|
|
|
|
the yellow video cable. |
Red |
Yellow |
|
|
|
|
|
|
|
Audio cable (supplied)
S-video cable
(not supplied)
Video cable (supplied)
White
Yellow
Red
Caution
 Do not power this player using any power cord other than the one supplied with this player.
 Do not use the supplied power cord with any device other than this player.
Connect the power cord finally to a 120V AC wall outlet.
Switching output signals and setting the resolution
Turn on the player ( page 28) before you configure the following setting.
1 |
Press |
(remote control). |
Player display window
Make sure the HDMI indicator TURNS OFF.
HDMI
Notes
2 |
Press |
repeatedly (remote |
|
control). |
|
Set the resolution to output from the player in accordance with the scanning method (480 ) of the connected TV.
Select “480 ” on the player display window.
 When you connect the player to your TV, be sure to turn off the power and unplug both units from the wall outlet before making any connections.
 Connect the player directly to your TV. If you connect the player to a VCR, TV/VCR combination, video selector or AV amplifier, the playback picture may be distorted due to copy protection.
20
 Loading...