


 Loading...
Form No. 3412-288 Rev B
22in Recycler® Lawn Mower
Model No. 20379—Serial No. 400000000 and Up
Operator's Manual
Introduction
This rotary-blade, walk-behind lawn mower is intended to be used by residential homeowners. It is designed primarily for cutting grass on well-maintained lawns on residential properties. It is not designed for cutting brush or for agricultural uses.
Read this information carefully to learn how to operate and maintain your product properly and to avoid injury and product damage. You are responsible for operating the product properly and safely.
You may contact Toro directly at www.Toro.com for product and accessory information, help finding a dealer, or to register your product.
Whenever you need service, genuine Toro parts, or additional information, contact an Authorized Service Dealer or Toro Customer Service and have the model and serial numbers of your product ready. Figure 1 identifies the location of the model and serial numbers on the product.
g193170
Figure 1
1.Model and serial number plate
Write the product model and serial numbers in the space below:
Model No.
Serial No.
This manual identifies potential hazards and has safety messages identified by the safety-alert symbol (Figure 2), which signals a hazard that may cause serious injury or death if you do not follow the recommended precautions.
g000502
Figure 2
1.Safety-alert symbol
This manual uses 2 words to highlight information. Important calls attention to special mechanical information and Note emphasizes general information worthy of special attention.
 WARNING
CALIFORNIA
Proposition 65 Warning
This product contains a chemical or chemicals known to the State of California to cause cancer, birth defects, or reproductive harm.
The engine exhaust from this product contains chemicals known to the State of California to cause cancer, birth defects, or other reproductive harm.
It is a violation of California Public Resource Code Section 4442 or 4443 to use or operate the engine on any forest-covered, brush-covered, or grass-covered land unless the engine is equipped with a spark arrester, as defined in Section 4442, maintained in effective working order or the engine is constructed, equipped, and maintained for the prevention of fire.
This spark ignition system complies with Canadian ICES-002.
The enclosed Engine Owner's Manual is supplied for information regarding the US Environmental Protection Agency (EPA) and the California Emission Control Regulation of emission systems, maintenance, and warranty. Replacements may be ordered through the engine manufacturer.
Net Torque: The gross or net torque of this engine was laboratory rated by the engine manufacturer in accordance with the Society of Automotive Engineers (SAE) J1940.
As configured to meet safety, emission, and operating requirements, the actual engine torque on this class of mower will be significantly lower. Go to www.Toro.com to view specifications on your mower model.
© 2017—The Toro® Company |
Register at www.Toro.com. |
Original Instructions (EN) |
*3412-288* B |
8111 Lyndale Avenue South |
|
Printed in the USA |
|
Bloomington, MN 55420 |
|
All Rights Reserved |

Contents |
|
Introduction .................................................................. |
1 |
Safety ........................................................................... |
2 |
General Safety......................................................... |
2 |
Safety and Instructional Decals ................................. |
3 |
Setup ............................................................................ |
4 |
1 Assembling and Unfolding the Handle ..................... |
4 |
2 Installing the Recoil-starter Rope in the Rope |
|
Guide................................................................. |
5 |
3 Filling the Engine with Oil...................................... |
5 |
4 Assembling the Grass Bag...................................... |
6 |
Product Overview .......................................................... |
7 |
Operation ..................................................................... |
8 |
Before Operation ....................................................... |
8 |
Before Operation Safety........................................... |
8 |
Filling the Fuel Tank ................................................ |
8 |
Checking the Engine-Oil Level.................................. |
9 |
Adjusting the Handle Height..................................... |
9 |
Adjusting the Cutting Height .................................... |
9 |
During Operation ..................................................... |
10 |
During Operating Safety.......................................... |
10 |
Starting the Engine................................................. |
10 |
Using the Self-Propel Drive ..................................... |
11 |
Shutting Off the Engine .......................................... |
11 |
Recycling the Clippings ........................................... |
11 |
Bagging the Clippings ............................................. |
11 |
Side-Discharging the Clippings................................. |
11 |
Operating Tips ...................................................... |
12 |
After Operation ........................................................ |
13 |
After Operating Safety ............................................ |
13 |
Cleaning under the Machine..................................... |
13 |
Folding the Handle................................................. |
14 |
Maintenance ................................................................. |
15 |
Recommended Maintenance Schedule(s) ...................... |
15 |
Maintenance Safety................................................. |
15 |
Preparing for Maintenance....................................... |
15 |
Servicing the Air Filter ............................................ |
15 |
Changing the Engine Oil ......................................... |
16 |
Replacing the Blade ................................................ |
17 |
Adjusting the Self-Propel Drive................................ |
18 |
Storage ........................................................................ |
18 |
Preparing the Machine for Storage ............................ |
18 |
Removing the Machine from Storage......................... |
18 |
Safety
This machine has been designed in accordance with ANSI B71.1-2012.
General Safety
This product is capable of amputating hands and feet and of throwing objects. Always follow all safety instructions to avoid serious personal injury.
Using this product for purposes other than its intended use could prove dangerous to you and bystanders.
•Read and understand the contents of this Operator’s Manual before starting the engine.
•Do not put your hands or feet near moving components of the machine.
•Do not operate the machine without all guards and other safety protective devices in place and working on the machine.
•Keep clear of any discharge opening. Keep bystanders a safe distance away from the machine.
•Keep children out of the operating area. Never allow children to operate the machine.
•Stop the machine and shut off the engine before servicing, fueling, or unclogging the machine.
Improperly using or maintaining this machine can result in injury. To reduce the potential for injury, comply with these safety instructions and always pay attention to the safety-alert symbol, which means Caution, Warning, or
Danger—personal safety instruction. Failure to comply with these instructions may result in personal injury or death.
You can find additional items of safety information in their respective sections throughout this manual.
2

Safety and Instructional Decals
Safety decals and instructions are easily visible to the operator and are located near any area of potential danger. Replace any decal that is damaged or missing.
decaloemmarkt
Manufacturer's Mark
1.Indicates the blade is identified as a part from the original machine manufacturer.
decal94-8072
94-8072
decal131-4514
131-4514
1.Warning—read the Operator's Manual.
2.Cutting/dismemberment hazard of hand or foot, mower blade—stay away from moving parts; keep all guards and shields in place.
3.Cutting/dismemberment hazard of hand or foot, mower blade—disconnect the spark-plug wire and read the instructions before servicing or performing maintenance.
4.Thrown object hazard—keep bystanders a safe distance away from the machine.
5.Cutting/dismemberment hazard of hand or foot, mower blade—do not operate up and down slopes; operate side to side on slopes; stop the engine before leaving the operating position; and look behind you when backing up.
decal112-8867
112-8867
1. Lock |
2. Unlock |
|
|
decal117-2718
117-2718
3
Setup
Important: Remove and discard the protective plastic sheet that covers the engine and any other plastic or wrapping on the machine.
1
Assembling and Unfolding the
Handle
No Parts Required
Procedure
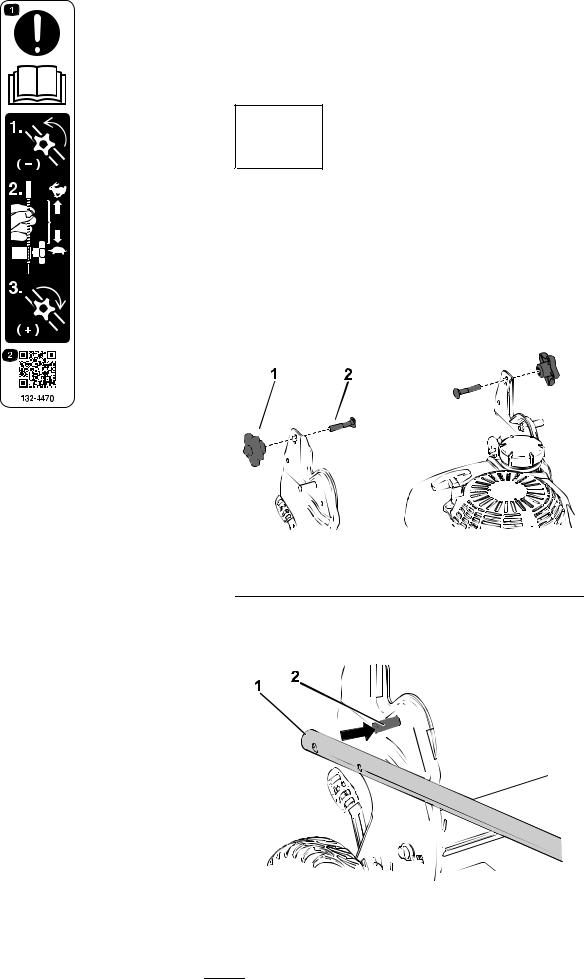
1.Remove and save the 2 handle knobs and 2 carriage bolts from the handle brackets (Figure 3).
decal132-4470
132-4470
Traction Adjustment
1. Attention; read the |
2. Scan the QR code for |
Operator's Manual—1) |
more information on |
Loosen the knob by turning |
traction adjustment. |
it counterclockwise; 2) Pull |
|
the cable(s) away from |
|
the engine to decrease |
|
the traction, or push the |
|
cable(s) toward the engine |
|
to increase the traction; |
|
3) Tighten the knob by |
|
turning it clockwise. |
|
|
|
g195256
Figure 3
1. Handle knob (2) |
2. Carriage bolt (2) |
2.Install the handle ends onto the mower housing so that the pin attached to each handle bracket is in the lower hole of its related handle end (Figure 4).
g189866
Figure 4
1. Handle end |
2. Pin |
|
|
4

Note: The pins do not show through the holes in the handle ends when the handle is in the folded position.
3.Unfold the handle to the operating position by rotating it rearward (Figure 5).
g193172
Figure 5
1. Operating position |
2. Folded position |
4.Insert the carriage bolt (with the bolt head toward the inside) through the upper or lower square hole in handle bracket and the upper hole in the handle end (Figure 6).
g189871
Figure 6
1. Handle knob |
2. Carriage bolt |
5.Loosely install the handle knobs onto the carriage bolts.
2
Installing the Recoil-starter
Rope in the Rope Guide
No Parts Required
Procedure
Important: To start the engine safely and easily whenever you use the machine, install the recoil-starter rope in the rope guide.
Hold the blade-control bar to the upper handle and pull the recoil-starter rope through the rope guide on the handle (Figure 7).
g003251
Figure 7
1. Recoil-starter rope |
2. Rope guide |
|
|
3
Filling the Engine with Oil
No Parts Required
Procedure
Important: Your machine does not come with oil in the engine, but it does come with a bottle of oil. Before starting the engine, fill the engine with oil.
Engine oil capacity: 0.5 L (18 fl oz)
Oil viscosity: SAE 30 or SAE 10W-30 detergent oil
API service classification: SJ or higher
Your machine does not come with oil in the engine.
1.Move the machine to a level surface.
2.Remove the dipstick by rotating the cap counterclockwise and pulling it out (Figure 8).
5

g024432
Figure 8
1. Full |
3. Low |
2.High
3.Carefully pour about 3/4 of the engine capacity of oil into the oil-fill tube.
4.Wait about 3 minutes for the oil to settle in the engine.
5.Wipe the dipstick clean with a clean cloth.
6.Insert the dipstick into the oil-fill tube, but do not screw it in, then remove the dipstick.
7.Read the oil level on the dipstick (Figure 8).
•If the oil level on the dipstick is too low, carefully pour a small amount of oil into the oil-fill tube, wait 3 minutes, and repeat steps 3 through 6 until the oil level on the dipstick is at the correct level.
•If the oil level on the dipstick is too high, drain the excess oil until the oil level on the dipstick is at the correct level; refer to Changing the Engine Oil (page 16).
Important: If the oil level in the engine is too low or too high and you run the engine, you may damage the engine.
Important: Change the engine oil after the first 5 operating hours; change it yearly thereafter. Refer to Changing the Engine Oil (page 16).
8.Install the dipstick securely.
4
Assembling the Grass Bag
No Parts Required
Procedure
1.Slip the grass bag over the frame as shown in Figure 9.
g027120
Figure 9
1. Handle |
3. Grass bag |
2.Frame
Note: Do not slip the bag over the handle (Figure 9).
2.Hook the bottom channel of the bag onto the bottom of the frame (Figure 10).
6
Loading...