Toro 115-0789 Installation Instructions

Form No. 3359-794 Rev A
Replacement Bucket Edge Kit
for Compact Utility Loader Buckets
Model No. 115–0789
Installation Instructions
This kit requires parts to be welded. Welding can expose you to a number of hazards including toxic fumes, smoke, dust, burns, fires, explosions, electric shock, radiation, noise, and heat stress which can cause serious injury and death.
•The welding portions of the kit should be performed by a trained welder.
•Weld in an adequately ventilated area with suitable fire extinguishing equipment readily available.
•Weld in a fire-safe workplace. This can be accomplished by welding behind fire-safe barriers or curtains and on concrete or other fire-safe flooring. Remove or protect all combustibles from ignition sources.
•Wear proper protective clothing when welding, such as fire retardant coveralls. Protect your hands with leather gauntlet gloves. Protect your feet with high top leather shoes, preferably safety shoes.
•Protect your eyes when welding. A welding helmet or hand shield with filter plate and cover plate is mandatory to protect the eyes while welding. Transparent goggles or safety glasses should be worn at all times.
Removing the Old Blade
1.Secure the bucket upside down, so that the blade under the front edge of the bucket is exposed.
2.Using a power grinder, grind off the old blade from the bucket.
Important: Ensure that you grind away all of the old blade material, but do not grind into the metal of the bucket itself.
Grinding steel is very loud and could damage your hearing. It also produces sparks and flying debris which could burn you and damage your eyes.
•Always wear hearing protection when using a grinder.
•Wear transparent goggles or safety glasses to protect your eyes.
•Wear proper protective clothing when grinding, such as fire retardant coveralls. Protect your hands with leather gloves. Protect your feet with high top leather shoes, preferably safety shoes.
Cutting the Blade to Fit
1.Cut the blade supplied with this kit to the proper dimension for the bucket you are working on, as listed in the following table:
Note: The bucket model number is located on a plate on the back of the bucket.
Bucket Model |
Blade Length Required |
|
|
22409 |
41.3 inches (104.9 cm) |
|
|
22410 |
47.48 inches (120.6 cm) |
|
(No cutting necessary) |
22422 |
33.66 inches (85.5 cm) |
|
|
22520 |
33.66 inches (85.5 cm) |
|
|
2.File off any burrs from the blade that were formed during the cutting process.
© 2007—The Toro® Company |
Register at www.Toro.com. |
Original Instructions (EN) |
8111 Lyndale Avenue South |
|
Printed in the USA. |
Bloomington, MN 55420 |
|
All Rights Reserved |

Welding the Blade to the Bucket
For this procedure, you need to obtain and use a low hydrogen electrode because the blade is high carbon steel.
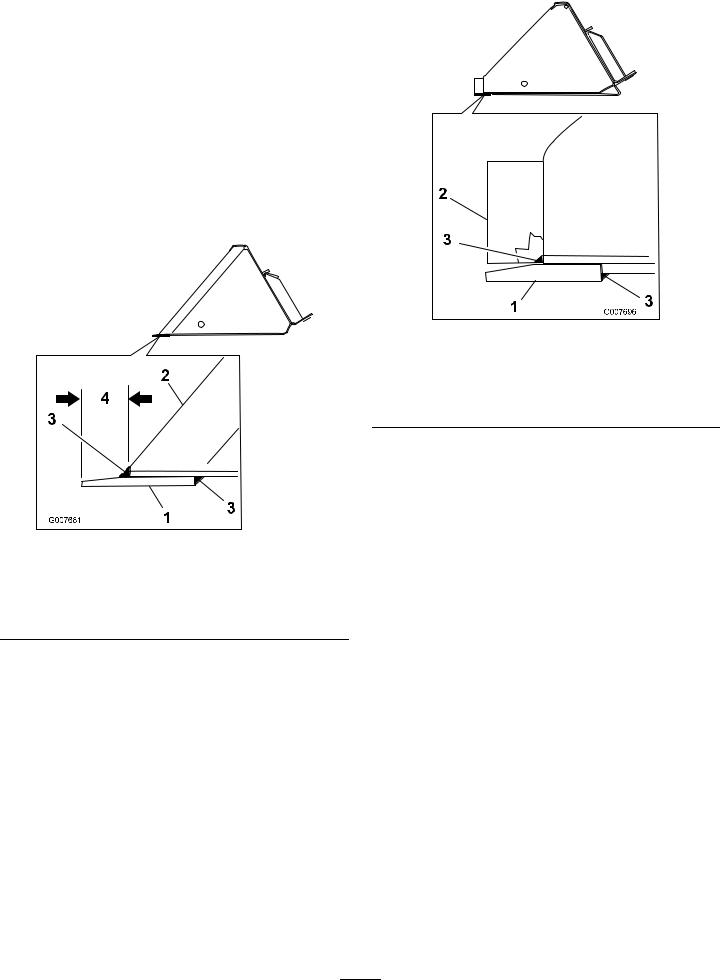
1.Clamp the blade to the front underside of the bucket (Figure 1), ensuring that you leave access to the entire front and rear seams of the blade for welding.
•For models 22409 and 22410, clamp the blade so that 1-1/4 inches (3.2 cm) of the blade protrudes from the front of the bucket (Figure 1).
Figure 1
Side View (Model 22409 shown)
1. |
Blade |
3. |
Fillet weld, 1/8 inch (0.3 |
2. |
Bucket |
|
cm) |
4. |
1-1/4 inches (3.2 cm) |
•For models 22422 and 22520, clamp the blade so that it lines up with the side blades and is tight against the plate on the bottom of the bucket (Figure 2).
|
Figure 2 |
|
Side View (Model 22422 shown) |
1. Blade |
3. Fillet weld, 3/16 inch (0.5 |
|
cm) |
2.Side blade on the bucket
2.Weld the blade to the bucket across the entire length of the bucket using a low hydrogen electrode at the front/top and rear/bottom seams of the blade (Figure 1) as follows:
•For models 22409 and 22410, use an 1/8 inch (0.3 cm) fillet weld (Figure 1).
•For models 22422 and 22520, use a 3/16 inch (0.5 cm) fillet weld (Figure 2).
Important: The blade is made from high-carbon steel. You must use a low hydrogen electrode when welding it. If you use a standard electrode, the seams will be weak and the blade may fall off during use.
2

Form No. 3359-794 Rev A
Kit de filo de repuesto
para cucharones del Vehículo compacto de carga
Model No. 115–0789
Installation Instructions
Este kit requiere la realización de soldaduras de arco. La soldadura puede exponerle a diversos peligros, incluyendo vapores tóxicos, humo, polvo, quemaduras, incendio, explosión, descarga eléctrica, radiación, ruido y calor, que pueden causar graves lesiones o la muerte.
•Las soldaduras necesarias deben ser realizadas por un soldador capacitado.
•Suelde en un lugar que tenga una ventilación adecuada, y tenga a mano equipos apropiados de extinción de incendios.
•Realice las soldaduras en un lugar de trabajo protegido contra incendios. Esta condición puede obtenerse soldando detrás de pantallas o cortinas ignífugas y sobre un suelo de hormigón u otro material ignífugo. Retire cualquier material combustible o protéjalo de toda fuente de ignición.
•Lleve ropa protectora adecuada mientras suelda, como por ejemplo un mono de trabajo ignífugo. Protéjase las manos con guantes largos de cuero. Protéjase los pies con zapatos altos de cuero, preferentemente zapatos de seguridad.
•Protéjase los ojos mientras suelda. Es obligatorio el uso de un casco de soldar o una pantalla manual con filtro y placa protectora para proteger los ojos mientras suelda. Deben llevarse gafas de seguridad transparentes en todo momento.
Cómo retirar el filo cortante antiguo
1.Sujete el cucharón boca abajo, de manera que quede expuesto el filo cortante, debajo del borde delantero del mismo.
2.Elimine el filo cortante antiguo del cucharón con una amoladora angular.
Important: Asegúrese de eliminar todo el material del filo antiguo, pero sin amolar el metal del cucharón en sí.
El amolado del acero produce mucho ruido que podría dañar el oído. También produce chispas y lanza residuos que podrían quemarle o dañar sus ojos.
•Lleve siempre protección auditiva mientras utilice la amoladora.
•Lleve gafas de seguridad transparentes para proteger los ojos.
•Lleve ropa protectora adecuada mientras utilice la amoladora, como por ejemplo un mono de trabajo ignífugo. Protéjase las manos con guantes de cuero. Protéjase los pies con zapatos altos de cuero, preferentemente zapatos de seguridad.
Corte el filo a la longitud correcta
1.Corte el filo suministrado con este kit a la longitud correcta para su cucharón, según lo indicado en la tabla siguiente:
© 2007—The Toro® Company |
Register at www.Toro.com. |
Original Instructions (EN) |
8111 Lyndale Avenue South |
|
Impreso en EE.UU. |
Bloomington, MN 55420 |
|
All Rights Reserved |
 Loading...