


20037

Operator ’s Manual
Para obtener una versión gratis de este manual en español, escriba a la dirección indicada
más abajo. Asegúrese de indicar el modelo y el número de serie de su producto.
Pour obtenir gratuitement une version en français de ce manuel, écrivez à l’adresse
ci–dessous. N’oubliez pas d’indiquer les numéros de modèle et de série de votre produit.
The Toro Company, Attn: Parts Dept., 8111 Lyndale Ave S, Bloomington, MN 55420-1196.
Domestic English (EN)
Form No. 3328-678
Super Recycler
Walk Power Lawn Mower
Model No. 20036—Serial No. 230000001 and Up
Model No. 20037—Serial No. 230000001 and Up

2
All Rights Reserved
Printed in the USA
2002 by The Toro Company
8111 Lyndale Avenue South
Bloomington, MN 55420-1196
CALIFORNIA
Proposition 65 Warning
The engine exhaust from this product contains
chemicals known to the State of California to cause
cancer, birth defects, or other reproductive harm.
Warning
Important This engine is not equipped with a spark
arrester muffler. It is a violation of California Public
Resource Code Section 4442 to use or operate this engine
on any forest-covered, brush-covered or grass-covered
land. Other states or federal areas may have similar laws.
This spark ignition system complies with Canadian
ICES-002.
Ce système d’allumage par étincelle de véhicule est
conforme à la norme NMB-002 du Canada.
The enclosed Engine Owner’s Manual is supplied for
information regarding The U.S. Environmental
Protection Agency (EPA) and the California Emission
Control Regulation of emission systems, maintenance
and warranty. See the emission label(s) on the engine.
Keep this engine Owner’s Manual with your unit.
Should this engine Owner’s Manual become damaged
or illegible, replace immediately. Replacements may be
ordered through the engine manufacturer.
Contents
Page
Introduction 2. . . . . . . . . . . . . . . . . . . . . . . . . . . . . . . .
Safety 3. . . . . . . . . . . . . . . . . . . . . . . . . . . . . . . . . . . . .
General Lawn Mower Safety 3. . . . . . . . . . . . . . . .
Safety and Instruction Decals 6. . . . . . . . . . . . . . . .
Setup 6. . . . . . . . . . . . . . . . . . . . . . . . . . . . . . . . . . . . .
Loose Parts 6. . . . . . . . . . . . . . . . . . . . . . . . . . . . . .
Installing the Handle 7. . . . . . . . . . . . . . . . . . . . . .
Installing the Starter Rope 7. . . . . . . . . . . . . . . . . .
Before Starting 8. . . . . . . . . . . . . . . . . . . . . . . . . . . . . .
Filling the Crankcase with Oil 8. . . . . . . . . . . . . . .
Filling the Fuel Tank with Gasoline 8. . . . . . . . . . .
Reviewing the Maintenance Schedule 9. . . . . . . . .
Operation 9. . . . . . . . . . . . . . . . . . . . . . . . . . . . . . . . . .
Controls 9. . . . . . . . . . . . . . . . . . . . . . . . . . . . . . . .
Starting the Engine 9. . . . . . . . . . . . . . . . . . . . . . . .
Stopping the Engine 10. . . . . . . . . . . . . . . . . . . . . . .
Using the Self-propel Drive 10. . . . . . . . . . . . . . . . .
Page
Adjusting the Cutting Height 10. . . . . . . . . . . . . . . .
Using the Grass Bag 10. . . . . . . . . . . . . . . . . . . . . . .
Operating Tips 11. . . . . . . . . . . . . . . . . . . . . . . . . . .
Maintenance 13. . . . . . . . . . . . . . . . . . . . . . . . . . . . . . . .
Recommended Maintenance Schedule 13. . . . . . . . .
Checking the Engine Oil Level 14. . . . . . . . . . . . . .
Cleaning under the Housing 14. . . . . . . . . . . . . . . . .
Replacing the Air Filter 14. . . . . . . . . . . . . . . . . . . .
Servicing the Spark Plug 15. . . . . . . . . . . . . . . . . . .
Changing the Engine Oil 15. . . . . . . . . . . . . . . . . . .
Maintaining the Blade 15. . . . . . . . . . . . . . . . . . . . .
Adjusting the Self-propel Drive Cable 17. . . . . . . . .
Lubricating the Self-propel Drive 18. . . . . . . . . . . .
Cleaning under the Belt Cover 18. . . . . . . . . . . . . . .
Cleaning the Cooling System 18. . . . . . . . . . . . . . . .
Emptying the Fuel Tank 18. . . . . . . . . . . . . . . . . . . .
Folding the Handle 18. . . . . . . . . . . . . . . . . . . . . . . .
Storage 19. . . . . . . . . . . . . . . . . . . . . . . . . . . . . . . . . . . .
Preparing the Fuel System 19. . . . . . . . . . . . . . . . . .
Preparing the Engine 19. . . . . . . . . . . . . . . . . . . . . .
General Information 19. . . . . . . . . . . . . . . . . . . . . . .
Removing From Storage 19. . . . . . . . . . . . . . . . . . .
Accessories 20. . . . . . . . . . . . . . . . . . . . . . . . . . . . . . . . .
Troubleshooting 20. . . . . . . . . . . . . . . . . . . . . . . . . . . . .
The Toro Starting Guarantee 22. . . . . . . . . . . . . . . . . . .
The Toro Total Coverage Guarantee 24. . . . . . . . . . . . .
Introduction
Read this manual carefully to learn how to operate and
maintain your product properly. The information in this
manual can help you and others avoid injury and product
damage. Although Toro designs and produces safe
products, you are responsible for operating the product
properly and safely.
Whenever you need service, genuine Toro parts, or
additional information, contact an Authorized Service
Dealer or Toro Customer Service and have the model and
serial numbers of your product ready. Figure 1 illustrates
the location of the model and serial numbers on the
product.
1064
1
Figure 1
1. Location of the model and serial numbers

3
Write the product model and serial numbers in the space
below:
Model No.
Serial No.
This manual identifies potential hazards and has special
safety messages that help you and others avoid personal
injury and even death. Danger, Warning, and Caution are
signal words used to identify the level of hazard. However,
regardless of the hazard, be extremely careful.
Danger signals an extreme hazard that will cause serious
injury or death if you do not follow the recommended
precautions.
Warning signals a hazard that may cause serious injury or
death if you do not follow the recommended precautions.
Caution signals a hazard that may cause minor or moderate
injury if you do not follow the recommended precautions.
This manual uses 2 other words to highlight information.
Important calls attention to special mechanical
information and Note: emphasizes general information
worthy of special attention.
Safety
This lawn mower meets or exceeds the CPSC blade
safety requirements for walk-behind rotary lawn
mowers and the B71.1 specifications of the American
National Standards Institute in effect at the time of
production.
Toro designed and tested this lawn mower to offer
reasonably safe service; however, failure to comply with
the following instructions may result in personal injury.
Engine exhaust contains carbon monoxide, an
odorless, deadly poison that can kill you.
Do not run the engine indoors or in an enclosed
area.
Warning
To ensure maximum safety, best performance, and to
gain knowledge of the product, it is essential that you
and any other operator of the lawn mower read and
understand the contents of this manual before operating
the lawn mower.
This is the safety alert symbol. It is used to alert you
to potential personal injury hazards. Obey all safety
messages that follow this symbol to avoid possible
injury or death.
Improperly using or maintaining this lawn mower can
result in injury. To reduce the potential for injury,
comply with these safety instructions.
General Lawn Mower Safety
The following instructions have been adapted from the
ANSI/OPEI standard B71.1—1998 and ISO standard
5395:1990(E). Information or terminology specific to Toro
lawn mowers is enclosed in parenthesis.
This lawn mower is capable of amputating hands and feet
and of throwing objects. Failure to observe the following
safety instructions could result in serious injury or death.
Training
• Read this operator’s manual carefully. Be thoroughly
familiar with the controls and the proper use of the lawn
mower before starting it.
• Never allow children to operate the lawn mower. Local
regulations may restrict the age of the operator.
• Never allow adults unfamiliar with these instructions to
operate the lawn mower.
• Never mow while people (especially children) or pets
are nearby. Stop the lawn mower if anyone enters the
area.
• Tragic accidents can occur if the operator is not alert to
the presence of children. Children are often attracted to
the lawn mower and the mowing activity. Never assume
that children will remain where you last saw them.
• Keep children out of the mowing area and under the
watchful care of a responsible adult.
• Be alert and turn the lawn mower off if children enter
the area.
• Use extra care when approaching blind corners, shrubs,
trees, or other objects that may obscure vision.
• Keep in mind that the operator or user is responsible for
accidents or hazards occurring to other people or their
property.
• See the manufacturer’s instructions for proper operation
and installation of accessories. Use only the accessories
that are approved by the manufacturer.
Preparation
• Thoroughly inspect the area where you will use the
lawn mower, and remove all stones, sticks, wires,
bones, and other foreign objects.

4
• While mowing, always wear substantial footwear and
long trousers.
• Do not operate the lawn mower when barefoot or
wearing open sandals.
• Always wear safety goggles or safety glasses with side
shields when operating the lawn mower.
• Warning: Gasoline is highly flammable. Take the
following precautions:
– Store fuel in containers specifically designed for this
purpose.
– Refuel outdoors only and do not smoke while
refuelling.
– Add fuel before starting the engine. Never remove
the cap of the fuel tank or add gasoline while the
engine is running or when the engine is hot.
– If gasoline is spilled, do not attempt to start the
engine. Move the lawn mower away from the area
of spillage to avoid creating any source of ignition
until the gasoline vapors have dissipated.
– Replace all fuel tank and container caps securely.
– If you must drain the fuel from the fuel tank, do it
outdoors.
• Replace faulty mufflers.
• Before using, always visually inspect the blades, blade
bolts, and cutter assembly for wear or damage. Replace
worn or damaged blades and bolts in sets to preserve
balance.
• On multibladed lawn mowers, use care as rotating one
blade can cause the other blades to rotate.
Operation
• Do not operate the engine in a confined space where
dangerous carbon monoxide fumes can collect.
• Mow only in daylight or in good artificial light.
• Always be sure of your footing on slopes.
• Walk; never run.
• Keep a firm hold on the handle.
• For wheeled rotary lawn mowers, mow across the face
of slopes, never up and down.
• Exercise extreme caution when changing the direction
on slopes.
• Do not mow excessively steep slopes.
• Use extreme caution when reversing or pulling the lawn
mower toward you.
• Before and while moving backward, look behind and
down for small children.
• Stop the blade(s) if you must tilt the lawn mower for
transportation when crossing surfaces other than grass
and when transporting the lawn mower to and from the
area to be mowed.
• Never operate the lawn mower with damaged or
missing guards or shields, or without safety devices
(such as deflectors and grass catchers) in place.
• Do not change the speed settings on the engine.
• Disengage all blade and drive clutches before starting
the engine.
• Start the engine carefully according to instructions and
with feet well away from the blade(s).
• Do not tilt the lawn mower when starting the engine,
unless you must tilt the lawn mower to start it. In this
case, do not tilt it more than absolutely necessary and
lift only the part which is away from the operator.
• Do not start the engine when standing in front of the
discharge chute.
• Do not put your hands or feet near or under rotating
parts. Keep clear of the discharge opening at all times.
• Never pick up or carry a lawn mower while the engine
is running.
• Stop the engine and disconnect the spark-plug wire:
– before clearing blockages or unclogging the chute;
– before checking, cleaning, or working on the lawn
mower;
– after striking a foreign object. Inspect the lawn
mower for damage and make repairs before starting
and operating the lawn mower; and
– if the lawn mower starts to vibrate abnormally
(check it immediately).
• Stop the engine:
– whenever you leave the lawn mower; and
– before refuelling.
• Reduce the throttle setting during engine run-out and, if
the engine has a shutoff valve, turn the fuel off after
mowing.
• Stop the blade(s) when crossing gravel drives, walks, or
roads.
• Shut the engine off and wait until the blade comes to a
complete stop before removing the grass catcher.
• Do not operate the lawn mower while under the
influence of alcohol or drugs.
• If the lawn mower should start to vibrate abnormally,
stop the engine and check immediately for the cause.
Vibration is generally a warning of trouble.

5
Slopes are a major factor related to slip and fall accidents
which can result in a severe injury. If you feel uneasy on a
slope, do not mow it.
• Watch for holes, ruts, or bumps. Tall grass can hide
obstacles.
• Do not mow near drop-offs, ditches, or embankments.
You could lose your footing or balance.
• Do not mow on wet grass. Reduced footing could cause
slipping.
Maintenance and Storage
• Keep all nuts, bolts (especially blade attachment bolts),
and screws tight to ensure that the lawn mower is in
safe working condition.
• Never store the lawn mower with gasoline in the tank
inside a building where fumes may reach an open flame
or spark.
• Allow the engine to cool before storing the lawn mower
in any enclosure.
• To reduce the fire hazard, keep the engine, muffler,
battery compartment, and gasoline storage area free of
grass, leaves, or excessive grease.
• Check the grass catcher frequently for wear or
deterioration.
• Replace worn or damaged parts.
• Use extra care when handling gasoline; gasoline vapors
are explosive.
• Never tamper with safety devices. Check their proper
operation regularly.
• Keep the lawn mower free of grass, leaves, or other
debris buildup. Clean up any oil or fuel that spills.
• Stop and inspect the lawn mower if you strike an object.
Repair the lawn mower, if necessary, before starting the
engine.
• Never attempt to make wheel height adjustments while
the engine is running.
• Grass catcher components are subject to wear, damage,
and deterioration, which could expose moving parts or
allow objects to be thrown. Frequently check the
components and replace them with the manufacturer’s
recommended parts when necessary.
• Lawn mower blades are sharp and can cut. Wrap the
blade(s) or wear gloves, and use extra caution when
servicing them.
• Do not change the speed settings on the engine.
• If you must drain the fuel from the fuel tank, do it
outdoors.
• To ensure the best performance and safety, purchase
only genuine Toro replacement parts and accessories.
• Maintain or replace safety and instruction decals when
necessary.
6
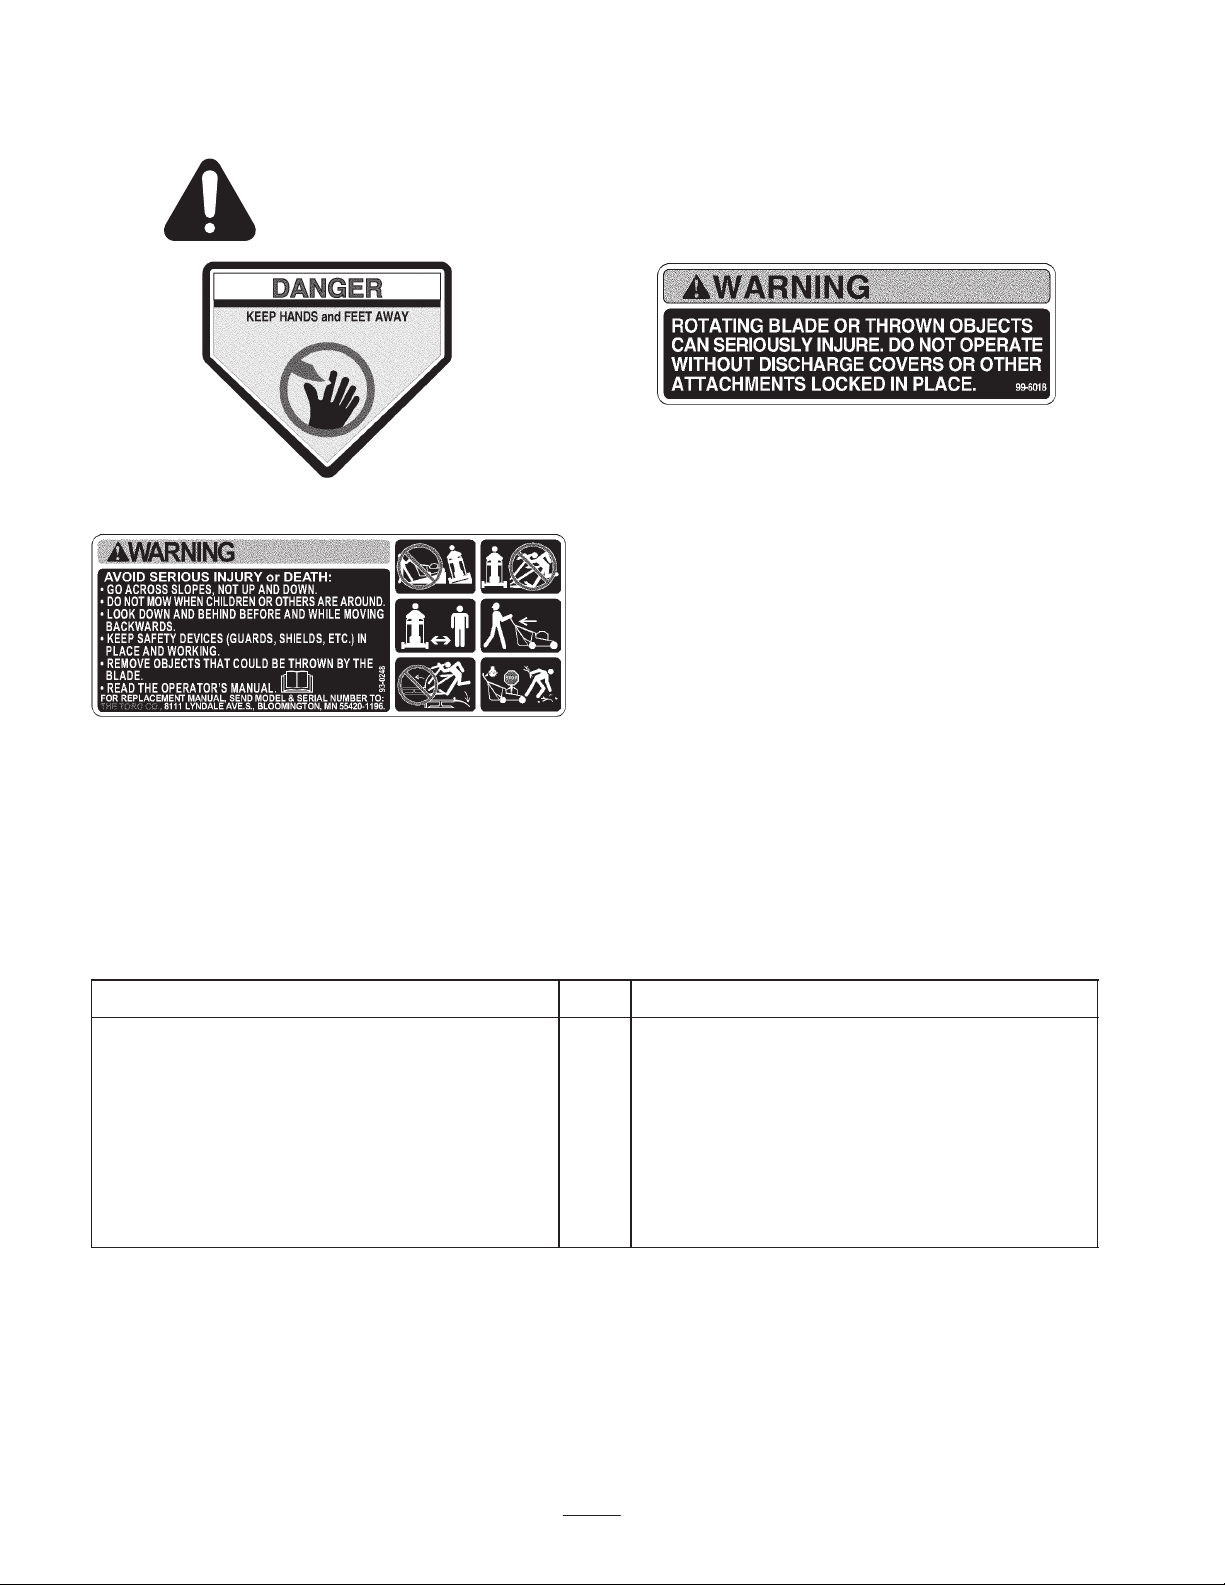
Safety and Instruction Decals
Safety decals and instructions are easily visible to the operator and are located near any area
of potential danger. Replace any decal that is damaged or lost.
43-8480
93-0248
99-6018
Setup
Note: Determine the left and right sides of the machine from the normal operating position.
Loose Parts
DESCRIPTION QTY. USE
Knobs
Carriage bolts
Contoured-handle bolts
Upper handle section
Lower handle section
Flange-head bolts
Nuts
4
2
2
1
1
2
2
Installing the handle
7
Installing the Handle
Folding or unfolding the handle improperly can
pinch, stretch, or damage one or more of the
cables. Any pinched, stretched, or damaged cable
may cause an operational failure that results in an
unsafe operating condition.
• Do not pinch, stretch, or damage the cables.
• Handle the cables with care when folding or
unfolding the handle.
• Do not use the lawn mower if one or more of the
cables are pinched, stretched, or damaged.
Contact an Authorized Service Dealer.
Warning
1. Lay the upper handle section on the ground behind the
lawn mower with the handle label facing up.
2. Install the lower handle section to the housing with
2 flange-head bolts and 2 nuts (Fig. 2).
m-4272
4
2
3
1
5
6
Figure 2
1. Knob (2)
2. Lower handle section
3. Carriage bolt (2)
4. Support bracket (2)
5. Housing
6. Nut (2)
7. Flange-head bolt (2) not
shown
3. Swing the lower handle section back and the support
brackets up, aligning the brackets with the holes in the
handle (Fig. 2).
4. Secure the handle to the support brackets with
2 carriage bolts and 2 knobs, using the height
adjustment holes on the support brackets that best fit
your height (Fig. 2).
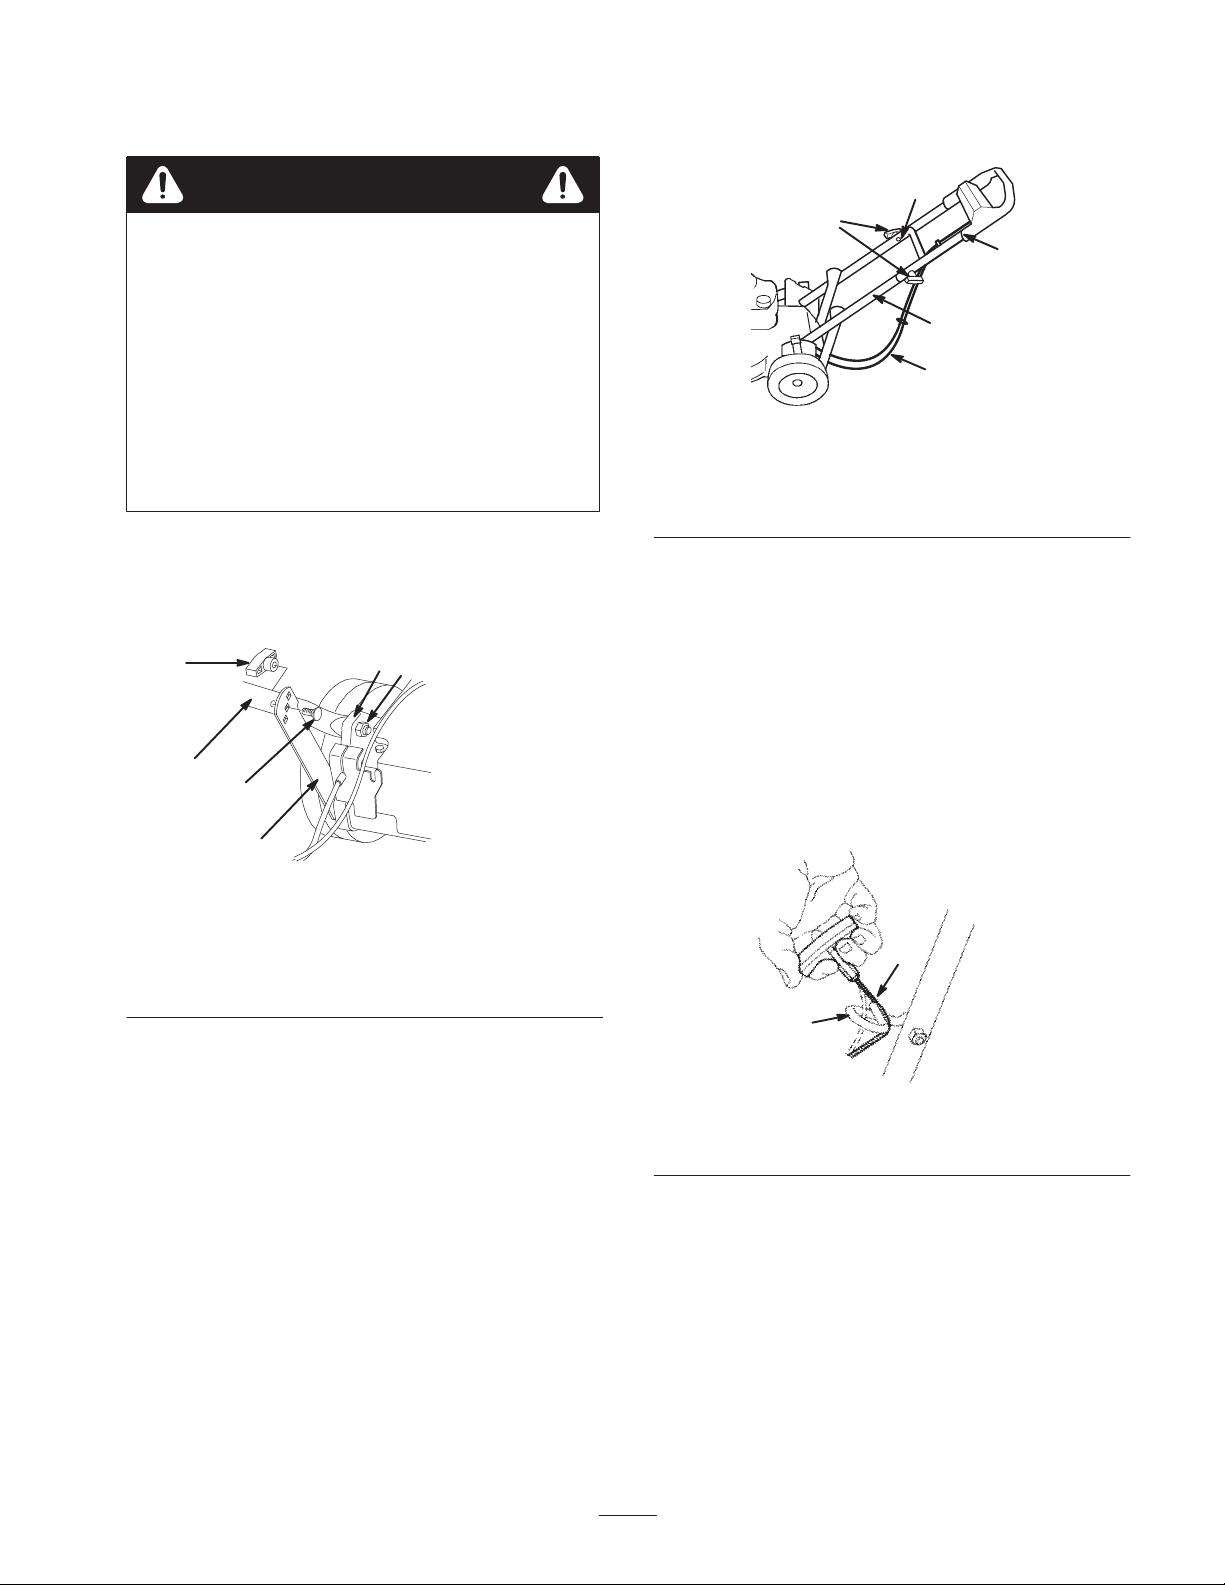
5. Slide the upper handle section ends over the lower
handle section so that the sections nest together (Fig. 3).
1
m-4204
3
4
2
5
Figure 3
1. Knob
2. Contoured-handle bolt
(only one shown)
3. Upper handle section
4. Lower handle section
5. Cables
6. Ensure that the cables are routed below and behind the
lower handle section as illustrated in Figure 3.
7. Secure the upper handle section to the lower handle
section using 2 contoured-handle bolts and 2 knobs
(Fig. 3).
Installing the Starter Rope
Pull the starter rope through the rope guide on the handle
(Fig. 4).
210
2
1
Figure 4
1. Rope guide 2. Starter rope
8
Before Starting
Filling the Crankcase with Oil
The crankcase can hold 20 ounces (0.59 liters) of oil. Use
only high-quality, SAE 30 weight detergent oil that has the
American Petroleum Institute (API) service classification
SF, SG, SH, or SJ.
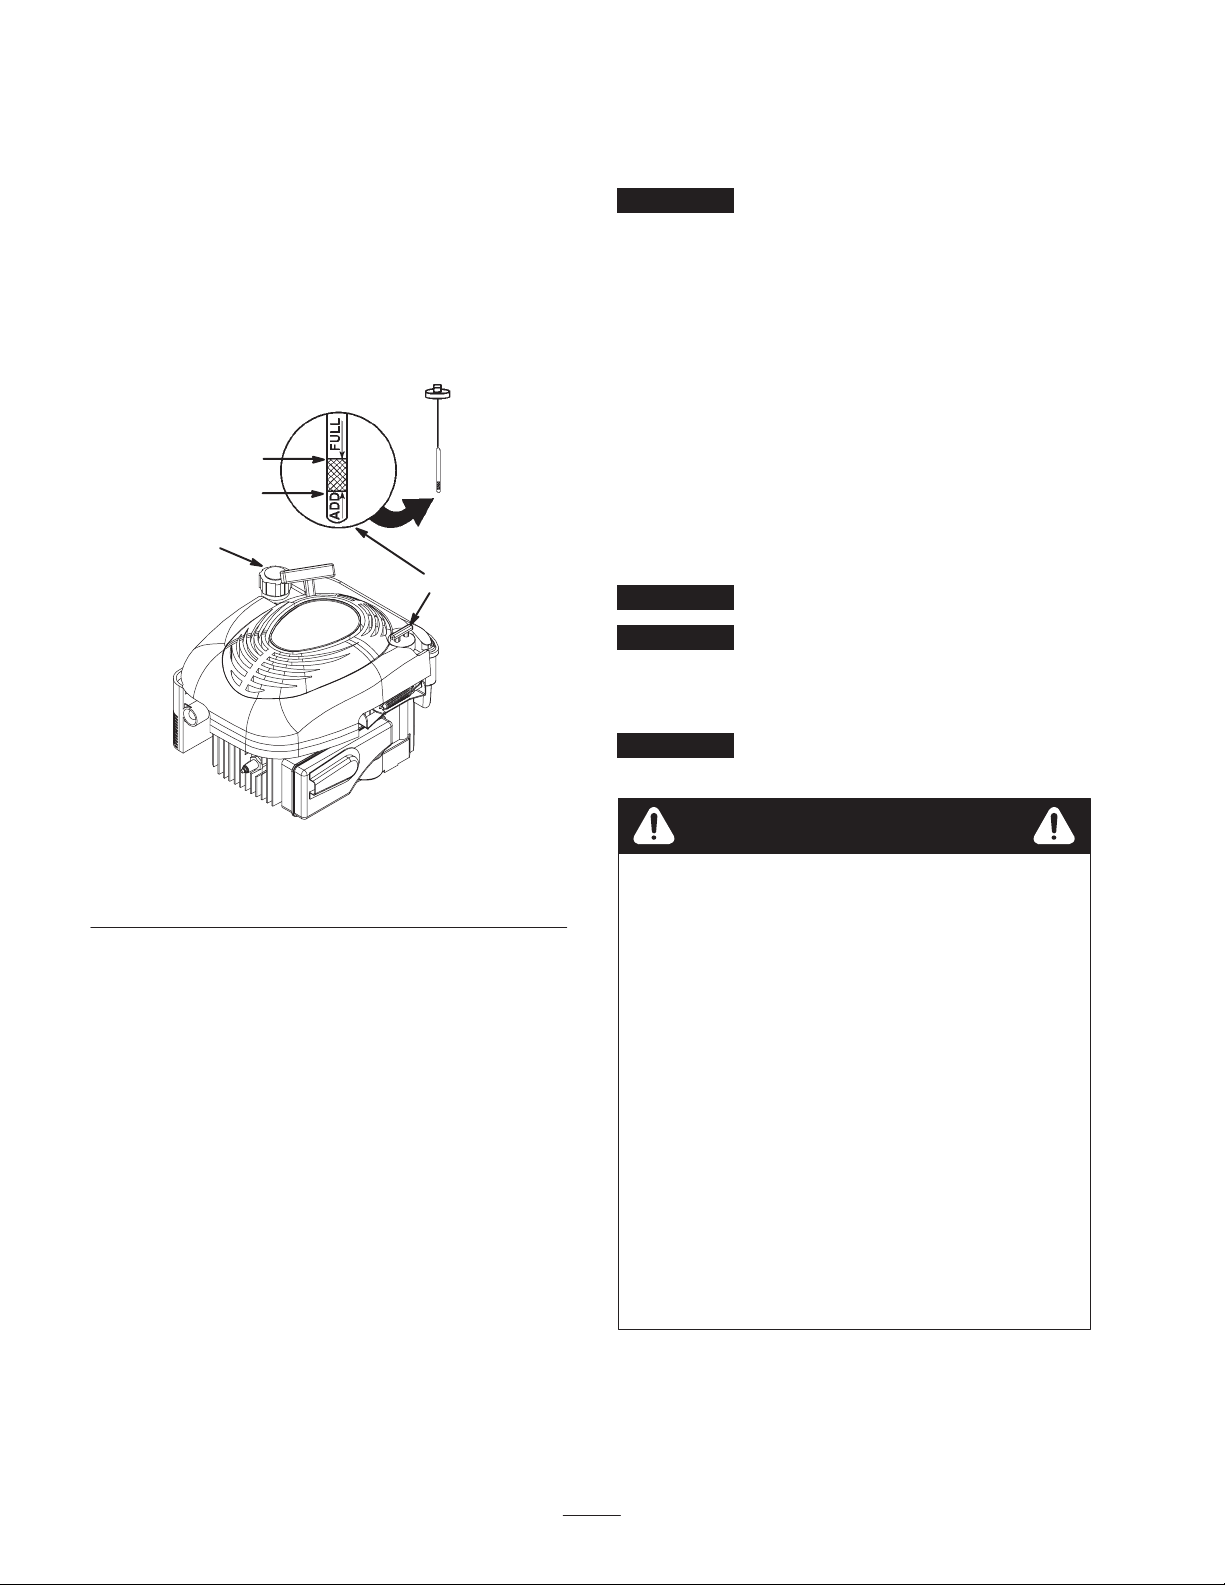
Before each use, ensure that the oil level is between the
Add and the Full marks on the dipstick (Fig. 5).
3
2
1
4
1626/m-6341
Figure 5
1. Dipstick
2. Add mark
3. Full mark
4. Fuel tank cap
To add oil:
1. Move the lawn mower to a level surface.
2. Clean around the dipstick (Fig. 5).
3. Remove the dipstick by rotating the cap
counterclockwise and pulling it out.
4. Wipe the dipstick clean with a clean cloth.
5. Fully insert the dipstick into the filler neck, then remove
it.
Note: To ensure an accurate oil level reading, you must
fully install the dipstick.
6. Read the oil level on the dipstick (Fig. 5).
7. If the oil level reading is below the Add mark on the
dipstick, slowly pour only enough oil into the filler hole
to raise the oil level to the Full mark on the dipstick.
Important Do not overfill the crankcase with oil and
run the engine; engine damage will result. Drain the excess
oil until the oil level on the dipstick reads Full.
8. Insert the dipstick into the filler neck and rotate the cap
clockwise until it is tight.
Filling the Fuel Tank with
Gasoline
For best results, use clean, fresh, lead-free gasoline with an
octane rating of 87 or higher. To ensure freshness, purchase
only the quantity of gasoline that you expect to use in 30
days. Unleaded gasoline burns cleaner, extends engine life,
and promotes good starting. You may use leaded gasoline if
unleaded gasoline is not available.
Important Do not add oil to the gasoline.
Important Do not use methanol, gasoline containing
methanol, gasohol containing more than 10% ethanol,
premium gasoline, or white gas. Using these fuels can
damage the engine’s fuel system.
Important Do not use gasoline that is more than 30
days old.
Danger
In certain conditions, gasoline is extremely
flammable and highly explosive. A fire or
explosion from gasoline can burn you and others
and can damage property.
• Fill the fuel tank outdoors, in an open area, and
when the engine is cold. Wipe up any gasoline
that spills.
• Do not fill the fuel tank completely full. Add
gasoline to the fuel tank until the level is 1/4 to
1/2 in. (6 to 13 mm) below the bottom of the
filler neck. This empty space in the tank allows
the gasoline to expand.
• Never smoke when handling gasoline, and stay
away from an open flame or where a spark may
ignite the gasoline fumes.
• Store gasoline in an approved fuel container and
keep it out of the reach of children.
• Never buy more than a 30-day supply of
gasoline.
 Loading...